Embed Size (px)
Citation preview

Star Star Star Star FlightFlightFlightFlight Quilt BlockQuilt BlockQuilt BlockQuilt Block
Cutting Directions: See the block directions for
Cutting out the block pieces
Wings Blocks Green – Two Strips – 3” x wof (Bottom) Pink – Three Strips – 3½” x wof (Top) Two Strips – 3” x wof (plus leftover
from 3½” strip) (Bottom) Light Red – Two Strips – 3½” x wof (Top) Two Strips – 3” x wof (Bottom) Medium Red – One Strip – 3½” x wof (Top) Dark Red – One Strip – 3½” x wof (Top)
You will need: 2 ½” hard plastic template
Fabric – small to med print
Usual sewing tools
Rotary Cutter
Small to mini cutting mat
Iron
Yardage: (wof = 20”)
Green - Fat 8th (6” x 20”)
Pink - Fat Quarter (16” x 20”)
Light Red - Fat Quarter (13” x 20”)
Medium Red - Fat 8th (3½” x 20”)
Dark Red - Fat 8th (3½” x 20”)
Refer to the Wings Shortcut block
directions below.
4 4 4 4
4 4 4
4 4

Star Star Star Star FlightFlightFlightFlight Quilt BlockQuilt BlockQuilt BlockQuilt Block
Corners
Center
Middle
Above left here you can see the BOM quilt block. On the right here is the layout showing you how all of the blocks lay in the layout.
Make sure you have all the colors in the right position and you have the blocks turned the right direction. ****************************************
I like to break the quilt block into 4 patches. Or you can sew the blocks into rows then sew the rows together.
1st step:
Sew all 4 of the corner 4 Patches 2nd step Sew all 4 of the Middle 4 patches
3rd step Sew the center 4 patch
4th step Sew all of the 4 patches into rows According to the layout above

Star Star Star Star FlightFlightFlightFlight Quilt BlockQuilt BlockQuilt BlockQuilt Block
Wings Shortcut Block
You will find the paper patterns on the last page of this tutorial. You’ll also need a 2 ½” template and a mini mat or turntable mat.
Step 1: Cut out the pattern pieces. These can be reused as long as they hold their shape. The inside solid lines are the sewing lines. No need to add a seam allowance. You don’t have to sew on the lines as when you cut out the piece it allows you a ¼” seam allowance. The line is just to show you where the seam should go.
Step 2: Pin the paper pattern pieces to your fabric. The color fabrics you use will depend on the BOM (or quilt block) you are making. The BOM directions show how to cut out strips. Here is a demonstration on how to lay the paper templates on the fabric.
Star Star Star Star FlightFlightFlightFlight Quilt BlockQuilt BlockQuilt BlockQuilt Block
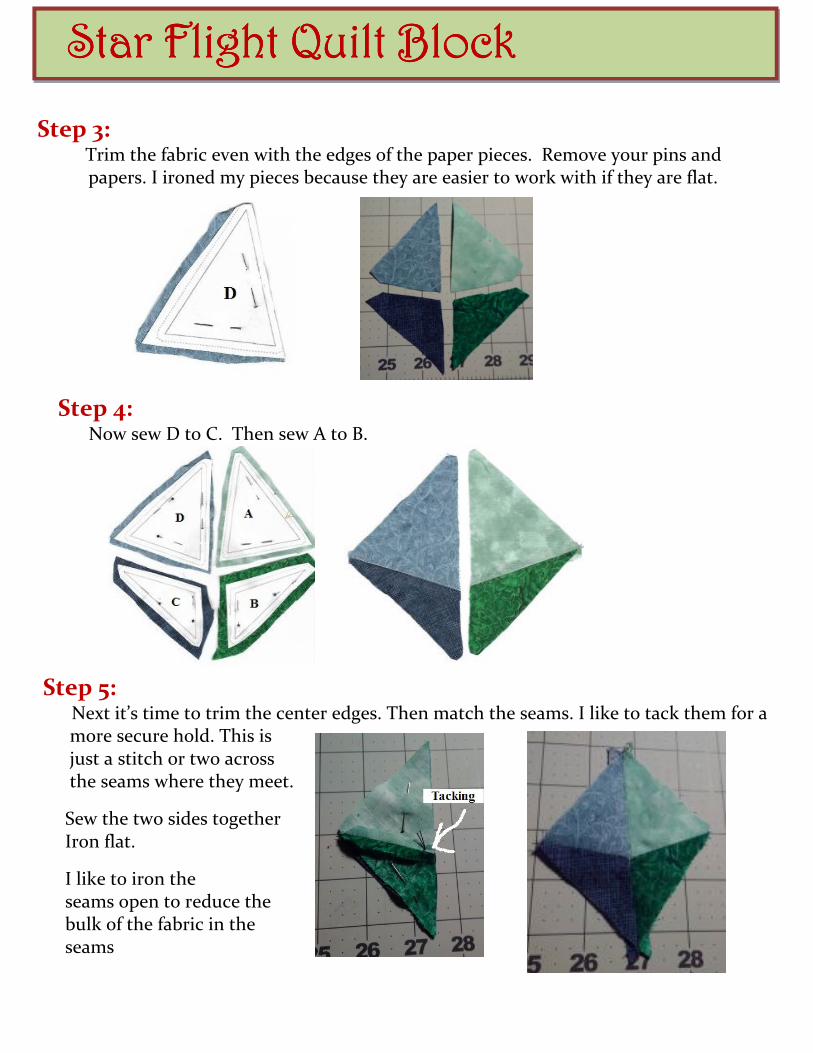
Step 3: Trim the fabric even with the edges of the paper pieces. Remove your pins and papers. I ironed my pieces because they are easier to work with if they are flat.
Step 4: Now sew D to C. Then sew A to B.
Step 5: Next it’s time to trim the center edges. Then match the seams. I like to tack them for a more secure hold. This is just a stitch or two across the seams where they meet. Sew the two sides together Iron flat.
I like to iron the seams open to reduce the bulk of the fabric in the seams

Star Star Star Star FlightFlightFlightFlight Quilt BlockQuilt BlockQuilt BlockQuilt Block
Step 6: A mini mat or turntable makes these easier to cut out but it’s not a have to. Place your joined fabrics on a small cutting mat so you can turn the mat while you cut out the square from the center. Place your 2 ½” template in the center. Make sure you have all 4 corners on the seams and do your best to not let the template slip. You can gently trim to get the square more square but be careful not to trim too much. Here is the Wings Block!!
If you need any help just let me know. I am always willing to help. My email – [email protected] or message me
The paper patterns are on the next page.

Star Star Star Star FlightFlightFlightFlight Quilt BlockQuilt BlockQuilt BlockQuilt Block