Embed Size (px)
Citation preview
St FX- Chemistry Revision: ApH Meter Use and
CalibrationDate: Aug 08, 2012
Page: 1 of 5
Standard Operating Procedure pH Meter Use and Calibration
1.0 PurposeThis procedure describes how to calibrate and use a pH meter.
2.0 Method SummaryPerform at least a 2-point calibration at room temperature using standard buffers that bracket (one above and one below) the expected sample range. You can also perform a 1-point calibration, but make sure that the buffer value is close to the sample value you are measuring. Use the pH meter to perform a reading.
3.0 When it should be performed:Calibration should be performed at least every time used, on a daily basis, after cleaning or if the readings become unsteady.
4.0 EquipmentpH electrode pH metertemperature probestandard pH buffers 4.01; 7.00; and 10.00.Kimwipes waste containerwash bottle -triply deionized water beakers
5.0 pH Meter Connecting the Electrode and Temperature Probe
1. To connect the Acorn meter to your electrode, align the post of the meter's connector with the slots on the electrode's connector, push together and twist the electrode connector 1/2 turn until it clicks into place. To remove, simply rotate the connector counter-clockwise until it unlocks, and slide the connector off the socket.
2. Insert the phono jack of the temperature sensor into the socket on the meter. Unplug the phono jack when not in use.
Switching the meter onPress the ON/OFF key to power up your meter. All the LCD segments display for a few seconds as the meter goes through a self-diagnostic test. The LCD then switches into pH measurement mode. If the LCD then displays "Ur", the electrode is not properly connected, it is faulty, the temperature sensor is faulty, or there is an open circuit.
St FX- Chemistry Revision: ApH Meter Use and
CalibrationDate: Aug 08, 2012
Page: 2 of 5
Before use: remove the electrode soaker bottle. If the electrode has been stored dry, condition the glass bulb by soaking it in tap water for 30 minutes. This hydrates theglass bulb if the electrode is too dry, or has not been used for a long period of time.
Calibration Procedure1. Complete the pH Meter Calibration Sheet Appendix 1 2. Pour a known pH buffer standard solution into a clean dry container.
3. Power on the meter. Meter will automatically enter pH measurement mode. Select pH mode by pressing MODE key if necessary.
4. Rinse electrode thoroughly with deionized water or a rinse solution. DO NOT wipe the electrode; this causes a build-up of electrostatic charge on the glass surface.
5. Dip both the electrode and temperature sensor into pH 7.00 buffer solution. The glass bulb must be completely immersed into the sample. Stir gently, and wait for reading to stabilize (approximately 30 seconds to 1 minute - depending on your electrode condition).
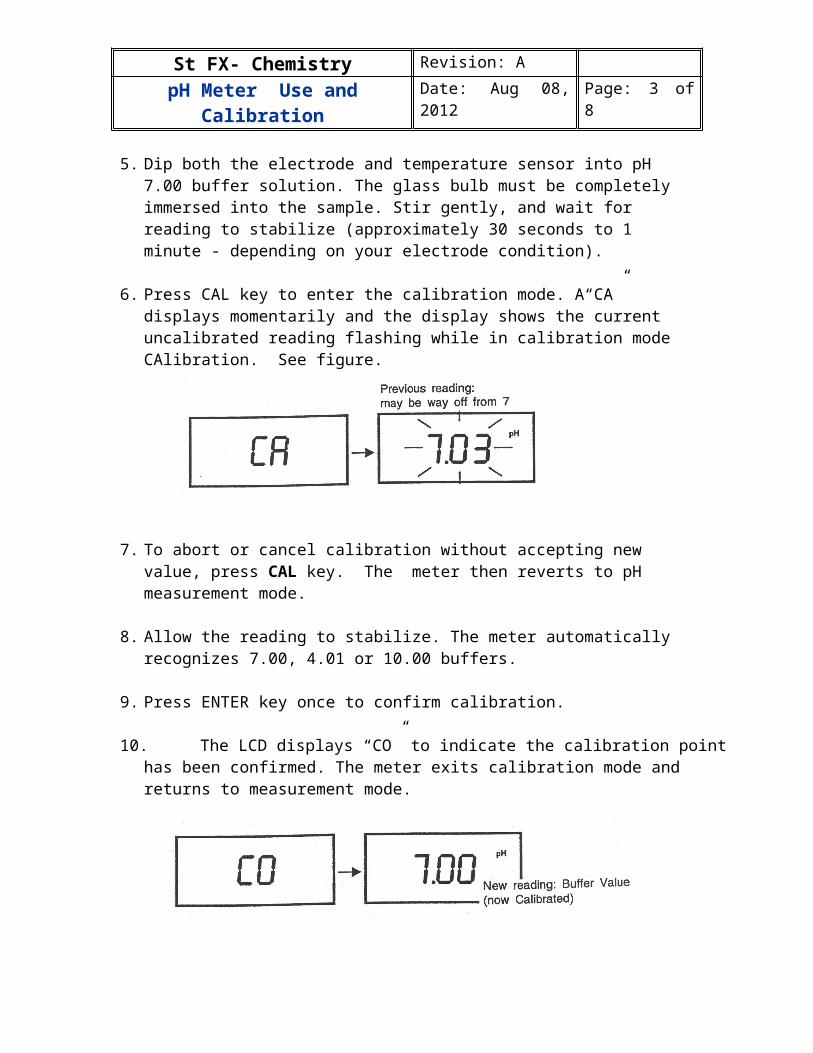
6. Press CAL key to enter the calibration mode. A“CA” displays momentarily and the display shows the current uncalibrated reading flashing while in calibration mode CAlibration. See figure.
7. To abort or cancel calibration without accepting new value, press CAL key. The meter then reverts to pH measurement mode.
8. Allow the reading to stabilize. The meter automatically recognizes 7.00, 4.01 or 10.00 buffers.
9. Press ENTER key once to confirm calibration.
10. The LCD displays “CO” to indicate the calibration point has been confirmed. The meter exits calibration mode and returns to measurement mode.
St FX- Chemistry Revision: ApH Meter Use and
CalibrationDate: Aug 08, 2012
Page: 3 of 5
11. Repeat with pH buffers 4.01 and/or 10.00 for best accuracy.
12. If the meter fails to calibrate, indicate on pH Meter Calibration Sheet and get another electrode or meter.
NOTE: This meter has automatic buffer recognition which identifies the correct pH buffer values during calibration. If buffers other than 4.01, 7.00 or 10.00 are used, or the electrode has worn out, the LCD will flash "Er1".5. Measurement
Taking Measurements1. Rinse both calibrated electrode and temperature sensor with distilled water. DO
NOT wipe the electrode; this causes a build-up of electrostatic charge on the glass surface.
2. Turn meter on. Press MODE key to select desired parameter (pH, mV, Temperature).
3. Dip electrode and temperature sensor approximately 1" to 2" into sample. Ensure the bulb is covered by the solution.
4. Stir gently and wait for display to stabilize. Note reading.
5. Hold function To freeze your reading, press the HOLD key once. The LCD show "HO" to indicate the HOLD function is activated. Press HOLD key again to deactivate the HOLD function and return to measurement mode.
After measuring1. Rinse the electrode and reference junction in deionized water.
2. Store the electrode as for best results, keep the pH bulb wet. Store the pH bulb in the electrode soaker bottle filled with electrode storage solution. Or you can store the electrode in a pH 4 buffer with 1/100 part saturated KCl. Other pH buffers are also suitable for storage. NEVER use deionized water for storage.
Electrode cleaning1. Because your pH electrode is susceptible to dirt and contamination, clean it every
one to three months depending on extent and condition of use.
2. Clean the electrode in a mild detergent solution. Wipe the probe with a soft tissue
St FX- Chemistry Revision: ApH Meter Use and
CalibrationDate: Aug 08, 2012
Page: 4 of 5
paper. Avoid touching the glass membrane with your fingers.
3. Wash thoroughly in tap water and then in distilled water.
4. Recalibrate your meter after cleaning the electrode.
Special Cleaning TipsSalt deposit: dissolve the deposit by immersing the electrode in tap water for ten tofifteen minutes. Then thoroughly rinse with distilled water.Oil/grease film: wash electrode pH bulb gently in detergent solution. Rinse electrodetip with distilled water.Clogged reference junction: heat a diluted KCl solution for 60-80°C. Place the sensingpart of the electrode into the heated solution for about 10 minutes. Allow theelectrode to cool in some unheated KCl solution.Protein deposits: prepare a 1% pepsin solution in 0.1M of HCl. Set the electrode inthe solution for five to ten minutes. Rinse the electrode with distilled water.
References: Operating instructions, pH 5 and pH 6 Acorn Series Meters, Oakton 8/98
St FX- Chemistry Revision: ApH Meter Use and
CalibrationDate: Aug 08, 2012
Page: 5 of 5
APPENDIX 1:pH Meter Calibration
pH meter # : _________________________pH electrode # : _________________________
Brand : _________________________
Calibration : pH 4.00 pH 7.00 pH 10.00
Test Conditions :Temperature probe Test temperature : ____________________________ C
Damages : None
Type of damage _________________________
___________________________________________
Evaluation :
Test passes (calibrates) Test not passed (won’t calibrate) returned to Lab Instructor
Date : ________________________ Examiner : ________________________


![A Trip to the Arctic - StFXpeople.stfx.ca/tsmithpa/Chem265/Exams/2012 final with a few... · A Trip to the Arctic The Environment. [1] 1. The white bears there are disappearing. One](https://img.pdfslide.us/doc/110x75/5aa234127f8b9a436d8ca432/a-trip-to-the-arctic-final-with-a-fewa-trip-to-the-arctic-the-environment.jpg)

![fcamin.nic.infcamin.nic.in/writereaddata/Gas Meter.docx · Web view[TO BE PUBLISHED IN THE GAZETTE OF INDIA, EXTRA ORDINARY, PART II SECTION 3 SUB-SECTION (i)] GOVERNMENT OF INDIA](https://img.pdfslide.us/doc/110x75/5e2c14fecd88e20a7b4d8348/meterdocx-web-view-to-be-published-in-the-gazette-of-india-extra-ordinary.jpg)
![Chem 265 - StFXpeople.stfx.ca/tsmithpa/Chem265/Exams/Chem 265 exam 2010... · Web viewSmith-Palmer Chemistry 265 – Analytical and Environmental 2010 Part A Short Snappers [2]1](https://img.pdfslide.us/doc/110x75/5b841ec17f8b9aef498b9ca2/chem-265-265-exam-2010-web-viewsmith-palmer-chemistry-265-analytical.jpg)


