Embed Size (px)
Citation preview
Version 1.1, May 2016
Standard Operating Procedure Hitachi UHR CFE SU8230 SEM
Yale West Campus
Materials Characterization Core
ywcmatsci.yale.edu
ESC II, Room E119F
810 West Campus Drive
West Haven, CT 06516

Hitachi SU8230 SEM
1
Yale West Campus Materials Characterization Core

Hitachi SU8230 SEM
1
Yale West Campus Materials Characterization Core
Please FOLLOW the SOP strictly to keep the facility in good condition. Any
explorations are strongly prohibited unless permitted by lab manager
NEVER use your own USB drive on the SEM computer. Data can be
retrieved from Yale data server
NEVER surf the web on the SEM/EDS computer in order to minimize the
risk of the computer being hacked
Yale West Campus MCC facility users must acknowledge MCC in their
publications that rely significantly on MCC resources. The general
acknowledgement for SEM should read:
“The micrographs were taken using the Hitachi SU8230 CFE SEM at Yale
West Campus Materials Characterization Core (MCC)."
The core reserves the right to use the micrographs for core promotion

Hitachi SU8230 SEM
2
Yale West Campus Materials Characterization Core
Hitachi SU8230 SEM
1
Yale West Campus Materials Characterization Core
Table of Contents
1 Introduction ............................................................................................................................. 1
2 Specimen Preparation ............................................................................................................. 2
3 Starting Instrument.................................................................................................................. 3
4 Loading the Specimen............................................................................................................. 3
5 Image Observation .................................................................................................................. 8
6 Retrieving the Specimen ....................................................................................................... 13
7 Checklist after Experiment ................................................................................................... 14
8 Photodiode Back Scattered Electron (PD-BSE) detection.................................................... 15
9 Scanning Transmission Electron Microscopy (STEM) detection ........................................ 17
10 Energy Dispersive X-ray Spectroscopy (EDS) ..................................................................... 19

Hitachi SU8230 SEM
1
Yale West Campus Materials Characterization Core

Hitachi SU8230 SEM
1
Yale West Campus Materials Characterization Core
Hitachi SU8230 Standard Operating Procedure
1 Introduction
1) Instrument features:
Cold field emission (CFE) e-beam source high resolution on conductive surfaces
(0.8 nm on Au clusters/magnetic tape)
Sliding-in annular Energy Dispersive Spectroscopy (EDS) detector high elemental
mapping resolution
Sliding-in annular Photo Diode PD-BSE detector much high intensity backscattered
electron detection than regular SE detectors
Scanning Transmission Electron Microscopy (STEM) detector high resolution
compositional contrast imaging, ideal for EDS mapping
2) Location
Materials Characterization Core
Room E119
810 West Campus Drive
West Haven, CT 06516
3) Primary Staff Contact
Dr. Min Li
Tel: 203-737-8270
Email: [email protected]
Office: ESC II, Room E119D
Zishan Wu, superuser
203-824-5563 (cell)
Office: ESC II
Yiren Zhong, superuser
203-710-9820 (cell)
The Yale West Campus MCC Facilities are operated for the benefit of all researchers. If you
encounter any problems with this facility, please contact the staff member listed above
immediately. There is never a penalty for asking questions. If the equipment is not behaving
exactly the way it should, contact a staff member.
Notice: Please follow strictly the SOP to keep the facility under good condition. We DO NOT
recommend user explorations on program unless endorsed by core manager.

Hitachi SU8230 SEM
2
Yale West Campus Materials Characterization Core
2 Specimen Preparation1
1) Always wear gloves for vacuum sample preparation!! Change gloves if touched computer
keyboard and mouse.
2) The sample for SEM needs to be completely dried!
a) The powders samples can be dripped and dried on Si substrate. Alternately, dried
samples can be pasted firmly on double sided conducting carbon tab. The
Conducting Graphite Paint is highly recommended to fix the samples for high
magnification (>100 k) measurement.
Warning: use dry N2 gas in the fume hood to blow off loose particles on powder
samples before being introduced into SEM chamber. Loose particles will do
damage to turbo pump in the specimen chamber (SC) and contaminate the
vacuum including the lens system.
b) The solid samples, large size flakes, single crystals can be fixed directly onto the
sample holder using Conducting Graphite Paint.
3) Attach the specimen stub to the specimen holder; DO NOT overtighten the locking ring.
4) Adjust the height of specimen so that the highest point on the sample matches the lower
surface of the height gauge.
a) Caution: if the paste at the edge of sample surpasses the sample surface, then align
the paste to the height gauge.
b) Warning: Failure to follow the instruction may lead to severe damage to the lens
system, and the repair fee will be charged to PI’s account.)
5) Bring the specimen stub inside the fume hood and blow off loose particles on the sample
surface using the N2 nozzle.2
1 Always wear gloves for your sample preparation in your own lab or in MCC! Warnings will be given for violations
and the user account will be revoked after three warnings with notice to PI. Further training at PI’s expense will be
required to resume the account. 2 This step is crucial to keep the SEM chamber vacuum at good pressure, which in turn improves the imaging
resolution with less surface contamination and keeps the SEM lens system at good condition.
Specimen stub
Locking ring
Specimen holder

Hitachi SU8230 SEM
3
Yale West Campus Materials Characterization Core
3 Starting Instrument
1) Sign in on the logbook and put down date, usage time, sample materials, Specimen
Chamber (SC) pressure, imaging modes (SEM, PD-BSE, STEM or EDS), and report any
issues during measurement.
2) Turn on SEM computer monitor, if the PC_SEM program is not open, click PC_SEM
icon on desktop, choose or type WC MCC as profile name and hit OK button to login, no
password required. (If the computer is logged off, then choose the profile PC-SEM and
type hitachi to login.)
3) If a flashing message in yellow “Execute Normal Flashing” appears on top of the imaging
window, click OK on the popup window, click the Electron Beam window and click
button to open the Flashing window. Make sure the Vacc is OFF (blue bar
on), then click Execute button to flash the tip.
4 Loading the Specimen
1) Check the Electron Beam window below: accelerating voltage Vacc should be OFF in
the HV indication area with blue bar highlighted. If Vacc is ON, click the OFF button.
2) Turn on the Specimen Chamber SC chamber scope LCD (the switch is at the top left corner
in the back)
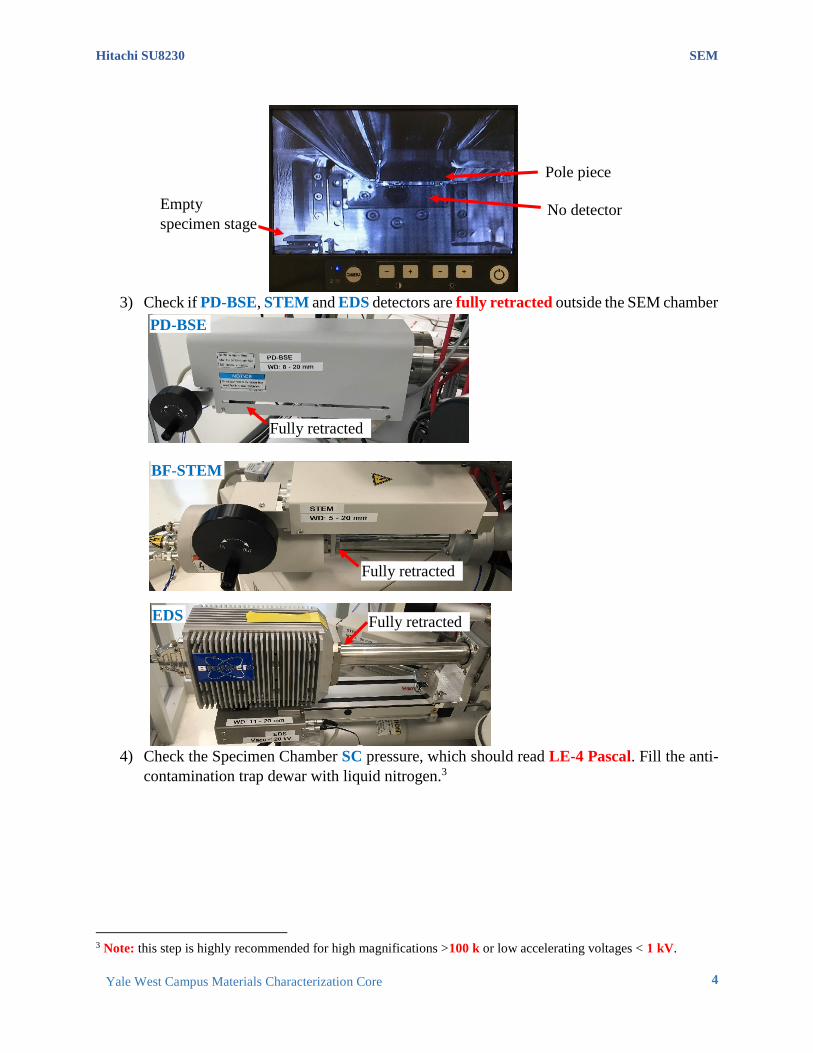
a) Caution: the specimen holder should be empty and at the exchange EXC position
b) Caution: no other detectors (PD-BSE or EDS) underneath the pole piece.
Hitachi SU8230 SEM
4
Yale West Campus Materials Characterization Core
3) Check if PD-BSE, STEM and EDS detectors are fully retracted outside the SEM chamber
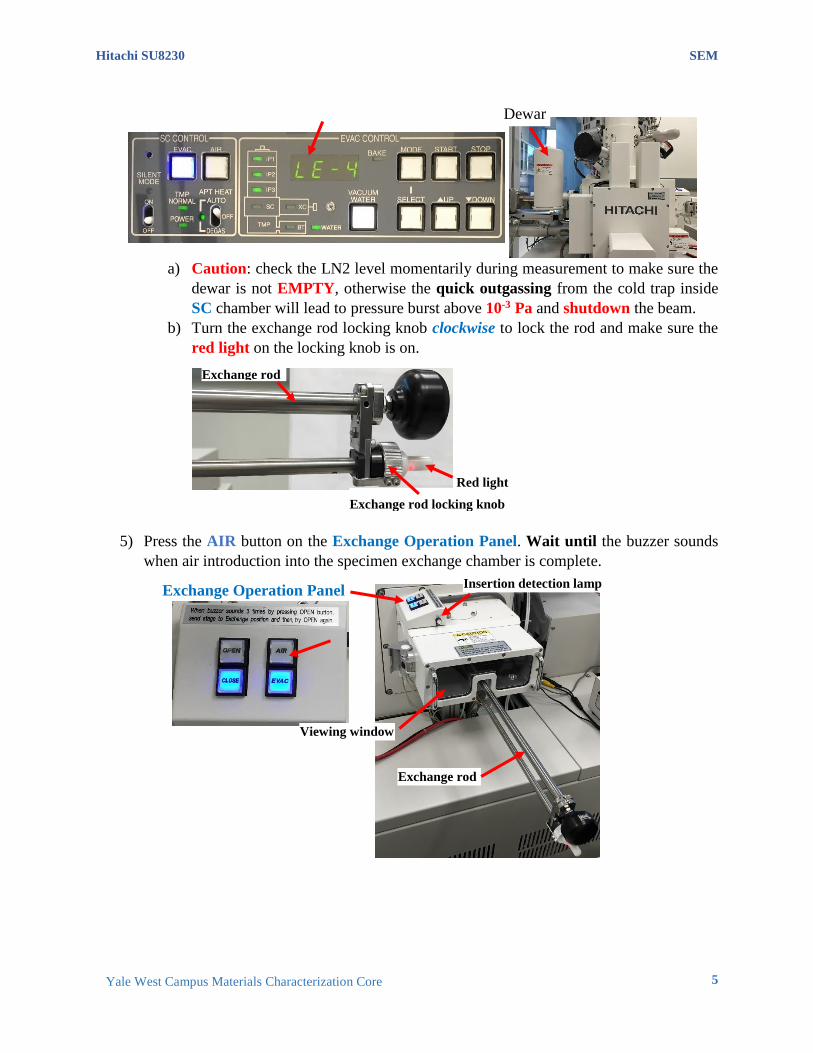
4) Check the Specimen Chamber SC pressure, which should read LE-4 Pascal. Fill the anti-
contamination trap dewar with liquid nitrogen.3
3 Note: this step is highly recommended for high magnifications >100 k or low accelerating voltages < 1 kV.
Empty
specimen stage
Pole piece
No detector
Fully retracted
Fully retracted
Fully retracted
PD-BSE
BF-STEM
EDS
Hitachi SU8230 SEM
5
Yale West Campus Materials Characterization Core
a) Caution: check the LN2 level momentarily during measurement to make sure the
dewar is not EMPTY, otherwise the quick outgassing from the cold trap inside
SC chamber will lead to pressure burst above 10-3 Pa and shutdown the beam.
b) Turn the exchange rod locking knob clockwise to lock the rod and make sure the
red light on the locking knob is on.
5) Press the AIR button on the Exchange Operation Panel. Wait until the buzzer sounds
when air introduction into the specimen exchange chamber is complete.
Dewar
Exchange Operation Panel Insertion detection lamp
Viewing window
Exchange rod
Exchange rod locking knob
knob
Red light
knob
Exchange rod
Hitachi SU8230 SEM
6
Yale West Campus Materials Characterization Core
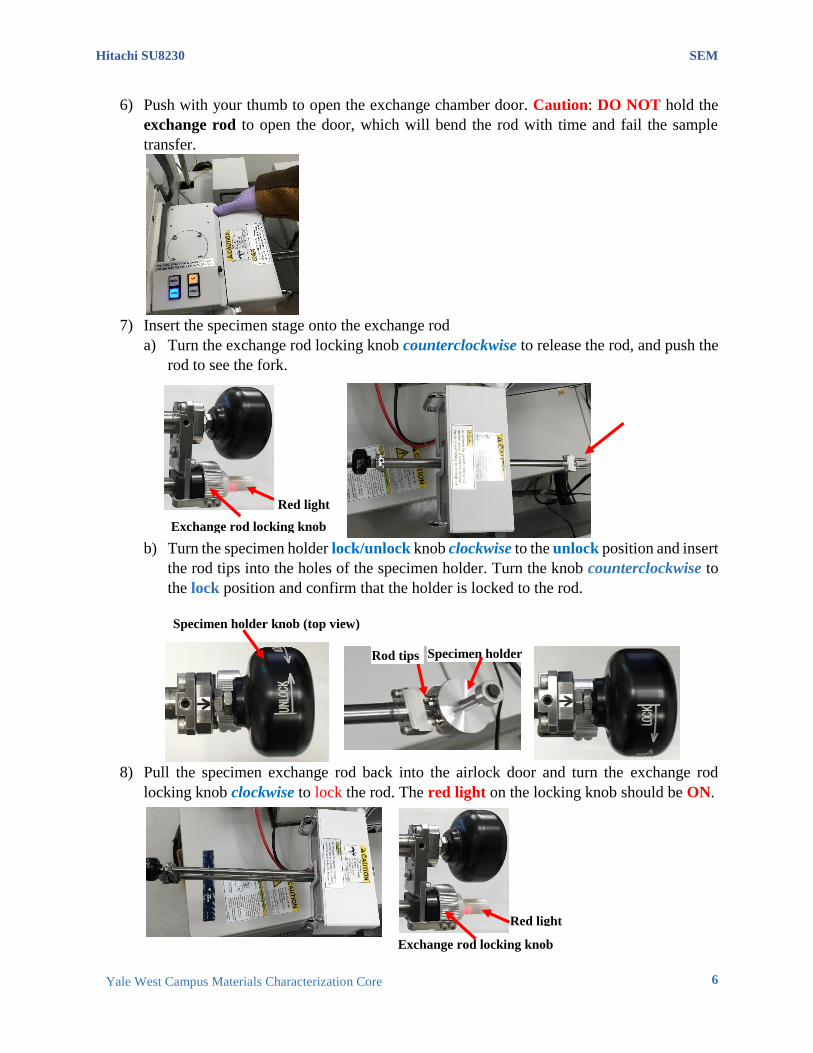
6) Push with your thumb to open the exchange chamber door. Caution: DO NOT hold the
exchange rod to open the door, which will bend the rod with time and fail the sample
transfer.
7) Insert the specimen stage onto the exchange rod
a) Turn the exchange rod locking knob counterclockwise to release the rod, and push the
rod to see the fork.
b) Turn the specimen holder lock/unlock knob clockwise to the unlock position and insert
the rod tips into the holes of the specimen holder. Turn the knob counterclockwise to
the lock position and confirm that the holder is locked to the rod.
8) Pull the specimen exchange rod back into the airlock door and turn the exchange rod
locking knob clockwise to lock the rod. The red light on the locking knob should be ON.
Exchange rod locking knob
knob
Red light
knob
Specimen holder knob (top view)
Rod tips Specimen holder
Exchange rod locking knob
Red light
Hitachi SU8230 SEM
7
Yale West Campus Materials Characterization Core
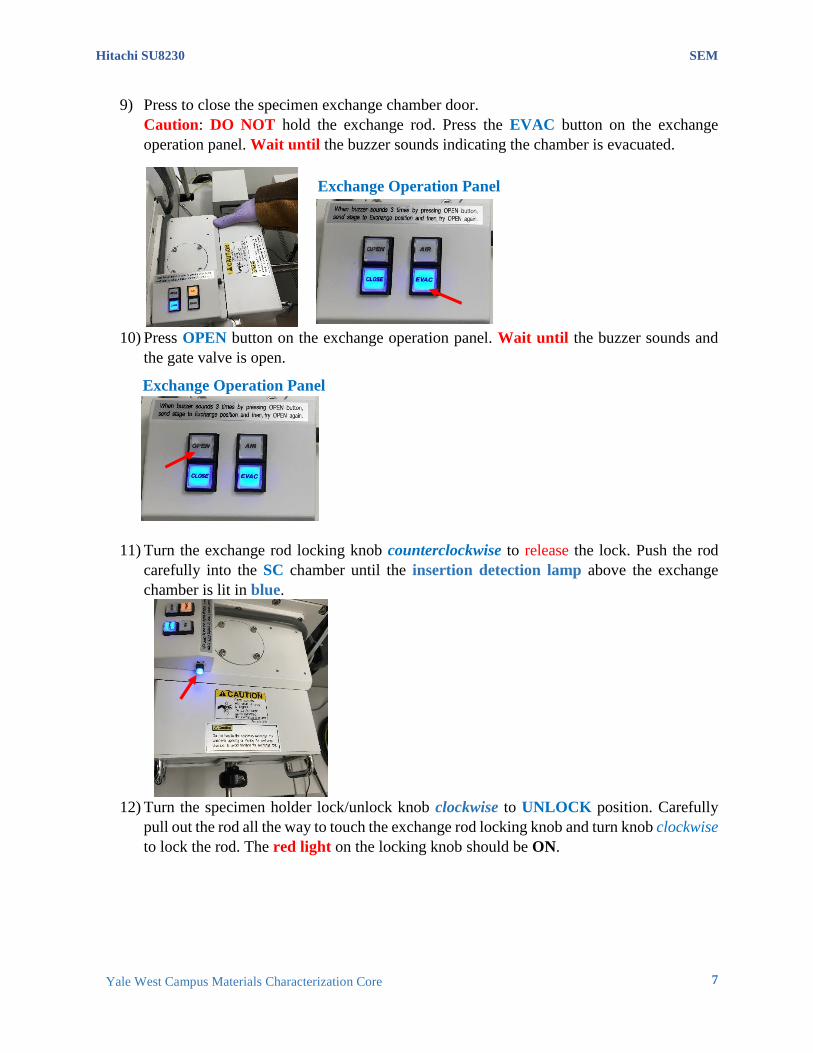
9) Press to close the specimen exchange chamber door.
Caution: DO NOT hold the exchange rod. Press the EVAC button on the exchange
operation panel. Wait until the buzzer sounds indicating the chamber is evacuated.
10) Press OPEN button on the exchange operation panel. Wait until the buzzer sounds and
the gate valve is open.
11) Turn the exchange rod locking knob counterclockwise to release the lock. Push the rod
carefully into the SC chamber until the insertion detection lamp above the exchange
chamber is lit in blue.
12) Turn the specimen holder lock/unlock knob clockwise to UNLOCK position. Carefully
pull out the rod all the way to touch the exchange rod locking knob and turn knob clockwise
to lock the rod. The red light on the locking knob should be ON.
Exchange Operation Panel
Exchange Operation Panel
Hitachi SU8230 SEM
8
Yale West Campus Materials Characterization Core
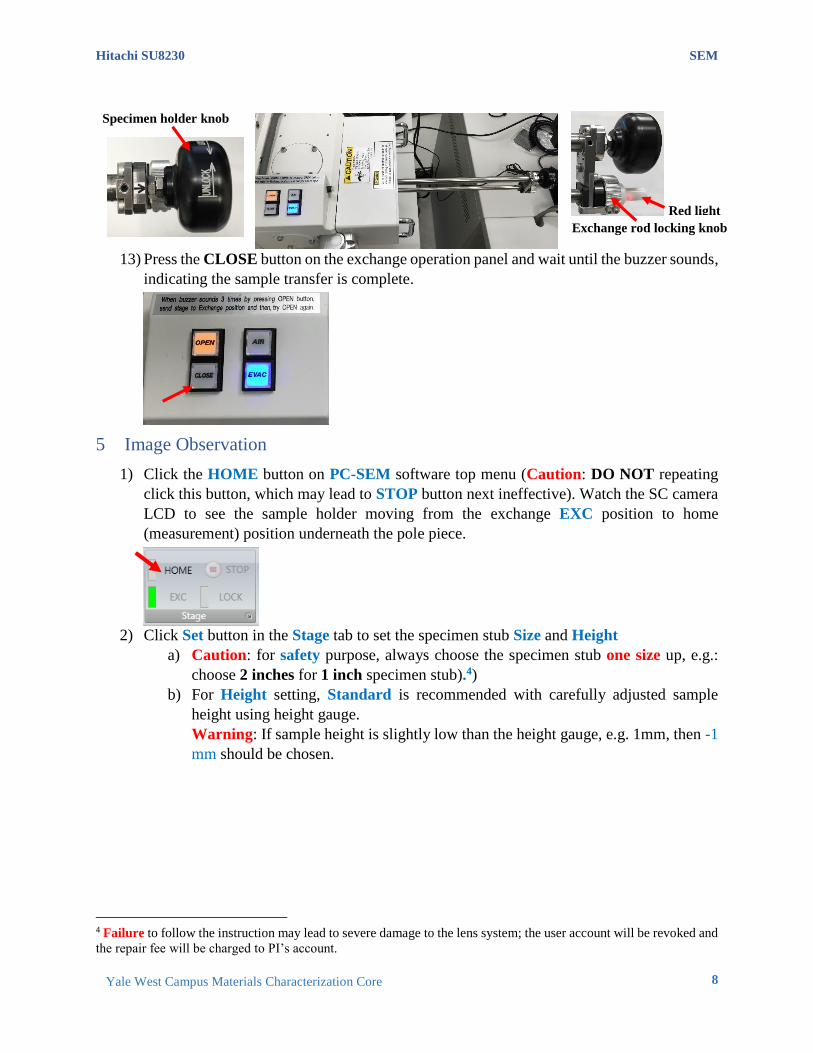
13) Press the CLOSE button on the exchange operation panel and wait until the buzzer sounds,
indicating the sample transfer is complete.
5 Image Observation
1) Click the HOME button on PC-SEM software top menu (Caution: DO NOT repeating
click this button, which may lead to STOP button next ineffective). Watch the SC camera
LCD to see the sample holder moving from the exchange EXC position to home
(measurement) position underneath the pole piece.
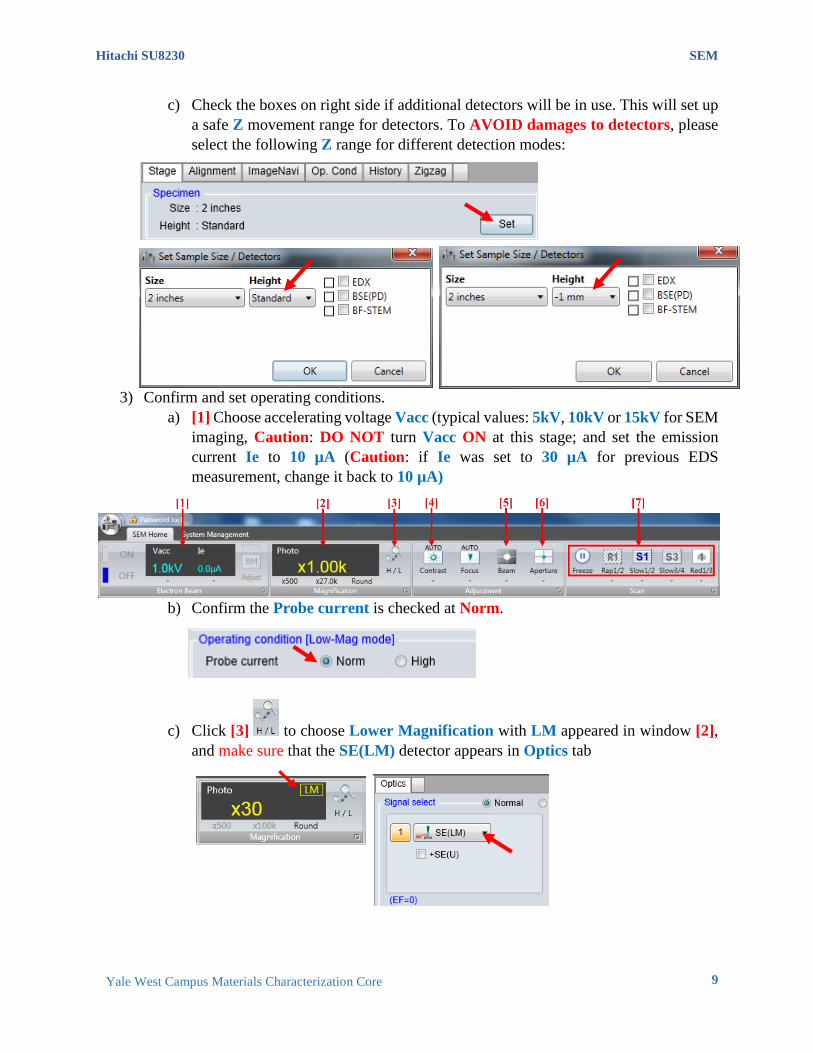
2) Click Set button in the Stage tab to set the specimen stub Size and Height
a) Caution: for safety purpose, always choose the specimen stub one size up, e.g.:
choose 2 inches for 1 inch specimen stub).4)
b) For Height setting, Standard is recommended with carefully adjusted sample
height using height gauge.
Warning: If sample height is slightly low than the height gauge, e.g. 1mm, then -1
mm should be chosen.
4 Failure to follow the instruction may lead to severe damage to the lens system; the user account will be revoked and
the repair fee will be charged to PI’s account.
Specimen holder knob
Exchange rod locking knob
Red light
Hitachi SU8230 SEM
9
Yale West Campus Materials Characterization Core
c) Check the boxes on right side if additional detectors will be in use. This will set up
a safe Z movement range for detectors. To AVOID damages to detectors, please
select the following Z range for different detection modes:
3) Confirm and set operating conditions.
a) [1] Choose accelerating voltage Vacc (typical values: 5kV, 10kV or 15kV for SEM
imaging, Caution: DO NOT turn Vacc ON at this stage; and set the emission
current Ie to 10 µA (Caution: if Ie was set to 30 µA for previous EDS
measurement, change it back to 10 µA)
b) Confirm the Probe current is checked at Norm.
c) Click [3] to choose Lower Magnification with LM appeared in window [2],
and make sure that the SE(LM) detector appears in Optics tab
Hitachi SU8230 SEM
10
Yale West Campus Materials Characterization Core
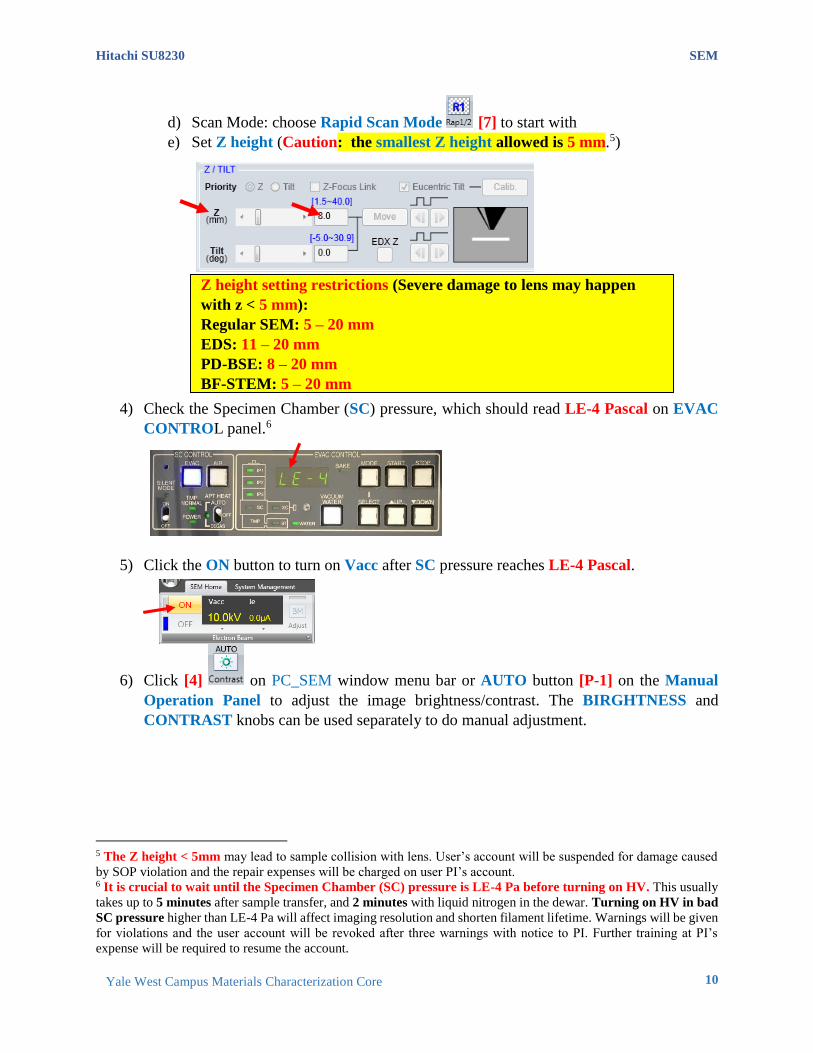
d) Scan Mode: choose Rapid Scan Mode [7] to start with
e) Set Z height (Caution: the smallest Z height allowed is 5 mm.5)
4) Check the Specimen Chamber (SC) pressure, which should read LE-4 Pascal on EVAC
CONTROL panel.6
5) Click the ON button to turn on Vacc after SC pressure reaches LE-4 Pascal.
6) Click [4] on PC_SEM window menu bar or AUTO button [P-1] on the Manual
Operation Panel to adjust the image brightness/contrast. The BIRGHTNESS and
CONTRAST knobs can be used separately to do manual adjustment.
5 The Z height < 5mm may lead to sample collision with lens. User’s account will be suspended for damage caused
by SOP violation and the repair expenses will be charged on user PI’s account. 6 It is crucial to wait until the Specimen Chamber (SC) pressure is LE-4 Pa before turning on HV. This usually
takes up to 5 minutes after sample transfer, and 2 minutes with liquid nitrogen in the dewar. Turning on HV in bad
SC pressure higher than LE-4 Pa will affect imaging resolution and shorten filament lifetime. Warnings will be given
for violations and the user account will be revoked after three warnings with notice to PI. Further training at PI’s
expense will be required to resume the account.
Z height setting restrictions (Severe damage to lens may happen
with z < 5 mm):
Regular SEM: 5 – 20 mm
EDS: 11 – 20 mm
PD-BSE: 8 – 20 mm
BF-STEM: 5 – 20 mm
Hitachi SU8230 SEM
11
Yale West Campus Materials Characterization Core
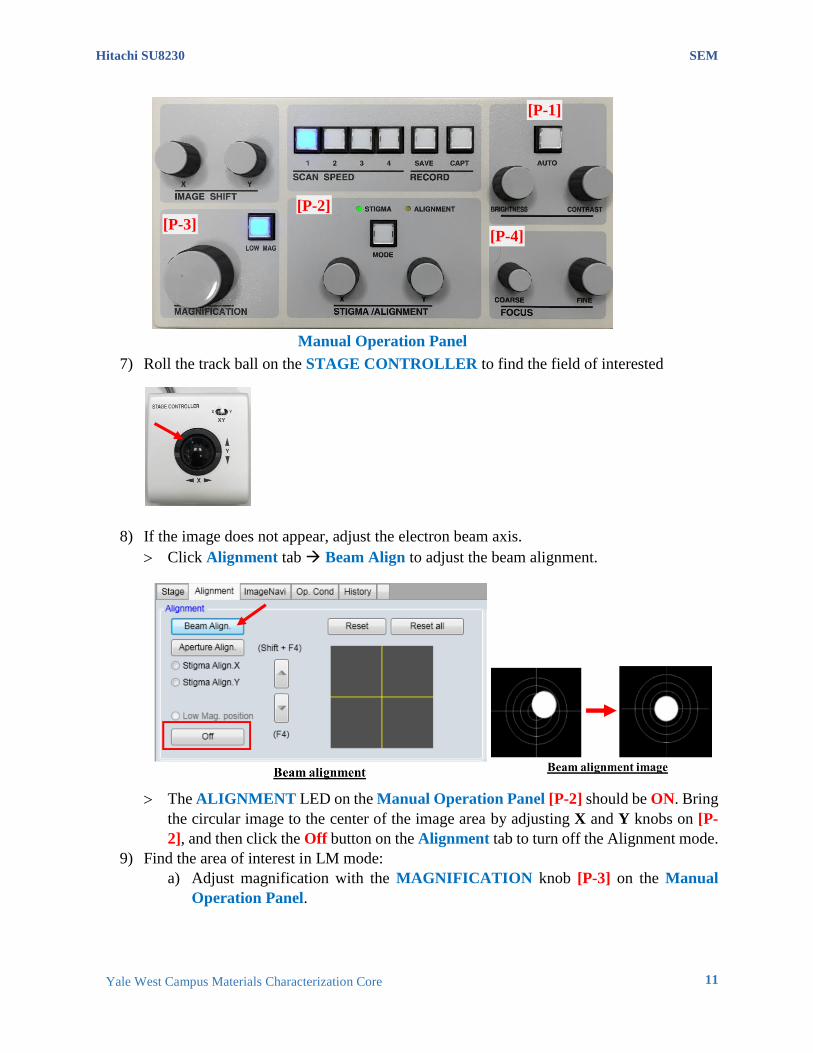
7) Roll the track ball on the STAGE CONTROLLER to find the field of interested
8) If the image does not appear, adjust the electron beam axis.
Click Alignment tab Beam Align to adjust the beam alignment.
The ALIGNMENT LED on the Manual Operation Panel [P-2] should be ON. Bring
the circular image to the center of the image area by adjusting X and Y knobs on [P-
2], and then click the Off button on the Alignment tab to turn off the Alignment mode.
9) Find the area of interest in LM mode:
a) Adjust magnification with the MAGNIFICATION knob [P-3] on the Manual
Operation Panel.
[P-3]
[P-2]
[P-4]
[P-1]
Manual Operation Panel
Hitachi SU8230 SEM
12
Yale West Campus Materials Characterization Core
b) Adjust focus using FOCUS COARSE and FINE knobs [P-4]. Move the stage to
look for the field of interest in LM mode for field search, and then click [3] to
switch to High Magnification (HM) mode.
10) In HM mode, adjust FOCUS knob on Manual Operation Panel
a) If image drifts (swaying or heaving):
Click Alignment tab and click Beam Align button to adjust the electron beam
axis
Notice: skip this step is Vacc is not changed
Click Aperture Align button below and adjust STIGMA/ALIGNMENT X /Y
knobs [P-2] to minimize the wobbling motion in image
Click Stigma Align X/Y button below and adjust STIGMA/ALIGNMENT X
/Y knobs [P-2] to minimize the wobbling motion in image
Click on Alignment tab
b) If image distorts (stretching), correct astigmatism:
Make sure the Alignment LED [P-2] is OFF, otherwise on
Alignment tab
Use the STIGMA/ALIGNMENT X /Y knobs [P-2] alternately with FINE
FOCUS knob [P-4] to reduce distortion and obtain the sharpest image.
c) Repeat steps a) and b) at each high magnification
11) Select the field of view, confirm image with slow scan or and then, click the
Capture button .
12) To save data, click ALL button on the bottom of the image thumbnail column and click
PCI button, the collected images will be transferred into the Quartz PCI program
13) In Quartz PCI program top menu bar, click File and select Export All… on the
dropdown menu, then choose export path and file format.
Hitachi SU8230 SEM
13
Yale West Campus Materials Characterization Core
6 Retrieving the Specimen
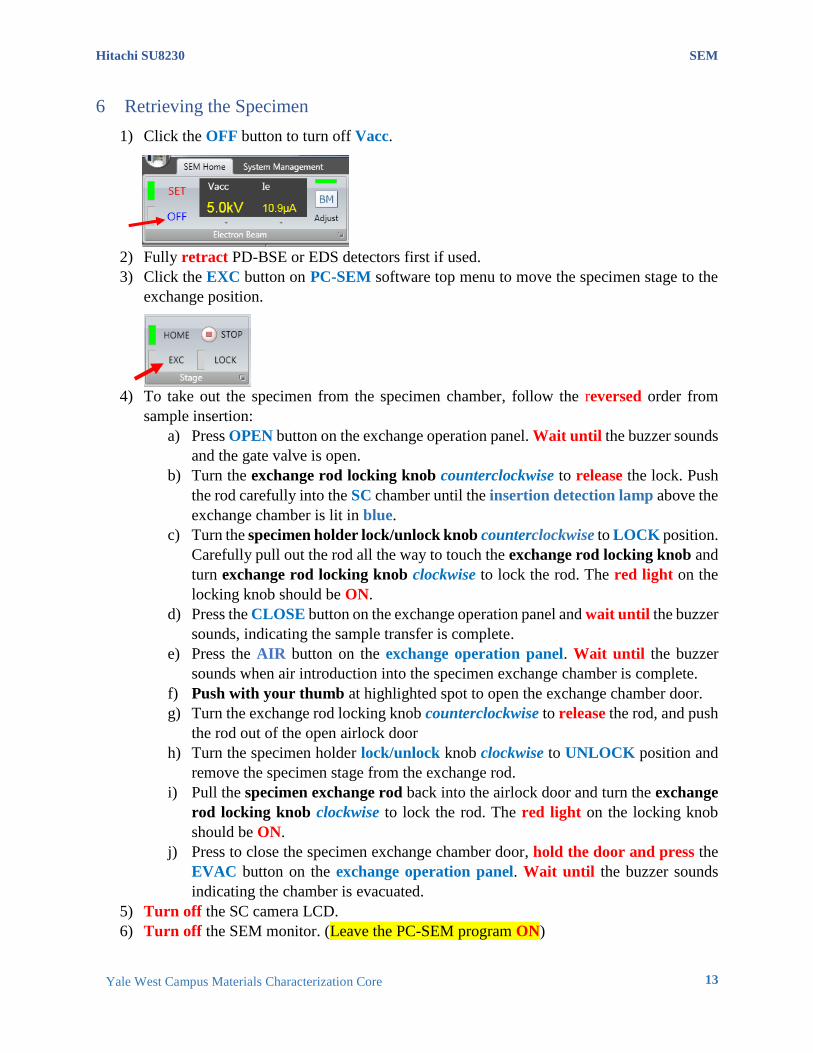
1) Click the OFF button to turn off Vacc.
2) Fully retract PD-BSE or EDS detectors first if used.
3) Click the EXC button on PC-SEM software top menu to move the specimen stage to the
exchange position.
4) To take out the specimen from the specimen chamber, follow the reversed order from
sample insertion:
a) Press OPEN button on the exchange operation panel. Wait until the buzzer sounds
and the gate valve is open.
b) Turn the exchange rod locking knob counterclockwise to release the lock. Push
the rod carefully into the SC chamber until the insertion detection lamp above the
exchange chamber is lit in blue.
c) Turn the specimen holder lock/unlock knob counterclockwise to LOCK position.
Carefully pull out the rod all the way to touch the exchange rod locking knob and
turn exchange rod locking knob clockwise to lock the rod. The red light on the
locking knob should be ON.
d) Press the CLOSE button on the exchange operation panel and wait until the buzzer
sounds, indicating the sample transfer is complete.
e) Press the AIR button on the exchange operation panel. Wait until the buzzer
sounds when air introduction into the specimen exchange chamber is complete.
f) Push with your thumb at highlighted spot to open the exchange chamber door.
g) Turn the exchange rod locking knob counterclockwise to release the rod, and push
the rod out of the open airlock door
h) Turn the specimen holder lock/unlock knob clockwise to UNLOCK position and
remove the specimen stage from the exchange rod.
i) Pull the specimen exchange rod back into the airlock door and turn the exchange
rod locking knob clockwise to lock the rod. The red light on the locking knob
should be ON.
j) Press to close the specimen exchange chamber door, hold the door and press the
EVAC button on the exchange operation panel. Wait until the buzzer sounds
indicating the chamber is evacuated.
5) Turn off the SC camera LCD.
6) Turn off the SEM monitor. (Leave the PC-SEM program ON)

Hitachi SU8230 SEM
14
Yale West Campus Materials Characterization Core
7 Checklist after Experiment
1) Remove sample from the stub on the specimen holder, and clean the holder with clean
wipes using Methanol/IPA.
2) Store the specimen holder in assigned organizer box.
3) Use ONLY the core USB flash drive to transfer data from SEM computer to the
workstation in the core, and then use either your own USB flash drive or internet to retrieve
data.
4) Sign out on the logbook and report any problems.
Hitachi SU8230 SEM
15
Yale West Campus Materials Characterization Core
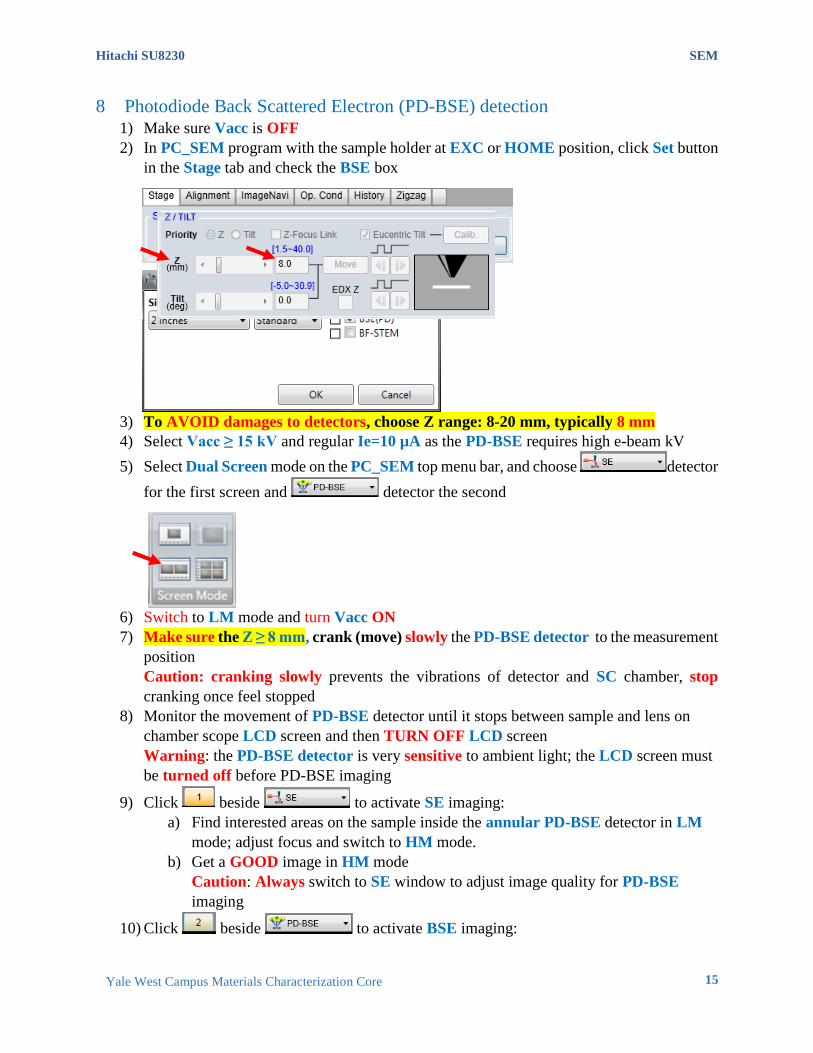
8 Photodiode Back Scattered Electron (PD-BSE) detection 1) Make sure Vacc is OFF
2) In PC_SEM program with the sample holder at EXC or HOME position, click Set button
in the Stage tab and check the BSE box
3) To AVOID damages to detectors, choose Z range: 8-20 mm, typically 8 mm
4) Select Vacc ≥ 15 kV and regular Ie=10 µA as the PD-BSE requires high e-beam kV
5) Select Dual Screen mode on the PC_SEM top menu bar, and choose detector
for the first screen and detector the second
6) Switch to LM mode and turn Vacc ON
7) Make sure the Z ≥ 8 mm, crank (move) slowly the PD-BSE detector to the measurement
position
Caution: cranking slowly prevents the vibrations of detector and SC chamber, stop
cranking once feel stopped
8) Monitor the movement of PD-BSE detector until it stops between sample and lens on
chamber scope LCD screen and then TURN OFF LCD screen
Warning: the PD-BSE detector is very sensitive to ambient light; the LCD screen must
be turned off before PD-BSE imaging
9) Click beside to activate SE imaging:
a) Find interested areas on the sample inside the annular PD-BSE detector in LM
mode; adjust focus and switch to HM mode.
b) Get a GOOD image in HM mode
Caution: Always switch to SE window to adjust image quality for PD-BSE
imaging
10) Click beside to activate BSE imaging:
Hitachi SU8230 SEM
16
Yale West Campus Materials Characterization Core
a) Click or AUTO button on the Manual Operation Panel to adjust the
image brightness/contrast. The BIRGHTNESS and CONTRAST knobs can be
used separately to do manual adjustment
b) Select the field of view, confirm image with slow scan or and then,
click the Capture button .
Notice: do not use rapid scan mode for PD-BSE imaging
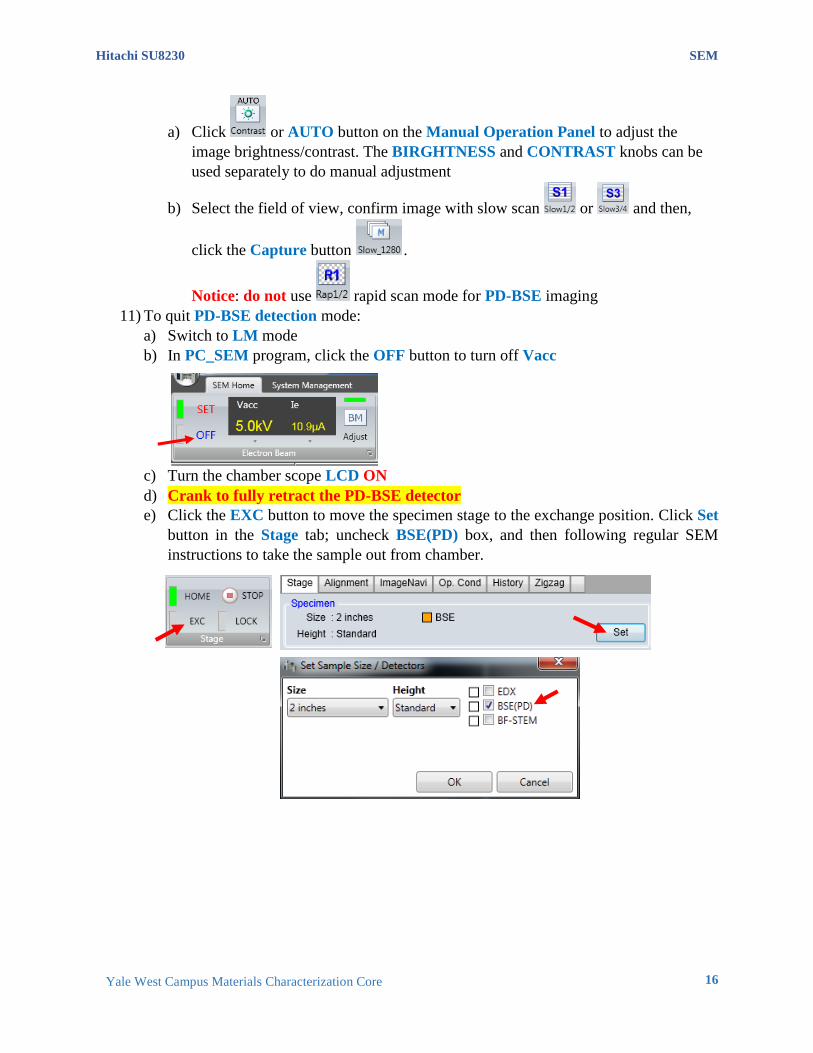
11) To quit PD-BSE detection mode:
a) Switch to LM mode
b) In PC_SEM program, click the OFF button to turn off Vacc
c) Turn the chamber scope LCD ON
d) Crank to fully retract the PD-BSE detector
e) Click the EXC button to move the specimen stage to the exchange position. Click Set
button in the Stage tab; uncheck BSE(PD) box, and then following regular SEM
instructions to take the sample out from chamber.
Hitachi SU8230 SEM
17
Yale West Campus Materials Characterization Core
9 Scanning Transmission Electron Microscopy (STEM) detection
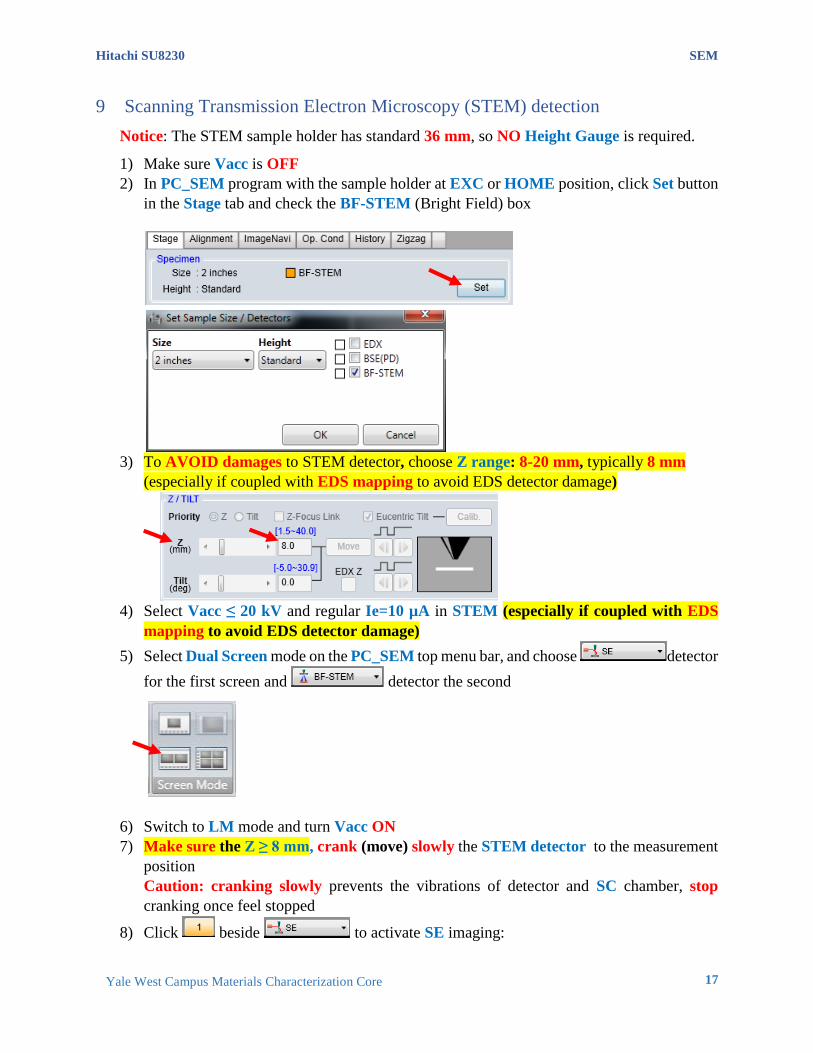
Notice: The STEM sample holder has standard 36 mm, so NO Height Gauge is required.
1) Make sure Vacc is OFF
2) In PC_SEM program with the sample holder at EXC or HOME position, click Set button
in the Stage tab and check the BF-STEM (Bright Field) box
3) To AVOID damages to STEM detector, choose Z range: 8-20 mm, typically 8 mm
(especially if coupled with EDS mapping to avoid EDS detector damage)
4) Select Vacc ≤ 20 kV and regular Ie=10 µA in STEM (especially if coupled with EDS
mapping to avoid EDS detector damage)
5) Select Dual Screen mode on the PC_SEM top menu bar, and choose detector
for the first screen and detector the second
6) Switch to LM mode and turn Vacc ON
7) Make sure the Z ≥ 8 mm, crank (move) slowly the STEM detector to the measurement
position
Caution: cranking slowly prevents the vibrations of detector and SC chamber, stop
cranking once feel stopped
8) Click beside to activate SE imaging:
Hitachi SU8230 SEM
18
Yale West Campus Materials Characterization Core
a) Find interested areas on the sample in LM mode; adjust focus and switch to HM
mode.
b) Get a GOOD image in HM mode
Caution: Always switch to SE window to adjust image quality for STEM
imaging
9) Click beside to activate STEM imaging:
a) Click or AUTO button on the Manual Operation Panel to adjust the
image brightness/contrast. The BIRGHTNESS and CONTRAST knobs can be
used separately to do manual adjustment
b) Select the field of view, confirm image with slow scan or and then,
click the Capture button .
Notice: do not use rapid scan mode for STEM imaging
10) To quit STEM detection mode:
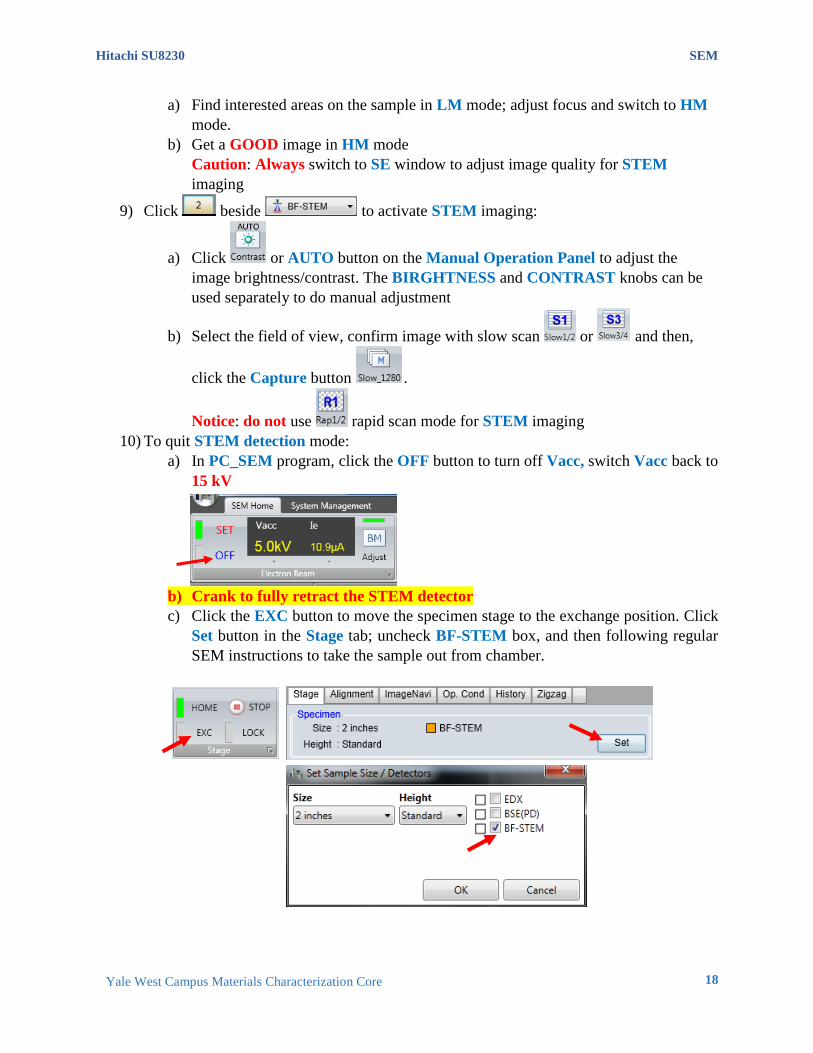
a) In PC_SEM program, click the OFF button to turn off Vacc, switch Vacc back to
15 kV
b) Crank to fully retract the STEM detector
c) Click the EXC button to move the specimen stage to the exchange position. Click
Set button in the Stage tab; uncheck BF-STEM box, and then following regular
SEM instructions to take the sample out from chamber.
Hitachi SU8230 SEM
19
Yale West Campus Materials Characterization Core
10 Energy Dispersive X-ray Spectroscopy (EDS) Both regular SE sample holders and STEM holders can be used in EDS mode. We
recommend samples mounted on STEM holder in EDS mapping for good resolution.
1) Make sure Vacc is OFF
2) On PC_SEM top menu bar, set Vacc up to 19 kV
3) Turn on EDS monitor and log into the profile PC-SEM with password hitachi
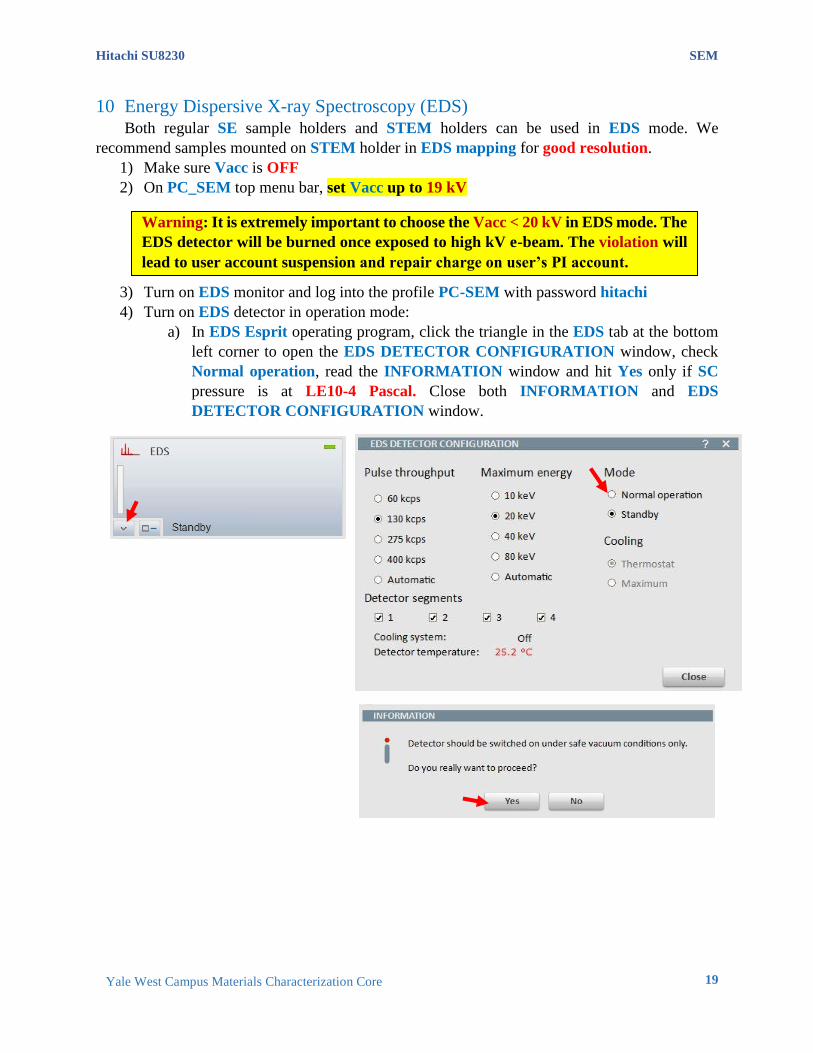
4) Turn on EDS detector in operation mode:
a) In EDS Esprit operating program, click the triangle in the EDS tab at the bottom
left corner to open the EDS DETECTOR CONFIGURATION window, check
Normal operation, read the INFORMATION window and hit Yes only if SC
pressure is at LE10-4 Pascal. Close both INFORMATION and EDS
DETECTOR CONFIGURATION window.
Warning: It is extremely important to choose the Vacc < 20 kV in EDS mode. The
EDS detector will be burned once exposed to high kV e-beam. The violation will
lead to user account suspension and repair charge on user’s PI account.
Hitachi SU8230 SEM
20
Yale West Campus Materials Characterization Core
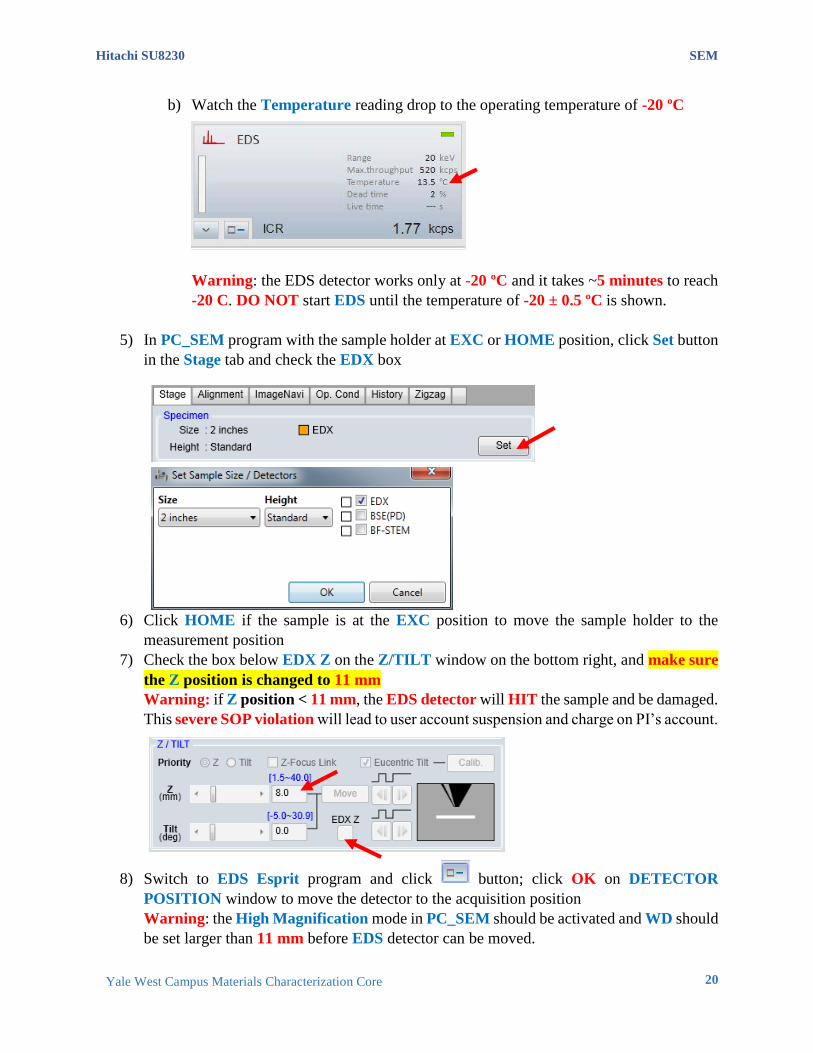
b) Watch the Temperature reading drop to the operating temperature of -20 ºC
Warning: the EDS detector works only at -20 ºC and it takes ~5 minutes to reach
-20 C. DO NOT start EDS until the temperature of -20 ± 0.5 ºC is shown.
5) In PC_SEM program with the sample holder at EXC or HOME position, click Set button
in the Stage tab and check the EDX box
6) Click HOME if the sample is at the EXC position to move the sample holder to the
measurement position
7) Check the box below EDX Z on the Z/TILT window on the bottom right, and make sure
the Z position is changed to 11 mm
Warning: if Z position < 11 mm, the EDS detector will HIT the sample and be damaged.
This severe SOP violation will lead to user account suspension and charge on PI’s account.
8) Switch to EDS Esprit program and click button; click OK on DETECTOR
POSITION window to move the detector to the acquisition position
Warning: the High Magnification mode in PC_SEM should be activated and WD should
be set larger than 11 mm before EDS detector can be moved.

Hitachi SU8230 SEM
21
Yale West Campus Materials Characterization Core
9) Switch to PC_SEM program, make sure the Vacc is set below 20 eV
a) Switch Vacc ON and change the emission current Ie to 30 µA
b) Change the Probe current to High.
c) Choose either SE(U) or STEM (if STEM holder is being used) detector
d) Select interested, adjust image quality (focus, stigma) and start SEM scan on Rapid
Scan Mode
10) EDS scan
Switch to EDS Esprit program and select interested scan modes (Spectra, Object, Line
scan and Mapping). Always click for detailed instruction
a) Spectrum Acquisition Mode:
Click on the left side menu to enter Spectra workspace
Click button to acquire live spectrum and hit again
to stop preview
Click button to start spectral scan
To add collected spectra into project or report, hit the button on the top
right corner of the spectral workspace
To save the data in Bruker spectra format (*.spx) or export to *.txt or *.xlsx
format, click the lower button.
b) Objects Mode (spectrum acquisition from objects in image):
Hit on the left side menu to enter Object workspace and hit
button to capture an image.
Hitachi SU8230 SEM
22
Yale West Campus Materials Characterization Core
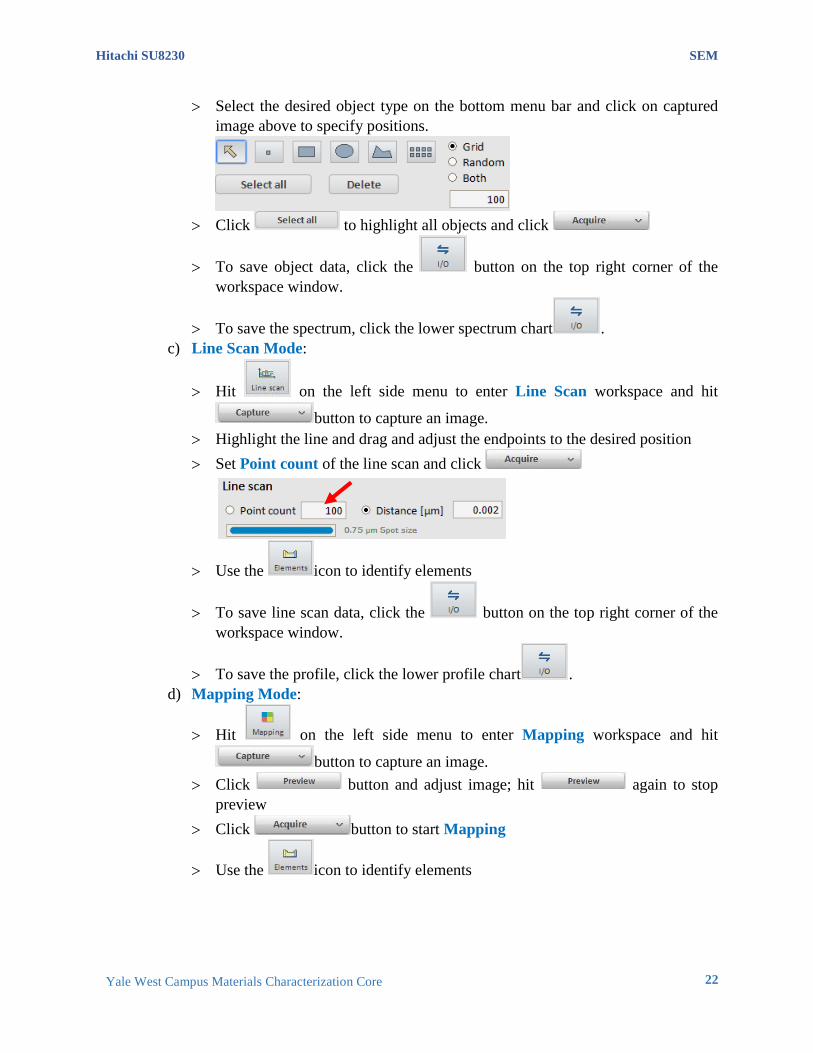
Select the desired object type on the bottom menu bar and click on captured
image above to specify positions.
Click to highlight all objects and click
To save object data, click the button on the top right corner of the
workspace window.
To save the spectrum, click the lower spectrum chart .
c) Line Scan Mode:
Hit on the left side menu to enter Line Scan workspace and hit
button to capture an image.
Highlight the line and drag and adjust the endpoints to the desired position
Set Point count of the line scan and click
Use the icon to identify elements
To save line scan data, click the button on the top right corner of the
workspace window.
To save the profile, click the lower profile chart .
d) Mapping Mode:
Hit on the left side menu to enter Mapping workspace and hit
button to capture an image.
Click button and adjust image; hit again to stop
preview
Click button to start Mapping
Use the icon to identify elements
Hitachi SU8230 SEM
23
Yale West Campus Materials Characterization Core
To save map data, click the button on the top right corner of the
workspace window.
To save the map image, click the lower image window .
To save individual element image in the thumbnail on the bottom, click the
thumbnail bar .
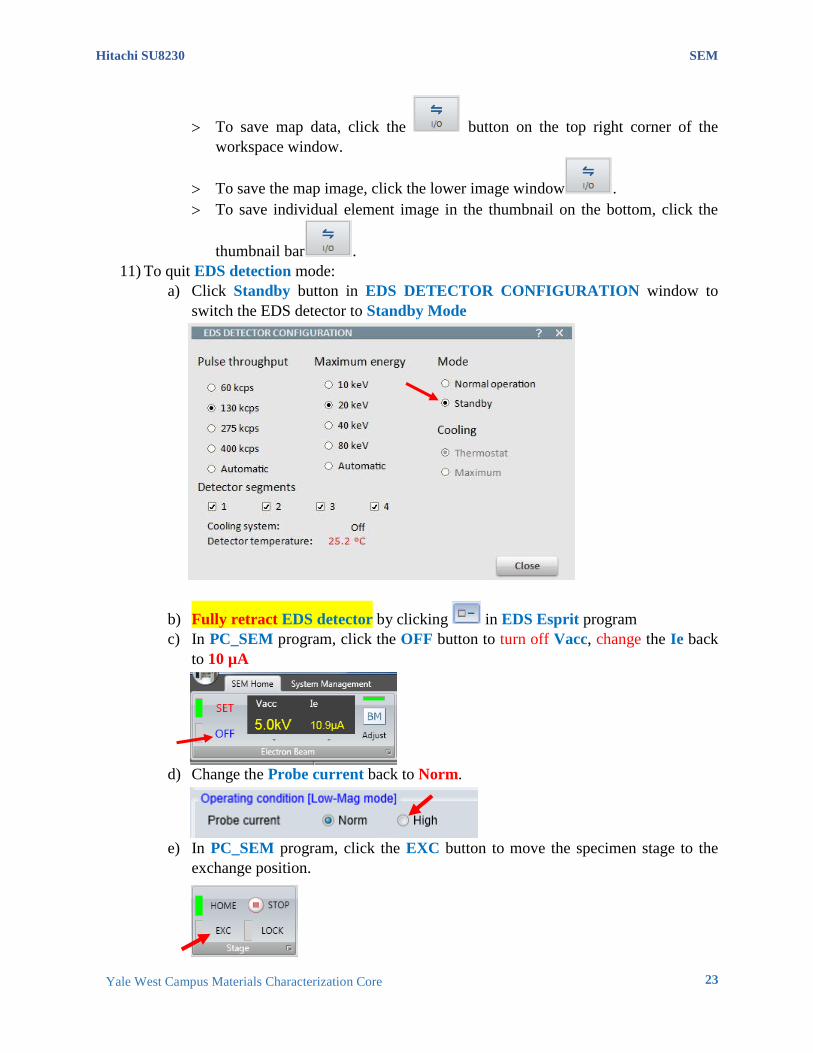
11) To quit EDS detection mode:
a) Click Standby button in EDS DETECTOR CONFIGURATION window to
switch the EDS detector to Standby Mode
b) Fully retract EDS detector by clicking in EDS Esprit program
c) In PC_SEM program, click the OFF button to turn off Vacc, change the Ie back
to 10 µA
d) Change the Probe current back to Norm.
e) In PC_SEM program, click the EXC button to move the specimen stage to the
exchange position.
Hitachi SU8230 SEM
24
Yale West Campus Materials Characterization Core
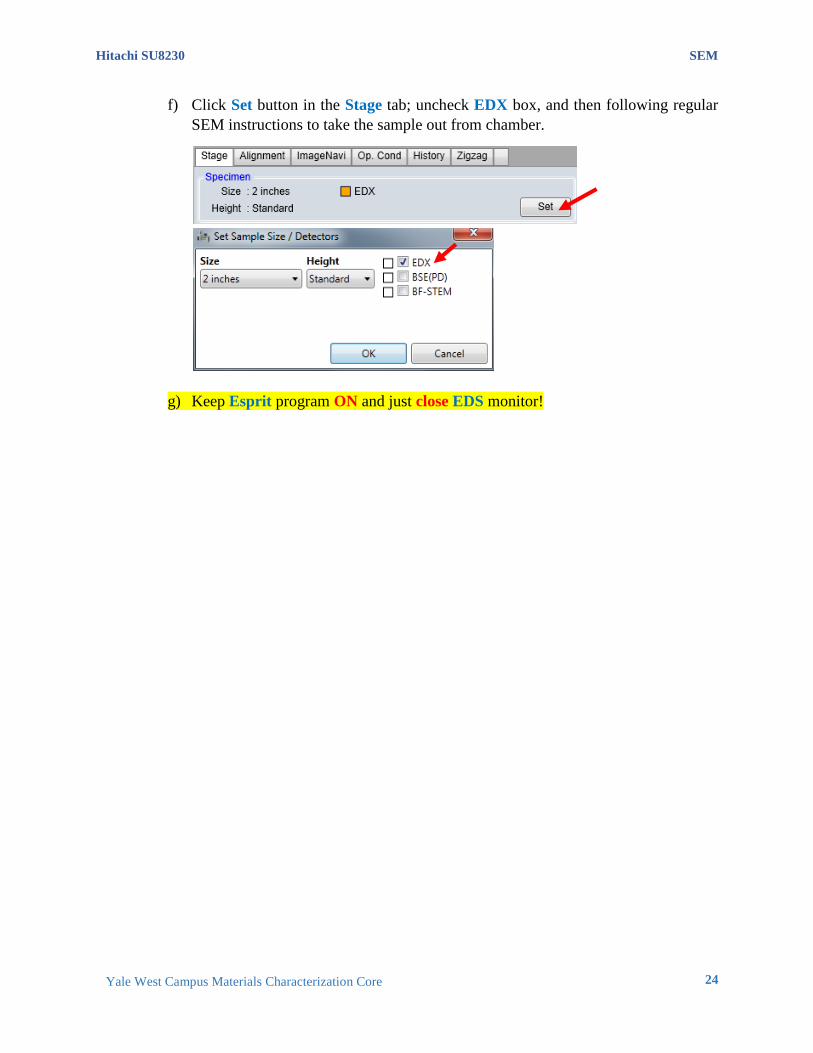
f) Click Set button in the Stage tab; uncheck EDX box, and then following regular
SEM instructions to take the sample out from chamber.
g) Keep Esprit program ON and just close EDS monitor!

Hitachi SU8230 SEM
25
Yale West Campus Materials Characterization Core