Embed Size (px)
Citation preview

P. Eskandar Page 1
Core 3 JAVASERVERFACES Tutorial
STANDARD JSF TAGS
Development of compelling JSF applications requires a good grasp of the JSF tag
libraries. JSF 1.2 had two tag libraries: core and HTML. As of JSF 2.0, there are six libraries with over 100 tags—see the table.
Figure 1 - JSF Tag Libraries
An Overview of the JSF Core Tags :
The core library contains the tags that are independent of HTML rendering.

P. Eskandar Page 2
Figure 2 - JSF Core Tags

P. Eskandar Page 3
Figure 3 - JSF Core Tags (cont.)
Most of the core tags represent objects you add to components, such as the following :
• Attributes • Parameters
• Facets • Listeners
• Converters • Validators • Selection items
Attributes, Parameters, and Facets : The f:attribute, f:param, and f:facet tags are general-purpose tags to add information to a
component. Any component can store arbitrary name/value pairs in its attribute map. You can set an attribute in a page and later retrieve it programatically.
<h:outputText value="#{payment.card}"> <f:attribute name="separator" value="-" /> </h:outputText>
The converter that formats the output retrieves the attribute from the component.
P. Eskandar Page 4
The f:param tag also lets you define a name/value pair, but the value is placed in a
separate child component, a much bulkier storage mechanism. However, the child components form a list, not a map. You use f:param if you need to supply a number of
values with the same name (or no name at all). Finally, f:facet adds a named component to a component’s facet map. A facet is not a child
component; each component has both a list of child components and a map of named facet components. The facet components are usually rendered in a special place. The root
of a Facelets page has two facets named "head" and "body". An Overview of the JSF HTML Tags :
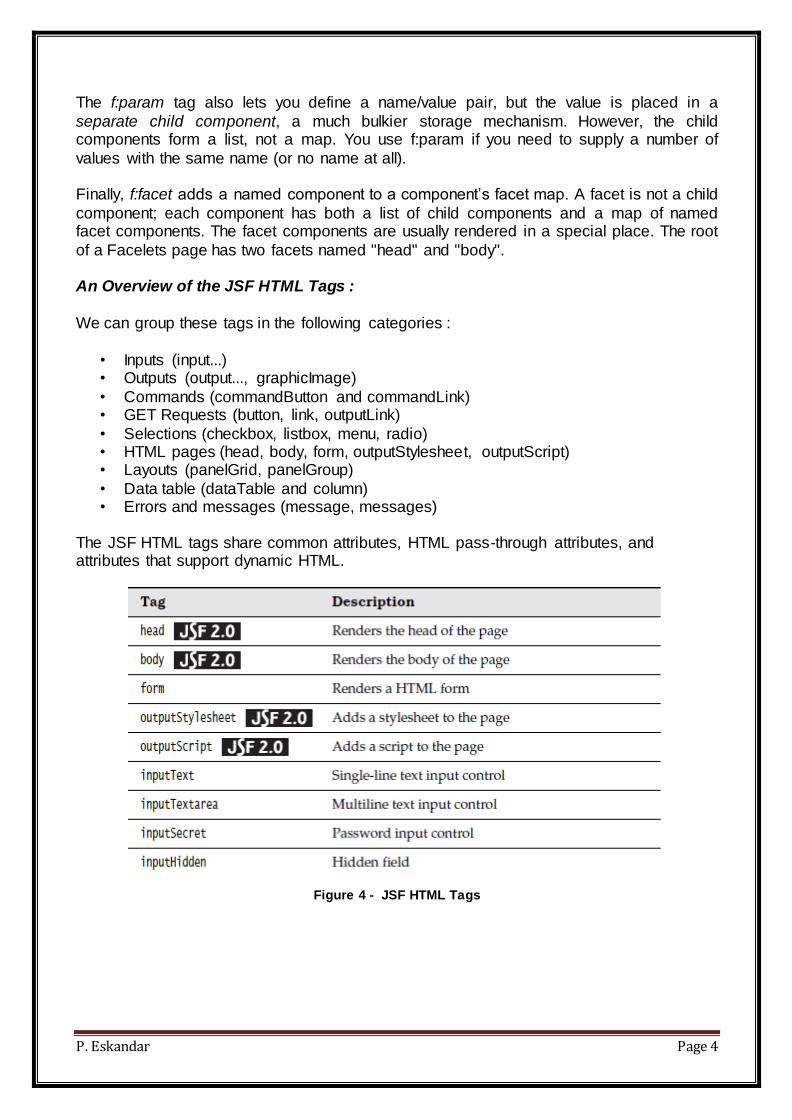
We can group these tags in the following categories :
• Inputs (input...) • Outputs (output..., graphicImage)
• Commands (commandButton and commandLink) • GET Requests (button, link, outputLink)
• Selections (checkbox, listbox, menu, radio) • HTML pages (head, body, form, outputStylesheet, outputScript) • Layouts (panelGrid, panelGroup)
• Data table (dataTable and column) • Errors and messages (message, messages)
The JSF HTML tags share common attributes, HTML pass-through attributes, and attributes that support dynamic HTML.
Figure 4 - JSF HTML Tags

P. Eskandar Page 5
Figure 5 - JSF HTML Tags (cont.)
All components can have id, binding, and rendered attributes.
The value and converter attributes let you specify a component value and a means to convert it from a string to an object, or vice versa.
The validator, required, and valueChangeListener attributes are available for input components so that you can validate values and react to changes to those values.
IDs and Bindings :
The versatile id attribute lets you do the following :

P. Eskandar Page 6
• Access JSF components from other JSF tags
• Obtain component references in Java code • Access HTML elements with scripts
The id attribute lets page authors reference a component from another tag. For example, an error message for a component can be displayed like this : <h:inputText id="name" .../> <h:message for="name"/>
You can also use component identifiers to get a component reference in your Java code. For example, you could access the name component in a listener like this :
UIComponent component = event.getComponent().findComponent("name");
The preceding call to findComponent has a caveat: The component that generated the
event and the name component must be in the same form. There is another way to access a component in your Java code. Define the component as an instance field of a class.
Provide property getters and setters for the component. Then use the binding attribute, which you specify in a JSF page, like this : <h:inputText binding="#{form.nameField}" .../>
The binding attribute is specified with a value expression. That expression refers to a read-
write bean property, such as this one : private UIComponent nameField = new UIInput(); public UIComponent getNameField() { return nameField; } public void setNameField(UIComponent newValue) { nameField = newValue; }
Values, Converters, and Validators :
Inputs, outputs, commands, and data tables all have values. Associated tags in the HTML library, such as h:inputText and h:dataTable, come with a value attribute. You can specify values with a string, like this :
<h:commandButton value="Logout" .../>
Most of the time you will use a value expression—for example :
<h:inputText value="#{customer.name}"/>
The converter attribute, shared by inputs and outputs, lets you attach a converter to a component. Input tags also have a validator attribute that you can use to attach a validator
to a component.

P. Eskandar Page 7
Conditional Rendering :
You use the rendered attribute to include or exclude a component, depending on a
condition. For example, you may want to render a “Logout” button only if the user is currently logged in : <h:commandButton ... rendered="#{user.loggedIn}"/>
HTML 4.0 Attributes :
JSF HTML tags have appropriate HTML 4.0 pass-through attributes. Those attribute
values are passed through to the generated HTML element. For example, <h:inputText value="#{form.name.last}" size="25".../> generates this HTML: <input type="text" size="25".../>. Notice that the size attribute is passed through to HTML.
Styles :
You can use CSS styles, either inline (style) or classes (styleClass), to influence how components are rendered :
<h:outputText value="#{customer.name}" styleClass="emphasis"/> <h:outputText value="#{customer.id}" style="border: thin solid blue"/>
CSS style attributes can be value expressions—that gives you programmatic control over styles.
Resources :
Since JSF 2.0, there is a better way. You can place stylesheets, JavaScript files, images, and other files into a resources directory in the root of your web application. Subdirectories
of this directory are called libraries. You can create any libraries that you like. To include a stylesheet, use the tag:
<h:outputStylesheet library="css" name="styles.css"/>
The tag adds a link of the form :
<link href="/context-root/faces/javax.faces.resource/styles.css?ln=css" rel="stylesheet" type="text/css"/>
to the header of the page.
To include a script resource, use the outputScript tag instead : <h:outputScript name="jsf.js" library="javascript" target="head" />
If the target attribute is head or body, the script is appended to the "head" or "body" facet of the root component, which means that it appears at the end of the head or body in the
generated HTML. If there is no target element, the script is inserted in the current location.

P. Eskandar Page 8
To include an image from a library, you use the graphicImage tag :
<h:graphicImage name="logo.png" library="images"/>
There is a versioning mechanism for resource libraries and individual resources. You can add subdirectories to the library directory and place newer versions of files into them. The subdirectory names are simply the version numbers. For example, suppose you have the
following directories : resources/css/1_0_2 resources/css/1_1
Then the latest version (resources/css/1_1) will be used. Note that you can add
new versions of a library in a running application. Similarly, you can add new versions of an individual resource, but the naming scheme is a
bit odd. You replace the resource with a directory of the same name, then use the version name as the file name. You can add an extension if you like. For example :
resources/css/styles.css/1_0_2.css resources/css/styles.css/1_1.css
The version numbers must consist of decimal numbers, separated by underscores. They
are compared in the usual way, first comparing the major version numbers and using the minor numbers to break ties.
There is also a mechanism for supplying localized versions of resources. Unfortunately, that mechanism is unintuitive and not very useful. Localized resources have a prefix, such
as resources/de_DE/images, but the prefix is not treated in the same way as a bundle suffix. There is no fallback mechanism. That is, if an image is not found in
resources/de_DE/images, then resources/de/images and resources/images are not consulted.
Moreover, the locale prefix is not simply the current locale. Instead, it is obtained by a curious lookup, which you enable by following these steps :
1. Add the line
<message-bundle>name of a resource bundle used in your application</message-
bundle> inside the application element of faces-config.xml.
2. Inside each localized version of that resource bundle, place a name/value pair javax.faces.resource.localePrefix=prefix
3. Place the matching resources into resources/prefix/library/...
For example, if you use the message bundle com.corejsf.messages, and the file com.corejsf.messages_de contains the entry javax.faces.resource.localePrefix=german then you place the German resources into resources/german. (The prefix need not use the
standard language and country codes, and in fact it is a good idea not to use them so that you don’t raise false hopes.)

P. Eskandar Page 9
DHTML Events :
Client-side scripting is useful for all sorts of tasks, such as syntax validation or rollover
images, and it is easy to use with JSF. HTML attributes that support scripting, such as onclick and onchange are called dynamic HTML (DHTML) event attributes. JSF supports DHTML event attributes for nearly all of the JSF HTML tags.
Figure 6 - DHTML Events
Figure 7 - DHTML Events (cont.)

P. Eskandar Page 10
The DHTML event attributes listed in the table let you associate client-side scripts with
events. Typically, JavaScript is used as a scripting language, but you can use any scripting language you like.
Panels :
Up to this point, we have used HTML tables to lay out components. Creating table markup by hand is tedious, so now we’ll look at alleviating some of that tedium with h:panelGrid, which generates the HTML markup for laying out components in rows and columns.You
can specify the number of columns with the columns attribute, like this :
<h:panelGrid columns="3"> ... </h:panelGrid>
The columns attribute is not mandatory, if you do not specify it, the number of columns
defaults to 1. The h:panelGrid tag places components in columns from left to right and top to bottom. For example, if you have a panel grid with three columns and nine components,
you will wind up with three rows, each containing three columns. If you specify three columns and 10 components, you will have four rows, and in the last row only the first column will contain the tenth component.
You can specify CSS classes for different parts of the table: header, footer, rows, and columns. The columnClasses and rowClasses specify lists of CSS classes that are applied
to columns and rows, respectively. If those lists contain fewer class names than rows or columns, the CSS classes are reused. That makes it possible to specify classes, like this :
rowClasses="evenRows, oddRows"
and
columnClasses="evenColumns, oddColumns"
The cellpadding, cellspacing, frame, rules, and summary attributes are HTML pass-
through attributes that apply only to tables.
h:panelGrid is often used with h:panelGroup, which groups two or more components so they are treated as one. For example, you might group an input field and its error
message, like this : <h:panelGrid columns="2"> ... <h:panelGroup> <h:inputText id="name" value="#{user.name}"> <h:message for="name"/> </h:panelGroup> ... </h:panelGrid>
Grouping the text field and error message puts them in the same table cell.

P. Eskandar Page 11
Although the HTML form tag has method and action attributes, h:form does not. Because
you can save state in the client—an option that is implemented as a hidden field—posting forms with the GET method is disallowed. The contents of that hidden field can be quite
large and may overrun the buffer for request parameters, so all JSF form submissions are implemented with the POST method.
There is no need for an anchor attribute since JSF form submissions always post to the current page. (Navigation to a new page happens after the form data have been posted.)
The h:form tag generates an HTML form element. For example, if, in a JSF page named /index.xhtml, you use an h:form tag with no attributes, the Form renderer generates HTML
like this :
<form id="_id0" method="post" action="/faces/index.xhtml" enctype="application/x-www-form-urlencoded">
If you do not specify the id attribute explicitly, a value is generated by the JSF implementation, as is the case for all generated HTML elements. You can explicitly specify
the id attribute for forms so that it can be referenced in stylesheets or scripts.
Form Elements and JavaScript :
JavaServer Faces is all about server-side components, but it is also designed to work with scripting languages, such as JavaScript. For example, the application shown uses
JavaScript to confirm that a password field matches a password confirm field. If the fields do not match, a JavaScript dialog is displayed. If they do match, the form is submitted.
Figure 8 - JavaScript
We use the id attribute to assign names to the relevant HTML elements so that we can access them with JavaScript :

P. Eskandar Page 12
<h:form> <h:inputSecret id="password" /> <h:inputSecret id="passwordConfirm" /> <h:commandButton type="button" onclick="checkPassword(this.form)"/> </h:form>
When the user clicks the button, a JavaScript function checkPassword is invoked. Here is the implementation of the function :
<script type="text/javascript"> function checkPassword(form) { var password = form[form.id + ":password"].value; var passwordConfirm = form[form.id + ":passwordConfirm"].value; if (password == passwordConfirm) form.submit(); else alert("Password and password confirm fields don't match"); } </script>
To understand the syntax used to access form elements, look at the HTML produced by
the preceding code :
<form id="_id0" method="post" action="/javascript/faces/index.xhtml" enctype="application/x-www-form-urlencoded"> ... <input id="_id0:password" type="text" name="registerForm:password"/> ... <input type="button" name="_id0:_id5" value="Submit Form" onclick="checkPassword(this.form)"/> ... </form>
All form controls generated by JSF have names that conform to
formName:componentName
where formName represents the name of the control’s form and componentName
represents the control’s name. If you do not specify id attributes, the JSF implementation creates identifiers for you. In our case, we didn’t specify an id for the form. Therefore, to access the password field in the preceding example, the script uses the expression:
form[form.id + ":password"]
Hidden Fields :
JSF provides support for hidden fields with h:inputHidden. Hidden fields are often used
with JavaScript actions to send data back to the server. The h:inputHidden tag has the same attributes as the other input tags, except that it does not support the standard HTML and DHTML tags.

P. Eskandar Page 13
Using Text Fields and Text Areas :
The application shown uses h:inputText, h:inputSecret, and h:inputTextarea to collect
personal information from a user. The values of those components are wired to bean properties, which are accessed in the thankYou.xhtml page that redisplays the information the user entered.
Figure 9 - InputText
Figure 10 - Directory structure of the text fields and text areas example

P. Eskandar Page 14
UserBean :
package com.corejsf; import java.io.Serializable; import javax.inject.Named; // or import javax.faces.bean.ManagedBean; import javax.enterprise.context.SessionScoped; // or import javax.faces.bean.SessionScoped; @Named("user") // or @ManagedBean(name="user") @SessionScoped public class UserBean implements Serializable { private String name; private String password; private String aboutYourself; public String getName() { return name; } public void setName(String newValue) { name = newValue; } public String getPassword() { return password; } public void setPassword(String newValue) { password = newValue; } public String getAboutYourself() { return aboutYourself; } public void setAboutYourself(String newValue) { aboutYourself = newValue; } }
Index.xhtml :
<!DOCTYPE html PUBLIC "-//W3C//DTD XHTML 1.0 Transitional//EN" "http://www.w3.org/TR/xhtml1/DTD/xhtml1-transitional.dtd"> <html xmlns="http://www.w3.org/1999/xhtml" xmlns:h="http://java.sun.com/jsf/html" xmlns:a4j="http://richfaces.org/a4j" xmlns:rich="http://richfaces.org/rich" xmlns:f="http://java.sun.com/jsf/core" xmlns:ui="http://java.sun.com/jsf/facelets"> <h:head> <title>#{msgs.indexWindowTitle}</title> </h:head> <body> <h:outputText value="#{msgs.indexPageTitle}" style="font-style: italic; font-size: 1.5em"/> <h:form> <h:panelGrid columns="2"> #{msgs.namePrompt} <h:inputText value="#{user.name}"/> #{msgs.passwordPrompt}

P. Eskandar Page 15
<h:inputSecret value="#{user.password}"/> #{msgs.tellUsPrompt} <h:inputTextarea value="#{user.aboutYourself}" rows="5" cols="35"/> </h:panelGrid> <h:commandButton value="#{msgs.submitPrompt}" action="thankYou"/> </h:form> </body> </html>
thankYou.xhtml :
<!DOCTYPE html PUBLIC "-//W3C//DTD XHTML 1.0 Transitional//EN" "http://www.w3.org/TR/xhtml1/DTD/xhtml1-transitional.dtd"> <html xmlns="http://www.w3.org/1999/xhtml" xmlns:h="http://java.sun.com/jsf/html" xmlns:a4j="http://richfaces.org/a4j" xmlns:rich="http://richfaces.org/rich" xmlns:f="http://java.sun.com/jsf/core" xmlns:ui="http://java.sun.com/jsf/facelets"> <h:head> <title>#{msgs.thankYouWindowTitle}</title> </h:head> <body> <h:outputText value="#{msgs.thankYouPageTitle}" style="font-style: italic; font-size: 1.5em"/> <h:outputText value="#{msgs.namePrompt}" style="font-style: italic"/> #{user.name} <br/> <h:outputText value="#{msgs.aboutYourselfPrompt}" style="font-style: italic"/> <br/> <pre>#{user.aboutYourself}</pre> </body> </html> messages.properties :
indexWindowTitle=Using Textfields and Textareas thankYouWindowTitle=Thank you for submitting your information thankYouPageTitle=Thank you! indexPageTitle=Please enter the following personal information namePrompt=Name: passwordPrompt=Password: tellUsPrompt=Please tell us about yourself: aboutYourselfPrompt=Some information about you: submitPrompt=Submit your information

P. Eskandar Page 16
Faces-config.xml Configuration :
<?xml version="1.0" encoding="UTF-8"?> <faces-config xmlns="http://java.sun.com/xml/ns/javaee" xmlns:xsi="http://www.w3.org/2001/XMLSchema-instance" xsi:schemaLocation="http://java.sun.com/xml/ns/javaee http://java.sun.com/xml/ns/javaee/web-facesconfig_2_0.xsd" version="2.0"> <application> <locale-config> <default-locale>en</default-locale> <supported-locale>de</supported-locale> </locale-config> <resource-bundle> <base-name>com.corejsf.messages</base-name> <var>msgs</var> </resource-bundle> </application> <managed-bean> <managed-bean-name>UserBean</managed-bean-name> <managed-bean-class>com.corejsf.UserBean</managed-bean-class> <managed-bean-scope>session</managed-bean-scope> </managed-bean> </faces-config>
Displaying Text and Images :
JSF applications use the following tags to display text and images:
• h:outputText • h:outputFormat
• h:graphicImage
The h:outputText tag is one of JSF’s simplest tags. With only a handful of attributes, it
does not typically generate an HTML element. Instead, it generates mere text—with one exception: If you specify the style or styleClass attributes, h:outputText will generate an
HTML span element.
In JSF 2.0, you don’t usually need the h:outputText tag since you can simply insert value
expressions, such as #{msgs.namePrompt} into your page. You would use h:outputText in the following circumstances :
• To produce styled output • In a panel grid to make sure that the text is considered one cell of the grid
• To generate HTML markup
P. Eskandar Page 17
The h:outputFormat tag formats a compound message with parameters specified in the
body of the tag—for example :
<h:outputFormat value="{0} is {1} years old"> <f:param value="Bill"/> <f:param value="38"/> </h:outputFormat>
In the preceding code fragment, the compound message is {0} is {1} years old and the parameters, specified with f:param tags, are Bill and 38. The output of the preceding code
fragment is: Bill is 38 years old. The h:outputFormat tag uses a java.text.MessageFormat instance to format its output.
The h:graphicImage tag generates an HTML img element. You can specify the image location with the url or value attribute, as a context-relative path—meaning relative to the
web application’s context root. As of JSF 2.0, you can place images into the resources directory and specify a library and name :
<h:graphicImage library="images" name="de_flag.gif"/>
Here, the image is located in resources/images/de_flag.gif. Alternatively, you can use this :
<h:graphicImage url="/resources/images/de_flag.gif"/>
You can also use the resources map:
<h:graphicImage value="#{resources['images:de_flag.gif']}"/>
-------------------------------------------------
Next Tutorial :
Iam going to discuss the following topics :
• Buttons and Links
• Selection Tags • Checkboxes and Radio Buttons
• Menus and Listboxes • Item Groups
For Questions please contact me : [email protected]