Embed Size (px)
Citation preview
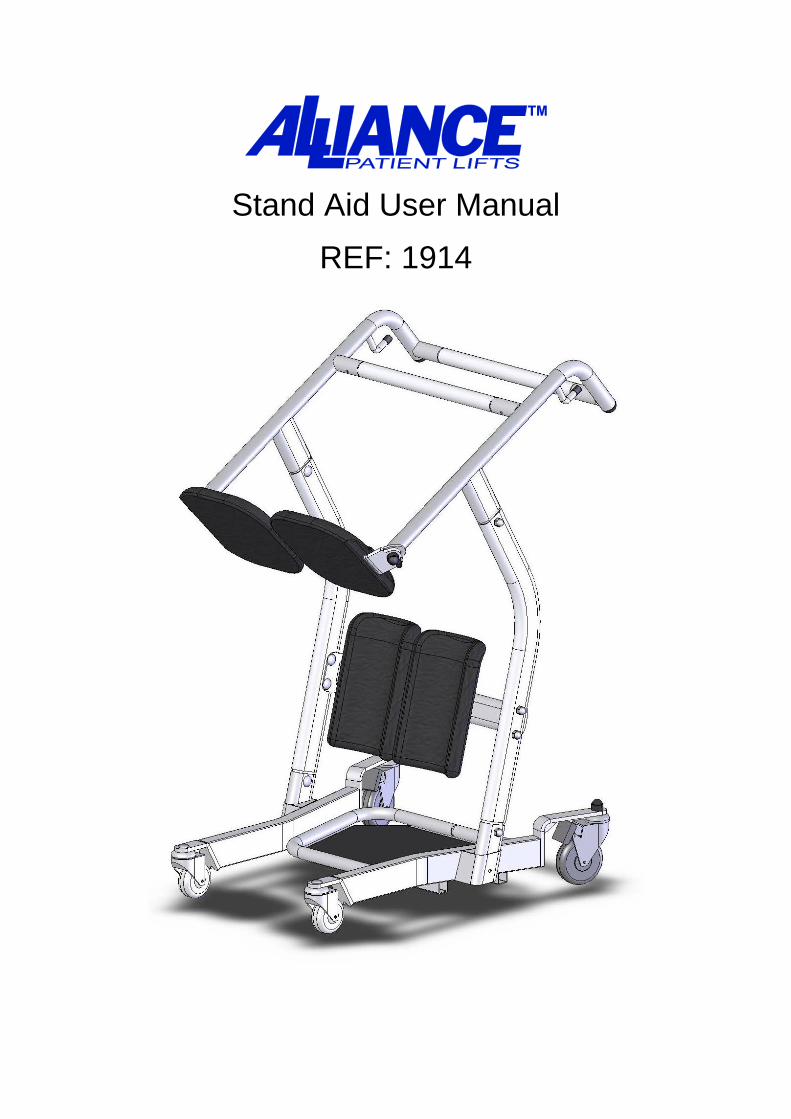
Stand Aid User Manual
REF: 1914

The Chattanooga Group AllianceTM Stand Aid is a manual standing aid to allow patients to assist themselves in preparation for transport. Patients qualified to use the Stand Aid should have adequate arm strength to pull themselves upward and enough leg strength to support their own weight. Patients who meet these criteria and have difficulty walking will find the Stand Aid a useful and safe transport device. The Stand Aid is positioned between a traditional walker and electric stand assist lift in terms of function. Once the patient has positioned themselves on board, the split seat can easily be placed securely and allow the patient to sit comfortably while a caregiver performs the transport. For residents lacking the strength to assist themselves, a stand assist lift such as the AllianceTM HE Patient Lift is recommended.
The AllianceTM Stand Aid is capable of the following transfers when used according to the instuctions: Bed to Chair/Wheelchair Bed/Chair/Wheelchair to commode Room to Room
FAILURE TO USE THIS DEVICE ACCORDING TO INSTRUCTIONS MAY CAUSE SERIOUS INJURY
NEVER ATTEMPT TO TRANSFER A PATIENT WHOSE WEIGHT EXCEEDS 400 LBS / 180KGS
DO NOT LEAVE A PATIENT UNATTENDED DURING TRANSPORT
©2007 Encore Medical, L.P. and its affiliates, Austin, Texas, USA. Any use of editorial, pictorial or layout composition of this publication without express written consent from Chattanooga Group of Encore Medical, L.P. is strictly prohibited. This publication was written, illustrated and prepared for print by Chattanooga Group of Encore Medical, L.P.
1

ASSEMBLY AND SAFETY PRECAUTIONS
Safety Precautions: Only qualified caregivers familiar with the proper use of the Stand Aid
should attempt to transfer patients. Patients unable to pull themselves upright and support their own weight
should not be transported with a Stand Aid. Never attempt to transfer a patient whose weight exceeds the safe load
limit. Prior to a transfer check the Stand Aid to insure all components are
properly and securely assembled and in working order. Do not leave a patient unattended during any part of the transport.
MAXIMUM SAFE WORKING LOAD LIMIT IS 180kgs / 400lbs
Assembly Instructions: PRIOR TO ASSEMBLY, UNLOAD SHIPPING CARTON AND CHECK ALL PARTS. IMMEDIATELY CONTACT YOUR DEALER IF PARTS MISSING.
Parts List:
1. Base preassembled with footplate and casters
2. Two side support arm units
2

3. Two kneepads and kneepad support unit
4. Two seat pad and handle bar support units and two cross bar tubes
5. Assemblies & tools No. Item Description Quantity
A1
Hex Bolt 8
A2
Bolt 2
A3 Screw 4 A4 Washer 10 A5 Spring Washer 10 A6 Lock Nut 8
A7 Plastic Cap 2
T1
Wrench 1
T2
Allen Key 1
3

STEP BY STEP ASSEMBLY 1. Place the base assembly on the floor and lock the back casters for ease of
assembly.
2. Insert the kneepads into the kneepad support unit. Tighten the 2 bolt
assemblies<A2+A4+A5> securely using the wrench<T1>. Put the 2 plastic cap<A7> on the bolts. The finished assembly is shown below.
3. Attach the kneepad assembly to the two side support arms as shown
above by using 4 of the hex bolt assemblies<A1+A4+A5+A6>. Fit the square shoulder of each bolt in the square hole and use the washer on the outside of the support arm units. DO NOT tighten the 4 bolt assemblies. The finished assembly is shown below.
4

4. Insert the two tubular cross bars into the holes on the seat and handle bar support units. Line up the small holes on the underside of the tubes with the holes in the support units. Use the 4 set screws<A3> supplied to tighten the assembly using the Allen key<T2>. The finished assembly is shown below.
5. Insert the kneepad side support assembly into the base brackets as
shown above. The kneepads and arm curvature should be facing away from the lockable casters.
5

6. Insert the seat and cross bar assembly into the slots at the top of the kneepad assembly as shown above.
7. Use the remaining 4 hex bolt assemblies<A1+A4+A5+A6> to securely
fasten the two sub assemblies to the base unit. All of the square shoulders of the bolts should be on the inside and the washers and lock nuts on the outside. Use the wrench<T1> to tighten all bolt assemblies.
DOUBLE CHECK ALL ASSEMBLIES FOR TIGHTNESS AND READ OPERATING INSTRUCTIONS CAREFULLY PRIOR TO USE
6

SEAT USAGE INSTRUCTIONS The two black molded seat units can be rotated upwards to allow for patient loading. Once the patient is in an upward standing position the split seats must be lowered down to form a complete two-sided seat. Always make sure each of the two seat components are properly lowered, forming a complete seat prior to having the patient sit down.
ACCESSORIES The AllianceTM Stand Aid is designed to fully support a seated patient for transport. For patients requiring some upper body support or additional security, a safety belt (REF: 1915) may be used. Please see the pictures below for the use of this belt:
7

INSTRUCTIONS FOR USE AND TRANSPORT 1. Raise the two split seat units up and parallel to the side of the Stand Aid
as shown below.
2. Have the patient positioned at the edge of the surface and move the Stand
Aid in front of the patient so that their feet are firmly on the platform and knees/shins are in contact with the two cupped knee/shin pads as shown below.
3. Lock the casters by stepping on the caster clip and pushing down as
shown below.
8

4. Have the patient grasp the cross bar closest to them and using their own strength, pull themselves up into a standing position firmly on the platform as shown below.
5. Lower both of the split seat units down into position to form a complete
seat as shown below.
9

6. Have the patient lower themselves down onto the seat while keeping their knees/shins in the knee/shin pads and while still holding the cross bar with both hands as shown below.
7. Unlock the casters and place both hands on the cross bar furthest from
the patient and move the Stand Aid to the new surface. Make sure the patient is secure and in proper position as described in Step 6 above prior and during transfer as shown below.
10

ONCE THE ALLIANCETM STAND AID HAS BEEN POSITIONED AGAINST THE NEW SURFACE THE FOLLOWING STEPS ARE REQUIRED:
1. Position the Stand Aid against the new surface, insuring the patient will be in a position to sit down firmly and safely on the new surface.
2. Lock the casters. 3. Have the patients pull themselves back up to a full standing position. 4. Raise the two split seat units up to a parallel position to allow the patients
to lower themselves. 5. Stand beside the patient as they lower themselves down onto the new
surface. 6. Make sure the patient is safely positioned then unlock the casters and
move the Stand Aid to storage.
MAINTENENANCE The AllianceTM Stand Aid is a manual unit and therefore requires minimum maintenance on an ongoing basis. However, to insure safety and proper use, the following steps should be taken on a monthly basis: Check all bolt/nut assemblies to make sure they are tight and no wear and
tear is evident. Replace and tighten any worn assemblies prior to using the Stand Aid.
Check the two seat assemblies to make sure they are not worn or damaged and that the bolts are tight. Replace any worn or damaged seat components prior to using the Stand Aid.
Check the casters to make sure they are in working order and are secured firmly to the Stand Aid. Replace any worn or damaged casters prior to using the Stand Aid.
11

LIMITED WARRANTY Chattanooga Group, a division of Encore Medical, L.P., ("Company") warrants that the AllianceTM Stand Aid ("Product") is free of defects in material and workmanship. This warranty shall remain in effect for one year (12 months) from the date of original consumer purchase. If this Product fails to function during the one year warranty period due to a defect in material or workmanship, at the Company's option, the Company or the selling dealer will repair or replace this Product without charge within a period of thirty days from the date on which the Product is returned to the Company or the dealer. All repairs to the Product must be performed by a service center authorized by the Company. Any modifications or repairs performed by unauthorized centers or groups will void this warranty. To participate in warranty coverage, this Product's warranty registration card (included with Product) must be filled out and returned to the Company by the original owner within ten business days of purchase. This warranty does not cover: Replacement parts or labor furnished by anyone other than the Company, the selling dealer, or an certified Company service agent. Defects or damage caused by labor furnished by someone other than Company, the selling dealer, or an certified Company service agent. Any malfunction or failure in the Product caused by product misuse, including, but not limited to, the failure to provide reasonable and necessary maintenance or any use that is inconsistent with the Product User's Manual. COMPANY SHALL NOT BE LIABLE IN ANY EVENT FOR INCIDENTAL OR CONSEQUENTIAL DAMAGES. Some states do not allow the exclusion or limitation of incidental or consequential damages, so the above limitation or exclusion may not apply to you. To obtain service from Company or the selling dealer under this warranty: 1. A written claim must be made within the warranty period to the Company or
the selling dealer. Written claims made to the Company should be sent to: 4717 Adams Road P.O. Box 489 Hixson, TN 37343 USA Telephone: 423-870-2281 or 1-800-592-7329 Outside USA: +1 (423) 870-7200 Outside USA FAX: +1 (423) 870-2046 Facsimile: (423) 875-5497
2. The Product must be returned to the Company or the selling dealer by the owner.
This warranty gives you specific legal rights and you may also have other rights which vary from state to state. The Company does not authorize any person or representative to create for it any other obligation or liability in connection with the sale of the Product. Any representation or agreement not contained in the warranty shall be void and of no effect. THE FOREGOING WARRANTY IS IN LIEU OF ALL OTHER WARRANTIES, EXPRESSED OR IMPLIED, INCLUDING ANY WARRANTY OR MERCHANTABILITY OR FITNESS FOR A PARTICULAR PURPOSE.
12