Embed Size (px)
Citation preview
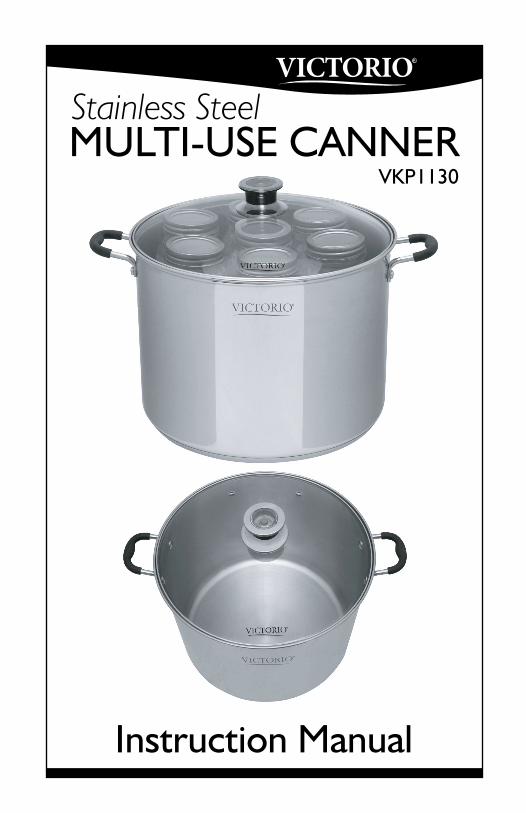
MULTI-USE CANNER
Instruction Manual
VKP1130
Stainless Steel
Copyright © 2013 Victorio Kitchen Products. All Rights Reserved.
Table of Contents
Canner Illustration ......................................................................... 1
Operating Precautions ................................................................... 2
Product Overview .......................................................................... 3
Care Instructions ............................................................................ 4
Canning Jar & Lid Selection ......................................................... 4
Jar Sterilization ................................................................................ 5
Indicator Knob Instructions ........................................................ 5
Canner Use Instructions ............................................................... 6
Water Bath Canning ......................................................... 6
Steam Canning .................................................................. 8
Processing Times............................................................................ 9
Troubleshooting Guide .............................................................. 10
Notes ............................................................................................. 11
Recipes ..................................................................................... 12-17
Warranty/Contact Info .............................................. Back Cover
*For the most up-to-date manual, or for more information
regarding this product, visit our website at www.Victorio.info.
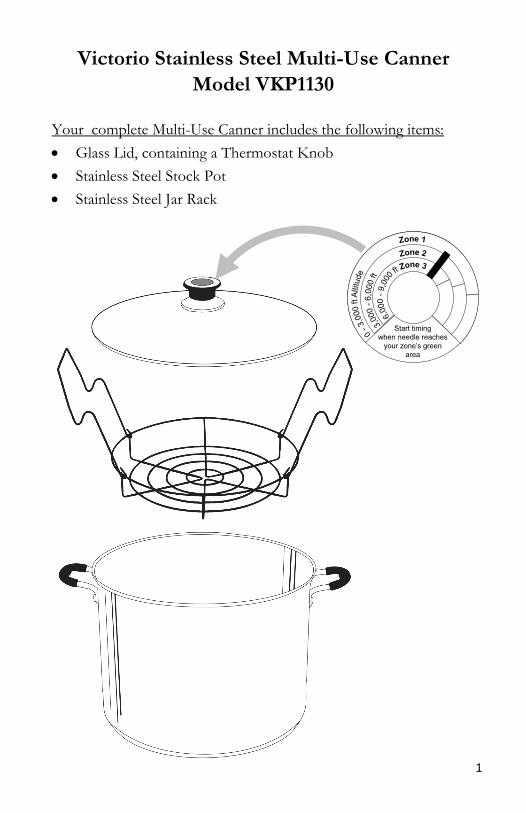
Victorio Stainless Steel Multi-Use Canner
Model VKP1130
Your complete Multi-Use Canner includes the following items:
Glass Lid, containing a Thermostat Knob
Stainless Steel Stock Pot
Stainless Steel Jar Rack
1

2
Operating Precautions
WARNING! To prevent personal injuries, please read and
follow all instructions correctly.
Steam canners and boiling-water or water bath canners are
not to be used for canning low-acid foods, such as
vegetables and meats. Low-acid foods must be processed in
a pressure canner.
Be certain your range or cooktop is rated for home canning.
Some models of ranges or cooktops cannot be used for home
canning, -especially smooth top ranges– since they can be
damaged. Check with the manufacturer of your cooktop before
using your canner. Victorio Kitchen Products IS NOT
responsible for damage of any kind to the range or cooktop as a
result of using this canner.
Always use heat protective gloves or mitts when handling any part
of your canner.
When removing the lid from the canner, be sure to always tilt it
away from you to avoid steam burns.
Any steam produced will be hot and can cause serious injury. Use
extreme caution while using your canner.
Never leave your canner unattended while it is in use.
Check the stock pot water level after every batch. DO NOT LET
THE STOCK POT BOIL DRY. This will cause serious damage
to your canner and may render it unusable. Your stove top could
also be damaged if this happens.
Do not use by or near children.
For household use only.
3
Water Bath Steam
Product Overview Congratulations on your purchase of a Victorio Multi-Use Canner! This
manual will help you use your canner properly and understand its features.
However, this manual is NOT a general guide to home canning. If you do
not have a USDA approved home canning guide, visit their website at
nchfp.uga.edu, for more information. You can also visit our website,
www.Victorio.info, where you’ll find resources for approved home
canning procedures. Don’t forget, you can also check with your local
Extension office for helpful canning advice and your local altitude (see the
Troubleshooting Guide for more information on p. 10)
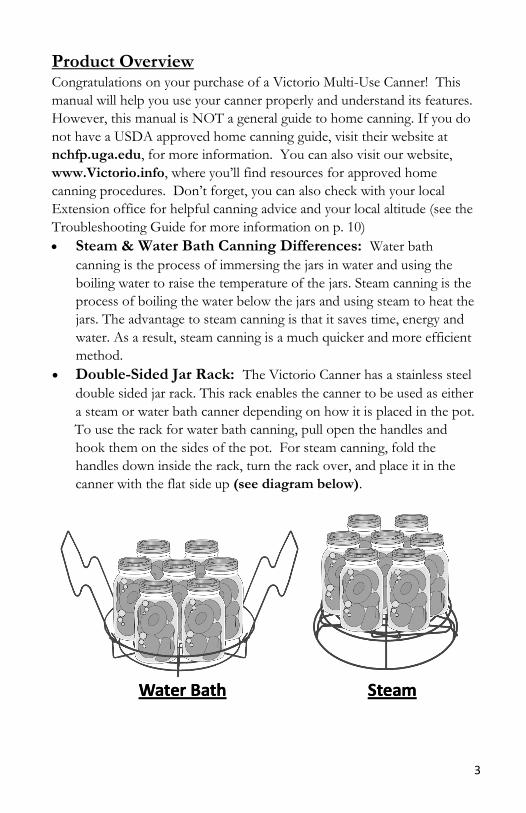
Steam & Water Bath Canning Differences: Water bath
canning is the process of immersing the jars in water and using the
boiling water to raise the temperature of the jars. Steam canning is the
process of boiling the water below the jars and using steam to heat the
jars. The advantage to steam canning is that it saves time, energy and
water. As a result, steam canning is a much quicker and more efficient
method.
Double-Sided Jar Rack: The Victorio Canner has a stainless steel
double sided jar rack. This rack enables the canner to be used as either
a steam or water bath canner depending on how it is placed in the pot.
To use the rack for water bath canning, pull open the handles and
hook them on the sides of the pot. For steam canning, fold the
handles down inside the rack, turn the rack over, and place it in the
canner with the flat side up (see diagram below).
Water Bath Steam
4
Stock Pot Capacity:
○ 20 Quart liquid capacity
Canning Jar Capacity:
○ 8 Pint Jars
○ 7 Quart Jars
Care Instructions Use a soft cloth and warm, soapy water to wash your Victorio Multi-Use
Canner by hand before the initial use. This will help to remove any
particles or residue from the factory. Then follow these simple care
instructions to keep your canner clean:
After each use, wash the pot, lid and jar rack in warm, soapy water.
Rinse and dry well. Be sure to use a soft cloth to keep from
scratching the stainless steel surface.
As the canner is used, you may notice hard water build up or small
rust specks. To remove these deposits from the stock pot, add 1/4
cup of vinegar and 1 gallon of water to the pot and boil for 2 to 3
minutes. Once the pot has cooled, you can wipe clean with a soft
cloth, or rewash in the sink. For tougher stains, you may need to
increase the amount of vinegar used.
NEVER ALLOW YOUR CANNER TO BOIL DRY. Negligence
might result in damage to the canner or your stove. Check the water
level after every batch.
Canning Jar and Lid Selection
Regular and wide-mouth Mason-type, threaded, home-canning jars with
self-sealing lids (lid and screw-band combination) are the best choice. The
regular jar mouth opening is approximately 2-3/8 inches. Wide-mouth
jars have openings of approximately 3 inches. These types of canning jars
come in several different sizes depending upon your needs and recipe
requirements. For further information on jar and lid selections and for jar
cleaning and sterilization, please refer to the USDA’s Complete Guide to
Home Canning.
5
Jar Sterilization
According to the USDA, all jams, jellies, juices and pickled products processed for less than 10 minutes in a water bath canner should be filled into sterile empty jars. To sterilize empty jars after washing in soap and rinsing thoroughly,
submerge them, right side up, in a boiling-water canner with the rack in the bottom. Fill the canner with enough warm water so it is 1 inch above the tops of the jars. Bring the water to a boil, and boil 10 minutes at altitudes of less than 1,000 ft. At higher elevations, boil 1 additional minute for each additional 1,000 ft elevation. Reduce the heat under the canner, and keep the jars in the hot water until it is time to fill them. Remove and drain hot sterilized jars one at a time, saving the hot water in the canner for processing filled jars. Fill the sterilized jars with food, add lids, and tighten screw bands.
Indicator Knob Instructions
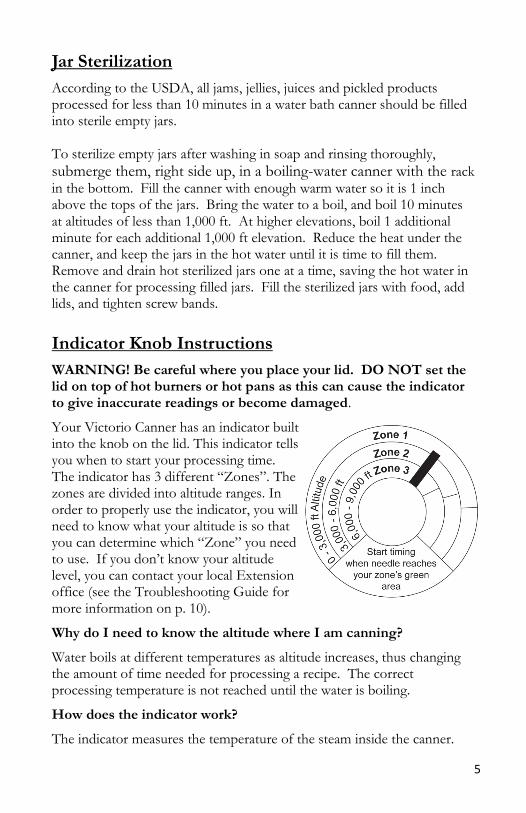
WARNING! Be careful where you place your lid. DO NOT set the lid on top of hot burners or hot pans as this can cause the indicator to give inaccurate readings or become damaged.
Your Victorio Canner has an indicator built into the knob on the lid. This indicator tells you when to start your processing time. The indicator has 3 different “Zones”. The zones are divided into altitude ranges. In order to properly use the indicator, you will need to know what your altitude is so that you can determine which “Zone” you need to use. If you don’t know your altitude level, you can contact your local Extension office (see the Troubleshooting Guide for more information on p. 10).
Why do I need to know the altitude where I am canning?
Water boils at different temperatures as altitude increases, thus changing the amount of time needed for processing a recipe. The correct processing temperature is not reached until the water is boiling.
How does the indicator work?
The indicator measures the temperature of the steam inside the canner.
6
When the temperature inside the canner reaches the processing temperature (boiling) the indicator will reach the green area for your zone. You may also see steam escaping around the lid as another indicator that the canner is up to the correct temperature.
NOTE: The “Zones” on the indicator are approximations for the different altitudes. As you use the canner, watch where the indicator is pointing when the water is boiling or when you can see steam escaping from the vent holes in the lid. You can use that as your guide to start your processing time.
Canner Use Instructions
Please make sure you have read through the sections - Operating Precautions (p. 2) and Indicator Knob Instructions (p. 4) - before using your canner.
Warning! The steam and water will be hot and can cause a serious burn injury. Use extreme caution while using your canner.
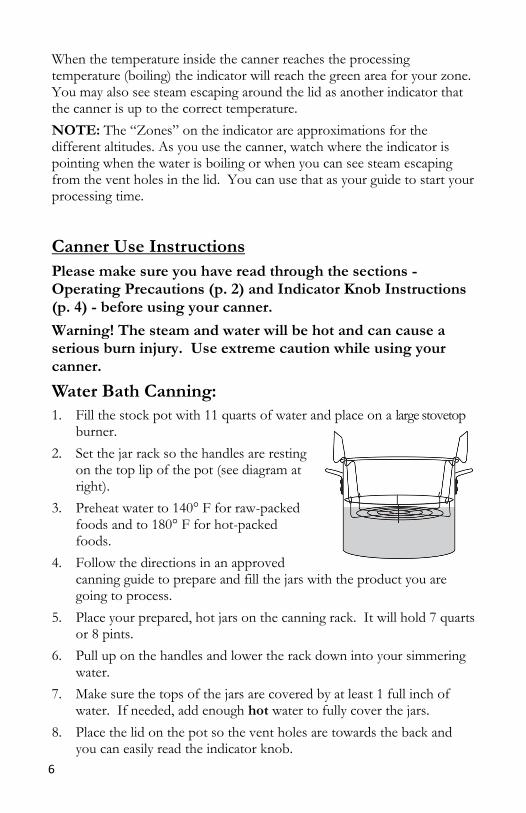
Water Bath Canning:
1. Fill the stock pot with 11 quarts of water and place on a large stovetop burner.
2. Set the jar rack so the handles are resting on the top lip of the pot (see diagram at right).
3. Preheat water to 140° F for raw-packed foods and to 180° F for hot-packed foods.
4. Follow the directions in an approved canning guide to prepare and fill the jars with the product you are going to process.
5. Place your prepared, hot jars on the canning rack. It will hold 7 quarts or 8 pints.
6. Pull up on the handles and lower the rack down into your simmering water.
7. Make sure the tops of the jars are covered by at least 1 full inch of water. If needed, add enough hot water to fully cover the jars.
8. Place the lid on the pot so the vent holes are towards the back and you can easily read the indicator knob.
7
9. Make sure you know which “Zone” you are in according to your altitude. If you do not, contact your local Extension office (see the Troubleshooting Guide for more information on p. 10).
10. Turn your burner on so the water comes to a vigorous boil.
11. As soon as the needle reaches your “Zone’s” green area, start your processing time (see p. 4 for Indicator Knob Instructions).
12. DO NOT let the water continue to boil vigorously throughout the entire processing time. This can cause leakage and breakage of jars. Slowly turn down your burner unit, watching the needle carefully, to keep it from continuing to rise further into your green area. You only need enough heat to maintain the temperature inside your pot and to keep the needle just inside your “Zone’s” green area.
13. When the processing time is finished, turn off the heat, remove the lid (by tilting it away from you to avoid steam burns), and let stand for 5 minutes before removing jars. If the jars are removed immediately from the canner after processing, that could increase the possibility for breakage due to drastic temperature changes taking place too quickly.
14. Warning! The steam and water will be hot and can cause a
serious burn injury. Use extreme caution while using your canner.
15. Use hot pads or a jar lifter to remove the jars from the canner. Place the jars on a dry towel, cloth or cooling rack, in a draft-free area, leaving 2 inches of space around all sides of the jars. Let cool for 12-24 hours.
16. After cooling time is complete, remove the rings and check the seals by depressing the center of the canning lid. If it pops back up, it is not sealed. Reprocess within 24 hours or refrigerate immediately and eat the contents within a few days. Store the sealed jars in a cool, dark place.
8
Steam Canning:
Processing times for boiling-water canners are the same for steam canners and can be used interchangeably.
DO NOT let the canner boil dry. Check water level after each batch and add more if needed.
DO NOT remove lid during processing. Removing the lid allows the steam to escape and the jars will no longer be at the correct temperature. If the lid is removed during processing you will need to bring the canner back up to heat and restart the processing time to ensure the jars are processed correctly.
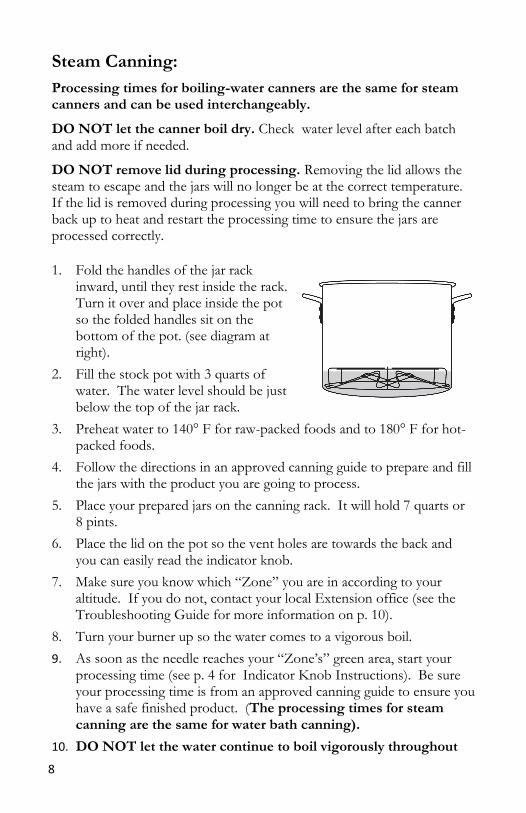
1. Fold the handles of the jar rack
inward, until they rest inside the rack. Turn it over and place inside the pot so the folded handles sit on the bottom of the pot. (see diagram at right).
2. Fill the stock pot with 3 quarts of water. The water level should be just below the top of the jar rack.
3. Preheat water to 140° F for raw-packed foods and to 180° F for hot-packed foods.
4. Follow the directions in an approved canning guide to prepare and fill the jars with the product you are going to process.
5. Place your prepared jars on the canning rack. It will hold 7 quarts or 8 pints.
6. Place the lid on the pot so the vent holes are towards the back and you can easily read the indicator knob.
7. Make sure you know which “Zone” you are in according to your altitude. If you do not, contact your local Extension office (see the Troubleshooting Guide for more information on p. 10).
8. Turn your burner up so the water comes to a vigorous boil.
9. As soon as the needle reaches your “Zone’s” green area, start your processing time (see p. 4 for Indicator Knob Instructions). Be sure your processing time is from an approved canning guide to ensure you have a safe finished product. (The processing times for steam canning are the same for water bath canning).
10. DO NOT let the water continue to boil vigorously throughout
9
the entire processing time. This can cause leakage and breakage of jars. Slowly turn down your burner unit, watching the needle carefully, to keep it from continuing to rise further into your green area. You only need enough heat to maintain the temperature inside your pot and to keep the needle just inside your “Zone’s” green area.
11. When the processing time is finished, turn off the heat, remove the lid (by tilting it away from you to avoid steam burns), and let stand for 5 minutes before removing jars. If the jars are removed immediately from the canner after processing, that could increase the possibility for breakage due to drastic temperature changes taking place too quickly.
12. Warning! The steam and water will be hot and can cause a serious burn injury. Use extreme caution while using your canner.
13. Use hot pads or a jar lifter to remove the jars from the canner. Place the jars on a dry towel, cloth or cooling rack, in a draft-free area, leaving 2 inches of space around all sides of the jars. Let cool for 12-24 hours.
14. After cooling time is complete, remove the rings and check the seals by depressing the center of the canning lid. If it pops back up, it is not sealed. Reprocess within 24 hours or refrigerate immediately and eat the contents within a few days. Store the sealed jars in a cool, dark place.
Processing Times Processing times for boiling-water canners are the same for steam canners and can be used interchangeably. The only time difference is how long it takes to get the water up to temperature depending on which method you choose to use. Processing times will vary based upon the product that is being canned and the recipe that is used. Please refer to the USDA’s website for approved canning guides and recipes, nchfp.uga.edu. A few USDA approved recipes have been attached to the end of this manual.
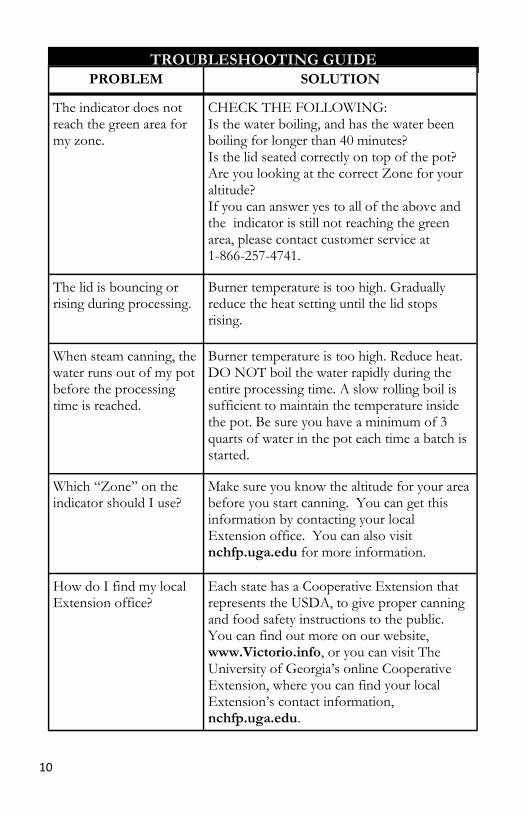
TROUBLESHOOTING GUIDE
PROBLEM SOLUTION
The indicator does not reach the green area for my zone.
CHECK THE FOLLOWING: Is the water boiling, and has the water been boiling for longer than 40 minutes? Is the lid seated correctly on top of the pot? Are you looking at the correct Zone for your altitude? If you can answer yes to all of the above and the indicator is still not reaching the green area, please contact customer service at 1-866-257-4741.
The lid is bouncing or rising during processing.
Burner temperature is too high. Gradually reduce the heat setting until the lid stops rising.
When steam canning, the water runs out of my pot before the processing time is reached.
Burner temperature is too high. Reduce heat. DO NOT boil the water rapidly during the entire processing time. A slow rolling boil is sufficient to maintain the temperature inside the pot. Be sure you have a minimum of 3 quarts of water in the pot each time a batch is started.
Which “Zone” on the indicator should I use?
Make sure you know the altitude for your area before you start canning. You can get this information by contacting your local Extension office. You can also visit nchfp.uga.edu for more information.
How do I find my local Extension office?
Each state has a Cooperative Extension that represents the USDA, to give proper canning and food safety instructions to the public. You can find out more on our website, www.Victorio.info, or you can visit The University of Georgia’s online Cooperative Extension, where you can find your local Extension’s contact information, nchfp.uga.edu.
10

Notes
___________________________________________
___________________________________________
___________________________________________
___________________________________________
___________________________________________
___________________________________________
___________________________________________
___________________________________________
___________________________________________
___________________________________________
___________________________________________
___________________________________________
___________________________________________
___________________________________________
___________________________________________
___________________________________________
___________________________________________
___________________________________________
___________________________________________
___________________________________________
11
Recipes
All of the following recipes have been taken from the USDA’s
Complete Guide to Home Canning.
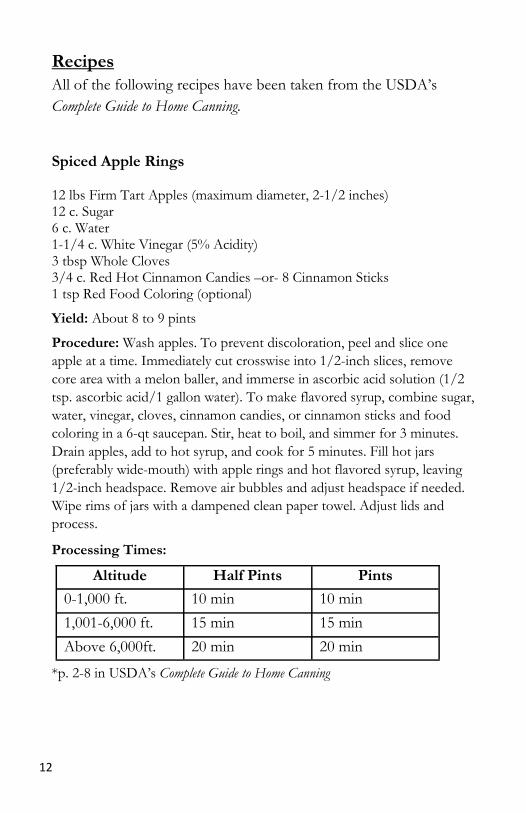
Spiced Apple Rings 12 lbs Firm Tart Apples (maximum diameter, 2-1/2 inches) 12 c. Sugar 6 c. Water 1-1/4 c. White Vinegar (5% Acidity) 3 tbsp Whole Cloves 3/4 c. Red Hot Cinnamon Candies –or- 8 Cinnamon Sticks 1 tsp Red Food Coloring (optional)
Yield: About 8 to 9 pints
Procedure: Wash apples. To prevent discoloration, peel and slice one
apple at a time. Immediately cut crosswise into 1/2-inch slices, remove
core area with a melon baller, and immerse in ascorbic acid solution (1/2
tsp. ascorbic acid/1 gallon water). To make flavored syrup, combine sugar,
water, vinegar, cloves, cinnamon candies, or cinnamon sticks and food
coloring in a 6-qt saucepan. Stir, heat to boil, and simmer for 3 minutes.
Drain apples, add to hot syrup, and cook for 5 minutes. Fill hot jars
(preferably wide-mouth) with apple rings and hot flavored syrup, leaving
1/2-inch headspace. Remove air bubbles and adjust headspace if needed.
Wipe rims of jars with a dampened clean paper towel. Adjust lids and
process.
Processing Times:
*p. 2-8 in USDA’s Complete Guide to Home Canning
Altitude Half Pints Pints
0-1,000 ft. 10 min 10 min
1,001-6,000 ft. 15 min 15 min
Above 6,000ft. 20 min 20 min
12
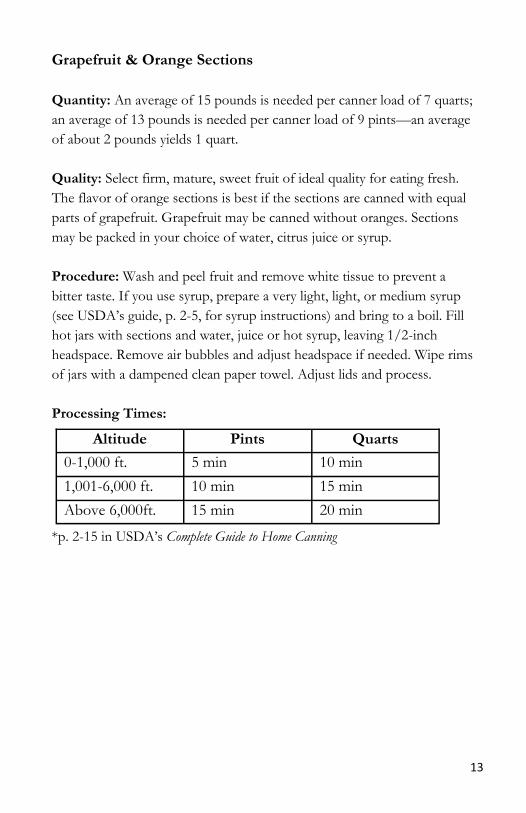
Grapefruit & Orange Sections
Quantity: An average of 15 pounds is needed per canner load of 7 quarts;
an average of 13 pounds is needed per canner load of 9 pints—an average
of about 2 pounds yields 1 quart.
Quality: Select firm, mature, sweet fruit of ideal quality for eating fresh.
The flavor of orange sections is best if the sections are canned with equal
parts of grapefruit. Grapefruit may be canned without oranges. Sections
may be packed in your choice of water, citrus juice or syrup.
Procedure: Wash and peel fruit and remove white tissue to prevent a
bitter taste. If you use syrup, prepare a very light, light, or medium syrup
(see USDA’s guide, p. 2-5, for syrup instructions) and bring to a boil. Fill
hot jars with sections and water, juice or hot syrup, leaving 1/2-inch
headspace. Remove air bubbles and adjust headspace if needed. Wipe rims
of jars with a dampened clean paper towel. Adjust lids and process.
Processing Times:
*p. 2-15 in USDA’s Complete Guide to Home Canning
Altitude Pints Quarts
0-1,000 ft. 5 min 10 min
1,001-6,000 ft. 10 min 15 min
Above 6,000ft. 15 min 20 min
13
14
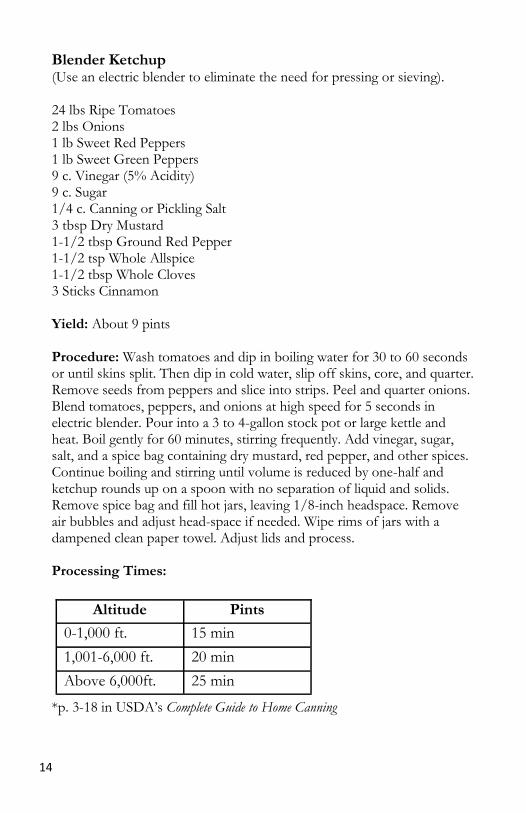
Blender Ketchup (Use an electric blender to eliminate the need for pressing or sieving). 24 lbs Ripe Tomatoes 2 lbs Onions 1 lb Sweet Red Peppers 1 lb Sweet Green Peppers 9 c. Vinegar (5% Acidity) 9 c. Sugar 1/4 c. Canning or Pickling Salt 3 tbsp Dry Mustard 1-1/2 tbsp Ground Red Pepper 1-1/2 tsp Whole Allspice 1-1/2 tbsp Whole Cloves 3 Sticks Cinnamon Yield: About 9 pints Procedure: Wash tomatoes and dip in boiling water for 30 to 60 seconds or until skins split. Then dip in cold water, slip off skins, core, and quarter. Remove seeds from peppers and slice into strips. Peel and quarter onions. Blend tomatoes, peppers, and onions at high speed for 5 seconds in electric blender. Pour into a 3 to 4-gallon stock pot or large kettle and heat. Boil gently for 60 minutes, stirring frequently. Add vinegar, sugar, salt, and a spice bag containing dry mustard, red pepper, and other spices. Continue boiling and stirring until volume is reduced by one-half and ketchup rounds up on a spoon with no separation of liquid and solids. Remove spice bag and fill hot jars, leaving 1/8-inch headspace. Remove air bubbles and adjust headspace if needed. Wipe rims of jars with a dampened clean paper towel. Adjust lids and process. Processing Times:
*p. 3-18 in USDA’s Complete Guide to Home Canning
Altitude Pints
0-1,000 ft. 15 min
1,001-6,000 ft. 20 min
Above 6,000ft. 25 min
15
Tomatillo Green Salsa
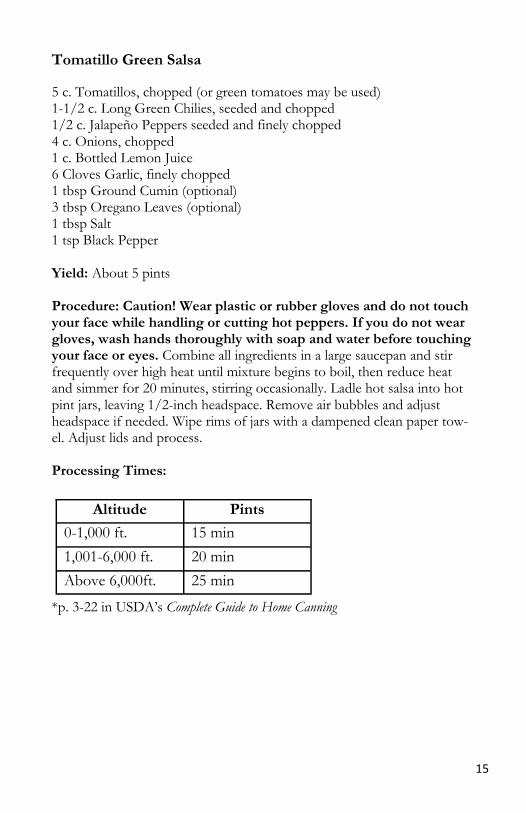
5 c. Tomatillos, chopped (or green tomatoes may be used) 1-1/2 c. Long Green Chilies, seeded and chopped 1/2 c. Jalapeño Peppers seeded and finely chopped 4 c. Onions, chopped 1 c. Bottled Lemon Juice 6 Cloves Garlic, finely chopped 1 tbsp Ground Cumin (optional) 3 tbsp Oregano Leaves (optional) 1 tbsp Salt 1 tsp Black Pepper Yield: About 5 pints Procedure: Caution! Wear plastic or rubber gloves and do not touch your face while handling or cutting hot peppers. If you do not wear gloves, wash hands thoroughly with soap and water before touching your face or eyes. Combine all ingredients in a large saucepan and stir frequently over high heat until mixture begins to boil, then reduce heat and simmer for 20 minutes, stirring occasionally. Ladle hot salsa into hot pint jars, leaving 1/2-inch headspace. Remove air bubbles and adjust headspace if needed. Wipe rims of jars with a dampened clean paper tow-el. Adjust lids and process. Processing Times:
*p. 3-22 in USDA’s Complete Guide to Home Canning
Altitude Pints
0-1,000 ft. 15 min
1,001-6,000 ft. 20 min
Above 6,000ft. 25 min

16
Pickled Beets
7 lbs of Beets, 2 to 2-1/2-inch diameter 4 c. Vinegar (5% Acidity) 1-1/2 tsp Canning or Pickling Salt 2 c. Sugar 2 c. Water 2 Cinnamon Sticks 12 Whole Cloves 4 to 6 Onions, 2 to 2-1/2-inch diameter (optional) Yield: About 8 pints Procedure: Trim off beet tops, leaving 1 inch of stem and roots to prevent bleeding of color. Wash thoroughly and sort according to size. Cover similar sizes together with boiling water and cook until tender (about 25 to 30 minutes). Caution: Drain and discard liquid. Cool beets. Trim off roots and stems and slip off skins. Slice into 1/4-inch slices. Peel and thinly slice onions. Combine vinegar, salt, sugar, and fresh water. Put spices in cheesecloth bag and add to vinegar mixture. Bring to a boil. Add beets and onions. Simmer for 5 minutes. Remove spice bag. Fill hot jars with hot beets and onions, leaving 1/2-inch headspace. Add hot vinegar solution, allowing 1/2-inch headspace. Remove air bubbles and adjust headspace if needed. Wipe rims of jars with a dampened clean paper towel. Adjust lids and process. Variation: For pickled whole baby beets, follow above directions but use beets that are 1to 1-1/2 inches in diameter. Pack whole; do not slice. Onions may be omitted. Processing Times:
*p. 6-15 in USDA’s Complete Guide to Home Canning
Altitude Pints Quarts
0-1,000 ft. 30 min 30 min
1,001-3,000 ft. 35 min 35 min
3,001-6,000 ft. 40 min 40 min
Above 6,000 ft. 45 min 45 min
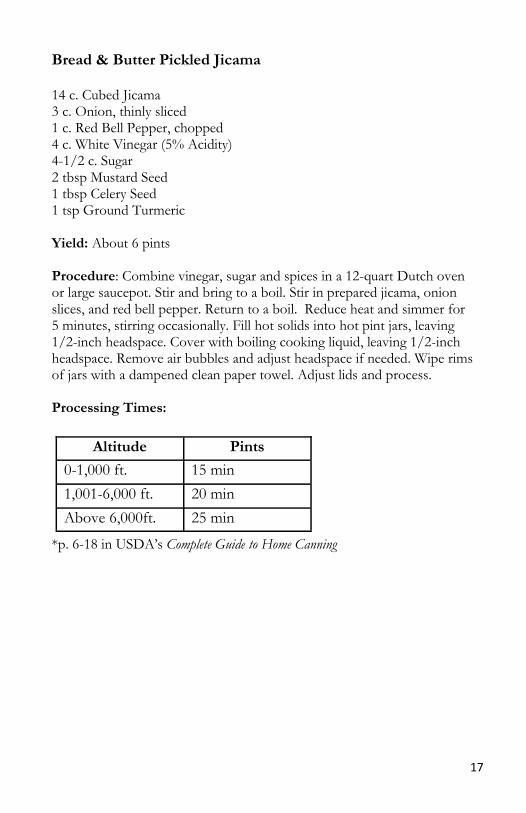
Bread & Butter Pickled Jicama 14 c. Cubed Jicama 3 c. Onion, thinly sliced 1 c. Red Bell Pepper, chopped 4 c. White Vinegar (5% Acidity) 4-1/2 c. Sugar 2 tbsp Mustard Seed 1 tbsp Celery Seed 1 tsp Ground Turmeric Yield: About 6 pints Procedure: Combine vinegar, sugar and spices in a 12-quart Dutch oven or large saucepot. Stir and bring to a boil. Stir in prepared jicama, onion slices, and red bell pepper. Return to a boil. Reduce heat and simmer for 5 minutes, stirring occasionally. Fill hot solids into hot pint jars, leaving 1/2-inch headspace. Cover with boiling cooking liquid, leaving 1/2-inch headspace. Remove air bubbles and adjust headspace if needed. Wipe rims of jars with a dampened clean paper towel. Adjust lids and process. Processing Times:
*p. 6-18 in USDA’s Complete Guide to Home Canning
Altitude Pints
0-1,000 ft. 15 min
1,001-6,000 ft. 20 min
Above 6,000ft. 25 min
17
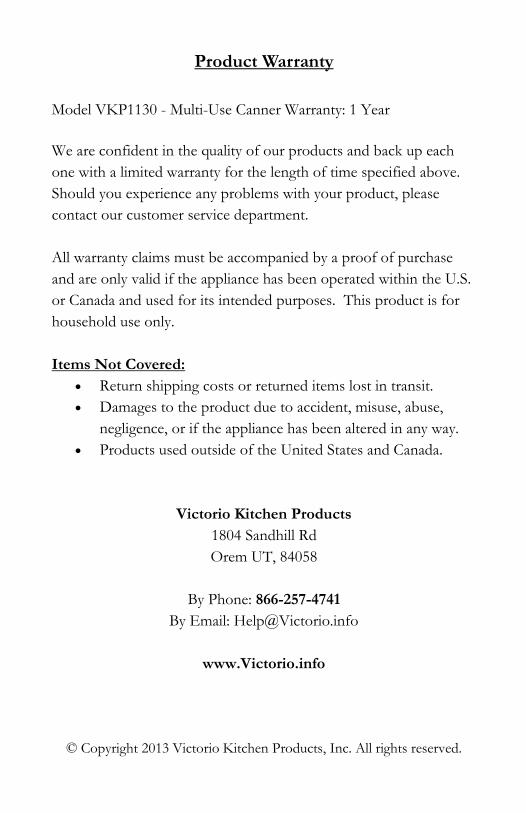
Product Warranty
Model VKP1130 - Multi-Use Canner Warranty: 1 Year
We are confident in the quality of our products and back up each
one with a limited warranty for the length of time specified above.
Should you experience any problems with your product, please
contact our customer service department.
All warranty claims must be accompanied by a proof of purchase
and are only valid if the appliance has been operated within the U.S.
or Canada and used for its intended purposes. This product is for
household use only.
Items Not Covered:
Return shipping costs or returned items lost in transit.
Damages to the product due to accident, misuse, abuse,
negligence, or if the appliance has been altered in any way.
Products used outside of the United States and Canada.
Victorio Kitchen Products
1804 Sandhill Rd
Orem UT, 84058
By Phone: 866-257-4741
By Email: [email protected]
www.Victorio.info
© Copyright 2013 Victorio Kitchen Products, Inc. All rights reserved.