Embed Size (px)
Citation preview
Straumann® SmartOne
S t a g e 3 | P r o s t h e t i c p r o c e d u r e s
Step 1Impression-taking
2
Prosthetic proceduresStep 1 | Impression-taking
Overview
Straumann® SmartOne
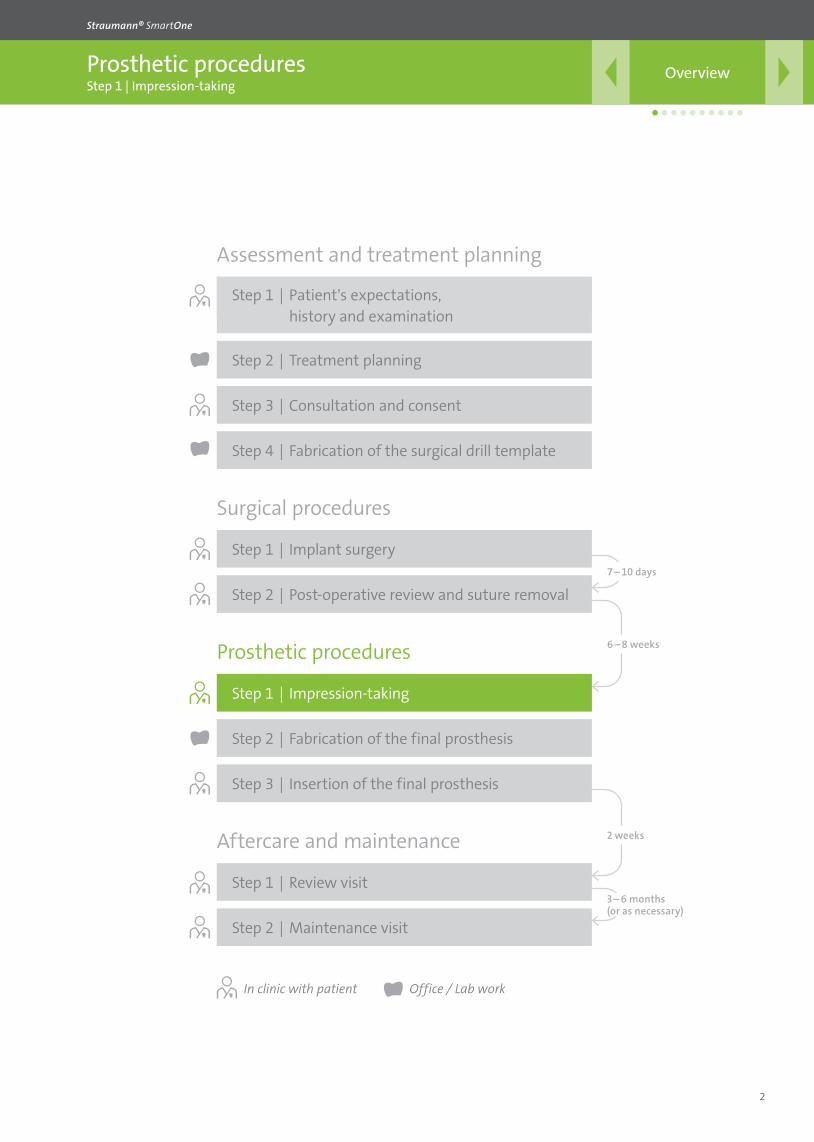
Assessment and treatment planning
Prosthetic procedures
Aftercare and maintenance
In clinic with patient Office / Lab work
Step 1 | History and examination
Surgical procedures
Step 1 | Implant surgery
Step 1 | Review visit
Step 3 | Consultation and consent
Step 2 | Fabrication of the final prosthesis
Step 2 | Treatment planning
Step 1 | Impression-taking
Step 2 | Post-operative review and suture removal
Step 2 | Maintenance visit
Step 4 | Fabrication of the surgical drill template
Step 3 | Insertion of the final prosthesis
7 – 10 days
3 – 6 months (or as necessary)
6 – 8 weeks
2 weeks
Step 1 | Patient's expectations, history and examination
3
Prosthetic proceduresStep 1 | Impression-taking
Contents
Straumann® SmartOne
Introduction 4
Learning objectives 4
1. Assessment 5
2. Clinical examination 6
3. Treatment 73.1 Impression-taking with the SP (RN) Implant – open tray 103.2 Impression-taking with the SP (RN) Implant – closed tray 183.3 Impression-taking with the BLT (RC) Implant – open tray 263.4 Impression-taking with the BLT (RC) Implant – closed tray 33
Contents
4
Prosthetic proceduresStep 1 | Impression-taking
Introduction
Straumann® SmartOne
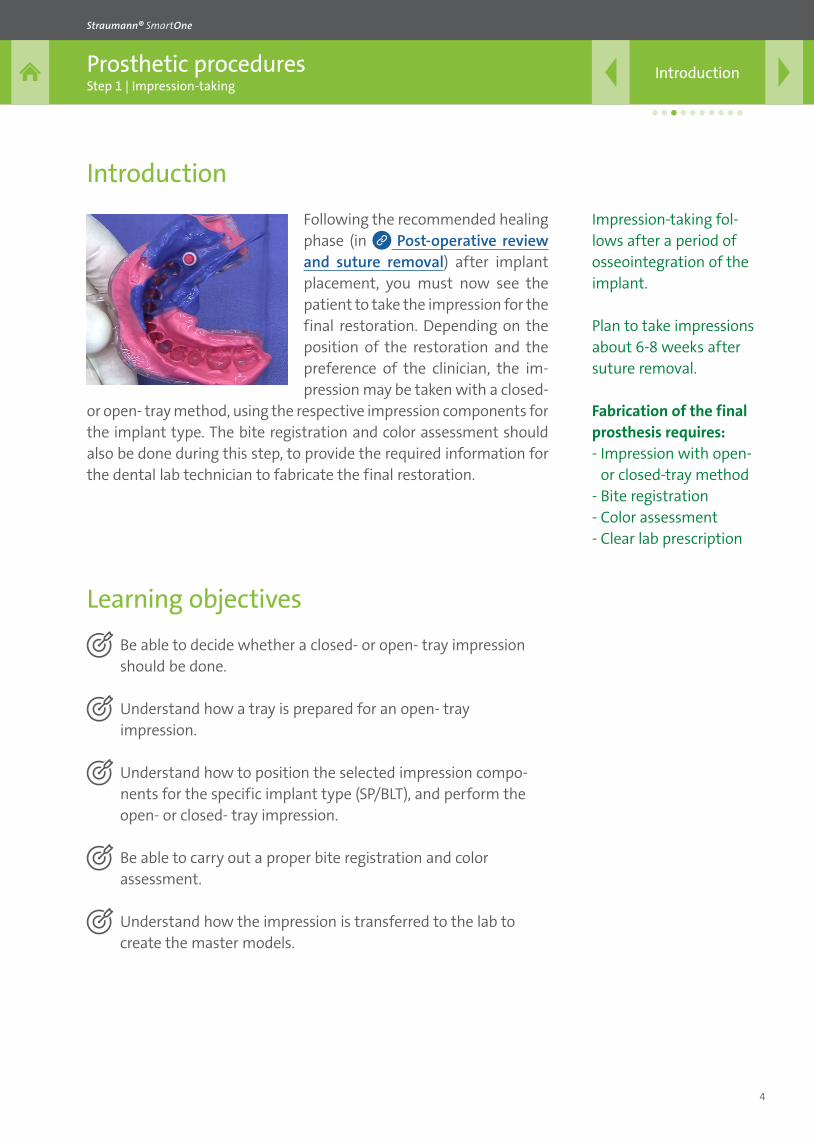
IntroductionFollowing the recommended healing phase (in Post-operative review and suture removal) after implant place ment, you must now see the patient to take the impression for the final restoration. Depending on the position of the restoration and the preference of the clinician, the im-pression may be taken with a closed-
or open- tray method, using the respective impression components for the implant type. The bite registration and color assessment should also be done during this step, to provide the required information for the dental lab technician to fabricate the final restoration.
Learning objectives Be able to decide whether a closed- or open- tray impression should be done.
Understand how a tray is prepared for an open- tray impression.
Understand how to position the selected impression compo-nents for the specific implant type (SP/BLT), and perform the open- or closed- tray impression.
Be able to carry out a proper bite registration and color assessment.
Understand how the impression is transferred to the lab to create the master models.
Impression-taking fol-lows after a period of osseointegration of the implant.
Plan to take impressions about 6-8 weeks after suture removal.
Fabrication of the final prosthesis requires:- Impression with open-
or closed-tray method - Bite registration- Color assessment- Clear lab prescription
5
Prosthetic proceduresStep 1 | Impression-taking
1. Assessment
Straumann® SmartOne
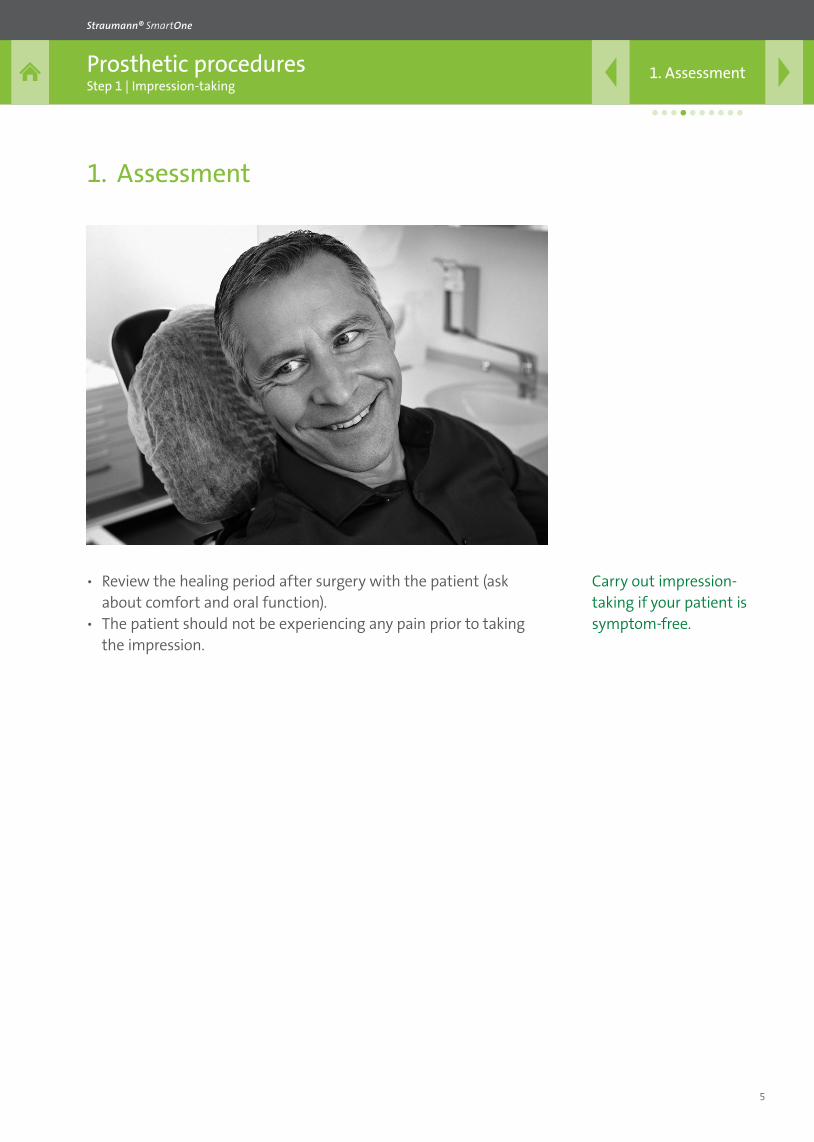
1. Assessment
ѹ Review the healing period after surgery with the patient (ask about comfort and oral function).
ѹ The patient should not be experiencing any pain prior to taking the impression.
Carry out impression- taking if your patient is symptom-free.
6
Prosthetic proceduresStep 1 | Impression-taking
2. Clinical examination
Straumann® SmartOne
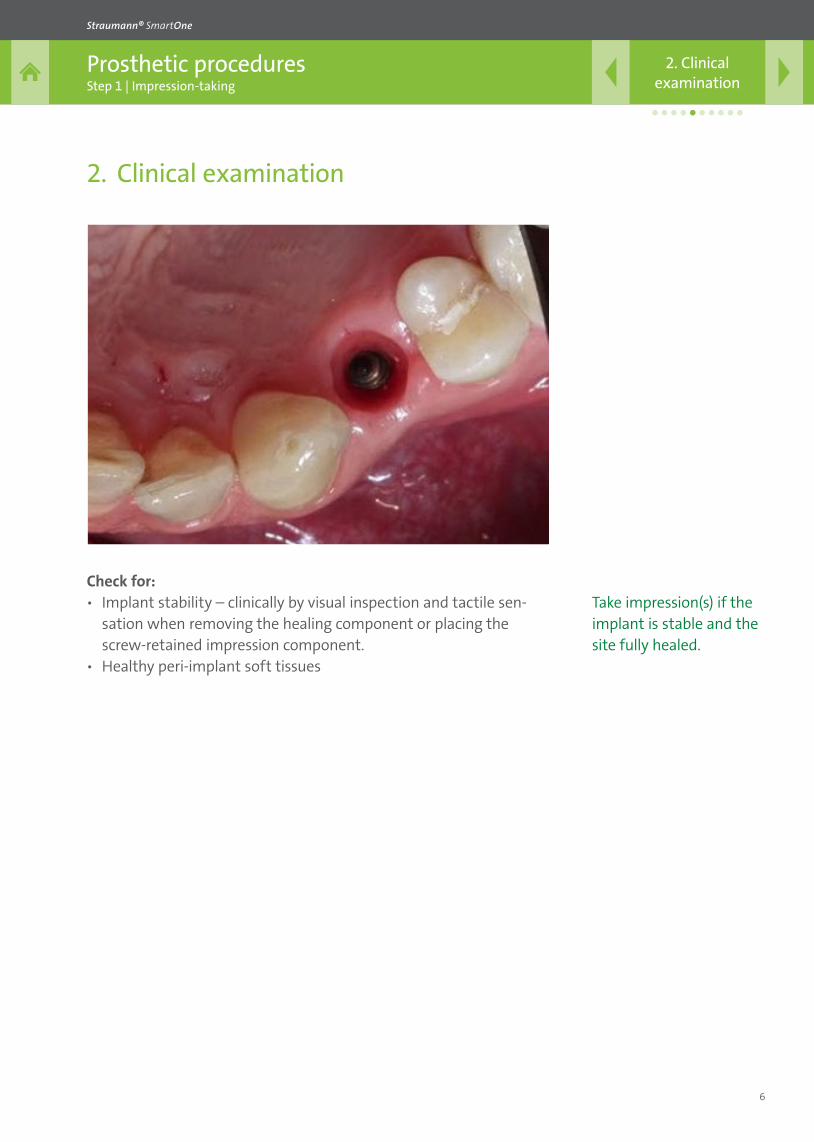
2. Clinical examination
Check for: ѹ Implant stability – clinically by visual inspection and tactile sen-
sation when removing the healing component or placing the screw-retained impression component.
ѹ Healthy peri-implant soft tissues
Take impression(s) if the implant is stable and the site fully healed.
7
Prosthetic proceduresStep 1 | Impression-taking
3. Treatment
Straumann® SmartOne
3. Treatment ѹ Carry out impression-taking with
either the open- or closed-tray for the implant type SP or BLT.
ѹ Perform a bite registration and color assessment for the required final restoration.
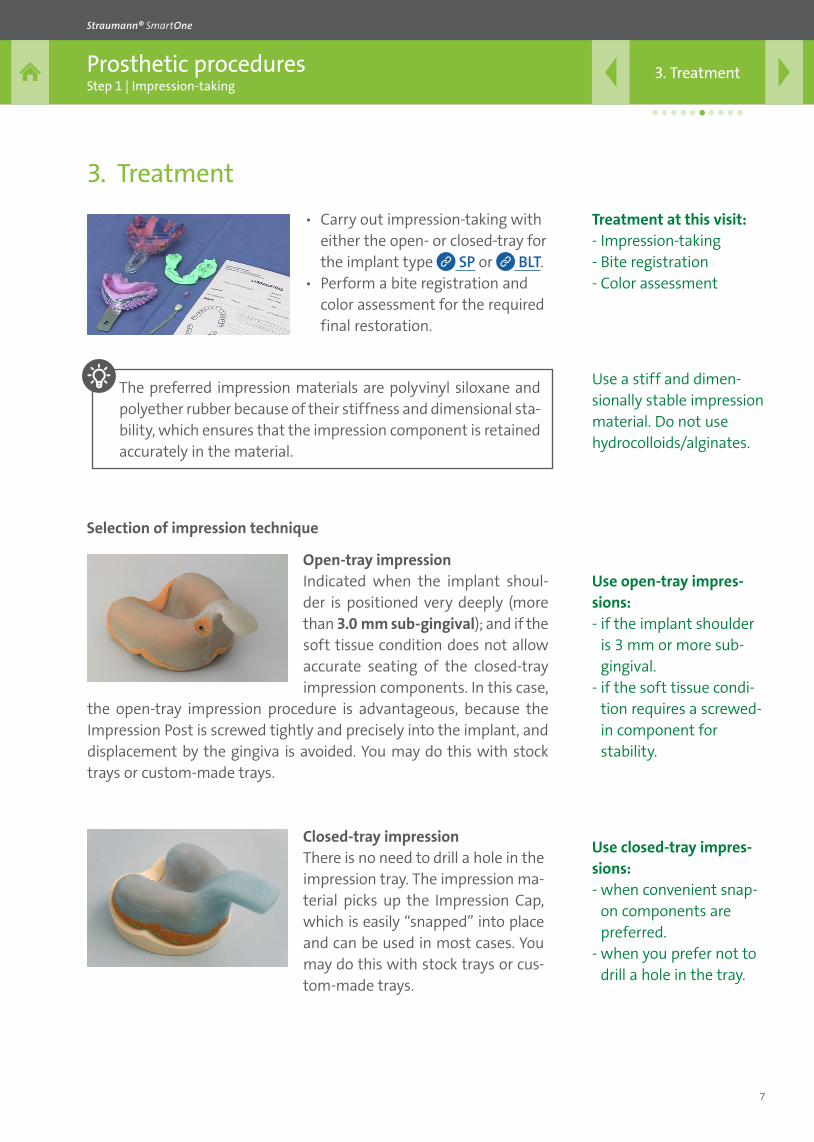
Selection of impression technique
Open-tray impressionIndicated when the implant shoul-der is positioned very deeply (more than 3.0 mm sub-gingival); and if the soft tissue condition does not allow accurate seating of the closed-tray impression components. In this case,
the open-tray impression procedure is advantageous, because the Impression Post is screwed tightly and precisely into the implant, and displacement by the gingiva is avoided. You may do this with stock trays or custom-made trays.
Closed-tray impressionThere is no need to drill a hole in the impression tray. The impression ma-terial picks up the Impression Cap, which is easily “snapped” into place and can be used in most cases. You may do this with stock trays or cus-tom-made trays.
• The preferred impression materials are polyvinyl siloxane and polyether rubber because of their stiffness and dimensional sta-bility, which ensures that the impression component is retained accurately in the material.
Treatment at this visit:- Impression-taking- Bite registration- Color assessment
Use a stiff and dimen-sionally stable impression material. Do not use hydrocolloids/alginates.
Use open-tray impres-sions:- if the implant shoulder
is 3 mm or more sub- gingival.
- if the soft tissue condi-tion requires a screwed-in component for stability.
Use closed-tray impres-sions:- when convenient snap-
on components are preferred.
- when you prefer not to drill a hole in the tray.
8
Prosthetic proceduresStep 1 | Impression-taking
3. Treatment
Straumann® SmartOne
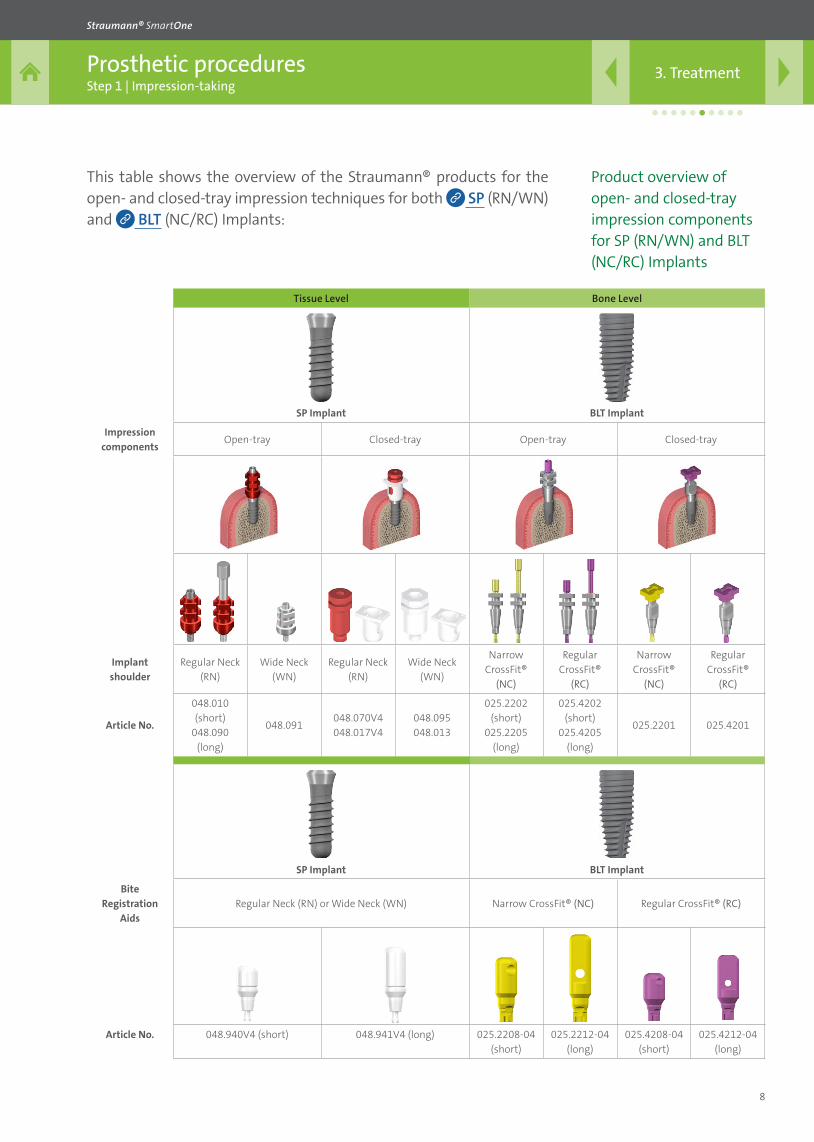
This table shows the overview of the Straumann® products for the open- and closed-tray impression techniques for both SP (RN/WN) and BLT (NC/RC) Implants:
Tissue Level Bone Level
SP Implant BLT Implant
Impression components
Open-tray Closed-tray Open-tray Closed-tray
Implant shoulder
Regular Neck (RN)
Wide Neck (WN)
Regular Neck (RN)
Wide Neck (WN)
Narrow CrossFit®
(NC)
Regular CrossFit®
(RC)
Narrow CrossFit®
(NC)
Regular CrossFit®
(RC)
Article No.
048.010 (short)
048.090 (long)
048.091048.070V4048.017V4
048.095 048.013
025.2202(short)
025.2205(long)
025.4202 (short)
025.4205 (long)
025.2201 025.4201
SP Implant BLT Implant
Bite Registration
AidsRegular Neck (RN) or Wide Neck (WN) Narrow CrossFit® (NC) Regular CrossFit® (RC)
Article No. 048.940V4 (short) 048.941V4 (long) 025.2208-04 (short)
025.2212-04 (long)
025.4208-04 (short)
025.4212-04 (long)
Product overview of open- and closed-tray impression components for SP (RN/WN) and BLT (NC/RC) Implants
9
Prosthetic proceduresStep 1 | Impression-taking
3. Treatment
Straumann® SmartOne
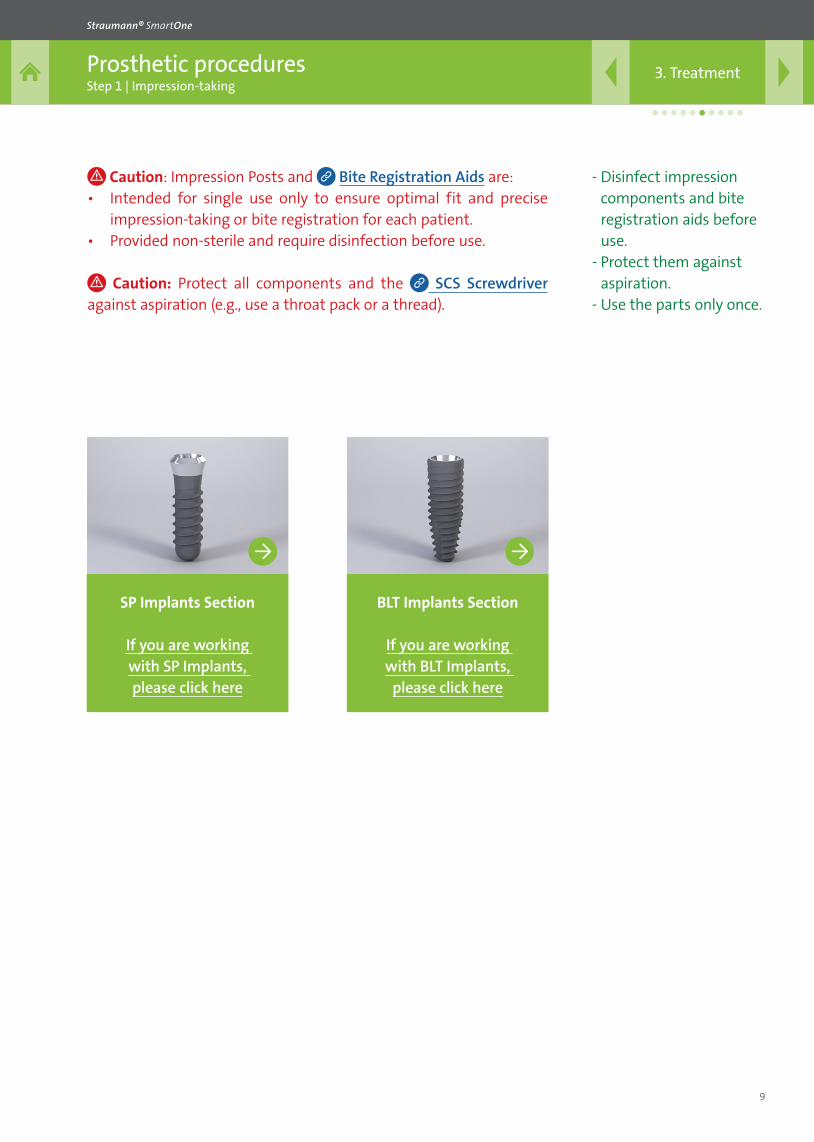
Caution: Impression Posts and Bite Registration Aids are: • Intended for single use only to ensure optimal fit and precise
impression-taking or bite registration for each patient. • Provided non-sterile and require disinfection before use.
Caution: Protect all components and the SCS Screwdriver against aspiration (e.g., use a throat pack or a thread).
BLT Implants Section
If you are working with BLT Implants,
please click here
SP Implants Section
If you are working with SP Implants, please click here
- Disinfect impression components and bite registration aids before use.
- Protect them against aspiration.
- Use the parts only once.
10
Prosthetic proceduresStep 1 | Impression-taking
Open-tray impressions with SP (RN) Implants
Straumann® SmartOne
3.1 Impression-taking with the SP (RN) Implant – open tray
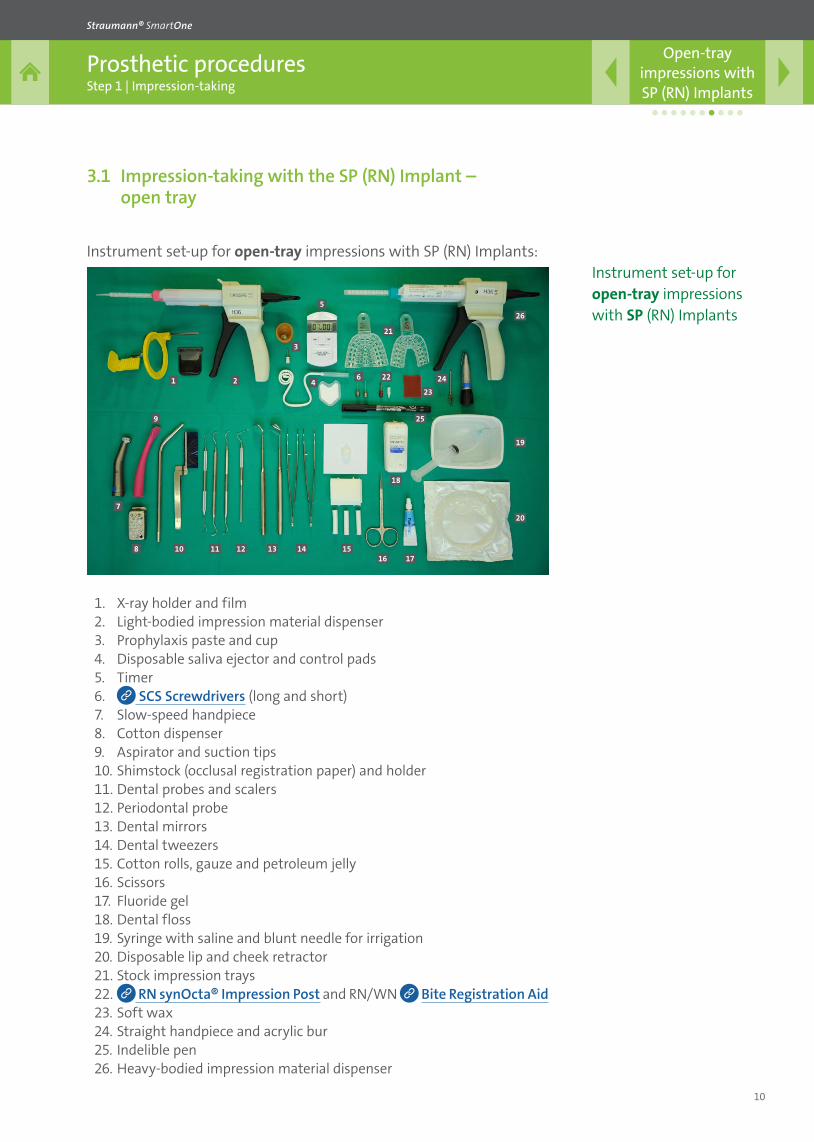
Instrument set-up for open-tray impressions with SP (RN) Implants:
1. X-ray holder and film 2. Light-bodied impression material dispenser3. Prophylaxis paste and cup4. Disposable saliva ejector and control pads5. Timer6. SCS Screwdrivers (long and short) 7. Slow-speed handpiece8. Cotton dispenser9. Aspirator and suction tips10. Shimstock (occlusal registration paper) and holder11. Dental probes and scalers12. Periodontal probe13. Dental mirrors14. Dental tweezers15. Cotton rolls, gauze and petroleum jelly16. Scissors17. Fluoride gel18. Dental floss19. Syringe with saline and blunt needle for irrigation20. Disposable lip and cheek retractor21. Stock impression trays22. RN synOcta® Impression Post and RN/WN Bite Registration Aid23. Soft wax24. Straight handpiece and acrylic bur25. Indelible pen26. Heavy-bodied impression material dispenser
Instrument set-up for open-tray impressions with SP (RN) Implants
1 2
3
4
5
6
7
8
9
10 11 12 13 14 1516 17
18
22
23
24
25
21
20
19
26
11
Prosthetic proceduresStep 1 | Impression-taking
Open-tray impressions with SP (RN) Implants
Straumann® SmartOne
Step-by-step instructions for open-tray impressions with SP (RN) Implants
Please click here for a quick reference checklist for this procedure.
Video: Open-tray impression-taking with the Standard Plus (RN) Implant
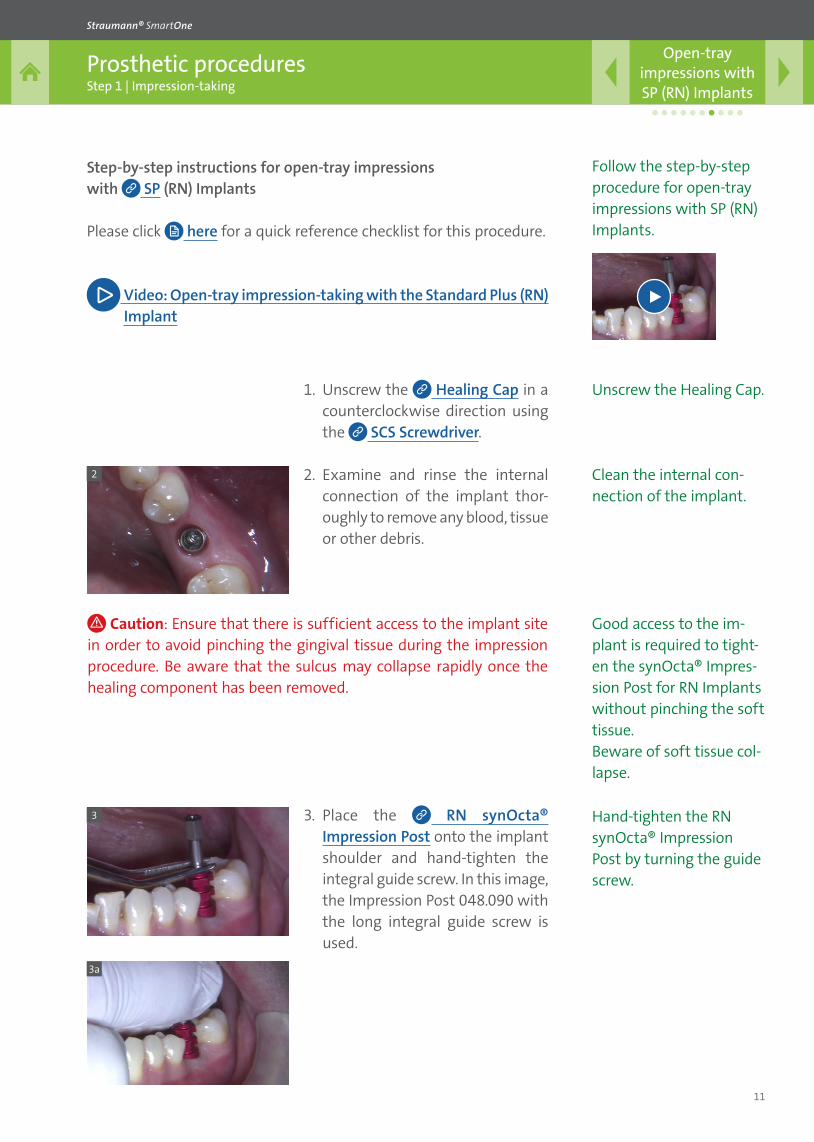
1. Unscrew the Healing Cap in a counterclockwise direction using the SCS Screwdriver.
3. Place the RN synOcta® Impression Post onto the implant shoulder and hand-tighten the integral guide screw. In this image, the Impression Post 048.090 with the long integral guide screw is used.
2. Examine and rinse the internal connection of the implant thor-oughly to remove any blood, tissue or other debris.
2
3
3a
Caution: Ensure that there is sufficient access to the implant site in order to avoid pinching the gingival tissue during the impression procedure. Be aware that the sulcus may collapse rapidly once the healing component has been removed.
Follow the step-by-step procedure for open-tray impressions with SP (RN) Implants.
Unscrew the Healing Cap.
Clean the internal con-nection of the implant.
Good access to the im-plant is required to tight-en the synOcta® Impres-sion Post for RN Implants without pinching the soft tissue. Beware of soft tissue col-lapse.
Hand-tighten the RN synOcta® Impression Post by turning the guide screw.
12
Prosthetic proceduresStep 1 | Impression-taking
Open-tray impressions with SP (RN) Implants
Straumann® SmartOne
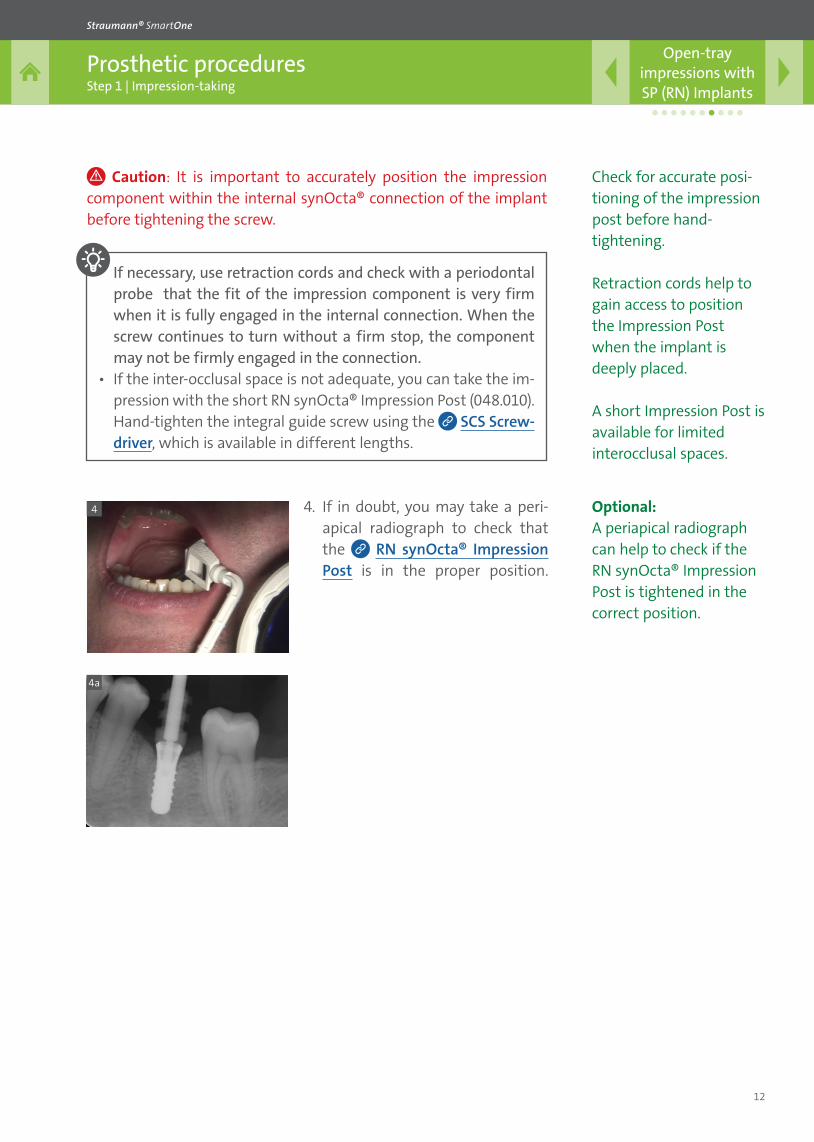
4. If in doubt, you may take a peri-apical radiograph to check that the RN synOcta® Impression Post is in the proper position.
4
4a
Caution: It is important to accurately position the impression component within the internal synOcta® connection of the implant before tightening the screw.
If necessary, use retraction cords and check with a periodontal probe that the fit of the impression component is very firm when it is fully engaged in the internal connection. When the screw continues to turn without a firm stop, the component may not be firmly engaged in the connection.
• If the inter-occlusal space is not adequate, you can take the im-pression with the short RN synOcta® Impression Post (048.010). Hand-tighten the integral guide screw using the SCS Screw-driver, which is available in different lengths.
Check for accurate posi-tioning of the impression post before hand- tightening.
Retraction cords help to gain access to position the Impression Post when the implant is deeply placed.
A short Impression Post is available for limited interocclusal spaces.
Optional: A periapical radiograph can help to check if the RN synOcta® Impression Post is tightened in the correct position.

13
Prosthetic proceduresStep 1 | Impression-taking
Open-tray impressions with SP (RN) Implants
Straumann® SmartOne
6. Cover the tray opening with den-tal wax applied from the inner side. When taking the impression this wax will occlude the head of the screw in order to allow retrievability of the screw by the
SCS Screwdriver.
7. Apply a light-bodied elasto-meric impression material (e.g., light-bodied polyvinyl siloxane or polyether rubber) around the
RN synOcta® Impression Post.
6
7
7a
5 5. Customize the prefabricated tray provided by the dental lab, or a standard plastic tray at the chair-side by cutting out a window over the area of the implant to al-low clearance for the impression component. A minimum window size of 1.5 cm by 1.5 cm is recom-mended.
Try the impression tray in the patient’s mouth to check that the impression component and its integral guide screw can protrude through the tray.
Caution: Due to its low tensile strength, hydrocolloid is not suitable for this impression.
Cut a 1.5 cm x 1.5 cm window in the tray.
Try-in the modified tray before taking the impression.
Cover the window with dental wax before taking the impression to block the head of the screw for retrievability.
Apply a light-bodied im-pression material around the Impression Post.
Load the tray with heavy-bodied impression material and seat over the area.
Do not use hydrocolloids/alginates.
Mean while, load the impression tray with heavy-bodied impres-sion material and seat it directly in the mouth over the area with the light-bodied impression material.
14
Prosthetic proceduresStep 1 | Impression-taking
Open-tray impressions with SP (RN) Implants
Straumann® SmartOne
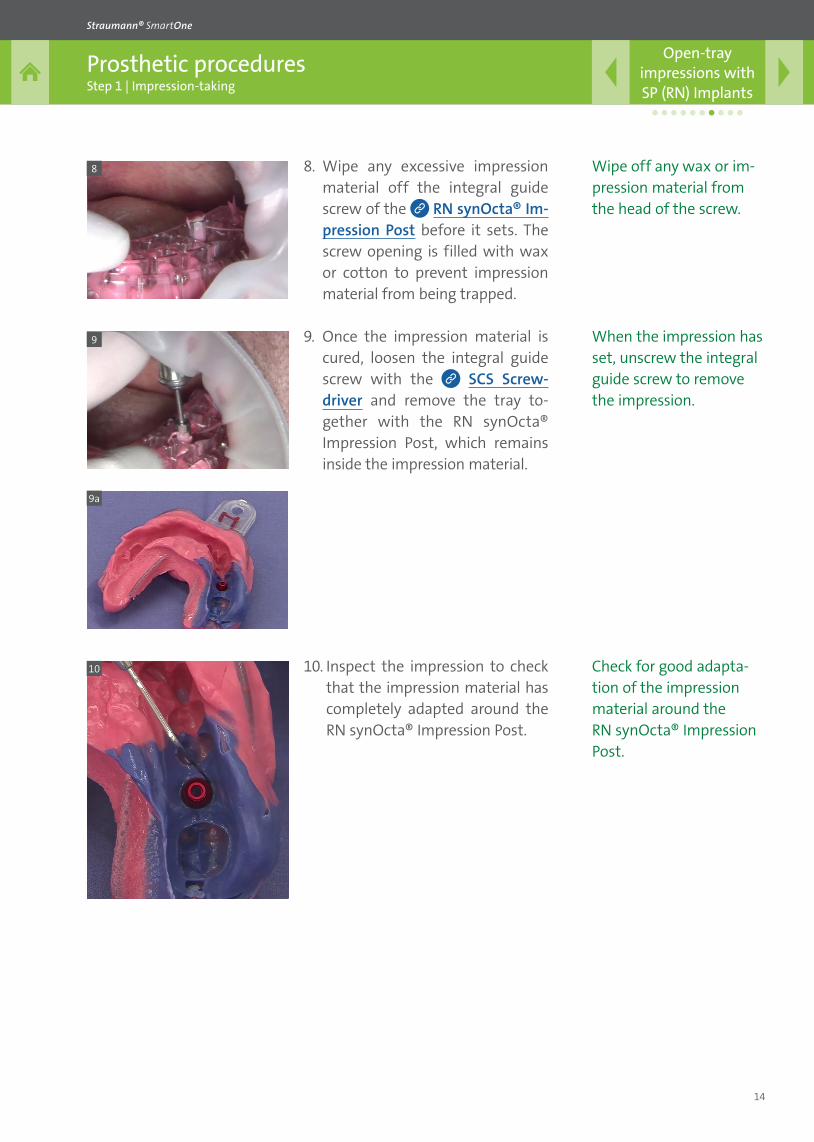
9. Once the impression material is cured, loosen the integral guide screw with the SCS Screw-driver and remove the tray to-gether with the RN synOcta® Impression Post, which remains inside the impression material.
10. Inspect the impression to check that the impression material has completely adapted around the RN synOcta® Impression Post.
9
9a
10
8. Wipe any excessive impression material off the integral guide screw of the RN synOcta® Im-pression Post before it sets. The screw opening is filled with wax or cotton to prevent impression material from being trapped.
8 Wipe off any wax or im-pression material from the head of the screw.
When the impression has set, unscrew the integral guide screw to remove the impression.
Check for good adapta-tion of the impression material around the RN synOcta® Impression Post.
15
Prosthetic proceduresStep 1 | Impression-taking
Open-tray impressions with SP (RN) Implants
Straumann® SmartOne
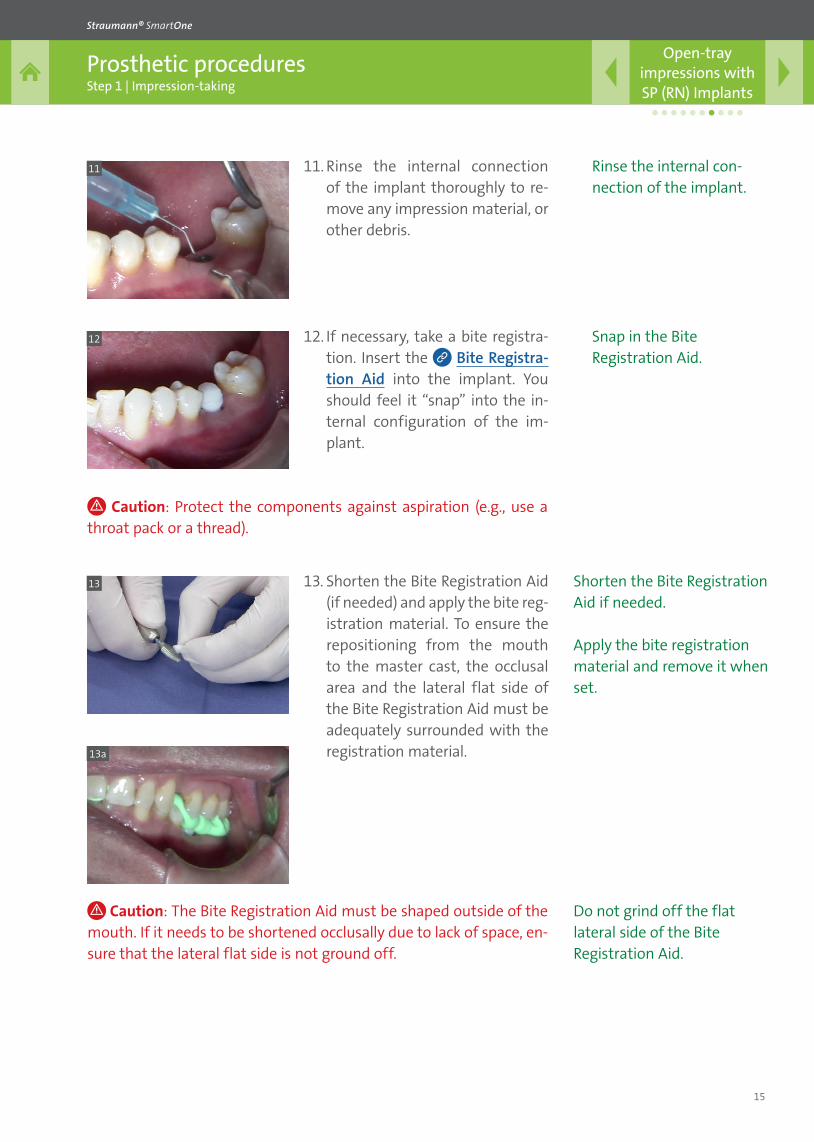
13. Shorten the Bite Registration Aid (if needed) and apply the bite reg-istration material. To ensure the repositioning from the mouth to the master cast, the occlusal area and the lateral flat side of the Bite Registration Aid must be adequately surrounded with the registration material.
13
13a
12. If necessary, take a bite registra-tion. Insert the Bite Registra-tion Aid into the implant. You should feel it “snap” into the in-ternal configuration of the im-plant.
12
11. Rinse the internal connection of the implant thoroughly to re-move any impression material, or other debris.
11
Caution: Protect the components against aspiration (e.g., use a throat pack or a thread).
Caution: The Bite Registration Aid must be shaped outside of the mouth. If it needs to be shortened occlusally due to lack of space, en-sure that the lateral flat side is not ground off.
Rinse the internal con-nection of the implant.
Snap in the Bite Registration Aid.
Shorten the Bite Registration Aid if needed.
Apply the bite registration material and remove it when set.
Do not grind off the flat lateral side of the Bite Registration Aid.
16
Prosthetic proceduresStep 1 | Impression-taking
Open-tray impressions with SP (RN) Implants
Straumann® SmartOne
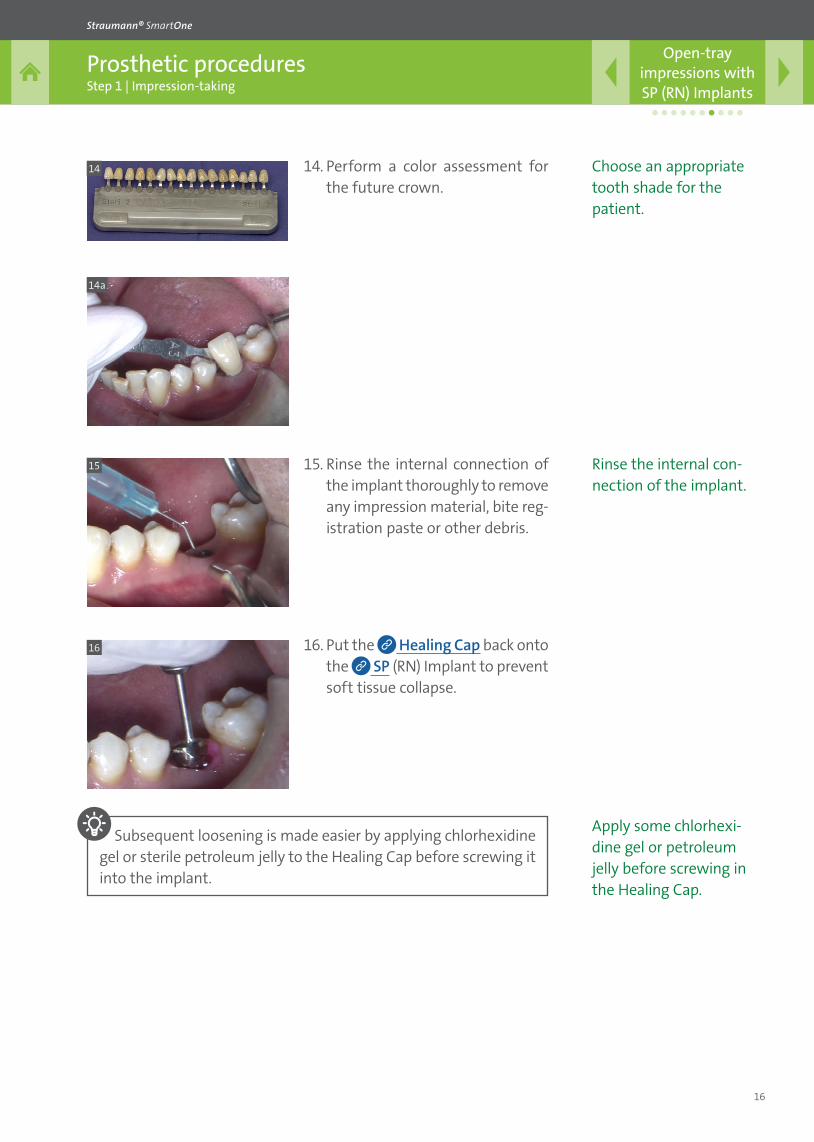
16 16. Put the Healing Cap back onto the SP (RN) Implant to prevent soft tissue collapse.
15 15. Rinse the internal connection of the implant thoroughly to remove any impression material, bite reg-istration paste or other debris.
14a
14. Perform a color assessment for the future crown.
14
Subsequent loosening is made easier by applying chlorhexidine gel or sterile petroleum jelly to the Healing Cap before screwing it into the implant.
Choose an appropriate tooth shade for the patient.
Rinse the internal con-nection of the implant.
Apply some chlorhexi-dine gel or petroleum jelly before screwing in the Healing Cap.
17
Prosthetic proceduresStep 1 | Impression-taking
Open-tray impressions with SP (RN) Implants
Straumann® SmartOne
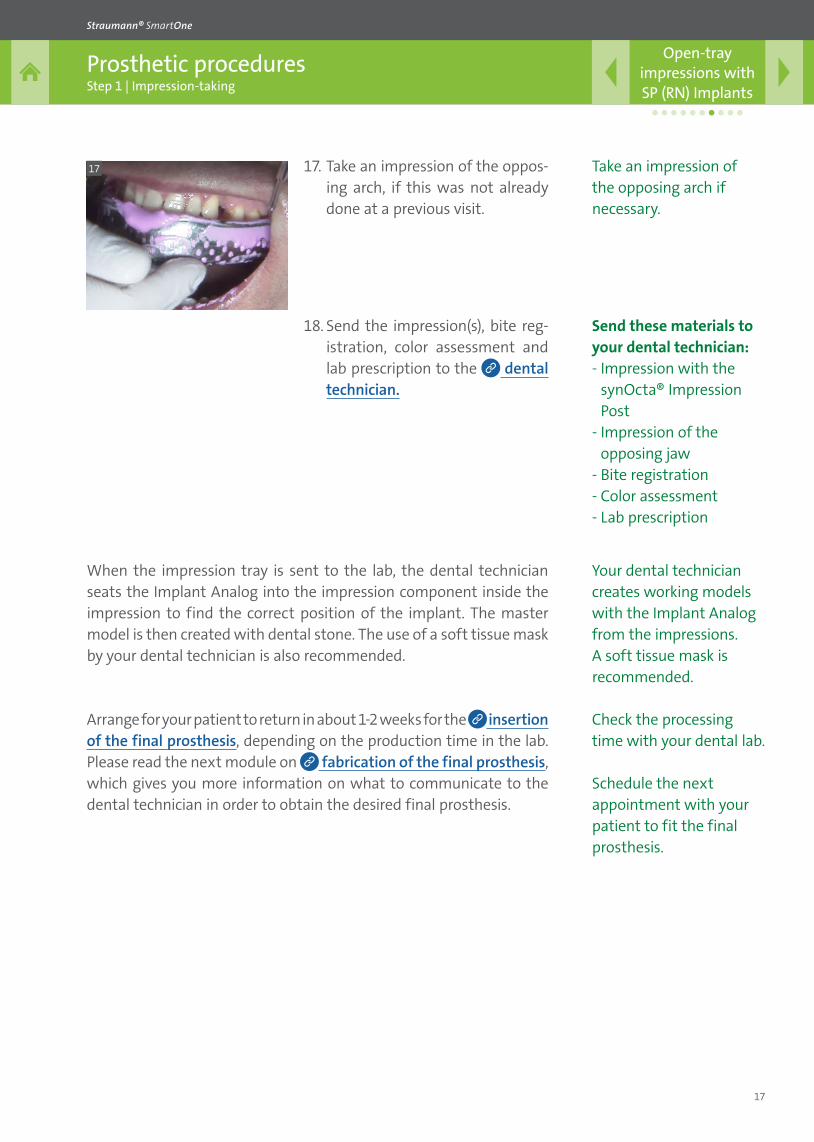
18. Send the impression(s), bite reg-istration, color assessment and lab prescription to the dental technician.
17 17. Take an impression of the oppos-ing arch, if this was not already done at a previous visit.
Take an impression of the opposing arch if necessary.
Send these materials to your dental technician: - Impression with the
synOcta® Impression Post
- Impression of the opposing jaw
- Bite registration- Color assessment- Lab prescription
Your dental technician creates working models with the Implant Analog from the impressions. A soft tissue mask is recommended.
Check the processing time with your dental lab.
Schedule the next appointment with your patient to fit the final prosthesis.
When the impression tray is sent to the lab, the dental technician seats the Implant Analog into the impression component inside the impression to find the correct position of the implant. The master model is then created with dental stone. The use of a soft tissue mask by your dental technician is also recommended.
Arrange for your patient to return in about 1-2 weeks for the insertion of the final prosthesis, depending on the production time in the lab. Please read the next module on fabrication of the final prosthesis, which gives you more information on what to communicate to the dental technician in order to obtain the desired final prosthesis.
18
Prosthetic proceduresStep 1 | Impression-taking
Closed-tray impressions with SP (RN) Implants
Straumann® SmartOne
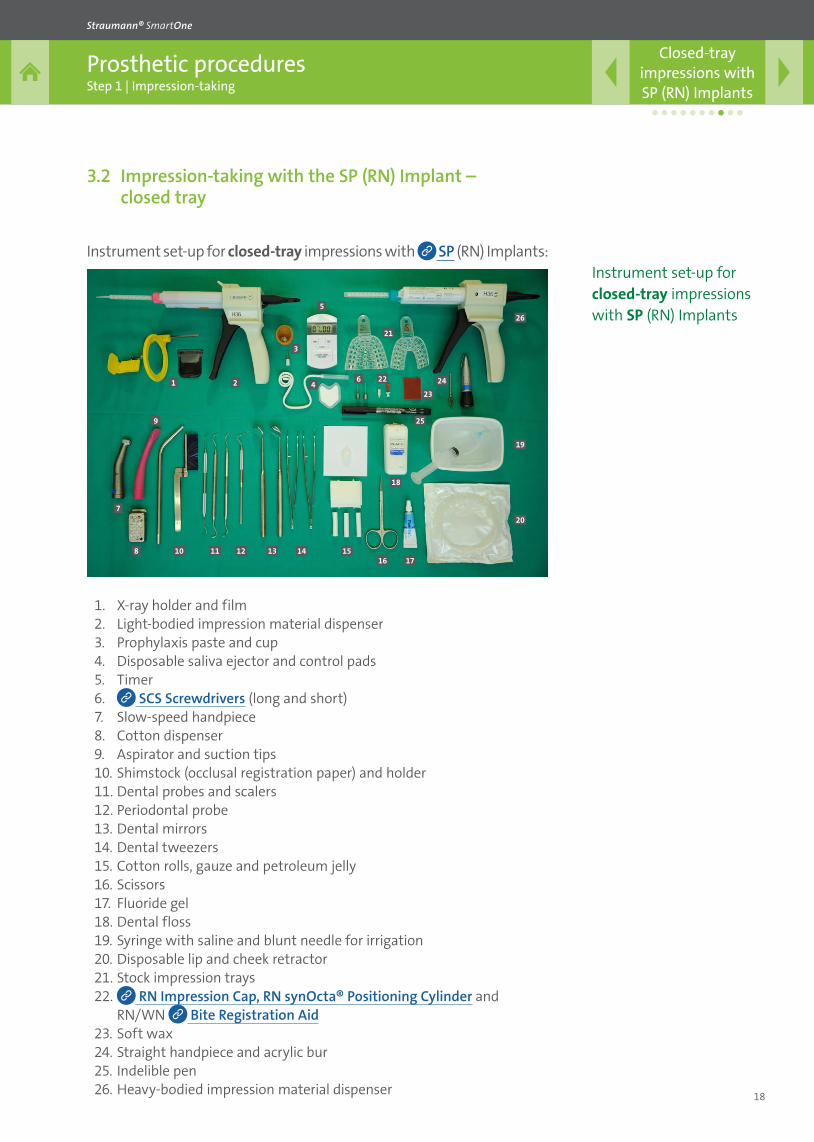
3.2 Impression-taking with the SP (RN) Implant – closed tray
Instrument set-up for closed-tray impressions with SP (RN) Implants:
1. X-ray holder and film 2. Light-bodied impression material dispenser3. Prophylaxis paste and cup4. Disposable saliva ejector and control pads5. Timer6. SCS Screwdrivers (long and short) 7. Slow-speed handpiece8. Cotton dispenser9. Aspirator and suction tips10. Shimstock (occlusal registration paper) and holder11. Dental probes and scalers12. Periodontal probe13. Dental mirrors14. Dental tweezers15. Cotton rolls, gauze and petroleum jelly16. Scissors17. Fluoride gel18. Dental floss19. Syringe with saline and blunt needle for irrigation20. Disposable lip and cheek retractor21. Stock impression trays22. RN Impression Cap, RN synOcta® Positioning Cylinder and
RN/WN Bite Registration Aid23. Soft wax24. Straight handpiece and acrylic bur25. Indelible pen26. Heavy-bodied impression material dispenser
Instrument set-up for closed-tray impressions with SP (RN) Implants
1 2
3
4
5
6
7
8
9
10 11 12 13 14 1516 17
18
22
23
24
25
21
20
19
26
19
Prosthetic proceduresStep 1 | Impression-taking
Closed-tray impressions with SP (RN) Implants
Straumann® SmartOne
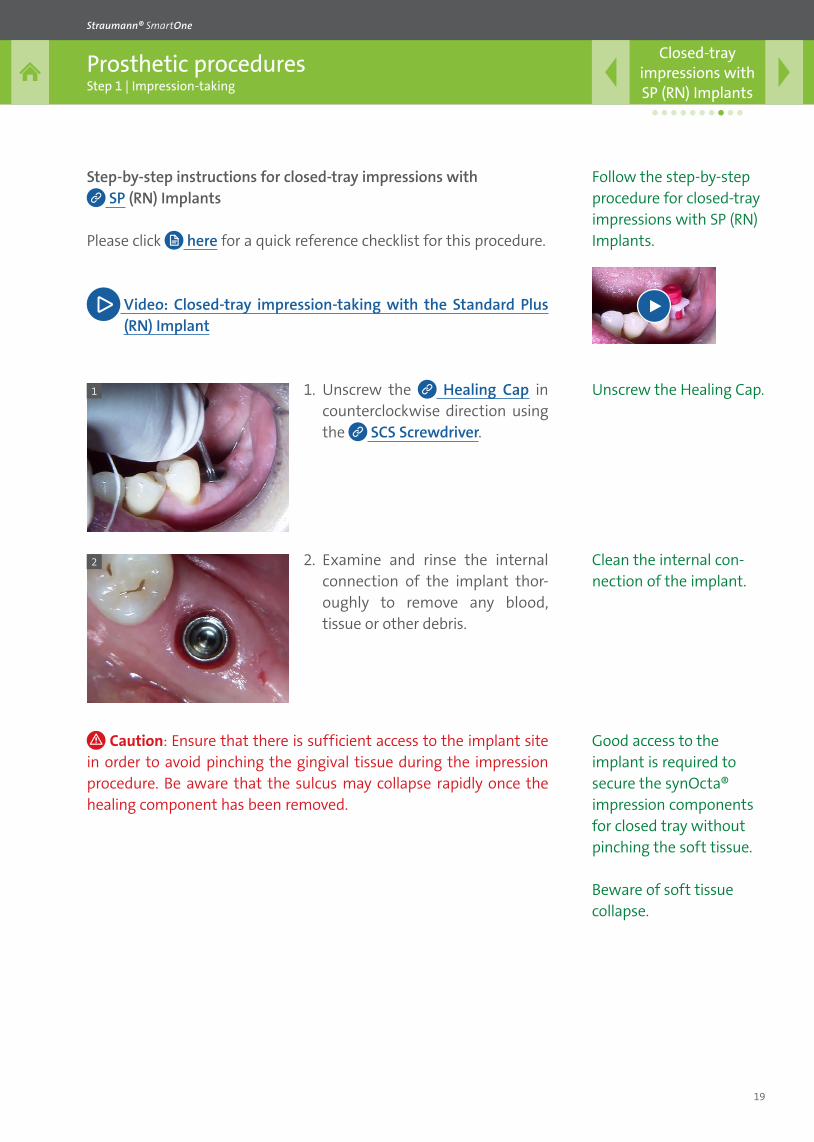
Step-by-step instructions for closed-tray impressions with SP (RN) Implants
Please click here for a quick reference checklist for this procedure.
Video: Closed-tray impression-taking with the Standard Plus (RN) Implant
1. Unscrew the Healing Cap in counterclockwise direction using the SCS Screwdriver.
1
2 2. Examine and rinse the internal connection of the implant thor-oughly to remove any blood, tissue or other debris.
Caution: Ensure that there is sufficient access to the implant site in order to avoid pinching the gingival tissue during the impression procedure. Be aware that the sulcus may collapse rapidly once the healing component has been removed.
Follow the step-by-step procedure for closed-tray impressions with SP (RN) Implants.
Unscrew the Healing Cap.
Clean the internal con-nection of the implant.
Good access to the implant is required to secure the synOcta® impression components for closed tray without pinching the soft tissue.
Beware of soft tissue collapse.
20
Prosthetic proceduresStep 1 | Impression-taking
Closed-tray impressions with SP (RN) Implants
Straumann® SmartOne
3
3a
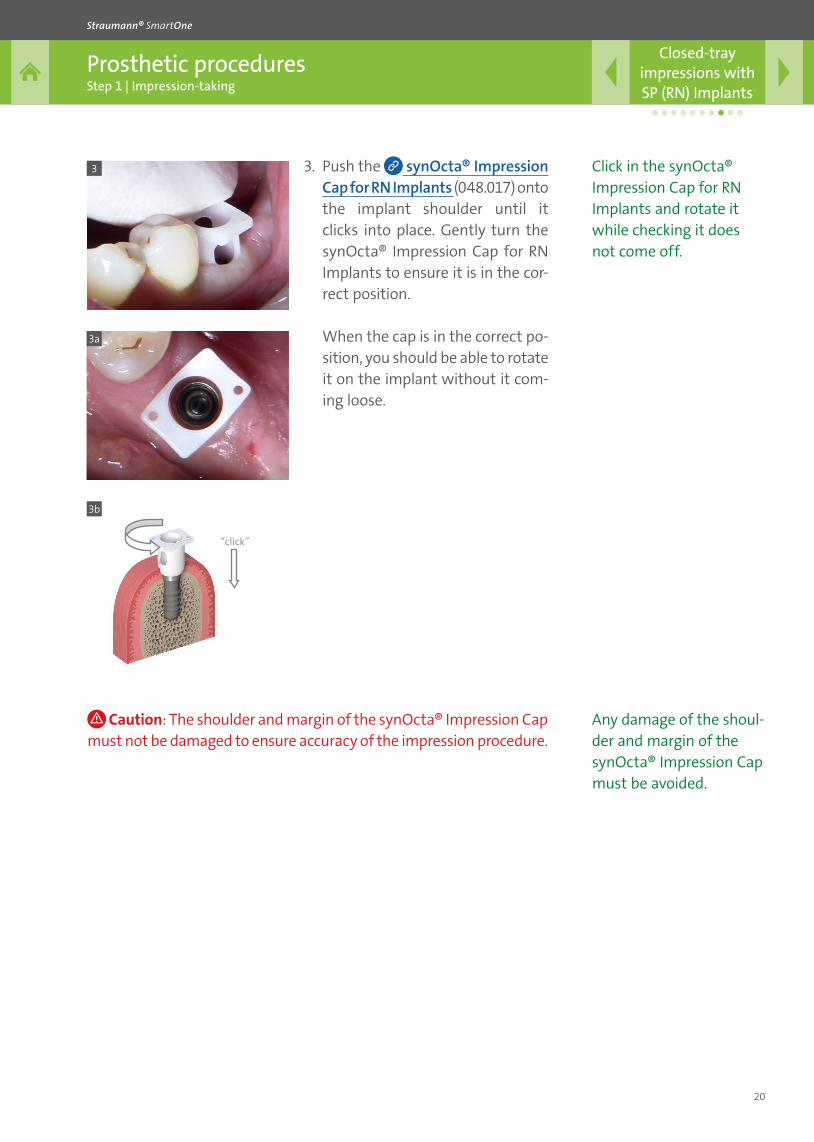
3. Push the synOcta® Impression Cap for RN Implants (048.017) onto the implant shoulder until it clicks into place. Gently turn the synOcta® Impression Cap for RN Implants to ensure it is in the cor-rect position.
When the cap is in the correct po-sition, you should be able to rotate it on the implant without it com-ing loose.
3b
Caution: The shoulder and margin of the synOcta® Impression Cap must not be damaged to ensure accuracy of the impression procedure.
Click in the synOcta® Impression Cap for RN Implants and rotate it while checking it does not come off.
Any damage of the shoul-der and margin of the synOcta® Impression Cap must be avoided.
“click”
21
Prosthetic proceduresStep 1 | Impression-taking
Closed-tray impressions with SP (RN) Implants
Straumann® SmartOne
4
4a
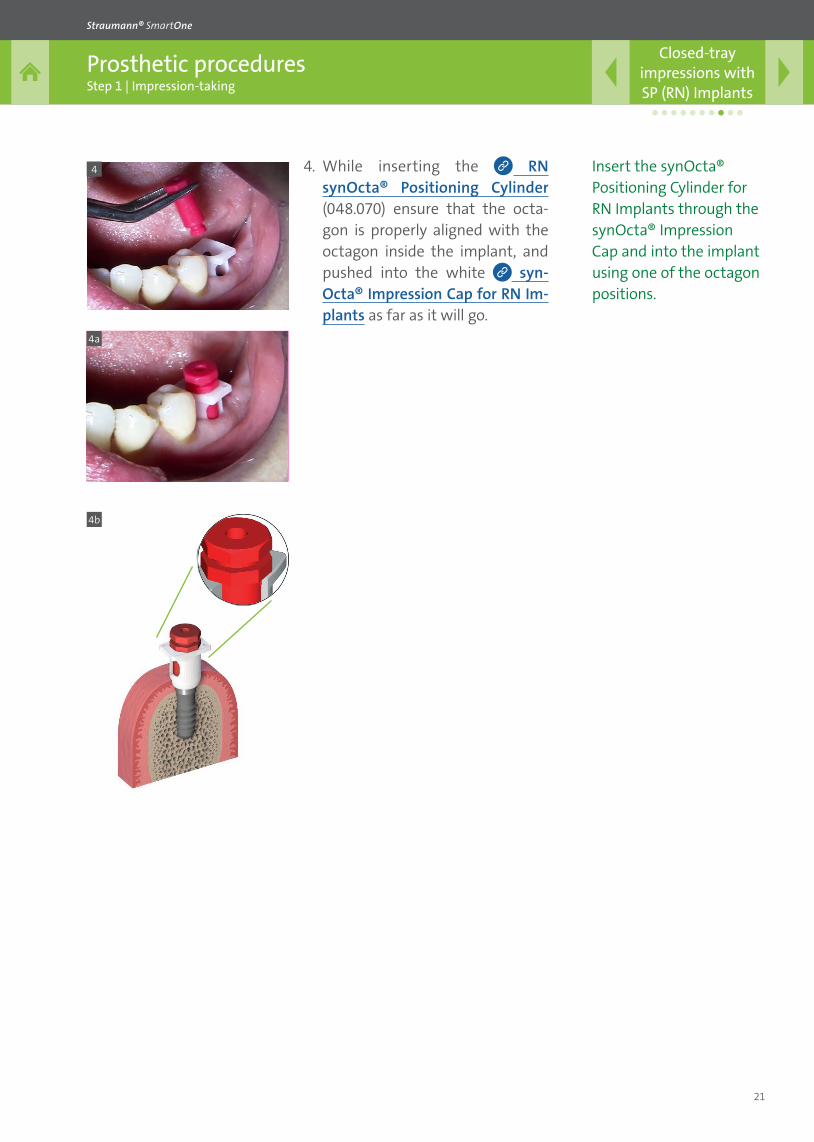
4. While inserting the RN synOcta® Positioning Cylinder (048.070) ensure that the octa-gon is properly aligned with the octagon inside the implant, and pushed into the white syn-Octa® Impression Cap for RN Im-plants as far as it will go.
4b
Insert the synOcta® Positioning Cylinder for RN Implants through the synOcta® Impression Cap and into the implant using one of the octagon positions.
22
Prosthetic proceduresStep 1 | Impression-taking
Closed-tray impressions with SP (RN) Implants
Straumann® SmartOne
5
6a
6
7
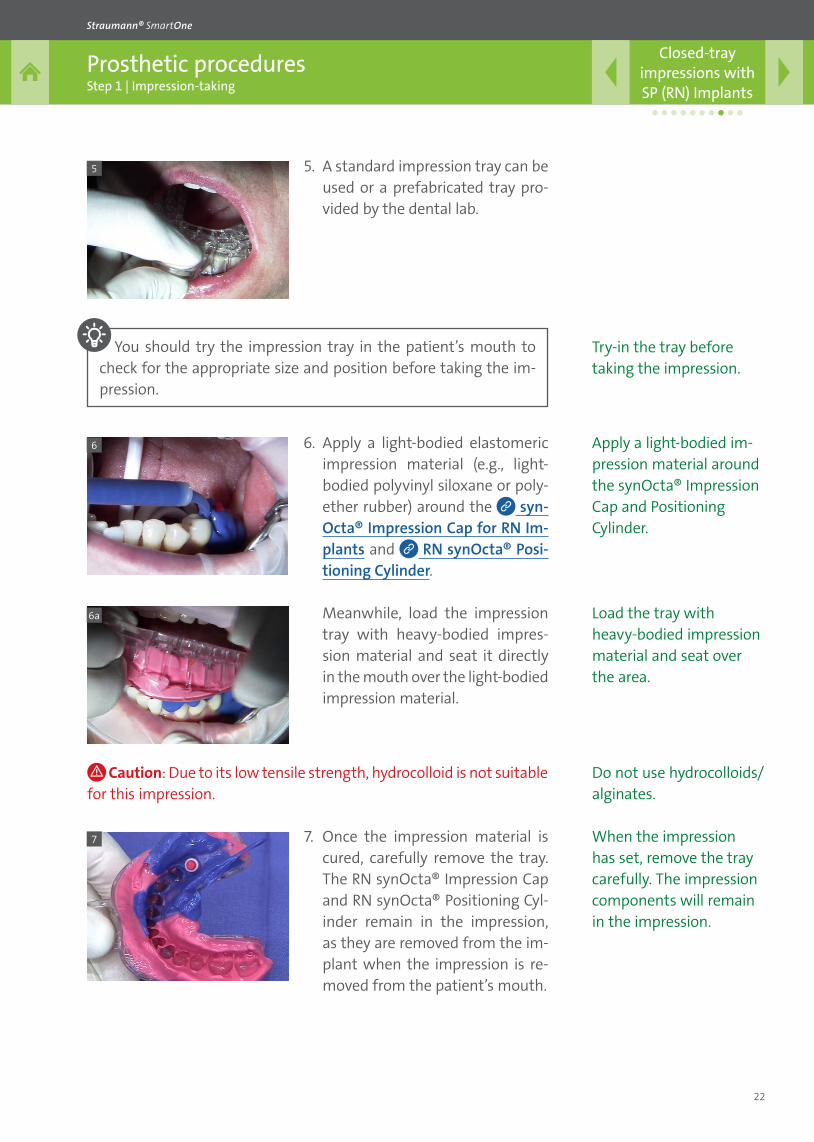
5. A standard impression tray can be used or a prefabricated tray pro-vided by the dental lab.
6. Apply a light-bodied elastomeric impression material (e.g., light- bodied polyvinyl siloxane or poly-ether rubber) around the syn-Octa® Impression Cap for RN Im-plants and RN synOcta® Posi-tioning Cylinder.
Mean while, load the impression tray with heavy-bodied impres-sion material and seat it directly in the mouth over the light-bodied impression material.
7. Once the impression material is cured, carefully remove the tray. The RN synOcta® Impression Cap and RN synOcta® Positioning Cyl-inder remain in the impression, as they are removed from the im-plant when the impression is re-moved from the patient’s mouth.
Caution: Due to its low tensile strength, hydrocolloid is not suitable for this impression.
You should try the impression tray in the patient’s mouth to check for the appropriate size and position before taking the im-pression.
Try-in the tray before taking the impression.
Apply a light-bodied im-pression material around the synOcta® Impression Cap and Positioning Cylinder.
Load the tray with heavy-bodied impression material and seat over the area.
Do not use hydrocolloids/alginates.
When the impression has set, remove the tray carefully. The impression components will remain in the impression.
23
Prosthetic proceduresStep 1 | Impression-taking
Closed-tray impressions with SP (RN) Implants
Straumann® SmartOne
8
9
10
11a
11
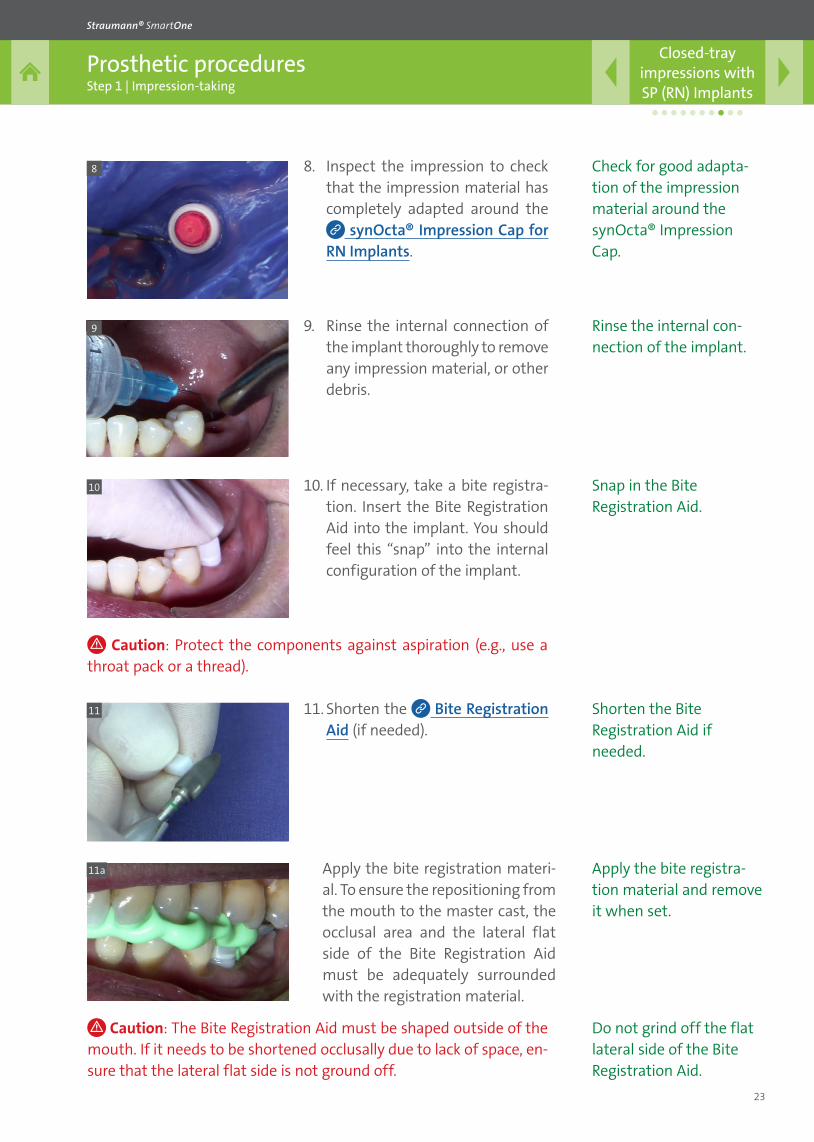
8. Inspect the impression to check that the impression material has completely adapted around the
synOcta® Impression Cap for RN Implants.
9. Rinse the internal connection of the implant thoroughly to remove any impression material, or other debris.
10. If necessary, take a bite registra-tion. Insert the Bite Registration Aid into the implant. You should feel this “snap” into the internal configuration of the implant.
11. Shorten the Bite Registration Aid (if needed).
Caution: Protect the components against aspiration (e.g., use a throat pack or a thread).
Check for good adapta-tion of the impression material around the synOcta® Impression Cap.
Rinse the internal con-nection of the implant.
Snap in the Bite Registration Aid.
Shorten the Bite Registration Aid if needed.
Apply the bite registra-tion material and remove it when set.
Apply the bite registration materi-al. To ensure the repositioning from the mouth to the master cast, the occlusal area and the lateral flat side of the Bite Registration Aid must be adequately surrounded with the registration material.
Caution: The Bite Registration Aid must be shaped outside of the mouth. If it needs to be shortened occlusally due to lack of space, en-sure that the lateral flat side is not ground off.
Do not grind off the flat lateral side of the Bite Registration Aid.
24
Prosthetic proceduresStep 1 | Impression-taking
Closed-tray impressions with SP (RN) Implants
Straumann® SmartOne
13
14
12a
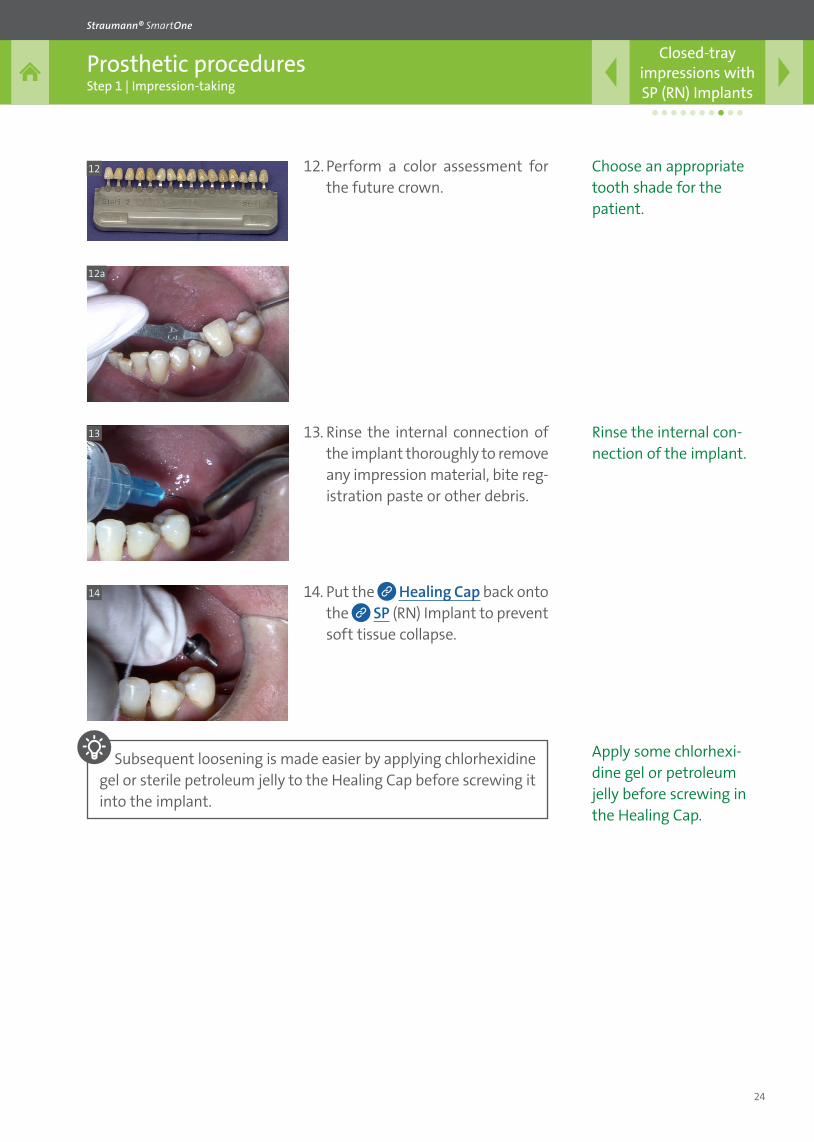
12. Perform a color assessment for the future crown.
13. Rinse the internal connection of the implant thoroughly to remove any impression material, bite reg-istration paste or other debris.
14. Put the Healing Cap back onto the SP (RN) Implant to prevent soft tissue collapse.
12
Subsequent loosening is made easier by applying chlorhexidine gel or sterile petroleum jelly to the Healing Cap before screwing it into the implant.
Choose an appropriate tooth shade for the patient.
Rinse the internal con-nection of the implant.
Apply some chlorhexi-dine gel or petroleum jelly before screwing in the Healing Cap.
25
Prosthetic proceduresStep 1 | Impression-taking
Closed-tray impressions with SP (RN) Implants
Straumann® SmartOne
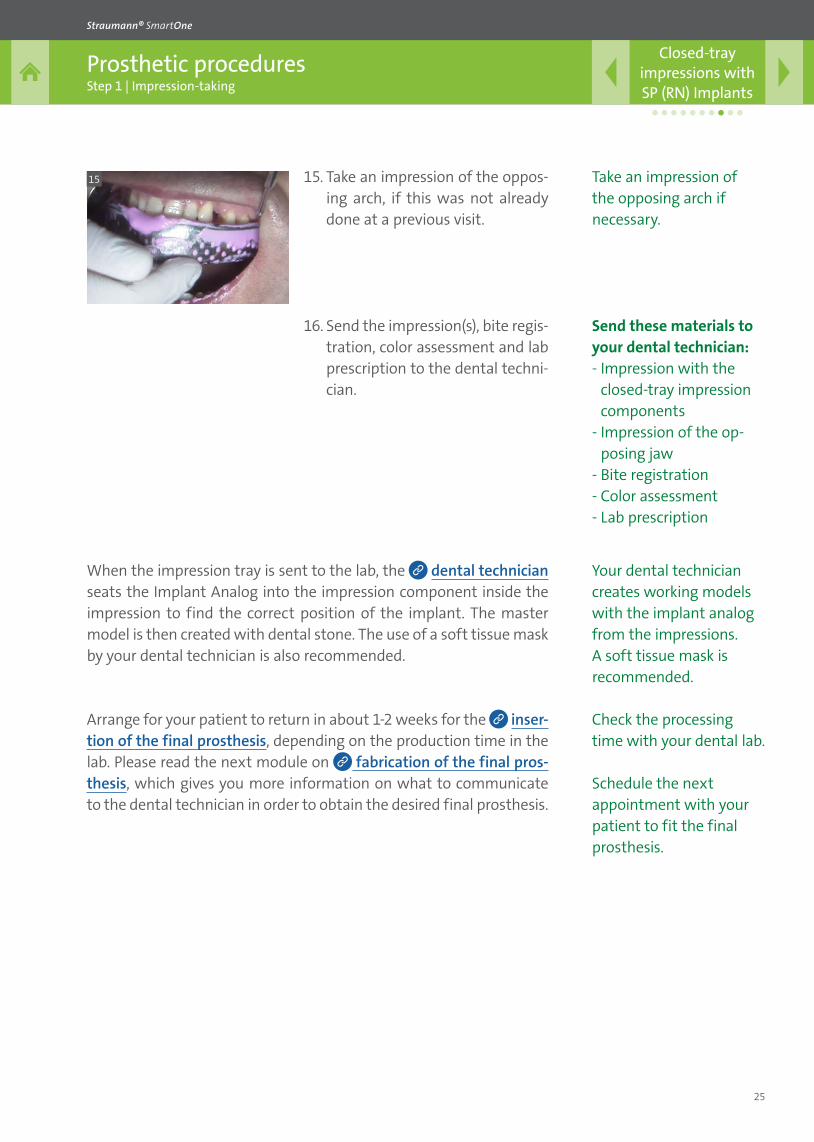
16. Send the impression(s), bite regis-tration, color assessment and lab prescription to the dental techni-cian.
15 15. Take an impression of the oppos-ing arch, if this was not already done at a previous visit.
Take an impression of the opposing arch if necessary.
Send these materials to your dental technician: - Impression with the
closed-tray impression components
- Impression of the op-posing jaw
- Bite registration- Color assessment- Lab prescription
Your dental technician creates working models with the implant analog from the impressions. A soft tissue mask is recommended.
Check the processing time with your dental lab.
Schedule the next appointment with your patient to fit the final prosthesis.
When the impression tray is sent to the lab, the dental technician seats the Implant Analog into the impression component inside the impression to find the correct position of the implant. The master model is then created with dental stone. The use of a soft tissue mask by your dental technician is also recommended.
Arrange for your patient to return in about 1-2 weeks for the inser-tion of the final prosthesis, depending on the production time in the lab. Please read the next module on fabrication of the final pros-thesis, which gives you more information on what to communicate to the dental technician in order to obtain the desired final prosthesis.
26
Prosthetic proceduresStep 1 | Impression-taking
Open-tray impressions with BLT (RC) Implants
Straumann® SmartOne
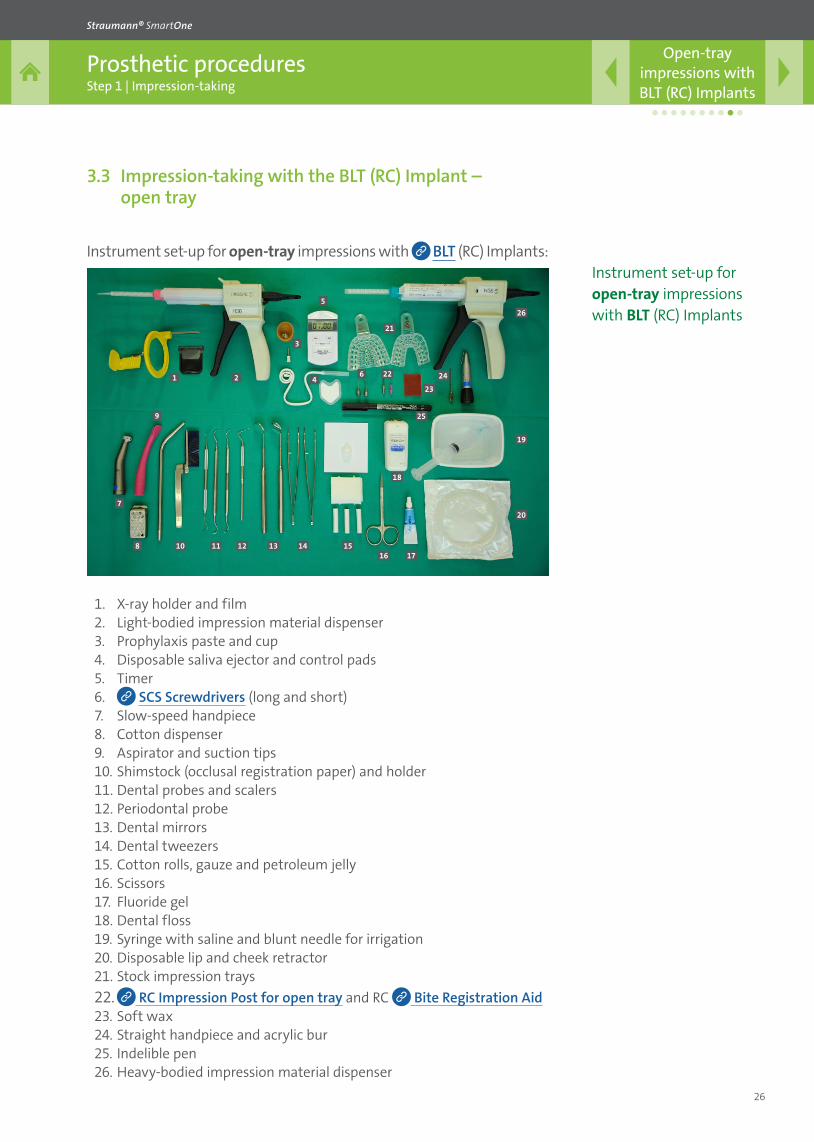
3.3 Impression-taking with the BLT (RC) Implant – open tray
Instrument set-up for open-tray impressions with BLT (RC) Implants:
1. X-ray holder and film 2. Light-bodied impression material dispenser3. Prophylaxis paste and cup4. Disposable saliva ejector and control pads5. Timer6. SCS Screwdrivers (long and short) 7. Slow-speed handpiece8. Cotton dispenser9. Aspirator and suction tips10. Shimstock (occlusal registration paper) and holder 11. Dental probes and scalers12. Periodontal probe13. Dental mirrors14. Dental tweezers15. Cotton rolls, gauze and petroleum jelly16. Scissors17. Fluoride gel18. Dental floss19. Syringe with saline and blunt needle for irrigation20. Disposable lip and cheek retractor21. Stock impression trays22. RC Impression Post for open tray and RC Bite Registration Aid23. Soft wax24. Straight handpiece and acrylic bur25. Indelible pen26. Heavy-bodied impression material dispenser
Instrument set-up for open-tray impressions with BLT (RC) Implants
1 2
3
4
5
6
7
8
9
10 11 12 13 14 1516 17
18
22
23
24
25
21
20
19
26
27
Prosthetic proceduresStep 1 | Impression-taking
Open-tray impressions with BLT (RC) Implants
Straumann® SmartOne
Step-by-step instructions for open-tray impressions with BLT (RC) Implants
Please click here for a quick reference checklist for this procedure.
Video: Open-tray impression-taking with the Bone Level Ta-pered (RC) Implant
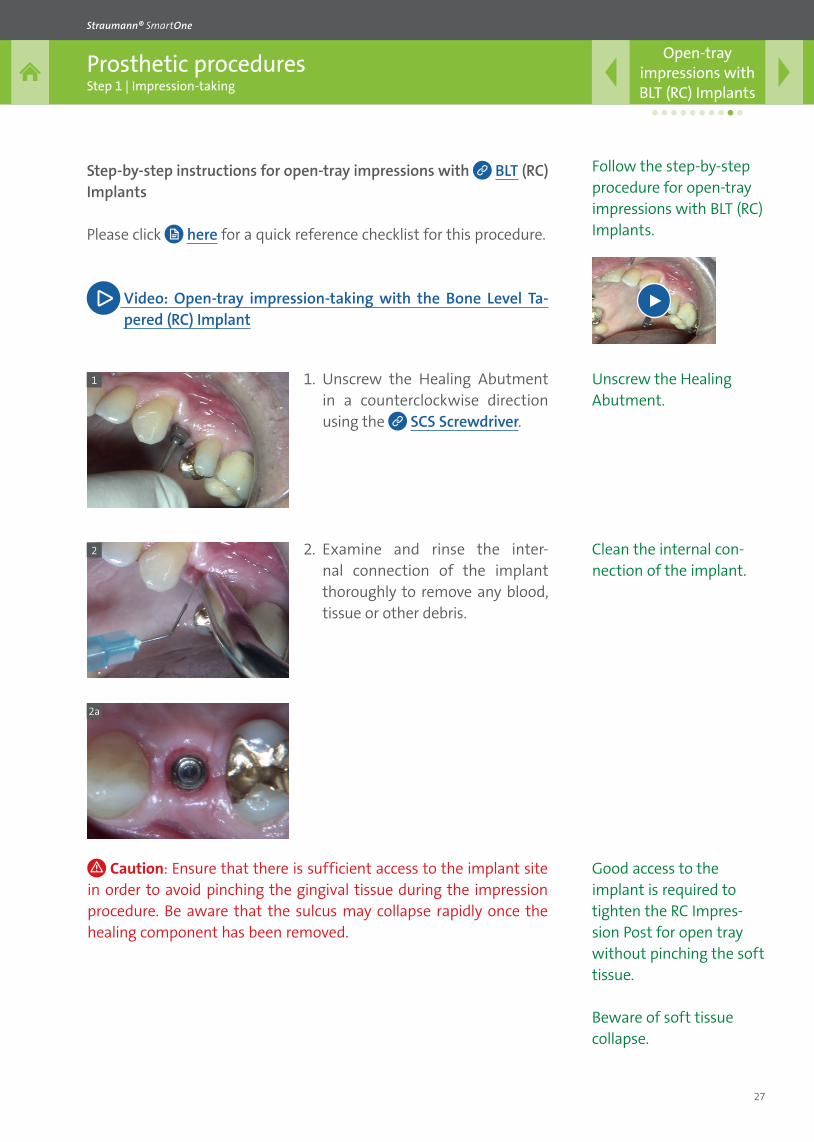
1. Unscrew the Healing Abutment in a counterclockwise direction using the SCS Screwdriver.
1
2
2a
2. Examine and rinse the inter-nal connection of the implant thoroughly to remove any blood, tissue or other debris.
Caution: Ensure that there is sufficient access to the implant site in order to avoid pinching the gingival tissue during the impression procedure. Be aware that the sulcus may collapse rapidly once the healing component has been removed.
Follow the step-by-step procedure for open-tray impressions with BLT (RC) Implants.
Unscrew the Healing Abutment.
Clean the internal con-nection of the implant.
Good access to the implant is required to tighten the RC Impres-sion Post for open tray without pinching the soft tissue.
Beware of soft tissue collapse.
28
Prosthetic proceduresStep 1 | Impression-taking
Open-tray impressions with BLT (RC) Implants
Straumann® SmartOne
3
4
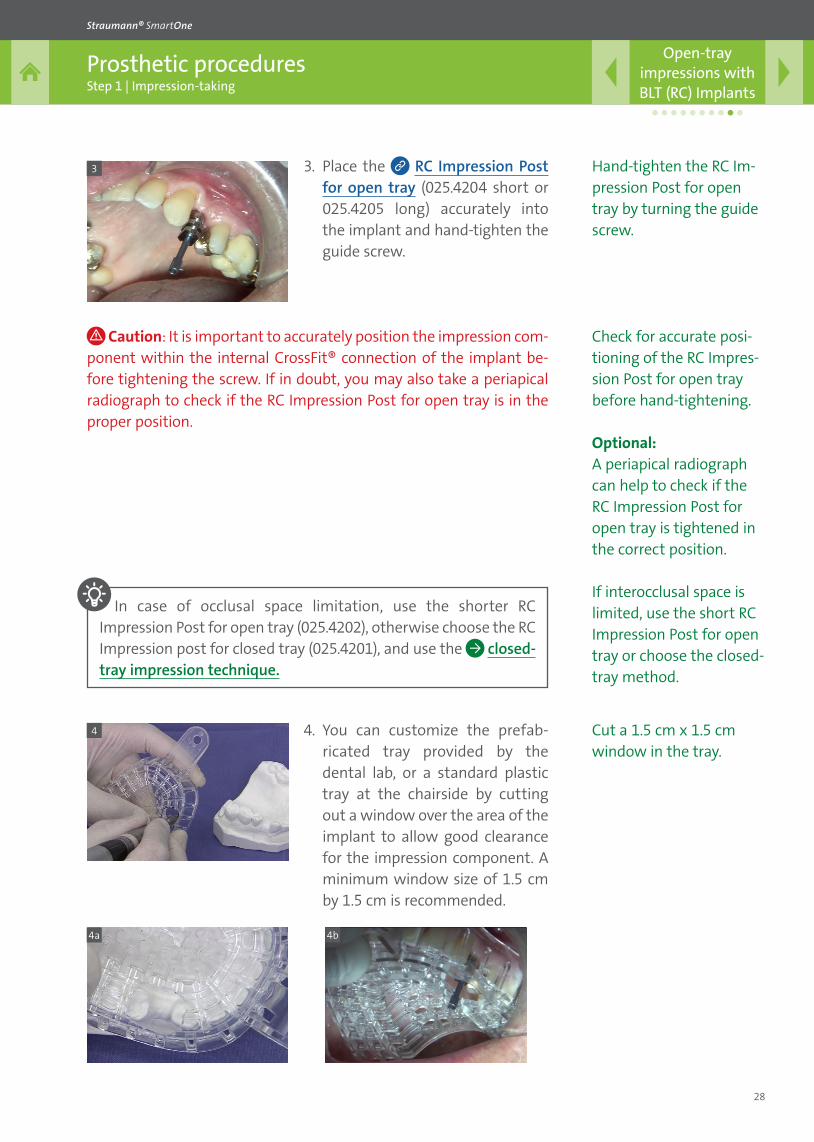
3. Place the RC Impression Post for open tray (025.4204 short or 025.4205 long) accurately into the implant and hand-tighten the guide screw.
4. You can customize the prefab-ricated tray provided by the dental lab, or a standard plastic tray at the chairside by cutting out a window over the area of the implant to allow good clearance for the impression component. A minimum window size of 1.5 cm by 1.5 cm is recommended.
Caution: It is important to accurately position the impression com-ponent within the internal CrossFit® connection of the implant be-fore tightening the screw. If in doubt, you may also take a periapical radiograph to check if the RC Impression Post for open tray is in the proper position.
In case of occlusal space limitation, use the shorter RC Impression Post for open tray (025.4202), otherwise choose the RC Impression post for closed tray (025.4201), and use the closed-tray impression technique.
Hand-tighten the RC Im-pression Post for open tray by turning the guide screw.
Check for accurate posi-tioning of the RC Impres-sion Post for open tray before hand-tightening.
Optional: A periapical radiograph can help to check if the RC Impression Post for open tray is tightened in the correct position.
If interocclusal space is limited, use the short RC Impression Post for open tray or choose the closed-tray method.
Cut a 1.5 cm x 1.5 cm window in the tray.
4a 4b
29
Prosthetic proceduresStep 1 | Impression-taking
Open-tray impressions with BLT (RC) Implants
Straumann® SmartOne
5
6
6a
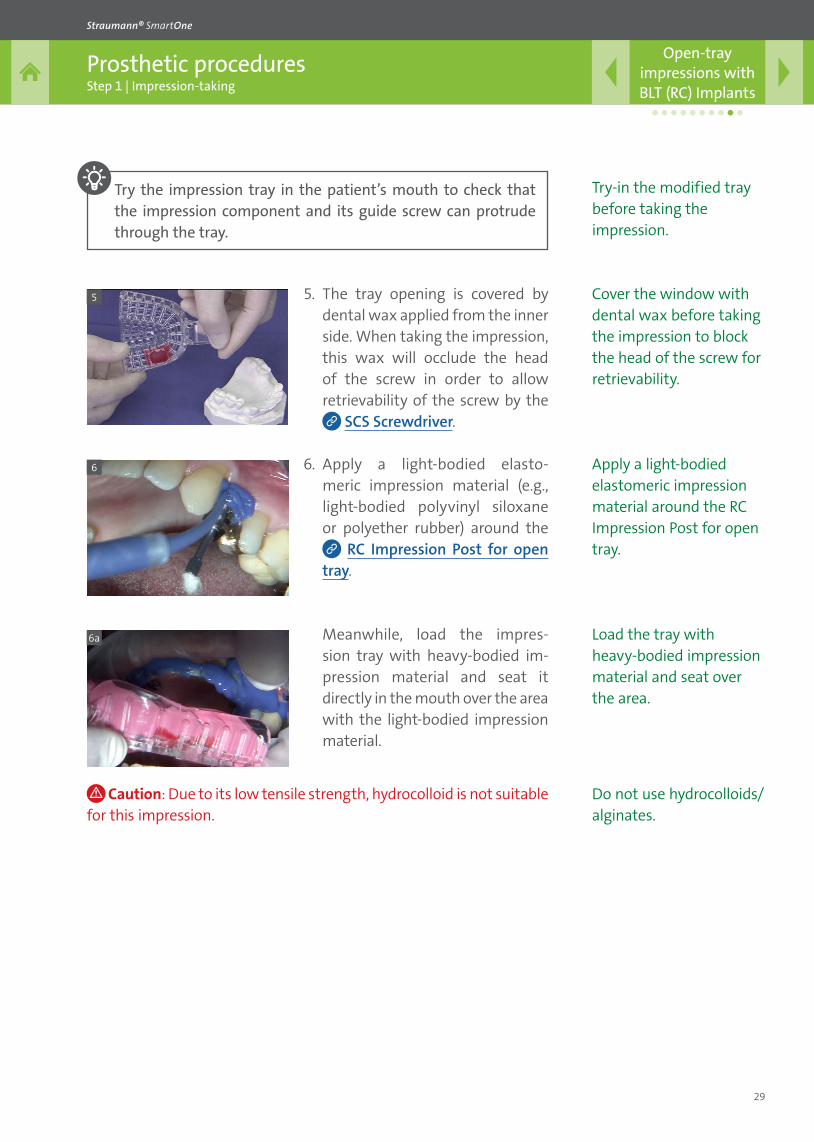
5. The tray opening is covered by dental wax applied from the inner side. When taking the impression, this wax will occlude the head of the screw in order to allow retrievability of the screw by the
SCS Screwdriver.
6. Apply a light-bodied elasto-meric impression material (e.g., light-bodied polyvinyl siloxane or polyether rubber) around the
RC Impression Post for open tray.
Caution: Due to its low tensile strength, hydrocolloid is not suitable for this impression.
Cover the window with dental wax before taking the impression to block the head of the screw for retrievability.
Apply a light-bodied elasto meric impression material around the RC Impression Post for open tray.
Do not use hydrocolloids/alginates.
Try-in the modified tray before taking the impression.
Try the impression tray in the patient’s mouth to check that the impression component and its guide screw can protrude through the tray.
Mean while, load the impres-sion tray with heavy-bodied im-pression material and seat it directly in the mouth over the area with the light-bodied impression material.
Load the tray with heavy-bodied impression material and seat over the area.
30
Prosthetic proceduresStep 1 | Impression-taking
Open-tray impressions with BLT (RC) Implants
Straumann® SmartOne
8
10
11
9
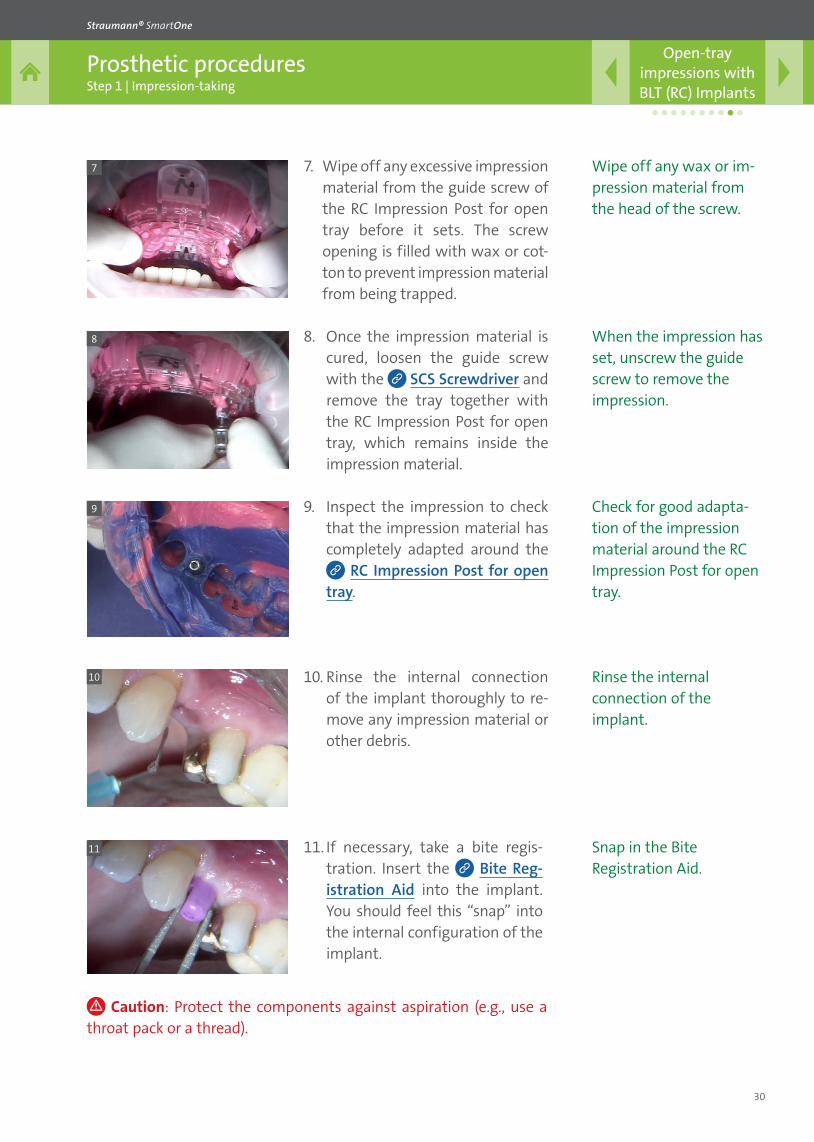
8. Once the impression material is cured, loosen the guide screw with the SCS Screwdriver and remove the tray together with the RC Impression Post for open tray, which remains inside the impression material.
9. Inspect the impression to check that the impression material has completely adapted around the
RC Impression Post for open tray.
10. Rinse the internal connection of the implant thoroughly to re-move any impression material or other debris.
11. If necessary, take a bite regis-tration. Insert the Bite Reg-istration Aid into the implant. You should feel this “snap” into the internal configuration of the implant.
Caution: Protect the components against aspiration (e.g., use a throat pack or a thread).
When the impression has set, unscrew the guide screw to remove the impression.
Check for good adapta-tion of the impression material around the RC Impression Post for open tray.
Rinse the internal connection of the implant.
Snap in the Bite Registration Aid.
7 7. Wipe off any excessive impression material from the guide screw of the RC Impression Post for open tray before it sets. The screw opening is filled with wax or cot-ton to prevent impression material from being trapped.
Wipe off any wax or im-pression material from the head of the screw.
31
Prosthetic proceduresStep 1 | Impression-taking
Open-tray impressions with BLT (RC) Implants
Straumann® SmartOne
12
14
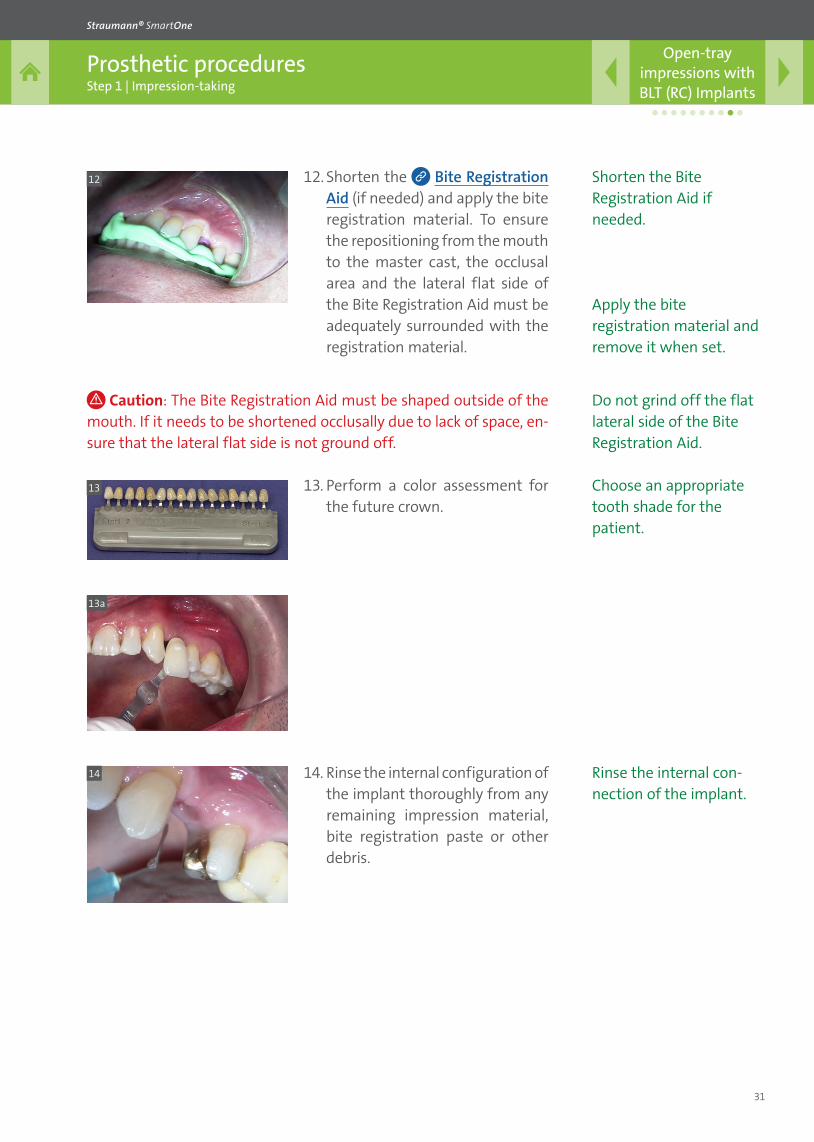
12. Shorten the Bite Registration Aid (if needed) and apply the bite registration material. To ensure the repositioning from the mouth to the master cast, the occlusal area and the lateral flat side of the Bite Registration Aid must be adequately surrounded with the registration material.
13a
13. Perform a color assessment for the future crown.
14. Rinse the internal configuration of the implant thoroughly from any remaining impression material, bite registration paste or other debris.
13
Caution: The Bite Registration Aid must be shaped outside of the mouth. If it needs to be shortened occlusally due to lack of space, en-sure that the lateral flat side is not ground off.
Shorten the Bite Registration Aid if needed.
Apply the bite registration material and remove it when set.
Do not grind off the flat lateral side of the Bite Registration Aid.
Choose an appropriate tooth shade for the patient.
Rinse the internal con-nection of the implant.
32
Prosthetic proceduresStep 1 | Impression-taking
Open-tray impressions with BLT (RC) Implants
Straumann® SmartOne
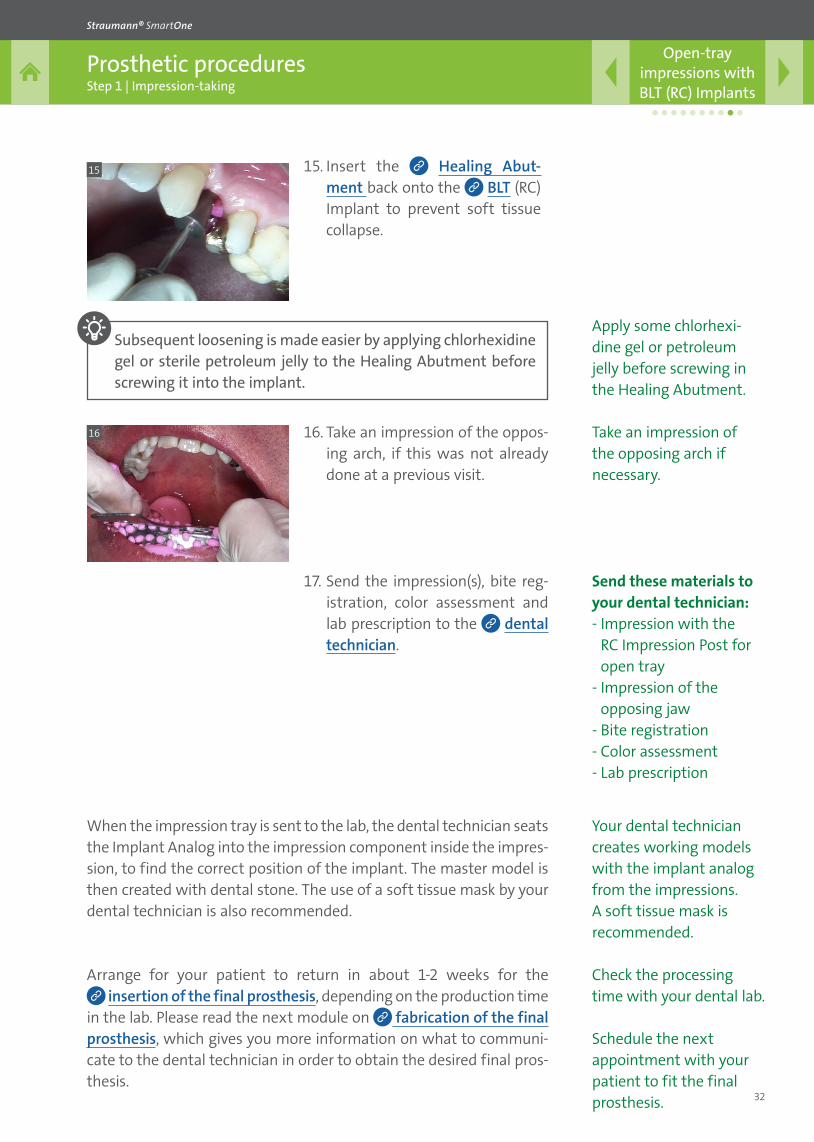
16 16. Take an impression of the oppos-ing arch, if this was not already done at a previous visit.
17. Send the impression(s), bite reg-istration, color assessment and lab prescription to the dental technician.
15 15. Insert the Healing Abut-ment back onto the BLT (RC) Implant to prevent soft tissue collapse.
Subsequent loosening is made easier by applying chlorhexidine gel or sterile petroleum jelly to the Healing Abutment before screwing it into the implant.
Apply some chlorhexi-dine gel or petroleum jelly before screwing in the Healing Abutment.
Take an impression of the opposing arch if necessary.
Send these materials to your dental technician: - Impression with the
RC Impression Post for open tray
- Impression of the opposing jaw
- Bite registration- Color assessment- Lab prescription
Your dental technician creates working models with the implant analog from the impressions. A soft tissue mask is recommended.
Check the processing time with your dental lab.
Schedule the next appointment with your patient to fit the final prosthesis.
When the impression tray is sent to the lab, the dental technician seats the Implant Analog into the impression component inside the impres-sion, to find the correct position of the implant. The master model is then created with dental stone. The use of a soft tissue mask by your dental technician is also recommended.
Arrange for your patient to return in about 1-2 weeks for the insertion of the final prosthesis, depending on the production time
in the lab. Please read the next module on fabrication of the final prosthesis, which gives you more information on what to communi-cate to the dental technician in order to obtain the desired final pros-thesis.

33
Prosthetic proceduresStep 1 | Impression-taking
Closed-tray impressions with BLT (RC) Implants
Straumann® SmartOne
3.4 Impression-taking with the BLT (RC) Implant – closed tray
Instrument set-up for closed-tray impressions with BLT (RC) Implants:
1. X-ray holder and film 2. Light-bodied impression material dispenser3. Prophylaxis paste and cup4. Disposable saliva ejector and control pads5. Timer6. SCS Screwdrivers (long and short) 7. Slow-speed handpiece8. Cotton dispenser9. Aspirator and suction tips10. Shimstock (occlusal registration paper) and holder11. Dental probes and scalers12. Periodontal probe13. Dental mirrors14. Dental tweezers15. Cotton rolls, gauze and petroleum jelly16. Scissors17. Fluoride gel18. Dental floss19. Syringe with saline and blunt needle for irrigation20. Disposable lip and cheek retractor21. Stock impression trays22. RC Impression Post for closed tray and RC Bite Registration Aid23. Soft wax24. Straight handpiece and acrylic bur25. Indelible pen26. Heavy-bodied impression material dispenser
1 2
3
4
5
6
7
8
9
10 11 12 13 14 1516 17
18
22
23
24
25
21
20
19
26
Instrument set-up for closed-tray impressions with BLT (RC) Implants
34
Prosthetic proceduresStep 1 | Impression-taking
Closed-tray impressions with BLT (RC) Implants
Straumann® SmartOne
Step-by-step instructions for closed-tray impressions with BLT (RC) Implants
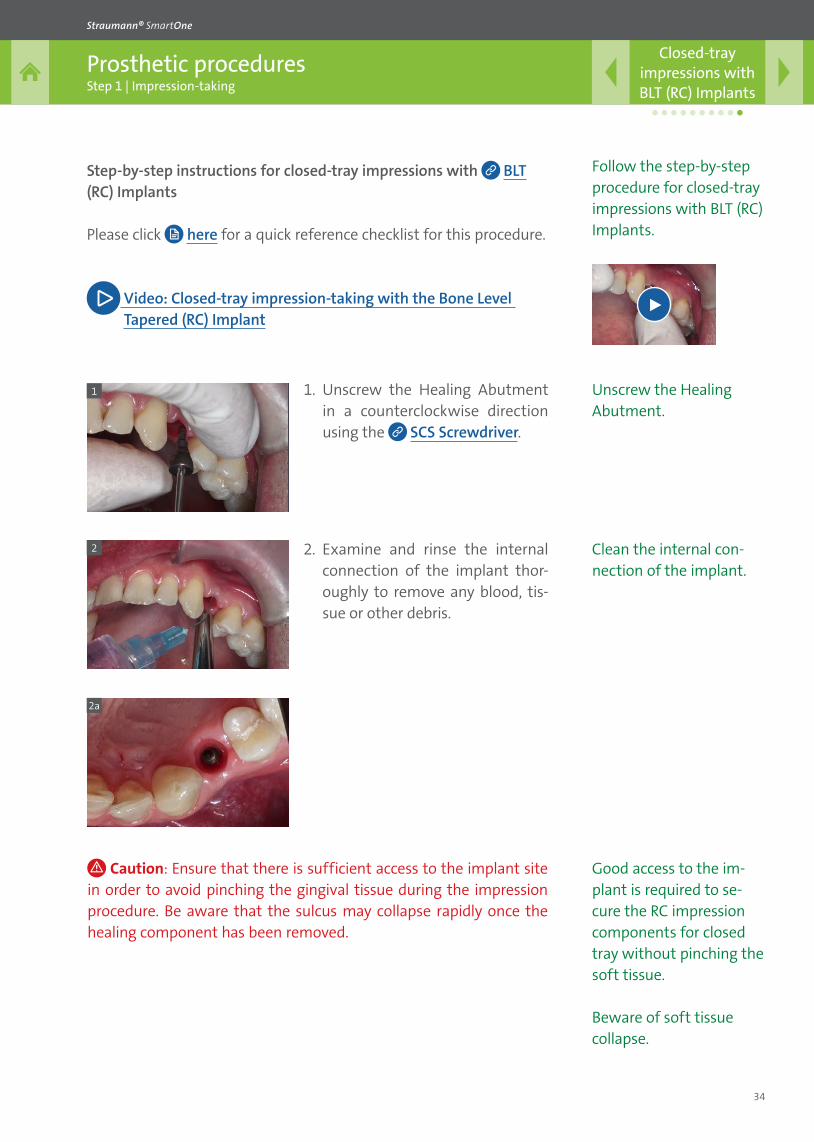
1. Unscrew the Healing Abutment in a counterclockwise direction using the SCS Screwdriver.
2. Examine and rinse the internal connection of the implant thor-oughly to remove any blood, tis-sue or other debris.
2
2a
1
Caution: Ensure that there is sufficient access to the implant site in order to avoid pinching the gingival tissue during the impression procedure. Be aware that the sulcus may collapse rapidly once the healing component has been removed.
Please click here for a quick reference checklist for this procedure.
Video: Closed-tray impression-taking with the Bone Level Tapered (RC) Implant
Follow the step-by-step procedure for closed-tray impressions with BLT (RC) Implants.
Unscrew the Healing Abutment.
Clean the internal con-nection of the implant.
Good access to the im-plant is required to se-cure the RC impression components for closed tray without pinching the soft tissue.
Beware of soft tissue collapse.
35
Prosthetic proceduresStep 1 | Impression-taking
Closed-tray impressions with BLT (RC) Implants
Straumann® SmartOne
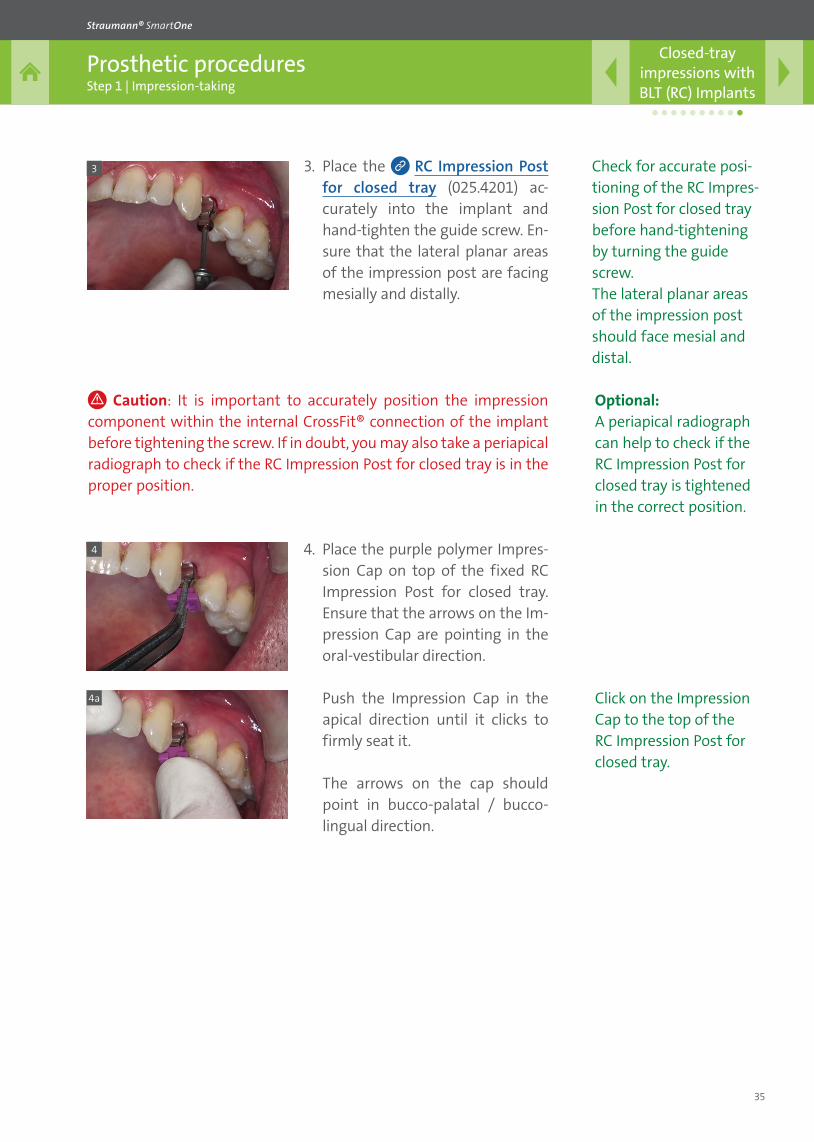
3 3. Place the RC Impression Post for closed tray (025.4201) ac-curately into the implant and hand-tighten the guide screw. En-sure that the lateral planar areas of the impression post are facing mesially and distally.
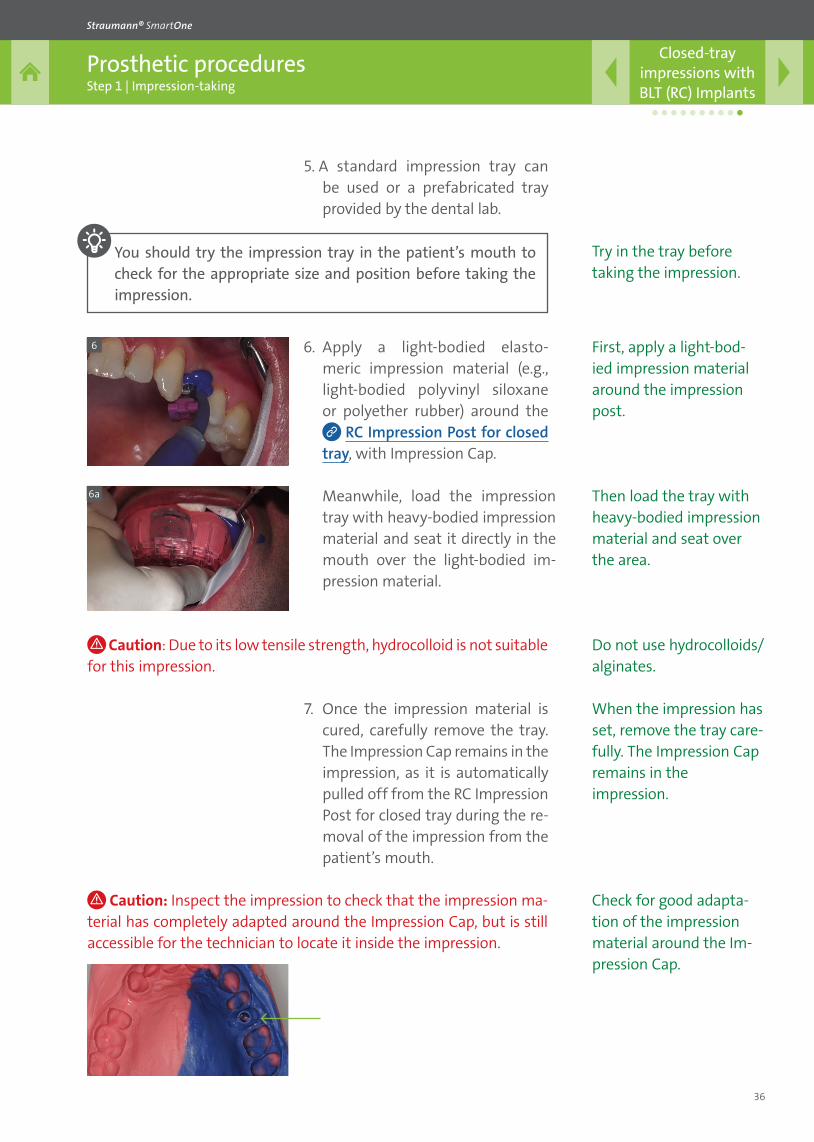
4. Place the purple polymer Impres-sion Cap on top of the fixed RC Impression Post for closed tray. Ensure that the arrows on the Im-pression Cap are pointing in the oral-vestibular direction.
4
4a
Caution: It is important to accurately position the impression component within the internal CrossFit® connection of the implant before tightening the screw. If in doubt, you may also take a periapical radiograph to check if the RC Impression Post for closed tray is in the proper position.
Check for accurate posi-tioning of the RC Impres-sion Post for closed tray before hand-tightening by turning the guide screw.The lateral planar areas of the impression post should face mesial and distal.
Optional: A periapical radiograph can help to check if the RC Impression Post for closed tray is tightened in the correct position.
Click on the Impression Cap to the top of the RC Impression Post for closed tray.
Push the Impression Cap in the apical direction until it clicks to firmly seat it.
The arrows on the cap should point in bucco-palatal / bucco- lingual direction.
36
Prosthetic proceduresStep 1 | Impression-taking
Closed-tray impressions with BLT (RC) Implants
Straumann® SmartOne
5. A standard impression tray can be used or a prefabricated tray provided by the dental lab.
6a
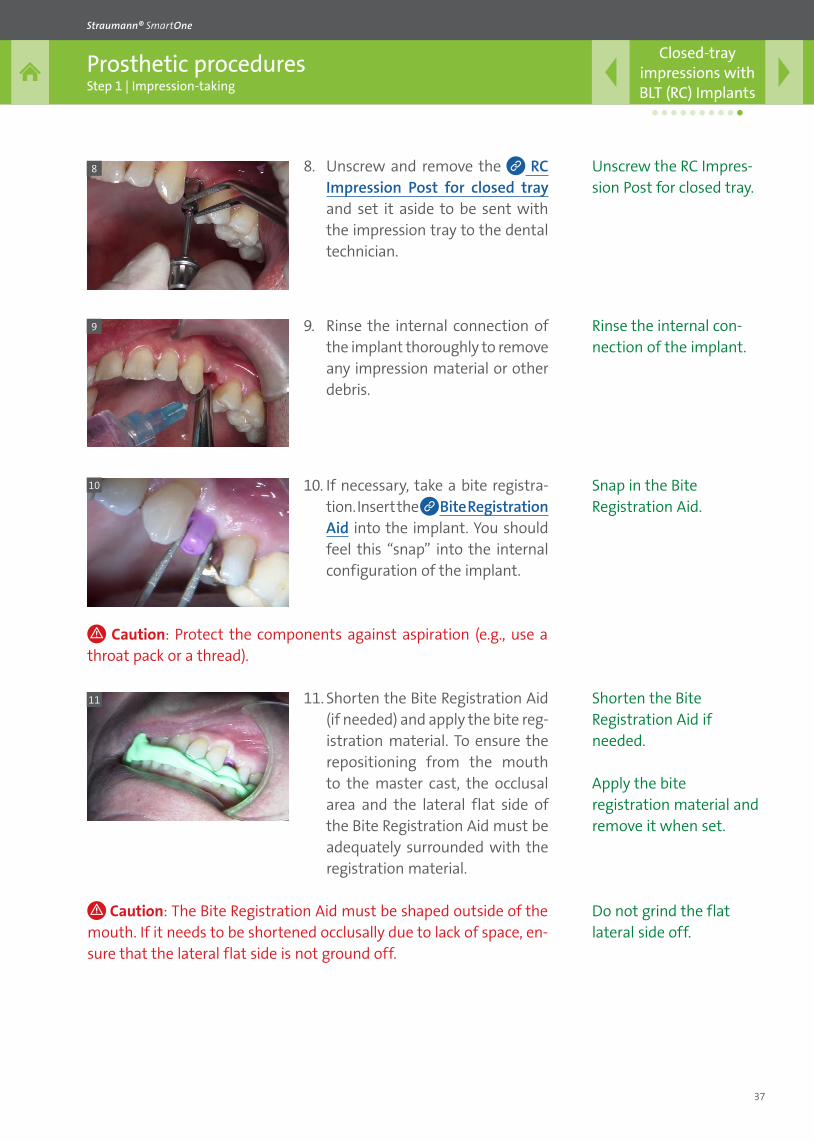
6 6. Apply a light-bodied elasto-meric impression material (e.g., light-bodied polyvinyl siloxane or polyether rubber) around the
RC Impression Post for closed tray, with Impression Cap.
7. Once the impression material is cured, carefully remove the tray. The Impression Cap remains in the impression, as it is automatically pulled off from the RC Impression Post for closed tray during the re-moval of the impression from the patient’s mouth.
You should try the impression tray in the patient’s mouth to check for the appropriate size and position before taking the impression.
Caution: Due to its low tensile strength, hydrocolloid is not suitable for this impression.
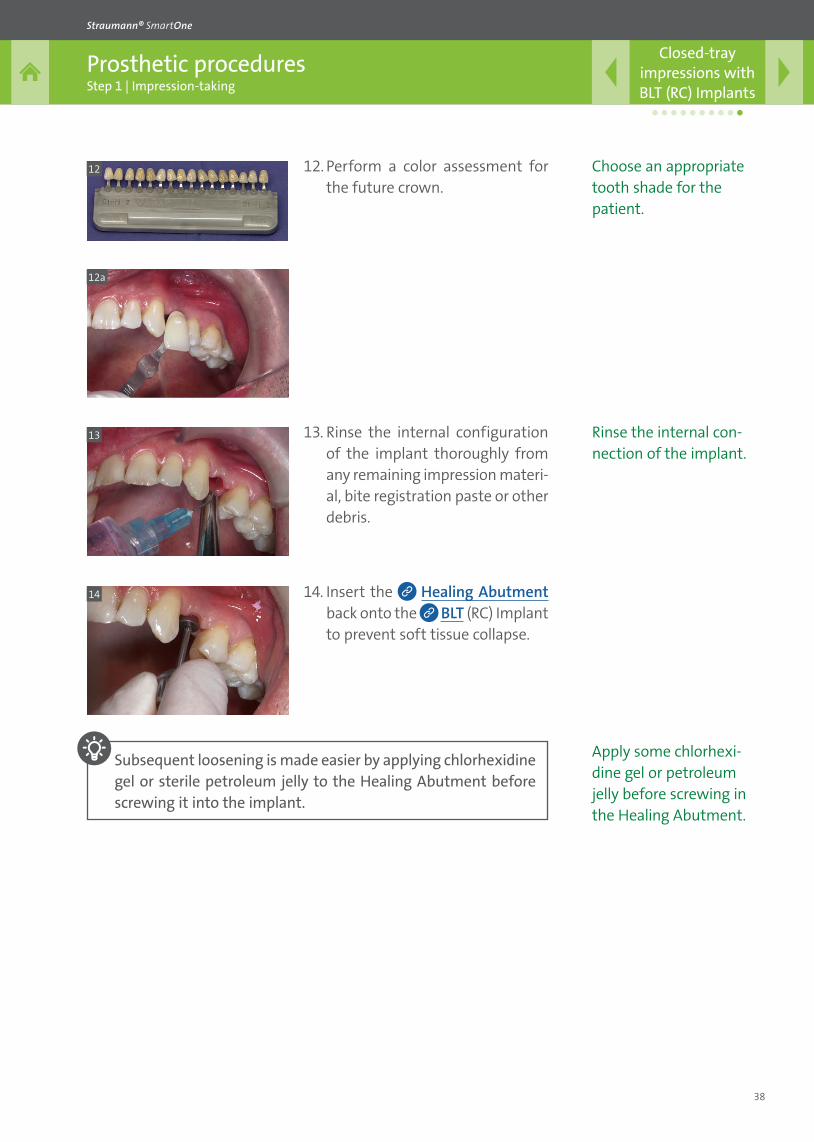
Caution: Inspect the impression to check that the impression ma-terial has completely adapted around the Impression Cap, but is still accessible for the technician to locate it inside the impression.
Try in the tray before taking the impression.
First, apply a light-bod-ied impression material around the impression post.
When the impression has set, remove the tray care-fully. The Impression Cap remains in the impression.
Check for good adapta-tion of the impression material around the Im-pression Cap.
Mean while, load the impression tray with heavy-bodied impression material and seat it directly in the mouth over the light-bodied im-pression material.
Then load the tray with heavy-bodied impression material and seat over the area.
Do not use hydrocolloids/alginates.
37
Prosthetic proceduresStep 1 | Impression-taking
Closed-tray impressions with BLT (RC) Implants
Straumann® SmartOne
8
9
10
11
8. Unscrew and remove the RC Impression Post for closed tray and set it aside to be sent with the impression tray to the dental technician.
9. Rinse the internal connection of the implant thoroughly to remove any impression material or other debris.
10. If necessary, take a bite registra-tion. Insert the Bite Registration Aid into the implant. You should feel this “snap” into the internal configuration of the implant.
11. Shorten the Bite Registration Aid (if needed) and apply the bite reg-istration material. To ensure the repositioning from the mouth to the master cast, the occlusal area and the lateral flat side of the Bite Registration Aid must be adequately surrounded with the registration material.
Caution: Protect the components against aspiration (e.g., use a throat pack or a thread).
Unscrew the RC Impres-sion Post for closed tray.
Rinse the internal con-nection of the implant.
Snap in the Bite Registration Aid.
Shorten the Bite Registration Aid if needed.
Apply the bite registration material and remove it when set.
Caution: The Bite Registration Aid must be shaped outside of the mouth. If it needs to be shortened occlusally due to lack of space, en-sure that the lateral flat side is not ground off.
Do not grind the flat lateral side off.
38
Prosthetic proceduresStep 1 | Impression-taking
Closed-tray impressions with BLT (RC) Implants
Straumann® SmartOne
12a
13
14
13. Rinse the internal configuration of the implant thoroughly from any remaining impression materi-al, bite registration paste or other debris.
14. Insert the Healing Abutment back onto the BLT (RC) Implant to prevent soft tissue collapse.
12. Perform a color assessment for the future crown.
12
Subsequent loosening is made easier by applying chlorhexidine gel or sterile petroleum jelly to the Healing Abutment before screwing it into the implant.
Choose an appropriate tooth shade for the patient.
Rinse the internal con-nection of the implant.
Apply some chlorhexi-dine gel or petroleum jelly before screwing in the Healing Abutment.
39
Prosthetic proceduresStep 1 | Impression-taking
Closed-tray impressions with BLT (RC) Implants
Straumann® SmartOne
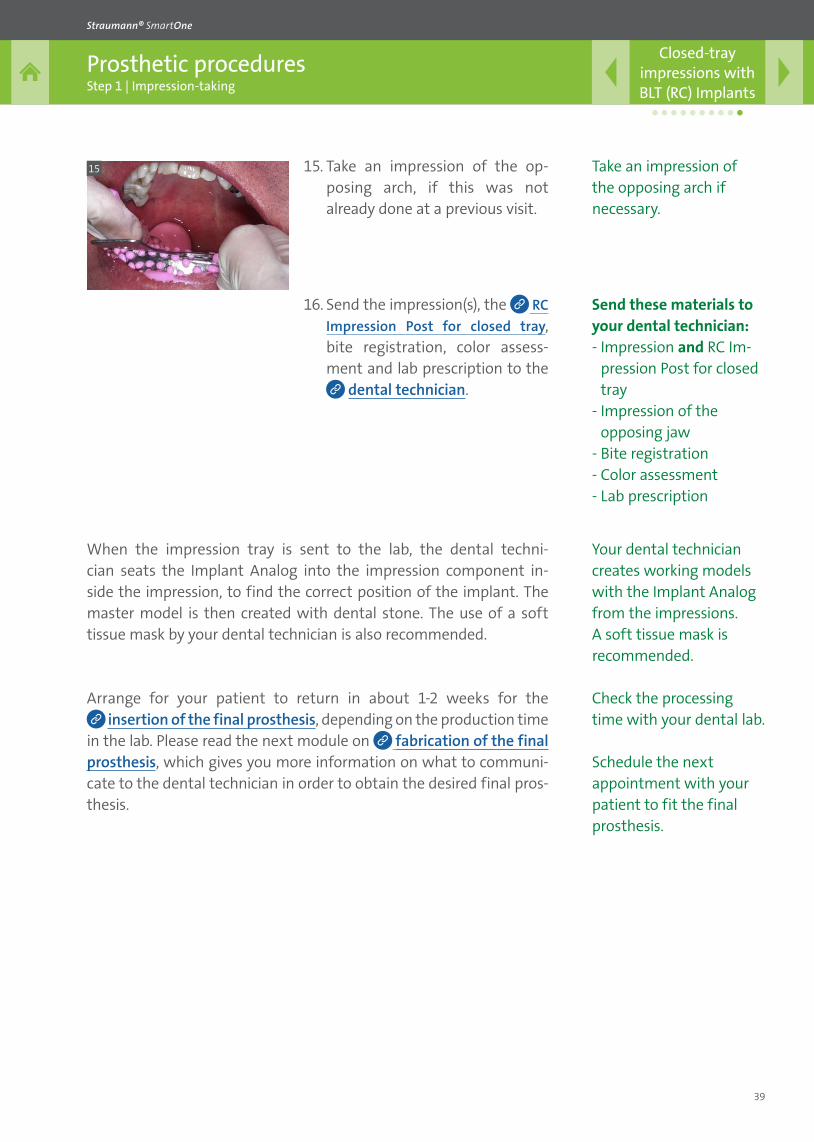
16. Send the impression(s), the RC Impression Post for closed tray, bite registration, color assess-ment and lab prescription to the
dental technician.
15 15. Take an impression of the op-posing arch, if this was not already done at a previous visit.
Take an impression of the opposing arch if necessary.
Send these materials to your dental technician: - Impression and RC Im-
pression Post for closed tray
- Impression of the opposing jaw
- Bite registration- Color assessment- Lab prescription
Your dental technician creates working models with the Implant Analog from the impressions. A soft tissue mask is recommended.
Check the processing time with your dental lab.
Schedule the next appointment with your patient to fit the final prosthesis.
When the impression tray is sent to the lab, the dental techni-cian seats the Implant Analog into the impression component in-side the impression, to find the correct position of the implant. The master model is then created with dental stone. The use of a soft tissue mask by your dental technician is also recommended.
Arrange for your patient to return in about 1-2 weeks for the insertion of the final prosthesis, depending on the production time
in the lab. Please read the next module on fabrication of the final prosthesis, which gives you more information on what to communi-cate to the dental technician in order to obtain the desired final pros-thesis.
40
Prosthetic proceduresStep 1 | Impression-taking
Straumann® SmartOne
DISCLAIMER
Straumann® Smart is a blended training and education program focused on the education of general dentists who want to become surgically active in the field of dental implantology. The program is limited to information pertaining to straightforward implant cases and focuses on a reduced portfolio of products that are suitable for the treatment of such cases.
All clinical Straumann® Smart content – such as texts, medical record forms, pictures and videos – was created in collaboration with Prof. Dr. Christoph Hämmerle, Prof. Dr. Ronald Jung, Dr. Francine Brandenberg-Lustenberger and Dr. Alain Fontolliet from the University of Zürich, Clinic for Fixed and Removable Prosthodontics and Dental Material Science, Switzerland.
Straumann does not give any guarantee that Straumann® Smart provides sufficient knowledge or instruction for the dental professional to become surgically active in the field of implantology. It is the dental professional’s sole responsibility to ensure that he/she has the appropriate knowledge and instruction before placing dental implants.
Straumann® Smart does not replace a careful and thorough analysis of each individual patient by a dental professional. Further, it does not imply any guarantee or warranty with regard to complete-ness of the information provided to the patient. It does not replace the dental professional’s duty to inform the patient about the treatment, the products and the risks involved and to receive the patient’s informed consent. The dental professional is solely responsible for determining whether or not a treatment or product is suitable for a particular patient and circumstances. Knowledge of dental implantology and instruction in the handling of the relevant products is always necessary and the sole responsibility of the dental professional. The dental professional must always comply with the individual product’s Instructions For Use as well as all laws and regulations.
STRAUMANN DISCLAIMS, TO THE EXTENT POSSIBLE BY LAW, ANY LIABILITY, EXPRESS OR IMPLIED, AND BEARS NO RESPONSIBILITY FOR ANY DIRECT, INDIRECT, PUNITIVE, CONSEQUENTIAL OR OTHER DAMAGES, ARISING OUT OF OR IN CONNECTION WITH ANY INFORMATION PROVIDED TO PATIENTS, ERRORS IN PROFESSIONAL JUDGMENT, IN PRODUCT CHOICES OR PRACTICE IN THE USE OR INSTALLA-TION OF STRAUMANN PRODUCTS.
All clinical content as well as clinical and radiographic images are provided by courtesy of Prof. Dr. Chris-toph Hämmerle, Prof. Dr. Ronald Jung, Dr. Francine Brandenberg-Lustenberger and Dr. Alain Fontolliet from the University of Zürich, Clinic for Fixed and Removable Prosthodontics and Dental Material Science, Switzerland.

International Headquarters Institut Straumann AG Peter Merian-Weg 12 CH-4002 Basel, Switzerland Phone +41 (0)61 965 11 11 Fax +41 (0)61 965 11 01 www.straumann.com
© Institut Straumann AG, 2016. All rights reserved.Straumann® and/or other trademarks and logos from Straumann® mentioned herein are the trademarks or registered trademarks of Straumann Holding AG and/or its affiliates. 49
0.08
4/en
/A/0
0 08
/16