Embed Size (px)
Citation preview

TABLE SAW
Although the table saw is one of the most useful machines in the wood lab, it is also one of the most dangerous. It can be used to accurately rip and crosscut lumber and sheet goods. The table saw can also be used for special operations including cutting dadoes and rabbets and for resawing. With the use of special jigs, joinery like tenons and box joints can be made. In addition, the blade can be tilted for cutting bevels and miters. The saws in WMT use 10”diameter blades and tilt left (that is, away from the fence). All 10” saws in our wood lab are SawStops, considered the safest in the industry. SawStop saws are equipped with a safety system that detects when someone accidentally contacts the spinning saw blade, and then stops the blade in milliseconds. In most cases, such an accident would result in just a nick on a SawStop saw, instead of the devastating injury which would likely occur on an ordinary table saw. How does it work? The SawStop electronic safety system induces an electrical signal onto the blade and then monitors that signal for changes. Because the human body has a relatively large inherent electrical capacitance and conductivity, this signal drops when flesh contacts the blade. Wood, on the other hand, has a relatively small inherent capacitance and conductivity and therefore does not cause the signal to drop when it comes in contact with the blade.
1. The number one cause of injuries on the table saw is kickback. Kickback occurs when the operator loses control of the material being cut and it is thrown from the machine with great force.

2. When cutting, the saw blade should project ¼” above the stock or enough to clear the common gullets.
3. The fence is used to guide ripping operations. The miter gauge or sled is used to guide crosscut operations. Always hold the work firmly against the fence, sled, or miter gauge.
4. During a rip cut, once the material has moved away from your left hand, move your left off the table. Do not drag your hand across the table and never reach over the blade.
5. You must use a push stick when ripping pieces that are 6” or less in width.
6. Cutting workpieces shorter than 10” in length is a special setup; get permission from the instructor or aide prior to cutting.
7. Performing on-edge resawing is a special setup. You must get specific instruction and special permission from your instructor.
8. When ripping stock, the piece between the fence and blade must be controlled and pushed past the blade all the way onto the outfeed table. Failure to do so may result in a kickback.
9. Lowering stock directly down over the saw blade is dangerous and is never allowed.
10. Procedures involving raising the blade into the work are special setups. Permission and instructions must be obtained from your instructor for doing this type of work.
11. The over-arm saw guard must always be in place over the blade except when the instructor has authorized its removal for special setups.
12. The riving knife must always be in place behind the blade except when the instructor has authorized its removal for special set-ups..
13. Make adjustments only when the power switch is off and the blade is at a complete stop.
14. Whenever a measurement or other procedure is made where you must have your fingers in close proximity to the blade, make sure the main power switch is in the off position.
15. The main power switch should be left in the off position when you leave the saw.
16. Freehand cutting, ripping, or crosscutting without using the fence, sled, or miter gauge is ABSOLUTELY FORBIDDEN in all circumstances.
17. When you are ripping stock, the scrap must fall to the outside (non-bound side) of the blade (not between the blade and fence).
18. Do not reach over the saw blade or pass wood over the saw blade at any time.
19. When helping someone to tail-off (supporting the work hanging off the back of the saw table), your only purpose is to support the stock from below. Only the operator pushes the stock through the saw.
20. Make sure the blade is stopped and completely lowered when clearing scraps from the table.
21. The instructor must inspect all special setups and dado blade installations before the power is turned on.

22. Use a special setup with V-block or sled when cutting cylindrical stock to help keep it from spinning.
22. Use a special setup with V-block or sled when cutting cylindrical stock to help keep it from spinning.
23. Backing the stock away from the blade while the saw is running may throw the piece toward you. If it is necessary to remove the piece, always stop the saw first.
24. Never attempt to turn off the saw in the middle of a cut. If you must stop mid-cut, stop what you are doing without moving your hands and turn off the saw by gently engaging the red START/STOP PADDLE with your knee.
25. If the fence is used at the same time as the miter gauge, the miter gauge must be between the fence and the blade. This is a special setup.
26. When you are crosscutting a number of pieces to the same length, clamp a clearance block to the rip fence well ahead of the saw blade to prevent the cut piece from being pinched between the blade and fence.
27. Stock edges or faces that contact the table, miter gauge or fence, must be straight and flat.
28. Seek assistance and direction from your instructor before milling materials with defects such as splits, warps and knots.
29. Changing the saw blade is required depending on the situation and is a special setup. The brake cartridge must be installed properly and adjusted approximately 1/8” away from the blade, and checked by the instructor.
30. Obtain permission from the instructor for all special setups using the 8” dado set, which requires a different brake cartridge installed properly [1/8” gap]. Manually spin the blade through one rotation to make sure it clears the brake cartridge before turning on the saw.

MITER SAW
The miter or chop saw is the best tool in the lab for accurately crosscutting surfaced lumber to length. It is extremely useful for making all cuts from 90° to ±45°. The miter saw is one of the most dangerous machines in the lab. Use care in its operation.
1. Keep protective guards in place at all times.
2. Remove scraps and other foreign items from the machine before operating the saw.
3. Make sure the piece to be cut is firmly against the table and fence before cutting.
4. Allow the blade to reach full speed before cutting.
5. Do not force the tool into the work.
6. Never hold the piece to be cut in a manner that causes your arms to cross. The majority of all cuts are made on the miter saw with the material held with the left hand on the left side of the saw while the right hand operates the machine.
7. Do not leave the area of the machine until the blade has come to a full and complete stop.
8. Always maintain a 6” margin of safety between all body parts and the blade.

9. Remove chips, scraps and cutoffs only after the blade is at a complete stop.
10. After placing the stock securely on the saw table and aligning the cut, pull the trigger. After the blade comes to full speed, lower the blade into the work at a moderate speed. When the cut is complete release the trigger and allow the blade to come to a complete stop before returning it to the upright position.
11. Use a stick or other hold down device when needed to secure short material without putting your hand in danger.
12. The workpiece should be held in place, rather than the off-fall, by the operator for all cuts.
13. NEVER use the chop saw to cut rough material length.
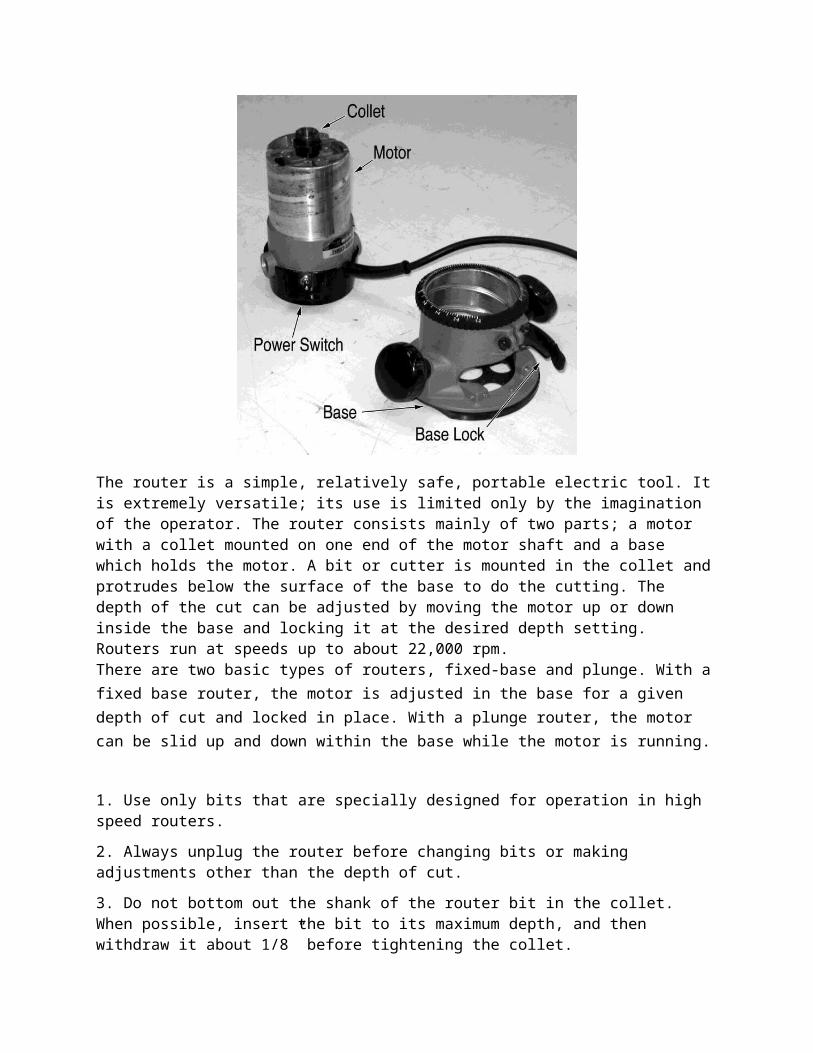
HAND-HELD ROUTER
The router is a simple, relatively safe, portable electric tool. It is extremely versatile; its use is limited only by the imagination of the operator. The router consists mainly of two parts; a motor with a collet mounted on one end of the motor shaft and a base which holds the motor. A bit or cutter is mounted in the collet and protrudes below the surface of the base to do the cutting. The depth of the cut can be adjusted by moving the motor up or down inside the base and locking it at the desired depth setting. Routers run at speeds up to about 22,000 rpm. There are two basic types of routers, fixed-base and plunge. With a fixed base router, the motor is adjusted in the base for a given depth of cut and locked in place. With a plunge router, the motor can be slid up and down within the base while the motor is running.

1. Use only bits that are specially designed for operation in high speed routers.
2. Always unplug the router before changing bits or making adjustments other than the depth of cut.
3. Do not bottom out the shank of the router bit in the collet. When possible, insert the bit to its maximum depth, and then withdraw it about 1/8” before tightening the collet.
4. Make sure the bit is firmly secured in the collet before starting work. A loose bit will work its way out of the collet, damaging your work and/or injuring you.
5. Make sure the router motor is tight in the router base before power is turned on.
6. When starting the router, make sure the bit is not in contact with anything.
7. Hold the router firmly when turning on the power to withstand the starting torque of the router motor.
8. Keep hands and loose clothing away from revolving bits and cutters.
9. Operate the router in the proper direction. If only one side of the bit is being used, move the work against cutter rotation. If the bit is cutting on both sides, feed the work so that the bit pushes the work towards the fence (when applicable).
10. Use slower speeds for larger bits.
11. Do not overload or bog down the speed of the motor.
12. Make several light cuts where large amounts of material are to be removed.
13. Always make sure the bit is sharp; if unsure, check with the instructor.
14. Always secure or clamp the work so that it cannot move during routing.
15. When using multi-piece router bits, ensure all nuts and bearings are tightened properly.
16. Large panel-cutting bits should not be used in a hand-held router.
17. Due to the physics of routing, dados and rabbets in solid wood are best achieved using a table saw. Dados and rabbets in manufactured material such as plywood, particle board, and MDF are better achieved using a router.
ROUTER TABLE
One way to increase a router’s usefulness is to mount the base to the underside of a table. The bit then protrudes up through the table and the piece being routed is moved past the bit. This configuration makes for a very stable and controllable routing process and is the desired configuration whenever possible. Using the router table is not possible, however, for large workpieces or for those that cannot be moved to the router table. The procedures for using a router at the router table are similar to those for a hand-held router, with the following additional information.
1. Move the workpiece in the proper direction. If only one side of the bit is being used, move the work against cutter rotation. If the bit is cutting on both sides, feed the work so that the bit pushes the work towards the fence (when applicable).
2. Use slower router speeds for longer bits. This is
especially important at the router table, since large bits are more likely to be used here.
3. On the Bench Dog router lifts: Do not change router bits without first removing the throat plate. When tightening the throat plate attach screws, use only light finger pressure. Do not over-tighten one throat plate screw before tightening the other; the tightness of the first screw will prevent the throat place from being flush with the table when you tighten the second screw.
4. Use the throat plate that leaves the smallest opening around the router bit.
5. When routing small or narrow pieces, use a backer board and/or a pushstick to ensure proper support, along with a fence with a small or no opening.
PORTABLE BELT SANDER
The belt sander features a continuous abrasive belt which runs over rollers at each end of a platen. An adjustment is provided for tracking the belt. When used properly, the belt sander excels at removing high spots and flattening surfaces. The size of the sander refers to the width and length of the belt; for example, a 3 x 24 belt sander has a 3” wide belt, 24” long.
1. Avoid excessive downward pressure on the belt sander. The weight of the machine should be the only pressure necessary.
2. Check to see that the belt is in good condition and that the proper grit paper is installed. 80- or 100-grit papers are good choices for general use.
3. Be sure the belt is tracking properly prior to use. The belt tracking can be adjusted only while the machine is running.
4. Allow the sander to reach full speed before placing it on the piece to be sanded.

5. Lift the sander off the work before stopping the motor and wait until the belt is completely stopped before placing the sander on the bench.
6. Do not use the belt sander to sand stock smaller than the platen.
7. Use the belt sander in a consistent pattern and always keep it moving.
8. Belts should always be installed with the arrow pointing in the direction of motor rotation.
9. The belt sander should be used at full speed at all times.
10. Always hold the piece to be sanded securely with a clamp or vise.
11. Before plugging in the machine, make sure the trigger lock is not engaged. Lay the machine on its side when inserting the plug.
12. Always use two hands when operating or carrying the machine.
PNEUMATIC NAIL GUNS and STAPLERS
Pneumatic nail guns and staplers are compressed-air-operated devices used to drive nails or staples quickly and efficiently. They also increase accuracy over using a hammer, since the gun does not require pounding on the workpiece. Nail guns and staplers are made in a variety of sizes. In the Cerritos wood lab, finish nailers, brad nailers, and several varieties of staplers are available. Each shoots a specific diameter of nail or width of staple in a range of lengths. Operating a nail gun or stapler requires the user to press the gun against the workpiece, thereby depressing the nose guard. The gun is then actuated by pulling the trigger.

1. Safety glasses must be worn when operating a nail gun or stapler.
2. Always point the nail gun or stapler away from any person or body parts.
3. Except when ready to actuate the nail gun or stapler, keep your finger off the trigger.
4. Always disconnect the air supply when loading or unloading the magazine, or when making adjustments.
5. Ensure the nose guard is working properly. If there is any question, report the problem to the instructor.
6. When operating the nail gun or stapler, make sure your hand or other body parts are not in front of or to the side of the fastener’s intended path. Nails especially have been known to hit hard objects, like knots or difficult grain, and shoot out the side of a workpiece.
7. Use extra caution when driving a fastener close to an edge to prevent the fastener from splitting the work, flying away, or hitting your hand.
8. Do not attempt to angle a nail or staple into the work surface more than about 10°; more than that may cause the fastener to ricochet off the work.
9. Pull the trigger lightly. A heavy pull may result in the gun driving two nails.
10. Before loading or unloading nails into the magazine, make sure the magazine is completely empty, then load the fasteners. Failure to do so may result in misfire, damage to the tool, or a fastener too long for the job.