Embed Size (px)
Citation preview
SRS Troubleshooter Users Manual SRS Troubleshooter CD ROM (Airbags—Supplemental Restraint)
User’s Manual
Copyright © 2006 by Mandy Concepcion
SRS Troubleshooter Users Manual
INSTALLATION INSTRUCTIONS
To install the software, perform the following easy steps: 1. Double click on the “SRS Troubleshooter Installation Files”
folder. 2. Double click on the “Setup” icon. This will start the installa-
tion program. 3. A “Welcome to the SRS Troubleshooter” screen will start im-
mediately. Click the “OK” button. 4. A screen with a BIG square installation button and icon ap-
pears. Click on the big square button to prepare for the in-stall.
5. Next, a choose the program group screen will appear. The setup will automatically install on the “Programs files”. This is recommended, so click the “Continue” button.
6. At this point in time the SRS Troubleshooter program will be-gin the brief installation process.
7. Finally, an installation complete screen appears and you’re done. Click the “OK” button.
To start the SRS troubleshooter, click start, all programs, and then the SRS Troubleshooter should be seen. Click on it. To put an icon on the “Desktop” or the main windows screen, click “Start”, My Computer, then click the C: DRIVE or where the program was installed, double click “Program Files” and then SRS Troubleshooter. Just copy and paste the icon to the program on the “Desktop”. Now every time you need to open the SRS Troubleshooter, just double click on this desktop icon.
SRS Troubleshooter Users Manual
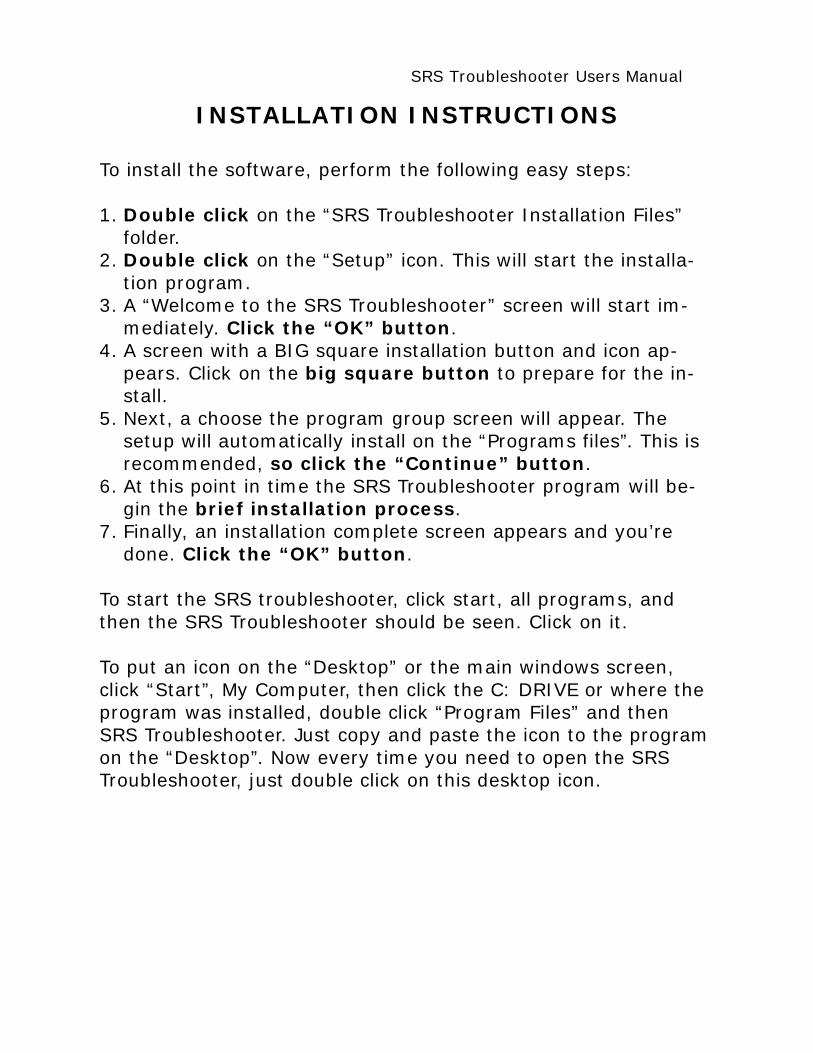
The SRS Troubleshooter is an all encompassing troubleshooting and information systems developed only to diagnose airbag units. This software is able to guide the tech on any Domestic and Asian SRS diagnostics. This is the “Start Up” screen, which prompts you to read and ac-cept the “Warning” message on SRS airbag Systems. This is a very straightforward message. Take your time to at leas read it for the first time, since the information contained can prevent a possible injury, due to accidental airbag deployment.
SRS Troubleshooter Users Manual
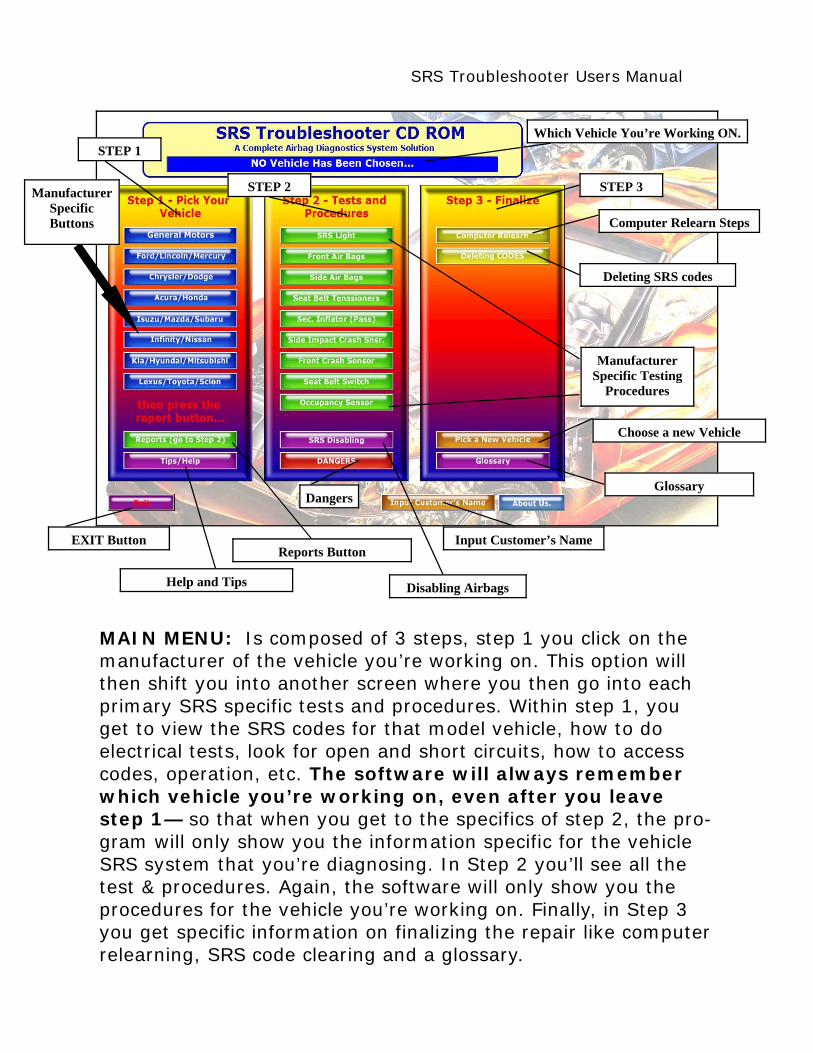
MAIN MENU: Is composed of 3 steps, step 1 you click on the manufacturer of the vehicle you’re working on. This option will then shift you into another screen where you then go into each primary SRS specific tests and procedures. Within step 1, you get to view the SRS codes for that model vehicle, how to do electrical tests, look for open and short circuits, how to access codes, operation, etc. The software will always remember which vehicle you’re working on, even after you leave step 1— so that when you get to the specifics of step 2, the pro-gram will only show you the information specific for the vehicle SRS system that you’re diagnosing. In Step 2 you’ll see all the test & procedures. Again, the software will only show you the procedures for the vehicle you’re working on. Finally, in Step 3 you get specific information on finalizing the repair like computer relearning, SRS code clearing and a glossary.
STEP 1
STEP 2 STEP 3
Which Vehicle You’re Working ON.
Manufacturer Specific Buttons
Reports Button
Manufacturer Specific Testing
Procedures
Help and Tips Disabling Airbags
Dangers
Input Customer’s Name
Computer Relearn Steps
Deleting SRS codes
Choose a new Vehicle
Glossary
EXIT Button
SRS Troubleshooter Users Manual
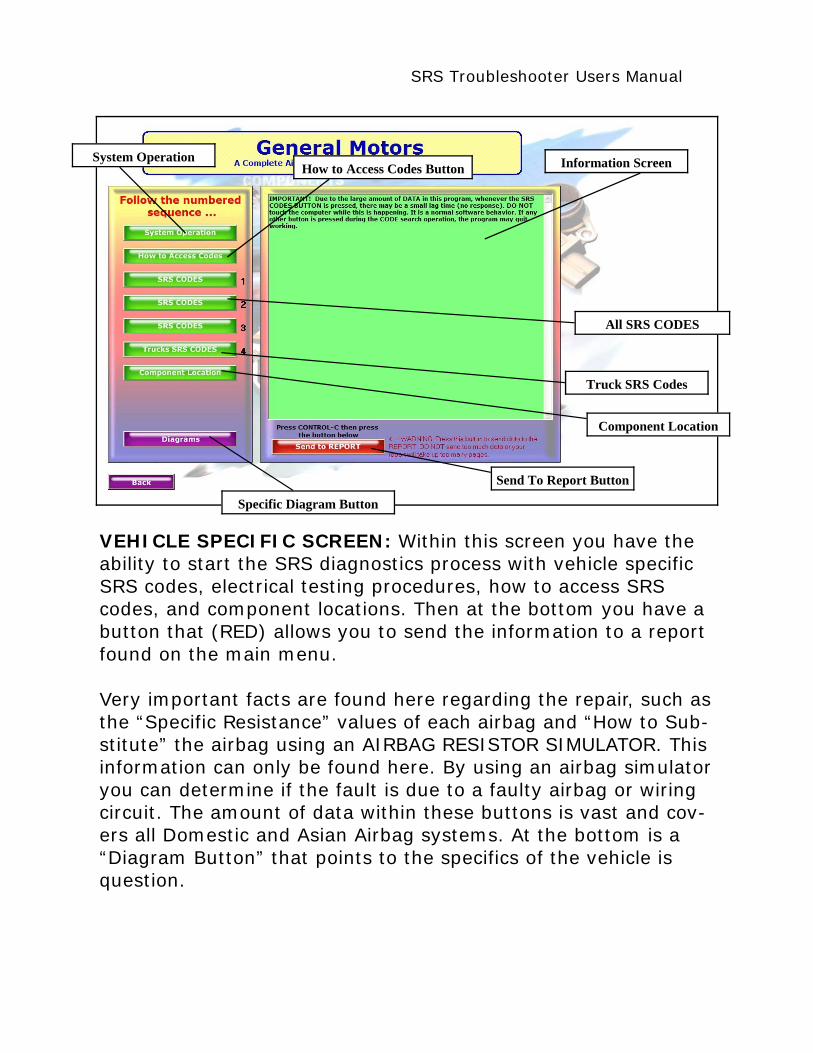
VEHICLE SPECIFIC SCREEN: Within this screen you have the ability to start the SRS diagnostics process with vehicle specific SRS codes, electrical testing procedures, how to access SRS codes, and component locations. Then at the bottom you have a button that (RED) allows you to send the information to a report found on the main menu. Very important facts are found here regarding the repair, such as the “Specific Resistance” values of each airbag and “How to Sub-stitute” the airbag using an AIRBAG RESISTOR SIMULATOR. This information can only be found here. By using an airbag simulator you can determine if the fault is due to a faulty airbag or wiring circuit. The amount of data within these buttons is vast and cov-ers all Domestic and Asian Airbag systems. At the bottom is a “Diagram Button” that points to the specifics of the vehicle is question.
System Operation Information Screen
Send To Report Button
Specific Diagram Button
Component Location
Truck SRS Codes
All SRS CODES
How to Access Codes Button
SRS Troubleshooter Users Manual
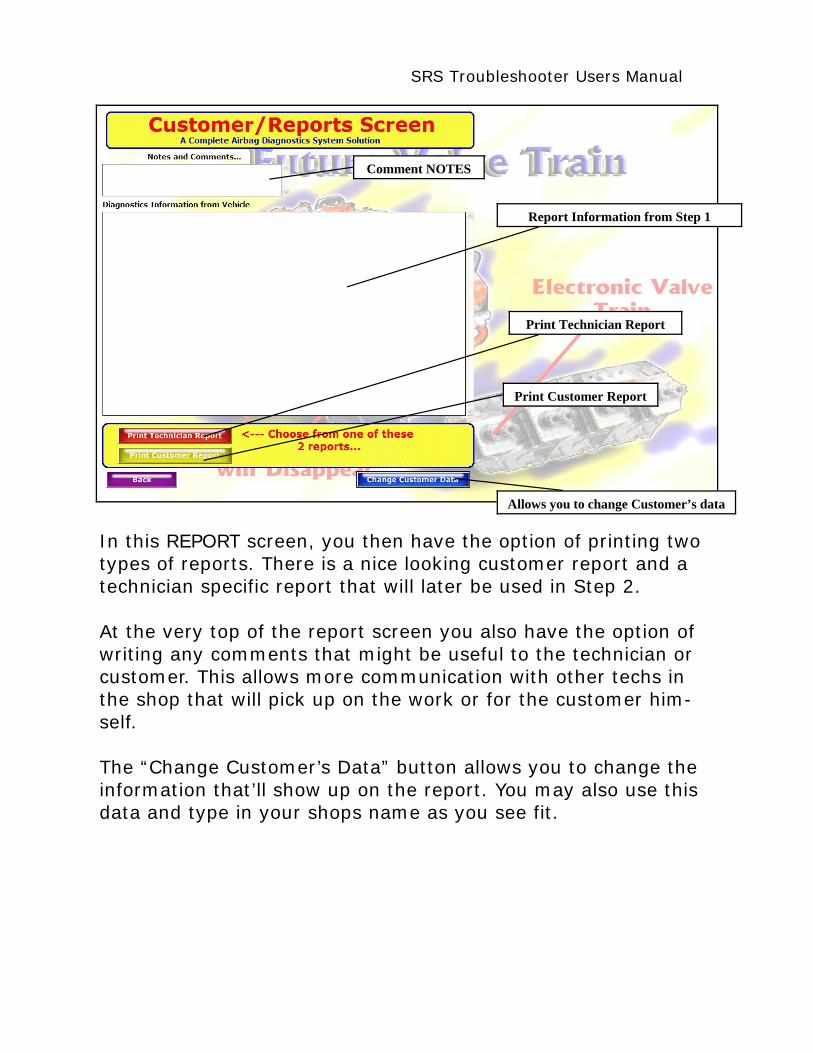
In this REPORT screen, you then have the option of printing two types of reports. There is a nice looking customer report and a technician specific report that will later be used in Step 2. At the very top of the report screen you also have the option of writing any comments that might be useful to the technician or customer. This allows more communication with other techs in the shop that will pick up on the work or for the customer him-self. The “Change Customer’s Data” button allows you to change the information that’ll show up on the report. You may also use this data and type in your shops name as you see fit.
Comment NOTES
Report Information from Step 1
Print Technician Report
Print Customer Report
Allows you to change Customer’s data
SRS Troubleshooter Users Manual
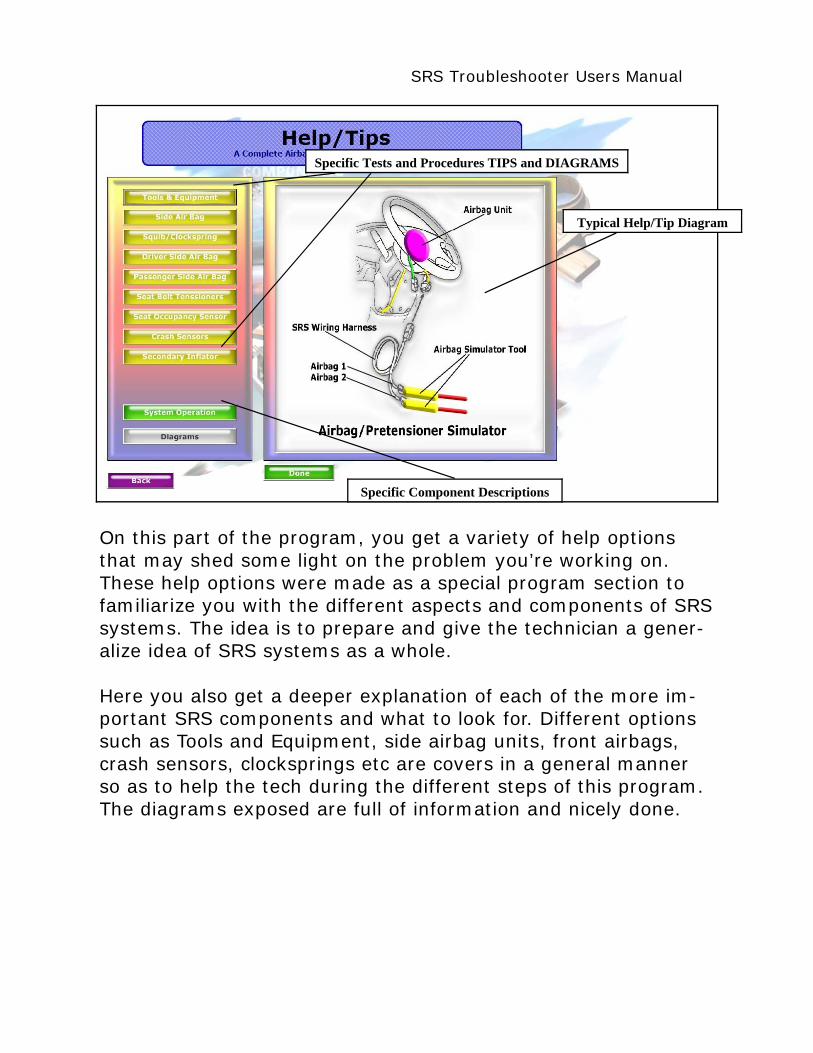
On this part of the program, you get a variety of help options that may shed some light on the problem you’re working on. These help options were made as a special program section to familiarize you with the different aspects and components of SRS systems. The idea is to prepare and give the technician a gener-alize idea of SRS systems as a whole. Here you also get a deeper explanation of each of the more im-portant SRS components and what to look for. Different options such as Tools and Equipment, side airbag units, front airbags, crash sensors, clocksprings etc are covers in a general manner so as to help the tech during the different steps of this program. The diagrams exposed are full of information and nicely done.
Specific Tests and Procedures TIPS and DIAGRAMS
Specific Component Descriptions
Typical Help/Tip Diagram
SRS Troubleshooter Users Manual
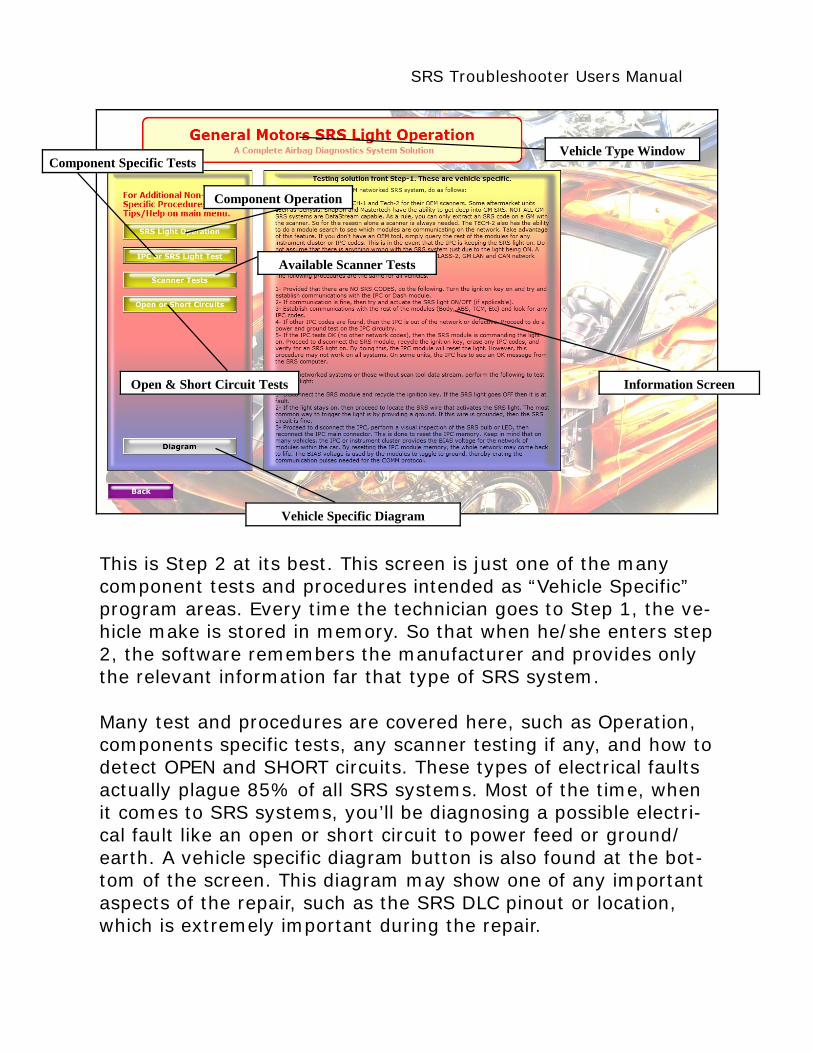
This is Step 2 at its best. This screen is just one of the many component tests and procedures intended as “Vehicle Specific” program areas. Every time the technician goes to Step 1, the ve-hicle make is stored in memory. So that when he/she enters step 2, the software remembers the manufacturer and provides only the relevant information far that type of SRS system. Many test and procedures are covered here, such as Operation, components specific tests, any scanner testing if any, and how to detect OPEN and SHORT circuits. These types of electrical faults actually plague 85% of all SRS systems. Most of the time, when it comes to SRS systems, you’ll be diagnosing a possible electri-cal fault like an open or short circuit to power feed or ground/earth. A vehicle specific diagram button is also found at the bot-tom of the screen. This diagram may show one of any important aspects of the repair, such as the SRS DLC pinout or location, which is extremely important during the repair.
Vehicle Type Window
Open & Short Circuit Tests
Vehicle Specific Diagram
Information Screen
Component Operation
Component Specific Tests
Available Scanner Tests
SRS Troubleshooter Users Manual
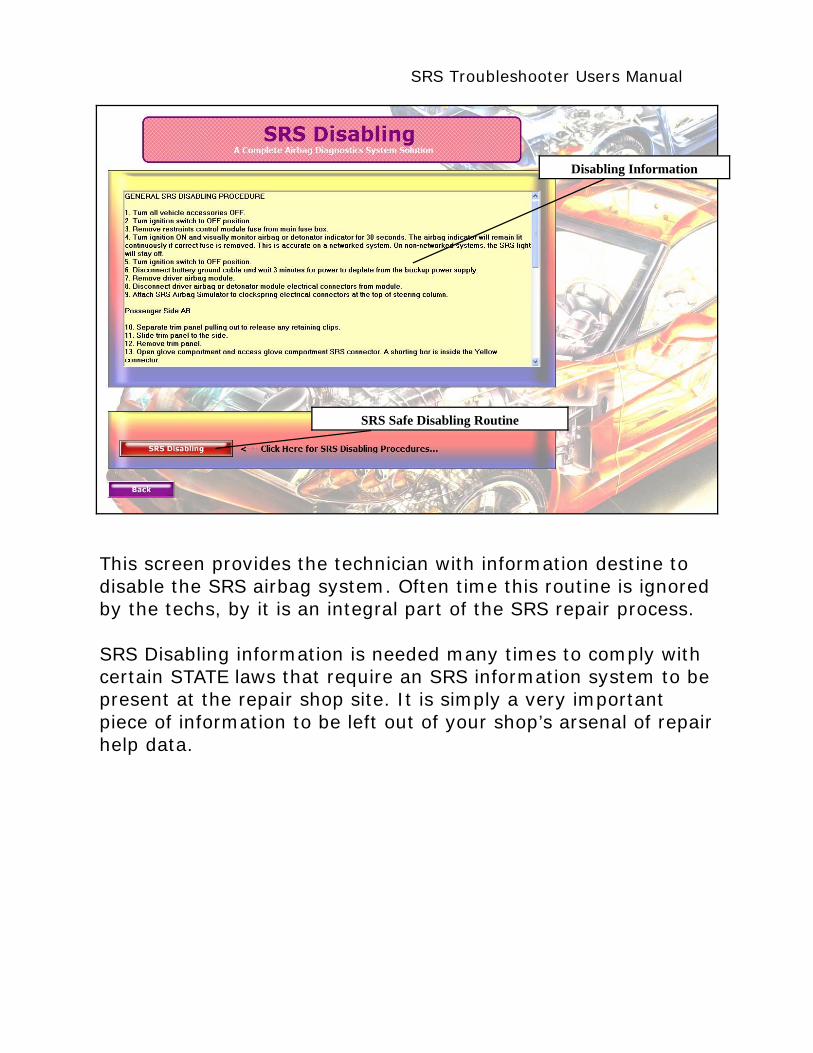
This screen provides the technician with information destine to disable the SRS airbag system. Often time this routine is ignored by the techs, by it is an integral part of the SRS repair process. SRS Disabling information is needed many times to comply with certain STATE laws that require an SRS information system to be present at the repair shop site. It is simply a very important piece of information to be left out of your shop’s arsenal of repair help data.
SRS Safe Disabling Routine
Disabling Information
SRS Troubleshooter Users Manual
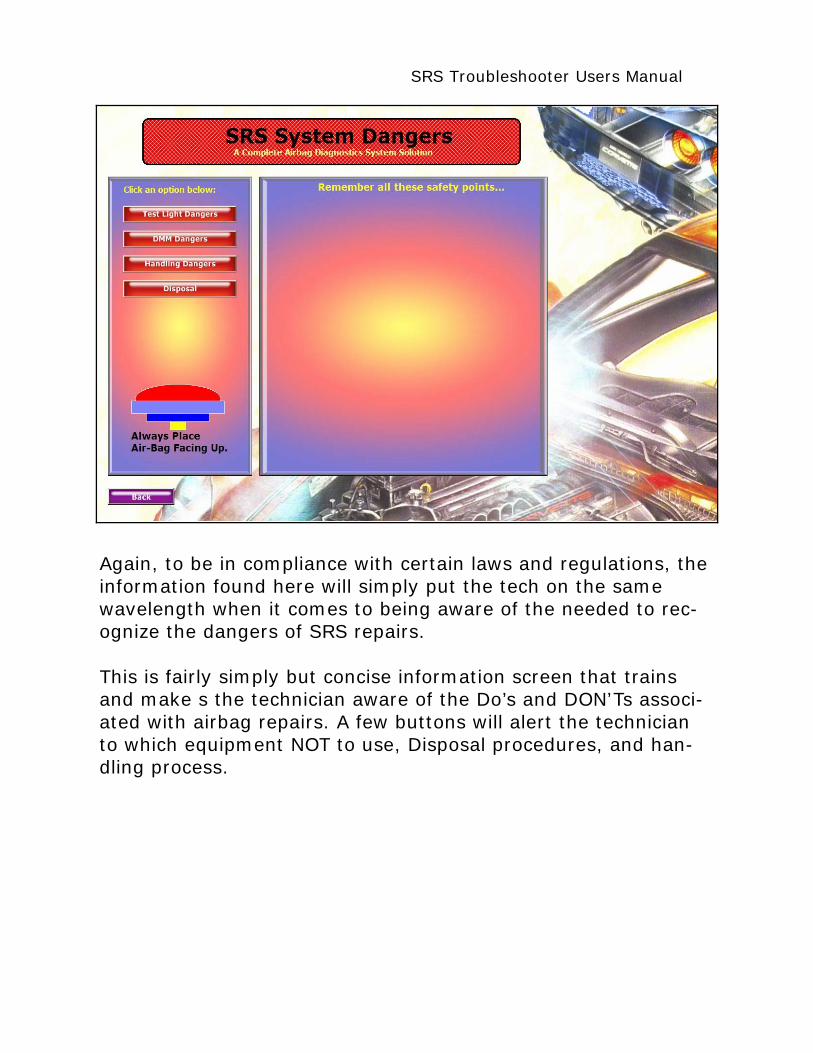
Again, to be in compliance with certain laws and regulations, the information found here will simply put the tech on the same wavelength when it comes to being aware of the needed to rec-ognize the dangers of SRS repairs. This is fairly simply but concise information screen that trains and make s the technician aware of the Do’s and DON’Ts associ-ated with airbag repairs. A few buttons will alert the technician to which equipment NOT to use, Disposal procedures, and han-dling process.
SRS Troubleshooter Users Manual
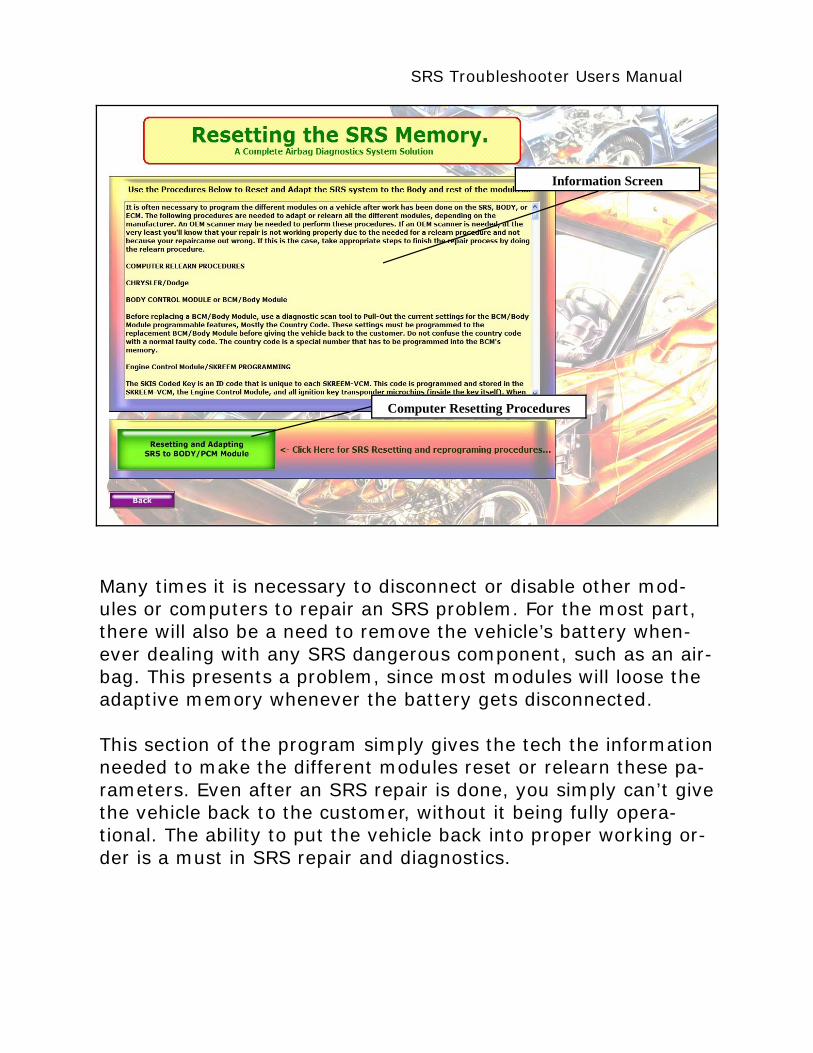
Many times it is necessary to disconnect or disable other mod-ules or computers to repair an SRS problem. For the most part, there will also be a need to remove the vehicle’s battery when-ever dealing with any SRS dangerous component, such as an air-bag. This presents a problem, since most modules will loose the adaptive memory whenever the battery gets disconnected. This section of the program simply gives the tech the information needed to make the different modules reset or relearn these pa-rameters. Even after an SRS repair is done, you simply can’t give the vehicle back to the customer, without it being fully opera-tional. The ability to put the vehicle back into proper working or-der is a must in SRS repair and diagnostics.
Computer Resetting Procedures
Information Screen
SRS Troubleshooter Users Manual
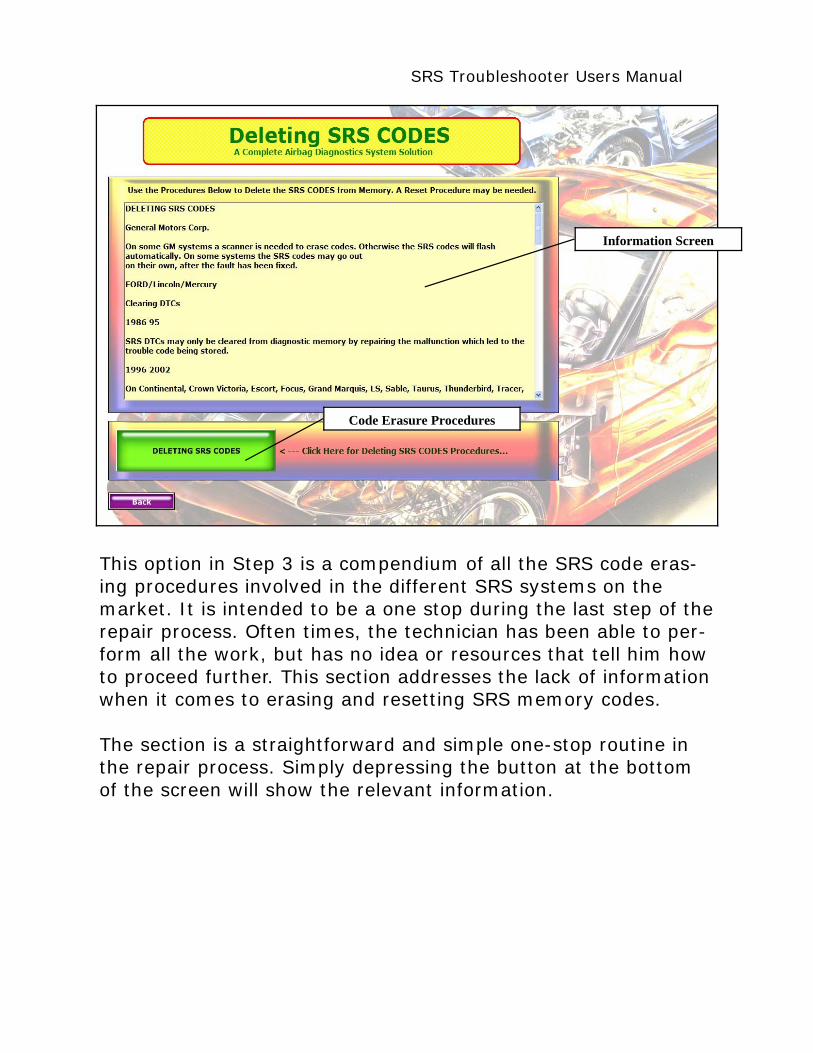
This option in Step 3 is a compendium of all the SRS code eras-ing procedures involved in the different SRS systems on the market. It is intended to be a one stop during the last step of the repair process. Often times, the technician has been able to per-form all the work, but has no idea or resources that tell him how to proceed further. This section addresses the lack of information when it comes to erasing and resetting SRS memory codes. The section is a straightforward and simple one-stop routine in the repair process. Simply depressing the button at the bottom of the screen will show the relevant information.
Code Erasure Procedures
Information Screen
SRS Troubleshooter Users Manual
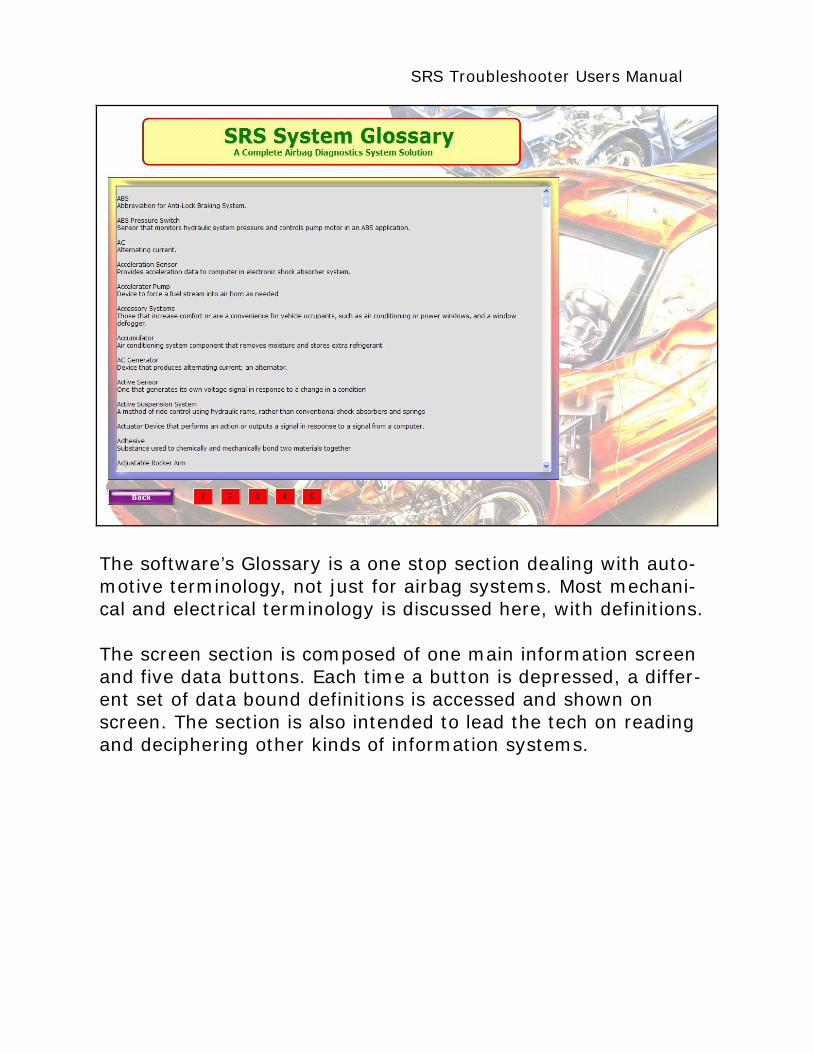
The software’s Glossary is a one stop section dealing with auto-motive terminology, not just for airbag systems. Most mechani-cal and electrical terminology is discussed here, with definitions. The screen section is composed of one main information screen and five data buttons. Each time a button is depressed, a differ-ent set of data bound definitions is accessed and shown on screen. The section is also intended to lead the tech on reading and deciphering other kinds of information systems.
SRS Troubleshooter Users Manual
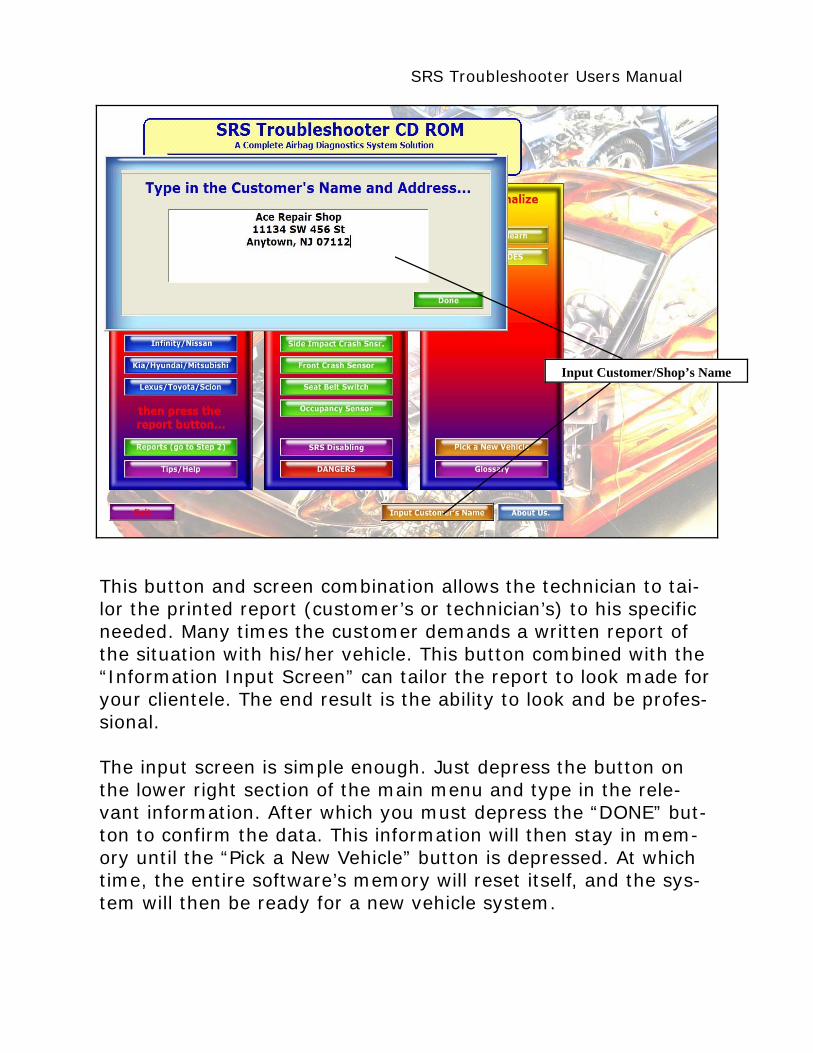
This button and screen combination allows the technician to tai-lor the printed report (customer’s or technician’s) to his specific needed. Many times the customer demands a written report of the situation with his/her vehicle. This button combined with the “Information Input Screen” can tailor the report to look made for your clientele. The end result is the ability to look and be profes-sional. The input screen is simple enough. Just depress the button on the lower right section of the main menu and type in the rele-vant information. After which you must depress the “DONE” but-ton to confirm the data. This information will then stay in mem-ory until the “Pick a New Vehicle” button is depressed. At which time, the entire software’s memory will reset itself, and the sys-tem will then be ready for a new vehicle system.
Input Customer/Shop’s Name
SRS Troubleshooter Users Manual
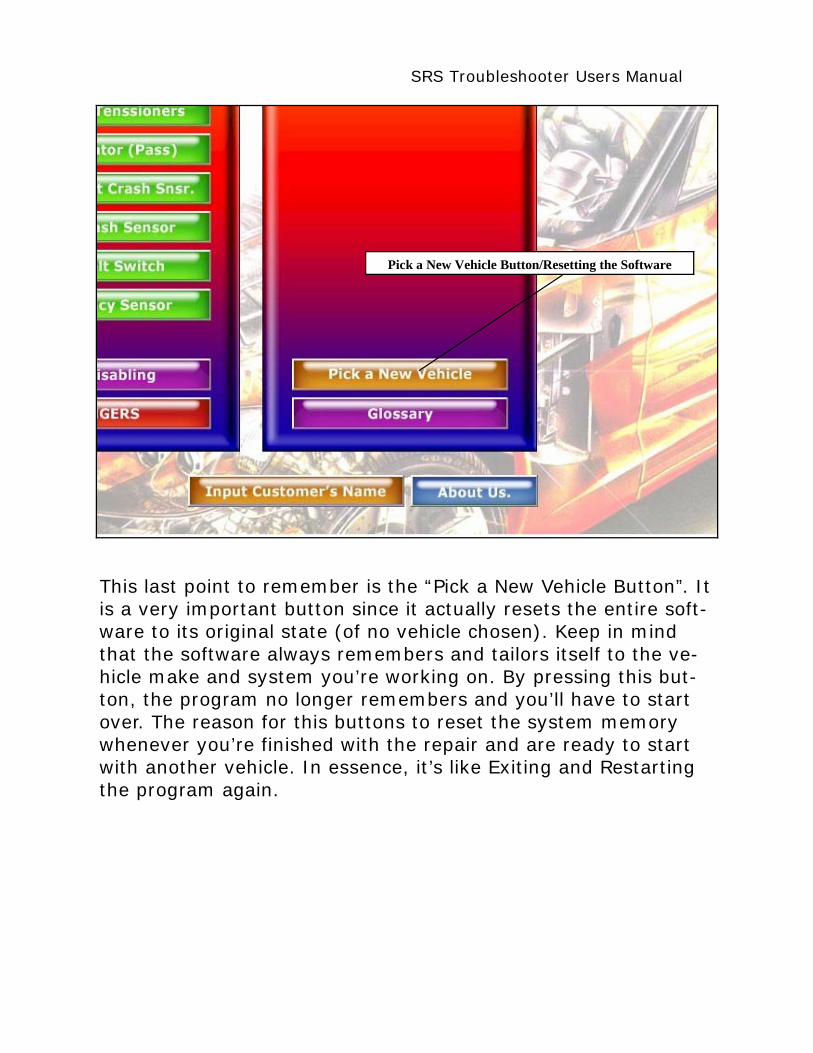
This last point to remember is the “Pick a New Vehicle Button”. It is a very important button since it actually resets the entire soft-ware to its original state (of no vehicle chosen). Keep in mind that the software always remembers and tailors itself to the ve-hicle make and system you’re working on. By pressing this but-ton, the program no longer remembers and you’ll have to start over. The reason for this buttons to reset the system memory whenever you’re finished with the repair and are ready to start with another vehicle. In essence, it’s like Exiting and Restarting the program again.
Pick a New Vehicle Button/Resetting the Software

SRS Troubleshooter Users Manual
NOTES


![SRS-01 SRS-02 Encoder 4MPX-ASI Decoder ASI-4MPXUserManuals~SRS_[EN].pdf · SRS-02 Encoder 4MPX-ASI Decoder ASI-4MPX ... The package should contain: a. SRS-01. b. ... The SRS-02, as](https://img.pdfslide.us/doc/110x75/5abb735f7f8b9a441d8cd573/srs-01-srs-02-encoder-4mpx-asi-decoder-asi-usermanualssrsenpdfsrs-02-encoder.jpg)