Embed Size (px)
Citation preview

SRS MU Stage 2 User Training 1 SRS Confidential
SRS Meaningful Use User Training Cheat Sheet Patient Demographics .................................................................................................................2
Demographic Data for CPOE ..................................................................................................3
Demographic Data for Patient Electronic Access .....................................................................3
Demographic Data for Patient Reminders ...............................................................................5
Demographic Data for Immunizations ......................................................................................6
Clinical Quality Measure Data .....................................................................................................8
Source of Payment ..................................................................................................................8
Encounter Start / Stop Time ....................................................................................................9
Visit Type App .......................................................................................................................10
Family Health History ................................................................................................................11
Medication Reconciliation .........................................................................................................14
Electronic Notes (a.k.a Progress Note) .....................................................................................16
Creating an eNote .................................................................................................................16
Summary of Care ......................................................................................................................17
Sending the Summary of Care...............................................................................................18
Functional /Cognitive Status ..................................................................................................21
Care Plan ..............................................................................................................................24
Care Team ............................................................................................................................26
Adding Clinical Staff or Referring Doctors ..........................................................................29
Discrete Data Reconciliation .....................................................................................................31
Receiving a Transfer of Care (Message Center) ....................................................................31
Unmatched Patients ...........................................................................................................32
Reconciling a Transfer of Care (Dashboard)..........................................................................33
Saving an Electronic Transfer of Care Document ..................................................................36
Clinical Decision Support Rule ..................................................................................................36
Clinical Summary ......................................................................................................................37
Smoking Status .........................................................................................................................38
Patient Education ......................................................................................................................41
Diagnosis App (with ICD-10!) ....................................................................................................41
Vital Signs .................................................................................................................................48
SRS MU Stage 2 User Training 2 SRS Confidential
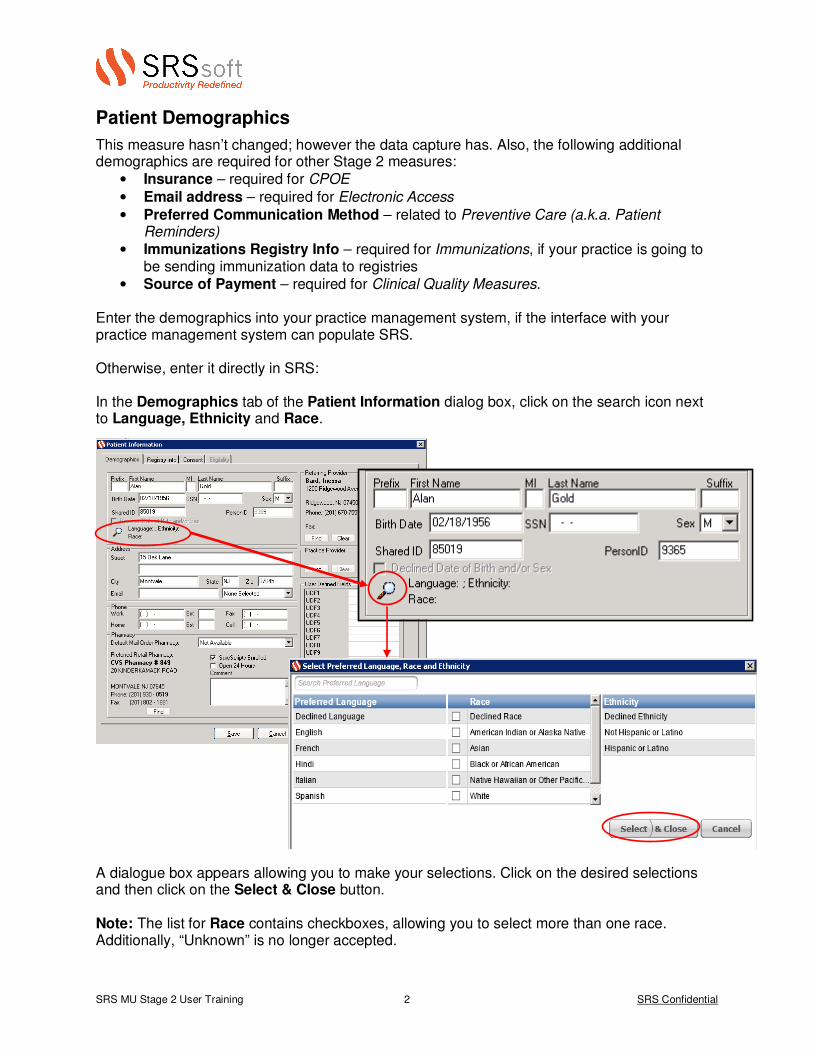
Patient Demographics
This measure hasn’t changed; however the data capture has. Also, the following additional demographics are required for other Stage 2 measures:
• Insurance – required for CPOE
• Email address – required for Electronic Access
• Preferred Communication Method – related to Preventive Care (a.k.a. Patient Reminders)
• Immunizations Registry Info – required for Immunizations, if your practice is going to be sending immunization data to registries
• Source of Payment – required for Clinical Quality Measures. Enter the demographics into your practice management system, if the interface with your practice management system can populate SRS. Otherwise, enter it directly in SRS: In the Demographics tab of the Patient Information dialog box, click on the search icon next to Language, Ethnicity and Race. A dialogue box appears allowing you to make your selections. Click on the desired selections and then click on the Select & Close button. Note: The list for Race contains checkboxes, allowing you to select more than one race. Additionally, “Unknown” is no longer accepted.
SRS MU Stage 2 User Training 3 SRS Confidential
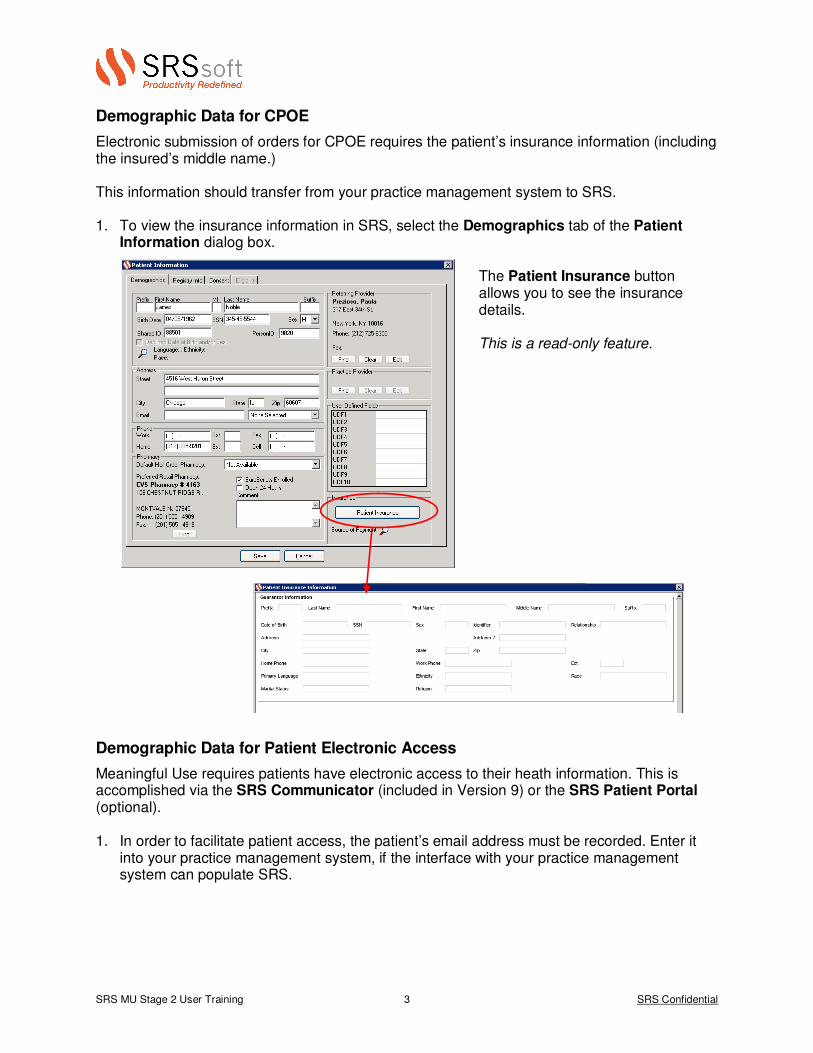
Demographic Data for CPOE
Electronic submission of orders for CPOE requires the patient’s insurance information (including the insured’s middle name.) This information should transfer from your practice management system to SRS. 1. To view the insurance information in SRS, select the Demographics tab of the Patient
Information dialog box.
The Patient Insurance button allows you to see the insurance details. This is a read-only feature.
Demographic Data for Patient Electronic Access
Meaningful Use requires patients have electronic access to their heath information. This is accomplished via the SRS Communicator (included in Version 9) or the SRS Patient Portal (optional). 1. In order to facilitate patient access, the patient’s email address must be recorded. Enter it
into your practice management system, if the interface with your practice management system can populate SRS.

SRS MU Stage 2 User Training 4 SRS Confidential
Otherwise, enter it directly in SRS:
In the Demographics tab of the Patient Information dialog box, type in the patient’s Email address.
Then click on the Save button. Note: The email address can be that of a parent or guardian of a minor patient. SRS accepts the same email address for multiple patients.
The SRS Communicator also requires the patient’s consent; however you must first enter the patient’s email address. 2. Select the Consent tab of the Patient Information dialog box. Then select SRS
Communicator under Consent Type and click on the Consent button. 3. A dialogue box appears confirming the patient’s email address. Click on the OK button.

SRS MU Stage 2 User Training 5 SRS Confidential
4. The consent is active. An email will automatically be sent to the patient with instructions on setting up a portal account.
The consent status displays in the Patient Consent app on the dashboard. Demographic Data for Patient Reminders
Patient Reminders must be sent using the patient’s preferred communication method, if known. To record the patient’s preferred contact method for patient reminders, select the Demographics tab of the dialogue box.
Patient Information

SRS MU Stage 2 User Training 6 SRS Confidential
Click on the down arrow in the field to the right of the email address, and click on one of the options in the list to select it. Then click on the Save button at the bottom of the Demographics tab.
Demographic Data for Immunizations
If your practice performs immunizations, additional demographics must be recorded. 1. Select the Registry Info tab of the Patient Information dialog box.
Enter the information and then click on the Save button. Publicity Code - Indicates how a person wishes to be contacted in a reminder or recall situation.

SRS MU Stage 2 User Training 7 SRS Confidential
2. Select the Consent tab of the Patient Information dialog box. Select Immunization Data under Consent Type and click on the Consent button.
3. The Immunization Data dialogue box appears. Select the duration and click on the
Consent button. 4. The consent status displays in the Patient Consent app on the dashboard.
5. SRS has an icon on the Dashboard to indicate if the immunization demographics have been
recorded:
= Immunization Demographics incomplete or not recorded = Immunization Demographics complete (Note: Requires email address in the Registry Info screen!)
SRS MU Stage 2 User Training 8 SRS Confidential
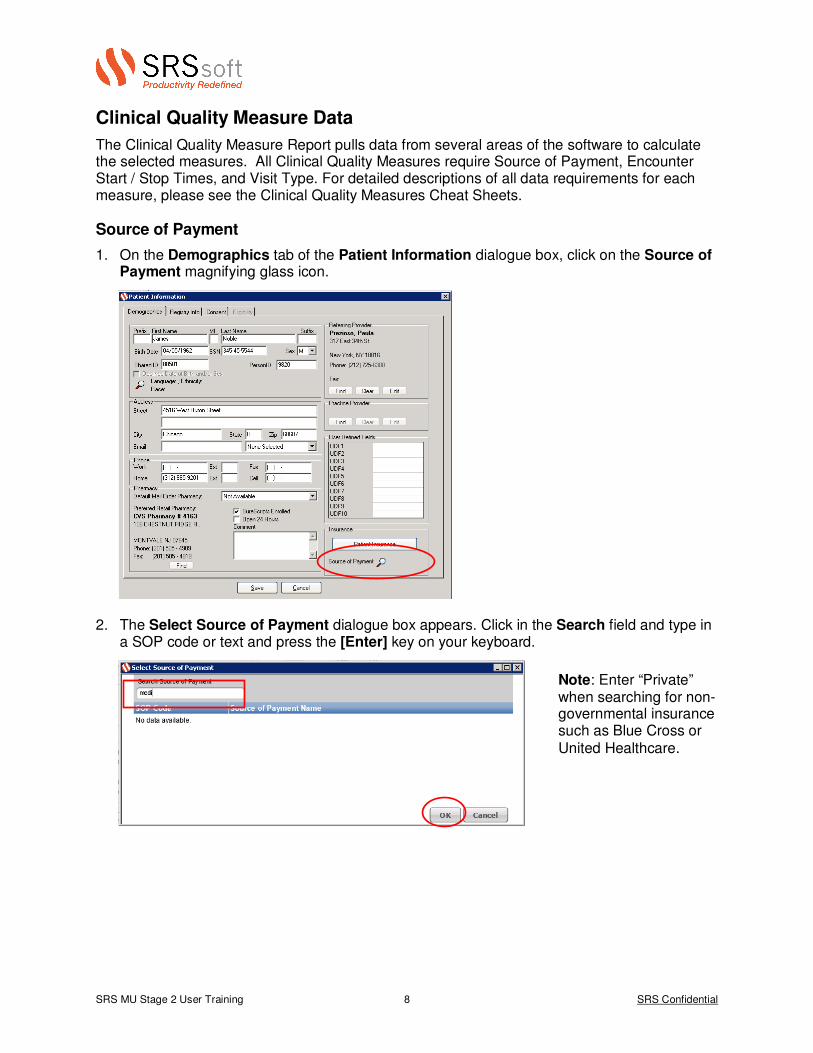
Clinical Quality Measure Data
The Clinical Quality Measure Report pulls data from several areas of the software to calculate the selected measures. All Clinical Quality Measures require Source of Payment, Encounter Start / Stop Times, and Visit Type. For detailed descriptions of all data requirements for each measure, please see the Clinical Quality Measures Cheat Sheets. Source of Payment
1. On the Demographics tab of the Patient Information dialogue box, click on the Source of Payment magnifying glass icon.
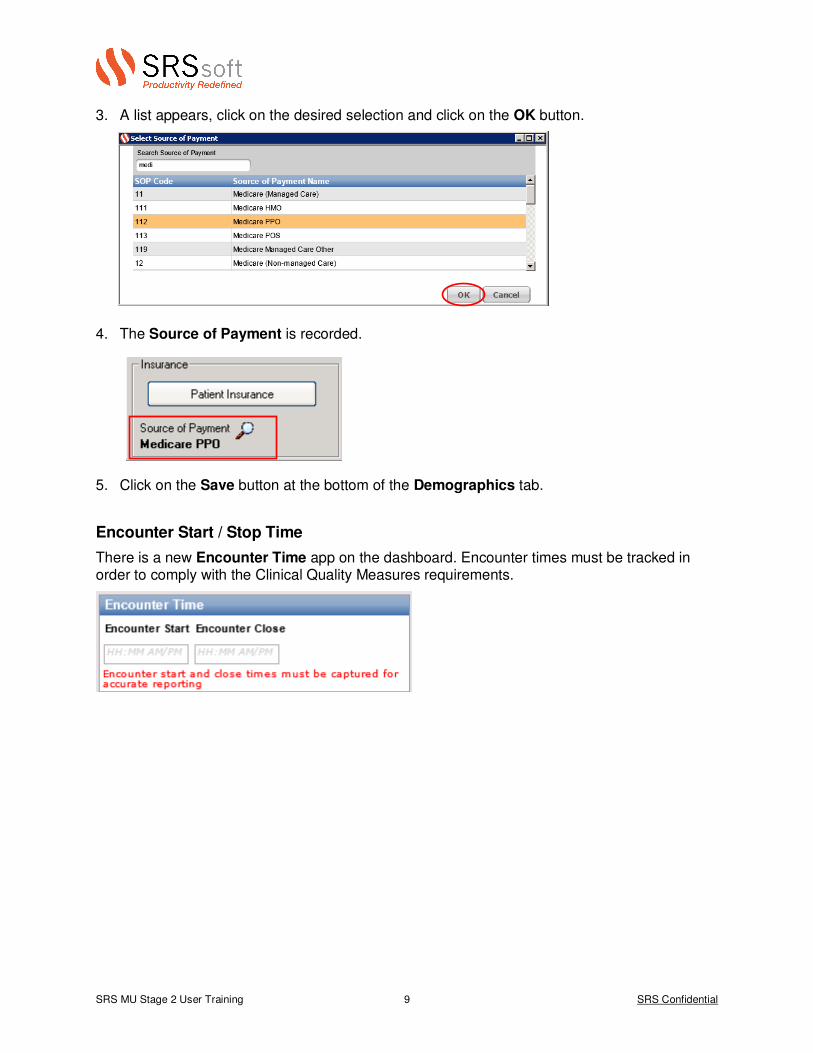
2. The Select Source of Payment dialogue box appears. Click in the Search field and type in a SOP code or text and press the [Enter] key on your keyboard.
Note: Enter “Private” when searching for non-governmental insurance such as Blue Cross or United Healthcare.
SRS MU Stage 2 User Training 9 SRS Confidential
3. A list appears, click on the desired selection and click on the OK button.
4. The Source of Payment is recorded. 5. Click on the Save button at the bottom of the Demographics tab.
Encounter Start / Stop Time
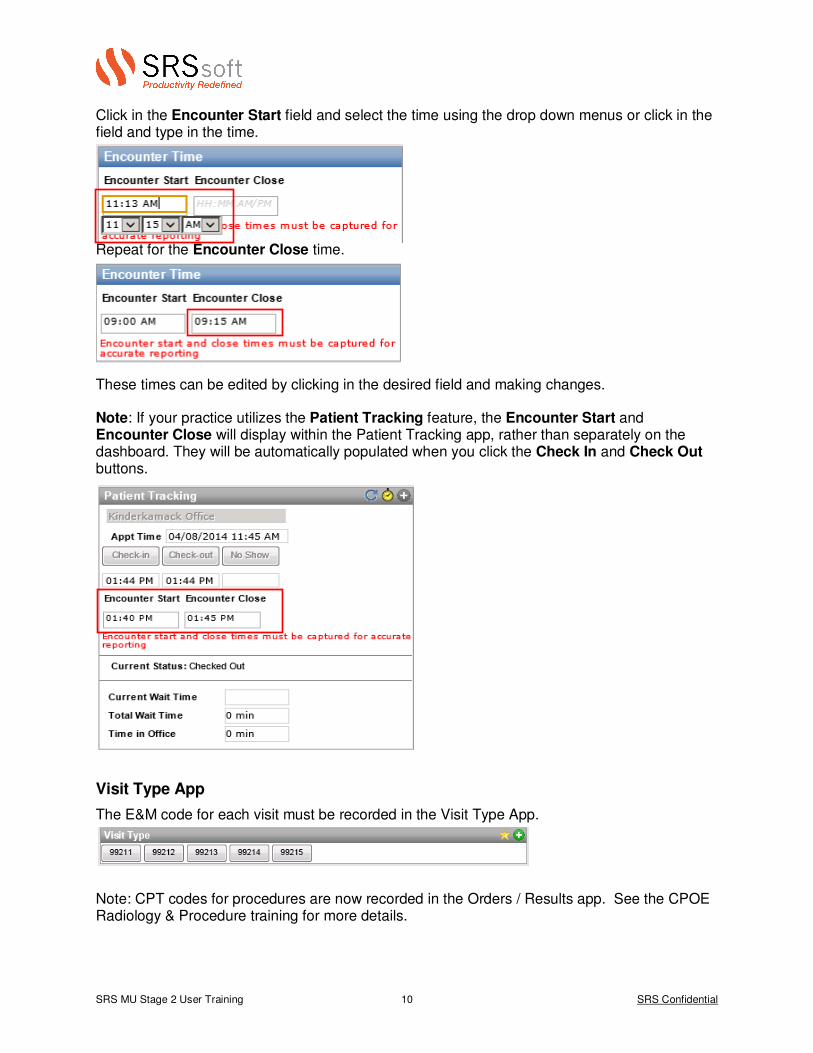
There is a new Encounter Time app on the dashboard. Encounter times must be tracked in order to comply with the Clinical Quality Measures requirements.
SRS MU Stage 2 User Training 10 SRS Confidential
Click in the Encounter Start field and select the time using the drop down menus or click in the field and type in the time. Repeat for the Encounter Close time. These times can be edited by clicking in the desired field and making changes. Note: If your practice utilizes the Patient Tracking feature, the Encounter Start and Encounter Close will display within the Patient Tracking app, rather than separately on the dashboard. They will be automatically populated when you click the Check In and Check Out buttons.
Visit Type App
The E&M code for each visit must be recorded in the Visit Type App.
Note: CPT codes for procedures are now recorded in the Orders / Results app. See the CPOE Radiology & Procedure training for more details.
SRS MU Stage 2 User Training 11 SRS Confidential
Family Health History
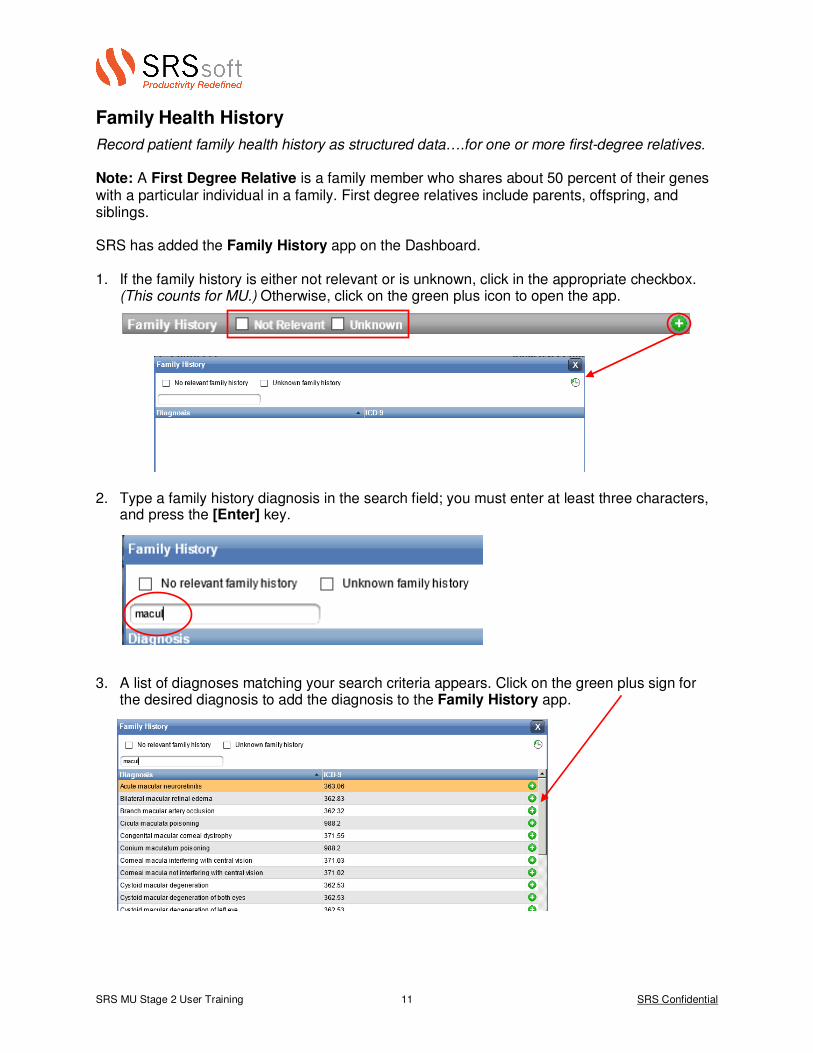
Record patient family health history as structured data….for one or more first-degree relatives. Note: A First Degree Relative is a family member who shares about 50 percent of their genes with a particular individual in a family. First degree relatives include parents, offspring, and siblings. SRS has added the Family History app on the Dashboard. 1. If the family history is either not relevant or is unknown, click in the appropriate checkbox.
(This counts for MU.) Otherwise, click on the green plus icon to open the app. 2. Type a family history diagnosis in the search field; you must enter at least three characters,
and press the [Enter] key. 3. A list of diagnoses matching your search criteria appears. Click on the green plus sign for
the desired diagnosis to add the diagnosis to the Family History app.

SRS MU Stage 2 User Training 12 SRS Confidential
4. The diagnosis is now listed in the app. Click in the radio button for the family member(s) who
have the diagnosis. Note: You can select more than one family member for each diagnosis. (“Other” is not a First Degree Relative and therefore does not count for meaningful use.)
In this example, the green circle indicates the patient’s Mother is identified as having Macular. Note: If you selected an incorrect family member, just click on the radio button again; it will remove the green circle.
5. If you wish to add additional information, right-click on the green circle. A dialogue box appears allowing you to enter Notes, Age of Onset and indicate if the relative is Deceased. After entering the desired information, click on the Save button.
If you added additional information, the green circle will have a note icon over it.

SRS MU Stage 2 User Training 13 SRS Confidential
6. To add another family history diagnosis, click on the green circle with the plus sign.
7. Repeat steps 3 through 6 above for each family history diagnosis. 8. When all diagnoses have been added, click on the X button to close the app. The Family History displays on the Dashboard.
Note: If your practice utilized the SRS Flow Sheet to record family history that information will display on the Dashboard, however you will not be able to use the Flow Sheet for this purpose in Version 9.

SRS MU Stage 2 User Training 14 SRS Confidential
Family History Diagnosis Favorites The Family History app allows a user to set Favorites. After adding a diagnosis to the app, right click on the Diagnosis. Then click on Add to Favorites. Once you have created Favorites, they appear whenever you open the app. Favorites are indicated by a yellow star. They are not added to the selected patient’s Family History unless you click on one or more of the relatives to associate the diagnosis with that person. To remove a diagnosis from your favorites, right click on the Diagnosis and select Remove from Favorites.
Medication Reconciliation
The EP who receives a patient from another setting of care or provider of care or believes an encounter is relevant should perform medication reconciliation. To reconcile the patient’s medications: 1. To indicate a patient has been received from another provider or setting of care, locate the
desired patient chart. Click in the Transfer Encounter checkbox on the Encounter Bar.
Note: SRS has a setting in the Admin module that can be configured to identify transfers in to the provider’s care by appointment type, e.g. “New Patient”. Patients with the flagged appointment types will have the Transfer Encounter checkbox automatically checked. (This applies only to patient appointments scheduled after the setting is configured.) Additionally, any patients whose charts have received an electronic Summary of Care will also have the Transfer Encounter checkbox automatically checked. (Please refer to the Discrete Data Reconciliation section of this document.)

SRS MU Stage 2 User Training 15 SRS Confidential
2. Then click on the Rx button on the SRS tool bar. The Rx module displays. Review the medications listed in the Patient Drug History with the patient, or against information received from a hospital or other provider.
Note: Medication reconciliation includes verifying the drug name, dosage, frequency and route. If necessary, add medications as historical entries to ensure the Patient Drug History has the most accurate list possible.
3. Click in the Medications Reconciled (Transfer Encounter) checkbox to indicate the
reconciliation has been completed.
Note: Any patients whose charts have received an electronic Summary of Care, and have had their medications reconciled using the Discrete Data Reconciliation feature will also have the Medications Reconciled (Transfer Encounter) checkbox automatically checked.
SRS MU Stage 2 User Training 16 SRS Confidential
Electronic Notes (a.k.a Progress Note)
Creating an eNote
To create an electronic note:
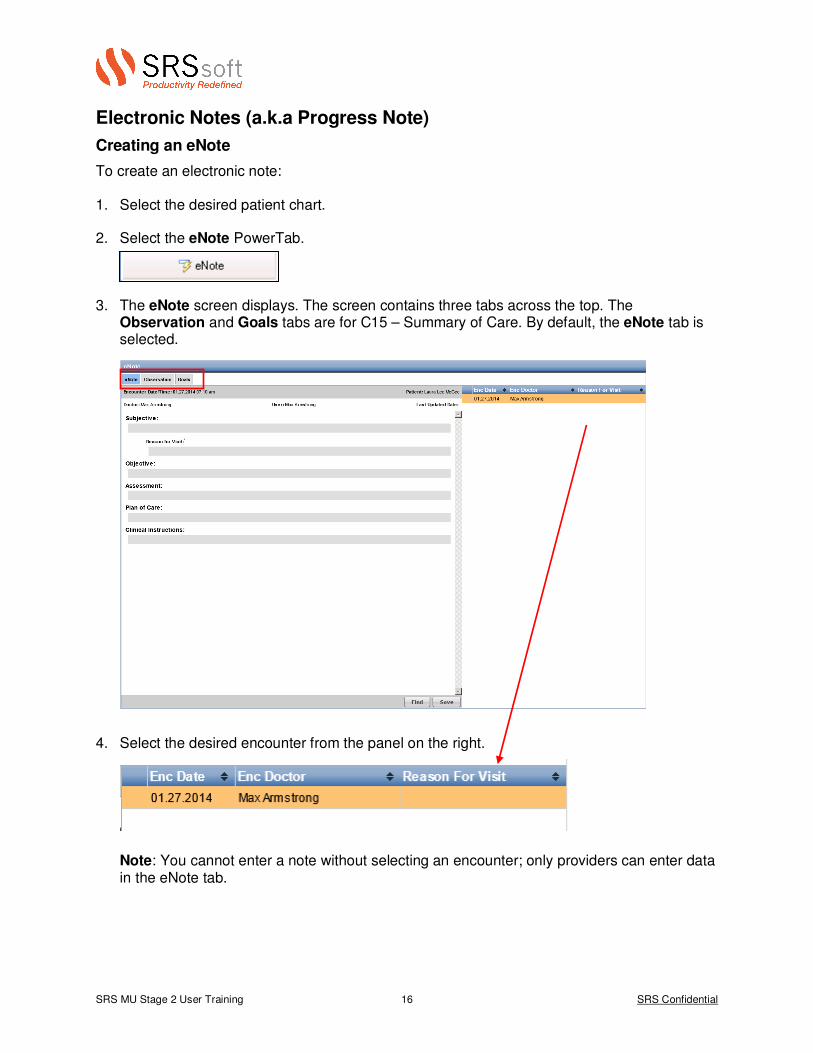
1. Select the desired patient chart. 2. Select the eNote PowerTab.
3. The eNote screen displays. The screen contains three tabs across the top. The Observation and Goals tabs are for C15 – Summary of Care. By default, the eNote tab is selected.
4. Select the desired encounter from the panel on the right.
Note: You cannot enter a note without selecting an encounter; only providers can enter data in the eNote tab.
SRS MU Stage 2 User Training 17 SRS Confidential
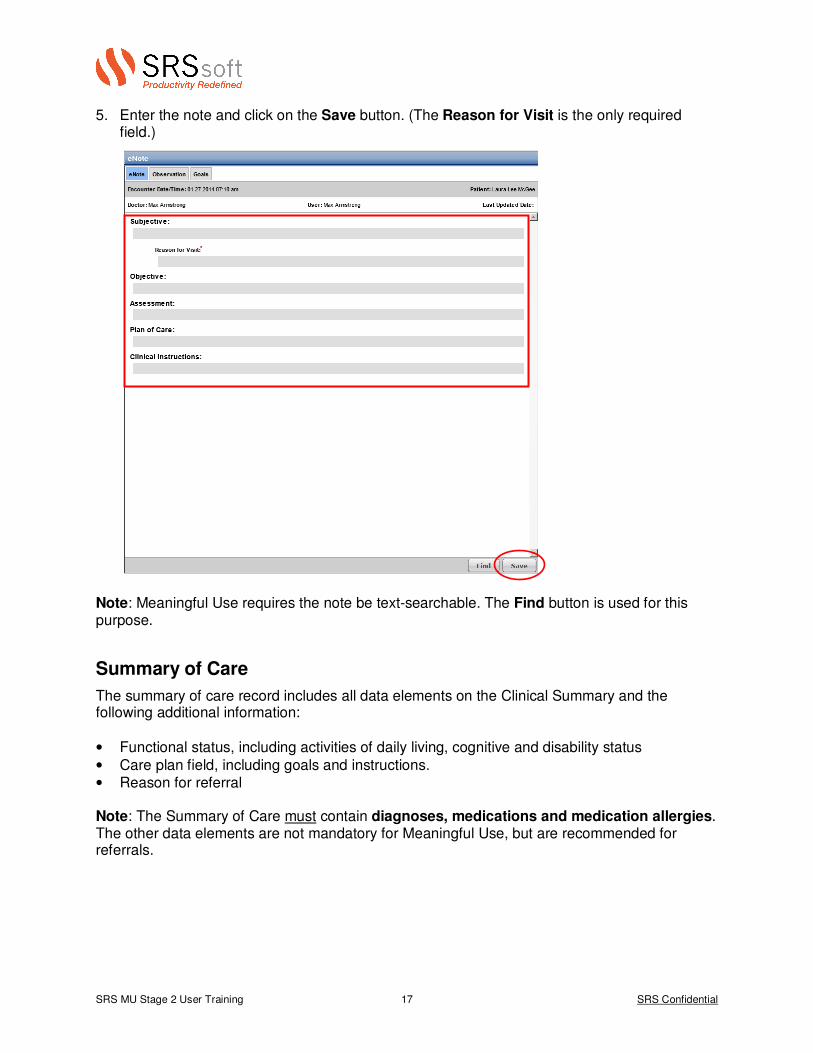
5. Enter the note and click on the Save button. (The Reason for Visit is the only required field.)
Note: Meaningful Use requires the note be text-searchable. The Find button is used for this purpose.
Summary of Care
The summary of care record includes all data elements on the Clinical Summary and the following additional information:
• Functional status, including activities of daily living, cognitive and disability status
• Care plan field, including goals and instructions. • Reason for referral Note: The Summary of Care must contain diagnoses, medications and medication allergies. The other data elements are not mandatory for Meaningful Use, but are recommended for referrals.
SRS MU Stage 2 User Training 18 SRS Confidential
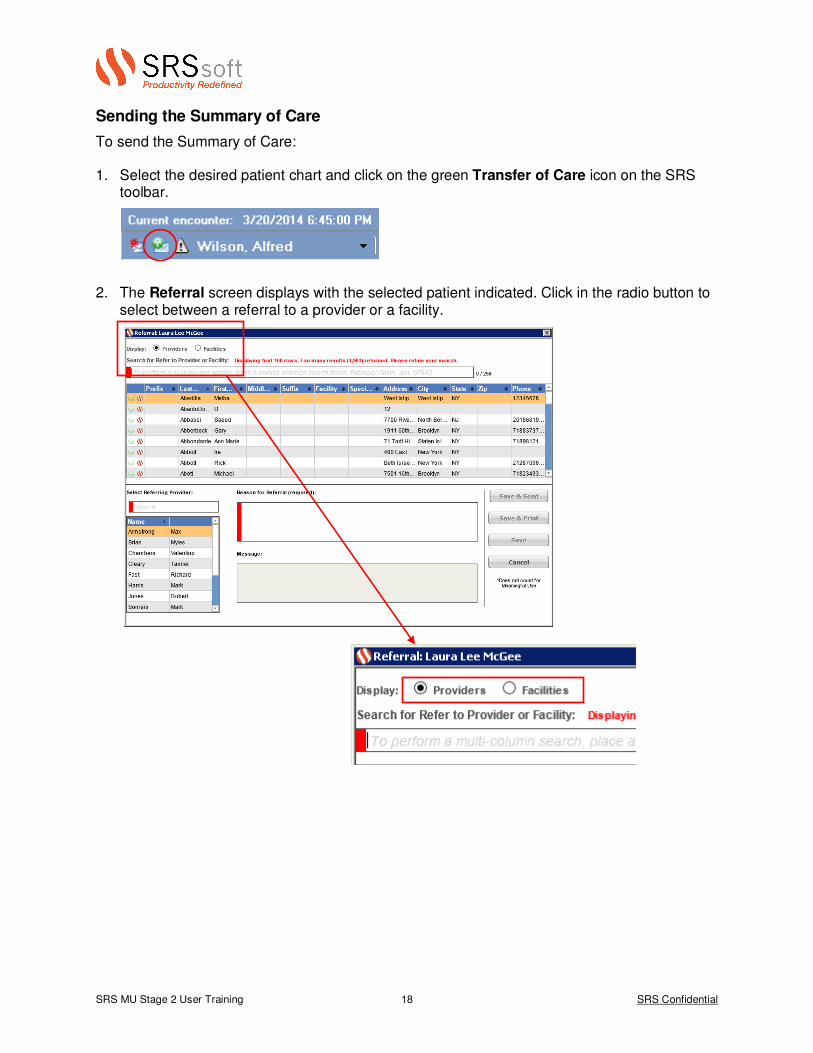
Sending the Summary of Care
To send the Summary of Care: 1. Select the desired patient chart and click on the green Transfer of Care icon on the SRS
toolbar. 2. The Referral screen displays with the selected patient indicated. Click in the radio button to
select between a referral to a provider or a facility.

SRS MU Stage 2 User Training 19 SRS Confidential
3. A list of providers or facilities displays. You can use the scroll bar to the right to navigate the list, or type in the search field to find the desired record.
The Providers and Facilities lists contain the following icons in the first column:
= The provider or facility can receive a Summary of Care via direct messaging
= The provider or facility cannot receive a Summary of Care via direct messaging The Providers and Facilities lists contain the following icons in the second column:
= The provider or facility is enrolled with Surescripts for direct messaging
= The provider or facility has been added manually by the practice Note: If the desired record is not in the list, you will have to add it. Please refer to the Adding Clinical Staff or Referring Doctors section of this document for more information on adding records. When adding providers who do not participate with the Surescripts network for direct messaging, if you have the provider’s direct messaging address, you can add it; you may then be able to communicate with the provider electronically.
4. Click on the desired Refer to Provider or Facility record to select it.
SRS MU Stage 2 User Training 20 SRS Confidential
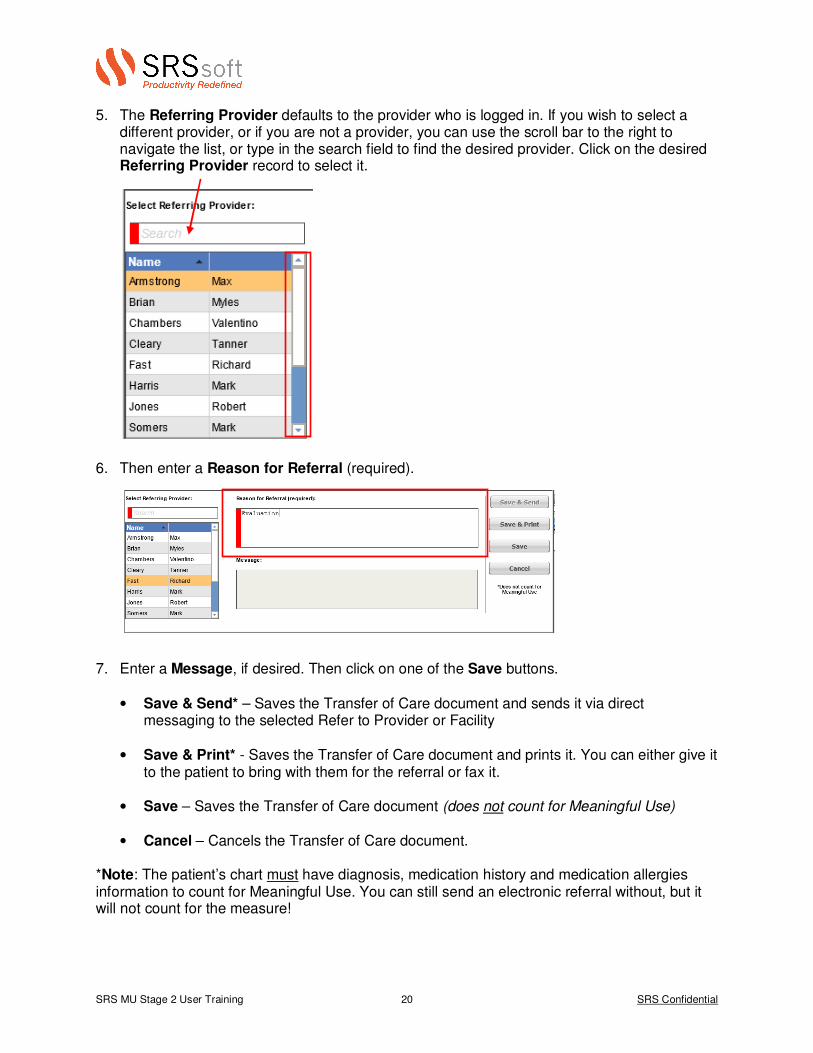
5. The Referring Provider defaults to the provider who is logged in. If you wish to select a different provider, or if you are not a provider, you can use the scroll bar to the right to navigate the list, or type in the search field to find the desired provider. Click on the desired Referring Provider record to select it.
6. Then enter a Reason for Referral (required).
7. Enter a Message, if desired. Then click on one of the Save buttons.
• Save & Send* – Saves the Transfer of Care document and sends it via direct messaging to the selected Refer to Provider or Facility
• Save & Print* - Saves the Transfer of Care document and prints it. You can either give it
to the patient to bring with them for the referral or fax it.
• Save – Saves the Transfer of Care document (does not count for Meaningful Use)
• Cancel – Cancels the Transfer of Care document. *Note: The patient’s chart must have diagnosis, medication history and medication allergies information to count for Meaningful Use. You can still send an electronic referral without, but it will not count for the measure!

SRS MU Stage 2 User Training 21 SRS Confidential
The document saves to the Transition of Care Archive tab; the format is similar to the Clinical Summary.
The Transition of Care (Summary of Care) document is a HTML format document which cannot be modified. The Save to External File is the only button available on the Powerviewer toolbar. Functional /Cognitive Status
To document Functional and/or Cognitive Status:
1. Select the desired patient chart. 2. Select the eNote PowerTab.

SRS MU Stage 2 User Training 22 SRS Confidential
3. The eNote screen displays. Click on the Observation tab.
4. The Observation screen displays. Click in the click in the checkboxes for No Impairment as appropriate.
–OR–
Click in the Observation search field and type in search criteria. Press the [Enter] key.

SRS MU Stage 2 User Training 23 SRS Confidential
5. Click on the desired Observation to select it. 6. The Date defaults to the current day. Click in this field and select a different date from the
calendar, if desired (you can enter dates in the past). This is a required field.
7. Type in Notes and then click on the Add Functional or Add Cognitive button as
appropriate.

SRS MU Stage 2 User Training 24 SRS Confidential
8. The Observation is added to the chart. To delete an Observation, click on the red minus icon.
Care Plan
To document the Care Plan:
1. Select the desired patient chart. 2. Select the eNote PowerTab.
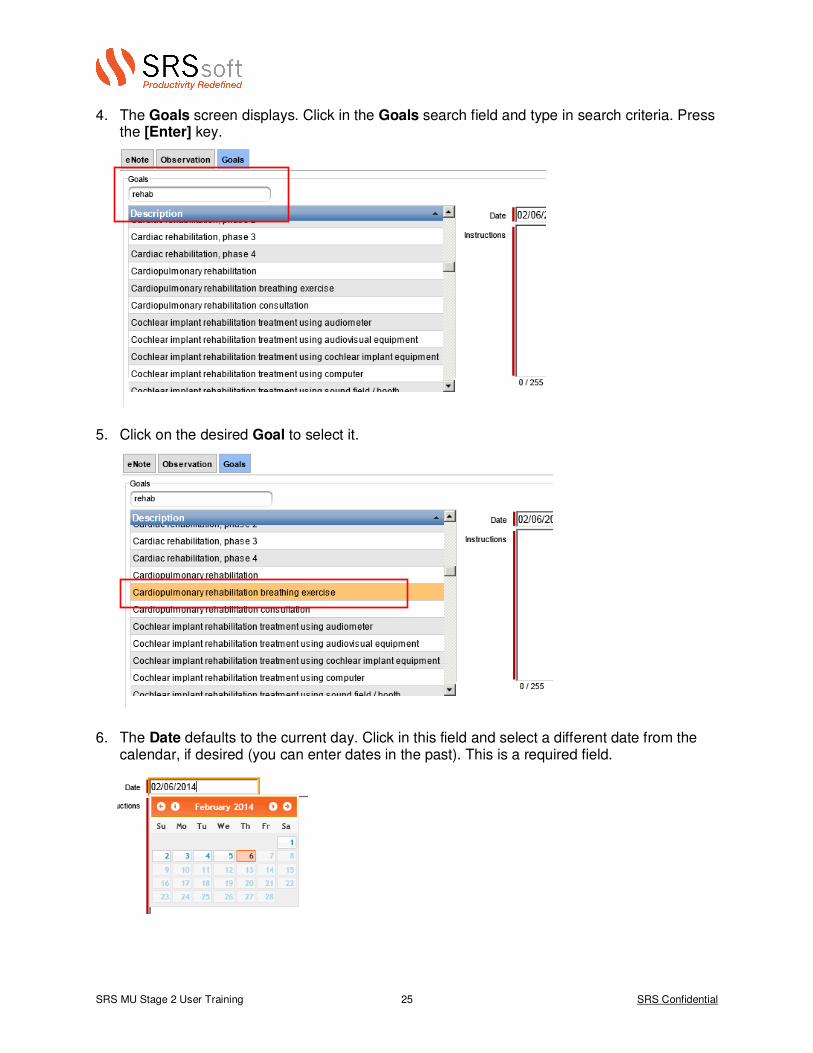
3. The eNote screen displays. Click on the Goals tab.
SRS MU Stage 2 User Training 25 SRS Confidential
4. The Goals screen displays. Click in the Goals search field and type in search criteria. Press the [Enter] key.
5. Click on the desired Goal to select it. 6. The Date defaults to the current day. Click in this field and select a different date from the
calendar, if desired (you can enter dates in the past). This is a required field.

SRS MU Stage 2 User Training 26 SRS Confidential
7. Type in Instructions (required) and then click on the Add button. 8. The Goal is added to the chart. To delete a Goal, click on the red minus icon. Note: The Goal will appear on the patient’s Clinical Summary under the Plan of Care section.
Care Team
Care team members, including providers, are participants in the care of the patient. A patient’s care team may include individuals providing support to the patient, such as family members or caregivers, as well as providers and non-physician providers, including nurses, technicians and assistance.
“When capturing care team member information, it is recommended to capture the name, identification number, and contact information … to indicate the type of providers and role in the patient’s care. Detailing the type of provider and role helps to distinguish care team members across care settings so that participants in the patient’s care are clear to recipients of the document.”
(Source: U.S. Health and Human Services, Office of the National Coordinator for Health IT Standards & Interoperability Framework Companion Guide to HL7 Consolidated CDA For Meaningful Use Stage 2 (November 19, 2012)
To add Care Team Members: 1. Select the Care Team Members PowerTab.
SRS MU Stage 2 User Training 27 SRS Confidential
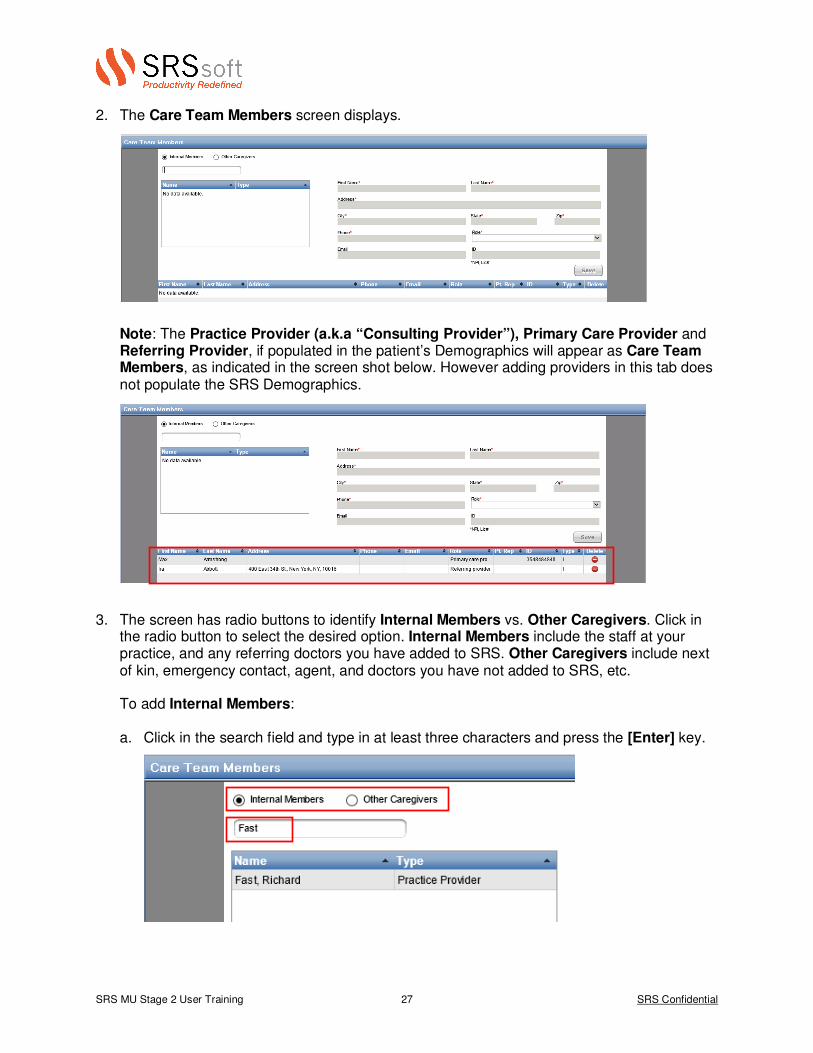
2. The Care Team Members screen displays.
Note: The Practice Provider (a.k.a “Consulting Provider”), Primary Care Provider and Referring Provider, if populated in the patient’s Demographics will appear as Care Team Members, as indicated in the screen shot below. However adding providers in this tab does not populate the SRS Demographics.
3. The screen has radio buttons to identify Internal Members vs. Other Caregivers. Click in the radio button to select the desired option. Internal Members include the staff at your practice, and any referring doctors you have added to SRS. Other Caregivers include next of kin, emergency contact, agent, and doctors you have not added to SRS, etc.
To add Internal Members: a. Click in the search field and type in at least three characters and press the [Enter] key.
SRS MU Stage 2 User Training 28 SRS Confidential
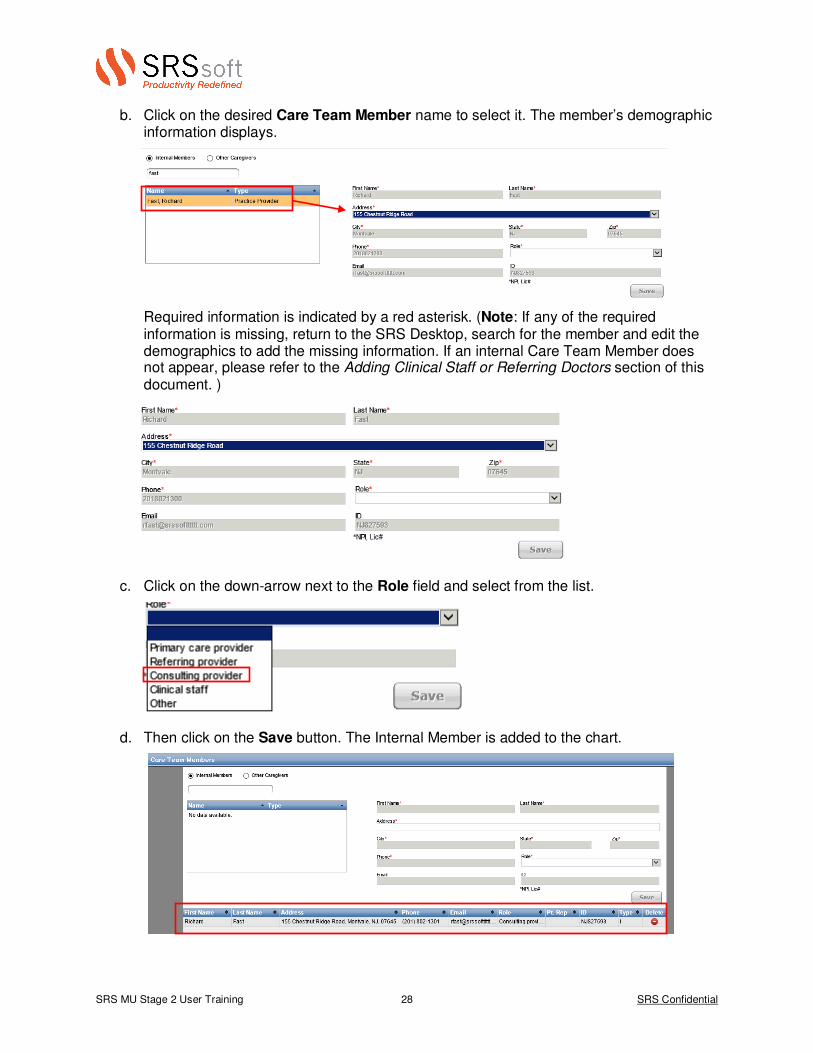
b. Click on the desired Care Team Member name to select it. The member’s demographic information displays.
Required information is indicated by a red asterisk. (Note: If any of the required information is missing, return to the SRS Desktop, search for the member and edit the demographics to add the missing information. If an internal Care Team Member does not appear, please refer to the Adding Clinical Staff or Referring Doctors section of this document. )
c. Click on the down-arrow next to the Role field and select from the list.
d. Then click on the Save button. The Internal Member is added to the chart.
SRS MU Stage 2 User Training 29 SRS Confidential
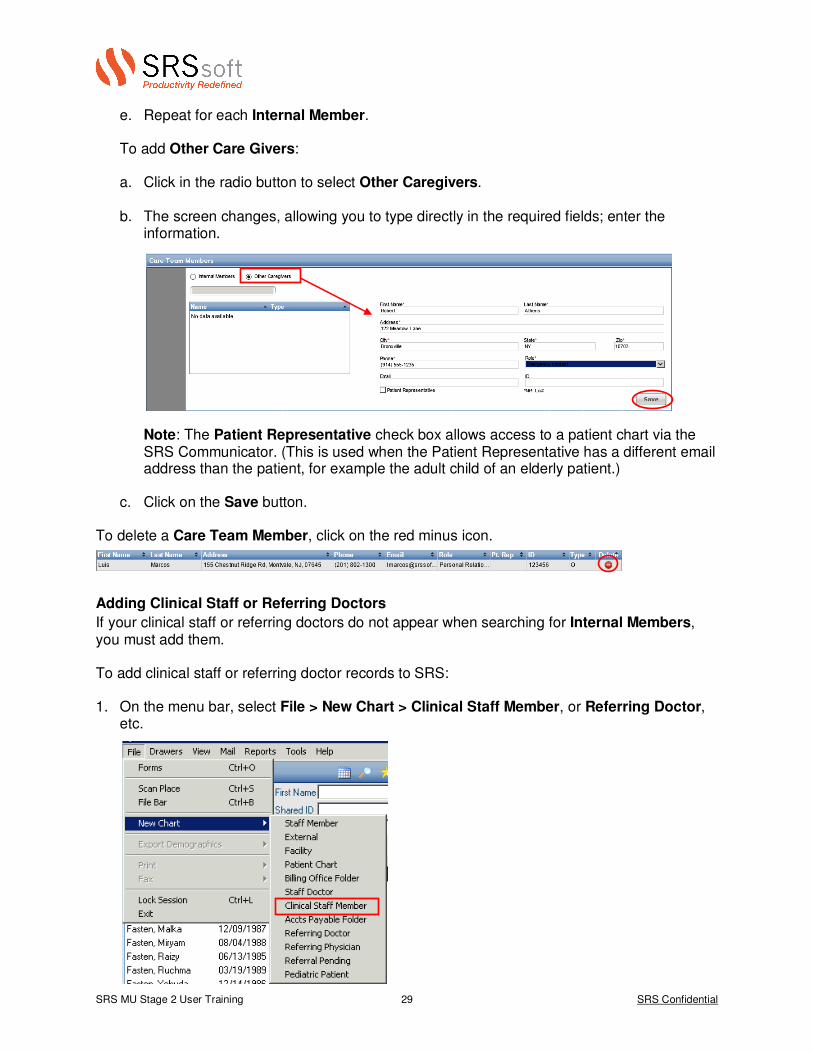
e. Repeat for each Internal Member. To add Other Care Givers:
a. Click in the radio button to select Other Caregivers.
b. The screen changes, allowing you to type directly in the required fields; enter the
information.
Note: The Patient Representative check box allows access to a patient chart via the SRS Communicator. (This is used when the Patient Representative has a different email address than the patient, for example the adult child of an elderly patient.)
c. Click on the Save button. To delete a Care Team Member, click on the red minus icon. Adding Clinical Staff or Referring Doctors
If your clinical staff or referring doctors do not appear when searching for Internal Members, you must add them. To add clinical staff or referring doctor records to SRS: 1. On the menu bar, select File > New Chart > Clinical Staff Member, or Referring Doctor,
etc.

SRS MU Stage 2 User Training 30 SRS Confidential
2. The dialog box for the selected record type opens. Type in the information. Note: The dialog box varies depending on the type of record being added.
a. If adding an internal Clinical Staff member, click on the down arrow next to the User
field and select the SRS user from the list; this links the record you are creating with an existing SRS user. You do not need to enter data into the User Defined Fields.
b. If adding a Referring Doctor, if you know the provider’s Direct messaging address, add it for the Summary of Care measure.
3. Click on the Save button.
Note: Direct messaging is facilitated by Health Information Service Providers (HISPs) and Health Information Exchanges (HIEs). If the Referring Doctor’s Direct address is with a HISP/HIE other than Surescripts, the message may not go through. Surescripts has relationships with many other HISP/HIEs but not all of them.

SRS MU Stage 2 User Training 31 SRS Confidential
Discrete Data Reconciliation
Stage 2 of Meaningful Use encourages sharing of data between providers at different practices. This is accomplished via direct messaging from one provider to another. (For more information, please see the Summary of Care section of this document.) As a result, providers may receive an electronic Transfer of Care from a provider outside of your practice. The data can be reviewed and either added to the chart or deleted.
Receiving a Transfer of Care (Message Center)
The new data arrives in the form of a Transfer of Care (TOC) document in the provider’s Message Center. The data includes diagnoses, medications and medication allergies. The TOC message can be forwarded to clinical staff to reconcile; signing off on the message does not reconcile the data. Note: Inbound Transition of Care messages are directed to specific provider; SRS does not provide for bulk message forwarding on these messages.

SRS MU Stage 2 User Training 32 SRS Confidential
Unmatched Patients
If the Transfer of Care message does not match any patients in SRS, the patient can be manually matched. Click on the Select Patient button.
Search for and select the patient to match the TOC to and click on the Select this Patient button. The patient is matched, and the data can now be reconciled.

SRS MU Stage 2 User Training 33 SRS Confidential
Reconciling a Transfer of Care (Dashboard)
The Discrete Data Reconciliation (DDR) feature allows review, and acceptance or rejection of a Transfer of Care from a provider outside your practice. • When new data has arrived for the selected patient, the DDR link on the Dashboard will
indicate Reconcile New Data with a yellow bar. • If there is no new data for the selected patient, the link will indicate View data summary. To view and reconcile new data for the selected patient: 1. Click on the Reconcile New Data yellow bar. The Discrete Data Reconciliation screen
appears.
The default layout for the data is by Type; however you can click on the Grouping buttons to change the data display.

SRS MU Stage 2 User Training 34 SRS Confidential
The data is presented with status icons in the fourth column; a green checkmark indicates SRS matched the data; a red question mark indicates SRS could not match the data.
The first three columns determine the reviewer’s action for each data point:
• Red minus – click to delete item
• Yellow dot - click to defer item
• Green plus – click to add item to patient’s chart
You can also click in the checkboxes at the top of each column to apply the desired action to all items in the relevant section, e.g. to add all.
SRS MU Stage 2 User Training 35 SRS Confidential
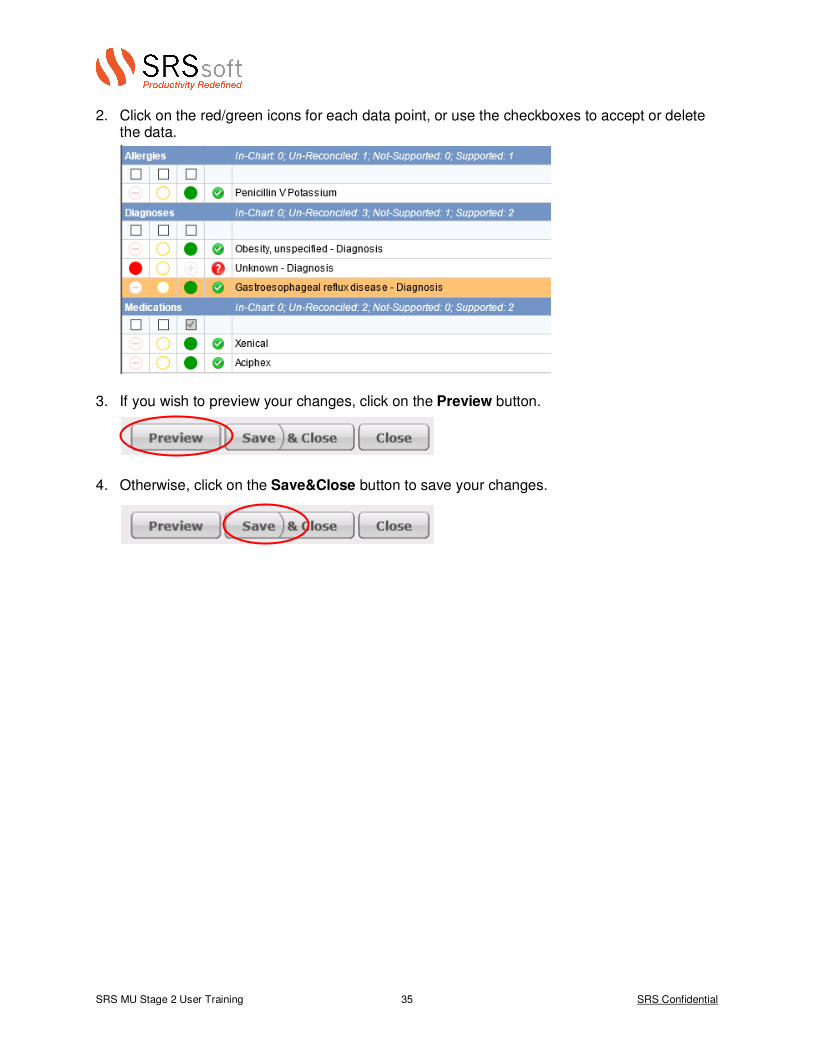
2. Click on the red/green icons for each data point, or use the checkboxes to accept or delete the data.
3. If you wish to preview your changes, click on the Preview button. 4. Otherwise, click on the Save&Close button to save your changes.

SRS MU Stage 2 User Training 36 SRS Confidential
Saving an Electronic Transfer of Care Document
The TOC document is automatically saved in the Transitions of Care Import tab in SRS. Note: The message is an interactive HTML document; the Power Viewer toolbar is disabled.
Clinical Decision Support Rule
The v8 Clinical Decision Support Alert app on the dashboard has been renamed Automated Reminders in v9. The Automated Reminders display below the new v9 Clinical Decision Support Rules app on the dashboard. Version 9 has automated Clinical Decision Support Rules which are tied to the Clinical Quality Measures. Rules created for Stage 1 will still be available, but will not count for Stage 2 MU. No action is required for the new rules.

SRS MU Stage 2 User Training 37 SRS Confidential
Clinical Summary
The Clinical Summary is automatically sent to the patient’s SRS Communicator or SRS Patient Portal (Omedix) account the day after the office visit for patients who have online accounts.
The Clinical Summary now includes the following data points:
• Patient name.
• Provider's name and office contact information.
• Date and location of the visit. • Reason for the office visit. (Entered in eNote PowerTab)
• Current problem list.
• Current medication list.
• Current medication allergy list.
• Procedures performed during the visit. • Immunizations or medications administered during the visit.
• Vital signs taken during the visit (or other recent vital signs).
• Laboratory test results.
• List of diagnostic tests pending. • Clinical instructions. (Entered in eNote PowerTab)
• Future appointments.
• Referrals to other providers.
• Future scheduled tests.
• Demographic information (sex, race, ethnicity, date of birth, preferred language).
• Smoking status. • Care plan field(s), including goals and instructions. (Entered in eNote PowerTab / Goals tab)
• Recommended patient decision aids (if applicable to the visit). (Patient Education)

SRS MU Stage 2 User Training 38 SRS Confidential
• Care team including the primary care provider of record and any additional known care team members beyond the referring or transitioning provider and the receiving provider.
Note: The information contained in the Clinical Summary is mandated per CMS requirements; it cannot be customized. If a patient does not have a portal account, print from the Clinical Summary PowerTab or mark declined using the Health Info Req PowerTab, as done in Stage 1.
- OR-
Smoking Status
This measure hasn’t changed; however the Smoking app has new statuses and functionality. 1. Click on the green plus icon on the Smoking Status app to open it. 2. Select the desired status. Note: next to each status is an icon:

SRS MU Stage 2 User Training 39 SRS Confidential
a. If you click on a status with a green plus icon, the app will add the status it to the patient’s chart:
b. If you click on a status with a brown arrow icon, the app will prompt you for additional data entry. Enter the additional information and click on the Save button.
Note: The Post-screening plan is used if an Eligible Provider has selected smoking-related CQMs; it requires a Start and End time. Click in the fields to make changes.
3. The status is added. Once a status is added, it appears in the app with a series of icons,
depending on if the status required additional information,
or, if the status was added without requiring additional information.
Note: The only required additional information is the Date. (Indicated by the red bar to the left of the field.)

SRS MU Stage 2 User Training 40 SRS Confidential
Indicates Post-screening plan was selected (for CQMs).
Indicates Post-screening plan was not selected.
Click to refresh status.
Click to edit the additional information (only if status required additional information.)
Click to delete the status. 4. Click on the X button to close the app. Note: If you click on the Not Screened – medical reason button, a dialogue box appears. Click on the green plus icon to add the reason. (This does not count for Meaningful Use.) The Smoking Status app closes and the Reason for Decline displays in the Notes field on the dashboard, but the rest of the fields are blank.
SRS MU Stage 2 User Training 41 SRS Confidential
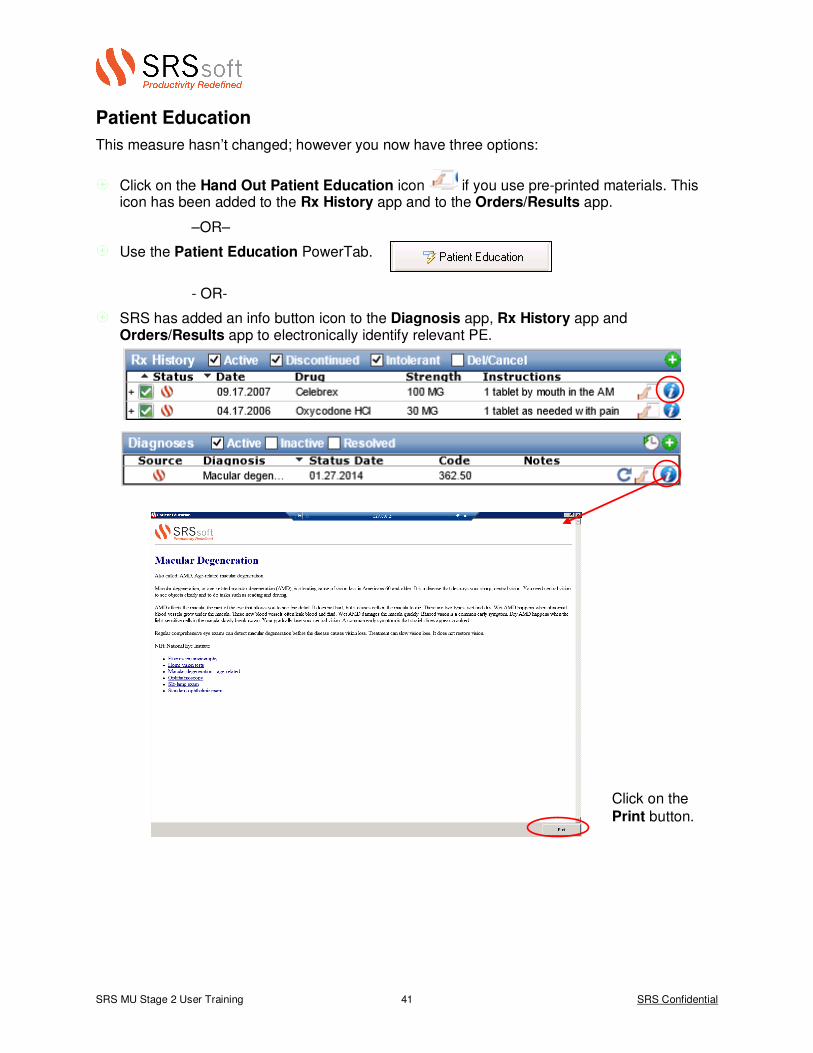
Patient Education
This measure hasn’t changed; however you now have three options:
Click on the Hand Out Patient Education icon if you use pre-printed materials. This icon has been added to the Rx History app and to the Orders/Results app.
–OR–
Use the Patient Education PowerTab.
- OR-
SRS has added an info button icon to the Diagnosis app, Rx History app and Orders/Results app to electronically identify relevant PE.
Click on the
Print button.
SRS MU Stage 2 User Training 42 SRS Confidential
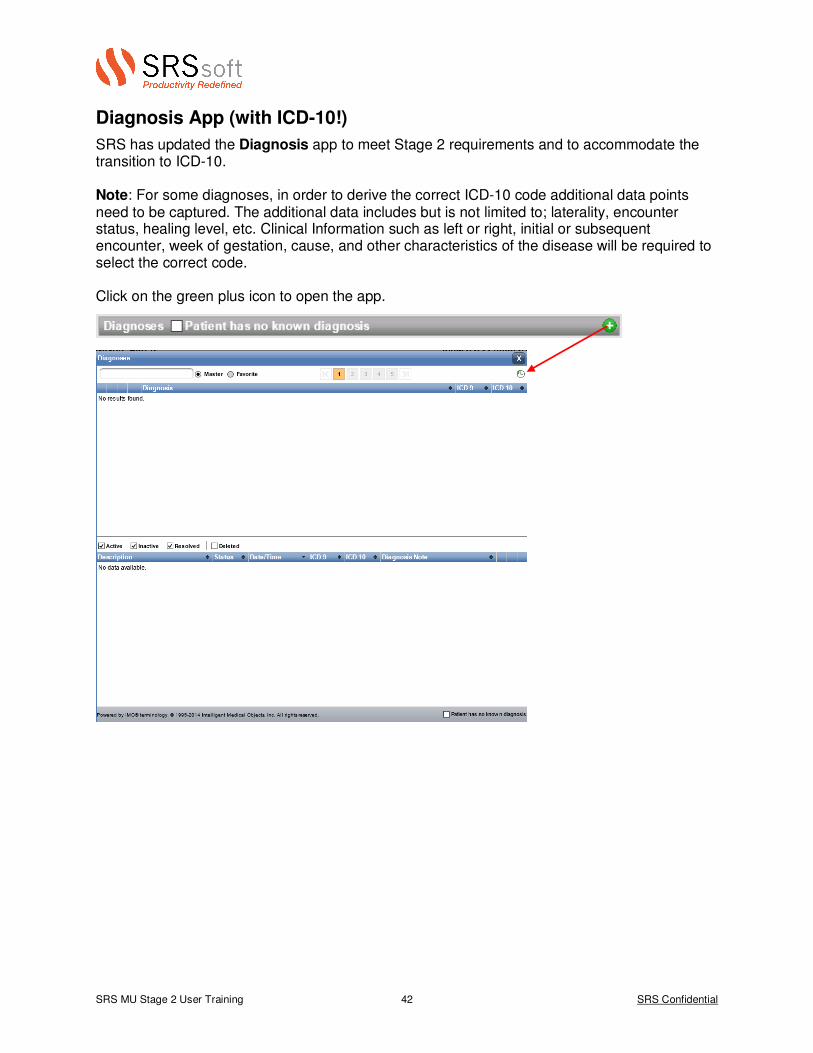
Diagnosis App (with ICD-10!)
SRS has updated the Diagnosis app to meet Stage 2 requirements and to accommodate the transition to ICD-10. Note: For some diagnoses, in order to derive the correct ICD-10 code additional data points need to be captured. The additional data includes but is not limited to; laterality, encounter status, healing level, etc. Clinical Information such as left or right, initial or subsequent encounter, week of gestation, cause, and other characteristics of the disease will be required to select the correct code. Click on the green plus icon to open the app.
SRS MU Stage 2 User Training 43 SRS Confidential
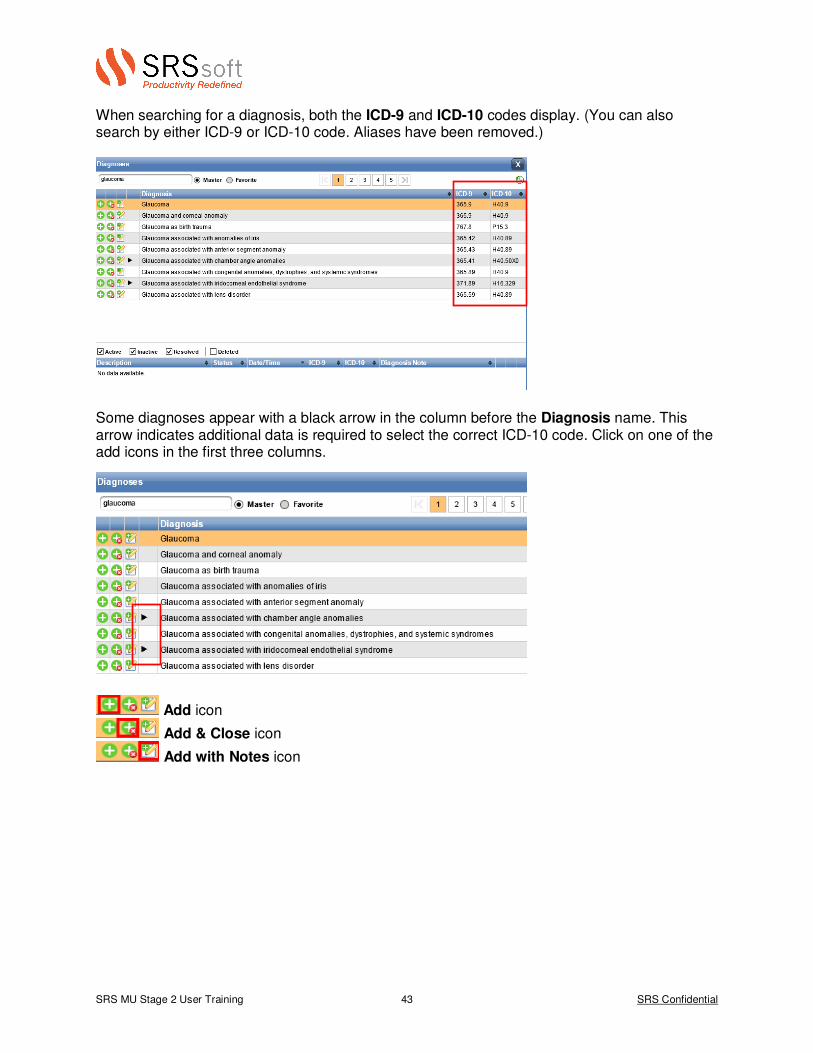
When searching for a diagnosis, both the ICD-9 and ICD-10 codes display. (You can also search by either ICD-9 or ICD-10 code. Aliases have been removed.) Some diagnoses appear with a black arrow in the column before the Diagnosis name. This arrow indicates additional data is required to select the correct ICD-10 code. Click on one of the add icons in the first three columns.
Add icon
Add & Close icon
Add with Notes icon
SRS MU Stage 2 User Training 44 SRS Confidential
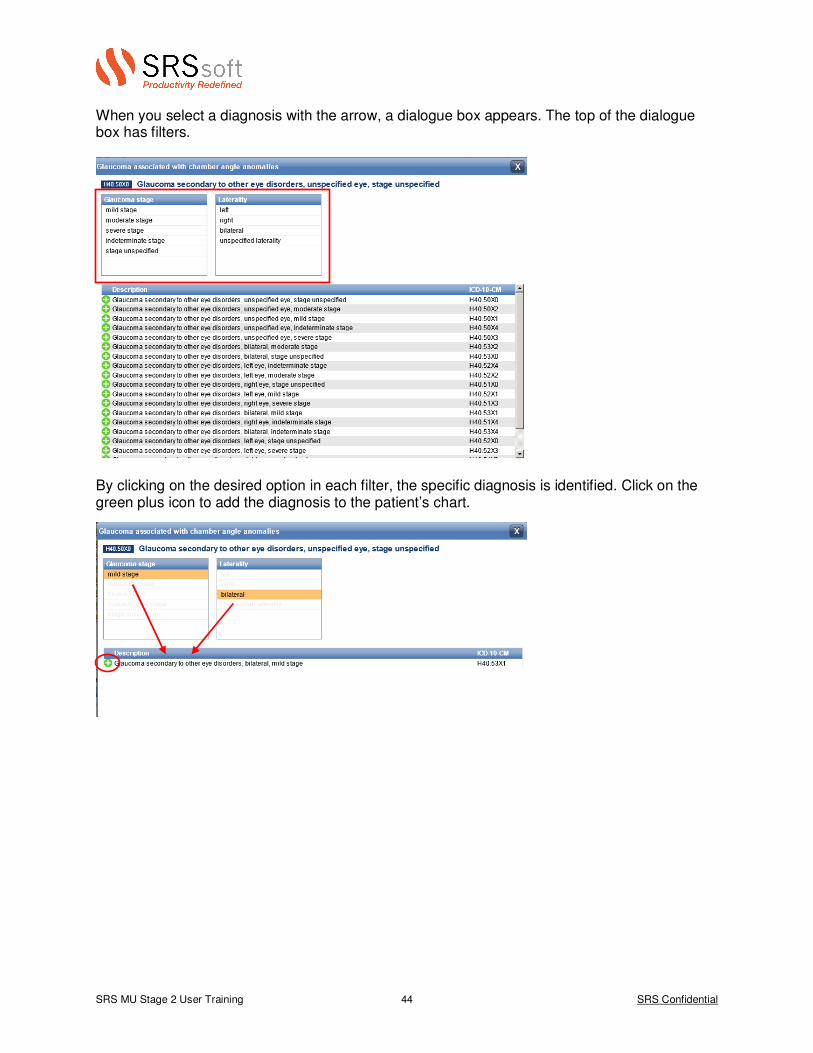
When you select a diagnosis with the arrow, a dialogue box appears. The top of the dialogue box has filters. By clicking on the desired option in each filter, the specific diagnosis is identified. Click on the green plus icon to add the diagnosis to the patient’s chart.

SRS MU Stage 2 User Training 45 SRS Confidential
If you clicked on the Add with Note icon, when the diagnosis is added, a dialogue box appears allowing you to add the desired information. Additionally, all diagnosis entries are now Date and Time stamped, to meet the requirements of the Clinical Quality Measures. During subsequent encounters, if a diagnosis is refreshed, it is flagged as an Encounter Diagnosis. This is required for transitions of care (referrals).

SRS MU Stage 2 User Training 46 SRS Confidential
The Diagnosis app opens, with the diagnosis selected and the detail dialogue box displayed. Add notes if desired, then click on the Save & Close button. Note: When refreshing an existing diagnosis, it may result in an ICD-10 code change based on changes to the modifiers (e.g. initial vs. subsequent encounter). In the example below the original diagnosis has an ICD-10 code of S82.002G.

SRS MU Stage 2 User Training 47 SRS Confidential
After clicking on the Refresh icon, the dialogue box for the diagnosis appears allowing the user to select the correct modifiers for the current encounter; click on the updated diagnosis to select it. The Diagnosis app displays the updated ICD-10 code with the refresh date. (Refreshed diagnosis is now S82.002D.) However the diagnosis history displays all of the ICD -10 codes. In this example, diagnosis S.82.002G was refreshed; as a result the diagnosis was marked Resolved when the new diagnosis S82.002D was added.
SRS MU Stage 2 User Training 48 SRS Confidential
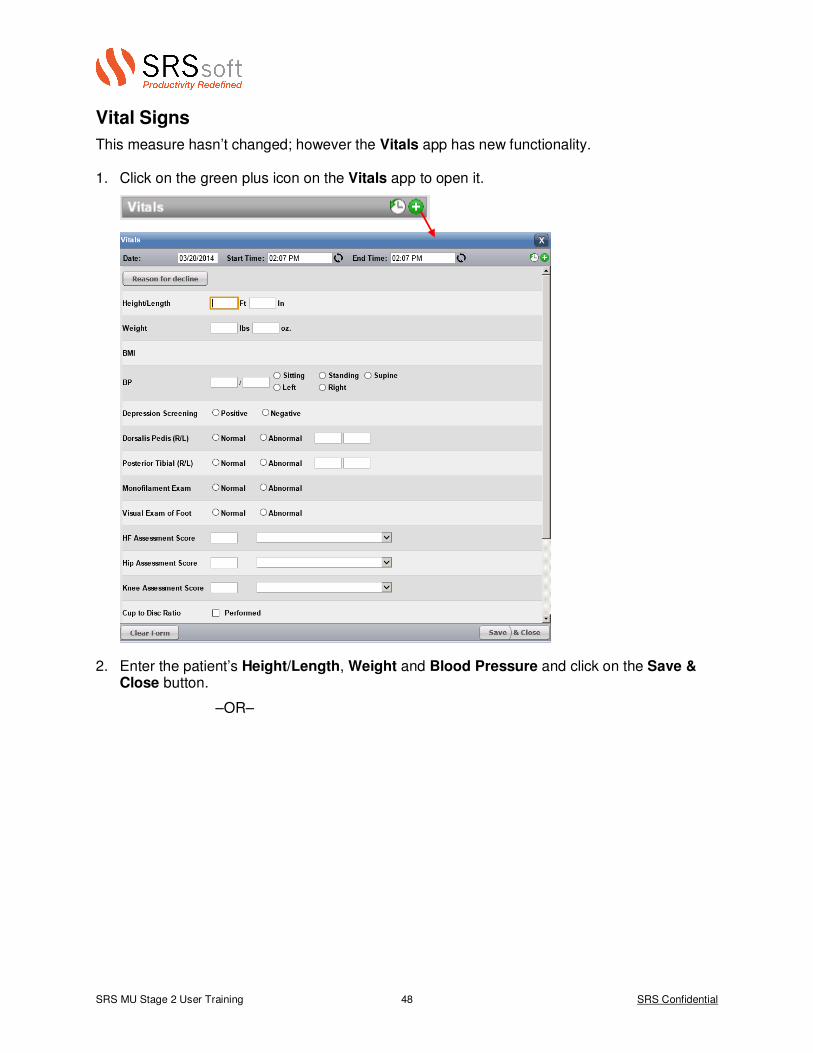
Vital Signs
This measure hasn’t changed; however the Vitals app has new functionality. 1. Click on the green plus icon on the Vitals app to open it. 2. Enter the patient’s Height/Length, Weight and Blood Pressure and click on the Save &
Close button.
–OR–

SRS MU Stage 2 User Training 49 SRS Confidential
If vitals are not recorded, click on the Reason for decline button. (This does not count for meeting Meaningful Use.) The Reason for Decline dialogue box appears allowing you to select the declined vital(s) and a reason. Click on the down arrow next to the declined vital. Click on a reason from the list to select it. Click on the OK button to close the dialogue box.
SRS MU Stage 2 User Training 50 SRS Confidential
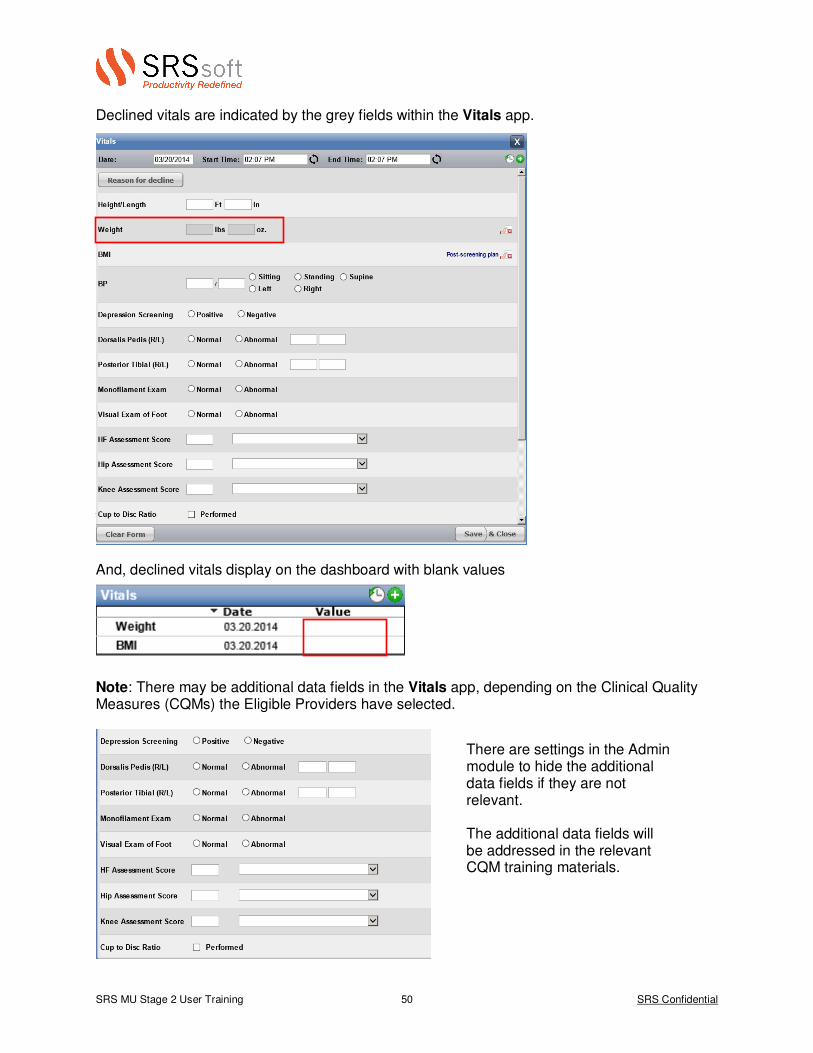
Declined vitals are indicated by the grey fields within the Vitals app. \ And, declined vitals display on the dashboard with blank values Note: There may be additional data fields in the Vitals app, depending on the Clinical Quality Measures (CQMs) the Eligible Providers have selected.
There are settings in the Admin module to hide the additional data fields if they are not relevant. The additional data fields will be addressed in the relevant CQM training materials.