Embed Size (px)
Citation preview
Chapter 1
Seaside by Example
Seaside is a framework for building web applications in Smalltalk. It wasoriginally developed by Avi Bryant in 2002; once mastered, Seaside makesweb applications almost as easy to write as desktop application.
Two of the better known applications built with Seaside are Squeak-Source1 and Dabble DB2. Seaside is unusual in that it is thoroughly object-oriented: there are no XHTML templates, no complicated control flowsthrough web pages, and no encoding of state in URLs. Instead, you justsend messages to objects. What a nice idea!
1.1 Why do we need Seaside?
Modern web applications try to interact with the user in the same way asdesktop applications: they ask the user questions, and the user responds,usually by filling in a form or clicking a button. But the web works theother way around: the user’s browser makes a request of the server, andthe server responds with a new web page. So web application developmentframeworks have to cope with a host of problems, chief among them beingthe management of this “inverted” control flow. Because of this, many webapplications try to forbid the use of the browser’s “back” button due to thedifficulty of keeping track of the state of a session. Expressing non-trivialcontrol flows across multiple web pages is often cumbersome, and multiplecontrol flows can be difficult or impossible to express.
Seaside is a component-based framework that makes web developmenteasier in several ways. First, control flow can be expressed naturally using
1http://SqueakSource.com2http://DabbleDB.com
2 Seaside by Example
message sends. Seaside keeps track of which web page corresponds towhich point in the execution of the web application. This means that thebrowser’s “back” button works correctly.
Second, state is managed for you. As the developer, you have the choiceof enabling backtracking of state, so that navigation “back” in time willundo side-effects. Alternatively, you can use the transaction support builtinto Seaside to prevent users from undoing permanent side-effects whenthey use the back button. You do not have to encode state information inthe URL — this too is managed automatically for you.
Third, web pages are built up from nested components, each of whichcan support its own, independent control flow. There are no XHTMLtemplates — instead valid XHTML is generated programmatically using asimple Smalltalk protocol. Seaside supports Cascading Style Sheets (CSS),so content and layout are cleanly separated.
Finally, Seaside provides a convenient web-based development inter-face, making it easy to develop applications iteratively, debug applicationsinteractively, and recompile and extend applications while the server isrunning.
1.2 Getting started
The easiest way to get started is to download the “Seaside One-Click Ex-perience” from the Seaside web site3. This is a prepackaged version ofSeaside 2.8 for Mac OSX, Linux and Windows. The same web site listsmany pointers to additional resources, including documentation and tuto-rials. Be warned, however, that Seaside has evolved considerably over theyears, and not all available material refers to the latest version of Seaside.
If you are feeling more adventurous, an alternative to the “one-click”image is to start with the latest Squeak Developers’ Web image4, and installSeaside yourself by following the manual installation instructions on theSeaside web site.
Seaside includes a web server; you can turn the server on, telling it tolisten on port 8080, by evaluating WAKom startOn: 8080, and you can turn itoff again by evaluating WAKom stop. In the default installation, the defaultadministrator login is admin and the default password is seaside. To changethem, evaluate: WADispatcherEditor initialize. This will prompt you for a newname and password.
3http://seaside.st4http://damien.cassou.free.fr/squeak-dev.html
Getting started 3
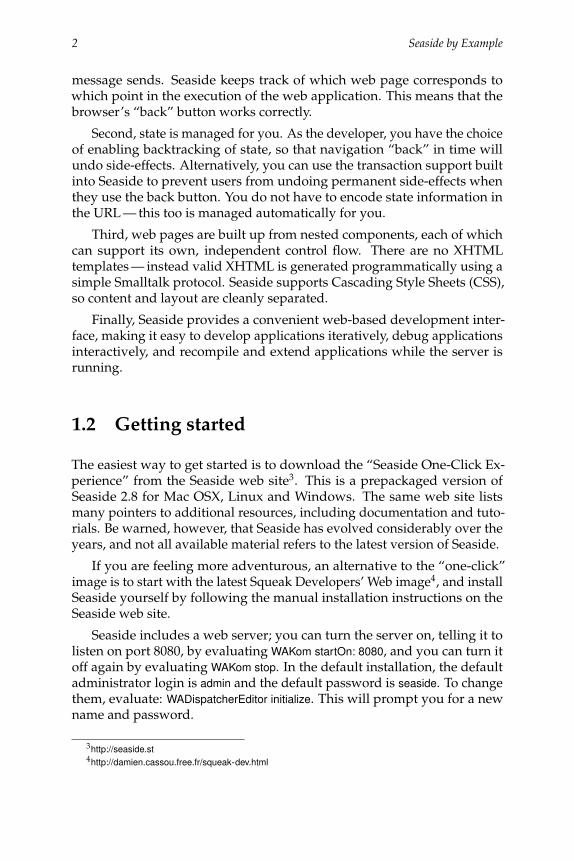
Figure 1.1: Starting up Seaside
Start the Seaside server and direct a web browser to http:// localhost:8080/seaside/ .
You should see a web page that looks like Figure 1.1.
Navigate to the examples. counter page. (Figure 1.2)
Figure 1.2: The counter.
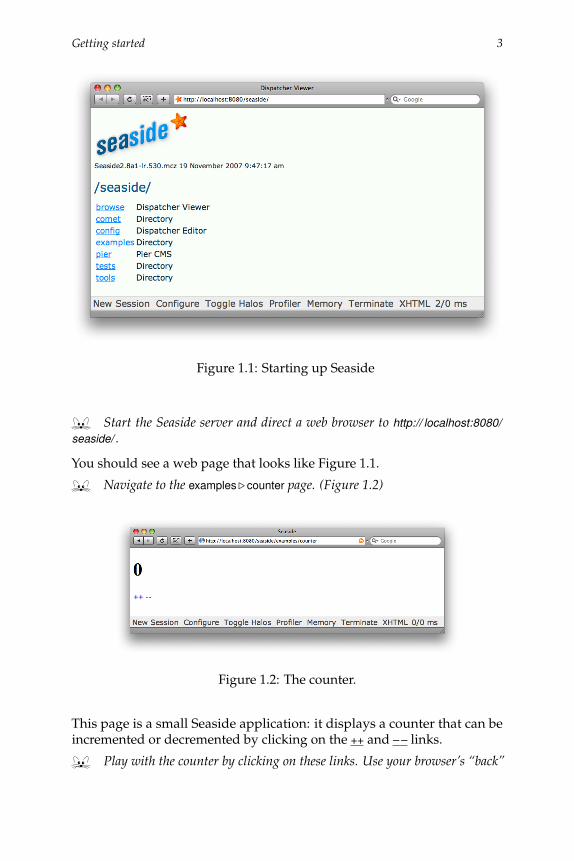
This page is a small Seaside application: it displays a counter that can beincremented or decremented by clicking on the ++ and – – links.
Play with the counter by clicking on these links. Use your browser’s “back”
4 Seaside by Example
button to go back to a previous state, and then click on ++ again. Notice howthe counter is correctly incremented with respect to the currently displayed state,rather than the state that the counter was in when you started using the “back”button.
Notice the toolbar at the bottom of the web page in Figure 1.1. Seasidesupports a notion of “sessions” to keep track of the state of the applicationfor different users. New Session will start a new session on the counter ap-plication. Configure allows you to configure the settings of your applicationthrough a convenient web-interface. (To close the Configure view, click onthe x in the top right corner.) Toggle Halos provides a way to explore the stateof the application running on the Seaside server. Profiler and Memory providedetailed information about the run-time performance of the application.XHTML can be used to validate the generated web page, but works onlywhen the web page is publicly accessible from the Internet, because it usesthe W3C validation service.
Seaside applications are built up from pluggable “components”. In fact,components are ordinary Smalltalk objects. The only thing that is specialabout them is that they should be instances of classes that inherit from theSeaside framework class WAComponent. We can explore components andtheir classes from the Squeak image, or directly from the web interfaceusing halos.
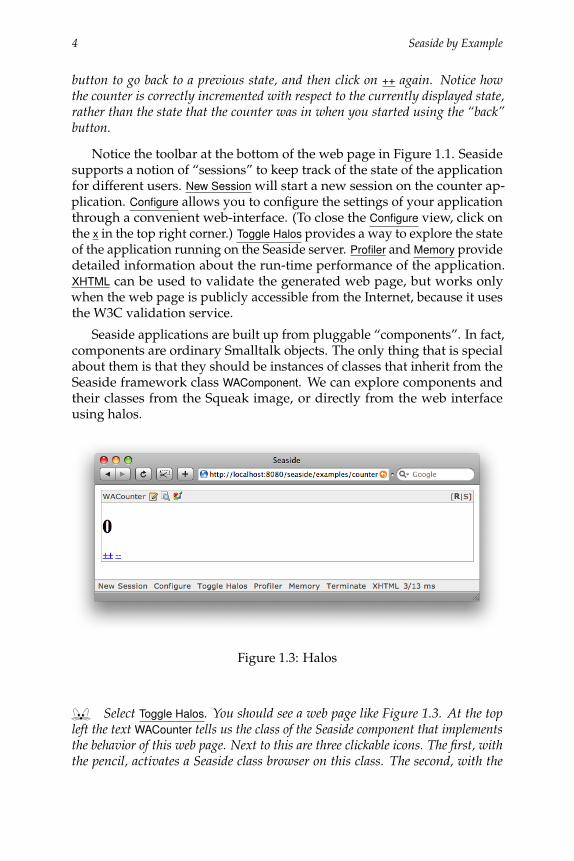
Figure 1.3: Halos
Select Toggle Halos. You should see a web page like Figure 1.3. At the topleft the text WACounter tells us the class of the Seaside component that implementsthe behavior of this web page. Next to this are three clickable icons. The first, withthe pencil, activates a Seaside class browser on this class. The second, with the
Getting started 5
magnifying glass, opens an object inspector on the currently active WACounterinstance. The third, with the coloured circles, displays the CSS style sheet for thiscomponent. At the top right, the R and S let you toggle between the rendered andsource views of the web page. Experiment with all of these links. Note that the++ and – links are also active in the source view. Contrast the nicely-formattedsource view provided by the Halos with the unformatted source view offered byyour browser.
The Seaside class browser and object inspector can be very convenientwhen the server is running on another computer, especially when the serverdoes not have a display, or if it is in remote place. However, when you arefirst developing a Seaside application, the server will be running locally,and it is easy to use the ordinary Squeak development tools in the serverimage.
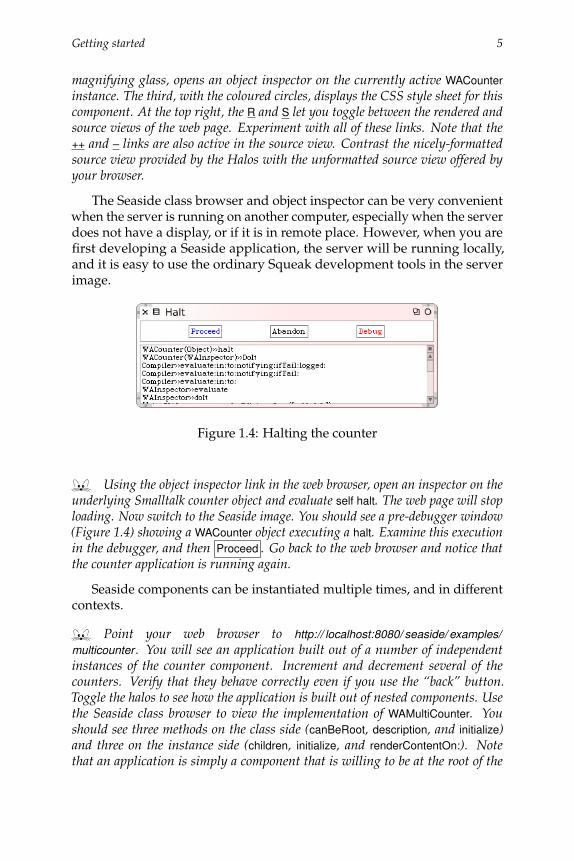
Figure 1.4: Halting the counter
Using the object inspector link in the web browser, open an inspector on theunderlying Smalltalk counter object and evaluate self halt. The web page will stoploading. Now switch to the Seaside image. You should see a pre-debugger window(Figure 1.4) showing a WACounter object executing a halt. Examine this executionin the debugger, and then Proceed . Go back to the web browser and notice thatthe counter application is running again.
Seaside components can be instantiated multiple times, and in differentcontexts.
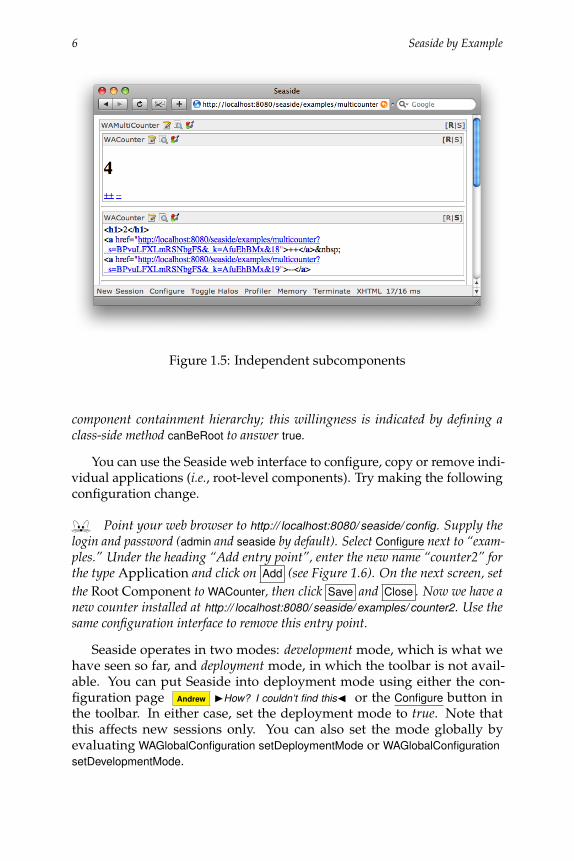
Point your web browser to http:// localhost:8080/ seaside/ examples/multicounter . You will see an application built out of a number of independentinstances of the counter component. Increment and decrement several of thecounters. Verify that they behave correctly even if you use the “back” button.Toggle the halos to see how the application is built out of nested components. Usethe Seaside class browser to view the implementation of WAMultiCounter. Youshould see three methods on the class side (canBeRoot, description, and initialize)and three on the instance side (children, initialize, and renderContentOn:). Notethat an application is simply a component that is willing to be at the root of the
6 Seaside by Example
Figure 1.5: Independent subcomponents
component containment hierarchy; this willingness is indicated by defining aclass-side method canBeRoot to answer true.
You can use the Seaside web interface to configure, copy or remove indi-vidual applications (i.e., root-level components). Try making the followingconfiguration change.
Point your web browser to http:// localhost:8080/ seaside/ config. Supply thelogin and password (admin and seaside by default). Select Configure next to “exam-ples.” Under the heading “Add entry point”, enter the new name “counter2” forthe type Application and click on Add (see Figure 1.6). On the next screen, setthe Root Component to WACounter, then click Save and Close . Now we have anew counter installed at http:// localhost:8080/ seaside/ examples/ counter2. Use thesame configuration interface to remove this entry point.
Seaside operates in two modes: development mode, which is what wehave seen so far, and deployment mode, in which the toolbar is not avail-able. You can put Seaside into deployment mode using either the con-figuration page Andrew IHow? I couldn’t find thisJ or the Configure button inthe toolbar. In either case, set the deployment mode to true. Note thatthis affects new sessions only. You can also set the mode globally byevaluating WAGlobalConfiguration setDeploymentMode or WAGlobalConfigurationsetDevelopmentMode.

Seaside components 7
Figure 1.6: Configuring a new application
The configuration web page is just another Seaside application, so it toocan be controlled from the configuration page. If you remove the “config”application, you can get it back by evaluating WADispatcherEditor initialize.
1.3 Seaside components
Andrew IThis section was too long — 18 pages. It also contained several self-references (“see
section 1.3”). So I broke into smaller sections, by promoting some of the subsections and
subsubsections.J
As we mentioned in the previous section, Seaside applications arebuilt out of components . Let’s take a closer look at how Seaside worksby implementing the Hello World component.
Every Seaside component should inherit directly or indirectly fromWAComponent, as shown in Figure 1.8.
Define a subclass of WAComponent called WAHelloWorld.
Components must know how to render themselves. Usually this is doneby implementing the method renderContentOn:, which gets as its argumentan instance of WAHtmlCanvas, which knows how to render XHTML.
Implement the following method, and put it in a protocol called rendering:
WAHelloWorld»renderContentOn: htmlhtml text: 'hello world'
8 Seaside by Example
Now we must inform Seaside that this component is willing to be a stan-dalone application.
Implement the following method on the class side of WAHelloWorld.
WAHelloWorld class»canBeRoot↑ true
We are almost done!
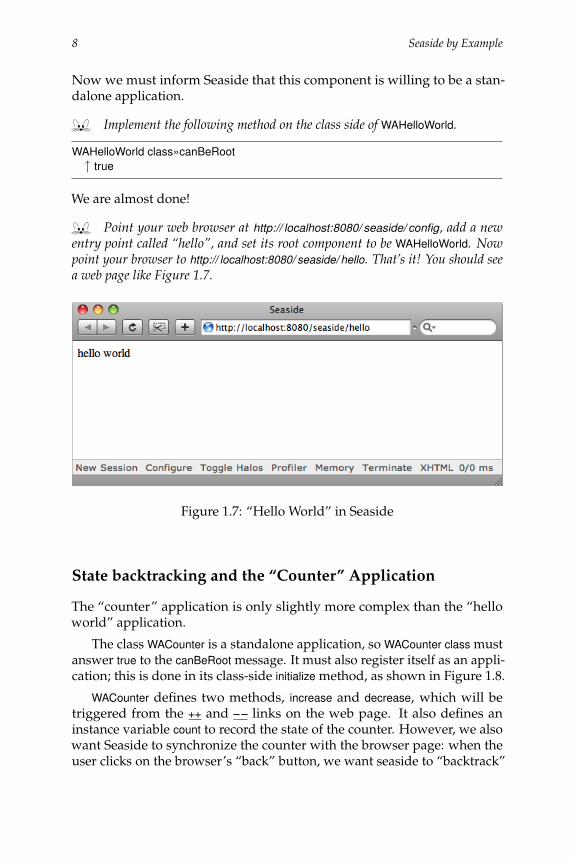
Point your web browser at http:// localhost:8080/ seaside/ config, add a newentry point called “hello”, and set its root component to be WAHelloWorld. Nowpoint your browser to http:// localhost:8080/ seaside/ hello. That’s it! You should seea web page like Figure 1.7.
Figure 1.7: “Hello World” in Seaside
State backtracking and the “Counter” Application
The “counter” application is only slightly more complex than the “helloworld” application.
The class WACounter is a standalone application, so WACounter class mustanswer true to the canBeRoot message. It must also register itself as an appli-cation; this is done in its class-side initialize method, as shown in Figure 1.8.
WACounter defines two methods, increase and decrease, which will betriggered from the ++ and – – links on the web page. It also defines aninstance variable count to record the state of the counter. However, we alsowant Seaside to synchronize the counter with the browser page: when theuser clicks on the browser’s “back” button, we want seaside to “backtrack”
Seaside components 9
canBeRoot
WAComponent↑ false
canBeRootinitializeinitializeincreasedecreaserenderContentOn: htmlstates
countWACounter
↑ truehtml heading: count.html anchor
callback: [ self increase ];with: '++'.
html space.html anchor
callback: [ self decrease ];with: '--'
↑ Array with: self
states
WAPresenter↑ #() self registerAsApplication: 'examples/counter'
super initialize.self count: 0
count := count + 1
count := count – 1
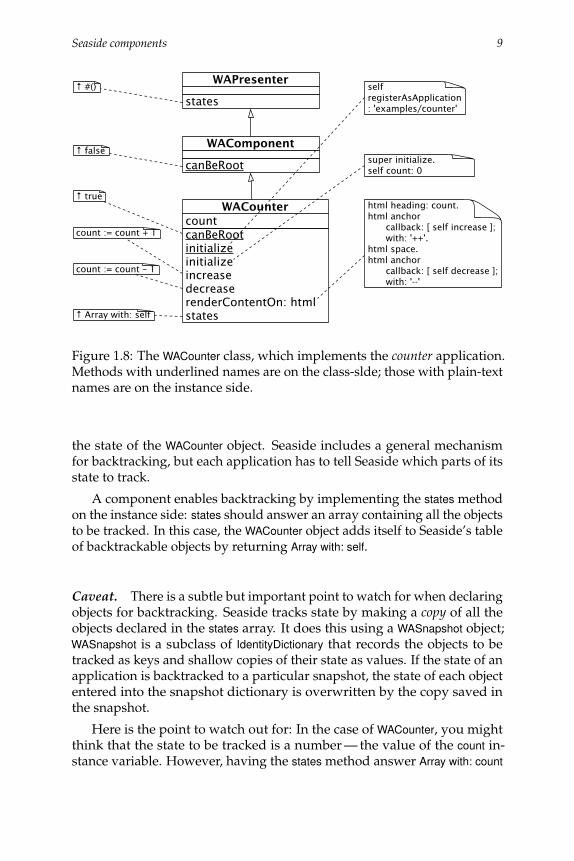
Figure 1.8: The WACounter class, which implements the counter application.Methods with underlined names are on the class-slde; those with plain-textnames are on the instance side.
the state of the WACounter object. Seaside includes a general mechanismfor backtracking, but each application has to tell Seaside which parts of itsstate to track.
A component enables backtracking by implementing the states methodon the instance side: states should answer an array containing all the objectsto be tracked. In this case, the WACounter object adds itself to Seaside’s tableof backtrackable objects by returning Array with: self.
Caveat. There is a subtle but important point to watch for when declaringobjects for backtracking. Seaside tracks state by making a copy of all theobjects declared in the states array. It does this using a WASnapshot object;WASnapshot is a subclass of IdentityDictionary that records the objects to betracked as keys and shallow copies of their state as values. If the state of anapplication is backtracked to a particular snapshot, the state of each objectentered into the snapshot dictionary is overwritten by the copy saved inthe snapshot.
Here is the point to watch out for: In the case of WACounter, you mightthink that the state to be tracked is a number — the value of the count in-stance variable. However, having the states method answer Array with: count
10 Seaside by Example
won’t work. This is because the object named by count is an integer, andintegers are immutable. The increase and decrease methods don’t changethe state of the object 0 into 1 or the object 3 into 2. Instead, they makecount name a different integer: every time the count is incremented ordecremented, the object named by count is replaced by another. This is whyWACounter»states must return Array with: self. When the state of a WACounterobject is replaced by a previous state, the value of each of the instance vari-able in the object is replaced by a previous value; this correctly replaces thecurrent value of count by a prior value.
1.4 Rendering XHTML
The purpose of a web application is to create, or “render”, web pages. Aswe mentioned in Section 1.3, each Seaside component is responsible forrendering itself. So, lets start our exploration of rendering by seeing howthe counter component renders itself.
Rendering the Counter
The rendering of the counter is relatively straightforward; the code is shownin Figure 1.8. The current value of the counter is displayed as an XHTMLheading, and the increment and decrement operations are implemented ashtml anchors (that is, links) with callbacks to blocks that will send increaseand decrease to the counter object.
We will have a closer look at the rendering protocol in a moment. Butbefore we do, let’s have a quick look at the multi-counter.
From Counter to MultiCounter
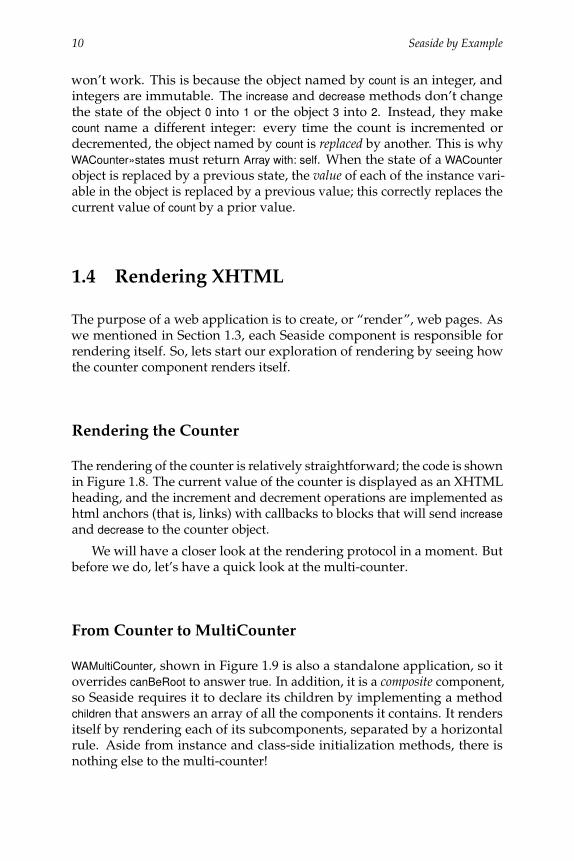
WAMultiCounter, shown in Figure 1.9 is also a standalone application, so itoverrides canBeRoot to answer true. In addition, it is a composite component,so Seaside requires it to declare its children by implementing a methodchildren that answers an array of all the components it contains. It rendersitself by rendering each of its subcomponents, separated by a horizontalrule. Aside from instance and class-side initialization methods, there isnothing else to the multi-counter!
Rendering XHTML 11
children
WAComponent↑ #()
canBeRootinitializerenderContentOn: htmlchildren
countersWAMultiCounter
↑ true
countersdo: [ :each | html render: each ]separatedBy: [ html horizontalRule ]
↑ counters
super initialize.counters := (1 to: 5) collect:
[ :each | WACounter new ]
Figure 1.9: WAMultiCounter
More about Rendering XHTML
As you can see from these examples, Seaside does not use templates togenerate web pages. Instead it generates XTHML programmatically. Thebasic idea is that every Seaside component should override the methodrenderContentOn:; this message will be sent by the framework to each com-ponent that needs to be rendered. This renderContentOn: message will haveargument that is an html canvas onto which the component should renderitself. By convention, the html canvas parameter is called html. An htmlcanvas is analogous to the graphics canvas used by Morphic (and mostother drawing frameworks) to abstract away from the device-dependentdetails of drawing.
Here are some of the most basic rendering methods:
html text: 'hello world'. "render a plain text string"html html: '–'. "render an XHTML incantation"html render: 1. "render any object"
The message render: anyObject can be sent to an html canvas to renderanyObject; it is normally used to render subcomponents. anyObject will itselfbe sent the message renderContentOn: this is what happens in multi-counter(see Figure 1.9).
Using Brushes
A canvas provides a number of brushes that can be used to render (i.e.,“paint”) content on the canvas. There are brushes for every kind of XHTMLelement — paragraphs, tables, lists, and so on. To see the full protocol ofbrushes and convenience methods, you should browse the class WACanvasand its subclasses. The argument to renderContentOn: is actually an instance
12 Seaside by Example
of the subclass WARenderCanvas.
We have already seen the following brush used in the counter andmulti-counter examples:
html horizontalRule.
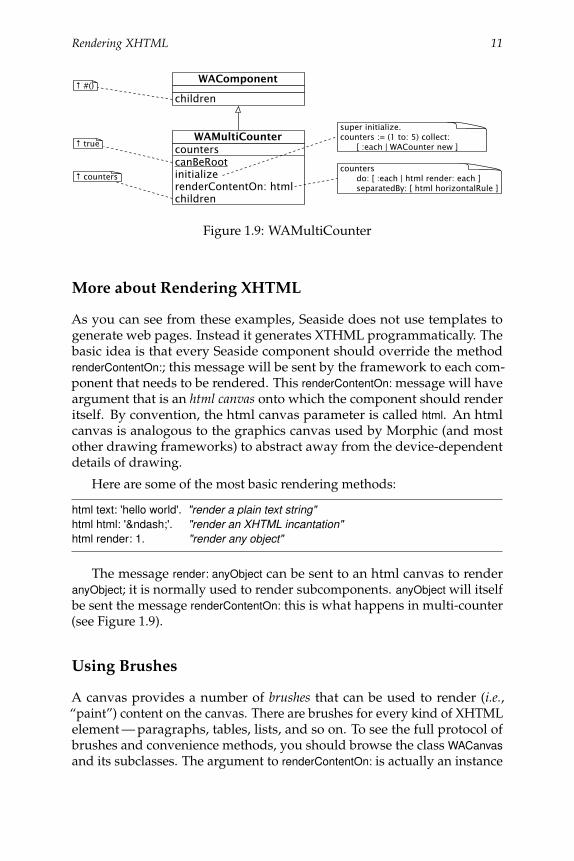
Figure 1.10: RenderingDemo
In Figure 1.10 we can see the output of many of the basic brushes
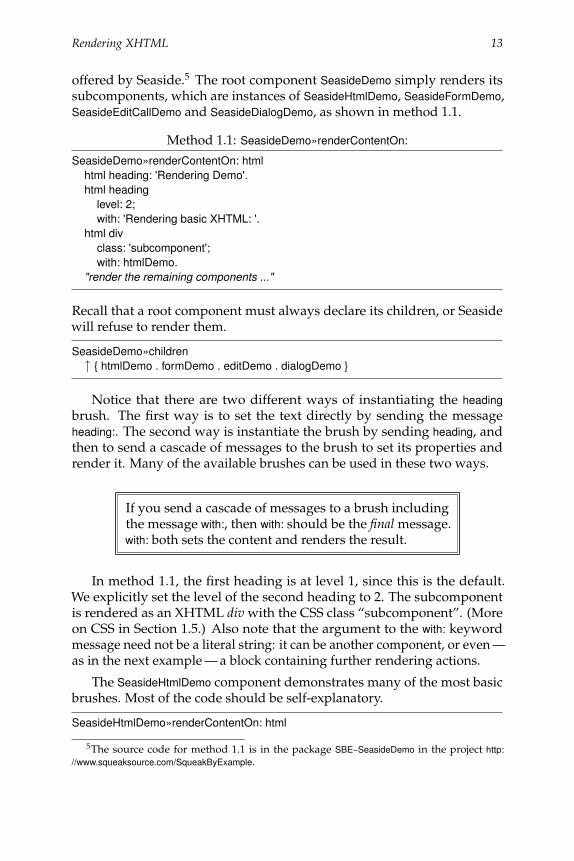
Rendering XHTML 13
offered by Seaside.5 The root component SeasideDemo simply renders itssubcomponents, which are instances of SeasideHtmlDemo, SeasideFormDemo,SeasideEditCallDemo and SeasideDialogDemo, as shown in method 1.1.
Method 1.1: SeasideDemo»renderContentOn:
SeasideDemo»renderContentOn: htmlhtml heading: 'Rendering Demo'.html heading
level: 2;with: 'Rendering basic XHTML: '.
html divclass: 'subcomponent';with: htmlDemo.
"render the remaining components ..."
Recall that a root component must always declare its children, or Seasidewill refuse to render them.
SeasideDemo»children↑ { htmlDemo . formDemo . editDemo . dialogDemo }
Notice that there are two different ways of instantiating the headingbrush. The first way is to set the text directly by sending the messageheading:. The second way is instantiate the brush by sending heading, andthen to send a cascade of messages to the brush to set its properties andrender it. Many of the available brushes can be used in these two ways.
If you send a cascade of messages to a brush includingthe message with:, then with: should be the final message.with: both sets the content and renders the result.
In method 1.1, the first heading is at level 1, since this is the default.We explicitly set the level of the second heading to 2. The subcomponentis rendered as an XHTML div with the CSS class “subcomponent”. (Moreon CSS in Section 1.5.) Also note that the argument to the with: keywordmessage need not be a literal string: it can be another component, or even —as in the next example — a block containing further rendering actions.
The SeasideHtmlDemo component demonstrates many of the most basicbrushes. Most of the code should be self-explanatory.
SeasideHtmlDemo»renderContentOn: html
5The source code for method 1.1 is in the package SBE--SeasideDemo in the project http://www.squeaksource.com/SqueakByExample.
14 Seaside by Example
self renderParagraphsOn: html.self renderListsAndTablesOn: html.self renderDivsAndSpansOn: html.self renderLinkWithCallbackOn: html
It is common practice to break up long rendering methods into manyhelper methods, as we have done here.
Don’t put all your rendering code into a single method.Split it into helper methods named using the patternrender*On:. All rendering methods go in the renderingprotocol. Don’t send renderContentOn: from your owncode, use render: instead.
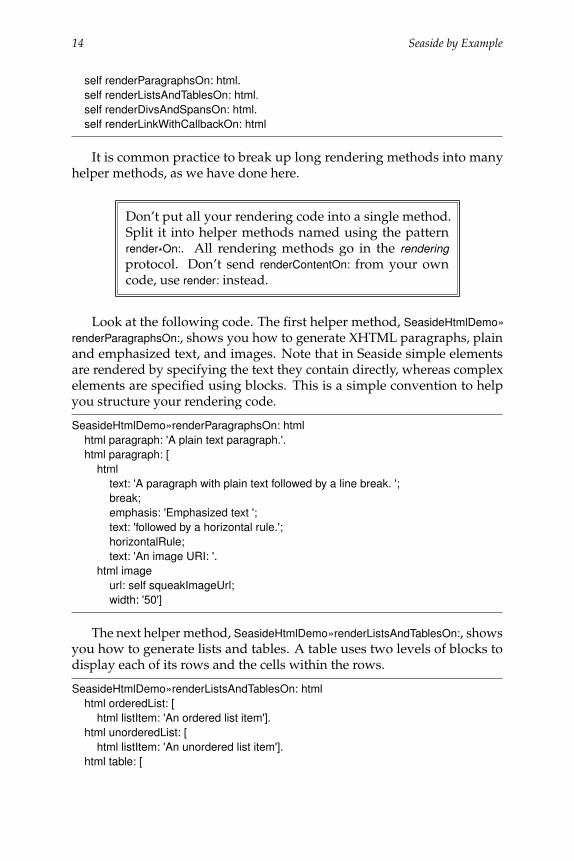
Look at the following code. The first helper method, SeasideHtmlDemo»renderParagraphsOn:, shows you how to generate XHTML paragraphs, plainand emphasized text, and images. Note that in Seaside simple elementsare rendered by specifying the text they contain directly, whereas complexelements are specified using blocks. This is a simple convention to helpyou structure your rendering code.
SeasideHtmlDemo»renderParagraphsOn: htmlhtml paragraph: 'A plain text paragraph.'.html paragraph: [
htmltext: 'A paragraph with plain text followed by a line break. ';break;emphasis: 'Emphasized text ';text: 'followed by a horizontal rule.';horizontalRule;text: 'An image URI: '.
html imageurl: self squeakImageUrl;width: '50']
The next helper method, SeasideHtmlDemo»renderListsAndTablesOn:, showsyou how to generate lists and tables. A table uses two levels of blocks todisplay each of its rows and the cells within the rows.
SeasideHtmlDemo»renderListsAndTablesOn: htmlhtml orderedList: [
html listItem: 'An ordered list item'].html unorderedList: [
html listItem: 'An unordered list item'].html table: [
Rendering XHTML 15
html tableRow: [html tableData: 'A table with one data cell.']]
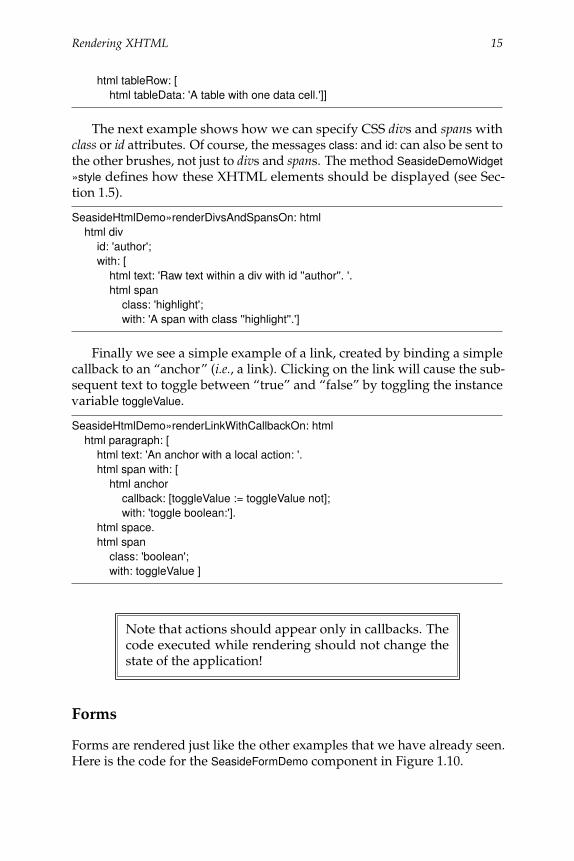
The next example shows how we can specify CSS divs and spans withclass or id attributes. Of course, the messages class: and id: can also be sent tothe other brushes, not just to divs and spans. The method SeasideDemoWidget»style defines how these XHTML elements should be displayed (see Sec-tion 1.5).
SeasideHtmlDemo»renderDivsAndSpansOn: htmlhtml div
id: 'author';with: [
html text: 'Raw text within a div with id ''author''. '.html span
class: 'highlight';with: 'A span with class ''highlight''.']
Finally we see a simple example of a link, created by binding a simplecallback to an “anchor” (i.e., a link). Clicking on the link will cause the sub-sequent text to toggle between “true” and “false” by toggling the instancevariable toggleValue.
SeasideHtmlDemo»renderLinkWithCallbackOn: htmlhtml paragraph: [
html text: 'An anchor with a local action: '.html span with: [
html anchorcallback: [toggleValue := toggleValue not];with: 'toggle boolean:'].
html space.html span
class: 'boolean';with: toggleValue ]
Note that actions should appear only in callbacks. Thecode executed while rendering should not change thestate of the application!
Forms
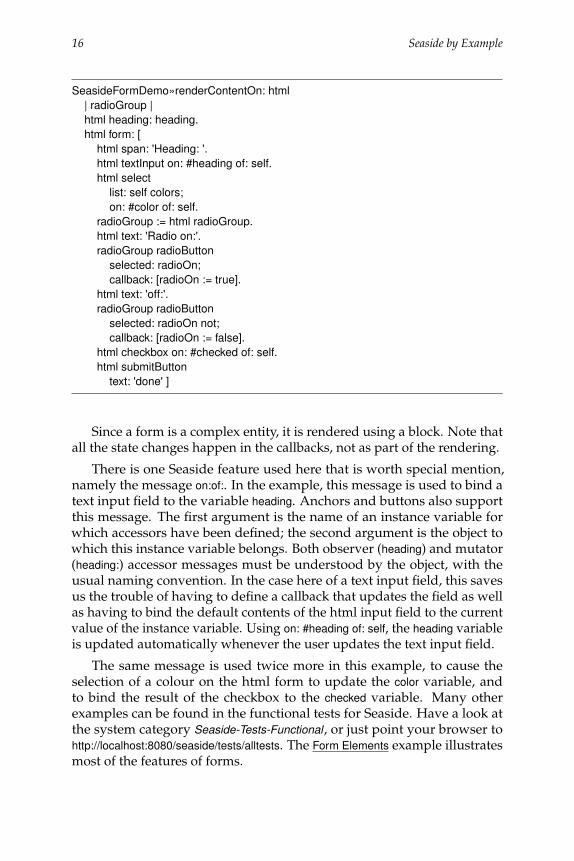
Forms are rendered just like the other examples that we have already seen.Here is the code for the SeasideFormDemo component in Figure 1.10.
16 Seaside by Example
SeasideFormDemo»renderContentOn: html| radioGroup |html heading: heading.html form: [
html span: 'Heading: '.html textInput on: #heading of: self.html select
list: self colors;on: #color of: self.
radioGroup := html radioGroup.html text: 'Radio on:'.radioGroup radioButton
selected: radioOn;callback: [radioOn := true].
html text: 'off:'.radioGroup radioButton
selected: radioOn not;callback: [radioOn := false].
html checkbox on: #checked of: self.html submitButton
text: 'done' ]
Since a form is a complex entity, it is rendered using a block. Note thatall the state changes happen in the callbacks, not as part of the rendering.
There is one Seaside feature used here that is worth special mention,namely the message on:of:. In the example, this message is used to bind atext input field to the variable heading. Anchors and buttons also supportthis message. The first argument is the name of an instance variable forwhich accessors have been defined; the second argument is the object towhich this instance variable belongs. Both observer (heading) and mutator(heading:) accessor messages must be understood by the object, with theusual naming convention. In the case here of a text input field, this savesus the trouble of having to define a callback that updates the field as wellas having to bind the default contents of the html input field to the currentvalue of the instance variable. Using on: #heading of: self, the heading variableis updated automatically whenever the user updates the text input field.
The same message is used twice more in this example, to cause theselection of a colour on the html form to update the color variable, andto bind the result of the checkbox to the checked variable. Many otherexamples can be found in the functional tests for Seaside. Have a look atthe system category Seaside-Tests-Functional, or just point your browser tohttp://localhost:8080/seaside/tests/alltests. The Form Elements example illustratesmost of the features of forms.
CSS: Cascading style sheets 17
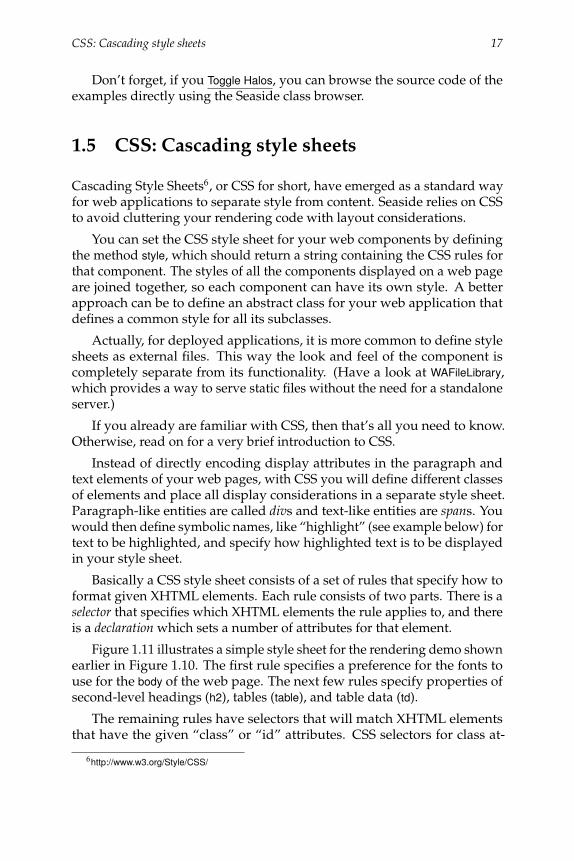
Don’t forget, if you Toggle Halos, you can browse the source code of theexamples directly using the Seaside class browser.
1.5 CSS: Cascading style sheets
Cascading Style Sheets6, or CSS for short, have emerged as a standard wayfor web applications to separate style from content. Seaside relies on CSSto avoid cluttering your rendering code with layout considerations.
You can set the CSS style sheet for your web components by definingthe method style, which should return a string containing the CSS rules forthat component. The styles of all the components displayed on a web pageare joined together, so each component can have its own style. A betterapproach can be to define an abstract class for your web application thatdefines a common style for all its subclasses.
Actually, for deployed applications, it is more common to define stylesheets as external files. This way the look and feel of the component iscompletely separate from its functionality. (Have a look at WAFileLibrary,which provides a way to serve static files without the need for a standaloneserver.)
If you already are familiar with CSS, then that’s all you need to know.Otherwise, read on for a very brief introduction to CSS.
Instead of directly encoding display attributes in the paragraph andtext elements of your web pages, with CSS you will define different classesof elements and place all display considerations in a separate style sheet.Paragraph-like entities are called divs and text-like entities are spans. Youwould then define symbolic names, like “highlight” (see example below) fortext to be highlighted, and specify how highlighted text is to be displayedin your style sheet.
Basically a CSS style sheet consists of a set of rules that specify how toformat given XHTML elements. Each rule consists of two parts. There is aselector that specifies which XHTML elements the rule applies to, and thereis a declaration which sets a number of attributes for that element.
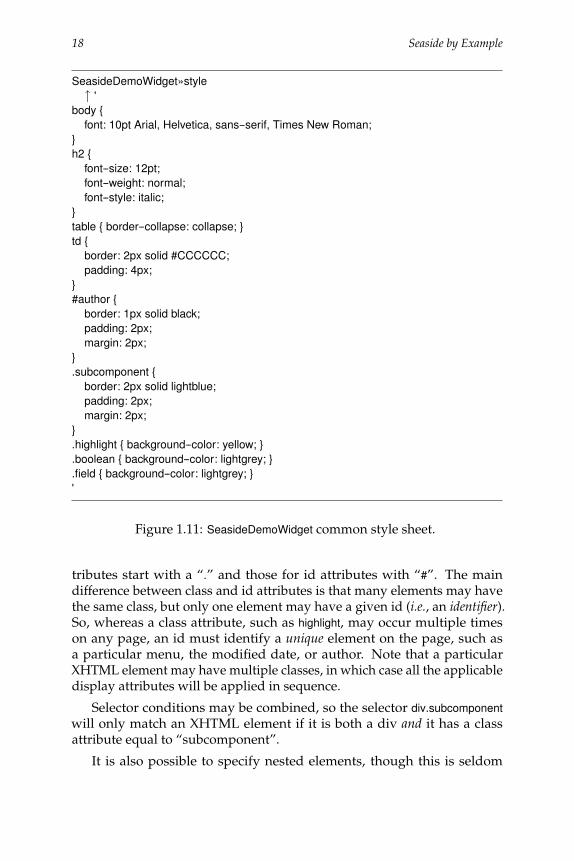
Figure 1.11 illustrates a simple style sheet for the rendering demo shownearlier in Figure 1.10. The first rule specifies a preference for the fonts touse for the body of the web page. The next few rules specify properties ofsecond-level headings (h2), tables (table), and table data (td).
The remaining rules have selectors that will match XHTML elementsthat have the given “class” or “id” attributes. CSS selectors for class at-
6http://www.w3.org/Style/CSS/
18 Seaside by Example
SeasideDemoWidget»style↑ '
body {font: 10pt Arial, Helvetica, sans--serif, Times New Roman;
}h2 {
font--size: 12pt;font--weight: normal;font--style: italic;
}table { border--collapse: collapse; }td {
border: 2px solid #CCCCCC;padding: 4px;
}#author {
border: 1px solid black;padding: 2px;margin: 2px;
}.subcomponent {
border: 2px solid lightblue;padding: 2px;margin: 2px;
}.highlight { background--color: yellow; }.boolean { background--color: lightgrey; }.field { background--color: lightgrey; }'
Figure 1.11: SeasideDemoWidget common style sheet.
tributes start with a “.” and those for id attributes with “#”. The maindifference between class and id attributes is that many elements may havethe same class, but only one element may have a given id (i.e., an identifier).So, whereas a class attribute, such as highlight, may occur multiple timeson any page, an id must identify a unique element on the page, such asa particular menu, the modified date, or author. Note that a particularXHTML element may have multiple classes, in which case all the applicabledisplay attributes will be applied in sequence.
Selector conditions may be combined, so the selector div.subcomponentwill only match an XHTML element if it is both a div and it has a classattribute equal to “subcomponent”.
It is also possible to specify nested elements, though this is seldom
Managing control flow 19
necessary. For example, the selector “p span” will match a span within aparagraph but not within a div.
There are numerous books and web sites to help you learn CSS. For adramatic demonstration of the power of CSS, we recommend you to havea look at the CSS Zen Garden7, which shows how the same content canbe rendered in radically different ways simply by changing the CSS stylesheet.
1.6 Managing control flow
Seaside makes it particularly easy to design web applications with non-trivial control flow. There are basically two mechanisms that you can use:
1. A component can call another component by sending caller call: callee.The caller is temporarily replaced by the callee, until the callee returnscontrol by sending answer:. The caller is usually self, but could also beany other currently visible component.
2. A workflow can be be defined as a task. This is a special kind ofcomponent that subclasses WATask (instead of WAComponent). Insteadof defining renderContentOn:, it defines no content of its own, but ratherdefines a go method that sends a series of call: messages to activatevarious subcomponents in turn.
Call and answer
Call and answer are used to realize simple dialogues.
There is a trivial example of call: and answer: in the rendering demoof Figure 1.10. The component SeasideEditCallDemo displays a text fieldand an edit link. The callback for the edit link calls a new instance ofSeasideEditAnswerDemo initialized to the value of the text field. The callbackalso updates this text field to the result which is sent as an answer.
(We underline the call: and answer: sends to draw attention to them.)
SeasideEditCallDemo»renderContentOn: htmlhtml span
class: 'field';with: self text.
html space.html anchor
7http://www.csszengarden.com/
20 Seaside by Example
callback: [self text: (self call: (SeasideEditAnswerDemo new text: self text))];with: 'edit'
What is particularly elegant is that the code makes absolutely no ref-erence to the new web page that must be created. At run-time, a newpage is created in which the SeasideEditCallDemo component is replaced bya SeasideEditAnswerDemo component; the parent component and the otherpeer components are untouched.
call: and answer: should never be used while rendering.They may safely be sent from within a callback, or fromwithin the go method of a task.
The SeasideEditAnswerDemo component is also remarkably simple. It justrenders a form with a text field. The submit button is bound to a callbackthat will answer the final value of the text field.
SeasideEditAnswerDemo»renderContentOn: htmlhtml form: [
html textInputon: #text of: self.
html submitButtoncallback: [ self answer: self text ];text: 'ok'.
]
That’s it.
Seaside takes care of the control flow and the correct rendering of all thecomponents. Interestingly, the “back” button of the browser will also workjust fine (though side effects are not rolled back unless we take additionalsteps).
Convenience methods
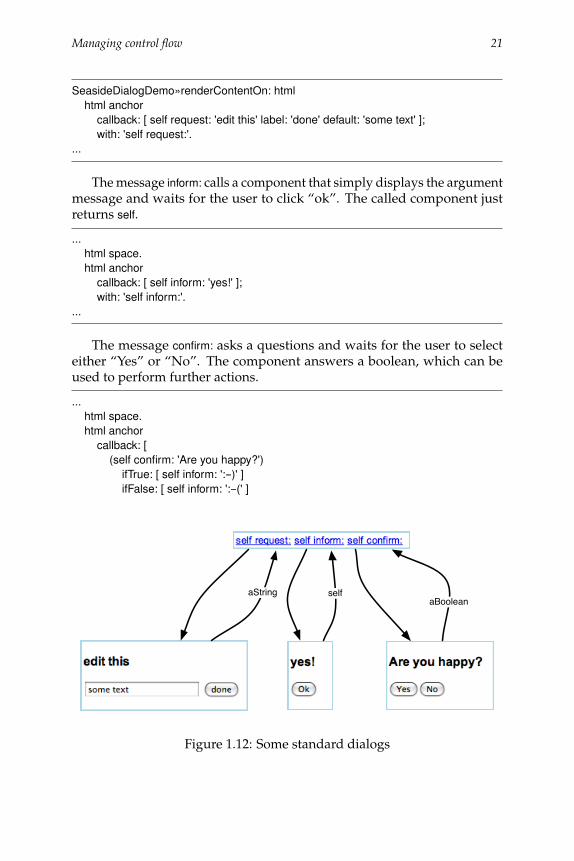
Since certain call–answer dialogues are very common, Seaside providessome convenience methods to save you the trouble of writing compo-nents like SeasideEditAnswerDemo. The generated dialogues are shown inFigure 1.12. We can see these convenience methods being used withinSeasideDialogDemo»renderContentOn:
The message request: performs a call to a component that will let youedit a text field. The component answers the edited string. An optionallabel and default value may also be specified.
Managing control flow 21
SeasideDialogDemo»renderContentOn: htmlhtml anchor
callback: [ self request: 'edit this' label: 'done' default: 'some text' ];with: 'self request:'.
...
The message inform: calls a component that simply displays the argumentmessage and waits for the user to click “ok”. The called component justreturns self.
...html space.html anchor
callback: [ self inform: 'yes!' ];with: 'self inform:'.
...
The message confirm: asks a questions and waits for the user to selecteither “Yes” or “No”. The component answers a boolean, which can beused to perform further actions.
...html space.html anchor
callback: [(self confirm: 'Are you happy?')
ifTrue: [ self inform: ':--)' ]ifFalse: [ self inform: ':--(' ]
aBooleanselfaString
Figure 1.12: Some standard dialogs
22 Seaside by Example
];with: 'self confirm:'.
A few further convenience methods, such as chooseFrom:caption:, aredefined in the convenience protocol of WAComponent.
Tasks
A task is a component that subclasses WATask. It does not render anythingitself, but simply calls other components in a control flow defined by im-plementing the method go.
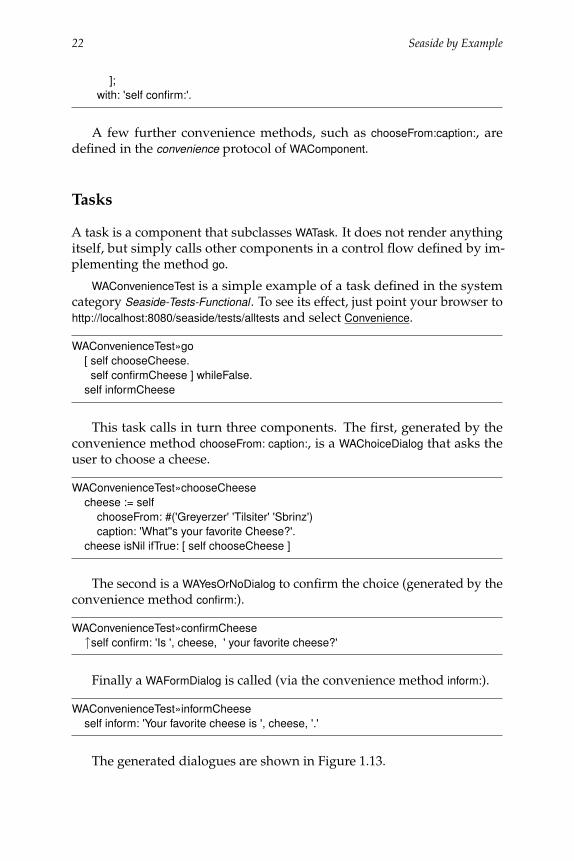
WAConvenienceTest is a simple example of a task defined in the systemcategory Seaside-Tests-Functional. To see its effect, just point your browser tohttp://localhost:8080/seaside/tests/alltests and select Convenience.
WAConvenienceTest»go[ self chooseCheese.
self confirmCheese ] whileFalse.self informCheese
This task calls in turn three components. The first, generated by theconvenience method chooseFrom: caption:, is a WAChoiceDialog that asks theuser to choose a cheese.
WAConvenienceTest»chooseCheesecheese := self
chooseFrom: #('Greyerzer' 'Tilsiter' 'Sbrinz')caption: 'What''s your favorite Cheese?'.
cheese isNil ifTrue: [ self chooseCheese ]
The second is a WAYesOrNoDialog to confirm the choice (generated by theconvenience method confirm:).
WAConvenienceTest»confirmCheese↑self confirm: 'Is ', cheese, ' your favorite cheese?'
Finally a WAFormDialog is called (via the convenience method inform:).
WAConvenienceTest»informCheeseself inform: 'Your favorite cheese is ', cheese, '.'
The generated dialogues are shown in Figure 1.13.
Managing control flow 23
no
yes
Figure 1.13: A simple task
Transactions
We saw in Section 1.3 that Seaside can keep track of the correspondencebetween the state of components and individual web pages by havingcomponents register their state for backtracking: all that a component needdo is implement the method states to answer an array of all the objectswhose state must be tracked.
However, sometimes, we do not want to backtrack state: instead wewant to prevent the user from accidentally undoing effects that should bepermanent. This is often referred to as “the shopping cart problem”. Onceyou have checked-out your shopping cart and paid for the items you havepurchased, it should not be possible to go “back” with the browser and addmore items to the shopping cart!
Seaside allows you to prevent this by defining a task within whichcertain actions are grouped together as transactions. You can backtrackwithin a transaction, but once a transaction is complete, you can no longergo back to it. The corresponding pages are invalidated, and any attempt togo back to them will cause Seaside to generate a warning and redirect theuser to the most recent valid page.
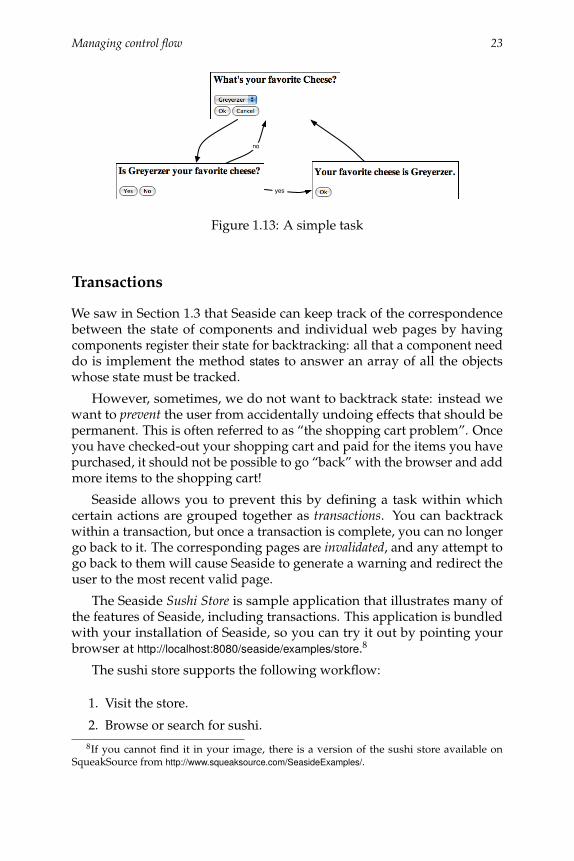
The Seaside Sushi Store is sample application that illustrates many ofthe features of Seaside, including transactions. This application is bundledwith your installation of Seaside, so you can try it out by pointing yourbrowser at http://localhost:8080/seaside/examples/store.8
The sushi store supports the following workflow:
1. Visit the store.
2. Browse or search for sushi.8If you cannot find it in your image, there is a version of the sushi store available on
SqueakSource from http://www.squeaksource.com/SeasideExamples/.
24 Seaside by Example
Figure 1.14: The Sushi Store
3. Add sushi to your shopping cart.
4. Checkout.
5. Verify your order.
6. Enter shipping address.
7. Verify shipping address.
8. Enter payment information.
9. Your fish is on its way!
If you toggle the halos, you will see that the top-level component of thesushi store is an instance of WAStore. It does nothing but render the title bar,and then it renders task, an instance of WAStoreTask.
WAStore»renderContentOn: html"... render the title bar ..."html div id: 'body'; with: task
WAStoreTask captures this workflow sequence. At a couple of points itis critical that the user not be able to go back and change the submittedinformation.
“Purchase” some sushi and then use the “back” button to try to put moresushi into your cart. You will get the message “That page has expired.”
Seaside lets the programmer say that a certain part of a workflow actlike a transaction: once the transaction is complete, the user cannot go backand undo it. You say this by sending isolate: to a task with the transactional
Managing control flow 25
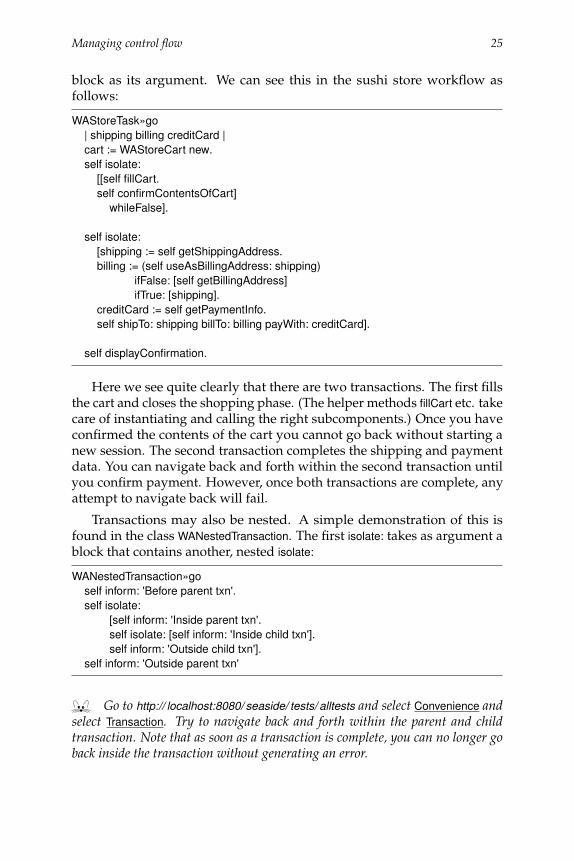
block as its argument. We can see this in the sushi store workflow asfollows:
WAStoreTask»go| shipping billing creditCard |cart := WAStoreCart new.self isolate:
[[self fillCart.self confirmContentsOfCart]
whileFalse].
self isolate:[shipping := self getShippingAddress.billing := (self useAsBillingAddress: shipping)
ifFalse: [self getBillingAddress]ifTrue: [shipping].
creditCard := self getPaymentInfo.self shipTo: shipping billTo: billing payWith: creditCard].
self displayConfirmation.
Here we see quite clearly that there are two transactions. The first fillsthe cart and closes the shopping phase. (The helper methods fillCart etc. takecare of instantiating and calling the right subcomponents.) Once you haveconfirmed the contents of the cart you cannot go back without starting anew session. The second transaction completes the shipping and paymentdata. You can navigate back and forth within the second transaction untilyou confirm payment. However, once both transactions are complete, anyattempt to navigate back will fail.
Transactions may also be nested. A simple demonstration of this isfound in the class WANestedTransaction. The first isolate: takes as argument ablock that contains another, nested isolate:
WANestedTransaction»goself inform: 'Before parent txn'.self isolate:
[self inform: 'Inside parent txn'.self isolate: [self inform: 'Inside child txn'].self inform: 'Outside child txn'].
self inform: 'Outside parent txn'
Go to http:// localhost:8080/ seaside/ tests/ alltests and select Convenience andselect Transaction. Try to navigate back and forth within the parent and childtransaction. Note that as soon as a transaction is complete, you can no longer goback inside the transaction without generating an error.
26 Seaside by Example
1.7 A complete tutorial example
Let’s see how we can build a complete Seaside application from scratch.9
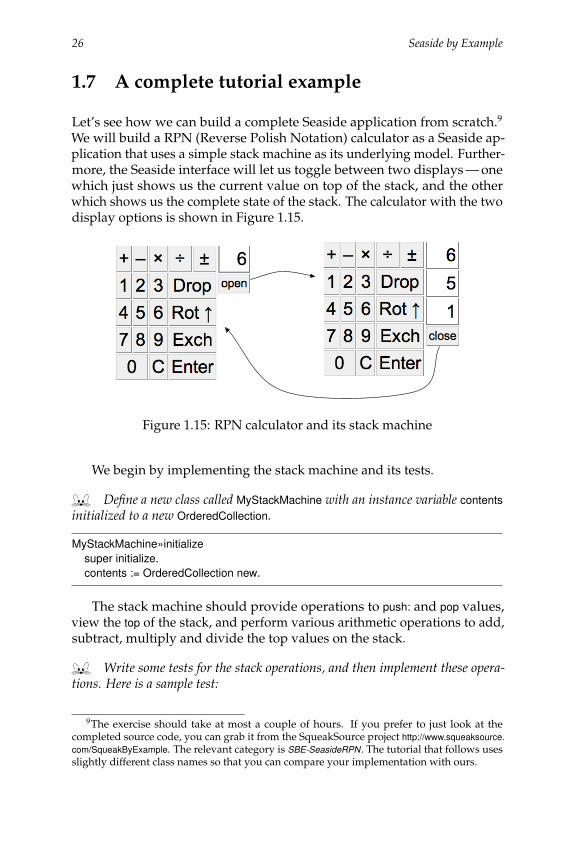
We will build a RPN (Reverse Polish Notation) calculator as a Seaside ap-plication that uses a simple stack machine as its underlying model. Further-more, the Seaside interface will let us toggle between two displays — onewhich just shows us the current value on top of the stack, and the otherwhich shows us the complete state of the stack. The calculator with the twodisplay options is shown in Figure 1.15.
Figure 1.15: RPN calculator and its stack machine
We begin by implementing the stack machine and its tests.
Define a new class called MyStackMachine with an instance variable contentsinitialized to a new OrderedCollection.
MyStackMachine»initializesuper initialize.contents := OrderedCollection new.
The stack machine should provide operations to push: and pop values,view the top of the stack, and perform various arithmetic operations to add,subtract, multiply and divide the top values on the stack.
Write some tests for the stack operations, and then implement these opera-tions. Here is a sample test:
9The exercise should take at most a couple of hours. If you prefer to just look at thecompleted source code, you can grab it from the SqueakSource project http://www.squeaksource.com/SqueakByExample. The relevant category is SBE-SeasideRPN. The tutorial that follows usesslightly different class names so that you can compare your implementation with ours.
A complete tutorial example 27
MyStackMachineTest»testDivstack
push: 3;push: 4;div.
self assert: stack size = 1.self assert: stack top = (4/3).
You might consider using some helper methods for the arithmetic op-erations to check that there are two numbers on the stack before doinganything, and raising an error if this precondition is not fulfilled.10 If youdo this, most of your methods will just be one or two lines long.
You might also consider implementing MyStackMachine»printOn: to makeit easier to debug your stack machine implementation with the help of anobject inspector. (Hint: just delegate printing to the contents variable.)
Complete the MyStackMachine by writing operations dup (push a duplicate ofthe top value onto the stack), exch (exchange the top two values), and rotUp (rotatethe entire stack contents up — the top value will move to the bottom).
Now we have a simple stack machine implementation. We can start toimplement the Seaside RPN Calculator.
We will make use of 5 classes:
• MyRPNWidget — this should be an abstract class that defines the com-mon CSS style sheet for the application, and other common behav-ior for the components of the RPN calculator. It is a subclass ofWAComponent and the direct superclass of the following four classes.
• MyCalculator — this is the root component. It should register the appli-cation (on the class side), it should instantiate and render its subcom-ponents, and it should register any state for backtracking.
• MyKeypad — this displays the keys that we use to interact with thecalculator.
• MyDisplay — this component displays the top of the stack and providesa button to call another component to display the detailed view.
• MyDisplayStack — this component shows the detailed view of the stackand provides a button to answer back. It is a subclass of MyDisplay.
10It’s a good idea to use Object»assert: to specify the preconditions for an operation. Thismethod will raise an AssertionFailure if the user tries to use the stack machine in an invalid state.
28 Seaside by Example
Define MyRPNWidget in the category MyCalculator. Define the common stylefor the application.
Here is a minimal CSS for the application. You can make it more fancyif you like.
MyRPNWidget»style↑ 'table.keypad { float: left; }
td.key {border: 1px solid grey;background: lightgrey;padding: 4px;text--align: center;
}table.stack { float: left; }td.stackcell {
border: 2px solid white;border--left--color: grey;border--right--color: grey;border--bottom--color: grey;padding: 4px;text--align: right;
}td.small { font--size: 8pt; }'
Define MyCalculator to be a root component and register itself as an appli-cation (i.e., implement canBeRoot and initialize on the class side). ImplementMyCalculator»renderContentOn: to render something trivial (such as its name), andverify that the application runs in a browser.
MyCalculator is responsible for instantiating MyStackMachine, MyKeypad andMyDisplay.
Define MyKeypad and MyDisplay as subclasses of MyRPNWidget. All threecomponents will need access to a common instance of the stack machine, so definethe instance variable stackMachine and an initialization method setMyStackMachine:in the common parent, MyRPNWidget. Add instance variables keypad and displayto MyCalculator and initialize them in MyCalculator»initialize. (Don’t forget to sendsuper initialize!)
Pass the shared instance of the stack machine to the keypad and the displayin the same initialize method. Implement MyCalculator»renderContentOn: to simplyrender in turn the keypad and the display. To correctly display the subcomponents,you must implement MyCalculator»children to return an array with the keypad andthe display. Implement placeholder rendering methods for the keypad and thedisplay and verify that the calculator now displays its two subcomponents.
A complete tutorial example 29
Now we will change the implementation of the display to show the topvalue of the stack.
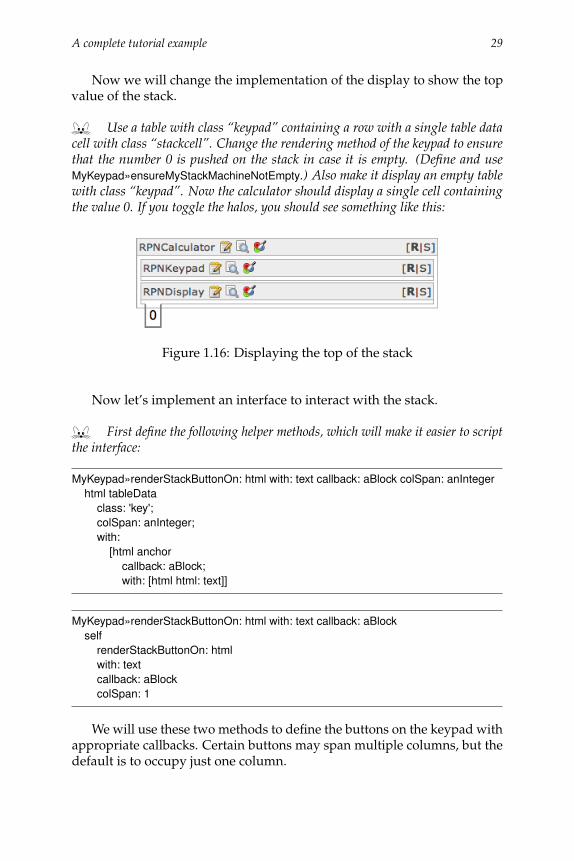
Use a table with class “keypad” containing a row with a single table datacell with class “stackcell”. Change the rendering method of the keypad to ensurethat the number 0 is pushed on the stack in case it is empty. (Define and useMyKeypad»ensureMyStackMachineNotEmpty.) Also make it display an empty tablewith class “keypad”. Now the calculator should display a single cell containingthe value 0. If you toggle the halos, you should see something like this:
Figure 1.16: Displaying the top of the stack
Now let’s implement an interface to interact with the stack.
First define the following helper methods, which will make it easier to scriptthe interface:
MyKeypad»renderStackButtonOn: html with: text callback: aBlock colSpan: anIntegerhtml tableData
class: 'key';colSpan: anInteger;with:
[html anchorcallback: aBlock;with: [html html: text]]
MyKeypad»renderStackButtonOn: html with: text callback: aBlockself
renderStackButtonOn: htmlwith: textcallback: aBlockcolSpan: 1
We will use these two methods to define the buttons on the keypad withappropriate callbacks. Certain buttons may span multiple columns, but thedefault is to occupy just one column.
30 Seaside by Example
Use the two helper methods to script the keypad as follows: (Hint: start bygetting the digit and “Enter” keys working, then the arithmetic operators.)
MyKeypad»renderContentOn: htmlself ensureStackMachineNotEmpty.html tableclass: 'keypad';with: [
html tableRow: [self renderStackButton: '+' callback: [self stackOp: #add] on: html.self renderStackButton: '–' callback: [self stackOp: #min] on: html.self renderStackButton: '×' callback: [self stackOp: #mul] on: html.self renderStackButton: '÷' callback: [self stackOp: #div] on: html.self renderStackButton: '±' callback: [self stackOp: #neg] on: html ].
html tableRow: [self renderStackButton: '1' callback: [self type: '1'] on: html.self renderStackButton: '2' callback: [self type: '2'] on: html.self renderStackButton: '3' callback: [self type: '3'] on: html.self renderStackButton: 'Drop' callback: [self stackOp: #pop]colSpan: 2 on: html ].
" and so on ... "html tableRow: [self renderStackButton: '0' callback: [self type: '0'] colSpan: 2 on: html.self renderStackButton: 'C' callback: [self stackClearTop] on: html.self renderStackButton: 'Enter'callback: [self stackOp: #dup. self setClearMode]colSpan: 2 on: html ]]
Check that the keypad displays properly. If you try to click on the keys,however, you will find that the calculator does not work yet ...
Implement MyKeypad»type: to update the top of the stack by appending thetyped digit. You will need to convert the top value to a string, update it, andconvert it back to an integer, something like this:
MyKeypad»type: aStringstackMachine push: (stackMachine pop asString, aString) asNumber.
Now when you click on the digit keys the display should be updated.(Be sure that MyStackMachine»pop returns the value popped, or this will notwork!)
Now we must implement MyKeypad»stackOp: Something like this will do thetrick:
MyKeypad»stackOp: op[ stackMachine perform: op ] on: AssertionFailure do: [ ].
A complete tutorial example 31
The point is that we are not sure that all operations will succeed, forexample, addition will fail if we do not have two numbers on the stack.For the moment we can just ignore such errors. If we are feeling moreambitious later on, we can provide some user feedback in the error handlerblock.
The first version of the calculator should be working now. Try to enter somenumbers by pressing the digit keys, hitting Enter to push a copy of the currentvalue, and entering + to sum the top two values.
You will notice that typing digits does not behave the way you mightexpect. Actually the calculator should be aware of whether you are typinga new number, or appending to an existing number.
Adapt MyKeypad»type: to behave differently depending on the current typingmode. Introduce an instance variable mode which takes on one of the three valuestyping (when you are typing), push (after you you have performed a calculatoroperation and typing should force the top value to be pushed), or clear (after youhave performed Enter and the top value should be cleared before typing). The newtype: method might look like this:
MyKeypad»type: aStringself inPushMode ifTrue: [
stackMachine push: stackMachine top.self stackClearTop ].
self inClearMode ifTrue: [ self stackClearTop ].stackMachine push: (stackMachine pop asString, aString) asNumber.
Typing might work better now, but it is still frustrating not to be able tosee what is on the stack.
Define MyDisplayStack as a subclass of MyDisplay. Add a button to therendering method of MyDisplay which will call a new instance of MyDisplayStack.You will need an html anchor that looks something like this:
html anchorcallback: [ self call: (MyDisplayStack new setMyStackMachine: stackMachine)];with: 'open'
The callback will cause the current instance of MyDisplay to be temporar-ily replaced by a new instance of MyDisplayStack whose job it is to display thecomplete stack. When this component signals that it is done (i.e., by sendingself answer), then control will return to the original instance of MyDisplay.
Define the rendering method of MyDisplayStack to display all of the valueson the stack. (You will either need to define an accessor for the stack machine’s
32 Seaside by Example
contents or you can define MyStackMachine»do: to iterate over the stack values.)The stack display should also have a button labelled “close” whose callback willsimply perform self answer.
html anchorcallback: [ self answer];with: 'close'
Now you should be able to open and close the stack while you are usingthe calculator.
There is, however, one thing we have forgotten. Try to perform someoperations on the stack. Now use the “back” button of your browser andtry to perform some more stack operations. (For example, open the stack,type 1 , Enter twice and + . The stack should display “2” and “1”. Now hitthe “back” button. The stack now shows three times “1” again. Now if youtype + the stack shows “3”. Backtracking is not yet working.
Implement MyCalculator»states to return the contents of the stack machine.Check that backtracking now works correctly!
Sit back and enjoy a tall glass of something cool!
1.8 A quick look at AJAX
AJAX (Asynchronous JavaScript and XML) is a technique to make webapplications more interactive by exploiting JavaScript functionality on theclient side.
Two well-known JavaScript libraries are Prototype (http://www.prototypejs.org) and script.aculo.us (http://script.aculo.us). Prototype provides a frame-work to ease writing JavaScript. script.aculo.us provides some additionalfeatures to support animations and drag-and-drop on top of Prototype.Both frameworks are supported in Seaside through the package “Scriptacu-lous”.
All ready-made images have the Scriptaculous package extensions al-ready loaded. The latest version is available from http://www.squeaksource.com/Seaside. An online demo is available at http://scriptaculous.seasidehosting.st. Al-ternatively, if you have a enabled image running, simply go to http://localhost:8080/seaside/tests/scriptaculous.
The Scriptaculous extensions follow the same approach as Seaside it-self — simply configure Smalltalk objects to model your application, andthe needed Javascript code will be generated for you.

A quick look at AJAX 33
Let us look at a simple example of how client-side Javascript supportcan make our RPN calculator behave more naturally. Currently everykeystroke to enter a digit generates a request to refresh the page. We wouldlike instead to handle editing of the display on the client-side by updatingthe display in the existing page.
To address the display from JavaScript code we must first give it a unique id.Update the calculator’s rendering method as follows:11
MyCalculator»renderContentOn: htmlhtml div id: 'keypad'; with: keypad.html div id: 'display'; with: display.
To be able to re-render the display when a keyboard button is pressed, thekeyboard needs to know the display component. Add a display instance vari-able to MyKeypad, an initializer method MyKeypad»setDisplay:, and call this fromMyCalculator>>initialize. Now we are able to assign some JavaScript code to thebuttons by updating MyKeypad»renderStackButtonOn: as follows:
MyKeypad»renderStackButton: text callback: aBlock colSpan: anInteger on: htmlhtml tableData
class: 'key';colSpan: anInteger;with: [
html anchorcallback: aBlock;onClick: "handle Javascript event"
(html updaterid: 'display';callback: [ :r |
aBlock value.r render: display ];
return: false);with: [ html html: text ] ]
onClick: specifies a JavaScript event handler. html updater returns aninstance of SUUpdater, a Smalltalk object representing the JavaScriptAjax.Updater object (http://www.prototypejs.org/api/ajax/updater). This objectperforms an AJAX request and updates a container’s contents based on theresponse text. id: tells the updater what XHTML DOM element to update,in this case the contents of the div element with the id ’display’. callback:specifies a block that is triggered when the user presses the button. The
11If you have not implemented the tutorial example yourself, you can simply load thecomplete example from http://www.squeaksource.com/SqueakByExample and apply the suggestedchanges to the classes RPN* instead of My*.
34 Seaside by Example
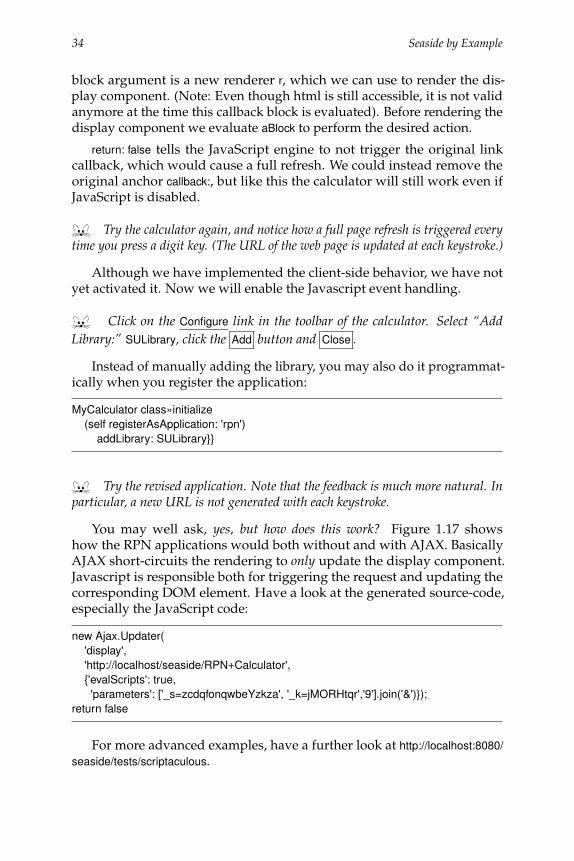
block argument is a new renderer r, which we can use to render the dis-play component. (Note: Even though html is still accessible, it is not validanymore at the time this callback block is evaluated). Before rendering thedisplay component we evaluate aBlock to perform the desired action.
return: false tells the JavaScript engine to not trigger the original linkcallback, which would cause a full refresh. We could instead remove theoriginal anchor callback:, but like this the calculator will still work even ifJavaScript is disabled.
Try the calculator again, and notice how a full page refresh is triggered everytime you press a digit key. (The URL of the web page is updated at each keystroke.)
Although we have implemented the client-side behavior, we have notyet activated it. Now we will enable the Javascript event handling.
Click on the Configure link in the toolbar of the calculator. Select “AddLibrary:” SULibrary, click the Add button and Close .
Instead of manually adding the library, you may also do it programmat-ically when you register the application:
MyCalculator class»initialize(self registerAsApplication: 'rpn')
addLibrary: SULibrary}}
Try the revised application. Note that the feedback is much more natural. Inparticular, a new URL is not generated with each keystroke.
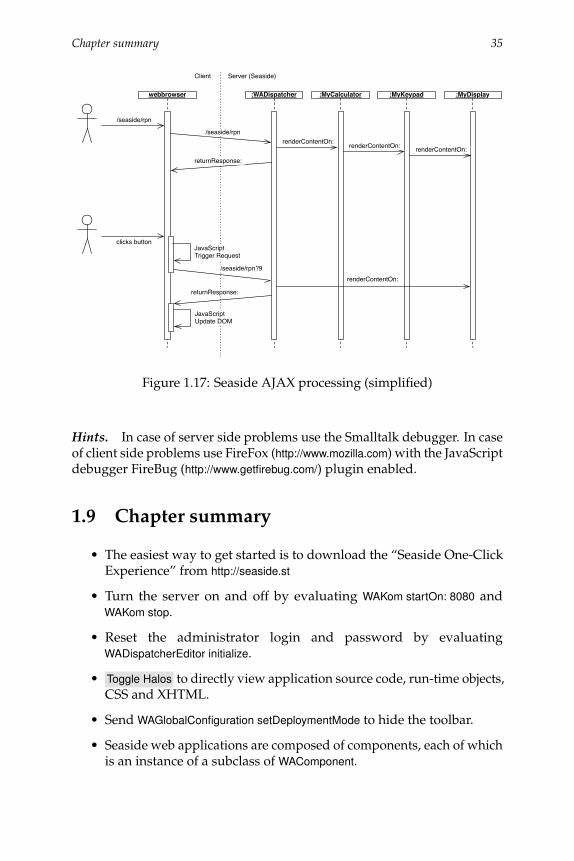
You may well ask, yes, but how does this work? Figure 1.17 showshow the RPN applications would both without and with AJAX. BasicallyAJAX short-circuits the rendering to only update the display component.Javascript is responsible both for triggering the request and updating thecorresponding DOM element. Have a look at the generated source-code,especially the JavaScript code:
new Ajax.Updater('display','http://localhost/seaside/RPN+Calculator',{'evalScripts': true,
'parameters': ['_s=zcdqfonqwbeYzkza', '_k=jMORHtqr','9'].join('&')});return false
For more advanced examples, have a further look at http://localhost:8080/seaside/tests/scriptaculous.
Chapter summary 35
webbrowser
/seaside/rpn
Client Server (Seaside)
/seaside/rpn
:WADispatcher :MyCalculator :MyKeypad :MyDisplay
renderContentOn: renderContentOn: renderContentOn:returnResponse:
clicks button
/seaside/rpn?9renderContentOn:
returnResponse:
JavaScriptTrigger Request
JavaScriptUpdate DOM
Figure 1.17: Seaside AJAX processing (simplified)
Hints. In case of server side problems use the Smalltalk debugger. In caseof client side problems use FireFox (http://www.mozilla.com) with the JavaScriptdebugger FireBug (http://www.getfirebug.com/) plugin enabled.
1.9 Chapter summary
• The easiest way to get started is to download the “Seaside One-ClickExperience” from http://seaside.st
• Turn the server on and off by evaluating WAKom startOn: 8080 andWAKom stop.
• Reset the administrator login and password by evaluatingWADispatcherEditor initialize.
• Toggle Halos to directly view application source code, run-time objects,CSS and XHTML.
• Send WAGlobalConfiguration setDeploymentMode to hide the toolbar.
• Seaside web applications are composed of components, each of whichis an instance of a subclass of WAComponent.
36 Seaside by Example
• Only a root component may be registered as a component. It shouldimplement canBeRoot on the class side. Alternatively it may registeritself as an application in its class-side initialize method by sendingself registerAsApplication: application path. If you override description itis possible to return a descriptive application name that will be dis-played in the configuration editor.
• To backtrack state, a component must implement the states methodto answer an array of objects whose state will be restored if the userclicks the browser’s “back” button.
• A component renders itself by implementing renderContentOn:. Theargument to this method is an XHTML rendering canvas (usuallycalled html).
• A component can render a subcomponent by sending self render: sub-component.
• XHTML is generated programmatically by sending messages tobrushes. A brush is obtained by sending a message, such as paragraphor div, to the html canvas.
• If you send a cascade of messages to a brush that includes the messagewith:, then with: should be the last message sent. Thw with: messagesets the contents and renders the result.
• Actions should appear only in callbacks. You should not change thestate of the application while you are rendering it.
• You can bind various form widgets and anchors to instance variableswith accessors by sending the message on: instance variable of: object tothe brush.
• You can define the CSS for a component hierarchy by defining themethod style, which should return a string containing the style sheet.(For deployed applications, it is more usual to refer to a style sheetlocated at a static URL.)
• Control flows can be programmed by sending x call: y, in which casecomponent x will be replaced by y until y answers by sending answer:with a result in a callback. The receiver of call: is usually self, but mayin general be any visible component.
• A control flow can also be specified as a task — a instance of a subclassof WATask. It should implement the method go, which should call: aseries of components in a workflow.
Chapter summary 37
• Use WAComponents’s convenience methods request:, inform:, confirm: andchooseFrom:caption: for basic interactions.
• To prevent the user from using the browser’s “back” button to accessa previous execution state of the web application, you can declareportions of the workflow to be a transaction by enclosing them in anisolate: block.