Embed Size (px)
DESCRIPTION
Spring Framework 3.1
Citation preview

SPRING FRAMEWORK
Majrul Ansari Java Technology Trainer http://www.majrul.com
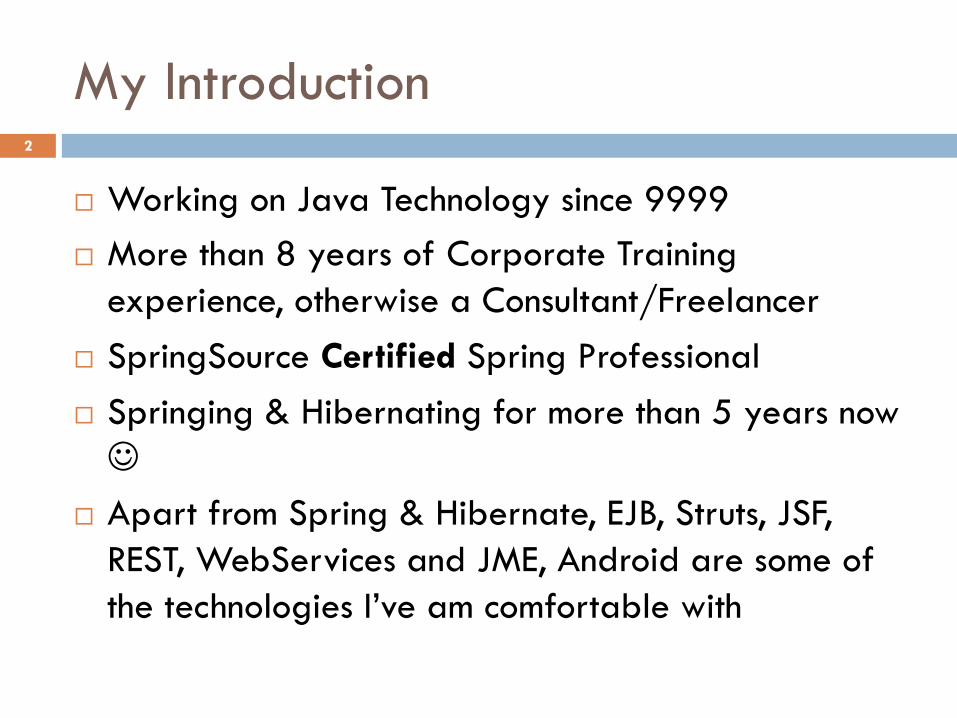
My Introduction
¨ Working on Java Technology since 9999 ¨ More than 8 years of Corporate Training
experience, otherwise a Consultant/Freelancer ¨ SpringSource Certified Spring Professional ¨ Springing & Hibernating for more than 5 years now J
¨ Apart from Spring & Hibernate, EJB, Struts, JSF, REST, WebServices and JME, Android are some of the technologies I’ve am comfortable with
2
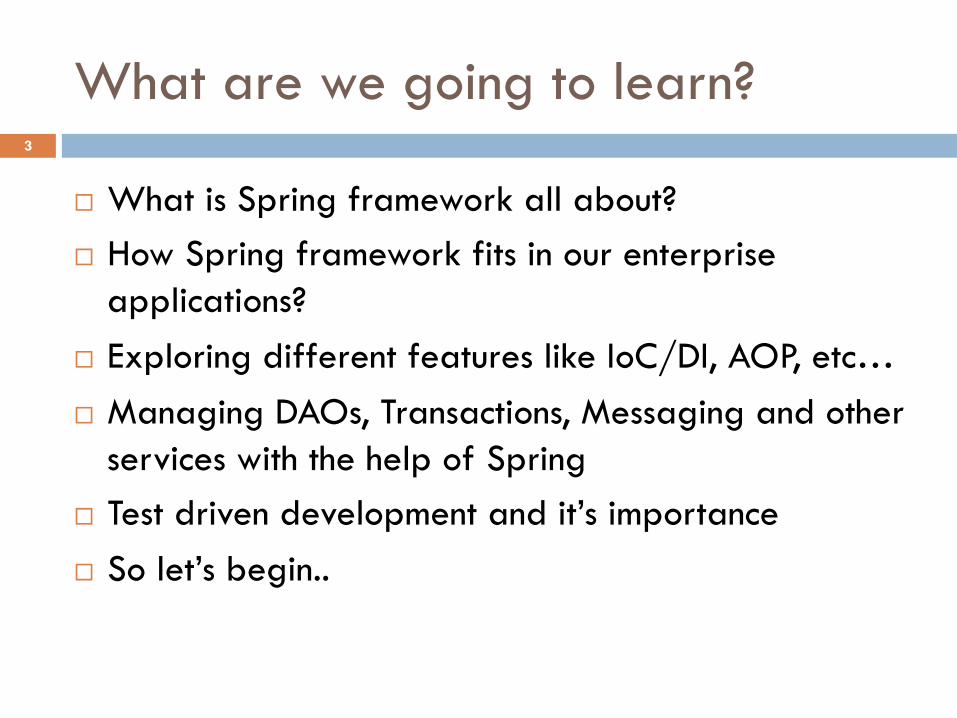
What are we going to learn?
¨ What is Spring framework all about? ¨ How Spring framework fits in our enterprise
applications? ¨ Exploring different features like IoC/DI, AOP, etc… ¨ Managing DAOs, Transactions, Messaging and other
services with the help of Spring ¨ Test driven development and it’s importance ¨ So let’s begin..
3
Topics in this Session
¨ Introduction to Spring ¨ Introduction to IoC and DI
4
Topics in this Session
¨ Introduction to Spring ¨ Introduction to IoC and DI
5
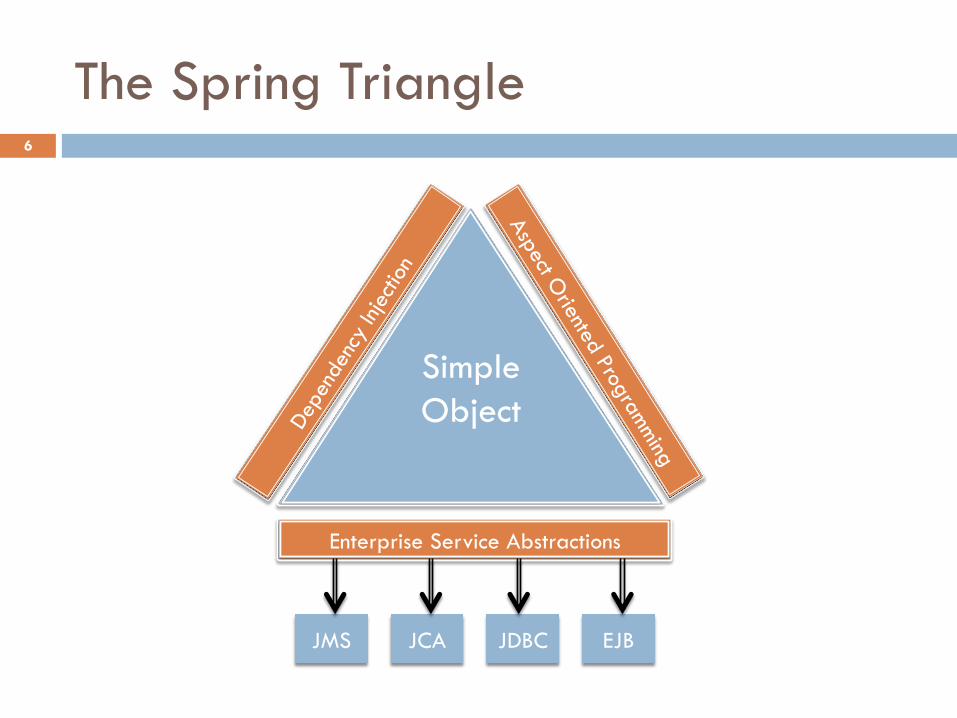
The Spring Triangle
Simple Object
Enterprise Service Abstractions
JMS JCA JDBC EJB
6
Goal of Spring framework
¨ Provide comprehensive infrastructural support for developing enterprise Java applications ¤ Spring deals with the plumbing ¤ So you can focus on solving the domain problem
7
Spring advantage
¨ Make a Java method execute in a database transaction without having to deal with the transaction APIs
¨ Make a local Java method a remote procedure without having to deal with remote APIs
¨ Make a local Java method a management operation without having to deal with JMX APIs
¨ Make a local Java method a message handler without having to deal with JMS APIs
8
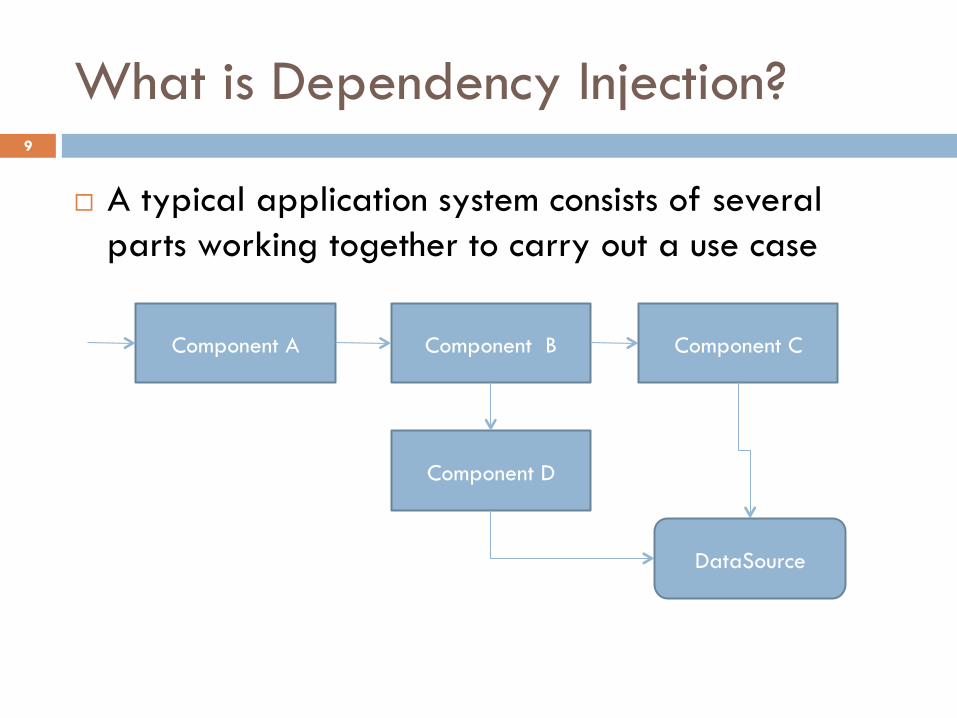
What is Dependency Injection?
¨ A typical application system consists of several parts working together to carry out a use case
Component A Component C Component B
Component D
DataSource
9
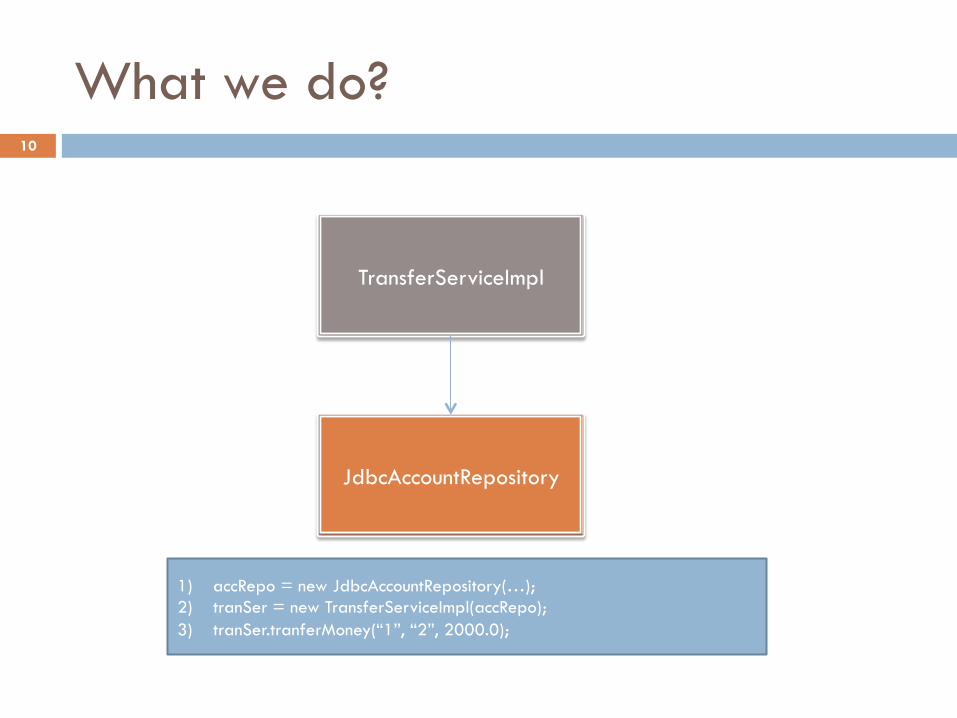
What we do?
TransferServiceImpl
JdbcAccountRepository
1) accRepo = new JdbcAccountRepository(…); 2) tranSer = new TransferServiceImpl(accRepo); 3) tranSer.tranferMoney(“1”, “2”, 2000.0);
10
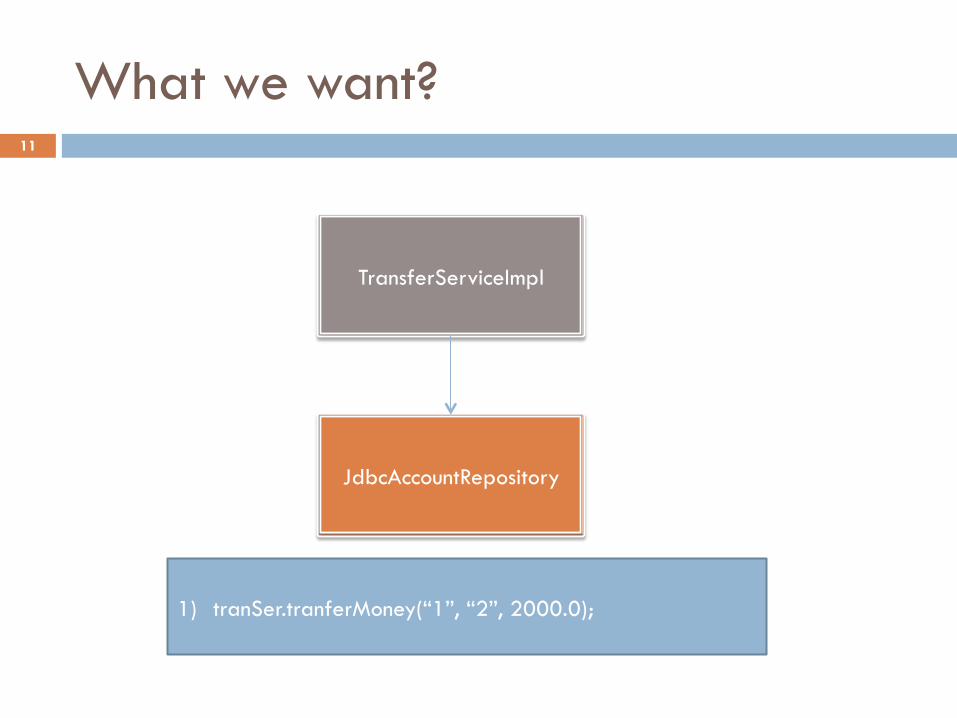
What we want?
TransferServiceImpl
JdbcAccountRepository
1) tranSer.tranferMoney(“1”, “2”, 2000.0);
11
But how?
¨ To achieve this, we need someone who can manage the components and it’s dependencies
¨ The term Container which is commonly used in EE, is also used by Spring and is referred to as an IoC (Inversion of Control) Container
¨ Spring provides a Container/Factory which manages ¤ Component instantiation and initialization ¤ Component dependencies ¤ Services wrapped around those Components
12
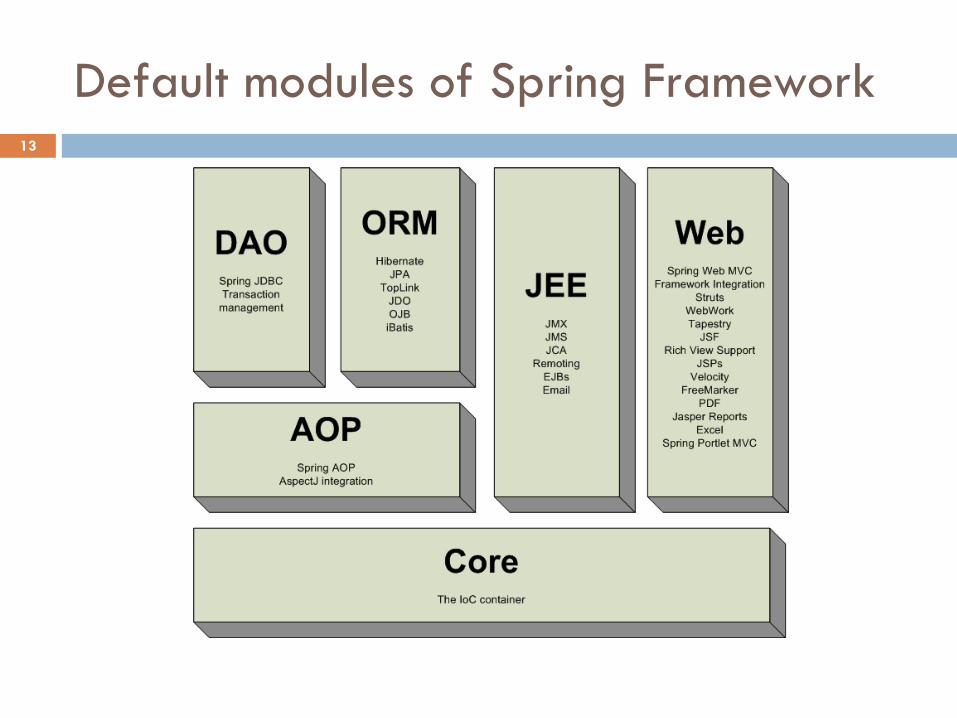
Default modules of Spring Framework 13
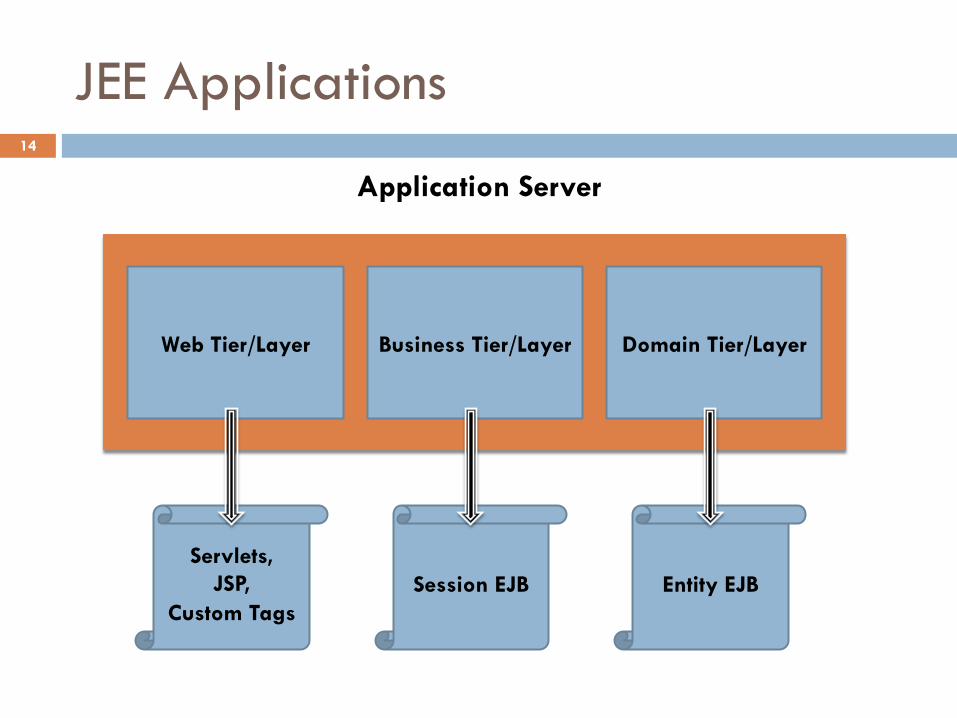
JEE Applications
Web Tier/Layer Business Tier/Layer Domain Tier/Layer
Application Server
Servlets, JSP,
Custom Tags Session EJB Entity EJB
14
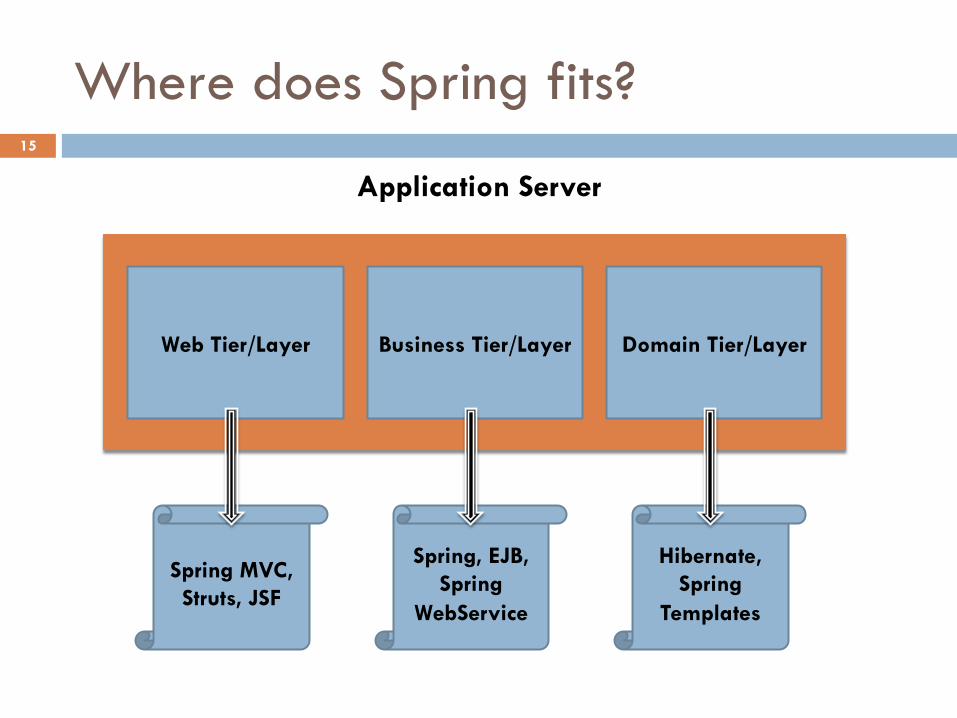
Where does Spring fits?
Web Tier/Layer Business Tier/Layer Domain Tier/Layer
Application Server
Spring MVC, Struts, JSF
Spring, EJB, Spring
WebService
Hibernate, Spring
Templates
15
Enter Spring
¨ A Lightweight JEE framework designed to provide louse coupling between components and a POJO model recommended for business modeling rather than EJB
¨ Provides a Container which manages business objects and lifecycle
¨ Dependencies between components are supplied via XML configuration. Now (Since Spring 2.x) even annotations are also supported
¨ Container in Spring is nothing but a factory object making is truly lightweight when compared with EJB’s
16
The IoC Container
¨ The IoC container is an implementation of BeanFactory interface
¨ Then we have ApplicationContext and WebApplicationContext derived from it for adding additional capabilities
¨ The most commonly used form of IoC container is the ApplicationContext implementation
17
Cont’d…
¨ When the container is loaded, it gets its instructions on what objects to instantiate, configure, and assemble by reading configuration metadata. The configuration metadata is represented in XML, Java annotations, or Java code. It allows you to express the objects that compose your application and the rich interdependencies between such objects
18
Topics in this Session
¨ Introduction to Spring ¨ Introduction to IoC and DI
19
Dependency Injection
¨ It's a process whereby objects define their dependencies, that is, the other objects they work with. The container then injects those dependencies when it creates the bean. This process is fundamentally the inverse, hence the name Inversion of Control (IoC)
20
Different ways of DI
¨ We will explore different types of DI ¤ Setter injection ¤ Constructor injection ¤ Lookup method injection ¤ Method injection (Using Spring API)
21
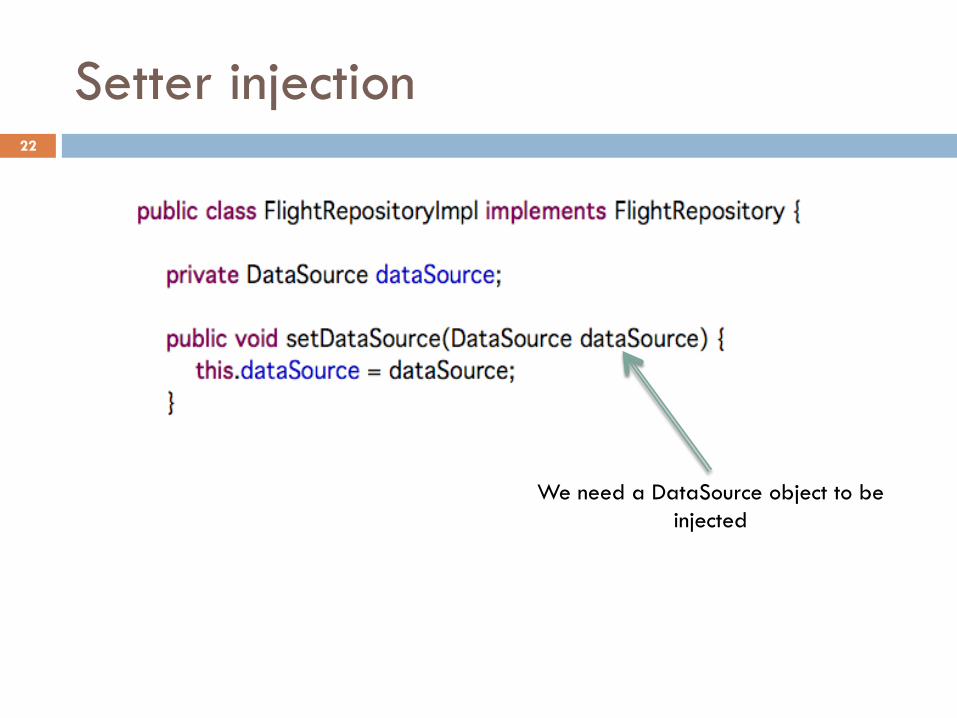
Setter injection
We need a DataSource object to be injected
22
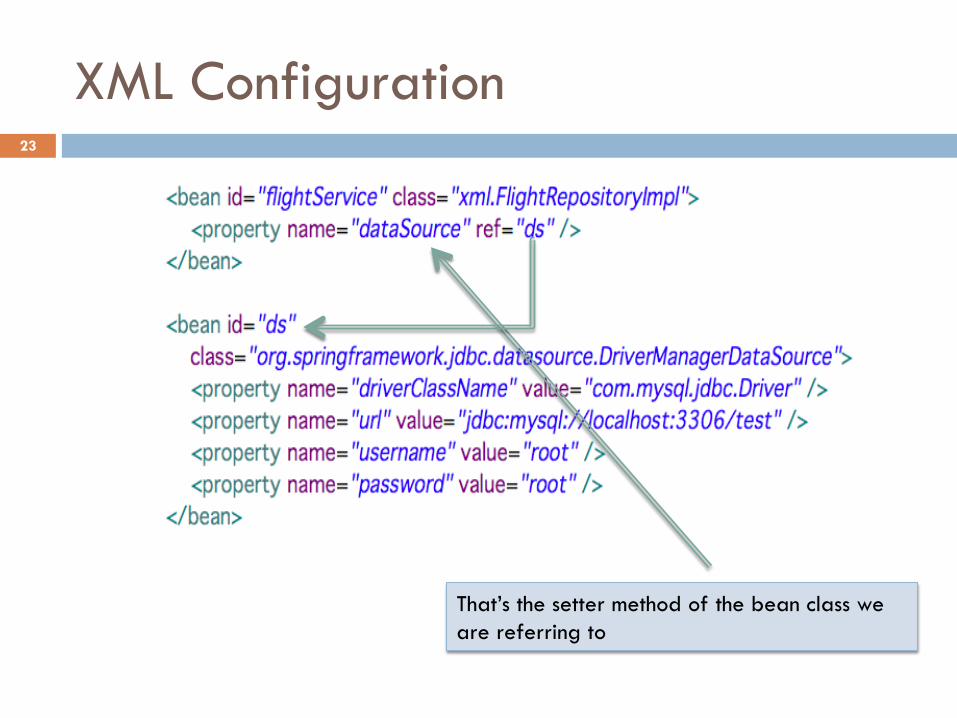
XML Configuration
That’s the setter method of the bean class we are referring to
23
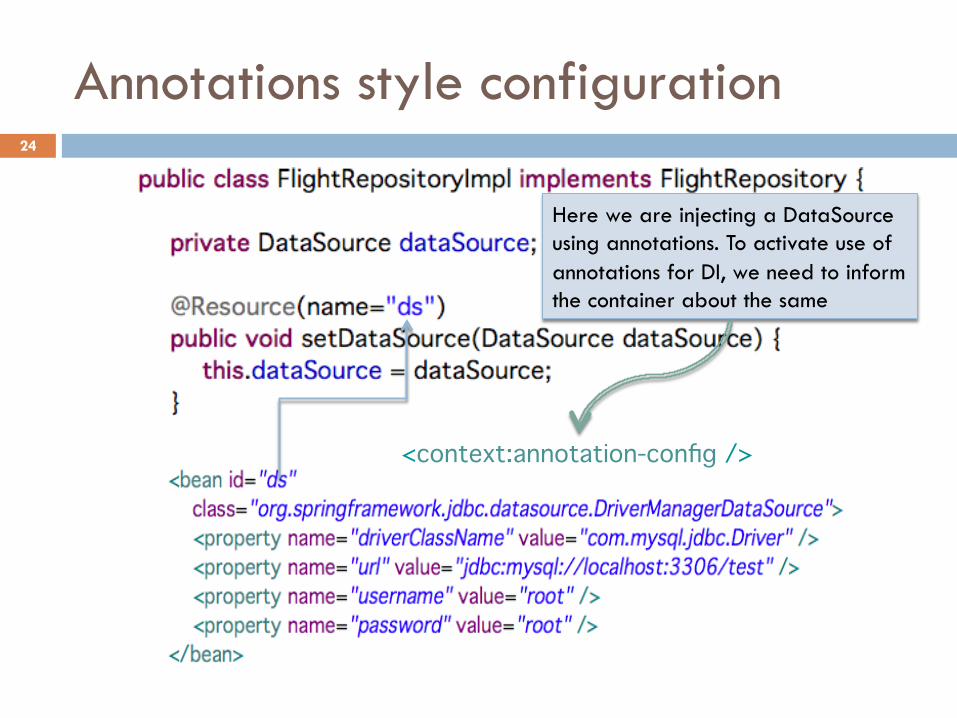
Annotations style configuration
Here we are injecting a DataSource using annotations. To activate use of annotations for DI, we need to inform the container about the same
<context:annotation-config />
24
Cont’d…
¨ @Resource is a JSR standard annotation. Apart from this we can use @Autowired annotation provided by Spring for DI. One more annotation which is part of Java EE 6 spec, @Inject is also supported by default
¨ By using the above annotations, we still need to add the bean entries in the xml file
¨ To avoid configuring the beans in xml file, we need to additionally use @Component annotation
¨ Any bean marked as @Component will be scanned by the IoC container on startup and will be loaded automatically
¨ To make it more clear as to what type of components are we building, Spring introduces @Service, @Repository, @Controller and many others stereotypes to distinguish between the same
25
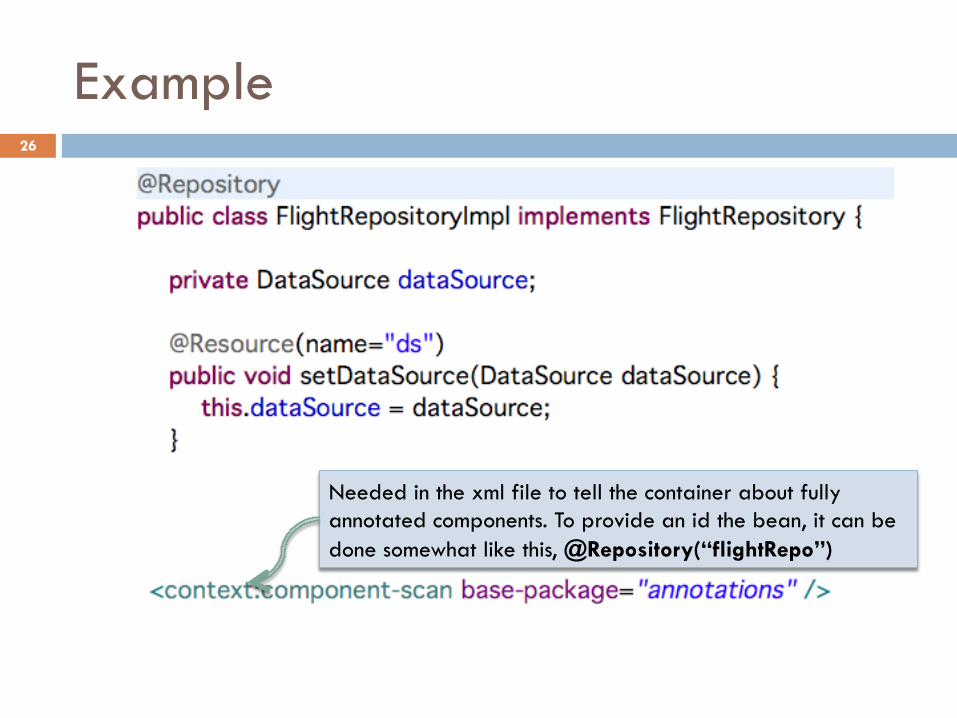
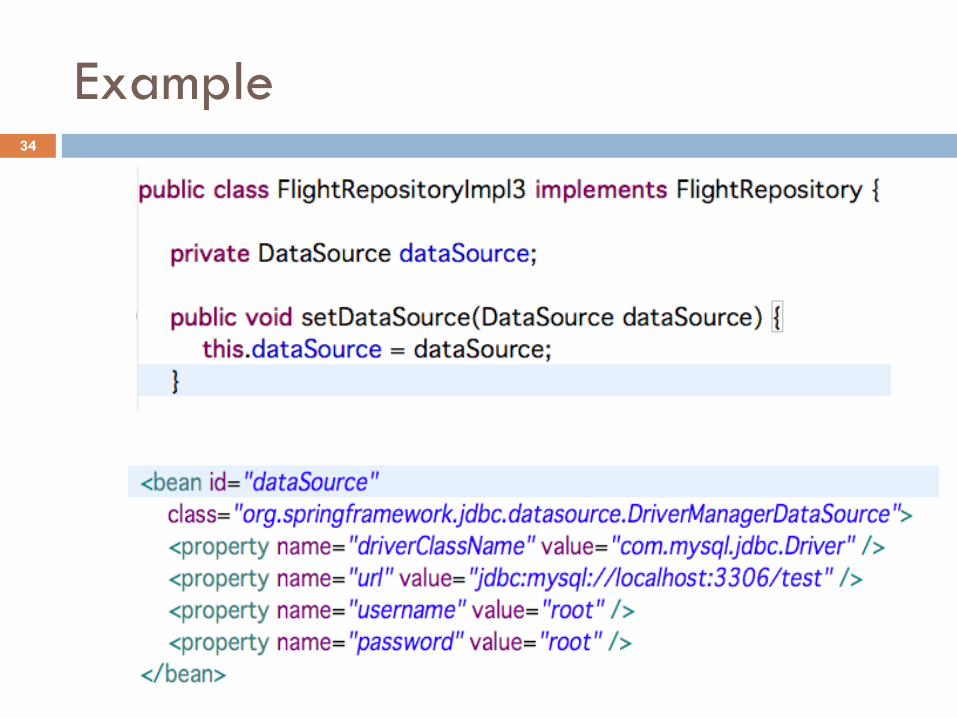
Example
Needed in the xml file to tell the container about fully annotated components. To provide an id the bean, it can be done somewhat like this, @Repository(“flightRepo”)
26
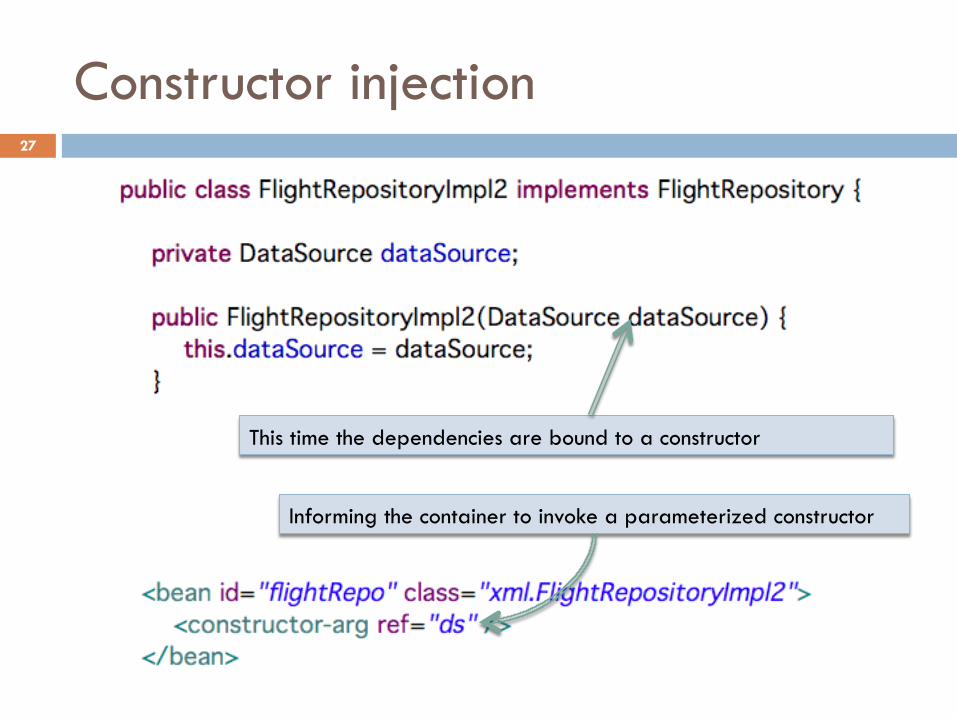
Constructor injection
This time the dependencies are bound to a constructor
Informing the container to invoke a parameterized constructor
27
Annotations approach
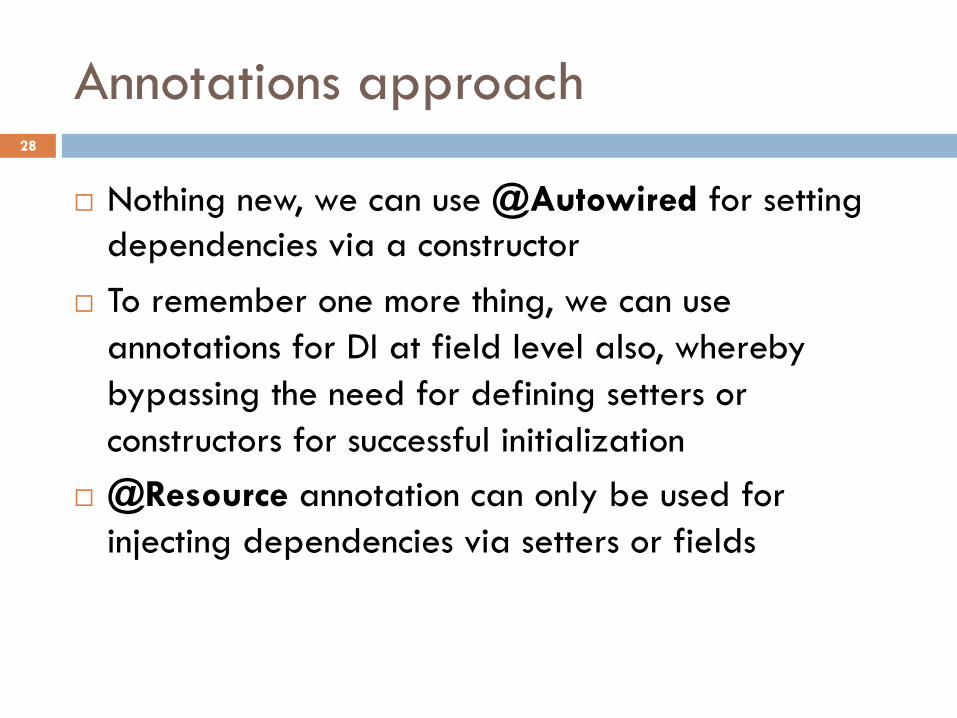
¨ Nothing new, we can use @Autowired for setting dependencies via a constructor
¨ To remember one more thing, we can use annotations for DI at field level also, whereby bypassing the need for defining setters or constructors for successful initialization
¨ @Resource annotation can only be used for injecting dependencies via setters or fields
28
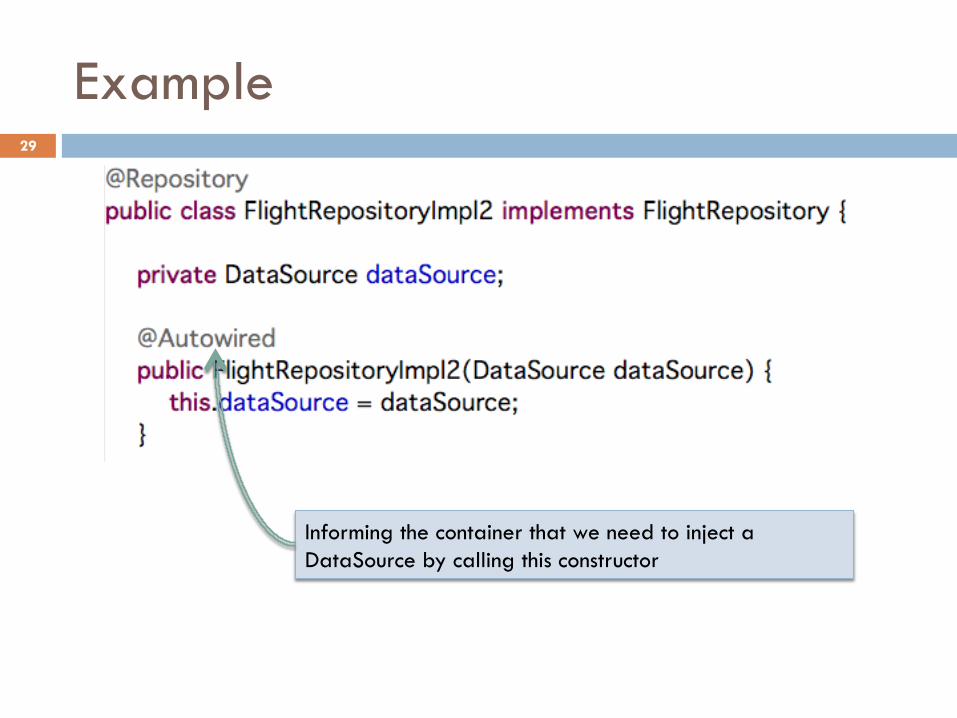
Example
Informing the container that we need to inject a DataSource by calling this constructor
29
A bit more about @Autowired
¨ Autowiring is a mechanism by which beans dependent on each other can be discovered by the framework while loading them and inject them dynamically based on the autowire type in the XML or annotation reducing duplicate configuration
¨ Basically there are 2 ways of autowiring dependencies: ¤ byName ¤ byType
30
Example
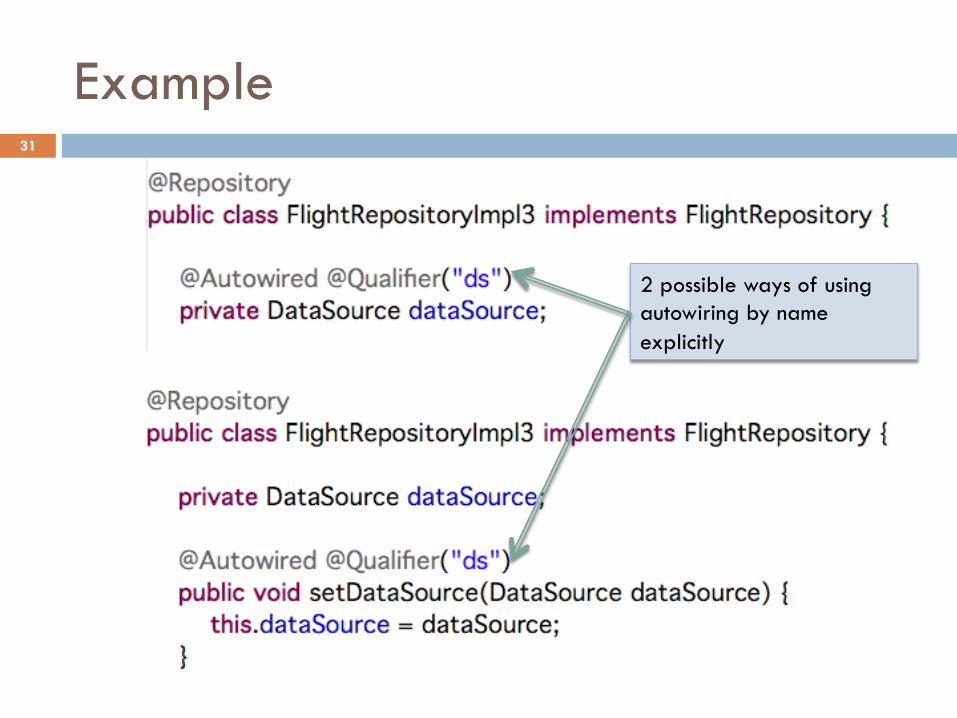
2 possible ways of using autowiring by name explicitly
31
Autowiring using xml configuration
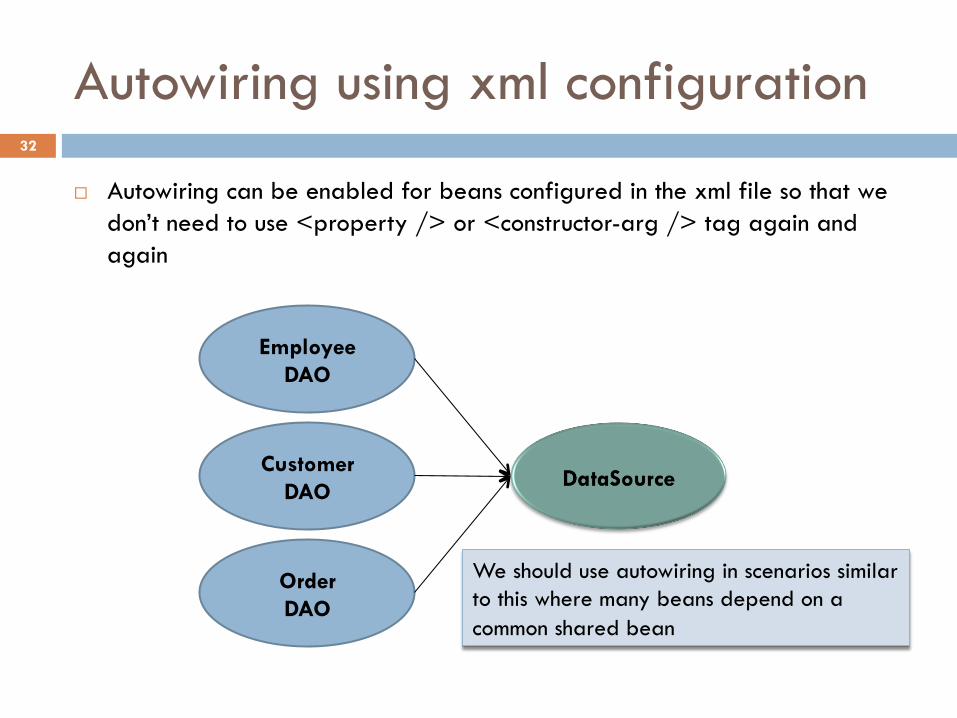
¨ Autowiring can be enabled for beans configured in the xml file so that we don’t need to use <property /> or <constructor-arg /> tag again and again
Employee DAO
Customer DAO
Order DAO
We should use autowiring in scenarios similar to this where many beans depend on a common shared bean
32
Example
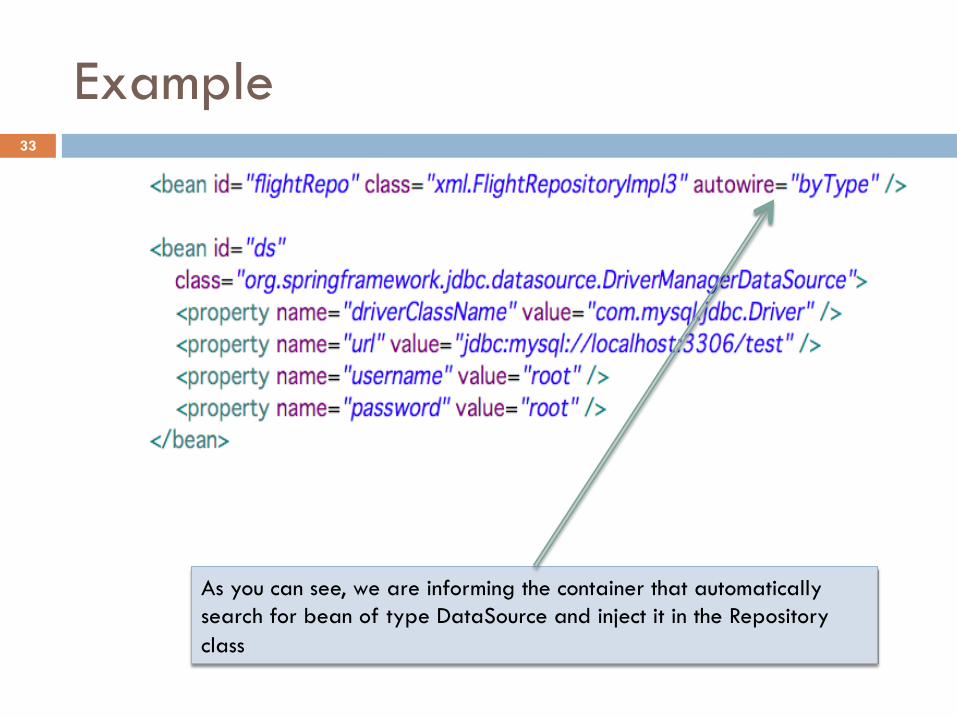
As you can see, we are informing the container that automatically search for bean of type DataSource and inject it in the Repository class
33
Example 34
Revisiting the IoC container
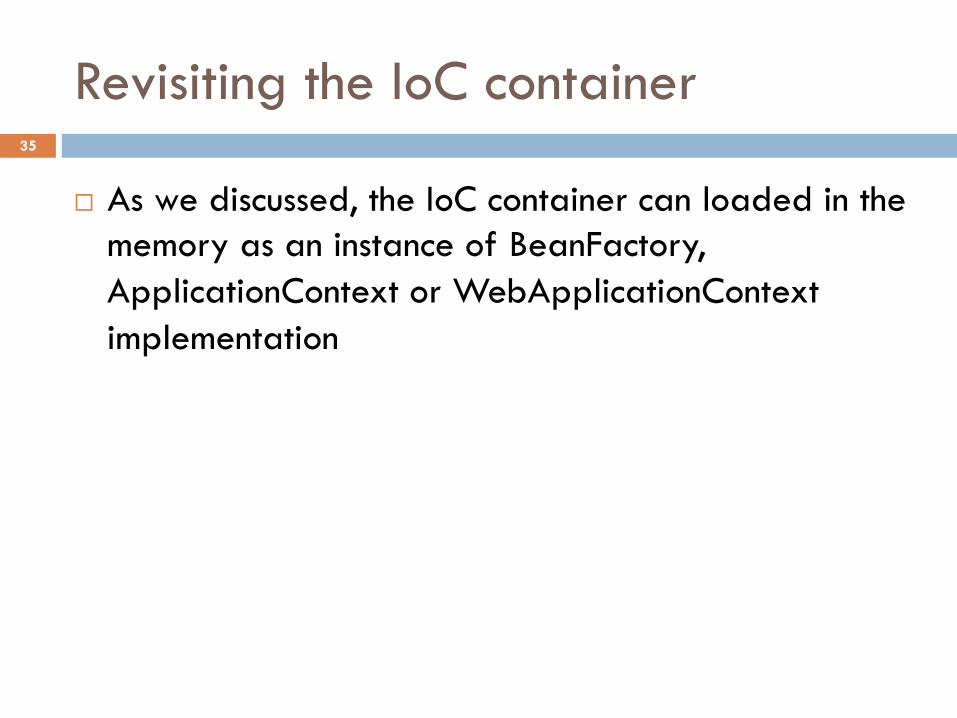
¨ As we discussed, the IoC container can loaded in the memory as an instance of BeanFactory, ApplicationContext or WebApplicationContext implementation
35
IoC Container
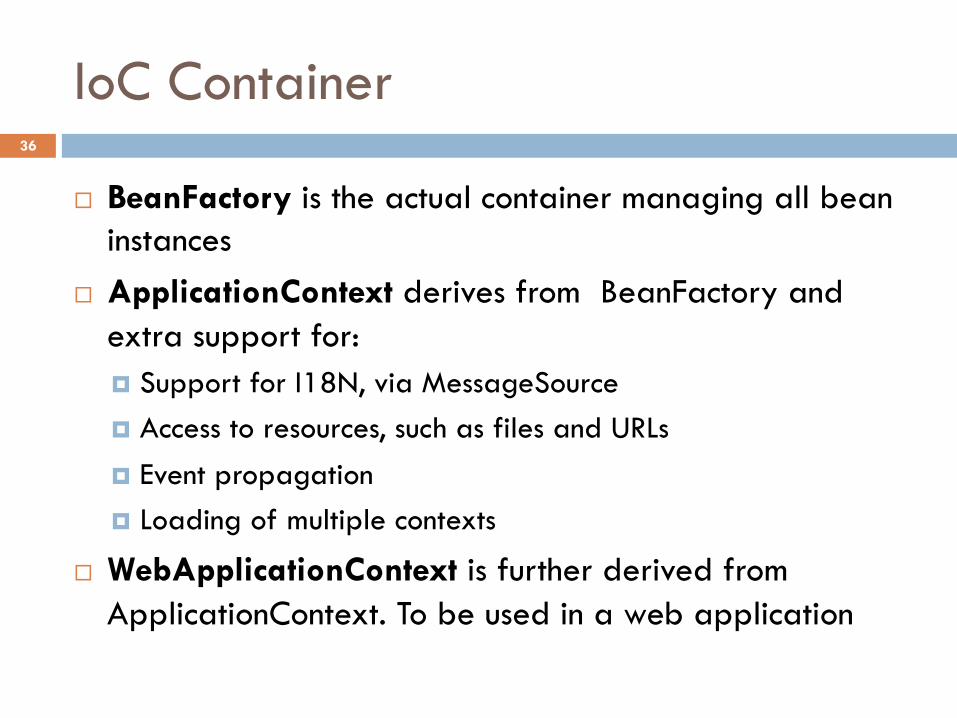
¨ BeanFactory is the actual container managing all bean instances
¨ ApplicationContext derives from BeanFactory and extra support for: ¤ Support for I18N, via MessageSource ¤ Access to resources, such as files and URLs ¤ Event propagation ¤ Loading of multiple contexts
¨ WebApplicationContext is further derived from ApplicationContext. To be used in a web application
36
Example
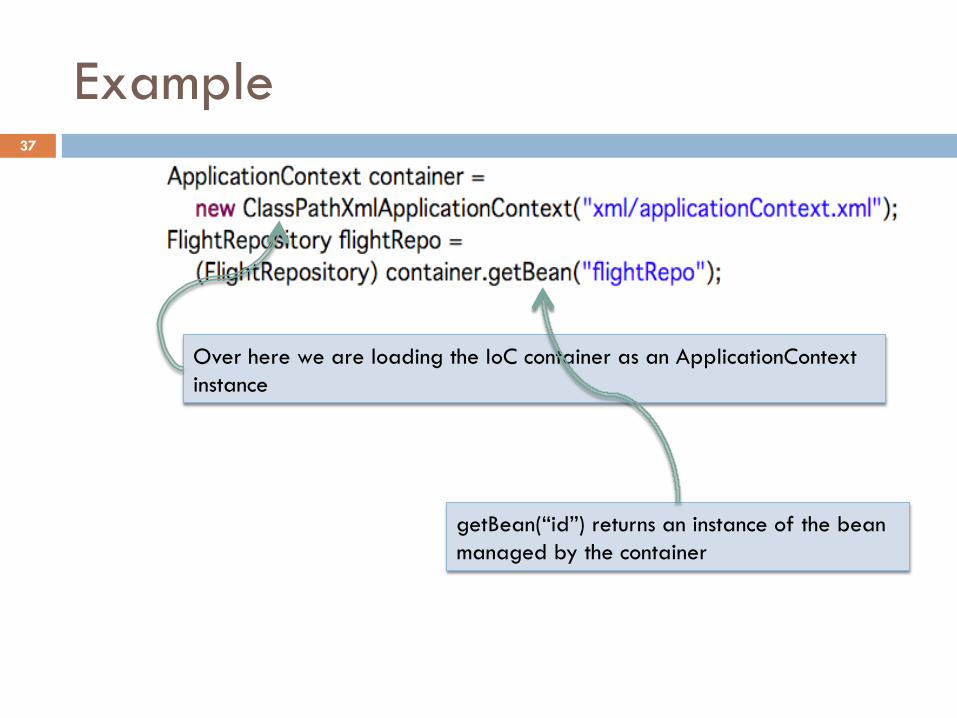
Over here we are loading the IoC container as an ApplicationContext instance
getBean(“id”) returns an instance of the bean managed by the container
37
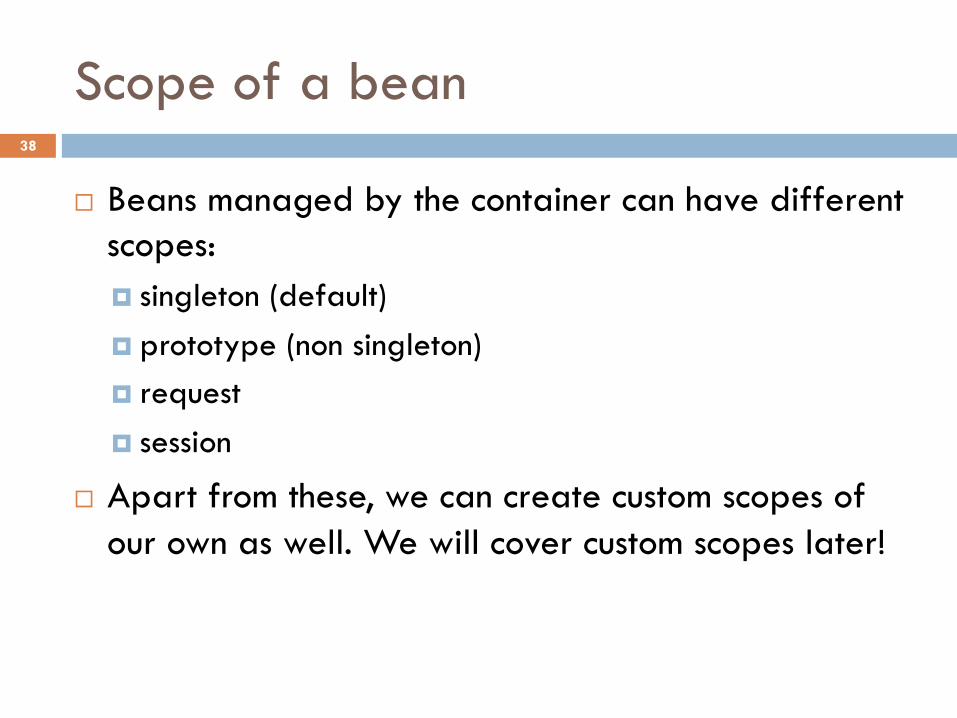
Scope of a bean
¨ Beans managed by the container can have different scopes: ¤ singleton (default) ¤ prototype (non singleton) ¤ request ¤ session
¨ Apart from these, we can create custom scopes of our own as well. We will cover custom scopes later!
38
Cont’d…
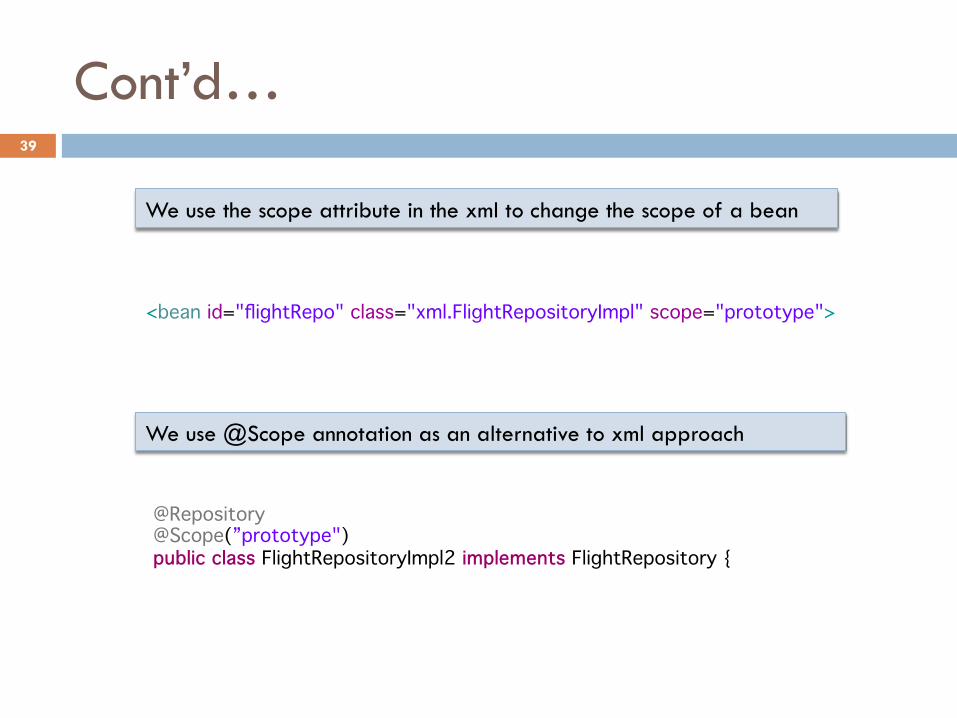
<bean id="flightRepo" class="xml.FlightRepositoryImpl" scope="prototype">
@Repository @Scope(”prototype") public class FlightRepositoryImpl2 implements FlightRepository {
We use the scope attribute in the xml to change the scope of a bean
We use @Scope annotation as an alternative to xml approach
39
Lab No. 1
Introduction to IoC and DI
Refer to the lab guide provided along with the eclipse project to proceed further
40
Topics in this Session
¨ DI a bit more in detail ¤ Inheritance ¤ Creating bean instance using static factory method ¤ Creating bean instance using a custom factory class ¤ Lookup method injection ¤ Spring API for DI ¤ Understanding namespaces and using some of the
namespaces
41
Topics in this Session
¨ DI a bit more in detail ¤ Inheritance ¤ Creating bean instance using static factory method ¤ Creating bean instance using a custom factory class ¤ Lookup method injection ¤ Spring API for DI ¤ Understanding different namespaces and using some of
the namespaces
42

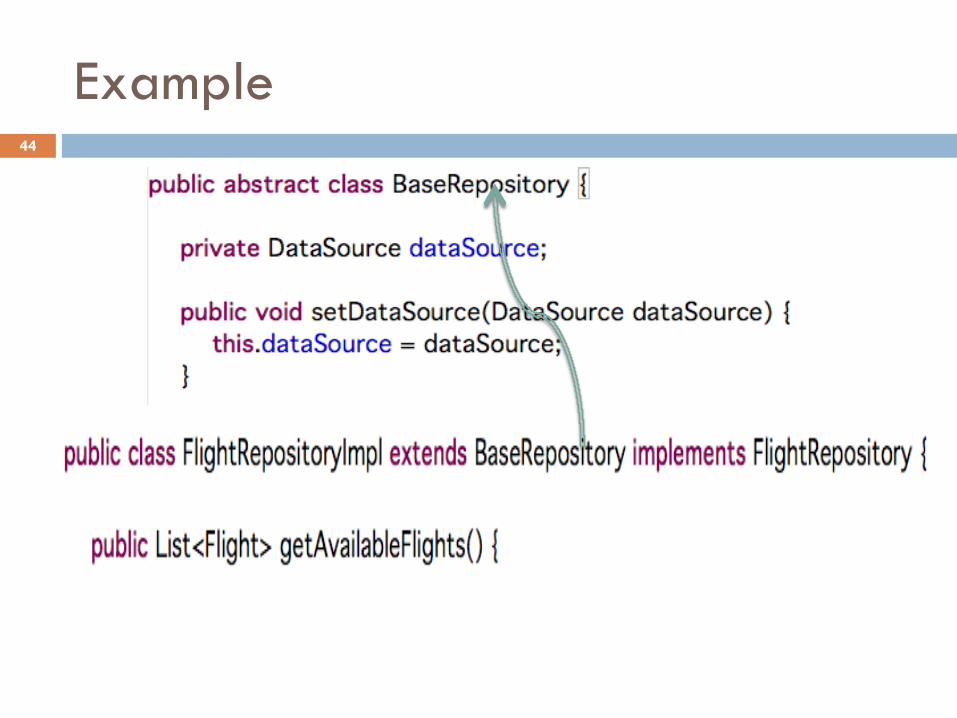
Inheritance between beans
¨ It’s obvious that we will use inheritance for reusing common behavior across. From Spring perspective, those beans which share common set of dependencies, will share a common base class
¨ For ex, all repository classes require a DataSource, so instead of declaring the DataSource again and again, we can have a base class containing the DataSource
43
Example 44
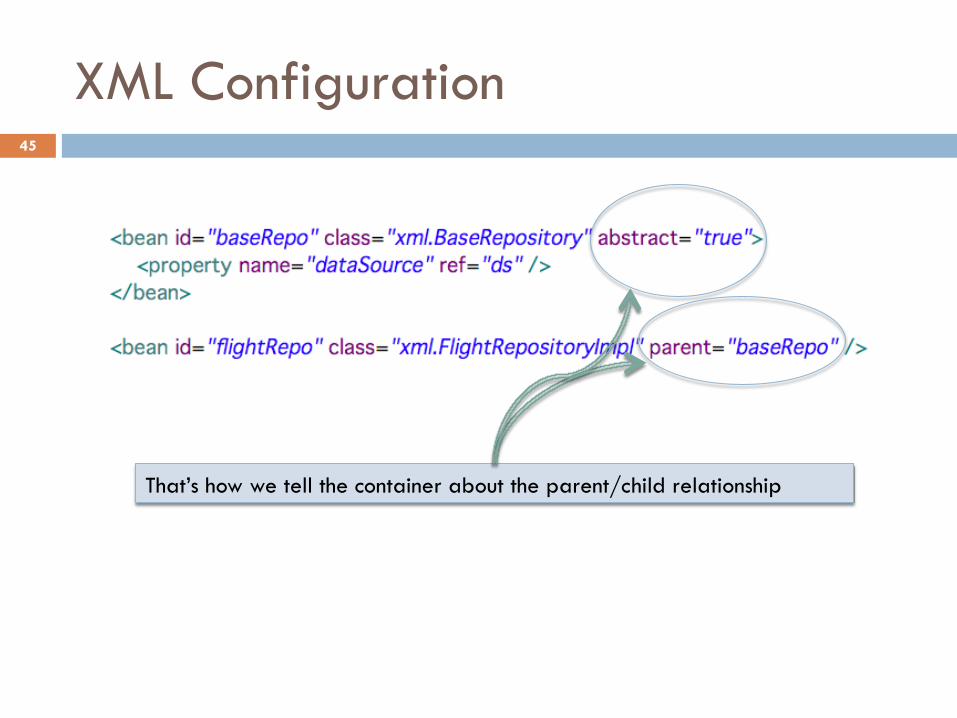
XML Configuration
That’s how we tell the container about the parent/child relationship
45
Topics in this Session
¨ DI a bit more in detail ¤ Inheritance ¤ Creating bean instance using static factory method ¤ Creating bean instance using a custom factory class ¤ Lookup method injection ¤ Spring API for DI ¤ Understanding different namespaces and using some of
the namespaces
46
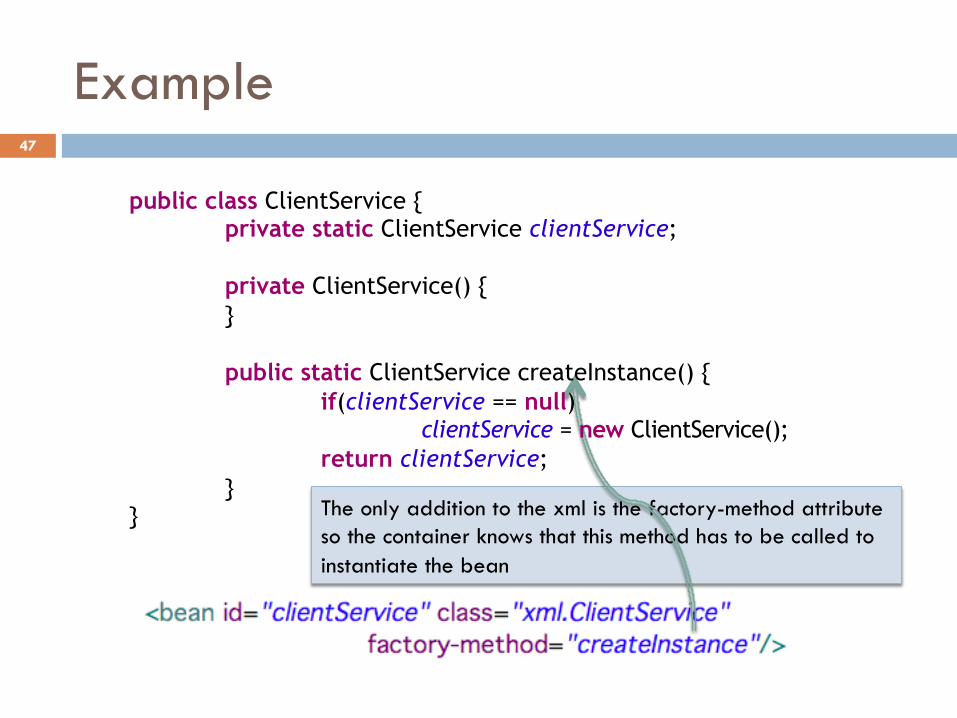
Example
The only addition to the xml is the factory-method attribute so the container knows that this method has to be called to instantiate the bean
public class ClientService { private static ClientService clientService;
private ClientService() { }
public static ClientService createInstance() { if(clientService == null) clientService = new ClientService(); return clientService; }
}
47
Topics in this Session
¨ DI a bit more in detail ¤ Inheritance ¤ Lookup method injection ¤ Creating bean instance using static factory method ¤ Creating bean instance using a custom factory class ¤ Spring API for DI ¤ Understanding different namespaces and using some of
the namespaces
48

Custom factory bean
¨ Because of the complexity involved, we tend to write our own factory classes to initialize our complex beans. There are couple of ways to handle this situation in Spring framework: ¤ Traditional way of writing a factory class ¤ Using the FactoryBean API for writing a factory class
49
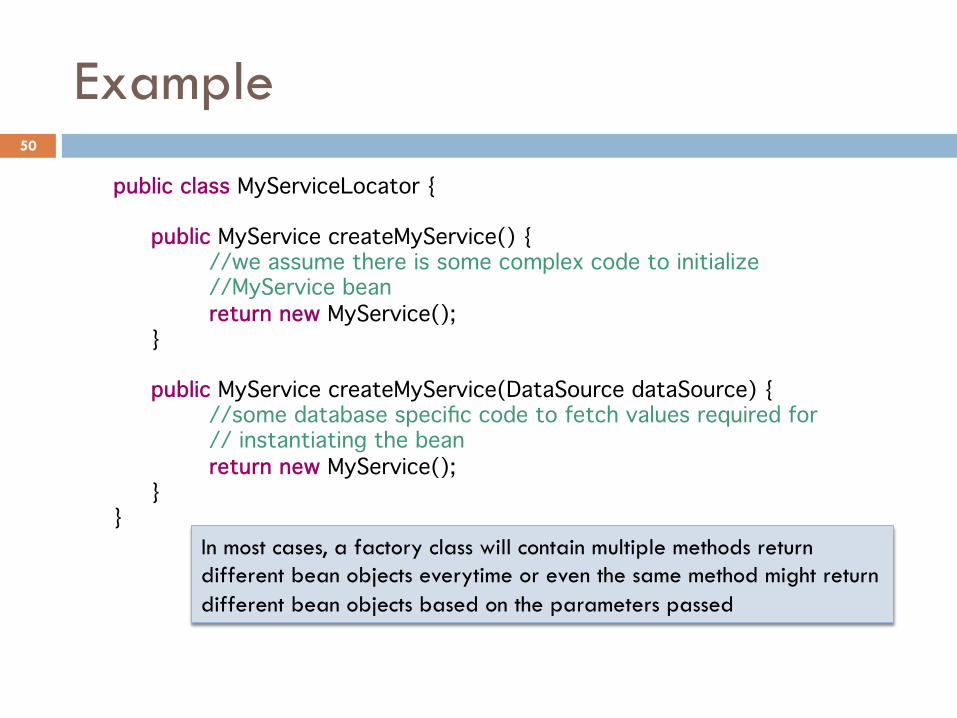
Example
public class MyServiceLocator {
public MyService createMyService() { //we assume there is some complex code to initialize //MyService bean return new MyService(); } public MyService createMyService(DataSource dataSource) { //some database specific code to fetch values required for // instantiating the bean return new MyService(); }
} In most cases, a factory class will contain multiple methods return different bean objects everytime or even the same method might return different bean objects based on the parameters passed
50
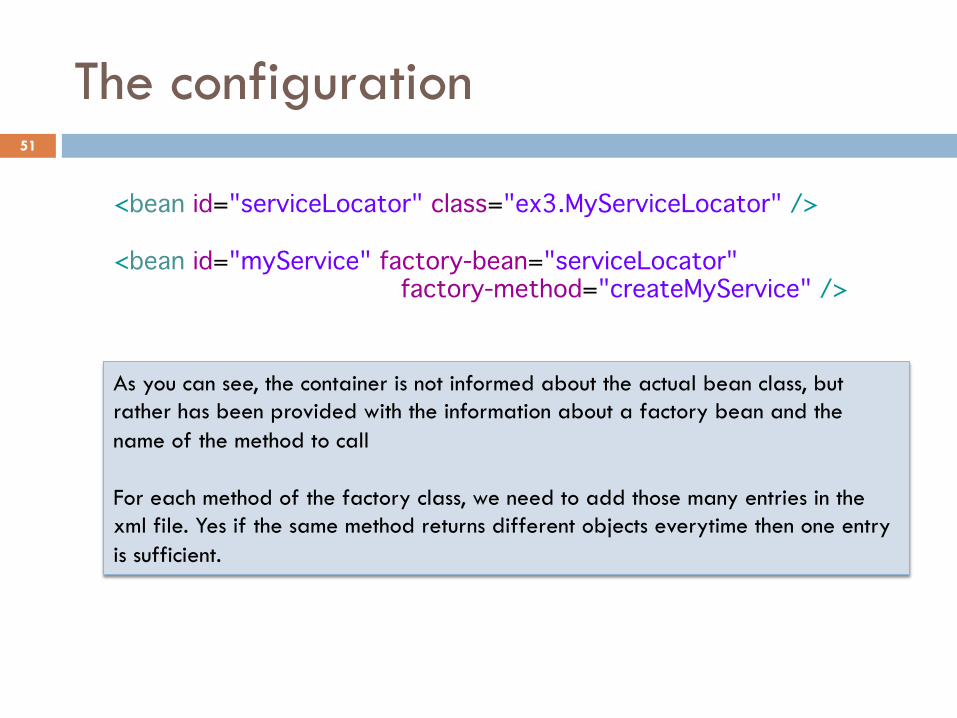
The configuration
As you can see, the container is not informed about the actual bean class, but rather has been provided with the information about a factory bean and the name of the method to call For each method of the factory class, we need to add those many entries in the xml file. Yes if the same method returns different objects everytime then one entry is sufficient.
<bean id="serviceLocator" class="ex3.MyServiceLocator" />
<bean id="myService" factory-bean="serviceLocator" factory-method="createMyService" />
51
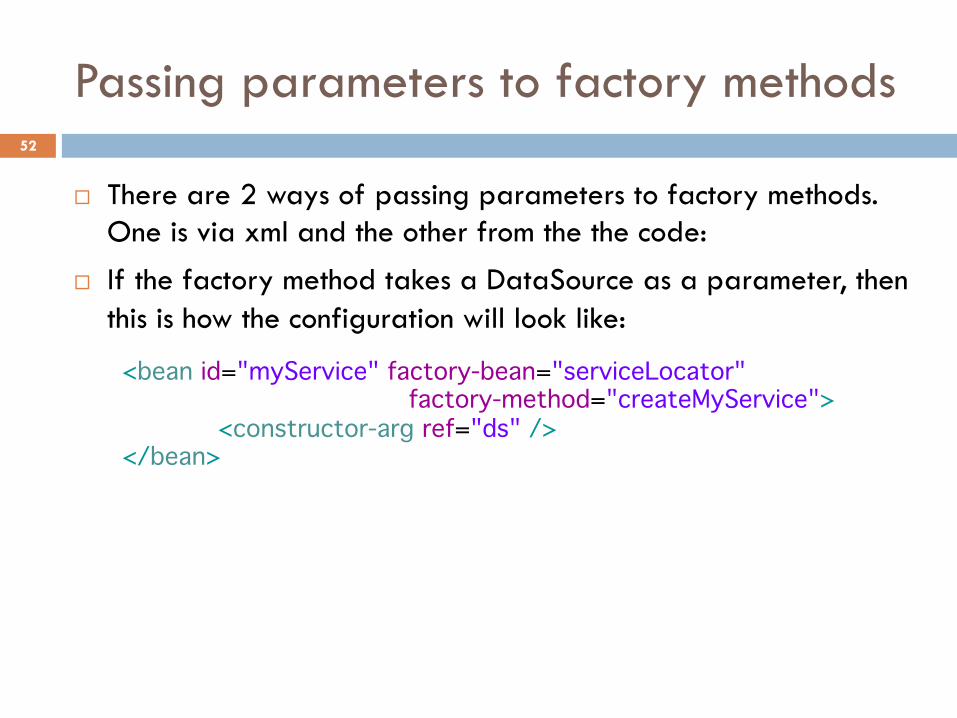
Passing parameters to factory methods
¨ There are 2 ways of passing parameters to factory methods. One is via xml and the other from the the code:
¨ If the factory method takes a DataSource as a parameter, then this is how the configuration will look like:
<bean id="myService" factory-bean="serviceLocator" factory-method="createMyService"> <constructor-arg ref="ds" />
</bean>
52
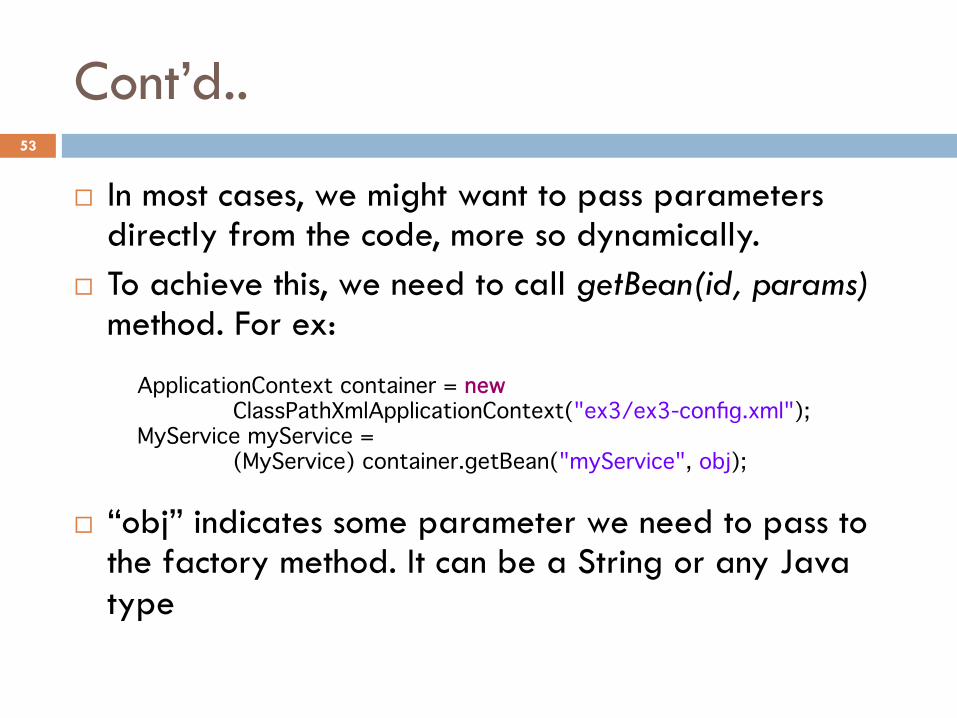
Cont’d..
¨ In most cases, we might want to pass parameters directly from the code, more so dynamically.
¨ To achieve this, we need to call getBean(id, params) method. For ex:
¨ “obj” indicates some parameter we need to pass to the factory method. It can be a String or any Java type
ApplicationContext container = new ClassPathXmlApplicationContext("ex3/ex3-config.xml");
MyService myService = (MyService) container.getBean("myService", obj);
53
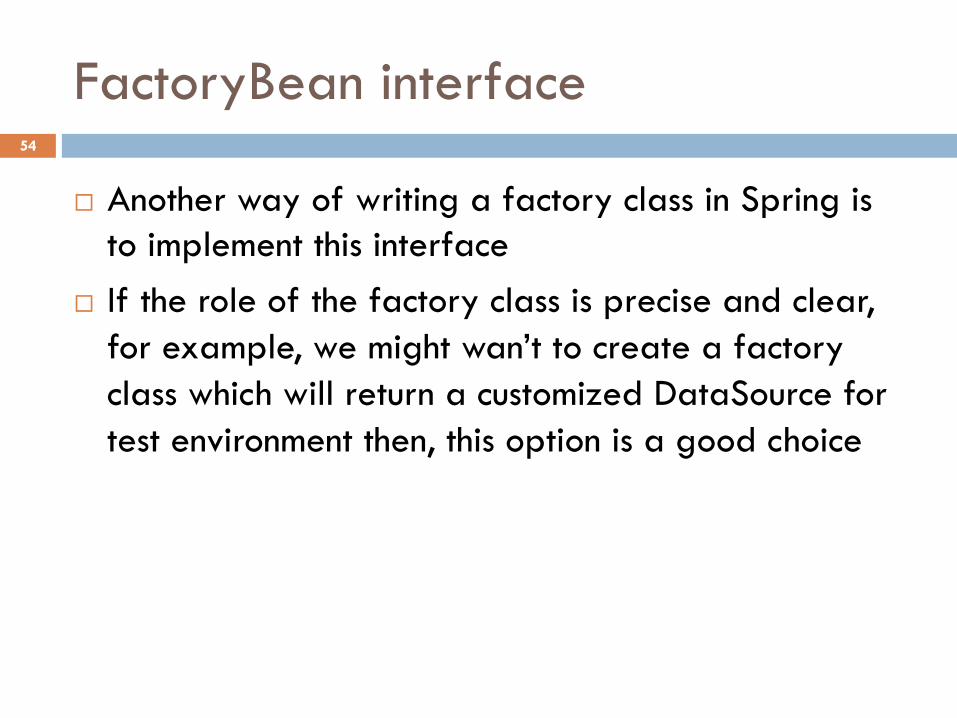
FactoryBean interface
¨ Another way of writing a factory class in Spring is to implement this interface
¨ If the role of the factory class is precise and clear, for example, we might wan’t to create a factory class which will return a customized DataSource for test environment then, this option is a good choice
54
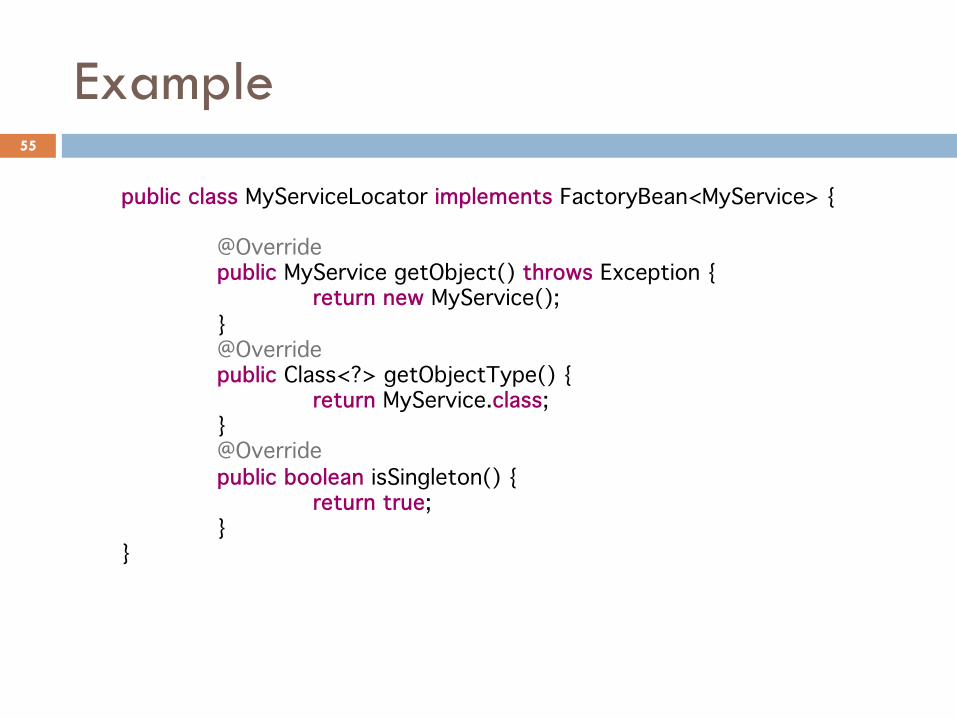
Example
public class MyServiceLocator implements FactoryBean<MyService> {
@Override public MyService getObject() throws Exception { return new MyService(); } @Override public Class<?> getObjectType() { return MyService.class; } @Override public boolean isSingleton() { return true; }
}
55
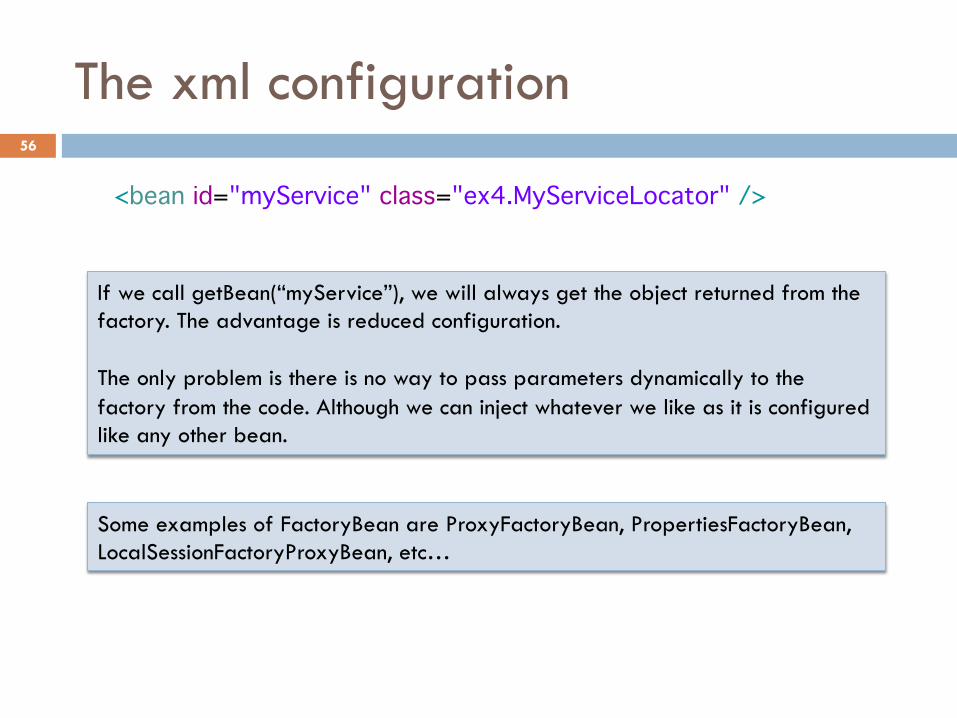
The xml configuration
If we call getBean(“myService”), we will always get the object returned from the factory. The advantage is reduced configuration. The only problem is there is no way to pass parameters dynamically to the factory from the code. Although we can inject whatever we like as it is configured like any other bean.
Some examples of FactoryBean are ProxyFactoryBean, PropertiesFactoryBean, LocalSessionFactoryProxyBean, etc…
<bean id="myService" class="ex4.MyServiceLocator" />
56
Topics in this Session
¨ DI a bit more in detail ¤ Inheritance ¤ Creating bean instance using static factory method ¤ Creating bean instance using a custom factory class ¤ Lookup method injection ¤ Spring API for DI ¤ Understanding different namespaces and using some of
the namespaces
57
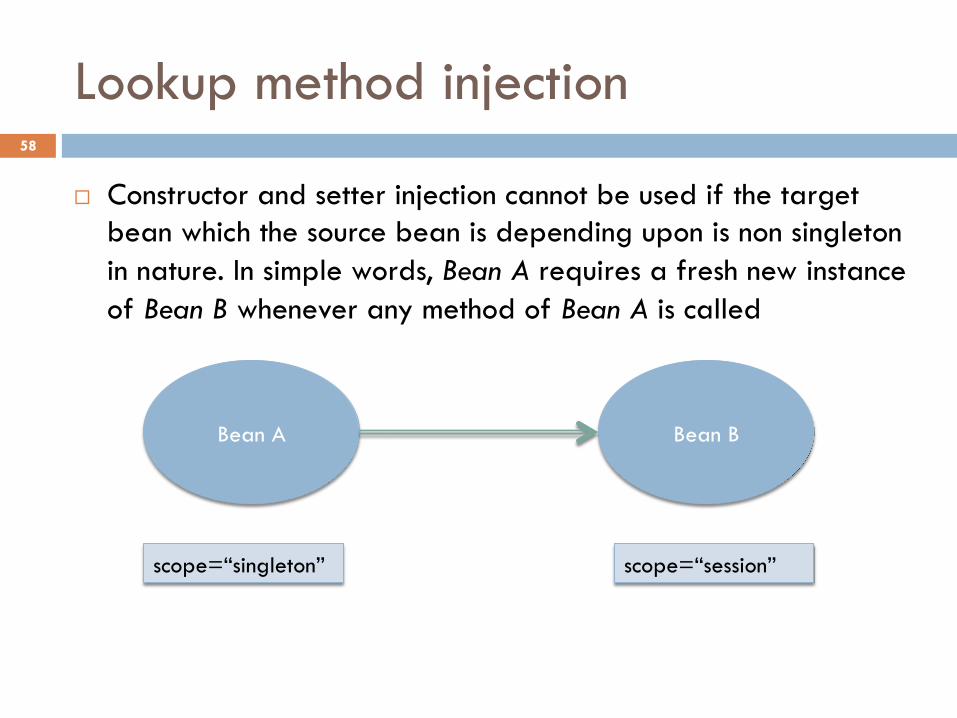
Lookup method injection
¨ Constructor and setter injection cannot be used if the target bean which the source bean is depending upon is non singleton in nature. In simple words, Bean A requires a fresh new instance of Bean B whenever any method of Bean A is called
Bean A Bean B
scope=“singleton” scope=“session”
58
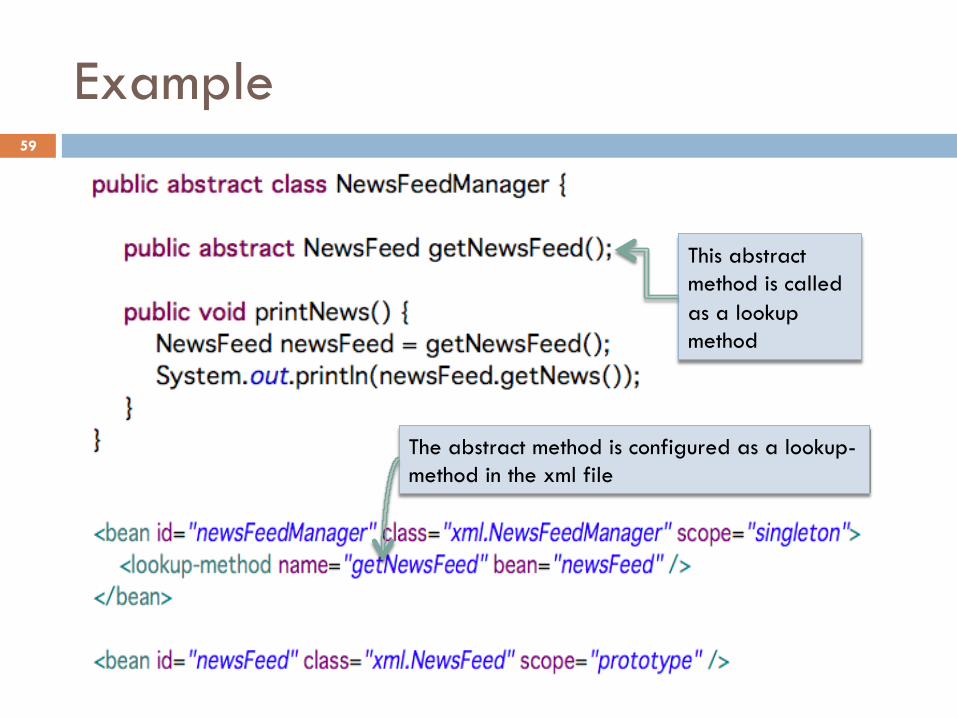
Example
This abstract method is called as a lookup method
The abstract method is configured as a lookup-method in the xml file
59
Topics in this Session
¨ DI a bit more in detail ¤ Inheritance ¤ Creating bean instance using static factory method ¤ Creating bean instance using a custom factory class ¤ Lookup method injection ¤ Spring API for DI ¤ Understanding different namespaces and using some of
the namespaces
60
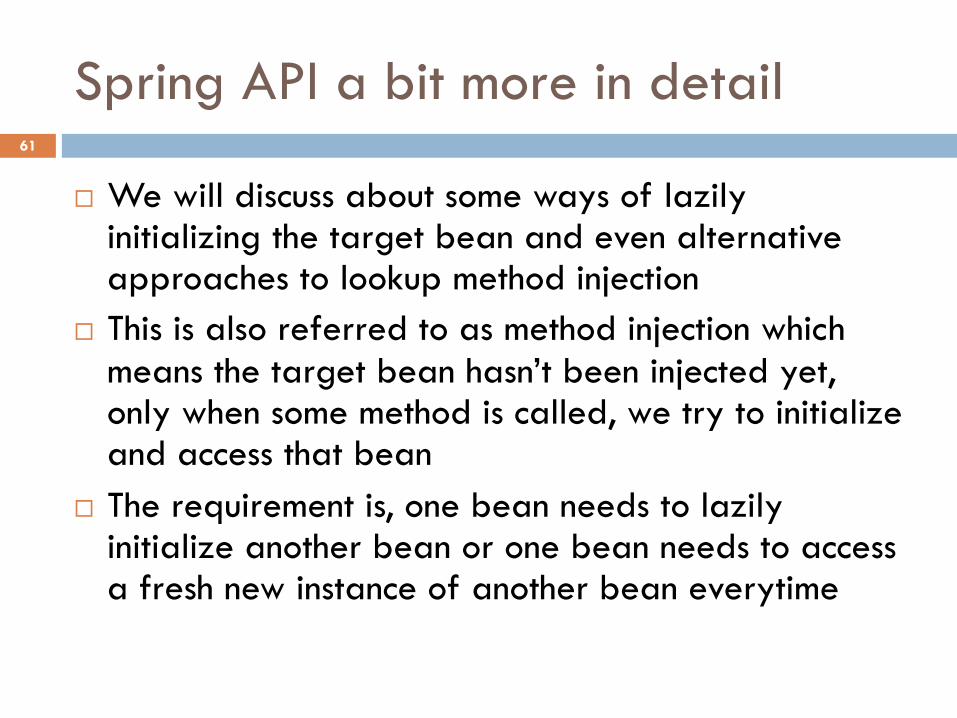
Spring API a bit more in detail
¨ We will discuss about some ways of lazily initializing the target bean and even alternative approaches to lookup method injection
¨ This is also referred to as method injection which means the target bean hasn’t been injected yet, only when some method is called, we try to initialize and access that bean
¨ The requirement is, one bean needs to lazily initialize another bean or one bean needs to access a fresh new instance of another bean everytime
61
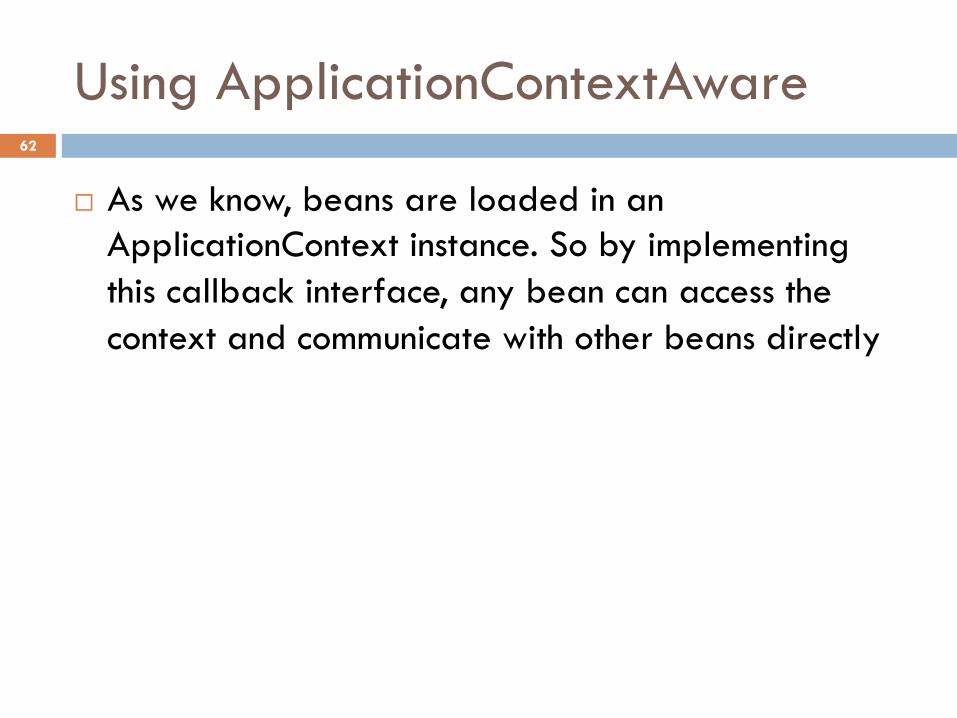
Using ApplicationContextAware
¨ As we know, beans are loaded in an ApplicationContext instance. So by implementing this callback interface, any bean can access the context and communicate with other beans directly
62
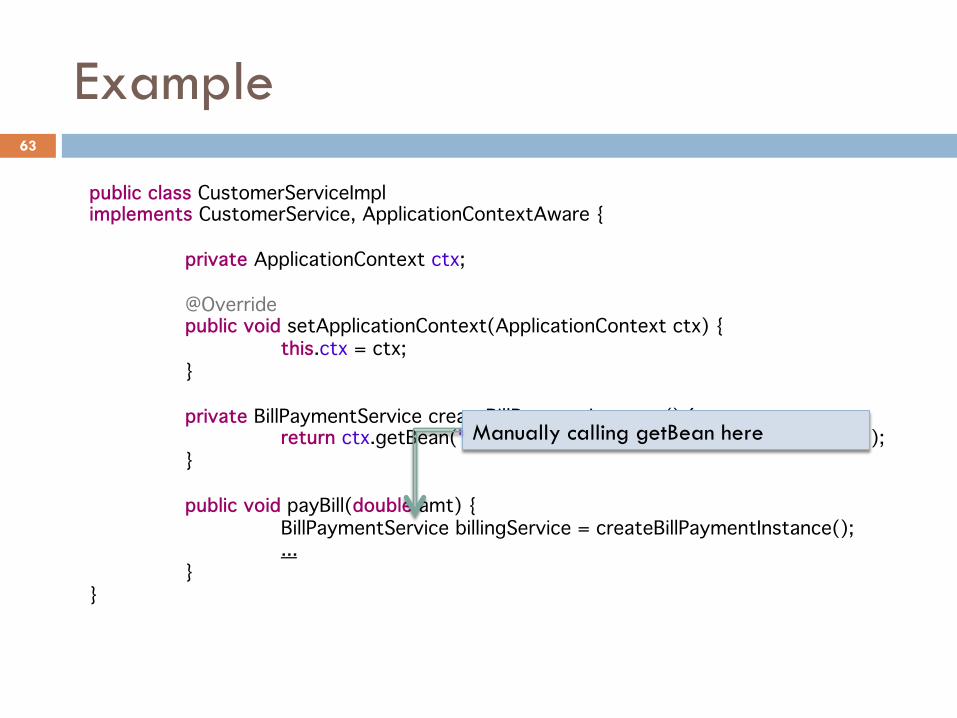
public class CustomerServiceImpl implements CustomerService, ApplicationContextAware {
private ApplicationContext ctx; @Override public void setApplicationContext(ApplicationContext ctx) { this.ctx = ctx; }
private BillPaymentService createBillPaymentInstance() { return ctx.getBean("billPaymentService", BillPaymentService.class); } public void payBill(double amt) { BillPaymentService billingService = createBillPaymentInstance(); ... }
}
Example
Manually calling getBean here
63
Using ObjectFactory interface
¨ This is another way of dealing with the same requirement. The only problem in the previous approach was that we need to know the id of the bean to get an instance of it. No doubt we can inject the id of the bean somehow, but still that means more code. Although this is not a good comparison done here
¨ This interface is even used internally by Spring framework to create bean objects
64

Example
public class CustomerServiceImpl2 implements CustomerService {
private ObjectFactory<BillPaymentService> factory; public void setFactory( ObjectFactory<BillPaymentService> factory) { this.factory = factory; } public void payBill(double amt) { BillPaymentService billService = factory.getObject(); … }
}
65
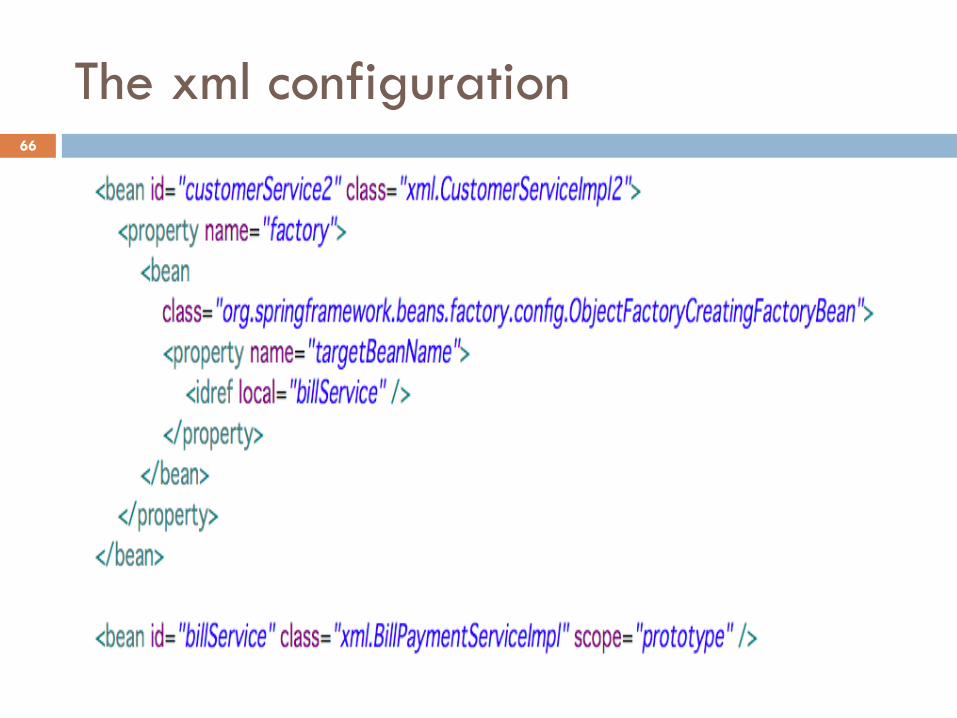
The xml configuration 66

Using ServiceLocatorFactoryBean
¨ The common problem with ApplicationContextAware and ObjectFactory is that the component is coupled with the Spring API classes
¨ Once again the requirement is the same, one bean needs to lazily initialize another bean or one bean needs to access a fresh new instance of another bean everytime
67
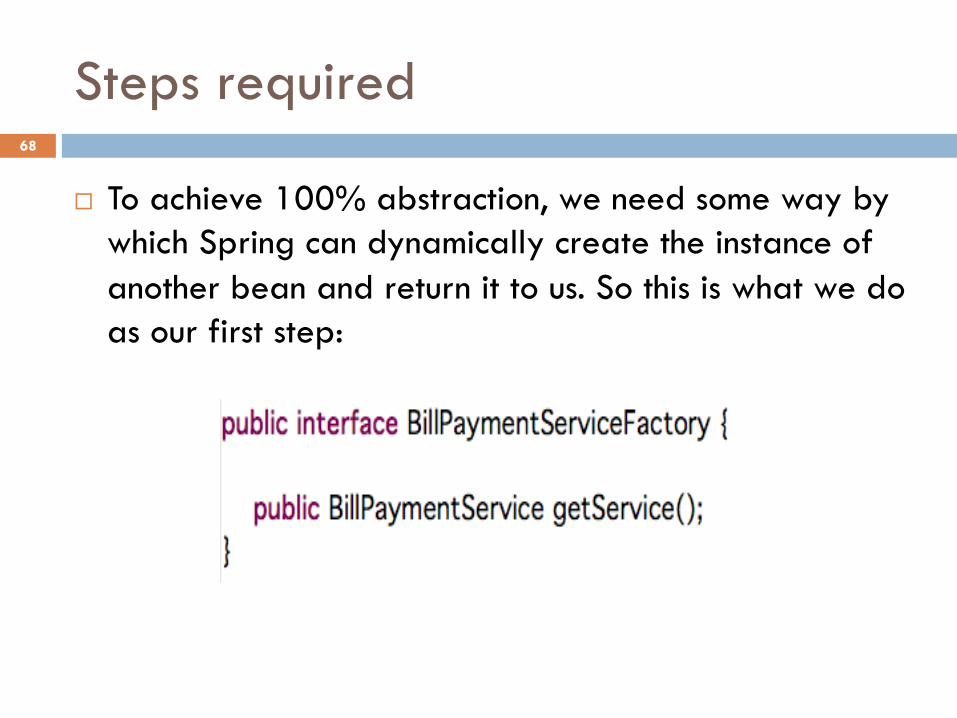
Steps required
¨ To achieve 100% abstraction, we need some way by which Spring can dynamically create the instance of another bean and return it to us. So this is what we do as our first step:
68
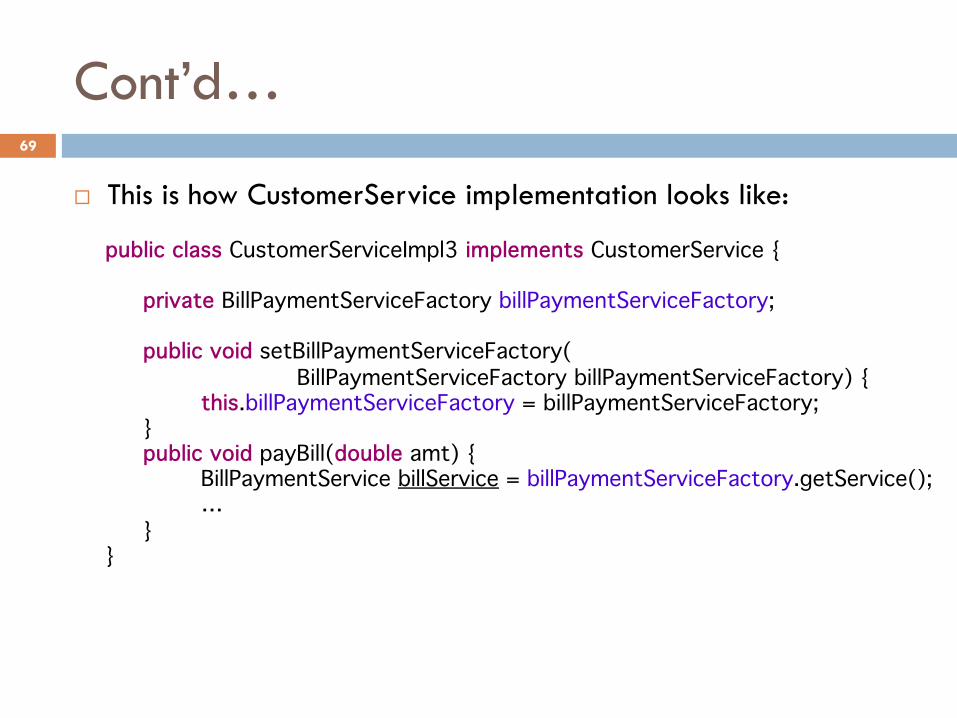
Cont’d…
¨ This is how CustomerService implementation looks like:
public class CustomerServiceImpl3 implements CustomerService {
private BillPaymentServiceFactory billPaymentServiceFactory; public void setBillPaymentServiceFactory( BillPaymentServiceFactory billPaymentServiceFactory) { this.billPaymentServiceFactory = billPaymentServiceFactory; } public void payBill(double amt) { BillPaymentService billService = billPaymentServiceFactory.getService(); … }
}
69
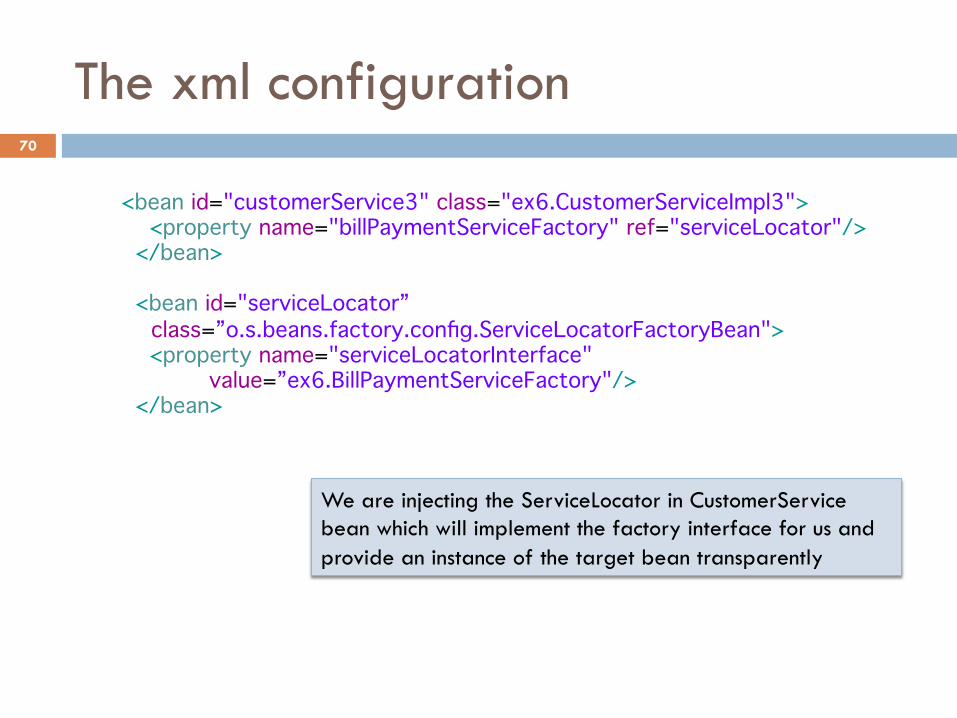
The xml configuration
We are injecting the ServiceLocator in CustomerService bean which will implement the factory interface for us and provide an instance of the target bean transparently
<bean id="customerService3" class="ex6.CustomerServiceImpl3"> <property name="billPaymentServiceFactory" ref="serviceLocator"/> </bean> <bean id="serviceLocator”
class=”o.s.beans.factory.config.ServiceLocatorFactoryBean"> <property name="serviceLocatorInterface"
value=”ex6.BillPaymentServiceFactory"/> </bean>
70
Topics in this Session
¨ DI a bit more in detail ¤ Inheritance ¤ Creating bean instance using static factory method ¤ Creating bean instance using a custom factory class ¤ Lookup method injection ¤ Spring API for DI ¤ Understanding different namespaces and using some of
the namespaces
71
Namespaces in Spring
¨ By now you must be familiar with the xml file which we have been writing every time. Older versions of Spring configuration relied on dtd based validation. From version 2.0, xsd based schemas were introduced making the configuration of different resources in spring much easier
¨ Also we can create custom schemas of our own and use that in the configuration file of Spring
72
Default namespace
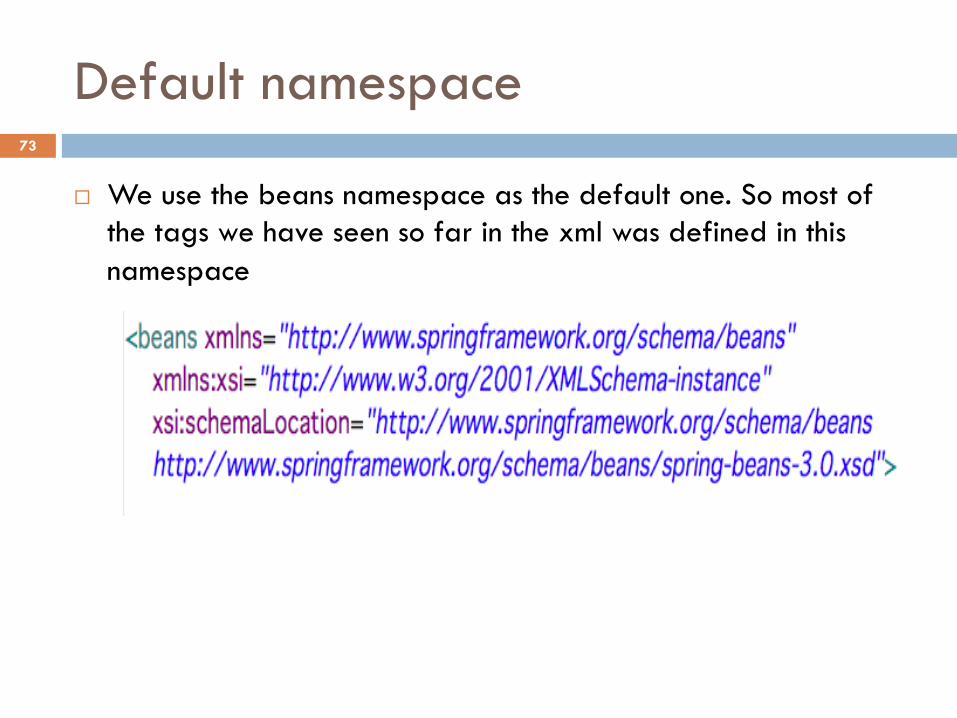
¨ We use the beans namespace as the default one. So most of the tags we have seen so far in the xml was defined in this namespace
73
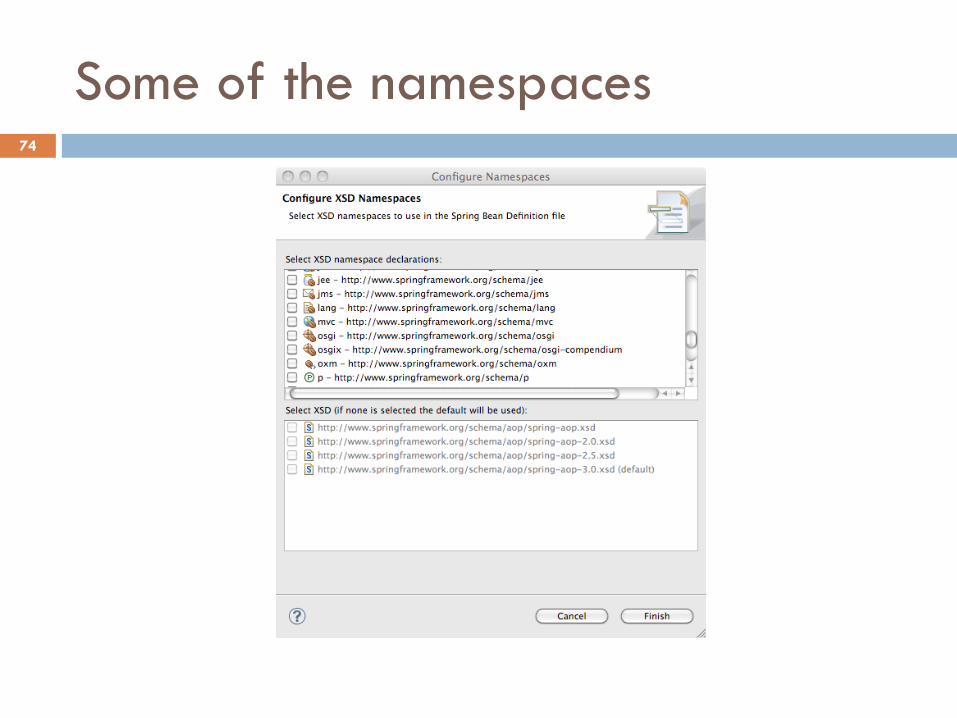
Some of the namespaces 74
Why so many namespaces?
¨ Since in Spring any resource is configured as a bean in the xml file, whether it is a DataSource or JNDI resource or user defined beans. Sometimes this leads to confusions since the xml file is less verbose
¨ With namespaces it becomes easy to identify what type of bean have we configured in the xml file
¨ We will see some examples to understand the difference and discuss about the best option
75
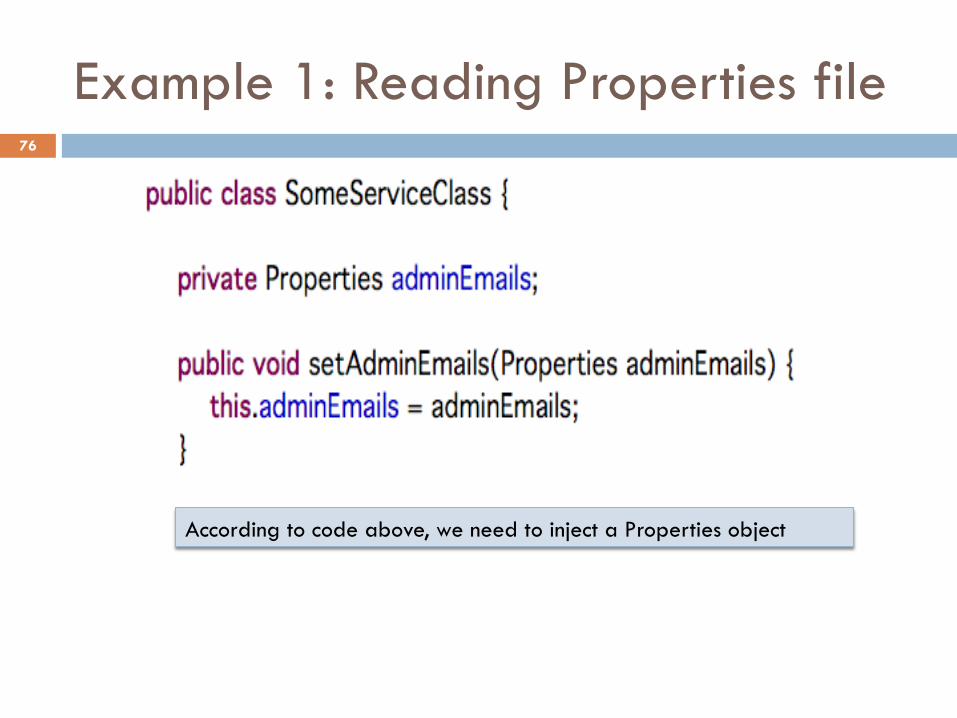
Example 1: Reading Properties file
According to code above, we need to inject a Properties object
76
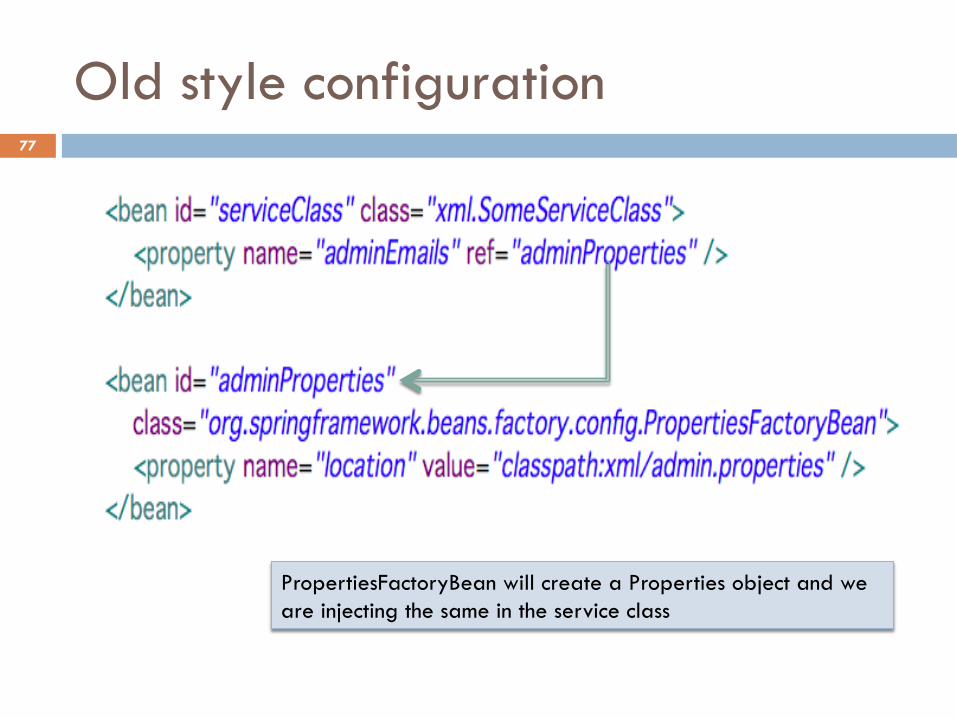
Old style configuration
PropertiesFactoryBean will create a Properties object and we are injecting the same in the service class
77
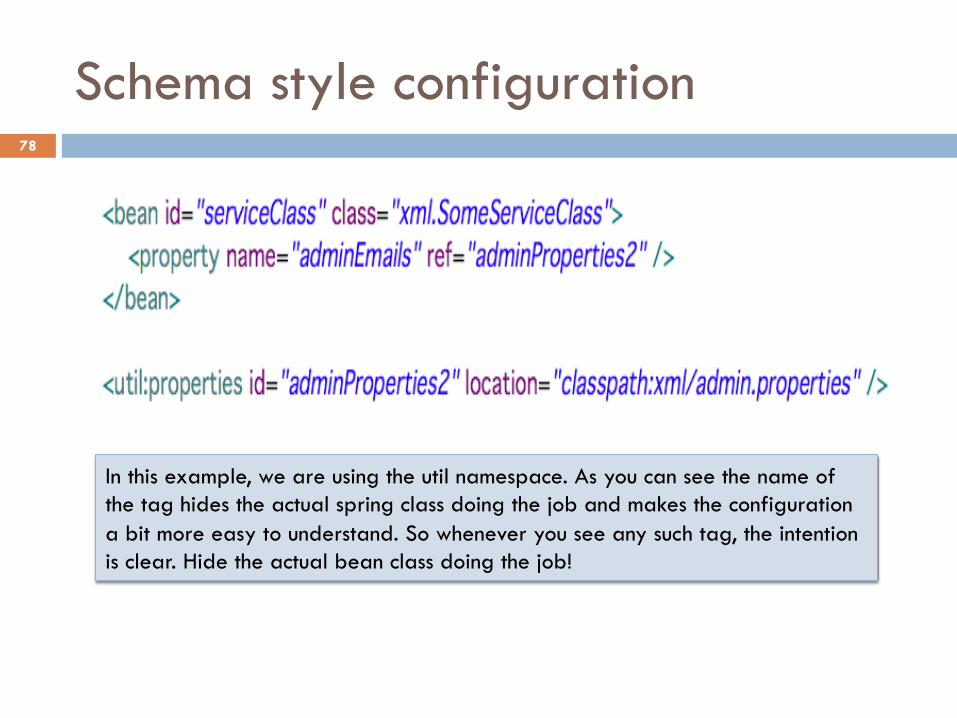
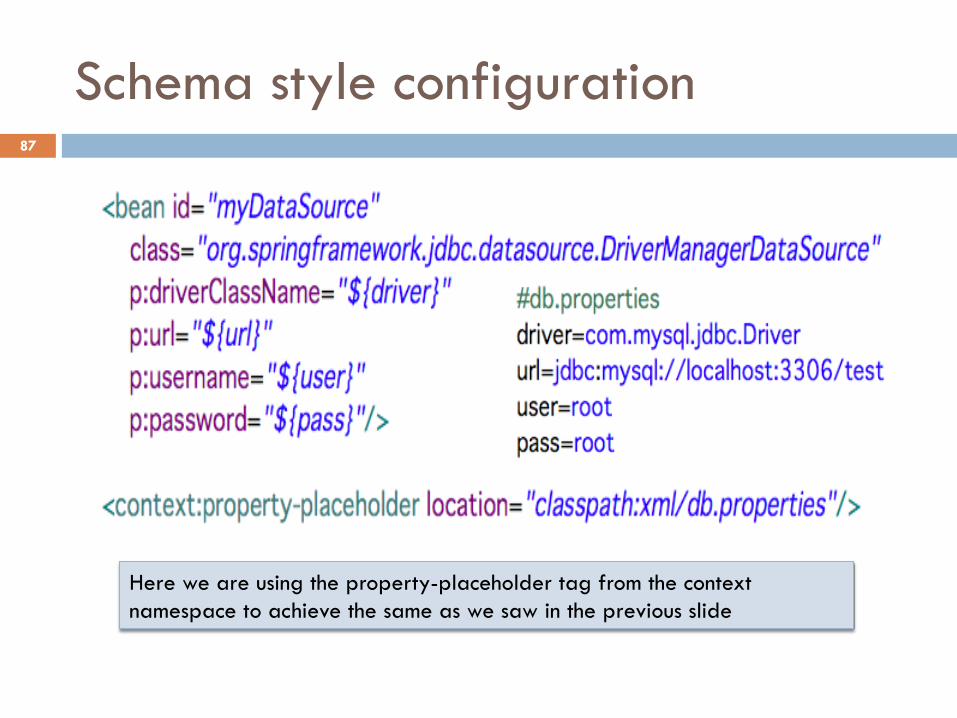
Schema style configuration
In this example, we are using the util namespace. As you can see the name of the tag hides the actual spring class doing the job and makes the configuration a bit more easy to understand. So whenever you see any such tag, the intention is clear. Hide the actual bean class doing the job!
78
Example 2: JNDI lookup
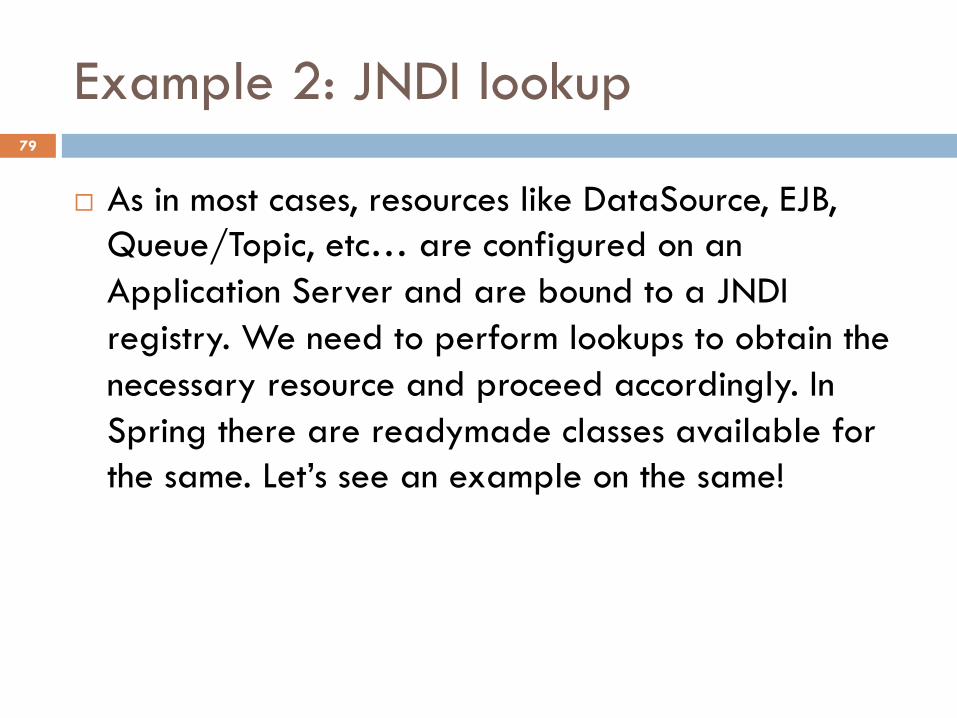
¨ As in most cases, resources like DataSource, EJB, Queue/Topic, etc… are configured on an Application Server and are bound to a JNDI registry. We need to perform lookups to obtain the necessary resource and proceed accordingly. In Spring there are readymade classes available for the same. Let’s see an example on the same!
79

Old style configuration 80
Schema style configuration
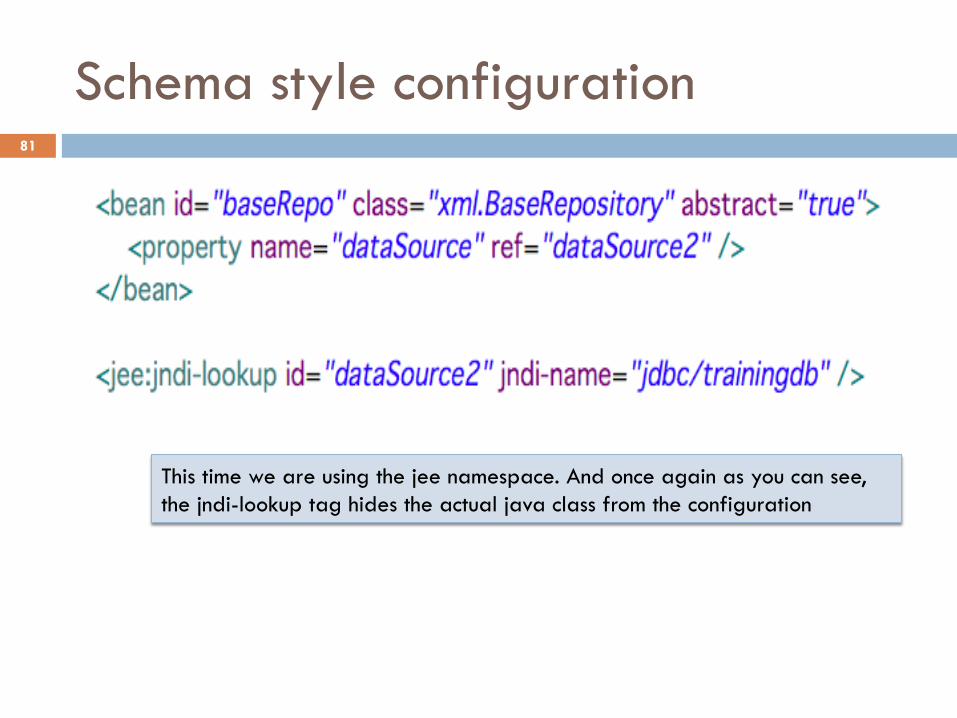
This time we are using the jee namespace. And once again as you can see, the jndi-lookup tag hides the actual java class from the configuration
81
Example 3: Using p namespace
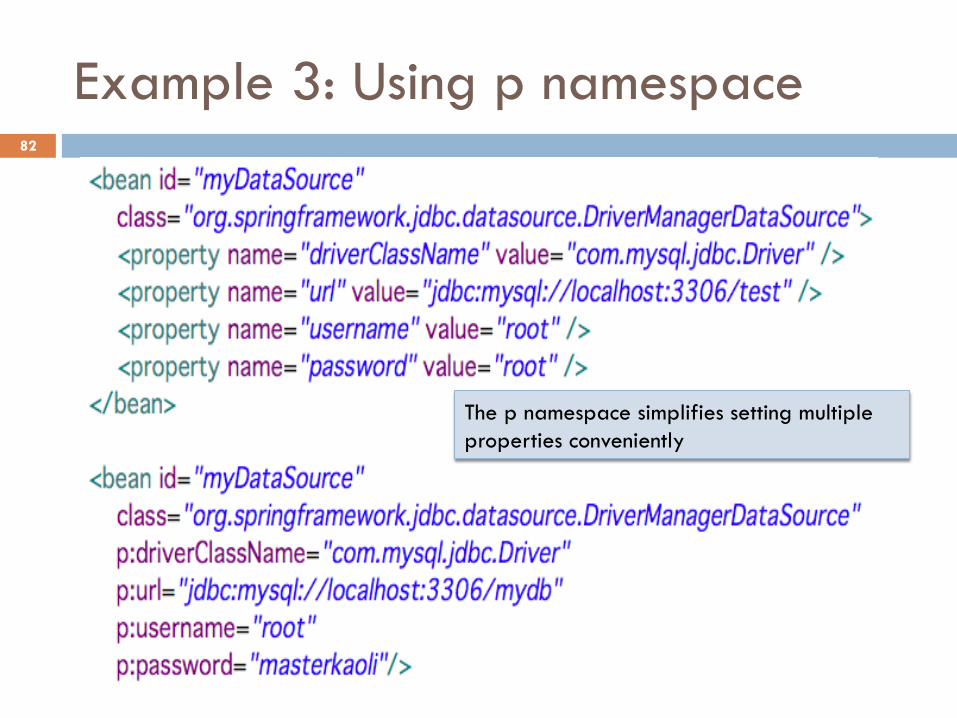
The p namespace simplifies setting multiple properties conveniently
82
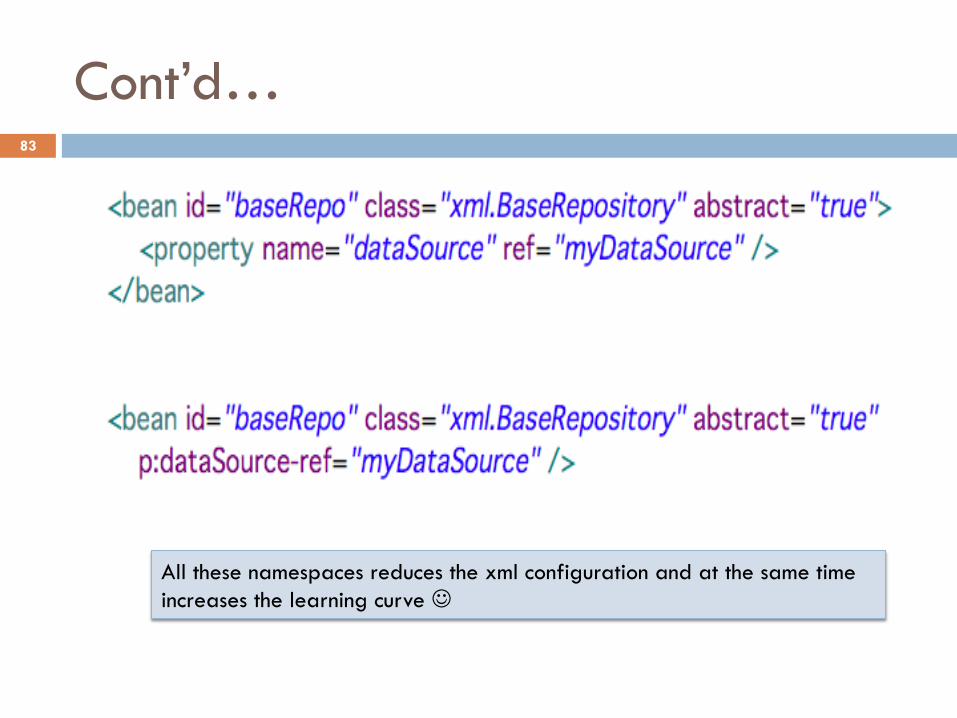
Cont’d…
All these namespaces reduces the xml configuration and at the same time increases the learning curve J
83
Example 4: Again Properties file
¨ We will now discuss about some more commonly used helper classes provided by Spring dealing with properties file and then we will see the schema style configuration for the same
84
PropertyPlaceholderConfigurer
¨ With the help of this utility class, one can avoid hardcoding the bean properties in the xml and use ant-style ${propertyname} styntax in the xml file.
85
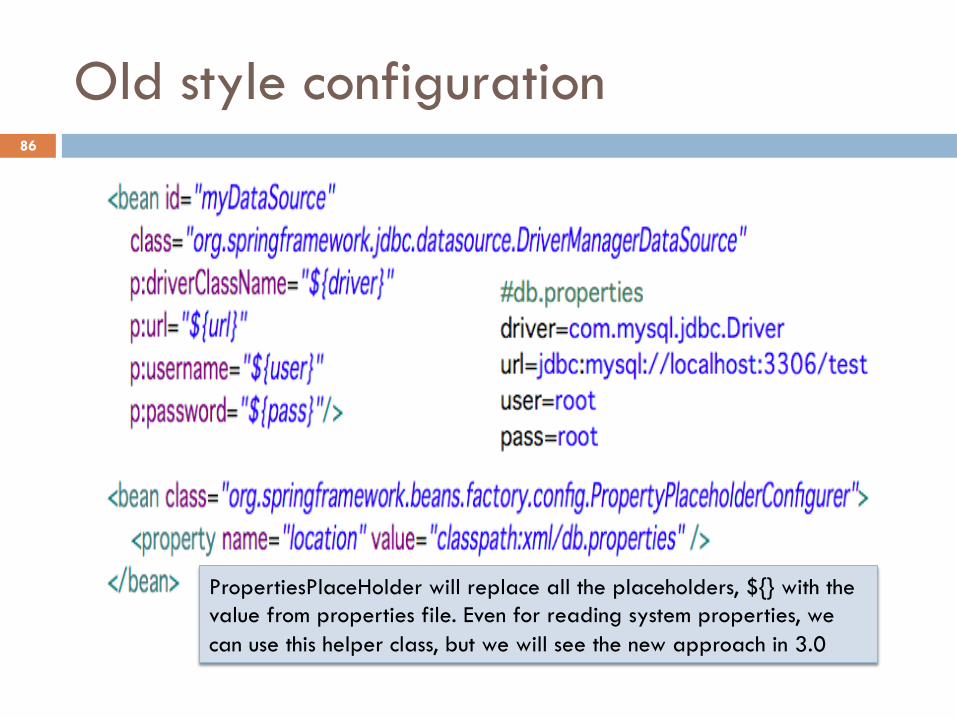
Old style configuration
PropertiesPlaceHolder will replace all the placeholders, ${} with the value from properties file. Even for reading system properties, we can use this helper class, but we will see the new approach in 3.0
86
Schema style configuration
Here we are using the property-placeholder tag from the context namespace to achieve the same as we saw in the previous slide
87
PropertyOverrideConfigurer
¨ This one is another smart little helper class to play with Properties file. With the help of this class, you can set the bean properties in a properties file without even using placeholders in the xml file
88
Old style configuration
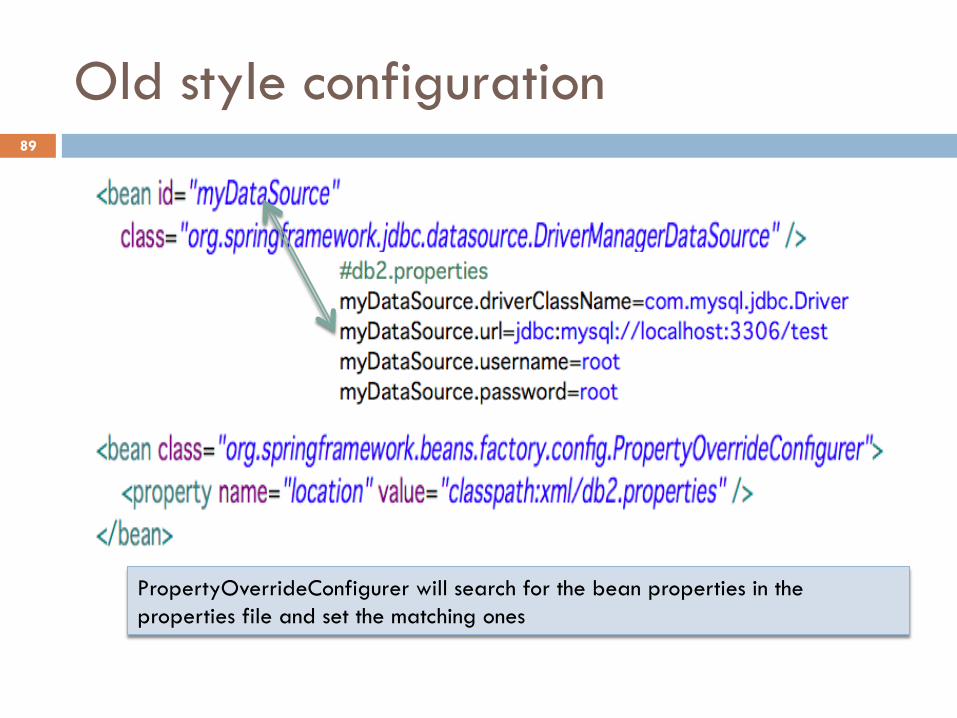
PropertyOverrideConfigurer will search for the bean properties in the properties file and set the matching ones
89
Schema style configuration
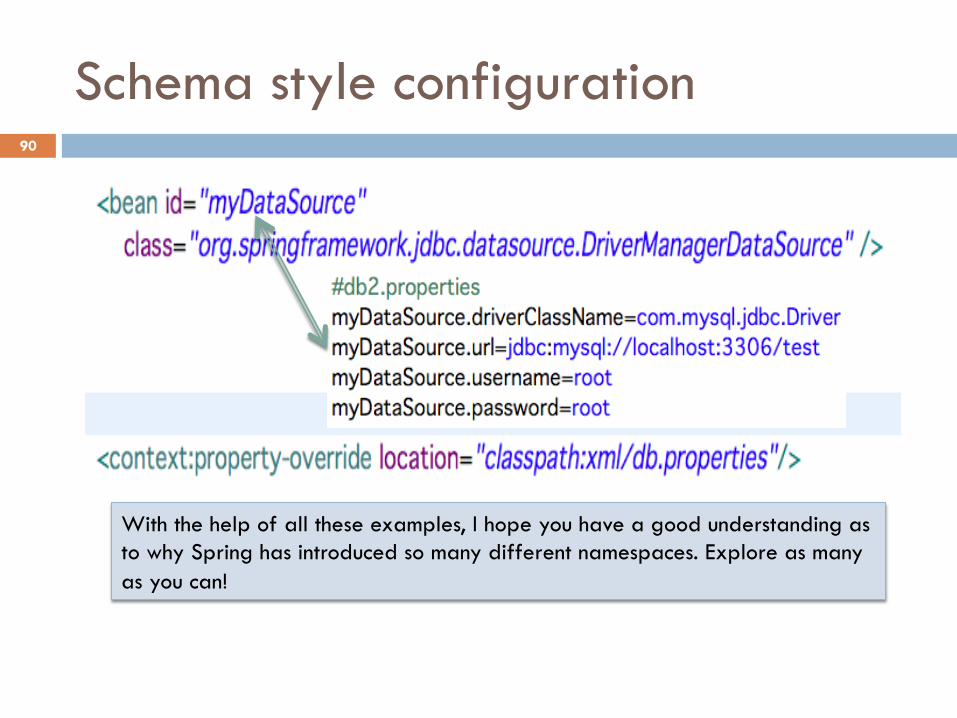
With the help of all these examples, I hope you have a good understanding as to why Spring has introduced so many different namespaces. Explore as many as you can!
90

Lab No. 2
More on DI and IoC
Refer to the lab guide provided along with the eclipse project to proceed further
91
Topics in this Session
¨ Some new features of Spring 3.0 and 3.1 ¨ Lifecycle of beans managed by the container ¨ Extensions for managing container’s lifecycle ¨ Managing events in a Spring environment ¨ Creating custom scopes in Spring ¨ Creating custom namespaces in Spring
92
Topics in this Session
¨ Some new features of Spring 3.0 and 3.1 ¨ Lifecycle of beans managed by the container ¨ Extensions for managing container’s lifecycle ¨ Managing events in a Spring environment ¨ Creating custom scopes in Spring ¨ Creating custom namespaces in Spring
93
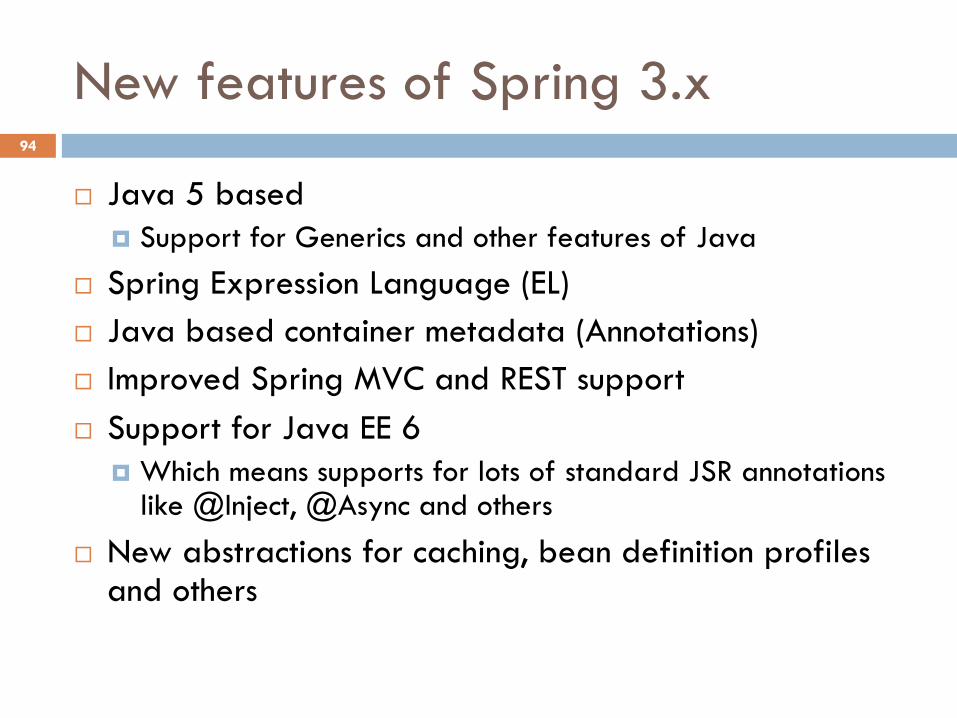
New features of Spring 3.x
¨ Java 5 based ¤ Support for Generics and other features of Java
¨ Spring Expression Language (EL) ¨ Java based container metadata (Annotations) ¨ Improved Spring MVC and REST support ¨ Support for Java EE 6
¤ Which means supports for lots of standard JSR annotations like @Inject, @Async and others
¨ New abstractions for caching, bean definition profiles and others
94
Spring 3.0 EL
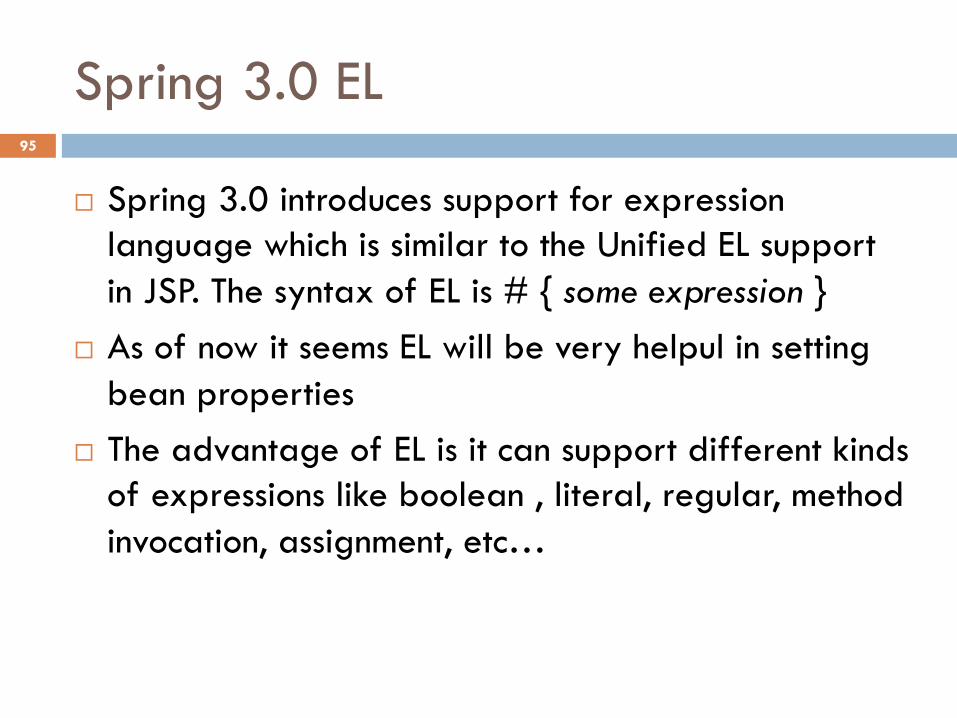
¨ Spring 3.0 introduces support for expression language which is similar to the Unified EL support in JSP. The syntax of EL is # { some expression }
¨ As of now it seems EL will be very helpul in setting bean properties
¨ The advantage of EL is it can support different kinds of expressions like boolean , literal, regular, method invocation, assignment, etc…
95
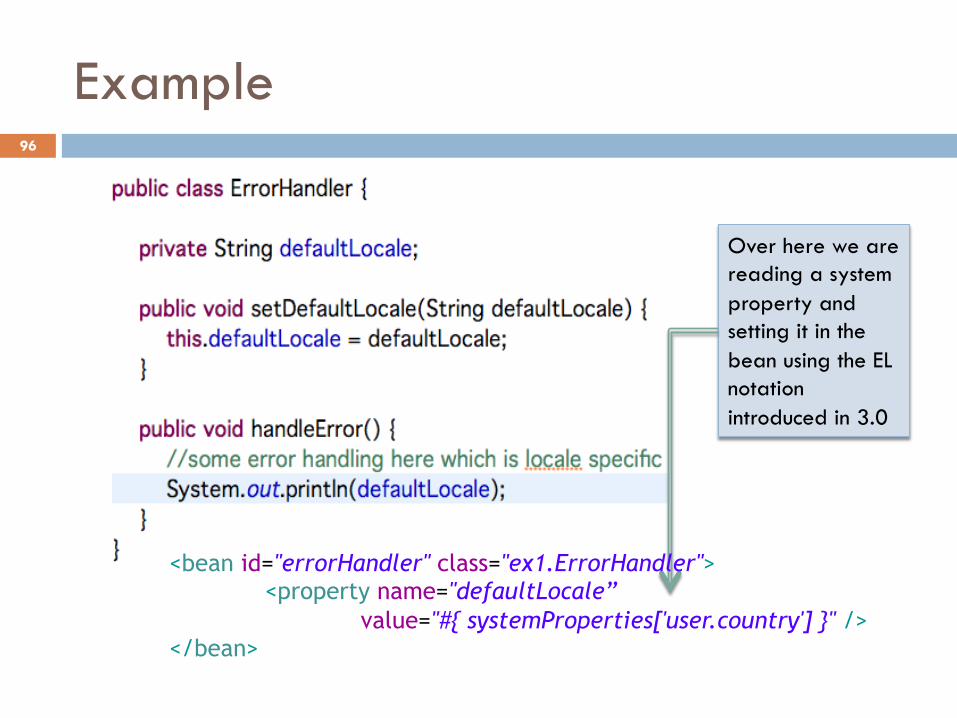
Example
Over here we are reading a system property and setting it in the bean using the EL notation introduced in 3.0
<bean id="errorHandler" class="ex1.ErrorHandler"> <property name="defaultLocale” value="#{ systemProperties['user.country'] }" />
</bean>
96

Annotation style configuration
@Value annotation can be used at field level also so need of a setter method for injecting the value. @Value can be used at setter and constructor level also
Correction: it’s user.country
97
Another example
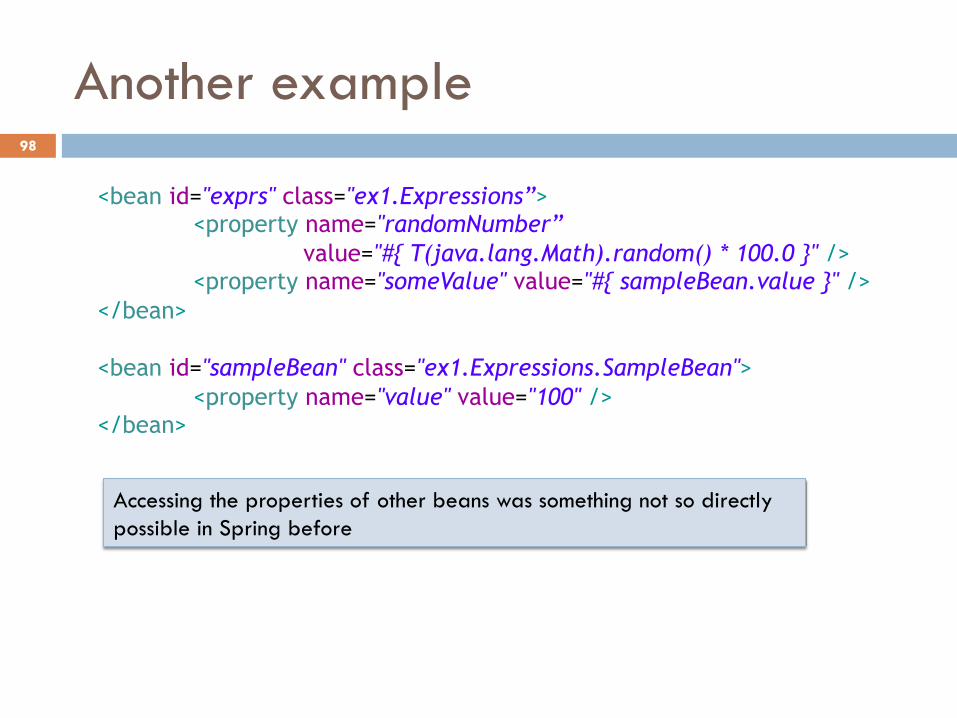
<bean id="exprs" class="ex1.Expressions”> <property name="randomNumber” value="#{ T(java.lang.Math).random() * 100.0 }" /> <property name="someValue" value="#{ sampleBean.value }" />
</bean> <bean id="sampleBean" class="ex1.Expressions.SampleBean">
<property name="value" value="100" /> </bean>
Accessing the properties of other beans was something not so directly possible in Spring before
98
Collection Selection
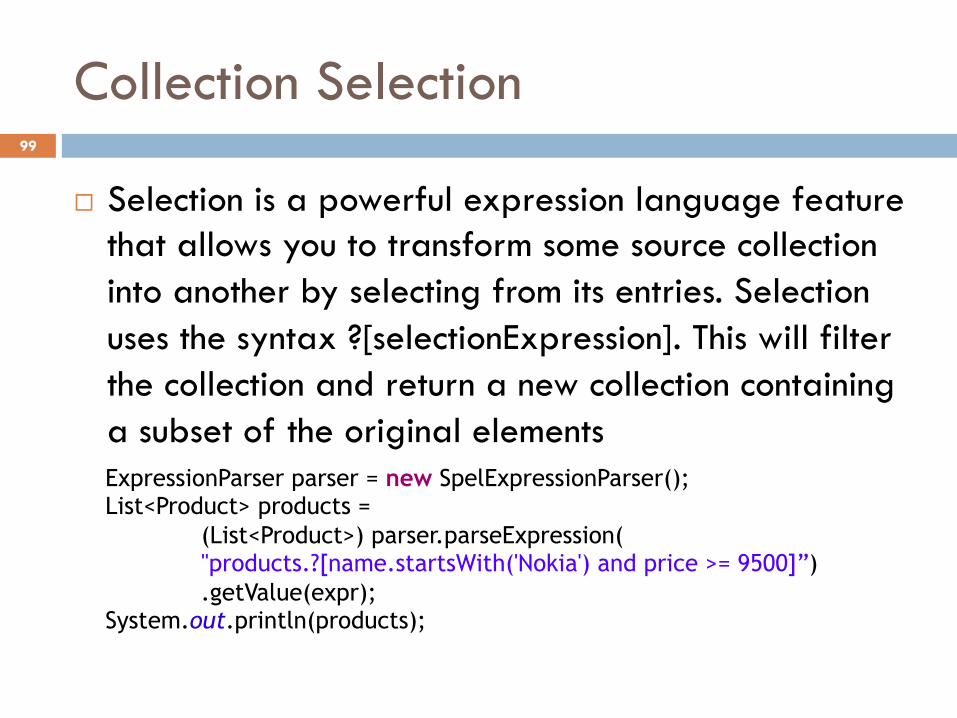
¨ Selection is a powerful expression language feature that allows you to transform some source collection into another by selecting from its entries. Selection uses the syntax ?[selectionExpression]. This will filter the collection and return a new collection containing a subset of the original elements ExpressionParser parser = new SpelExpressionParser(); List<Product> products =
(List<Product>) parser.parseExpression( "products.?[name.startsWith('Nokia') and price >= 9500]”) .getValue(expr);
System.out.println(products);
99
Collection Projection
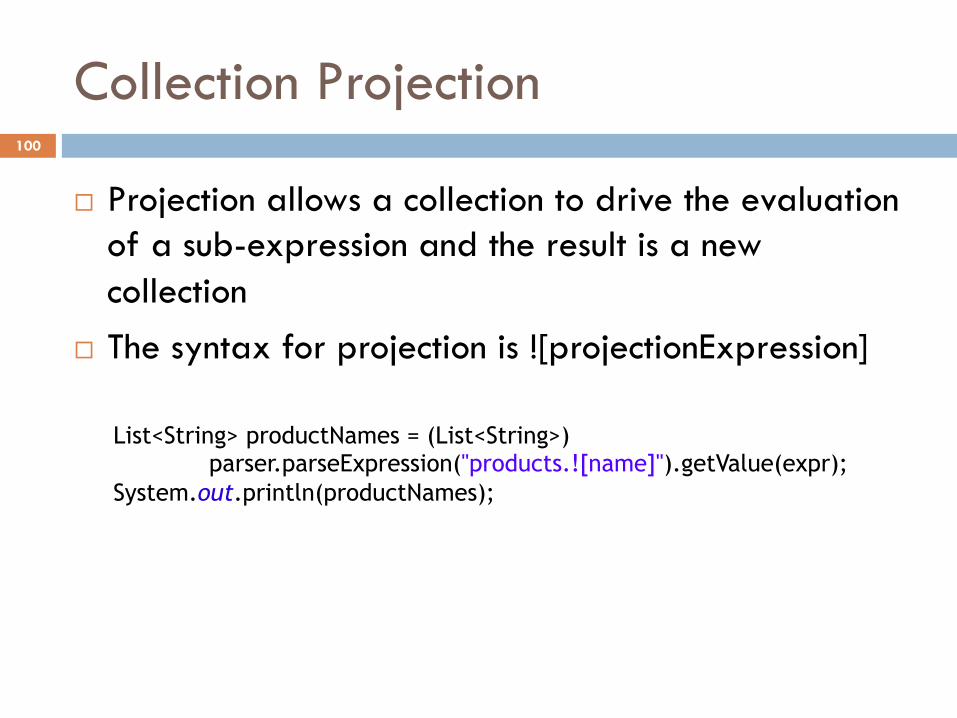
¨ Projection allows a collection to drive the evaluation of a sub-expression and the result is a new collection
¨ The syntax for projection is ![projectionExpression]
List<String> productNames = (List<String>) parser.parseExpression("products.![name]").getValue(expr);
System.out.println(productNames);
100
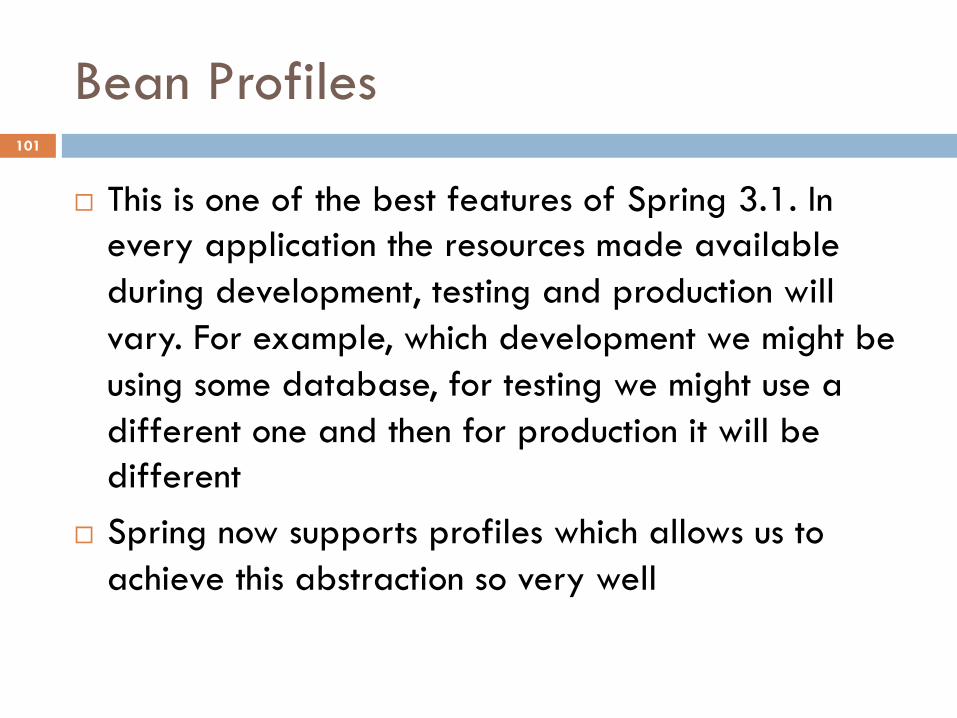
Bean Profiles
¨ This is one of the best features of Spring 3.1. In every application the resources made available during development, testing and production will vary. For example, which development we might be using some database, for testing we might use a different one and then for production it will be different
¨ Spring now supports profiles which allows us to achieve this abstraction so very well
101
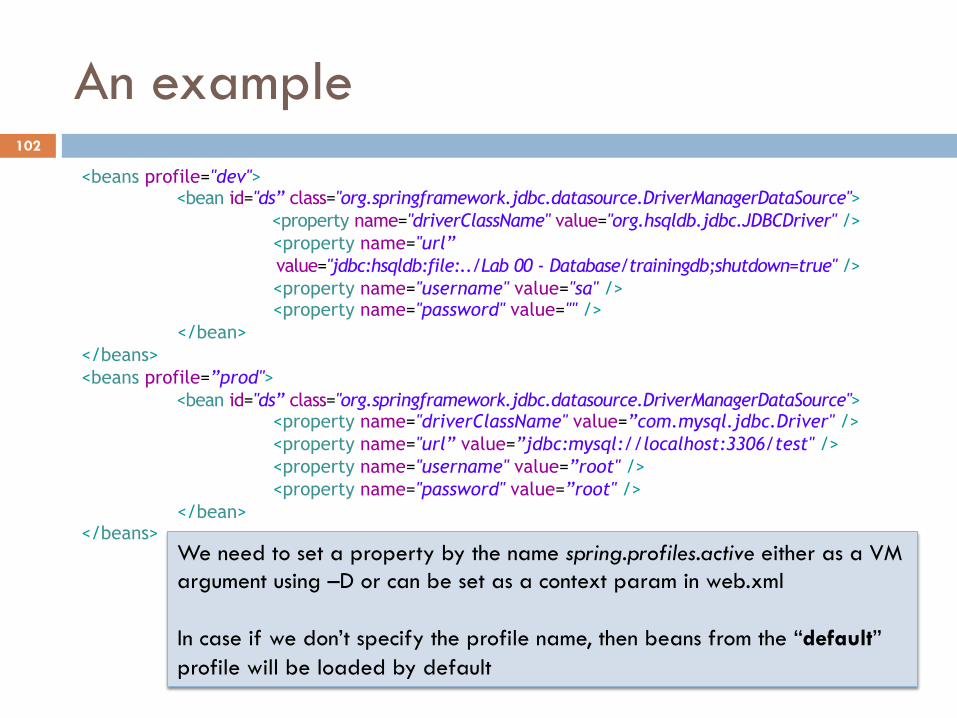
An example <beans profile="dev">
<bean id="ds” class="org.springframework.jdbc.datasource.DriverManagerDataSource"> <property name="driverClassName" value="org.hsqldb.jdbc.JDBCDriver" /> <property name="url” value="jdbc:hsqldb:file:../Lab 00 - Database/trainingdb;shutdown=true" /> <property name="username" value="sa" /> <property name="password" value="" /> </bean>
</beans> <beans profile=”prod">
<bean id="ds” class="org.springframework.jdbc.datasource.DriverManagerDataSource"> <property name="driverClassName" value=”com.mysql.jdbc.Driver" /> <property name="url” value=”jdbc:mysql://localhost:3306/test" /> <property name="username" value=”root" /> <property name="password" value=”root" /> </bean>
</beans> We need to set a property by the name spring.profiles.active either as a VM argument using –D or can be set as a context param in web.xml In case if we don’t specify the profile name, then beans from the “default” profile will be loaded by default
102
Java based container configuration
¨ Prior to Spring 3.0, the only way to provide configuration metadata was XML
¨ With the introduction of @Component family of annotations in 2.5, we were able to remove bean definitions from the xml and using @Resource and @Autowired, even the dependencies could be managed from the code itself
¨ In 2.0, we only had annotations for transaction management and aspects.
¨ Prior to 2.0, everthing had to be in XML only
103
Cont’d…
¨ So even though you use annotations, you still need an xml file to bootstrap the container process
¨ In Spring 3.0, they have introduced a Java based configuration metadata, so it’s possible that we can now eliminate xml completely
104
Example
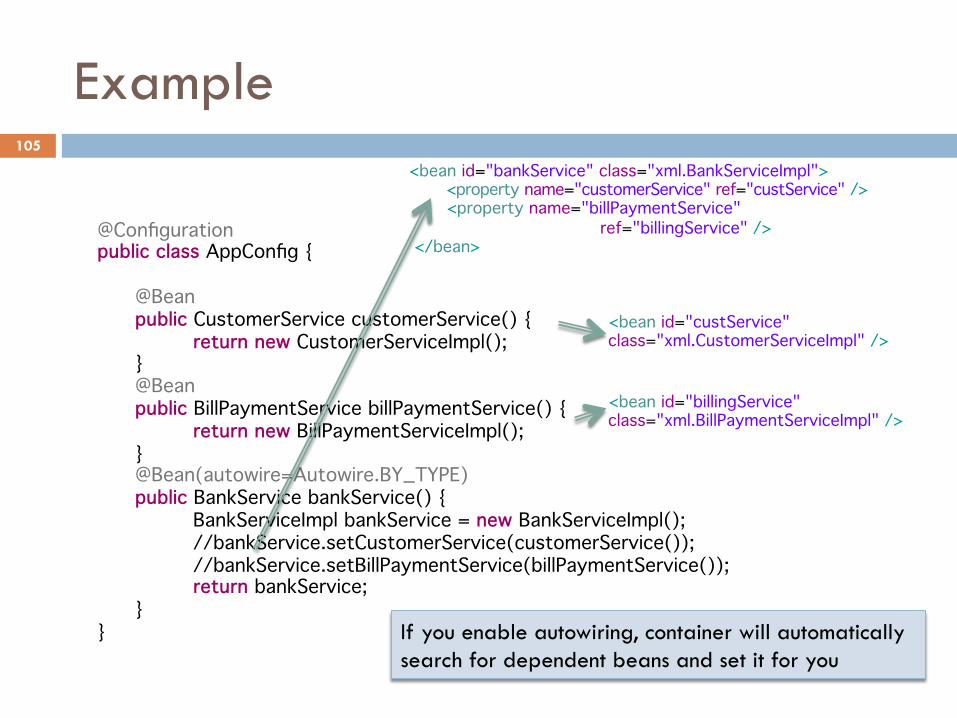
@Configuration public class AppConfig {
@Bean public CustomerService customerService() { return new CustomerServiceImpl(); } @Bean public BillPaymentService billPaymentService() { return new BillPaymentServiceImpl(); } @Bean(autowire=Autowire.BY_TYPE) public BankService bankService() { BankServiceImpl bankService = new BankServiceImpl(); //bankService.setCustomerService(customerService()); //bankService.setBillPaymentService(billPaymentService()); return bankService; }
}
<bean id="custService" class="xml.CustomerServiceImpl" />
<bean id="billingService" class="xml.BillPaymentServiceImpl" />
<bean id="bankService" class="xml.BankServiceImpl"> <property name="customerService" ref="custService" /> <property name="billPaymentService" ref="billingService" />
</bean>
If you enable autowiring, container will automatically search for dependent beans and set it for you
105

Loading the container
ApplicationContext ctx = new AnnotationConfigApplicationContext(AppConfig.class); BillPaymentService billService = ctx.getBean(BillPaymentService.class); ...
This time we are launching the Spring IoC container with the help of a Java based configuration class. Alternatively to avoid changing the bootstrap process, you can still have an xml file containing <context:component-scan base-package=”ex2" /> , so that the container will automatically load the Java based configuration class like any other bean but with those additional configurational capabilities Best of both the worlds isn’t it!
106
Topics in this Session
¨ Some new features of Spring 3.0 and 3.1 ¨ Lifecycle of beans managed by the container ¨ Extensions for managing container’s lifecycle ¨ Managing events in a Spring environment ¨ Creating custom scopes in Spring ¨ Creating custom namespaces in Spring
107
Bean life cycle
¨ As like any other component, beans managed by the IoC container have a life cycle associated with it. The life cycle methods can be implemented optionally and there are multiple possible ways of managing the life cycle of beans: ¤ Callback API implementation ¤ XML configuration ¤ Annotations
108
Destroyed
Definition
Pre initialized
Ready
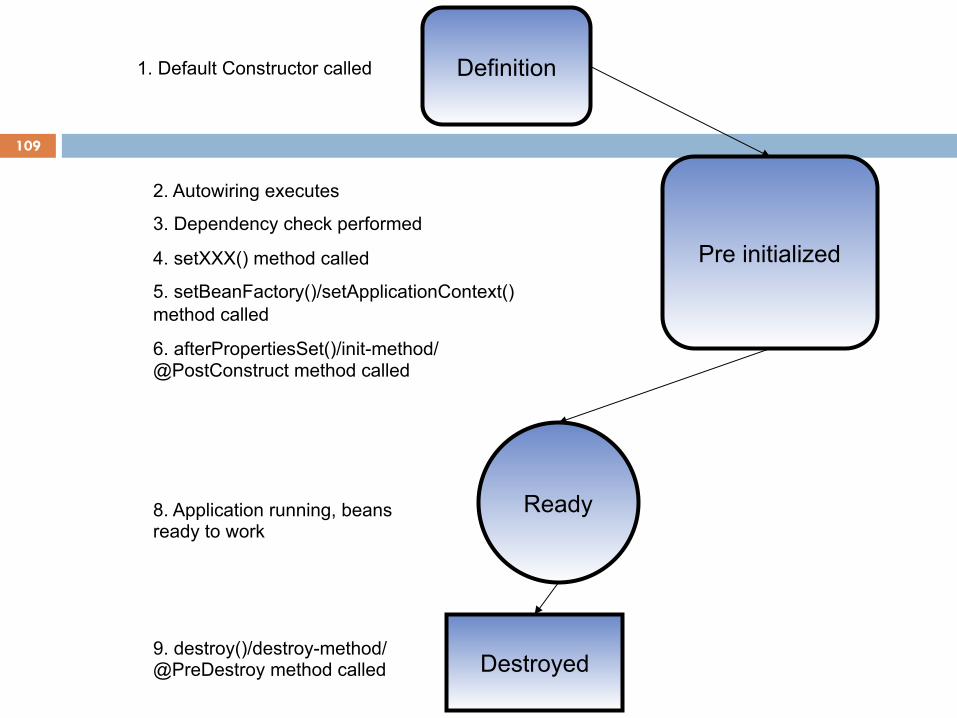
1. Default Constructor called
2. Autowiring executes
3. Dependency check performed
4. setXXX() method called
5. setBeanFactory()/setApplicationContext() method called
6. afterPropertiesSet()/init-method/@PostConstruct method called
8. Application running, beans ready to work
9. destroy()/destroy-method/@PreDestroy method called
109
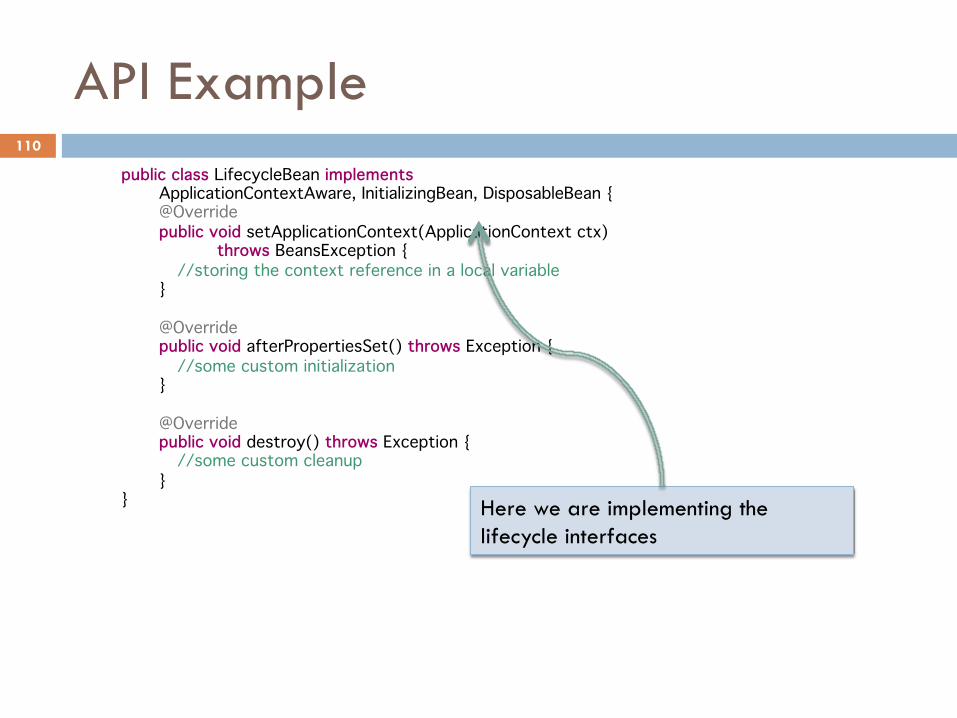
API Example public class LifecycleBean implements
ApplicationContextAware, InitializingBean, DisposableBean { @Override public void setApplicationContext(ApplicationContext ctx) throws BeansException { //storing the context reference in a local variable }
@Override public void afterPropertiesSet() throws Exception { //some custom initialization }
@Override public void destroy() throws Exception { //some custom cleanup }
} Here we are implementing the lifecycle interfaces
110
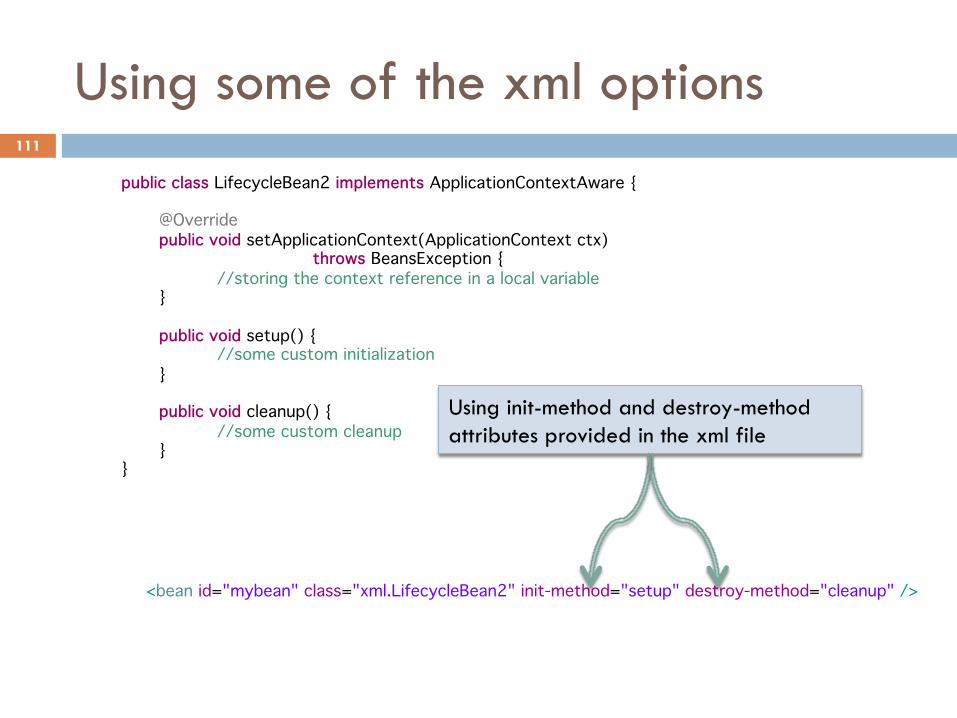
Using some of the xml options
public class LifecycleBean2 implements ApplicationContextAware {
@Override public void setApplicationContext(ApplicationContext ctx) throws BeansException { //storing the context reference in a local variable }
public void setup() { //some custom initialization }
public void cleanup() { //some custom cleanup }
}
<bean id="mybean" class="xml.LifecycleBean2" init-method="setup" destroy-method="cleanup" />
Using init-method and destroy-method attributes provided in the xml file
111
Annotations based life cycle callback
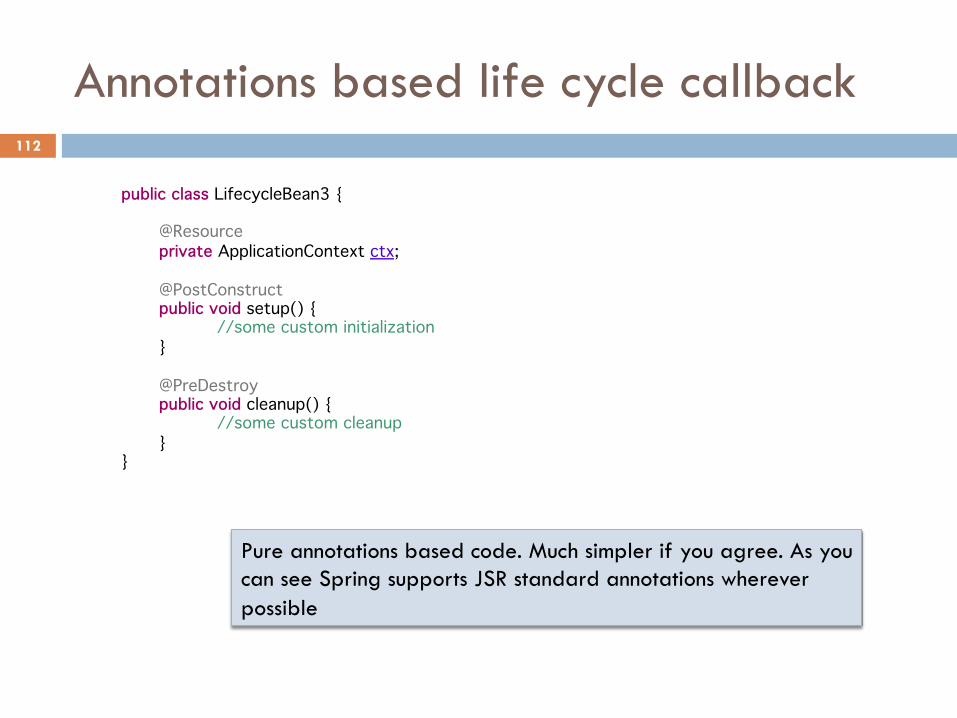
public class LifecycleBean3 {
@Resource private ApplicationContext ctx;
@PostConstruct public void setup() { //some custom initialization }
@PreDestroy public void cleanup() { //some custom cleanup }
}
Pure annotations based code. Much simpler if you agree. As you can see Spring supports JSR standard annotations wherever possible
112
Topics in this Session
¨ Some new features of Spring 3.0 and 3.1 ¨ Lifecycle of beans managed by the container ¨ Extensions for managing container’s lifecycle ¨ Managing events in a Spring environment ¨ Creating custom scopes in Spring ¨ Creating custom namespaces in Spring
113
Container level lifecycle
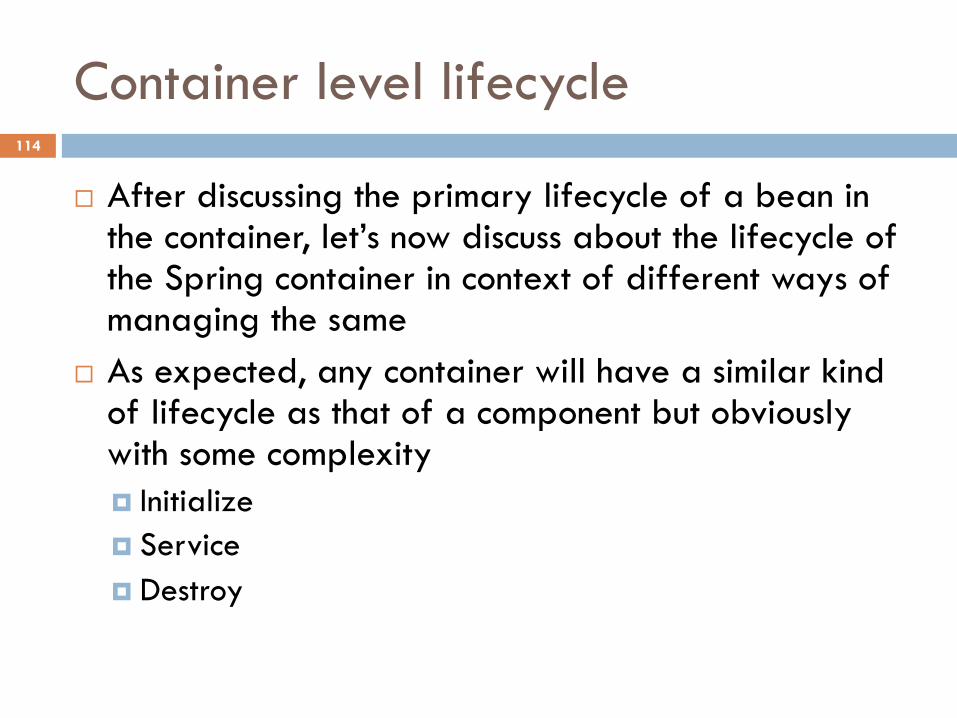
¨ After discussing the primary lifecycle of a bean in the container, let’s now discuss about the lifecycle of the Spring container in context of different ways of managing the same
¨ As expected, any container will have a similar kind of lifecycle as that of a component but obviously with some complexity ¤ Initialize ¤ Service ¤ Destroy
114
IoC container lifecycle
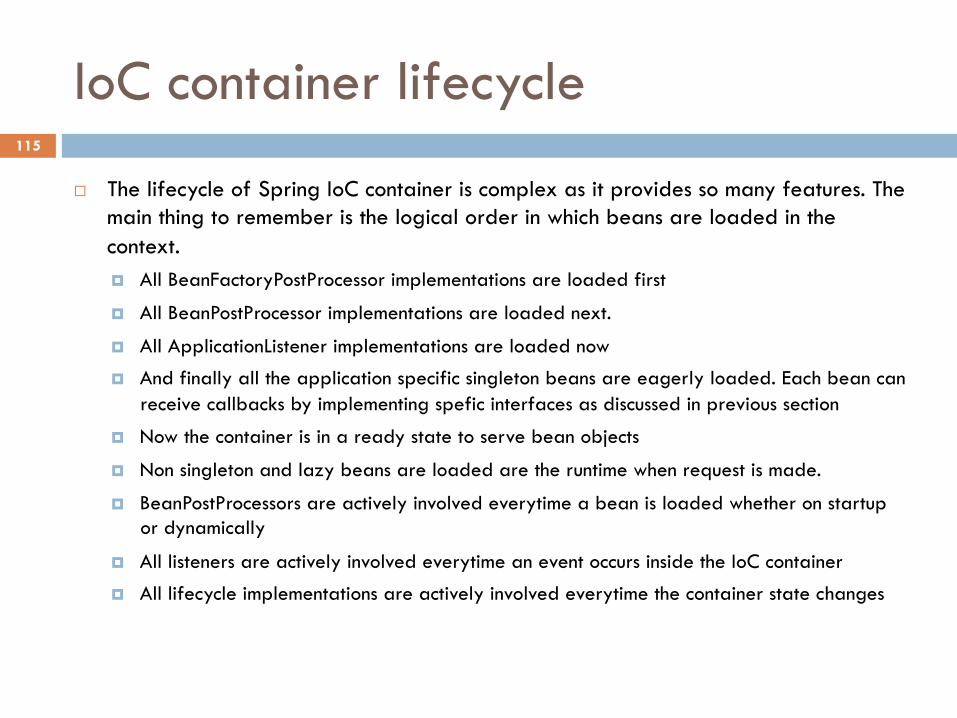
¨ The lifecycle of Spring IoC container is complex as it provides so many features. The main thing to remember is the logical order in which beans are loaded in the context. ¤ All BeanFactoryPostProcessor implementations are loaded first
¤ All BeanPostProcessor implementations are loaded next.
¤ All ApplicationListener implementations are loaded now
¤ And finally all the application specific singleton beans are eagerly loaded. Each bean can receive callbacks by implementing spefic interfaces as discussed in previous section
¤ Now the container is in a ready state to serve bean objects
¤ Non singleton and lazy beans are loaded are the runtime when request is made.
¤ BeanPostProcessors are actively involved everytime a bean is loaded whether on startup or dynamically
¤ All listeners are actively involved everytime an event occurs inside the IoC container
¤ All lifecycle implementations are actively involved everytime the container state changes
115

The most important interfaces
¨ BeanFactoryPostProcessor and BeanPostProcessor are the most commonly used extension points in Spring
116
BeanPostProcessor interface
¨ The BeanPostProcessor interface defines callback methods that you can implement to provide your own (or override the container's default) instantiation logic, dependency-resolution logic, and so forth. If you want to implement some custom logic after the Spring container finishes instantiating, configuring, and otherwise initializing a bean, you can plug in one or more BeanPostProcessor implementations
¨ You can control the order in which these BeanPostProcessor interfaces execute by setting the order property. You can set this property only if the BeanPostProcessor implements the Ordered interface
117
Cont’d…
¨ Classes that implement the BeanPostProcessor interface are special, and so they are treated differently by the container. All BeanPostProcessors and their directly referenced beans are instantiated on startup, as part of the special startup phase of the ApplicationContext
118
Example
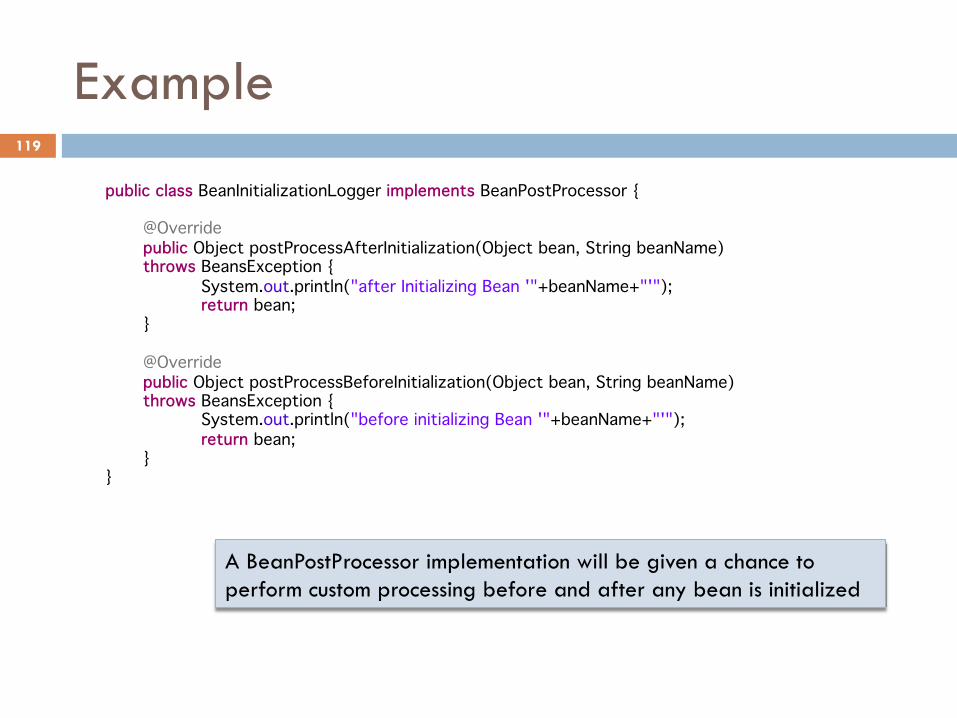
public class BeanInitializationLogger implements BeanPostProcessor {
@Override public Object postProcessAfterInitialization(Object bean, String beanName) throws BeansException { System.out.println("after Initializing Bean '"+beanName+"'"); return bean; }
@Override public Object postProcessBeforeInitialization(Object bean, String beanName) throws BeansException { System.out.println("before initializing Bean '"+beanName+"'"); return bean; }
}
A BeanPostProcessor implementation will be given a chance to perform custom processing before and after any bean is initialized
119
Another example
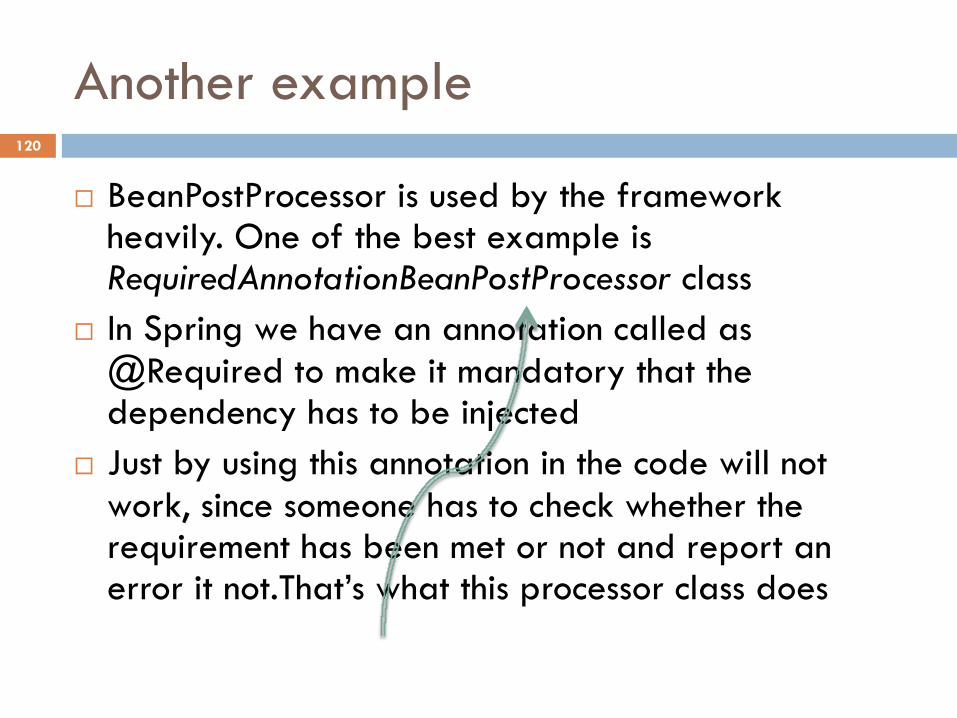
¨ BeanPostProcessor is used by the framework heavily. One of the best example is RequiredAnnotationBeanPostProcessor class
¨ In Spring we have an annotation called as @Required to make it mandatory that the dependency has to be injected
¨ Just by using this annotation in the code will not work, since someone has to check whether the requirement has been met or not and report an error it not.That’s what this processor class does
120
Example
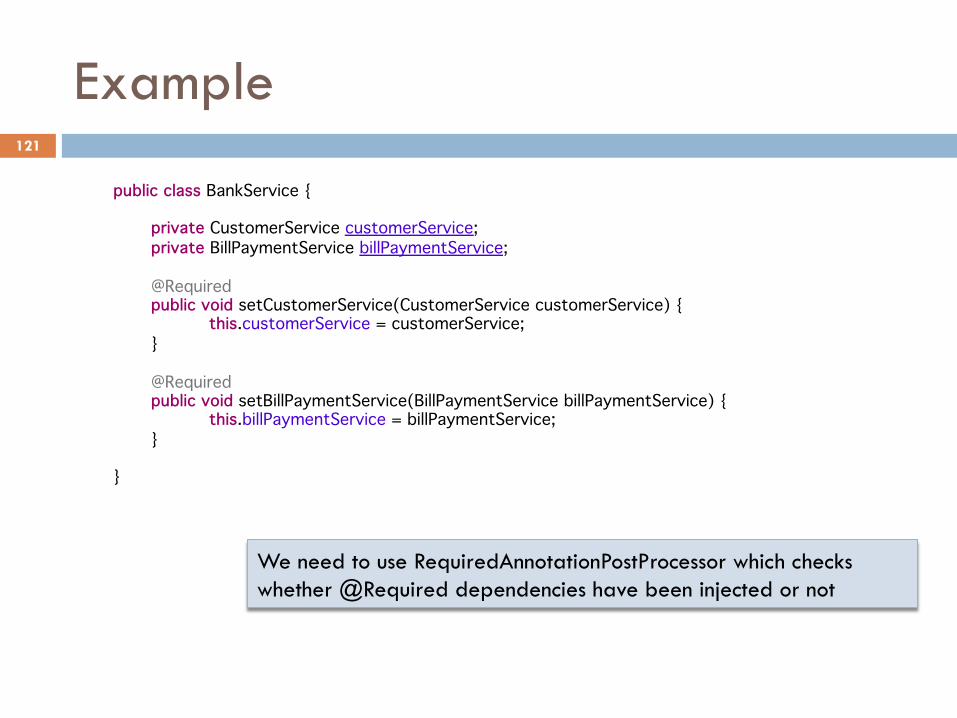
public class BankService {
private CustomerService customerService; private BillPaymentService billPaymentService; @Required public void setCustomerService(CustomerService customerService) { this.customerService = customerService; } @Required public void setBillPaymentService(BillPaymentService billPaymentService) { this.billPaymentService = billPaymentService; }
}
We need to use RequiredAnnotationPostProcessor which checks whether @Required dependencies have been injected or not
121
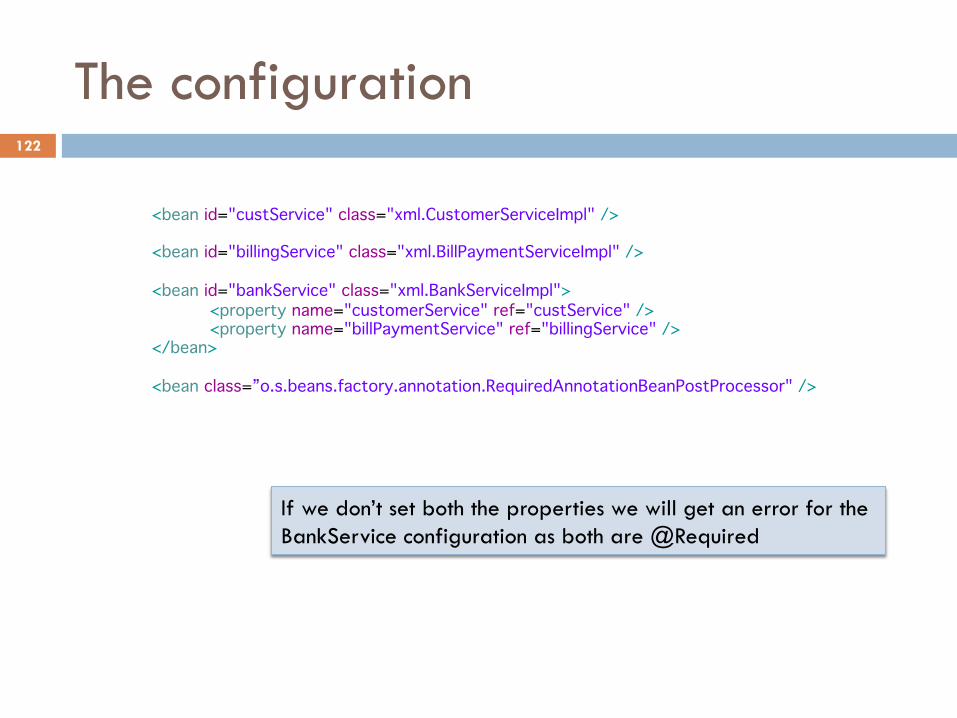
The configuration
<bean id="custService" class="xml.CustomerServiceImpl" /> <bean id="billingService" class="xml.BillPaymentServiceImpl" /> <bean id="bankService" class="xml.BankServiceImpl"> <property name="customerService" ref="custService" /> <property name="billPaymentService" ref="billingService" />
</bean>
<bean class=”o.s.beans.factory.annotation.RequiredAnnotationBeanPostProcessor" />
If we don’t set both the properties we will get an error for the BankService configuration as both are @Required
122
BeanFactoryPostProcessor
¨ The semantics of this interface are similar to the BeanPostProcessor, with one major difference: BeanFactoryPostProcessors operate on the bean configuration metadata; that is, the Spring IoC container allows BeanFactoryPostProcessors to read the configuration metadata and potentially change it before the container instantiates any beans other than BeanFactoryPostProcessors
¨ Please remember, If you want to change the actual bean instances (the objects that are created from the configuration metadata), then use BeanPostProcessor
123
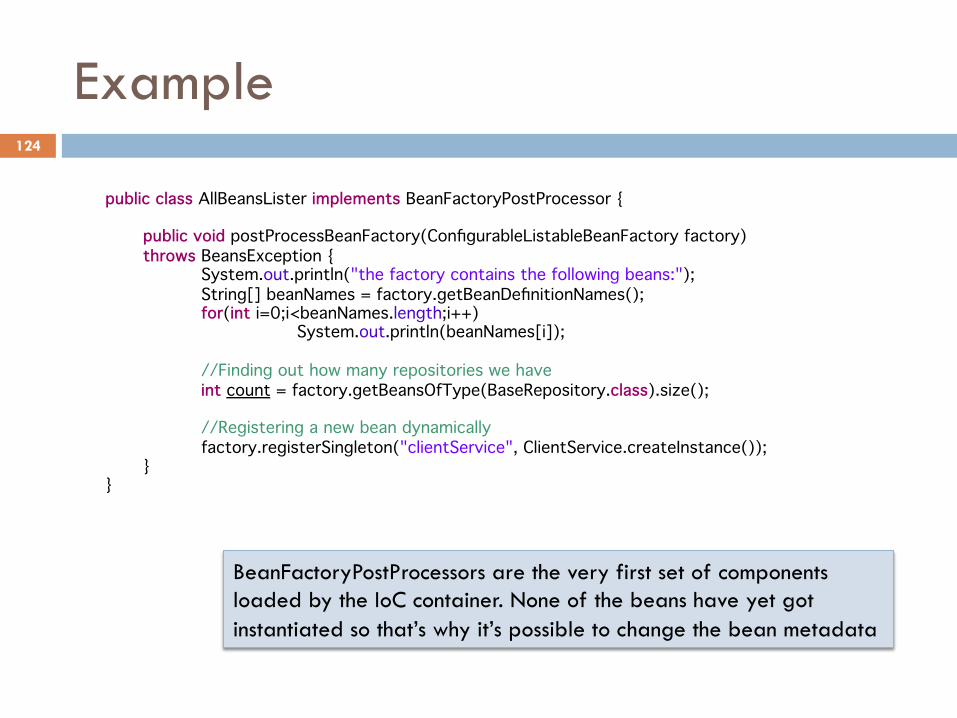
Example
public class AllBeansLister implements BeanFactoryPostProcessor {
public void postProcessBeanFactory(ConfigurableListableBeanFactory factory) throws BeansException {
System.out.println("the factory contains the following beans:"); String[] beanNames = factory.getBeanDefinitionNames(); for(int i=0;i<beanNames.length;i++) System.out.println(beanNames[i]); //Finding out how many repositories we have int count = factory.getBeansOfType(BaseRepository.class).size(); //Registering a new bean dynamically factory.registerSingleton("clientService", ClientService.createInstance()); }
}
BeanFactoryPostProcessors are the very first set of components loaded by the IoC container. None of the beans have yet got instantiated so that’s why it’s possible to change the bean metadata
124
Cont’d…
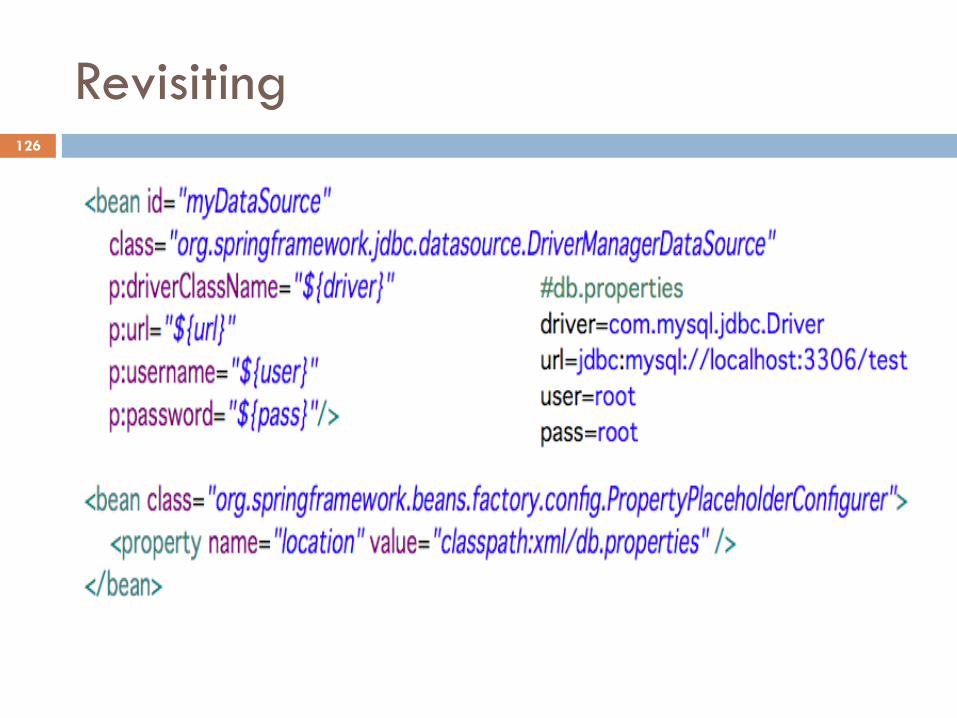
¨ Again, one of the commonly used BeanFactoryPostProcessor is PropertyPlaceHolderConfigurer class. We have already seen the usage of this class before. This class replaces the configuration of any bean containing ${} with the actual property value so by the time the bean is instantiated, the correct values are already known to the container
125
Revisiting 126
Topics in this Session
¨ Some new features of Spring 3.0 and 3.1 ¨ Lifecycle of beans managed by the container ¨ Extensions for managing container’s lifecycle ¨ Managing events in a Spring environment ¨ Creating custom scopes in Spring ¨ Creating custom namespaces in Spring
127
Cont’d…
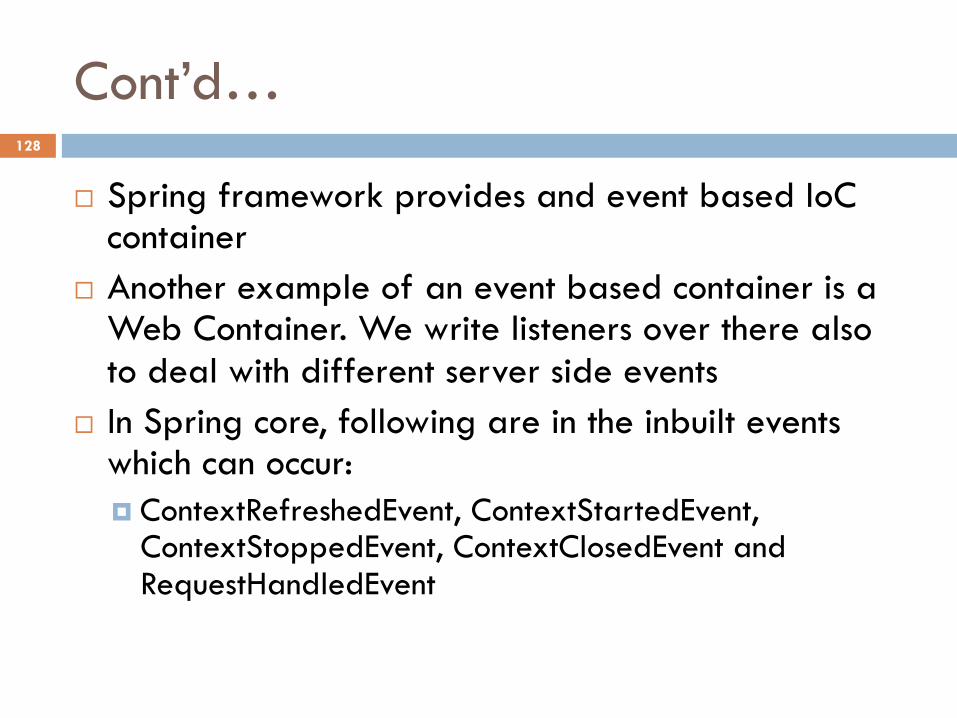
¨ Spring framework provides and event based IoC container
¨ Another example of an event based container is a Web Container. We write listeners over there also to deal with different server side events
¨ In Spring core, following are in the inbuilt events which can occur: ¤ ContextRefreshedEvent, ContextStartedEvent,
ContextStoppedEvent, ContextClosedEvent and RequestHandledEvent
128
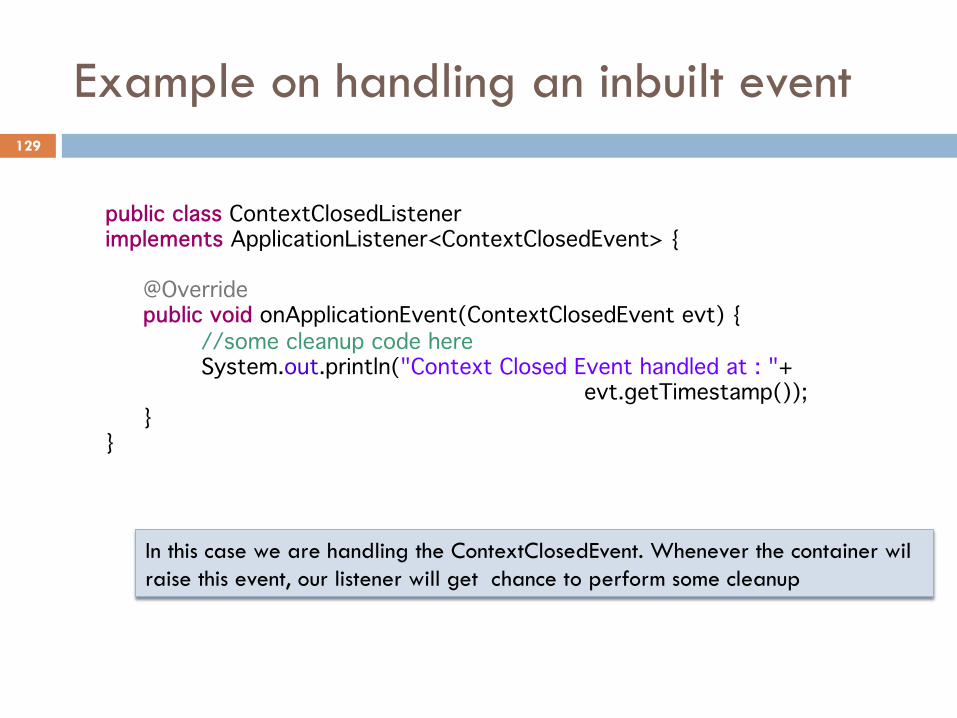
Example on handling an inbuilt event
public class ContextClosedListener implements ApplicationListener<ContextClosedEvent> {
@Override public void onApplicationEvent(ContextClosedEvent evt) { //some cleanup code here System.out.println("Context Closed Event handled at : "+ evt.getTimestamp()); }
}
In this case we are handling the ContextClosedEvent. Whenever the container wil raise this event, our listener will get chance to perform some cleanup
129
Raising a custom event
¨ The steps for raising a custom event are simple: ¤ Write a custom event class ¤ Write the business logic to raise an event ¤ Write a listener for dealing with the event
130

Writing a custom event class
public class BlackListEvent extends ApplicationEvent {
private String address; public BlackListEvent(String address, Object source) { super(source); this.address = address; }
}
An event class is just an extension of ApplicationEvent abstract class. Whenever an event is raised, the listener can track the source of the event from the event object.
131
Business logic to raise an event
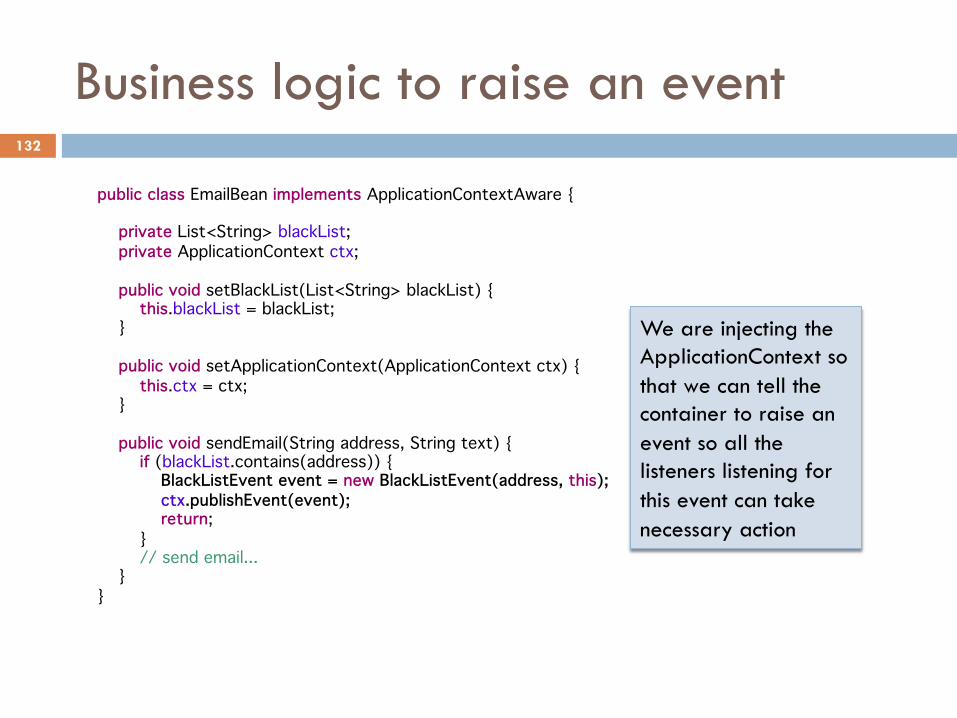
public class EmailBean implements ApplicationContextAware { private List<String> blackList; private ApplicationContext ctx; public void setBlackList(List<String> blackList) { this.blackList = blackList; } public void setApplicationContext(ApplicationContext ctx) { this.ctx = ctx; } public void sendEmail(String address, String text) { if (blackList.contains(address)) { BlackListEvent event = new BlackListEvent(address, this); ctx.publishEvent(event); return; } // send email... } }
We are injecting the ApplicationContext so that we can tell the container to raise an event so all the listeners listening for this event can take necessary action
132
Finally the Listener class
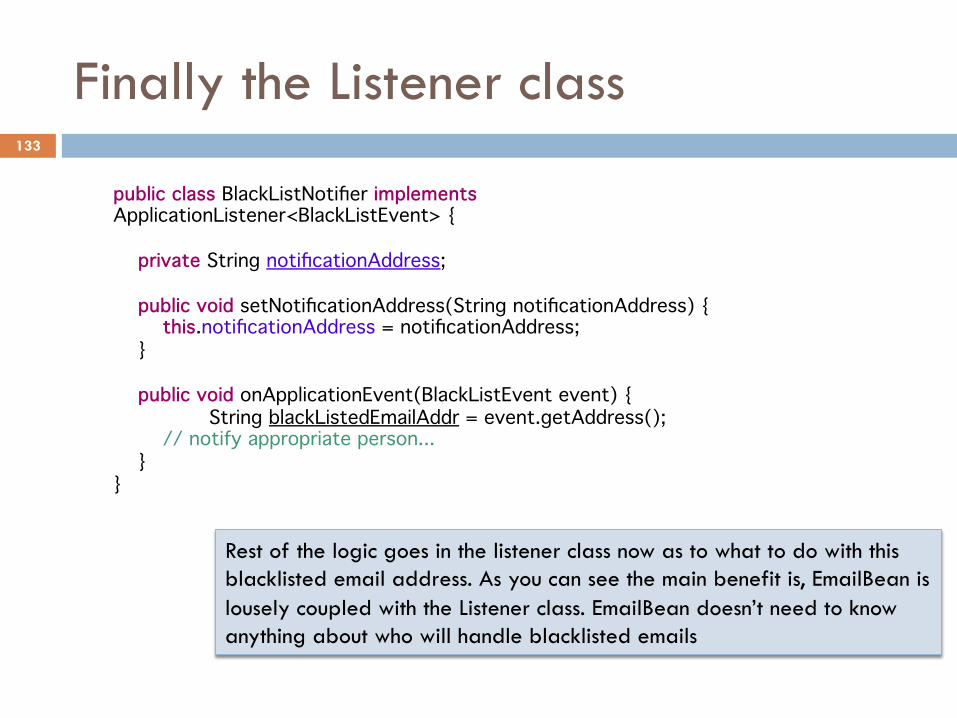
public class BlackListNotifier implements ApplicationListener<BlackListEvent> { private String notificationAddress; public void setNotificationAddress(String notificationAddress) { this.notificationAddress = notificationAddress; } public void onApplicationEvent(BlackListEvent event) { String blackListedEmailAddr = event.getAddress(); // notify appropriate person... } }
Rest of the logic goes in the listener class now as to what to do with this blacklisted email address. As you can see the main benefit is, EmailBean is lousely coupled with the Listener class. EmailBean doesn’t need to know anything about who will handle blacklisted emails
133
Topics in this Session
¨ Some new features of Spring 3.0 and 3.1 ¨ Lifecycle of beans managed by the container ¨ Extensions for managing container’s lifecycle ¨ Managing events in a Spring environment ¨ Creating custom scopes in Spring ¨ Creating custom namespaces in Spring
134
Writing custom scopes
¨ By default objects managed by the IoC container are singleton in nature. Further we have prototype, request and session which suits the need to most applications
¨ But there could be a possibility of creating scope of our own if none of the existing ones meet our requirement
¨ We will have a quick look at creating a custom “thread” scope of our own
135
Example
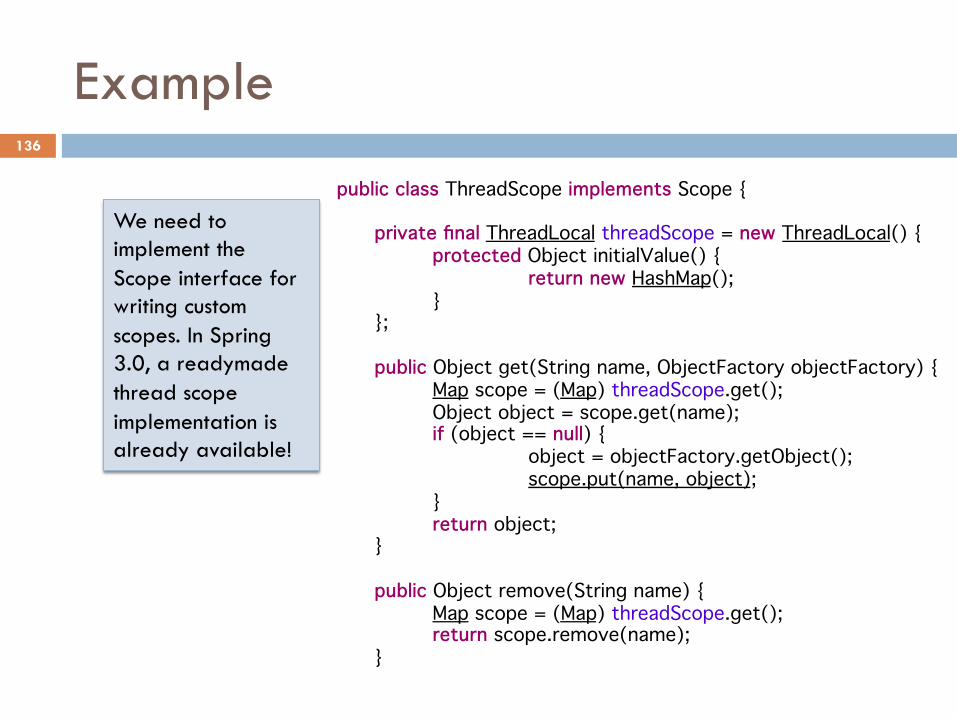
public class ThreadScope implements Scope {
private final ThreadLocal threadScope = new ThreadLocal() { protected Object initialValue() { return new HashMap(); } };
public Object get(String name, ObjectFactory objectFactory) { Map scope = (Map) threadScope.get(); Object object = scope.get(name); if (object == null) { object = objectFactory.getObject(); scope.put(name, object); } return object; }
public Object remove(String name) { Map scope = (Map) threadScope.get(); return scope.remove(name); }
We need to implement the Scope interface for writing custom scopes. In Spring 3.0, a readymade thread scope implementation is already available!
136
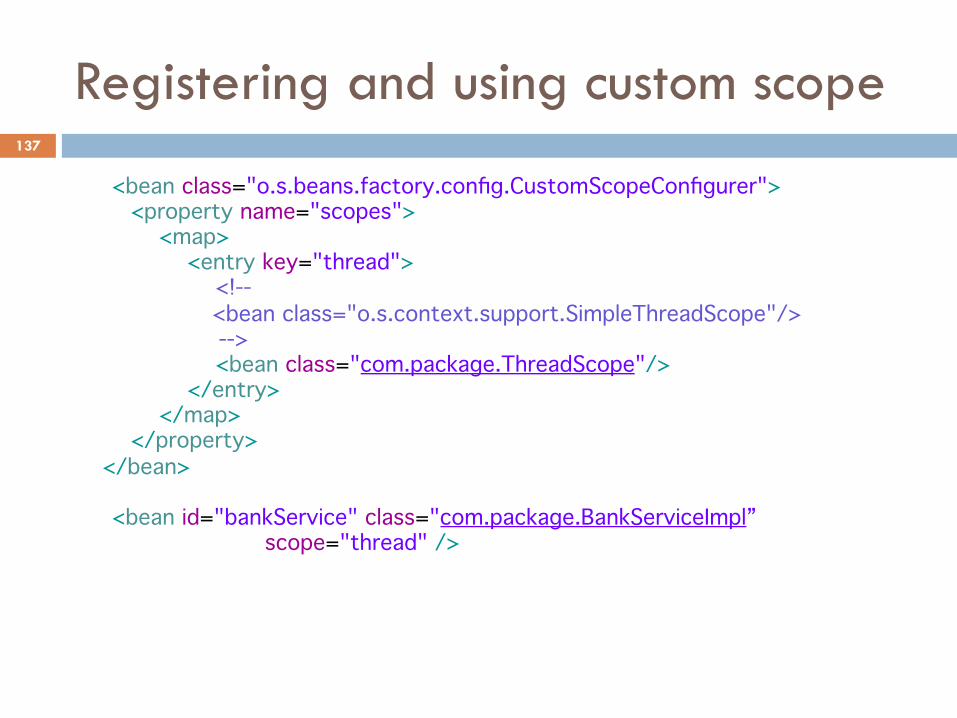
Registering and using custom scope
<bean class="o.s.beans.factory.config.CustomScopeConfigurer"> <property name="scopes"> <map> <entry key="thread"> <!--
<bean class="o.s.context.support.SimpleThreadScope"/> -->
<bean class="com.package.ThreadScope"/> </entry> </map> </property> </bean>
<bean id="bankService" class="com.package.BankServiceImpl” scope="thread" />
137

Topics in this Session
¨ Some new features of Spring 3.0 and 3.1 ¨ Lifecycle of beans managed by the container ¨ Extensions for managing container’s lifecycle ¨ Managing events in a Spring environment ¨ Creating custom scopes in Spring ¨ Creating custom namespaces in Spring
138
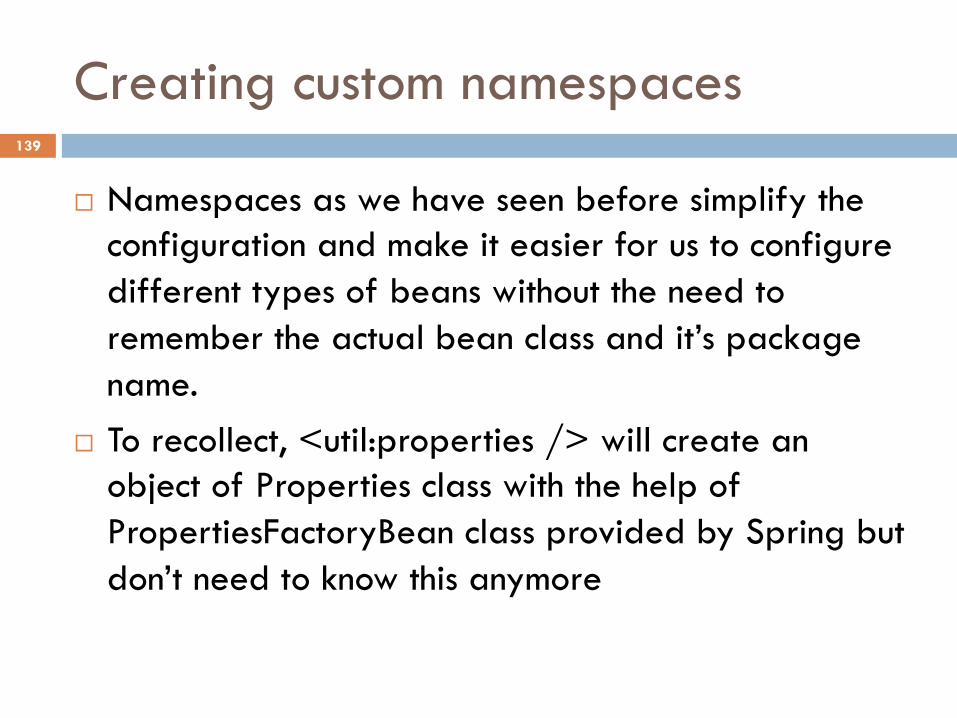
Creating custom namespaces
¨ Namespaces as we have seen before simplify the configuration and make it easier for us to configure different types of beans without the need to remember the actual bean class and it’s package name.
¨ To recollect, <util:properties /> will create an object of Properties class with the help of PropertiesFactoryBean class provided by Spring but don’t need to know this anymore
139
Revisting existing namespaces
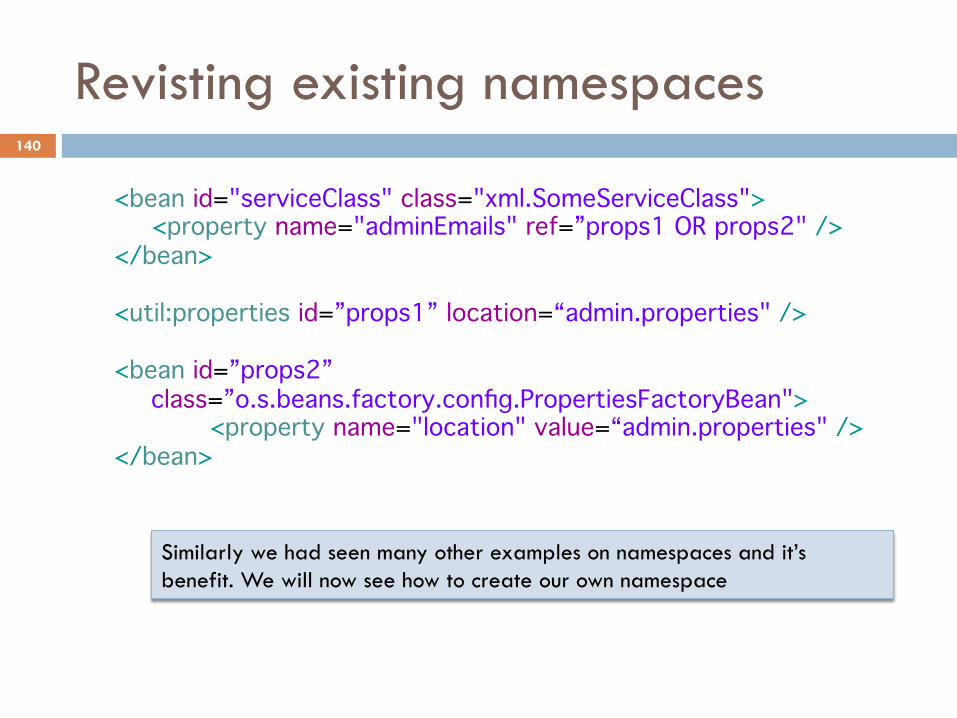
<bean id="serviceClass" class="xml.SomeServiceClass"> <property name="adminEmails" ref=”props1 OR props2" />
</bean> <util:properties id=”props1” location=“admin.properties" /> <bean id=”props2”
class=”o.s.beans.factory.config.PropertiesFactoryBean"> <property name="location" value=“admin.properties" />
</bean>
Similarly we had seen many other examples on namespaces and it’s benefit. We will now see how to create our own namespace
140
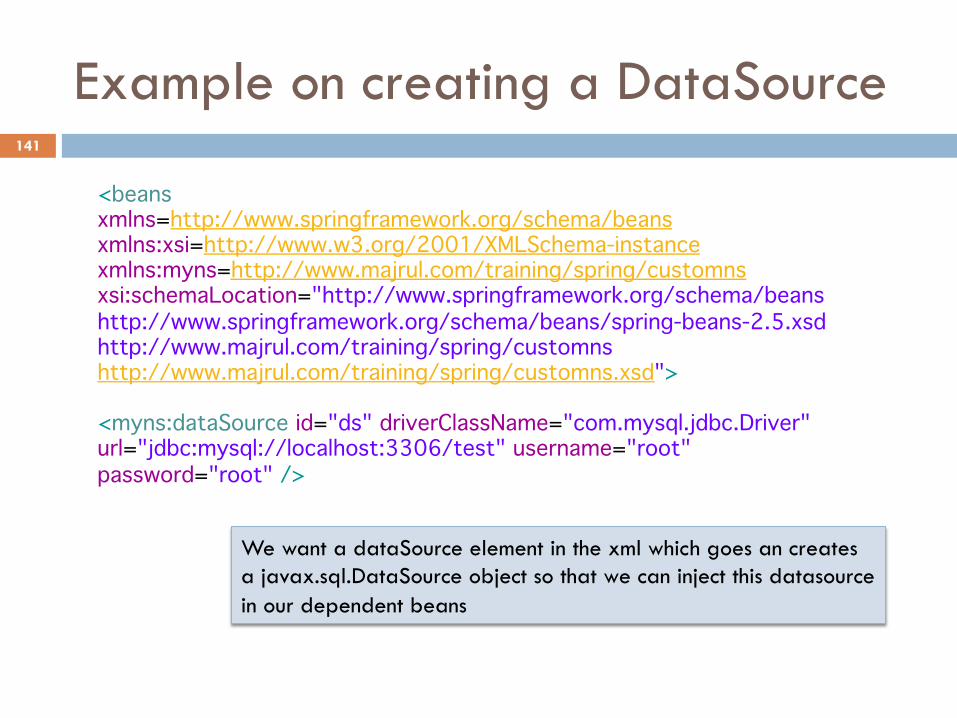
Example on creating a DataSource
<beans xmlns=http://www.springframework.org/schema/beans xmlns:xsi=http://www.w3.org/2001/XMLSchema-instance xmlns:myns=http://www.majrul.com/training/spring/customns xsi:schemaLocation="http://www.springframework.org/schema/beans http://www.springframework.org/schema/beans/spring-beans-2.5.xsd http://www.majrul.com/training/spring/customns http://www.majrul.com/training/spring/customns.xsd"> <myns:dataSource id="ds" driverClassName="com.mysql.jdbc.Driver" url="jdbc:mysql://localhost:3306/test" username="root" password="root" />
We want a dataSource element in the xml which goes an creates a javax.sql.DataSource object so that we can inject this datasource in our dependent beans
141
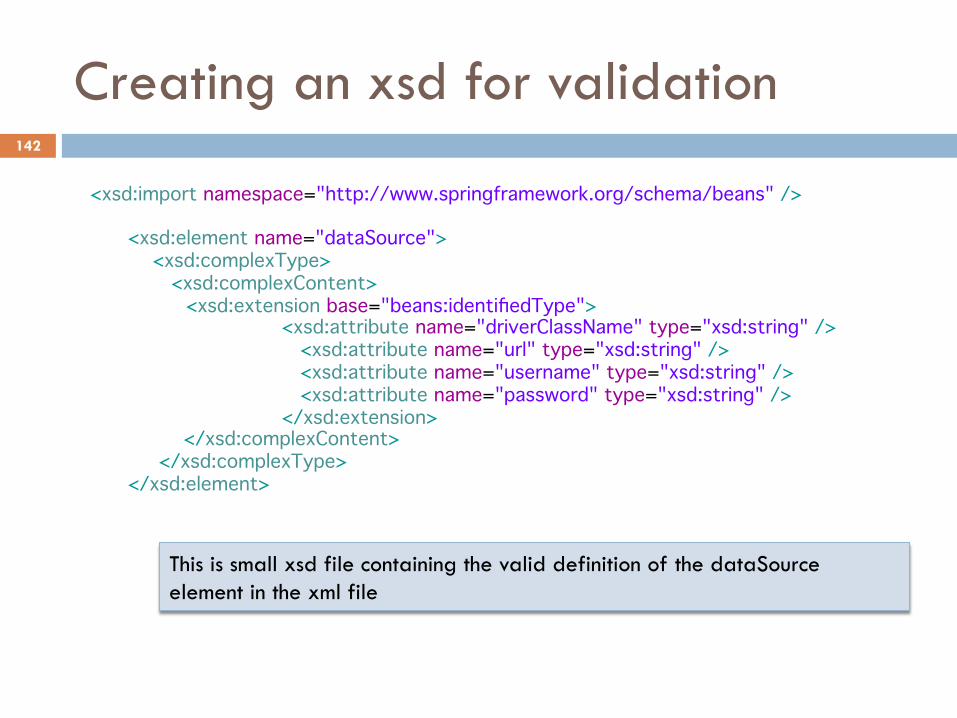
Creating an xsd for validation
<xsd:import namespace="http://www.springframework.org/schema/beans" />
<xsd:element name="dataSource"> <xsd:complexType> <xsd:complexContent> <xsd:extension base="beans:identifiedType"> <xsd:attribute name="driverClassName" type="xsd:string" /> <xsd:attribute name="url" type="xsd:string" /> <xsd:attribute name="username" type="xsd:string" /> <xsd:attribute name="password" type="xsd:string" /> </xsd:extension> </xsd:complexContent> </xsd:complexType> </xsd:element>
This is small xsd file containing the valid definition of the dataSource element in the xml file
142

Creating mapping properties file
#spring.schemas http\://www.majrul.com/training/spring/customns.xsd=myspring.xsd
#spring.handlers http\://www.majrul.com/training/spring/customns=CustomNamespaceHandler
spring.schemas file contains the mapping of the logical uri to a physical xsd file which the parser needs for validation spring.handlers contains the name of the Java class which will process the namespace Both the files should be placed in META-INF directory
143
The namespace handler class
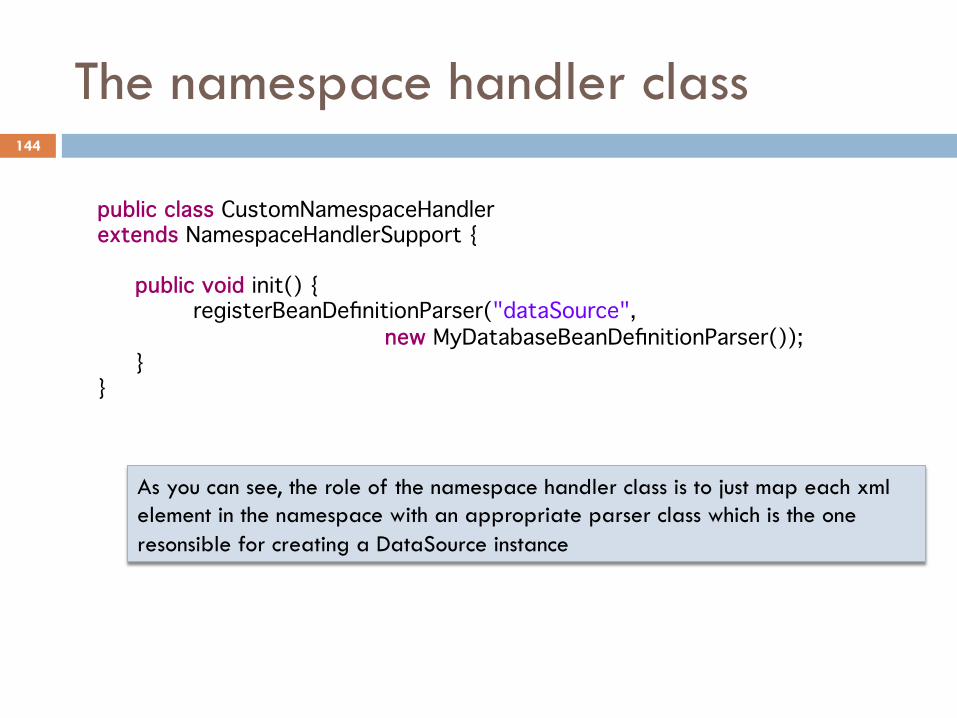
public class CustomNamespaceHandler extends NamespaceHandlerSupport {
public void init() { registerBeanDefinitionParser("dataSource", new MyDatabaseBeanDefinitionParser()); }
}
As you can see, the role of the namespace handler class is to just map each xml element in the namespace with an appropriate parser class which is the one resonsible for creating a DataSource instance
144
The Parser class
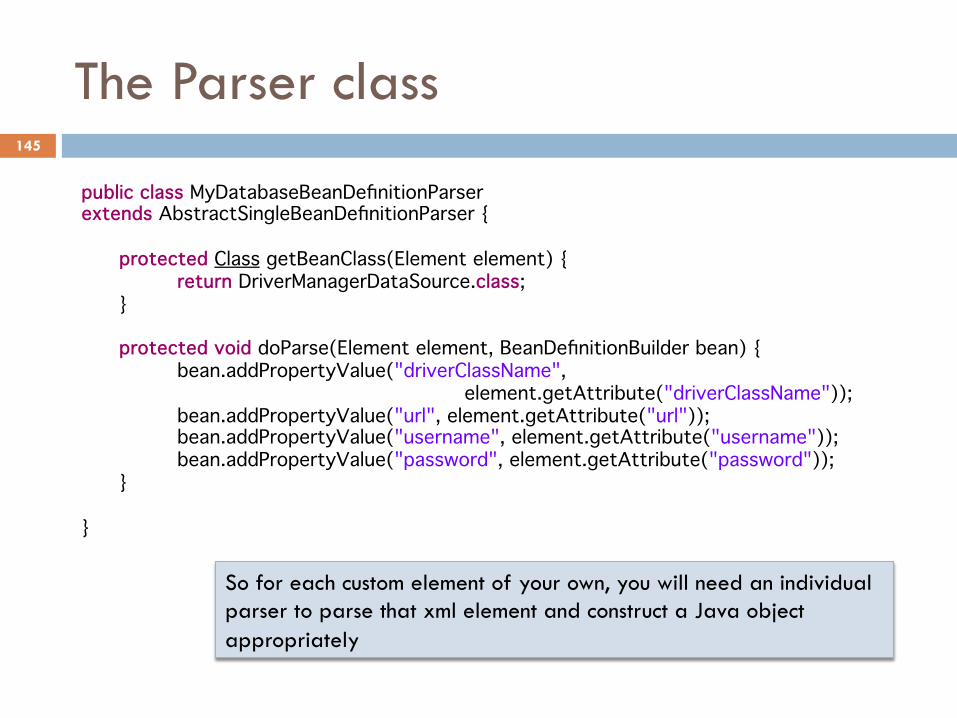
public class MyDatabaseBeanDefinitionParser extends AbstractSingleBeanDefinitionParser {
protected Class getBeanClass(Element element) { return DriverManagerDataSource.class; }
protected void doParse(Element element, BeanDefinitionBuilder bean) { bean.addPropertyValue("driverClassName", element.getAttribute("driverClassName")); bean.addPropertyValue("url", element.getAttribute("url")); bean.addPropertyValue("username", element.getAttribute("username")); bean.addPropertyValue("password", element.getAttribute("password")); }
}
So for each custom element of your own, you will need an individual parser to parse that xml element and construct a Java object appropriately
145
Lab No. 3
Spring 3.x and lifecyle management
Refer to the lab guide provided along with the eclipse project to proceed further
146
Topics in this session
¨ Creating Multiple ApplicationContexts ¨ Spring’s support for:
¤ I18N ¤ Unit Testing
147
Topics in this session
¨ Creating Multiple ApplicationContexts ¨ Spring’s support for:
¤ I18N ¤ Unit Testing
148
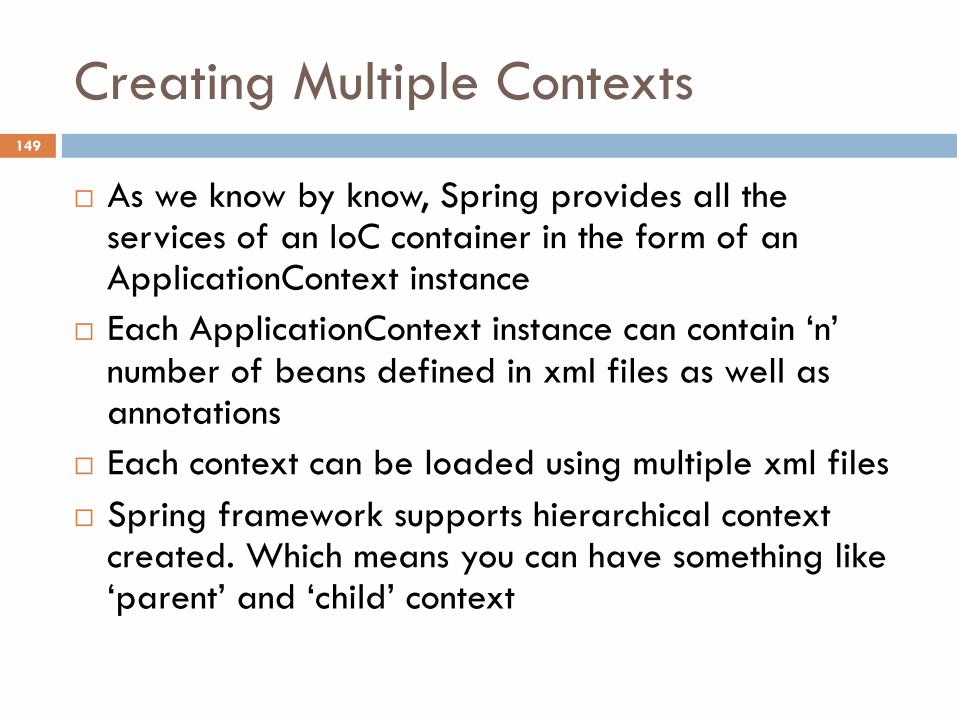
Creating Multiple Contexts
¨ As we know by know, Spring provides all the services of an IoC container in the form of an ApplicationContext instance
¨ Each ApplicationContext instance can contain ‘n’ number of beans defined in xml files as well as annotations
¨ Each context can be loaded using multiple xml files ¨ Spring framework supports hierarchical context
created. Which means you can have something like ‘parent’ and ‘child’ context
149
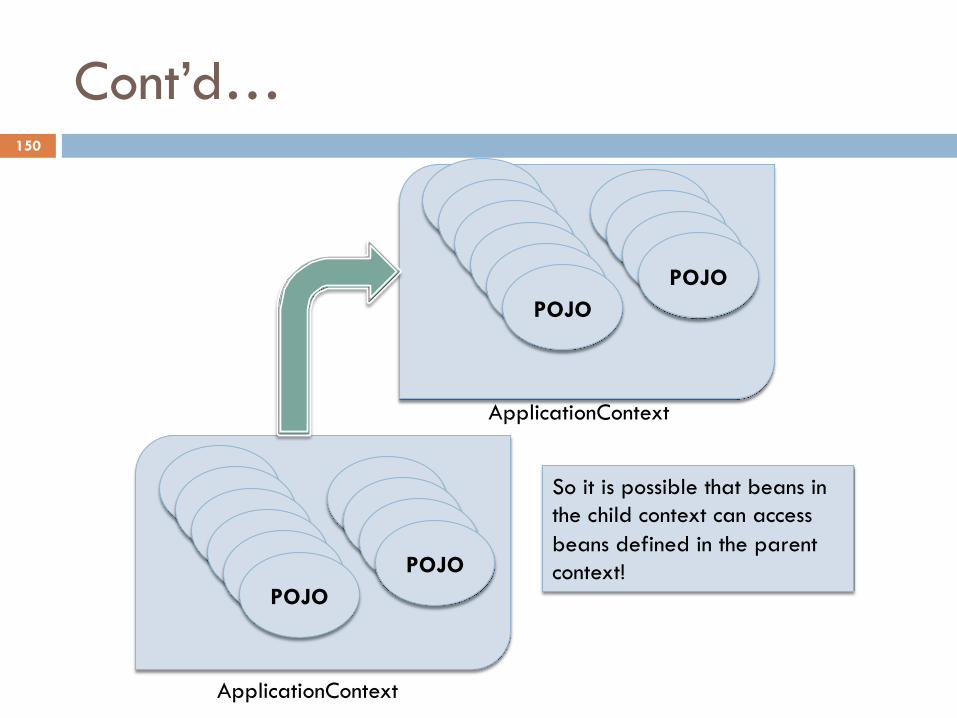
Cont’d…
ApplicationContext
POJO POJO
POJO POJO
POJO POJO
POJO POJO
POJO POJO
ApplicationContext
POJO POJO
POJO POJO
POJO POJO
POJO POJO
POJO POJO
So it is possible that beans in the child context can access beans defined in the parent context!
150
Example
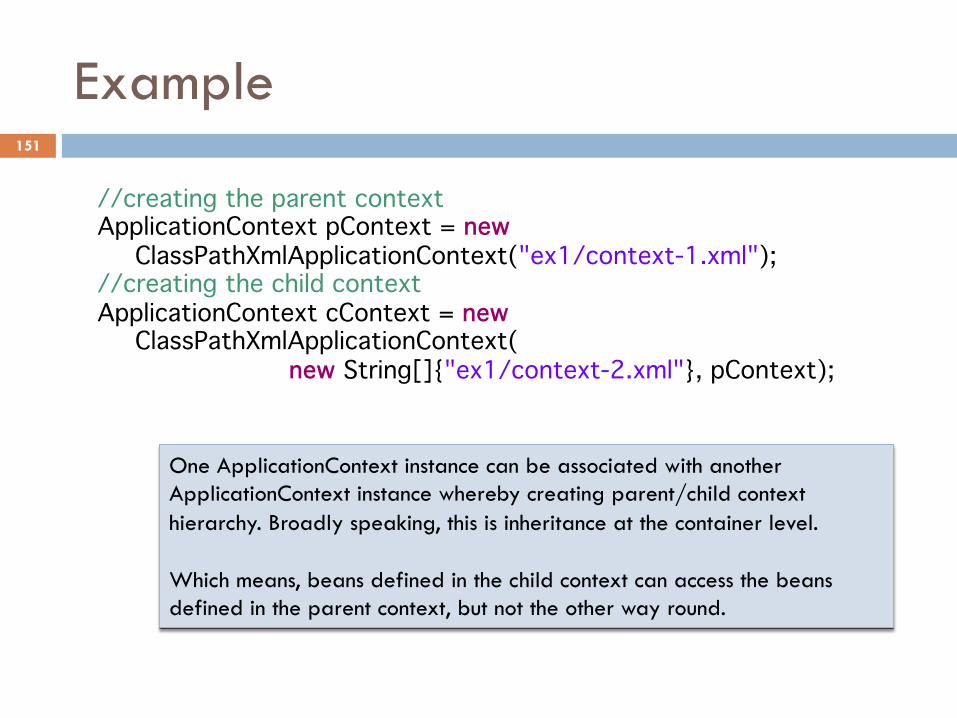
//creating the parent context ApplicationContext pContext = new
ClassPathXmlApplicationContext("ex1/context-1.xml"); //creating the child context ApplicationContext cContext = new
ClassPathXmlApplicationContext( new String[]{"ex1/context-2.xml"}, pContext);
One ApplicationContext instance can be associated with another ApplicationContext instance whereby creating parent/child context hierarchy. Broadly speaking, this is inheritance at the container level. Which means, beans defined in the child context can access the beans defined in the parent context, but not the other way round.
151
The xml configuration
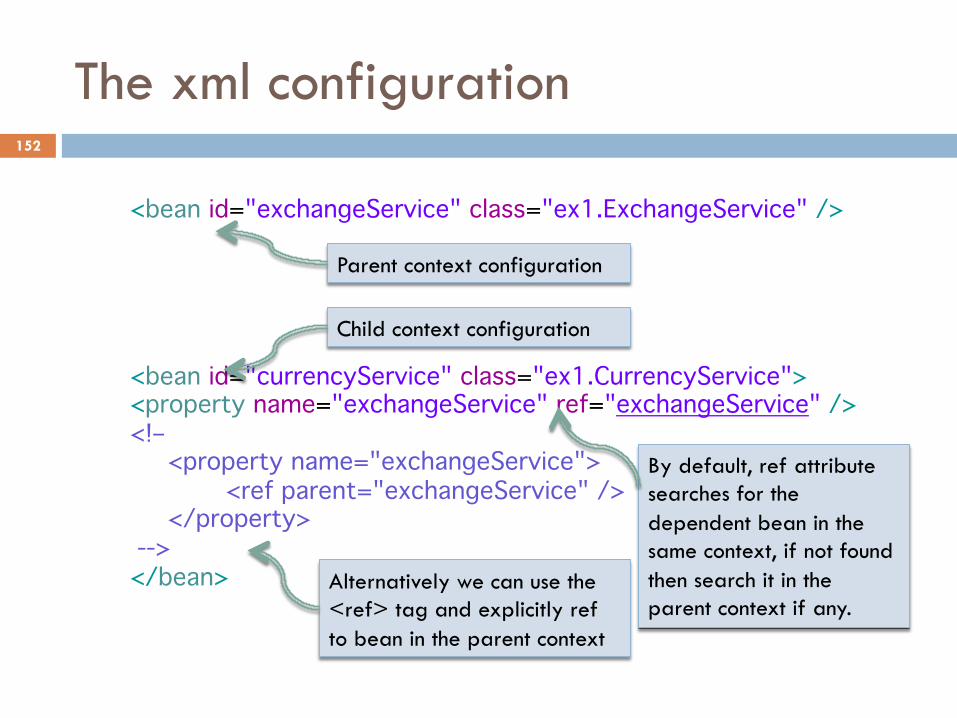
<bean id="exchangeService" class="ex1.ExchangeService" />
<bean id="currencyService" class="ex1.CurrencyService"> <property name="exchangeService" ref="exchangeService" /> <!–
<property name="exchangeService"> <ref parent="exchangeService" /> </property>
--> </bean>
Parent context configuration
Child context configuration
By default, ref attribute searches for the dependent bean in the same context, if not found then search it in the parent context if any.
Alternatively we can use the <ref> tag and explicitly ref to bean in the parent context
152
Topics in this session
¨ Creating Multiple ApplicationContexts ¨ Spring’s support for:
¤ I18N ¤ Unit Testing
153
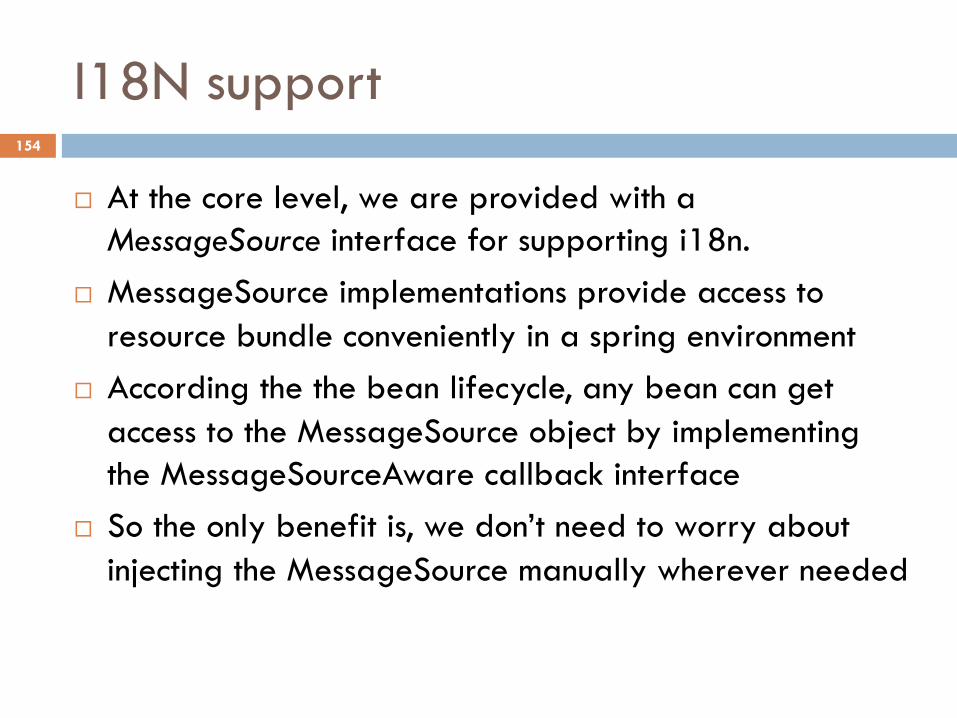
I18N support
¨ At the core level, we are provided with a MessageSource interface for supporting i18n.
¨ MessageSource implementations provide access to resource bundle conveniently in a spring environment
¨ According the the bean lifecycle, any bean can get access to the MessageSource object by implementing the MessageSourceAware callback interface
¨ So the only benefit is, we don’t need to worry about injecting the MessageSource manually wherever needed
154
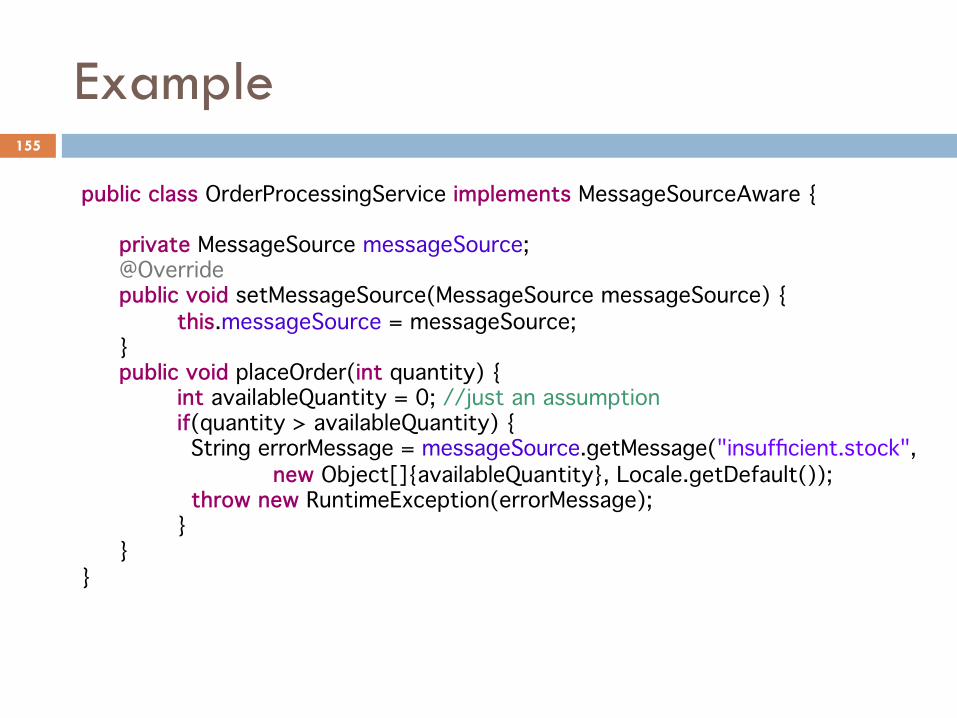
Example
public class OrderProcessingService implements MessageSourceAware {
private MessageSource messageSource; @Override public void setMessageSource(MessageSource messageSource) { this.messageSource = messageSource; } public void placeOrder(int quantity) { int availableQuantity = 0; //just an assumption if(quantity > availableQuantity) { String errorMessage = messageSource.getMessage("insufficient.stock", new Object[]{availableQuantity}, Locale.getDefault()); throw new RuntimeException(errorMessage); } }
}
155
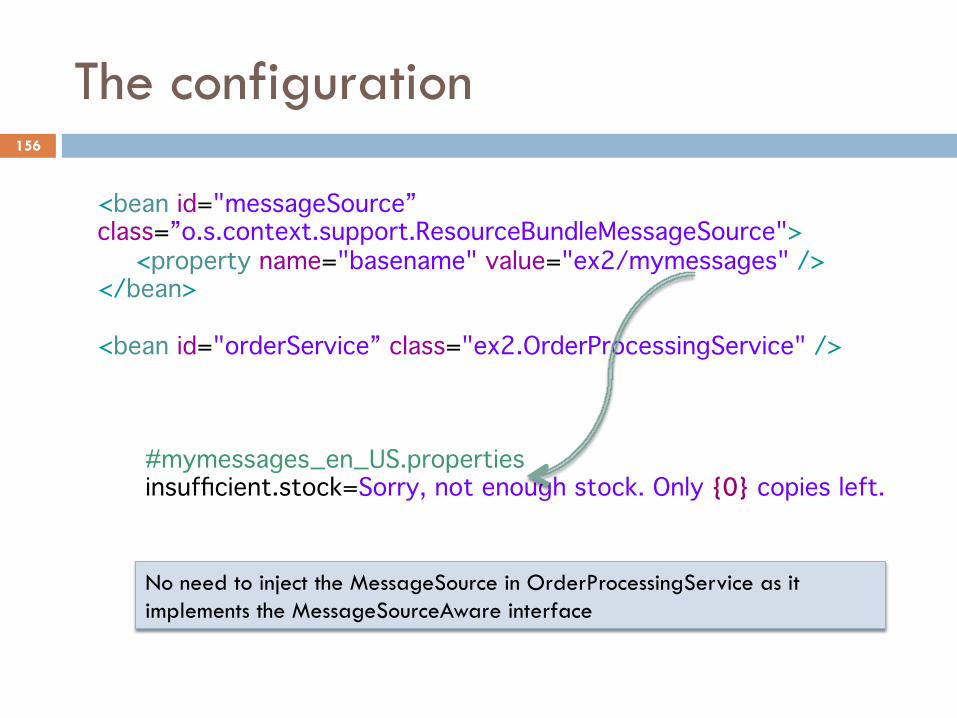
The configuration
<bean id="messageSource” class=”o.s.context.support.ResourceBundleMessageSource">
<property name="basename" value="ex2/mymessages" /> </bean>
<bean id="orderService” class="ex2.OrderProcessingService" />
#mymessages_en_US.properties insufficient.stock=Sorry, not enough stock. Only {0} copies left.
No need to inject the MessageSource in OrderProcessingService as it implements the MessageSourceAware interface
156
Topics in this session
¨ Creating Multiple ApplicationContexts ¨ Spring’s support for:
¤ I18N ¤ Unit Testing
157

Unit Testing support
¨ Spring is one of the frameworks which realized the importance unit testing and provided early support for the same.
¨ The intention is to make the core container capabilities accessible to test cases, i.e. Dependency Injection
¨ Unfortunately all the facilities provided by Spring are available only for Spring managed objects.
¨ JUnit test cases aren’t managed by Spring so it’s not directly possible, but it can be achieved!
158
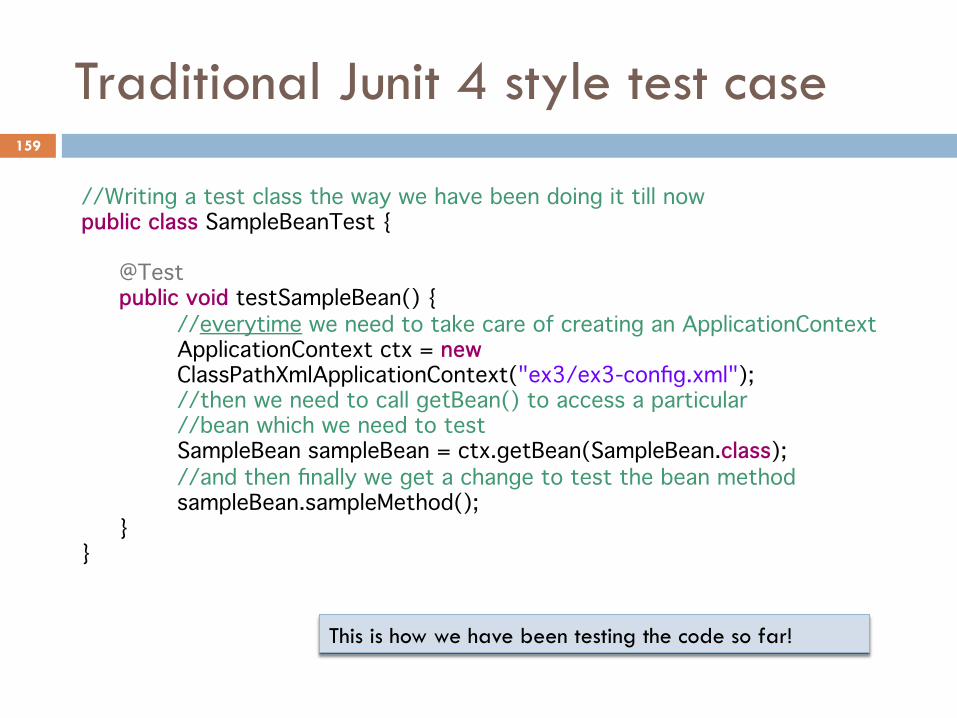
Traditional Junit 4 style test case
//Writing a test class the way we have been doing it till now public class SampleBeanTest {
@Test public void testSampleBean() { //everytime we need to take care of creating an ApplicationContext ApplicationContext ctx = new ClassPathXmlApplicationContext("ex3/ex3-config.xml"); //then we need to call getBean() to access a particular //bean which we need to test SampleBean sampleBean = ctx.getBean(SampleBean.class); //and then finally we get a change to test the bean method sampleBean.sampleMethod(); }
}
This is how we have been testing the code so far!
159
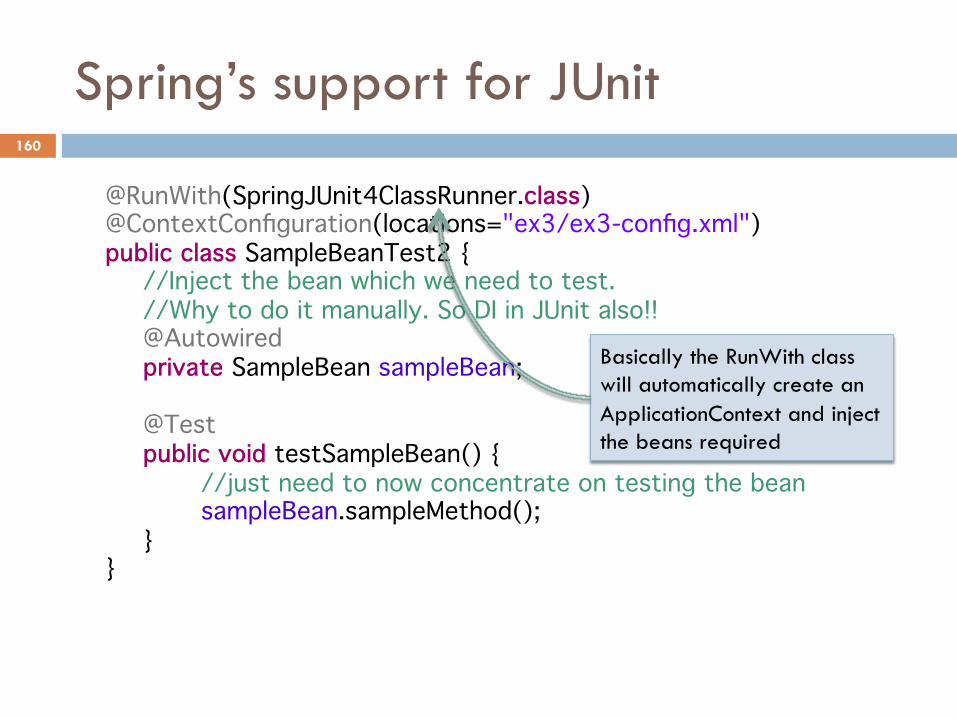
Spring’s support for JUnit
@RunWith(SpringJUnit4ClassRunner.class) @ContextConfiguration(locations="ex3/ex3-config.xml") public class SampleBeanTest2 {
//Inject the bean which we need to test. //Why to do it manually. So DI in JUnit also!! @Autowired private SampleBean sampleBean;
@Test public void testSampleBean() { //just need to now concentrate on testing the bean sampleBean.sampleMethod(); }
}
Basically the RunWith class will automatically create an ApplicationContext and inject the beans required
160
Lab No. 4
Some more examples on Spring
Refer to the lab guide provided along with the eclipse project to proceed further
161
Topics in this Session
¨ Introduction to AOP ¨ What is an Aspect? ¨ Spring’s support for AOP
¤ Proxy based ¤ Weaving
¨ Spring and AspectJ relationship ¨ Pointcuts, Joinpoints and other terminologies ¨ Different types of Aspects
¤ Before, After, AfterReturning, AfterThrowing, Around
162
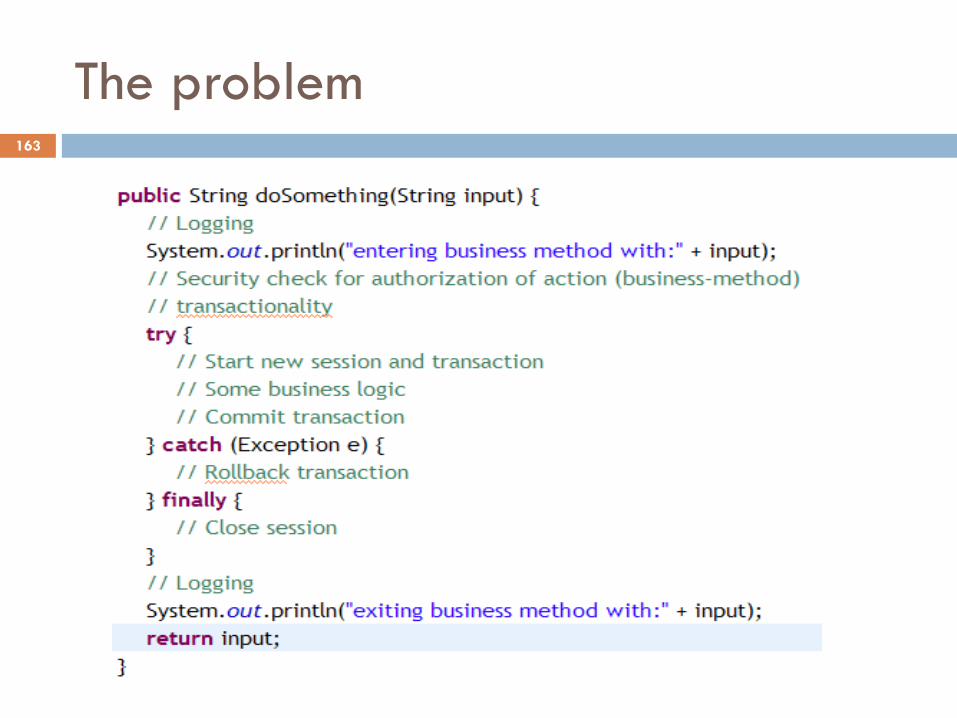
The problem 163
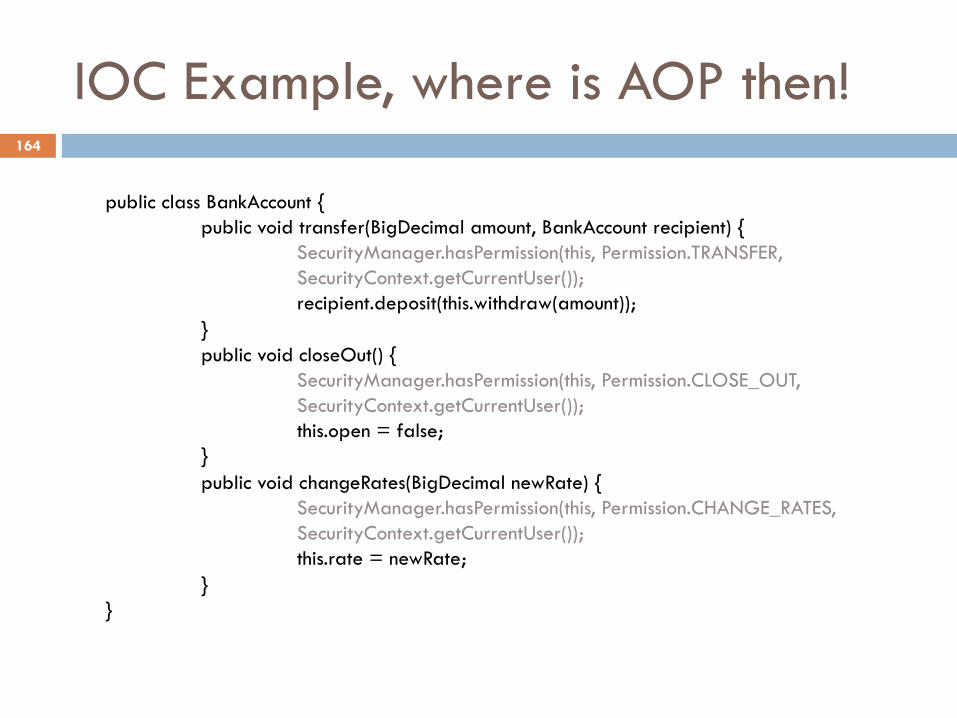
IOC Example, where is AOP then!
public class BankAccount { public void transfer(BigDecimal amount, BankAccount recipient) { SecurityManager.hasPermission(this, Permission.TRANSFER, SecurityContext.getCurrentUser()); recipient.deposit(this.withdraw(amount)); } public void closeOut() { SecurityManager.hasPermission(this, Permission.CLOSE_OUT, SecurityContext.getCurrentUser()); this.open = false; } public void changeRates(BigDecimal newRate) { SecurityManager.hasPermission(this, Permission.CHANGE_RATES, SecurityContext.getCurrentUser()); this.rate = newRate; }
}
164
Identifying repetitive code
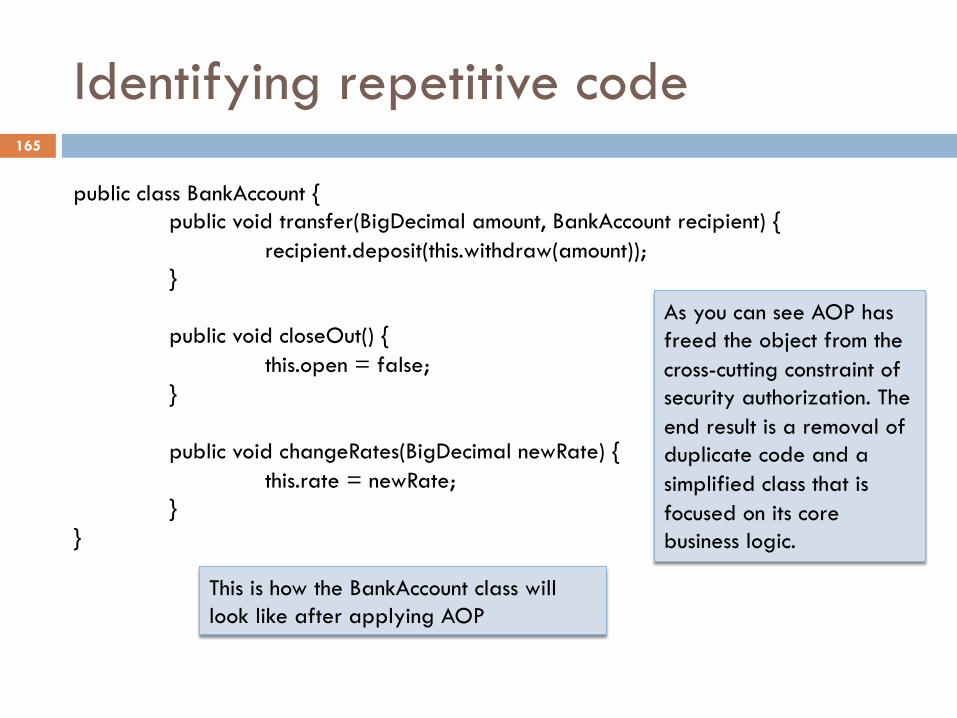
public class BankAccount { public void transfer(BigDecimal amount, BankAccount recipient) { recipient.deposit(this.withdraw(amount)); }
public void closeOut() { this.open = false; } public void changeRates(BigDecimal newRate) { this.rate = newRate; }
}
As you can see AOP has freed the object from the cross-cutting constraint of security authorization. The end result is a removal of duplicate code and a simplified class that is focused on its core business logic.
This is how the BankAccount class will look like after applying AOP
165
Cont’d…
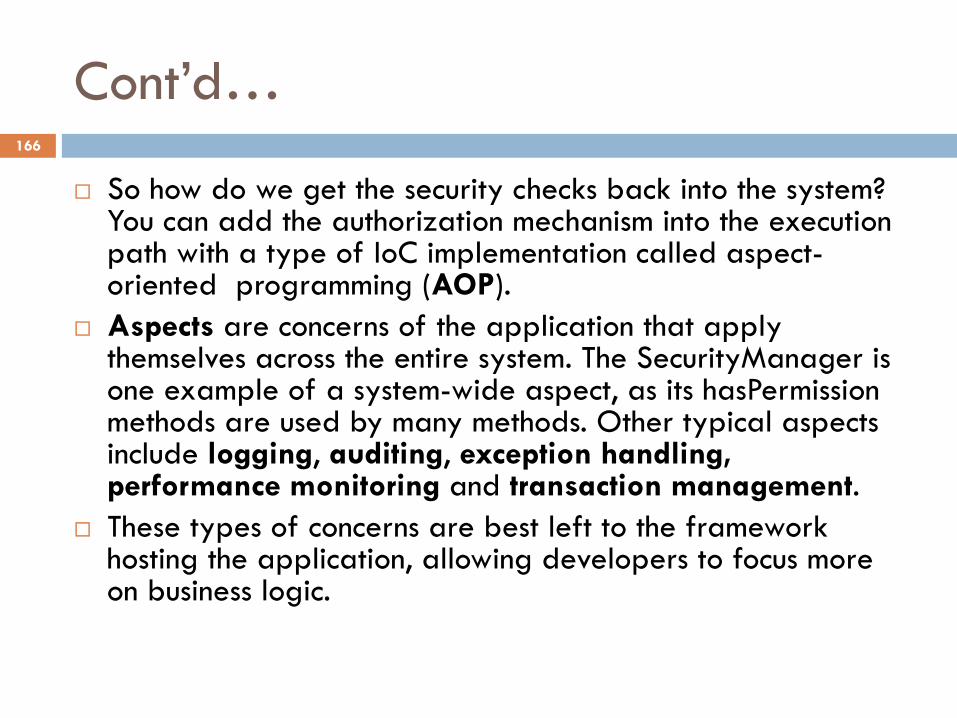
¨ So how do we get the security checks back into the system? You can add the authorization mechanism into the execution path with a type of IoC implementation called aspect-oriented programming (AOP).
¨ Aspects are concerns of the application that apply themselves across the entire system. The SecurityManager is one example of a system-wide aspect, as its hasPermission methods are used by many methods. Other typical aspects include logging, auditing, exception handling, performance monitoring and transaction management.
¨ These types of concerns are best left to the framework hosting the application, allowing developers to focus more on business logic.
166
Cont’d…
¨ An AOP framework, such as Spring AOP, will interject (also called weaving) aspect code transparently into your domain model at runtime or compile time. This means that while we may have removed calls to the SecurityManager from the BankAccount class, the deleted code will still be executed in the AOP framework
¨ The beauty of this technique is that both the domain model (the BankAccount) and any client of the code are unaware of this enhancement to the code.
167
Different AOP implementations
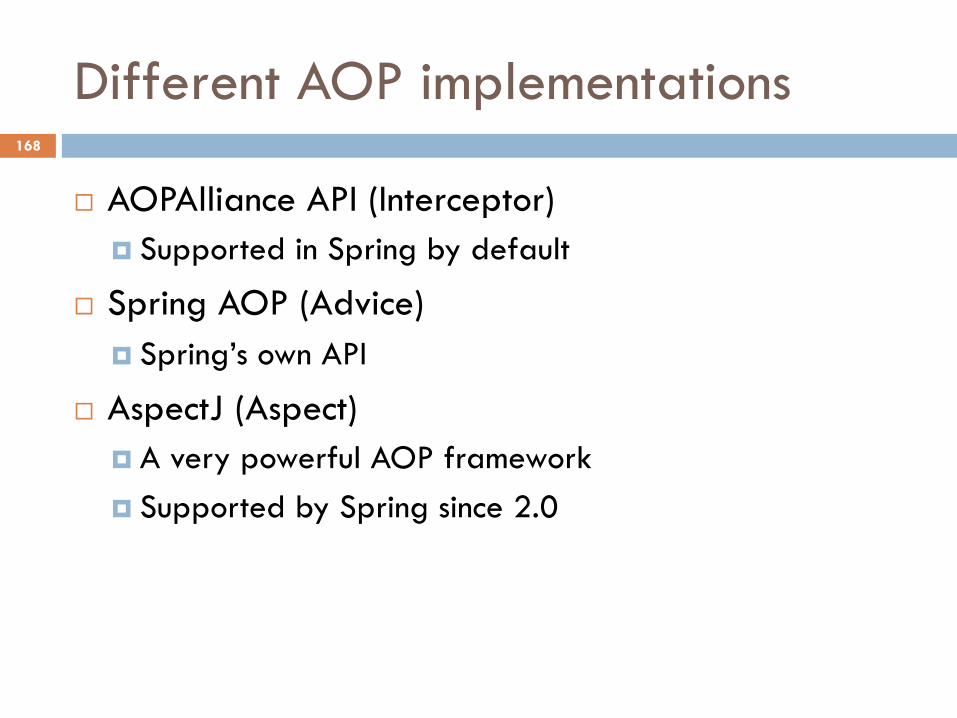
¨ AOPAlliance API (Interceptor) ¤ Supported in Spring by default
¨ Spring AOP (Advice) ¤ Spring’s own API
¨ AspectJ (Aspect) ¤ A very powerful AOP framework ¤ Supported by Spring since 2.0
168
Spring’s dynamic proxies for AOP
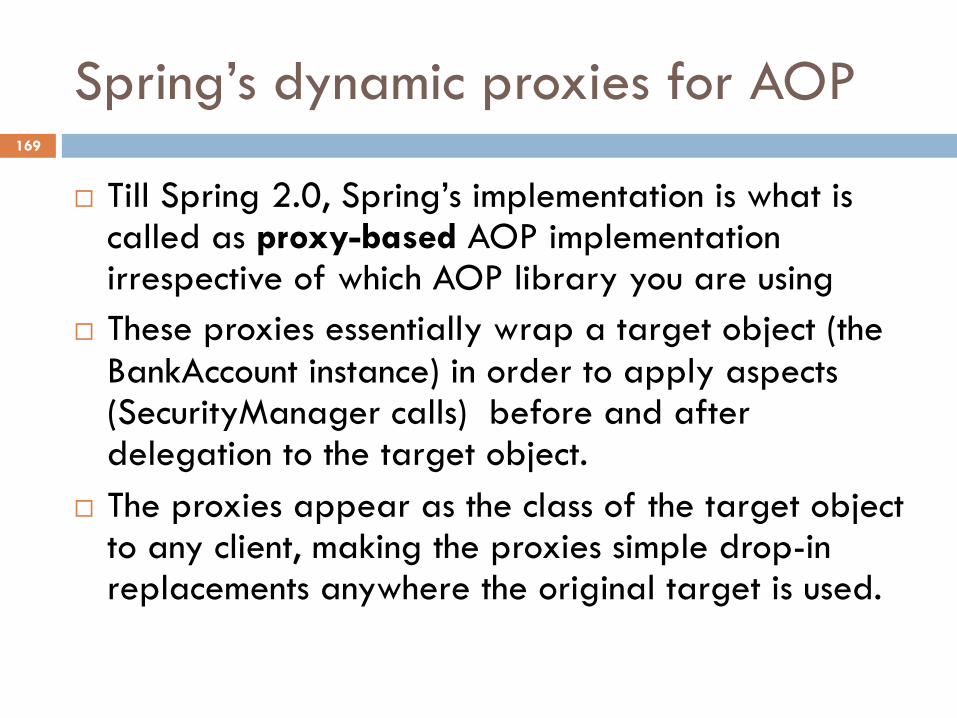
¨ Till Spring 2.0, Spring’s implementation is what is called as proxy-based AOP implementation irrespective of which AOP library you are using
¨ These proxies essentially wrap a target object (the BankAccount instance) in order to apply aspects (SecurityManager calls) before and after delegation to the target object.
¨ The proxies appear as the class of the target object to any client, making the proxies simple drop-in replacements anywhere the original target is used.
169
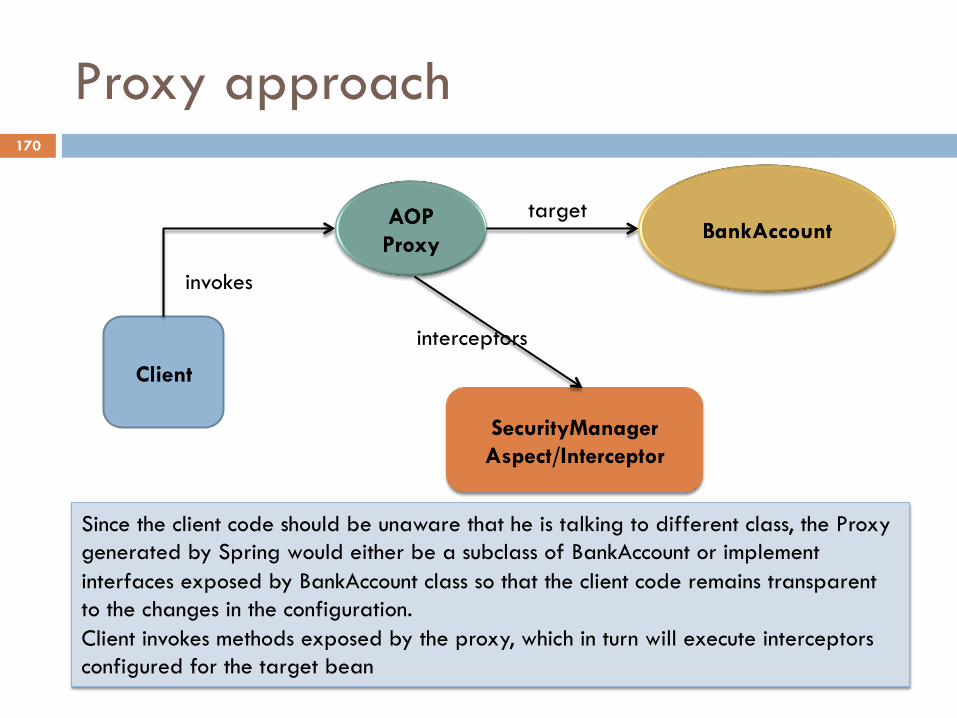
Proxy approach
SecurityManager Aspect/Interceptor
target
interceptors
Client
Since the client code should be unaware that he is talking to different class, the Proxy generated by Spring would either be a subclass of BankAccount or implement interfaces exposed by BankAccount class so that the client code remains transparent to the changes in the configuration. Client invokes methods exposed by the proxy, which in turn will execute interceptors configured for the target bean
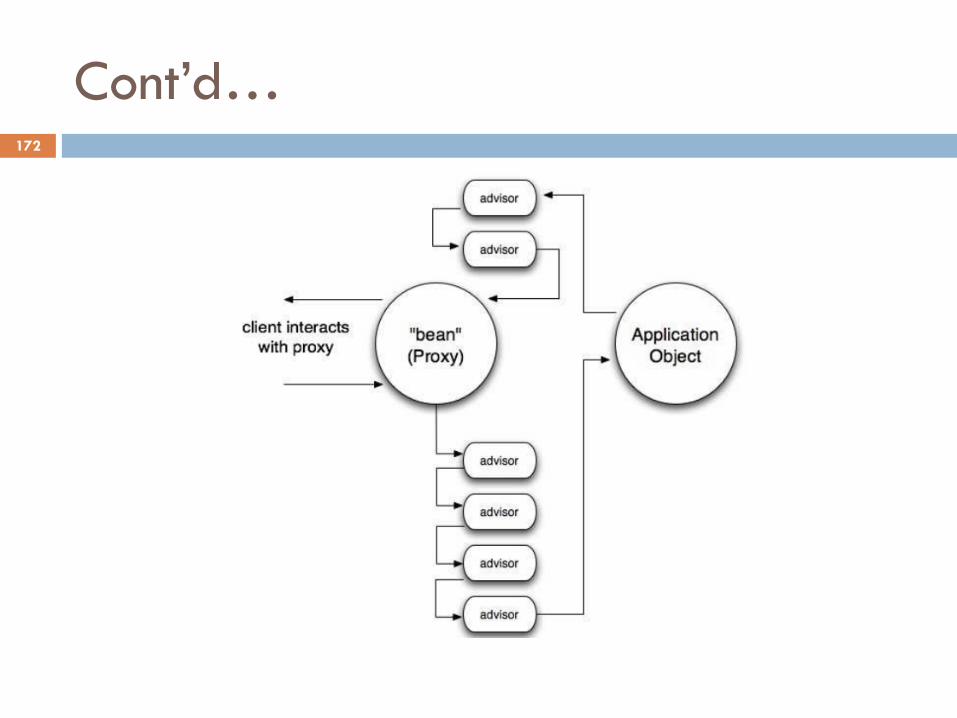
invokes
170
Cont’d…
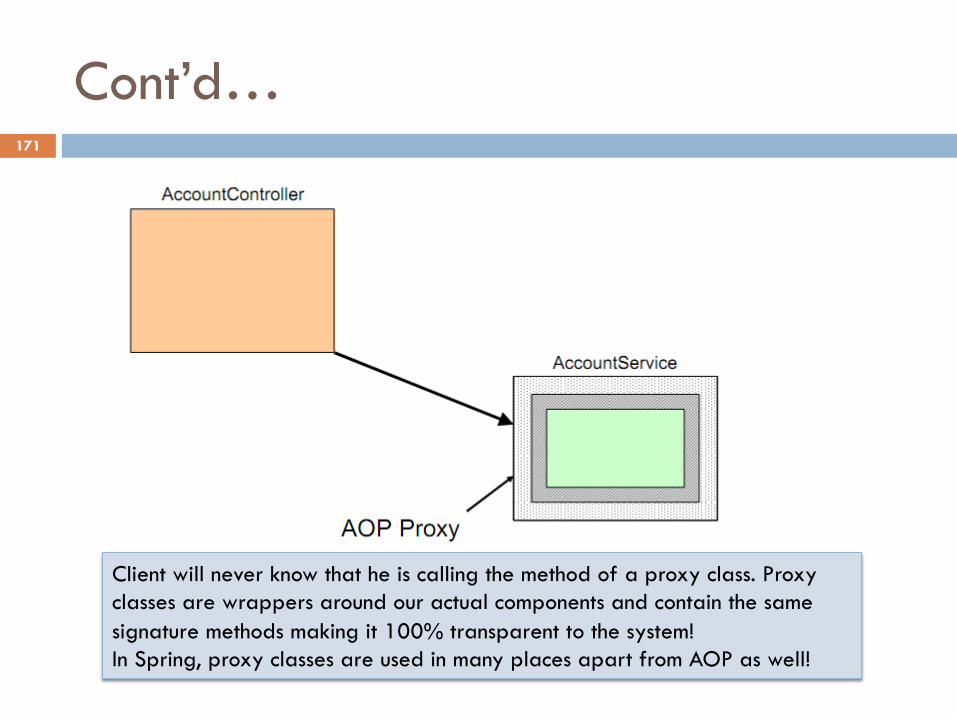
Client will never know that he is calling the method of a proxy class. Proxy classes are wrappers around our actual components and contain the same signature methods making it 100% transparent to the system! In Spring, proxy classes are used in many places apart from AOP as well!
171
Cont’d… 172

One more diagram 173
Weaving style of working with AOP
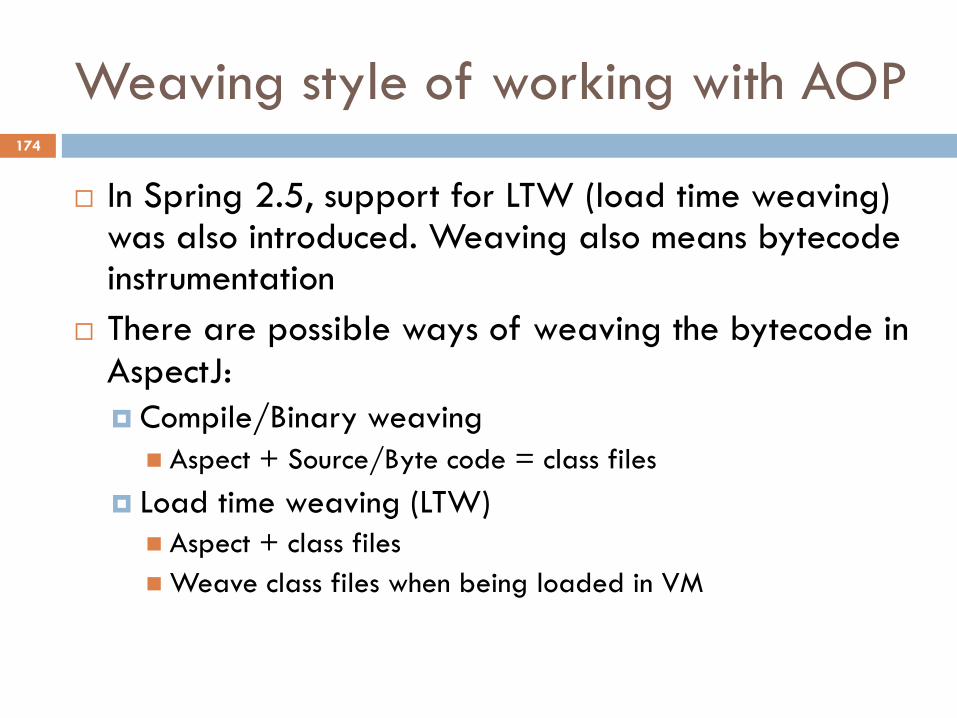
¨ In Spring 2.5, support for LTW (load time weaving) was also introduced. Weaving also means bytecode instrumentation
¨ There are possible ways of weaving the bytecode in AspectJ: ¤ Compile/Binary weaving
n Aspect + Source/Byte code = class files ¤ Load time weaving (LTW)
n Aspect + class files n Weave class files when being loaded in VM
174
AspectJ weaver
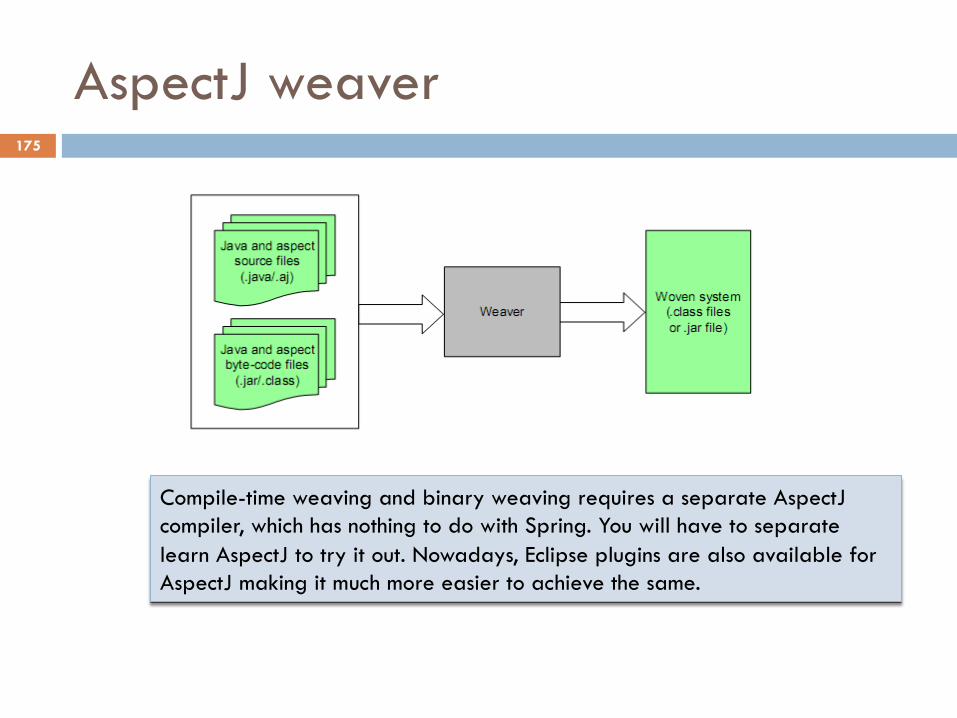
Compile-time weaving and binary weaving requires a separate AspectJ compiler, which has nothing to do with Spring. You will have to separate learn AspectJ to try it out. Nowadays, Eclipse plugins are also available for AspectJ making it much more easier to achieve the same.
175
Load time weaver
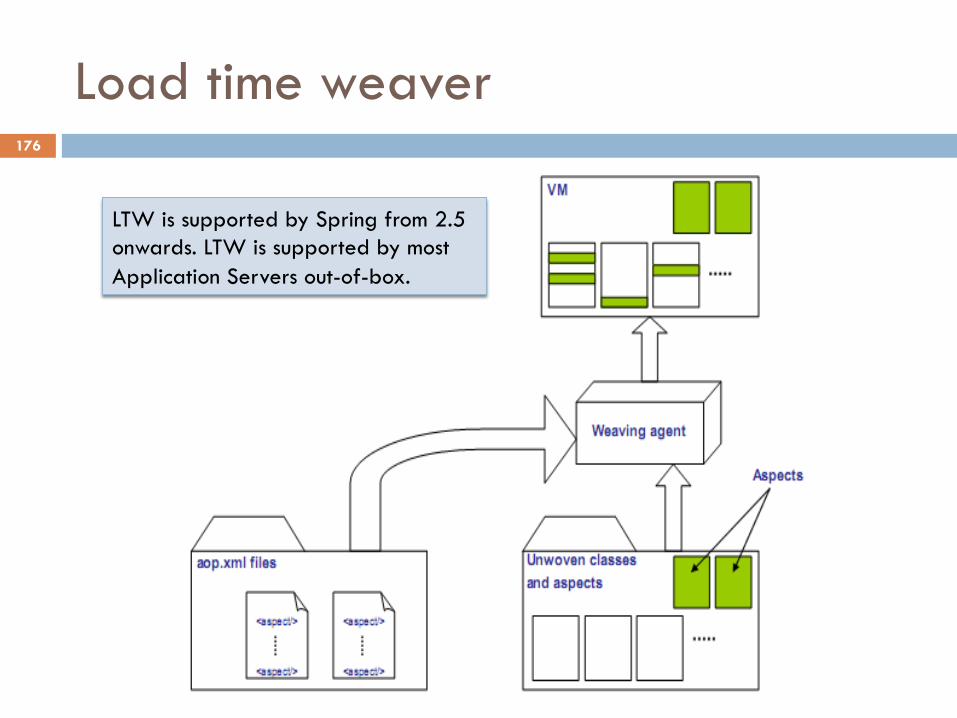
LTW is supported by Spring from 2.5 onwards. LTW is supported by most Application Servers out-of-box.
176
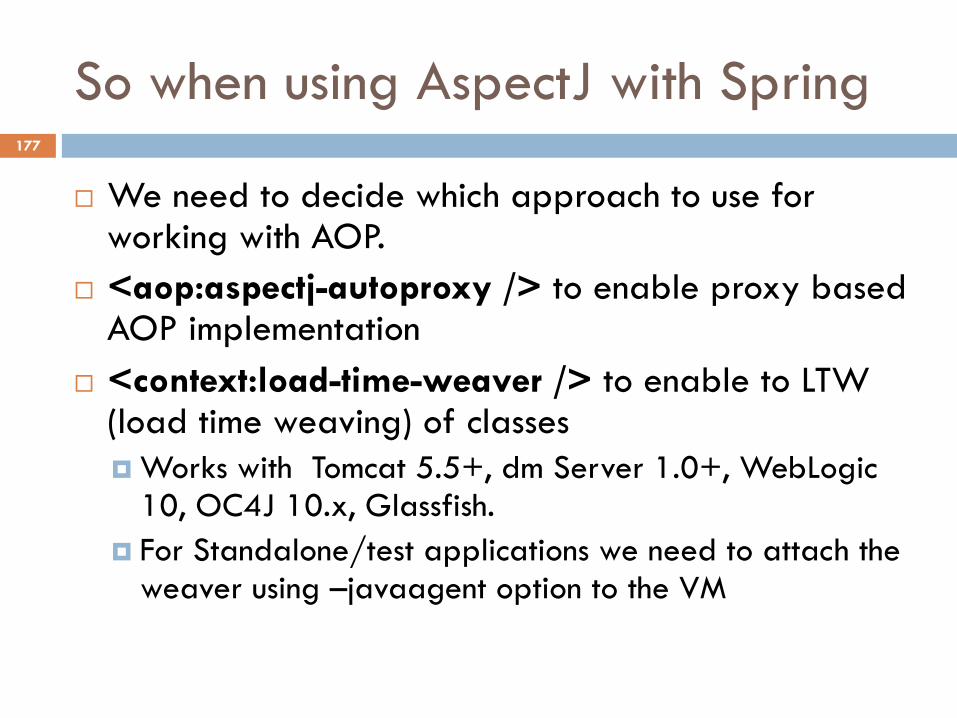
So when using AspectJ with Spring
¨ We need to decide which approach to use for working with AOP.
¨ <aop:aspectj-autoproxy /> to enable proxy based AOP implementation
¨ <context:load-time-weaver /> to enable to LTW (load time weaving) of classes ¤ Works with Tomcat 5.5+, dm Server 1.0+, WebLogic
10, OC4J 10.x, Glassfish. ¤ For Standalone/test applications we need to attach the
weaver using –javaagent option to the VM
177
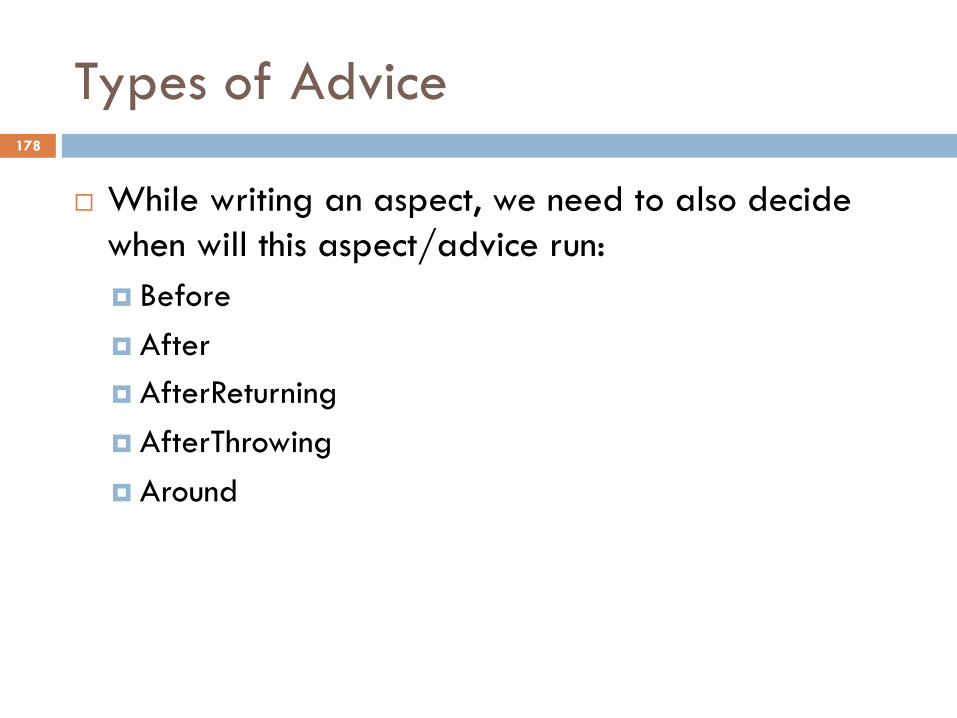
Types of Advice
¨ While writing an aspect, we need to also decide when will this aspect/advice run: ¤ Before ¤ After ¤ AfterReturning ¤ AfterThrowing ¤ Around
178
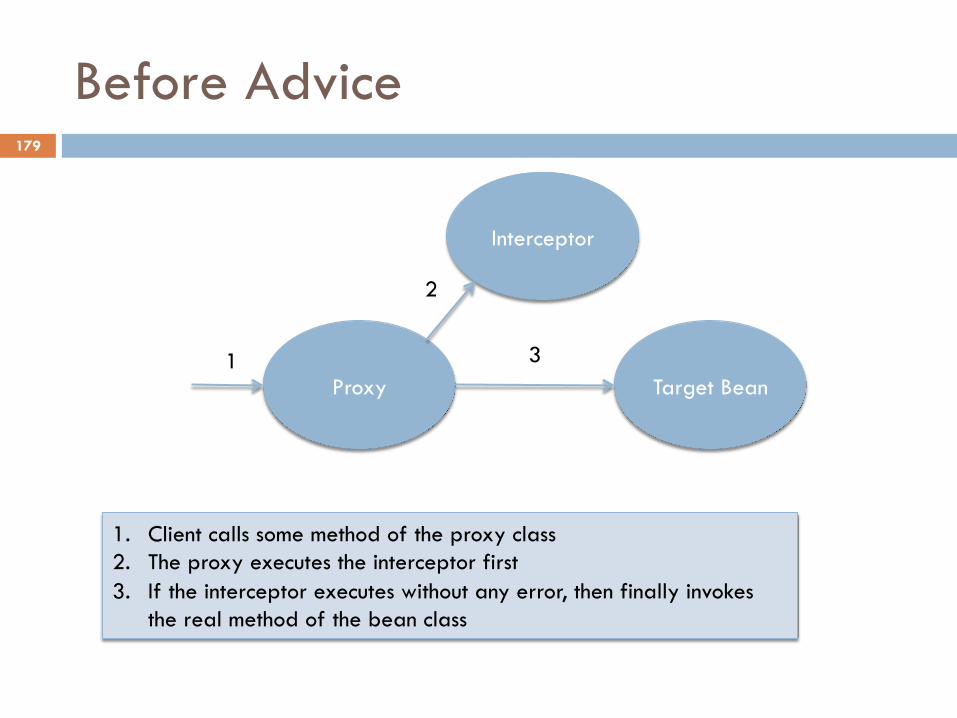
Before Advice
Proxy
Interceptor
Target Bean
1. Client calls some method of the proxy class 2. The proxy executes the interceptor first 3. If the interceptor executes without any error, then finally invokes
the real method of the bean class
1
2
3
179
After Advice
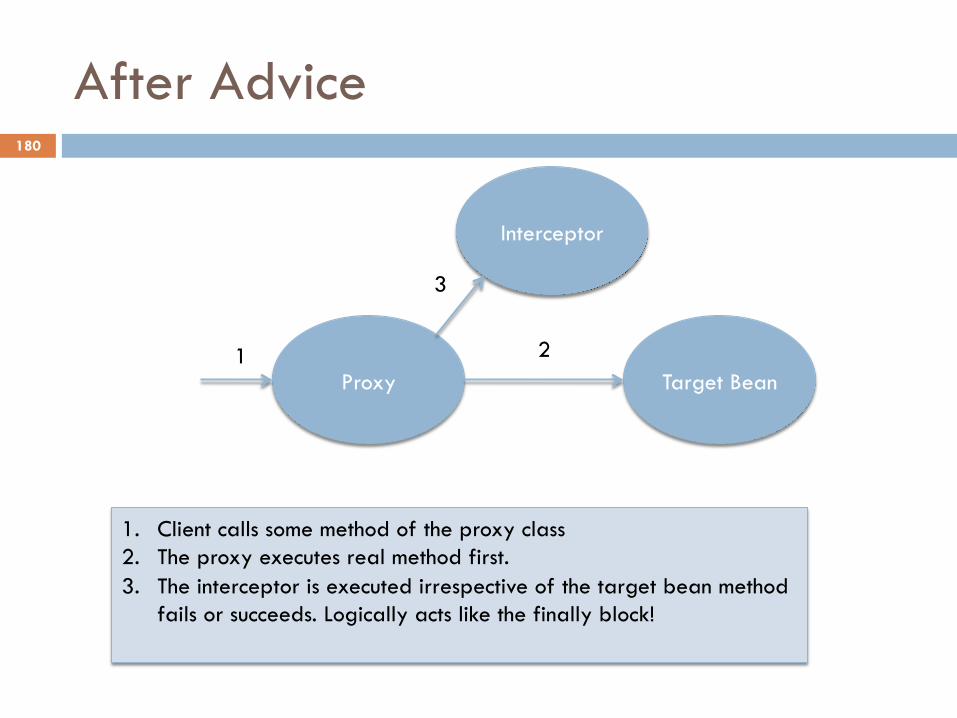
Proxy
Interceptor
Target Bean
1. Client calls some method of the proxy class 2. The proxy executes real method first. 3. The interceptor is executed irrespective of the target bean method
fails or succeeds. Logically acts like the finally block!
1
3
2
180
AfterReturning Advice
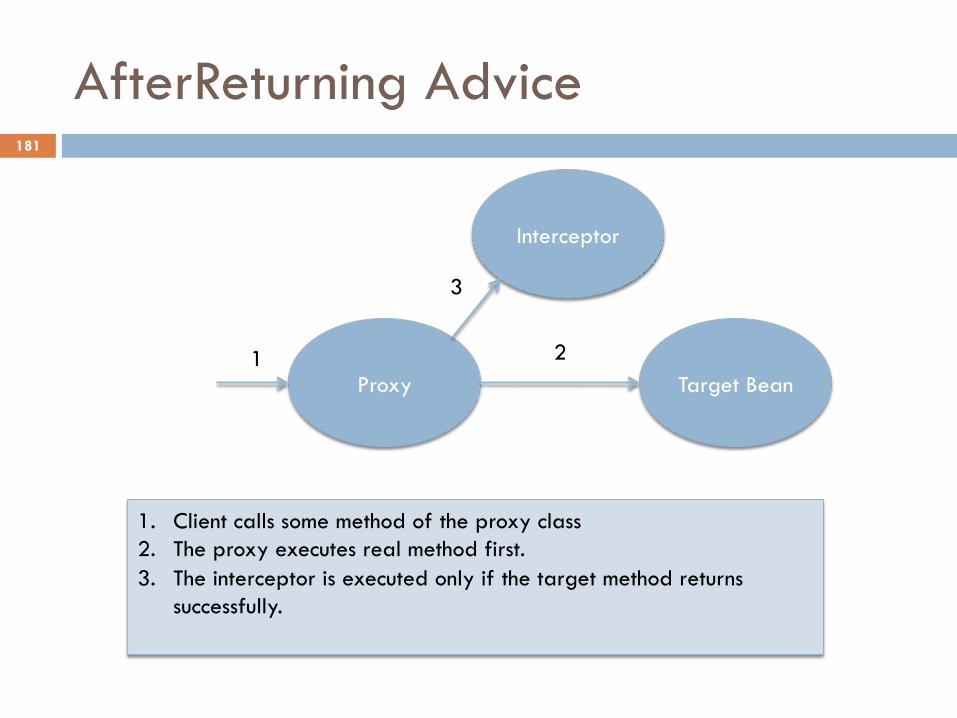
Proxy
Interceptor
Target Bean
1. Client calls some method of the proxy class 2. The proxy executes real method first. 3. The interceptor is executed only if the target method returns
successfully.
1
3
2
181
AfterThrowing Advice
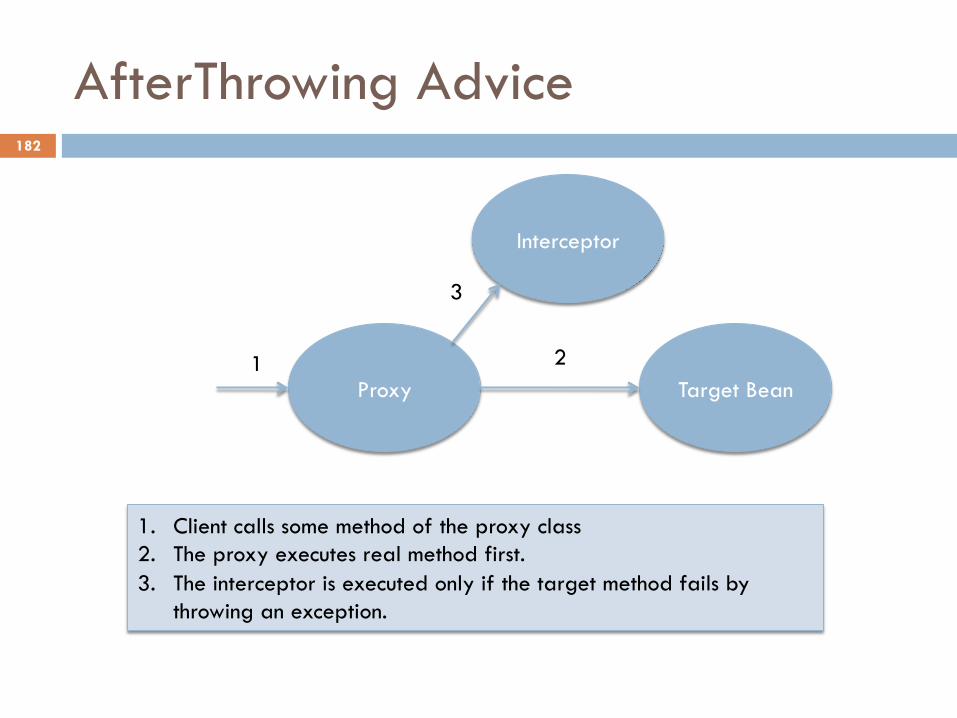
Proxy
Interceptor
Target Bean
1. Client calls some method of the proxy class 2. The proxy executes real method first. 3. The interceptor is executed only if the target method fails by
throwing an exception.
1
3
2
182
Around Advice
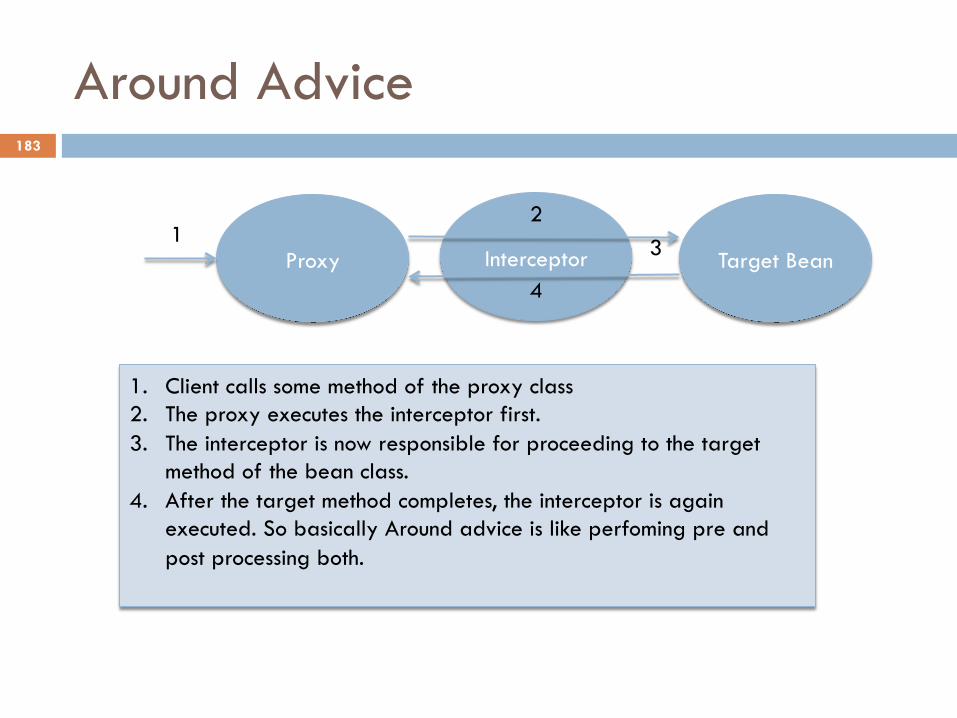
Proxy Interceptor Target Bean
1. Client calls some method of the proxy class 2. The proxy executes the interceptor first. 3. The interceptor is now responsible for proceeding to the target
method of the bean class. 4. After the target method completes, the interceptor is again
executed. So basically Around advice is like perfoming pre and post processing both.
1 3 2
4
183
AOP terminologies
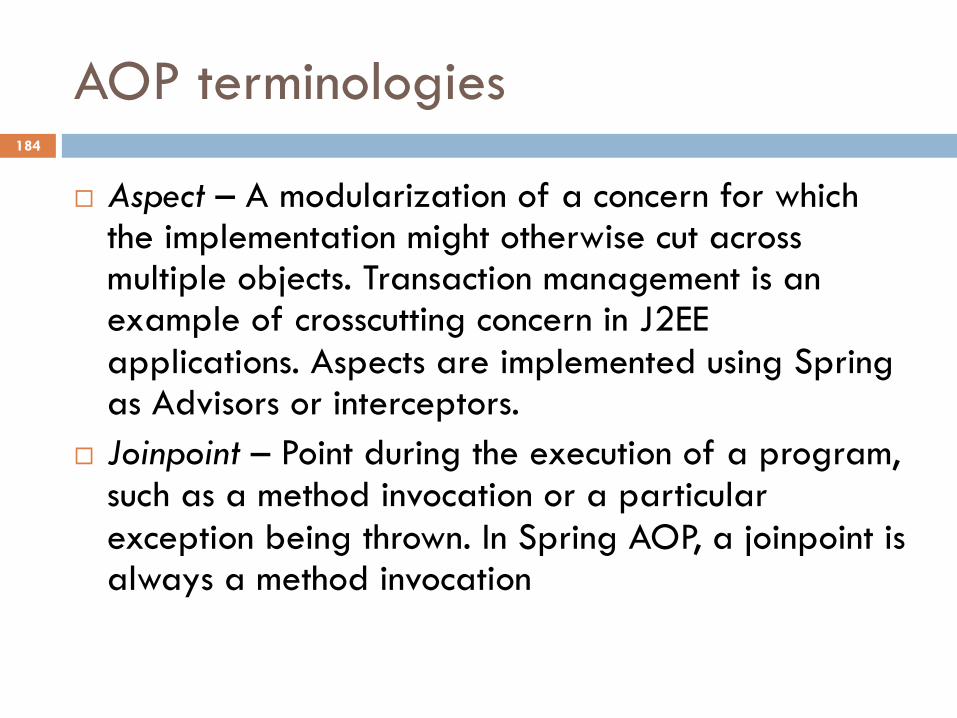
¨ Aspect – A modularization of a concern for which the implementation might otherwise cut across multiple objects. Transaction management is an example of crosscutting concern in J2EE applications. Aspects are implemented using Spring as Advisors or interceptors.
¨ Joinpoint – Point during the execution of a program, such as a method invocation or a particular exception being thrown. In Spring AOP, a joinpoint is always a method invocation
184
Cont’d…
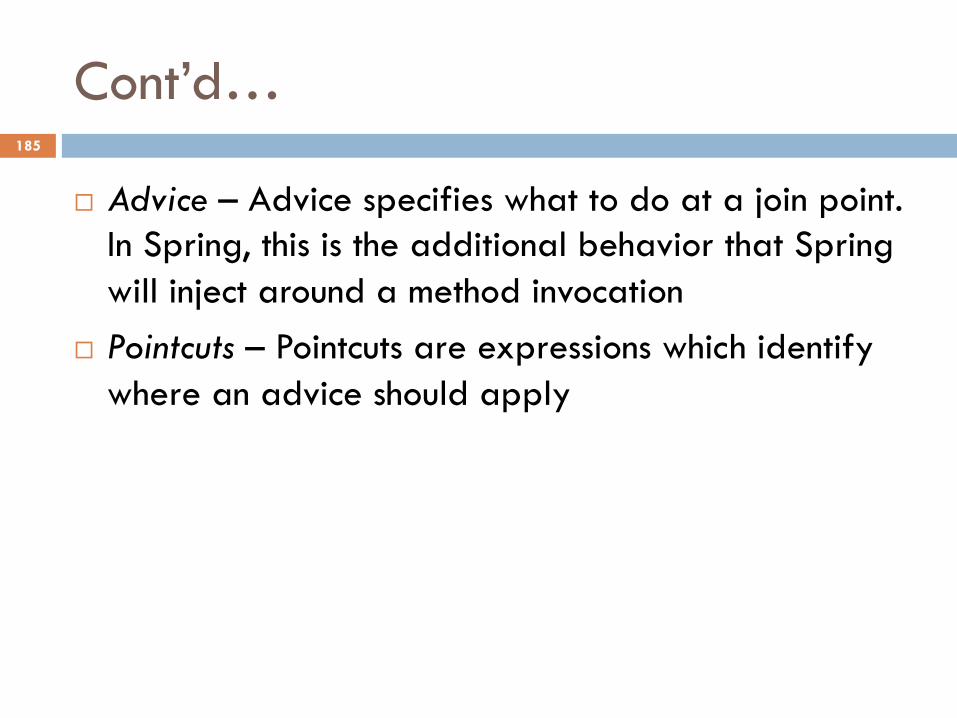
¨ Advice – Advice specifies what to do at a join point. In Spring, this is the additional behavior that Spring will inject around a method invocation
¨ Pointcuts – Pointcuts are expressions which identify where an advice should apply
185

Example
Log a message everytime, before a method is called..
Steps to be followed: 1. Write a class which will contain the common logging code. This called will be called as Aspect. 2. Either in xml or annotations, we will have to configure a pointcut, to specify when(before) and where(for all the beans or only a few or only for a particular method pattern) this aspect will apply.
186
The Aspect class
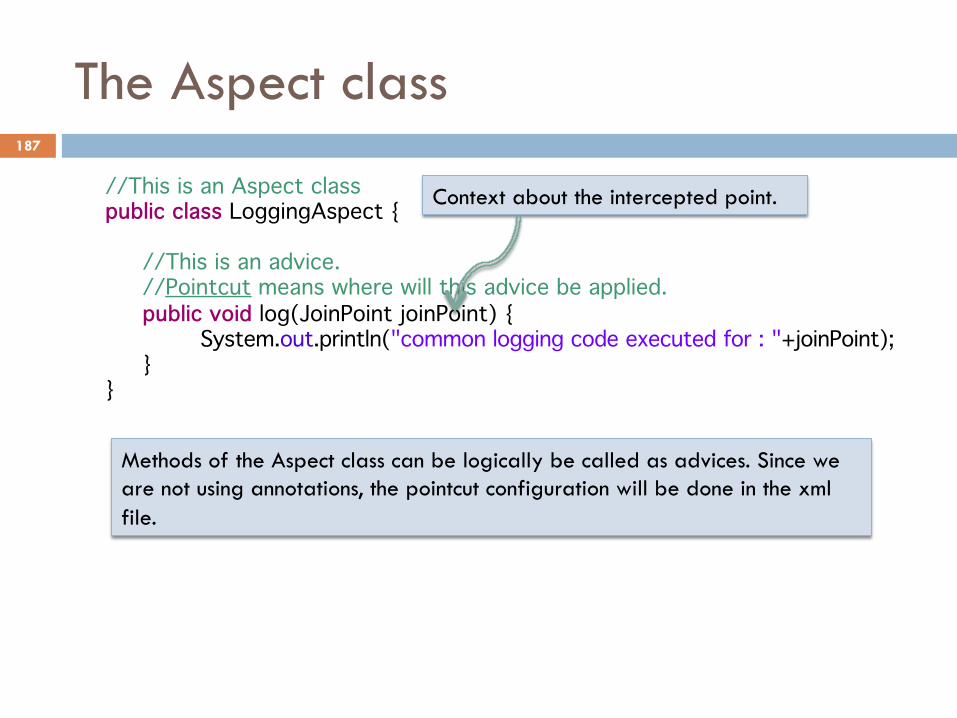
//This is an Aspect class public class LoggingAspect {
//This is an advice. //Pointcut means where will this advice be applied. public void log(JoinPoint joinPoint) { System.out.println("common logging code executed for : "+joinPoint); }
}
Methods of the Aspect class can be logically be called as advices. Since we are not using annotations, the pointcut configuration will be done in the xml file.
Context about the intercepted point.
187
The Sample bean class
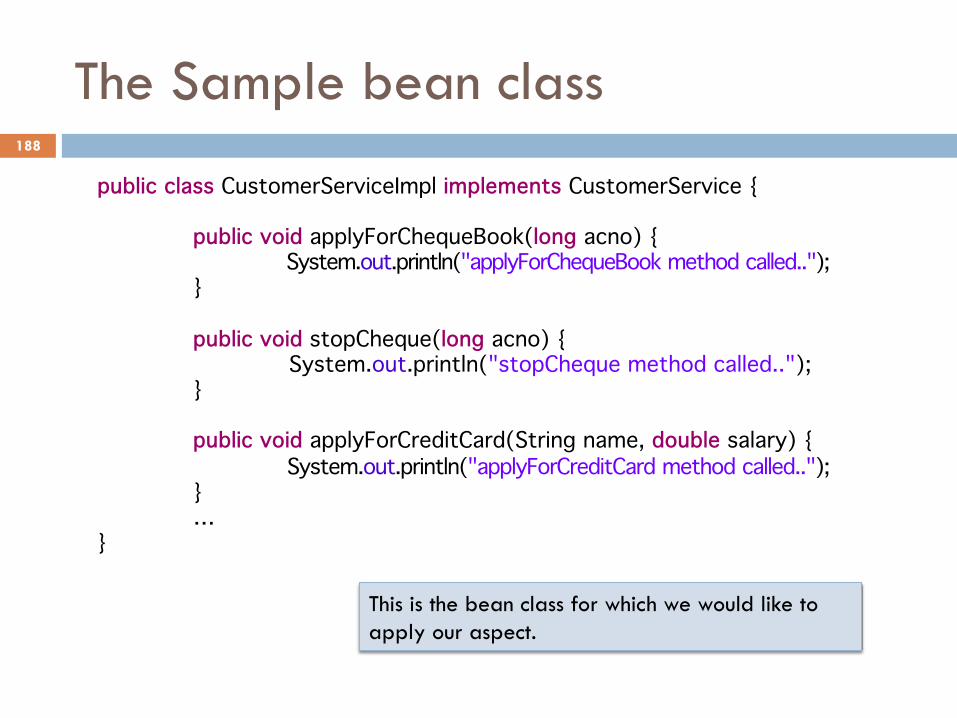
public class CustomerServiceImpl implements CustomerService {
public void applyForChequeBook(long acno) { System.out.println("applyForChequeBook method called.."); } public void stopCheque(long acno) { System.out.println("stopCheque method called.."); } public void applyForCreditCard(String name, double salary) { System.out.println("applyForCreditCard method called.."); } …
}
This is the bean class for which we would like to apply our aspect.
188
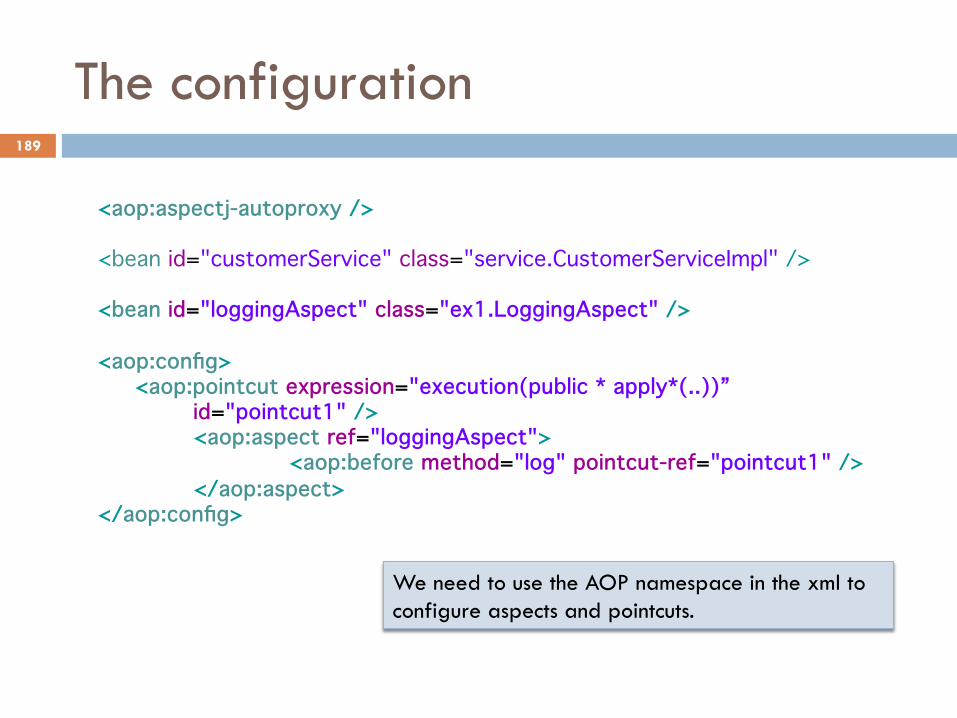
The configuration
<aop:aspectj-autoproxy />
<bean id="customerService" class="service.CustomerServiceImpl" />
<bean id="loggingAspect" class="ex1.LoggingAspect" /> <aop:config>
<aop:pointcut expression="execution(public * apply*(..))” id="pointcut1" /> <aop:aspect ref="loggingAspect"> <aop:before method="log" pointcut-ref="pointcut1" /> </aop:aspect>
</aop:config>
We need to use the AOP namespace in the xml to configure aspects and pointcuts.
189
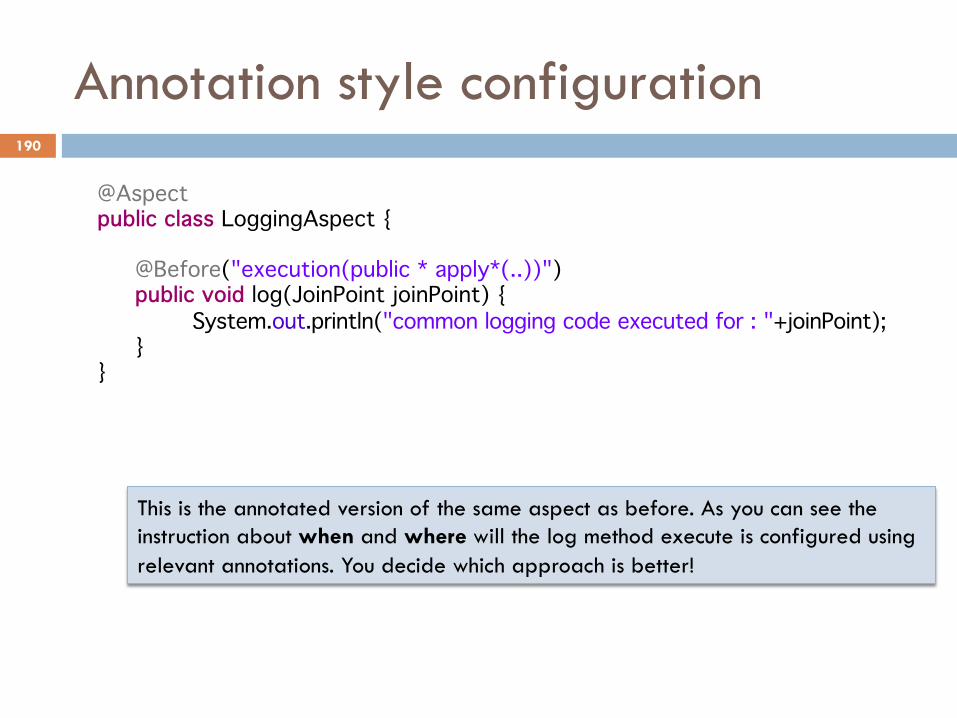
Annotation style configuration
@Aspect public class LoggingAspect {
@Before("execution(public * apply*(..))") public void log(JoinPoint joinPoint) { System.out.println("common logging code executed for : "+joinPoint); }
}
This is the annotated version of the same aspect as before. As you can see the instruction about when and where will the log method execute is configured using relevant annotations. You decide which approach is better!
190
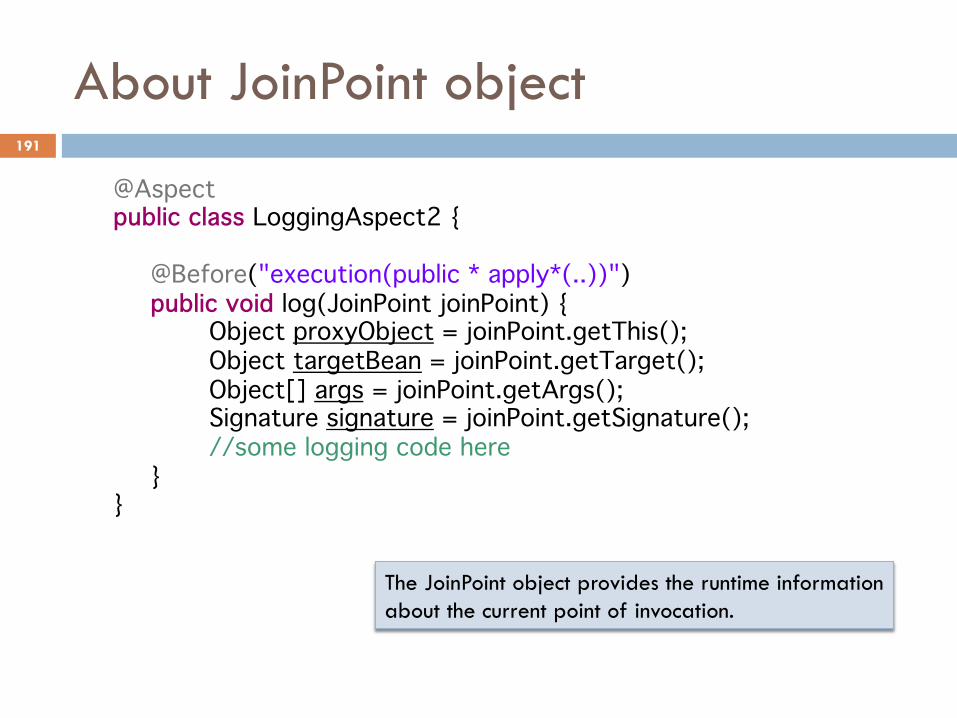
About JoinPoint object
@Aspect public class LoggingAspect2 {
@Before("execution(public * apply*(..))") public void log(JoinPoint joinPoint) { Object proxyObject = joinPoint.getThis(); Object targetBean = joinPoint.getTarget(); Object[] args = joinPoint.getArgs(); Signature signature = joinPoint.getSignature(); //some logging code here }
}
The JoinPoint object provides the runtime information about the current point of invocation.
191
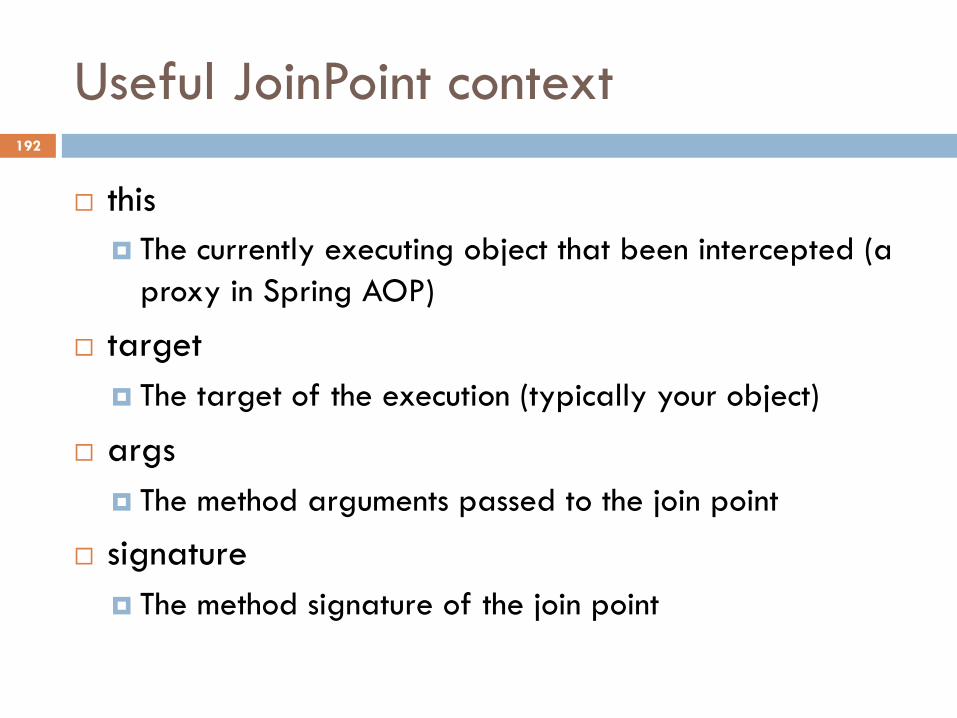
Useful JoinPoint context
¨ this ¤ The currently executing object that been intercepted (a
proxy in Spring AOP)
¨ target ¤ The target of the execution (typically your object)
¨ args ¤ The method arguments passed to the join point
¨ signature ¤ The method signature of the join point
192
Pointcuts
¨ One of the reason why AspectJ was adopted by Spring was because of a very powerful and easy to learn pointcut expressions.
¨ This is the most important thing in our configuration, because a pointcut identifies the places where our aspects will execute.
193
Pointcut expressions
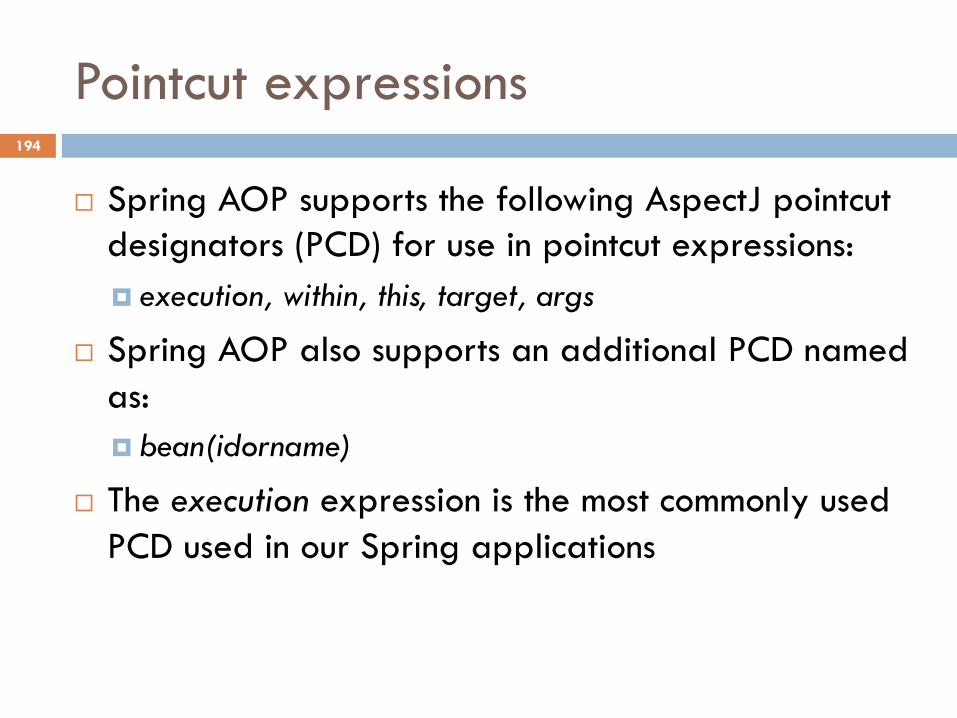
¨ Spring AOP supports the following AspectJ pointcut designators (PCD) for use in pointcut expressions: ¤ execution, within, this, target, args
¨ Spring AOP also supports an additional PCD named as: ¤ bean(idorname)
¨ The execution expression is the most commonly used PCD used in our Spring applications
194
execution expression
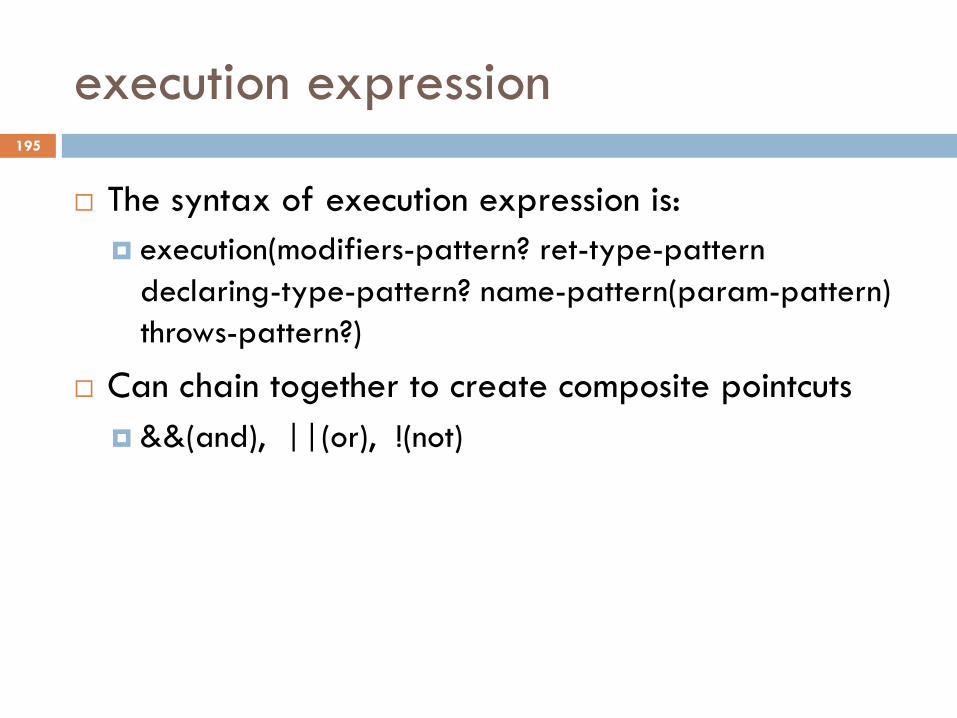
¨ The syntax of execution expression is: ¤ execution(modifiers-pattern? ret-type-pattern
declaring-type-pattern? name-pattern(param-pattern) throws-pattern?)
¨ Can chain together to create composite pointcuts ¤ &&(and), ||(or), !(not)
195
Example
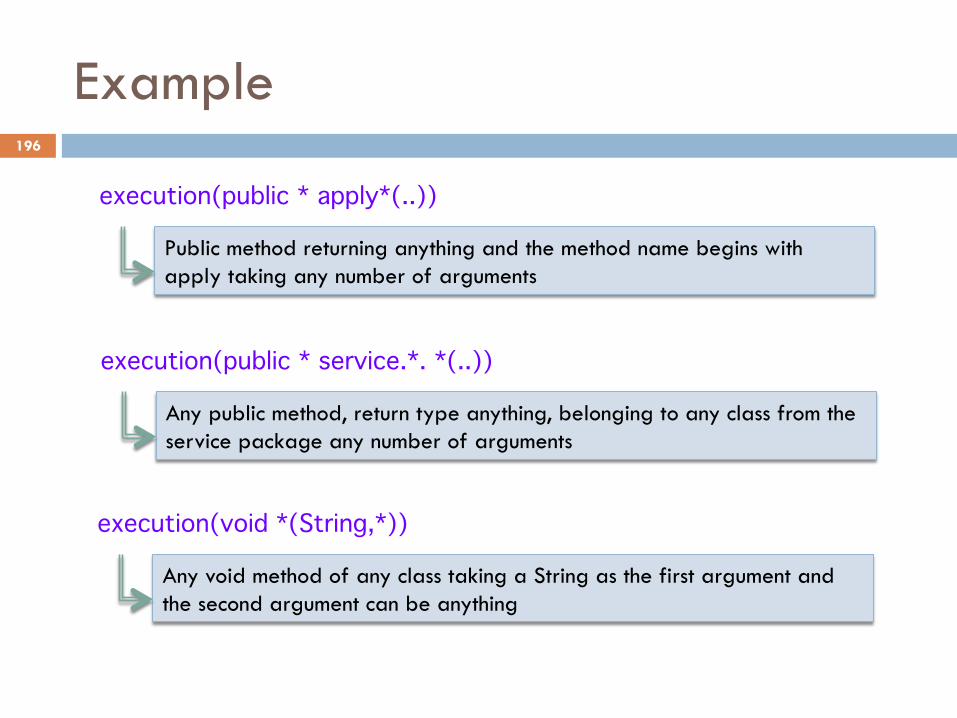
execution(public * apply*(..))
Public method returning anything and the method name begins with apply taking any number of arguments
execution(public * service.*. *(..))
Any public method, return type anything, belonging to any class from the service package any number of arguments
execution(void *(String,*))
Any void method of any class taking a String as the first argument and the second argument can be anything
196
Example
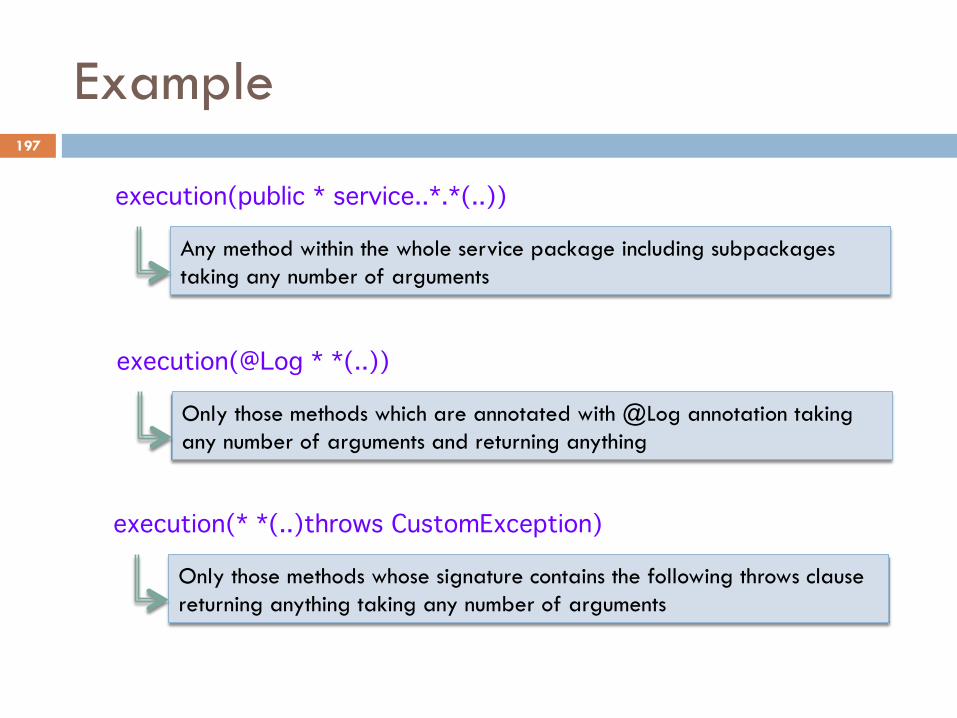
execution(public * service..*.*(..))
Any method within the whole service package including subpackages taking any number of arguments
execution(@Log * *(..))
Only those methods which are annotated with @Log annotation taking any number of arguments and returning anything
execution(* *(..)throws CustomException)
Only those methods whose signature contains the following throws clause returning anything taking any number of arguments
197
Example on other expressions
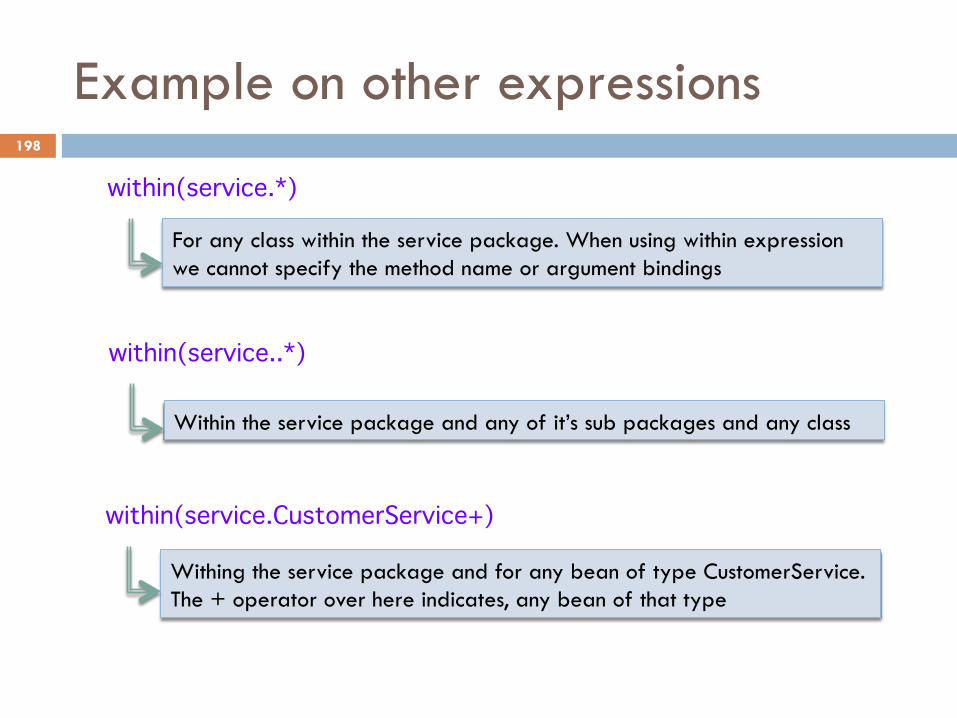
within(service.*)
For any class within the service package. When using within expression we cannot specify the method name or argument bindings
within(service..*)
Within the service package and any of it’s sub packages and any class
within(service.CustomerService+)
Withing the service package and for any bean of type CustomerService. The + operator over here indicates, any bean of that type
198
Cont’d…
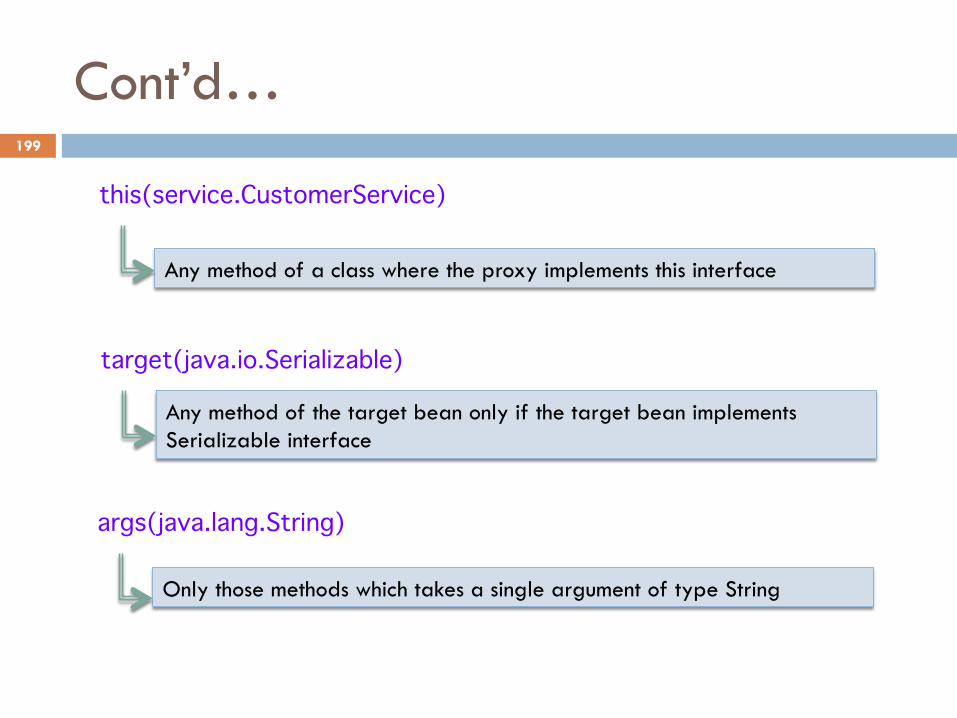
this(service.CustomerService)
Any method of a class where the proxy implements this interface
target(java.io.Serializable)
Any method of the target bean only if the target bean implements Serializable interface
args(java.lang.String)
Only those methods which takes a single argument of type String
199
Cont’d…
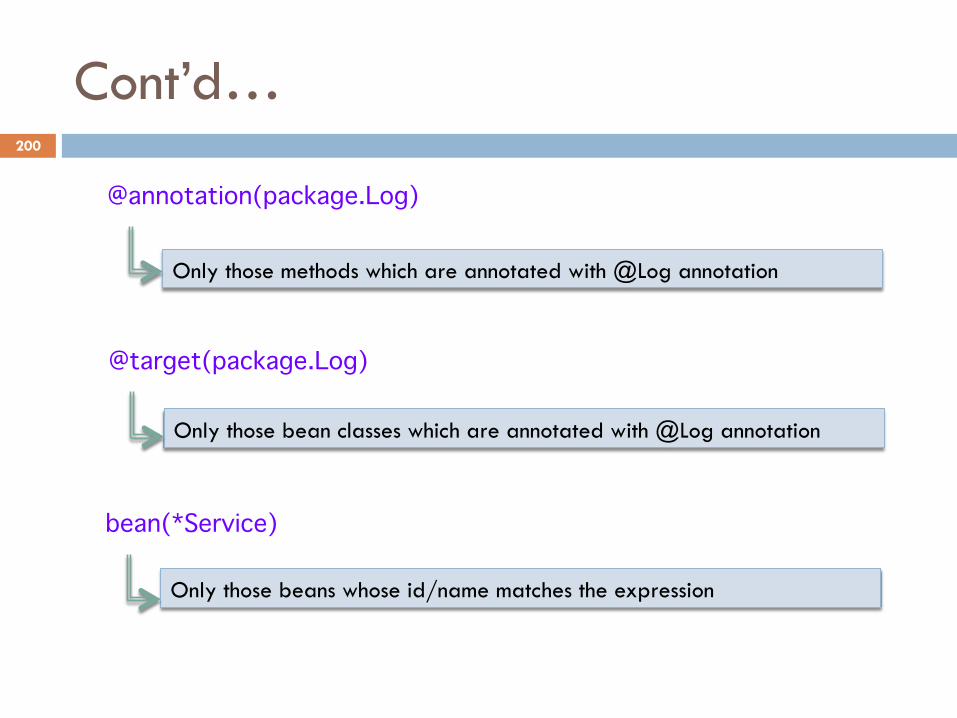
@annotation(package.Log)
Only those methods which are annotated with @Log annotation
@target(package.Log)
Only those bean classes which are annotated with @Log annotation
bean(*Service)
Only those beans whose id/name matches the expression
200
Passing parameters to advice
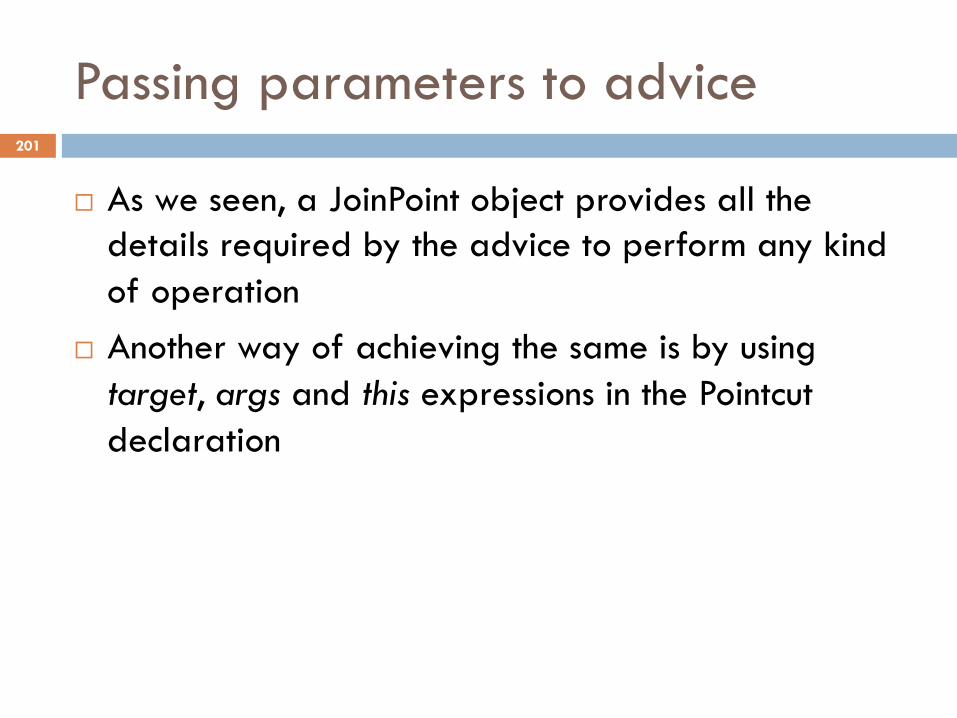
¨ As we seen, a JoinPoint object provides all the details required by the advice to perform any kind of operation
¨ Another way of achieving the same is by using target, args and this expressions in the Pointcut declaration
201
Example
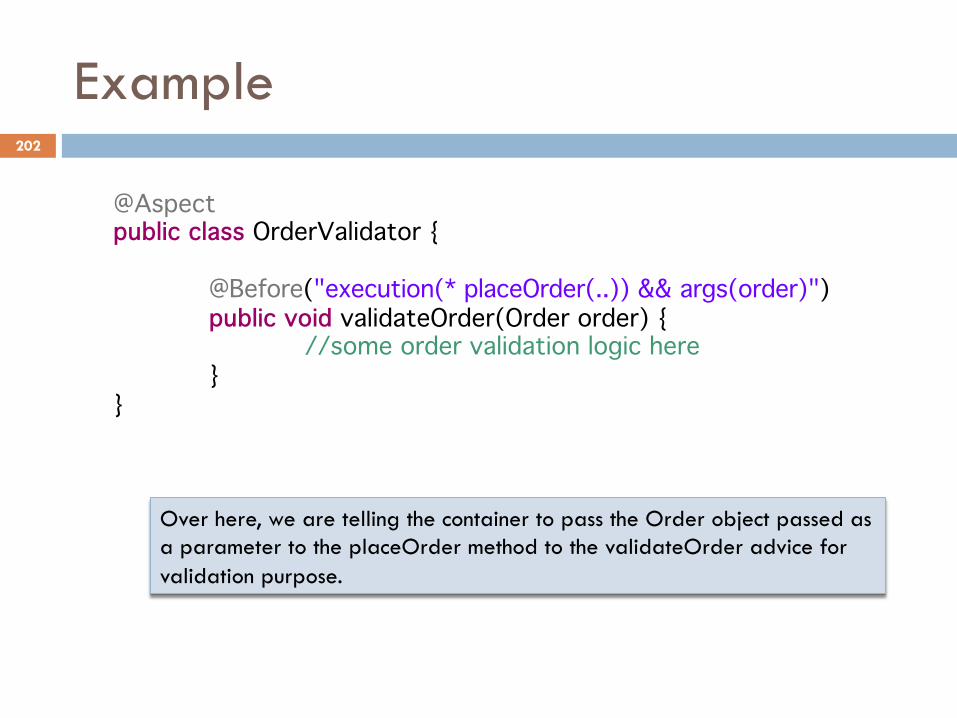
@Aspect public class OrderValidator {
@Before("execution(* placeOrder(..)) && args(order)") public void validateOrder(Order order) { //some order validation logic here }
}
Over here, we are telling the container to pass the Order object passed as a parameter to the placeOrder method to the validateOrder advice for validation purpose.
202
Named Pointcut
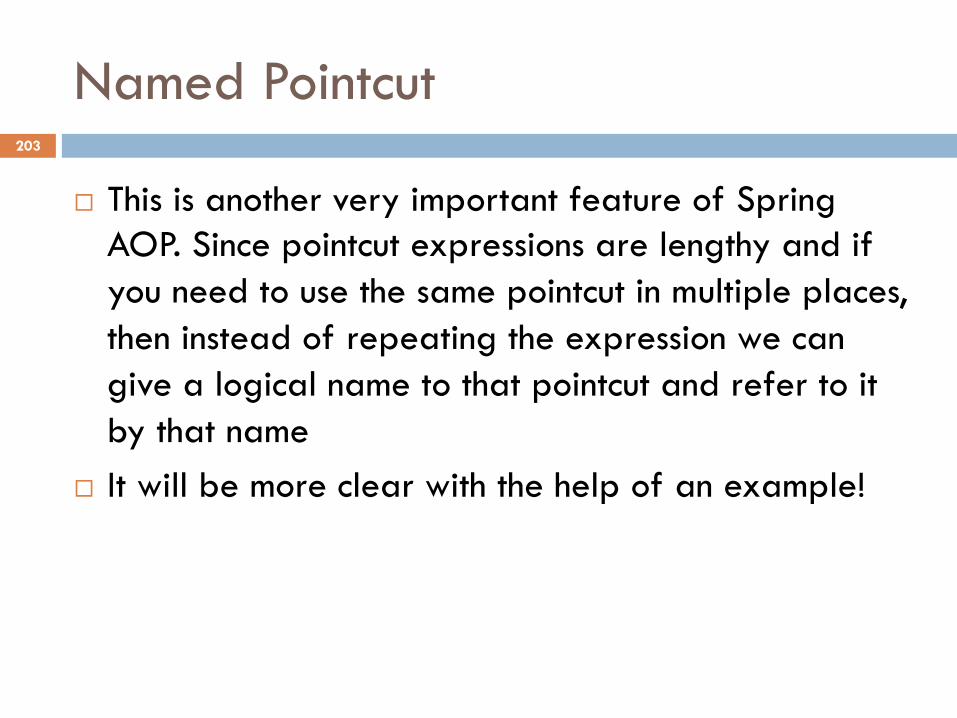
¨ This is another very important feature of Spring AOP. Since pointcut expressions are lengthy and if you need to use the same pointcut in multiple places, then instead of repeating the expression we can give a logical name to that pointcut and refer to it by that name
¨ It will be more clear with the help of an example!
203
Example
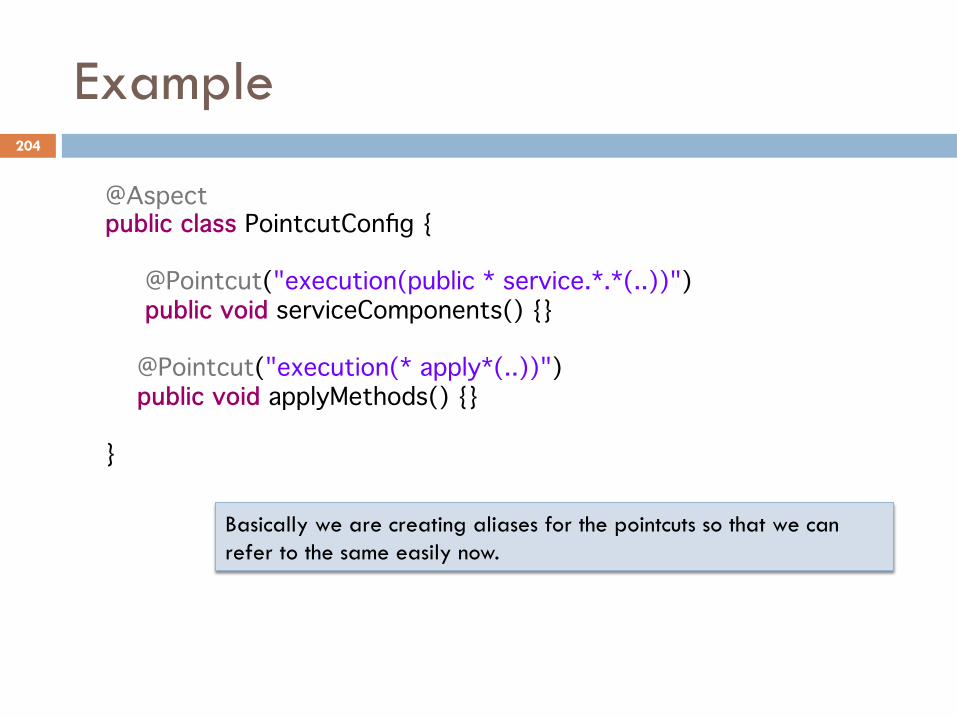
@Aspect public class PointcutConfig { @Pointcut("execution(public * service.*.*(..))") public void serviceComponents() {} @Pointcut("execution(* apply*(..))") public void applyMethods() {} }
Basically we are creating aliases for the pointcuts so that we can refer to the same easily now.
204
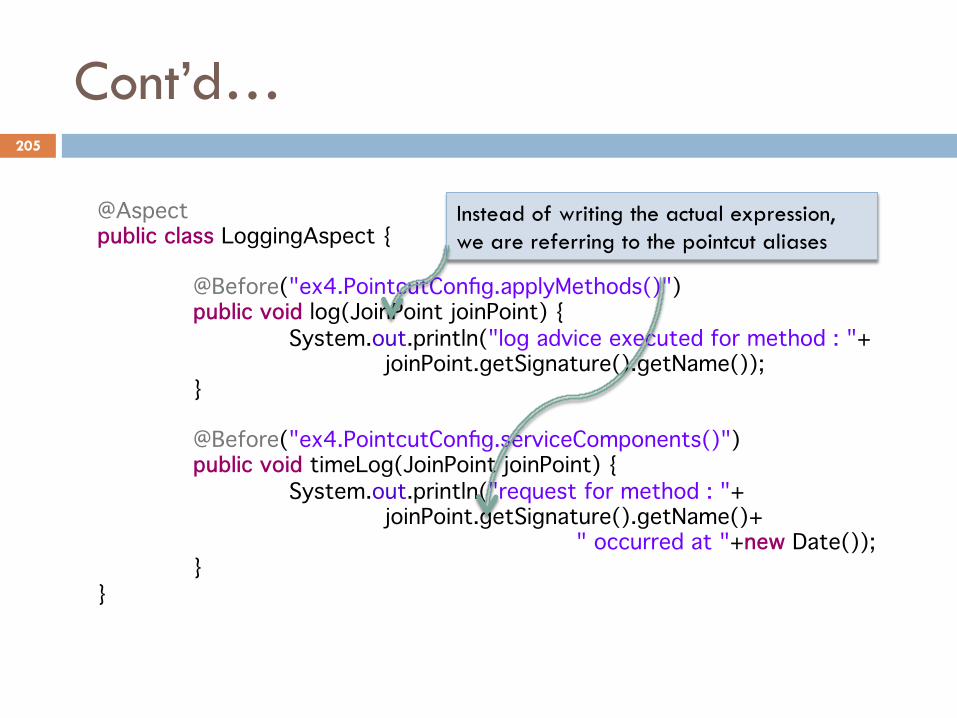
Cont’d…
@Aspect public class LoggingAspect {
@Before("ex4.PointcutConfig.applyMethods()") public void log(JoinPoint joinPoint) { System.out.println("log advice executed for method : "+ joinPoint.getSignature().getName()); } @Before("ex4.PointcutConfig.serviceComponents()") public void timeLog(JoinPoint joinPoint) { System.out.println("request for method : "+ joinPoint.getSignature().getName()+ " occurred at "+new Date()); }
}
Instead of writing the actual expression, we are referring to the pointcut aliases
205
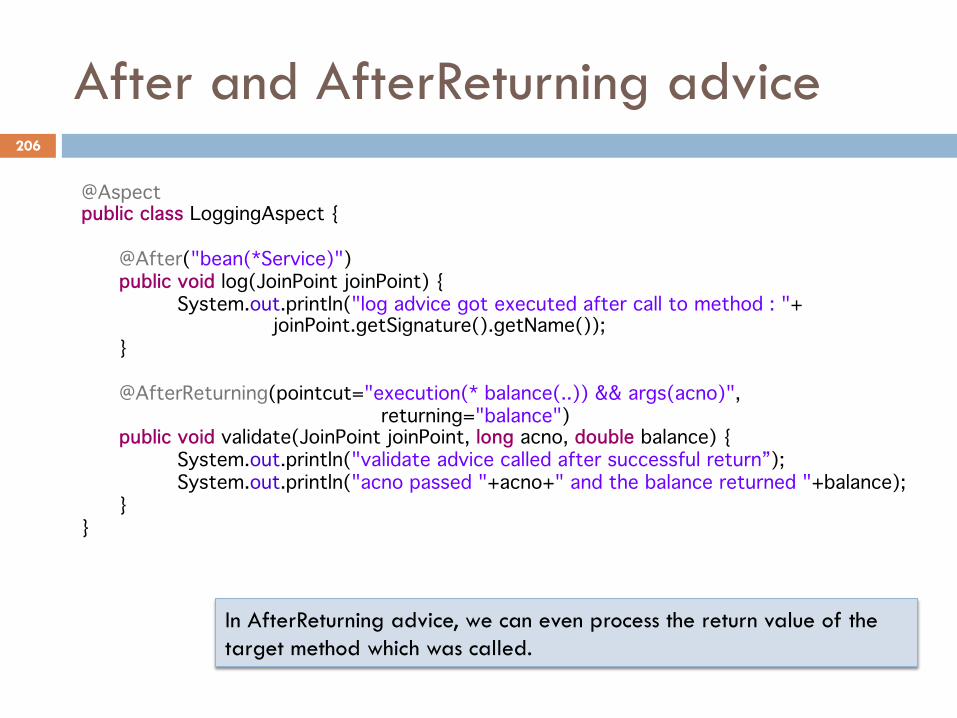
After and AfterReturning advice
@Aspect public class LoggingAspect {
@After("bean(*Service)") public void log(JoinPoint joinPoint) { System.out.println("log advice got executed after call to method : "+ joinPoint.getSignature().getName()); } @AfterReturning(pointcut="execution(* balance(..)) && args(acno)", returning="balance") public void validate(JoinPoint joinPoint, long acno, double balance) { System.out.println("validate advice called after successful return”); System.out.println("acno passed "+acno+" and the balance returned "+balance); }
}
In AfterReturning advice, we can even process the return value of the target method which was called.
206
Exception handling using AOP
¨ Exception handling is one more important aspect of our application development
¨ In many cases exeption handling is merely catching system exceptions, wrapping it up as user defined exceptions and throwing it to the caller.
¨ This means we end up writing duplicate try/catch blocks in many places, which can easily be eliminated using AOP
207
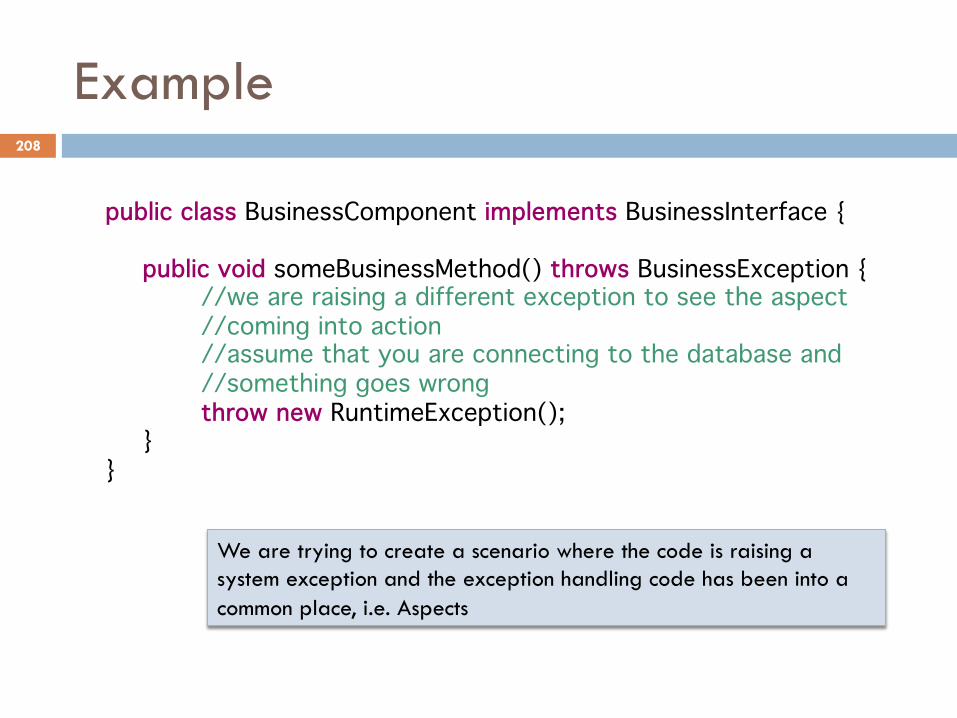
Example
public class BusinessComponent implements BusinessInterface {
public void someBusinessMethod() throws BusinessException { //we are raising a different exception to see the aspect //coming into action //assume that you are connecting to the database and //something goes wrong throw new RuntimeException(); }
}
We are trying to create a scenario where the code is raising a system exception and the exception handling code has been into a common place, i.e. Aspects
208
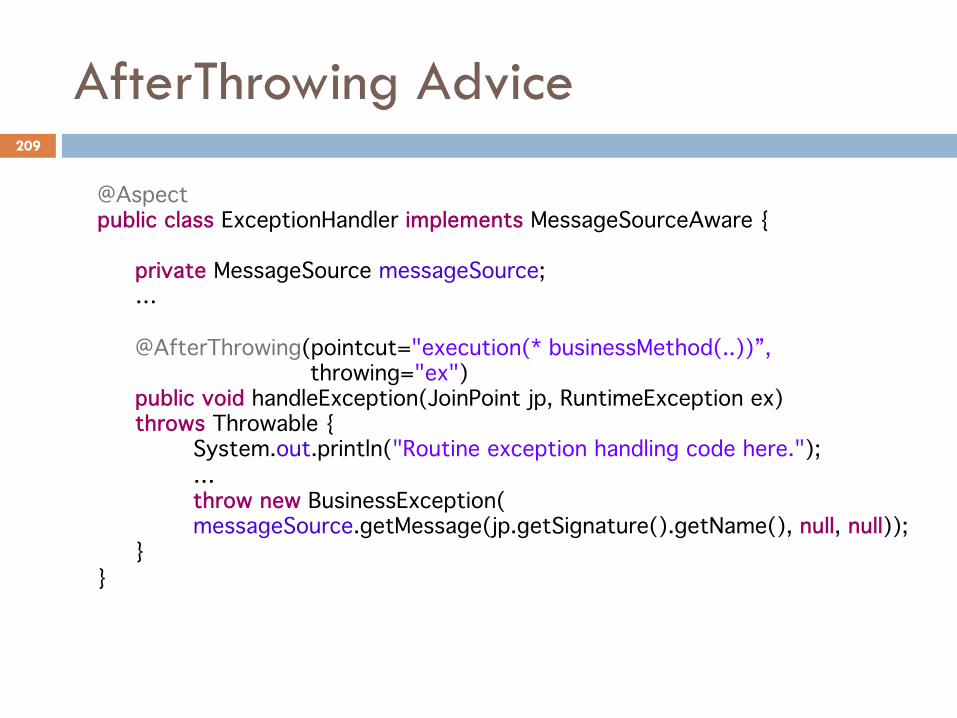
AfterThrowing Advice
@Aspect public class ExceptionHandler implements MessageSourceAware {
private MessageSource messageSource; … @AfterThrowing(pointcut="execution(* businessMethod(..))”, throwing="ex") public void handleException(JoinPoint jp, RuntimeException ex) throws Throwable { System.out.println("Routine exception handling code here."); … throw new BusinessException( messageSource.getMessage(jp.getSignature().getName(), null, null)); }
}
209
Around Advice
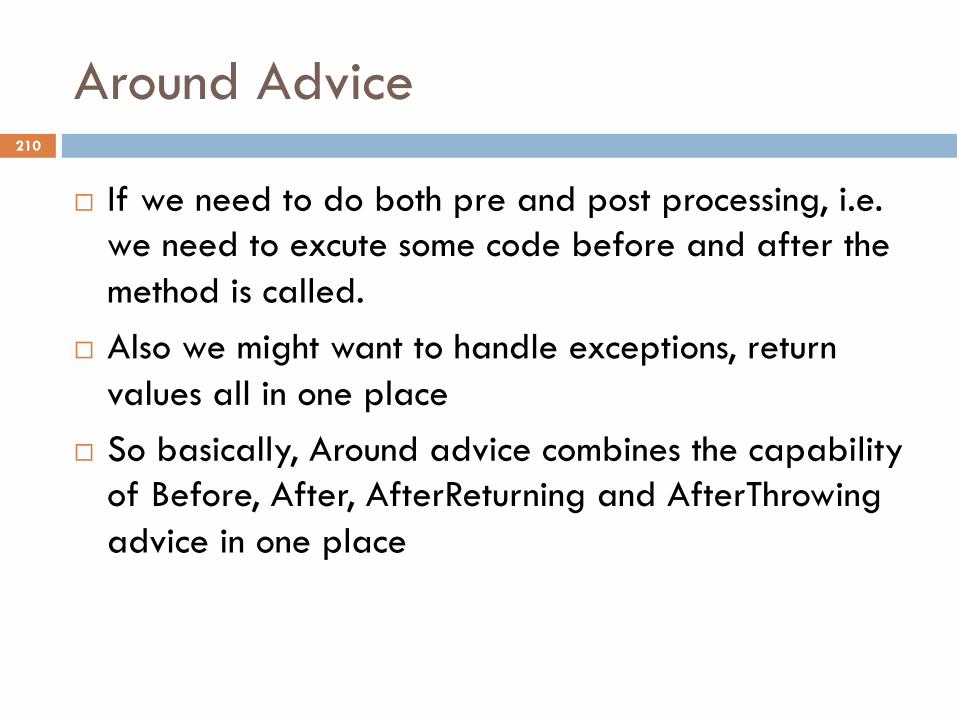
¨ If we need to do both pre and post processing, i.e. we need to excute some code before and after the method is called.
¨ Also we might want to handle exceptions, return values all in one place
¨ So basically, Around advice combines the capability of Before, After, AfterReturning and AfterThrowing advice in one place
210
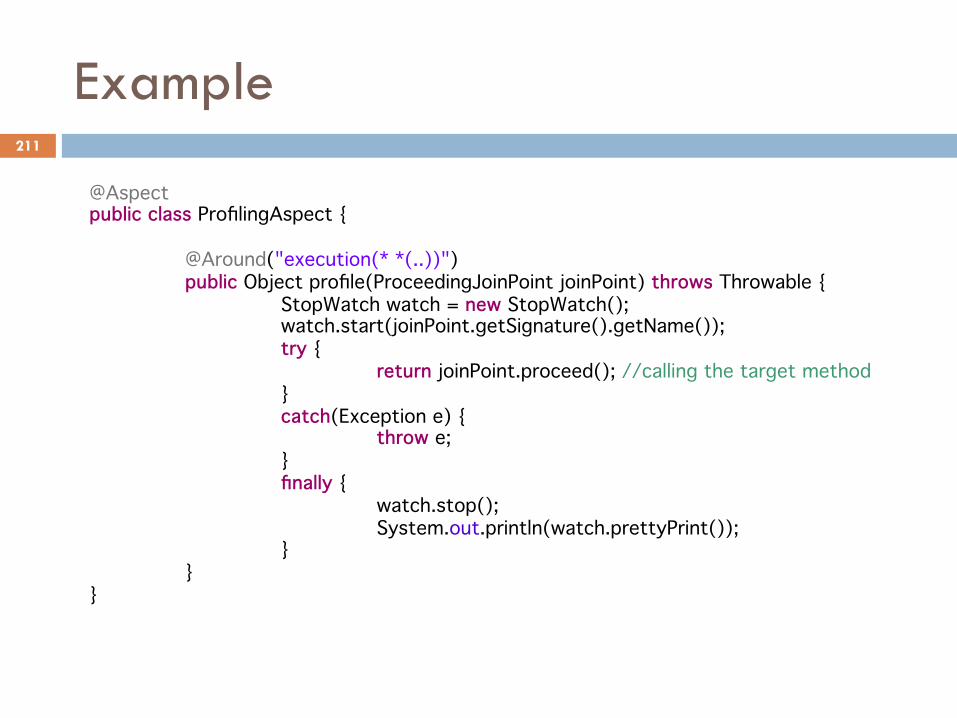
Example
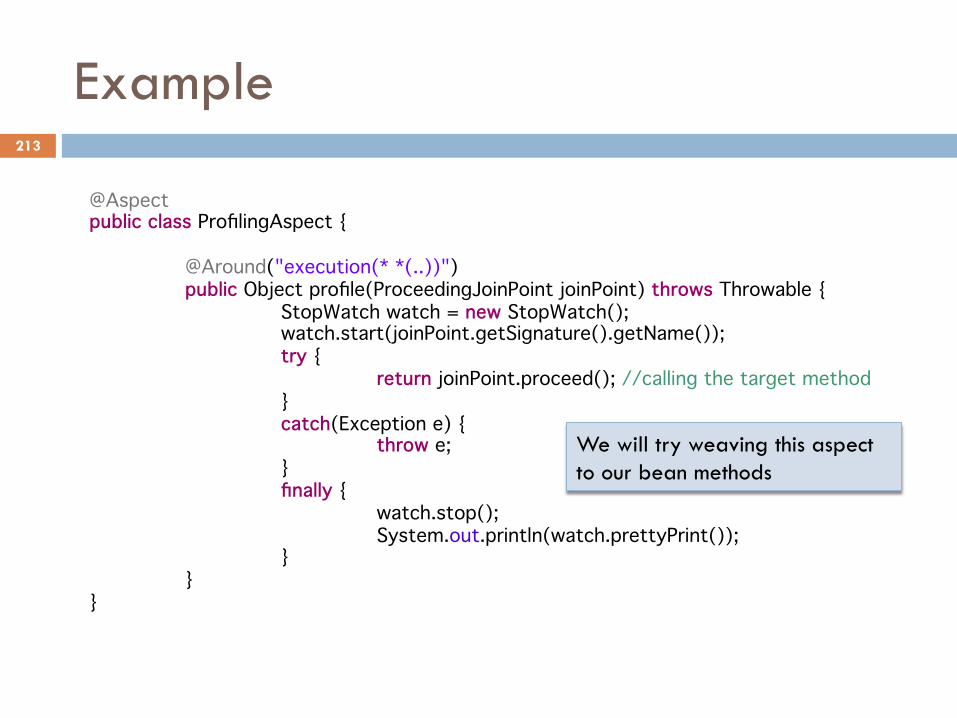
@Aspect public class ProfilingAspect {
@Around("execution(* *(..))") public Object profile(ProceedingJoinPoint joinPoint) throws Throwable { StopWatch watch = new StopWatch(); watch.start(joinPoint.getSignature().getName()); try { return joinPoint.proceed(); //calling the target method } catch(Exception e) { throw e; } finally { watch.stop(); System.out.println(watch.prettyPrint()); } }
}
211
Load Time Weaving
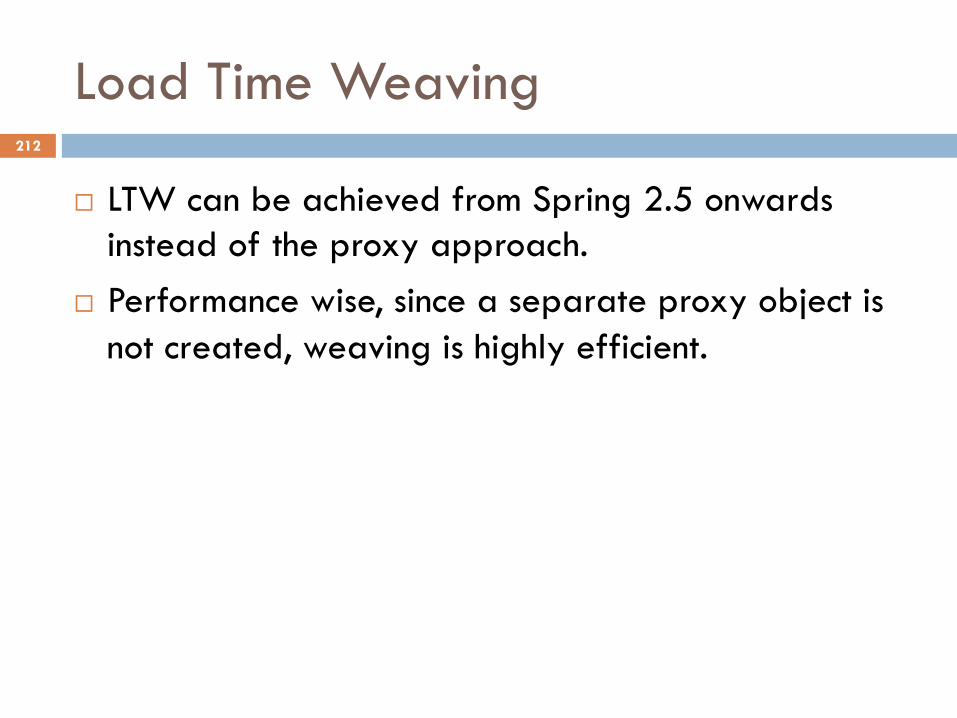
¨ LTW can be achieved from Spring 2.5 onwards instead of the proxy approach.
¨ Performance wise, since a separate proxy object is not created, weaving is highly efficient.
212
Example
@Aspect public class ProfilingAspect {
@Around("execution(* *(..))") public Object profile(ProceedingJoinPoint joinPoint) throws Throwable { StopWatch watch = new StopWatch(); watch.start(joinPoint.getSignature().getName()); try { return joinPoint.proceed(); //calling the target method } catch(Exception e) { throw e; } finally { watch.stop(); System.out.println(watch.prettyPrint()); } }
}
We will try weaving this aspect to our bean methods
213
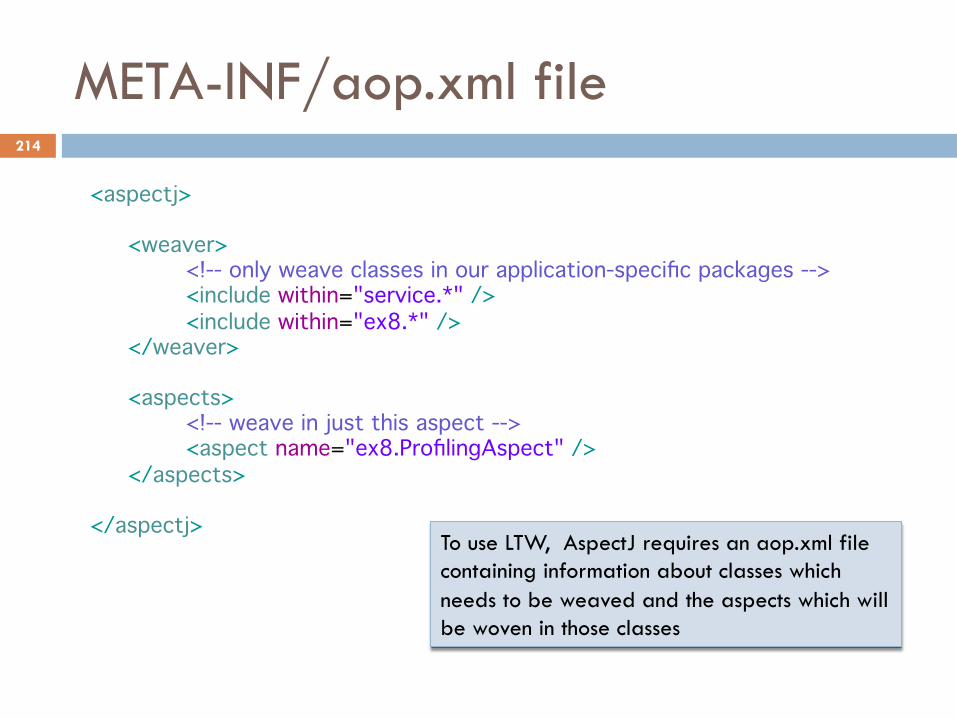
META-INF/aop.xml file
<aspectj>
<weaver> <!-- only weave classes in our application-specific packages --> <include within="service.*" /> <include within="ex8.*" /> </weaver>
<aspects> <!-- weave in just this aspect --> <aspect name="ex8.ProfilingAspect" /> </aspects>
</aspectj>
To use LTW, AspectJ requires an aop.xml file containing information about classes which needs to be weaved and the aspects which will be woven in those classes
214
The test class
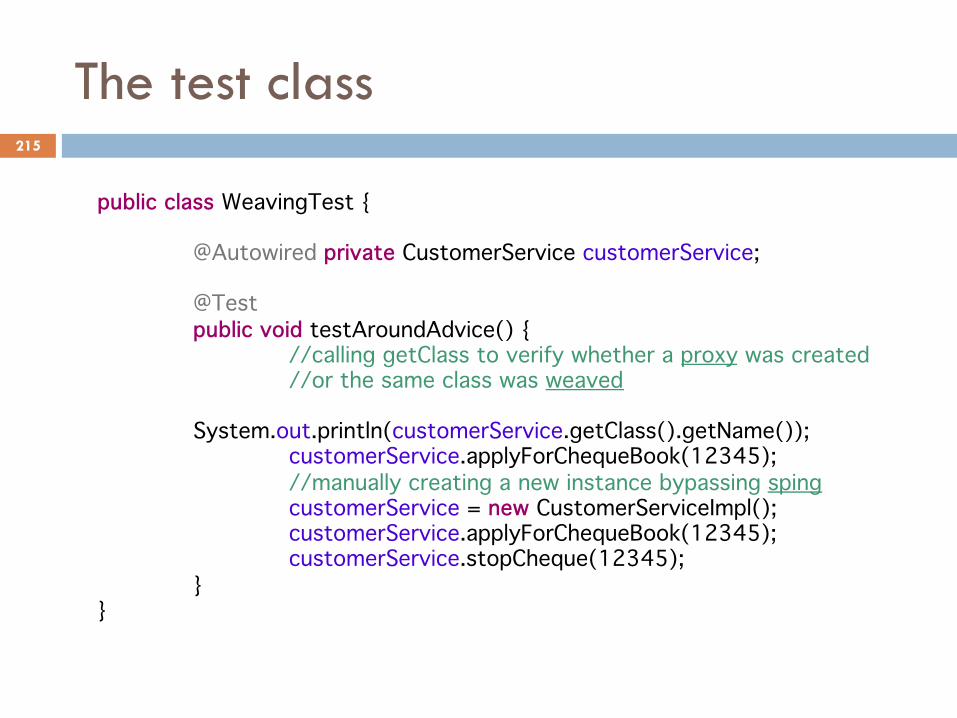
public class WeavingTest {
@Autowired private CustomerService customerService;
@Test public void testAroundAdvice() { //calling getClass to verify whether a proxy was created //or the same class was weaved System.out.println(customerService.getClass().getName()); customerService.applyForChequeBook(12345); //manually creating a new instance bypassing sping customerService = new CustomerServiceImpl(); customerService.applyForChequeBook(12345); customerService.stopCheque(12345); }
}
215
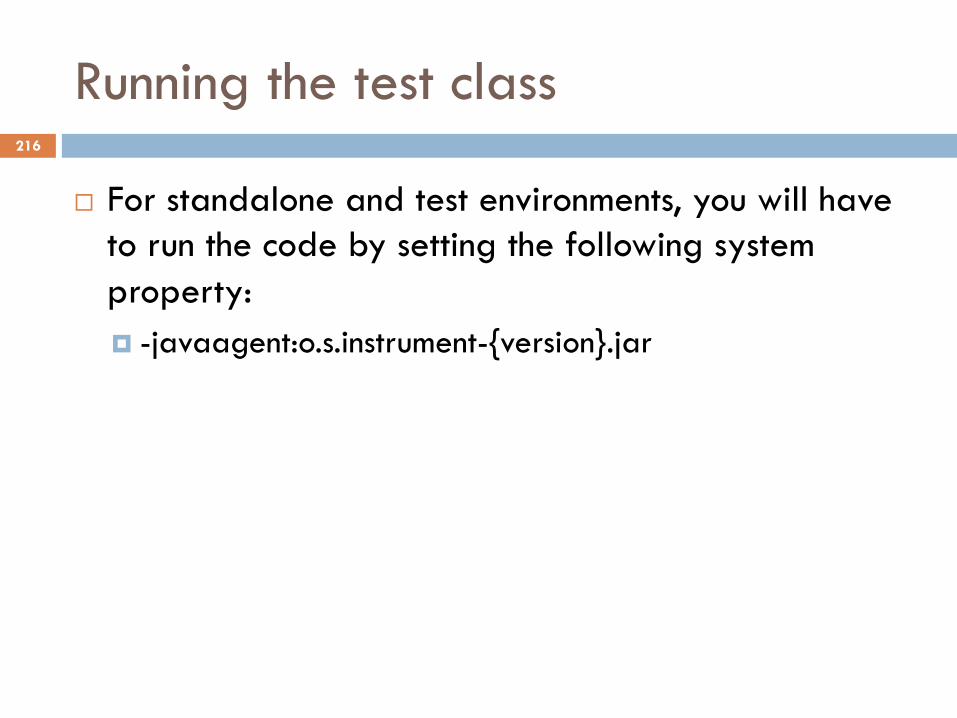
Running the test class
¨ For standalone and test environments, you will have to run the code by setting the following system property: ¤ -javaagent:o.s.instrument-{version}.jar
216
Lab No. 5
Spring and AspectJ
Refer to the lab guide provided along with the eclipse project to proceed further
217
Topics in this Session
¨ Spring’s role in supporting transactional data access within an enterprise application ¤ Effective Resource management ¤ Support for data access technologies
n JDBC, Hibernate, JPA
218
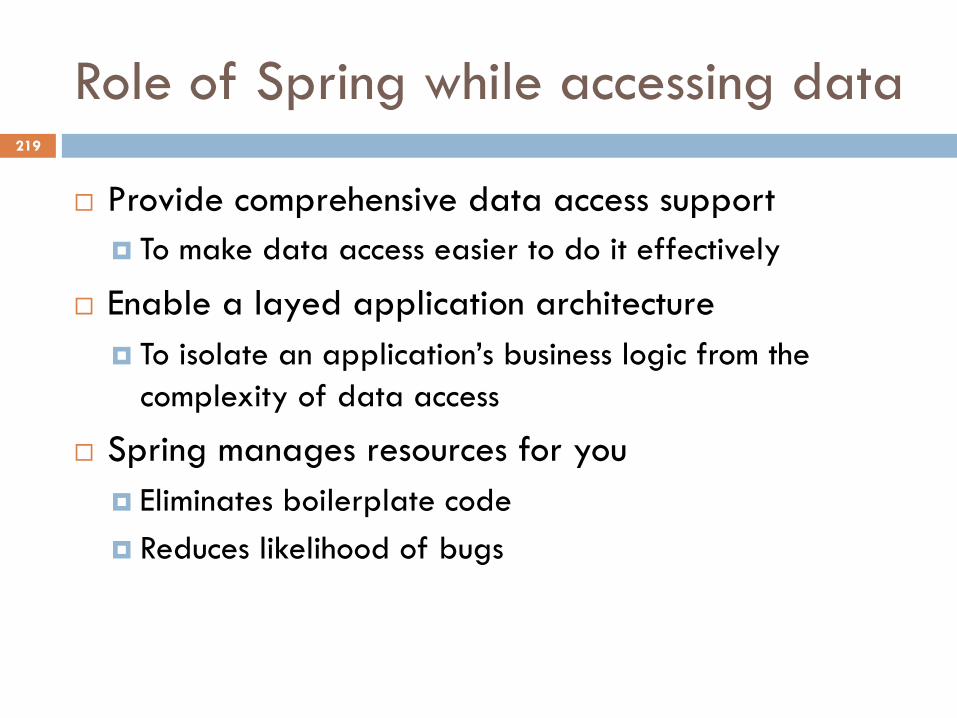
Role of Spring while accessing data
¨ Provide comprehensive data access support ¤ To make data access easier to do it effectively
¨ Enable a layed application architecture ¤ To isolate an application’s business logic from the
complexity of data access
¨ Spring manages resources for you ¤ Eliminates boilerplate code ¤ Reduces likelihood of bugs
219
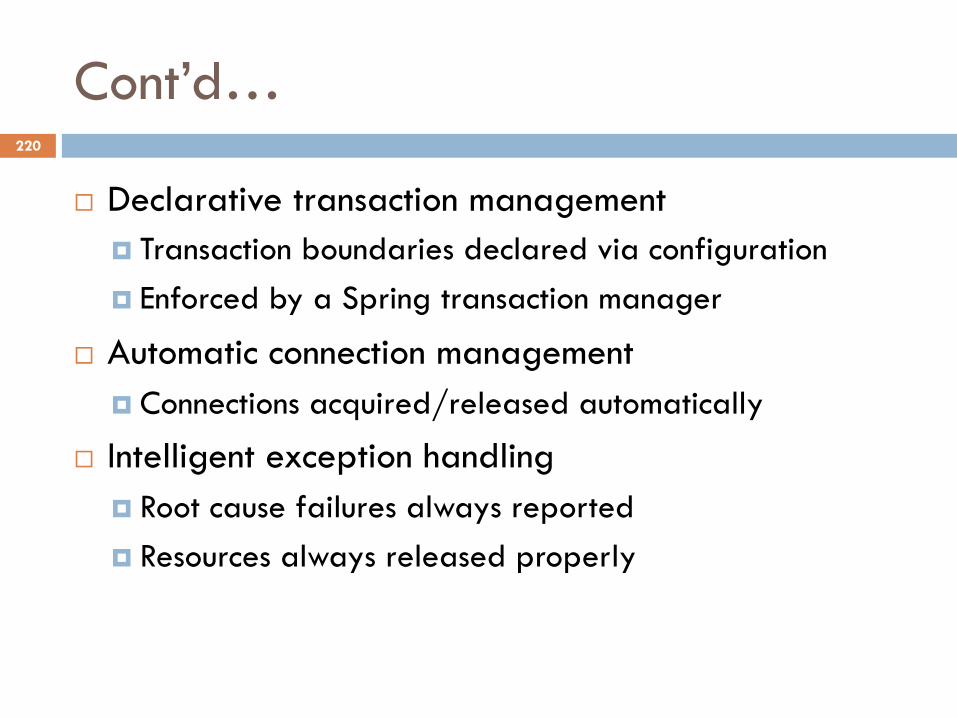
Cont’d…
¨ Declarative transaction management ¤ Transaction boundaries declared via configuration ¤ Enforced by a Spring transaction manager
¨ Automatic connection management ¤ Connections acquired/released automatically
¨ Intelligent exception handling ¤ Root cause failures always reported ¤ Resources always released properly
220
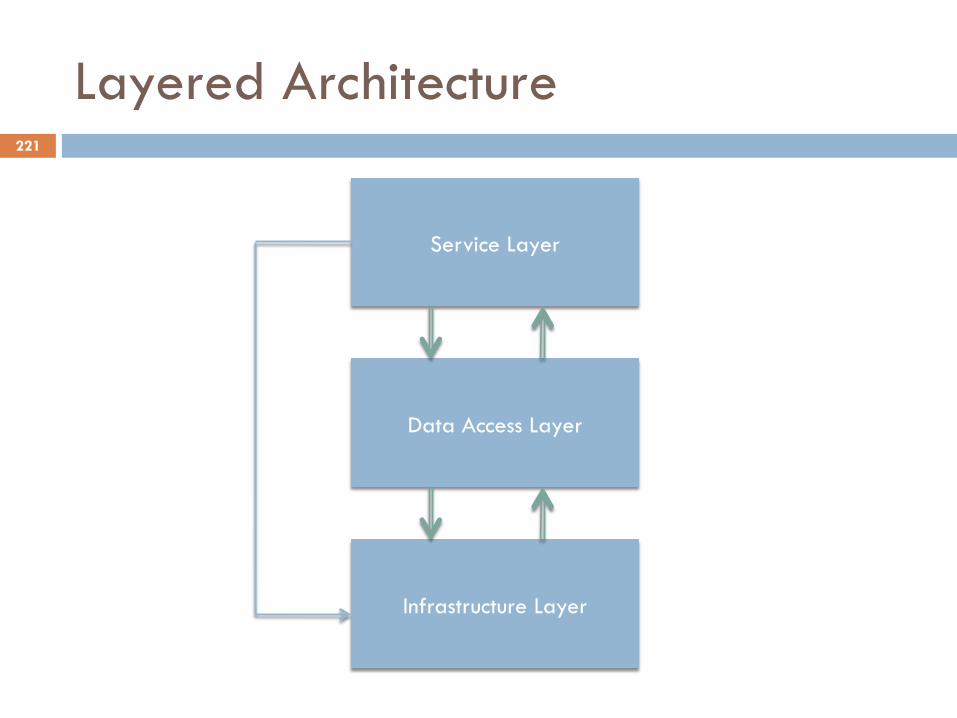
Layered Architecture
Service Layer
Data Access Layer
Infrastructure Layer
221
The Service Layer
¨ Defines the public functions of the application ¤ Clients call into the application through this layer
¨ Encapsulates the logic to carry out each application function ¤ Delegates to the infrastructure layer to manage
transactions ¤ Delegates to the data access layer to map persisent
data into a form needed to execute the business logic
222
The Data Access Layer
¨ Used by the service layer to access data needed by the business logic
¨ Encapsulates the complexity of data access ¤ The use of data access API
n JDBC, Hibernate, etc
¤ The mapping of data into a form suitable for business logic n A JDBC ResultSet to a domain object graph
223
The Infrastructure Layer
¨ Exposes low-level services needed by other layers ¤ Infrastructure services are provided by Spring ¤ Developers typically do not write thems
¨ Likely to vary between environments ¤ Production vs. test
224
Layers working together
¨ Client calls a function of the service layer ¨ A service initiates a function of the application
¤ By delegating to the transaction manager to begin a transaction
¤ By delegating to repositories to load data for processing n All data access calls participate in a transaction n Repositories oftern return domain objects that encapsulate
domain behaviors
225
Cont’d…
¨ A service continues processing ¤ By executing business logic ¤ Often by coordinating between domain objects loaded
by repositories
¨ And finally, completes processing ¤ By updating changed data and committing the
transaction
226
Topics in this Session
¨ Introduction to Spring JDBC ¤ Problems with traditional JDBC
n Results in reduntant, error prone code n Leads to poor exception handling
¤ Spring’s JdbcTemplate API n Configuration n Query execution n Working with result sets n Exception handling
227
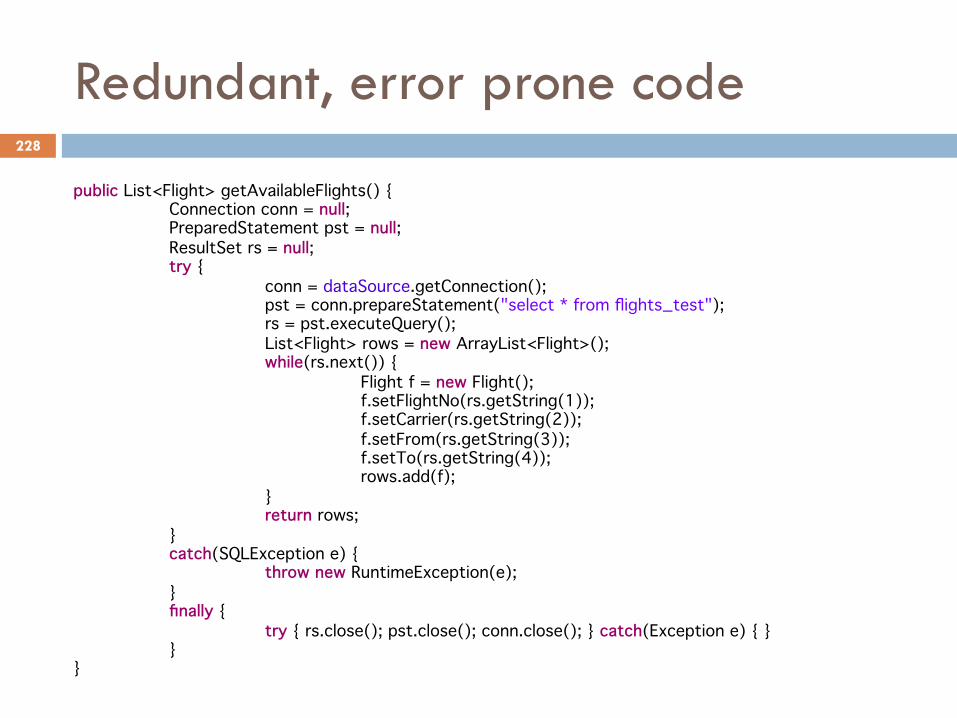
Redundant, error prone code
public List<Flight> getAvailableFlights() { Connection conn = null; PreparedStatement pst = null; ResultSet rs = null; try { conn = dataSource.getConnection(); pst = conn.prepareStatement("select * from flights_test"); rs = pst.executeQuery(); List<Flight> rows = new ArrayList<Flight>(); while(rs.next()) { Flight f = new Flight(); f.setFlightNo(rs.getString(1)); f.setCarrier(rs.getString(2)); f.setFrom(rs.getString(3)); f.setTo(rs.getString(4)); rows.add(f); } return rows; } catch(SQLException e) { throw new RuntimeException(e); } finally { try { rs.close(); pst.close(); conn.close(); } catch(Exception e) { } }
}
228
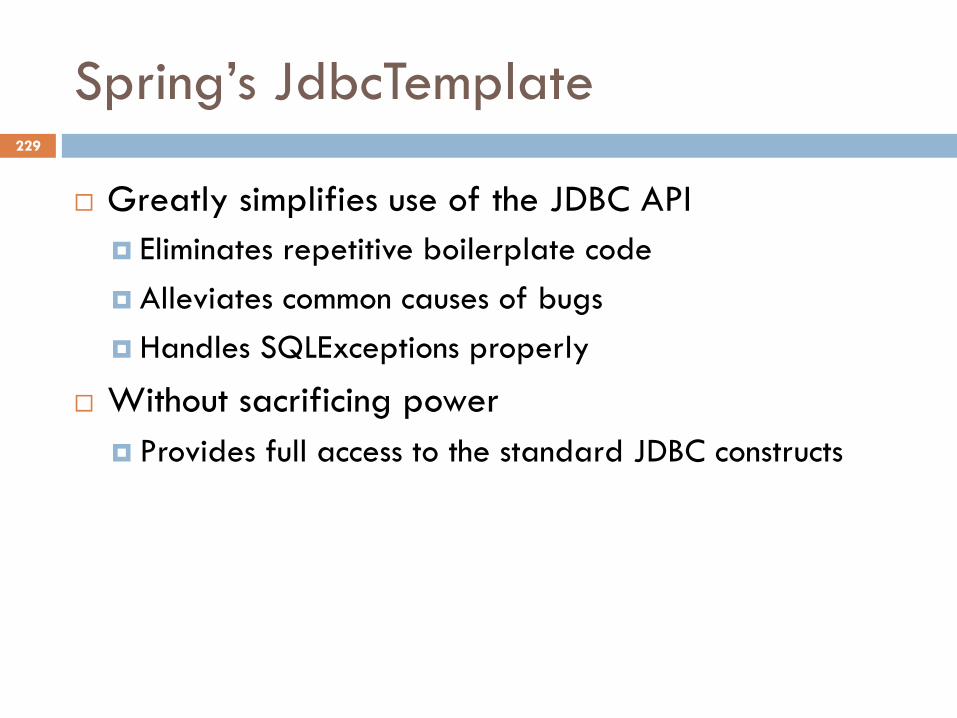
Spring’s JdbcTemplate
¨ Greatly simplifies use of the JDBC API ¤ Eliminates repetitive boilerplate code ¤ Alleviates common causes of bugs ¤ Handles SQLExceptions properly
¨ Without sacrificing power ¤ Provides full access to the standard JDBC constructs
229
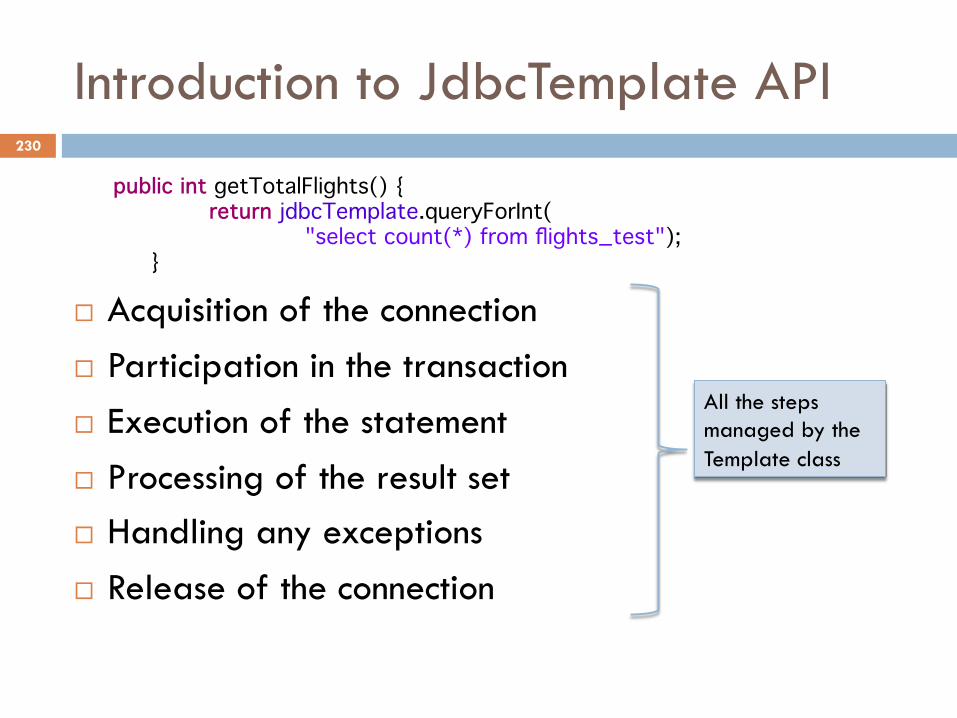
Introduction to JdbcTemplate API
¨ Acquisition of the connection ¨ Participation in the transaction ¨ Execution of the statement ¨ Processing of the result set ¨ Handling any exceptions ¨ Release of the connection
All the steps managed by the Template class
public int getTotalFlights() { return jdbcTemplate.queryForInt( "select count(*) from flights_test"); }
230
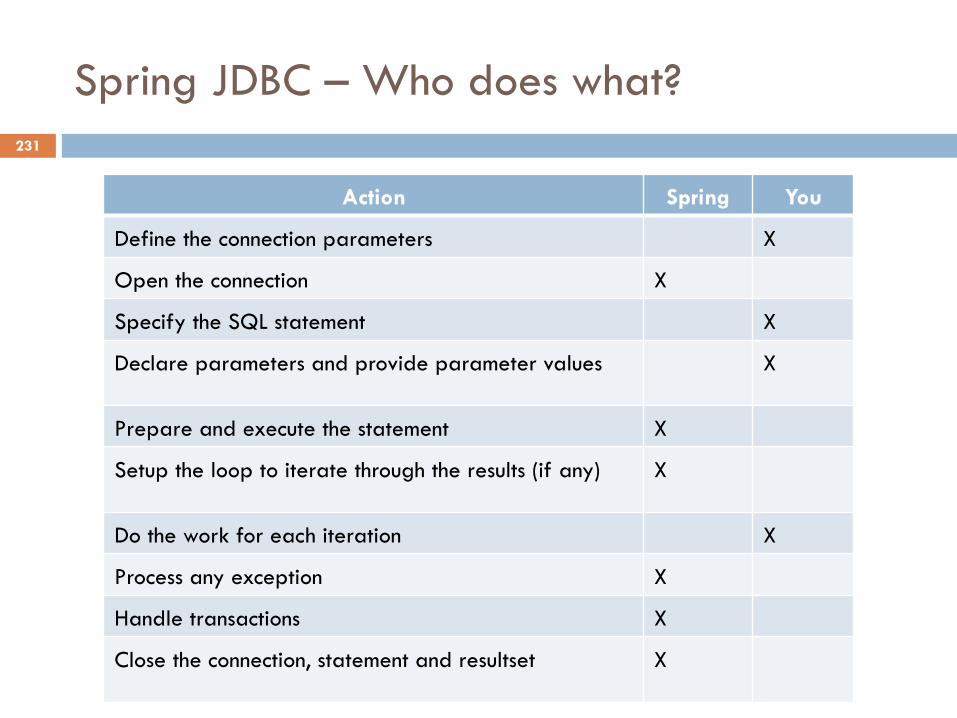
Spring JDBC – Who does what?
Action Spring You
Define the connection parameters X
Open the connection X
Specify the SQL statement X
Declare parameters and provide parameter values X
Prepare and execute the statement X
Setup the loop to iterate through the results (if any) X
Do the work for each iteration X
Process any exception X
Handle transactions X
Close the connection, statement and resultset X
231
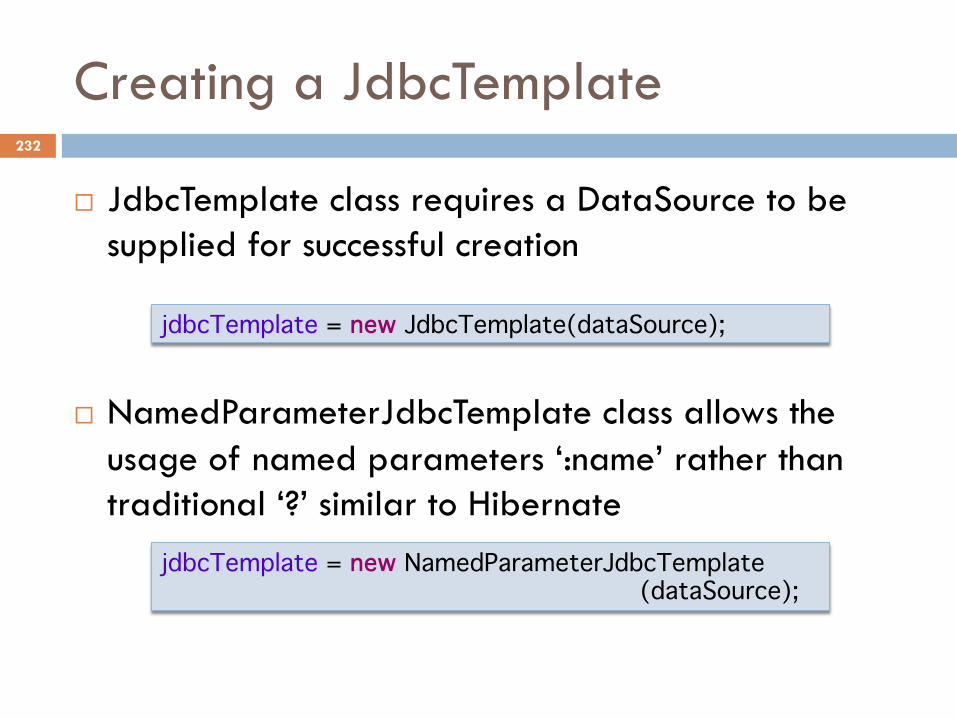
Creating a JdbcTemplate
¨ JdbcTemplate class requires a DataSource to be supplied for successful creation
¨ NamedParameterJdbcTemplate class allows the usage of named parameters ‘:name’ rather than traditional ‘?’ similar to Hibernate
jdbcTemplate = new JdbcTemplate(dataSource);
jdbcTemplate = new NamedParameterJdbcTemplate (dataSource);
232
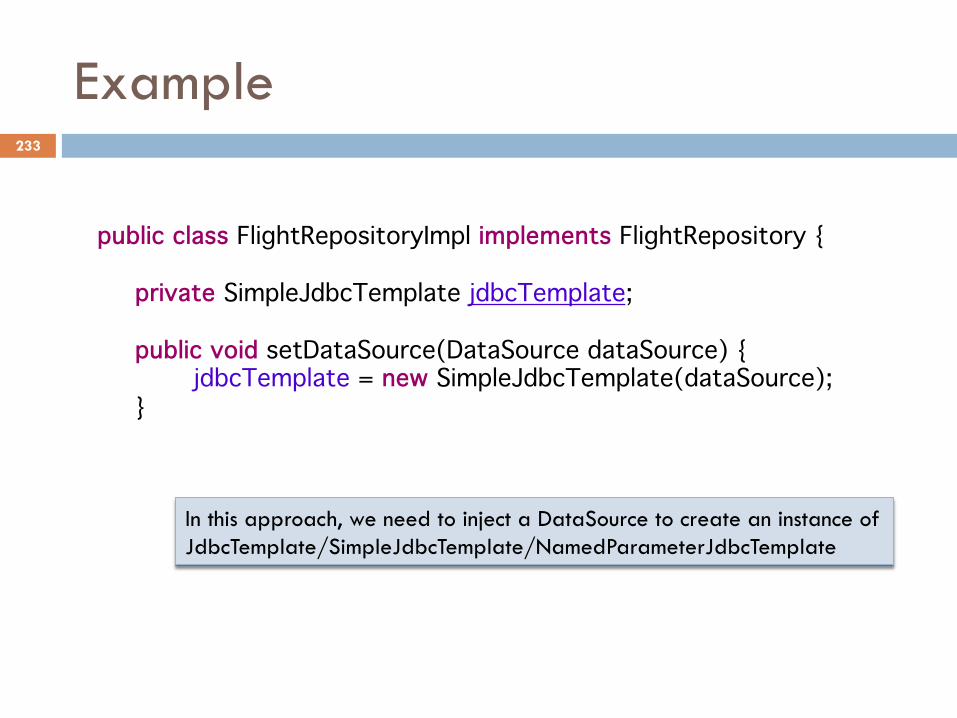
Example
public class FlightRepositoryImpl implements FlightRepository {
private SimpleJdbcTemplate jdbcTemplate; public void setDataSource(DataSource dataSource) { jdbcTemplate = new SimpleJdbcTemplate(dataSource); }
In this approach, we need to inject a DataSource to create an instance of JdbcTemplate/SimpleJdbcTemplate/NamedParameterJdbcTemplate
233
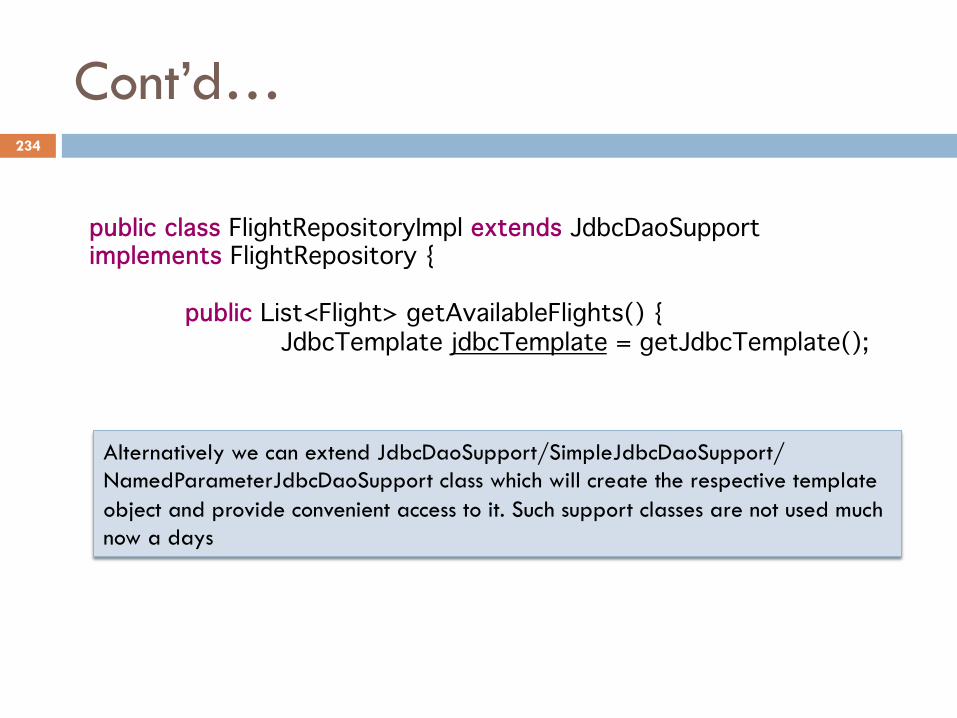
Cont’d…
public class FlightRepositoryImpl extends JdbcDaoSupport implements FlightRepository {
public List<Flight> getAvailableFlights() { JdbcTemplate jdbcTemplate = getJdbcTemplate();
Alternatively we can extend JdbcDaoSupport/SimpleJdbcDaoSupport/NamedParameterJdbcDaoSupport class which will create the respective template object and provide convenient access to it. Such support classes are not used much now a days
234
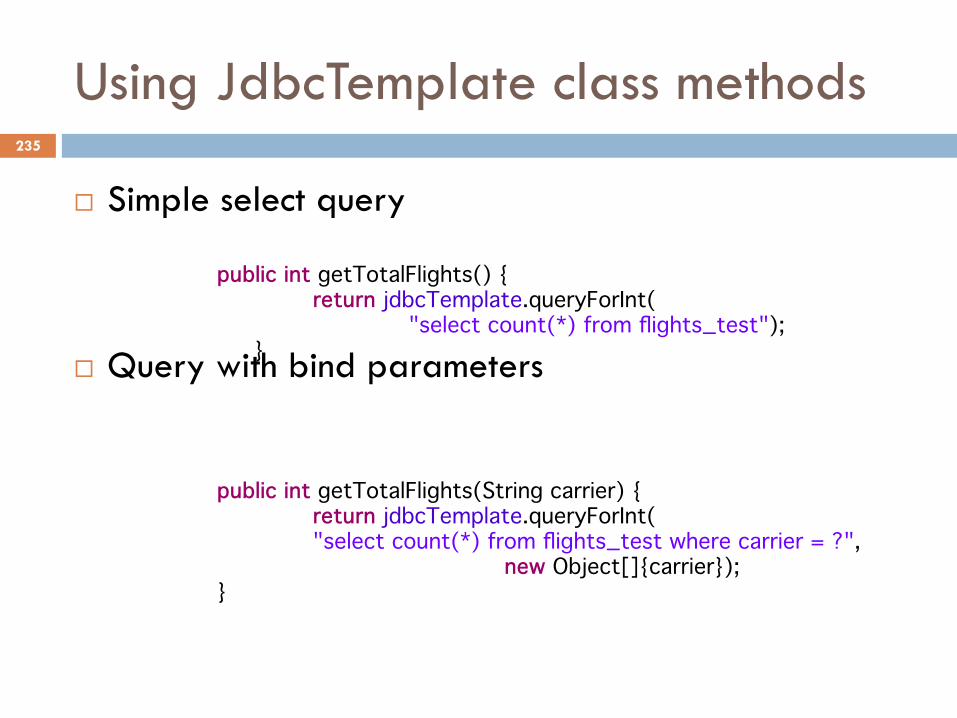
Using JdbcTemplate class methods
¨ Simple select query
¨ Query with bind parameters
public int getTotalFlights() { return jdbcTemplate.queryForInt( "select count(*) from flights_test"); }
public int getTotalFlights(String carrier) { return jdbcTemplate.queryForInt( "select count(*) from flights_test where carrier = ?", new Object[]{carrier});
}
235
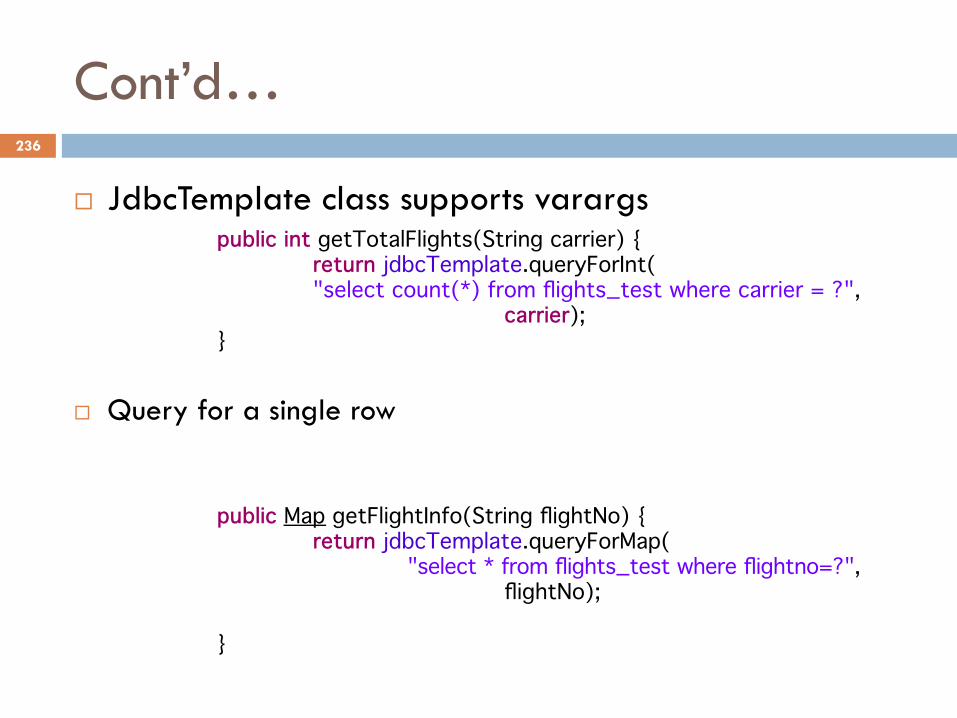
Cont’d…
¨ JdbcTemplate class supports varargs
¨ Query for a single row
public int getTotalFlights(String carrier) { return jdbcTemplate.queryForInt( "select count(*) from flights_test where carrier = ?", carrier);
}
public Map getFlightInfo(String flightNo) { return jdbcTemplate.queryForMap( "select * from flights_test where flightno=?", flightNo);
}
236
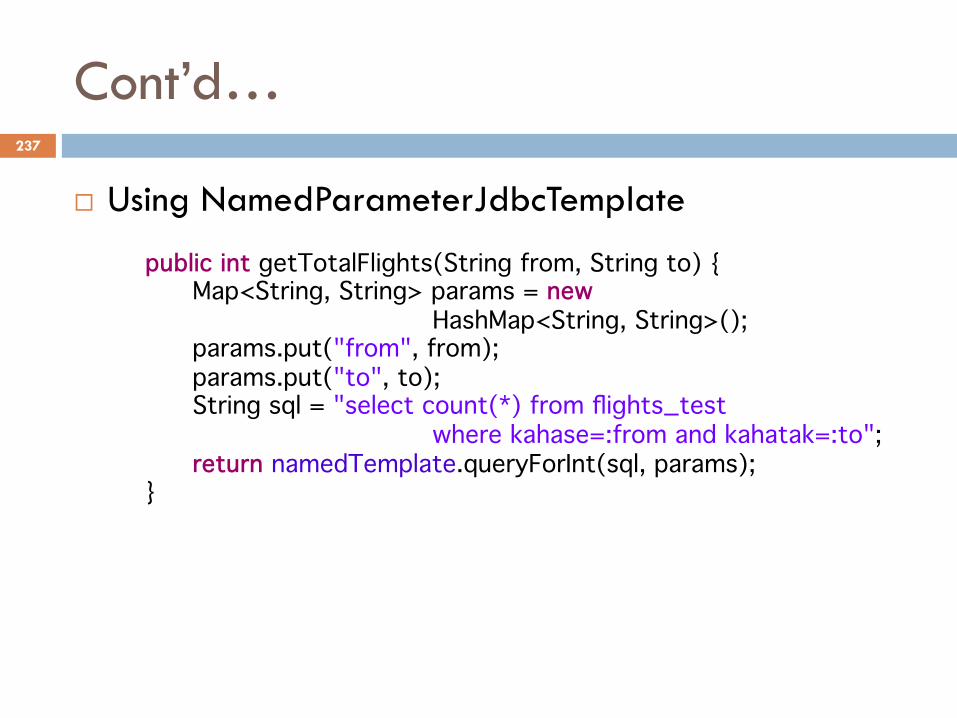
Cont’d…
¨ Using NamedParameterJdbcTemplate
public int getTotalFlights(String from, String to) { Map<String, String> params = new HashMap<String, String>(); params.put("from", from); params.put("to", to); String sql = "select count(*) from flights_test where kahase=:from and kahatak=:to"; return namedTemplate.queryForInt(sql, params);
}
237
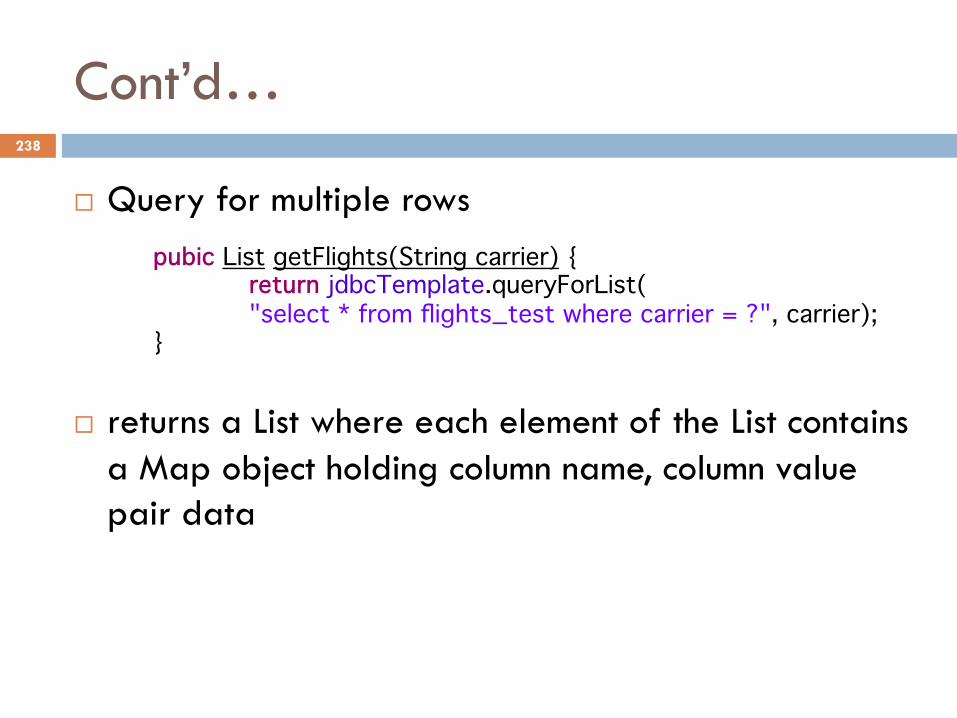
Cont’d…
¨ Query for multiple rows
¨ returns a List where each element of the List contains a Map object holding column name, column value pair data
pubic List getFlights(String carrier) { return jdbcTemplate.queryForList( "select * from flights_test where carrier = ?", carrier);
}
238
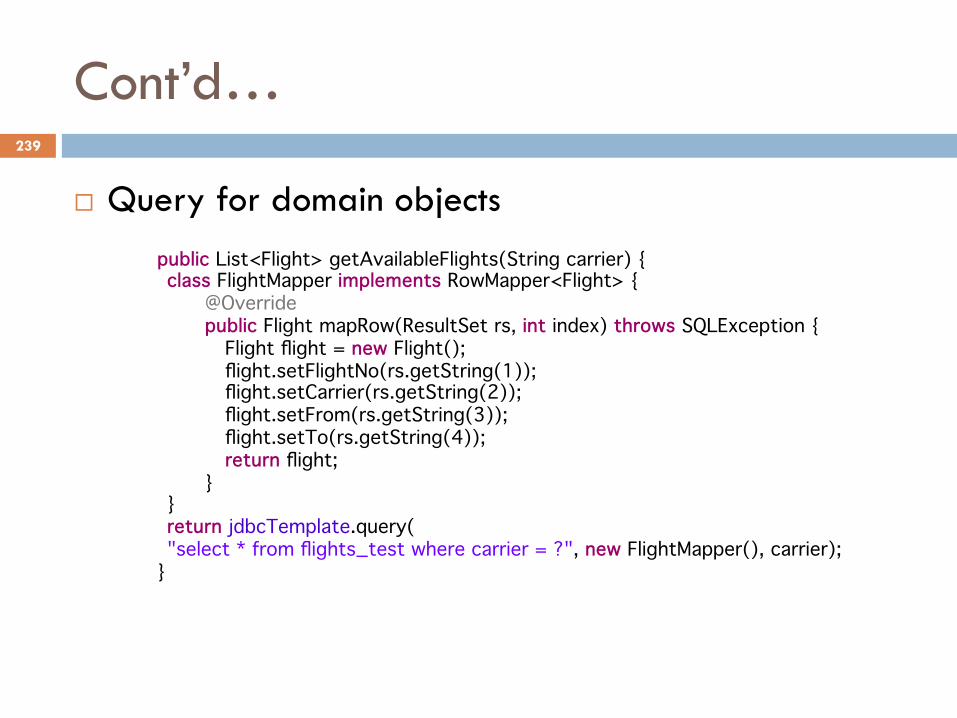
Cont’d…
¨ Query for domain objects public List<Flight> getAvailableFlights(String carrier) { class FlightMapper implements RowMapper<Flight> { @Override public Flight mapRow(ResultSet rs, int index) throws SQLException { Flight flight = new Flight(); flight.setFlightNo(rs.getString(1)); flight.setCarrier(rs.getString(2)); flight.setFrom(rs.getString(3)); flight.setTo(rs.getString(4)); return flight; } } return jdbcTemplate.query( "select * from flights_test where carrier = ?", new FlightMapper(), carrier); }
239
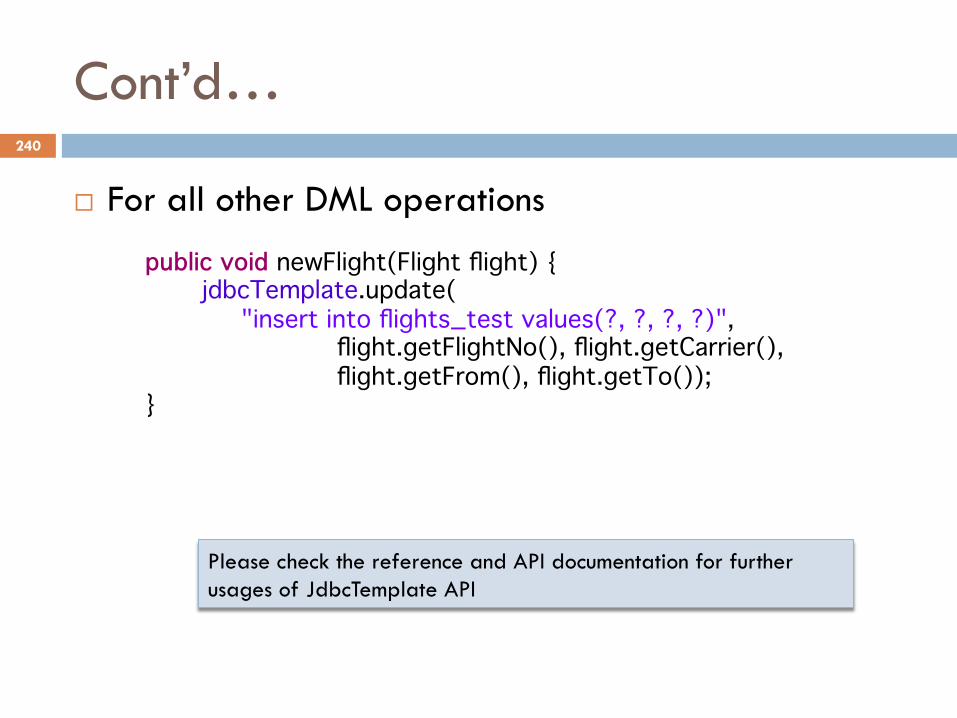
Cont’d…
¨ For all other DML operations
public void newFlight(Flight flight) { jdbcTemplate.update( "insert into flights_test values(?, ?, ?, ?)", flight.getFlightNo(), flight.getCarrier(), flight.getFrom(), flight.getTo());
}
Please check the reference and API documentation for further usages of JdbcTemplate API
240
Lab No. 6
Spring JDBC Support
Refer to the lab guide provided along with the eclipse project to proceed further
241
Topics in this Session
¨ Spring and Hibernate integration ¤ Configure Hibernate SessionFactory in Spring ¤ Using HibernateTemplate class for managing Hibernate
Session object
¨ Spring and JPA integration ¤ Confure EntityManagerFactory in Spring ¤ Using JpaTemplate class for managing JPA
EntityManager object
242
About Spring and Hibernate
¨ Hibernate is one of the most powerful ORM technology used widely today
¨ Hibernate is 100% JPA compliant ORM ¨ Spring supports native Hibernate integration as well as
integration via JPA ¨ The real benefit of Spring used along with Hibernate/
JPA would be: ¤ Delegating SessionFactory creation to Spring ¤ Use DI wherever we need the SessionFactory ¤ Manage transactions using Spring’s declarative
TransactionManager
243
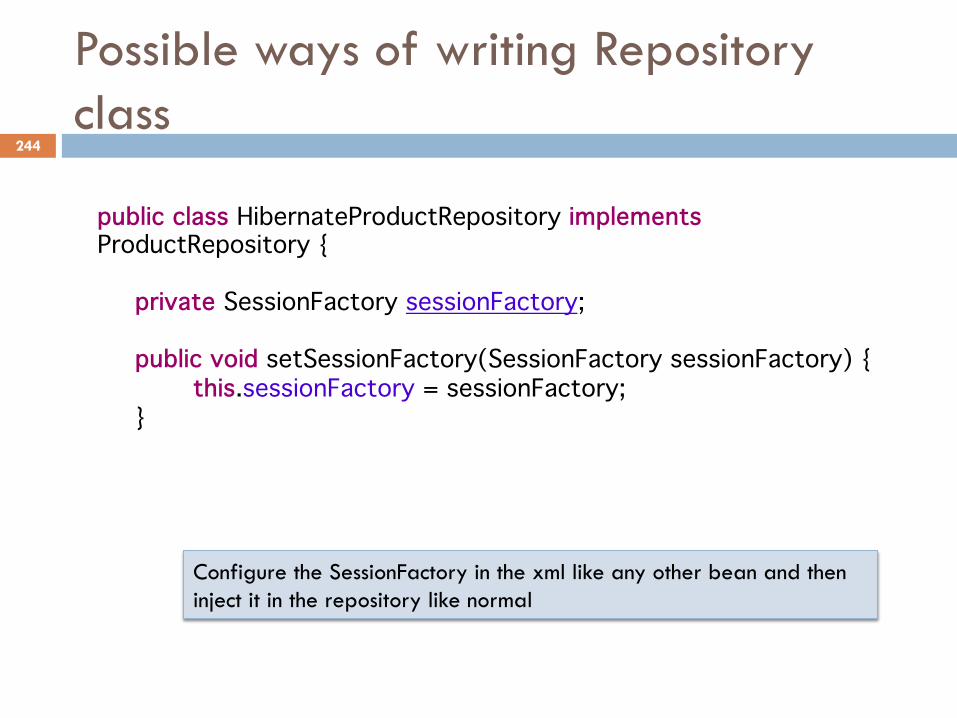
Possible ways of writing Repository class
public class HibernateProductRepository implements ProductRepository {
private SessionFactory sessionFactory; public void setSessionFactory(SessionFactory sessionFactory) { this.sessionFactory = sessionFactory; }
Configure the SessionFactory in the xml like any other bean and then inject it in the repository like normal
244
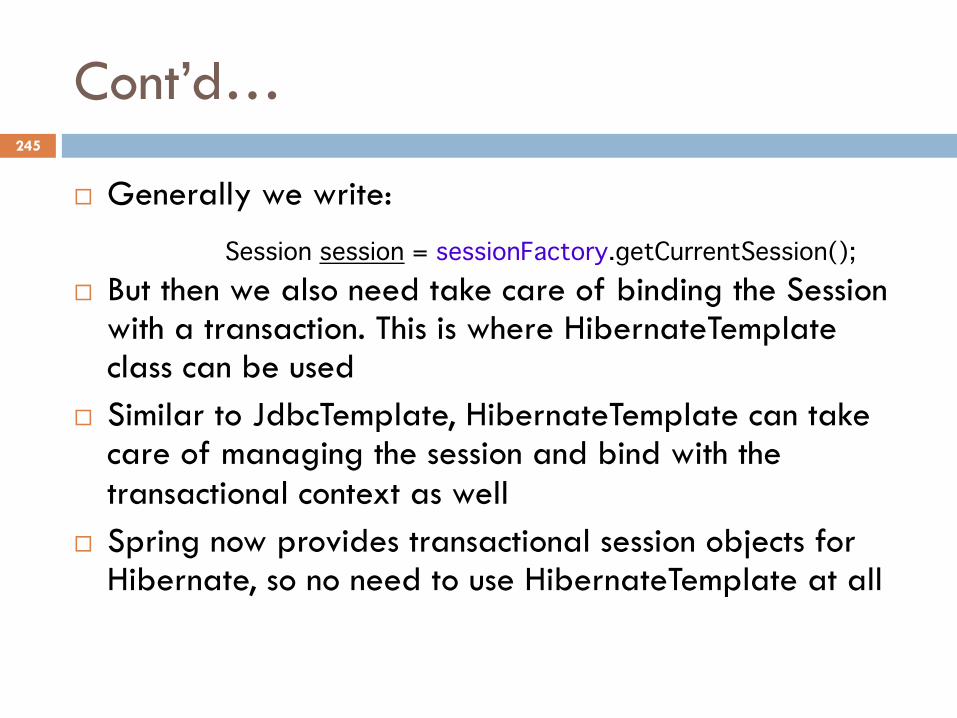
Cont’d…
¨ Generally we write: ¨ But then we also need take care of binding the Session
with a transaction. This is where HibernateTemplate class can be used
¨ Similar to JdbcTemplate, HibernateTemplate can take care of managing the session and bind with the transactional context as well
¨ Spring now provides transactional session objects for Hibernate, so no need to use HibernateTemplate at all
Session session = sessionFactory.getCurrentSession();
245
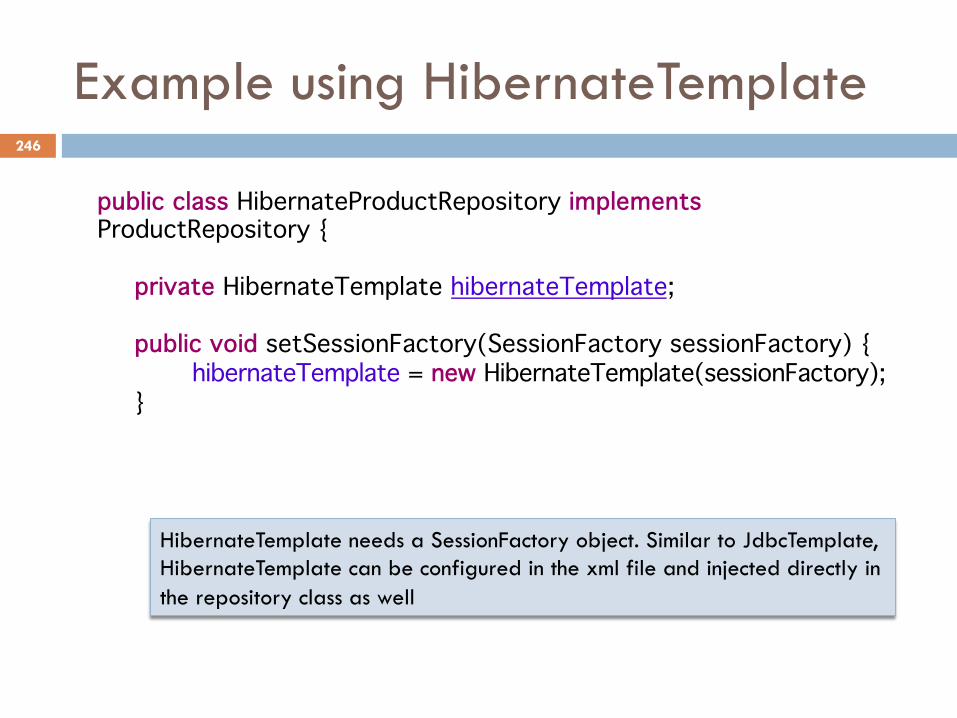
Example using HibernateTemplate
public class HibernateProductRepository implements ProductRepository {
private HibernateTemplate hibernateTemplate; public void setSessionFactory(SessionFactory sessionFactory) { hibernateTemplate = new HibernateTemplate(sessionFactory); }
HibernateTemplate needs a SessionFactory object. Similar to JdbcTemplate, HibernateTemplate can be configured in the xml file and injected directly in the repository class as well
246
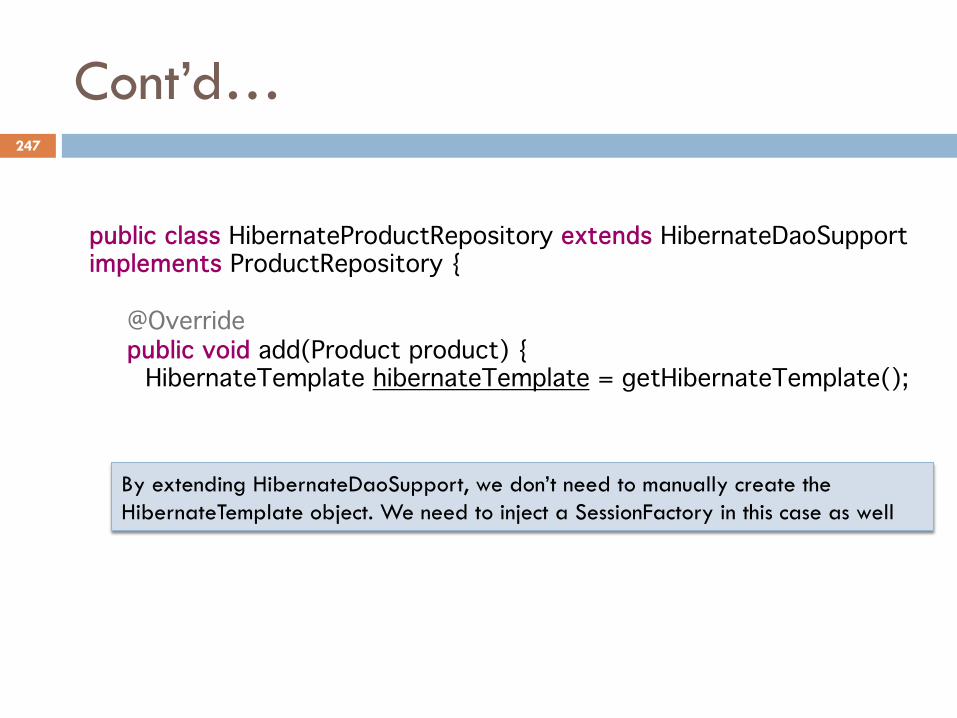
Cont’d…
public class HibernateProductRepository extends HibernateDaoSupport implements ProductRepository {
@Override public void add(Product product) { HibernateTemplate hibernateTemplate = getHibernateTemplate();
By extending HibernateDaoSupport, we don’t need to manually create the HibernateTemplate object. We need to inject a SessionFactory in this case as well
247
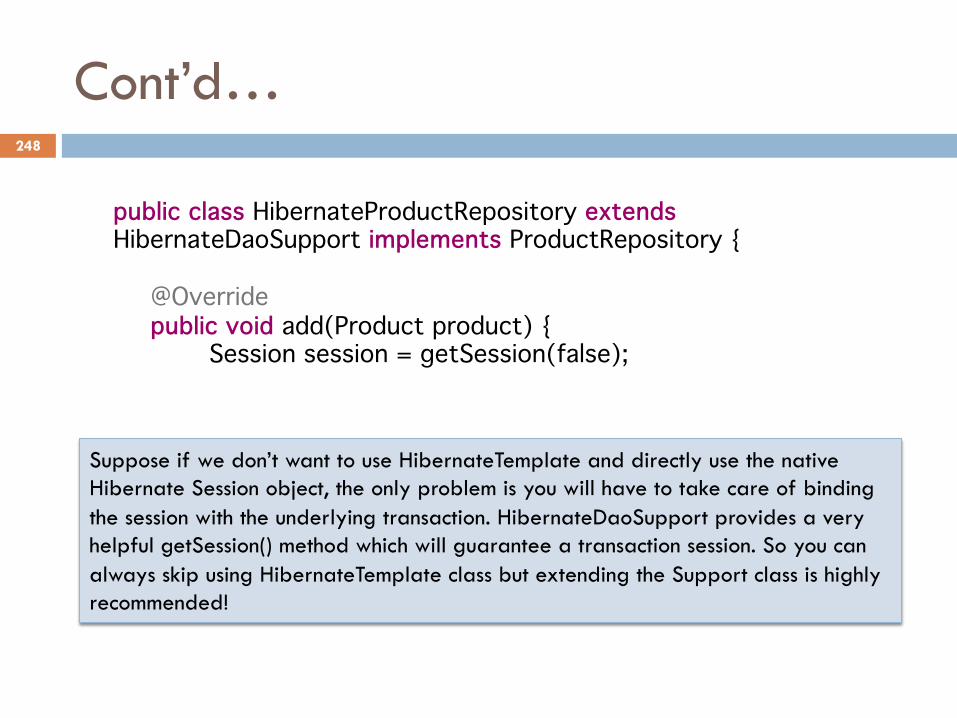
Cont’d…
public class HibernateProductRepository extends HibernateDaoSupport implements ProductRepository {
@Override public void add(Product product) { Session session = getSession(false);
Suppose if we don’t want to use HibernateTemplate and directly use the native Hibernate Session object, the only problem is you will have to take care of binding the session with the underlying transaction. HibernateDaoSupport provides a very helpful getSession() method which will guarantee a transaction session. So you can always skip using HibernateTemplate class but extending the Support class is highly recommended!
248
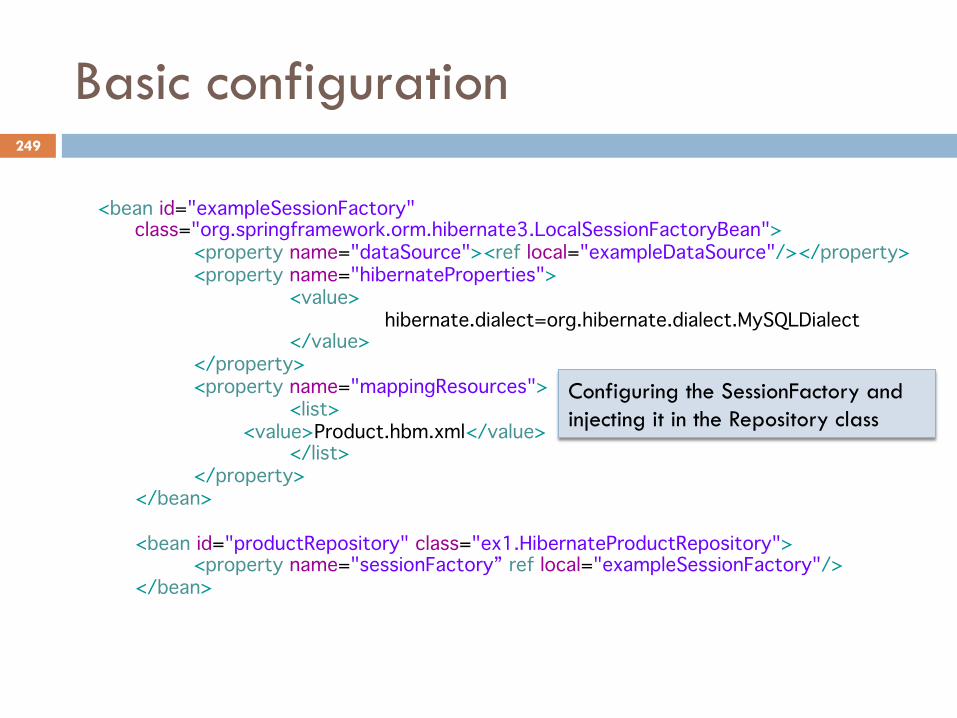
Basic configuration
<bean id="exampleSessionFactory" class="org.springframework.orm.hibernate3.LocalSessionFactoryBean"> <property name="dataSource"><ref local="exampleDataSource"/></property> <property name="hibernateProperties"> <value> hibernate.dialect=org.hibernate.dialect.MySQLDialect </value> </property> <property name="mappingResources"> <list> <value>Product.hbm.xml</value> </list> </property> </bean> <bean id="productRepository" class="ex1.HibernateProductRepository"> <property name="sessionFactory” ref local="exampleSessionFactory"/> </bean>
Configuring the SessionFactory and injecting it in the Repository class
249
Spring JPA Support
¨ In JPA, a persistent unit is represented as an object of EntityManagerFactory interface similar to SessionFactory interface in Hibernate
¨ To persist/load object graph we need to use EntityManager interface and it’s method similar to Session interface in Hibernate
¨ Spring provides a JpaTemplate with similar set of expectations as like HibernateTemplate class
250
Example
public class JpaProductRepository implements ProductRepository {
private EntityManagerFactory entityManagerFactory; public void setEntityManagerFactory( EntityManagerFactory entityManagerFactory) { this.entityManagerFactory = entityManagerFactory; } @Override public void add(Product product) { EntityManager entityManager = entityManagerFactory.createEntityManager(); …
Once again we will have to deal with transactional issues in this code
251
Cont’d…
public class JpaProductRepository implements ProductRepository {
private JpaTemplate jpaTemplate; public void setEntityManagerFactory( EntityManagerFactory entityManagerFactory) { jpaTemplate = new JpaTemplate(entityManagerFactory); }
JpaTemplate like other template classes manage the underlying resource and take of transactional binding as well Similarly we have JpaDaoSupport class as well which we can extend if we don’t want to manually instantiate JpaTemplate object
252
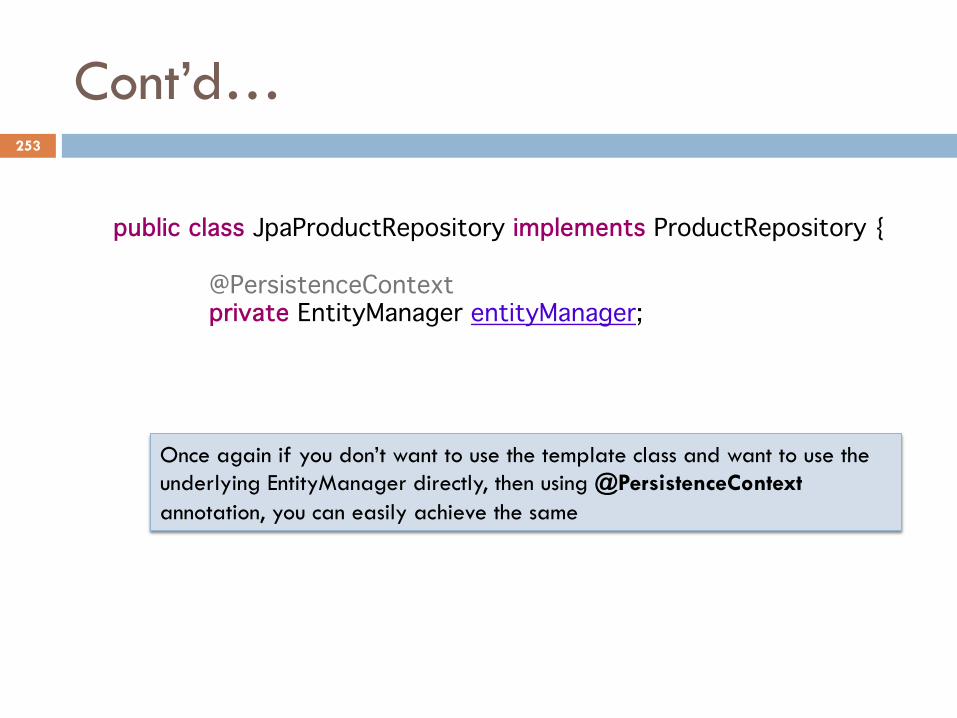
Cont’d…
public class JpaProductRepository implements ProductRepository {
@PersistenceContext private EntityManager entityManager;
Once again if you don’t want to use the template class and want to use the underlying EntityManager directly, then using @PersistenceContext annotation, you can easily achieve the same
253
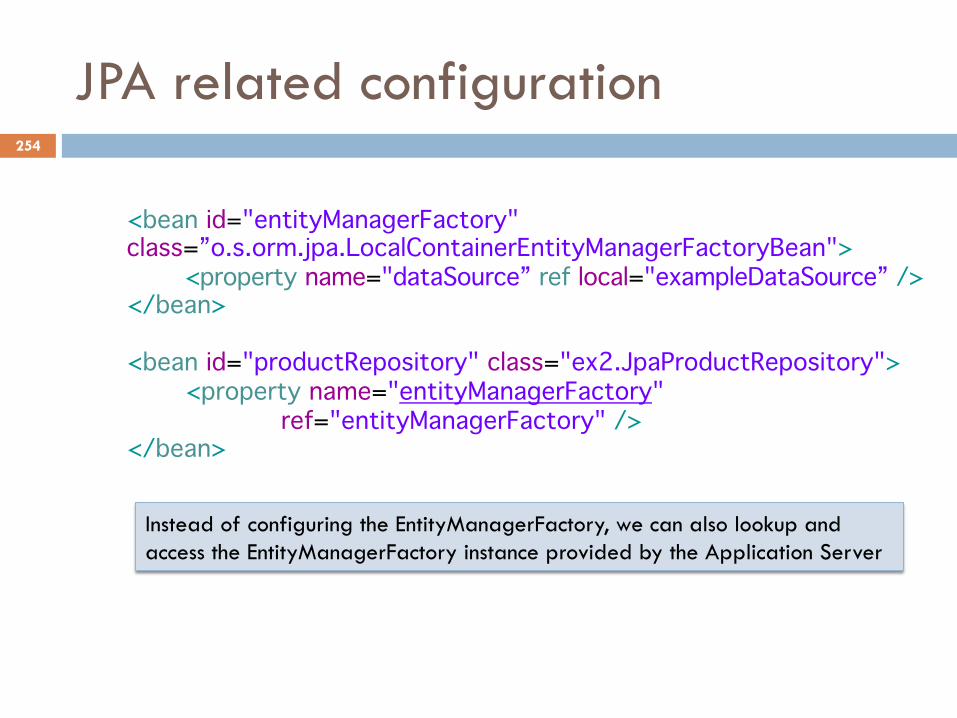
JPA related configuration
<bean id="entityManagerFactory" class=”o.s.orm.jpa.LocalContainerEntityManagerFactoryBean"> <property name="dataSource” ref local="exampleDataSource” /> </bean>
<bean id="productRepository" class="ex2.JpaProductRepository"> <property name="entityManagerFactory" ref="entityManagerFactory" /> </bean>
Instead of configuring the EntityManagerFactory, we can also lookup and access the EntityManagerFactory instance provided by the Application Server
254
Lab No. 7
Spring Hibernate/JPA Integration
Refer to the lab guide provided along with the eclipse project to proceed further
255
Topics in this Session
¨ Why use transactions? ¨ Local transaction management ¨ Distributed transaction management ¨ Spring transaction management ¨ Declarative transaction management ¨ Transaction propagation
256
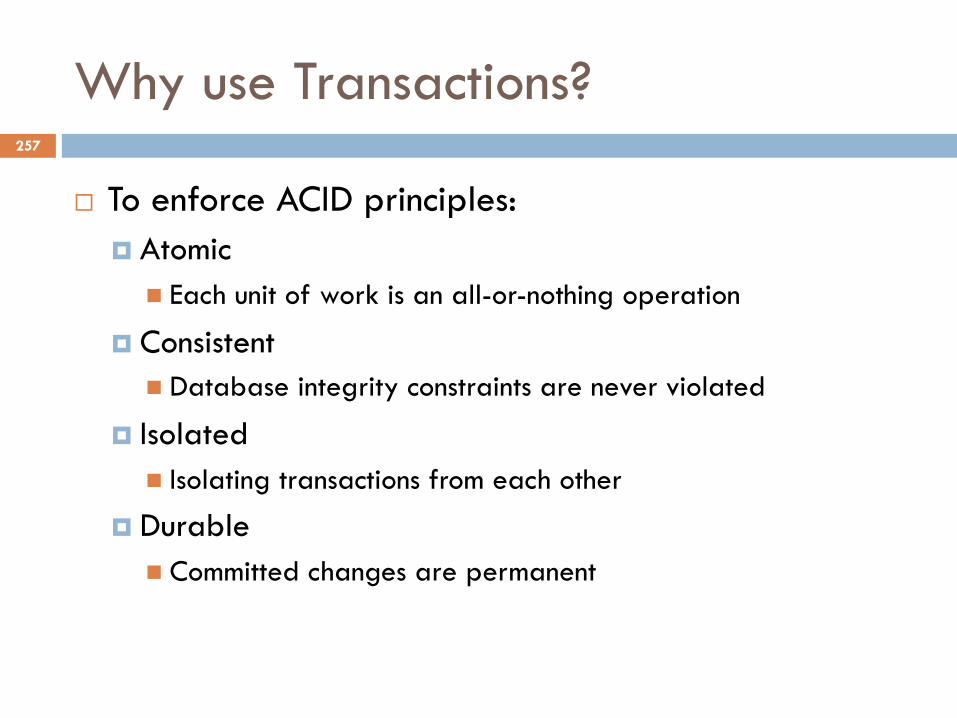
Why use Transactions?
¨ To enforce ACID principles: ¤ Atomic
n Each unit of work is an all-or-nothing operation
¤ Consistent n Database integrity constraints are never violated
¤ Isolated n Isolating transactions from each other
¤ Durable n Committed changes are permanent
257
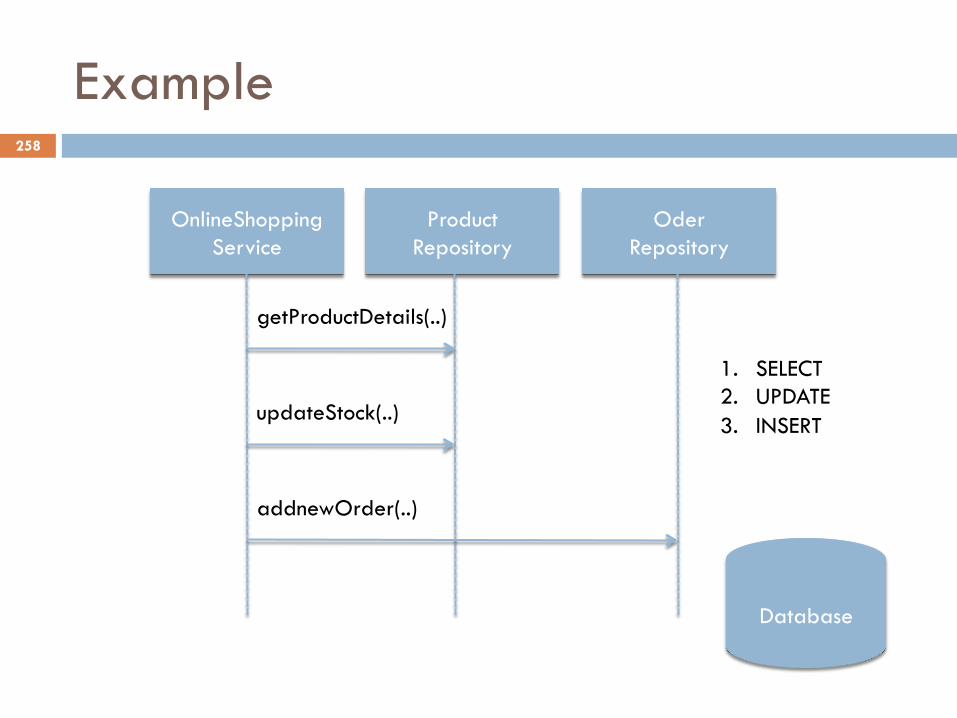
Example
OnlineShopping Service
Product Repository
Oder Repository
getProductDetails(..)
updateStock(..)
addnewOrder(..)
1. SELECT 2. UPDATE 3. INSERT
Database
258
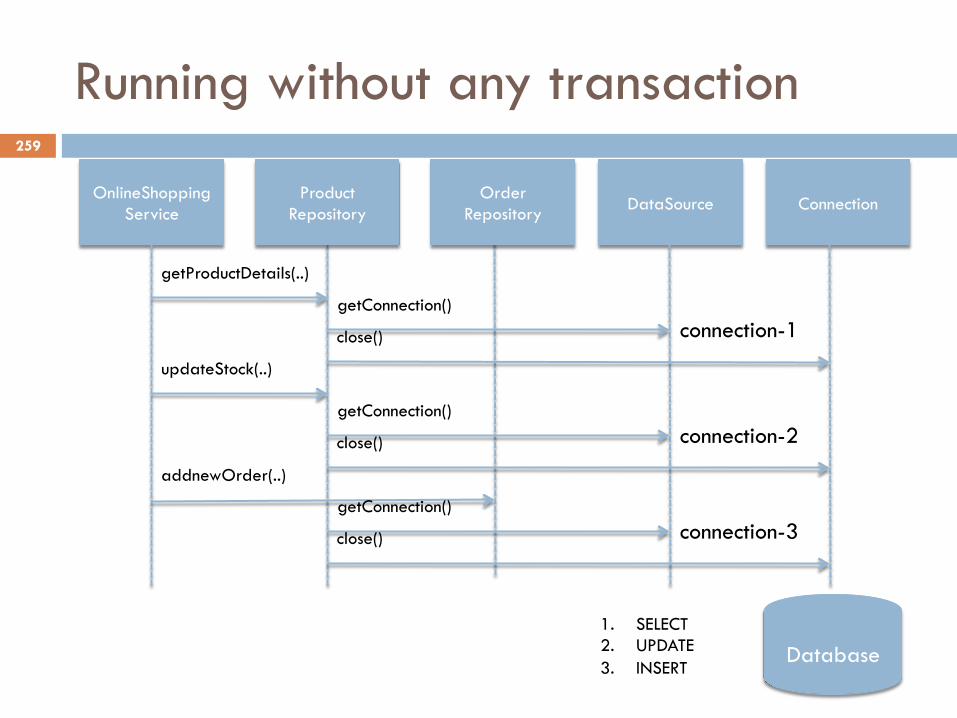
Running without any transaction
OnlineShopping Service
getProductDetails(..)
updateStock(..)
addnewOrder(..)
1. SELECT 2. UPDATE 3. INSERT
Database
Product Repository
Order Repository DataSource Connection
getConnection()
close() connection-1
getConnection()
close() connection-2
getConnection()
close() connection-3
259

Running in a transaction
OnlineShopping Service
getProductDetails(..)
updateStock(..)
addnewOrder(..)
1. SELECT 2. UPDATE 3. INSERT
Database
Product Repository
Order Repository DataSource Connection
getConnection()
connection-1
close()
260
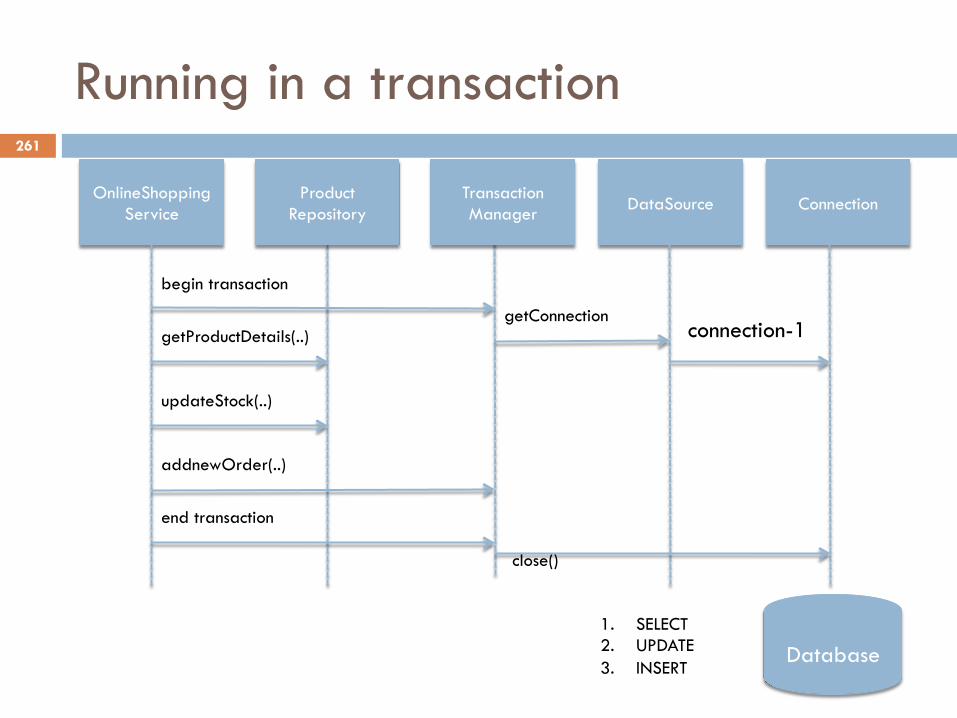
Running in a transaction
OnlineShopping Service
getProductDetails(..)
updateStock(..)
addnewOrder(..)
1. SELECT 2. UPDATE 3. INSERT
Database
Product Repository
Transaction Manager DataSource Connection
begin transaction
connection-1
end transaction
getConnection
close()
261
The risks of not using transactions
¨ Efficient connection management is important ¨ Proper transaction management is even more important
¤ Using a Transaction API to dealing with this ¨ The problem is that the API for managing local
transaction management is part of JDBC itself whereas the API for distributed transaction management is JTA
¨ It might happen that initially we are using a single database and using JDBC for managing transactions and in future we might want to distribute the data across multiple databases and this would mean a good amount of change in transaction management code
262
Local Transaction management
¨ Transactions can be managed at the level of the local resource ¤ Database
¨ Cannot be used if multiple resources are paticipating in a transaction
¨ The java.sql.Connection interface itself contains methods for managing local transactions: ¤ setAutoCommit(boolean), commit(), rollback(), etc…
263

Distributed Transaction management
¨ JTA is used if we need to manage transactions across multiple resources
¨ Application Servers provide full support for 2PC/XA transactions ¤ We need to use UserTransaction interface and it’s
methods like begin(), commit() and rollback()
264
Declarative transactions
¨ We are not going to write transaction management code
¨ We just need to declare that a service method represents a logical, atomic unit-of-work
¨ Container/Framework manages transactions based on metadata ¤ Spring and EJB both support declarative transaction
management ¨ No need for transaction management code getting
cluttered along with business logic
265
Spring Transaction management
¨ Provides a flexible and powerful abstraction layer for transaction management
¨ JTA is an option, not a requirement ¤ EJB uses JTA by default which means even if you are
accessing a single resouce, the container still performs two phase commit
¨ Difference between local and JTA transactions are completely hidden
266
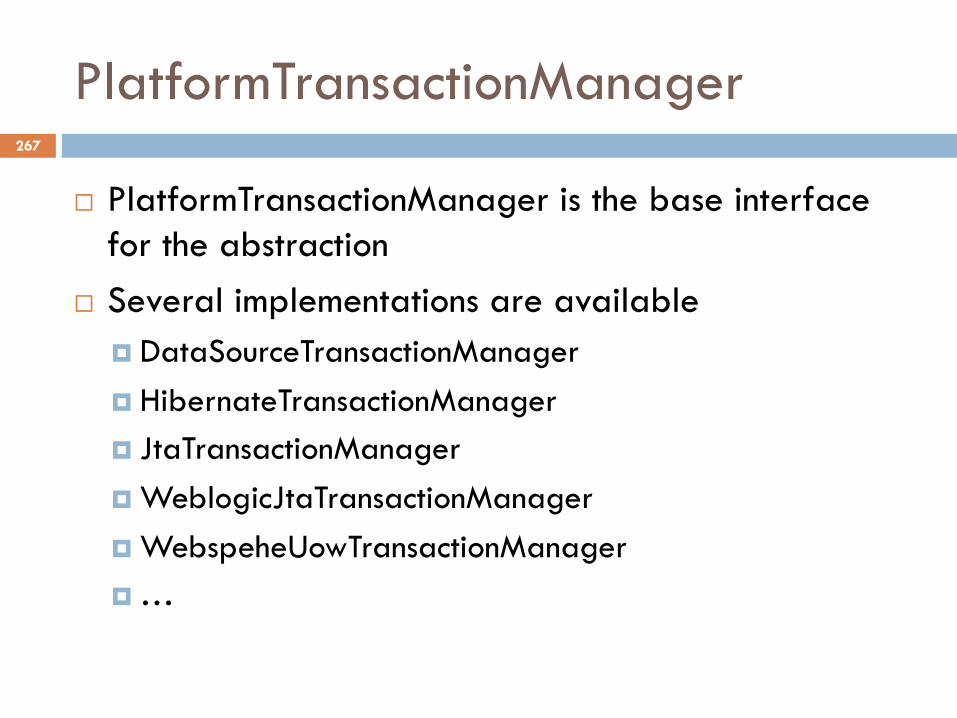
PlatformTransactionManager
¨ PlatformTransactionManager is the base interface for the abstraction
¨ Several implementations are available ¤ DataSourceTransactionManager ¤ HibernateTransactionManager ¤ JtaTransactionManager ¤ WeblogicJtaTransactionManager ¤ WebspeheUowTransactionManager ¤ …
267
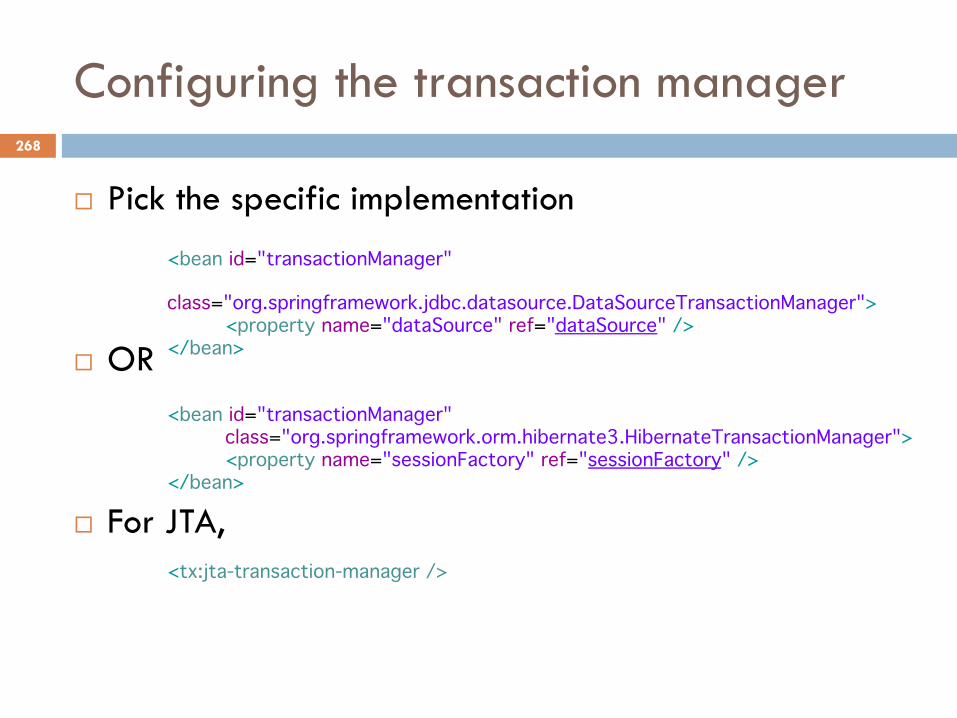
Configuring the transaction manager
¨ Pick the specific implementation
¨ OR
¨ For JTA,
<bean id="transactionManager" class="org.springframework.jdbc.datasource.DataSourceTransactionManager"> <property name="dataSource" ref="dataSource" /> </bean>
<bean id="transactionManager" class="org.springframework.orm.hibernate3.HibernateTransactionManager"> <property name="sessionFactory" ref="sessionFactory" /> </bean>
<tx:jta-transaction-manager />
268
Declarative transactions with Spring
¨ Declarative transactions is highly recommended ¨ If you wish to programatically deal with
transactions, you can always inject the TransactionManager like any other bean. Also Spring provides TransactionTemplate class for programatically managing the same
¨ Both annotations as well as xml approach can be used for declaring transaction boundaries
269
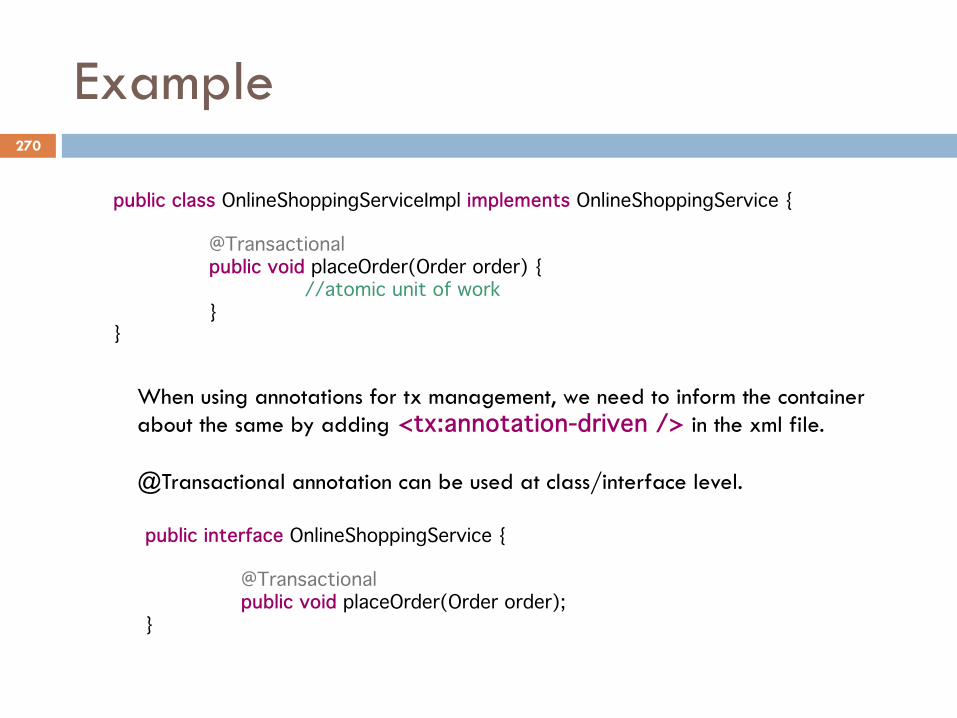
Example
public class OnlineShoppingServiceImpl implements OnlineShoppingService {
@Transactional public void placeOrder(Order order) { //atomic unit of work }
}
When using annotations for tx management, we need to inform the container about the same by adding <tx:annotation-driven /> in the xml file. @Transactional annotation can be used at class/interface level.
public interface OnlineShoppingService {
@Transactional public void placeOrder(Order order);
}
270
But who reads those annotations?
¨ Spring uses AOP proxies for beans requiring transaction support by default
¨ A proxy class would be generated for OnlineShoppingService bean which will communicate with the transaction manager and based on the configuration will propagate the transaction accordingly
¨ No problem if LTW has to be used, it’s a minor change in the configuration required
271
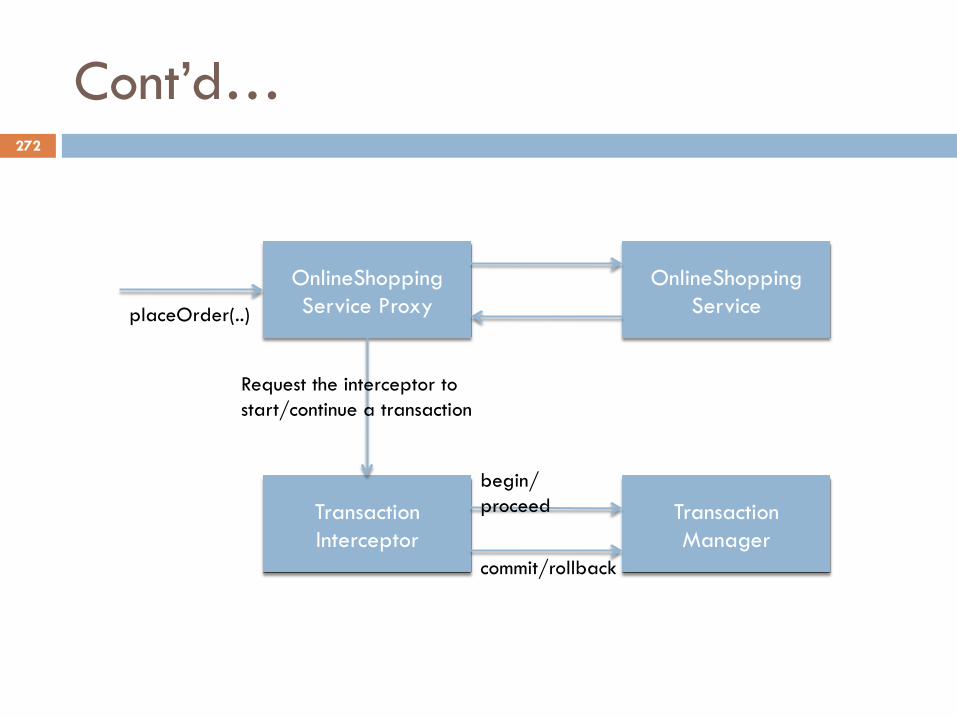
Cont’d…
Transaction Manager
Transaction Interceptor
OnlineShopping Service
OnlineShopping Service Proxy placeOrder(..)
Request the interceptor to start/continue a transaction
begin/proceed
commit/rollback
272
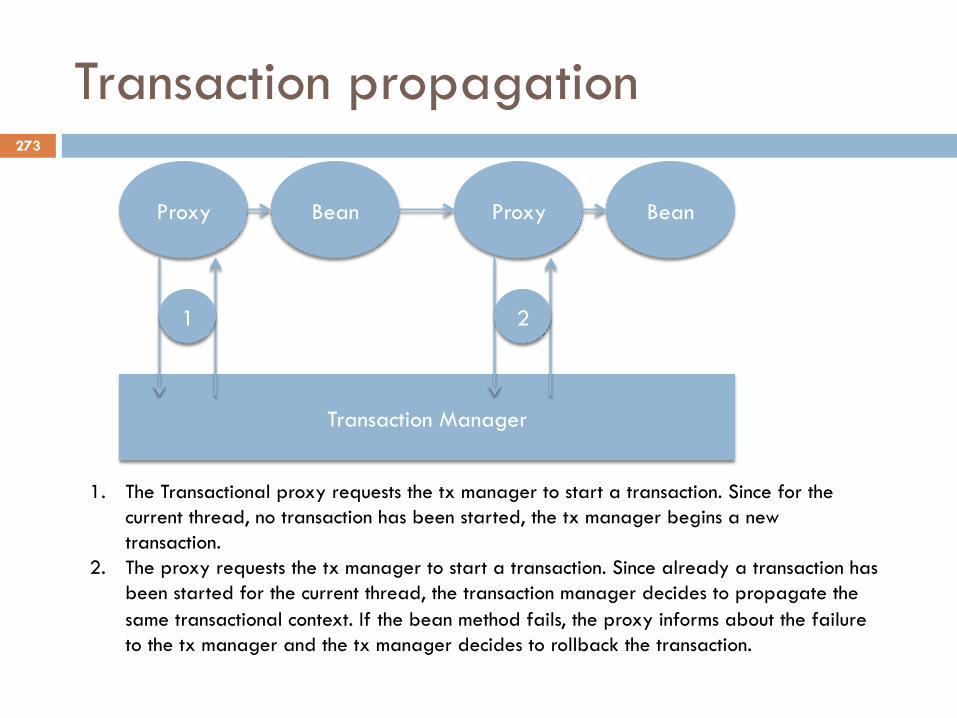
Transaction propagation
Proxy Bean Proxy Bean
Transaction Manager
1 2
1. The Transactional proxy requests the tx manager to start a transaction. Since for the current thread, no transaction has been started, the tx manager begins a new transaction.
2. The proxy requests the tx manager to start a transaction. Since already a transaction has been started for the current thread, the transaction manager decides to propagate the same transactional context. If the bean method fails, the proxy informs about the failure to the tx manager and the tx manager decides to rollback the transaction.
273

@Transactional attributes
@Transactional(isolation=Isolation.READ_COMMITTED)
Informs the tx manager that the following isolation level shoud be used for the current tx. Should be set at the point from where the tx starts because we cannot change the isolation level after starting a tx.
@Transactional(timeout=60)
Informs the tx manager about the time duration to wait for an idle tx before a decision is taken to rollback non-responsive transactions.
@Transactional(propagation=Propagation.REQUIRED)
If not specified, the default propagational behavior is REQUIRED. Other options are REQUIRES_NEW, MANDATORY, SUPPORTS, NOT_SUPPORTED, NEVER and NESTED.
274
REQUIRED
¨ Indicates that the target method can not run without an active tx. If a tx has already been started before the invocation of this method, then it will continue in the same tx or a new tx would begin soon as this method is called.
¨ Methods which can be atomic as well as sub-atomic in nature are the best candidates for this option ¤ withdraw() method can be a separate tx on its own as
well as can be a part of a tx in case of transfer()
275
REQUIRES_NEW
¨ Indicates that a new tx has to start everytime the target method is called. If already a tx is going on, it will be suspended before starting a new one.
¨ Methods which are atomic in nature and cannot be sub-atomic unit of work are the best candidates for this option. ¤ transfer(), placeOrder() cannot participate in an
ongoing tx. It should always run in it’s own tx
276
MANDATORY
¨ Indicates that the target method requires an active tx to be running. If a tx is not going on, it will fail by throwing an exception.
¨ Methods which are purely sub-atomic in nature and cannot be atomic unit or work are the best candidates for this option. ¤ addPaymentRecord() cannot be an atomic unit of work.
It’s always a part of an existing transaction like billPayment(), placeOrder(), etc…
277
SUPPORTS
¨ Indicates that the target method can execute irrespective of a tx. If a tx is running, it will participate in the same tx
¨ If executed without a tx it will still execute if no errors
¨ Methods which fetch data are the best candidates for this option ¤ getProductDetails() can utilize locking capabilities if
running in a tx, or else it will anyway fetch the data based on the isolation level set.
278
NOT_SUPPORTED
¨ Indicates that the target method doesn’t requires the transaction context to be propagated
¨ Mostly those methods which run in a transaction but perform in-memory operations are the best candidates for this option.
279
NEVER
¨ Indicates that the target method will raise an exception is executed in a transactional process
¨ This option is mostly not used in projects
280

NESTED
¨ Indicates that the target method should create a Savepoint in the ongoing transaction so that if the target method fails, instead of rolling back the whole tx, only rollback till the savepoint created
¨ createBackup() method can be good candidate for this option, as we don’t wan’t to cancel the order just because we were not able to create a backup of the order
281
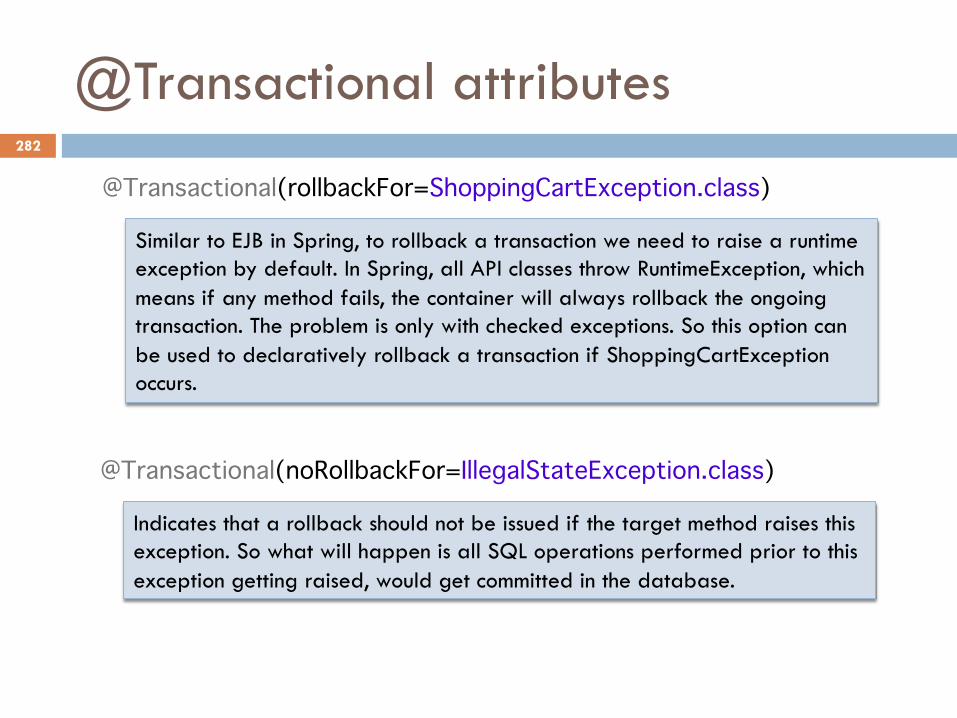
@Transactional attributes
@Transactional(rollbackFor=ShoppingCartException.class)
Similar to EJB in Spring, to rollback a transaction we need to raise a runtime exception by default. In Spring, all API classes throw RuntimeException, which means if any method fails, the container will always rollback the ongoing transaction. The problem is only with checked exceptions. So this option can be used to declaratively rollback a transaction if ShoppingCartException occurs.
@Transactional(noRollbackFor=IllegalStateException.class)
Indicates that a rollback should not be issued if the target method raises this exception. So what will happen is all SQL operations performed prior to this exception getting raised, would get committed in the database.
282
Lab No. 8
Transaction management
Refer to the lab guide provided along with the eclipse project to proceed further
283
Thank you for attending this training program. Hope you had a wonderful training experience. You can always [email protected]
conclusion 284