Embed Size (px)
Citation preview
1
Spring 2017 - Full Semester Course - 18 Weeks Sewing Fundamentals 2
►Apparel Construction February 2, 2017 – June 8, 2017
Thursdays: 1:30 – 6:30 PM.
Instructor: Joan McKenna [email protected]
619-588-2244 Blog: www.sewalongwithjoanie.com
Location: West City Campus 3249 Fordham Street San Diego, CA 92110 Room 209
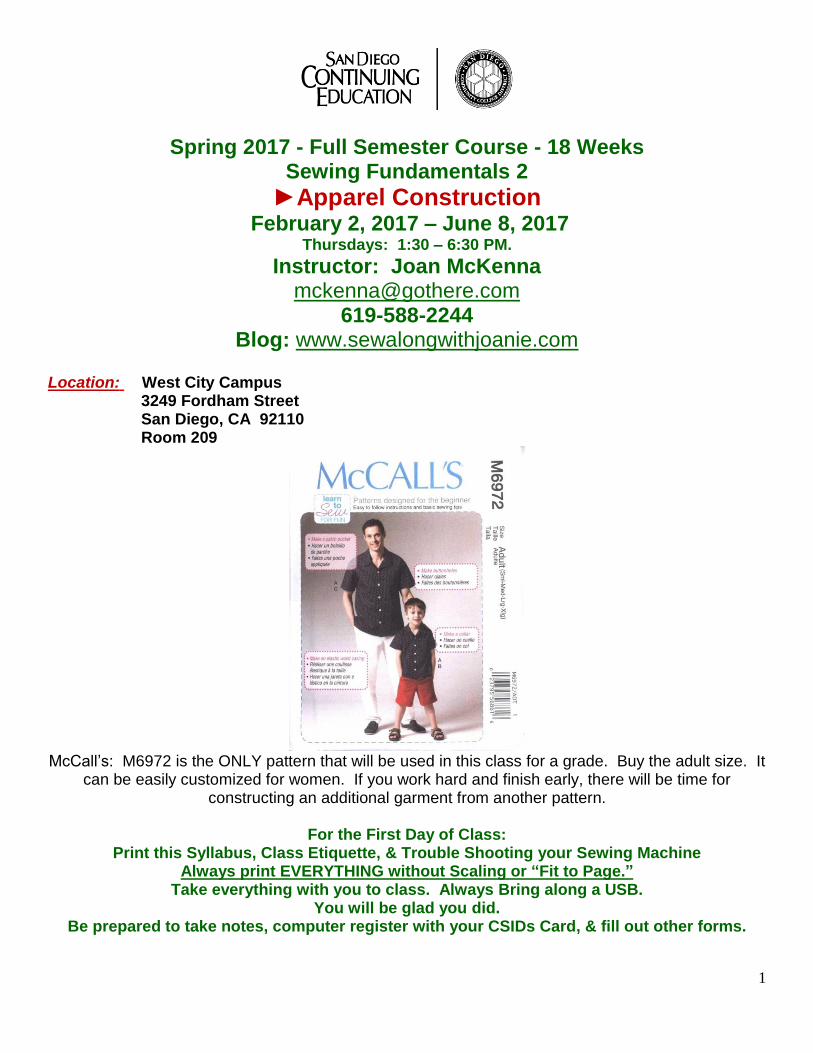
McCall’s: M6972 is the ONLY pattern that will be used in this class for a grade. Buy the adult size. It
can be easily customized for women. If you work hard and finish early, there will be time for constructing an additional garment from another pattern.
For the First Day of Class:
Print this Syllabus, Class Etiquette, & Trouble Shooting your Sewing Machine Always print EVERYTHING without Scaling or “Fit to Page.”
Take everything with you to class. Always Bring along a USB. You will be glad you did.
Be prepared to take notes, computer register with your CSIDs Card, & fill out other forms.

2
Hospitality and Consumer Sciences
SLOs, Visions, Missions
Program Purpose/Vision: The purpose is to provide San Diego Community College Continuing Education with non-credit courses consistent with the current Family and Consumer Sciences Program Plan for Community Colleges. Mission Statement: Students completing courses or programs in San Diego Continuing Education’s Hospitality and Consumer Sciences department will gain knowledge and skills in any of the possible subject matter offerings (foods/nutrition; culinary arts/hospitality/fashion productions/fashion merchandising/textiles/interior design/life management/consumer issues and personal development) in order to prepare for vocational careers in the above and to positively affect one’s quality of life. The vision is to increase professional development, expand course diversity, enhance CE’s image and grow enrollments in HCS. SDCE Institutional Student Learning Outcomes: 1. Social Responsibility
SDCE students demonstrate interpersonal skills by learning and working cooperatively in a diverse environment.
2. Effective Communication SDCE students demonstrate effective communication skills.
3. Critical Thinking SDCE students critically process information, make decisions, and solve problems independently or cooperatively.
4. Personal and Professional Development SDCE students pursue short term and life-long learning goals, mastering necessary skills and using resource management and self-advocacy skills to cope with changing situations in their lives.
5. Diversity SDCE students incorporate and use principles of civility and compassion as they develop knowledge and skills: recognizing, respecting and valuing the place and role of all individuals in their community. Fashion Discipline Student Learning Outcome (SLO): Students completing a fashion or fashion production course or program will be able to understand and apply concepts, technologies, related skills and techniques by successfully completing class projects in order to prepare for fashion careers. Course Student Learning Outcome: Upon course completion, students will be able to demonstrate basic sewn product stitching & construction skills as evidence by the completion of an Apparel Construction project. Course Description & Recommended Skill Level:
Learn how to understand a pattern guide. Master professional standards of workmanship without complicated and unnecessary work. Gain confidence using new fabrics, different types of sewing machines, and industrial techniques. Emphasis on commercial, custom, and timesaving techniques.
Course Objectives:
3
Students will demonstrate their class acquired learning and competencies through practical applications, plus written and oral communications. At the end of the course, with reasonable attendance, the student should be able to demonstrate the ability to: 1. Apply concepts of personal style including color and fit in garment sewing. 2. Interpret and plan the construction of the garment using information given on the pattern envelope, pattern pieces and instruction guide. 3. Identify various types of fabric, interfacings and sewing supplies. 4. Measure accurately a human body or dress form to determine correct pattern size. 5. Adjust a commercial pattern to have different and/or specific design features. 6. Demonstrate the use and maintenance of sewing machines, sergers, cutting tools, and other equipment and supplies necessary for efficient sewing. 7. Layout pattern pieces efficiently on fabric according to the appropriate grain line marked on the pattern. 8. Document progress of sewing abilities by the completion of a basic apparel project. Techniques learned may include, but not limited to seams and seam finishes, button and/or zipper closure, easing, pockets, & hems. 9. Describe fashion industry concepts and trends including green (sustainable) technology 10. Identify and discuss entry level career positions for beginning sewers in the sewn product industry. Method of Instruction: Methods of Instruction may include, but are not limited to: classroom lectures, classroom discussions, collaborative learning, peer training, demonstrations, internet resource websites and links for research, YouTube, software programs, books on disk, text books, library building books, written information handouts, audio-visual presentations, fandangos, field trips, guest speakers, completion of portfolios and sewn projects, personalized attention, and other student projects. To get Individualized Help: Write your name on the white board in descending order under the word "Help." Student Responsibilities: Students are expected to come to class on time (see me if you can’t) and commit to attending class each day. Sign in and out on the Class Attendance Sheet. If you do not sign in, I can NOT give you credit for coming to class.
ALL My Syllabi are ALWAYS subject to change. Sewing Fundamentals 2: Apparel Construction
Class 1: Thurs. Feb 2, 2017 – First Day of Class. Introductions. Computer Registration. Computer room. Use your CSIDs number. Student Learning Outcome Sheets. Phone number and email form. Tools and Equipment supplied by the School. The syllabus. Fit Models. Classroom Etiquette. Handouts and Resources on a USB. Work alone with the instructor’s help. Keep up with assignments. Homework. All Levels Welcome. Laying out & cutting in room 209. Bring your own sewing machine from home to use or provide TLC for the school’s machines. Signing out Sewing Machines. Using EROs. Sewing Fundamentals is taught as 2 classes: Sewing Fundamentals 1: BOOT CAMP – The Sewing Techniques Portfolio and Sewing Fundamentals 2: Individualized – Apparel Construction. The Text. There is a great Glossary in the text. Lessons, Sew alongs, & Demos are all student based. Receiving help and learning from each other. Always list your topic on the “Help” board. Buying your project needs: fabric, notions, & lifetime sewing kit. Buying a sewing machine. Email your absences to me. Cleaning up at end of EACH class. Today's Lessons:
4
1. Basic Apparel Construction Project. This course is tough in the beginning. Do the work involved - ONTIME. It will pay off. Print: the Syllabus, Troubleshooting your Sewing Machine, & Classroom Etiquette. Print without scaling or fit to page. For our first project: We will all make the same pattern.
2. Touch Test: Learning to feel fabrics and interfacings. HOW TO Pre-shrink your fabrics and interfacings. Stabilizers do NOT get pre-shrunk.
3. Power Point on Sewing Needs: New Sewer’s Supplies 2. 4. Homework. Buy this pattern: in San Diego: McCall’s 6972 before going on the Fandango. It would be GREAT if you could get this pattern by tomorrow. Yardage Town in El Cajon will have this. Call them before going there: 1043 Broadway. El Cajon. 92021. Phone: 619-444-3208. (You will be very glad you did this !!!!) Note: The first 5 weeks of this course are very very hard. You ABSOLUTELY need to keep up with the work and assignments. Understand that you can get hurt sewing. You can get injured if you don’t take care of the equipment and yourself. (Commandment #1: Safety First !!) This could cause you to give up the greatest most fulfilling pastime in the world!!!!! FANDANGO: Saturday, Feb 4, 2017 - Field Trip to Yardage Town, and Central Sewing in El Cajon with Joan McKenna. Remember to bring your supply money and your syllabus. I have asked my other classes to join us.
Homework: Preshrink your fabrics. If you are buying special interfacing, follow their
instructions. If you are buying regular iron on interfacing, you can pre-shrink it in your kitchen sink.
9:30 AM - Yardage Town. 1043 Broadway. El Cajon. 92021. Phone: 619-444-3208. Do NOT buy Serger Thread here. Buy woven inexpensive Light Denim, Woven Interfacing, some supplies. it is a good idea to buy your pattern: EARLY !!!!!! 11 AM - Central Sewing East. 1125 North Second Street. El Cajon. 92021. Phone: 619-447-3244. To buy: Corner Template, Simflex, Mechanical Chalk Pencil, Bobbins, Schmetz Needles. ? Lunch ? MJ’s Family Restaurant 576 North 2nd Street. El Cajon, CA 92021 (619) 444-1902 http://mjsfamilyrestaurant.com/
El Cajon Bistro. 109 Jamacha Road, El Cajon, CA 92019 (619) 590-0278. www.elcajonbistro.com.
Homework: Preshrink your fabrics. If you are buying special interfacing, follow their instructions. If you are buying regular iron on interfacing, you can pre-shrink it in your kitchen sink. Class 2 - __Feb 9__. Personal Image Class – Personal Image Class. Learn to apply concepts of personal style including color and fit in your garment sewing. We will be going over: Color Perception, Style Concepts, and Flattering your Figure by understanding how YOU see yourself and comparing it to how OTHERS see you. Bring a couple of questionable outfits from your personal wardrobe to try on, if there is time. (Evening or Business Casual) Wear a V-neck skin colored T-shirt. If you don’t have any, wear a white T-shirt. It is a good idea to bring a head shot on your personal USB. Power Point: How to Read a Pattern Envelope.
5
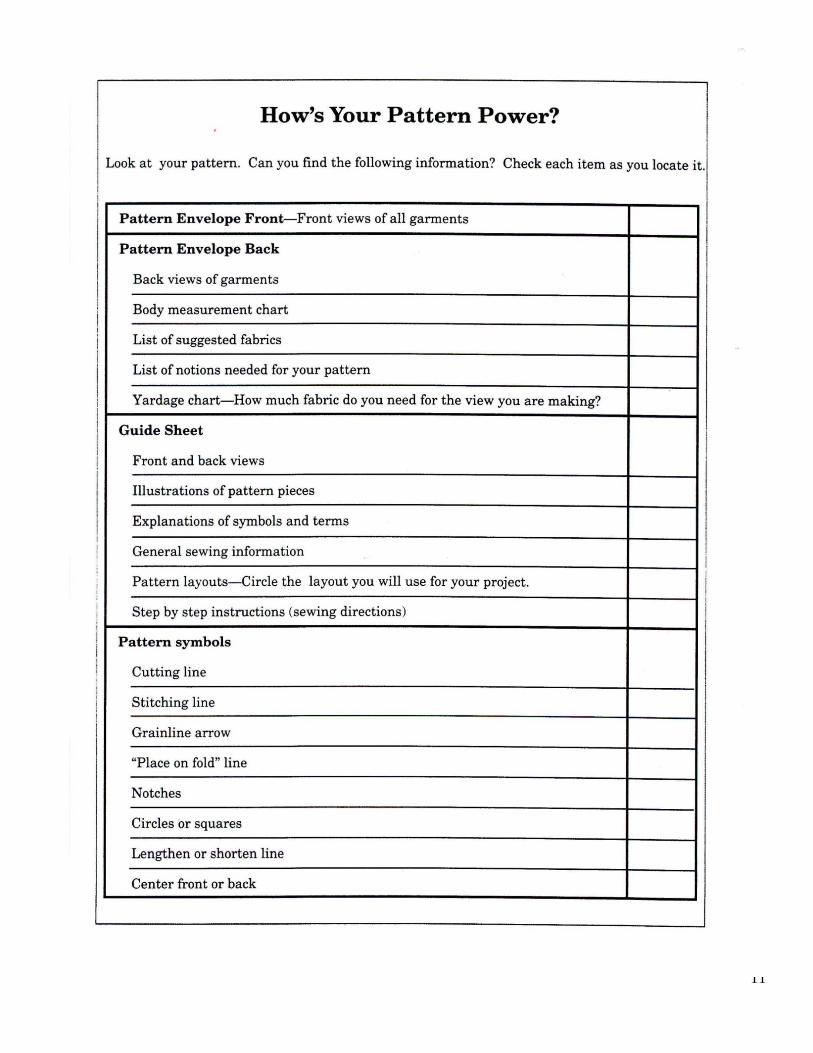
Class 3 __Feb 16__ - Come with your pattern: McCall’s 6972. Bring the following supplies you will need to use in class: paper scissors, Quilter’s straight pins, ¾ inch wide GREEN Invisible tape, a gallon size baggie, one highlighter, adding machine tape, a pencil and your McCall’s pattern. Cut out the pattern pieces on your size and put them in your gallon size baggie. This will keep them clean and flat. (This can be done @ home to save time.) First Pattern Fitting with instructor: Pin together on 5/8 inch seam line for your fitting. 3. Make Adjustments. Learn a bit of patternmaking.* Second Fittings will be done with a student peer. In your spare time, read your pattern guide and fill out your How’s your Pattern Power handout elsewhere in this syllabus. Jot down notes on the pattern guide to ask your instructor. Note: 1. For ANY Garment Fitting: Ladies need to wear the underwear they will wear under the garment. Gentlemen need to wear T-shirts, underwear, and walking shorts. Note: 2. *Because this is a Sewing Fundamentals class, there will be no technical design changes to the patterns. No Darts will be added. However, there will be other things done to the patterns to enhance fit. Class 4 _Feb 23__- Fabric Prep work is the most important part of sewing: Totally take notes on this lesson if you come unprepared !!!! Truing your fabric on grain, Layout your patterns on your preshrunk fabric.
A. View the power point: Grainlines & Other Prep for Layouts. B. Remember to: 1. Lay everything on grain. 2. Get an okay from the instructor to cut. C. Learn how to cut ergonomically.
Production Term of the Day is commandment #12: Respect Thy Grainlines. Remember to cut your woven interfacing according to what your pattern pieces say to do. Check what is written on your pattern pieces. Homework: What you do not finish in class, you will need to do at home. Come to the next class with everything cut out on grain. Remember to bring Scrap Fabric to all classes plus all your cut out fabric pattern pieces and patterns. Individual and Group Help. Class 5 – __March 2__- Demo & Do: Fusing interfacing with a press cloth, Serging, and Marking. Commandment #14: Thine Iron is Thy Friend. Learn to give TLC to the school’s sergers & irons. Serging to stop raveling: Outside edges of fused facings, and everything else that is NOT encased. THIS GETS DONE AFTER YOU FUSE & BEFORE YOU MARK!!!!!!! Homework: Finish up what you didn’t get to complete in class. Individual and Group Help. Remember to bring Scrap Fabric to all classes plus all your cut out fabric pattern pieces and patterns. Individual and Group Help. ! SAFETY FIRST ! NO PINS CAN BE USED WHEN YOU ARE USING A SERGER. ! SAFETY FIRST ! Note: 1. Remove all pins and patterns before serging. Pins go back into your pin cushion. Note: 2. ALL Pattern pieces need to re-pinned back onto the garment cut pieces, after serging, so that you are ready to mark your fabric with the pattern’s hieroglyphics. Class 6 __March 9__– 1. TLC for the school’s straight stitch sewing machines – Care, maintenance, threading of straight stitch machines. You will need your printout: Trouble Shooting Your Machine. Missing this maintenance class tells the instructor that you will not be using the school’s machines. Talk to me. There are many ways to do things. NEVER expect any two sewers
6
to agree on technique. Practice Control over your straight stitch sewing machine with your fabric scraps. Remember: There ARE exceptions to the following….. Thine Iron is thy friend. Each time you sew a seam, remember to iron it open. 2. Computerized Machine Embroidery Demo.
Follow your pattern guides and sew up your garments. I will be here to individually help. Remember to write your name on the board, under the word HELP, with your topic question. Class 7 through Class 17 (March 16 → June 1) – Sew up your shirt and pants. Student Proposed Demos & Individual and Group Help.
Class 18 – Student Proposed Demos & Individual and Group Help. Final Class. Pictures will be taken. Apparel Construction Project Needs: Your Commercial Pattern Buy this before seeing the “Reading Commercial Pattern Envelopes”
Power Point. McCall’s 6972. Adult Size. It would be good to have this early. All necessary fabrics and sewing notions for your project. (See what is listed on the pattern envelope and…)* *Always buy ¼ yard extra fabric for the shirt and for the pants. Almost Matching "Good Quality" thread *(Gutermann's, Molnyke, Metter, Dual Duty) 3/4-inch wide Scotch Invisible Tape (The packaging is GREEN plaid) 1 Gallon Size Plastic Baggie 18 inch grid ruler 2 inches wide 1 yard of light fusible (iron-on) woven interfacing ½ yard Tear Away Stabilizer (1 package Sulky’s Tear-Easy is fine) Do NOT pre-shrink. Highlighter Adding machine tape – 1 roll Basic Sewing Kit Needs: (INVESTMENTS FOR A LIFETIME !!!!) Embroidery scissors 5 inch Ginghers craft scissors (Don’t buy this without a 50% off coupon) An unbreakable thread catcher Fabric shears Paper scissors FABRIC tracing wheel and fabric tracing paper Glass headed or quilter’s straight pins - Dressmaker straight pins #17 are fine…… Pins should be 1.5 to 1.75 inches long. Regular Pincushion -- No magnetic pincushions in the classroom. Frixion Pen(s) – with marker head. Manufactured by Pilot. (Iron heat removes the marks….) Tailor’s Chalk (The squares or triangles) Tailor’s Chalk Mechanical Pencil Variety of hand sewing needles Darning Needles White basting thread Press Cloth (This should be a single fold diaper or a “flour sack” dish cloth) Point turner Bee's wax Simflex Thimble High Lighter
7
6-inch sewing gauge 18-inch grid ruler (2 inches wide) Seam ripper Thimble 3/4-inch wide Scotch Invisible Tape (The packaging is GREEN plaid) Fairly new Tape measure Plastic Tool Chest or Fishing Tackle Box for your supplies Pencils, Sharpie ultra-fine markers Instruction book for your personal sewing machine and/or serger* *ONLY if you plan to bring your own machine to class *YES…the school has manuals for all our machines Scrap Fabric (check machine EVERY TIME you begin to sew) Needle Threaders Schmetz or Klassé Needles - size 14/90 universal for straight stitch home sewing machines. "Tooth Brush" Kit for rethreading, cleaning, small repairs. 1 Small regular screw driver and 1 with a Phillips head. Looper threaders if your serger is NOT self-threading Text:
A Guide to Fashion Sewing – 6th edition This edition is over $100. Buy: any Previous Edition. These are fine to use as your text. Author: Connie Amaden-Crawford New York, New York: Fairchild Publications/Bloomsbury Publishing Buy from Amazon or Check other places listed on my blog.
Optional GREAT BOOKS to add to your library:
Sewing Patterns: 200 Q&A: Questions Answered on Everything from Understanding Patterns to Making Alterations
Author: Sophie English Publisher: Barron's Educational Series
Sewing Machine Basics: A step-by-step course for first-time stitchers. Includes 7 full-size pull-out patterns (2010) Author: Jane Bolsover Publisher: Cico Books
Best Website Help – for Sewing Techniques http://www.sewing.org/html/guidelines.html www.youtube.com (You will need to search for videos…Some are excellent) http://www.singerco.com/resources/ www.sewingsupport.com Course Evaluation A student’s completion/competency from this course will be based on multiple measures of performance. Assessment will measure the development of independent critical thinking and demonstrable basic sewing skills. Final course evaluation of the student’s ability will be based on, but not limited to, the following criteria: 1. Self-evaluation completion of Course Student Learning Outcomes.

8
2. Working on collaborative/group projects and activities. 3. Employing concepts of personal style including color and fit in garment sewing. 4. Evaluation of the student's competency in running home sewing machines plus related equipment. 5. 80% mastery of the skills embodied in the class assignments and course objectives. 6. Critique of completed apparel construction project illustrating competency skills learned in the course. Quality measured using basic construction competency standards discussed in class. I am going to take pictures the last day of class…… 7. Understanding fashion industry concepts and trends including green (sustainable) technology. 8. Attendance and punctuality. Student must attend 80% of each class in the course. Missing more of the course hours: will affect learning, grade, and certificate earning ability. (Total: Apparel Construction Class hours: ______________. 80% = _______________ hours.) 9. The student will identify employment, career and venture possibilities. Note: Paper Certificates are NOT given for Course Completions. There are Paper Certificates given for Program Completion at Graduation. The Clothing Construction Program consists of 4 courses: Sewing Fundamentals 1 & 2, Sewing Like a Professional and Contemporary Tailoring. Future Classes and Events: March 27-March 31 - Spring Break Saturday, April 29, 2017 - Sew Pro’s Field Trip to the LA garment District and M & L Fabrics. $50. Call Clairmont Sew Pro’s for details: 1-858-279-2500.
Prep Work Instructions
Fabric Prep - After you buy your fabric and interfacing, you need to preshrink it. The fabric gets washed and dried. You always pre-wash and dry your fabric the same way you are going to take care of the sewn product that you are going to produce from it. Fusible interfacing (woven or knit) is put in a clean sink filled with warm water for a minute or two, then swished around. Remove and roll up in a towel to take most of the moisture out. Then hang dry. You really can’t run this through your washer and dryer, because the glue will melt off. Stabilizers do NOT get pre-shrunk. Cutting – Cut out all your patterns on their outside cutting lines and put them in a gallon size plastic baggie. (I like to use freezer baggies because the plastic is a bit thicker.) Cut your notches straight across. Notches are the “Diamonds” on your patterns. Get a fabric cutting demo from the instructor. All of the fabric samples will be cut on the straight lengthwise (warp) grain unless otherwise specified on the pattern. ALWAYS…..Cut fabric as directed on the patterns. The straight lengthwise (warp) grainline is parallel with the selvage (manufacturer’s finished) edge of the fabric. Information on grainlines is included in your textbook. Check your text for cutting instructions for woven fabric cut on the straight lengthwise (warp) grain, bias grain, and for knit fabrics. Until your text arrives, check http://www.sewing.org/html/guidelines.html. Observe the “sew along” demo. Check your text’s glossary for words that are unfamiliar to you. Fusing your cut interfacings to your facings and undercollar - The textured (bumpy or shiny) side of your woven or knit interfacing is the glue side and it faces the wrong side of your facing. Remember to fuse your Interfacing to your facings. (NEVER face the glue side up when ironing. You MAY glue it to the iron and then you will have to clean the iron.) Use a Press Cloth!!!! Be

9
sure to follow the manufacturer’s directions for pressing on the fusible interfacing to the wrong side of the facing or undercollar if you miss the “sew along” demo. Never fuse with pins in the fabric. It won’t let the interfacing lie correctly. Believe in your fabric. It will talk to you. Read the key terms and concepts in your text. Serge all your outer edges except for those encased. Mark your Fabric with all Pattern Markings - You may need to use your fabric tracing wheel and fabric tracing paper to do this. There are options. You can use caulk and other markers. There are several ways to handle notches: Diamonds on your patterns. On the wrong side of the fabric: Mark all your darts, notches, and dots. Mark the dot on your sleeve shoulder, and inseam pocket piece. Make sure to watch the instructor demo these techniques.
10
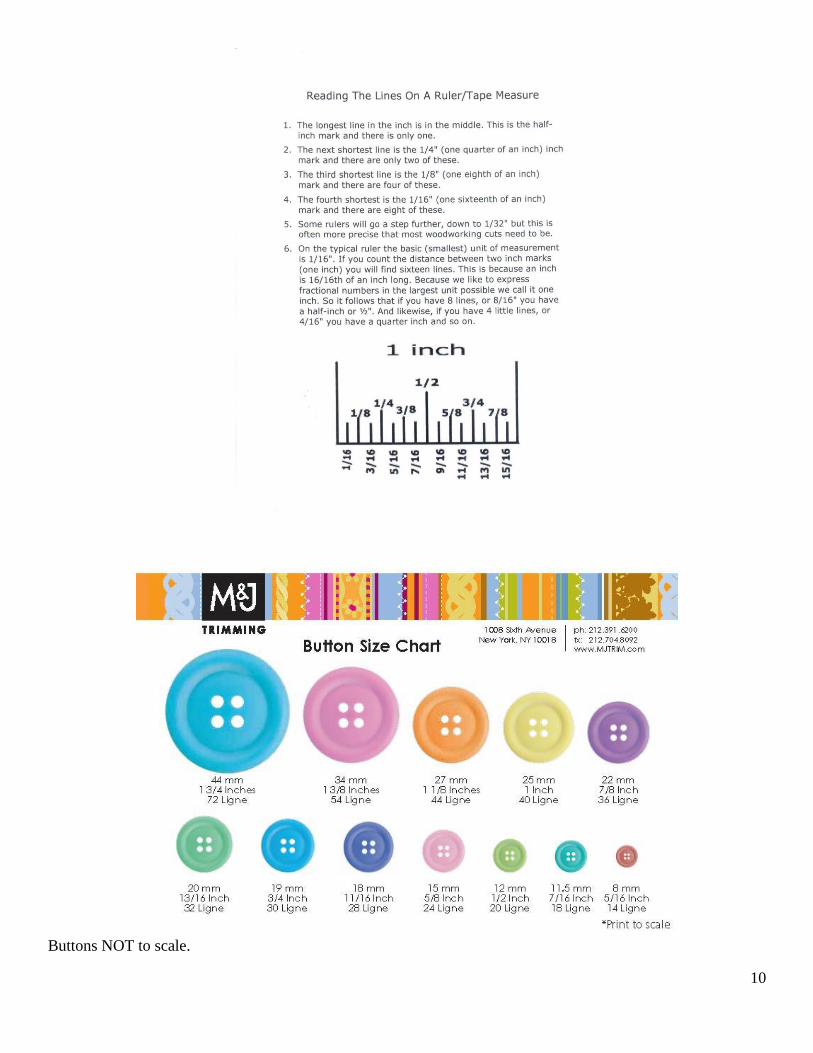
Buttons NOT to scale.
11
12