Embed Size (px)
Citation preview

Banner Finance Spreadsheet Budgeting Handbook
Release 8.0 May 2008

Banner®, Colleague®, PowerCAMPUS®, Luminis® and Datatel® are trademarks of Ellucian or its affiliates and are registered in the U.S. and other countries. Ellucian, Advance, DegreeWorks, fsaATLAS, Course Signals, SmartCall, Recruiter, MOX, ILP, and WCMS are trademarks of Ellucian or its affiliates. Other names may be trademarks of their respective owners.
©2000, 2008 Ellucian. All rights reserved. The unauthorized possession, use, reproduction, distribution, display or disclosure of this material or the information contained herein is prohibited.
Contains confidential and proprietary information of Ellucian and its subsidiaries. Use of these materials is limited to Ellucian licensees, and is subject to the terms and conditions of one or more written license agreements between Ellucian and the licensee in question.
In preparing and providing this publication, Ellucian is not rendering legal, accounting, or other similar professional services. Ellucian makes no claims that an institution's use of this publication or the software for which it is provided will insure compliance with applicable federal or state laws, rules, or regulations. Each organization should seek legal, accounting and other similar professional services from competent providers of the organization’s own choosing.
Prepared by: Ellucian 4375 Fair Lakes Court Fairfax, Virginia 22033 United States of America
Revision History
Publication Date Summary
May 2008 New version that supports Banner Finance 8.0 software.

Contents
Banner Finance 8.0Spreadsheet Budgeting Handbook
Chapter 1 Overview
Chapter 2 Setting Up Spreadsheet Budgeting
System Requirements . . . . . . . . . . . . . . . . . . . . . . . . . . . . . . .2-1
Visual Basic Requirement. . . . . . . . . . . . . . . . . . . . . . . . . . . . .2-1
Setting Up Spreadsheet Budgeting . . . . . . . . . . . . . . . . . . . . . . .2-1
Enabling Spreadsheet Budgeting in Microsoft Excel . . . . . . . . . . . . . . . .2-2
Establishing Security for Spreadsheet Budgeting Users . . . . . . . . . . . . . .2-2
Using Spreadsheet Budgeting on Different Platforms . . . . . . . . . . . . .2-3
Spreadsheet Budgeting on MacIntosh . . . . . . . . . . . . . . . . . . . . . . .2-3
Spreadsheet Budgeting on Citrix . . . . . . . . . . . . . . . . . . . . . . . . . .2-3
Installation and Updates . . . . . . . . . . . . . . . . . . . . . . . . . . . . .2-4
Establishing Prerequisite Budget Information in Banner. . . . . . . . . . . .2-4
Chapter 3 Procedures
Login Procedures for Spreadsheet Budgeting . . . . . . . . . . . . . . . . .3-1
Logging in to Spreadsheet Budgeting from Microsoft Excel . . . . . . . . . . . .3-1
Switching Connections in Microsoft Excel . . . . . . . . . . . . . . . . . . . . .3-1
Logging Out of Spreadsheet Budgeting. . . . . . . . . . . . . . . . . . . . . . .3-2
Downloading Data . . . . . . . . . . . . . . . . . . . . . . . . . . . . . . . . .3-2
Prerequisite . . . . . . . . . . . . . . . . . . . . . . . . . . . . . . . . . . . . .3-2
Using the Download Wizard . . . . . . . . . . . . . . . . . . . . . . . . . . . .3-2
May 2008 Banner Finance 8.0 iiiSpreadsheet Budgeting Handbook
Contents

Establish Preliminary Download Information . . . . . . . . . . . . . . . . . . .3-3Establish Functional Area-specific Download Information . . . . . . . . . . . .3-3Specifying FOAPAL Elements (Optional) . . . . . . . . . . . . . . . . . . . . .3-5
Validating Data . . . . . . . . . . . . . . . . . . . . . . . . . . . . . . . . . . .3-6
Prerequisite . . . . . . . . . . . . . . . . . . . . . . . . . . . . . . . . . . . . .3-6
Using the Validation Wizard. . . . . . . . . . . . . . . . . . . . . . . . . . . . .3-7
Using Header Rows. . . . . . . . . . . . . . . . . . . . . . . . . . . . . . . . .3-7
Uploading Data . . . . . . . . . . . . . . . . . . . . . . . . . . . . . . . . . .3-8
Prerequisite . . . . . . . . . . . . . . . . . . . . . . . . . . . . . . . . . . . . .3-8
Using the Upload Wizard . . . . . . . . . . . . . . . . . . . . . . . . . . . . . .3-8
Using Header Rows. . . . . . . . . . . . . . . . . . . . . . . . . . . . . . . . .3-9
Working with Uploaded Data in Banner . . . . . . . . . . . . . . . . . . . . .3-10
Working with Data in Microsoft Excel . . . . . . . . . . . . . . . . . . . . . .3-10
Data Lookups in Microsoft Excel . . . . . . . . . . . . . . . . . . . . . . . . .3-10
Locating a Value Using a Data Lookup . . . . . . . . . . . . . . . . . . . . . . .3-11
Chapter 4 Forms
Chapter 5 Reporting
List of Budget Development Reports and Processes . . . . . . . . . . . . . .5-1
Chapter 6 Add-in Components
Oracle Connection Wizard . . . . . . . . . . . . . . . . . . . . . . . . . . . .6-1
Login . . . . . . . . . . . . . . . . . . . . . . . . . . . . . . . . . . . . . . . .6-1
Switch Session . . . . . . . . . . . . . . . . . . . . . . . . . . . . . . . . . . .6-2
Disconnect Session . . . . . . . . . . . . . . . . . . . . . . . . . . . . . . . . .6-2
Download Wizard . . . . . . . . . . . . . . . . . . . . . . . . . . . . . . . . .6-3
Downloading from the Grant Ledger . . . . . . . . . . . . . . . . . . . . . . . .6-4Required Windows . . . . . . . . . . . . . . . . . . . . . . . . . . . . . . . .6-4Optional Windows . . . . . . . . . . . . . . . . . . . . . . . . . . . . . . . . .6-5Data that Appears When Downloading from the Grant Ledger . . . . . . . . . .6-6
iv Banner Finance 8.0 May 2008Spreadsheet Budgeting HandbookContents

Downloading from the Operating Ledger . . . . . . . . . . . . . . . . . . . . . .6-8Required Windows . . . . . . . . . . . . . . . . . . . . . . . . . . . . . . . .6-8Optional Windows . . . . . . . . . . . . . . . . . . . . . . . . . . . . . . . . .6-10Data that Appears When Downloading from the Operating Ledger. . . . . . . .6-11
Downloading from Budget Development . . . . . . . . . . . . . . . . . . . . . .6-13Required Windows . . . . . . . . . . . . . . . . . . . . . . . . . . . . . . . .6-13Optional Windows . . . . . . . . . . . . . . . . . . . . . . . . . . . . . . . . .6-15Data that Appears When Downloading from the Budget Line Item Table . . . . .6-16Data that Appears When Downloading from the Distributed Budget Table . . . .6-18
Validation Wizard . . . . . . . . . . . . . . . . . . . . . . . . . . . . . . . . .6-19
Prerequisite . . . . . . . . . . . . . . . . . . . . . . . . . . . . . . . . . . . . .6-20Data that Appears on the Validation Messages Worksheet . . . . . . . . . . . .6-22
Upload Wizard . . . . . . . . . . . . . . . . . . . . . . . . . . . . . . . . . . .6-23
Prerequisite . . . . . . . . . . . . . . . . . . . . . . . . . . . . . . . . . . . . .6-23Data that Appears on the Validation Messages Worksheet . . . . . . . . . . . .6-25
Data Lookups . . . . . . . . . . . . . . . . . . . . . . . . . . . . . . . . . . .6-26
Chapter 7 Technical Information
Tables. . . . . . . . . . . . . . . . . . . . . . . . . . . . . . . . . . . . . . . .7-1
Chapter 8 Tips and Hints
May 2008 Banner Finance 8.0 vSpreadsheet Budgeting Handbook
Contents

vi Banner Finance 8.0 May 2008Spreadsheet Budgeting HandbookContents

May 200
1 Overview
Banner Finance’s Spreadsheet Budgeting application enables users to create and modify budget information using Microsoft Excel. Spreadsheet Budgeting is an “add-in,” that is, a program that adds extra features to a third-party application. In this case, that application is Microsoft Excel.
By answering a series of questions, you can download budget information from Banner Finance tables, organize and change that information, and then upload the data back into the Budget Development tables. Helpful “wizards” guide you through the download, validation, and upload processes. These wizards are customizable by your institution, to accommodate a wide variety of functional needs.
Once you download data into a spreadsheet, you are free to use all of Excel’s features to work with it. You may want to create macros to organize and sort data according to your institution’s needs. For more information about using Excel to work with data, see the Microsoft Excel reference materials.
While working with downloaded data in Excel, authorized users can access data lookups. Each data lookup displays a Banner-like list of values for the various FOAPAL elements. The data lookups are queryable to help you narrow your search for active FOAPAL values within Banner.
After you have created or modified the data in Excel, you can use the Validation Wizard to ensure that your data is correct before uploading it into Banner. The Validation Wizard validates your data and displays any errors in a separate Excel sheet.
When your data is complete and has been validated, you are ready to upload it into the Budget Development module of Banner using the Upload Wizard. From there, you can use Budget Development functionality to move the budget into the appropriate ledger(s). For more information about developing budgets using the Budget Development module, refer to the “Processing” chapter in the Banner Finance User Guide.
Access security for Spreadsheet Budgeting is established on the Desktop Tools--User Security Rule Form (GORDSEC). Additionally, Spreadsheet Budgeting supports the Banner fund/organization security that is defined at your institution. For information about fund/organization security, refer to the “Processing” chapter in the Banner Finance User Guide. Information about using the Spreadsheet Budgeting enhancement to create salary and position budgets is contained in the Banner Human Resources Spreadsheet Budgeting Handbook.
In addition to downloading information for budget creation, you may want to download data for other purposes where Excel functionality would be useful. You can download data
8 Banner Finance 8.0 1-1Spreadsheet Budgeting Handbook
Overview

1-2
from any of the sources available in Spreadsheet Budgeting. Remember, however, that only budget data can be validated and/or uploaded.
Banner Finance 8.0 May 2008Spreadsheet Budgeting HandbookOverview

May 200
2 Setting Up Spreadsheet Budgeting
Only a minimal number of steps must be completed in order to use Spreadsheet Budgeting. Beyond those steps, you have the ability to customize the look and feel of the wizards by changing the data on the Spreadsheet Budgeting General forms. Further, advanced users at your institution, such as implementation specialists or DBAs, can create their own add-in applications using Visual Basic and the General forms delivered with this enhancement.
System Requirements
The following hardware and software components must be available at your institution in order to use the Spreadsheet Budgeting enhancement. See the General Technical Reference Manual for more installation information.
• Microsoft Excel 97
• Microsoft ActiveX Data Objects (ADO) v2.1 (optional for DBA PC)
• Oracle database, version 9.2.0.3
• Oracle Net8 Client Software or greater
Visual Basic Requirement
In addition to the system requirements listed above, your institution must have at least one licensed copy of Visual Basic 6.0 (Professional Version) in order to compile the .DLL (Dynamic Link Library) that is used in Spreadsheet Budgeting. For information about compiling and using the .DLL, refer to the General Technical Reference Manual.
Setting Up Spreadsheet Budgeting
Prior to using Spreadsheet Budgeting, all institutions must perform the following steps. All other steps are optional, and can be performed or omitted depending upon the specific needs of your institution.
8 Banner Finance 8.0 2-1Spreadsheet Budgeting HandbookSetting Up Spreadsheet Budgeting

2-2
• Perform a complete installation of the software according to the instructions in the General Technical Reference Manual.
• Establish security for those who will use Spreadsheet Budgeting.
• Enable the Spreadsheet Budgeting add-in in Microsoft Excel.
NoteYour computer must have access to the Banner database in order to use Spreadsheet Budgeting.
Enabling Spreadsheet Budgeting in Microsoft Excel
You must enable the Spreadsheet Budgeting add-in for each user’s copy of Microsoft Excel. This is one of two required steps.
1. Open Microsoft Excel.
2. Select Add-Ins from the Tools pull-down menu.
3. Select the Desktoptools check box.
NoteIf the Desktoptools check box does not appear, click the Browse button to select it from the appropriate directory. See the General Technical Reference Manual for more information.
4. Select OK.
Establishing Security for Spreadsheet Budgeting Users
You must grant access privileges to each user who will be using the Spreadsheet Budgeting enhancement. This is one of two required steps.
1. Go to the User Security Rules Form (GORDSEC).
2. Enter the user ID of a person to whom you want to grant wizard access.
3. Go to the next block.
4. Enter the add-in code and wizard name for each wizard to which the user will have access.
Banner Finance 8.0 May 2008Spreadsheet Budgeting HandbookSetting Up Spreadsheet Budgeting

May 200
5. Save.
NoteFor more information about the User Security Rules Form (GORDSEC), refer to the online help in Banner.
Using Spreadsheet Budgeting on Different Platforms
Spreadsheet Budgeting on MacIntosh
In order to run the Spreadsheet Budgeting application on a MacIntosh computer, you must use a PC emulator program. If you use a PC emulator, then you can use any of the wizards to which you have security access. Data can be downloaded, uploaded, and validated just as on the PC platform. You can also use any of the data lookups to which you have security access. For installation information, refer to the General Technical Reference Manual.
Without a PC emulator program, you cannot use any of the Spreadsheet Budgeting wizards. If you have a version of Microsoft Excel that runs on the MacIntosh platform, then you can use normal Excel functionality to work with the data. However, none of the wizard functionality will be available. If you want to upload the data, you must do so from a PC-based platform.
In addition, you should be aware that Microsoft Excel performs differently on the MacIntosh platform. Consult the General Technical Reference Manual and your Microsoft Excel reference documentation for more information.
Spreadsheet Budgeting on Citrix
Perform the following steps to install Desktop Tools on machines that run the Citrix server software:
1. Log on to the console as the administrator.
2. Put the machine into INSTALL mode.
3. Restrict access to the machine.
4. Follow the steps for installation that appear on your screen.
5. Ensure that the specified user groups have access to GODDTOP.DLL and to GODDTOP.XLA.
8 Banner Finance 8.0 2-3Spreadsheet Budgeting HandbookSetting Up Spreadsheet Budgeting

2-4
6. Place GODDTOP.XLA into the Microsoft Office Library directory.
Installation and Updates
Information about installing and updating new versions of the Spreadsheet Budgeting add-in is found in the General Technical Reference Manual.
Establishing Prerequisite Budget Information in Banner
When downloading data from either the Grant or Operating Ledger, you do not need to take any special steps. Since you will be downloading existing data from these ledgers, the data already exists.
If you are downloading from Budget Development, however, information must exist for the budget ID(s) and phase(s) that you want to use in either the Budget Line Item Table (FBBBLIN) or the Distributed Budget Table (FBRDIST).
Prior to validating and/or uploading data into Banner, you must have a budget ID and phase established to which the data will be uploaded. Additionally, the fiscal year that you want to use must be designated as Open on the Fiscal Year Maintenance Form (FTMFSYR). Once the data is uploaded, use the Budget Development module to roll the budget from Proposed status to Approved status.
If last minute budget adjustments are necessary, budget data that was uploaded from Spreadsheet Budgeting can still be rolled into a different phase and modified using the Budget Development module.
NoteSunGard Higher Education recommends that you be familiar with creating and maintaining budgets in the Budget Development module of Banner before using Spreadsheet Budgeting. Information about the forms used in Budget Development is available from the online help. For information about budgeting with Banner, refer to the “Processing” chapter in the Banner Finance User Guide.
Banner Finance 8.0 May 2008Spreadsheet Budgeting HandbookSetting Up Spreadsheet Budgeting

May 200
3 Procedures
Login Procedures for Spreadsheet Budgeting
Logging in to Spreadsheet Budgeting from Microsoft Excel
1. Open Microsoft Excel.
2. Select Connect to Database from the Banner pull-down menu.
NoteOnly users with the appropriate Banner security privileges will be permitted to log in to Spreadsheet Budgeting. Refer to the “Processing” chapter in the Banner Finance User Guide for information about Banner security.
3. Enter your Oracle user ID, password, and the database instance with which you want to work.
4. Select the Connect button. The database connection information will appear in Excel’s title bar.
NoteAlthough you do not need to be logged in to Banner in order to use Spreadsheet Budgeting, your computer must have access to the Banner database. See the General Technical Reference Manual for more information.
Switching Connections in Microsoft Excel
Spreadsheet Budgeting allows multiple database connections. This feature enables you to switch between different databases or to connect multiple users to the database at once.
8 Banner Finance 8.0 3-1Spreadsheet Budgeting Handbook
Procedures

3-2
For each connection, you must log in according to the preceding login procedure. Once connected, you can switch between connections by following these steps:
1. Select Switch Connection from the Banner pull-down menu.
2. Choose the appropriate connection.
3. Select the Switch Session button.
NoteThe database connection information about the active connection will appear in Excel’s title bar.
Logging Out of Spreadsheet Budgeting
1. Select Disconnect from Database from the Banner pull-down menu.
2. Choose the connection(s) that you want to disconnect. You can disconnect multiple connections at once by using the Shift-click or Ctrl-click commands, if desired.
Downloading Data
You can download data only if you have access to the download procedure (“Download Wizard”). Access to the Download Wizard is established for your user ID on the User Security Rules Form (GORDSEC). Additionally, you must have an active database connection.
Prerequisite
If you are going to download from Budget Development, then budget data must exist in Banner before it is downloaded into Excel. For information about creating and working with budget information, see the “Processing” chapter in the Banner Finance User Guide.
Using the Download Wizard
The download procedure is divided into three sections. The first and second sections are required, and the third section is optional. Complete each section depending upon the type of information that you want to download.
• The first section guides you through the preliminary download process, with steps that are universal regardless of the functional area from which you are downloading.
Banner Finance 8.0 May 2008Spreadsheet Budgeting HandbookProcedures

May 200
• The second section contains a sub-procedure for each different functional area. Each sub-procedure differs depending upon the functional area you select.
• The third section contains a series of optional steps that will reduce the amount of data downloaded. By selecting specific FOAPAL elements, you can narrow the focus of the information you download. These optional steps are available regardless of the functional area that you select.
If your institution uses Banner Human Resources, you can also download from the Position Control module. For additional information, refer to the Banner Human Resources Spreadsheet Budgeting Handbook.
For more information about the Download Wizard, see Chapter 6, “Add-in Components”.
Establish Preliminary Download Information
1. Select the Spreadsheet Budgeting sub-menu from the Banner pull-down list.
2. Select Download Wizard from the Spreadsheet Budgeting sub-menu.
3. Choose the Banner functional area in which you want to work by selecting the appropriate radio button. Select the Next button.
4. Proceed to the appropriate sub-procedure in Section 2 below.
Establish Functional Area-specific Download Information
Choose the appropriate sub-procedure depending upon the functional area that you selected in the first section.
NoteIf you need to change any of your previous choices, select the Previous button to return to previous wizard pages.
Downloading from the Grant Ledger
1. Choose the appropriate chart of accounts by selecting it. Select the Next button. You can select only one chart of accounts.
2. Choose the grant code(s) that you want to download. You can select more than one. Select the Next button.
3. Choose the grant year(s) for the grant code(s) selected above. You can choose more than one. Select the Next button.
4. Choose the grant period. Select the Next button. You can select only one grant period.
8 Banner Finance 8.0 3-3Spreadsheet Budgeting Handbook
Procedures

3-4
5. Choose the type(s) of data that you want to download from the Grant Ledger. You can choose more than one. Select the Next button.
6. Select the Finish button to begin the download process, or select the Next button if you are going to limit the amount of data downloaded by specifying FOAPAL elements.
NoteSpecifying FOAPAL elements is optional. For information about specifying FOAPAL elements, proceed to Step 3.
Downloading from the Operating Ledger
1. Choose the appropriate chart of accounts by selecting it. Select the Next button. You can choose only one chart of accounts.
2. Choose the fiscal year(s). You can choose more than one. Select the Next button.
3. Choose the fiscal period. Select the Next button. You can choose only one fiscal period.
4. Choose the type(s) of data that you want to download from the Operating Ledger. You can choose more than one. Select the Next button.
5. Choose whether committed, uncommitted, or both types of amounts will be downloaded by selecting the appropriate radio button. Select the Next button.
6. Select the Finish button to begin the download process, or select the Next button if you are going to limit the amount of data downloaded by specifying FOAPAL elements.
NoteSpecifying FOAPAL elements is optional. For information about specifying FOAPAL elements, proceed to Step 3.
Downloading from Budget Development
1. Select either the Budget Line Item Table radio button or the Distributed Budget Line Item Table radio button.
If you select the Budget Line Item Table radio button, then data will be downloaded from the Budget Line Item Table (FBBBLIN). If you select the Distributed Budget Line Item Table radio button, then data will be downloaded from the Distributed Budget Table (FBRDIST).
2. Choose the appropriate chart of accounts by selecting it. Select the Next button. You can choose only one chart of accounts.
Banner Finance 8.0 May 2008Spreadsheet Budgeting HandbookProcedures

May 200
3. Choose the budget ID(s) that you want to download. You can choose more than one. Select the Next button.
4. Choose the appropriate budget phase(s) that you want to download for the budget ID(s) that you are going to download. You can choose more than one. Select the Next button.
5. Choose the type(s) of data that you want to download from Budget Development. You can choose more than one, if necessary. Select the Next button.
6. Select the Finish button to begin the download process, or select the Next button if you are going to limit the amount of data downloaded by specifying FOAPAL elements.
NoteSpecifying FOAPAL elements is optional. For information about specifying FOAPAL elements, proceed to Step 3.
Specifying FOAPAL Elements (Optional)
After completing Sections 1 and 2, you have the option of specifying FOAPAL elements. Specifying FOAPAL elements will reduce download time and make your spreadsheets easier to manage. If you do not want to limit your download to only certain FOAPAL elements, you can select the Finish button on any of the optional windows without choosing any codes and the download process will begin.
For each FOAPAL element, you can select more than one value. If you do not select any value for a FOAPAL element, then all values associated with that element and your previous wizard choices will be downloaded.
1. (Optional) Choose the fund code(s) that you want to download by selecting the code(s). Select the Next button.
2. (Optional) Choose the organization code(s) that you want to download by selecting the code(s). Select the Next button.
3. (Optional) Choose the account code(s) that you want to download by selecting the code(s). Select the Next button.
4. (Optional) Choose the program code(s) that you want to download by selecting the code(s). Select the Next button.
5. (Optional) Choose the activity code(s) that you want to download by selecting the code(s). Select the Next button.
8 Banner Finance 8.0 3-5Spreadsheet Budgeting Handbook
Procedures

3-6
6. (Optional) Choose the location code(s) that you want to download by selecting the code(s). Select the Finish button.
NoteIf you need to change any of your previous choices, select the Previous button to return to previous wizard windows.
Validating Data
You can validate data only if you have access to the validation procedure (“Validation Wizard”). Access to the Validation Wizard is established for your user ID on the User Security Rules Form (GORDSEC). Additionally, you must have an active database connection.
You can use the Validation Wizard to validate your data before beginning the upload process. The Validation Wizard guides you through a series of steps, after which Banner validates the specified data. Any errors that Banner discovers during the validation process appear on a separate Validation Messages worksheet.
If your institution uses Banner Human Resources, you can also validate Position Control data. For information, refer to the Banner Human Resources Spreadsheet Budgeting Handbook.
Prerequisite
Prior to validating data, you must undo any local Excel formatting. If your institution uses local formatting, this generally means running the appropriate undo macro.
You must also have a budget ID and phase established to which the data will eventually be uploaded.
Lastly, each unique FOAPAL string may be used only once in a budget phase. If a FOAPAL string is used more than once in your spreadsheet, or already exists in the budget phase to which you will eventually upload, then the validation process will fail.
NoteSunGard Higher Education recommends that you be familiar with creating and maintaining budgets in the Budget Development module of Banner before using Spreadsheet Budgeting. Information about the forms used in Budget Development is available from the online help. For information about budgeting with Banner, refer to the “Processing” chapter in the Banner Finance User Guide.
Banner Finance 8.0 May 2008Spreadsheet Budgeting HandbookProcedures

May 200
Using the Validation Wizard
1. Choose Spreadsheet Budgeting from the Banner pull-down menu.
2. Choose Validation Wizard from the Spreadsheet Budgeting sub-menu.
3. Select the Budget Development radio button. Select the Next button.
4. Choose the worksheet(s) that you want to validate. You can choose more than one. Select the Next button.
5. (Optional) Select the sheet(s) that have headers. For details, see “Using Header Rows” on page 3-7.
6. Choose the chart of accounts. You can choose only one chart of accounts. Select the Next button.
7. Choose the budget ID. You can choose only one. Select the Next button.
8. Choose the budget phase. You can choose only one. Select the Next button.
9. Choose whether your spreadsheet contains only permanent budget data or both permanent and temporary budget data. Select the Next button.
10. Map each Banner column to the corresponding Excel column. Use the pull-down list in each row of the Excel Column field. Select the Next button.
If your institution uses headers, then the column header will appear in the pull-down list. If your institution does not use headers, then the generic Excel column heading will appear.
11. Select the Finish button.
12. Upon successful validation, a pop-up window will appear with the message: Your process has been completed successfully. Select the OK button.
If any errors are found during validation, they will appear on a separate “Validation Messages” worksheet. These errors must be resolved before you will be allowed to upload any data from the worksheet(s).
Using Header Rows
A header is the first row of the spreadsheet that provides an optional description of each column’s contents. In Spreadsheet Budgeting, the use of headers is optional. If your institution uses headers, a header must not exceed one row for purposes of validating and uploading.
8 Banner Finance 8.0 3-7Spreadsheet Budgeting Handbook
Procedures

3-8
Uploading Data
You can upload data only if you have access to the upload procedure (“Upload Wizard”). Access to the Upload Wizard is established for your user ID on the User Security Rules Form (GORDSEC). Additionally, you must have an active database connection.
The Upload Wizard guides you through a series of steps, after which Banner uploads the specified data. Any errors that Banner discovers during the upload process appear on a separate Validation Messages worksheet.
If your institution uses Banner Human Resources, you can also upload Position Control data. Refer to the Banner Human Resources Spreadsheet Budgeting Handbook.
Prerequisite
Prior to uploading data, you must undo any local Excel formatting. If your institution uses local formatting, this generally means running the appropriate undo macro.
In addition, you must have a budget ID and phase established to which the data will be uploaded. Once the data is uploaded, use the Budget Development module to roll the budget from Proposed status to Approved status.
Lastly, each unique FOAPAL string may be used only once in a budget phase. If a FOAPAL string is used more than once in your spreadsheet, or already exists in the budget phase to which you are uploading, then the upload process will fail.
NoteIn the case of last minute budget adjustments, budget data that was uploaded from Spreadsheet Budgeting can still be rolled into a different phase using the Budget Development module. You can upload the same spreadsheet to different budget phases, if necessary.
SunGard Higher Education recommends that you be familiar with creating and maintaining budgets in the Budget Development module of Banner before using Spreadsheet Budgeting. Information about the forms used in Budget Development is available from the online help. For information about budgeting with Banner, refer to the “Processing” chapter in the Banner Finance User Guide.
Using the Upload Wizard
1. Select Spreadsheet Budgeting from the Banner pull-down menu.
2. Select Upload Wizard from the Spreadsheet Budgeting sub-menu.
3. Select the Budget Development radio button. Select Next.
Banner Finance 8.0 May 2008Spreadsheet Budgeting HandbookProcedures

May 200
4. Select the workbook sheet(s) that you want to upload. Select the Next button.
5. (Optional) Select the sheet(s) that have headers. See Using Header Rows below for details. Select the Next button.
6. Select the chart of accounts to which you want to upload. You can choose only one. Select the Next button.
7. Select the budget ID of the budget to which you want to upload. You can choose only one. Select the Next button.
8. Select the budget phase to which you want to upload. You can choose only one. Select the Next button.
9. Choose whether your spreadsheet contains only permanent budget data or both permanent and temporary budget data. Select the Next button.
10. Map each Banner column to the corresponding Excel column. Use the pull-down list in each row of the Excel Column field. Select the Next button.
If your institution uses headers, then the column header will appear in the pull-down list. If your institution does not use headers, then the generic Excel column heading will appear.
11. Select the Finish button. Your data is validated. If no errors are found, then the data is uploaded to the Budgetary Line Item Table (FBBBLIN).
12. Upon successful validation, a pop-up window will appear with the message: Your process has been completed successfully. Select the OK button.
If any errors are found during validation, they will appear on a separate Validation Messages sheet. These errors must be resolved before you will be allowed to upload any data from the sheet(s).
NoteFor users of the Position Control module, Spreadsheet Budgeting uploads Position Control data differently (allowing partial uploads). For more information, refer to the Banner Human Resources Spreadsheet Budgeting Handbook.
Numeric data will be uploaded with the number of decimals used by the corresponding column in your Banner database.
Using Header Rows
A header is the first row of the spreadsheet that provides an optional description of each column’s contents. In Spreadsheet Budgeting, the use of headers is optional. If your
8 Banner Finance 8.0 3-9Spreadsheet Budgeting Handbook
Procedures

3-10
institution uses headers, a header must not exceed one row for purposes of validating and uploading.
Working with Uploaded Data in Banner
Prior to validating and/or uploading data into Banner, you must have a budget ID and phase established to which the data will be uploaded. Once the data is uploaded, use the Budget Development module to roll the budget from Proposed status to Approved status.
In the case of last minute budget adjustments, budget data that was uploaded from Spreadsheet Budgeting can still be rolled into a different phase using the Budget Development module.
SunGard Higher Education recommends that you be familiar with creating and maintaining budgets in the Budget Development module of Banner before using Spreadsheet Budgeting. Information about the forms used in Budget Development is available from the online help. For information about budgeting with Banner, refer to the “Processing” chapter in the Banner Finance User Guide.
Working with Data in Microsoft Excel
Numeric data appears in your spreadsheet with the number of decimals that are stored in your Banner database.
After downloading, you can use Excel functionality to work with the data. You may want to create macros to organize and sort data according to your institution’s needs. For more information about using Excel to work with data, see your Microsoft Excel reference materials.
When you are ready to upload data back into Banner, you must first undo any local formatting that was applied to the spreadsheet. You must also know whether or not a header row is used in the spreadsheet. For more information about headers, see “Validating Data” on page 3-6.
Data Lookups in Microsoft Excel
While in Microsoft Excel, you can find specific values for Banner FOAPAL elements by using data lookups. Each data lookup displays all values for the FOAPAL element that are active in Banner. A separate data lookup is available for each of the following FOAPAL elements:
Banner Finance 8.0 May 2008Spreadsheet Budgeting HandbookProcedures

May 200
• Fund
• Organization
• Account
• Program
• Activity
• Location
Access the appropriate data lookup by selecting it from the Spreadsheet Budgeting sub-menu on the toolbar.
For each FOAPAL element value, the following information appears in a Data Lookup window:
• chart of accounts code
• code
• description
• effective date
• termination date
When you select a value, only the code will be inserted into the spreadsheet cell. The description will not appear.
In addition to viewing information about all FOAPAL elements in Banner, you can also use the Find field to query for specific values. See “Add-in Components” on page 6-1 for more information about using this field.
NoteThe Data Lookup windows will display all active codes for the FOAPAL element selected, despite the Banner fund/organization security defined for the user.
Locating a Value Using a Data Lookup
1. Select Spreadsheet Budgeting from the Banner pull-down menu.
2. Select the appropriate data lookup from the Spreadsheet Budgeting sub-menu.
3. (Optional) Restrict the number of values displayed by querying with the Find field.
8 Banner Finance 8.0 3-11Spreadsheet Budgeting Handbook
Procedures

3-12
4. Select the required value, and then choose the Select button.
NoteWhen you select a value, only the code will be inserted into the spreadsheet cell. The description will not appear.
Banner Finance 8.0 May 2008Spreadsheet Budgeting HandbookProcedures

May 200
4 Forms
The forms that support Spreadsheet Budgeting appear on the Desktop Tools Menu (*GENDTOOLS) in Banner. For information about these forms, please access the online help.
8 Banner Finance 8.0 4-1Spreadsheet Budgeting Handbook
Forms

4-2
Banner Finance 8.0 May 2008Spreadsheet Budgeting HandbookForms
May 200
5 Reporting
Microsoft Excel provides a variety of features to meet your reporting needs. See your Microsoft Excel reference materials for more information.
The following is a quick summary of the reports and processes currently used in the Budget Development module of Banner. Refer to the “Reports and Processes” chapter in the Banner Finance User Guide for descriptions, parameter listings, and sample output.
List of Budget Development Reports and Processes
FBRAPPD Approved Distributed Budget Report
Displays the distributed budget by period, current year budget, prior year budget, and variance of the current year to the budget year.
FBRAPPR Approved Budget Report
Displays the approved budget phase along with the prior year, current year, and variance of the approved budget to the current amounts.
FBRBDBB Budget Build Process
Builds or changes line items for a budget phase. Creates/updates line items from another budget phase or from the operating ledger. You can delete line items by account or fund type. Enter the parameters used to execute this process on the Budget Process Control Parameter Form (FBABPRC).
FBRBDDS Distribution Process Summary
Provides a hard copy summary of the offline process used to distribute amounts from the budget line item table into periodic amounts in the distribution table.
FBRBDRL Budget Roll to General Ledger Process
Rolls budget amounts into the Finance Ledgers.
8 Banner Finance 8.0 5-1Spreadsheet Budgeting Handbook
Reporting

5-2
FBRFEED Finance Budget Feed Process
Sends Position Control budget information from the Position Control module into the Finance Budget tables.
FBRMCHG Budget Mass Change Process
Changes budget line items by an amount or a percentage. Enter these report parameters using the Mass Budget Change Form (FBAMCHG).
FBRWKSH Budget Worksheet Report
Displays up to three budget phases with current year and prior year budget amounts from the budget file.
Banner Finance 8.0 May 2008Spreadsheet Budgeting HandbookReporting

May 200
6 Add-in Components
This chapter contains information about the add-in components that make up Spreadsheet Budgeting. An add-in is a program, such as Spreadsheet Budgeting, that adds extra features to an application such as Microsoft Excel. The components are the parts of the add-in, such as the “wizards” that help you accomplish various tasks.
The add-in components that are delivered with Spreadsheet Budgeting control the flow of data to and from the Banner database by granting database access only to authorized users. These components also permit only authorized users to download and/or upload data. For information about security for the add-in components, refer to “Setting Up Spreadsheet Budgeting” on page 2-1.
The windows and fields of each add-in component are described in this chapter. When appropriate, tables list information that appears in your spreadsheet. For procedural information about the various components, refer to “Procedures” on page 3-1.
Oracle Connection Wizard
The Oracle Connection Wizard is made up of three wizard windows that enable you to manage your connection to the Banner database. Each of the following windows is described below:
• Login
• Switch Session
• Disconnect Session
For information about login procedures in Spreadsheet Budgeting, see “Procedures” on page 3-1.
Login
The Login wizard window enables you to connect to the Banner database. This login functions like the current Oracle login for Banner.
When you connect to the database, information about the active connection appears on the title bar of Excel.
8 Banner Finance 8.0 6-1Spreadsheet Budgeting Handbook
Add-in Components

6-2
Security for users at your institution is established on the User Security Rule Form (GORDSEC). For information about setting up Banner security at your institution, refer to the “Processing” chapter in the Banner Finance User Guide.
Select the Connect button to validate the data entered in the User ID, Password, and Database fields. If the information is valid, then you will be granted access to only the wizards authorized on the User Security Rules Form (GORDSEC). If the information is not valid, then you need to re-enter valid information.
Select the Cancel button to cancel the connection attempt.
NoteThe wizard stores the information about the user ID and database from your last login and automatically populates the Login wizard with this information. You may overwrite this information if you want to log in with a different user ID or database. For security purposes, you must enter your password each time you log in.
Switch Session
The Switch Session wizard window enables you to switch between Banner databases and/or users.
Disconnect Session
The Disconnect Session wizard window enables you to disconnect from the Banner database.
You can disconnect multiple users at once, if necessary.
Fields Description
User ID Oracle ID of the user
Password‘ Oracle password for the user
Database Database instance with which you want to work
Fields Description
Sessions User ID and database instance for each user who is logged into Spreadsheet Budgeting.
Banner Finance 8.0 May 2008Spreadsheet Budgeting HandbookAdd-in Components

May 200
Download Wizard
The Download Wizard enables you to specify the information that you want to download. A series of choices prompts you for increasingly specific criteria for the data that you want to download. Each successive choice appears on a separate “wizard window.” Each subsequent window narrows the focus of the data that will be downloaded, and determines the table from which the data will come.
NoteThe Banner Fund/Organization security established at your institution affects the data to which you have access. You can only download information about the funds and organizations to which you have query, posting, or both access. For information about fund/organization security, refer to the “Processing” chapter in the Banner Finance User Guide.
To begin, you must select a functional area from which data will be downloaded. You can select one of three functional areas of Banner Finance:
• Grant Ledger
• Operating Ledger
• Budget Development
NoteClients who use the Banner Position Control module can also download from Position Control. For information about using Spreadsheet Budgeting to download from Position Control, refer to the Banner Human Resources Spreadsheet Budgeting Handbook.
The functional area that you choose, when combined with your subsequent wizard choices, determine the columns of data that will be downloaded into the spreadsheet.
Numeric data appears in your spreadsheet with the number of decimal places that are stored in each numeric field of your Banner database.
The Find field that appears at the top of certain wizard windows helps you limit the number of values displayed. For query purposes in Spreadsheet Budgeting, the asterisk (*) and percent sign (%) both function as wildcards in this field.
Fields Description
Sessions User ID and database instance for each user who is logged into Spreadsheet Budgeting.
8 Banner Finance 8.0 6-3Spreadsheet Budgeting Handbook
Add-in Components

6-4
The wizard windows that appear for each functional area are described in the following pages. Additionally, the types of data that are downloaded from each of those functional areas appear in a table. For information about using the Download Wizard, refer to “Procedures” on page 3-1.
Downloading from the Grant Ledger
The following wizard windows appear when you download from the Grant Ledger. In order to download data from the Grant Ledger, you must select the Grant Ledger radio button on the first wizard window.
Required Windows
The following table lists the windows required to complete the download process and describes the contents of each window.
The FOAPAL windows described in the second table are optional, and function to limit the amount of data downloaded.
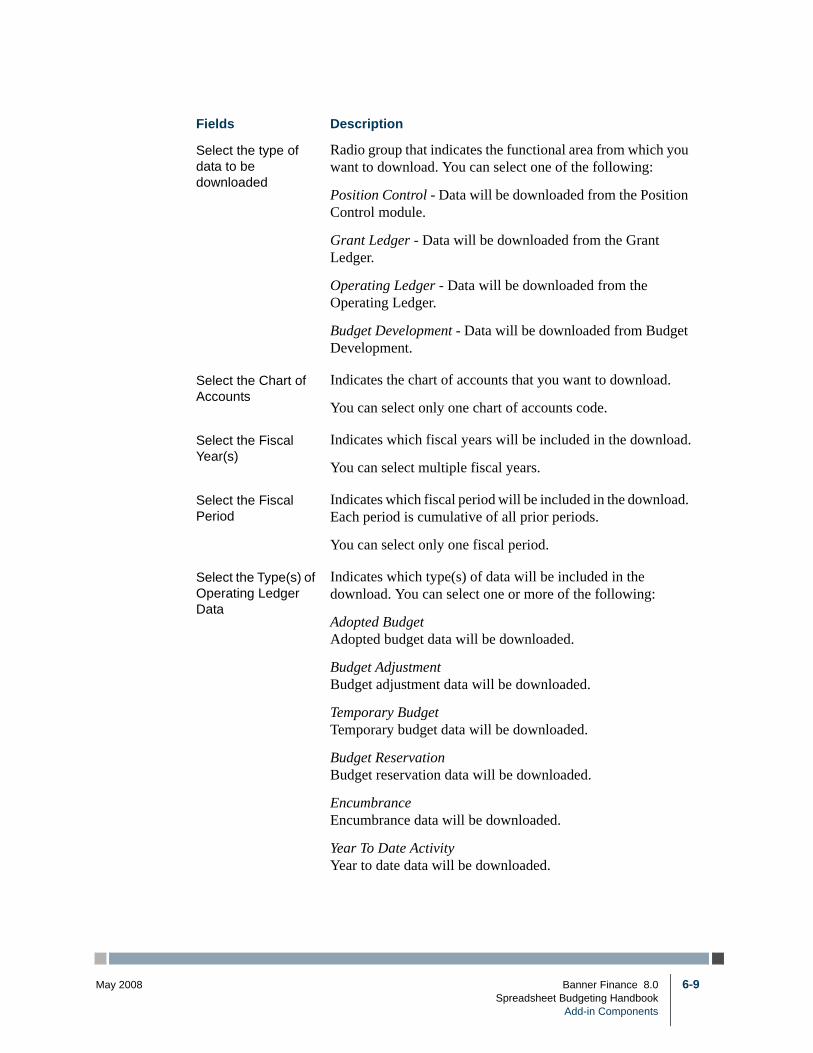
Fields Description
Select the type of data to be downloaded
Radio group that indicates the functional area from which you want to download. You can select one of the following:
Position ControlData will be downloaded from the Position Control module.
Grant LedgerData will be downloaded from the Grant Ledger.
Operating LedgerData will be downloaded from the Operating Ledger.
Budget DevelopmentData will be downloaded from Budget Development.
Select the Chart of Accounts
Indicates the chart of accounts that you want to download.
You can select only one chart of accounts code.
Select the Grant Code(s)
Indicates which grant codes will be included in the download.
You can select multiple grant codes.
Select the Grant Year(s)
Indicates which grant year(s) will be included in the download.
You can select multiple grant years for each grant code displayed.
Banner Finance 8.0 May 2008Spreadsheet Budgeting HandbookAdd-in Components

May 200
Optional Windows
Use of the windows in the following table is optional. Selecting data for all or some of them will limit the amount of data that is downloaded. To access these windows, select the Next button after completing the required windows. If you want to limit only certain FOAPAL elements, you can select the Finish button on any of these windows to begin the download process.
Select the Grant Period
Indicates the grant period that will be included in the download. You can select only one grant period.
Each period is cumulative of all prior periods.
NotePeriod 14 is special. Selecting period 14 will return cumulative period data for the selected grant year as well as data cumulative of all year(s) up through the grant year selected.
Select the Type(s) of Grant Ledger Data
Indicates which type(s) of data will be included in the download. You can select one or more of the following:
Adopted BudgetAdopted budget data will be downloaded.
Budget AdjustmentBudget adjustment data will be downloaded.
Temporary BudgetTemporary budget data will be downloaded.
Budget ReservationBudget reservation data will be downloaded.
EncumbranceEncumbrance data will be downloaded.
Year To Date ActivityYear to date data will be downloaded.
The download process is ready to begin
Select the Finish button to download data using all applicable FOAPAL values.
Select the Next button if you are going to limit the download by choosing specific FOAPAL values.
Fields Description
8 Banner Finance 8.0 6-5Spreadsheet Budgeting Handbook
Add-in Components

6-6
You have the option of bypassing these windows altogether by selecting the Finish button after completing the required windows.
Data that Appears When Downloading from the Grant Ledger
The data categories appear in your spreadsheet in the following order when you download from the Grant Ledger even if no values exist for a column that you select. The column will still appear in the spreadsheet. The Grant Ledger data types listed in the Download Wizard will appear in your spreadsheet only if you select them.
Data are sorted in the following order:
• Grant Code
• Grant Year
• Fund
Fields Description
Select the Fund Code(s)
Indicates the fund code(s) that you want to include in the download.
You can select more than one.
Select the Organization Code(s)
Indicates the organization code(s) that you want to include in the download.
You can select more than one.
Select the Account Code(s)
Indicates the account code(s) that you want to include in the download.
You can select more than one.
Select the Program Code(s)
Indicates the program code(s) that you want to include in the download.
You can select more than one.
Select the Activity Code(s)
Indicates the activity code(s) that you want to include in the download.
You can select more than one.
Select the Location Code(s)
Indicates the location code(s) that you want to include in the download.
You can select more than one.
Banner Finance 8.0 May 2008Spreadsheet Budgeting HandbookAdd-in Components

May 200
• Account
• Program
Downloaded Banner Columns from the Grant Ledger
COA Code
COA Description
Grant Code
Grant Description
Grant Year
Fund Code
Fund Description
Organization Code
Organization Description
Account Code
Account Description
Program Code
Program Description
Activity Code
Activity Description
Location Code
Location Description
Adopted Budget Amount for Period x (where x is the specified period)
NoteThis column is optional and appears only if you selected Adopted Budget in the Download Wizard.
Budget Adjustment Amount For Period x (where x is the specified period)
NoteThis column is optional and appears only if you selected Adjusted Budget in the Download Wizard.
8 Banner Finance 8.0 6-7Spreadsheet Budgeting Handbook
Add-in Components

6-8
Downloading from the Operating Ledger
The following wizard windows appear when you download from the Operating Ledger. In order to download data from the Operating Ledger, you must select the Operating Ledger radio button on the first wizard window.
Required Windows
The following table contains the windows required to complete the download process.
The FOAPAL windows described in the second table are optional, and function to limit the amount of data downloaded.
Temporary Budget Amount for Period x (where x is the specified period)
NoteThis column is optional and appears only if you selected Temporary Budget in the Download Wizard.
Budget Reservation Amount For Period x (where x is the specified period)
NoteThis column is optional and appears only if you selected Budget Reservation in the Download Wizard.
Encumbrance Amount For Period x (where x is the specified period)
NoteThis column is optional and appears only if you selected Encumbrance Amount in the Download Wizard.
Year To Date Activity Amount For Period x (where x is the specified period)
NoteThis column is optional and appears only if you selected Year To Date Activity Amount in the Download Wizard.
Downloaded Banner Columns from the Grant Ledger
Banner Finance 8.0 May 2008Spreadsheet Budgeting HandbookAdd-in Components
May 200
Fields Description
Select the type of data to be downloaded
Radio group that indicates the functional area from which you want to download. You can select one of the following:
Position Control - Data will be downloaded from the Position Control module.
Grant Ledger - Data will be downloaded from the Grant Ledger.
Operating Ledger - Data will be downloaded from the Operating Ledger.
Budget Development - Data will be downloaded from Budget Development.
Select the Chart of Accounts
Indicates the chart of accounts that you want to download.
You can select only one chart of accounts code.
Select the Fiscal Year(s)
Indicates which fiscal years will be included in the download.
You can select multiple fiscal years.
Select the Fiscal Period
Indicates which fiscal period will be included in the download. Each period is cumulative of all prior periods.
You can select only one fiscal period.
Select the Type(s) of Operating Ledger Data
Indicates which type(s) of data will be included in the download. You can select one or more of the following:
Adopted BudgetAdopted budget data will be downloaded.
Budget AdjustmentBudget adjustment data will be downloaded.
Temporary BudgetTemporary budget data will be downloaded.
Budget ReservationBudget reservation data will be downloaded.
EncumbranceEncumbrance data will be downloaded.
Year To Date ActivityYear to date data will be downloaded.
8 Banner Finance 8.0 6-9Spreadsheet Budgeting Handbook
Add-in Components

6-10
Optional Windows
Use the windows in the following table is optional. Selecting data for all or some of them will limit the amount of data that is downloaded. To access these windows, select the Next button after completing the required windows. If you want to limit only certain FOAPAL elements, you can select the Finish button on any of these windows to begin the download process.
You have the option of bypassing these windows altogether by selecting the Finish button after completing the required windows.
Select the Commitment Type
Indicates whether committed, uncommitted, or both committed and uncommitted amounts will be included in the download. You can select one of the following:
Committed - Only committed amounts will be downloaded.
Uncommitted - Only uncommitted amounts will be downloaded.
Both - Both committed and uncommitted amounts will be downloaded.
The download process is ready to begin
Select the Finish button to download data using all applicable FOAPAL values.
Select the Next button if you are going to limit the download by choosing specific FOAPAL values.
Fields Description
Select the Fund Code(s)
Indicates the fund code(s) that you want to include in the download.
You can select more than one.
Select the Organization Code(s)
Indicates the organization code(s) that you want to include in the download.
You can select more than one.
Select the Account Code(s)
Indicates the account code(s) that you want to include in the download.
You can select more than one.
Fields Description
Banner Finance 8.0 May 2008Spreadsheet Budgeting HandbookAdd-in Components

May 200
Data that Appears When Downloading from the Operating Ledger
The data categories appear in your spreadsheet in the following order when you download from the Operating Ledger. If no values exist for a column that you select, the column will still appear in the spreadsheet, but the cells will be empty. The Operating Ledger data types listed in the Download Wizard will appear in your spreadsheet only if you select them.
Data is sorted in the following order:
• Fiscal year
• Fund
• Organization
• Account
Select the Program Code(s)
Indicates the program code(s) that you want to include in the download.
You can select more than one.
Select the Activity Code(s)
Indicates the activity code(s) that you want to include in the download.
You can select more than one.
Select the Location Code(s)
Indicates the location code(s) that you want to include in the download.
You can select more than one.
Downloaded Banner Columns from the Operating Ledger
COA Code
COA Description
Fiscal Year
Commitment Type
Fund Code
Fund Description
Fields Description
8 Banner Finance 8.0 6-11Spreadsheet Budgeting Handbook
Add-in Components

6-12
Organization Code
Organization Description
Account Code
Account Description
Program Code
Program Description
Activity Code
Activity Description
Location Code
Location Description
Adopted Budget Amount for Period “x” (where x is the specified period)
NoteThis column is optional and appears only if you selected Adopted Budget in the Download Wizard.
Budget Adjustment Amount For Period x (where x is the specified period)
NoteThis column is optional and appears only if you selected Adjusted Budget in the Download Wizard.
Temporary Budget Amount for Period x (where x is the specified period)
NoteThis column is optional and appears only if you selected Temporary Budget in the Download Wizard.
Budget Reservation Amount For Period x (where x is the specified period)
NoteThis column is optional and appears only if you selected Budget Reservation in the Download Wizard.
Downloaded Banner Columns from the Operating Ledger
Banner Finance 8.0 May 2008Spreadsheet Budgeting HandbookAdd-in Components

May 200
Downloading from Budget Development
The following wizard windows appear when you download from Budget Development. In order to download data from Budget Development, you must select the Budget Development radio button on the first wizard window.
NoteThe table that you specify in the second wizard window, either the Budget Line Item Table or the Distributed Budget Table, affects the data that will be downloaded.
Required Windows
The following table contains the windows required to complete the download process.
Use of the FOAPAL windows described in the second table is optional, and functions to limit the amount of data downloaded.
Encumbrance Amount For Period x (where x is the specified period)
NoteThis column is optional and appears only if you selected Encumbrance Amount in the Download Wizard.
Year To Date Activity Amount For Period x (where x is the specified period)
NoteThis column is optional and appears only if you selected Year To Date Activity Amount in the Download Wizard.
Downloaded Banner Columns from the Operating Ledger
8 Banner Finance 8.0 6-13Spreadsheet Budgeting Handbook
Add-in Components

6-14
Fields Description
Select the type of data to be downloaded
Radio group that indicates the functional area from which you want to download. You can select one of the following:
Position ControlData will be downloaded from the Position Control module.
Grant LedgerData will be downloaded from the Grant Ledger.
Operating LedgerData will be downloaded from the Operating Ledger.
Budget DevelopmentData will be downloaded from Budget Development.
Select the Budget Development Table
Radio group that indicates the table from which you want to download data. You can select one of the following:
Budget Line Item TableData will be downloaded from the Budget Line Item Table. This option includes budget information by FOAPAL without regard to period.
Distributed Budget TableData will be downloaded from the Distributed Budget Table. This option includes budget information by FOAPAL for the defined period.
Select the Chart of Accounts
Indicates the chart of accounts that you want to download.
You can select only one chart of accounts code.
Select the Budget ID(s)
Indicates which budget IDs will be included in the download.
You can select multiple budget IDs.
Select the Phase Code(s)
Indicates which phase code(s) for the budget ID(s) you selected will be included in the download.
You can select multiple budget phase codes.
Banner Finance 8.0 May 2008Spreadsheet Budgeting HandbookAdd-in Components

May 200
Optional Windows
Use of the windows in the following table is optional. Selecting data on all or some of them will limit the amount of data that is downloaded. To access these windows, select the Next button after completing the required windows. If you want to limit only certain FOAPAL elements, you can select the Finish button on any of these windows to begin the download process.
You have the option of bypassing these windows altogether by selecting the Finish button after completing the required windows.
Select the Type(s) of Budget Development Data
Indicates which type(s) of data will be included in the download.
You can select one or more of the following:
Budget - Budget data will be downloaded.
Adjustment - Adjustment data will be downloaded.
Roll - Roll data will be downloaded.
The download process is ready to begin
Select the Finish button to download data using all applicable FOAPAL values.
Select the Next button if you are going to limit the download by choosing specific FOAPAL values.
Fields Description
Select the Fund Code(s)
Indicates the fund code(s) that you want to include in the download.
You can select more than one.
Select the Organization Code(s)
Indicates the organization code(s) that you want to include in the download.
You can select more than one.
Select the Account Code(s)
Indicates the account code(s) that you want to include in the download.
You can select more than one.
Fields Description
8 Banner Finance 8.0 6-15Spreadsheet Budgeting Handbook
Add-in Components

6-16
Data that Appears When Downloading from the Budget Line Item Table
The data categories appear in your spreadsheet in the following order when you download from the Budget Line Item Table. If no values exist for a column that you select, the column will still appear in the spreadsheet, but the cells will be empty. The Budget Development data types listed in the Download Wizard will appear in your spreadsheet only if you select them.
Data are sorted in the following order:
• Budget ID
• Budget phase
• Fund
• Organization
• Account
• Program
Select the Program Code(s)
Indicates the program code(s) that you want to include in the download.
You can select more than one.
Select the Activity Code(s)
Indicates the activity code(s) that you want to include in the download.
You can select more than one.
Select the Location Code(s)
Indicates the location code(s) that you want to include in the download.
You can select more than one.
Downloaded Banner Columns from the Budget Line Item Table
COA Code
COA Description
Budget Duration Code
Fields Description
Banner Finance 8.0 May 2008Spreadsheet Budgeting HandbookAdd-in Components

May 200
Budget Code
Budget Description
Budget Phase Code
Budget Phase Description
Fund Code
Fund Description
Organization Code
Organization Description
Account Code
Account Description
Program Code
Program Description
Activity Code
Activity Description
Location Code
Location Description
Budget Amount
NoteThis column appears only if you selected Budget Amount in the Download Wizard.
Adjustment Amount
NoteThis column appears only if you selected Adjustment Amount in the Download Wizard.
Roll Amount
NoteThis column appears only if you selected Roll Amount in the Download Wizard.
Downloaded Banner Columns from the Budget Line Item Table
8 Banner Finance 8.0 6-17Spreadsheet Budgeting Handbook
Add-in Components

6-18
Data that Appears When Downloading from the Distributed Budget Table
The data categories appear in your spreadsheet in the following order when you download from the Distributed Budget Table. If no values exist for a column that you select, the column will still appear in the spreadsheet, but the cells will be empty. The Budget Development data types listed in the Download Wizard will appear in your spreadsheet only if you select them.
Data are sorted in the following order:
• Budget ID
• Budget phase
• Fund
• Organization
• Account
• Period
Downloaded Banner Columns from the Distributed Budget Table
COA Code
COA Description
Budget Duration Code
Budget Code
Budget Description
Budget Phase Code
Budget Phase Description
Budget Period
Fund Code
Fund Description
Organization Code
Organization Description
Account Code
Account Description
Banner Finance 8.0 May 2008Spreadsheet Budgeting HandbookAdd-in Components

May 200
Validation Wizard
The Validation Wizard enables you to validate the data before uploading. A series of choices prompts you to identify the data that will be validated, as well as the parameters against which the data will be validated. Each successive choice appears on a separate “wizard window.” Each subsequent window narrows the focus of the data that will be validated.
The Banner Fund/Organization security established at your institution affects the data to which you have access. You can only validate information about the funds and organizations to which you have posting or both access. For information about fund/organization security, refer to the “Processing” chapter in the Banner Finance User Guide.
Program Code
Program Description
Activity Code
Activity Description
Location Code
Location Description
Budget Amount
NoteThis column appears only if you selected Budget Amount in the Download Wizard.
Adjustment Amount
NoteThis column appears only if you selected Adjustment Amount in the Download Wizard.
Roll Amount
NoteThis column appears only if you selected Roll Amount in the Download Wizard.
Downloaded Banner Columns from the Distributed Budget Table
8 Banner Finance 8.0 6-19Spreadsheet Budgeting Handbook
Add-in Components

6-20
The Find field that appears at the top of certain wizard windows helps you limit the number of values displayed. For query purposes in Spreadsheet Budgeting, the asterisk (*) and percent sign (%) both function as wildcards in this field.
NoteClients who use the Banner Position Control module can also validate using Position Control. For information about using Spreadsheet Budgeting to validate Position Control data, refer to the Banner Human Resources Spreadsheet Budgeting Handbook.
Prerequisite
Prior to validating data, you must undo any local Excel formatting. If your institution uses local formatting, this generally means running the appropriate undo macro.
In addition, you must have a budget ID and phase established to which the data will eventually be uploaded.
Lastly, each unique FOAPAL string may be used only once in a budget phase. If a FOAPAL string is used more than once in your spreadsheet, or already exists in the budget phase to which you will eventually upload, then the validation process will fail.
NoteSunGard Higher Education recommends that you be familiar with creating and maintaining budgets in the Budget Development module of Banner before using Spreadsheet Budgeting. For information about budgeting with Banner, refer to the “Processing” chapter in the Banner Finance User Guide.
The following table describes each window of the Validation Wizard. For information about using the Validation Wizard, refer to “Procedures” on page 3-1.
Fields Description
Select the type of data to be validated
Radio button that indicates the Banner functional area of the data. You can select one of the following:
Position Control - Data is for Banner Position Control.
Budget Development - Data is for Banner Finance budgets.
Select the worksheet(s)
Choose the worksheet(s) that you want to validate. You can select more than one worksheet.
Banner Finance 8.0 May 2008Spreadsheet Budgeting HandbookAdd-in Components

May 200
Select the worksheet(s) that have headers
Specify the worksheet(s) that has a header row.
A header is an optional first row that provides a description of each column’s contents. In Spreadsheet Budgeting, the use of headers is optional. If your institution uses headers, a header must not exceed one row.
Select the Chart of Accounts
Choose the chart of accounts to which the data will be validated.
You can select only one chart of accounts.
Selecting Budget ID and Phase confirmation
Select the Next button to proceed to the windows where you select the budget phase and ID.
Select the Budget ID Choose the budget ID against which the data will be validated.
You can select only one.
Select the Budget Phase Code
Choose the budget phase against which the data will be validated.
You can select only one.
Select Permanent Budget or Both Permanent and Temporary Budget
Radio button that indicates whether the data you want to validate contains only permanent budget data or both permanent and temporary budget data.
Permanent Only - Data contains only permanent budget data.
Temp and Perm - Data contains both temporary and permanent budget data.
Fields Description
8 Banner Finance 8.0 6-21Spreadsheet Budgeting Handbook
Add-in Components
6-22
Data that Appears on the Validation Messages Worksheet
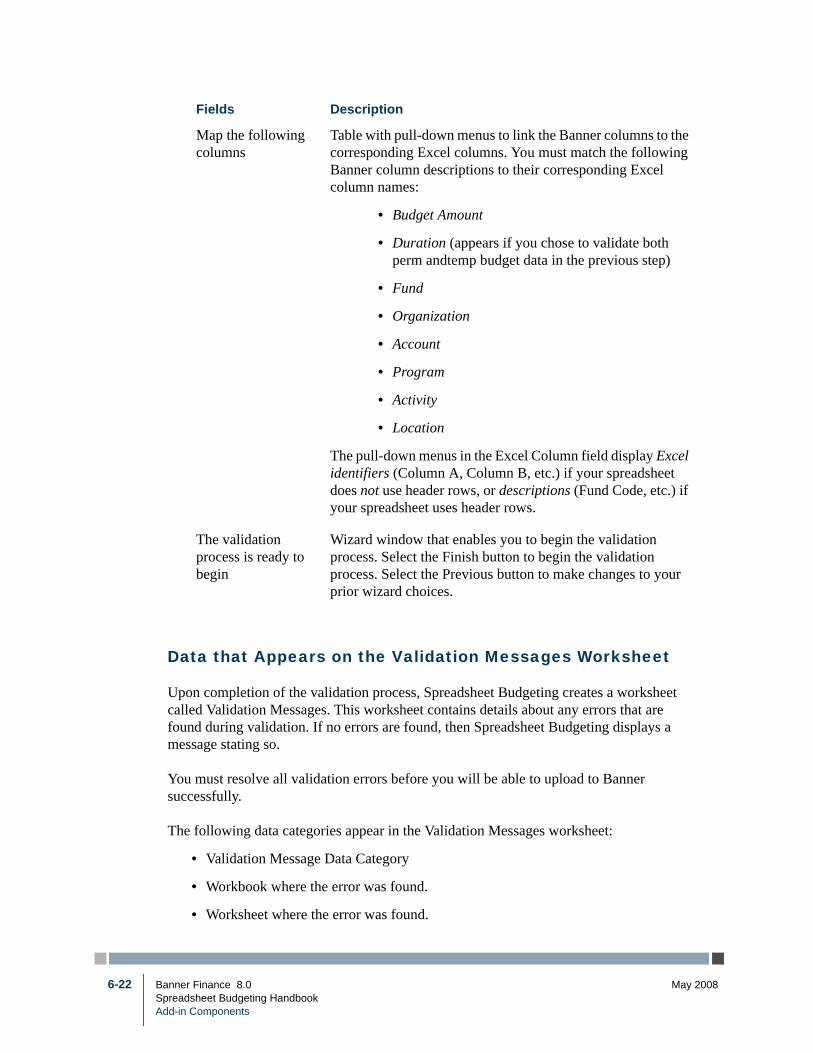
Upon completion of the validation process, Spreadsheet Budgeting creates a worksheet called Validation Messages. This worksheet contains details about any errors that are found during validation. If no errors are found, then Spreadsheet Budgeting displays a message stating so.
You must resolve all validation errors before you will be able to upload to Banner successfully.
The following data categories appear in the Validation Messages worksheet:
• Validation Message Data Category
• Workbook where the error was found.
• Worksheet where the error was found.
Map the following columns
Table with pull-down menus to link the Banner columns to the corresponding Excel columns. You must match the following Banner column descriptions to their corresponding Excel column names:
• Budget Amount
• Duration (appears if you chose to validate both perm andtemp budget data in the previous step)
• Fund
• Organization
• Account
• Program
• Activity
• Location
The pull-down menus in the Excel Column field display Excel identifiers (Column A, Column B, etc.) if your spreadsheet does not use header rows, or descriptions (Fund Code, etc.) if your spreadsheet uses header rows.
The validation process is ready to begin
Wizard window that enables you to begin the validation process. Select the Finish button to begin the validation process. Select the Previous button to make changes to your prior wizard choices.
Fields Description
Banner Finance 8.0 May 2008Spreadsheet Budgeting HandbookAdd-in Components

May 200
• Row Number containing the error.
• Message Description of the error.
Upload Wizard
The Upload Wizard enables the user to upload the data from the spreadsheet(s). A series of choices prompts you to identify the data that you want to upload, as well as the location to which the data will be uploaded. Each successive choice appears on a separate “wizard window.” Each subsequent window narrows the focus of the data that will be uploaded.
NoteThe Banner fund/organization security established at your institution affects the data to which you have access. You can only upload information about the funds and organizations to which you have posting or both access. For information about fund/organization security, refer to the “Processing” chapter in the Banner Finance User Guide.
If a cell in the spreadsheet contains a formula, the Upload Wizard will upload only the calculated value of the cell into the Banner database. The formula will not be uploaded. Description columns (for example, fund description) are not uploaded into the database.
The Find field that appears at the top of certain wizard windows helps you limit the number of values displayed. For query purposes in Spreadsheet Budgeting, the asterisk (*) and percent sign (%) both function as wildcards in this field.
NoteClients who use the Banner Position Control module can also upload to Position Control. For information about using Spreadsheet Budgeting to upload Position Control data, refer to the Banner Human Resources Spreadsheet Budgeting Handbook.
Prerequisite
Prior to uploading data, you must undo any local Excel formatting. If your institution uses local formatting, this generally means running the appropriate undo macro.
In addition, you must have a budget ID and phase established to which the data will be uploaded. Once the data is uploaded, use the Budget Development module to roll the budget from Proposed status to Approved status.
8 Banner Finance 8.0 6-23Spreadsheet Budgeting Handbook
Add-in Components

6-24
Lastly, each unique FOAPAL string may be used only once in a budget phase. If a FOAPAL string is used more than once in your spreadsheet, or already exists in the budget phase to which you are uploading, then the upload process will fail.
NoteIn the case of last minute budget adjustments, budget data that was uploaded from Spreadsheet Budgeting can still be rolled into a different phase using the Budget Development module. You can upload the same spreadsheet to different budget phases, if necessary.
SunGard Higher Education recommends that you be familiar with creating and maintaining budgets in the Budget Development module of Banner before using Spreadsheet Budgeting. Information about the forms used in Budget Development is available from the online help. For information about budgeting with Banner, refer to the “Processing” chapter in the Banner Finance User Guide.
The following table describes each window of the Upload Wizard. For information about using the Upload Wizard, refer to “Procedures” on page 3-2.
Fields Description
Select the type of data to be uploaded
Radio button that indicates the Banner functional area of the data. You can select one of the following:
Position Control - Data is for Banner Position Control.
Budget Development - Data is for Banner Finance budgets.
Select the worksheet(s)
Choose the worksheet(s) that you want to upload. You can select more than one worksheet.
Select the worksheet(s) that have headers
Specify the worksheet(s) that has a header row.
A header is an optional first row that provides a description of each column’s contents. In Spreadsheet Budgeting, the use of headers is optional. If your institution uses them, they must not exceed one row.
Select the Chart of Accounts
Choose the chart of accounts to which the data will be uploaded. You can select only one chart of accounts.
Selecting Budget ID and Phase confirmation
Select the Next button to proceed to the windows where you select the budget phase and ID.
Select the Budget ID Choose the budget ID to which the data will be uploaded. You can select only one.
Banner Finance 8.0 May 2008Spreadsheet Budgeting HandbookAdd-in Components

May 200
Data that Appears on the Validation Messages Worksheet
During the upload process, Spreadsheet Budgeting creates a worksheet called Validation Messages. This worksheet contains details about any errors that are found when Spreadsheet Budgeting validates the data prior to upload. If no errors are found, then Spreadsheet Budgeting displays a message stating so, and the data is uploaded.
Select the Budget Phase Code
Choose the budget phase to which the data will be uploaded. You can select only one.
Select Permanent Budget or Both Permanent and Temporary Budget
Radio button that indicates whether the data you want to upload contains only permanent budget data or both permanent and temporary budget data.
Permanent Only - Data contains only permanent budget data.
Temp and Perm - Data contains both temporary and permanent budget data.
Map the following columns
Table with pull-down menus to link the Banner columns to the corresponding Excel columns. You must match the following Banner column descriptions to their corresponding Excel column names:
• Budget Amount
• Duration (appears if you chose to validate both perm andtemp budget data in the previous step)
• Fund
• Organization
• Account
• Program
• Activity
• Location
The pull-down menus in the Excel Column field display Excel identifiers (Column A, Column B, etc.) if your spreadsheet does not use header rows, or descriptions (Fund Code, etc.) if your spreadsheet uses header rows.
The upload process is ready to begin
Wizard window that enables you to begin the upload process. Select the Finish button to begin the upload process. Select the Previous button to make changes to your prior wizard choices.
Fields Description
8 Banner Finance 8.0 6-25Spreadsheet Budgeting Handbook
Add-in Components

6-26
You must resolve all validation errors before you will be able to upload to Banner successfully.
The following data categories appear in the Validation Messages worksheet:
• Validation Message Data Category
• Workbook where the error was found.
• Worksheet where the error was found.
• Row Number containing the error.
• Message Description of the error.
Data Lookups
Data lookups are used to view and query various active codes, such as FOAPAL elements, that are in the Banner database. Each FOAPAL element (fund, organization, account, program, activity, and location), appears in a separate wizard window that functions similar to a list of values in Banner. The Banner fund/organization security established at your institution does not affect the data which you can access in the Data Lookup windows.
A separate data lookup is available for each of the following FOAPAL elements. Access the appropriate data lookup by selecting it from the Spreadsheet Budgeting sub-menu on the toolbar.
• Fund
• Organization
• Account
• Program
• Activity
• Location
For each FOAPAL element value, the following information appears in a Data Lookup window.
• Chart of accounts code
• Code
• Title
Banner Finance 8.0 May 2008Spreadsheet Budgeting HandbookAdd-in Components

May 200
• Effective date
• Termination date
Click on the desired value and then choose the Select button to insert the value into your spreadsheet. The value will appear in the cell where your cursor resided when you invoked the data lookup.
NoteWhen you select a value, only the code will be inserted into the spreadsheet cell. The description will not appear.
By using the Find field at the top of each data lookup window, you can restrict the number of values displayed. For query purposes in Spreadsheet Budgeting, the asterisk (*) and percent sign (%) both function as wildcards.
For information about using data lookups, refer to “Procedures” on page 3-2.
For information about FOAPAL elements in Banner Finance, refer to the “Processing” chapter in the Banner Finance User Guide.
8 Banner Finance 8.0 6-27Spreadsheet Budgeting Handbook
Add-in Components

6-28
Banner Finance 8.0 May 2008Spreadsheet Budgeting HandbookAdd-in Components
May 200
7 Technical Information
This chapter contains a list of the tables that support Spreadsheet Budgeting.
Tables
The following tables support Spreadsheet Budgeting:
GTVDADD Add-In Validation Table
GTVDPRP Step Property Validation Table
GORDPRP Step Property Values Rules Table
GTVDSTP Step Type Validation Table
GORDSTP Step Type Properties Rule Table
GORDSEC User Security Rules Table
GORDWIZ Add-In Wizard Association Repeating Table
GORDLUP Add-In Data Lookup Repeating Table
GORDSTE Wizard Step Repeating Table
GORDSPR Wizard Step Properties Repeating Table
GOTDWKS Worksheet Snapshot Table
GOTDMSG Temporary Desktop Tools Message Table
GOTDPAR Temporary Desktop Parameters Table
FBTBLIN Temporary Budget Line Item Table
8 Banner Finance 8.0 7-1Spreadsheet Budgeting Handbook
Technical Information

7-2
Banner Finance 8.0 May 2008Spreadsheet Budgeting HandbookTechnical Information
May 200
8 Tips and Hints
The following table contains tips and hints about using Spreadsheet Budgeting in a quick-reference format. The task is listed in the left-hand column, and one or more suggestions for accomplishing the task appears in the right-hand column.
This information is intended only as a supplement to the rest of the documentation.
Task Tips/Hints
I don’t have a Banner entry on my Excel toolbar.
The Spreadsheet Budgeting add-in must be installed on your client computer. See the General Technical Reference Manual for details.
The Desktop Tools add-in must be enabled in your copy of Microsoft Excel. See “Setting Up Spreadsheet Budgeting” on page 2-1.
I’m using Spreadsheet Budgeting on the Citrix platform, and I’m getting a message that says “GODDTOP.XLA is read-only.”
Consult your Citrix documentation for information about installing Microsoft Office.
I can’t log in to Spreadsheet Budgeting
You must have Banner access privileges in order to log in.
Your client computer must have access to the Banner database.
I can log into Spreadsheet Budgeting, but no add-ins appear in my menu bar.
You must have Spreadsheet Budgeting security privileges in order to access the Spreadsheet Budgeting add-in menu options. Security is established on the User Security Rules Form (GORDSEC).
I’m logged into several databases. How can I tell which one I’m currently using?
The active database connection appears in the title bar of Excel.
8 Banner Finance 8.0 8-1Spreadsheet Budgeting Handbook
Tips and Hints

8-2
I can’t select more than one value at a time on the wizard page.
Click the value at the beginning of the range that you want to select, hold down the Shift key, and then click the value at the opposite end of the range.
To select only certain values, hold down the Control key and click the values that you want to include.
The wizard questions on my screen are different from the ones in this book.
The Spreadsheet Budgeting reference materials document the wizard questions that are delivered with Banner. If any of the questions are changed at your institution, those changes will not appear in the documentation.
I just realized I made a wrong choice on a previous wizard window.
Select the Previous button to return to the previous wizard windows.
My spreadsheet is huge. Is there a way to limit the amount of data I download?
You can restrict your download by FOAPAL element. You can specify as many or as few as you need. Refer to“Downloading Data” on page 3-3.
The data lookup windows are showing me FOAPAL values that I know I am not authorized to use.
The Banner fund/organization security established at your institution does not affect the data to which you can access in the Data Lookup windows.
Why doesn’t the FOAPAL description appear in my spreadsheet when I select it from a data lookup window?
Spreadsheet Budgeting only inserts the code into your spreadsheet.
I have errors on my Validation Messages worksheet. Did anything get uploaded into Banner?
Spreadsheet Budgeting will not upload any data until all validation errors are resolved.
When I try to validate or upload, I’m getting messages that say certain FOAPAL codes are invalid, even though I know that they are valid.
Perform the validation or upload process again, paying special attention to your column mappings. Chapter 3 contains information about mapping your spreadsheet columns.
Verify the effective dates of codes in Banner.
I get error messages when I try to upload by budget period.
You can use a FOAPAL string only once per budget phase. If a FOAPAL string is used more than once in your spreadsheet, or already exists in the budget phase to which you are uploading, then the upload process will fail.
Task Tips/Hints
Banner Finance 8.0 May 2008Spreadsheet Budgeting HandbookTips and Hints

May 200
My permanent and temporary budget data was all uploaded as permanent budget data.
If you want to keep permanent and temporary budget data separate, you must select the Permanent and Temporary Budget Data radio button in the Validation and/or Upload Wizard. Otherwise, your budget data will be uploaded as permanent data.
I need to change the information I uploaded into Budget Development.
Make changes to the information using Budget Development functionality.
My institution does not use the Budget Development module of Banner.
The Spreadsheet Budgeting application can only upload data into the Budget Development module. If your institution does not use it, you will not be able to upload your data.
Exception: If your institution uses the Banner Human Resources System’s Position Control module, you can upload Position Control data into the Position Control tables.
Task Tips/Hints
8 Banner Finance 8.0 8-3Spreadsheet Budgeting Handbook
Tips and Hints

8-4
Banner Finance 8.0 May 2008Spreadsheet Budgeting HandbookTips and Hints