Embed Size (px)
Citation preview
OPERATING INSTRUCTION MANUAL
SPRAYSTATION 3900®
BEFORE USE – PLEASE READ THE MANUAL AND SAFETY INSTRUCTIONS.Please retain for future reference.
PLEASE REFER TO THE SEPARATE SPRAYPACK MANUAL FOR ADDITIONAL INSTRUCTIONS
EN
Expert Control Technology
2
12
11
10
98765432
1
A B
Fig.1
14
13
Fig.2
Fig.3
Fig.4 Fig.5
Fig.6 Fig.7
HV3900
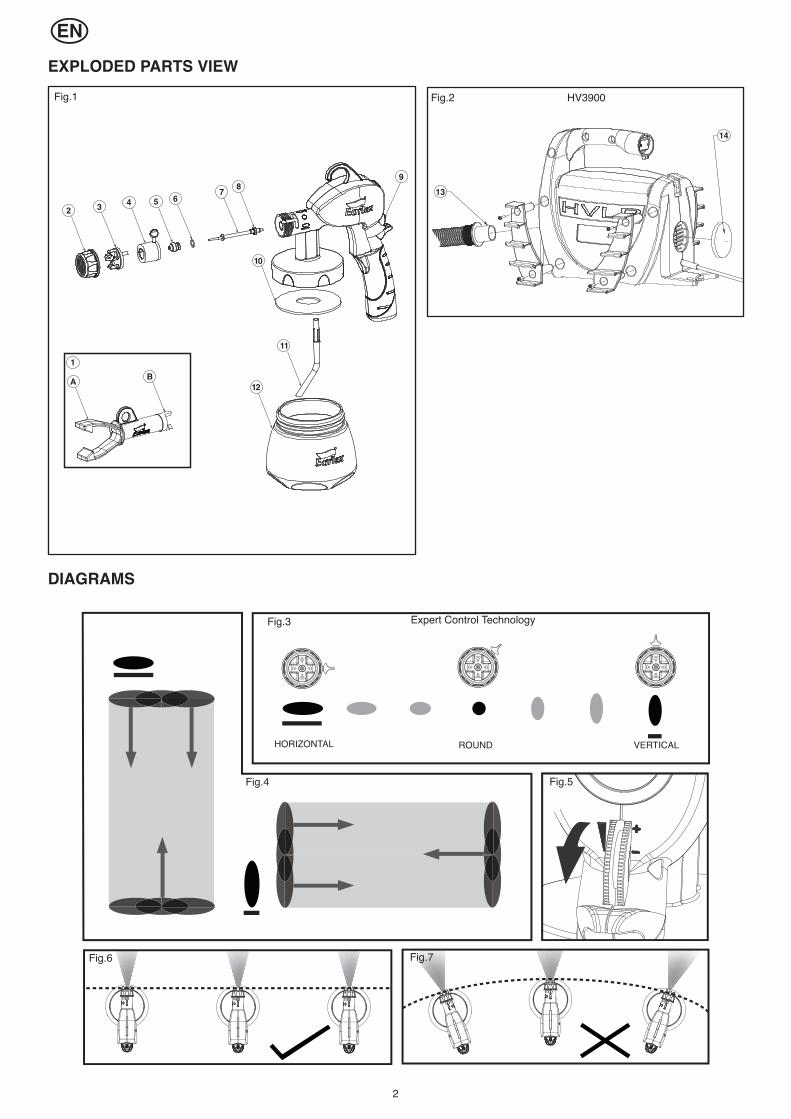
EXPLODED PARTS VIEW
DIAGRAMS
EN
HORIZONTAL ROUND VERTICAL
• WARNING! Use caution when spraying any materials with a flash point lower than 21°C (70°F). Check the technical specifications on the paint or coating container before spraying.
• NEVER under any circumstances aim the Spray Gun at another person or animal. In the event of injury occurring seek expert medical advice immediately.
• The Spray Gun must only be used with paints and solvents that have a flash point suitable for>spraying. If in doubt, consult the paint or solvent manufacturer’s data.• Always ensure there is adequate ventilation when spraying.• NEVER spray near a naked flame, including appliance pilot flame. • NEVER smoke whilst spraying.• Always read the solvent manufacturer’s instructions before use.• Always disconnect unit from mains supply when filling the paint container.• Always wear a suitable protective mask when spraying. We also recommend the use of suitable >ear protection, gloves, goggles and overalls.• After each use, thoroughly clean the Spray Gun. • This appliance can be used by children aged from 8 years and above and persons with reduced>physical, sensory or mental capabilities or lack of experience and knowledge if they have been>given supervision or instruction concerning use of the appliance in a safe way and understand>the hazards involved. Children shall not play with the appliance. Cleaning and user maintenance>shall not be made by children without supervision.• Use only genuine manufacturer replacement parts.• Always disconnect the Spray Station from the mains supply before cleaning the appliance.• WARNING! The use of any accessory or attachment, other than those recommended in this>instruction manual, may present a risk of personal injury.• Use the Spray Gun for the job it was designed for only. Mis-use of the Spray Gun will invalidate>the guarantee.• If the supply cord is damaged, it must be replaced by the manufacturer or its appointed agents to avoid a safety hazard.WARNING! The substances used with this Spray Gun (paints, solvents, etc.) may containdangerous, harmful, explosive or corrosive materials. ALWAYS COMPLY WITH THE SAFETY INSTRUCTIONS ISSUED WITH THISPRODUCT AND THE MATERIAL BEING USED.
3
SAFETY OPERATING INSTRUCTIONSPLEASE READ BEFORE USE
EN

4
No. Description Part No. 1. Needle and Fluid Tip Tool V0018 2. Air Cap Ring V0001 3. Air Cap V0002 4. Spray Direction Plate V0003 5. Fluid Tip 2.0mm V0004 6. Fluid Tip O-Ring V0005
No. Description Part No.7. Fluid Needle 2.0mm V0006 8. Lip Seal - Fluid Needle V0007 9. Paint Flow Adjuster V001110. Paint Container Seal L068211. Pick-Up Tube V0012 12. Paint Container V0014
The conceptA motor feeds out a high volume of air (HV) and enables products to be sprayed at a low pressure (LP). The air hose feeds the air produced by themotor to the Spray Gun. The solution is released from the Fluid Tip of the Spray Gun at a very low pressure and is enclosed in a high volume of air.
The powerful motor can spray a wide range of solutions with or without dilution. However, there will always be some which will not be suitable forthe Spray Gun. Good quality paint contains a high percentage of solids which make the dilution easier. The users must keep in mind that low temperatures make the paint thicker, that’s why we recommend spraying with the Spray Gun at 15°C minimum temperature.
TECHNICAL SPECIFICATION HV3900Wattage: 550 Watts Container capacity: 1 litre + 5 litre spraypackVoltage: 220-240VFrequency: 50-60HzAir hose length: 4mDynamic air pressure: 0,15 barSound pressure level: 75 dB (A)Maximum viscosity: 180DIN/s
No. Description Part No.13. Air Hose L2249 14. Filter L0290
FOR SPRAYPACK ASSEMBLY PLEASE REFER TO SPRAYPACK MANUAL.
PARTS LIST Fig.1
PARTS LIST HV3900 Fig.2
INTRODUCTION
EN
• Carefully cover areas which are not to be painted with a plastic cover and protective tape.• Wear a suitable mask when spraying products (and make sure there is adequate ventilation in the room when working indoors).• Clean the surface you are going to paint. As well as being clean, it must also be dry and smooth.• Practice first on some old wooden planks to make sure you are holding the Spray Gun correctly.• We recommend you wear protective clothing.• Stir the paint well.• Make sure there are no solid particles in the paint.• Many products can be sprayed without being thinned. However, if the application is not good, thin the product progressively in stages of 5%.• Most paints can be sprayed by being thinned just a little, e.g. by 5% or 10%.• Some thick paints such as outer wall paints and certain undercoats will need to be thinned by 20% or 25%.• Use water to thin a water-based product.• Use appropriate thinners to thin solvent-based products. • Certain manufacturers will indicate on the can whether a specific thinner is to be used.• Certain paint manufacturers have specific paints available for HVLP application.
Your SprayStation® is a powerful and versatile solution, and is compatible with different sizes of Needles and Fluid Tips:
• The smaller Needles and Fluid Tips are the most commonly used size for decorative paints.
• The larger Needles and Fluid Tips, which can be easily assembled to the Spray Gun with the Needle and Fluid Tip Tool (1), are for thick paints such as undercoats and smooth masonry paints.
There are other optional Needle and Fluid Tip sizes available to purchase for more specific applications.
FOR SPRAYPACK ASSEMBLY PLEASE REFER TO SPRAYPACK MANUAL.
PREPARATION
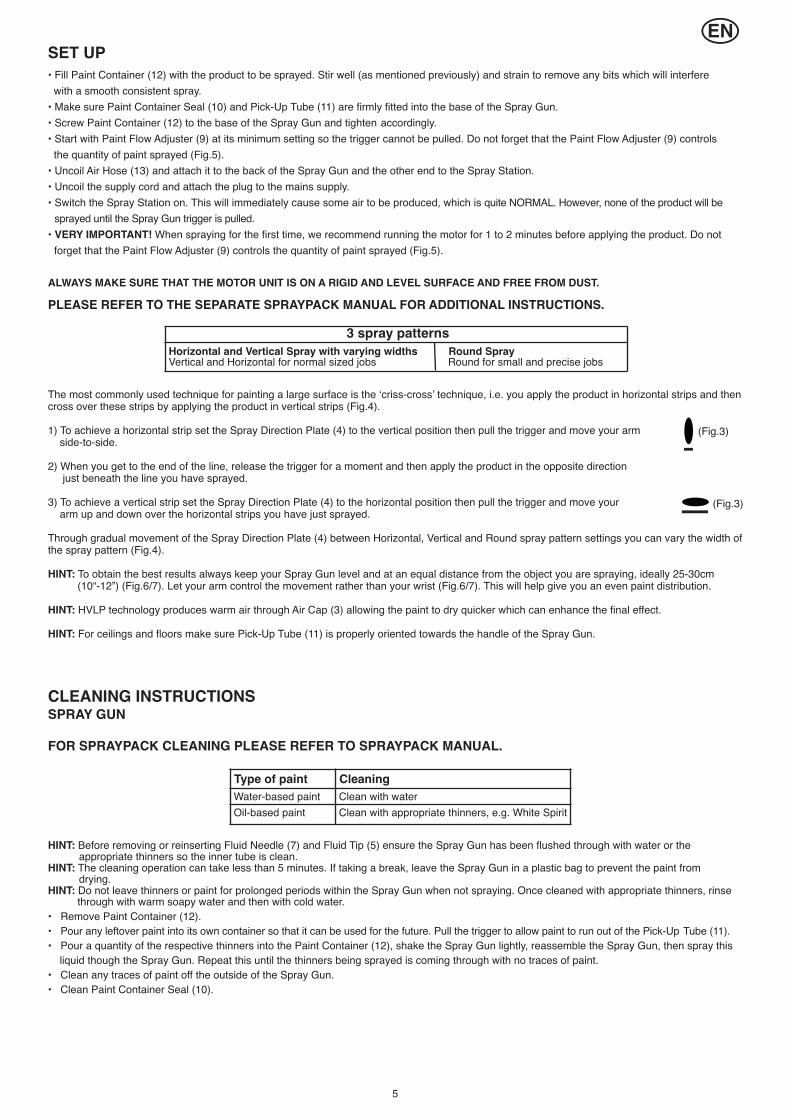
• Fill Paint Container (12) with the product to be sprayed. Stir well (as mentioned previously) and strain to remove any bits which will interfere with a smooth consistent spray.
• Make sure Paint Container Seal (10) and Pick-Up Tube (11) are firmly fitted into the base of the Spray Gun. • Screw Paint Container (12) to the base of the Spray Gun and tighten accordingly.• Start with Paint Flow Adjuster (9) at its minimum setting so the trigger cannot be pulled. Do not forget that the Paint Flow Adjuster (9) controls the quantity of paint sprayed (Fig.5).
• Uncoil Air Hose (13) and attach it to the back of the Spray Gun and the other end to the Spray Station.• Uncoil the supply cord and attach the plug to the mains supply.• Switch the Spray Station on. This will immediately cause some air to be produced, which is quite NORMAL. However, none of the product will be
sprayed until the Spray Gun trigger is pulled.• VERY IMPORTANT! When spraying for the first time, we recommend running the motor for 1 to 2 minutes before applying the product. Do not >forget that the Paint Flow Adjuster (9) controls the quantity of paint sprayed (Fig.5).
ALWAYS MAKE SURE THAT THE MOTOR UNIT IS ON A RIGID AND LEVEL SURFACE AND FREE FROM DUST.
PLEASE REFER TO THE SEPARATE SPRAYPACK MANUAL FOR ADDITIONAL INSTRUCTIONS.
3 spray patternsHorizontal and Vertical Spray with varying widths Round SprayVertical and Horizontal for normal sized jobs Round for small and precise jobs
The most commonly used technique for painting a large surface is the ‘criss-cross’ technique, i.e. you apply the product in horizontal strips and thencross over these strips by applying the product in vertical strips (Fig.4).
1) To achieve a horizontal strip set the Spray Direction Plate (4) to the vertical position then pull the trigger and move your arm side-to-side.
2) When you get to the end of the line, release the trigger for a moment and then apply the product in the opposite direction just beneath the line you have sprayed.
3) To achieve a vertical strip set the Spray Direction Plate (4) to the horizontal position then pull the trigger and move your arm up and down over the horizontal strips you have just sprayed.
Through gradual movement of the Spray Direction Plate (4) between Horizontal, Vertical and Round spray pattern settings you can vary the width ofthe spray pattern (Fig.4).
HINT: To obtain the best results always keep your Spray Gun level and at an equal distance from the object you are spraying, ideally 25-30cm (10“-12”) (Fig.6/7). Let your arm control the movement rather than your wrist (Fig.6/7). This will help give you an even paint distribution.
HINT: HVLP technology produces warm air through Air Cap (3) allowing the paint to dry quicker which can enhance the final effect.
HINT: For ceilings and floors make sure Pick-Up Tube (11) is properly oriented towards the handle of the Spray Gun.
(Fig.3)
(Fig.3)
5
SET UPEN
Type of paint CleaningWater-based paint Clean with waterOil-based paint Clean with appropriate thinners, e.g. White Spirit
HINT: Before removing or reinserting Fluid Needle (7) and Fluid Tip (5) ensure the Spray Gun has been flushed through with water or the >>>>>appropriate thinners so the inner tube is clean.HINT: The cleaning operation can take less than 5 minutes. If taking a break, leave the Spray Gun in a plastic bag to prevent the paint from>>>>>drying.HINT: Do not leave thinners or paint for prolonged periods within the Spray Gun when not spraying. Once cleaned with appropriate thinners, rinse
through with warm soapy water and then with cold water.• Remove Paint Container (12).• Pour any leftover paint into its own container so that it can be used for the future. Pull the trigger to allow paint to run out of the Pick-Up Tube (11).• Pour a quantity of the respective thinners into the Paint Container (12), shake the Spray Gun lightly, reassemble the Spray Gun, then spray this
liquid though the Spray Gun. Repeat this until the thinners being sprayed is coming through with no traces of paint.• Clean any traces of paint off the outside of the Spray Gun.• Clean Paint Container Seal (10).
FOR SPRAYPACK CLEANING PLEASE REFER TO SPRAYPACK MANUAL.
CLEANING INSTRUCTIONSSPRAY GUN
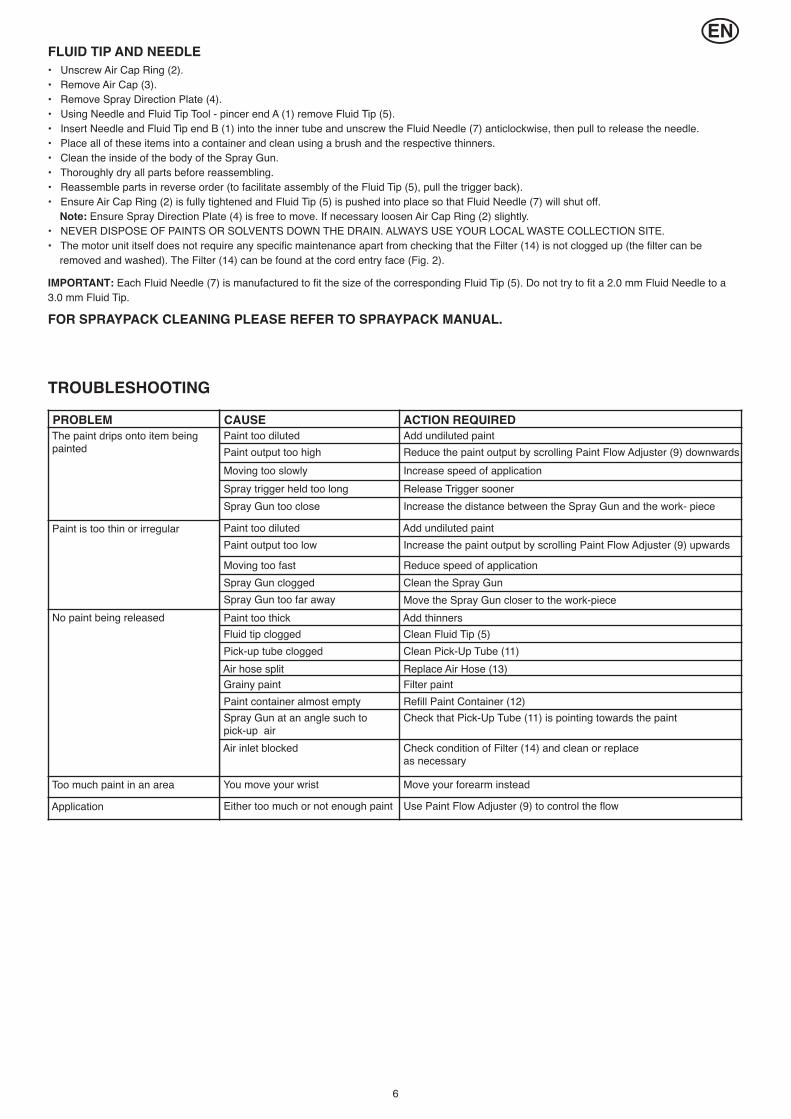
• Unscrew Air Cap Ring (2).• Remove Air Cap (3).• Remove Spray Direction Plate (4).• Using Needle and Fluid Tip Tool - pincer end A (1) remove Fluid Tip (5).• Insert Needle and Fluid Tip end B (1) into the inner tube and unscrew the Fluid Needle (7) anticlockwise, then pull to release the needle.• Place all of these items into a container and clean using a brush and the respective thinners.• Clean the inside of the body of the Spray Gun.• Thoroughly dry all parts before reassembling.• Reassemble parts in reverse order (to facilitate assembly of the Fluid Tip (5), pull the trigger back).• Ensure Air Cap Ring (2) is fully tightened and Fluid Tip (5) is pushed into place so that Fluid Needle (7) will shut off. Note: Ensure Spray Direction Plate (4) is free to move. If necessary loosen Air Cap Ring (2) slightly.
• NEVER DISPOSE OF PAINTS OR SOLVENTS DOWN THE DRAIN. ALWAYS USE YOUR LOCAL WASTE COLLECTION SITE.• The motor unit itself does not require any specific maintenance apart from checking that the Filter (14) is not clogged up (the filter can be
removed and washed). The Filter (14) can be found at the cord entry face (Fig. 2).
IMPORTANT: Each Fluid Needle (7) is manufactured to fit the size of the corresponding Fluid Tip (5). Do not try to fit a 2.0 mm Fluid Needle to a 3.0 mm Fluid Tip.
FOR SPRAYPACK CLEANING PLEASE REFER TO SPRAYPACK MANUAL.
CAUSE ACTION REQUIREDPaint too diluted Add undiluted paintPaint output too high Reduce the paint output by scrolling Paint Flow Adjuster (9) downwardsMoving too slowly Increase speed of applicationSpray trigger held too long Release Trigger soonerSpray Gun too close Increase the distance between the Spray Gun and the work- piece
Paint too diluted Add undiluted paintPaint output too low Increase the paint output by scrolling Paint Flow Adjuster (9) upwardsMoving too fast Reduce speed of applicationSpray Gun clogged Clean the Spray GunSpray Gun too far away Move the Spray Gun closer to the work-piecePaint too thick Add thinnersFluid tip clogged Clean Fluid Tip (5)Pick-up tube clogged Clean Pick-Up Tube (11)Air hose split Replace Air Hose (13)Grainy paint Filter paintPaint container almost empty Refill Paint Container (12)Spray Gun at an angle such to pick-up .air
Check that Pick-Up Tube (11) is pointing towards the paint
Air inlet blocked Check condition of Filter (14) and clean or replace .as necessary
You move your wrist Move your forearm instead
Either too much or not enough paint Use Paint Flow Adjuster (9) to control the flow
PROBLEMThe paint drips onto item being painted
Paint is too thin or irregular
No paint being released
Too much paint in an area
Application
6
FLUID TIP AND NEEDLE
TROUBLESHOOTING
EN
PLEASE NOTE: We have done all we can to ensure that when used correctly and in accordance with these instructions the SprayStation has a long and fault-free life. We accept no responsibility for damage caused by the use of incorrect or unsuitable substances, paints or liquids which have not been thinned correctly or which are not suitable for the surfaces to which they are applied, health hazards arising from a lack of ventilation when working in confined spaces or equipment which is faulty due to inadequate cleaning of the components after use. If in doubt, test a small inconspicuous area first. Always read the manufacturer’s instructions before use. Neither our guarantee nor the above statement affects your statutory rights.
GUARANTEE and HELPLINEThis product is guaranteed for a period of 24 months against faulty manufacture or materials. It is not guaranteed for industrial or hire purposes.
This guarantee does not affect your statutory rights. For further information or any user advice, please phone our helpline between 08.30 to 17.00Monday to Thursday and Friday 08.30 to 15.45 (excluding Bank Holidays), or visit our website www.earlex.com.
WAGNER WILL ACCEPT NO RESPONSIBILITY FOR THE USE OF THIS PRODUCT IF USED FOR ANY PURPOSES OTHER THAN THOSEDETAILED HEREIN.
Copyright and design rights reserved © 2015
INFORMATION ON THE DISPOSAL OF WASTE ELECTRICAL & ELECTRONIC EQUIPMENT KNOWN AS WEEE.Please do not dispose of tools with your household waste collected by the council. It is your responsibility to dispose of this type ofwaste by handing it over to a special designated collection point for recovery and recycling.
This unit is a Class II appliance which means it is double-insulated for your protection, no earthing wire is necessary. If the supply cord is damaged,it must be replaced by the manufacturer or its appointed agents to avoid a safety hazard.
If you are using an extension lead it must be rated a minimum of 6 Amps and fully unwound. Do not operate with a lead rated less than 6 Amps asthis will cause premature failure of the motor which is not covered by the guarantee.
If the plug is cut off from the supply cord, the plug must be disposed of safely. NEVER under any circumstances insert a plug which is cut off from the supply cord into a mains socket-outlet.
Design Registrations and Patents:
Wagner Spraytech (UK) LtdTel: +44 (0)1483 454666
Email: [email protected] Website: www.earlex.com
EC Declaration of ConformityWe declare that the unit HV3900 conforms to: LVD 2006/95/EC, EN60335-1, EMF EN 62233;
EMC 2004/108/EC, EN55014-1, EN55014-2, EN61000-3-2, EN61000-3-3.
7
Spray Gun Design RegistrationECD 001096218-0001CN 200930004457.XUS D609,778S
Spray Gun PatentGB 0903275.6GB 2468196GB 2469587US 8,308,083PCT/US 8,590,810
HV3900 Turbine Design RegistrationGB 3022947ECD 000608856-0001US D563,503S
Spray Pack Design RegistrationECD 001316970US D672, 847S
MAINS CONNECTION
EN
Spray Gun Patent PendingFR 2942414DE 10 2010 000 536.3

Wagner Spraytech (UK) LtdTel: +44 (0)1483 454666
Email: [email protected] Website: www.earlex.com© 2015 Wagner Spraytech (UK) Ltd. L1964 03/15