Embed Size (px)
Citation preview
Overview Overview
Microphone Jack - Connect to a microphone for voice input.
Ethernet Jack - Connect the Ethernet cable for internet access. If you need
advanced settings such as VPN, go into the settings page at:
“Settings” > “More...”. While connected with the Ethernet cable, the NEO U1
can be used as a router and also a Wi-Fi hotspot; if you need to use the Wi-Fi
hotspot feature, please make sure that the Wi-Fi feature is OFF before you
enable the Wi-Fi hotspot service at: “Settings” > “More”.
DC 5V Power-in Jack - Connect the 5V power adapter supplied in the package
to this port. The NEO U1 requires less than 1A to operate, however the included
power adapter provides 3A, in consideration that you may require extra to
connect other power-drawing external devices such as an external hard drive.
USB 2.0 Ports - Connect an external USB device to the NEO U1, such as USB
flash drive, reciever of wireless keyboard and mouse, USB wired mouse,
receiver of wireless headset, MINIX branded air-mouse / gyro-mouse etc...
Overview
HDMI port - Connect the NEO U1 to the HDMI port of a high-definition TV
or PC monitor using an HDMI cable.
Optical Audio Port - Connect to the optical audio input of an external sound
processing unit, such as an amplifier.
OTG Port - Connect the micro end of the Micro-USB cable to this port and
the other end to the computer for synchronization and manual upgrade
purposes. This port also serves as an extra USB port while using with the
Micro-USB OTG cable bundled in the package.
Overview
Control
Different Control Methods - You may control the NEO U1 with the following
input devices:
1.) Wired mouse;
2.) 2.4GHz USB wireless mouse and keyboard set;
3.) 2.4GHz USB air-mouse / gyro-mouse (MINIX branded mouses sold separately);
4.) MINIX IR-Remote(included).
NEO U1
Multi-Language Setup GuideEnglish/Deutsch/中文/Русский/español
NEO U1快速指南
操控
感谢您选购MINIX NEO U1.
遵循此指南设置您的设备。
MINIX NEO U1 是一款革命性的迷你电脑,基于四核ARM Cortex-A53
处理器和Mali-450 GPU以及最新的Android™操作系统,连接 液晶电视或电脑显示器,
即可成为一台功能完整的电脑、智能电视盒、 高清播放机、网络机顶盒或者游戏机。
登录任何安卓应用市场(如:百 度应用等)即可下载喜欢的应用程序并直接安装到
MINIX NEO U1.
MINIX NEO U1 支持以太网,蓝牙和Wi-Fi 连接; 您可以用同一网络 连接多个
设备并在他们之间共享视频,音乐,图片等内容。
不同的操控方法
您可以通过以下输入设备操控 MINIX NEO U1:
1.) 有线鼠标;
2.) 2.4GHz USB 无线鼠标和键盘设备;
3.) 2.4GHz USB 无线飞鼠,可以购买MINIX NEO A2 Lite;
4.) MINIX 红外遥控 (包含)。
Vielen Dank für Ihren Kauf des MINIX NEO U1
Bitte folgen Sie dieser Anleitung zur Einrichtung Ihres Geräts.
Der MINIX NEO U1 ist ein revolutionärer Smart Media Hub, basierend auf einem
ARM Cortex-A53 Prozessor mit der Mali-450 GPU und dem aktuellen Android
Betriebssystem. Nach Anmeldung im Google Play Store können Sie Ihre Lieblings-Apps
herunterladen und direkt auf dem NEO U1 installieren.
YouTube, Internet Radio und zahlreiche andere Apps stehen im Google Play Store zur
Verfügung. Alternativ können Sie auch Apps von Drittanbietern herunterladen und mit
dem vorinstallierten AppInstaller installieren.
Der U1 ist ausgestattet mit Ethernet- Bluetooth und Wi-FiVerbindung; Sie können das
Gerät mit vielen an Ihrem Netzwerk angeschlossenen Geräten verbinden und deren
Inhalte teilen, z.B. Videos, Musik und Fotos.
Bedienung
NEO U1Benutzerhandbuch
Verbinden Verbinden
Diverse Möglichkeiten der BedienungSie können Ihren MINIX NEO mit folgenden Eingabegerätenbedienen:1.)USB Kabelmaus2.)2,4GHz USB Funktastatur- und -maus Set 3.)2,4GHz USB kabellose AirMouse Fernbedienung / Keyboard MINIX NEO A2 Lite separat erhältlich) 4.)MINIX Infrarot Fernbedienung (wird mitgeliefert)
U1
安装连接 安装连接
Thank you for purchasing the MINIX NEO U1.
NEO U1 pushes the boundaries of Android™ on TV capabilities, bringing all the
great features that you expect from Android™ OS into your living room; including
web browsing, stunning Ultra High-Definition video playback and real-time streaming,
access to popular media player apps such as KODI™, screen-casting capability,
local media playback capability via USB port, Internet radio and audio streaming
services, Skype™ along with other VoIP services, Android™ gaming and much more.
More hints, tips and useful information can be found on the official MINIX Forum:
www.minixforum.com64-bit Quad CoreMedia Hub for Android
TM
Verbinden
安装连接 安装连接
Power LEDDie LED leuchtet bei eingeschaltetem MINIX NEO U1.
EIN/AUS SchalterUm den MINIX NEO U1 einzuschalten, drücken Sie für 1-2 Sekunden den EIN/AUS Schalter, bis die Power LED leuchtet. Um den MINIX NEO U1 auszuschalten, drücken Sie den EIN/AUS Schalter, bis Sie über das Display aufgefordert werden, dies zu bestätigen. Bestätigen Sie dies nun ODER halten Sie den EIN/AUS Schalter für 8 Sekunden gedrückt, um das Ausschalten zu erzwingen, bis die LED erlischt.
Kopfhörer AnschlussVerbinden Sie ein externes Audiogerät, z.B. Kopfhörer oder Lautsprecher.
Mikrofon AnschlussVerbinden Sie ein Mikrofon an diesem Eingang, z.B. für Spracheingabe.
TF Karten SteckplatzErweitern Sie den Speicherplatz oder greifen Sie auf Dateien auf einerTF Speicherkarte zu, unterstützt werden Karten bis max. 256GB.
OTG PortVerbinden Sie den Micro-USB Stecker des Micro-USB Kabels mit dem OTG Port des NEO U1 und das andere Ende mit dem USB Anschluss Ihres Computers für die Synchronisation und zum Zweck von Upgrades. Dieser Port dient auch als weiterer USB Port in Verbindung mit dem mitgelieferten Micro-USB OTG Kabel.
Recover / WiederherstellungstasteDiese Taste wird zusammen mit dem OTG Port für Service/Upgrade-zwecke benutzt. Schalten Sie den über den OTG Port mit dem PC verbundenen NEO U1 ein, während Sie die "RECOVER" Taste gedrückt halten, bis der NEO U1 startet.
HDMI AnschlussVerbinden Sie den MINIX NEO U1 mit dem HDMI Port eines HD-fähigenTV Geräts oder Monitors mittels eines HDMI Kabels.
Optischer Audio AnschlussVerbinden Sie diesen Ausgang mit dem optischen Audio Eingang einesexternen Wiedergabegerätes, z.B. eines Verstärkers.
USB 2.0 PortsVerbinden Sie externe USB Geräte mit dem MINIX NEO U1, wie USB-Speichersticks, Empfänger für kabellose Tastatur und Maus, USB Maus, Empfänger von kabellosen Kopfhörern, etc ...
Google Play StoreErste SchritteErste Schritte
Einstellung der Sprachversion
Sie können das Betriebssystem auf die gewünschte Systemsprache einstellen wie folgt:
Launcher Home Screen > Settings > Language Die voreingestellte Sprache ist Englisch, hier können Sie die gewünschte Sprache auswählen und bestätigen.
Einstellung der ZeitzoneStellen Sie die Zeitzone Ihres Standorts ein wie folgt:
Übersicht Launcher Home Screen > Einstellungen > Datum & Uhrzeit> Zeitzone auswählenWählen Sie Ihre entsprechende Zeitzone aus.
Wi-Fi Einrichtung Grundeinstellungen Verbinden Sie Ihren MINIX NEO U1 mit Ihrem WLAN für die Verbindung mit dem Internet wie folgt: Übersicht Launcher Home Screen > Einstellungen > WLAN > WLAN aktivieren, um verfügbare Netze abzurufenDer MINIX NEO U1 scannt nun die verfügbaren WLAN Netzwerke. Wählen Sie das entsprechende Netzwerk aus und bestätigen Sie die Auswahl, geben Sie das Passwort für Ihr WLAN Netzwerk ein, wenn die virtuelle Tastatur erscheint. Abschließend betätigen Sie die Schaltfläche„Verbinden“.
Verbinden mit Ihrem Google Account
Aktivieren Sie den Zugang zum Google Play Store wie folgt:
Übersicht Launcher Home Screen > Google Play Store > anklicken
Um den Google Play Store nutzen zu können, brauchen Sie ein Google Nutzerkonto. Wenn Sie bereits einen Google Account haben, wählen Sie “Anmelden“ und loggen Sie sich mit Ihren Zugangsdaten ein. Wenn Sie noch kein Google Nutzerkonto haben, wählen Sie “Google Konto einrichten“ und folgen Sie den Anweisungen.
Nach erfolgreicher Anmeldung werden Sie zum Google Play Store weiter geleitet, wo Sie die gewünschten Apps aussuchen und installieren können.
Falls Sie die gewünschte App im Google Play Store nicht finden, können Sie alternativ auch “.apk“ Apps aus dem Internet herunterladen und mit dem vorinstallierten “ApkInstaller“ installieren.
Copyright © 2016 MINIX Tech. Alle Rechte vorbehalten.
Kein Teil dieses Handbuchs, einschließlich der darin beschriebenen Produkte und Software, darf in irgendeiner Form oder mit irgendwelchen Mitteln vervielfältigt, übertragen, überschrieben, in einem Daten- abfragesystem gespeichert oder in irgendeine Sprache übersetzt werden, ohne die ausdrückliche schriftliche Genehmigung von Minix, außer durch den Käufer zum Zweck der Datensicherung. Diese Klausel gilt nicht für solche Software, die unter der General Public License ("GPL") oder anderen Free Open-Source-Lizenzen lizenziert ist. Kopien der jeweiligen Lizenzbedingungen, und, wo erforderlich, ein Angebot, um den jeweiligen Quellcode zu liefern, sind im Produkt enthalten.
Google, Android, Gmail, Google Maps, Chrome, Google Play, YouTube, Google+ und andere Warenzeichen sind Eigentum der Google Inc. Eine Liste der Google-Marken finden Sie unter http://www.google.com/ permissions/guidelines.html. MINIX und das MINIX Logo sind Warenzeichen von MINIX Tech. Alle anderen Marken- und Warenzeichen sind Eigentum ihrer jeweiligen Inhaber.
Der Inhalt dieser Anleitung kann sich in einigen Details von dem Produkt oder seiner Software unterscheiden. Alle Informationen in diesem Dokument können sich ohne vorherige Ankündigung ändern.
Für Online Hilfe und Support besuchen Sie bitte www.minix.com.hk
Erste Schritte
Was benötigt wirdUm den MINIX NEO zu benutzen, brauchen Sie Folgendes:
High Definition TV / PC MonitorEin HD-fähiges TV Gerät oder PC Monitor, welches 720p, 1080p or 4KVideo wiedergeben kann mit einem freien HDMI Eingang.
KabelEin HDMI Kabel, um den MINIX NEO U1 mit Ihrem TV zu verbinden.
NetzwerkEin Netzwerkkabel als Verbindung zu Ihrem Router oder ein 802.11ac Wi-Fi Netzwerk, den Namen und das Passwort Ihres WLANs.
Software und NutzerkontenUm Inhalte (Videos, Fotos, Musik) von einem Smartphone oder PC aufIhrem MINIX NEO U1 wiederzugeben, brauchen Sie:- Installierte UPnPTM/DLNA® Software installiert auf Smartphone oder PC- Einen Google Account für die Anmeldung im Google Play Store, um die entsprechenden Apps herunterzuladen (z.B. iMediaShare, eHomeMediaCenter), die für das Streaming des Inhalts von Smartphone / PC benötigt werden.- Ggf. werden weitere Nutzerkonten für den vollen Zugang zu weiterenWebinhalten benötigt.
U1Einrichten des MINIX NEO U1Der MINIX NEO wird über den HDMI Port mit Ihrem HDMI-fähigen TV oder PC Monitor verbunden, wobei sowohl Bild als auch Ton mittels eines HDMI Kabels übertragen werden. Bevor Sie den MINIX NEO U1 einrichten, prüfen Sie bitte die seitlichen/hinteren Anschlüsse Ihres TV / PC Monitors, um sicher zu gehen, dass Sie das richtige Kabel haben:
- HDMI Kabel: Sie können den MINIX NEO U1 damit mit einem HDTV Gerät oder Home Theater Receiver mit HDMI Anschluss verbinden, das HDMI Kabel überträgt sowohl Bild als auch Ton.
Schritt 1: Verbinden der Kabel1. Verbinden Sie ein Ende des HDMI Kabels mit dem HDMI AnschlussIhres TV/PC Monitors.2. Verbinden Sie das andere Ende des HDMI Kabels mit dem HDMI Anschluss des MINIX NEO U1.
Schritt 2: Anschließen der StromquelleVerbinden Sie das mitgelieferte 5V Netzteil mit dem MINIX NEO U1. Drücken Sie für 2-3 Sekunden den EIN/AUS Schalter, um den MINIX NEO U1 zu starten, bis die blaue Power LED leuchtet, .
Schritt 3: Anschalten des TV / Monitors und Wahl des Eingangs Schalten Sie einfach Ihr TV Gerät oder Ihren PC Monitor an und wählen Sie den entsprechenden HDMI Port aus, an dem Ihr MINIX NEO U1angeschlossen ist.
U1
电源指示灯
MINIX NEO U1开机状态下指示灯亮。
电源键
MINIX NEO U1开机时按住电源键保持1-2秒直到电源指示灯亮起。关机
时按住电源键,显示器会提示出确认关闭对话框,选择OK确认关闭,或
者长按电源键8秒强制关机,电源指示灯灭掉。
耳机接口 连接到一个外部音频输出设备如耳机或喇叭。
麦克风接口 连接麦克风输出声音。
TF 卡接口
可增大存储容量或直接从 TF 卡读取文件,支持扩充到的最大容量
为256GB 。
OTG 接口
Micro-USB线较小的一端连接此接口,另一端连接电脑用于同步数据或升
级。当与包装中的 Micro-USB OTG线配合使用时,此接口也可作为额外
的USB接口。
复位键 当连接电脑服务或升级时,此按键与OTG接口配合使用。
在连接到电脑 USB接口之前按住此按键并保持,当MINIX NEO U1启动时
释放按键。
HDMI 接口
用一根HDMI 线连接 MINIX NEO U1到高清电视或电脑显示器的HDMI接
口。
音频光纤接口 连接到外部声音处理单元(如扬声器)的音频光纤输入接口。
USB 2.0 接口
连接外部USB设备,如USB闪存驱动器、无线键盘鼠标接收器、USB鼠
标、无线耳机接收器等到MINIX NEO U1.
以太网接口
连接网线接入互联网。如果您想做进一步设置如PPPoE 拨号,请进入设置页
面:
设置 ->更多…
当连接网线时,MINIX NEO U1可作为路由器和Wi-Fi接入点使用;如果
您需要使用Wi-Fi接入点功能,请确保在您通过:设置 ->更多…
启动Wi-Fi接入点服务之前,Wi-Fi功能是关闭状态。
DC 5V 充电接口
将包装内提供的5 v电源适配器连接到此端口。MINIX NEO U1操作所需
电流低于1A,但是考虑到您需要连接其他牵引功率的外部设备(如外接硬
盘),故我们提供一个5V 3A的电源适配器。
安卓应用市场基础设置
您可以通过以下步骤选择所需的系统语言:
开启主屏幕> 设置> 语言 默认语言是英语,您可以选择您想要的语言并确认。
时区设置
您可以根据您的当前位置通过以下步骤调整时区:
开启主屏幕> 设置> 日期 & 时间 > 选择时区 选择您的时区并确认。
无线网络设置(基础)
通过以下步骤连接到无线网络,您就可以访问互联网:
开启主屏幕 > 设置>Wi-Fi>选中该选项“发现可用 的网络开启Wi-Fi ”
wi - fi将打开并自动扫描可用的无线网络,然后选择你想要的无线网络连接
并确认,当虚拟键盘提示时输入wi – fi密码,最后,点击“连接”按键。
遵循以下步骤安装应用程序或游戏:
登录浏览器 搜索“安卓市场” 下载、安装您喜欢的“安卓市场” 打开“安卓市场”
搜索您想要安装的应用程序或游戏 下载并安装应用程序或游戏 打开并使用应用程序
(注:MINIX推荐使用正版软件)
版权©2016 MINIX.保留所有权利。
没有MINIX明确的书面许可,禁止以任何形式或通过任何途径将此指南的 任何部分
包括产品和软件描述,复制、传播、转录、存储进检索系统或 翻译成任何语言;
购买者以备份的目的保存文档除外。此条款不适用于 获得通用公共许可证("GPL")
许可或其他免费开放资源许可的软件。许 可条款副本及需要时提供的源代码都包含
在产品中。
Google, Android, Gmail, Google Maps, Chrome, Google Play, YouTube, Google+,
和一些其他商标均为谷歌公司的财产。谷歌商标的列表可以
在 http://www.google.com/permissions/guidelines.html中找到。
MINIX和 MINIX的标识是MINIX科技的商标。所有其他标志或商标均为它们各自
所有者的财产。
此指南内容在一些细节上可能与产品或它的软件不同。本文件中的所有 信息可做更改,
不另行通知。
在线帮助和支持请访问www.minix.com.hk
基础设置 基础设置
您需要准备的
要使用MINIX NEO U1, 以下是您需要准备的:
高清电视/ 电脑显示器
一个高清电视或电脑显示器,可以显示720p, 1080p或4K视频和至少一个
HDMI输入接口。
排线
一根 HDMI排线用于MINIX NEO U1与电视连接。
无线网络
一个 802.11ac 或者 n Wi-Fi 无线网络
您的无线网络名称和密码。
软件和账户
在MINIX NEO U1上应用智能手机或电脑上的内容(视频,图片,
音乐),您需要:
-一个UPnP™/DLNA® 软件预装在您的智能手机或电脑上。
-登录某个安卓应用市场下载您想使用的应用程序或游戏。
-全面访问一些网站内容,可能还需要其他账户。
安装连接 MINIX NEO U1
通过HDMI端口将MINIX NEO U1与电视或电脑显示器相连接,传输音 频、视频。
在设置 MINIX NEO U1之前,查看您的电视或电脑显示器侧 面/背面的端口,
确保您有合适的排线:
-HDMI 排线: 用一根HDMI排线将MINIX NEO U1与有HDMI端口 的高清电视
或家庭影院接收器相连接传输视频或音频。
步骤1:连接排线
1. 将HDMI排线的一端与电视/电脑显示器的HDMI端口相连接。
2. 将排线的另一端与MINIX NEO U1的HDMI端口相连接。
步骤2:连接电源 将包装中提供的5V电源适配器与此端口相连,按住电源键2-3秒,
当电源 指示灯变亮时MINIX NEO U1 开机完成。
步骤3:打开电视/电脑显示器并选择输入
打开电视或电脑显示器,选择对应的HDMI端口连接到MINIX NEO U1.
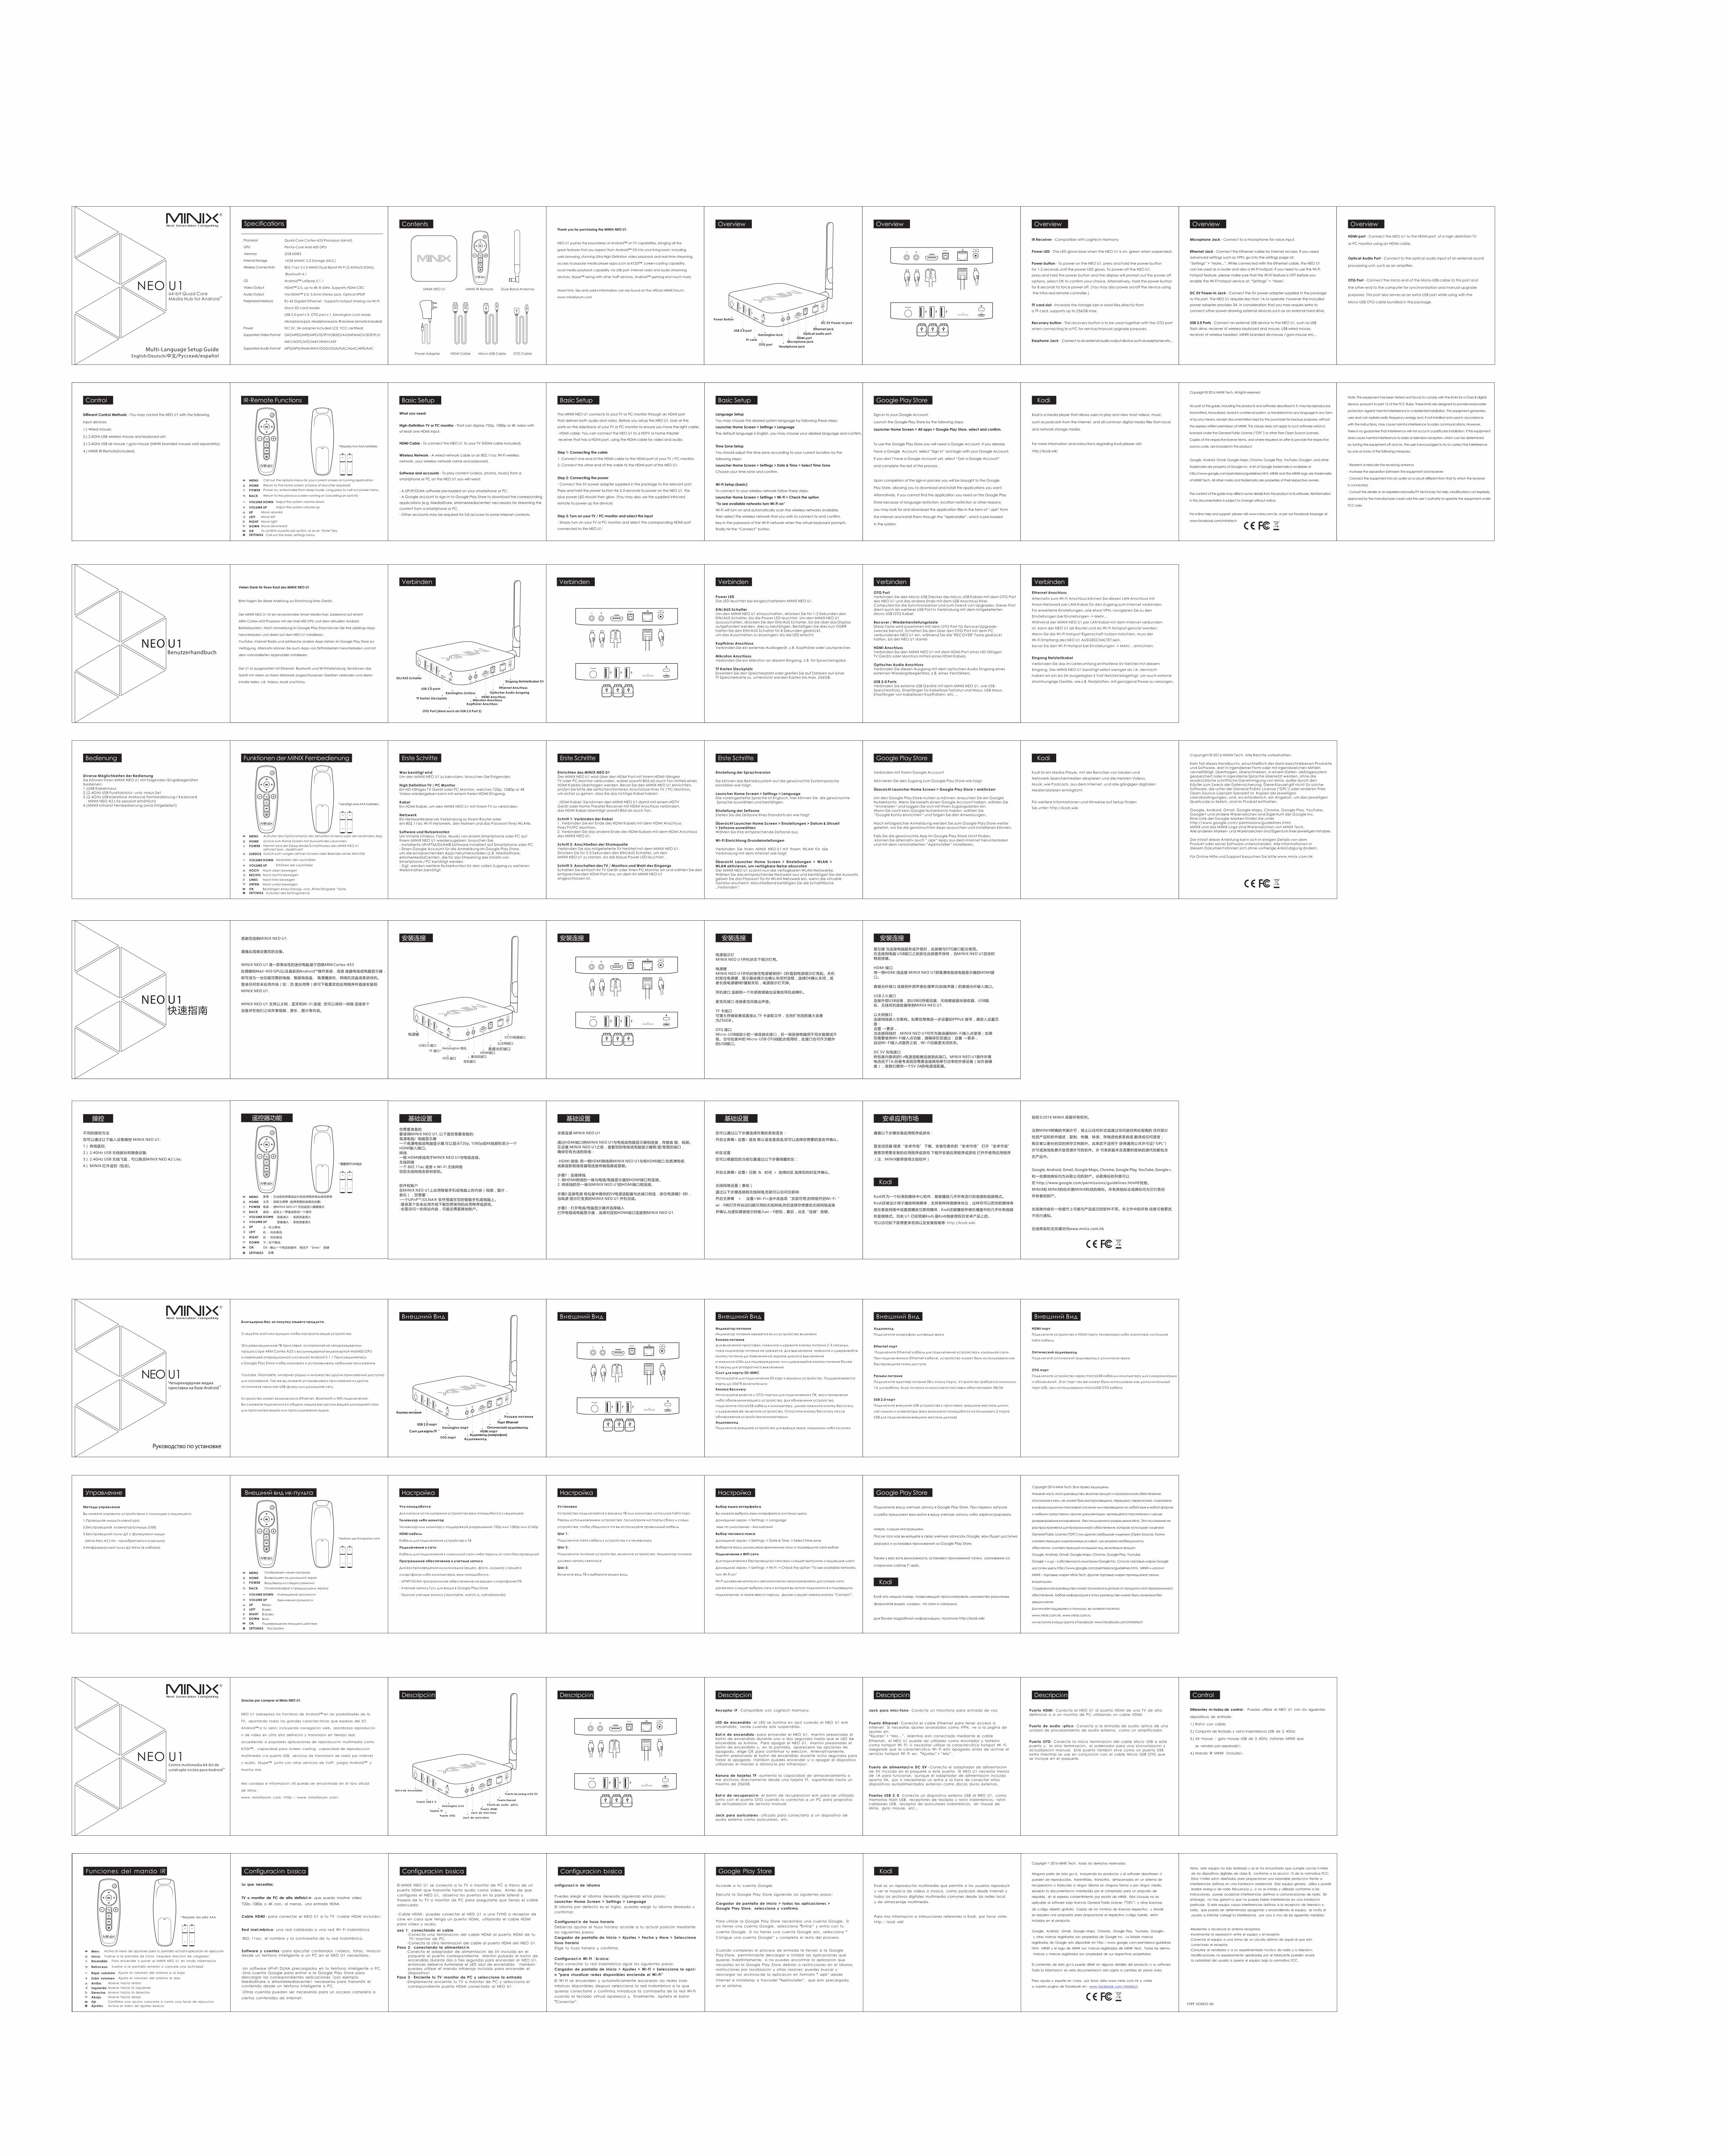
IR Receiver
Power LED - The LED glows blue when the NEO U1 is on, green when suspended.
Power button - To power on the NEO U1, press and hold the power button
for 1-2 seconds until the power LED glows. To power off the NEO U1,
press and hold the power button and the display will prompt out the power off
options, select OK to confirm your choice. Alternatively, hold the power button
for 8 seconds to force power off. (You may also power on/off the device using
the infra-red remote controller.)
TF card slot - Increase the storage size or read files directly from
a TF card, supports up to 256GB max.
Recovery button - The recovery button is to be used together with the OTG port
when connecting to a PC for service/manual upgrade purposes.
Earphone Jack - Connect to an external audio output device such as earphones etc...
- Compatible with Logitech Harmony
Ethernet Anschluss
Alternativ zum Wi-Fi Anschluss können Sie diesen LAN Anschluss mit
Ihrem Netzwerk per LAN-Kabel für den Zugang zum Internet verbinden.
Für erweiterte Einstellungen, wie etwa VPN, navigieren Sie zu den
Einstellungen bei Einstellungen -> Mehr...
Während der MINIX NEO U1 per LAN Kabel mit dem Internet verbunden
ist, kann der NEO U1 als Router und als Wi-Fi Hotspot genutzt werden.
Wenn Sie die Wi-Fi Hotspot Eigenschaft nutzen möchten, muss der
Wi-Fi Empfang des NEO U1 AUSGESCHALTET sein,
bevor Sie den Wi-Fi Hotspot bei Einstellungen -> Mehr... einrichten.
Eingang Netzteilkabel
Verbinden Sie das im Lieferumfang enthaltene 5V Netzteil mit diesem
Eingang. Der MINIX NEO U1 benötigt selbst weniger als 1A, dennoch
haben wir ein bis 3A ausgelegtes 5 Volt Netzteil beigefügt, um auch externe
stromhungrige Geräte, wie z.B. Festplatten, mit genügend Power zu versorgen.
Verbinden
Quad-Core Cortex A53 Processor (64-bit)
Penta-Core Mali-450 GPU
2GB DDR3
16GB eMMC 5.0 Storage (MLC)
802.11ac 2 x 2 MIMO Dual-Band Wi-Fi (2.4GHz/5.0GHz),
Bluetooth 4.1
Android™ Lollipop 5.1.1
HDMI™ 2.0, up to 4K @ 60Hz, Supports HDMI-CEC
Via HDMI™ 2.0, 3.5mm Stereo jack, Optical SPDIF
RJ-45 Gigabit Ethernet - Supports hotspot sharing via Wi-Fi
Micro SD card reader
USB 2.0 port x 3, OTG port x 1, Kensington Lock ready
Microphone jack, Headphone jack, IR receiver (remote included)
DC 5V, 3A adapter included (CE, FCC certified)
DAT/MPEG/MPE/MPG/TS/TP/VOB/ISO/AVI/MP4/MOV/3GP/FLV/
MKV/M2TS/MTS/M4V/WMV/ASF
MP2/MP3/WMA/WAV/OGG/OGA/FLAC/ALAC/APE/AAC
Processor
GPU
Memory
Internal Storage
Wireless Connectivity
OS
Video Output
Audio Output
Peripheral Interface
Power
Supported Video Format
Supported Audio Format
Specifications Overview
Verbinden
Contents
Power Adapter HDMI Cable Micro-USB Cable
MINIX NEO U1 MINIX IR-Remote
OTG Cable
Dual-Band Antenna
Управление
Руководство по установке
NEO U1Четырехядерная медиа
приставка на базе AndroidTM
Благодарим Вас за покупку нашего продукта.
Следуйте этой инструкции чтобы настроить ваше устройство.
Это революционная ТВ приставка основанная на четырехядерном
процессоре ARM Cortex A53 с восьмиядерной видеокартой Mali450 GPU
и новейшей операционной системой Android 5.1.1 Присоединяйтесь
к Google Play Store чтобы скачивать и устанавливать любимые приложения.
Youtube, Vkontakte, интернет радио и множество других приложений доступно
для скачивания. Так же вы можете устанавливать приложения из других
источников таких как USB флеш или домашняя сеть.
Устройство имеет возможность Ethernet, Bluetooth и Wifi подключений.
Вы сможете подключится к общим медиа ресурсам вашей домашней сети
для просмотра видео или прослушивания аудио.
Внешний Вид Внешний Вид
Индикатор питания
Индикатор питания зажжется если устройство включено
Кнопка питания
Для включения приставки, нажмите и держите кнопку питания 2-3 секунды,
пока индикатор питания не зажжется. Для выключения, нажмите и удерживайте
кнопку питания до появления на экране диалога выключения
и нажмите «ОК» для подтверждения; или удерживайте кнопку питания более
8 секунд для аппаратного выключения
Слот для карты SD-MMC
Используйте для подключения SD карт к вашему устройству. Поддерживаются
карты до 256Гб включительно
Кнопка Recovery
Используйте вместе с OTG портом для подключения к ПК, восстановления
либо обновления вашего устройства. Для обновления устройства,
подключите microUSB кабель к компьютеру, далее нажмите кнопку Recovery,
и удерживая её, включите устройство. Отпустите кнопку Recovery после
обнаружения устройства компьютером
Аудиовыход
Подключите внешнее устройство для вывода звука, наушники либо колонки
Внешний Вид Внешний Вид
Аудиовход
Подключите микрофон для ввода звука
Ethernet порт
Подключите Ethernet кабель для подключения устройства к локальной сети.
При подключенном Ethernet кабеле, устройство может быть использовано как
беспроводная точка доступа
Разъем питания
Подключите адаптер питания 5В к этому порту. Устройству требуется минимум
1А для работы. Блок питания из комплекта поставки обеспечивает 5В/3А
USB 2.0 порт
Подключите внешние USB устройства к приставке, внешние жесткие диски,
usb мышки и клавиатуры (вам возможно понадобится использовать 2 порта
USB для подключения внешних жестких дисков)
Внешний Вид
HDMI порт
Подключите устройство к HDMI порту телевизора либо монитора, используя
hdmi кабель
Оптический аудиовыход
Подключите оптический аудиовыход к усилителю звука
OTG порт
Подключите устройство через microUSB кабель к компьютеру для синхронизации
и обновлений. Этот порт так же может быть использован как дополнительный
порт USB, при использовании microUSB OTG кабеля
Методы управления
Вы можете управлять устройством с помощью следующего:
1.
2.Беспроводная клавиатура/мышь (USB)
3.Беспроводной пульт ДУ с функциями мыши
(Minix Neo A2 Lite – приобретается отдельно)
4.Инфракрасный пульт ДУ Minix (в наборе)
Проводная мышь/клавиатура
The MINIX NEO X5 connects to your TV or PC monitor through an HDMI port that delivers
both audio and video. Before you setup the NEO X5, look at the ports on the side/back
of your TV or PC monitor to ensure you have the right cable:
- An HDMI cable: You can connect the NEO X5 to an HDTV or home theater receiver
that has an HDMI port, using an HDMI cable for video and audio.
Step 1: Connecting the cable
1. Connect one end of the HDMI cable to the HDMI port of your TV / PC monitor.
2. Connect the other end of the cable to the HDMI port of the NEO X5.
Step 2: Connecting the power
- Connect the 5V power adapter supplied in the package to the relevant port. Press
and hold the power button for 2-3 seconds to power on the NEO X5 and the blue power
LED should glow when on.
Step 3: Turn on your TV / PC monitor and select the input
- Simply turn on your TV or PC monitor and select the corresponding HDMI port connected
to the NEO X5.
Basic SetupGoogle Play StoreНастройка
Что понадобится
Для начала использования устройства вам понадобится следующее:
Телевизор либо монитор
Телевизор или монитор с поддержкой разрешений 720р или 1080р или 2160р
HDMI кабель
Кабель для подключения устройства к ТВ
Подключение к сети
Кабель для подключения к локальной сети либо пароль от сети беспроводной
Программное обеспечение и учетные записи
Для воспроизведения мультимедиа (видео, фото, музыка) с вашего
смартфона либо компьютера, вам понадобится:
- UPNP/DLNA программное обеспечение на вашем смартфоне/ПК
- Учетная запись Гугл для входа в Google Play Store
- Прочие учетные записи (vkontakte, watch.is, odnoklassniki)
Установка
Устройство подключается к вашему ТВ или монитору используя hdmi порт.
Перед использованием устройства, посмотрите на порты сбоку и сзади
устройства, чтобы убедиться что вы используете правильный кабель
Шаг 1:
Подключите hdmi кабель к устройству и к телевизору
Шаг 2:
Подключите питание устройства, включите устройство. Индикатор питания
должен начать светиться
Шаг 3:
Включите ваш ТВ и выберите видео вход
Настройка
Выбор языка интерфейса
Вы можете выбрать язык интерфейса системы здесь
Домашний экран -> Settings -> Language
язык по умолчанию – Английский
Выбор часового пояса
Домашний экран -> Settings -> Date & Time -> Select time zone
Выберите вашу домашнюю временную зону и подтвердите свой выбор
Подключение к WIFI сети
Для подключения к беспроводной сети вам следует выполнить следующие шаги:
Домашний экран -> Settings -> Wi-Fi -> Check the option “To see available networks,
turn Wi-Fi on”
Wi-Fi должен включиться и автоматически просканировать доступные сети,
далее вам следует выбрать сеть к которой вы хотите подключится и подтвердить
подключение, а также ввести пароль. Далее следует нажать кнопку “Connect”.
Настройка
Подключите вашу учетную запись в Google Play Store. При первом запуске
служба предложит вам войти в вашу учетную запись либо зарегистрировать
новую, следуя инструкциям.
После того как вы войдете в свою учетную записать Google, вам будет доступна
загрузка и установка приложений из Google Play Store.
Также у вас есть возможность установки приложений путем скачивания со
сторонних сайтов (*.apk).
Copyright 2016 Minix Tech. Все права защищены.
Никакая часть этого руководства, включая продукт и программное обеспечение,
описанное в нем, не может быть воспроизведена, передана, переписана, сохранена
в информационно-поисковой системе или переведена на любой язык в любой форме
и любыми средствами, кроме документации, хранящейся покупателем с целью
резервирования копирования - без письменного разрешения Minix. Это положение не
распространяется для программного обеспечения, которое использует лицензии
General Public License ("GPL") или другие свободные лицензии (Open Source). Копии
соответствующих лицензионных условий, где указана необходимость
обеспечить -соответствующий исходный код, включены в продукт.
Google, Android, Gmail, Google Maps, Chrome, Google Play, Youtube,
Google + и др – собственность компании Google Inc. Список торговый марок Google
доступен здесь http://www.google.com/permissions/guidelines.html. MINIX и логотип
MINIX – торговые марки Minix Tech. Другие торговые марки принадлежат своим
владельцам.
Содержимое руководства может отличаться в деталях от продукта и его программного
обеспечения. Любая информация в этом руководстве может быть изменена без
уведомления.
Для онлайн поддержки и помощи, вы можете посетить
www.minix.com.hk, www.minix.com.ru
или вступить в нашу группу в Facebook: www.facebook.com/minixtech
Note: This equipment has been tested and found to comply with the limits for a Class B digital
device, pursuant to part 15 of the FCC Rules. These limits are designed to provide reasonable
protection against harmful interference in a residential installation. This equipment generates,
uses and can radiate radio frequency energy and, if not installed and used in accordance
with the instructions, may cause harmful interference to radio communications. However,
there is no guarantee that interference will not occur in a particular installation. If this equipment
does cause harmful interference to radio or television reception, which can be determined
by turning the equipment off and on, the user is encouraged to try to correct the interference
by one or more of the following measures:
- Reorient or relocate the receiving antenna.
- Increase the separation between the equipment and receiver.
- Connect the equipment into an outlet on a circuit different from that to which the receiver
is connected.
- Consult the dealer or an experienced radio/TV technician for help. Modifications not expressly
approved by the manufacturer could void the user’s authority to operate the equipment under
FCC rules.
Copyright © 2016 MINIX Tech. All rights reserved.
No part of this guide, including the products and software described in it, may be reproduced,
transmitted, transcribed, stored in a retrieval system, or translated into any language in any form
or by any means, except documentation kept by the purchaser for backup purposes, without
the express written permission of MINIX. This clause does not apply to such software which is
licensed under the General Public License (”GPL”) or other Free Open Source Licenses.
Copies of the respective license terms, and where required an offer to provide the respective
source code, are included in the product.
Google, Android, Gmail, Google Maps, Chrome, Google Play, YouTube, Google+, and other
trademarks are property of Google Inc. A list of Google trademarks is available at
http://www.google.com/permissions/guidelines.html. MINIX and the MINIX logo are trademarks
of MINIX Tech. All other marks and trademarks are properties of their respective owners.
The content of this guide may differ in some details from the product or its software. All information
in this documentation is subject to change without notice.
For online help and support, please visit www.minix.com.hk, or join our facebook fanpage at:
www.facebook.com/minixtech
Sign-in to your Google Account.
Launch the Google Play Store by the following steps:
Launcher Home Screen > All apps > Google Play Store, select and confirm.
To use the Google Play Store you will need a Google Account. If you already
have a Google Account, select “Sign in” and login with your Google Account.
If you don’t have a Google Account yet, select “Get a Google Account”
and complete the rest of the process.
Upon completion of the sign-in process you will be brought to the Google
Play Store, allowing you to download and install the applications you want.
Alternatively, if you cannot find the application you need on the Google Play
Store because of language restriction, location restriction or other reasons;
you may look for and download the application files in the form of “.apk” from
the internet and install them through the “ApkInstaller”, which is pre-loaded
in the system.
Google Play Store
Language Setup
You may choose the desired system language by following these steps:
Launcher Home Screen > Settings > Language
The default language is English, you may choose your desired language and confirm.
Time Zone Setup
You should adjust the time zone according to your current location by the
following steps:
Launcher Home Screen > Settings > Date & Time > Select Time Zone
Choose your time zone and confirm.
Wi-Fi Setup (basic)
To connect to your wireless network follow these steps:
Launcher Home Screen > Settings > Wi-Fi > Check the option
“To see available networks turn Wi-Fi on”
Wi-Fi will turn on and automatically scan the wireless networks available,
then select the wireless network that you wish to connect to and confirm,
key-in the password of the Wi-Fi network when the virtual keyboard prompts,
finally hit the “Connect” button.
Basic Setup
The MINIX NEO U1 connects to your TV or PC monitor through an HDMI port
that delivers both audio and video. Before you setup the NEO U1, look at the
ports on the side/back of your TV or PC monitor to ensure you have the right cable:
- HDMI cable: You can connect the NEO U1 to a HDTV or home theater
receiver that has a HDMI port, using the HDMI cable for video and audio.
Step 1: Connecting the cable
1. Connect one end of the HDMI cable to the HDMI port of your TV / PC monitor.
2. Connect the other end of the cable to the HDMI port of the NEO U1.
Step 2: Connecting the power
- Connect the 5V power adapter supplied in the package to the relevant port.
Press and hold the power button for 2-3 seconds to power on the NEO U1, the
blue power LED should then glow. (You may also use the supplied infra-red
remote to power up the device)
Step 3: Turn on your TV / PC monitor and select the input
- Simply turn on your TV or PC monitor and select the corresponding HDMI port
connected to the NEO U1.
Basic Setup
What you need:
High-Definition TV or PC monitor - That can display 720p, 1080p or 4K video with
at least one HDMI input.
HDMI Cable - To connect the NEO U1 to your TV (HDMI cable included).
Wireless Network - A wired network cable or an 802.11ac Wi-Fi wireless
network, your wireless network name and password.
Software and accounts - To play content (videos, photos, music) from a
smartphone or PC on the NEO U1 you will need:
- A UPnP/DLNA software pre-loaded on your smartphone or PC.
- A Google account to sign-in to Google Play Store to download the corresponding
applications (e.g. iMediaShare, eHomeMediacenter) neccessary for streaming the
content from a smartphone or PC.
- Other accounts may be required for full acccess to some internet contents.
Basic Setup
Y5PF-5C0925-00
* Requires two AAA batteries.
IR-Remote Functions
Call out the options menu for your current screen or running application
Return to the home screen (choice of launcher required)
Power on, enter/wake from sleep mode. Long press to call out power menu
Return to the previous screen running or cancelling an activity
Adjust the system volume down
Adjust the system volume up
MENU
HOME
POWER
BACK
VOLUME DOWN
VOLUME UP
Move upward UP
Move left LEFT
Move right RIGHT
Move downward DOWN
OK To confirm a particular action, or as an “Enter”key
Call out the basic settings menu SETTINGS
* benötigt zwei AAA batterien.
Funktionen der MINIX Fernbedienung
MENU
HOME
POWER
ZURÜCK
VOLUME DOWN
VOLUME UP
HOCH
RECHTS
LINKS
UNTEN
OK
Aufrufen des Settingsmenüs SETTINGS
Aufrufen des Optionsmenüs des aktuellen Screens oder der laufenden App
Zurück zum Home Screen mit Auswahl des Launchers
Hiermit wird der Sleep Mode/Schlafmodus des MINIX NEO U1aktiviert bzw . deaktiviert
Zurück zum vorigen aktiven Screen oder Beenden einer Aktivität
Absenken der Lautstärke
Erhöhen der Lautstärke
Nach oben bewegen
Nach links bewegen
Nach rechts bewegen
Nach unten bewegen
Bestätigen eines Dialogs, und „Enter/Eingabe“ Taste
* 需要两节3A电池
RIGHT
BACK
VOLUME UP
VOLUME DOWN
MENU
HOME
POWER
OK
UP
DOWN
SETTINGS
LEFT
菜单 - 为当前的屏幕或运行的应用程序调出选项菜单
主页 - 回到主屏幕 (选择需要的桌面启动器)
电源 - 使MINIX NEO U1 开启或进入睡眠模式
返回 - 返回上一界面或取消一个操作
音量减小 - 系统音量调小
音量增大 - 系统音量调大
上 - 向上移动
右 - 向右移动
左 - 向左移动
下 - 向下移动
OK - 确认一个特定的操作,相当于 “Enter” 按键
设置
遥控器功能
MENU
HOME
POWER
BACK
VOLUME DOWN
VOLUME UP
UP
LEFT
RIGHT
DOWN
OK
SETTINGS
Вверх
Влево
Вправо
Вниз
Подтверждение текущего действия
Настройки
Отображает меню настроек
Возвращает на домашний экран
Вход/выход из спящего режима
Отмена/возврат к предыдущему экрану
Уменьшение громкости
Увеличение громкости
Внешний вид ик-пульта
*Требует две батарейки ААА
Kodi is a media player that allows users to play and view most videos, music,
such as podcasts from the internet, and all common digital media files from local
and network storage media.
For more information and instructions regarding Kodi please visit:
http://kodi.wiki
Kodi
Kodi
Kodi ist ein Media-Player, mit der Benutzer von lokalen und
Netzwerk-Speichermedien abspielen und die meisten Videos,
Musik, wie Podcasts, aus dem Internet, und alle gängigen digitalen
Mediendateien ermöglicht.
Für weitere Informationen und Hinweise auf Setup finden
Sie unter: http://kodi.wiki
Kodi
Kodi作为一个标准的媒体中心软件,能够播放几乎所有流行的音频和视频格式。
Kodi还被设计用于播放网络媒体,支持各种网络媒体协议,这样你可以把你的媒体库
放在家庭网络中或直接播放互联网媒体,Kodi还能播放存储在硬盘中的几乎所有视频
和音频格式。目前 U1 已经预装Kodi,是Kodi独家授权在安卓产品上的。
可以访问如下获得更多咨询以及安装指南等: http://kodi.wiki
Kodi
Kodi это медиа плеер, позволяющий просматривать множество различных
форматов видео, музыки, по сети и локально.
Для более подробной информации, посетите http://kodi.wiki
TF
SPDIF
TF
SPDIF
TF
SPDIF
TF
SPDIF
USB 2.0 port
TF cardMicrophone jack
Ethernet jack
DC 5V Power-in jackPower Button
OTG portHeadphone jack
TF
HDMI port
Optical audio port
SPDIF
Kensington lock
TF
SPDIF
HDMI接口
以太网接口
DC5V电源接口电源键
耳机接口
USB2.0 接口
麦克风接口OTG 接口
TF 接口音频光纤接口Kensington 锁孔
USB 2.0 ports
TF
SPDIF
Kensington-Schloss
TF Karten Steckplatz HDMI Anschluss
Optischer Audio Ausgang
Ethernet Anschluss
Eingang Netzteilkabel 5VEin/AUS Schalter
Kopfhörer AnschlussMikrofon Anschluss
OTG Port (dient auch als USB 2.0 Port 2)
TF
SPDIF
Kensington портUSB 2.0 порт
Слот для карты TF HDMI портОптический аудиовыход
Порт Ethernet
Разъем питания
Кнопка питания
Аудиовыход
Аудиовход (микрофон)OTG порт
Descripción Descripción DescripciónDescripción Control
Diferentes métodos de control - Puedes utilizar el NEO U1 con los siguientes
dispositivos de entrada:
1.) Ratón con cable;
2.) Conjunto de teclado y ratón inalámbricos USB de 2.4Ghz;
3.) Air-mouse / gyro-mouse USB de 2.4Ghz (ratones MINIX que
se venden por separado);
4.) Mando IR MINIX (incluido).
NEO U1
Gracias por comprar el Minix NEO U1.
Centro multimedia 64-bit de cuádruple núcleo para Android
TM
Descripción
Ninguna parte de esta guía, incluyendo los productos y el software descritosen él
pueden ser reproducidos, transmitidos, transcritos, almacenados en un sistema de
recuperación o traducido a ningún idioma en ninguna forma o por ningún medio,
excepto la documentación mantenida por el comprador para un propósito de
respaldo, sin el expreso consentimiento por escrito de MINIX. Esta cláusula no es
aplicable al software bajo licencia General Public License (“GPL”) u otras licencias
de código abierto gratuito. Copias de los términos de licencia respectivo, y donde
se requiera una propuesta para proporcionar el respectivo código fuente, están
incluidos en el producto.
Google, Android, Gmail, Google Maps, Chrome, Google Play, Youtube, Google+,
y otras marcas registradas son propiedad de Google Inc. La listade marcas
registradas de Google está disponible en http://www.google.com/permissions/guidelines.
html. MINIX y el logo de MINIX son marcas registradas de MINIX Tech. Todas las demás
marcas y marcas registradas son propiedad de sus respectivos propietarios.
El contenido de esta guía puede diferir en algunos detalles del producto o su software.
Toda la información en esta documentación está sujeta a cambios sin previo aviso.
Para ayuda y soporte en línea, por favor visita www.minix.com.hk o únete
a nuestra página de Facebook en:
Copyright © 2016 MINIX Tech, todos los derechos reservados.
www.facebook.com/minixtech
Google Play StoreConfiguración básica
* .Requiere dos pilas AAA
Funciones del mando IR
Activa el menú de opciones para tu pantalla actual o aplicación en ejecución
Vuelve a la pantalla de inicio ( requiere elección de cargador)
Para encender o poner al MINIX NEO U1 en modo hibernación
Vuelve a la pantalla anterior o cancela una actividad
Ajusta el volumen del sistema a la baja
Ajusta el volumen del sistema al alza
Menú
Inicio
Encendido
Retroceso
Bajar volumen
Subir volumen
Mueve hacia arriba Arriba
Mueve hacia la izquierda Izquierda
Mueve hacia la derecha Derecha
Mueve hacia abajo Abajo
OK Confirma una acción concreta o como una tecla de ejecución
Activa el menú de ajustes básicos Ajustes
Kodi
TF
SPDIF
Puerto USB 2.0
Tarjeta TFJack de micrófono
Puerto thernet
Puerto de energía DC 5V
Botón de encendido
Puerto OTGJack de auriculare
TF
Puerto HDMI
Puerto de audio óptico
SPDIF
Kensington lock
NEO U1 sobrepasa las fronteras de Android en las posibilidades de la
TV, aportando todas las grandes características que esperas del SO
Android™ a tu salón; incluyendo navegación web, asombrosa reproducció
n de video en ultra alta definición y transmisión en tiempo real,
accediendo a populares aplicaciones de reproducción multimedia como
KODI™ , capacidad para screen-casting, capacidad de reproducción
multimedia vía puerto USB, servicios de transmisión de radio por internet
y audio, Skype™ junto con otros servicios de VoIP, juegos Android™ y
mucho más.
Más consejos e información útil puede ser encontrada en el foro oficial
de Minix:
www.minixforum.com <http://www.minixforum.com>
™ Receptor IF - Compatible con Logitech Harmony.
LED de encendido - el LED se ilumina en azul cuando el NEO U1 está encendido, verde cuando está suspendido.
Botón de encendido - para encender el NEO U1, mantén presionado el botón de encendido durante uno o dos segundos hasta que el LED de encendido se ilumine. Para apagar el NEO U1, mantén presionado el botón de encendido y, en la pantalla, aparecerán las opciones de apagado, elige OK para confirmar tu elección. Alternativamente, mantén presionado el botón de encendido durante ocho segundos para forzar el apagado (también puedes encender y/o apagar el dispositivo utilizando el mando a distancia por infrarrojos).
Ranura de tarjetas TF - aumenta la capacidad de almacenamiento o lee archivos directamente desde una tarjeta TF, soportando hasta un máximo de 256GB.
Botón de recuperación - el botón de recuperación está para ser utilizado junto con el puerto OTG cuando lo conectas a un PC para propósitos de actualización de servicio/manual.
Jack para auriculares - utilízalo para conectarlo a un dispositivo de audio externo como auriculares, etc.
Jack para micrófono Conecta un micrófono para entrada de voz.
Puerto Ethernet - Conecta el cable Ethernet para tener acceso a internet. Si necesitas ajustes avanzados como VPN, ve a la página de ajustes en:“Ajustes” > “Más…”. Mientras esté conectado mediante el cable
Ethernet, el NEO U1 puede ser utilizado como enrutador y también como hotspot Wi-Fi; si necesitas utilizar la característica hotspot Wi-Fi, asegúrate que la característica Wi-Fi está apagada antes de activar el servicio hotspot Wi-Fi en: “Ajustes” > “Más”.
Puerto de alimentación DC 5V - Conecta el adaptador de alimentación de 5V incluido en el paquete a este puerto. El NEO U1 necesita menos de 1A para funcionar, aunque el adaptador de alimentación incluido aporta 3A, por si necesitaras un extra a la hora de conectar otros dispositivos autoalimentados externos como discos duros externos.
Puertos USB 2.0 - Conecta un dispositivo externo USB al NEO U1, como memorias flash USB, receptores de teclado y ratón inalámbricos, ratón cableado USB, receptor de auriculares inalámbricos, air-mouse de Minix, gyro-mouse, etc…
- Puerto HDMI Conecta el NEO U1 al puerto HDMI de una TV de alta definición o a un monitor de PC utilizando un cable HDMI.
Puerto de audio óptico - Conecta a la entrada de audio óptica de una unidad de procesamiento de audio externa, como un amplificador.
Puerto OTG - Conecta la micro terminación del cable Micro-USB a este puerto y, la otra terminación, al ordenador para una sincronización y actualización manual. Este puerto también sirve como un puerto USB extra mientras se use en conjunción con el cable Micro-USB OTG que se incluye en el paquete.
-
Lo que necesitas:
TV o monitor de PC de alta definición - que pueda mostrar video
720p,1080p o 4K con, al menos, una entrada HDMI.
Cable HDMI - para conectar el NEO U1 a tu TV (cable HDMI incluido).
Red inalámbrica - una red cableada o una red Wi-Fi inalámbrica
802.11ac, el nombre y la contraseña de tu red inalámbrica.
Software y cuentas - para ejecutar contenidos (videos, fotos, música) desde un teléfono inteligente o un PC en el NEO U1 necesitarás:
-Un software UPnP/DLNA precargados en tu teléfono inteligente o PC.-Una cuenta Google para entrar a la Google Play Store para descargar las correspondientes aplicaciones (por ejemplo, iMediaShare o eHomeMediacenter) necesarias para transmitir el contenido desde un teléfono inteligente o PC.
-Otras cuentas pueden ser necesarias para un acceso completo a
ciertos contenidos de internet.
El MINIX NEO U1 se conecta a tu TV o monitor de PC a través de un
puerto HDMI que transmite tanto audio como video. Antes de que
configures el NEO U1, observa los puertos en la parte lateral y
trasera de tu TV o monitor de PC para asegurarte que tienes el cable
adecuado:
-Cable HDMI: puedes conectar el NEO U1 a una TVHD o receptor de
cine en casa que tenga un puerto HDMI, utilizando el cable HDMI
para video y audio.
aso 1: conectando el cable -Conecta una terminación del cable HDMI al puerto HDMI de tu TV/monitor de PC. -Conecta la otra terminación del cable al puerto HDMI del NEO U1.Paso 2: conectando la alimentación -Conecta el adaptador de alimentación de 5V incluido en el paquete al puerto correspondiente. Mantén pulsado el botón de encendido durante dos o tres segundos para encender el NEO U1, entonces debería iluminarse el LED azul de encendido. (también puedes utilizar el mando infrarrojo incluido para encender el dispositivo)Paso 3: Enciente tu TV/monitor de PC y selecciona la entrada -Simplemente enciente tu TV o monitor de PC y selecciona el
correspondiente puerto HDMI conectado al NEO U1.
Configuración básica Configuración básica
onfiguración de idioma
Puedes elegir el idioma deseado siguiendo estos pasos:
Launcher Home Screen > Settings > Language
El idioma por defecto es el inglés, puedes elegir tu idioma deseado y
confirmar.
Configuración de huso horario
Deberías ajustar el huso horario acorde a tu actual posición mediante
los siguientes pasos:
Cargador de pantalla de inicio > Ajustes > Fecha y Hora > Selecciona
huso horario
Elige tu huso horario y confirma.
Configuración Wi-Fi (básica)
Para conectar tu red inalámbrica sigue los siguientes pasos:
Cargador de pantalla de inicio > Ajustes > Wi-Fi > Selecciona la opció
n “para visualizar redes disponibles enciende el Wi-Fi”
El Wi-Fi se encenderá y automáticamente escaneará las redes inalá
mbricas disponibles,después selecciona la red inalámbrica a la que
quieras conectarte y confirma, introduce la contraseña de la red Wi-Fi
cuando el teclado virtual aparezca y, finalmente, aprieta el botón
“Conectar”.
Accede a tu cuenta Google.
Ejecuta la Google Play Store siguiendo los siguientes pasos:
Cargador de pantalla de inicio todas las aplicaciones
Google Play Store, selecciona y confirma.
Para utilizar la Google Play Store necesitarás una cuenta Google. Si
ya tienes una cuenta Google, selecciona “Entrar” y entra con tu
cuenta Google. Si no tienes una cuenta Google aún, selecciona “Conigue una cuenta Google” y completa el resto del proceso.
Cuando completes el proceso de entrada te llevará a la Google
Play Store, permitiéndote descargar e instalar las aplicaciones que
quieras. Indistintamente, si no puedes encontrar la aplicación que
necesites en la Google Play Store debido a restricciones en el idioma,
restricciones por localización u otras razones; puedes buscar y
descargar los archivos de la aplicación en formato “.apk” desde
internet e instalarlas a travésdel “Apkinstaller”, que está precargado
en el sistema.
> >
Kodi es un reproductor multimedia que permite a los usuarios reproducir
y ver la mayoría de videos o música, como podcasts desde internet y
todos los archivos digitales multimedia comunes desde las redes local
y de almacenaje multimedia.
Para más información e instrucciones referentes a Kodi, por favor visite:
http://kodi.wiki
Nota: este equipo ha sido testeado y se le ha encontrado que cumple con los límites
de los dispositivos digitales de clase B, conforme a la sección 15 de la normativa FCC.
Estos límites están diseñados para proporcionar una razonable protección frente a
interferencias dañinas en una instalación residencial. Este equipo genera, utiliza y puede
irradiar energía de radio frecuencia y, si no se instala y utilizada conforme a las
instrucciones, puede ocasionar interferencias dañinas a comunicaciones de radio. Sin
embargo, no hay garantía que no pueda haber interferencia en una instalación
particular. Si este equipo causa interferencias dañinas a la recepción de televisión o
radio, que pueda ser determinada apagando y encendiendo el equipo, se incita al
usuario a intentar corregir la interferencia por una o más de las siguientes medidas:
-Reorientar o recolocar la antena receptora.
-Incrementar la separación entre el equipo y el receptor.
-Conectar el equipo a una toma de un circuito distinto de aquel al que está
conectado el receptor.
-Consultar al vendedor o a un experimentado técnico de radio y/o televisión.
Modificaciones no expresamente aprobadas por el fabricante pueden anular
la autoridad del usuario a operar el equipo bajo la normativa FCC.