Embed Size (px)
Citation preview

Transaxle
Special Tool(s)
Automatic Transmission/Transaxle |Service and Repair, Procedures: 6 S... http://repair.alldata.com/alldata/article/display.action?componentId=844...
1 of 35 12/4/2014 5:52 PM
Material
CAUTION: MERCON (R), MERCON (R)V MERCON (R)SP, Motorcraft Premium Automatic Transmission Fluid andMotorcraft Continuously Variable Chain Type Transmission Fluid are not interchangeable transmission fluids. The use ofany fluid other than what is recommended for this transmission will cause transmission damage.
CAUTION: If a new transaxle or a transmission control module (TCM) is installed, the TCM will need to be reflashed to thelatest level calibration available. If the TCM is not reflashed, the wrench light on the dash may illuminate and internaltransaxle damage may occur.
NOTE: If the transaxle was overhauled, or if installing a new transaxle and the transmission fluid cooler tubes have notbeen flushed, flush the fluid cooler tubes at this time.
If the transaxle was overhauled, or if installing a new transaxle and a new transmission fluid cooler has not been installed,install a new fluid cooler at this time.
1. If removed, clean the rear transaxle mount bolts using a wire brush and apply new threadlocker to the threads. 2. If installing a new transaxle, install the rear transaxle mount. ^ Tighten to 55 Nm (41 ft. lbs.).
Automatic Transmission/Transaxle |Service and Repair, Procedures: 6 S... http://repair.alldata.com/alldata/article/display.action?componentId=844...
2 of 35 12/4/2014 5:52 PM

3. Prior to installing the transaxle, apply multi-purpose grease to the torque converter pilot hub.
4. Position the transaxle to the back of the engine. 5. Install the 3 transaxle-to-engine bolts. ^ Tighten to 40 Nm (30 ft. lbs.).
Automatic Transmission/Transaxle |Service and Repair, Procedures: 6 S... http://repair.alldata.com/alldata/article/display.action?componentId=844...
3 of 35 12/4/2014 5:52 PM
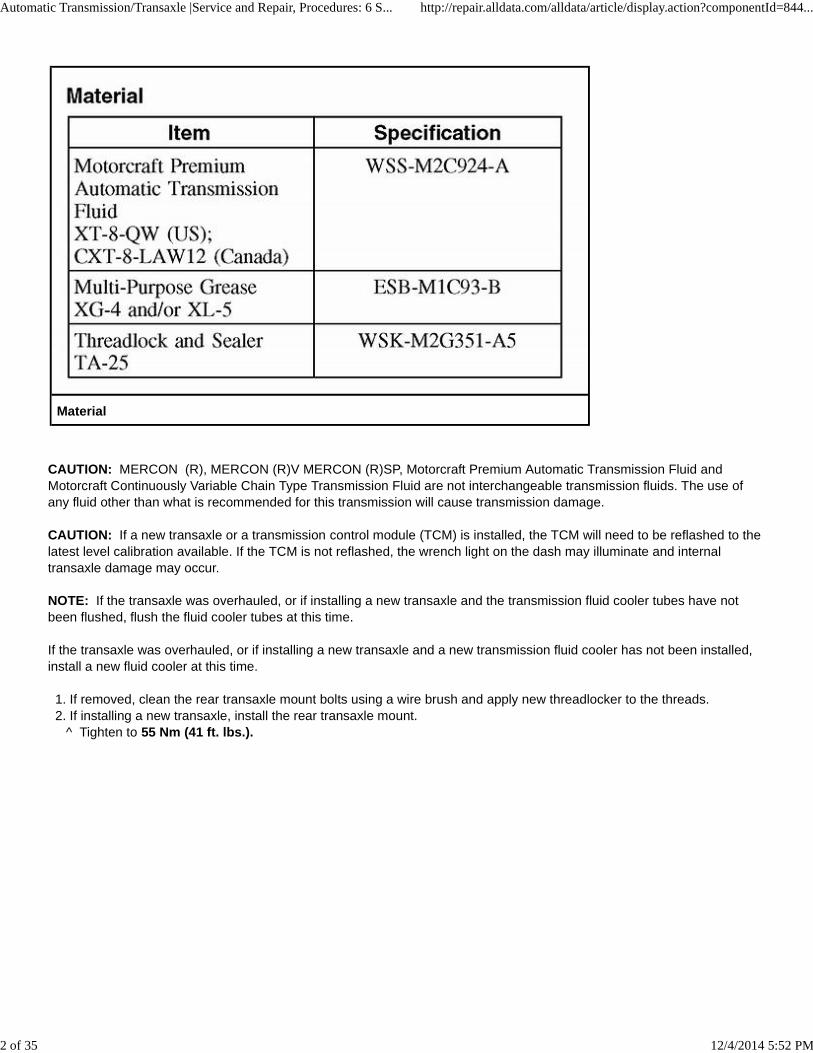
6. Using new O-ring seals, connect the transmission fluid cooler tubes to the transaxle. ^ Tighten to 10 Nm (89 inch lbs.).
7. Connect the transmission fluid cooler tube bracket. ^ Tighten to 10 Nm (89 inch lbs.).
Automatic Transmission/Transaxle |Service and Repair, Procedures: 6 S... http://repair.alldata.com/alldata/article/display.action?componentId=844...
4 of 35 12/4/2014 5:52 PM
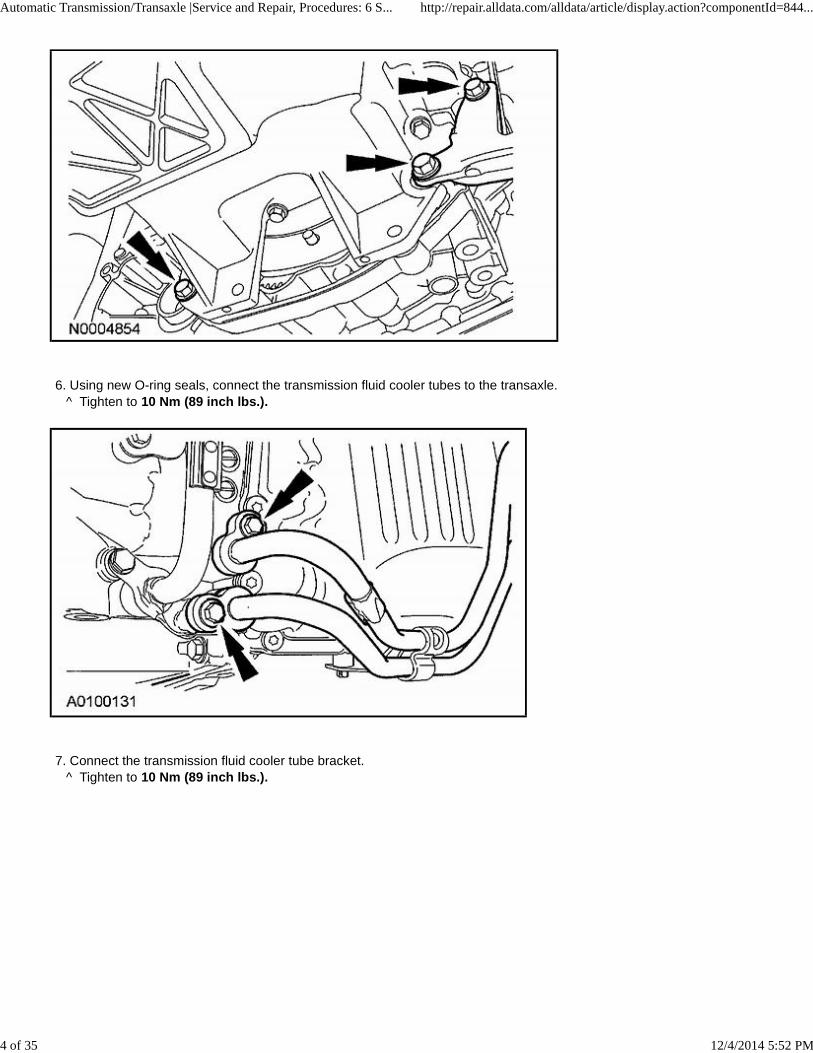
8. Install 4 new torque converter nuts. ^ Tighten to 36 Nm (27 ft. lbs.).
9. Install the lower rubber access plug and install the retaining pin.
Automatic Transmission/Transaxle |Service and Repair, Procedures: 6 S... http://repair.alldata.com/alldata/article/display.action?componentId=844...
5 of 35 12/4/2014 5:52 PM

10. Position the catalytic converter in place and loosely install the bolt for the bracket.
11. Connect the heated oxygen sensor (HO2S) electrical connector.
Automatic Transmission/Transaxle |Service and Repair, Procedures: 6 S... http://repair.alldata.com/alldata/article/display.action?componentId=844...
6 of 35 12/4/2014 5:52 PM

12. Using a suitable powertrain lift, position the subframe in place and install the 4 bolts. ^ Tighten to 90 Nm (66 ft. lbs.).
13. Install the 2 bolts for the LH rear subframe mount. ^ Tighten to 48 Nm (35 ft. lbs.).
Automatic Transmission/Transaxle |Service and Repair, Procedures: 6 S... http://repair.alldata.com/alldata/article/display.action?componentId=844...
7 of 35 12/4/2014 5:52 PM

14. Install the 2 bolts for the RH rear subframe mount. ^ Tighten to 48 Nm (35 ft. lbs.).
15. Install 2 new bolts for the rear transaxle mount. ^ Tighten to 90 Nm (66 ft. lbs.).
Automatic Transmission/Transaxle |Service and Repair, Procedures: 6 S... http://repair.alldata.com/alldata/article/display.action?componentId=844...
8 of 35 12/4/2014 5:52 PM

16. Install the nut for the rear motor mount. ^ Tighten to 70 Nm (52 ft. lbs.).
17. Install the 2 bolts for the lower stabilizer mount. ^ Tighten to 70 Nm (52 ft. lbs.).
Automatic Transmission/Transaxle |Service and Repair, Procedures: 6 S... http://repair.alldata.com/alldata/article/display.action?componentId=844...
9 of 35 12/4/2014 5:52 PM

18. Install the nut for the front motor mount. ^ Tighten to 70 Nm (52 ft. lbs.).
19. Position the splash shield in place and install the 3 pushpins.
Automatic Transmission/Transaxle |Service and Repair, Procedures: 6 S... http://repair.alldata.com/alldata/article/display.action?componentId=844...
10 of 35 12/4/2014 5:52 PM

20. Connect the HO2S electrical connector to the subframe.
21. Position the power steering rack in place. Install the bolts and nuts. ^ Tighten to 133 Nm (98 ft. lbs.).
Automatic Transmission/Transaxle |Service and Repair, Procedures: 6 S... http://repair.alldata.com/alldata/article/display.action?componentId=844...
11 of 35 12/4/2014 5:52 PM

22. Position the power steering line in place and install the 4 bolts. ^ Tighten to 7 Nm (62 inch lbs.).
23. Connect the wire harness to the LH front of the subframe.
Automatic Transmission/Transaxle |Service and Repair, Procedures: 6 S... http://repair.alldata.com/alldata/article/display.action?componentId=844...
12 of 35 12/4/2014 5:52 PM

24. Position the lower radiator hose in place and connect the retainers.
25. Install the LH and RH stabilizer bar link into the struts and install new nuts. ^ Tighten to 55 Nm (41 ft. lbs.).
Automatic Transmission/Transaxle |Service and Repair, Procedures: 6 S... http://repair.alldata.com/alldata/article/display.action?componentId=844...
13 of 35 12/4/2014 5:52 PM

26. Remove the special tool from the lifting hook near the EGR valve.
27. Remove the special tools from the RH (rear) cylinder head.
Automatic Transmission/Transaxle |Service and Repair, Procedures: 6 S... http://repair.alldata.com/alldata/article/display.action?componentId=844...
14 of 35 12/4/2014 5:52 PM

28. Remove the special tools from the LH (front) cylinder head.
29. Remove the special tools.
Automatic Transmission/Transaxle |Service and Repair, Procedures: 6 S... http://repair.alldata.com/alldata/article/display.action?componentId=844...
15 of 35 12/4/2014 5:52 PM
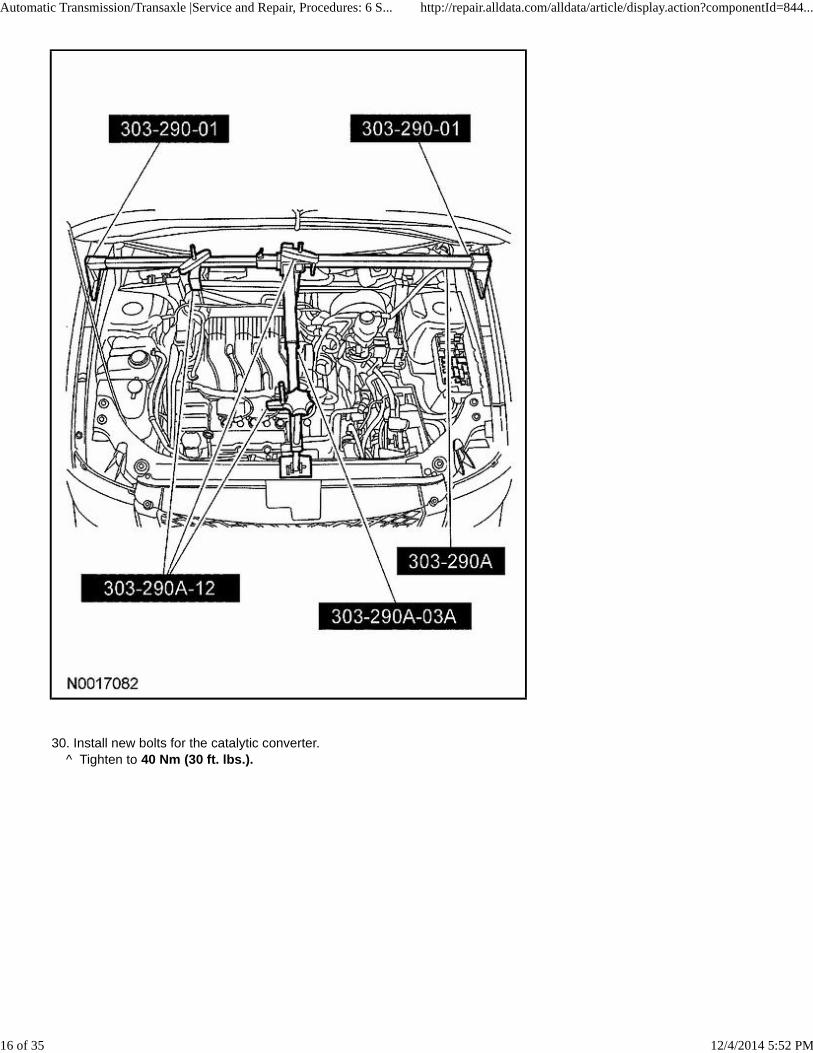
30. Install new bolts for the catalytic converter. ^ Tighten to 40 Nm (30 ft. lbs.).
Automatic Transmission/Transaxle |Service and Repair, Procedures: 6 S... http://repair.alldata.com/alldata/article/display.action?componentId=844...
16 of 35 12/4/2014 5:52 PM

31. Remove the upper half of the lifting hook.
32. Remove the lower half of the lifting hook.
Automatic Transmission/Transaxle |Service and Repair, Procedures: 6 S... http://repair.alldata.com/alldata/article/display.action?componentId=844...
17 of 35 12/4/2014 5:52 PM

33. Install the transaxle-to-engine bolt. ^ Tighten to 40 Nm (30 ft. lbs.).
34. Connect the KS wire harness to the transaxle.
Automatic Transmission/Transaxle |Service and Repair, Procedures: 6 S... http://repair.alldata.com/alldata/article/display.action?componentId=844...
18 of 35 12/4/2014 5:52 PM

35. Install the KS. ^ Tighten to 10 Nm (89 inch lbs.).
36. Install the heat shield over the KS.
Automatic Transmission/Transaxle |Service and Repair, Procedures: 6 S... http://repair.alldata.com/alldata/article/display.action?componentId=844...
19 of 35 12/4/2014 5:52 PM

37. If equipped, connect the engine block heater.
38. Position the power steering hose in place and install the bolt. ^ Tighten to 7 Nm (62 inch lbs.).
Automatic Transmission/Transaxle |Service and Repair, Procedures: 6 S... http://repair.alldata.com/alldata/article/display.action?componentId=844...
20 of 35 12/4/2014 5:52 PM
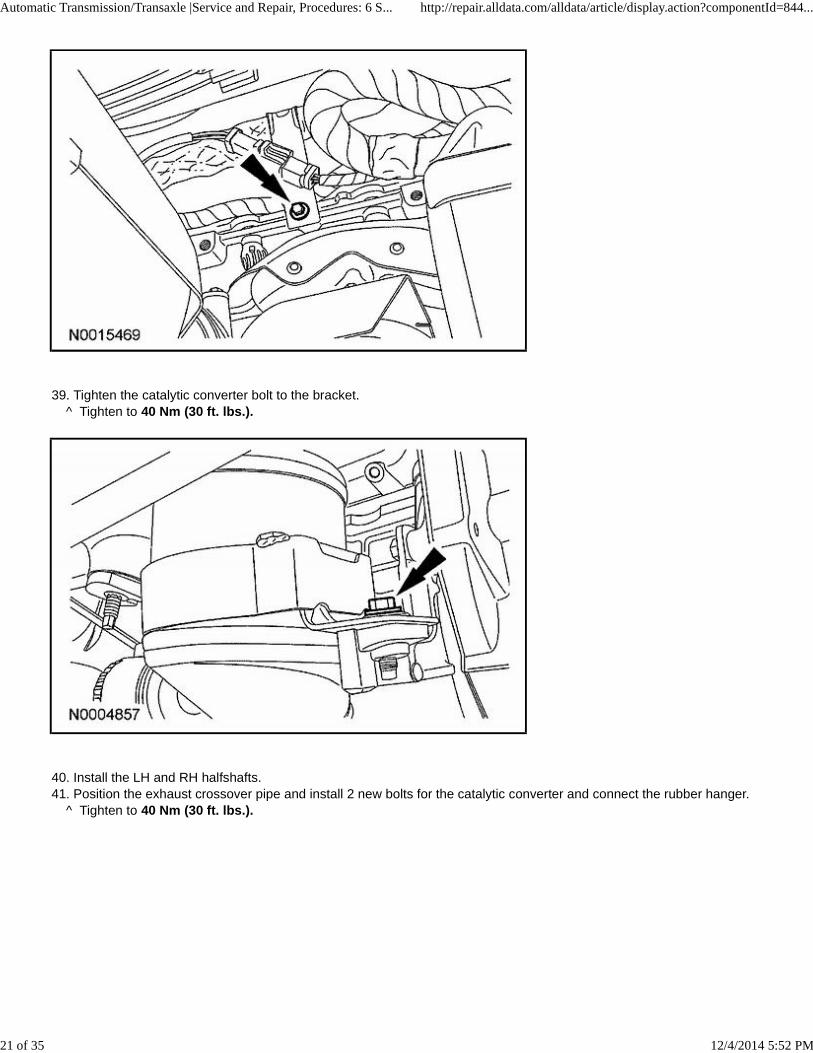
39. Tighten the catalytic converter bolt to the bracket. ^ Tighten to 40 Nm (30 ft. lbs.).
40. Install the LH and RH halfshafts. 41. Position the exhaust crossover pipe and install 2 new bolts for the catalytic converter and connect the rubber hanger. ^ Tighten to 40 Nm (30 ft. lbs.).
Automatic Transmission/Transaxle |Service and Repair, Procedures: 6 S... http://repair.alldata.com/alldata/article/display.action?componentId=844...
21 of 35 12/4/2014 5:52 PM

42. Install 2 new nuts for the rear exhaust pipe. ^ Tighten to 40 Nm (30 ft. lbs.).
43. Install 2 new nuts for the front exhaust pipe. ^ Tighten to 40 Nm (30 ft. lbs.).
Automatic Transmission/Transaxle |Service and Repair, Procedures: 6 S... http://repair.alldata.com/alldata/article/display.action?componentId=844...
22 of 35 12/4/2014 5:52 PM

44. Install the 4 upper transaxle bolts. ^ Tighten to 40 Nm (30 ft. lbs.).
45. Install the bolt for the power steering line. ^ Tighten to 7 Nm (62 inch lbs.).
Automatic Transmission/Transaxle |Service and Repair, Procedures: 6 S... http://repair.alldata.com/alldata/article/display.action?componentId=844...
23 of 35 12/4/2014 5:52 PM

46. Connect the vapor tube to the canister purge valve.
47. Install the PCV hose.
Automatic Transmission/Transaxle |Service and Repair, Procedures: 6 S... http://repair.alldata.com/alldata/article/display.action?componentId=844...
24 of 35 12/4/2014 5:52 PM

48. Connect the vacuum hose to the throttle body.
49. Position the bracket for the power steering hose and install the bolt. ^ Tighten to 7 Nm (62 inch lbs.).
Automatic Transmission/Transaxle |Service and Repair, Procedures: 6 S... http://repair.alldata.com/alldata/article/display.action?componentId=844...
25 of 35 12/4/2014 5:52 PM

50. Connect the ground wire. ^ Tighten to 12 Nm (9 ft. lbs.).
51. Clean the roll restrictor bolts using a wire brush and apply new threadlock and sealer to the threads. 52. Position the roll restrictor in place and install the bolts. ^ Tighten to 55 Nm (41 ft. lbs.).
Automatic Transmission/Transaxle |Service and Repair, Procedures: 6 S... http://repair.alldata.com/alldata/article/display.action?componentId=844...
26 of 35 12/4/2014 5:52 PM

53. Install the starter motor. ^ Tighten to 26 Nm (19 ft. lbs.).
54. Connect the 2 starter motor electrical connectors. ^ Tighten the larger nut to 12 Nm (9 ft. lbs.). ^ Tighten the smaller nut to 5 Nm (44 inch lbs.).
Automatic Transmission/Transaxle |Service and Repair, Procedures: 6 S... http://repair.alldata.com/alldata/article/display.action?componentId=844...
27 of 35 12/4/2014 5:52 PM
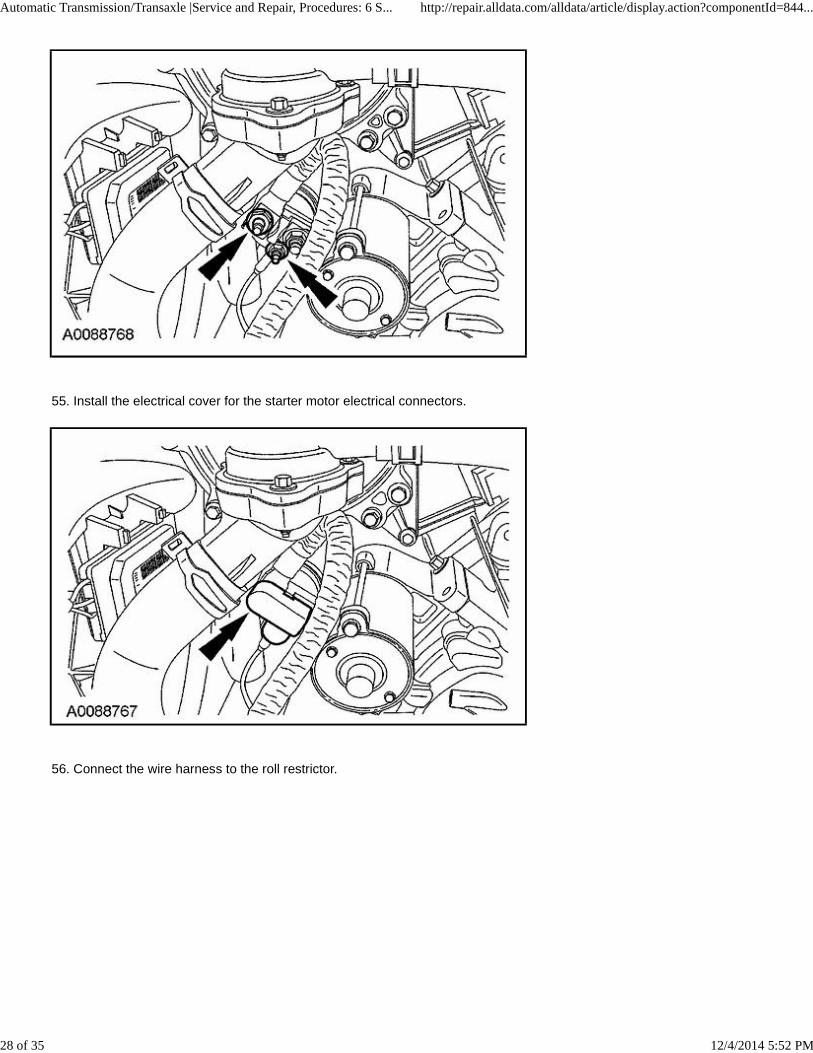
55. Install the electrical cover for the starter motor electrical connectors.
56. Connect the wire harness to the roll restrictor.
Automatic Transmission/Transaxle |Service and Repair, Procedures: 6 S... http://repair.alldata.com/alldata/article/display.action?componentId=844...
28 of 35 12/4/2014 5:52 PM

57. Clean the 4 roll restrictor bracket bolts using a wire brush and apply new threadlock and sealer to the threads. 58. Install the roll restrictor bracket and install 4 new bolts. ^ Tighten to 40 Nm (30 ft. lbs.).
59. Connect the lower wire harness to the transaxle.
Automatic Transmission/Transaxle |Service and Repair, Procedures: 6 S... http://repair.alldata.com/alldata/article/display.action?componentId=844...
29 of 35 12/4/2014 5:52 PM

60. Connect the wire harness to the transaxle.
61. Connect the transmission control module (TCM) electrical connector.
Automatic Transmission/Transaxle |Service and Repair, Procedures: 6 S... http://repair.alldata.com/alldata/article/display.action?componentId=844...
30 of 35 12/4/2014 5:52 PM

62. Install the shift cable bracket and bolts. ^ Tighten to 25 Nm (18 ft. lbs.).
63. Connect the electrical connector to the shift cable bracket.
Automatic Transmission/Transaxle |Service and Repair, Procedures: 6 S... http://repair.alldata.com/alldata/article/display.action?componentId=844...
31 of 35 12/4/2014 5:52 PM

64. CAUTION: Be careful not to bend the manual control lever when installing the shift cable.
Connect the shift cable end.
65. Clean the 4 roll restrictor brace bolts using a wire brush and apply new threadlock and sealer to the threads. 66. Position the roll restrictor brace in place and install the bolts. ^ Tighten to 55 Nm (41 ft. lbs.).
Automatic Transmission/Transaxle |Service and Repair, Procedures: 6 S... http://repair.alldata.com/alldata/article/display.action?componentId=844...
32 of 35 12/4/2014 5:52 PM

67. Clean the upper roll restrictor bolt using a wire brush and apply new threadlock and sealer to the threads. 68. Install the upper roll restrictor. ^ Tighten to 48 Nm (35 ft. lbs.).
69. Install the cowl panel grille. 70. Remove the transmission fluid fill plug.
Automatic Transmission/Transaxle |Service and Repair, Procedures: 6 S... http://repair.alldata.com/alldata/article/display.action?componentId=844...
33 of 35 12/4/2014 5:52 PM
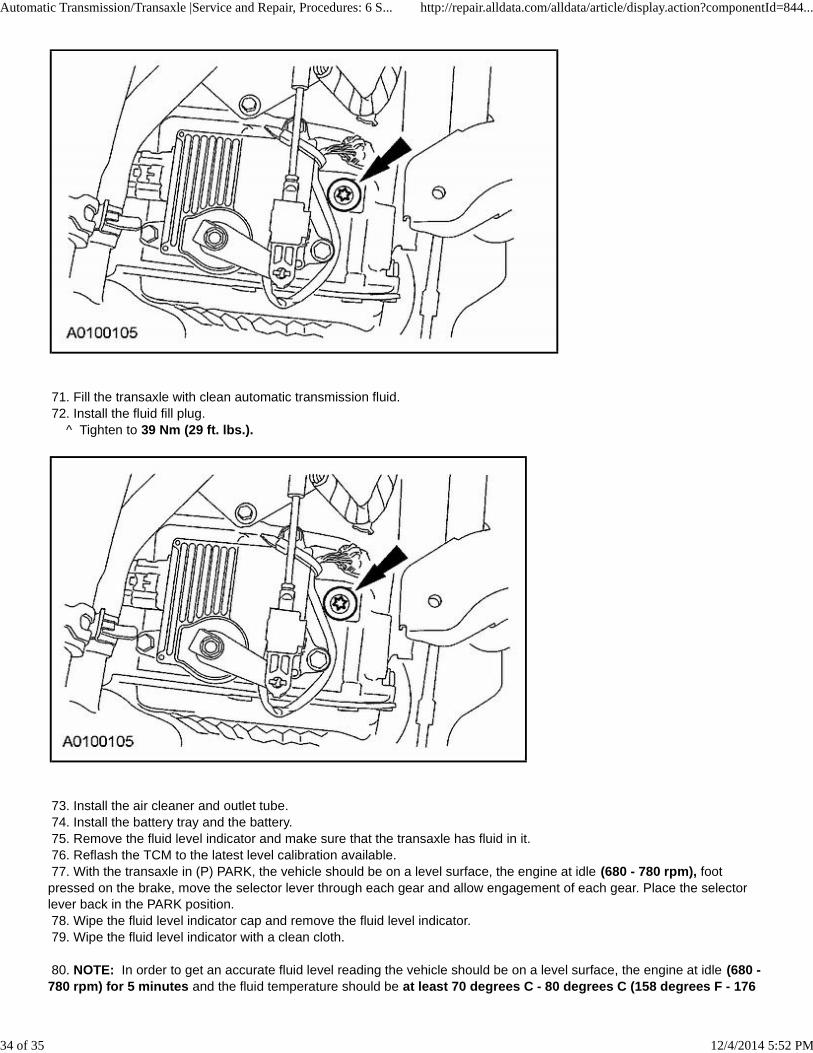
71. Fill the transaxle with clean automatic transmission fluid. 72. Install the fluid fill plug. ^ Tighten to 39 Nm (29 ft. lbs.).
73. Install the air cleaner and outlet tube. 74. Install the battery tray and the battery. 75. Remove the fluid level indicator and make sure that the transaxle has fluid in it. 76. Reflash the TCM to the latest level calibration available. 77. With the transaxle in (P) PARK, the vehicle should be on a level surface, the engine at idle (680 - 780 rpm), footpressed on the brake, move the selector lever through each gear and allow engagement of each gear. Place the selectorlever back in the PARK position. 78. Wipe the fluid level indicator cap and remove the fluid level indicator. 79. Wipe the fluid level indicator with a clean cloth.
80. NOTE: In order to get an accurate fluid level reading the vehicle should be on a level surface, the engine at idle (680 -780 rpm) for 5 minutes and the fluid temperature should be at least 70 degrees C - 80 degrees C (158 degrees F - 176
Automatic Transmission/Transaxle |Service and Repair, Procedures: 6 S... http://repair.alldata.com/alldata/article/display.action?componentId=844...
34 of 35 12/4/2014 5:52 PM
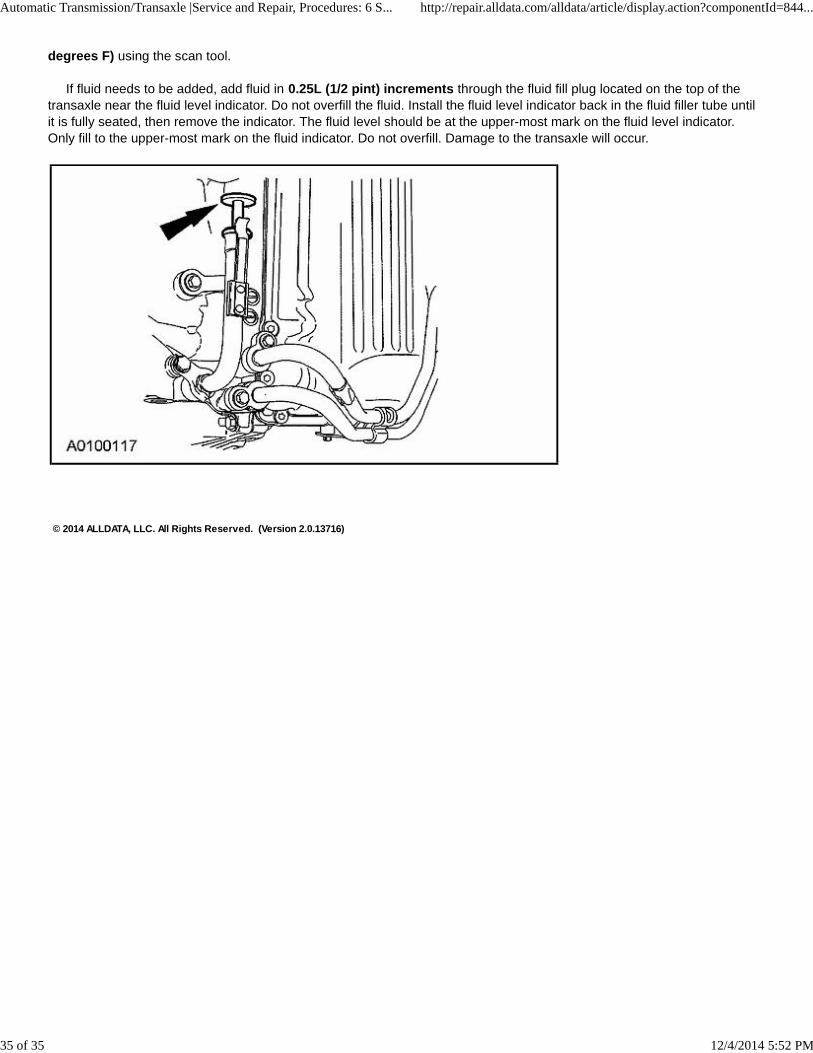
degrees F) using the scan tool.
If fluid needs to be added, add fluid in 0.25L (1/2 pint) increments through the fluid fill plug located on the top of thetransaxle near the fluid level indicator. Do not overfill the fluid. Install the fluid level indicator back in the fluid filler tube untilit is fully seated, then remove the indicator. The fluid level should be at the upper-most mark on the fluid level indicator.Only fill to the upper-most mark on the fluid indicator. Do not overfill. Damage to the transaxle will occur.
© 2014 ALLDATA, LLC. All Rights Reserved. (Version 2.0.13716)
Automatic Transmission/Transaxle |Service and Repair, Procedures: 6 S... http://repair.alldata.com/alldata/article/display.action?componentId=844...
35 of 35 12/4/2014 5:52 PM


![U660E AUTOMATIC TRANSMISSION / TRANSAXLE: … · u660e automatic transmission / transaxle: automatic transaxle fluid: adjustment; 2013 my camry [12/2012 -] 1. precautions and work](https://img.pdfslide.us/doc/110x75/5adfe3927f8b9ac0428cc9f3/u660e-automatic-transmission-transaxle-automatic-transmission-transaxle.jpg)