Embed Size (px)
Citation preview

Sage Paperless ConstructionSetup Guide
Sage 300 Construction and Real Estate and
Sage 100 Contractor
Sage University
This is a publication of Sage Software, Inc.
Copyright © 2015 Sage Software, Inc. All rights reserved.
Sage, the Sage logos, and the Sage product and service names mentioned herein are registered trademarks or trademarks of Sage Software, Inc. or its affiliated entities. All other trademarks are the property of their respective owners.
Your use of this document and the Sage product(s) described herein is governed by the terms and conditions of the Sage End User License Agreement ("EULA") or other agreement that is provided with or included in the Sage product. Nothing in this document supplements, modifies or amends those terms and conditions. Except as expressly stated in those terms and conditions, the information in this document is provided by Sage "AS IS" and Sage disclaims all express, implied or statutory warranties of any kind, including but not limited to the warranties of merchantability, fitness for a particular purpose or of non-infringement. No implied license is granted to you under any Sage intellectual property or trade secret right. Sage reserves the right to revise, supplement or remove information in this document at any time without notice to you or others.
04/2015
© 2015 Sage Software, Inc. 3
Sage Paperless Construction Setup Guide Contents
Contents
Welcome to Sage Paperless Construction . . . . . . . . . . . . . . . . . . . . . . . . . . . . . . . . . . . . . . . 5
Quick orientation . . . . . . . . . . . . . . . . . . . . . . . . . . . . . . . . . . . . . . . . . . . . . . . . . . . . . . . . . . . . . . . . . .5Implementation Plan . . . . . . . . . . . . . . . . . . . . . . . . . . . . . . . . . . . . . . . . . . . . . . . . . . . . . . . . . . . . . . .5
Install Sage Paperless Construction . . . . . . . . . . . . . . . . . . . . . . . . . . . . . . . . . . . . . . . . . . . . 6
System Components . . . . . . . . . . . . . . . . . . . . . . . . . . . . . . . . . . . . . . . . . . . . . . . . . . . . . . . . . . . . . . .6Prepare servers for Sage Paperless Construction . . . . . . . . . . . . . . . . . . . . . . . . . . . . . . . . . . . . . . .11Install Sage Paperless Construction on the Server . . . . . . . . . . . . . . . . . . . . . . . . . . . . . . . . . . . . . . .13Install SQL Server . . . . . . . . . . . . . . . . . . . . . . . . . . . . . . . . . . . . . . . . . . . . . . . . . . . . . . . . . . . . . . . .17Configure the Server Dashboard . . . . . . . . . . . . . . . . . . . . . . . . . . . . . . . . . . . . . . . . . . . . . . . . . . . . .21Set Security on the File Server . . . . . . . . . . . . . . . . . . . . . . . . . . . . . . . . . . . . . . . . . . . . . . . . . . . . . .27Install Workstations . . . . . . . . . . . . . . . . . . . . . . . . . . . . . . . . . . . . . . . . . . . . . . . . . . . . . . . . . . . . . . .30Install Printer Drivers on Workstations . . . . . . . . . . . . . . . . . . . . . . . . . . . . . . . . . . . . . . . . . . . . . . . .33
Configure Your Vault and Users . . . . . . . . . . . . . . . . . . . . . . . . . . . . . . . . . . . . . . . . . . . . . . 34
Sample Walk-Through: Configure Vault Access . . . . . . . . . . . . . . . . . . . . . . . . . . . . . . . . . . . . . . . . .34Business considerations: User Access . . . . . . . . . . . . . . . . . . . . . . . . . . . . . . . . . . . . . . . . . . . . . . . .39Vault Access Checklist . . . . . . . . . . . . . . . . . . . . . . . . . . . . . . . . . . . . . . . . . . . . . . . . . . . . . . . . . . . .40Establish the bridge to the accounting system . . . . . . . . . . . . . . . . . . . . . . . . . . . . . . . . . . . . . . . . . .40Configure email settings . . . . . . . . . . . . . . . . . . . . . . . . . . . . . . . . . . . . . . . . . . . . . . . . . . . . . . . . . . .45Add users . . . . . . . . . . . . . . . . . . . . . . . . . . . . . . . . . . . . . . . . . . . . . . . . . . . . . . . . . . . . . . . . . . . . . .45Import Document Types . . . . . . . . . . . . . . . . . . . . . . . . . . . . . . . . . . . . . . . . . . . . . . . . . . . . . . . . . . .50Create Vault Security Groups . . . . . . . . . . . . . . . . . . . . . . . . . . . . . . . . . . . . . . . . . . . . . . . . . . . . . . .52Add Queues to Vaults . . . . . . . . . . . . . . . . . . . . . . . . . . . . . . . . . . . . . . . . . . . . . . . . . . . . . . . . . . . . .55Give Access to Reports . . . . . . . . . . . . . . . . . . . . . . . . . . . . . . . . . . . . . . . . . . . . . . . . . . . . . . . . . . . .57
Set up Accounts Payable (APFlow) . . . . . . . . . . . . . . . . . . . . . . . . . . . . . . . . . . . . . . . . . . . 58
Sample Walk-Through: Process an Invoice . . . . . . . . . . . . . . . . . . . . . . . . . . . . . . . . . . . . . . . . . . . .58How roles and permissions affect APFlow workflows . . . . . . . . . . . . . . . . . . . . . . . . . . . . . . . . . . . . .60Business considerations: Roles and permissions . . . . . . . . . . . . . . . . . . . . . . . . . . . . . . . . . . . . . . . .65How queues and queue categories support APFlow . . . . . . . . . . . . . . . . . . . . . . . . . . . . . . . . . . . . .66Business considerations: Queues and Categories . . . . . . . . . . . . . . . . . . . . . . . . . . . . . . . . . . . . . . .68Reports . . . . . . . . . . . . . . . . . . . . . . . . . . . . . . . . . . . . . . . . . . . . . . . . . . . . . . . . . . . . . . . . . . . . . . . .69Business considerations: Reports . . . . . . . . . . . . . . . . . . . . . . . . . . . . . . . . . . . . . . . . . . . . . . . . . . . .69Preparation checklist for APFlow . . . . . . . . . . . . . . . . . . . . . . . . . . . . . . . . . . . . . . . . . . . . . . . . . . . .70Configure the APFlow queue category . . . . . . . . . . . . . . . . . . . . . . . . . . . . . . . . . . . . . . . . . . . . . . . .71Configure remaining APFlow settings . . . . . . . . . . . . . . . . . . . . . . . . . . . . . . . . . . . . . . . . . . . . . . . . .72Refine your APFlow setup . . . . . . . . . . . . . . . . . . . . . . . . . . . . . . . . . . . . . . . . . . . . . . . . . . . . . . . . . .75
© 2015 Sage Software, Inc. 4
Sage Paperless Construction Setup Guide Contents
Set Up Document Routing (DocRoute) . . . . . . . . . . . . . . . . . . . . . . . . . . . . . . . . . . . . . . . . . 81
Sample Walk-Through: Route a Document . . . . . . . . . . . . . . . . . . . . . . . . . . . . . . . . . . . . . . . . . . . . .82About document types and indexes . . . . . . . . . . . . . . . . . . . . . . . . . . . . . . . . . . . . . . . . . . . . . . . . . .83Business Considerations: Document and Index Types . . . . . . . . . . . . . . . . . . . . . . . . . . . . . . . . . . . .87How security groups and document types work together . . . . . . . . . . . . . . . . . . . . . . . . . . . . . . . . . .88Business Considerations: Document Types and Security Groups . . . . . . . . . . . . . . . . . . . . . . . . . . .90Document Routing . . . . . . . . . . . . . . . . . . . . . . . . . . . . . . . . . . . . . . . . . . . . . . . . . . . . . . . . . . . . . . . .90Business Considerations: Document Routing . . . . . . . . . . . . . . . . . . . . . . . . . . . . . . . . . . . . . . . . . . .92How queues and queue categories support DocRoute . . . . . . . . . . . . . . . . . . . . . . . . . . . . . . . . . . . .92Preparation checklist for DocRoute . . . . . . . . . . . . . . . . . . . . . . . . . . . . . . . . . . . . . . . . . . . . . . . . . . .94Create Document Types . . . . . . . . . . . . . . . . . . . . . . . . . . . . . . . . . . . . . . . . . . . . . . . . . . . . . . . . . . .95Create Index Types . . . . . . . . . . . . . . . . . . . . . . . . . . . . . . . . . . . . . . . . . . . . . . . . . . . . . . . . . . . . . . .99Test Document Types and Index Types . . . . . . . . . . . . . . . . . . . . . . . . . . . . . . . . . . . . . . . . . . . . . .101Set up document routing . . . . . . . . . . . . . . . . . . . . . . . . . . . . . . . . . . . . . . . . . . . . . . . . . . . . . . . . . .102Refine your DocRoute setup . . . . . . . . . . . . . . . . . . . . . . . . . . . . . . . . . . . . . . . . . . . . . . . . . . . . . . .106
Implement Additional Features . . . . . . . . . . . . . . . . . . . . . . . . . . . . . . . . . . . . . . . . . . . . . . 111
Document Classes . . . . . . . . . . . . . . . . . . . . . . . . . . . . . . . . . . . . . . . . . . . . . . . . . . . . . . . . . . . . . .111Attachment Synchronization . . . . . . . . . . . . . . . . . . . . . . . . . . . . . . . . . . . . . . . . . . . . . . . . . . . . . . .112Other Job Types . . . . . . . . . . . . . . . . . . . . . . . . . . . . . . . . . . . . . . . . . . . . . . . . . . . . . . . . . . . . . . . .115About the User Settings window . . . . . . . . . . . . . . . . . . . . . . . . . . . . . . . . . . . . . . . . . . . . . . . . . . . .116
© 2015 Sage Software, Inc. 5
Sage Paperless Construction Setup Guide Welcome to Sage Paperless Construction
Welcome to Sage Paperless ConstructionYour company might process dozens or hundreds of documents a day—invoices, contracts, change orders, job photos, and even relevant e-mails. Making sure that each document is reviewed appropriately and on time is critical to your success—and Sage Paperless Construction is here to help. This guide will get you started.
Quick orientation
We’re going to assume that you’re the system administrator—the person who will oversee the setup and configuration of Sage Paperless Construction. You’ll install the software, configure your vault, and work with your team to plan which document types your organization will use at the start of the implementation.
You can link (or bridge) your vault to a Sage 300 Construction and Real Estate or Sage 100 Contractor accounting system to streamline your invoice and document workflows—but you don’t have to do this. If you just want to improve the routing and handling of documents before processing them in your accounting system, you can use Sage Paperless Construction as stand-alone software. Some features, such as Attachment Synchronization, will only work if your vault is connected to the accounting system. This guide focuses on the scenarios where Sage Paperless Construction is connected to your accounting system. So let’s get started!
Implementation Plan
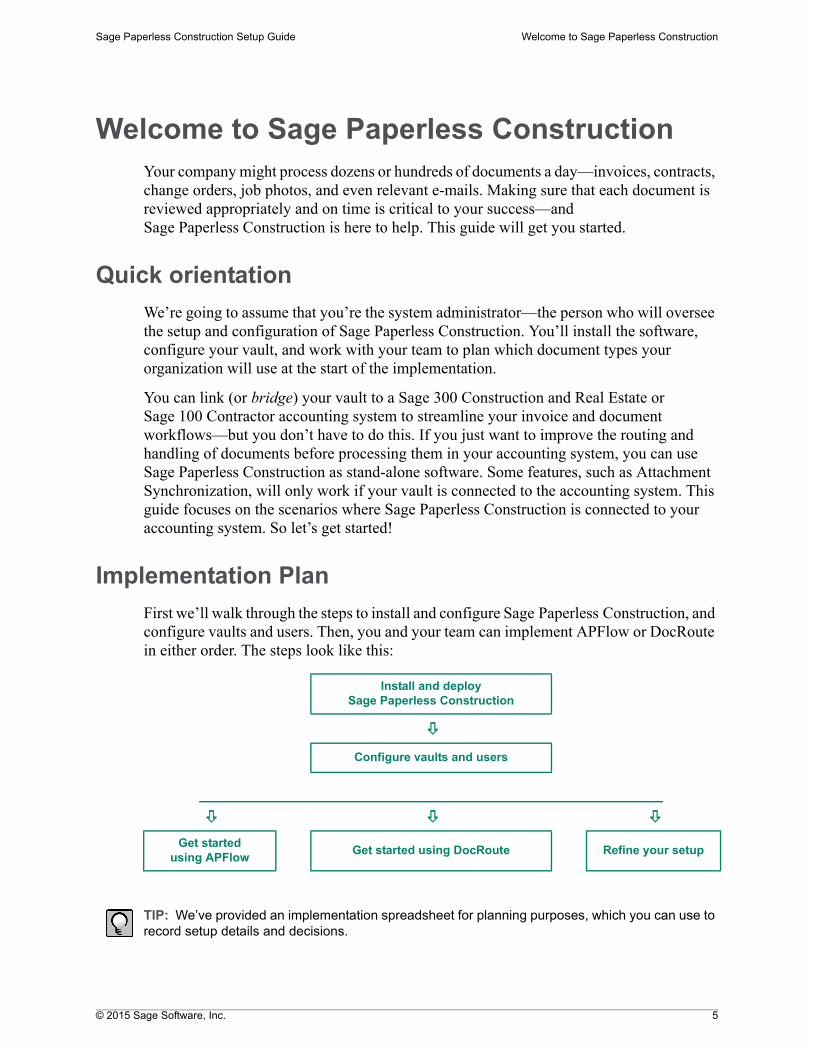
First we’ll walk through the steps to install and configure Sage Paperless Construction, and configure vaults and users. Then, you and your team can implement APFlow or DocRoute in either order. The steps look like this:
TIP: We’ve provided an implementation spreadsheet for planning purposes, which you can use to record setup details and decisions.
Install and deploy Sage Paperless Construction
Configure vaults and users
Get started using APFlow
Get started using DocRoute Refine your setup
© 2015 Sage Software, Inc. 6
Sage Paperless Construction Setup Guide Install Sage Paperless Construction
Install Sage Paperless ConstructionThis section explains the system components required for Sage Paperless Construction, and then provides step-by-step instructions for installing. Read this section carefully before you begin.
System Components
A Sage Paperless Construction implementation involves several hardware and system components. Review the specifications listed here before beginning installation.
Network Requirements
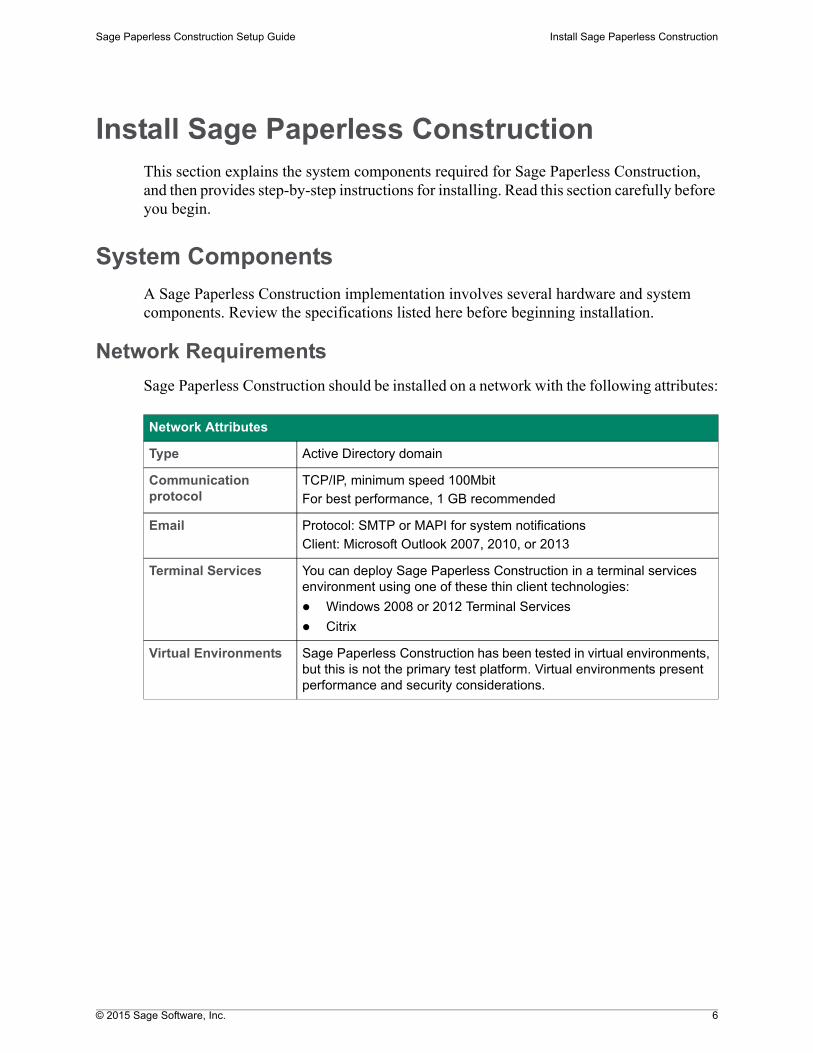
Sage Paperless Construction should be installed on a network with the following attributes:
Network Attributes
Type Active Directory domain
Communication protocol
TCP/IP, minimum speed 100Mbit
For best performance, 1 GB recommended
Email Protocol: SMTP or MAPI for system notifications
Client: Microsoft Outlook 2007, 2010, or 2013
Terminal Services You can deploy Sage Paperless Construction in a terminal services environment using one of these thin client technologies:
Windows 2008 or 2012 Terminal Services
Citrix
Virtual Environments Sage Paperless Construction has been tested in virtual environments, but this is not the primary test platform. Virtual environments present performance and security considerations.
© 2015 Sage Software, Inc. 7
Sage Paperless Construction Setup Guide Install Sage Paperless Construction
Sage Paperless Construction Server Dashboard
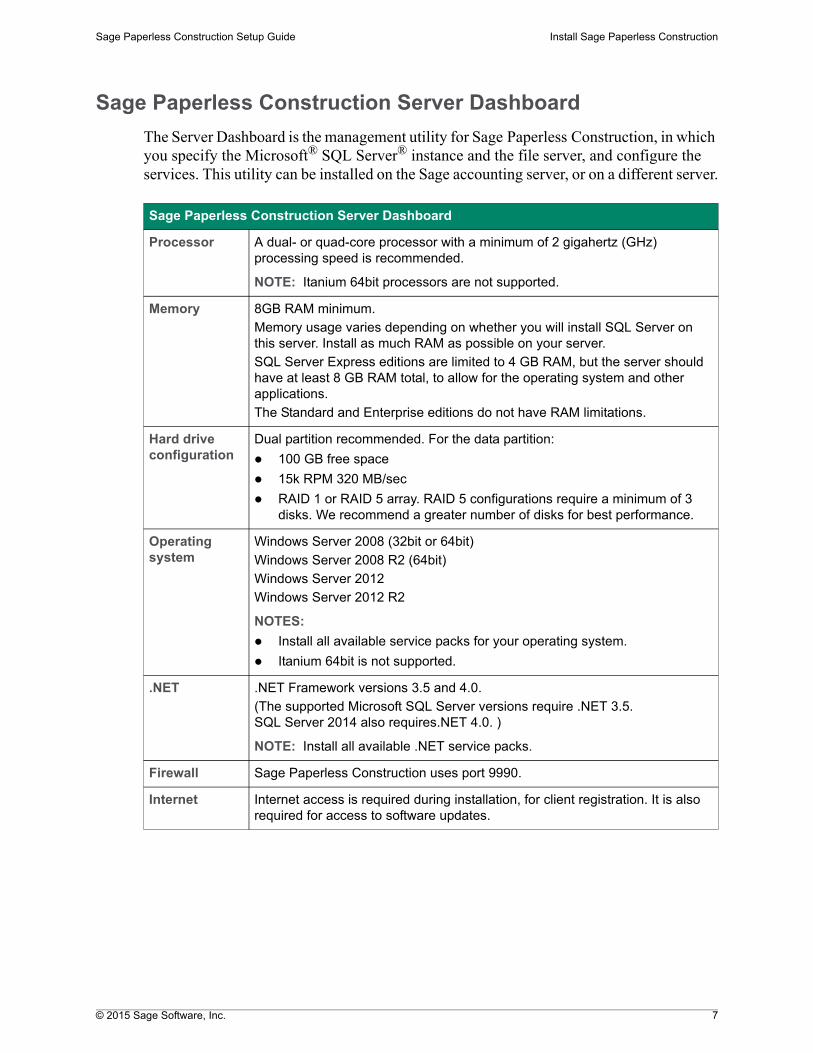
The Server Dashboard is the management utility for Sage Paperless Construction, in which you specify the Microsoft® SQL Server® instance and the file server, and configure the services. This utility can be installed on the Sage accounting server, or on a different server.
Sage Paperless Construction Server Dashboard
Processor A dual- or quad-core processor with a minimum of 2 gigahertz (GHz) processing speed is recommended.
NOTE: Itanium 64bit processors are not supported.
Memory 8GB RAM minimum.
Memory usage varies depending on whether you will install SQL Server on this server. Install as much RAM as possible on your server.
SQL Server Express editions are limited to 4 GB RAM, but the server should have at least 8 GB RAM total, to allow for the operating system and other applications.
The Standard and Enterprise editions do not have RAM limitations.
Hard drive configuration
Dual partition recommended. For the data partition:
100 GB free space
15k RPM 320 MB/sec
RAID 1 or RAID 5 array. RAID 5 configurations require a minimum of 3 disks. We recommend a greater number of disks for best performance.
Operating system
Windows Server 2008 (32bit or 64bit)
Windows Server 2008 R2 (64bit)
Windows Server 2012
Windows Server 2012 R2
NOTES:
Install all available service packs for your operating system.
Itanium 64bit is not supported.
.NET .NET Framework versions 3.5 and 4.0.
(The supported Microsoft SQL Server versions require .NET 3.5. SQL Server 2014 also requires.NET 4.0. )
NOTE: Install all available .NET service packs.
Firewall Sage Paperless Construction uses port 9990.
Internet Internet access is required during installation, for client registration. It is also required for access to software updates.
© 2015 Sage Software, Inc. 8
Sage Paperless Construction Setup Guide Install Sage Paperless Construction
Microsoft SQL Server
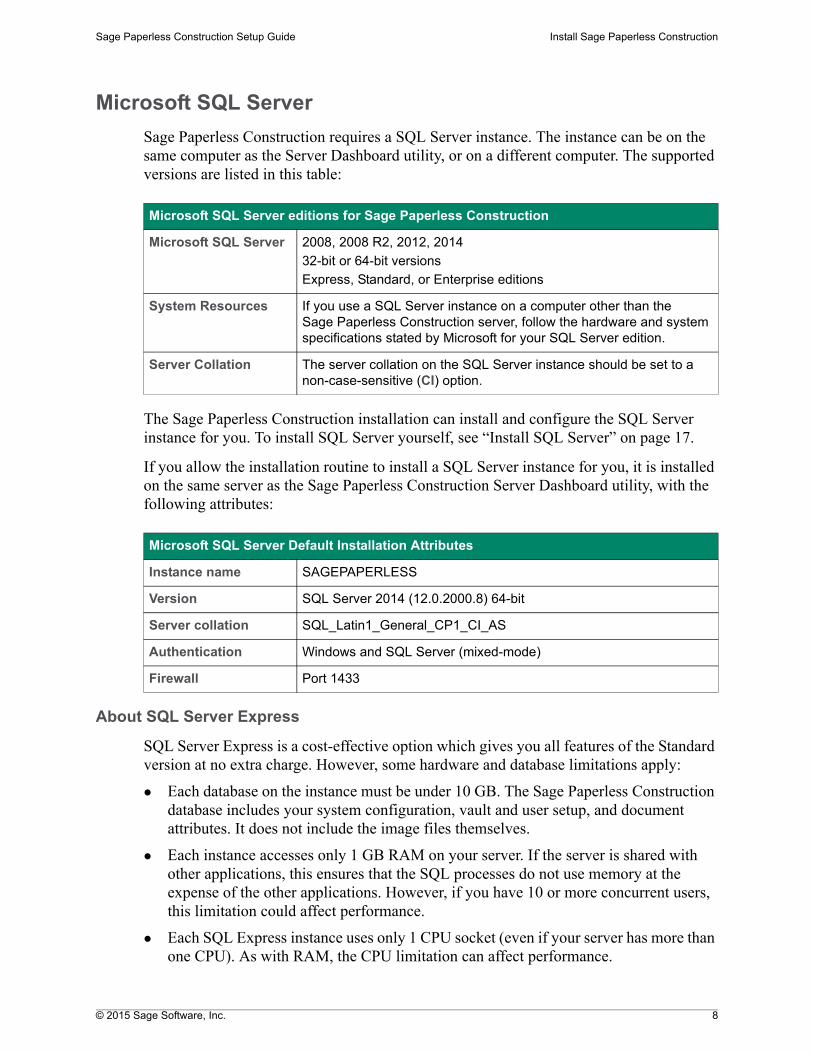
Sage Paperless Construction requires a SQL Server instance. The instance can be on the same computer as the Server Dashboard utility, or on a different computer. The supported versions are listed in this table:
The Sage Paperless Construction installation can install and configure the SQL Server instance for you. To install SQL Server yourself, see “Install SQL Server” on page 17.
If you allow the installation routine to install a SQL Server instance for you, it is installed on the same server as the Sage Paperless Construction Server Dashboard utility, with the following attributes:
About SQL Server Express
SQL Server Express is a cost-effective option which gives you all features of the Standard version at no extra charge. However, some hardware and database limitations apply:
Each database on the instance must be under 10 GB. The Sage Paperless Construction database includes your system configuration, vault and user setup, and document attributes. It does not include the image files themselves.
Each instance accesses only 1 GB RAM on your server. If the server is shared with other applications, this ensures that the SQL processes do not use memory at the expense of the other applications. However, if you have 10 or more concurrent users, this limitation could affect performance.
Each SQL Express instance uses only 1 CPU socket (even if your server has more than one CPU). As with RAM, the CPU limitation can affect performance.
Microsoft SQL Server editions for Sage Paperless Construction
Microsoft SQL Server 2008, 2008 R2, 2012, 2014
32-bit or 64-bit versions
Express, Standard, or Enterprise editions
System Resources If you use a SQL Server instance on a computer other than the Sage Paperless Construction server, follow the hardware and system specifications stated by Microsoft for your SQL Server edition.
Server Collation The server collation on the SQL Server instance should be set to a non-case-sensitive (CI) option.
Microsoft SQL Server Default Installation Attributes
Instance name SAGEPAPERLESS
Version SQL Server 2014 (12.0.2000.8) 64-bit
Server collation SQL_Latin1_General_CP1_CI_AS
Authentication Windows and SQL Server (mixed-mode)
Firewall Port 1433
© 2015 Sage Software, Inc. 9
Sage Paperless Construction Setup Guide Install Sage Paperless Construction
Sage Paperless Construction Image Server
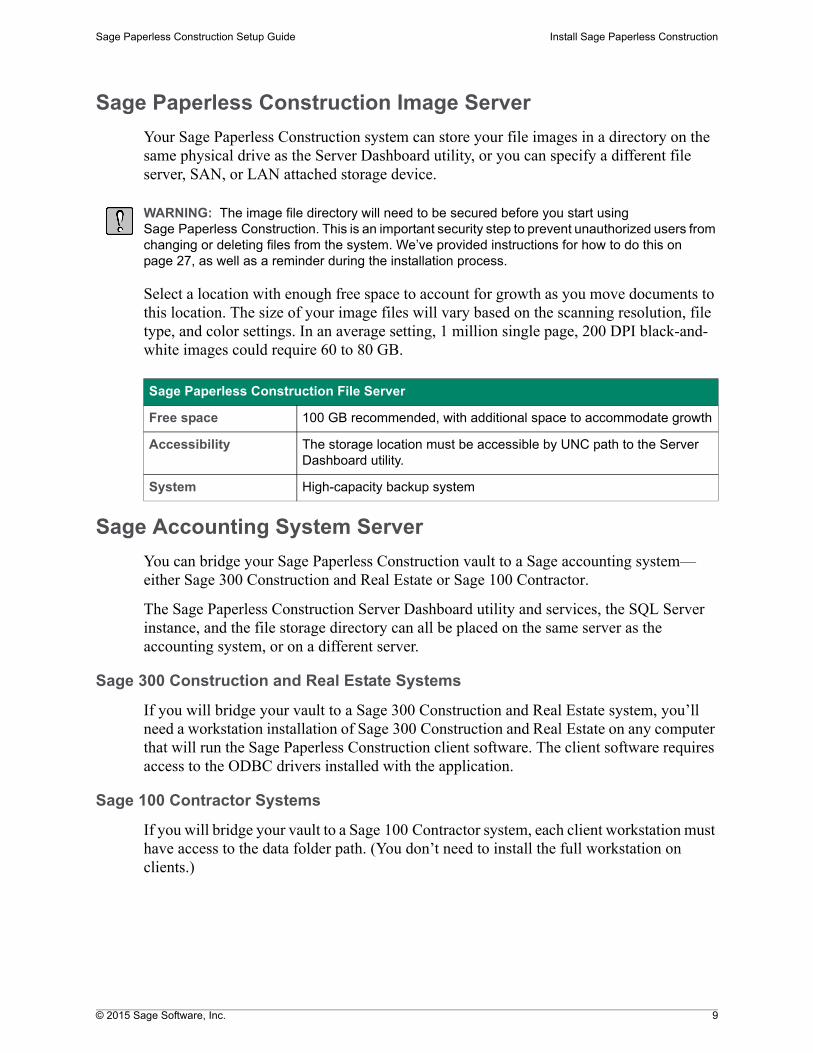
Your Sage Paperless Construction system can store your file images in a directory on the same physical drive as the Server Dashboard utility, or you can specify a different file server, SAN, or LAN attached storage device.
WARNING: The image file directory will need to be secured before you start using Sage Paperless Construction. This is an important security step to prevent unauthorized users from changing or deleting files from the system. We’ve provided instructions for how to do this on page 27, as well as a reminder during the installation process.
Select a location with enough free space to account for growth as you move documents to this location. The size of your image files will vary based on the scanning resolution, file type, and color settings. In an average setting, 1 million single page, 200 DPI black-and-white images could require 60 to 80 GB.
Sage Accounting System Server
You can bridge your Sage Paperless Construction vault to a Sage accounting system—either Sage 300 Construction and Real Estate or Sage 100 Contractor.
The Sage Paperless Construction Server Dashboard utility and services, the SQL Server instance, and the file storage directory can all be placed on the same server as the accounting system, or on a different server.
Sage 300 Construction and Real Estate Systems
If you will bridge your vault to a Sage 300 Construction and Real Estate system, you’ll need a workstation installation of Sage 300 Construction and Real Estate on any computer that will run the Sage Paperless Construction client software. The client software requires access to the ODBC drivers installed with the application.
Sage 100 Contractor Systems
If you will bridge your vault to a Sage 100 Contractor system, each client workstation must have access to the data folder path. (You don’t need to install the full workstation on clients.)
Sage Paperless Construction File Server
Free space 100 GB recommended, with additional space to accommodate growth
Accessibility The storage location must be accessible by UNC path to the Server Dashboard utility.
System High-capacity backup system
© 2015 Sage Software, Inc. 10
Sage Paperless Construction Setup Guide Install Sage Paperless Construction
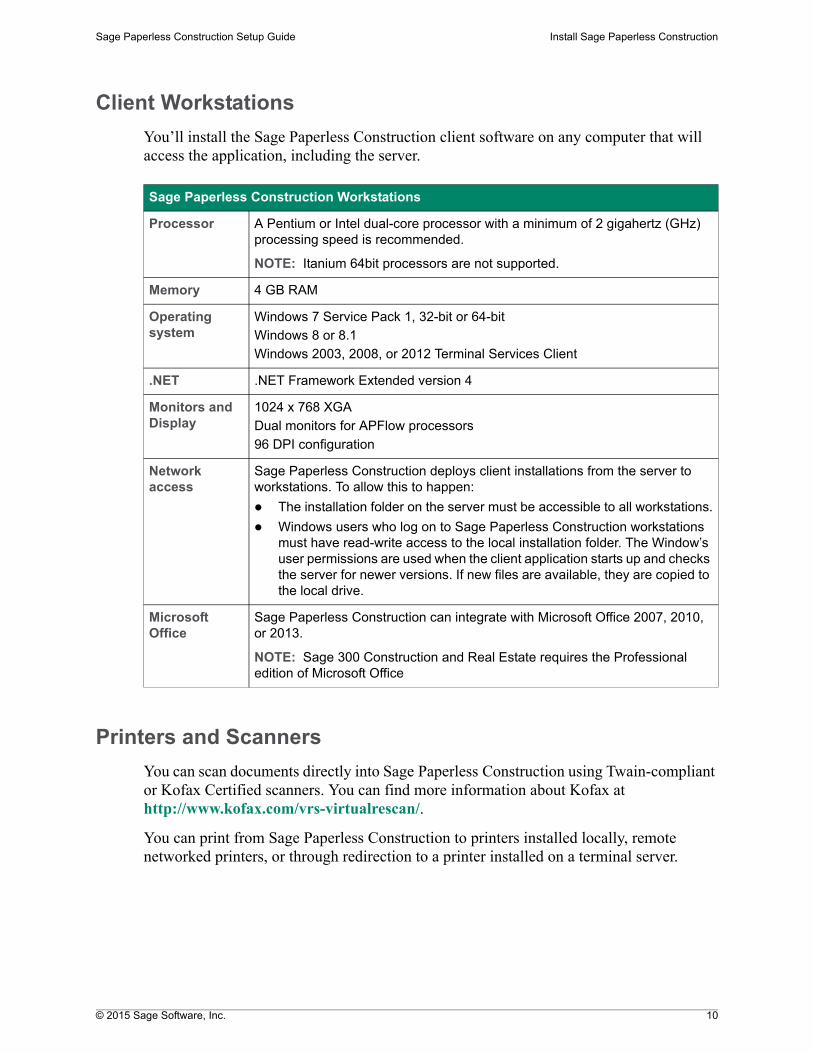
Client Workstations
You’ll install the Sage Paperless Construction client software on any computer that will access the application, including the server.
Printers and Scanners
You can scan documents directly into Sage Paperless Construction using Twain-compliant or Kofax Certified scanners. You can find more information about Kofax at http://www.kofax.com/vrs-virtualrescan/.
You can print from Sage Paperless Construction to printers installed locally, remote networked printers, or through redirection to a printer installed on a terminal server.
Sage Paperless Construction Workstations
Processor A Pentium or Intel dual-core processor with a minimum of 2 gigahertz (GHz) processing speed is recommended.
NOTE: Itanium 64bit processors are not supported.
Memory 4 GB RAM
Operating system
Windows 7 Service Pack 1, 32-bit or 64-bit
Windows 8 or 8.1
Windows 2003, 2008, or 2012 Terminal Services Client
.NET .NET Framework Extended version 4
Monitors and Display
1024 x 768 XGA
Dual monitors for APFlow processors
96 DPI configuration
Network access
Sage Paperless Construction deploys client installations from the server to workstations. To allow this to happen:
The installation folder on the server must be accessible to all workstations.
Windows users who log on to Sage Paperless Construction workstations must have read-write access to the local installation folder. The Window’s user permissions are used when the client application starts up and checks the server for newer versions. If new files are available, they are copied to the local drive.
Microsoft Office
Sage Paperless Construction can integrate with Microsoft Office 2007, 2010, or 2013.
NOTE: Sage 300 Construction and Real Estate requires the Professional edition of Microsoft Office
© 2015 Sage Software, Inc. 11
Sage Paperless Construction Setup Guide Install Sage Paperless Construction
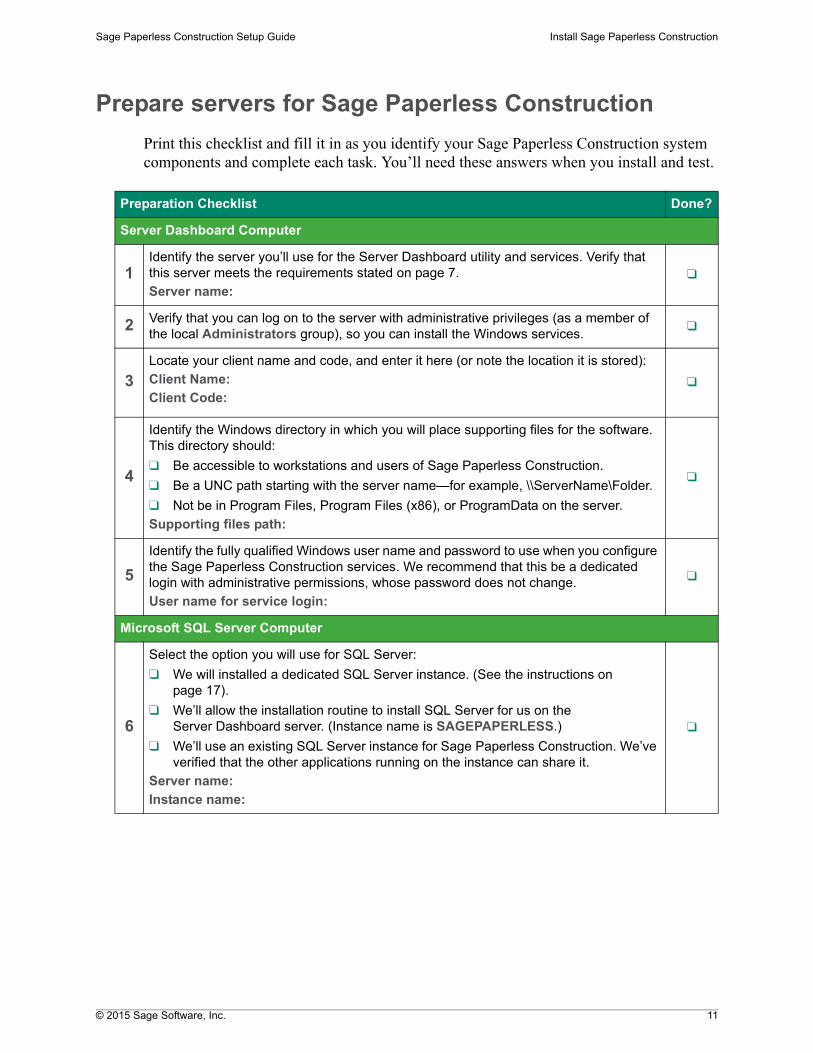
Prepare servers for Sage Paperless Construction
Print this checklist and fill it in as you identify your Sage Paperless Construction system components and complete each task. You’ll need these answers when you install and test.
Preparation Checklist Done?
Server Dashboard Computer
1Identify the server you’ll use for the Server Dashboard utility and services. Verify that this server meets the requirements stated on page 7.
Server name:❑
2 Verify that you can log on to the server with administrative privileges (as a member of the local Administrators group), so you can install the Windows services.
❑
3Locate your client name and code, and enter it here (or note the location it is stored):
Client Name:
Client Code:❑
4
Identify the Windows directory in which you will place supporting files for the software. This directory should:
❑ Be accessible to workstations and users of Sage Paperless Construction.
❑ Be a UNC path starting with the server name—for example, \\ServerName\Folder.
❑ Not be in Program Files, Program Files (x86), or ProgramData on the server.
Supporting files path:
❑
5
Identify the fully qualified Windows user name and password to use when you configure the Sage Paperless Construction services. We recommend that this be a dedicated login with administrative permissions, whose password does not change.
User name for service login:
❑
Microsoft SQL Server Computer
6
Select the option you will use for SQL Server:
❑ We will installed a dedicated SQL Server instance. (See the instructions on page 17).
❑ We’ll allow the installation routine to install SQL Server for us on the Server Dashboard server. (Instance name is SAGEPAPERLESS.)
❑ We’ll use an existing SQL Server instance for Sage Paperless Construction. We’ve verified that the other applications running on the instance can share it.
Server name:
Instance name:
❑
© 2015 Sage Software, Inc. 12
Sage Paperless Construction Setup Guide Install Sage Paperless Construction
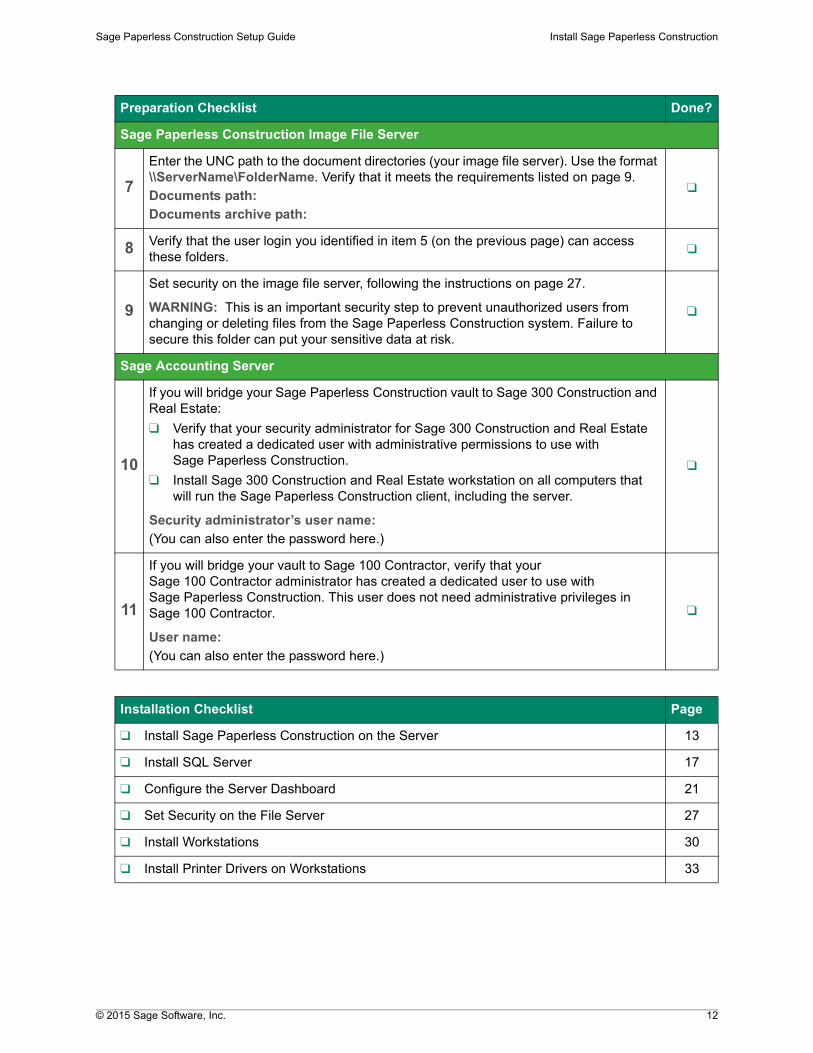
Sage Paperless Construction Image File Server
7
Enter the UNC path to the document directories (your image file server). Use the format \\ServerName\FolderName. Verify that it meets the requirements listed on page 9.
Documents path:
Documents archive path:
❑
8 Verify that the user login you identified in item 5 (on the previous page) can access these folders.
❑
9
Set security on the image file server, following the instructions on page 27.
WARNING: This is an important security step to prevent unauthorized users from changing or deleting files from the Sage Paperless Construction system. Failure to secure this folder can put your sensitive data at risk.
❑
Sage Accounting Server
10
If you will bridge your Sage Paperless Construction vault to Sage 300 Construction and Real Estate:
❑ Verify that your security administrator for Sage 300 Construction and Real Estate has created a dedicated user with administrative permissions to use with Sage Paperless Construction.
❑ Install Sage 300 Construction and Real Estate workstation on all computers that will run the Sage Paperless Construction client, including the server.
Security administrator’s user name:
(You can also enter the password here.)
❑
11
If you will bridge your vault to Sage 100 Contractor, verify that your Sage 100 Contractor administrator has created a dedicated user to use with Sage Paperless Construction. This user does not need administrative privileges in Sage 100 Contractor.
User name:
(You can also enter the password here.)
❑
Installation Checklist Page
❑ Install Sage Paperless Construction on the Server 13
❑ Install SQL Server 17
❑ Configure the Server Dashboard 21
❑ Set Security on the File Server 27
❑ Install Workstations 30
❑ Install Printer Drivers on Workstations 33
Preparation Checklist Done?
© 2015 Sage Software, Inc. 13
Sage Paperless Construction Setup Guide Install Sage Paperless Construction
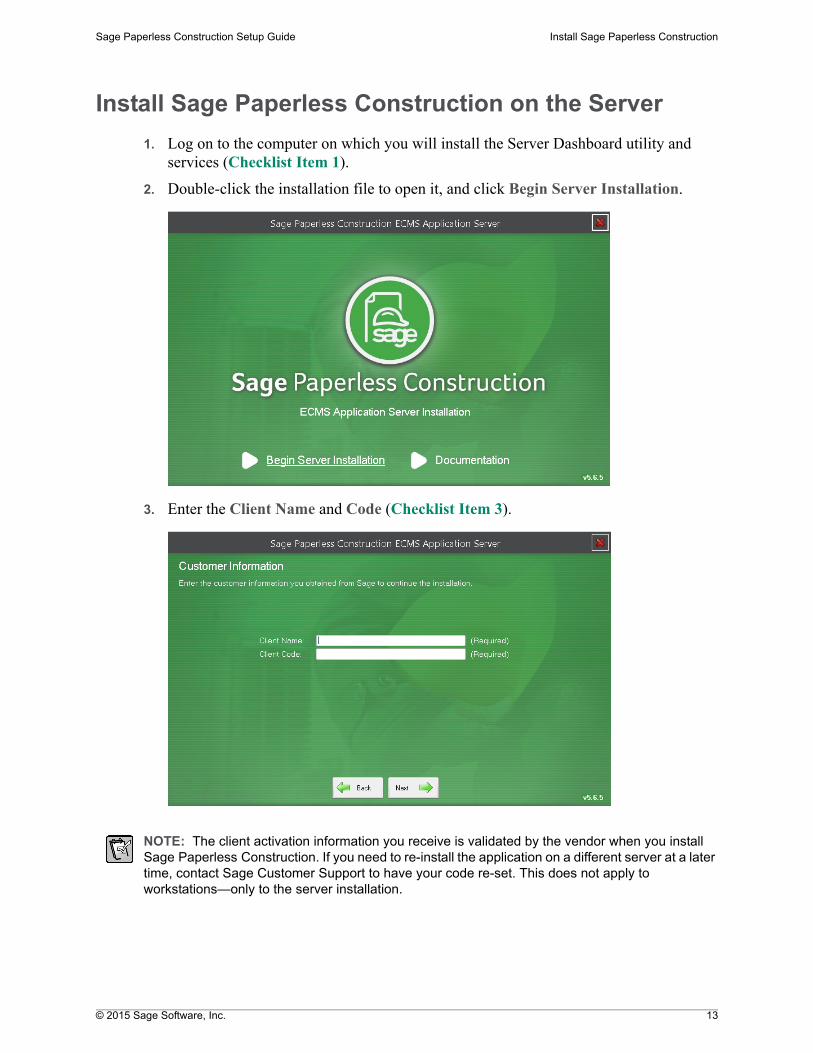
Install Sage Paperless Construction on the Server
1. Log on to the computer on which you will install the Server Dashboard utility and services (Checklist Item 1).
2. Double-click the installation file to open it, and click Begin Server Installation.
3. Enter the Client Name and Code (Checklist Item 3).
NOTE: The client activation information you receive is validated by the vendor when you install Sage Paperless Construction. If you need to re-install the application on a different server at a later time, contact Sage Customer Support to have your code re-set. This does not apply to workstations—only to the server installation.
© 2015 Sage Software, Inc. 14
Sage Paperless Construction Setup Guide Install Sage Paperless Construction
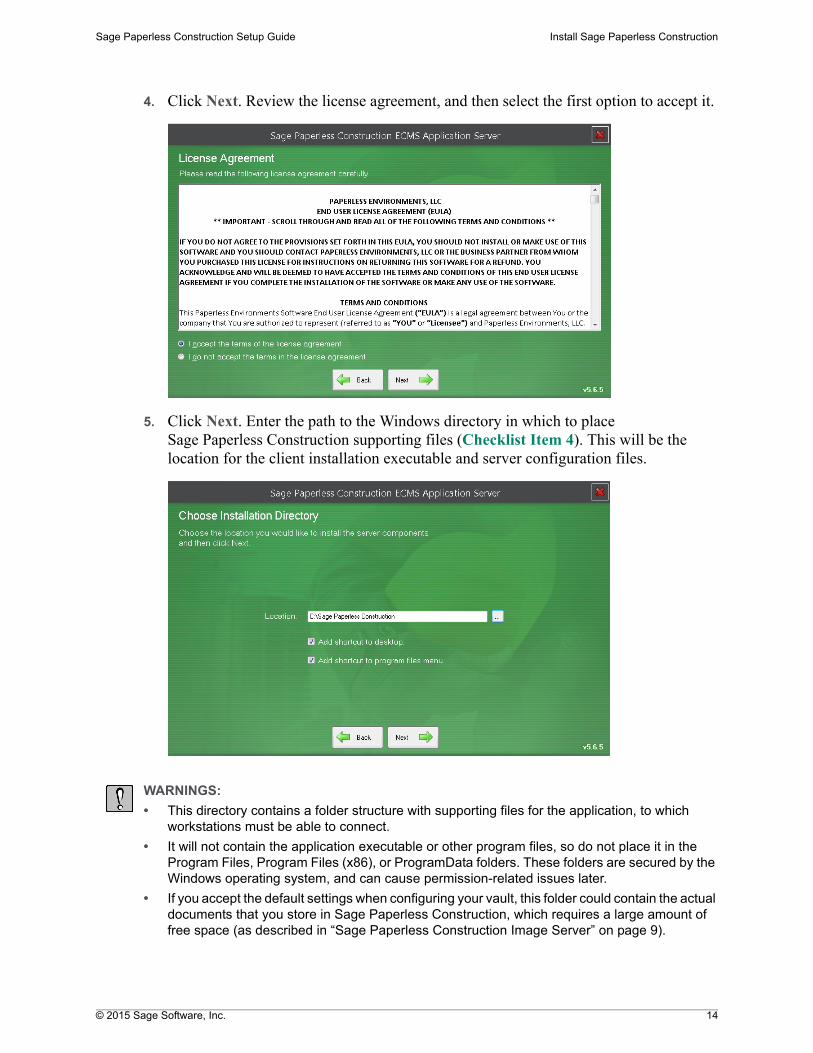
4. Click Next. Review the license agreement, and then select the first option to accept it.
5. Click Next. Enter the path to the Windows directory in which to place Sage Paperless Construction supporting files (Checklist Item 4). This will be the location for the client installation executable and server configuration files.
WARNINGS:
• This directory contains a folder structure with supporting files for the application, to which workstations must be able to connect.
• It will not contain the application executable or other program files, so do not place it in the Program Files, Program Files (x86), or ProgramData folders. These folders are secured by the Windows operating system, and can cause permission-related issues later.
• If you accept the default settings when configuring your vault, this folder could contain the actual documents that you store in Sage Paperless Construction, which requires a large amount of free space (as described in “Sage Paperless Construction Image Server” on page 9).
© 2015 Sage Software, Inc. 15
Sage Paperless Construction Setup Guide Install Sage Paperless Construction
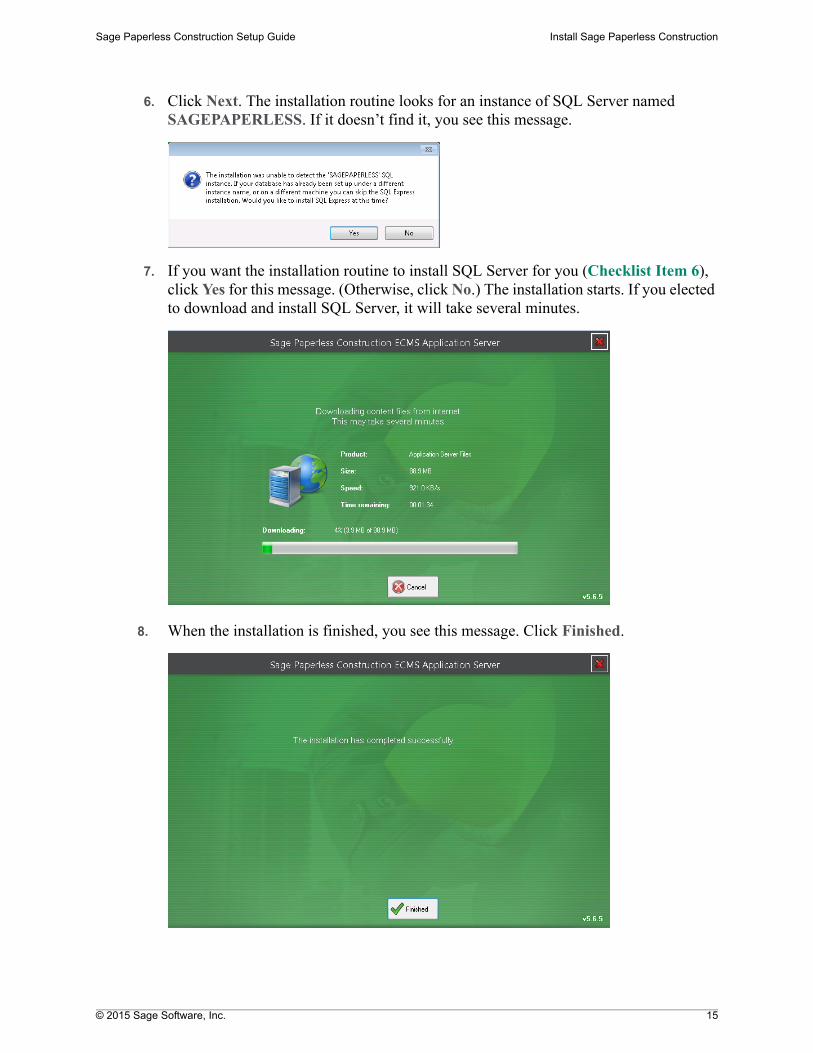
6. Click Next. The installation routine looks for an instance of SQL Server named SAGEPAPERLESS. If it doesn’t find it, you see this message.
7. If you want the installation routine to install SQL Server for you (Checklist Item 6), click Yes for this message. (Otherwise, click No.) The installation starts. If you elected to download and install SQL Server, it will take several minutes.
8. When the installation is finished, you see this message. Click Finished.
© 2015 Sage Software, Inc. 16
Sage Paperless Construction Setup Guide Install Sage Paperless Construction
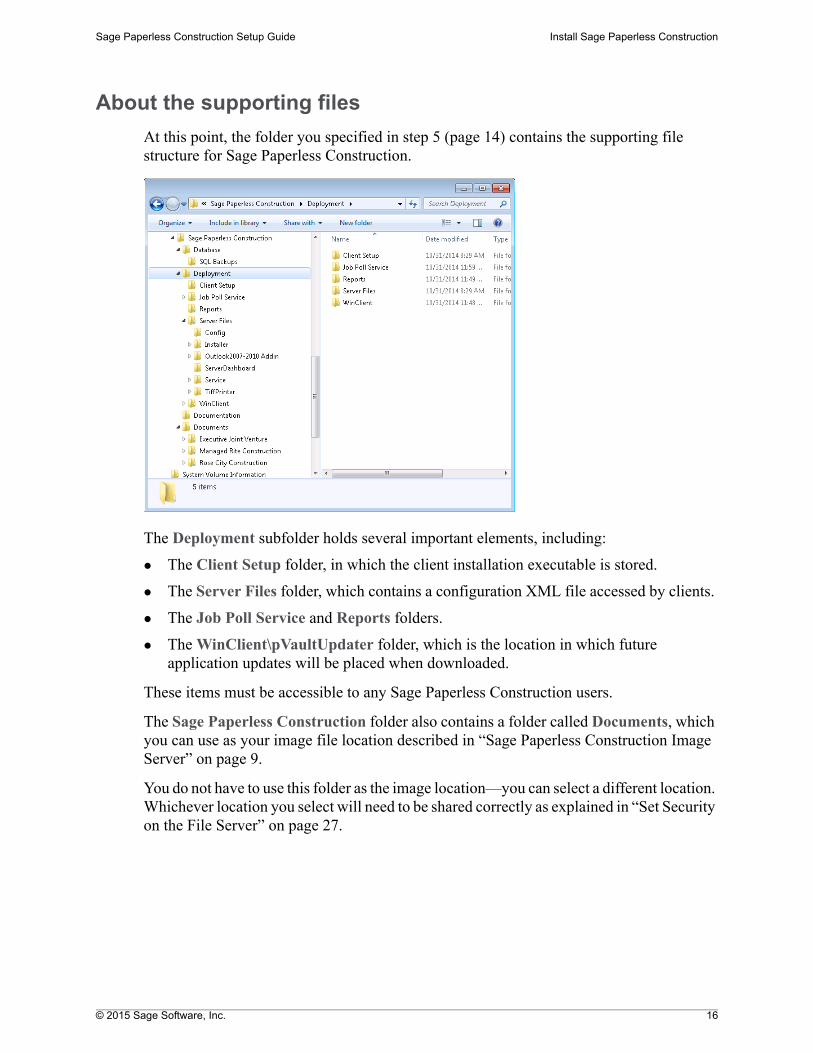
About the supporting files
At this point, the folder you specified in step 5 (page 14) contains the supporting file structure for Sage Paperless Construction.
The Deployment subfolder holds several important elements, including:
The Client Setup folder, in which the client installation executable is stored.
The Server Files folder, which contains a configuration XML file accessed by clients.
The Job Poll Service and Reports folders.
The WinClient\pVaultUpdater folder, which is the location in which future application updates will be placed when downloaded.
These items must be accessible to any Sage Paperless Construction users.
The Sage Paperless Construction folder also contains a folder called Documents, which you can use as your image file location described in “Sage Paperless Construction Image Server” on page 9.
You do not have to use this folder as the image location—you can select a different location. Whichever location you select will need to be shared correctly as explained in “Set Security on the File Server” on page 27.
© 2015 Sage Software, Inc. 17
Sage Paperless Construction Setup Guide Install Sage Paperless Construction
Install SQL Server
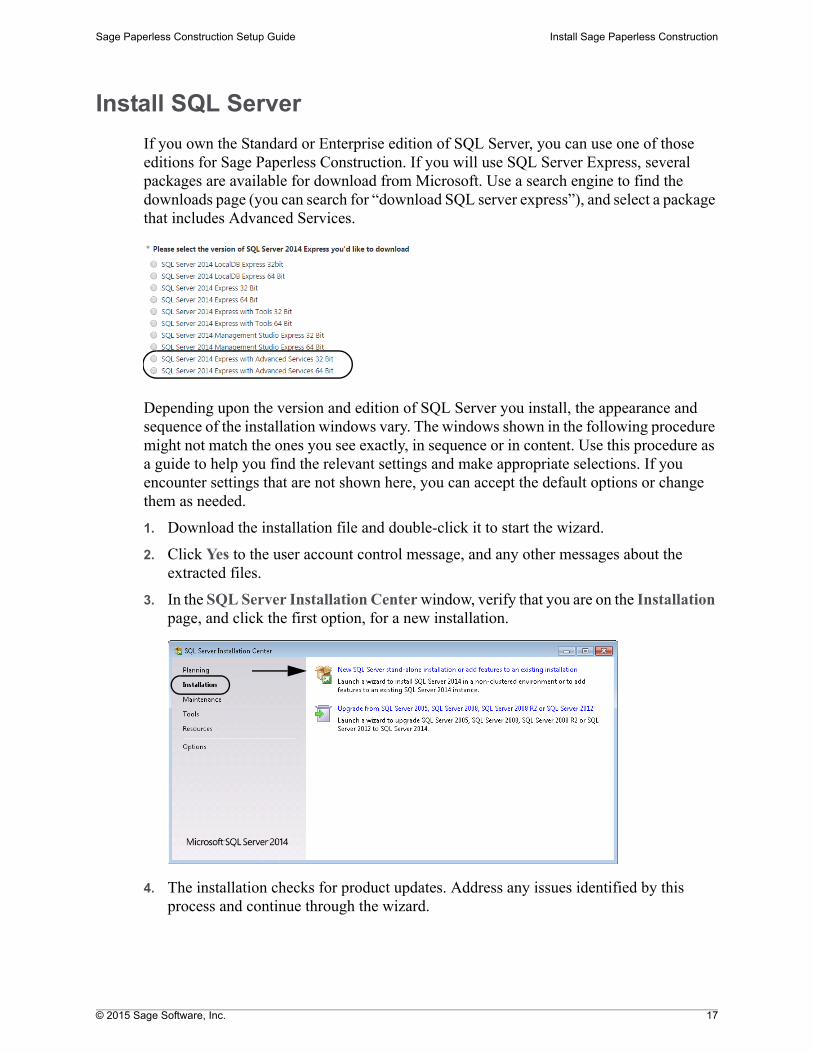
If you own the Standard or Enterprise edition of SQL Server, you can use one of those editions for Sage Paperless Construction. If you will use SQL Server Express, several packages are available for download from Microsoft. Use a search engine to find the downloads page (you can search for “download SQL server express”), and select a package that includes Advanced Services.
Depending upon the version and edition of SQL Server you install, the appearance and sequence of the installation windows vary. The windows shown in the following procedure might not match the ones you see exactly, in sequence or in content. Use this procedure as a guide to help you find the relevant settings and make appropriate selections. If you encounter settings that are not shown here, you can accept the default options or change them as needed.
1. Download the installation file and double-click it to start the wizard.
2. Click Yes to the user account control message, and any other messages about the extracted files.
3. In the SQL Server Installation Center window, verify that you are on the Installation page, and click the first option, for a new installation.
4. The installation checks for product updates. Address any issues identified by this process and continue through the wizard.
© 2015 Sage Software, Inc. 18
Sage Paperless Construction Setup Guide Install Sage Paperless Construction
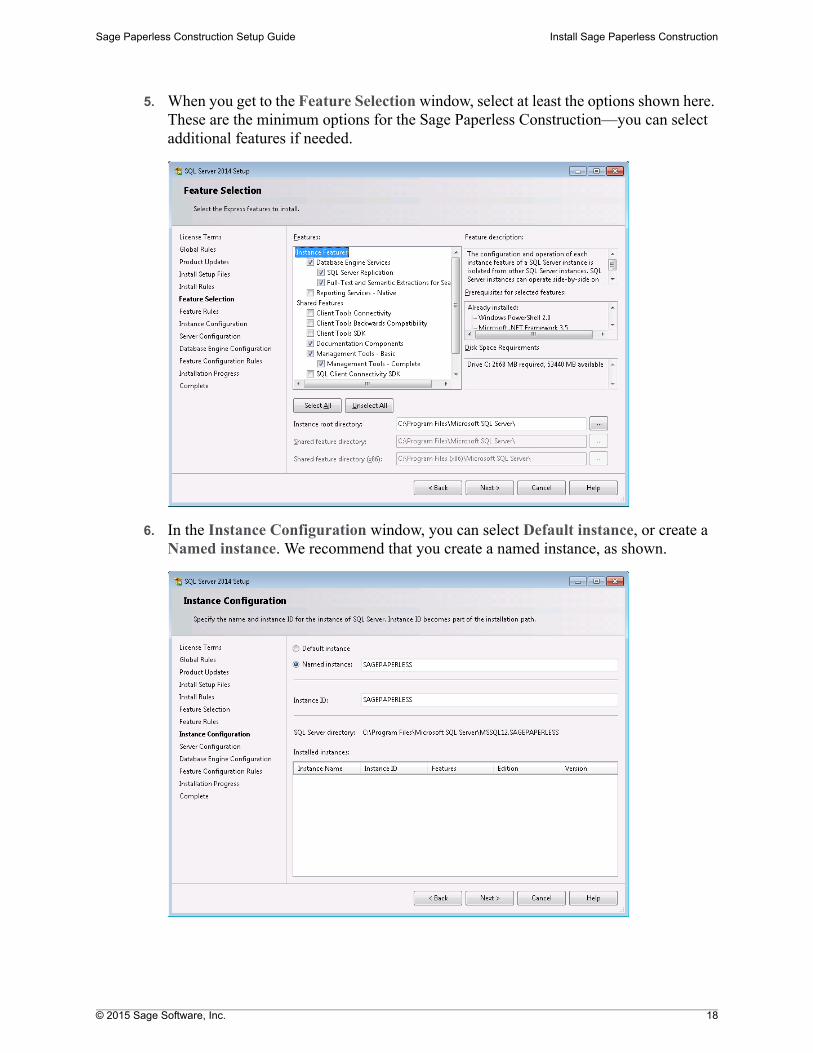
5. When you get to the Feature Selection window, select at least the options shown here. These are the minimum options for the Sage Paperless Construction—you can select additional features if needed.
6. In the Instance Configuration window, you can select Default instance, or create a Named instance. We recommend that you create a named instance, as shown.
© 2015 Sage Software, Inc. 19
Sage Paperless Construction Setup Guide Install Sage Paperless Construction
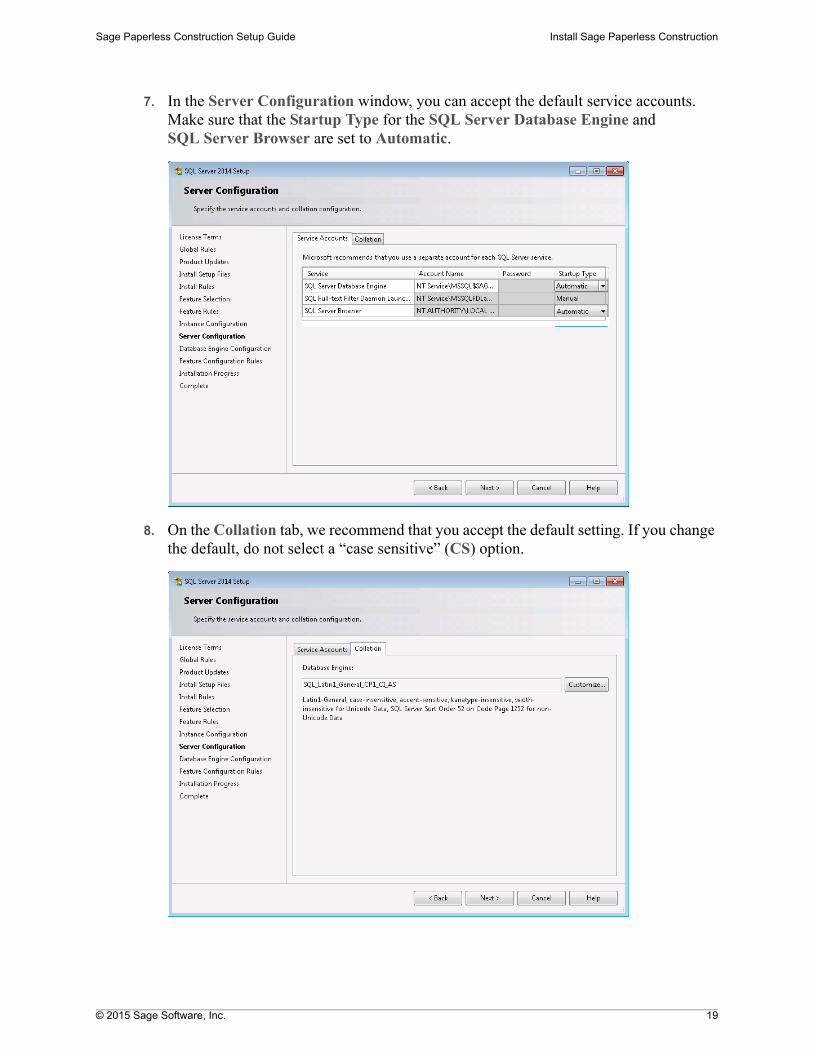
7. In the Server Configuration window, you can accept the default service accounts. Make sure that the Startup Type for the SQL Server Database Engine and SQL Server Browser are set to Automatic.
8. On the Collation tab, we recommend that you accept the default setting. If you change the default, do not select a “case sensitive” (CS) option.
© 2015 Sage Software, Inc. 20
Sage Paperless Construction Setup Guide Install Sage Paperless Construction
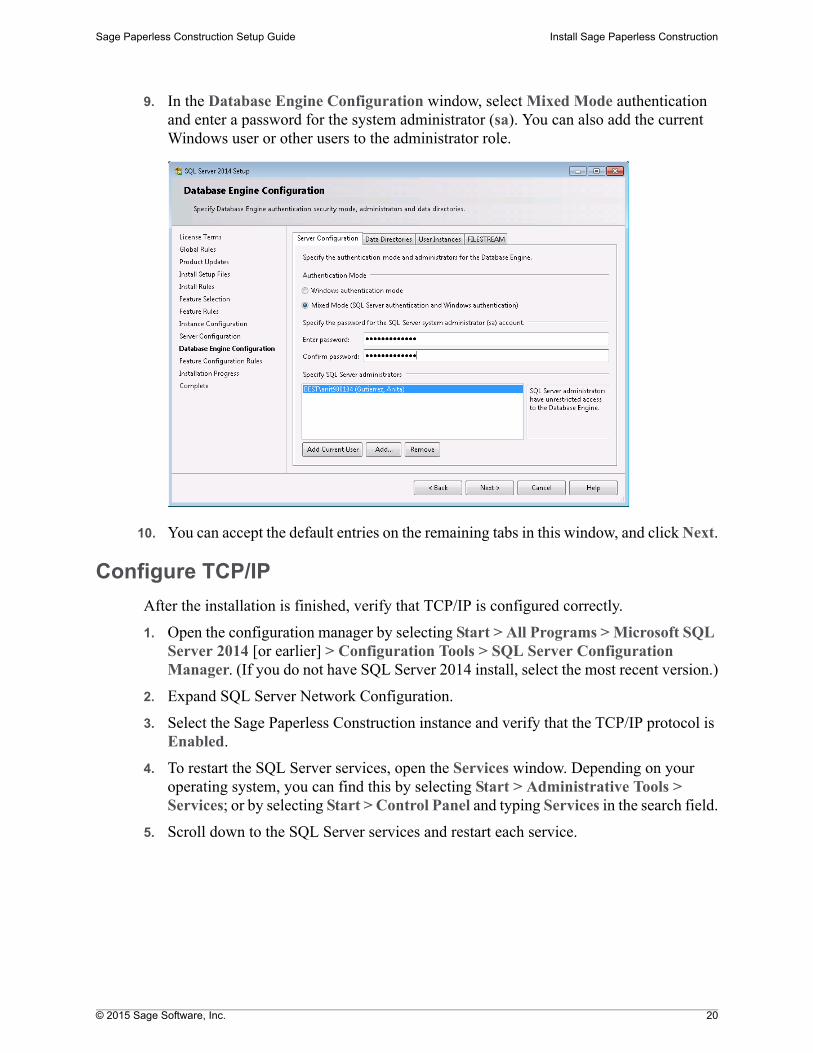
9. In the Database Engine Configuration window, select Mixed Mode authentication and enter a password for the system administrator (sa). You can also add the current Windows user or other users to the administrator role.
10. You can accept the default entries on the remaining tabs in this window, and click Next.
Configure TCP/IP
After the installation is finished, verify that TCP/IP is configured correctly.
1. Open the configuration manager by selecting Start > All Programs > Microsoft SQL Server 2014 [or earlier] > Configuration Tools > SQL Server Configuration Manager. (If you do not have SQL Server 2014 install, select the most recent version.)
2. Expand SQL Server Network Configuration.
3. Select the Sage Paperless Construction instance and verify that the TCP/IP protocol is Enabled.
4. To restart the SQL Server services, open the Services window. Depending on your operating system, you can find this by selecting Start > Administrative Tools > Services; or by selecting Start > Control Panel and typing Services in the search field.
5. Scroll down to the SQL Server services and restart each service.
© 2015 Sage Software, Inc. 21
Sage Paperless Construction Setup Guide Install Sage Paperless Construction
Configure the Server Dashboard
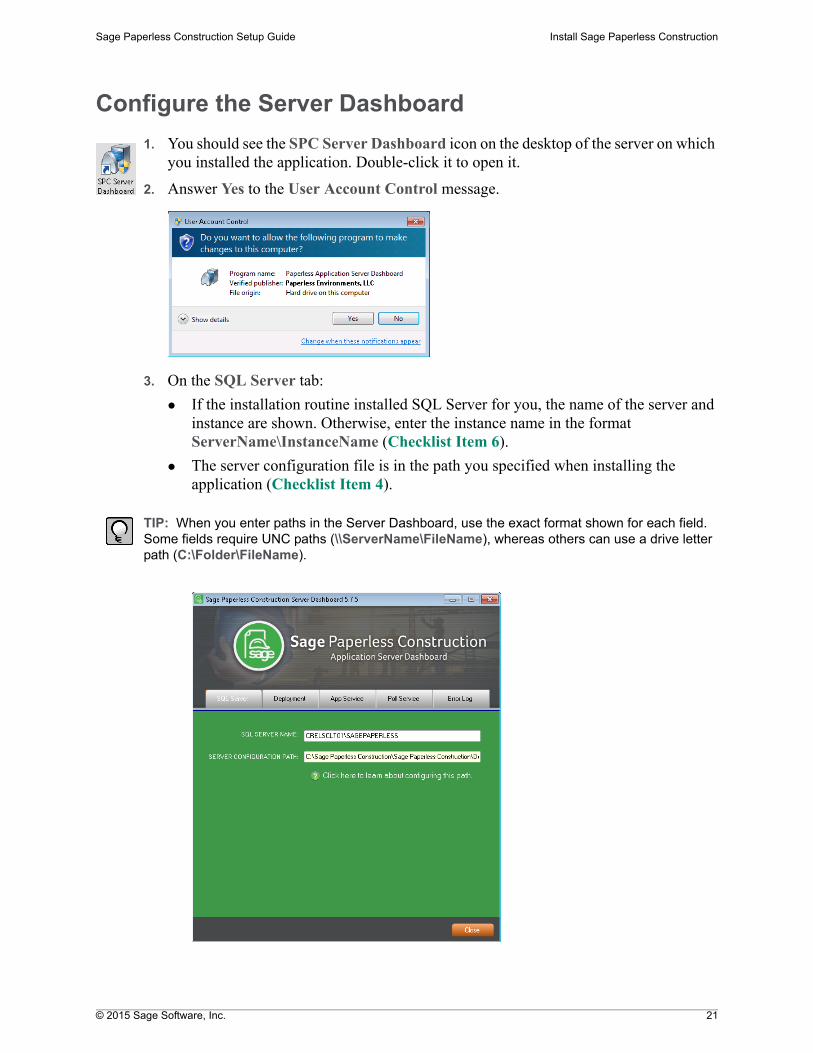
1. You should see the SPC Server Dashboard icon on the desktop of the server on which you installed the application. Double-click it to open it.
2. Answer Yes to the User Account Control message.
3. On the SQL Server tab:
If the installation routine installed SQL Server for you, the name of the server and instance are shown. Otherwise, enter the instance name in the format ServerName\InstanceName (Checklist Item 6).
The server configuration file is in the path you specified when installing the application (Checklist Item 4).
TIP: When you enter paths in the Server Dashboard, use the exact format shown for each field. Some fields require UNC paths (\\ServerName\FileName), whereas others can use a drive letter path (C:\Folder\FileName).
© 2015 Sage Software, Inc. 22
Sage Paperless Construction Setup Guide Install Sage Paperless Construction
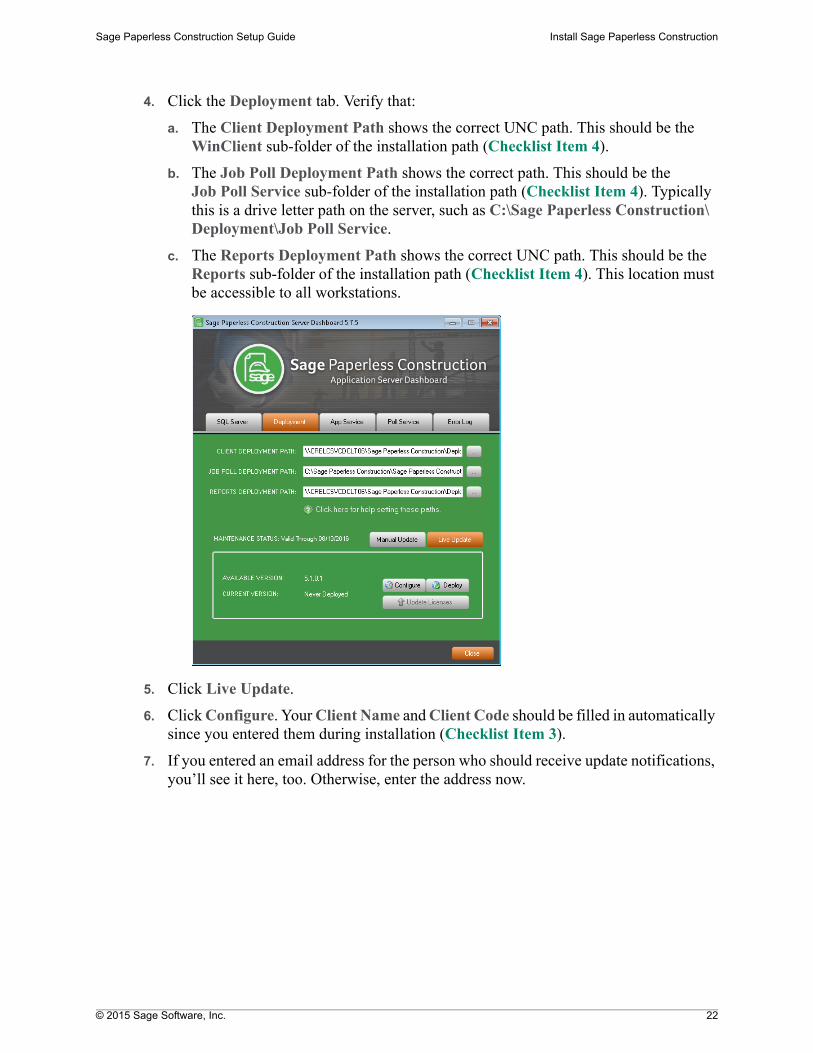
4. Click the Deployment tab. Verify that:
a. The Client Deployment Path shows the correct UNC path. This should be the WinClient sub-folder of the installation path (Checklist Item 4).
b. The Job Poll Deployment Path shows the correct path. This should be the Job Poll Service sub-folder of the installation path (Checklist Item 4). Typically this is a drive letter path on the server, such as C:\Sage Paperless Construction\Deployment\Job Poll Service.
c. The Reports Deployment Path shows the correct UNC path. This should be the Reports sub-folder of the installation path (Checklist Item 4). This location must be accessible to all workstations.
5. Click Live Update.
6. Click Configure. Your Client Name and Client Code should be filled in automatically since you entered them during installation (Checklist Item 3).
7. If you entered an email address for the person who should receive update notifications, you’ll see it here, too. Otherwise, enter the address now.
© 2015 Sage Software, Inc. 23
Sage Paperless Construction Setup Guide Install Sage Paperless Construction
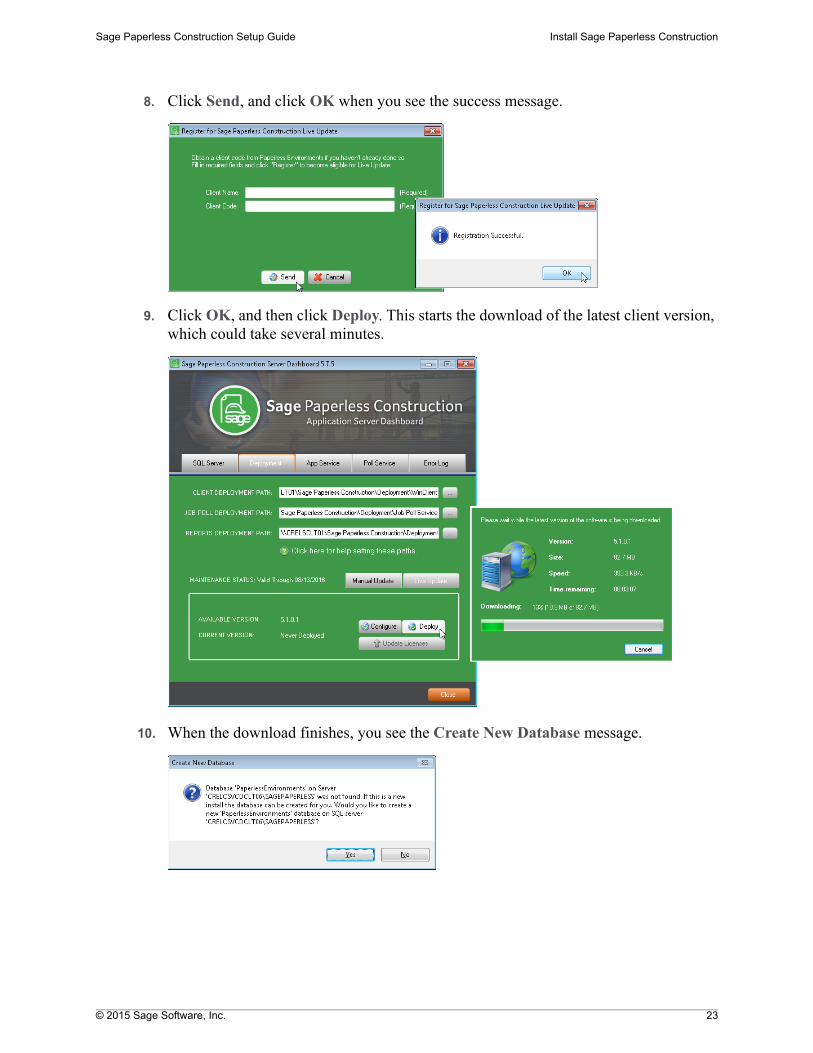
8. Click Send, and click OK when you see the success message.
9. Click OK, and then click Deploy. This starts the download of the latest client version, which could take several minutes.
10. When the download finishes, you see the Create New Database message.
© 2015 Sage Software, Inc. 24
Sage Paperless Construction Setup Guide Install Sage Paperless Construction
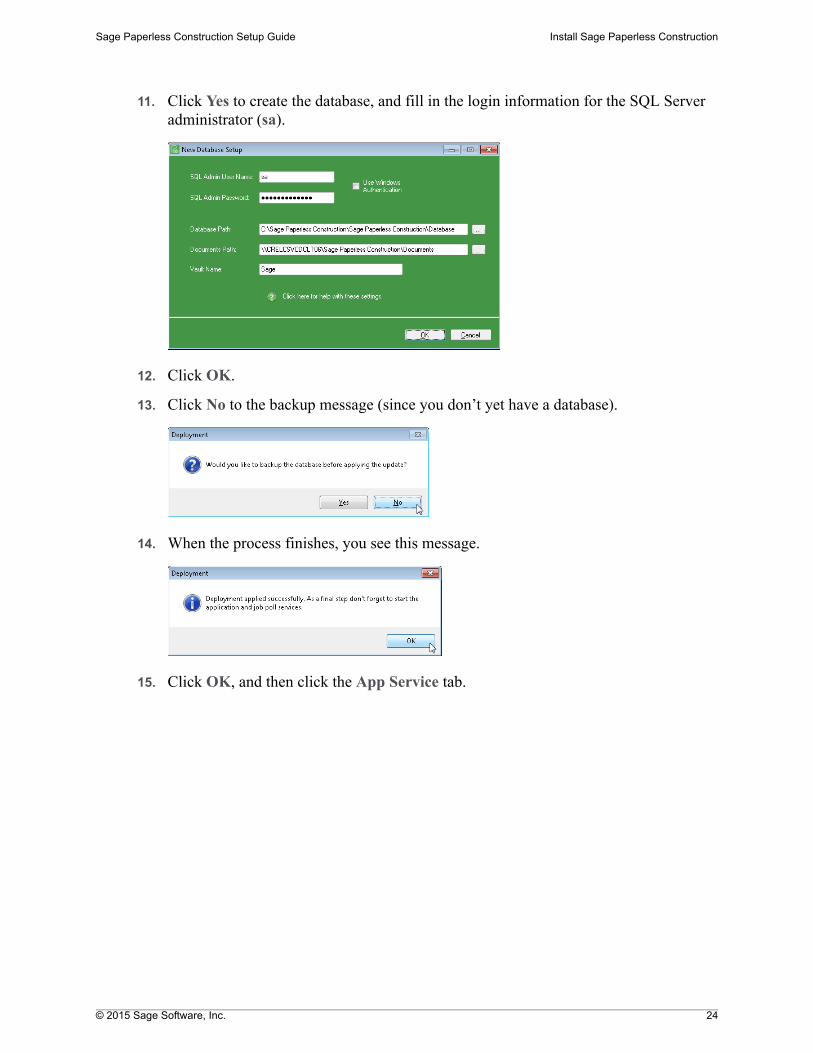
11. Click Yes to create the database, and fill in the login information for the SQL Server administrator (sa).
12. Click OK.
13. Click No to the backup message (since you don’t yet have a database).
14. When the process finishes, you see this message.
15. Click OK, and then click the App Service tab.
© 2015 Sage Software, Inc. 25
Sage Paperless Construction Setup Guide Install Sage Paperless Construction
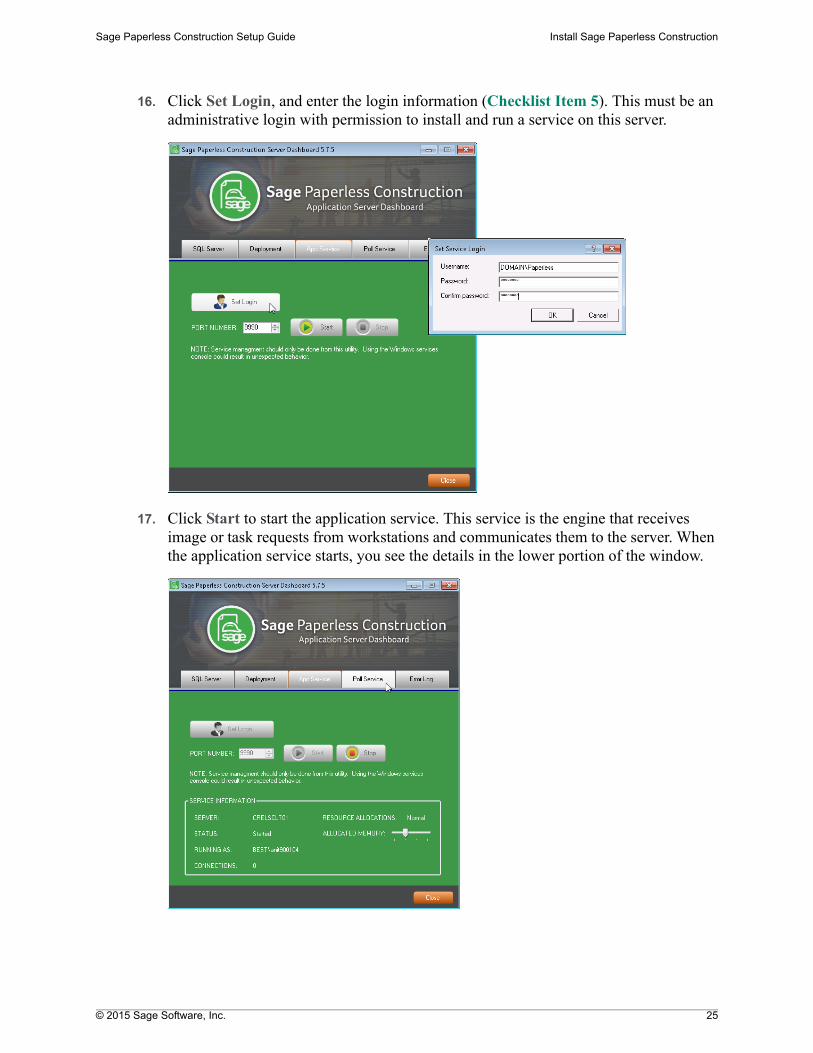
16. Click Set Login, and enter the login information (Checklist Item 5). This must be an administrative login with permission to install and run a service on this server.
17. Click Start to start the application service. This service is the engine that receives image or task requests from workstations and communicates them to the server. When the application service starts, you see the details in the lower portion of the window.
© 2015 Sage Software, Inc. 26
Sage Paperless Construction Setup Guide Install Sage Paperless Construction
WARNINGS:
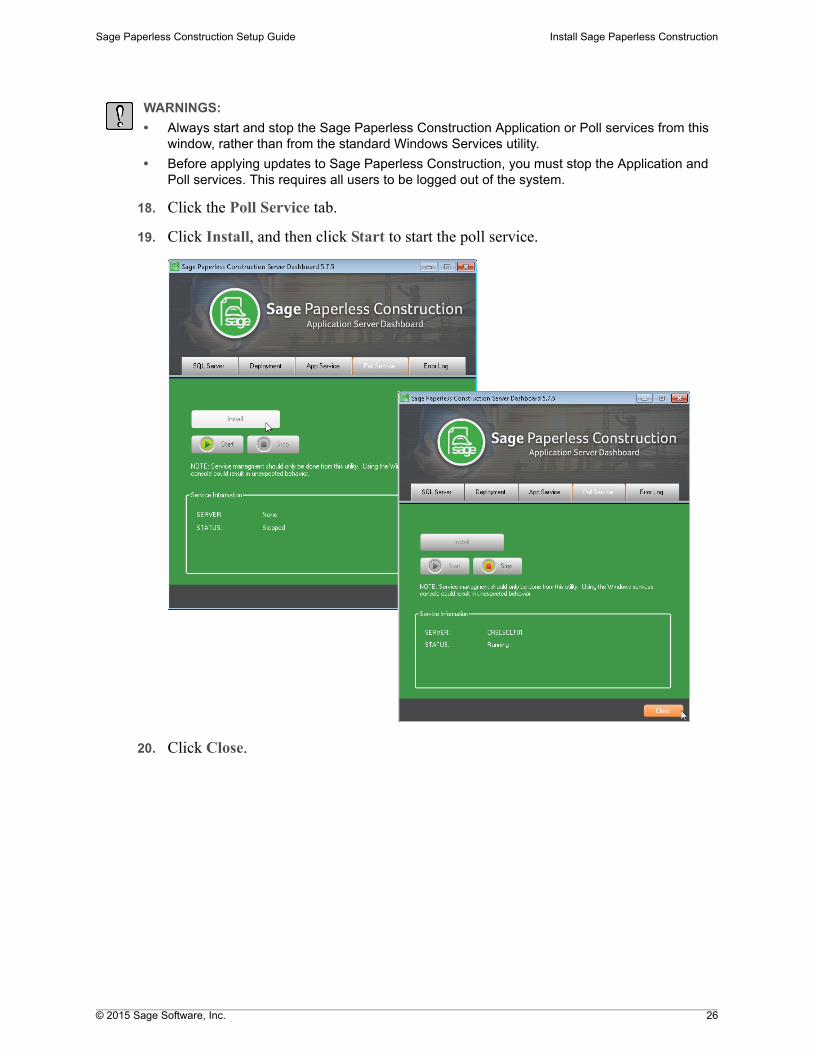
• Always start and stop the Sage Paperless Construction Application or Poll services from this window, rather than from the standard Windows Services utility.
• Before applying updates to Sage Paperless Construction, you must stop the Application and Poll services. This requires all users to be logged out of the system.
18. Click the Poll Service tab.
19. Click Install, and then click Start to start the poll service.
20. Click Close.
© 2015 Sage Software, Inc. 27
Sage Paperless Construction Setup Guide Install Sage Paperless Construction
Set Security on the File Server
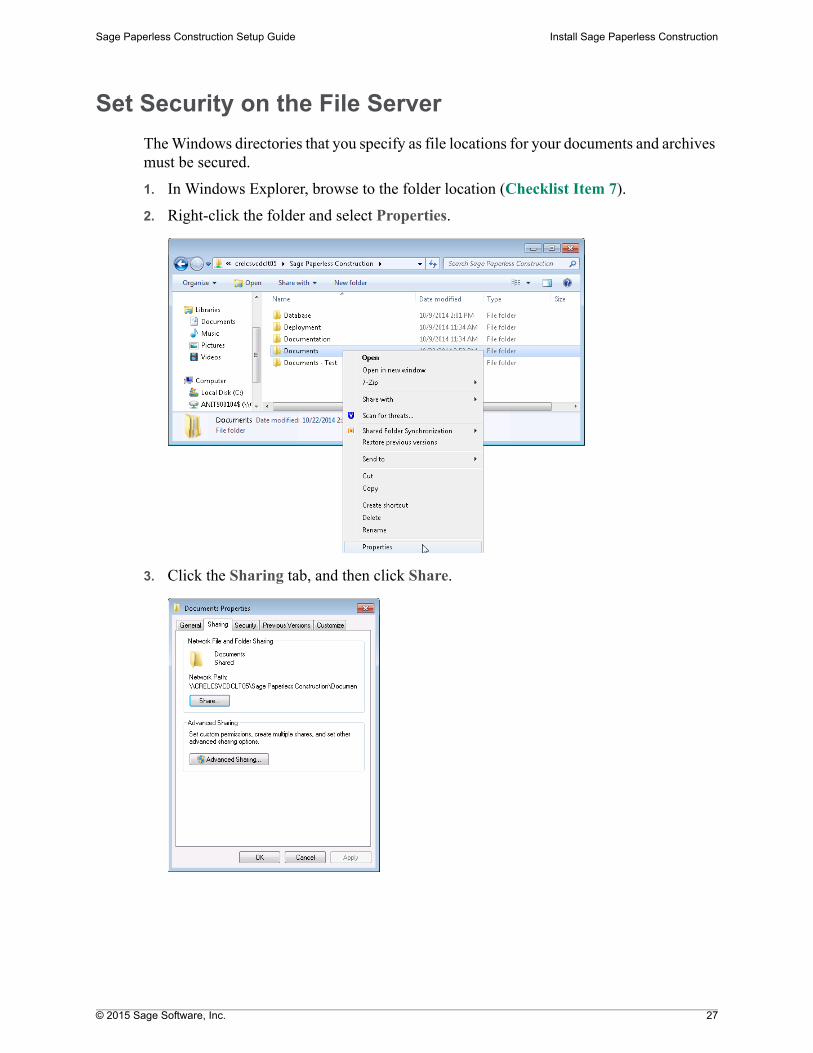
The Windows directories that you specify as file locations for your documents and archives must be secured.
1. In Windows Explorer, browse to the folder location (Checklist Item 7).
2. Right-click the folder and select Properties.
3. Click the Sharing tab, and then click Share.

© 2015 Sage Software, Inc. 28
Sage Paperless Construction Setup Guide Install Sage Paperless Construction
4. Click in the drop-down, and select Find people...
5. Enter the name of the security login that you assigned to the Sage Paperless Construction application service (Checklist Item 5).
6. Click OK.
7. Assign Read/Write permissions to the user.
8. Click Share.
© 2015 Sage Software, Inc. 29
Sage Paperless Construction Setup Guide Install Sage Paperless Construction
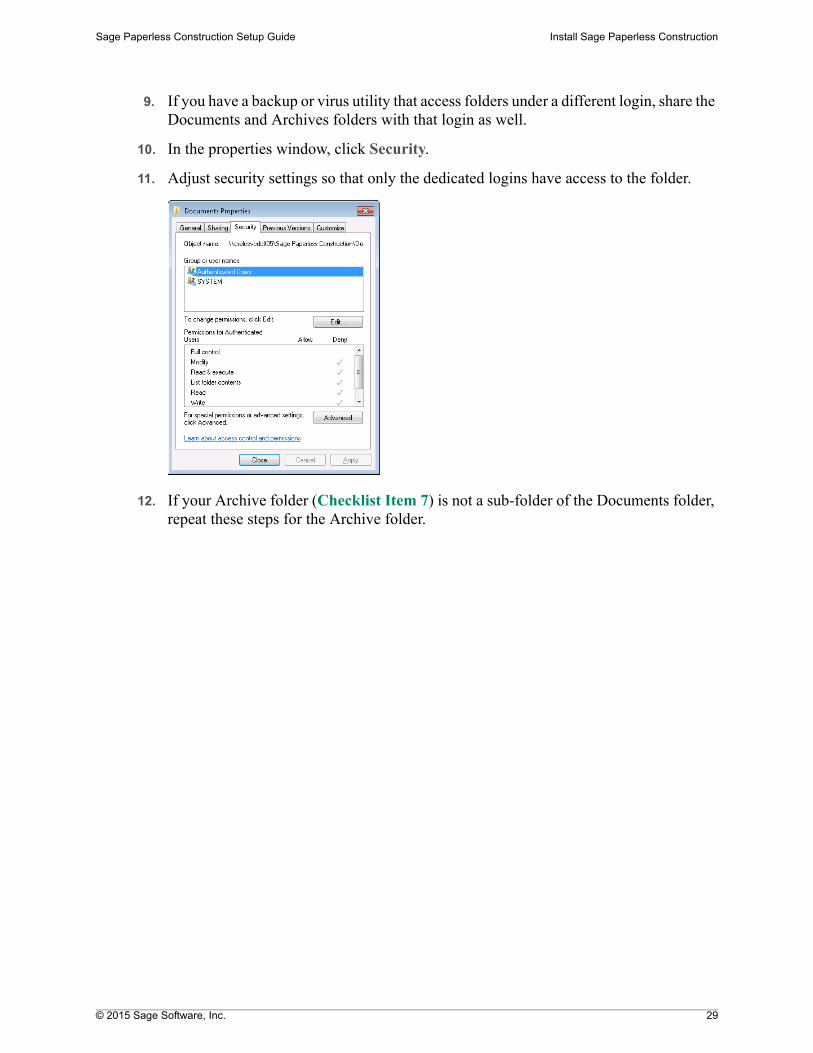
9. If you have a backup or virus utility that access folders under a different login, share the Documents and Archives folders with that login as well.
10. In the properties window, click Security.
11. Adjust security settings so that only the dedicated logins have access to the folder.
12. If your Archive folder (Checklist Item 7) is not a sub-folder of the Documents folder, repeat these steps for the Archive folder.
© 2015 Sage Software, Inc. 30
Sage Paperless Construction Setup Guide Install Sage Paperless Construction
Install Workstations
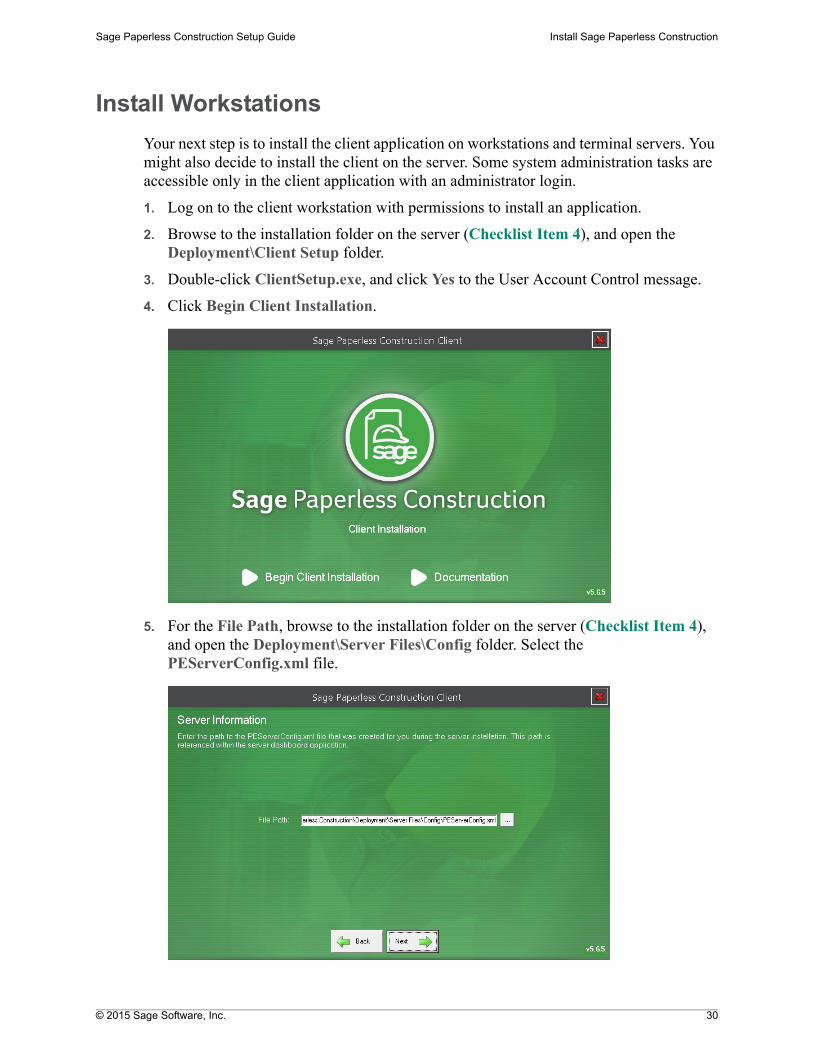
Your next step is to install the client application on workstations and terminal servers. You might also decide to install the client on the server. Some system administration tasks are accessible only in the client application with an administrator login.
1. Log on to the client workstation with permissions to install an application.
2. Browse to the installation folder on the server (Checklist Item 4), and open the Deployment\Client Setup folder.
3. Double-click ClientSetup.exe, and click Yes to the User Account Control message.
4. Click Begin Client Installation.
5. For the File Path, browse to the installation folder on the server (Checklist Item 4), and open the Deployment\Server Files\Config folder. Select the PEServerConfig.xml file.
© 2015 Sage Software, Inc. 31
Sage Paperless Construction Setup Guide Install Sage Paperless Construction
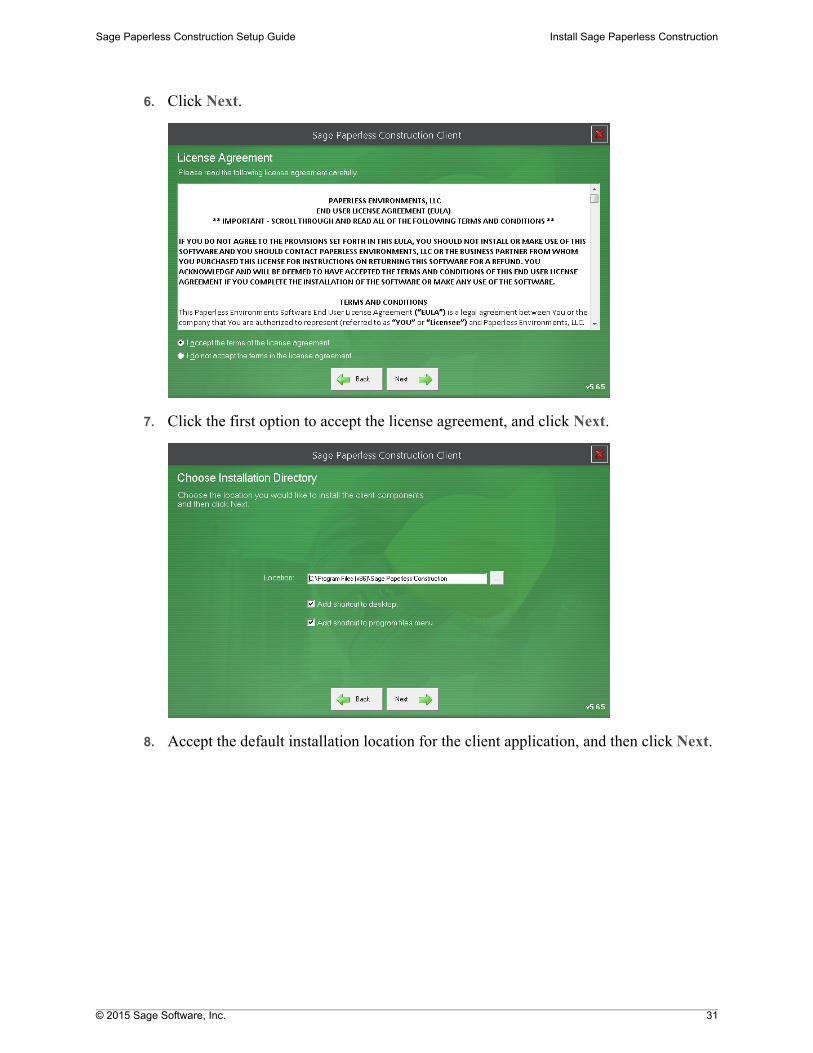
6. Click Next.
7. Click the first option to accept the license agreement, and click Next.
8. Accept the default installation location for the client application, and then click Next.
© 2015 Sage Software, Inc. 32
Sage Paperless Construction Setup Guide Install Sage Paperless Construction
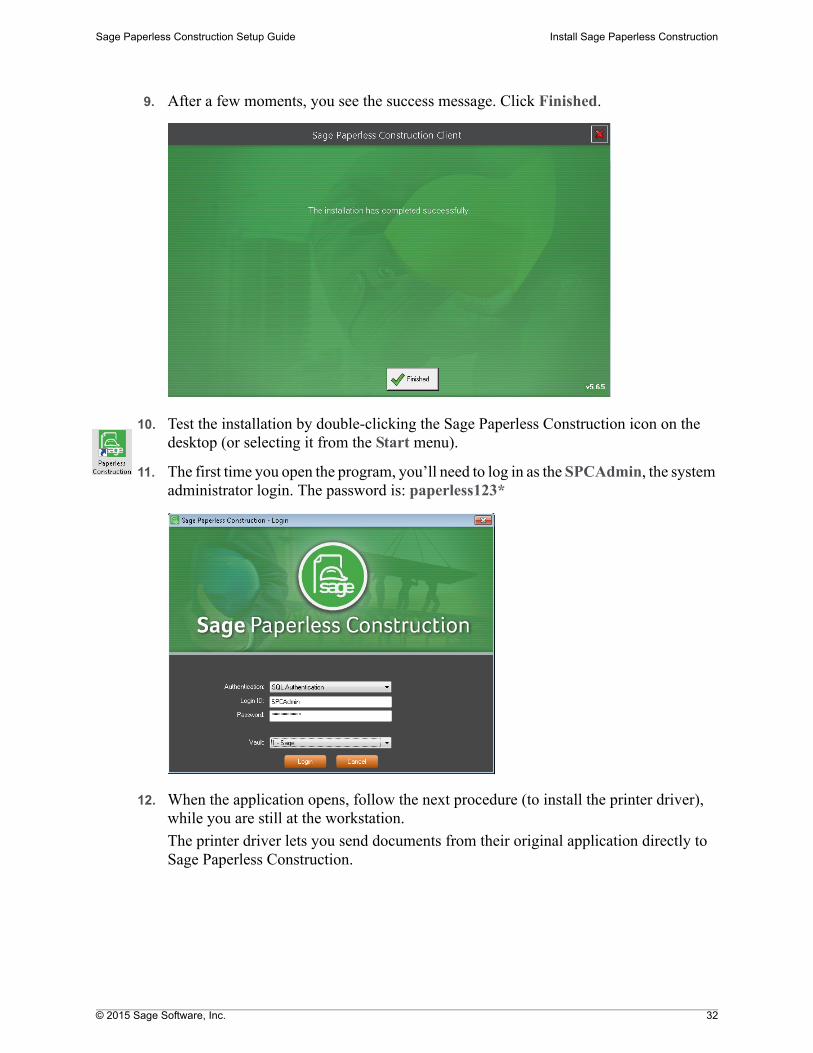
9. After a few moments, you see the success message. Click Finished.
10. Test the installation by double-clicking the Sage Paperless Construction icon on the desktop (or selecting it from the Start menu).
11. The first time you open the program, you’ll need to log in as the SPCAdmin, the system administrator login. The password is: paperless123*
12. When the application opens, follow the next procedure (to install the printer driver), while you are still at the workstation.
The printer driver lets you send documents from their original application directly to Sage Paperless Construction.
© 2015 Sage Software, Inc. 33
Sage Paperless Construction Setup Guide Install Sage Paperless Construction
Install Printer Drivers on Workstations
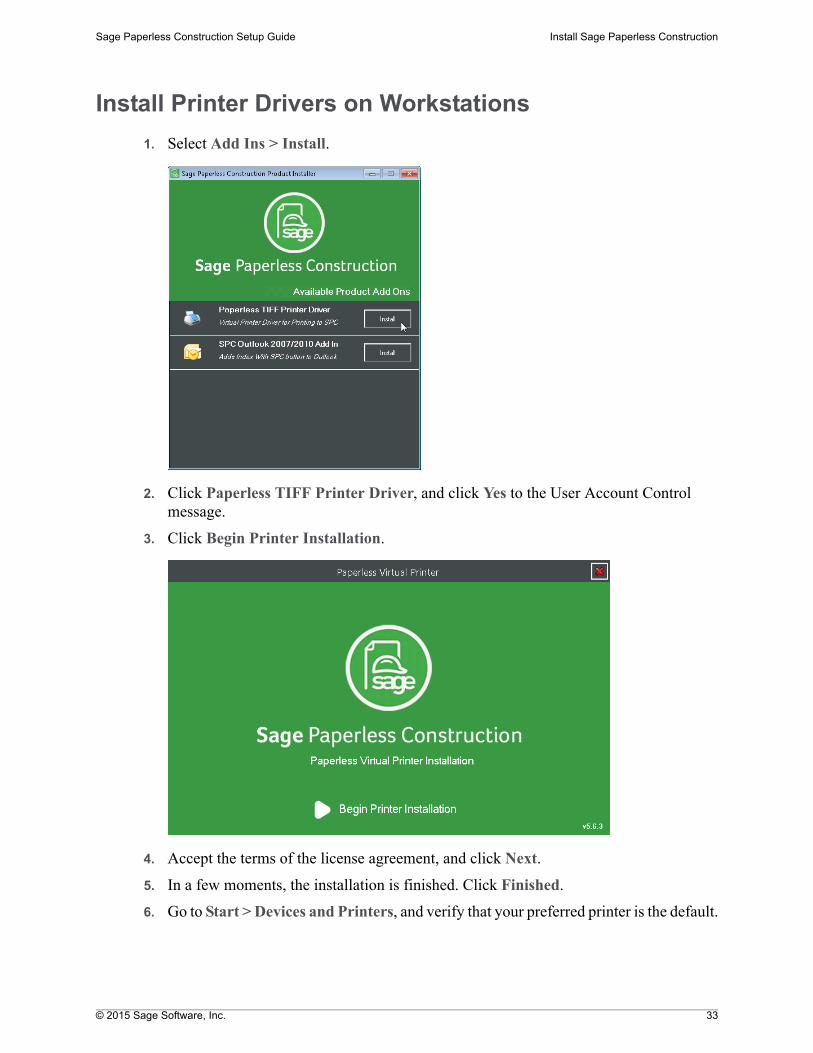
1. Select Add Ins > Install.
2. Click Paperless TIFF Printer Driver, and click Yes to the User Account Control message.
3. Click Begin Printer Installation.
4. Accept the terms of the license agreement, and click Next.
5. In a few moments, the installation is finished. Click Finished.
6. Go to Start > Devices and Printers, and verify that your preferred printer is the default.
© 2015 Sage Software, Inc. 34
Sage Paperless Construction Setup Guide Configure Your Vault and Users
Configure Your Vault and UsersYour vault is the highest level of organization of documents and users. You can control which users have access to the vault, and which documents they can see, by configuring the vault’s security groups. In this section, you will:
Walk through a sample scenario to understand how vault access and security works.
Configure your vault and link it to your accounting system.
Set up the users who will help with implementation.
Create security groups for the vault, and add users and document types to them.
Sample Walk-Through: Configure Vault Access
Rose City Construction uses Sage Paperless Construction to store and route several types of documents. Let’s see how they have set up their system.
Vault and Users
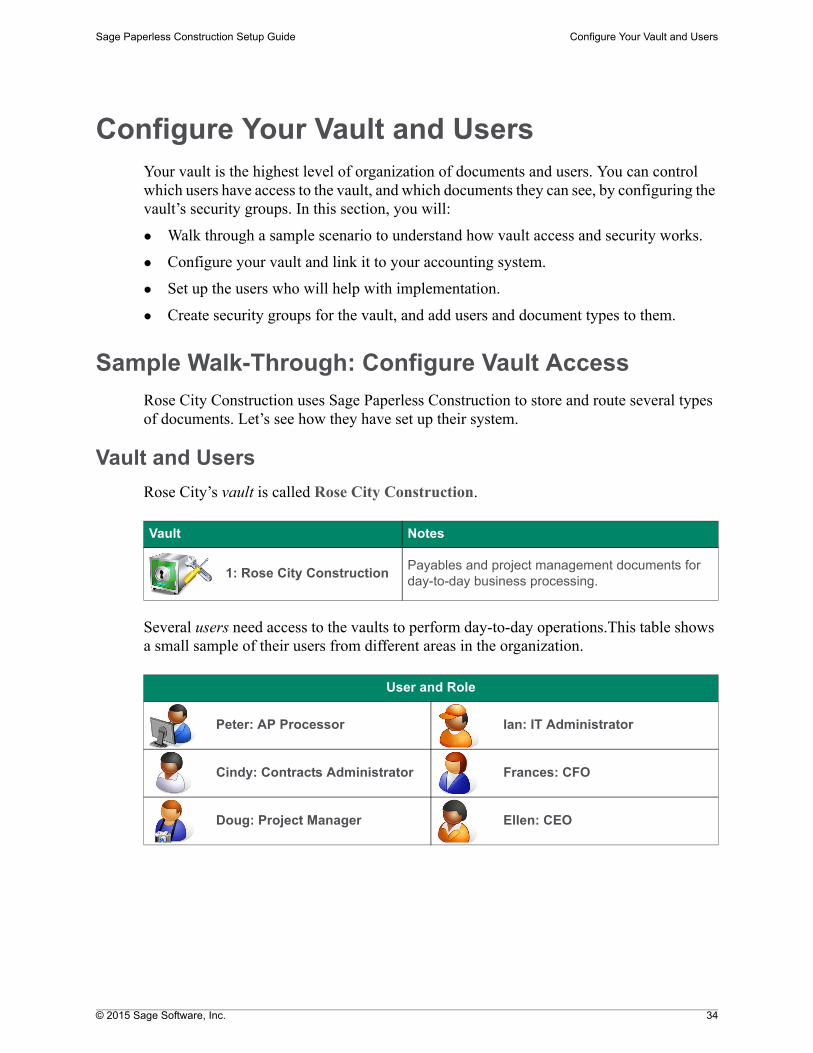
Rose City’s vault is called Rose City Construction.
Several users need access to the vaults to perform day-to-day operations.This table shows a small sample of their users from different areas in the organization.
Vault Notes
1: Rose City ConstructionPayables and project management documents for day-to-day business processing.
User and Role
Peter: AP Processor Ian: IT Administrator
Cindy: Contracts Administrator Frances: CFO
Doug: Project Manager Ellen: CEO
© 2015 Sage Software, Inc. 35
Sage Paperless Construction Setup Guide Configure Your Vault and Users
Security Groups
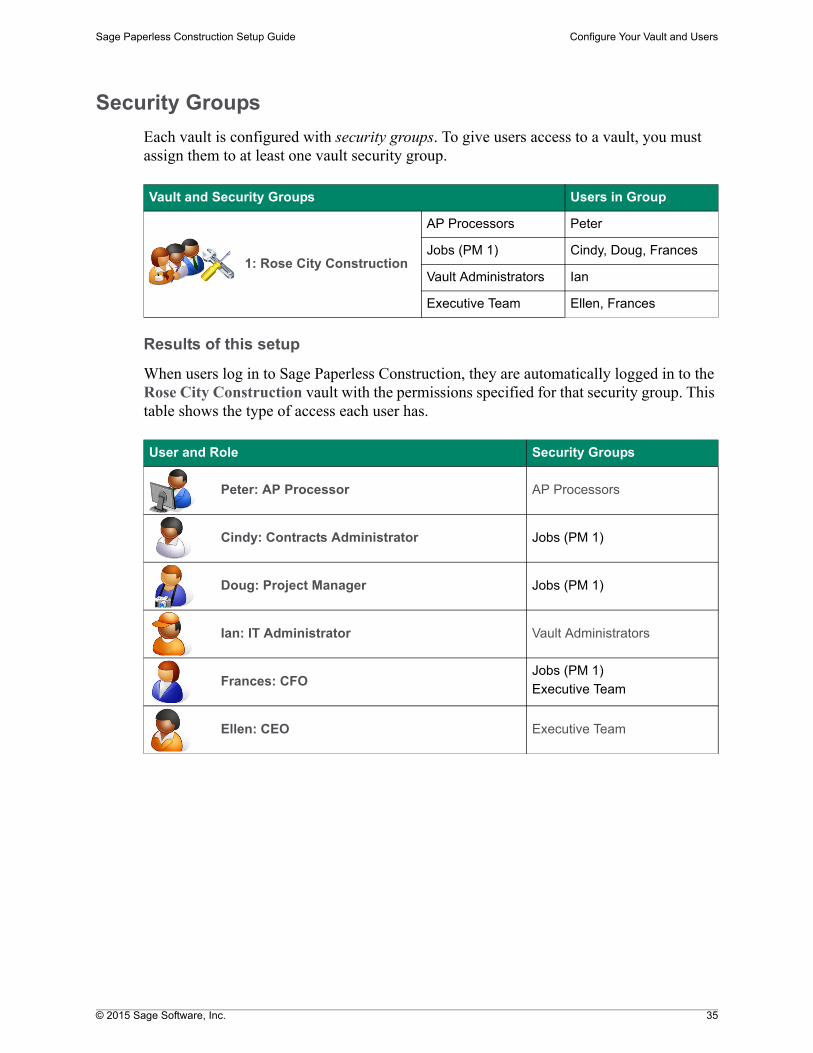
Each vault is configured with security groups. To give users access to a vault, you must assign them to at least one vault security group.
Results of this setup
When users log in to Sage Paperless Construction, they are automatically logged in to the Rose City Construction vault with the permissions specified for that security group. This table shows the type of access each user has.
Vault and Security Groups Users in Group
1: Rose City Construction
AP Processors Peter
Jobs (PM 1) Cindy, Doug, Frances
Vault Administrators Ian
Executive Team Ellen, Frances
User and Role Security Groups
Peter: AP Processor AP Processors
Cindy: Contracts Administrator Jobs (PM 1)
Doug: Project Manager Jobs (PM 1)
Ian: IT Administrator Vault Administrators
Frances: CFOJobs (PM 1)
Executive Team
Ellen: CEO Executive Team
© 2015 Sage Software, Inc. 36
Sage Paperless Construction Setup Guide Configure Your Vault and Users
Document Types
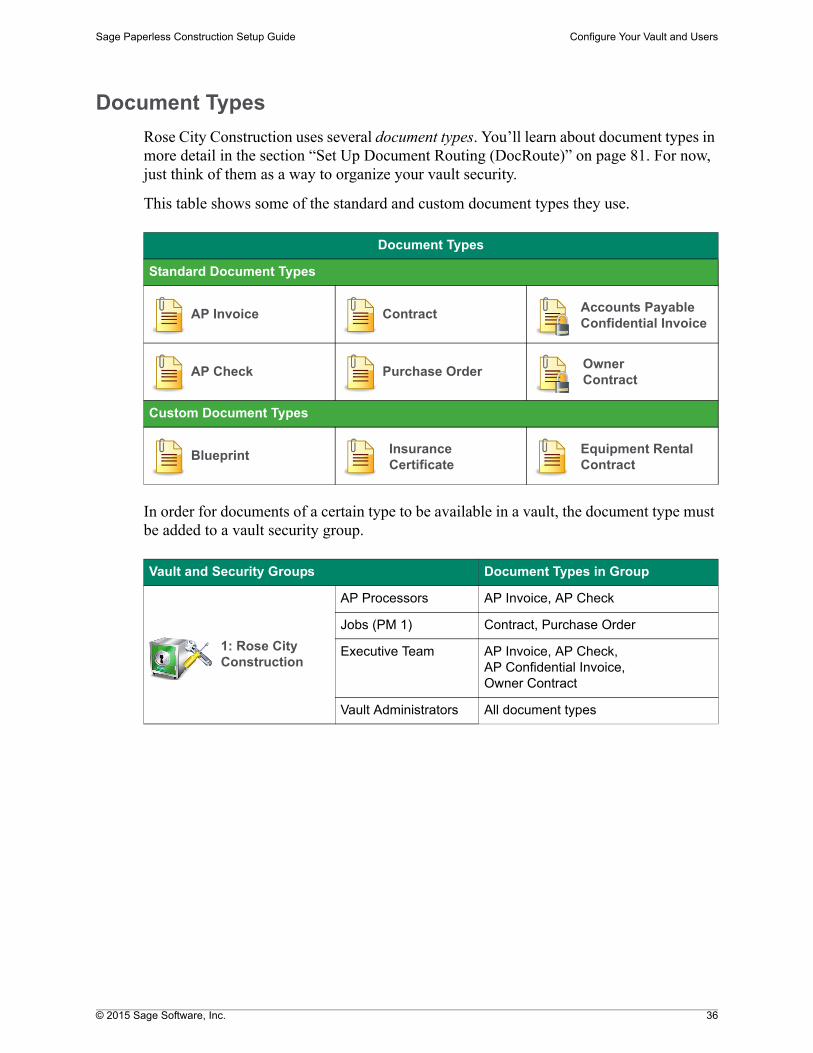
Rose City Construction uses several document types. You’ll learn about document types in more detail in the section “Set Up Document Routing (DocRoute)” on page 81. For now, just think of them as a way to organize your vault security.
This table shows some of the standard and custom document types they use.
In order for documents of a certain type to be available in a vault, the document type must be added to a vault security group.
Document Types
Standard Document Types
Custom Document Types
Vault and Security Groups Document Types in Group
1: Rose City Construction
AP Processors AP Invoice, AP Check
Jobs (PM 1) Contract, Purchase Order
Executive Team AP Invoice, AP Check, AP Confidential Invoice, Owner Contract
Vault Administrators All document types
AP Invoice Contract Accounts Payable Confidential Invoice
AP Check Purchase OrderOwner Contract
Blueprint Insurance Certificate
Equipment Rental Contract
© 2015 Sage Software, Inc. 37
Sage Paperless Construction Setup Guide Configure Your Vault and Users
Results of this setup
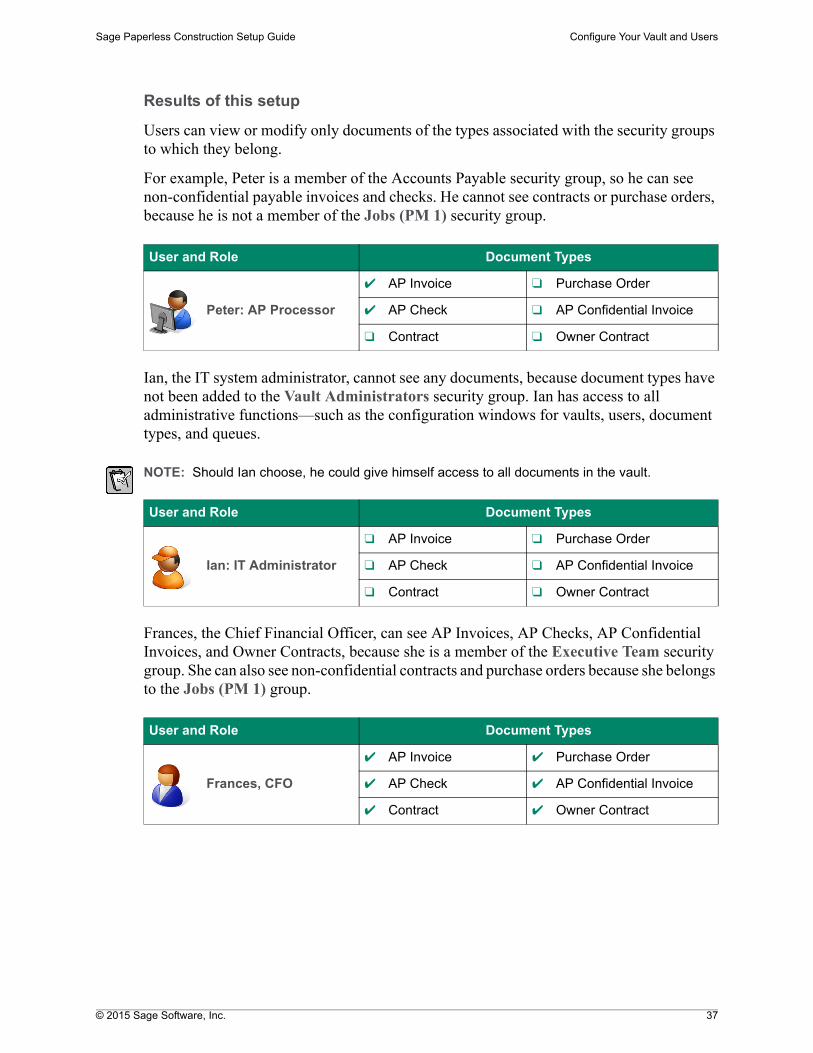
Users can view or modify only documents of the types associated with the security groups to which they belong.
For example, Peter is a member of the Accounts Payable security group, so he can see non-confidential payable invoices and checks. He cannot see contracts or purchase orders, because he is not a member of the Jobs (PM 1) security group.
Ian, the IT system administrator, cannot see any documents, because document types have not been added to the Vault Administrators security group. Ian has access to all administrative functions—such as the configuration windows for vaults, users, document types, and queues.
NOTE: Should Ian choose, he could give himself access to all documents in the vault.
Frances, the Chief Financial Officer, can see AP Invoices, AP Checks, AP Confidential Invoices, and Owner Contracts, because she is a member of the Executive Team security group. She can also see non-confidential contracts and purchase orders because she belongs to the Jobs (PM 1) group.
User and Role Document Types
Peter: AP Processor
✔ AP Invoice ❑ Purchase Order
✔ AP Check ❑ AP Confidential Invoice
❑ Contract ❑ Owner Contract
User and Role Document Types
Ian: IT Administrator
❑ AP Invoice ❑ Purchase Order
❑ AP Check ❑ AP Confidential Invoice
❑ Contract ❑ Owner Contract
User and Role Document Types
Frances, CFO
✔ AP Invoice ✔ Purchase Order
✔ AP Check ✔ AP Confidential Invoice
✔ Contract ✔ Owner Contract
© 2015 Sage Software, Inc. 38
Sage Paperless Construction Setup Guide Configure Your Vault and Users
Reports
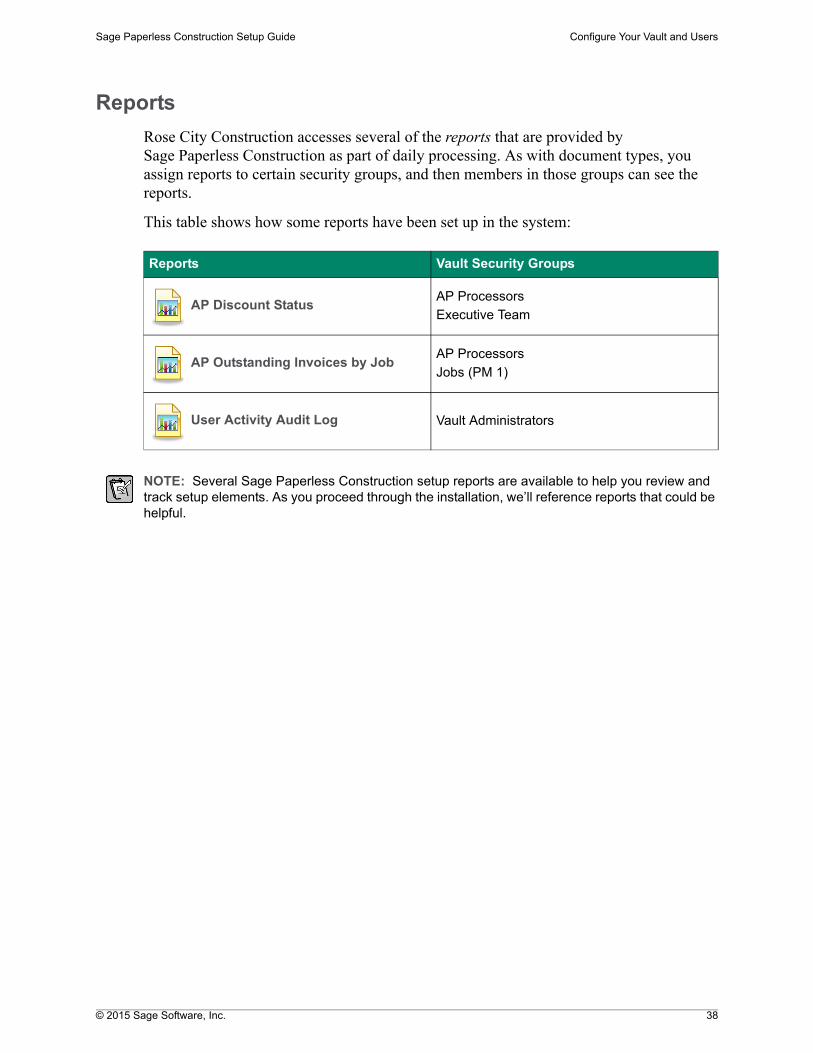
Rose City Construction accesses several of the reports that are provided by Sage Paperless Construction as part of daily processing. As with document types, you assign reports to certain security groups, and then members in those groups can see the reports.
This table shows how some reports have been set up in the system:
NOTE: Several Sage Paperless Construction setup reports are available to help you review and track setup elements. As you proceed through the installation, we’ll reference reports that could be helpful.
Reports Vault Security Groups
AP Processors
Executive Team
AP Processors
Jobs (PM 1)
Vault Administrators
AP Discount Status
AP Outstanding Invoices by Job
User Activity Audit Log
© 2015 Sage Software, Inc. 39
Sage Paperless Construction Setup Guide Configure Your Vault and Users
Business considerations: User Access
1. Who in your organization is involved in implementation and testing?
We recommend that you start by setting up implementation team members so that they can assist with setup and testing. Your pilot test could involve a single document type (such as payable invoices or contracts) and the users who will work with that document type.
2. Who are your backup system administrators and vault administrators?
List the users who will back up your system administrator and serve as vault administrators.
System administrators have access to all tasks on the Administration menu, including vault and user setup, document and index types, APFlow role assignments, and queues.
Vault administrators have access to all vault-related tasks on the Administration menu. For example:
They cannot create new users or vaults, but they can assign existing users to vaults.
They cannot create or modify document types, but they can add existing document types and filters to vaults, modify the vault’s bridge to the accounting system, and assign users to APFlow roles.
They cannot create or modify queues or make queues available to vaults. They can add existing queues to queue categories.
3. Will your users use SQL or Windows authentication?
You can establish logins by adding Windows users or by adding SQL Server logins (or a combination of both). One advantage to Windows authentication is that any security settings applied to users of Sage 300 Construction and Real Estate are respected by Sage Paperless Construction. This integration is not available with SQL Server logins.
If you will use Windows authentication, collect the domain and user ID to set up.
If you will use SQL Server authentication, decide on a naming convention and make a list of users. Also, determine whether you want the system to enforce SQL Server’s password policy, as you’ll need to specify this during user setup.
4. Will Sage Paperless Construction users be mapped to accounting logins?
You can map your Sage Paperless Construction users to IDs in your accounting system.
In Sage 300 Construction and Real Estate, you can map users to Approval ID’s (AP: Setup > Approval IDs).
In Sage 100 Contractor, you can map users to Payroll employees (5-2-1 Employees).
5. Which reports will users need to access?
Review the list of reports and determine which ones to assign to each security group. Reports must be assigned to a security group for members of that group to see them.
© 2015 Sage Software, Inc. 40
Sage Paperless Construction Setup Guide Configure Your Vault and Users
Vault Access Checklist
Use this checklist to keep track of your setup progress.
Establish the bridge to the accounting system
Before you begin, Sage Paperless Construction should be installed and configured as explained in the section “Install Sage Paperless Construction,” starting on page 6. Also, the client application should be installed on workstations (see page 30).
To complete the bridge setup, you’ll need the credentials for a user in your accounting system who has access to all information. You probably completed this step when you filled in the Preparation Checklist on page 12, line 7 (Sage 300 Construction and Real Estate) or line 8 (Sage 100 Contractor).
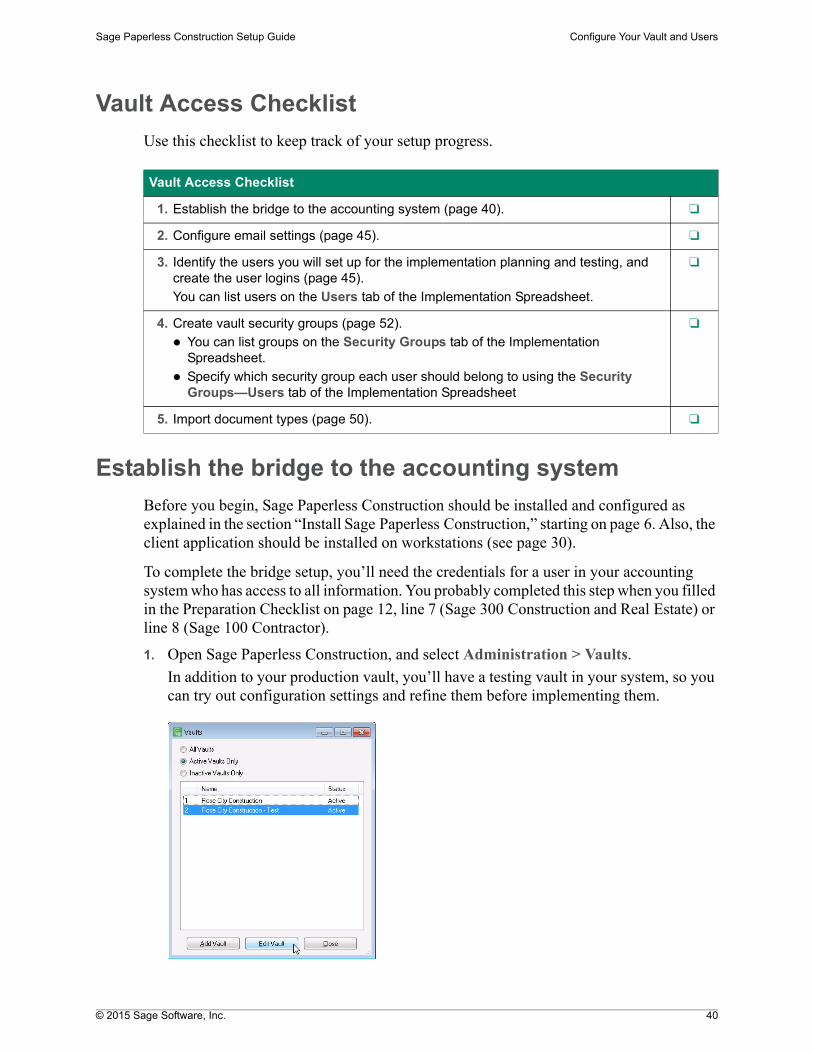
1. Open Sage Paperless Construction, and select Administration > Vaults.
In addition to your production vault, you’ll have a testing vault in your system, so you can try out configuration settings and refine them before implementing them.
Vault Access Checklist
1. Establish the bridge to the accounting system (page 40). ❑
2. Configure email settings (page 45). ❑
3. Identify the users you will set up for the implementation planning and testing, and create the user logins (page 45).
You can list users on the Users tab of the Implementation Spreadsheet.
❑
4. Create vault security groups (page 52).
You can list groups on the Security Groups tab of the Implementation Spreadsheet.
Specify which security group each user should belong to using the Security Groups—Users tab of the Implementation Spreadsheet
❑
5. Import document types (page 50). ❑
© 2015 Sage Software, Inc. 41
Sage Paperless Construction Setup Guide Configure Your Vault and Users
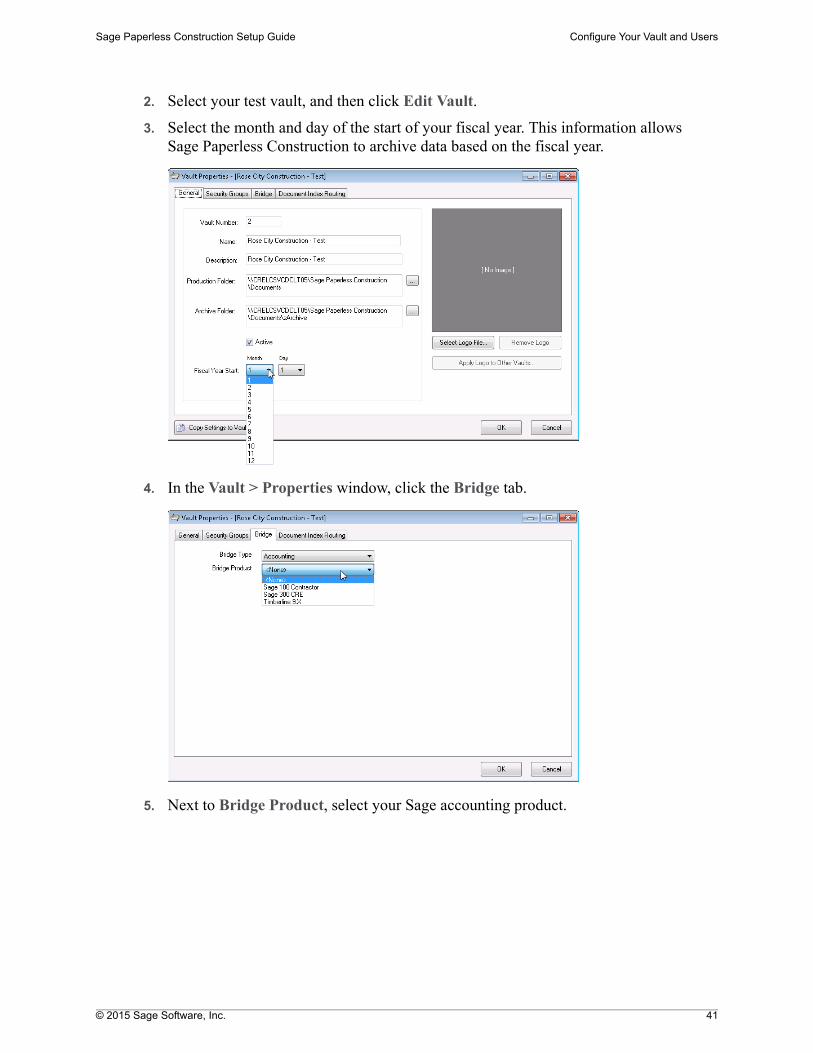
2. Select your test vault, and then click Edit Vault.
3. Select the month and day of the start of your fiscal year. This information allows Sage Paperless Construction to archive data based on the fiscal year.
4. In the Vault > Properties window, click the Bridge tab.
5. Next to Bridge Product, select your Sage accounting product.
© 2015 Sage Software, Inc. 42
Sage Paperless Construction Setup Guide Configure Your Vault and Users
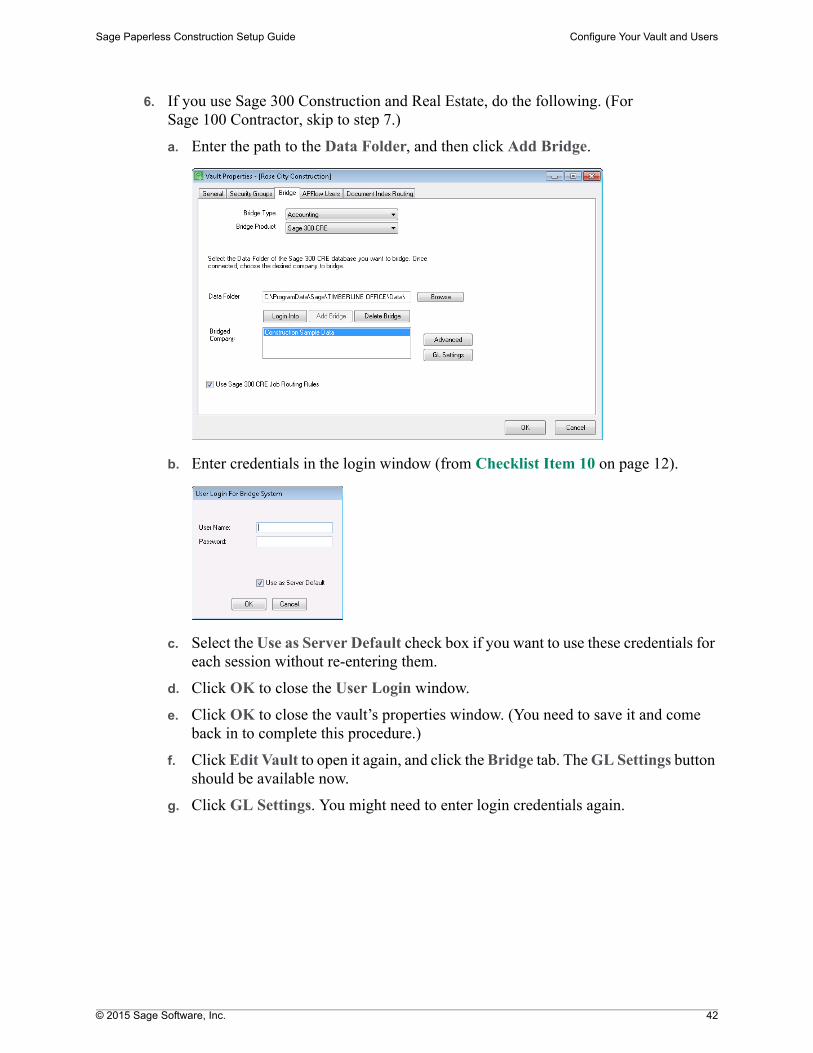
6. If you use Sage 300 Construction and Real Estate, do the following. (For Sage 100 Contractor, skip to step 7.)
a. Enter the path to the Data Folder, and then click Add Bridge.
b. Enter credentials in the login window (from Checklist Item 10 on page 12).
c. Select the Use as Server Default check box if you want to use these credentials for each session without re-entering them.
d. Click OK to close the User Login window.
e. Click OK to close the vault’s properties window. (You need to save it and come back in to complete this procedure.)
f. Click Edit Vault to open it again, and click the Bridge tab. The GL Settings button should be available now.
g. Click GL Settings. You might need to enter login credentials again.
© 2015 Sage Software, Inc. 43
Sage Paperless Construction Setup Guide Configure Your Vault and Users
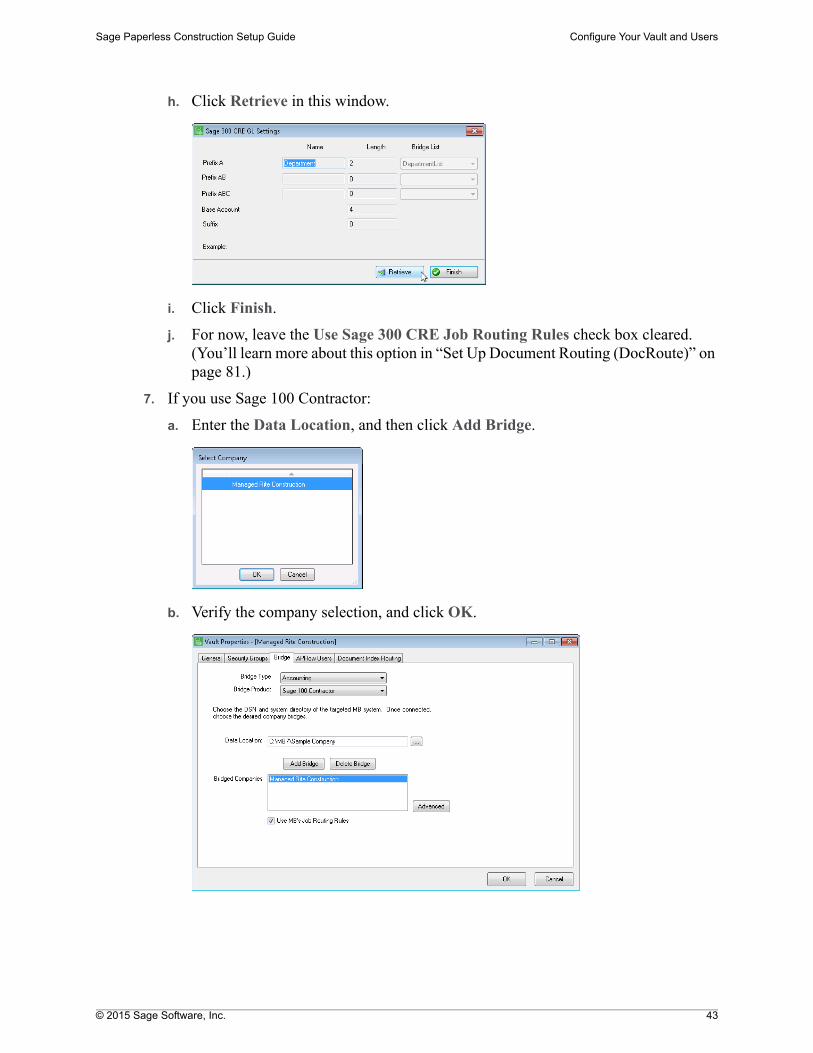
h. Click Retrieve in this window.
i. Click Finish.
j. For now, leave the Use Sage 300 CRE Job Routing Rules check box cleared. (You’ll learn more about this option in “Set Up Document Routing (DocRoute)” on page 81.)
7. If you use Sage 100 Contractor:
a. Enter the Data Location, and then click Add Bridge.
b. Verify the company selection, and click OK.
© 2015 Sage Software, Inc. 44
Sage Paperless Construction Setup Guide Configure Your Vault and Users
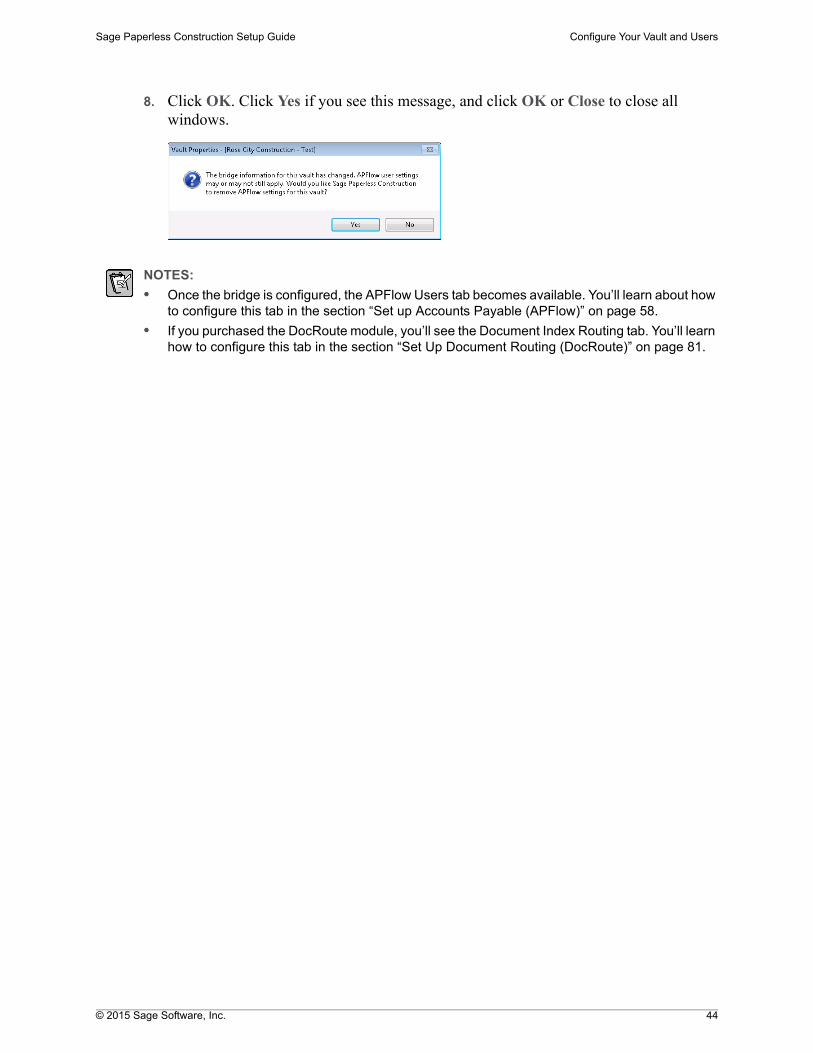
8. Click OK. Click Yes if you see this message, and click OK or Close to close all windows.
NOTES:
• Once the bridge is configured, the APFlow Users tab becomes available. You’ll learn about how to configure this tab in the section “Set up Accounts Payable (APFlow)” on page 58.
• If you purchased the DocRoute module, you’ll see the Document Index Routing tab. You’ll learn how to configure this tab in the section “Set Up Document Routing (DocRoute)” on page 81.
© 2015 Sage Software, Inc. 45
Sage Paperless Construction Setup Guide Configure Your Vault and Users
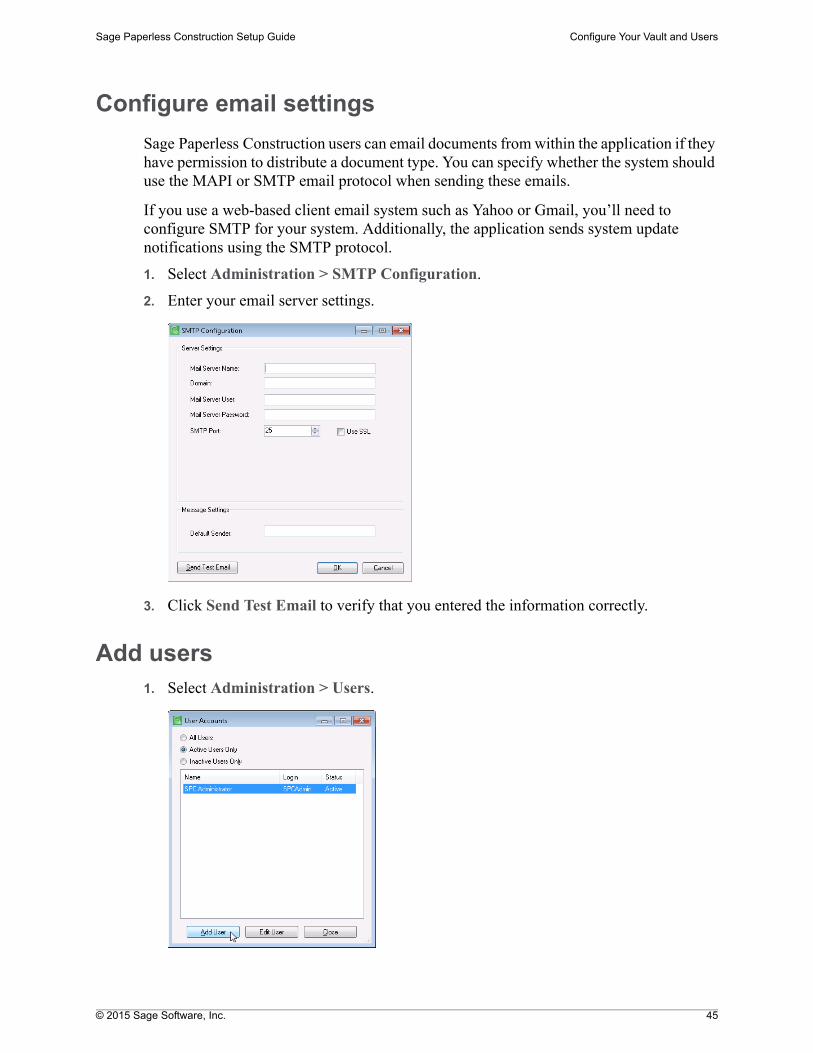
Configure email settings
Sage Paperless Construction users can email documents from within the application if they have permission to distribute a document type. You can specify whether the system should use the MAPI or SMTP email protocol when sending these emails.
If you use a web-based client email system such as Yahoo or Gmail, you’ll need to configure SMTP for your system. Additionally, the application sends system update notifications using the SMTP protocol.
1. Select Administration > SMTP Configuration.
2. Enter your email server settings.
3. Click Send Test Email to verify that you entered the information correctly.
Add users1. Select Administration > Users.
© 2015 Sage Software, Inc. 46
Sage Paperless Construction Setup Guide Configure Your Vault and Users
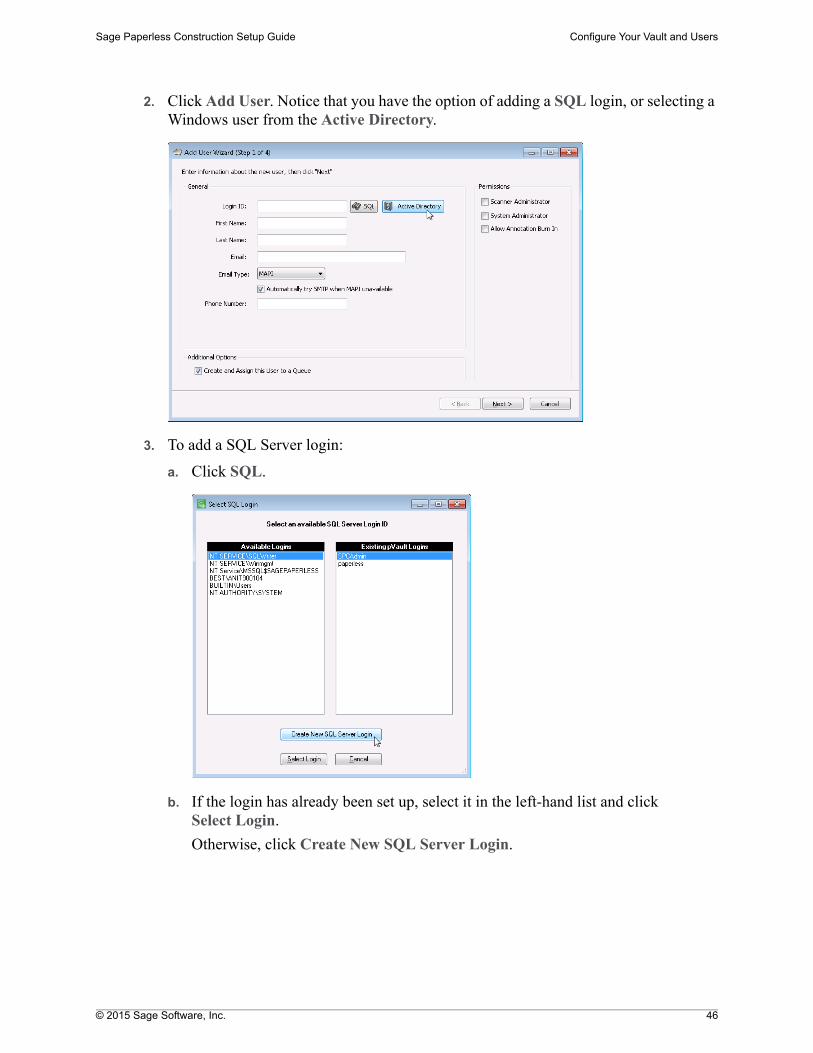
2. Click Add User. Notice that you have the option of adding a SQL login, or selecting a Windows user from the Active Directory.
3. To add a SQL Server login:
a. Click SQL.
b. If the login has already been set up, select it in the left-hand list and click Select Login.
Otherwise, click Create New SQL Server Login.
© 2015 Sage Software, Inc. 47
Sage Paperless Construction Setup Guide Configure Your Vault and Users
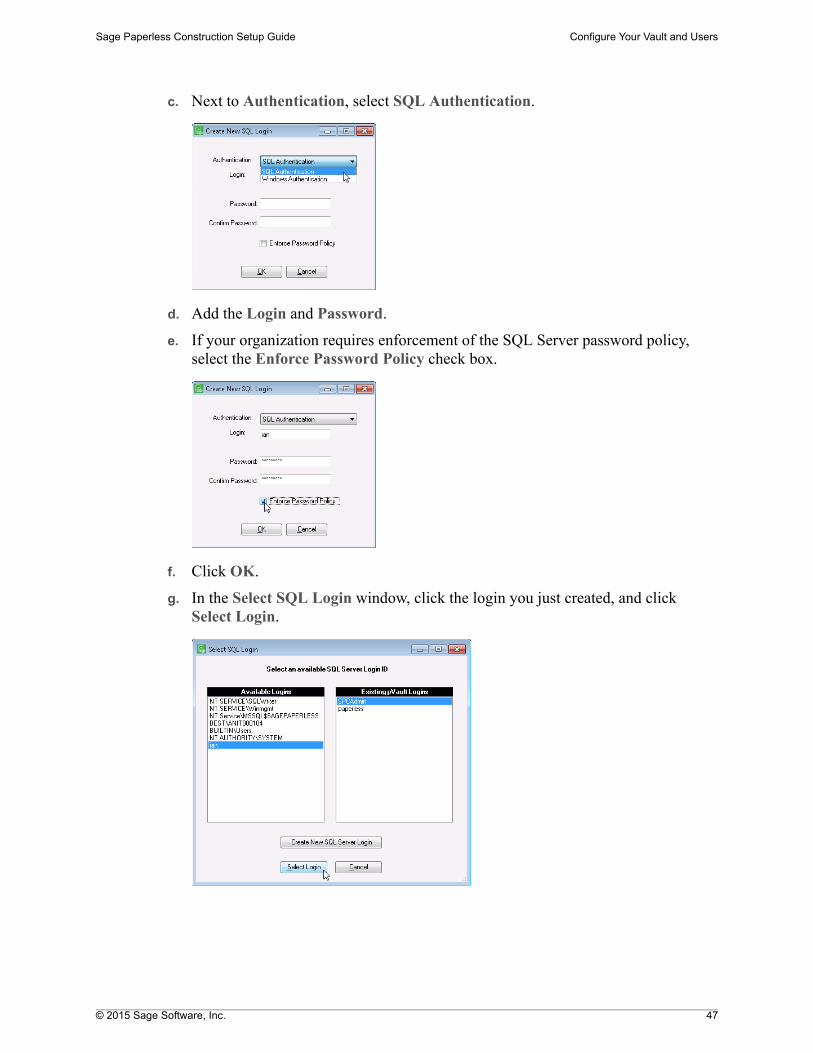
c. Next to Authentication, select SQL Authentication.
d. Add the Login and Password.
e. If your organization requires enforcement of the SQL Server password policy, select the Enforce Password Policy check box.
f. Click OK.
g. In the Select SQL Login window, click the login you just created, and click Select Login.
© 2015 Sage Software, Inc. 48
Sage Paperless Construction Setup Guide Configure Your Vault and Users
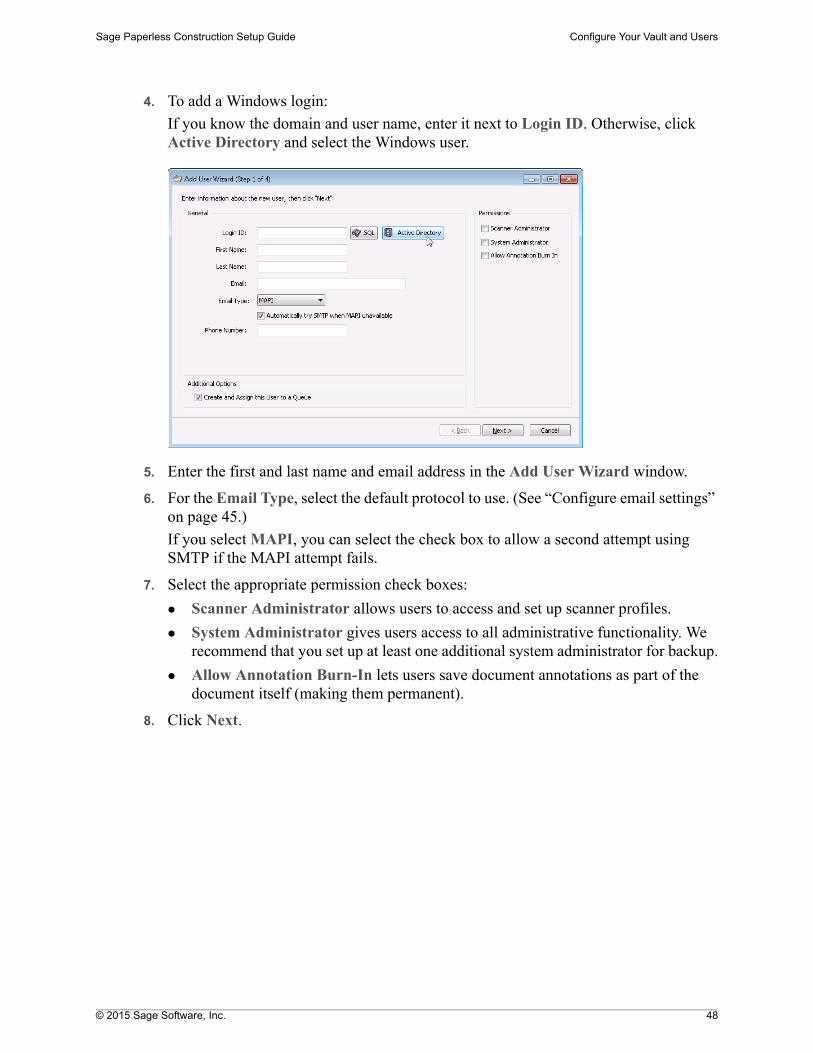
4. To add a Windows login:
If you know the domain and user name, enter it next to Login ID. Otherwise, click Active Directory and select the Windows user.
5. Enter the first and last name and email address in the Add User Wizard window.
6. For the Email Type, select the default protocol to use. (See “Configure email settings” on page 45.)
If you select MAPI, you can select the check box to allow a second attempt using SMTP if the MAPI attempt fails.
7. Select the appropriate permission check boxes:
Scanner Administrator allows users to access and set up scanner profiles.
System Administrator gives users access to all administrative functionality. We recommend that you set up at least one additional system administrator for backup.
Allow Annotation Burn-In lets users save document annotations as part of the document itself (making them permanent).
8. Click Next.
© 2015 Sage Software, Inc. 49
Sage Paperless Construction Setup Guide Configure Your Vault and Users
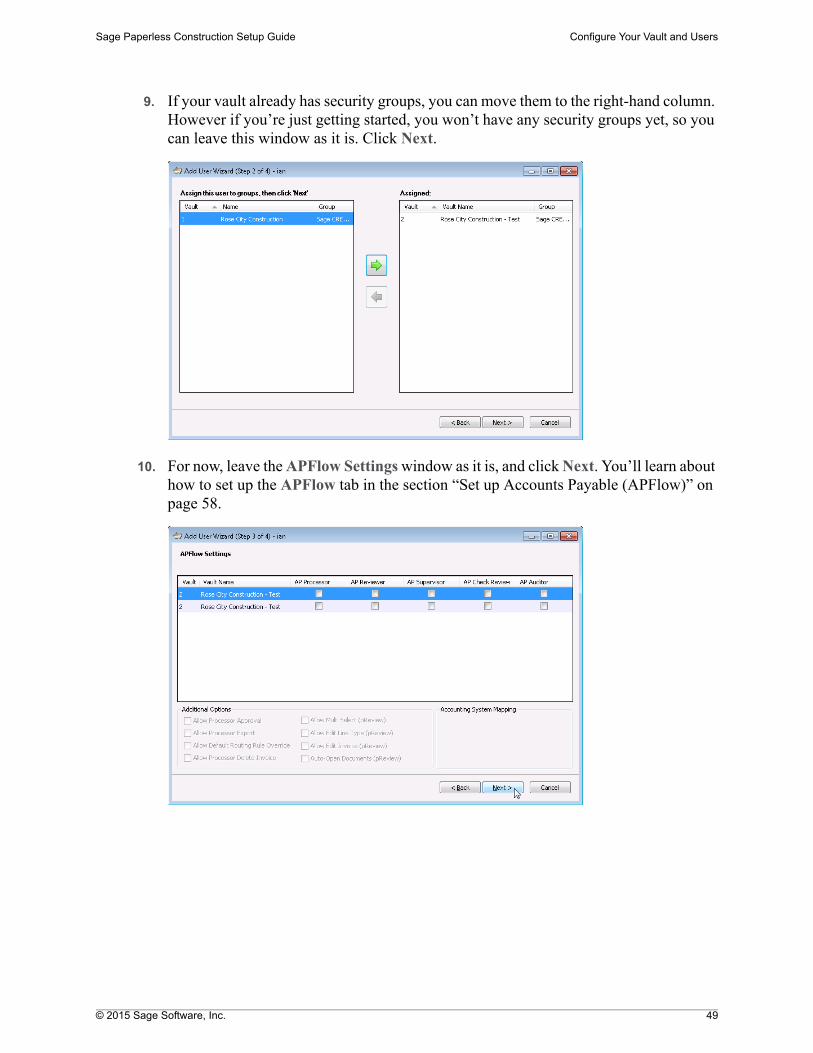
9. If your vault already has security groups, you can move them to the right-hand column. However if you’re just getting started, you won’t have any security groups yet, so you can leave this window as it is. Click Next.
10. For now, leave the APFlow Settings window as it is, and click Next. You’ll learn about how to set up the APFlow tab in the section “Set up Accounts Payable (APFlow)” on page 58.
© 2015 Sage Software, Inc. 50
Sage Paperless Construction Setup Guide Configure Your Vault and Users
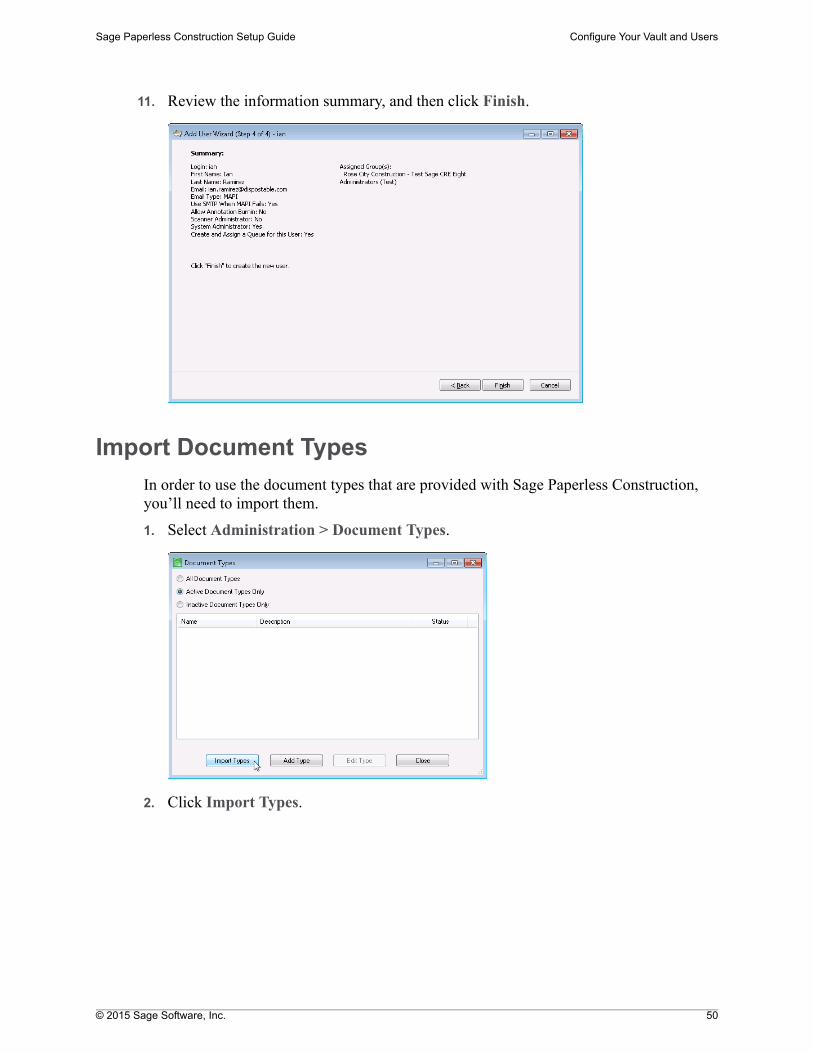
11. Review the information summary, and then click Finish.
Import Document Types
In order to use the document types that are provided with Sage Paperless Construction, you’ll need to import them.
1. Select Administration > Document Types.
2. Click Import Types.
© 2015 Sage Software, Inc. 51
Sage Paperless Construction Setup Guide Configure Your Vault and Users
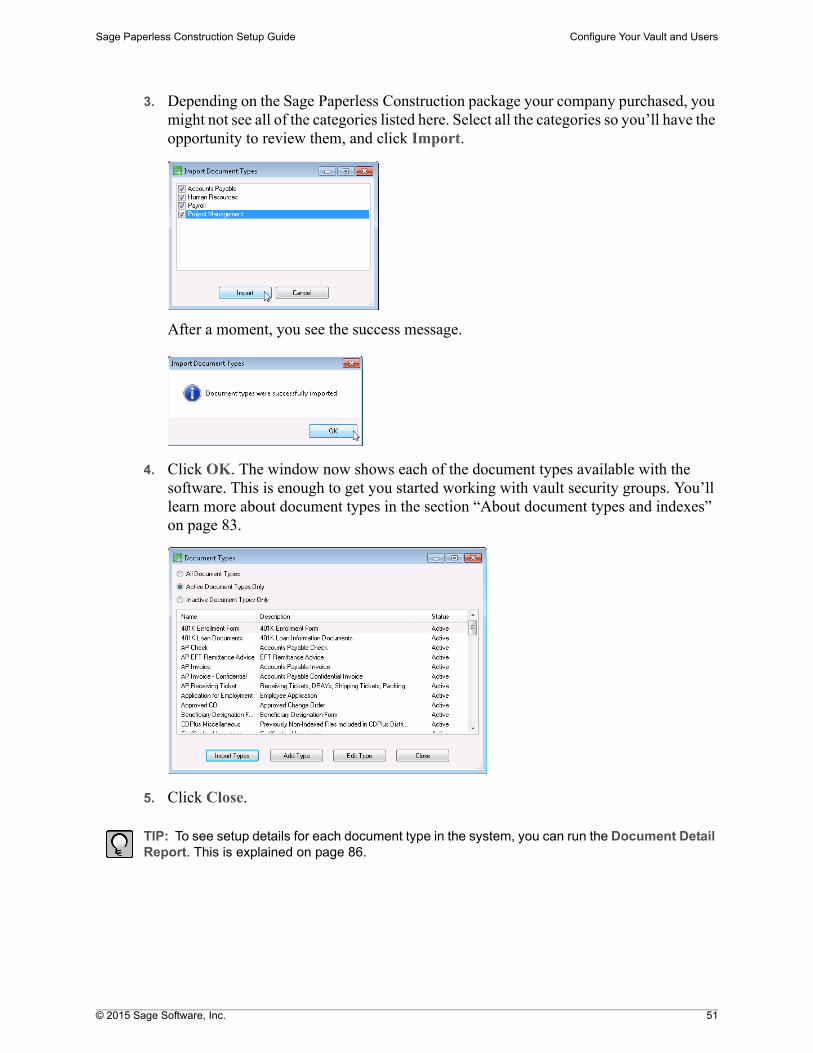
3. Depending on the Sage Paperless Construction package your company purchased, you might not see all of the categories listed here. Select all the categories so you’ll have the opportunity to review them, and click Import.
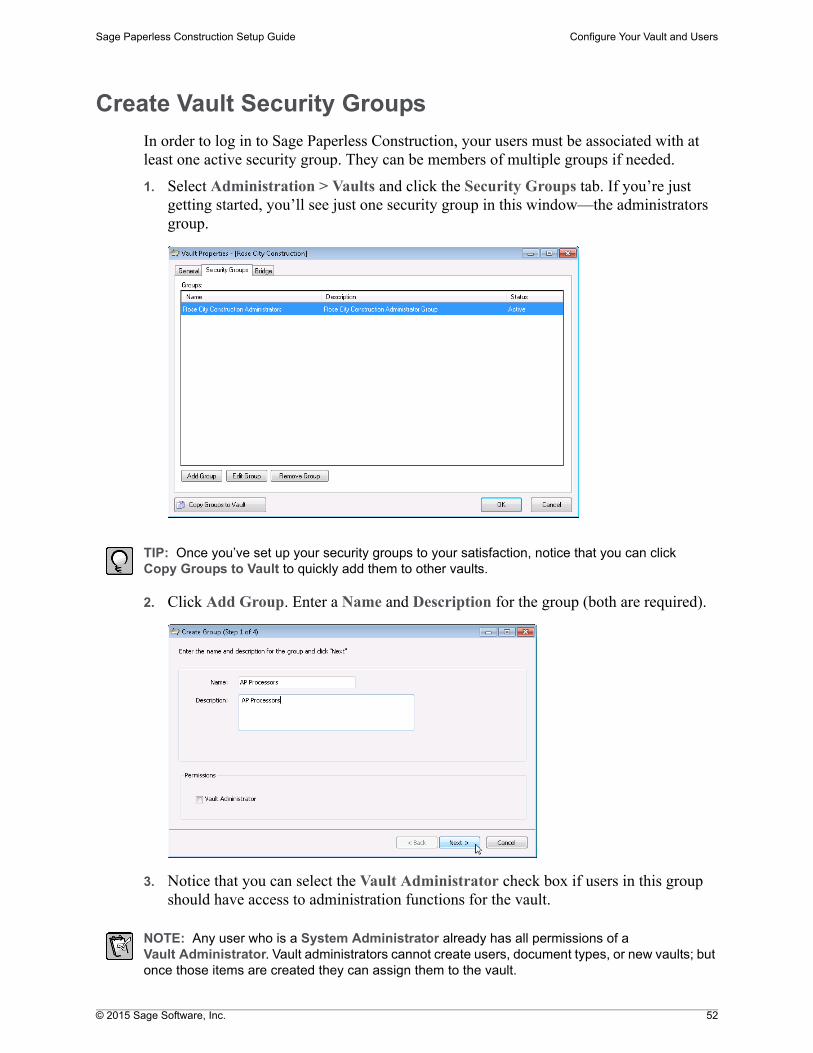
After a moment, you see the success message.
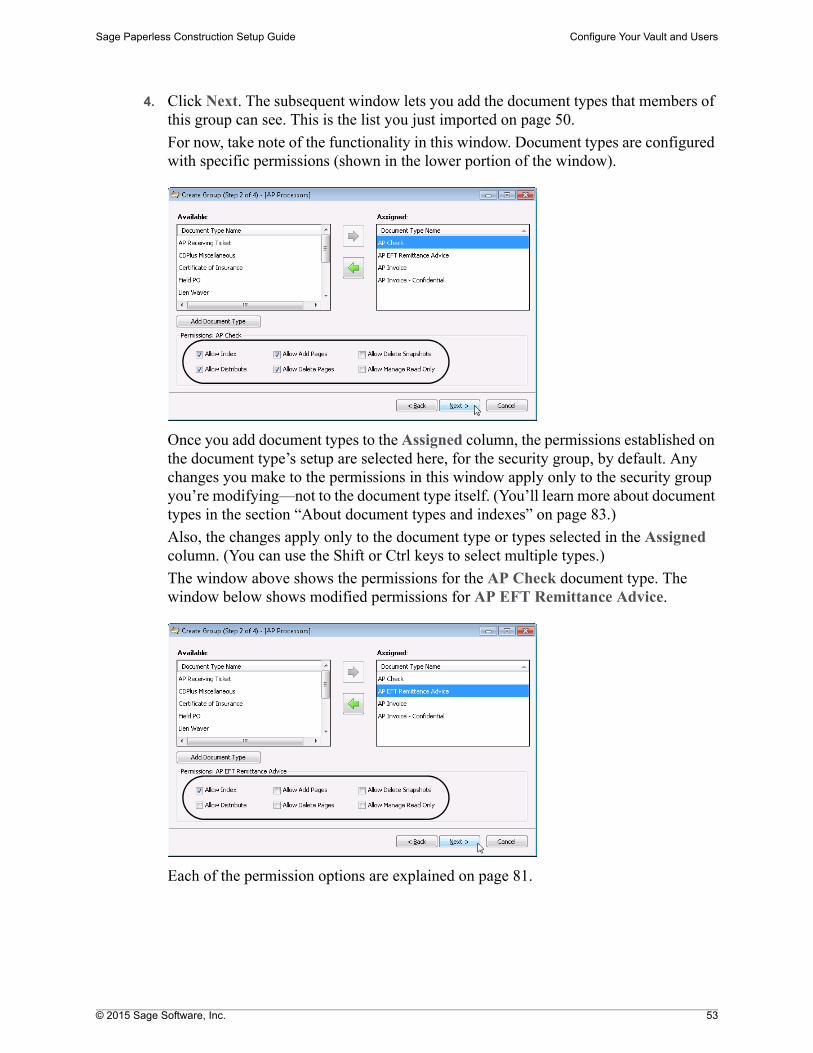
4. Click OK. The window now shows each of the document types available with the software. This is enough to get you started working with vault security groups. You’ll learn more about document types in the section “About document types and indexes” on page 83.
5. Click Close.
TIP: To see setup details for each document type in the system, you can run the Document Detail Report. This is explained on page 86.
© 2015 Sage Software, Inc. 52
Sage Paperless Construction Setup Guide Configure Your Vault and Users
Create Vault Security Groups
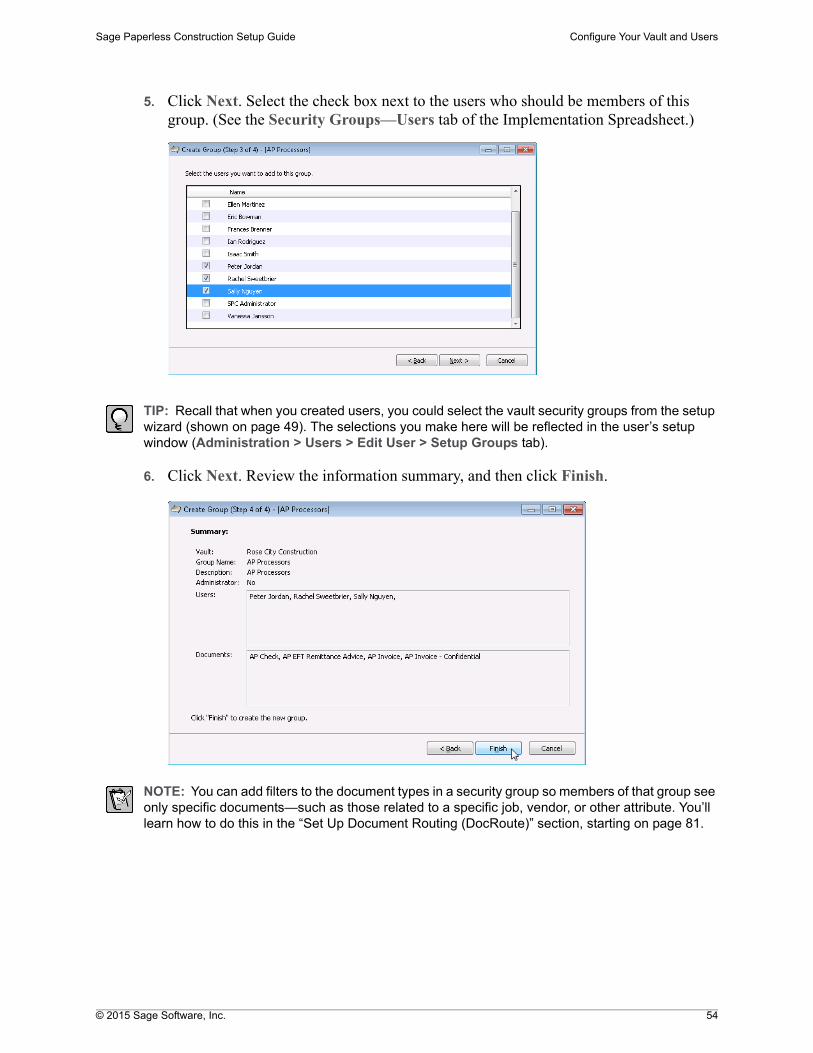
In order to log in to Sage Paperless Construction, your users must be associated with at least one active security group. They can be members of multiple groups if needed.
1. Select Administration > Vaults and click the Security Groups tab. If you’re just getting started, you’ll see just one security group in this window—the administrators group.
TIP: Once you’ve set up your security groups to your satisfaction, notice that you can click Copy Groups to Vault to quickly add them to other vaults.
2. Click Add Group. Enter a Name and Description for the group (both are required).
3. Notice that you can select the Vault Administrator check box if users in this group should have access to administration functions for the vault.
NOTE: Any user who is a System Administrator already has all permissions of a Vault Administrator. Vault administrators cannot create users, document types, or new vaults; but once those items are created they can assign them to the vault.
© 2015 Sage Software, Inc. 53
Sage Paperless Construction Setup Guide Configure Your Vault and Users
4. Click Next. The subsequent window lets you add the document types that members of this group can see. This is the list you just imported on page 50.
For now, take note of the functionality in this window. Document types are configured with specific permissions (shown in the lower portion of the window).
Once you add document types to the Assigned column, the permissions established on the document type’s setup are selected here, for the security group, by default. Any changes you make to the permissions in this window apply only to the security group you’re modifying—not to the document type itself. (You’ll learn more about document types in the section “About document types and indexes” on page 83.)
Also, the changes apply only to the document type or types selected in the Assigned column. (You can use the Shift or Ctrl keys to select multiple types.)
The window above shows the permissions for the AP Check document type. The window below shows modified permissions for AP EFT Remittance Advice.
Each of the permission options are explained on page 81.
© 2015 Sage Software, Inc. 54
Sage Paperless Construction Setup Guide Configure Your Vault and Users
5. Click Next. Select the check box next to the users who should be members of this group. (See the Security Groups—Users tab of the Implementation Spreadsheet.)
TIP: Recall that when you created users, you could select the vault security groups from the setup wizard (shown on page 49). The selections you make here will be reflected in the user’s setup window (Administration > Users > Edit User > Setup Groups tab).
6. Click Next. Review the information summary, and then click Finish.
NOTE: You can add filters to the document types in a security group so members of that group see only specific documents—such as those related to a specific job, vendor, or other attribute. You’ll learn how to do this in the “Set Up Document Routing (DocRoute)” section, starting on page 81.
© 2015 Sage Software, Inc. 55
Sage Paperless Construction Setup Guide Configure Your Vault and Users
Add Queues to Vaults
When Sage Paperless Construction users need to send documents to other operators before indexing them, they can push them to queues. The system administrator creates queues (and queue categories), and then assigns them to vaults.
Queues should be set up to work with the module you are implementing. You’ll learn more about them in each module’s chapter:
Queues for APFlow are discussed in the section “How queues and queue categories support APFlow” on page 66.
Queues for DocRoute are discussed in “How queues and queue categories support DocRoute” on page 92.
For now, add at least one queue to your vault so your implementation team can work with the features.
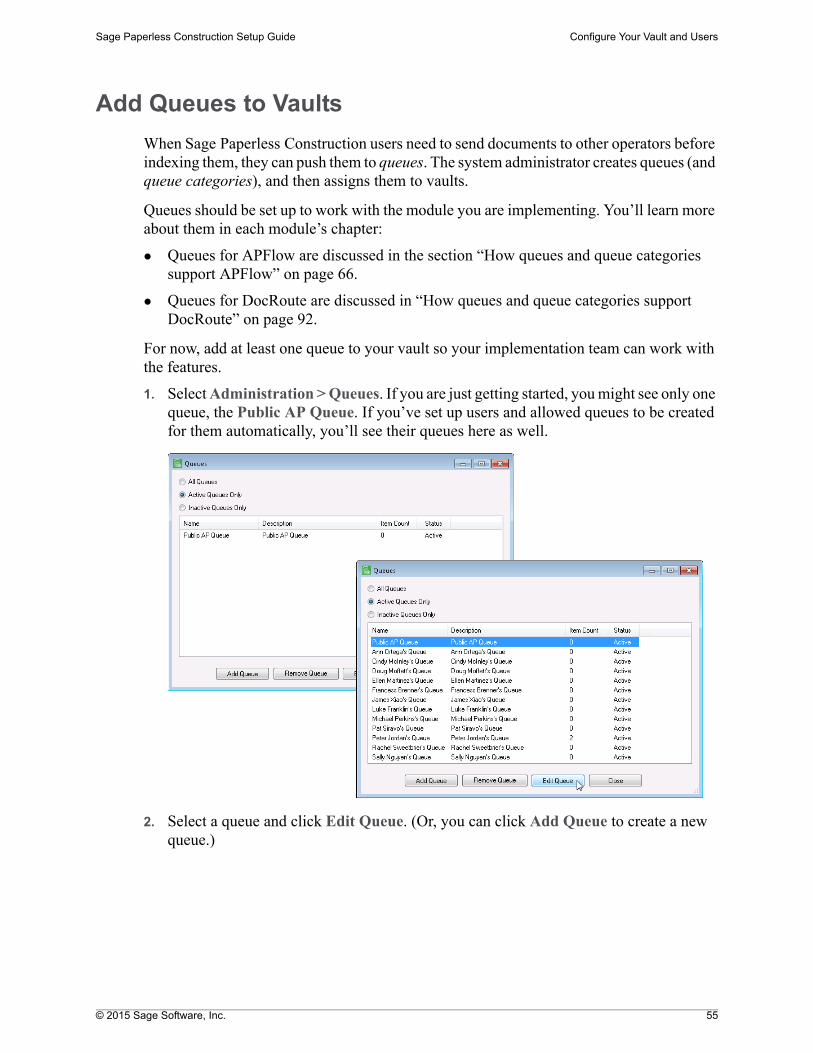
1. Select Administration > Queues. If you are just getting started, you might see only one queue, the Public AP Queue. If you’ve set up users and allowed queues to be created for them automatically, you’ll see their queues here as well.
2. Select a queue and click Edit Queue. (Or, you can click Add Queue to create a new queue.)
© 2015 Sage Software, Inc. 56
Sage Paperless Construction Setup Guide Configure Your Vault and Users
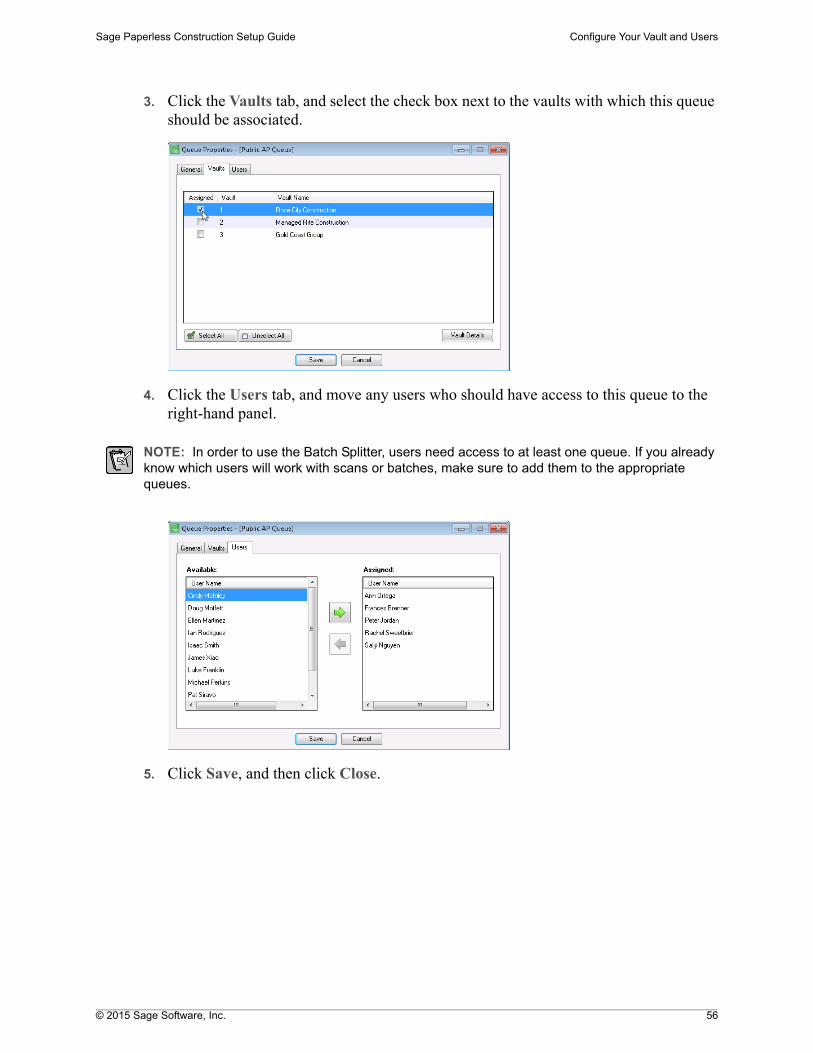
3. Click the Vaults tab, and select the check box next to the vaults with which this queue should be associated.
4. Click the Users tab, and move any users who should have access to this queue to the right-hand panel.
NOTE: In order to use the Batch Splitter, users need access to at least one queue. If you already know which users will work with scans or batches, make sure to add them to the appropriate queues.
5. Click Save, and then click Close.
© 2015 Sage Software, Inc. 57
Sage Paperless Construction Setup Guide Configure Your Vault and Users
Give Access to Reports
Several reports are provided with Sage Paperless Construction. System administrators and vault administrators have access to these reports, and can grant permissions to other users to view them.
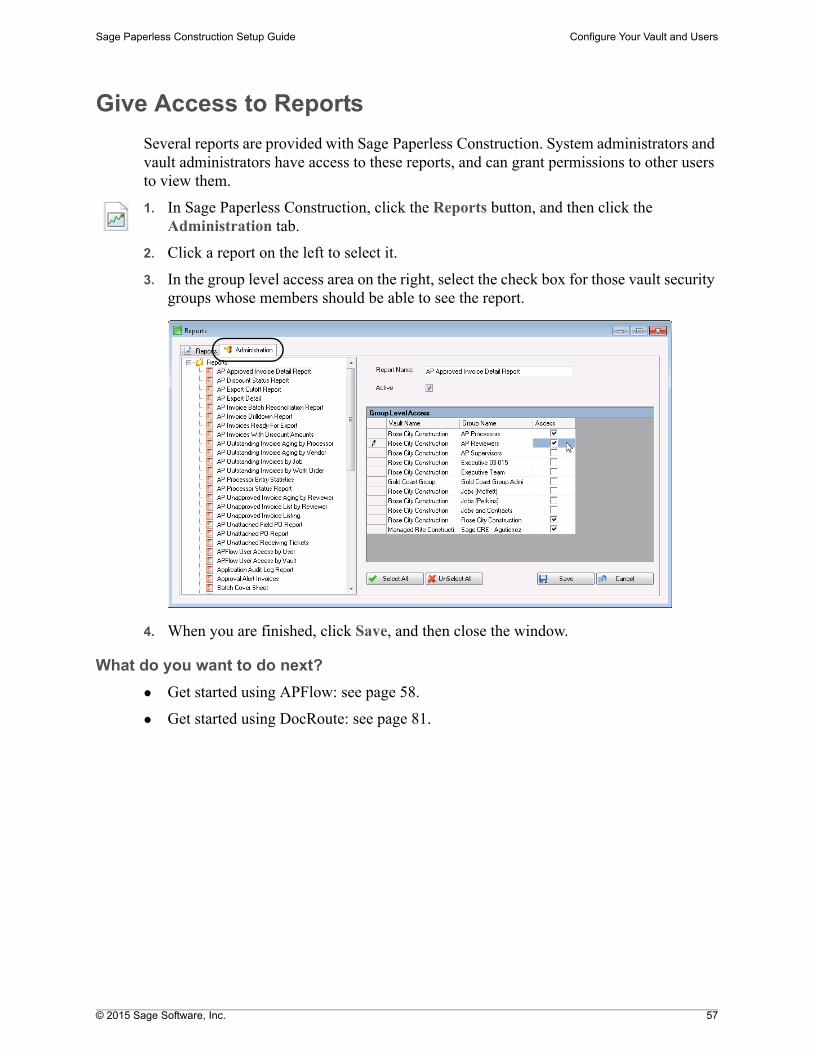
1. In Sage Paperless Construction, click the Reports button, and then click the Administration tab.
2. Click a report on the left to select it.
3. In the group level access area on the right, select the check box for those vault security groups whose members should be able to see the report.
4. When you are finished, click Save, and then close the window.
What do you want to do next?
Get started using APFlow: see page 58.
Get started using DocRoute: see page 81.

© 2015 Sage Software, Inc. 58
Sage Paperless Construction Setup Guide Set up Accounts Payable (APFlow)
Set up Accounts Payable (APFlow)The APFlow module in Sage Paperless Construction streamlines your payable invoice processing by routing invoices automatically to the people who need to approve them. Invoices you enter in this system are integrated with your accounting system, so you can easily route approvals and track documents associated with invoices.
In this section, you will:
Walk through an example of an invoice moving through the system.
See how user permissions can be set up to support your payable invoicing workflows.
Learn how queues and queue categories can support your invoicing workflows.
Review business considerations related to using APFlow.
See the step-by-step process for setting up APFlow.
Sample Walk-Through: Process an Invoice
Rose City Construction uses Sage Paperless Construction with APFlow. Their Accounts Payable team includes the following individuals.
User and Role
Ann: Administrative Assistant Rachel: AP Reviewer
Peter: AP Processor Sally: AP Supervisor
© 2015 Sage Software, Inc. 59
Sage Paperless Construction Setup Guide Set up Accounts Payable (APFlow)
Invoice Scenario
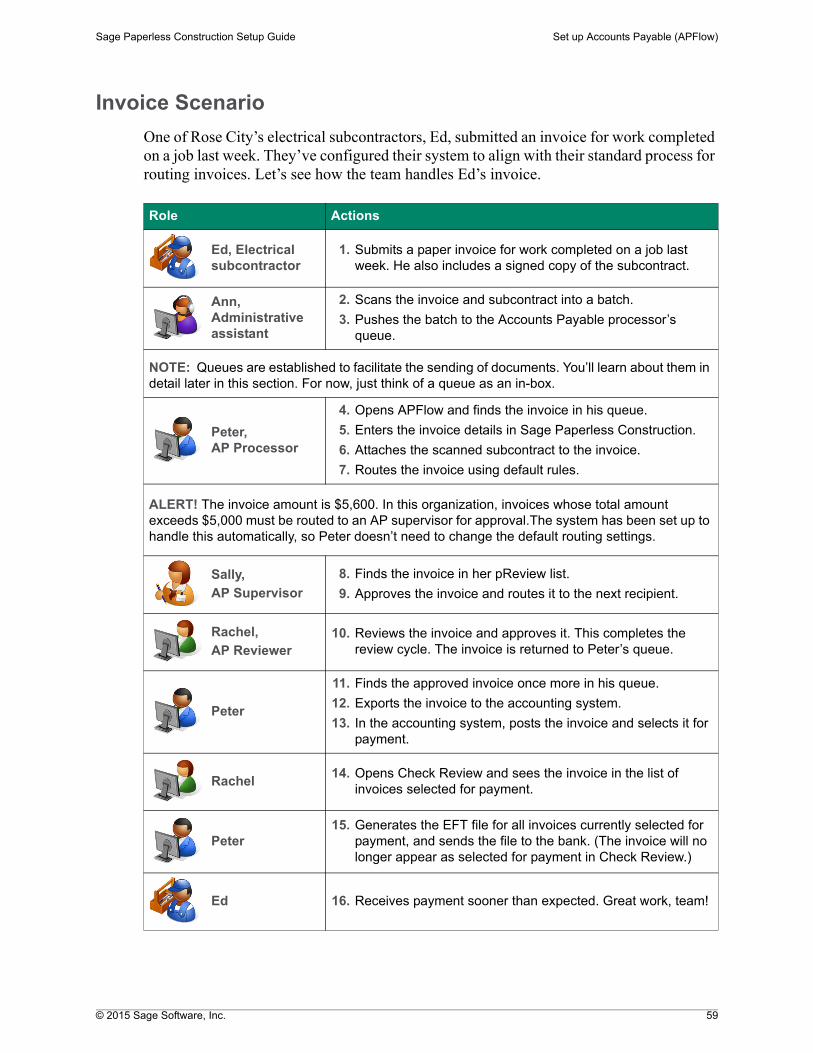
One of Rose City’s electrical subcontractors, Ed, submitted an invoice for work completed on a job last week. They’ve configured their system to align with their standard process for routing invoices. Let’s see how the team handles Ed’s invoice.
Role Actions
Ed, Electrical subcontractor
1. Submits a paper invoice for work completed on a job last week. He also includes a signed copy of the subcontract.
Ann, Administrative assistant
2. Scans the invoice and subcontract into a batch.
3. Pushes the batch to the Accounts Payable processor’s queue.
NOTE: Queues are established to facilitate the sending of documents. You’ll learn about them in detail later in this section. For now, just think of a queue as an in-box.
Peter, AP Processor
4. Opens APFlow and finds the invoice in his queue.
5. Enters the invoice details in Sage Paperless Construction.
6. Attaches the scanned subcontract to the invoice.
7. Routes the invoice using default rules.
ALERT! The invoice amount is $5,600. In this organization, invoices whose total amount exceeds $5,000 must be routed to an AP supervisor for approval.The system has been set up to handle this automatically, so Peter doesn’t need to change the default routing settings.
Sally,
AP Supervisor
8. Finds the invoice in her pReview list.
9. Approves the invoice and routes it to the next recipient.
Rachel,
AP Reviewer10. Reviews the invoice and approves it. This completes the
review cycle. The invoice is returned to Peter’s queue.
Peter
11. Finds the approved invoice once more in his queue.
12. Exports the invoice to the accounting system.
13. In the accounting system, posts the invoice and selects it for payment.
Rachel14. Opens Check Review and sees the invoice in the list of
invoices selected for payment.
Peter15. Generates the EFT file for all invoices currently selected for
payment, and sends the file to the bank. (The invoice will no longer appear as selected for payment in Check Review.)
Ed 16. Receives payment sooner than expected. Great work, team!
© 2015 Sage Software, Inc. 60
Sage Paperless Construction Setup Guide Set up Accounts Payable (APFlow)
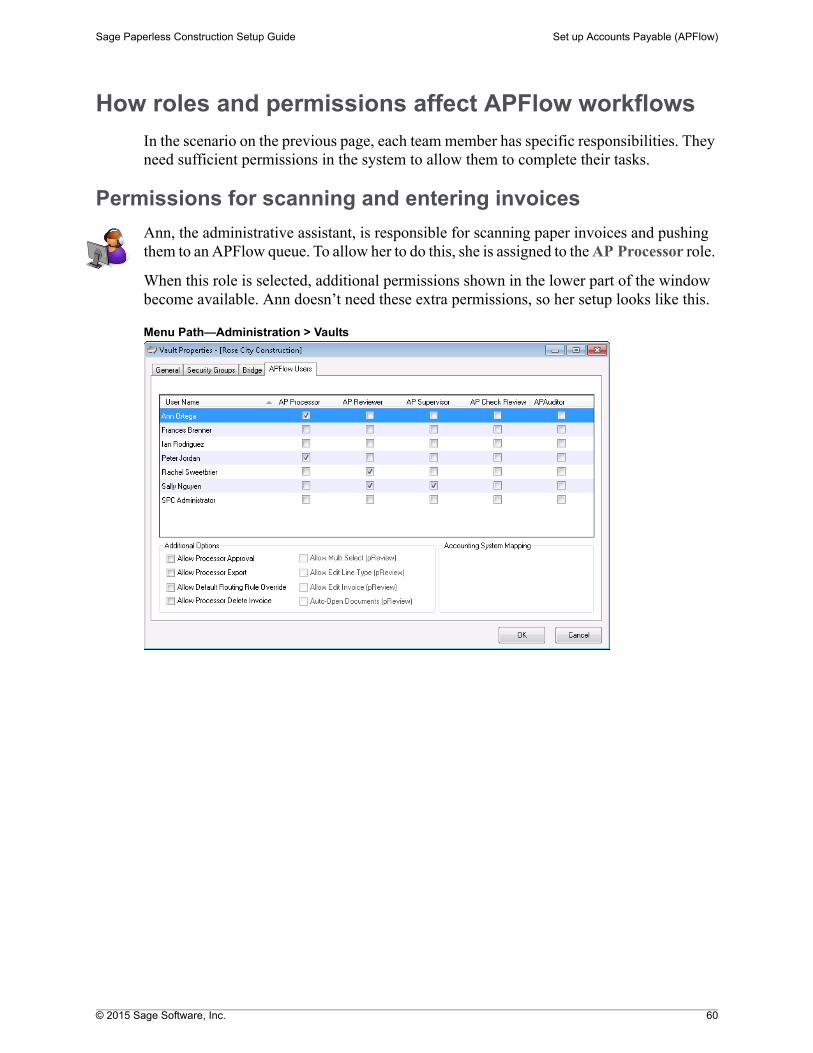
How roles and permissions affect APFlow workflows
In the scenario on the previous page, each team member has specific responsibilities. They need sufficient permissions in the system to allow them to complete their tasks.
Permissions for scanning and entering invoices
Ann, the administrative assistant, is responsible for scanning paper invoices and pushing them to an APFlow queue. To allow her to do this, she is assigned to the AP Processor role.
When this role is selected, additional permissions shown in the lower part of the window become available. Ann doesn’t need these extra permissions, so her setup looks like this.
Menu Path—Administration > Vaults
© 2015 Sage Software, Inc. 61
Sage Paperless Construction Setup Guide Set up Accounts Payable (APFlow)
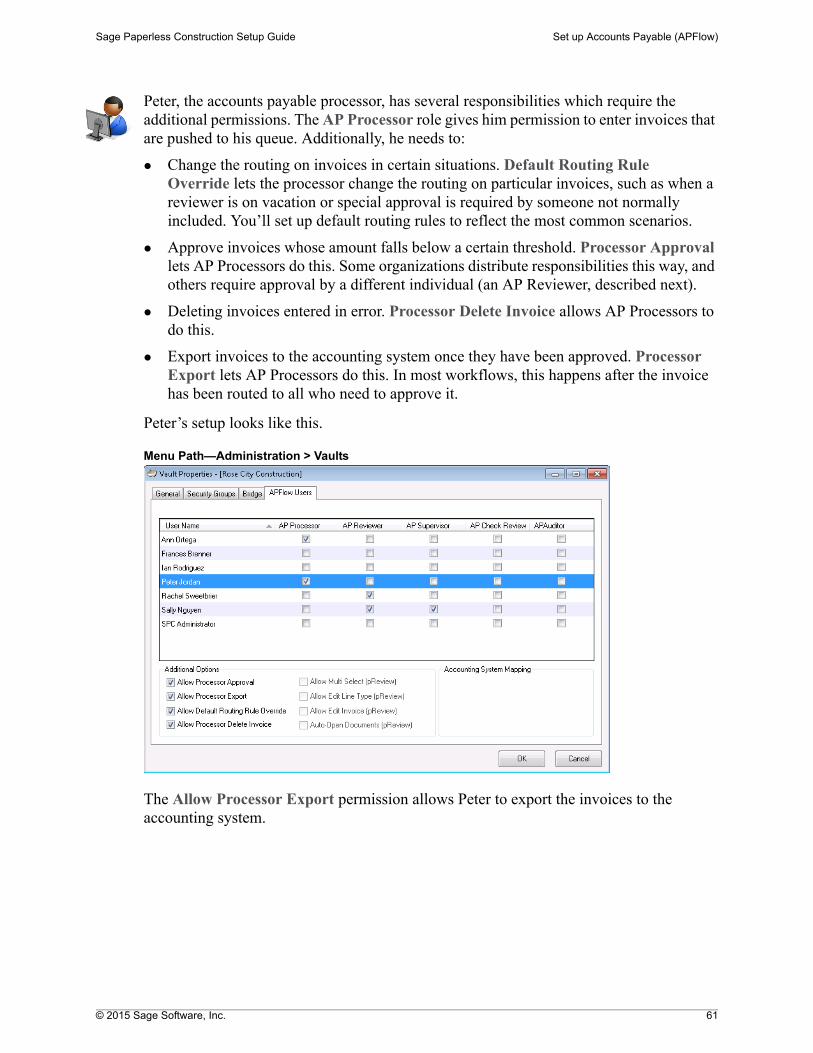
Peter, the accounts payable processor, has several responsibilities which require the additional permissions. The AP Processor role gives him permission to enter invoices that are pushed to his queue. Additionally, he needs to:
Change the routing on invoices in certain situations. Default Routing Rule Override lets the processor change the routing on particular invoices, such as when a reviewer is on vacation or special approval is required by someone not normally included. You’ll set up default routing rules to reflect the most common scenarios.
Approve invoices whose amount falls below a certain threshold. Processor Approval lets AP Processors do this. Some organizations distribute responsibilities this way, and others require approval by a different individual (an AP Reviewer, described next).
Deleting invoices entered in error. Processor Delete Invoice allows AP Processors to do this.
Export invoices to the accounting system once they have been approved. Processor Export lets AP Processors do this. In most workflows, this happens after the invoice has been routed to all who need to approve it.
Peter’s setup looks like this.
Menu Path—Administration > Vaults
The Allow Processor Export permission allows Peter to export the invoices to the accounting system.
© 2015 Sage Software, Inc. 62
Sage Paperless Construction Setup Guide Set up Accounts Payable (APFlow)
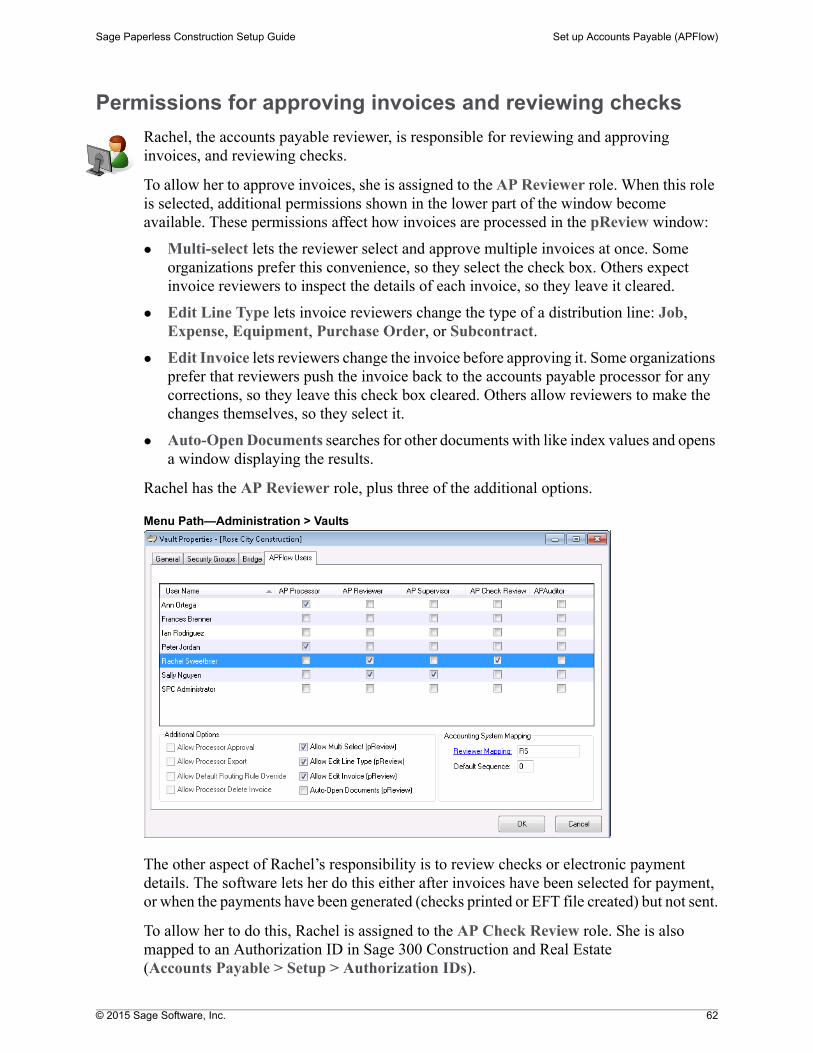
Permissions for approving invoices and reviewing checks
Rachel, the accounts payable reviewer, is responsible for reviewing and approving invoices, and reviewing checks.
To allow her to approve invoices, she is assigned to the AP Reviewer role. When this role is selected, additional permissions shown in the lower part of the window become available. These permissions affect how invoices are processed in the pReview window:
Multi-select lets the reviewer select and approve multiple invoices at once. Some organizations prefer this convenience, so they select the check box. Others expect invoice reviewers to inspect the details of each invoice, so they leave it cleared.
Edit Line Type lets invoice reviewers change the type of a distribution line: Job, Expense, Equipment, Purchase Order, or Subcontract.
Edit Invoice lets reviewers change the invoice before approving it. Some organizations prefer that reviewers push the invoice back to the accounts payable processor for any corrections, so they leave this check box cleared. Others allow reviewers to make the changes themselves, so they select it.
Auto-Open Documents searches for other documents with like index values and opens a window displaying the results.
Rachel has the AP Reviewer role, plus three of the additional options.
Menu Path—Administration > Vaults
The other aspect of Rachel’s responsibility is to review checks or electronic payment details. The software lets her do this either after invoices have been selected for payment, or when the payments have been generated (checks printed or EFT file created) but not sent.
To allow her to do this, Rachel is assigned to the AP Check Review role. She is also mapped to an Authorization ID in Sage 300 Construction and Real Estate (Accounts Payable > Setup > Authorization IDs).
© 2015 Sage Software, Inc. 63
Sage Paperless Construction Setup Guide Set up Accounts Payable (APFlow)
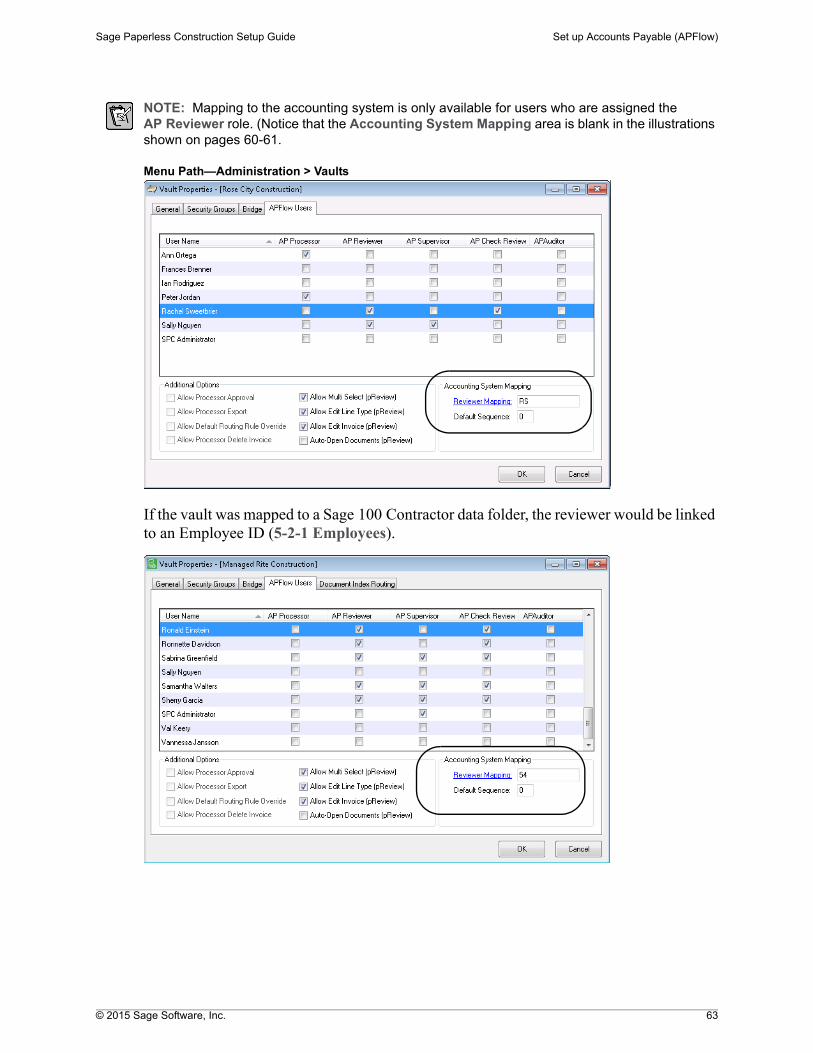
NOTE: Mapping to the accounting system is only available for users who are assigned the AP Reviewer role. (Notice that the Accounting System Mapping area is blank in the illustrations shown on pages 60-61.
Menu Path—Administration > Vaults
If the vault was mapped to a Sage 100 Contractor data folder, the reviewer would be linked to an Employee ID (5-2-1 Employees).
© 2015 Sage Software, Inc. 64
Sage Paperless Construction Setup Guide Set up Accounts Payable (APFlow)
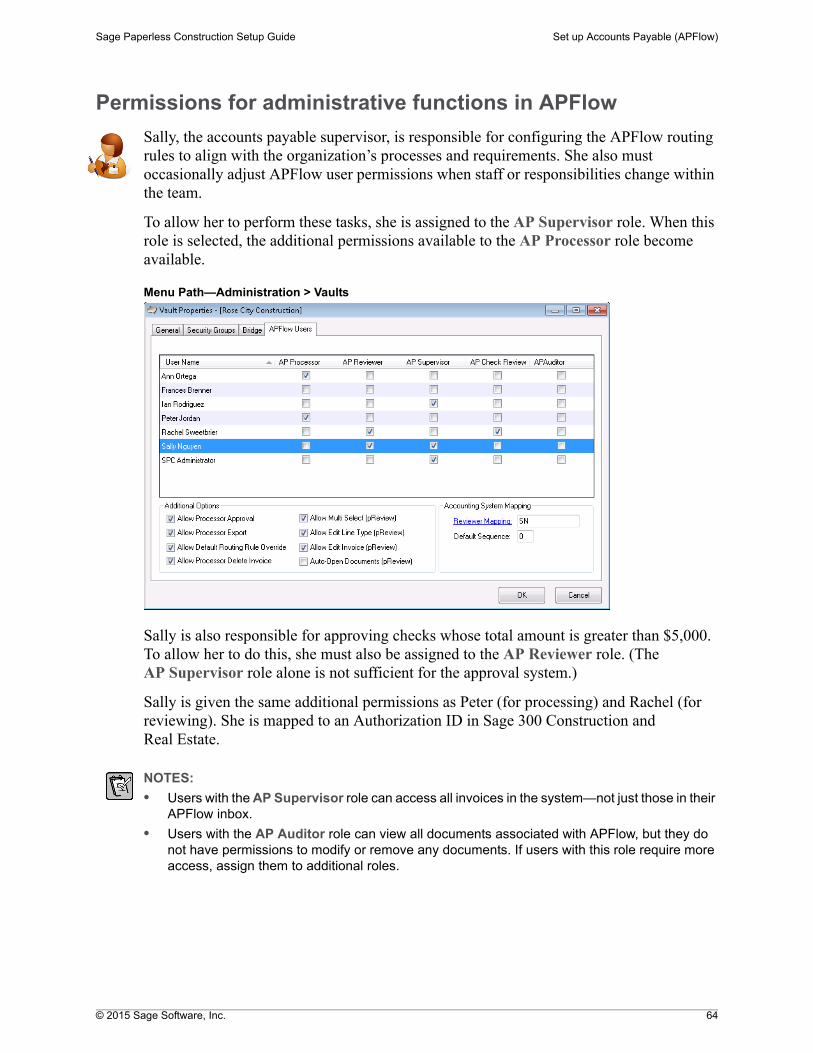
Permissions for administrative functions in APFlow
Sally, the accounts payable supervisor, is responsible for configuring the APFlow routing rules to align with the organization’s processes and requirements. She also must occasionally adjust APFlow user permissions when staff or responsibilities change within the team.
To allow her to perform these tasks, she is assigned to the AP Supervisor role. When this role is selected, the additional permissions available to the AP Processor role become available.
Menu Path—Administration > Vaults
Sally is also responsible for approving checks whose total amount is greater than $5,000. To allow her to do this, she must also be assigned to the AP Reviewer role. (The AP Supervisor role alone is not sufficient for the approval system.)
Sally is given the same additional permissions as Peter (for processing) and Rachel (for reviewing). She is mapped to an Authorization ID in Sage 300 Construction and Real Estate.
NOTES:
• Users with the AP Supervisor role can access all invoices in the system—not just those in their APFlow inbox.
• Users with the AP Auditor role can view all documents associated with APFlow, but they do not have permissions to modify or remove any documents. If users with this role require more access, assign them to additional roles.
© 2015 Sage Software, Inc. 65
Sage Paperless Construction Setup Guide Set up Accounts Payable (APFlow)
Business considerations: Roles and permissions
1. Who in your organization typically receives and routes paper invoices?
List the individual or role who will scan paper invoices into your system. These individuals will need to be set up as users in Sage Paperless Construction. To implement and test the product, you might decide to set up just one or two people in this role. Use permissions similar to those listed in the sample scenario for Ann (shown on page 60).
2. Who typically enters and codes invoices?
List the individuals or group that enters and codes invoices. For these users, determine whether they will:
Approve invoices?
Export invoices?
Change the routing for invoices when normal rules do not apply?
Delete invoices entered in error?
This team is probably also set up as users in your accounting system. You can map Sage Paperless Construction users to Approval ID’s in Sage 300 Construction and Real Estate (Accounts Payable > Setup > Approval IDs).
When you set this team up in Sage Paperless Construction, use permissions similar to Peter’s (shown on page 61).
3. Who reviews and approves invoices?
You might currently have your accounts payable processors approve invoices when they enter them—or, you might have a separate approval steps completed by reviewers. Additionally, invoices might require different approval steps based on the dollar amount, job, expense type, or other attributes. These rules can be built into the system so the routing happens automatically. You can even route invoice distributions to separate reviewers based on the type of cost.
Make notes on your current process so you can set up APFlow routing rules to support it. Include notes about the attributes and parameters that affect how your invoices are routed.
Users who will review and approve invoices can be set up with permissions similar to Rachel’s (shown on page 62).
4. How are confidential invoices handled in your organization?
You probably have a short list of individuals who process sensitive information. You can set up safeguards and security settings as needed to ensure that your confidential vendor documents are protected.
Make a list of the people who will process these invoices, as well as any criteria you’ve established for identifying the invoices in this category.
© 2015 Sage Software, Inc. 66
Sage Paperless Construction Setup Guide Set up Accounts Payable (APFlow)
How queues and queue categories support APFlow
In the sample scenario on page 58, recall that when the invoice was sent to different individuals for approval and processing, it was pushed to various queues. What are queues?
Queues let you move documents that have not yet been indexed or processed to individuals in your organization. Indexed documents cannot be pushed to a queue.
Any queues assigned to the APFlow Queue Category are accessible in APFlow by the accounting team.
Documents cannot be in more than one queue at the same time.
Documents in queues will not appear in vault search results, because they have not been indexed or saved to the vault.
Queues let you implement some business processes for sending documents to individuals in your organization even if you do not have the DocRoute module.
Once a document is indexed, it no longer appears in a queue—but you can search for it by document type or index values.
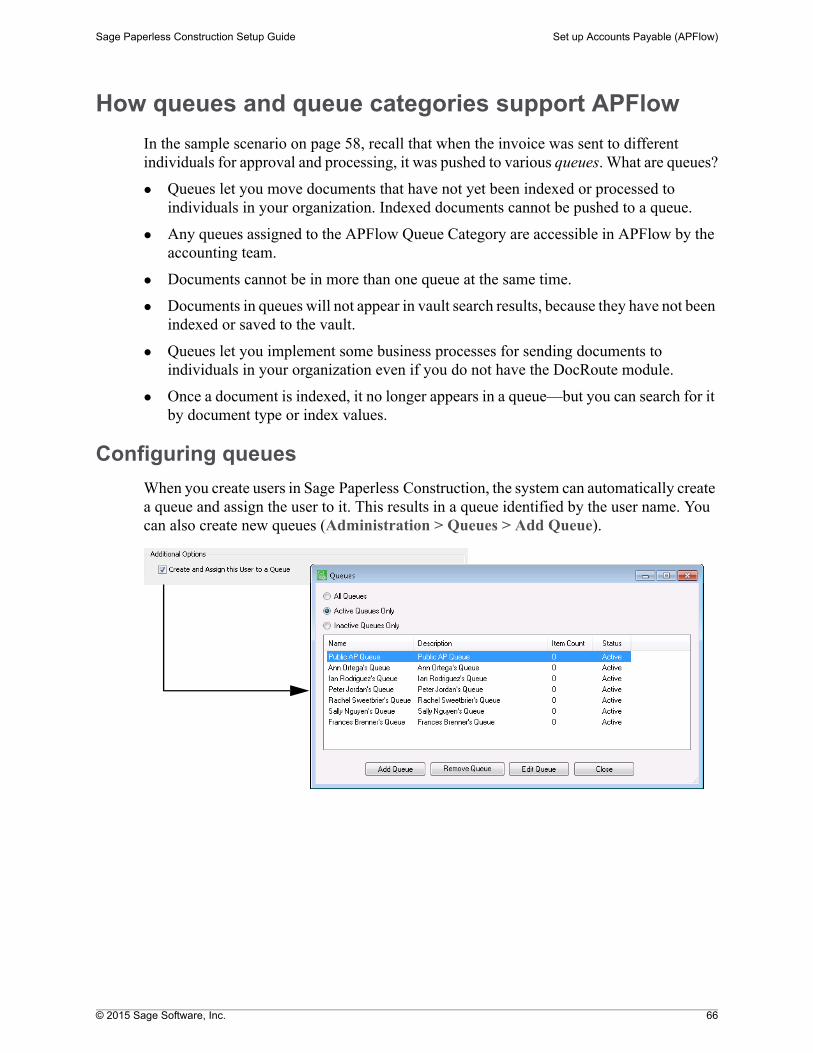
Configuring queues
When you create users in Sage Paperless Construction, the system can automatically create a queue and assign the user to it. This results in a queue identified by the user name. You can also create new queues (Administration > Queues > Add Queue).

© 2015 Sage Software, Inc. 67
Sage Paperless Construction Setup Guide Set up Accounts Payable (APFlow)
Each queue has an owner. If the queue was created as part of setting up the user, the user is the default owner.
NOTE: If you create a queue from the Queues window, the queue does not have an owner unless you specify one.
To make the queue available in specific vaults, you assign vaults to the queue. You can also add multiple users to the queue. Any users you add will be able to see the queue.
Menu Path—Administration > Queues
© 2015 Sage Software, Inc. 68
Sage Paperless Construction Setup Guide Set up Accounts Payable (APFlow)
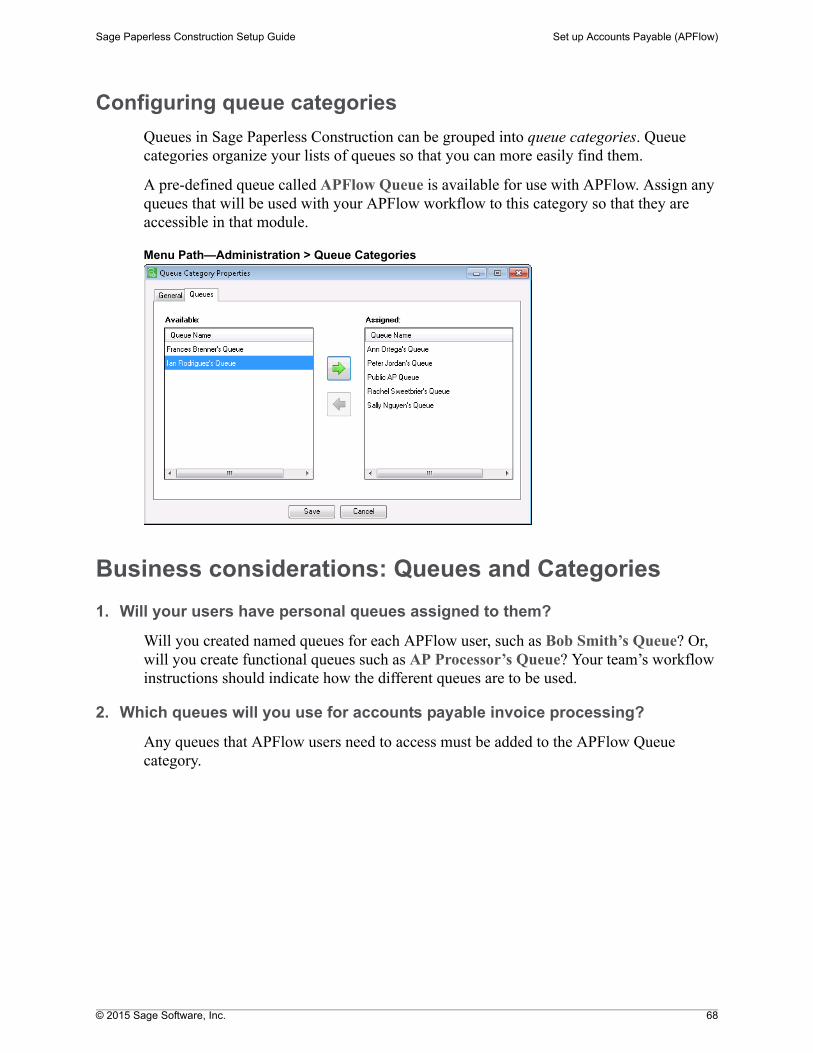
Configuring queue categories
Queues in Sage Paperless Construction can be grouped into queue categories. Queue categories organize your lists of queues so that you can more easily find them.
A pre-defined queue called APFlow Queue is available for use with APFlow. Assign any queues that will be used with your APFlow workflow to this category so that they are accessible in that module.
Menu Path—Administration > Queue Categories
Business considerations: Queues and Categories
1. Will your users have personal queues assigned to them?
Will you created named queues for each APFlow user, such as Bob Smith’s Queue? Or, will you create functional queues such as AP Processor’s Queue? Your team’s workflow instructions should indicate how the different queues are to be used.
2. Which queues will you use for accounts payable invoice processing?
Any queues that APFlow users need to access must be added to the APFlow Queue category.
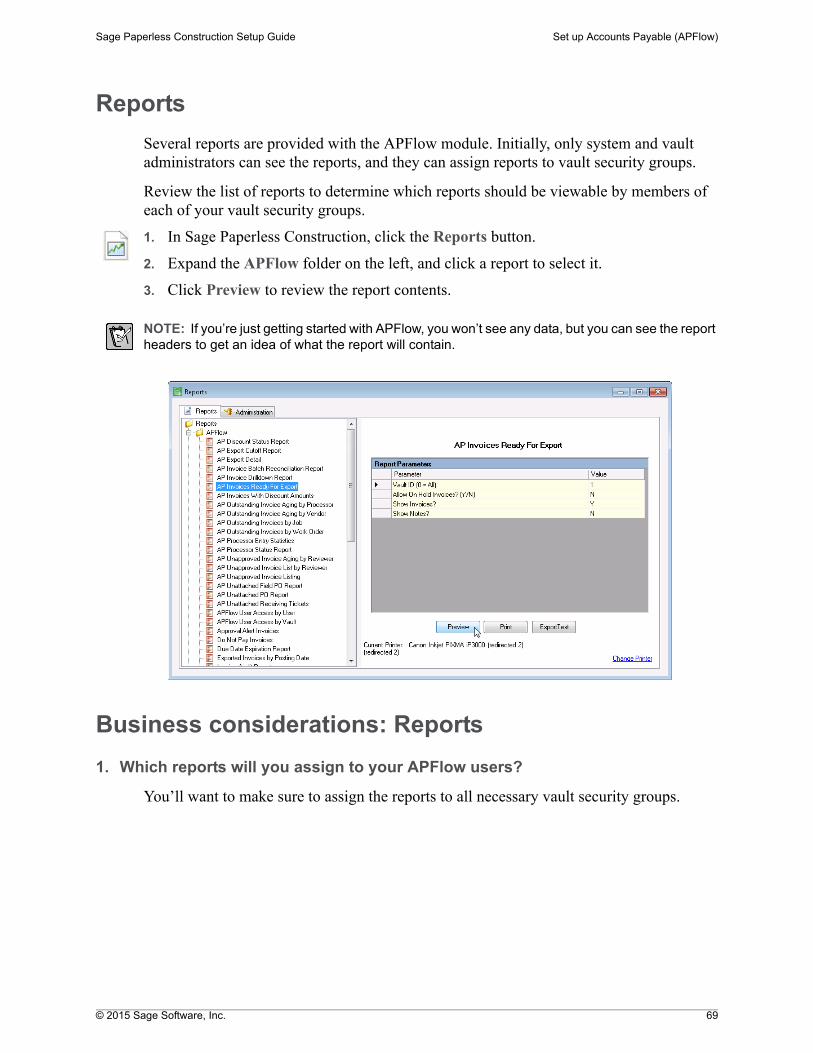
© 2015 Sage Software, Inc. 69
Sage Paperless Construction Setup Guide Set up Accounts Payable (APFlow)
Reports
Several reports are provided with the APFlow module. Initially, only system and vault administrators can see the reports, and they can assign reports to vault security groups.
Review the list of reports to determine which reports should be viewable by members of each of your vault security groups.
1. In Sage Paperless Construction, click the Reports button.
2. Expand the APFlow folder on the left, and click a report to select it.
3. Click Preview to review the report contents.
NOTE: If you’re just getting started with APFlow, you won’t see any data, but you can see the report headers to get an idea of what the report will contain.
Business considerations: Reports
1. Which reports will you assign to your APFlow users?
You’ll want to make sure to assign the reports to all necessary vault security groups.
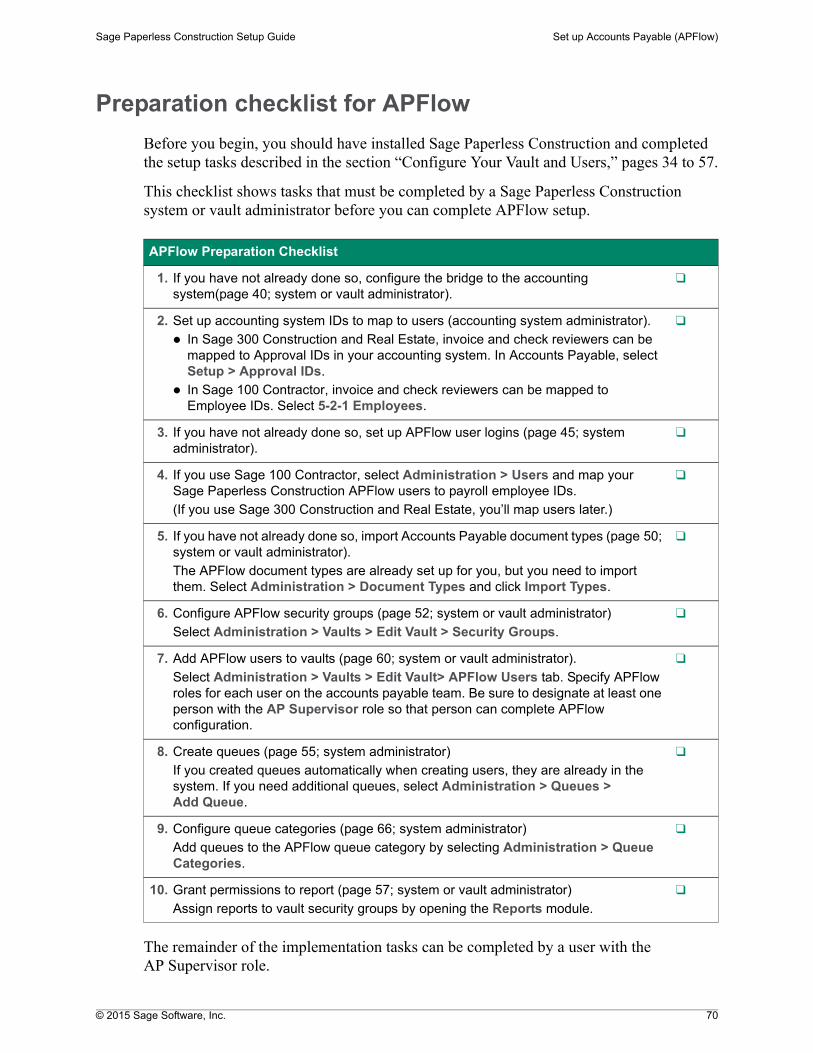
© 2015 Sage Software, Inc. 70
Sage Paperless Construction Setup Guide Set up Accounts Payable (APFlow)
Preparation checklist for APFlow
Before you begin, you should have installed Sage Paperless Construction and completed the setup tasks described in the section “Configure Your Vault and Users,” pages 34 to 57.
This checklist shows tasks that must be completed by a Sage Paperless Construction system or vault administrator before you can complete APFlow setup.
The remainder of the implementation tasks can be completed by a user with the AP Supervisor role.
APFlow Preparation Checklist
1. If you have not already done so, configure the bridge to the accounting system(page 40; system or vault administrator).
❑
2. Set up accounting system IDs to map to users (accounting system administrator).
In Sage 300 Construction and Real Estate, invoice and check reviewers can be mapped to Approval IDs in your accounting system. In Accounts Payable, select Setup > Approval IDs.
In Sage 100 Contractor, invoice and check reviewers can be mapped to Employee IDs. Select 5-2-1 Employees.
❑
3. If you have not already done so, set up APFlow user logins (page 45; system administrator).
❑
4. If you use Sage 100 Contractor, select Administration > Users and map your Sage Paperless Construction APFlow users to payroll employee IDs.
(If you use Sage 300 Construction and Real Estate, you’ll map users later.)
❑
5. If you have not already done so, import Accounts Payable document types (page 50; system or vault administrator).
The APFlow document types are already set up for you, but you need to import them. Select Administration > Document Types and click Import Types.
❑
6. Configure APFlow security groups (page 52; system or vault administrator)
Select Administration > Vaults > Edit Vault > Security Groups.
❑
7. Add APFlow users to vaults (page 60; system or vault administrator).
Select Administration > Vaults > Edit Vault> APFlow Users tab. Specify APFlow roles for each user on the accounts payable team. Be sure to designate at least one person with the AP Supervisor role so that person can complete APFlow configuration.
❑
8. Create queues (page 55; system administrator)
If you created queues automatically when creating users, they are already in the system. If you need additional queues, select Administration > Queues > Add Queue.
❑
9. Configure queue categories (page 66; system administrator)
Add queues to the APFlow queue category by selecting Administration > Queue Categories.
❑
10. Grant permissions to report (page 57; system or vault administrator)
Assign reports to vault security groups by opening the Reports module.
❑
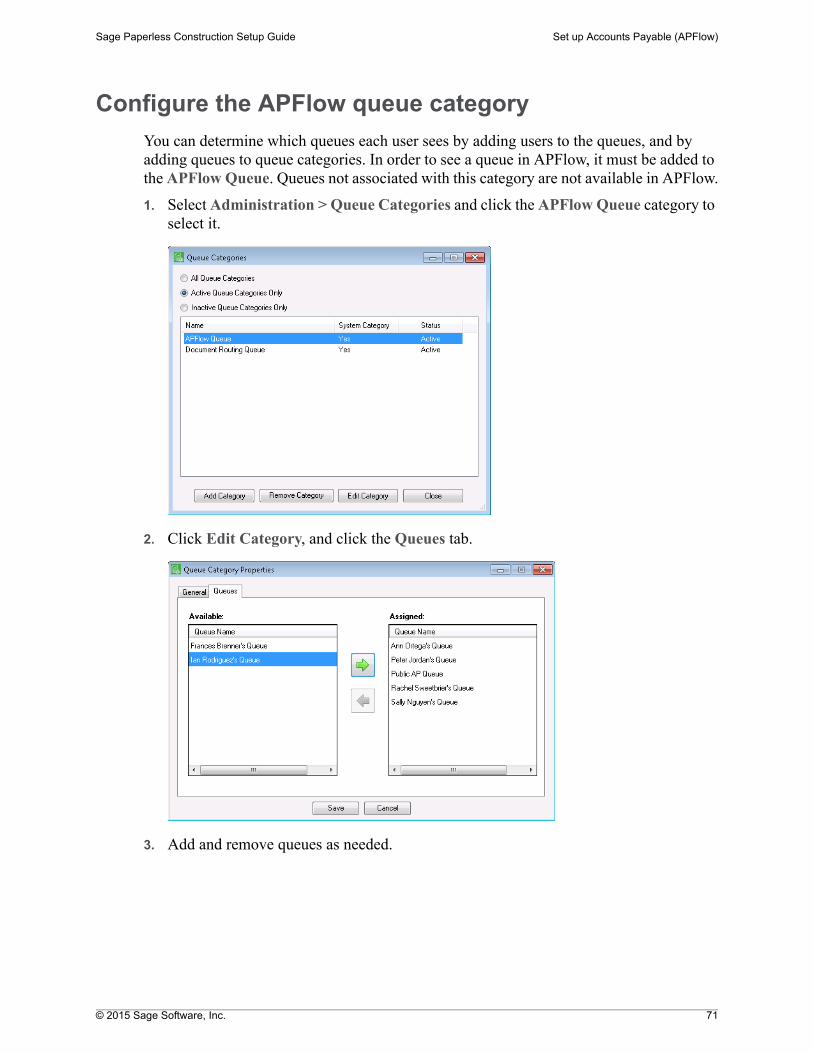
© 2015 Sage Software, Inc. 71
Sage Paperless Construction Setup Guide Set up Accounts Payable (APFlow)
Configure the APFlow queue category
You can determine which queues each user sees by adding users to the queues, and by adding queues to queue categories. In order to see a queue in APFlow, it must be added to the APFlow Queue. Queues not associated with this category are not available in APFlow.
1. Select Administration > Queue Categories and click the APFlow Queue category to select it.
2. Click Edit Category, and click the Queues tab.
3. Add and remove queues as needed.
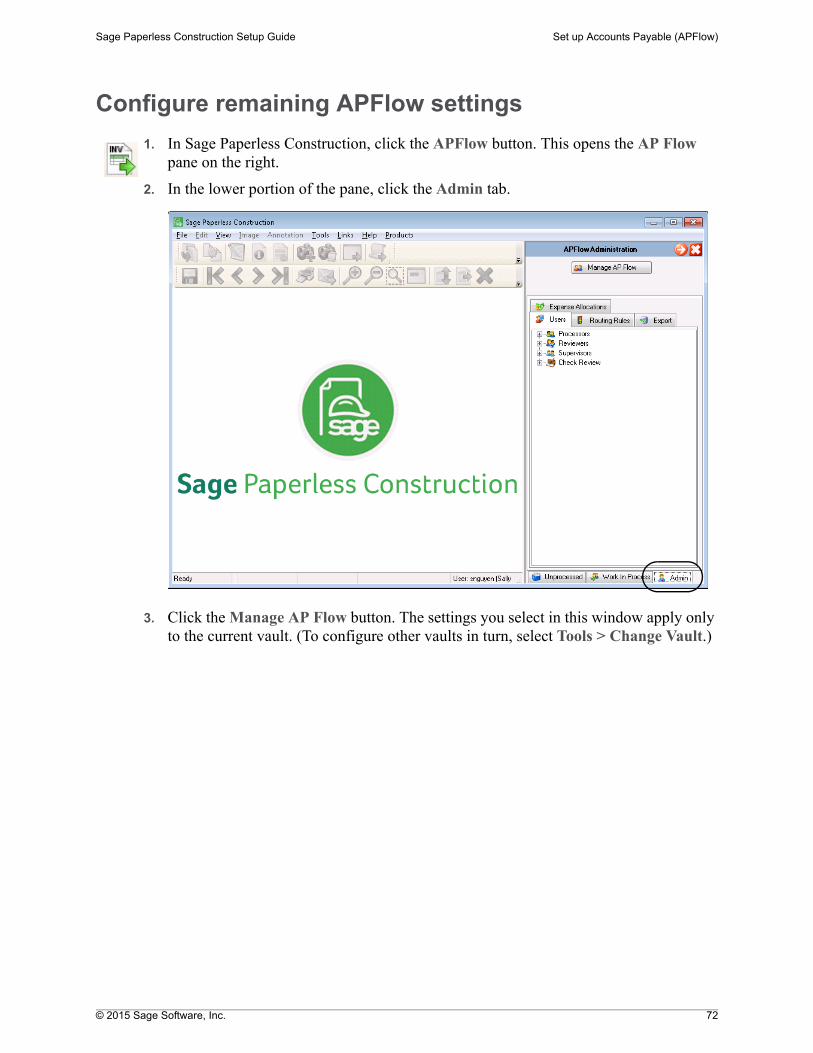
© 2015 Sage Software, Inc. 72
Sage Paperless Construction Setup Guide Set up Accounts Payable (APFlow)
Configure remaining APFlow settings
1. In Sage Paperless Construction, click the APFlow button. This opens the AP Flow pane on the right.
2. In the lower portion of the pane, click the Admin tab.
3. Click the Manage AP Flow button. The settings you select in this window apply only to the current vault. (To configure other vaults in turn, select Tools > Change Vault.)
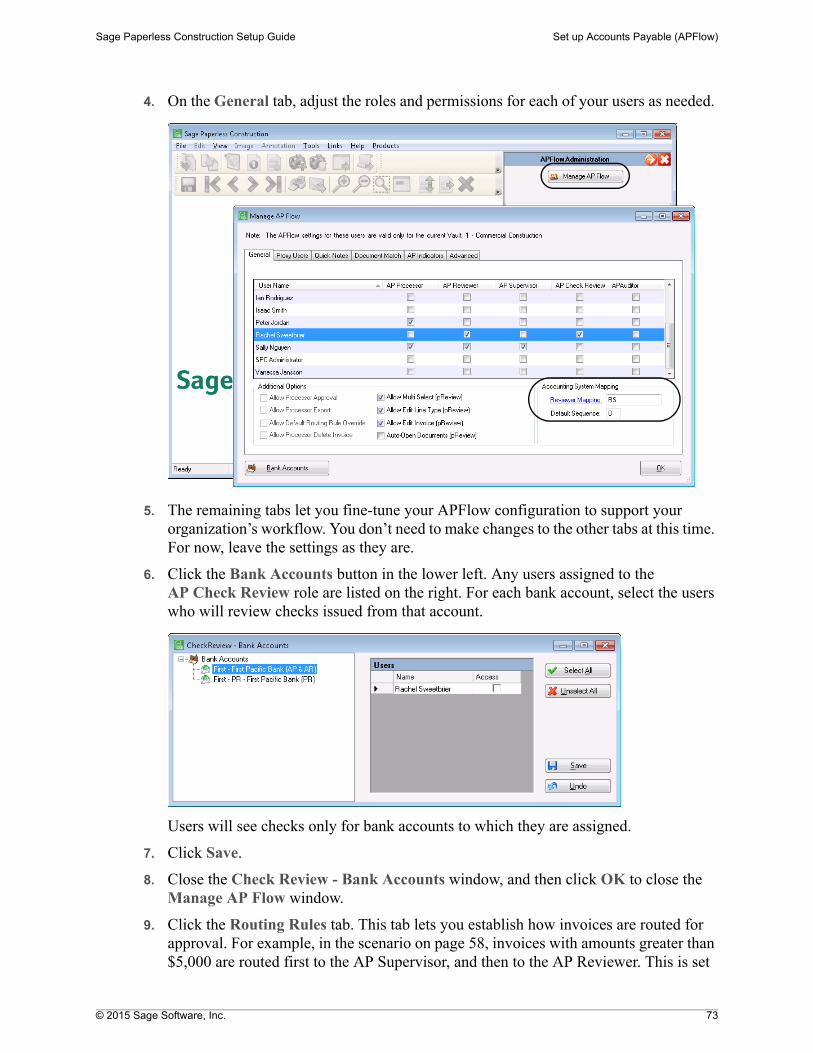
© 2015 Sage Software, Inc. 73
Sage Paperless Construction Setup Guide Set up Accounts Payable (APFlow)
4. On the General tab, adjust the roles and permissions for each of your users as needed.
5. The remaining tabs let you fine-tune your APFlow configuration to support your organization’s workflow. You don’t need to make changes to the other tabs at this time. For now, leave the settings as they are.
6. Click the Bank Accounts button in the lower left. Any users assigned to the AP Check Review role are listed on the right. For each bank account, select the users who will review checks issued from that account.
Users will see checks only for bank accounts to which they are assigned.
7. Click Save.
8. Close the Check Review - Bank Accounts window, and then click OK to close the Manage AP Flow window.
9. Click the Routing Rules tab. This tab lets you establish how invoices are routed for approval. For example, in the scenario on page 58, invoices with amounts greater than $5,000 are routed first to the AP Supervisor, and then to the AP Reviewer. This is set
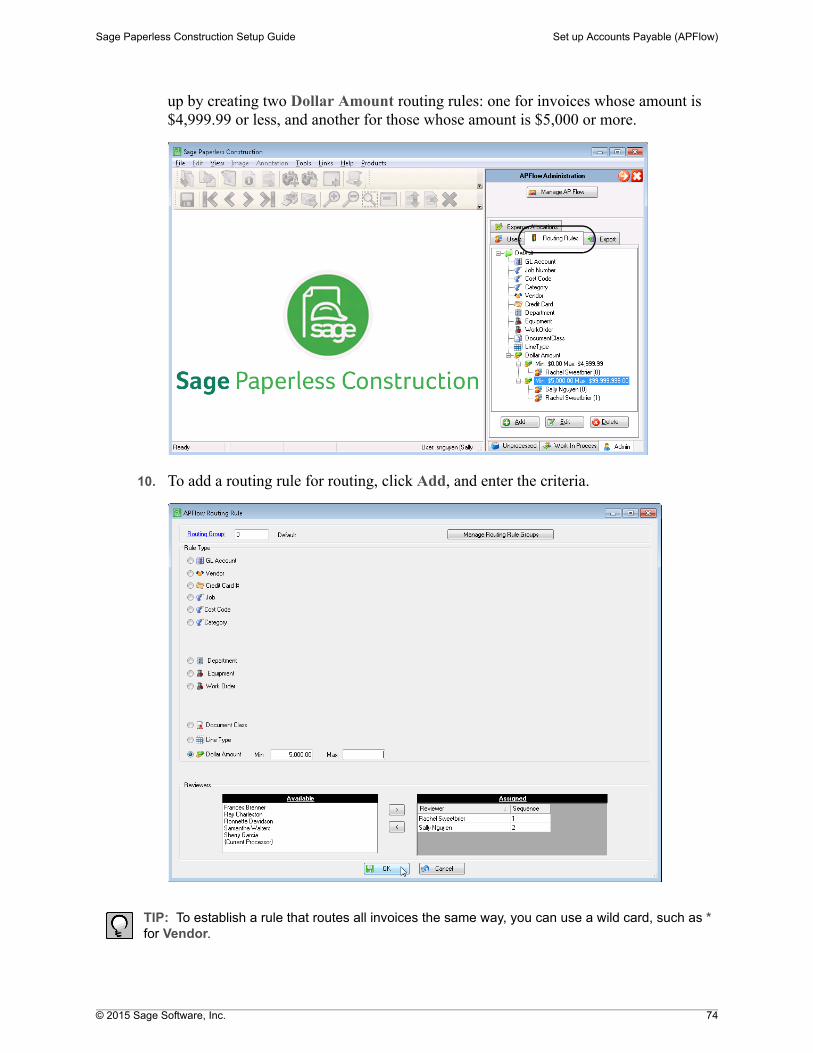
© 2015 Sage Software, Inc. 74
Sage Paperless Construction Setup Guide Set up Accounts Payable (APFlow)
up by creating two Dollar Amount routing rules: one for invoices whose amount is $4,999.99 or less, and another for those whose amount is $5,000 or more.
10. To add a routing rule for routing, click Add, and enter the criteria.
TIP: To establish a rule that routes all invoices the same way, you can use a wild card, such as * for Vendor.
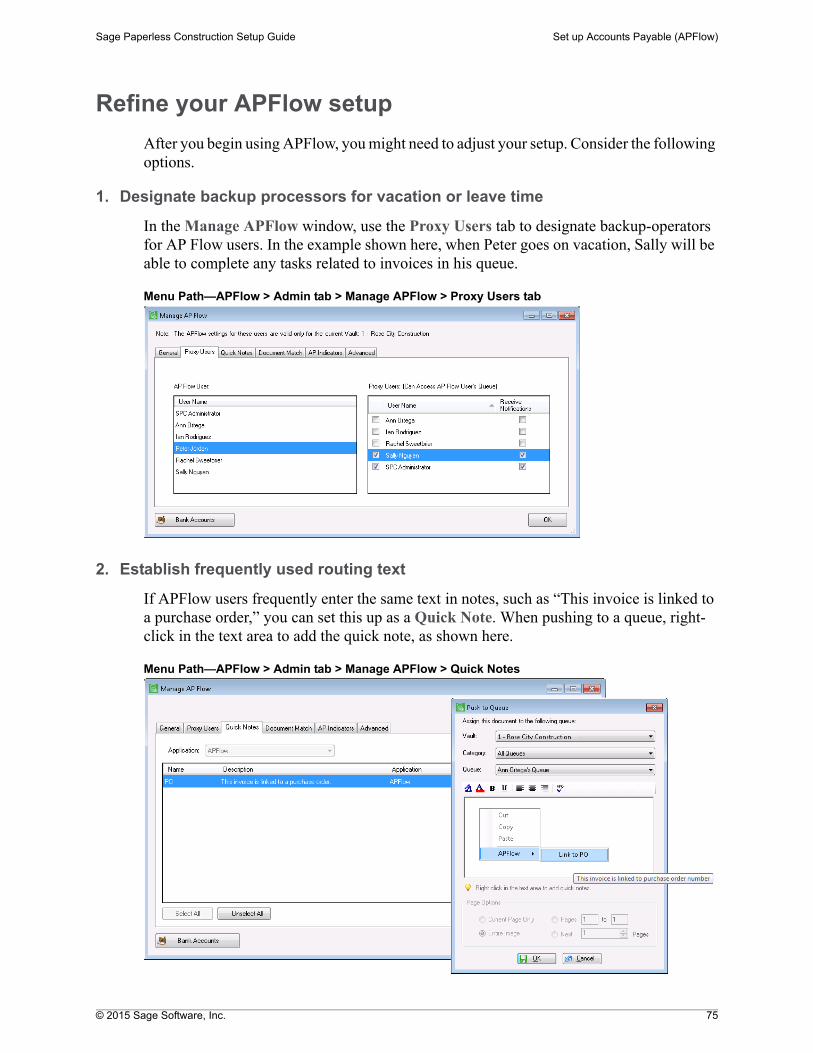
© 2015 Sage Software, Inc. 75
Sage Paperless Construction Setup Guide Set up Accounts Payable (APFlow)
Refine your APFlow setup
After you begin using APFlow, you might need to adjust your setup. Consider the following options.
1. Designate backup processors for vacation or leave time
In the Manage APFlow window, use the Proxy Users tab to designate backup-operators for AP Flow users. In the example shown here, when Peter goes on vacation, Sally will be able to complete any tasks related to invoices in his queue.
Menu Path—APFlow > Admin tab > Manage APFlow > Proxy Users tab
2. Establish frequently used routing text
If APFlow users frequently enter the same text in notes, such as “This invoice is linked to a purchase order,” you can set this up as a Quick Note. When pushing to a queue, right-click in the text area to add the quick note, as shown here.
Menu Path—APFlow > Admin tab > Manage APFlow > Quick Notes
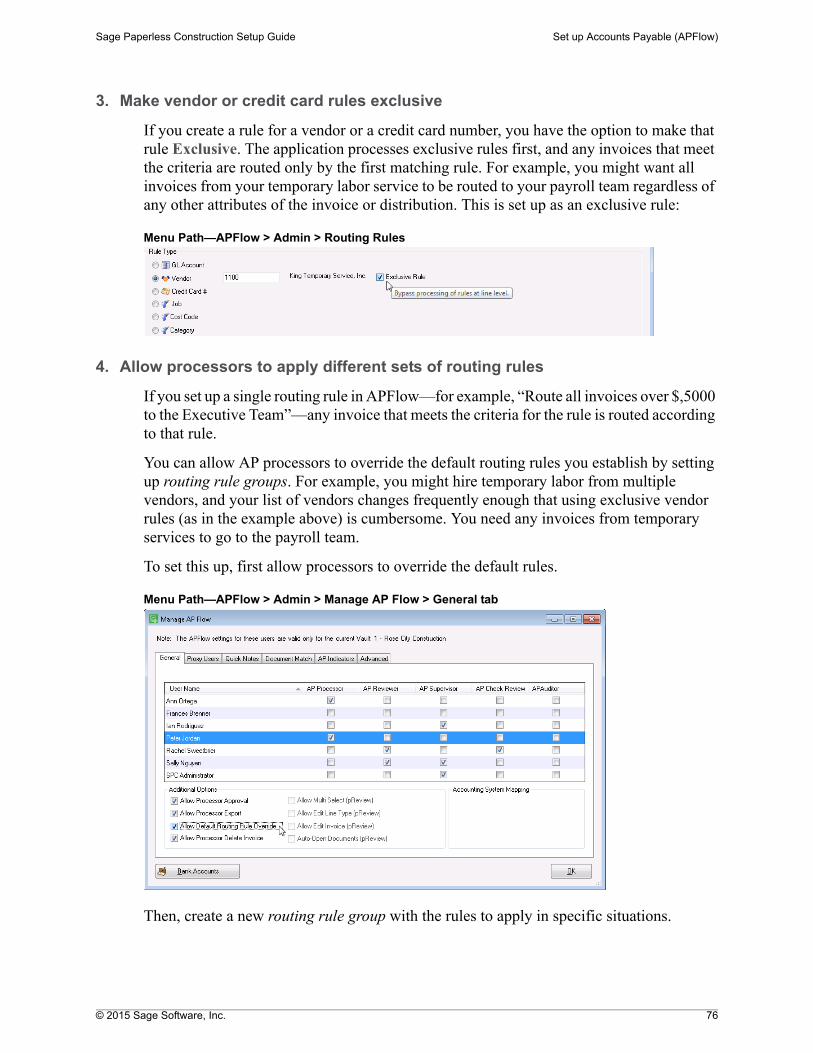
© 2015 Sage Software, Inc. 76
Sage Paperless Construction Setup Guide Set up Accounts Payable (APFlow)
3. Make vendor or credit card rules exclusive
If you create a rule for a vendor or a credit card number, you have the option to make that rule Exclusive. The application processes exclusive rules first, and any invoices that meet the criteria are routed only by the first matching rule. For example, you might want all invoices from your temporary labor service to be routed to your payroll team regardless of any other attributes of the invoice or distribution. This is set up as an exclusive rule:
Menu Path—APFlow > Admin > Routing Rules
4. Allow processors to apply different sets of routing rules
If you set up a single routing rule in APFlow—for example, “Route all invoices over $,5000 to the Executive Team”—any invoice that meets the criteria for the rule is routed according to that rule.
You can allow AP processors to override the default routing rules you establish by setting up routing rule groups. For example, you might hire temporary labor from multiple vendors, and your list of vendors changes frequently enough that using exclusive vendor rules (as in the example above) is cumbersome. You need any invoices from temporary services to go to the payroll team.
To set this up, first allow processors to override the default rules.
Menu Path—APFlow > Admin > Manage AP Flow > General tab
Then, create a new routing rule group with the rules to apply in specific situations.
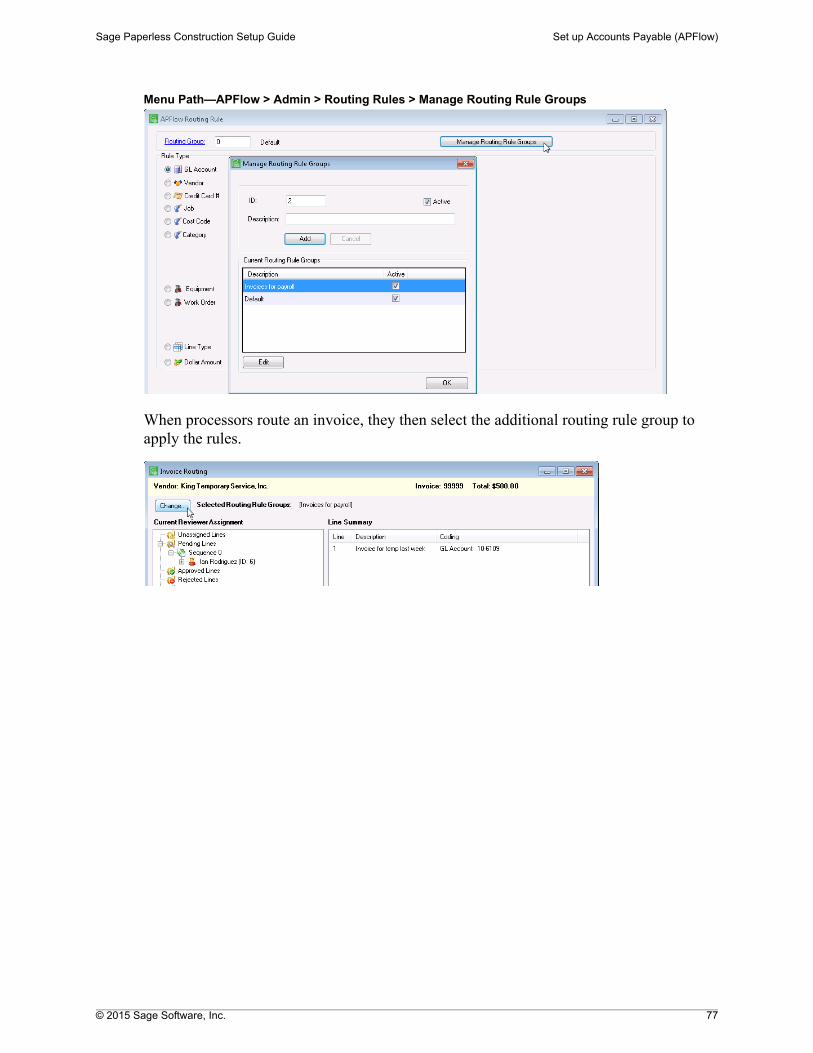
© 2015 Sage Software, Inc. 77
Sage Paperless Construction Setup Guide Set up Accounts Payable (APFlow)
Menu Path—APFlow > Admin > Routing Rules > Manage Routing Rule Groups
When processors route an invoice, they then select the additional routing rule group to apply the rules.
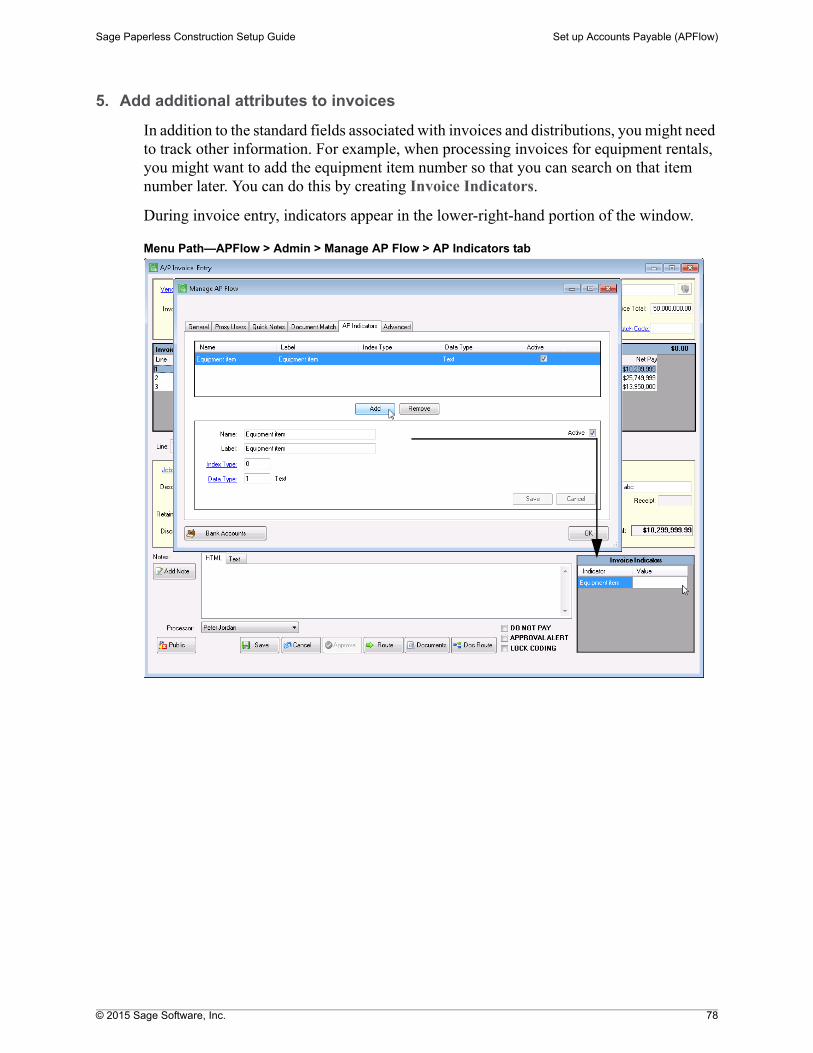
© 2015 Sage Software, Inc. 78
Sage Paperless Construction Setup Guide Set up Accounts Payable (APFlow)
5. Add additional attributes to invoices
In addition to the standard fields associated with invoices and distributions, you might need to track other information. For example, when processing invoices for equipment rentals, you might want to add the equipment item number so that you can search on that item number later. You can do this by creating Invoice Indicators.
During invoice entry, indicators appear in the lower-right-hand portion of the window.
Menu Path—APFlow > Admin > Manage AP Flow > AP Indicators tab
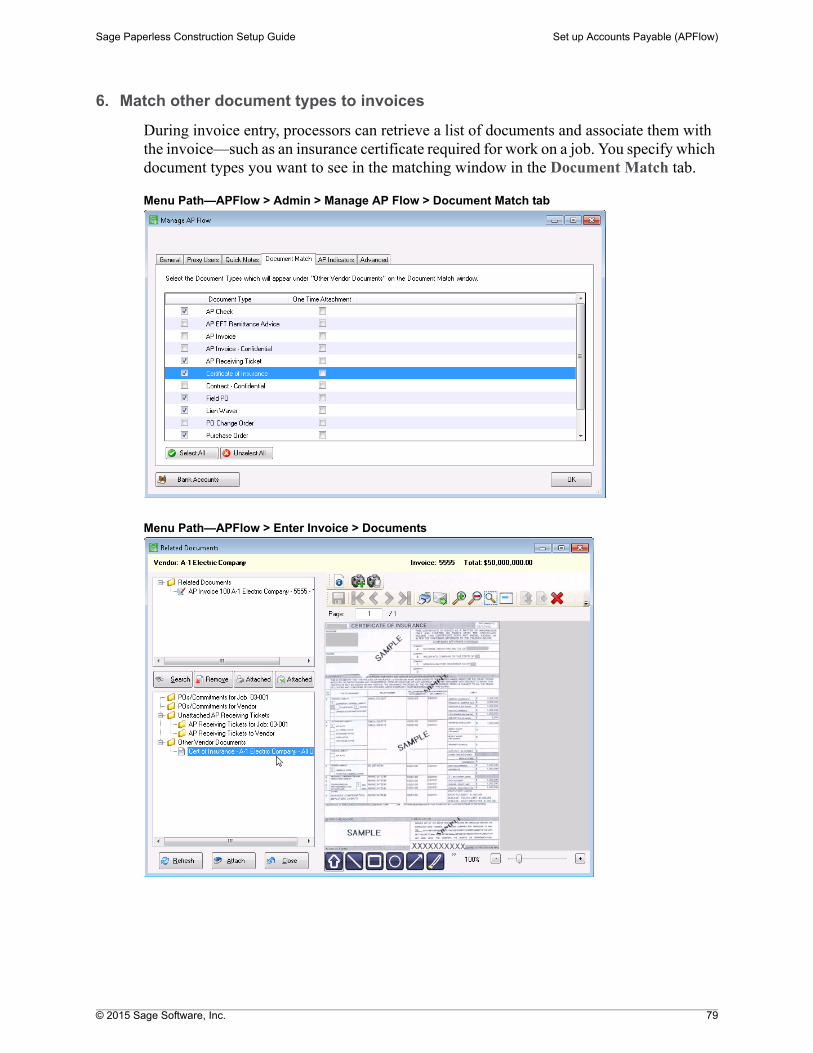
© 2015 Sage Software, Inc. 79
Sage Paperless Construction Setup Guide Set up Accounts Payable (APFlow)
6. Match other document types to invoices
During invoice entry, processors can retrieve a list of documents and associate them with the invoice—such as an insurance certificate required for work on a job. You specify which document types you want to see in the matching window in the Document Match tab.
Menu Path—APFlow > Admin > Manage AP Flow > Document Match tab
Menu Path—APFlow > Enter Invoice > Documents
© 2015 Sage Software, Inc. 80
Sage Paperless Construction Setup Guide Set up Accounts Payable (APFlow)
7. When you export invoices, do you want to send directly to Accounts Payable or manually import them?
When you export invoices, the system can generate an import file for you, that you would then import into Accounts Payable—or, it can push the invoices directly into Accounts Payable.
In the APFlow > Admin > Manage AP Flow window, set the Use AP Invoice Push path to True to send invoices to Accounts Payable. Set it to False to generate an import file.
© 2015 Sage Software, Inc. 81
Sage Paperless Construction Setup Guide Set Up Document Routing (DocRoute)
Set Up Document Routing (DocRoute)When a document flows through your organization, you probably route it to different departments or individuals based on the type of document, potential impact to your business, urgency of the response needed, and many other factors.
The DocRoute module in Sage Paperless Construction streamlines your organization’s document review and approval process. You can set up document types, indexes, and routing rules to automatically send the right documents to the right people each time.
In this section, you will:
Walk through a scenario in which a blueprint for a high-visibility job is routed though the system.
Learn how to set up document and index types to align with your business processes.
See how user permissions can be set up to support your document routing workflows.
Review business considerations related to using DocRoute.
See the step-by-step process for setting up DocRoute.
NOTE: Before you begin, you should have installed Sage Paperless Construction and completed the setup tasks described in the section “Configure Your Vault and Users,” pages 34 to 57.
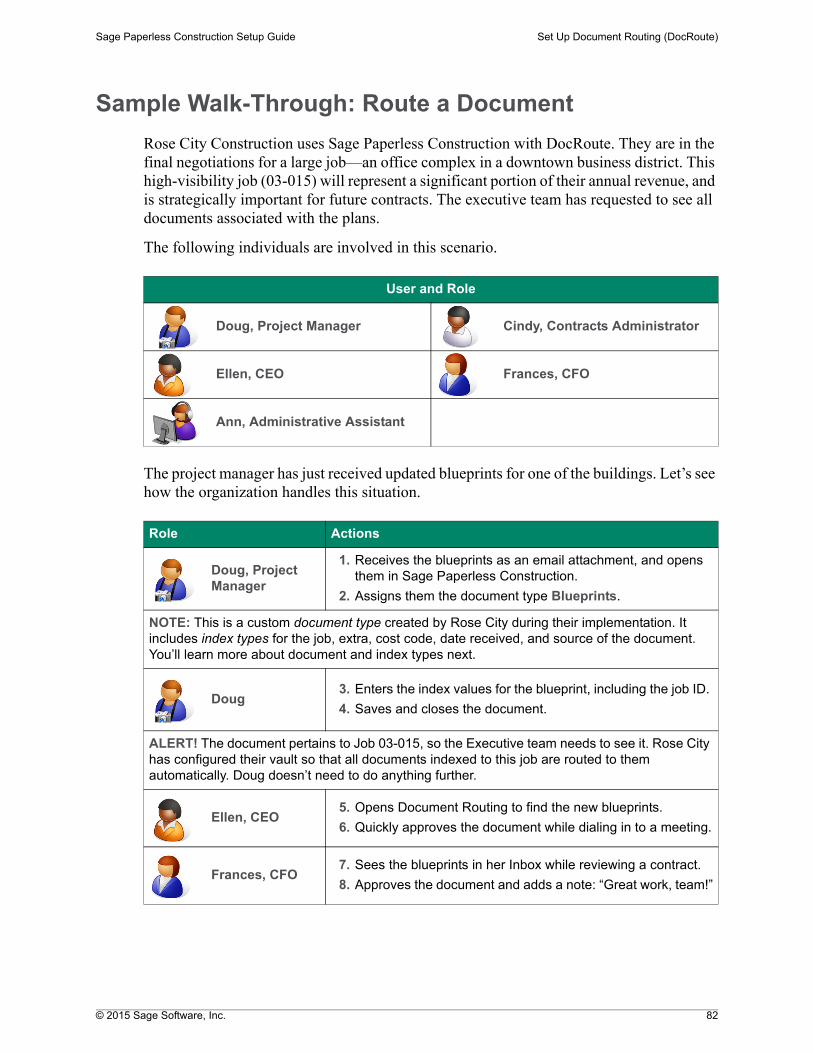
© 2015 Sage Software, Inc. 82
Sage Paperless Construction Setup Guide Set Up Document Routing (DocRoute)
Sample Walk-Through: Route a Document
Rose City Construction uses Sage Paperless Construction with DocRoute. They are in the final negotiations for a large job—an office complex in a downtown business district. This high-visibility job (03-015) will represent a significant portion of their annual revenue, and is strategically important for future contracts. The executive team has requested to see all documents associated with the plans.
The following individuals are involved in this scenario.
The project manager has just received updated blueprints for one of the buildings. Let’s see how the organization handles this situation.
User and Role
Doug, Project Manager Cindy, Contracts Administrator
Ellen, CEO Frances, CFO
Ann, Administrative Assistant
Role Actions
Doug, Project Manager
1. Receives the blueprints as an email attachment, and opens them in Sage Paperless Construction.
2. Assigns them the document type Blueprints.
NOTE: This is a custom document type created by Rose City during their implementation. It includes index types for the job, extra, cost code, date received, and source of the document. You’ll learn more about document and index types next.
Doug3. Enters the index values for the blueprint, including the job ID.
4. Saves and closes the document.
ALERT! The document pertains to Job 03-015, so the Executive team needs to see it. Rose City has configured their vault so that all documents indexed to this job are routed to them automatically. Doug doesn’t need to do anything further.
Ellen, CEO5. Opens Document Routing to find the new blueprints.
6. Quickly approves the document while dialing in to a meeting.
Frances, CFO7. Sees the blueprints in her Inbox while reviewing a contract.
8. Approves the document and adds a note: “Great work, team!”
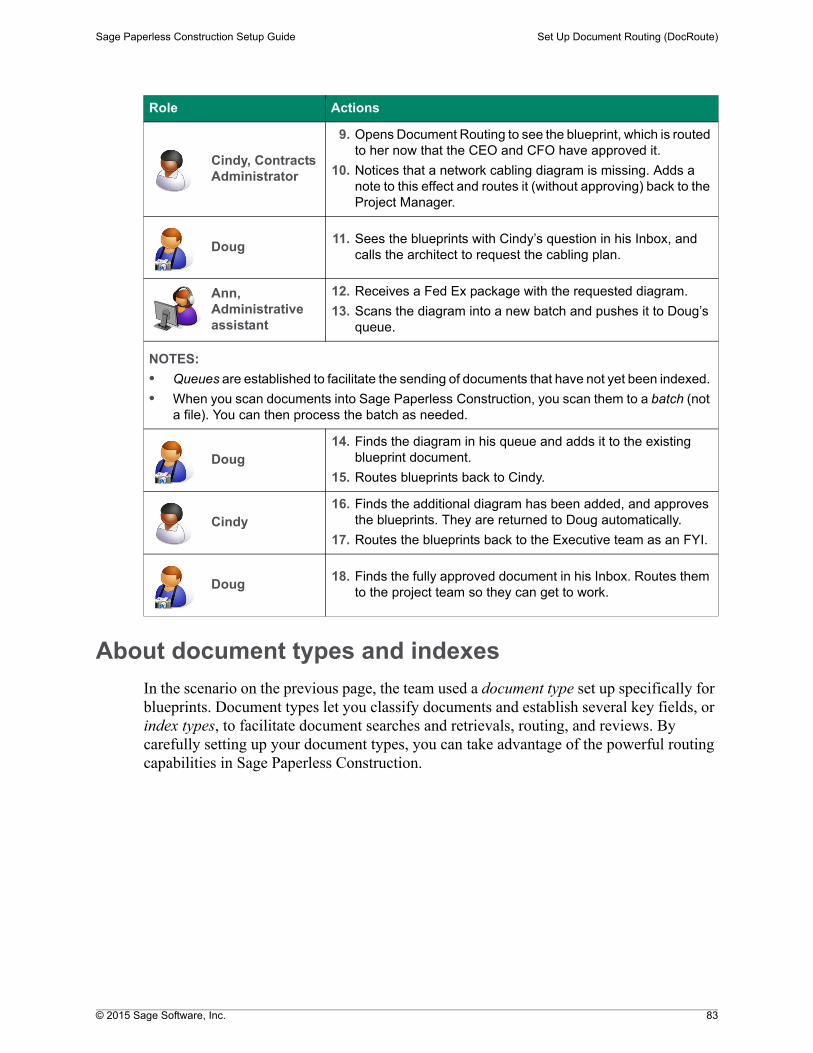
© 2015 Sage Software, Inc. 83
Sage Paperless Construction Setup Guide Set Up Document Routing (DocRoute)
About document types and indexes
In the scenario on the previous page, the team used a document type set up specifically for blueprints. Document types let you classify documents and establish several key fields, or index types, to facilitate document searches and retrievals, routing, and reviews. By carefully setting up your document types, you can take advantage of the powerful routing capabilities in Sage Paperless Construction.
Cindy, Contracts Administrator
9. Opens Document Routing to see the blueprint, which is routed to her now that the CEO and CFO have approved it.
10. Notices that a network cabling diagram is missing. Adds a note to this effect and routes it (without approving) back to the Project Manager.
Doug11. Sees the blueprints with Cindy’s question in his Inbox, and
calls the architect to request the cabling plan.
Ann, Administrative assistant
12. Receives a Fed Ex package with the requested diagram.
13. Scans the diagram into a new batch and pushes it to Doug’s queue.
NOTES:
• Queues are established to facilitate the sending of documents that have not yet been indexed.
• When you scan documents into Sage Paperless Construction, you scan them to a batch (not a file). You can then process the batch as needed.
Doug14. Finds the diagram in his queue and adds it to the existing
blueprint document.
15. Routes blueprints back to Cindy.
Cindy16. Finds the additional diagram has been added, and approves
the blueprints. They are returned to Doug automatically.
17. Routes the blueprints back to the Executive team as an FYI.
Doug18. Finds the fully approved document in his Inbox. Routes them
to the project team so they can get to work.
Role Actions
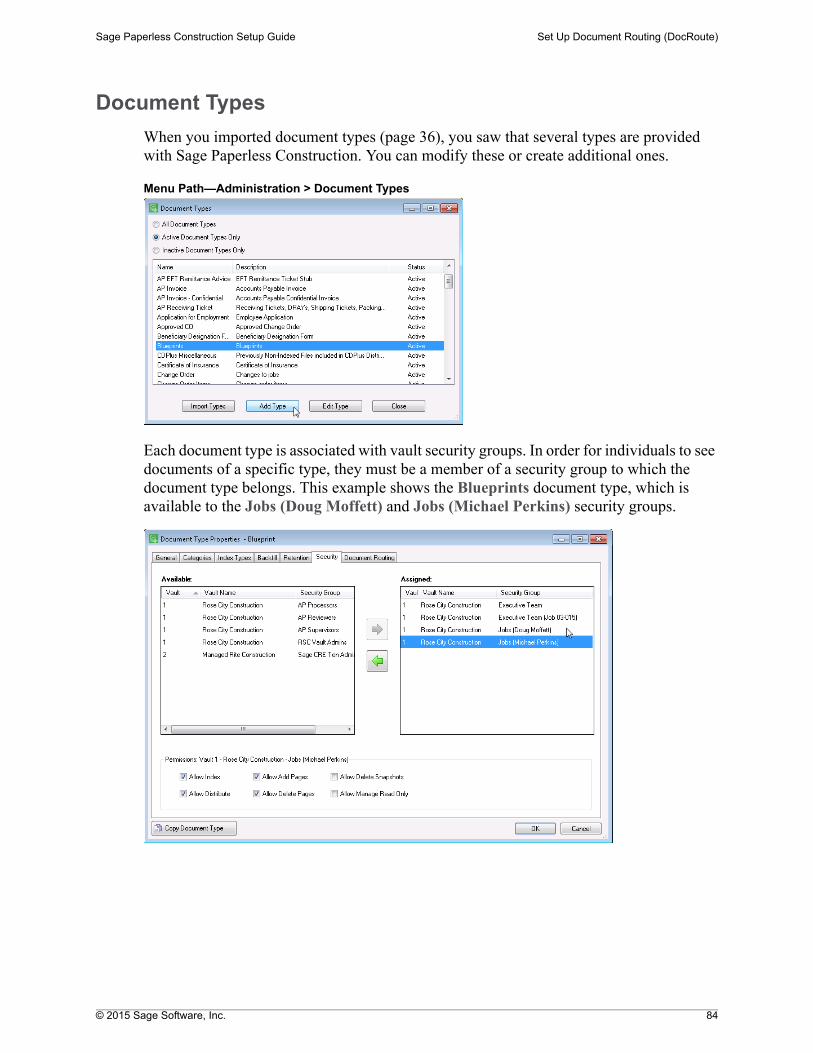
© 2015 Sage Software, Inc. 84
Sage Paperless Construction Setup Guide Set Up Document Routing (DocRoute)
Document Types
When you imported document types (page 36), you saw that several types are provided with Sage Paperless Construction. You can modify these or create additional ones.
Menu Path—Administration > Document Types
Each document type is associated with vault security groups. In order for individuals to see documents of a specific type, they must be a member of a security group to which the document type belongs. This example shows the Blueprints document type, which is available to the Jobs (Doug Moffett) and Jobs (Michael Perkins) security groups.
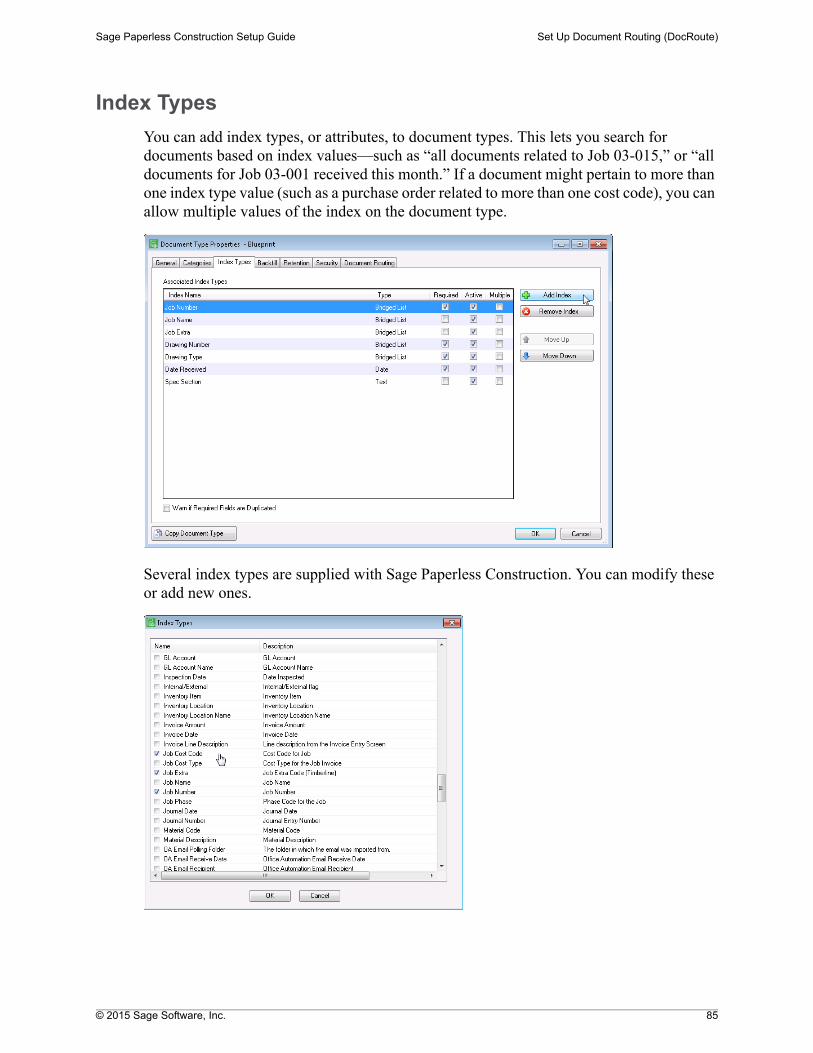
© 2015 Sage Software, Inc. 85
Sage Paperless Construction Setup Guide Set Up Document Routing (DocRoute)
Index Types
You can add index types, or attributes, to document types. This lets you search for documents based on index values—such as “all documents related to Job 03-015,” or “all documents for Job 03-001 received this month.” If a document might pertain to more than one index type value (such as a purchase order related to more than one cost code), you can allow multiple values of the index on the document type.
Several index types are supplied with Sage Paperless Construction. You can modify these or add new ones.
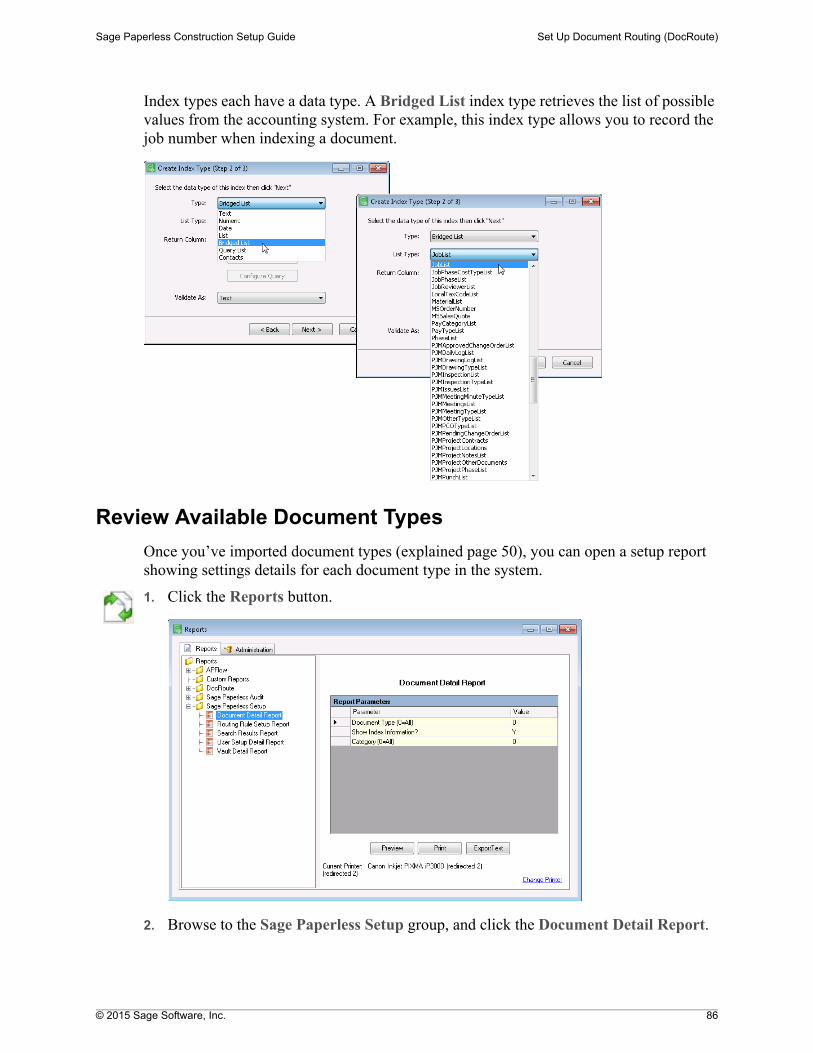
© 2015 Sage Software, Inc. 86
Sage Paperless Construction Setup Guide Set Up Document Routing (DocRoute)
Index types each have a data type. A Bridged List index type retrieves the list of possible values from the accounting system. For example, this index type allows you to record the job number when indexing a document.
Review Available Document Types
Once you’ve imported document types (explained page 50), you can open a setup report showing settings details for each document type in the system.
1. Click the Reports button.
2. Browse to the Sage Paperless Setup group, and click the Document Detail Report.
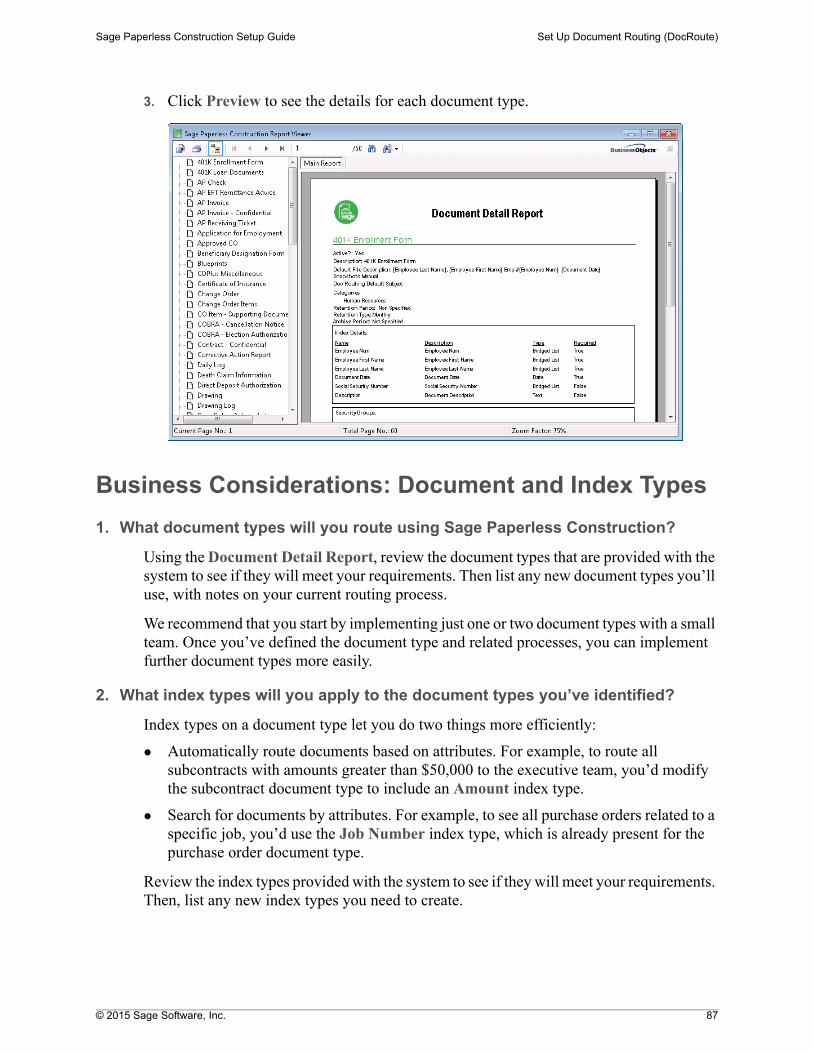
© 2015 Sage Software, Inc. 87
Sage Paperless Construction Setup Guide Set Up Document Routing (DocRoute)
3. Click Preview to see the details for each document type.
Business Considerations: Document and Index Types
1. What document types will you route using Sage Paperless Construction?
Using the Document Detail Report, review the document types that are provided with the system to see if they will meet your requirements. Then list any new document types you’ll use, with notes on your current routing process.
We recommend that you start by implementing just one or two document types with a small team. Once you’ve defined the document type and related processes, you can implement further document types more easily.
2. What index types will you apply to the document types you’ve identified?
Index types on a document type let you do two things more efficiently:
Automatically route documents based on attributes. For example, to route all subcontracts with amounts greater than $50,000 to the executive team, you’d modify the subcontract document type to include an Amount index type.
Search for documents by attributes. For example, to see all purchase orders related to a specific job, you’d use the Job Number index type, which is already present for the purchase order document type.
Review the index types provided with the system to see if they will meet your requirements. Then, list any new index types you need to create.
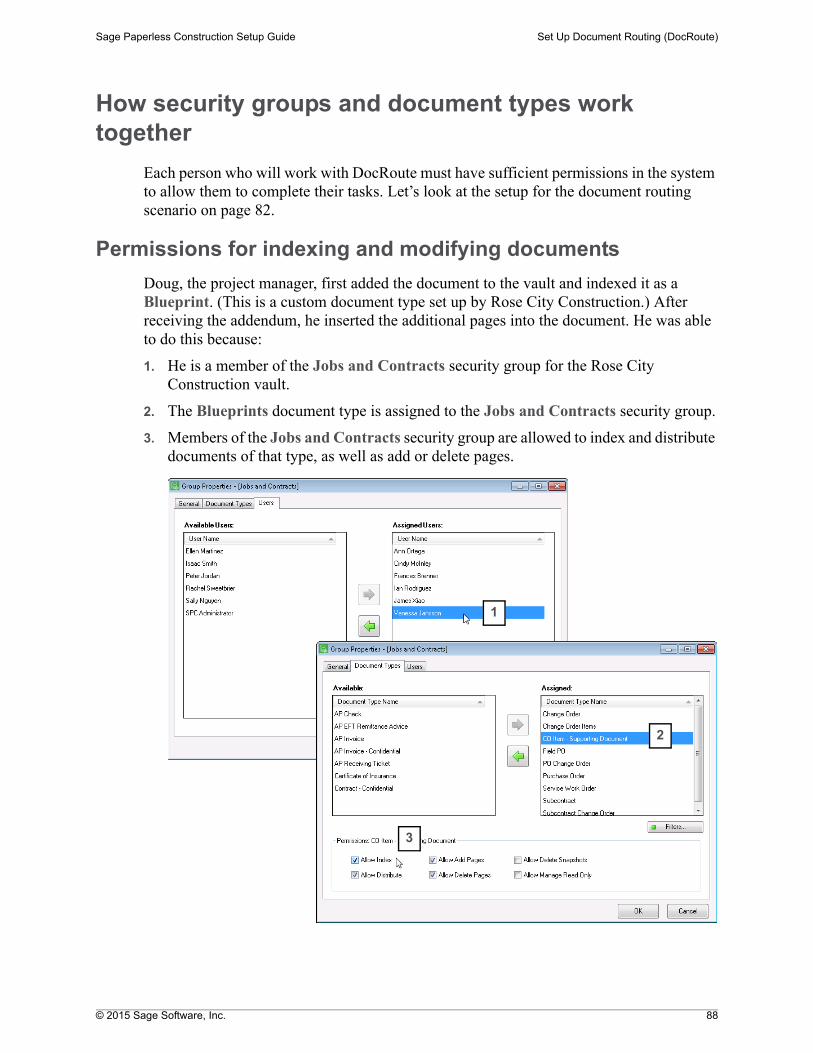
© 2015 Sage Software, Inc. 88
Sage Paperless Construction Setup Guide Set Up Document Routing (DocRoute)
How security groups and document types work together
Each person who will work with DocRoute must have sufficient permissions in the system to allow them to complete their tasks. Let’s look at the setup for the document routing scenario on page 82.
Permissions for indexing and modifying documents
Doug, the project manager, first added the document to the vault and indexed it as a Blueprint. (This is a custom document type set up by Rose City Construction.) After receiving the addendum, he inserted the additional pages into the document. He was able to do this because:
1. He is a member of the Jobs and Contracts security group for the Rose City Construction vault.
2. The Blueprints document type is assigned to the Jobs and Contracts security group.
3. Members of the Jobs and Contracts security group are allowed to index and distribute documents of that type, as well as add or delete pages.
1
2
3
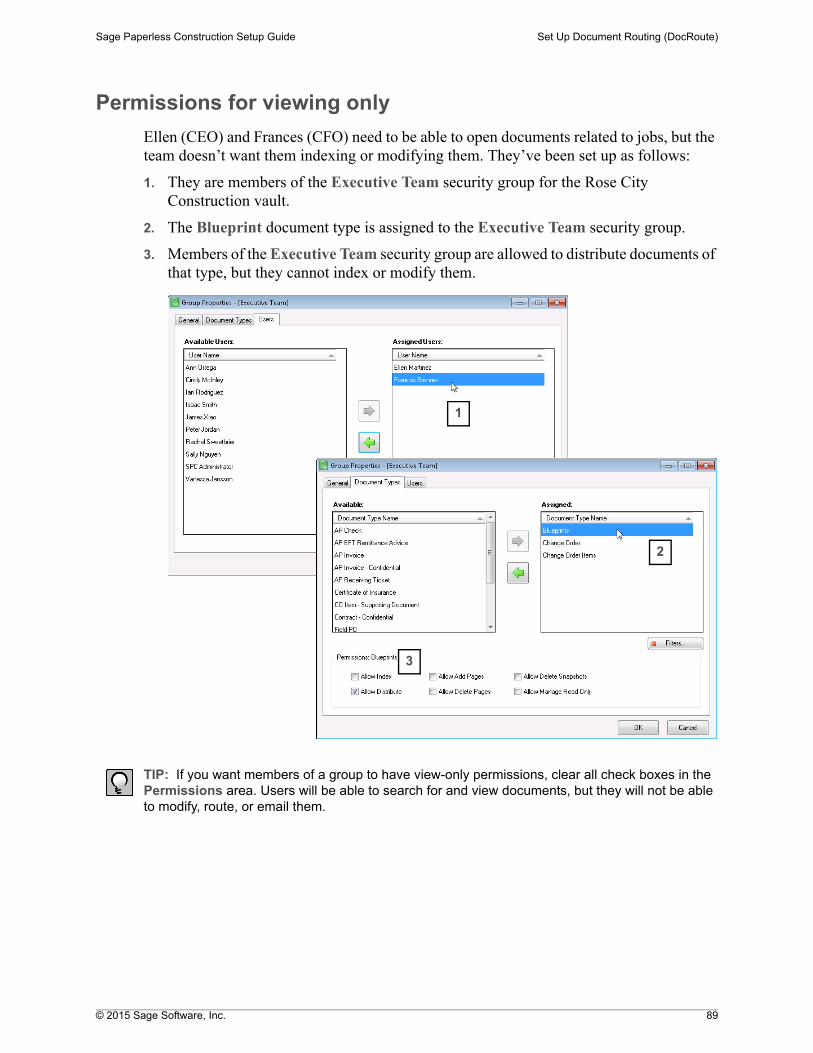
© 2015 Sage Software, Inc. 89
Sage Paperless Construction Setup Guide Set Up Document Routing (DocRoute)
Permissions for viewing only
Ellen (CEO) and Frances (CFO) need to be able to open documents related to jobs, but the team doesn’t want them indexing or modifying them. They’ve been set up as follows:
1. They are members of the Executive Team security group for the Rose City Construction vault.
2. The Blueprint document type is assigned to the Executive Team security group.
3. Members of the Executive Team security group are allowed to distribute documents of that type, but they cannot index or modify them.
TIP: If you want members of a group to have view-only permissions, clear all check boxes in the Permissions area. Users will be able to search for and view documents, but they will not be able to modify, route, or email them.
1
2
3
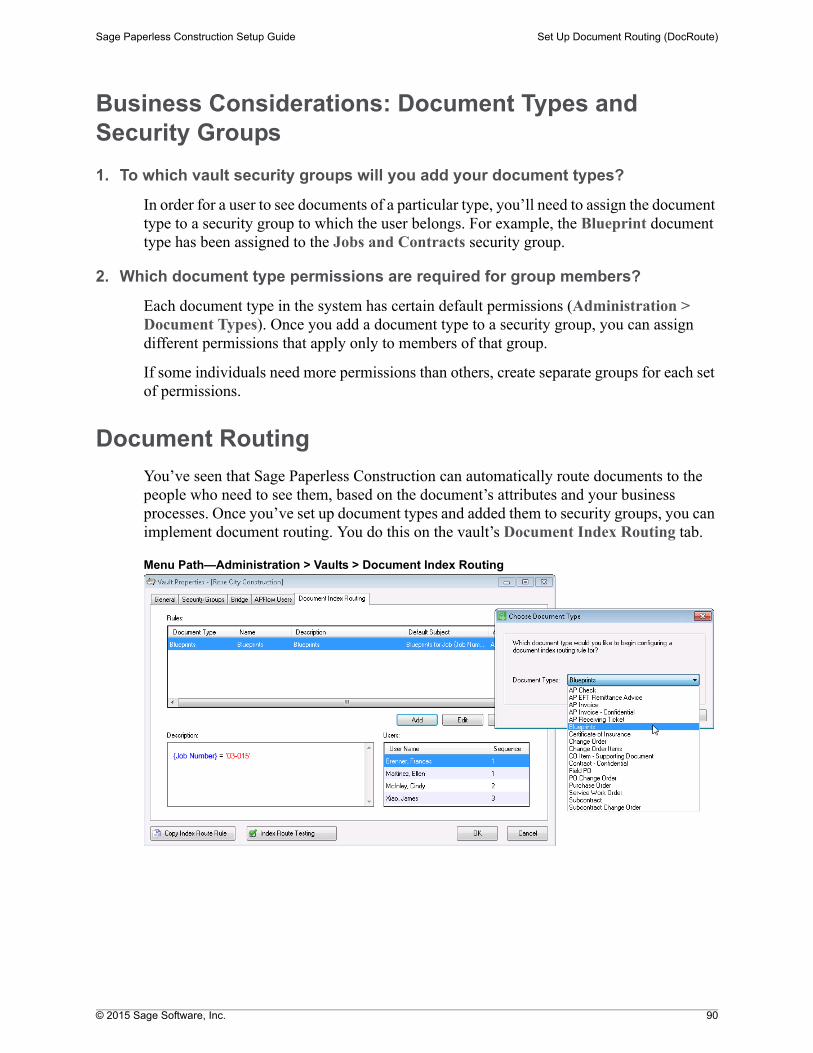
© 2015 Sage Software, Inc. 90
Sage Paperless Construction Setup Guide Set Up Document Routing (DocRoute)
Business Considerations: Document Types and Security Groups
1. To which vault security groups will you add your document types?
In order for a user to see documents of a particular type, you’ll need to assign the document type to a security group to which the user belongs. For example, the Blueprint document type has been assigned to the Jobs and Contracts security group.
2. Which document type permissions are required for group members?
Each document type in the system has certain default permissions (Administration > Document Types). Once you add a document type to a security group, you can assign different permissions that apply only to members of that group.
If some individuals need more permissions than others, create separate groups for each set of permissions.
Document Routing
You’ve seen that Sage Paperless Construction can automatically route documents to the people who need to see them, based on the document’s attributes and your business processes. Once you’ve set up document types and added them to security groups, you can implement document routing. You do this on the vault’s Document Index Routing tab.
Menu Path—Administration > Vaults > Document Index Routing
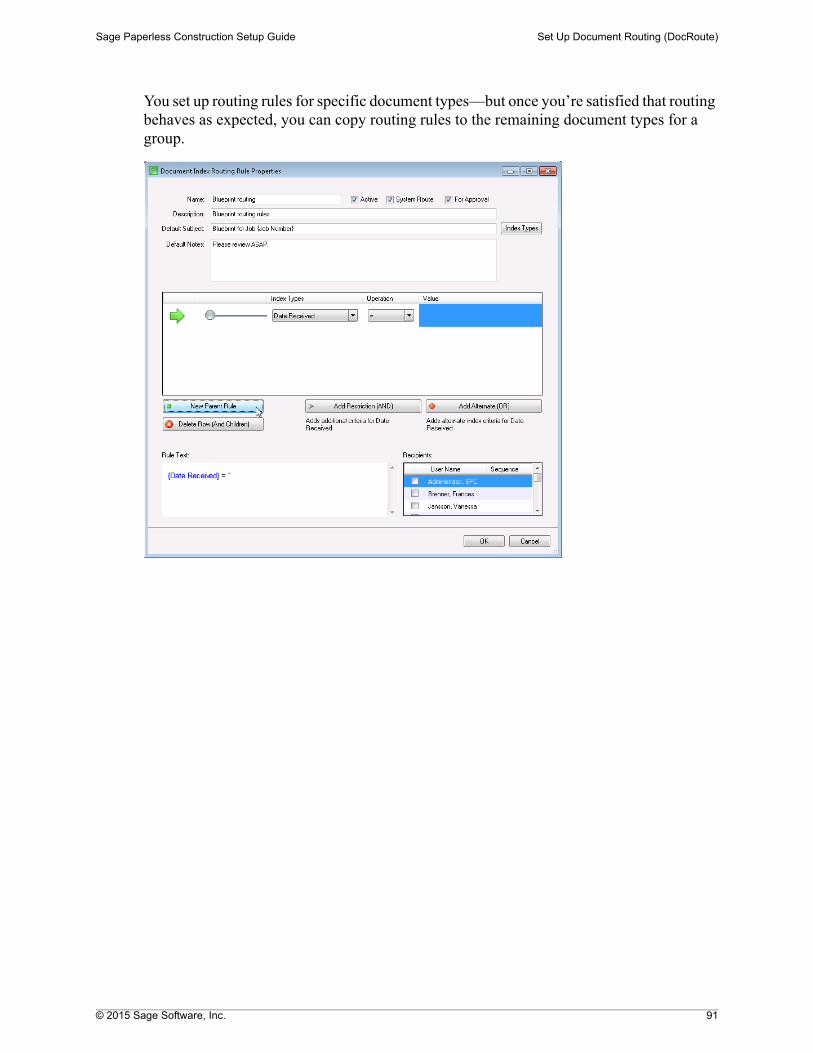
© 2015 Sage Software, Inc. 91
Sage Paperless Construction Setup Guide Set Up Document Routing (DocRoute)
You set up routing rules for specific document types—but once you’re satisfied that routing behaves as expected, you can copy routing rules to the remaining document types for a group.

© 2015 Sage Software, Inc. 92
Sage Paperless Construction Setup Guide Set Up Document Routing (DocRoute)
Business Considerations: Document Routing
1. How do you normally route documents through your organization?
For each document type that you will implement, list the sequence in which particular documents are routed, including any special routing that happens as a result of particular attributes (such as contracts over a certain amount, or compliance documents from a particular vendor).
2. How do employees normally search for documents?
Determine how members of your organization search for documents. For example, they might:
Search for contracts by customer number or start date.
Retrieve proof of insurance certificates by job or vendor.
Retrieve photos from the job site based on a vendor or employee number.
Each document attribute that your users might search on should be an index type. Review the available index types, and list any new ones that you’ll need to create.
How queues and queue categories support DocRoute
In the sample scenario on page 82, recall that when the addendum to the blueprint was received by Ann, she pushed it to a queue. Queues let you move documents that have not yet been indexed or processed to individuals in your organization. Indexed documents cannot be pushed to a queue.
When you create users in Sage Paperless Construction, the system can automatically create a queue and assign the user to it. This results in a queue identified by the user name. You can also create new queues (Administration > Queues > Add Queue).
Documents in queues don’t appear in vault search results, because they have not been indexed. Once a document is indexed, you can search for it by document type or indexes.
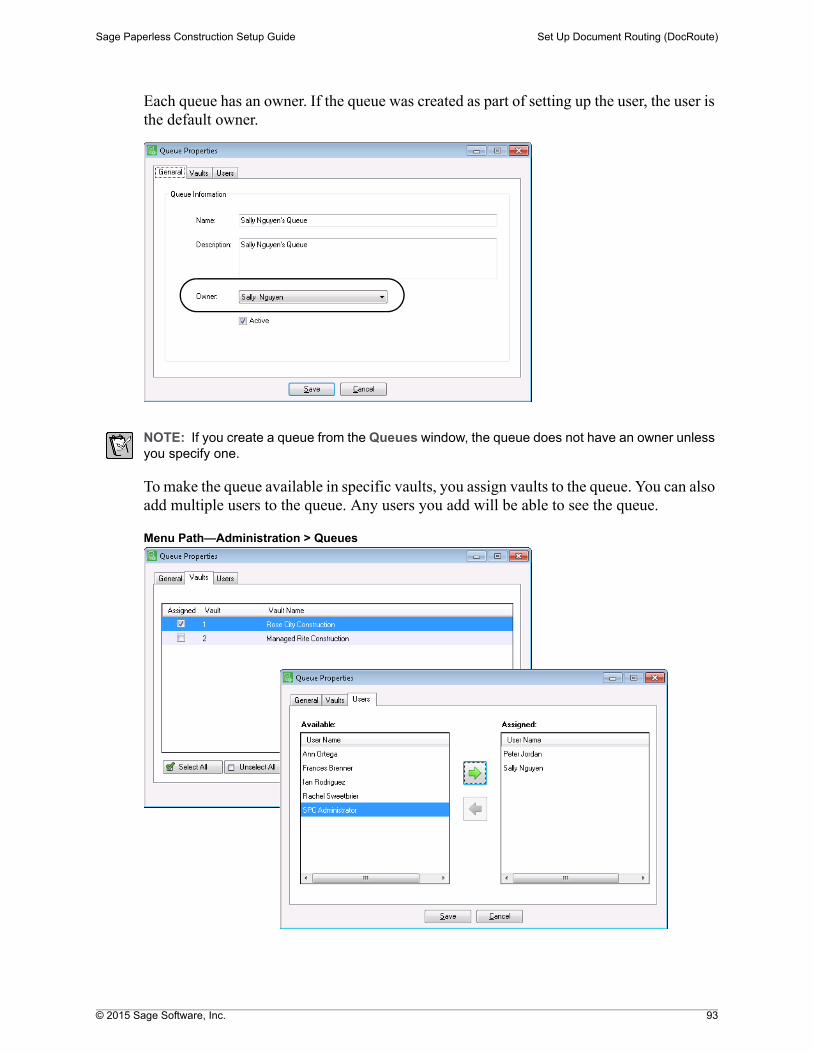
© 2015 Sage Software, Inc. 93
Sage Paperless Construction Setup Guide Set Up Document Routing (DocRoute)
Each queue has an owner. If the queue was created as part of setting up the user, the user is the default owner.
NOTE: If you create a queue from the Queues window, the queue does not have an owner unless you specify one.
To make the queue available in specific vaults, you assign vaults to the queue. You can also add multiple users to the queue. Any users you add will be able to see the queue.
Menu Path—Administration > Queues
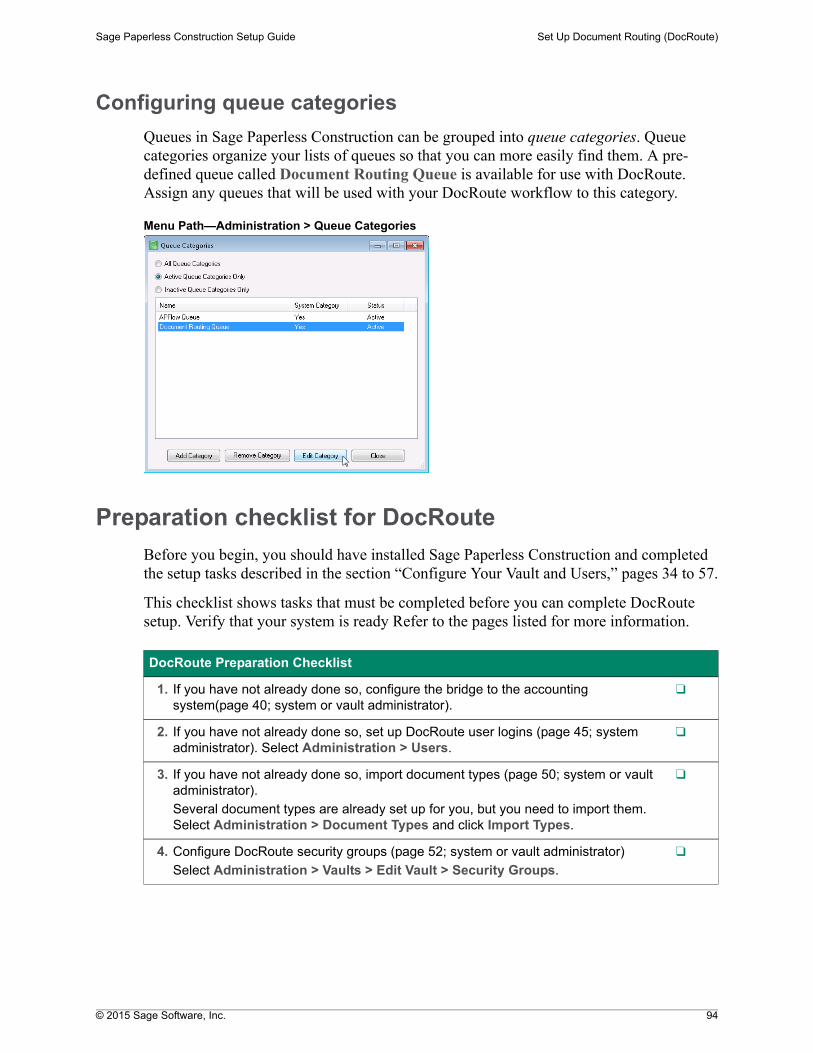
© 2015 Sage Software, Inc. 94
Sage Paperless Construction Setup Guide Set Up Document Routing (DocRoute)
Configuring queue categories
Queues in Sage Paperless Construction can be grouped into queue categories. Queue categories organize your lists of queues so that you can more easily find them. A pre-defined queue called Document Routing Queue is available for use with DocRoute. Assign any queues that will be used with your DocRoute workflow to this category.
Menu Path—Administration > Queue Categories
Preparation checklist for DocRoute
Before you begin, you should have installed Sage Paperless Construction and completed the setup tasks described in the section “Configure Your Vault and Users,” pages 34 to 57.
This checklist shows tasks that must be completed before you can complete DocRoute setup. Verify that your system is ready Refer to the pages listed for more information.
DocRoute Preparation Checklist
1. If you have not already done so, configure the bridge to the accounting system(page 40; system or vault administrator).
❑
2. If you have not already done so, set up DocRoute user logins (page 45; system administrator). Select Administration > Users.
❑
3. If you have not already done so, import document types (page 50; system or vault administrator).
Several document types are already set up for you, but you need to import them. Select Administration > Document Types and click Import Types.
❑
4. Configure DocRoute security groups (page 52; system or vault administrator)
Select Administration > Vaults > Edit Vault > Security Groups.
❑
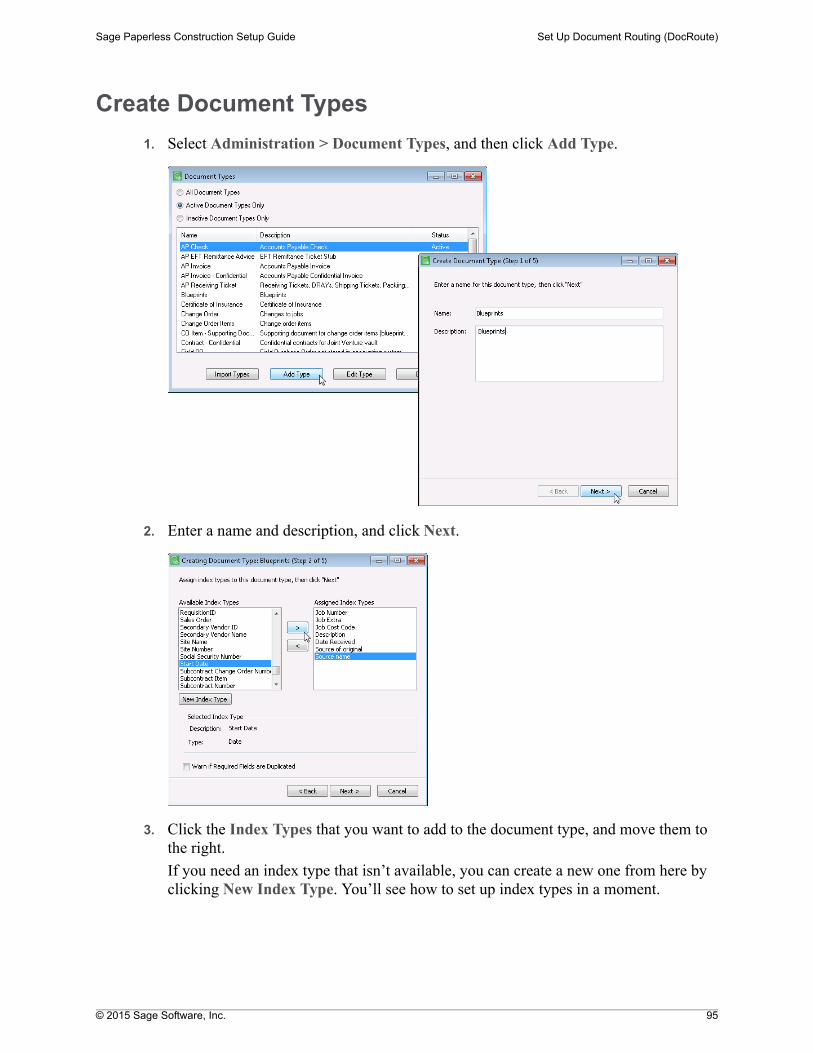
© 2015 Sage Software, Inc. 95
Sage Paperless Construction Setup Guide Set Up Document Routing (DocRoute)
Create Document Types
1. Select Administration > Document Types, and then click Add Type.
2. Enter a name and description, and click Next.
3. Click the Index Types that you want to add to the document type, and move them to the right.
If you need an index type that isn’t available, you can create a new one from here by clicking New Index Type. You’ll see how to set up index types in a moment.
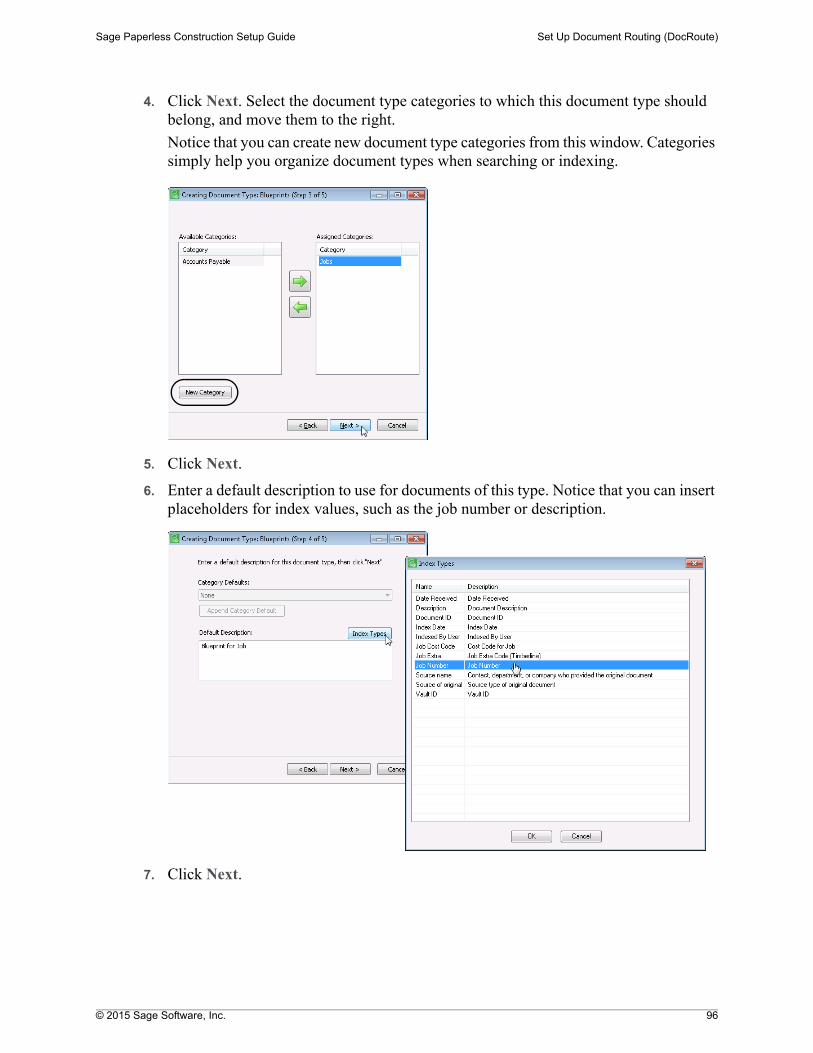
© 2015 Sage Software, Inc. 96
Sage Paperless Construction Setup Guide Set Up Document Routing (DocRoute)
4. Click Next. Select the document type categories to which this document type should belong, and move them to the right.
Notice that you can create new document type categories from this window. Categories simply help you organize document types when searching or indexing.
5. Click Next.
6. Enter a default description to use for documents of this type. Notice that you can insert placeholders for index values, such as the job number or description.
7. Click Next.
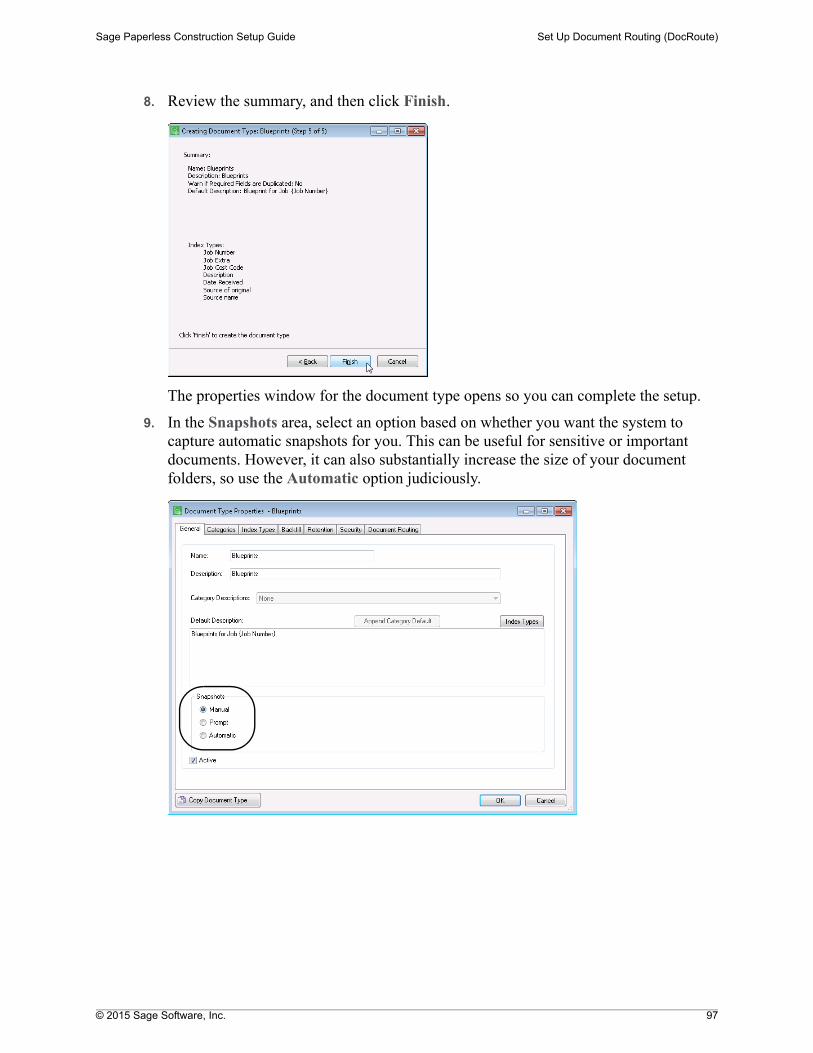
© 2015 Sage Software, Inc. 97
Sage Paperless Construction Setup Guide Set Up Document Routing (DocRoute)
8. Review the summary, and then click Finish.
The properties window for the document type opens so you can complete the setup.
9. In the Snapshots area, select an option based on whether you want the system to capture automatic snapshots for you. This can be useful for sensitive or important documents. However, it can also substantially increase the size of your document folders, so use the Automatic option judiciously.
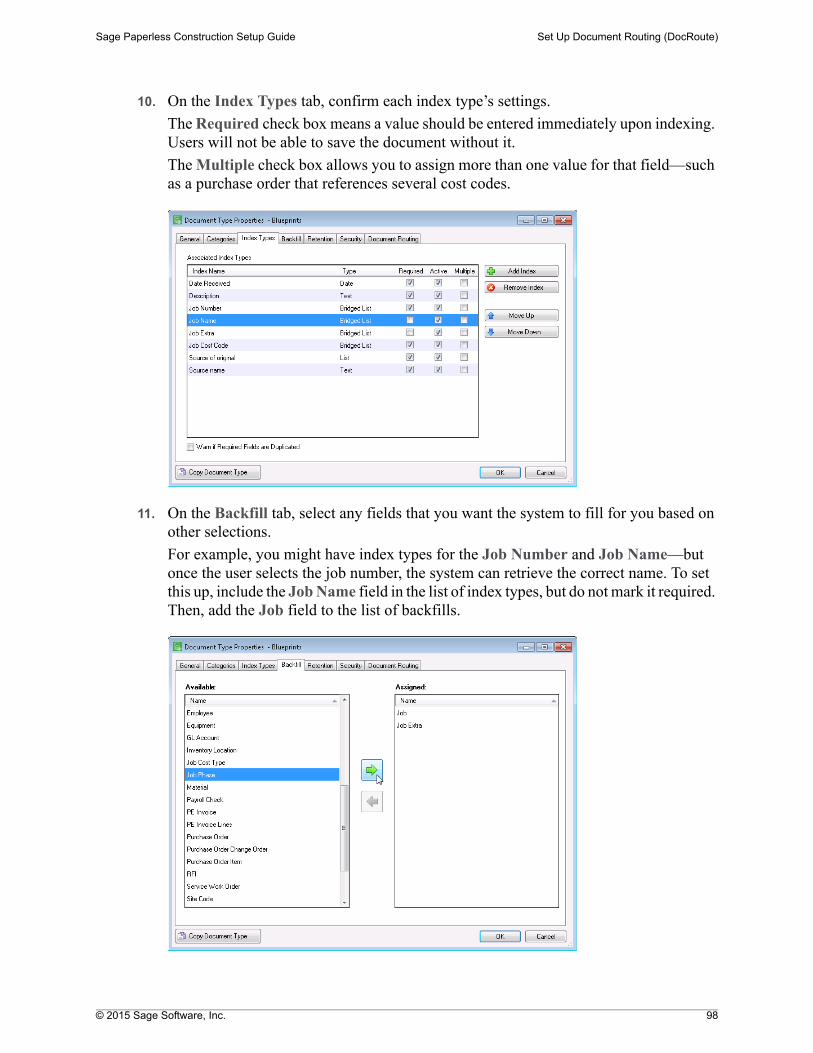
© 2015 Sage Software, Inc. 98
Sage Paperless Construction Setup Guide Set Up Document Routing (DocRoute)
10. On the Index Types tab, confirm each index type’s settings.
The Required check box means a value should be entered immediately upon indexing. Users will not be able to save the document without it.
The Multiple check box allows you to assign more than one value for that field—such as a purchase order that references several cost codes.
11. On the Backfill tab, select any fields that you want the system to fill for you based on other selections.
For example, you might have index types for the Job Number and Job Name—but once the user selects the job number, the system can retrieve the correct name. To set this up, include the Job Name field in the list of index types, but do not mark it required. Then, add the Job field to the list of backfills.
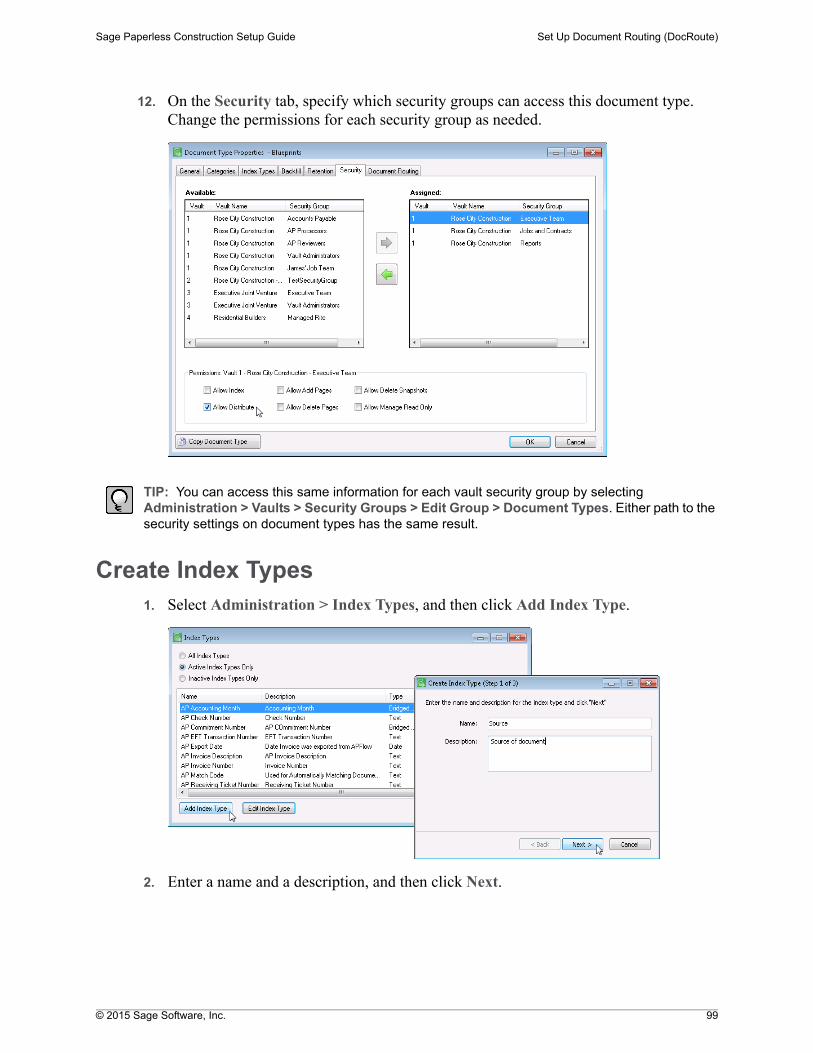
© 2015 Sage Software, Inc. 99
Sage Paperless Construction Setup Guide Set Up Document Routing (DocRoute)
12. On the Security tab, specify which security groups can access this document type. Change the permissions for each security group as needed.
TIP: You can access this same information for each vault security group by selecting Administration > Vaults > Security Groups > Edit Group > Document Types. Either path to the security settings on document types has the same result.
Create Index Types1. Select Administration > Index Types, and then click Add Index Type.
2. Enter a name and a description, and then click Next.
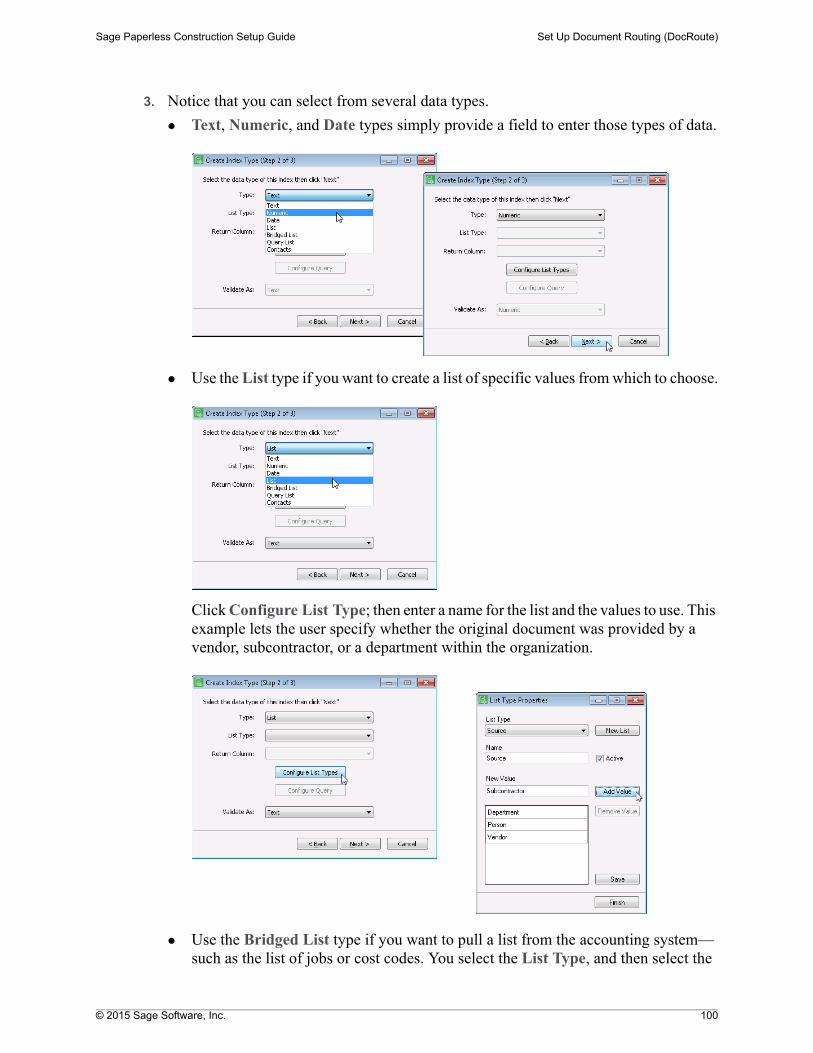
© 2015 Sage Software, Inc. 100
Sage Paperless Construction Setup Guide Set Up Document Routing (DocRoute)
3. Notice that you can select from several data types.
Text, Numeric, and Date types simply provide a field to enter those types of data.
Use the List type if you want to create a list of specific values from which to choose.
Click Configure List Type; then enter a name for the list and the values to use. This example lets the user specify whether the original document was provided by a vendor, subcontractor, or a department within the organization.
Use the Bridged List type if you want to pull a list from the accounting system—such as the list of jobs or cost codes. You select the List Type, and then select the
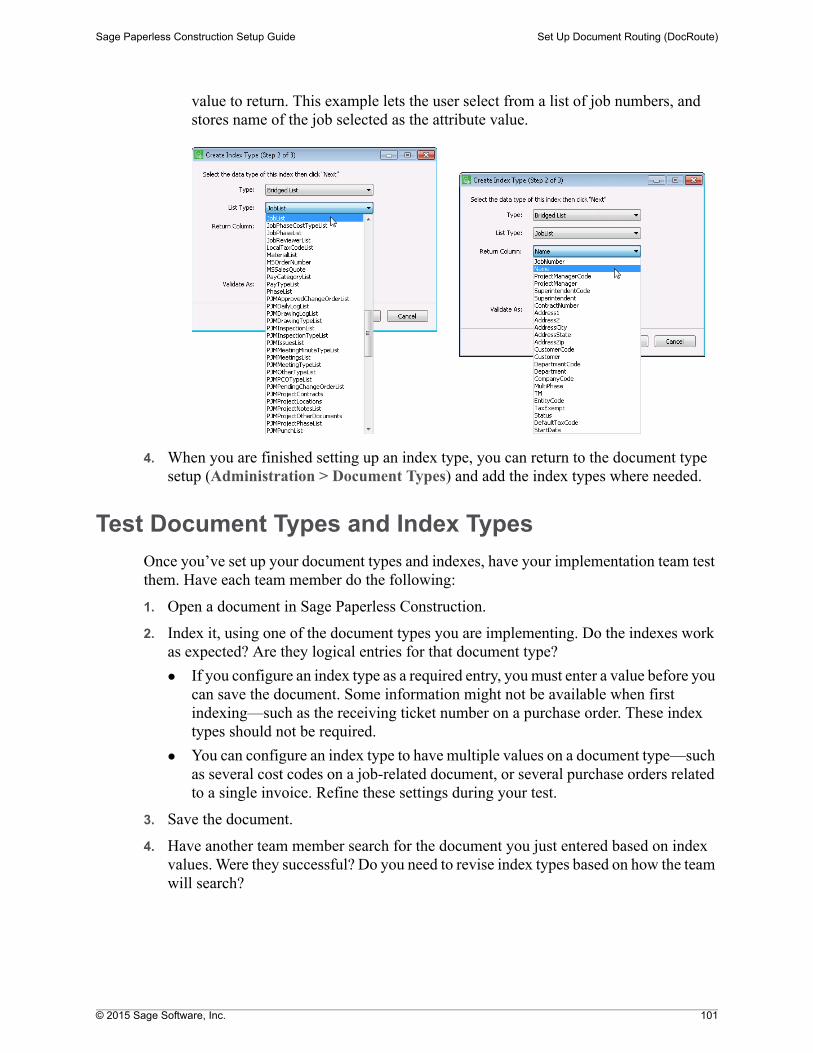
© 2015 Sage Software, Inc. 101
Sage Paperless Construction Setup Guide Set Up Document Routing (DocRoute)
value to return. This example lets the user select from a list of job numbers, and stores name of the job selected as the attribute value.
4. When you are finished setting up an index type, you can return to the document type setup (Administration > Document Types) and add the index types where needed.
Test Document Types and Index Types
Once you’ve set up your document types and indexes, have your implementation team test them. Have each team member do the following:
1. Open a document in Sage Paperless Construction.
2. Index it, using one of the document types you are implementing. Do the indexes work as expected? Are they logical entries for that document type?
If you configure an index type as a required entry, you must enter a value before you can save the document. Some information might not be available when first indexing—such as the receiving ticket number on a purchase order. These index types should not be required.
You can configure an index type to have multiple values on a document type—such as several cost codes on a job-related document, or several purchase orders related to a single invoice. Refine these settings during your test.
3. Save the document.
4. Have another team member search for the document you just entered based on index values. Were they successful? Do you need to revise index types based on how the team will search?
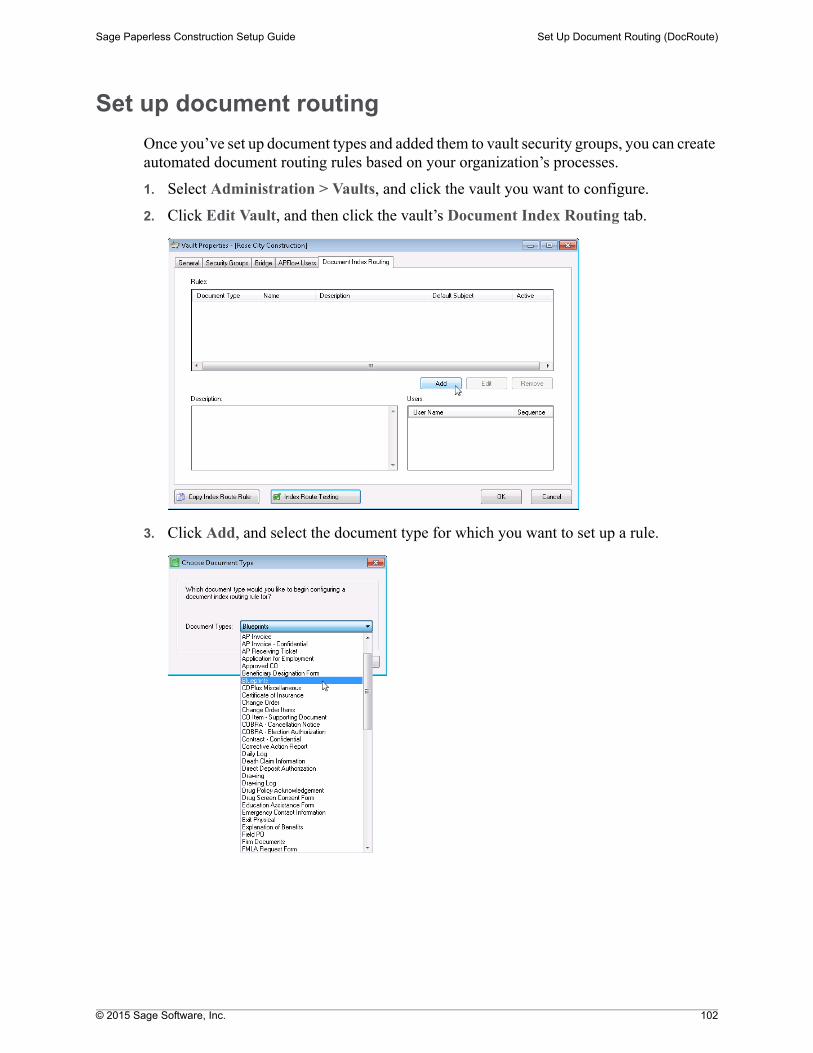
© 2015 Sage Software, Inc. 102
Sage Paperless Construction Setup Guide Set Up Document Routing (DocRoute)
Set up document routing
Once you’ve set up document types and added them to vault security groups, you can create automated document routing rules based on your organization’s processes.
1. Select Administration > Vaults, and click the vault you want to configure.
2. Click Edit Vault, and then click the vault’s Document Index Routing tab.
3. Click Add, and select the document type for which you want to set up a rule.
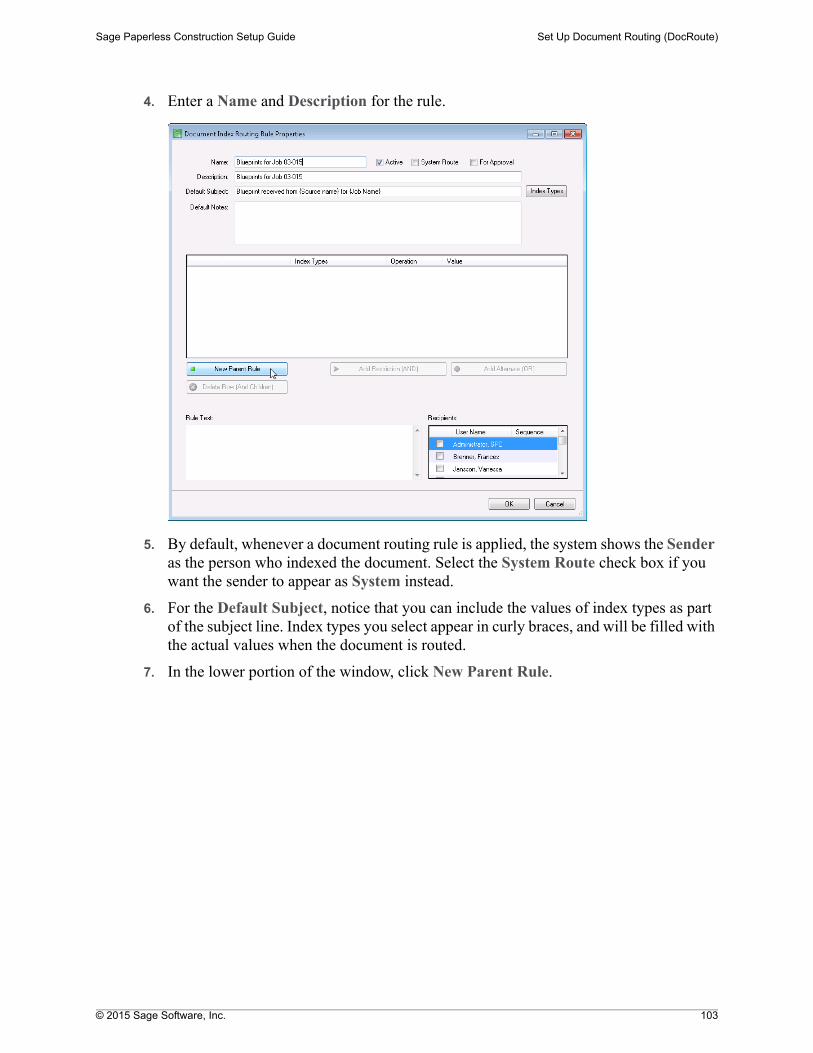
© 2015 Sage Software, Inc. 103
Sage Paperless Construction Setup Guide Set Up Document Routing (DocRoute)
4. Enter a Name and Description for the rule.
5. By default, whenever a document routing rule is applied, the system shows the Sender as the person who indexed the document. Select the System Route check box if you want the sender to appear as System instead.
6. For the Default Subject, notice that you can include the values of index types as part of the subject line. Index types you select appear in curly braces, and will be filled with the actual values when the document is routed.
7. In the lower portion of the window, click New Parent Rule.
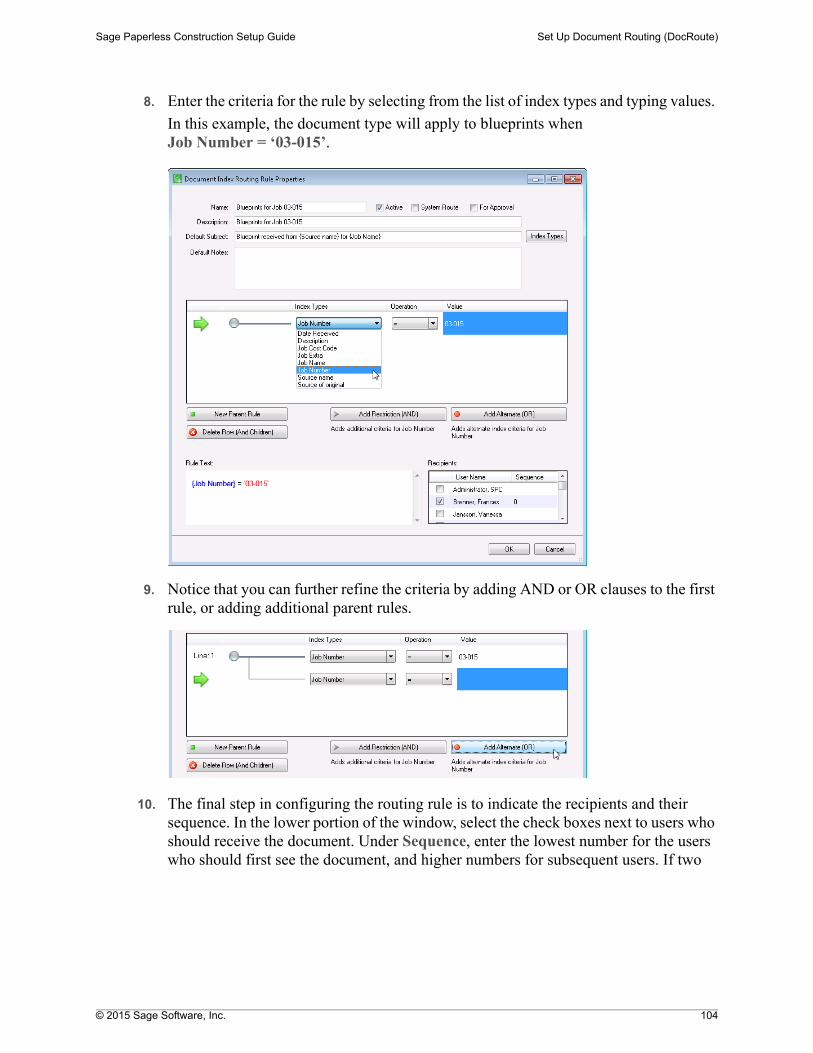
© 2015 Sage Software, Inc. 104
Sage Paperless Construction Setup Guide Set Up Document Routing (DocRoute)
8. Enter the criteria for the rule by selecting from the list of index types and typing values.
In this example, the document type will apply to blueprints when Job Number = ‘03-015’.
9. Notice that you can further refine the criteria by adding AND or OR clauses to the first rule, or adding additional parent rules.
10. The final step in configuring the routing rule is to indicate the recipients and their sequence. In the lower portion of the window, select the check boxes next to users who should receive the document. Under Sequence, enter the lowest number for the users who should first see the document, and higher numbers for subsequent users. If two
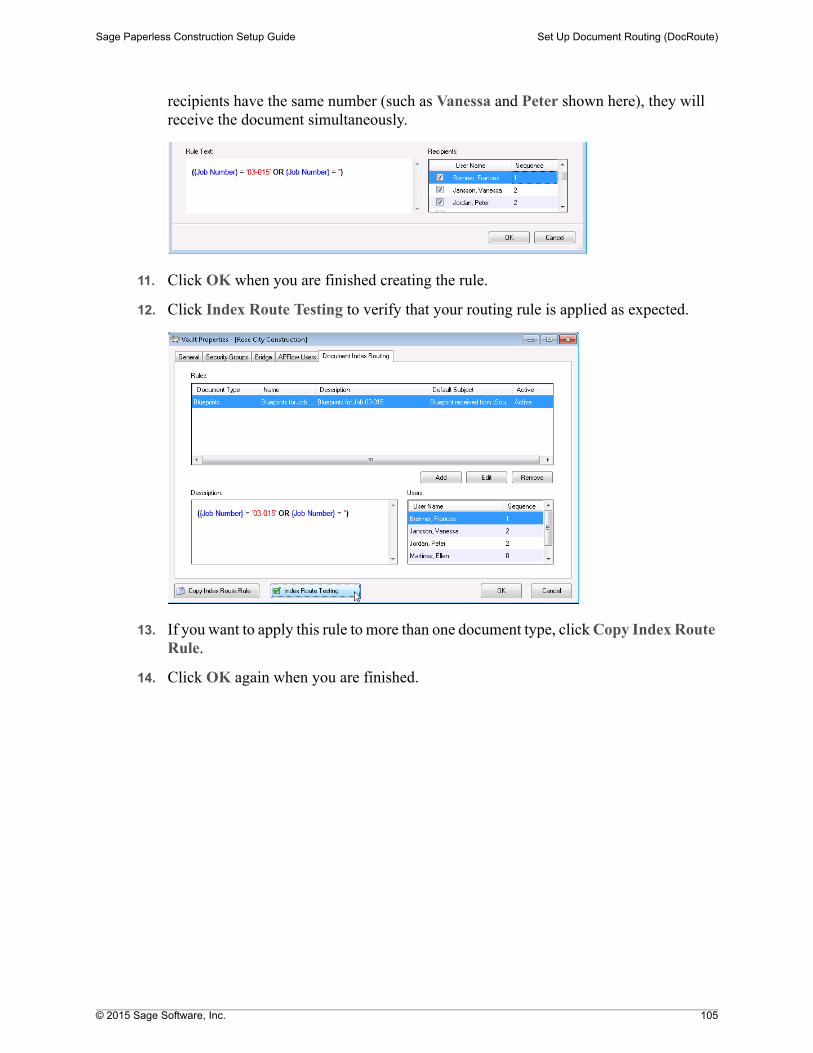
© 2015 Sage Software, Inc. 105
Sage Paperless Construction Setup Guide Set Up Document Routing (DocRoute)
recipients have the same number (such as Vanessa and Peter shown here), they will receive the document simultaneously.
11. Click OK when you are finished creating the rule.
12. Click Index Route Testing to verify that your routing rule is applied as expected.
13. If you want to apply this rule to more than one document type, click Copy Index Route Rule.
14. Click OK again when you are finished.
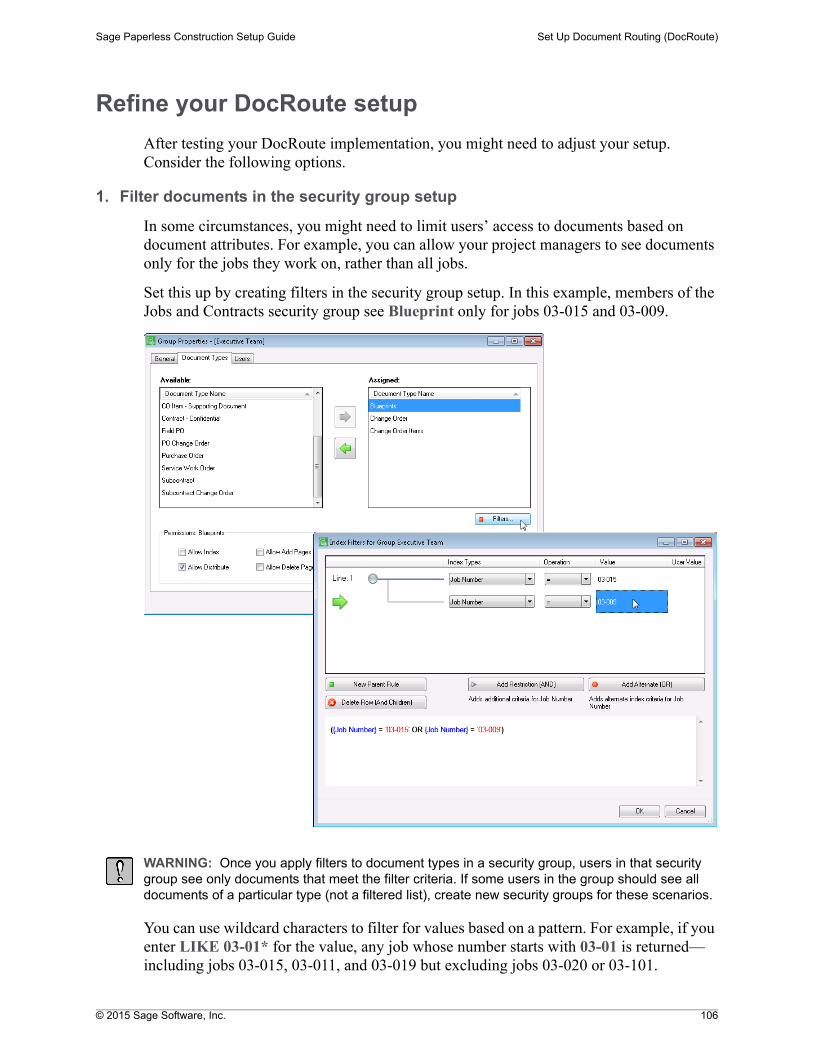
© 2015 Sage Software, Inc. 106
Sage Paperless Construction Setup Guide Set Up Document Routing (DocRoute)
Refine your DocRoute setup
After testing your DocRoute implementation, you might need to adjust your setup. Consider the following options.
1. Filter documents in the security group setup
In some circumstances, you might need to limit users’ access to documents based on document attributes. For example, you can allow your project managers to see documents only for the jobs they work on, rather than all jobs.
Set this up by creating filters in the security group setup. In this example, members of the Jobs and Contracts security group see Blueprint only for jobs 03-015 and 03-009.
WARNING: Once you apply filters to document types in a security group, users in that security group see only documents that meet the filter criteria. If some users in the group should see all documents of a particular type (not a filtered list), create new security groups for these scenarios.
You can use wildcard characters to filter for values based on a pattern. For example, if you enter LIKE 03-01* for the value, any job whose number starts with 03-01 is returned—including jobs 03-015, 03-011, and 03-019 but excluding jobs 03-020 or 03-101.
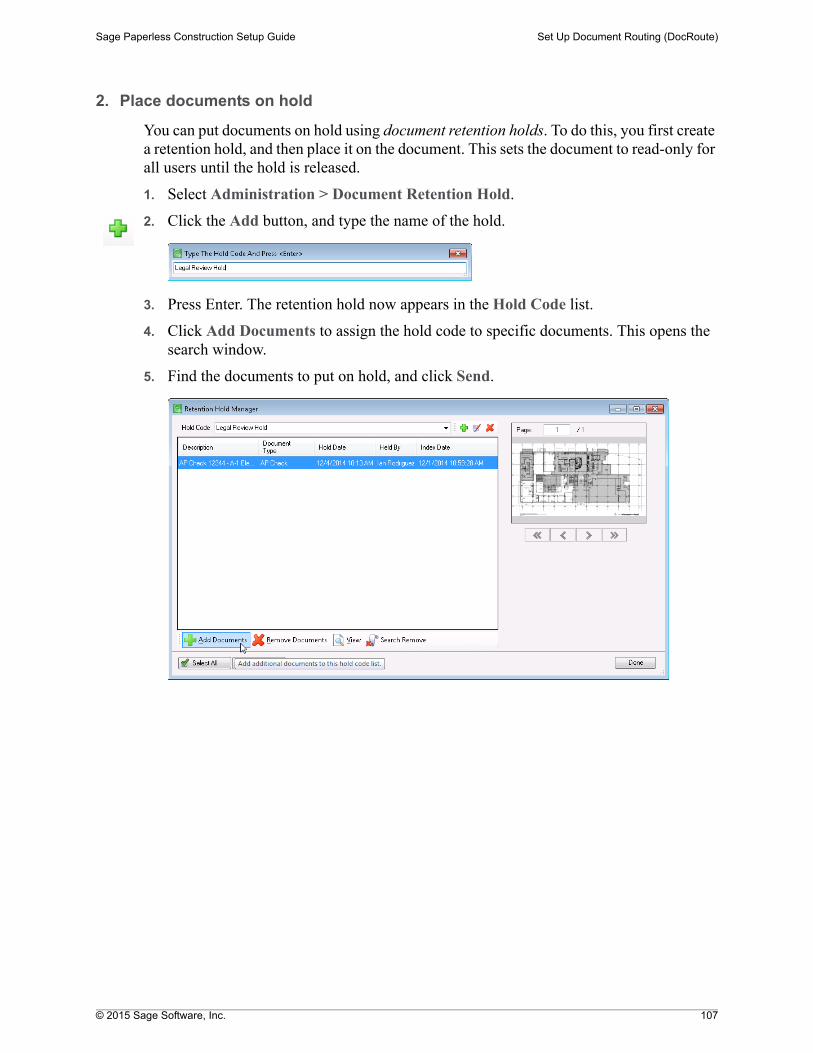
© 2015 Sage Software, Inc. 107
Sage Paperless Construction Setup Guide Set Up Document Routing (DocRoute)
2. Place documents on hold
You can put documents on hold using document retention holds. To do this, you first create a retention hold, and then place it on the document. This sets the document to read-only for all users until the hold is released.
1. Select Administration > Document Retention Hold.
2. Click the Add button, and type the name of the hold.
3. Press Enter. The retention hold now appears in the Hold Code list.
4. Click Add Documents to assign the hold code to specific documents. This opens the search window.
5. Find the documents to put on hold, and click Send.
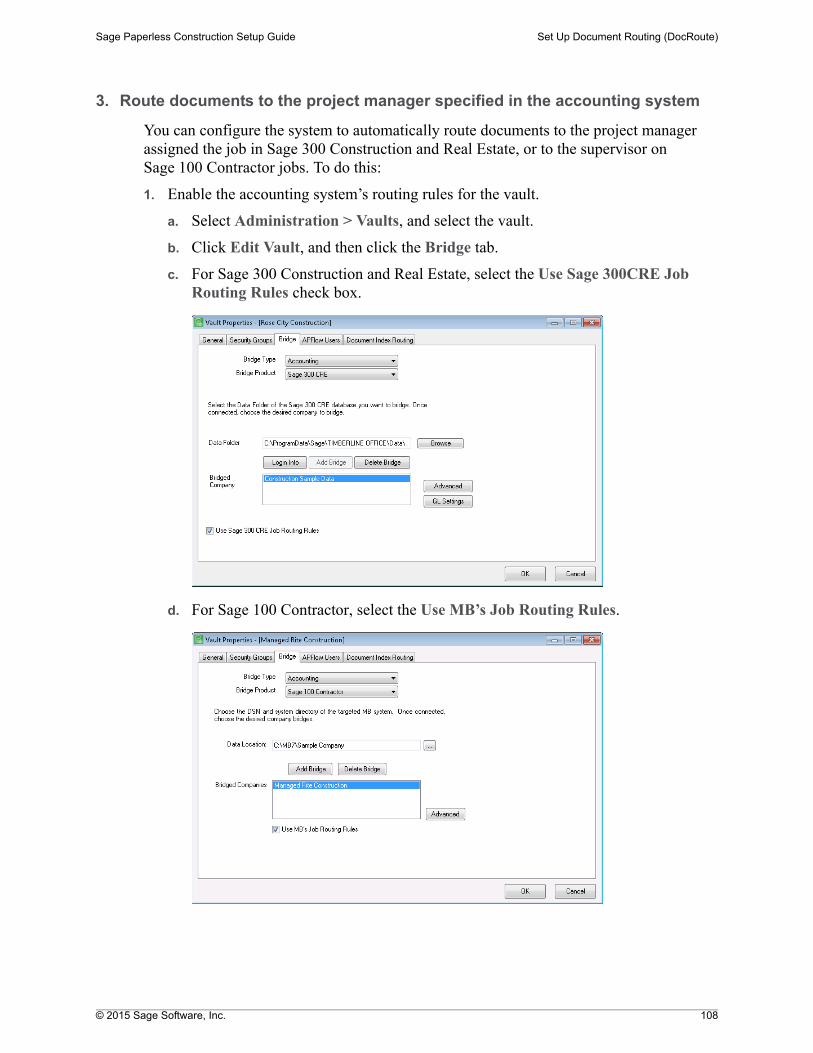
© 2015 Sage Software, Inc. 108
Sage Paperless Construction Setup Guide Set Up Document Routing (DocRoute)
3. Route documents to the project manager specified in the accounting system
You can configure the system to automatically route documents to the project manager assigned the job in Sage 300 Construction and Real Estate, or to the supervisor on Sage 100 Contractor jobs. To do this:
1. Enable the accounting system’s routing rules for the vault.
a. Select Administration > Vaults, and select the vault.
b. Click Edit Vault, and then click the Bridge tab.
c. For Sage 300 Construction and Real Estate, select the Use Sage 300CRE Job Routing Rules check box.
d. For Sage 100 Contractor, select the Use MB’s Job Routing Rules.
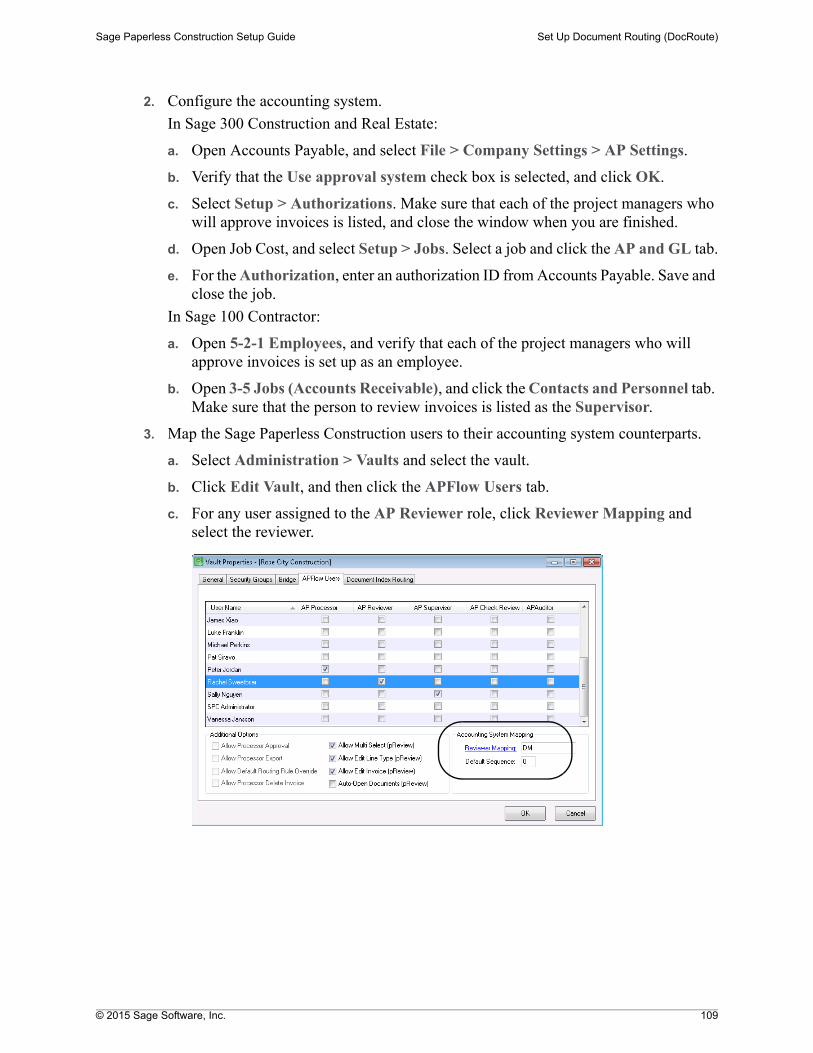
© 2015 Sage Software, Inc. 109
Sage Paperless Construction Setup Guide Set Up Document Routing (DocRoute)
2. Configure the accounting system.
In Sage 300 Construction and Real Estate:
a. Open Accounts Payable, and select File > Company Settings > AP Settings.
b. Verify that the Use approval system check box is selected, and click OK.
c. Select Setup > Authorizations. Make sure that each of the project managers who will approve invoices is listed, and close the window when you are finished.
d. Open Job Cost, and select Setup > Jobs. Select a job and click the AP and GL tab.
e. For the Authorization, enter an authorization ID from Accounts Payable. Save and close the job.
In Sage 100 Contractor:
a. Open 5-2-1 Employees, and verify that each of the project managers who will approve invoices is set up as an employee.
b. Open 3-5 Jobs (Accounts Receivable), and click the Contacts and Personnel tab. Make sure that the person to review invoices is listed as the Supervisor.
3. Map the Sage Paperless Construction users to their accounting system counterparts.
a. Select Administration > Vaults and select the vault.
b. Click Edit Vault, and then click the APFlow Users tab.
c. For any user assigned to the AP Reviewer role, click Reviewer Mapping and select the reviewer.
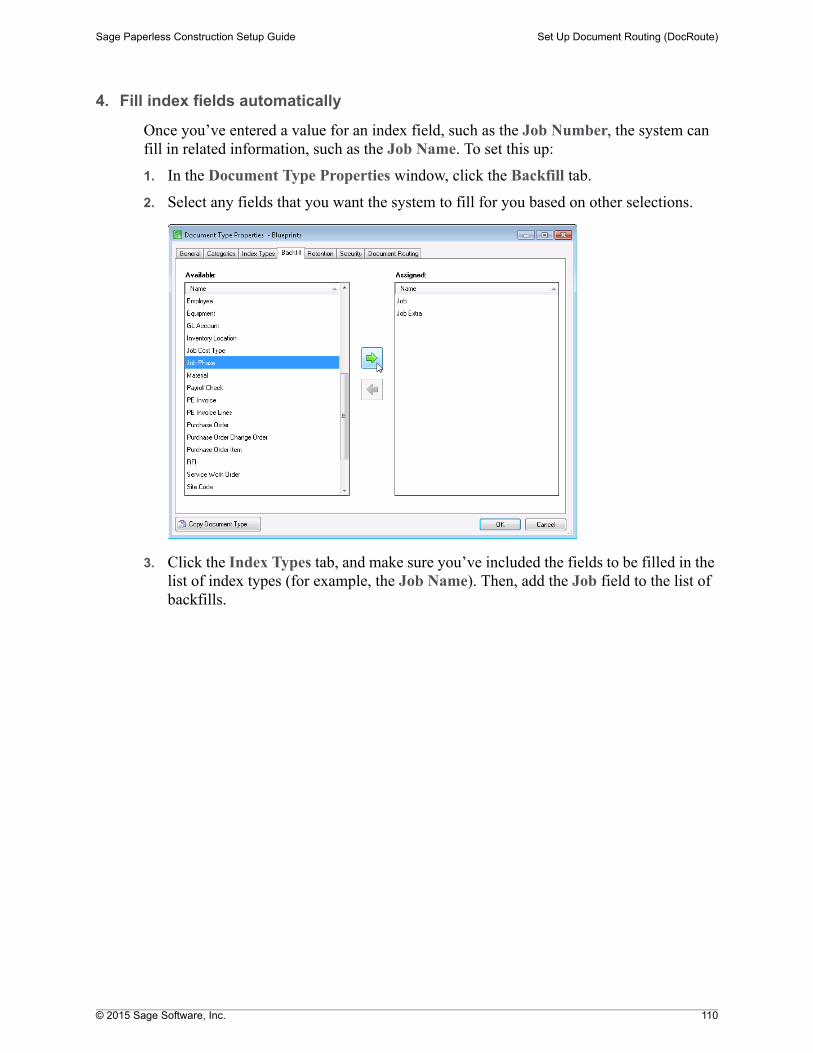
© 2015 Sage Software, Inc. 110
Sage Paperless Construction Setup Guide Set Up Document Routing (DocRoute)
4. Fill index fields automatically
Once you’ve entered a value for an index field, such as the Job Number, the system can fill in related information, such as the Job Name. To set this up:
1. In the Document Type Properties window, click the Backfill tab.
2. Select any fields that you want the system to fill for you based on other selections.
3. Click the Index Types tab, and make sure you’ve included the fields to be filled in the list of index types (for example, the Job Name). Then, add the Job field to the list of backfills.
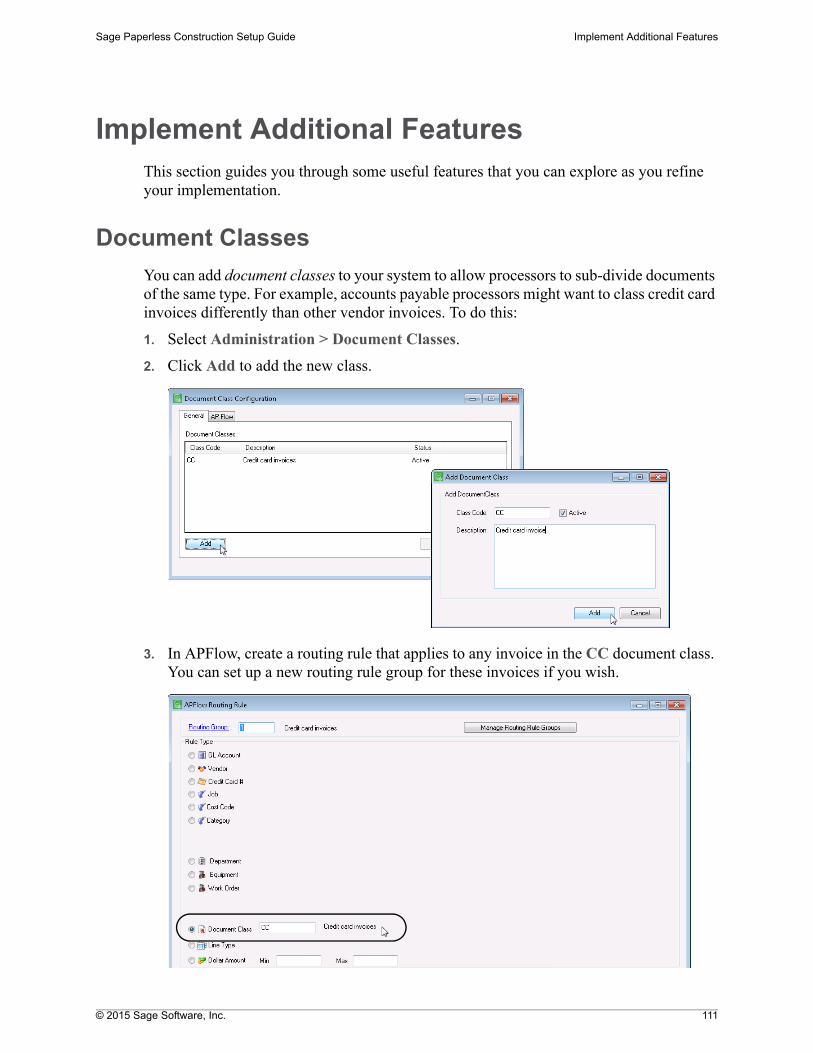
© 2015 Sage Software, Inc. 111
Sage Paperless Construction Setup Guide Implement Additional Features
Implement Additional FeaturesThis section guides you through some useful features that you can explore as you refine your implementation.
Document Classes
You can add document classes to your system to allow processors to sub-divide documents of the same type. For example, accounts payable processors might want to class credit card invoices differently than other vendor invoices. To do this:
1. Select Administration > Document Classes.
2. Click Add to add the new class.
3. In APFlow, create a routing rule that applies to any invoice in the CC document class. You can set up a new routing rule group for these invoices if you wish.

© 2015 Sage Software, Inc. 112
Sage Paperless Construction Setup Guide Implement Additional Features
4. In the Document Classes window, notice that the APFlow tab reflects the routing rule group you assigned to it in the routing rule window.
Attachment Synchronization
When you attach documents to records in your accounting system—such as cost code, invoice, or vendor attachments—the system can automatically update the accounting system with the attachments when you click the paperclip on the record. For example, you might scan and index a lien waiver received from a vendor. The next time the attachment synchronization job runs, the file appears in the Attachments window of the accounting system.
To set this up:
1. Select Administration > Attachment Sync Configuration.
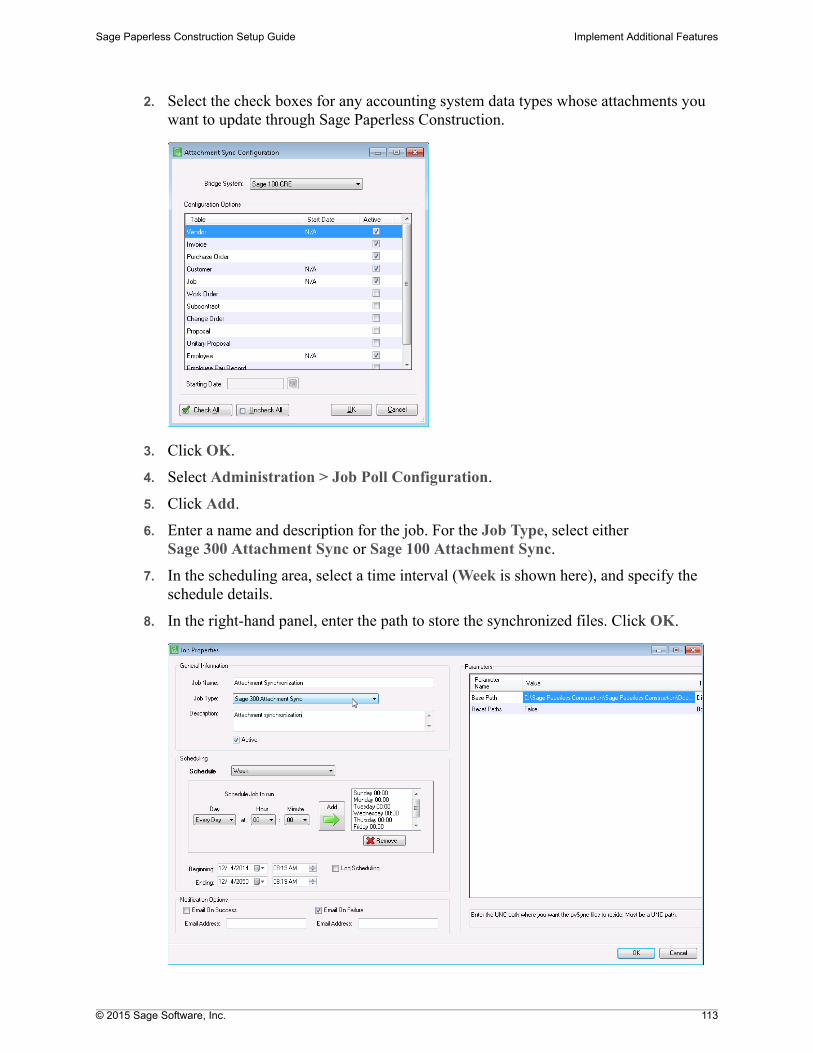
© 2015 Sage Software, Inc. 113
Sage Paperless Construction Setup Guide Implement Additional Features
2. Select the check boxes for any accounting system data types whose attachments you want to update through Sage Paperless Construction.
3. Click OK.
4. Select Administration > Job Poll Configuration.
5. Click Add.
6. Enter a name and description for the job. For the Job Type, select either Sage 300 Attachment Sync or Sage 100 Attachment Sync.
7. In the scheduling area, select a time interval (Week is shown here), and specify the schedule details.
8. In the right-hand panel, enter the path to store the synchronized files. Click OK.
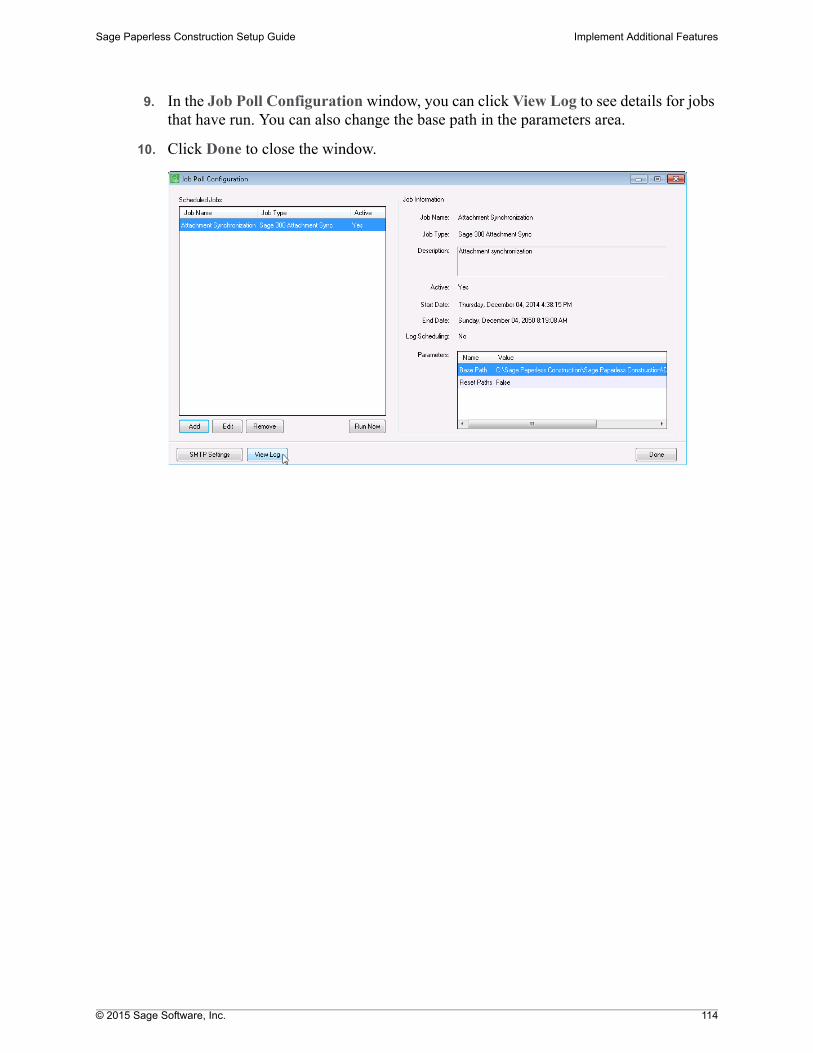
© 2015 Sage Software, Inc. 114
Sage Paperless Construction Setup Guide Implement Additional Features
9. In the Job Poll Configuration window, you can click View Log to see details for jobs that have run. You can also change the base path in the parameters area.
10. Click Done to close the window.
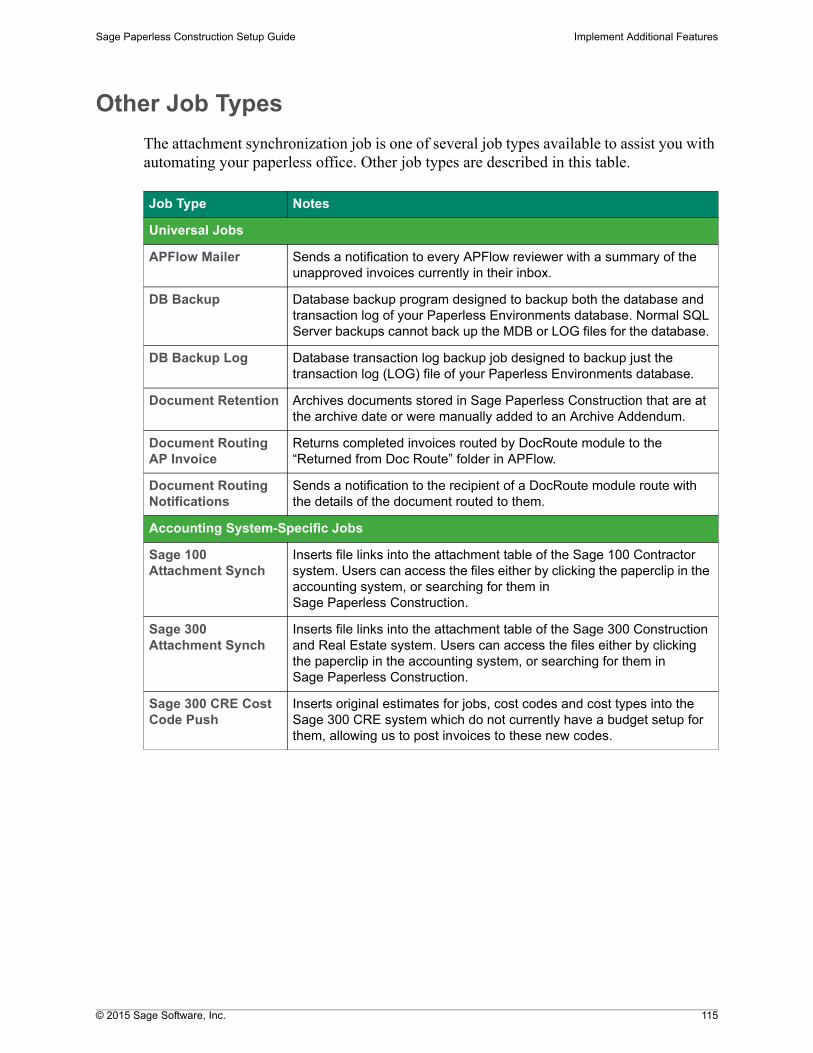
© 2015 Sage Software, Inc. 115
Sage Paperless Construction Setup Guide Implement Additional Features
Other Job Types
The attachment synchronization job is one of several job types available to assist you with automating your paperless office. Other job types are described in this table.
Job Type Notes
Universal Jobs
APFlow Mailer Sends a notification to every APFlow reviewer with a summary of the unapproved invoices currently in their inbox.
DB Backup Database backup program designed to backup both the database and transaction log of your Paperless Environments database. Normal SQL Server backups cannot back up the MDB or LOG files for the database.
DB Backup Log Database transaction log backup job designed to backup just the transaction log (LOG) file of your Paperless Environments database.
Document Retention Archives documents stored in Sage Paperless Construction that are at the archive date or were manually added to an Archive Addendum.
Document Routing AP Invoice
Returns completed invoices routed by DocRoute module to the “Returned from Doc Route” folder in APFlow.
Document Routing Notifications
Sends a notification to the recipient of a DocRoute module route with the details of the document routed to them.
Accounting System-Specific Jobs
Sage 100 Attachment Synch
Inserts file links into the attachment table of the Sage 100 Contractor system. Users can access the files either by clicking the paperclip in the accounting system, or searching for them in Sage Paperless Construction.
Sage 300 Attachment Synch
Inserts file links into the attachment table of the Sage 300 Construction and Real Estate system. Users can access the files either by clicking the paperclip in the accounting system, or searching for them in Sage Paperless Construction.
Sage 300 CRE Cost Code Push
Inserts original estimates for jobs, cost codes and cost types into the Sage 300 CRE system which do not currently have a budget setup for them, allowing us to post invoices to these new codes.
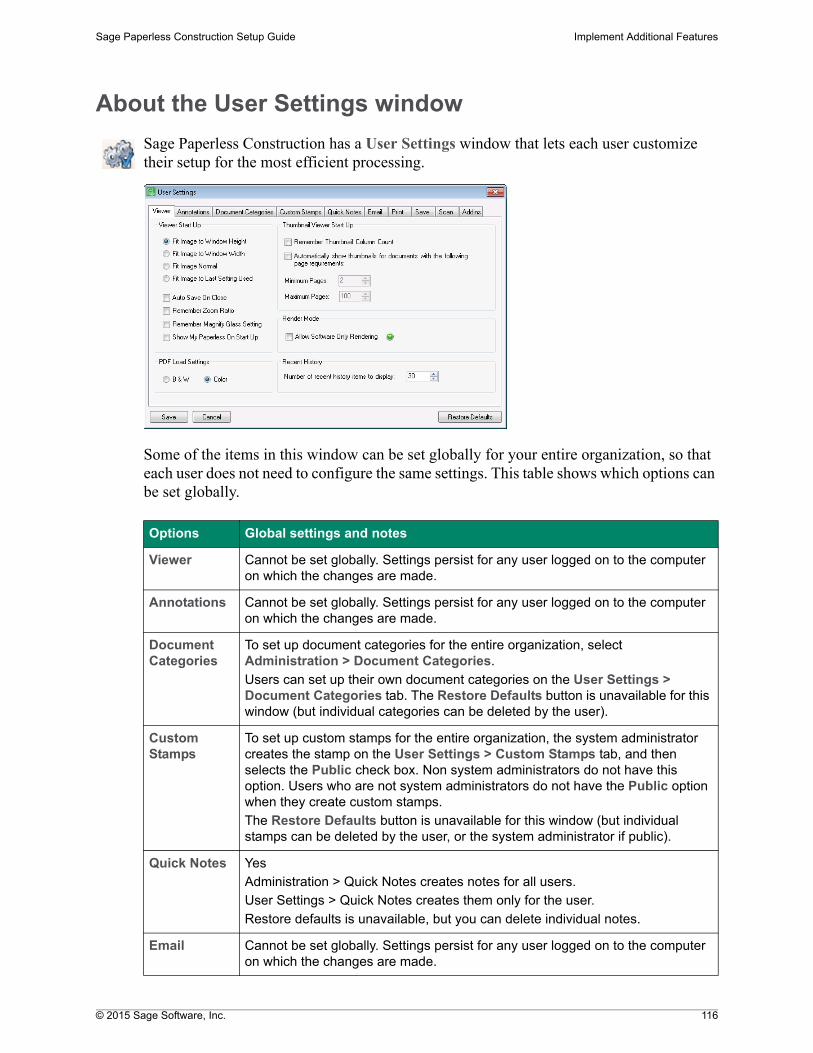
© 2015 Sage Software, Inc. 116
Sage Paperless Construction Setup Guide Implement Additional Features
About the User Settings window
Sage Paperless Construction has a User Settings window that lets each user customize their setup for the most efficient processing.
Some of the items in this window can be set globally for your entire organization, so that each user does not need to configure the same settings. This table shows which options can be set globally.
Options Global settings and notes
Viewer Cannot be set globally. Settings persist for any user logged on to the computer on which the changes are made.
Annotations Cannot be set globally. Settings persist for any user logged on to the computer on which the changes are made.
Document Categories
To set up document categories for the entire organization, select Administration > Document Categories.
Users can set up their own document categories on the User Settings > Document Categories tab. The Restore Defaults button is unavailable for this window (but individual categories can be deleted by the user).
Custom Stamps
To set up custom stamps for the entire organization, the system administrator creates the stamp on the User Settings > Custom Stamps tab, and then selects the Public check box. Non system administrators do not have this option. Users who are not system administrators do not have the Public option when they create custom stamps.
The Restore Defaults button is unavailable for this window (but individual stamps can be deleted by the user, or the system administrator if public).
Quick Notes Yes
Administration > Quick Notes creates notes for all users.
User Settings > Quick Notes creates them only for the user.
Restore defaults is unavailable, but you can delete individual notes.
Email Cannot be set globally. Settings persist for any user logged on to the computer on which the changes are made.
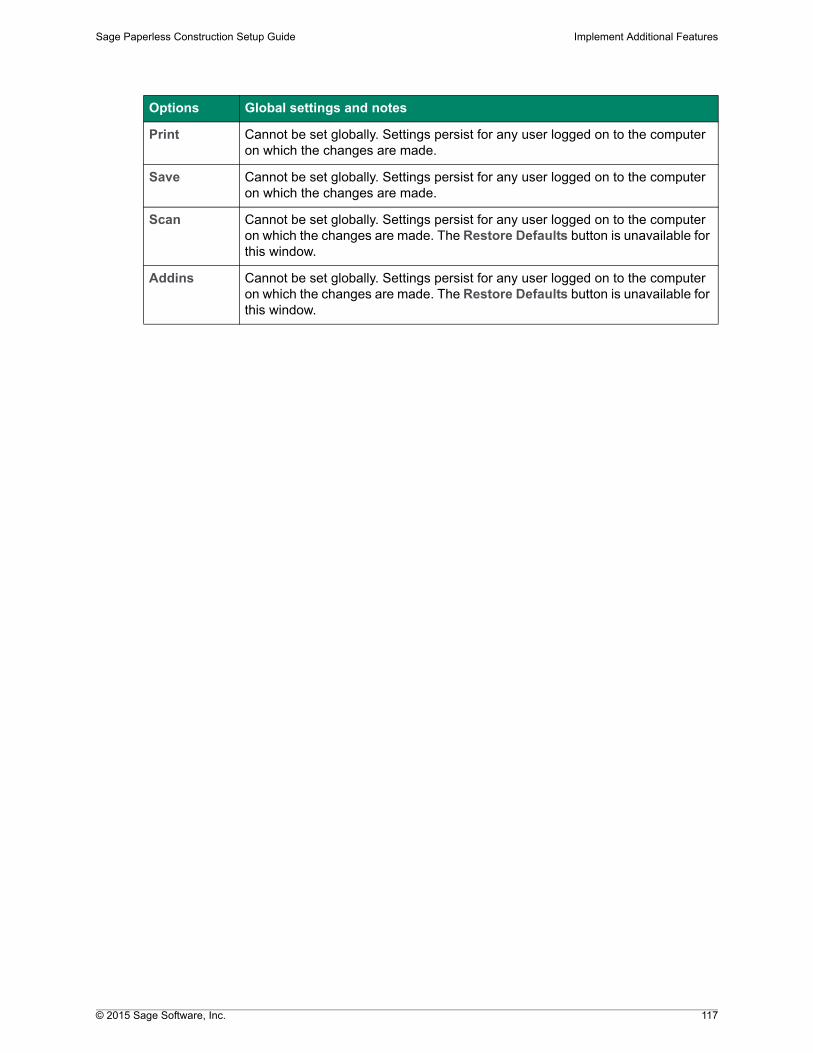
© 2015 Sage Software, Inc. 117
Sage Paperless Construction Setup Guide Implement Additional Features
Print Cannot be set globally. Settings persist for any user logged on to the computer on which the changes are made.
Save Cannot be set globally. Settings persist for any user logged on to the computer on which the changes are made.
Scan Cannot be set globally. Settings persist for any user logged on to the computer on which the changes are made. The Restore Defaults button is unavailable for this window.
Addins Cannot be set globally. Settings persist for any user logged on to the computer on which the changes are made. The Restore Defaults button is unavailable for this window.
Options Global settings and notes