Embed Size (px)
Citation preview
© 2011 State of Queensland (Department of Education & Training) http://www.di.uq.edu.au/SPARQ-ed SPARQ-ed – University of Queensland Diamantina Institute ph. +61 7 3176 7868 fax. +61 7 3176 5946 University of Queensland, Australia. Email: [email protected]
Page 1
SPARQ-ed
Introduction to Molecular Biology Techniques :
Recovering DNA from Transformed E. coli
© 2011 State of Queensland (Department of Education & Training) http://www.di.uq.edu.au/SPARQ-ed SPARQ-ed – University of Queensland Diamantina Institute ph. +61 7 3176 7868 fax. +61 7 3176 5946 University of Queensland, Australia. Email: [email protected]
Page 2
SPARQed is a collaboration between The University of Queensland’s Diamantina Institute and The Queensland Government’s Department of Education and Training. It exists due to the hard work of the SPARQ-ed Regional Reference Group (Regan Neumann, Associate Professor Nigel McMillan, Associate Professor Brian Gabrielli, Dr Peter Darben, Cheryl Capra, Peter Ellerton, Andrew Rhule, Darren Shepherd Michael Sparks, and Patrick Trussler).
The Recovering DNA from Transformed E. coli project is based on the Polo-box Cloning project developed by Associate Professor Brian Gabrielli. The experimental program and all supporting materials were adapted for student use by Dr Peter Darben, under the supervision of Associate Professor Brian Gabrielli and Stephanie Le.
All materials in the manual are Copyright 2011, State of Queensland (Department of Education and Training). Permission is granted for use in schools and other educational contexts. Permission for use and reproduction should be requested by contacting Peter Darben at [email protected]. These materials may not be used for commercial purposes
Risk assessments were developed with the assistance of Paul Kristensen, Maria Somodevilla-Torres and Jane Easson.
Many thanks to all in the “Gab Lab” whose patience and support made this happen.

© 2011 State of Queensland (Department of Education & Training) http://www.di.uq.edu.au/SPARQ-ed SPARQ-ed – University of Queensland Diamantina Institute ph. +61 7 3176 7868 fax. +61 7 3176 5946 University of Queensland, Australia. Email: [email protected]
Page 3
Table of Contents
Introduction What is Molecular Biology ? . . . . . . . . . . . . . . . . . . . . . . . . . . . . . . . . . . . . . . . . . . . . . . . . . . . . . . . Common Molecular Biology Techniques . . . . . . . . . . . . . . . . . . . . . . . . . . . . . . . . . . . . . . . . . . . . . .
The Project Getting Started . . . . . . . . . . . . . . . . . . . . . . . . . . . . . . . . . . . . . . . . . . . . . . . . . . . . . . . . . . . . . . . . . .
Theoretical Basis of the Project Using Plasmids for Cloning . . . . . . . . . . . . . . . . . . . . . . . . . . . . . . . . . . . . . . . . . . . . . . . . . . . . . . . . . The Alkaline Lysis Mini-Plasmid Preparation . . . . . . . . . . . . . . . . . . . . . . . . . . . . . . . . . . . . . . . . . . . Restriction Digest . . . . . . . . . . . . . . . . . . . . . . . . . . . . . . . . . . . . . . . . . . . . . . . . . . . . . . . . . . . . . . . . . Agarose Gel Electrophoresis . . . . . . . . . . . . . . . . . . . . . . . . . . . . . . . . . . . . . . . . . . . . . . . . . . . . . . . .
Experimental Protocol How to Use this Manual . . . . . . . . . . . . . . . . . . . . . . . . . . . . . . . . . . . . . . . . . . . . . . . . . . . . . . . . . . .
Alkaline Lysis Mini-Plasmid Preparation . . . . . . . . . . . . . . . . . . . . . . . . . . . . . . . . . . . . . . .
Restriction Digest . . . . . . . . . . . . . . . . . . . . . . . . . . . . . . . . . . . . . . . . . . . . . . . . . . . . . . . . . . . . . Agarose Gel Electrophoresis
Preparation of TAE Buffer . . . . . . . . . . . . . . . . . . . . . . . . . . . . . . . . . . . . . . . . . . . . . . . . . . . Preparation of Gel . . . . . . . . . . . . . . . . . . . . . . . . . . . . . . . . . . . . . . . . . . . . . . . . . . . . . . . . . Loading the Gel . . . . . . . . . . . . . . . . . . . . . . . . . . . . . . . . . . . . . . . . . . . . . . . . . . . . . . . . . . . . Running the Gel . . . . . . . . . . . . . . . . . . . . . . . . . . . . . . . . . . . . . . . . . . . . . . . . . . . . . . . . . . . Interpreting Your Gel . . . . . . . . . . . . . . . . . . . . . . . . . . . . . . . . . . . . . . . . . . . . . . . . . . . . . . .
Appendices
Appendix A : DNA . . . . . . . . . . . . . . . . . . . . . . . . . . . . . . . . . . . . . . . . . . . . . . . . . . . . . . . . . . . . . . . . Appendix B : Using a Micropipette . . . . . . . . . . . . . . . . . . . . . . . . . . . . . . . . . . . . . . . . . . . . . . . . . . . Appendix C : Using a Bench Centrifuge . . . . . . . . . . . . . . . . . . . . . . . . . . . . . . . . . . . . . . . . . . . . . . . Appendix D : Glossary of Terms . . . . . . . . . . . . . . . . . . . . . . . . . . . . . . . . . . . . . . . . . . . . . . . . . . . . .
4 5
6
7 8
10 10
11
11
13
14 15 15 16 17
18 20 25 27
© 2011 State of Queensland (Department of Education & Training) http://www.di.uq.edu.au/SPARQ-ed SPARQ-ed – University of Queensland Diamantina Institute ph. +61 7 3176 7868 fax. +61 7 3176 5946 University of Queensland, Australia. Email: [email protected]
Page 4
Introduction
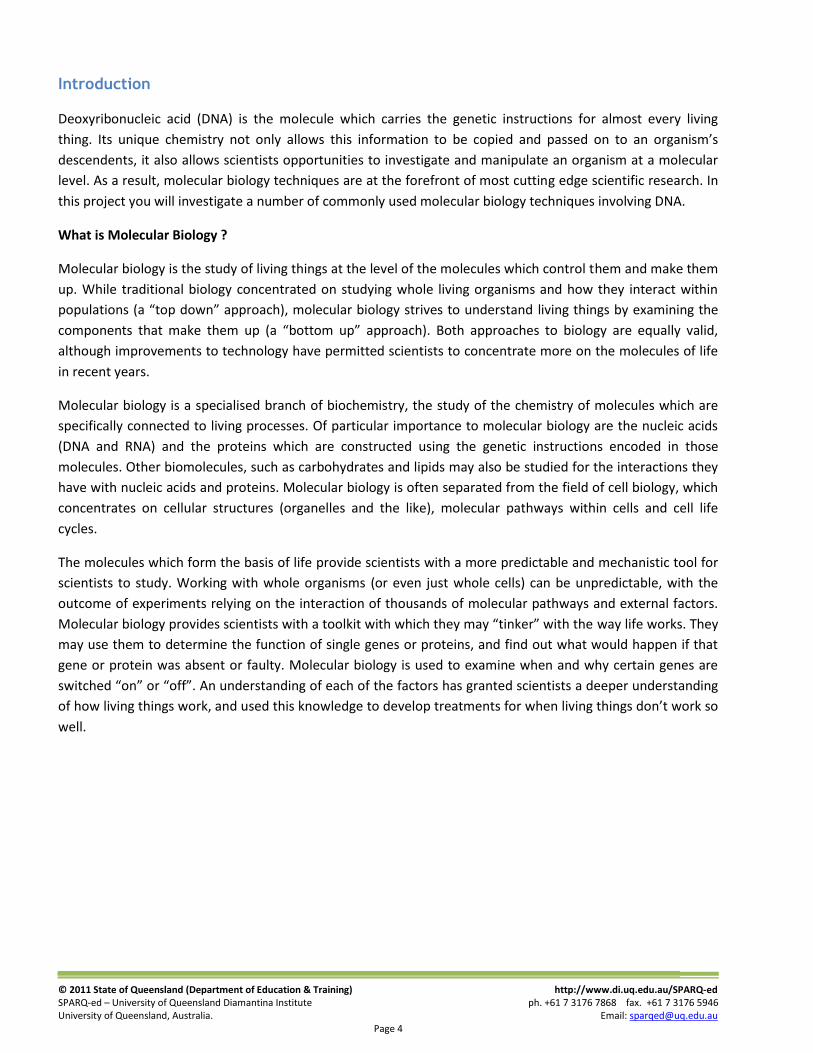
Deoxyribonucleic acid (DNA) is the molecule which carries the genetic instructions for almost every living
thing. Its unique chemistry not only allows this information to be copied and passed on to an organism’s
descendents, it also allows scientists opportunities to investigate and manipulate an organism at a molecular
level. As a result, molecular biology techniques are at the forefront of most cutting edge scientific research. In
this project you will investigate a number of commonly used molecular biology techniques involving DNA.
What is Molecular Biology ?
Molecular biology is the study of living things at the level of the molecules which control them and make them
up. While traditional biology concentrated on studying whole living organisms and how they interact within
populations (a “top down” approach), molecular biology strives to understand living things by examining the
components that make them up (a “bottom up” approach). Both approaches to biology are equally valid,
although improvements to technology have permitted scientists to concentrate more on the molecules of life
in recent years.
Molecular biology is a specialised branch of biochemistry, the study of the chemistry of molecules which are
specifically connected to living processes. Of particular importance to molecular biology are the nucleic acids
(DNA and RNA) and the proteins which are constructed using the genetic instructions encoded in those
molecules. Other biomolecules, such as carbohydrates and lipids may also be studied for the interactions they
have with nucleic acids and proteins. Molecular biology is often separated from the field of cell biology, which
concentrates on cellular structures (organelles and the like), molecular pathways within cells and cell life
cycles.
The molecules which form the basis of life provide scientists with a more predictable and mechanistic tool for
scientists to study. Working with whole organisms (or even just whole cells) can be unpredictable, with the
outcome of experiments relying on the interaction of thousands of molecular pathways and external factors.
Molecular biology provides scientists with a toolkit with which they may “tinker” with the way life works. They
may use them to determine the function of single genes or proteins, and find out what would happen if that
gene or protein was absent or faulty. Molecular biology is used to examine when and why certain genes are
switched “on” or “off”. An understanding of each of the factors has granted scientists a deeper understanding
of how living things work, and used this knowledge to develop treatments for when living things don’t work so
well.
© 2011 State of Queensland (Department of Education & Training) http://www.di.uq.edu.au/SPARQ-ed SPARQ-ed – University of Queensland Diamantina Institute ph. +61 7 3176 7868 fax. +61 7 3176 5946 University of Queensland, Australia. Email: [email protected]
Page 5
Common Molecular Biology Techniques
The following list covers some of the more commonly used molecular biology techniques – it is by no means
exhaustive.
Electrophoresis – a process which separates molecules such as DNA or proteins out according to their
size, electrophoresis is a mainstay of molecular biology laboratories. While knowing the size of a
molecule might not seem like all that much information, it can be used to identify molecules or
fragments of molecules and as a check to make sure that we have the correct molecule present.
Polymerase Chain Reaction (PCR) – a process used to amplify very small amounts of DNA to amounts
which can be used in further experiments. It is used as a basic tool in molecular biology to ensure that
we have sufficient DNA to carry out further techniques such as genetic modification, however it has
wider practical uses such as in forensics (identification using DNA profiling) and disease diagnosis. PCR
can also be used to introduce small point mutations into a gene in a process called site-directed
mutagenesis.
Restriction Digest – the process of cutting DNA up into smaller fragments using enzymes which only
act at a particular genetic sequence.
Ligation – the process of joining two pieces of DNA together. Ligation is useful when introducing a new
piece of DNA into another genome.
Blotting – a technique used to specifically identify biomolecules following electrophoresis. The
molecule of interest is indicated using either a labeled probe (a complementary strand of nucleic acid)
or a labeled antibody raised against a specific protein.
Cloning – the technique of introducing a new gene into a cell or organism. This can be used to see
what effect the expression of that gene has on the organism, to turn the organism into a factory which
will produce large quantities of the gene or the protein it codes for, or (within the inclusion of a label)
to indicate where the products of that gene are expressed in the organism. Insertion of genetic
material into a bacterium is called transformation, while insertion into a eukaryotic cell is called
transfection. If a virus is used to introduce this material, the process is called transduction.
Each of these techniques is used in conjunction with other techniques to help scientists solve a particular
research question. For example, following using PCR to create large quantities of a particular gene a scientist
may ligate a gene for a particular protein into a plasmid vector (a short circular strand of DNA which acts as a
carrier), perform a quick restriction digest and electrophoresis to ensure that the gene has been inserted
properly, and then use that plasmid to transform a bacterial cell which is used to produce large quantities of
the vector. After purification of the vector from the bacteria, it is then used to transfect a mammalian cell in
culture. The scientist then uses protein electrophoresis and western blotting to demonstrate the expression of
the gene product.
© 2011 State of Queensland (Department of Education & Training) http://www.di.uq.edu.au/SPARQ-ed SPARQ-ed – University of Queensland Diamantina Institute ph. +61 7 3176 7868 fax. +61 7 3176 5946 University of Queensland, Australia. Email: [email protected]
Page 6
The Project
Many molecular biology techniques take a significant amount of time to complete. Many of the enzyme-based
reactions which underpin these techniques require incubation periods of and hour or more, while cloning and
transformation often requires overnight incubation to allow the transformed cells time to recover and
multiply. In the limited time we have available, we cannot hope to cover all molecular biology techniques,
however you will undertake a mini-project which will expose you to some of the more important DNA-based
techniques.
In this project, you will be provided with a culture of Escherichia coli (E. coli), a bacterium which is widely used
in molecular biology. This culture has been transformed (genetically engineered) by the introduction of a small
loop of DNA (a plasmid) which contains a gene of interest. Your task is to use a technique called a mini-plasmid
preparation (mini-prep) to recover this plasmid from the culture and demonstrate its presence using
electrophoresis.
Getting Started
Before you begin, make sure that you are familiar with the relevant theory behind the techniques we will be
performing. This manual contains several appendices which will provide you with this information. Make sure
you read this information before proceeding.
Appendix A : DNA
Appendix B : Using a Micropipette
Appendix C : Using a Bench Centrifuge
Appendix D : Glossary of Terms
Other molecular biology techniques are provided at the SPARQ-ed website at :
http://www.di.uq.edu.au/sparqed-services#background
© 2011 State of Queensland (Department of Education & Training) http://www.di.uq.edu.au/SPARQ-ed SPARQ-ed – University of Queensland Diamantina Institute ph. +61 7 3176 7868 fax. +61 7 3176 5946 University of Queensland, Australia. Email: [email protected]
Page 7
Theoretical Basis of the Project
Using Plasmids for Cloning
One of the more common techniques available to scientists working in molecular biology is cloning. In this
technique, sequences of DNA containing genes of interest are inserted into vectors which are then used to
introduce these genes into cells or organisms to study the effects of the expression of the genes.
Vectors are based on bacterial plasmids – short circular pieces of DNA separate to the main bacterial
chromosome which may be transferred between bacteria. Scientists source plasmid vectors from biological
supply companies, which create them by ligating together pre-existing genes and sequences of DNA built from
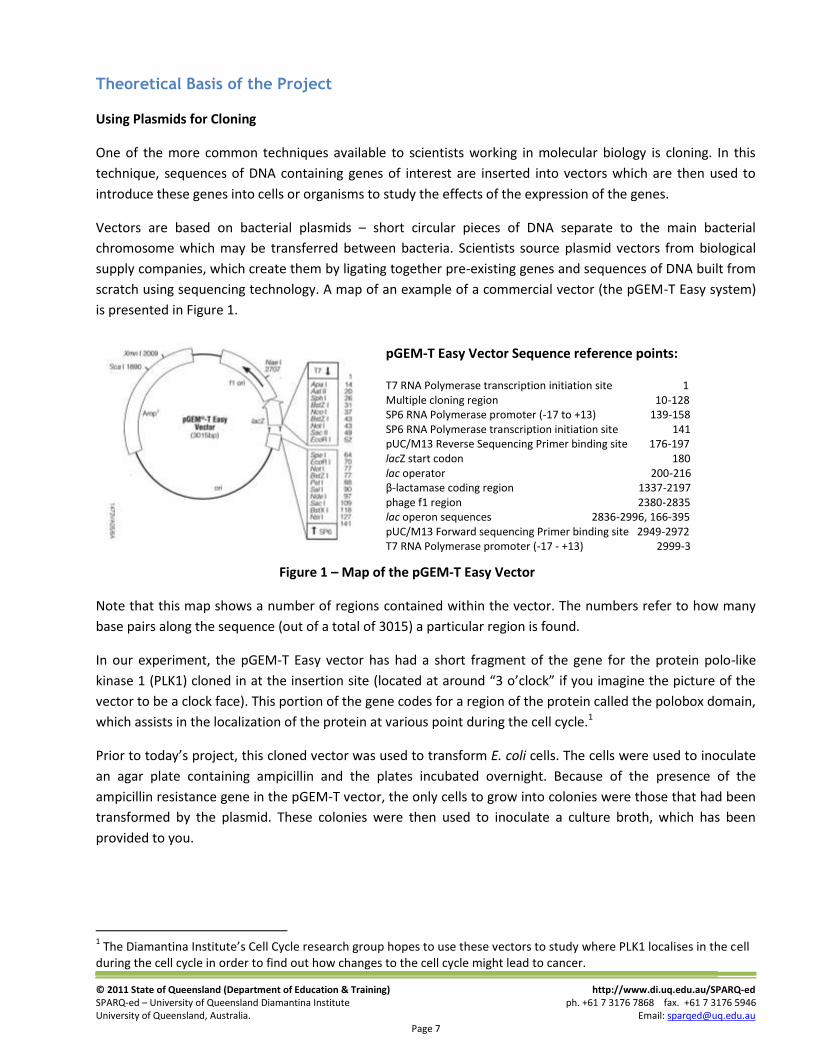
scratch using sequencing technology. A map of an example of a commercial vector (the pGEM-T Easy system)
is presented in Figure 1.
pGEM-T Easy Vector Sequence reference points:
T7 RNA Polymerase transcription initiation site 1 Multiple cloning region 10-128 SP6 RNA Polymerase promoter (-17 to +13) 139-158 SP6 RNA Polymerase transcription initiation site 141 pUC/M13 Reverse Sequencing Primer binding site 176-197 lacZ start codon 180 lac operator 200-216 β-lactamase coding region 1337-2197 phage f1 region 2380-2835 lac operon sequences 2836-2996, 166-395 pUC/M13 Forward sequencing Primer binding site 2949-2972 T7 RNA Polymerase promoter (-17 - +13) 2999-3
Figure 1 – Map of the pGEM-T Easy Vector
Note that this map shows a number of regions contained within the vector. The numbers refer to how many
base pairs along the sequence (out of a total of 3015) a particular region is found.
In our experiment, the pGEM-T Easy vector has had a short fragment of the gene for the protein polo-like
kinase 1 (PLK1) cloned in at the insertion site (located at around “3 o’clock” if you imagine the picture of the
vector to be a clock face). This portion of the gene codes for a region of the protein called the polobox domain,
which assists in the localization of the protein at various point during the cell cycle.1
Prior to today’s project, this cloned vector was used to transform E. coli cells. The cells were used to inoculate
an agar plate containing ampicillin and the plates incubated overnight. Because of the presence of the
ampicillin resistance gene in the pGEM-T vector, the only cells to grow into colonies were those that had been
transformed by the plasmid. These colonies were then used to inoculate a culture broth, which has been
provided to you.
1 The Diamantina Institute’s Cell Cycle research group hopes to use these vectors to study where PLK1 localises in the cell
during the cell cycle in order to find out how changes to the cell cycle might lead to cancer.
© 2011 State of Queensland (Department of Education & Training) http://www.di.uq.edu.au/SPARQ-ed SPARQ-ed – University of Queensland Diamantina Institute ph. +61 7 3176 7868 fax. +61 7 3176 5946 University of Queensland, Australia. Email: [email protected]
Page 8
The Alkaline Lysis Mini-Plasmid Preparation
Using transformed bacteria is a very efficient means to generate DNA needed for research. Bacteria have
minimal requirements for nutrition and so the production of large quantities of DNA can be done quickly and
at a minimal cost. Once a culture of transformed cells is established, this culture can be used to seed new
cultures, so transformation need only be performed once. However once we have our culture, we need a way
of recovering the DNA in a relatively pure form.
DNA (including plasmid DNA) is not generally secreted by cells. In order to recover it, we need to disrupt the
cells and then purify the DNA we need from the other cellular contents. This is the purpose of the alkaline lysis
mini-plasmid preparation (or mini-prep).
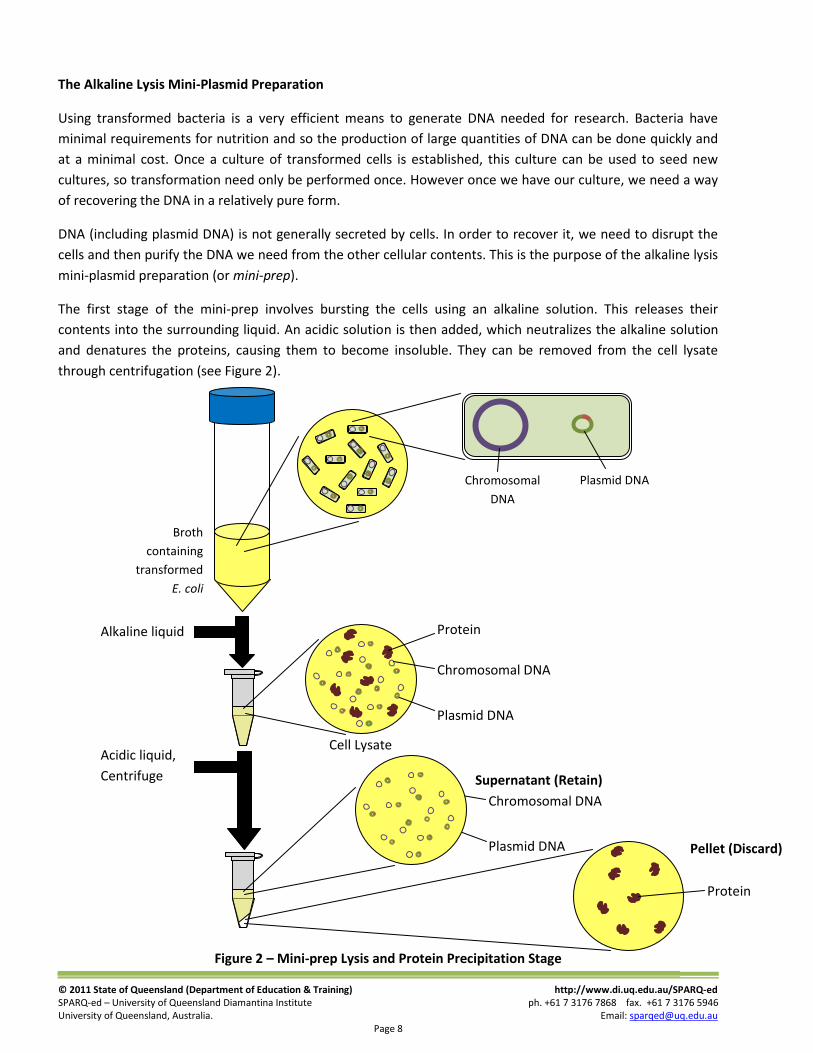
The first stage of the mini-prep involves bursting the cells using an alkaline solution. This releases their
contents into the surrounding liquid. An acidic solution is then added, which neutralizes the alkaline solution
and denatures the proteins, causing them to become insoluble. They can be removed from the cell lysate
through centrifugation (see Figure 2).
Figure 2 – Mini-prep Lysis and Protein Precipitation Stage
Broth
containing
transformed
E. coli
Chromosomal
DNA
Plasmid DNA
Alkaline liquid
Cell Lysate
Protein
Chromosomal DNA
Plasmid DNA
Acidic liquid,
Centrifuge
Protein
Pellet (Discard)
Supernatant (Retain)
Chromosomal DNA
Plasmid DNA
© 2011 State of Queensland (Department of Education & Training) http://www.di.uq.edu.au/SPARQ-ed SPARQ-ed – University of Queensland Diamantina Institute ph. +61 7 3176 7868 fax. +61 7 3176 5946 University of Queensland, Australia. Email: [email protected]
Page 9
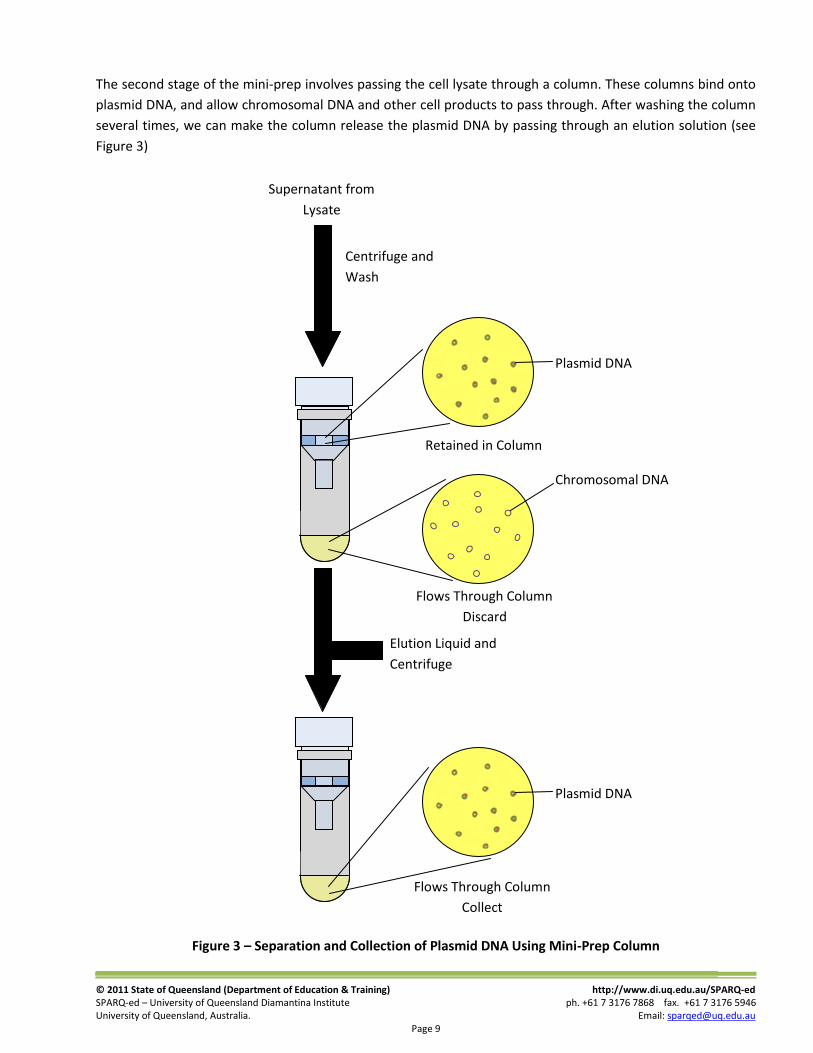
The second stage of the mini-prep involves passing the cell lysate through a column. These columns bind onto
plasmid DNA, and allow chromosomal DNA and other cell products to pass through. After washing the column
several times, we can make the column release the plasmid DNA by passing through an elution solution (see
Figure 3)
Figure 3 – Separation and Collection of Plasmid DNA Using Mini-Prep Column
Supernatant from
Lysate
Centrifuge and
Wash
Elution Liquid and
Centrifuge
Flows Through Column
Collect
Plasmid DNA
Retained in Column
Plasmid DNA
Flows Through Column
Discard
Chromosomal DNA
© 2011 State of Queensland (Department of Education & Training) http://www.di.uq.edu.au/SPARQ-ed SPARQ-ed – University of Queensland Diamantina Institute ph. +61 7 3176 7868 fax. +61 7 3176 5946 University of Queensland, Australia. Email: [email protected]
Page 10
Restriction Digests
By the end of the mini-prep procedure, you should have approximately one drop of a colourless liquid. To demonstrate that you have recovered the plasmid DNA you will need to run the sample on an electrophoresis gel. However, before your sample is ready to run, you must first prepare it using a restriction digest.
Plasmid DNA is circular. For DNA to be demonstrated on a gel, it needs to be linearised. This is done by using enzymes to cut the DNA (think of cutting a rubber band once to obtain a straight strip of rubber). Restriction endonucleases are enzymes which cut the DNA strand at very specific locations, normally given by sequences of half a dozen or so base pairs called restriction sites. If we know the sequence of a length of DNA, we can select enzymes which cut the DNA once (ie. the restriction site sequence occurs once in the entire DNA sequence) or even twice. If a plasmid is cut twice, you should end up with DNA fragments of two different sizes. Molecular biologists often use this double cutting to “drop out” an insert they have cloned into a vector.
The pGEM T vector has been created with a number of restriction sites on either side of the insertion point. Some of these restriction sites are only found on one side of the insertion point, and so can be used to linearise the vector to make it ready for electrophoresis. Others are found on both sides, and so may be used to drop out the insert to check its size. In this exercise, we will be using the enzyme EcoRI which has restriction sites just upstream (before) and downstream (after) the insertion site. This will allow us to drop out the polobox insert, resulting in DNA of two different sizes : around 3015 base pairs long for the vector, and 800 base pairs long for the insert. The two linearised fragments are now ready to be demonstrated using electrophoresis.
Further information on restriction digests can be found at : http://www.di.uq.edu.au/sparqrestriction.
Agarose Gel Electrophoresis
If we wanted to sort sand from gravel from larger rocks, we would use a series of sieves of different sizes. Each sized sieve lets smaller particles pass through but retains the larger fragments. Electrophoresis can be thought of as a sieve for large molecules like DNA or protein.
In agarose gel electrophoresis, a DNA sample is loaded towards one end of a block of a jelly-like substance called agarose. When an electrical current is passed through the gel, the DNA molecules are pushed through the gel away from the negative electrode (DNA has an overall negative charge and like charges repel). Smaller fragments of DNA can move more easily through the gel than larger fragments, so in a given period of time, DNA of different sizes accumulates in regions of the gel. If we include a dye which binds to the DNA, , these regions are visible as bands – the further towards the positive electrode a band is located, the smaller the fragments of DNA are found in that band.
To get an idea of the size of a band seen on a gel, we always run a sample consisting of a mixture of DNA fragments of known sizes alongside our test samples. This is called a marker, or a “ladder”, as the multiple bands of DNA seen on the gel resembles the rungs on a ladder. By matching the position of a band in our test sample to those representing DNA of known size in the ladder, we can estimate the size of DNA fragments in our test. The part of the PLK1 gene which codes for the polobox domain is 800 base pairs (bp) long. Therefore, if our digest has been a success, we should see a band corresponding to our DNA markers which is 800 base pairs long representing the polo-box insert, and another representing the pGEM-T vector at 3000 base pairs long.
More detailed information on electrophoresis can be found at http://www.di.uq.edu.au/sparqDNAelectrophoresis.
© 2011 State of Queensland (Department of Education & Training) http://www.di.uq.edu.au/SPARQ-ed SPARQ-ed – University of Queensland Diamantina Institute ph. +61 7 3176 7868 fax. +61 7 3176 5946 University of Queensland, Australia. Email: [email protected]
Page 11
Experimental Protocol
How to Use this Manual
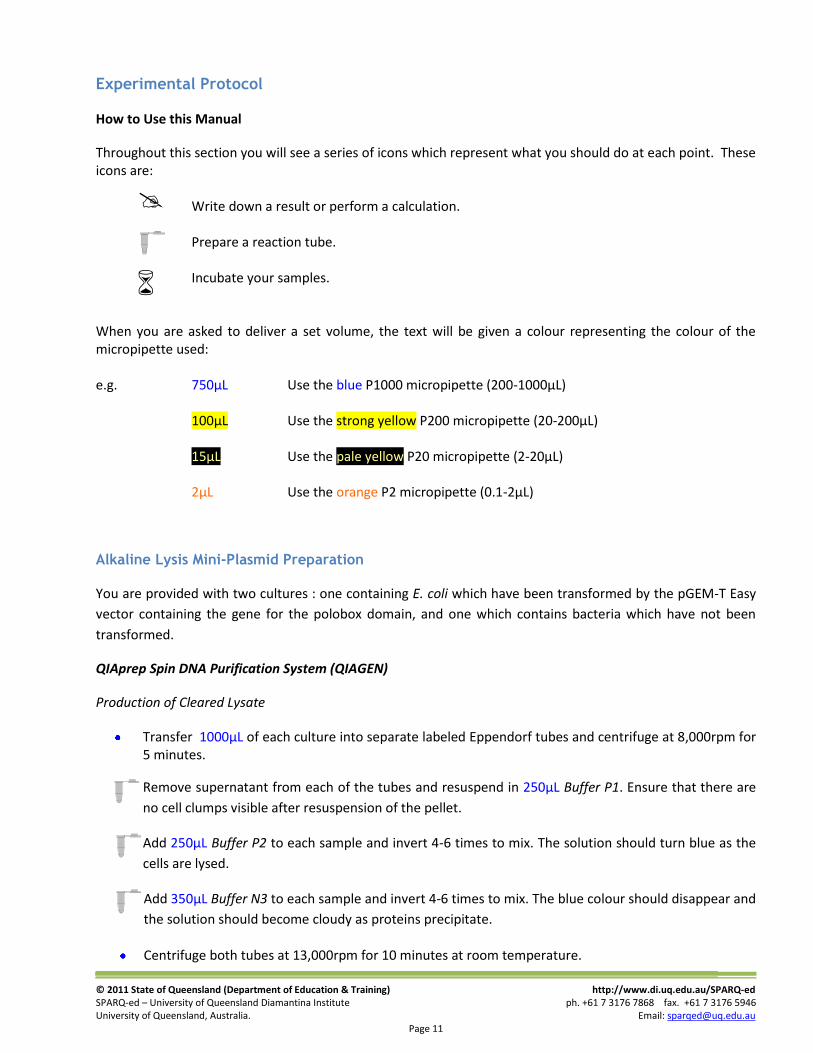
Throughout this section you will see a series of icons which represent what you should do at each point. These icons are: Write down a result or perform a calculation.
Prepare a reaction tube.
Incubate your samples. When you are asked to deliver a set volume, the text will be given a colour representing the colour of the micropipette used: e.g. 750µL Use the blue P1000 micropipette (200-1000µL) 100µL Use the strong yellow P200 micropipette (20-200µL) 15µL Use the pale yellow P20 micropipette (2-20µL) 2µL Use the orange P2 micropipette (0.1-2µL)
Alkaline Lysis Mini-Plasmid Preparation
You are provided with two cultures : one containing E. coli which have been transformed by the pGEM-T Easy
vector containing the gene for the polobox domain, and one which contains bacteria which have not been
transformed.
QIAprep Spin DNA Purification System (QIAGEN)
Production of Cleared Lysate
Transfer 1000µL of each culture into separate labeled Eppendorf tubes and centrifuge at 8,000rpm for 5 minutes.
Remove supernatant from each of the tubes and resuspend in 250µL Buffer P1. Ensure that there are
no cell clumps visible after resuspension of the pellet.
Add 250µL Buffer P2 to each sample and invert 4-6 times to mix. The solution should turn blue as the
cells are lysed.
Add 350µL Buffer N3 to each sample and invert 4-6 times to mix. The blue colour should disappear and
the solution should become cloudy as proteins precipitate.
Centrifuge both tubes at 13,000rpm for 10 minutes at room temperature.
© 2011 State of Queensland (Department of Education & Training) http://www.di.uq.edu.au/SPARQ-ed SPARQ-ed – University of Queensland Diamantina Institute ph. +61 7 3176 7868 fax. +61 7 3176 5946 University of Queensland, Australia. Email: [email protected]
Page 12
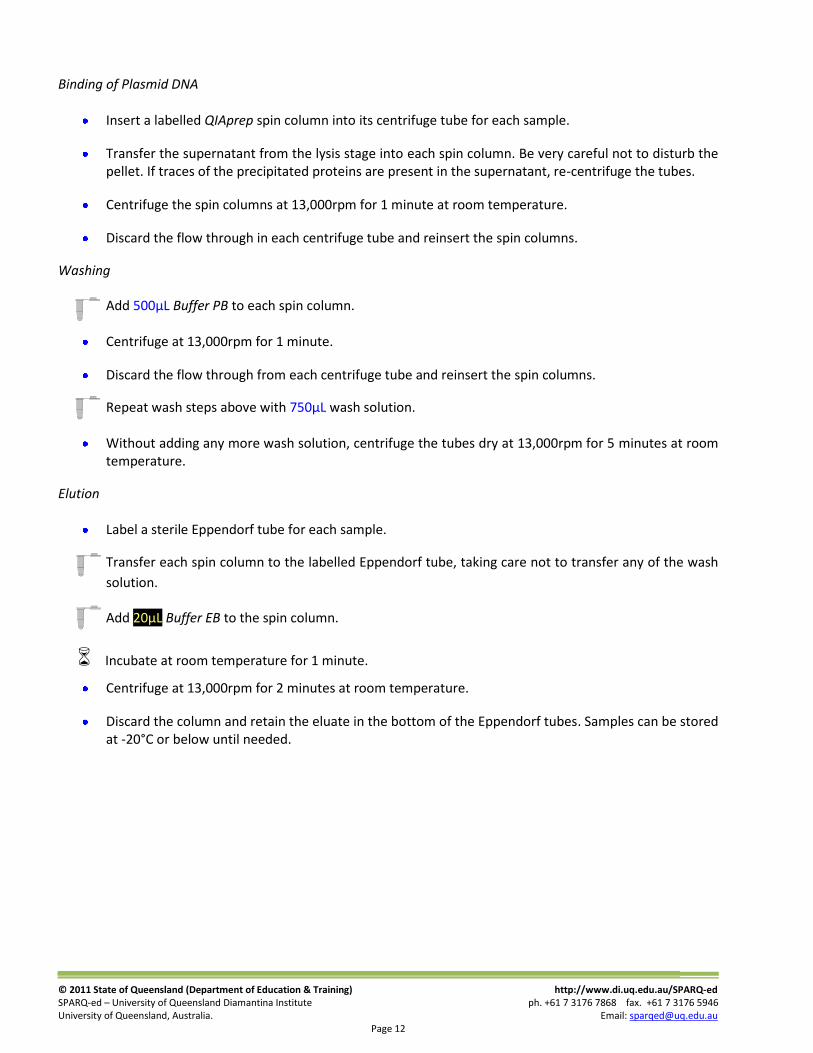
Binding of Plasmid DNA
Insert a labelled QIAprep spin column into its centrifuge tube for each sample.
Transfer the supernatant from the lysis stage into each spin column. Be very careful not to disturb the pellet. If traces of the precipitated proteins are present in the supernatant, re-centrifuge the tubes.
Centrifuge the spin columns at 13,000rpm for 1 minute at room temperature.
Discard the flow through in each centrifuge tube and reinsert the spin columns.
Washing
Add 500µL Buffer PB to each spin column.
Centrifuge at 13,000rpm for 1 minute.
Discard the flow through from each centrifuge tube and reinsert the spin columns.
Repeat wash steps above with 750µL wash solution.
Without adding any more wash solution, centrifuge the tubes dry at 13,000rpm for 5 minutes at room temperature.
Elution
Label a sterile Eppendorf tube for each sample.
Transfer each spin column to the labelled Eppendorf tube, taking care not to transfer any of the wash
solution.
Add 20µL Buffer EB to the spin column.
Incubate at room temperature for 1 minute.
Centrifuge at 13,000rpm for 2 minutes at room temperature.
Discard the column and retain the eluate in the bottom of the Eppendorf tubes. Samples can be stored at -20°C or below until needed.
© 2011 State of Queensland (Department of Education & Training) http://www.di.uq.edu.au/SPARQ-ed SPARQ-ed – University of Queensland Diamantina Institute ph. +61 7 3176 7868 fax. +61 7 3176 5946 University of Queensland, Australia. Email: [email protected]
Page 13
Restriction Digest
Our first procedure will be to prepare restriction digests of each of our mini-preps. We will perform a
restriction digest on the mini-prep from the untransformed cultures, even though they should not have any
plasmid DNA. This is called a negative control (ie. it shows us what the results of the experiment should look
like if it didn’t work.
Restriction digests require very small amounts of reagents to be added. Since this exercise is a check of our
samples and we do not want to use all of them up, we will work with the barest minimum volumes.
The reagents required for our digest are :
DNA Sample – generally added in the same proportion as the restriction enzyme
Restriction Enzyme – generally added at 10% of the final volume
10X Buffer – a solution of salts which maintain the correct pH for the enzyme to function. “10X” refers
to the fact that it is ten times more concentrated than it needs to be and so must be diluted by the
addition of the other reagents. The volume of buffer used must be 10% of the final volume. There may
be different buffers required for each restriction enzyme
Water – used to make up the reaction mixture to the final volume
We will be performing an EcoRI digest on our sample to drop out the polobox inserts.
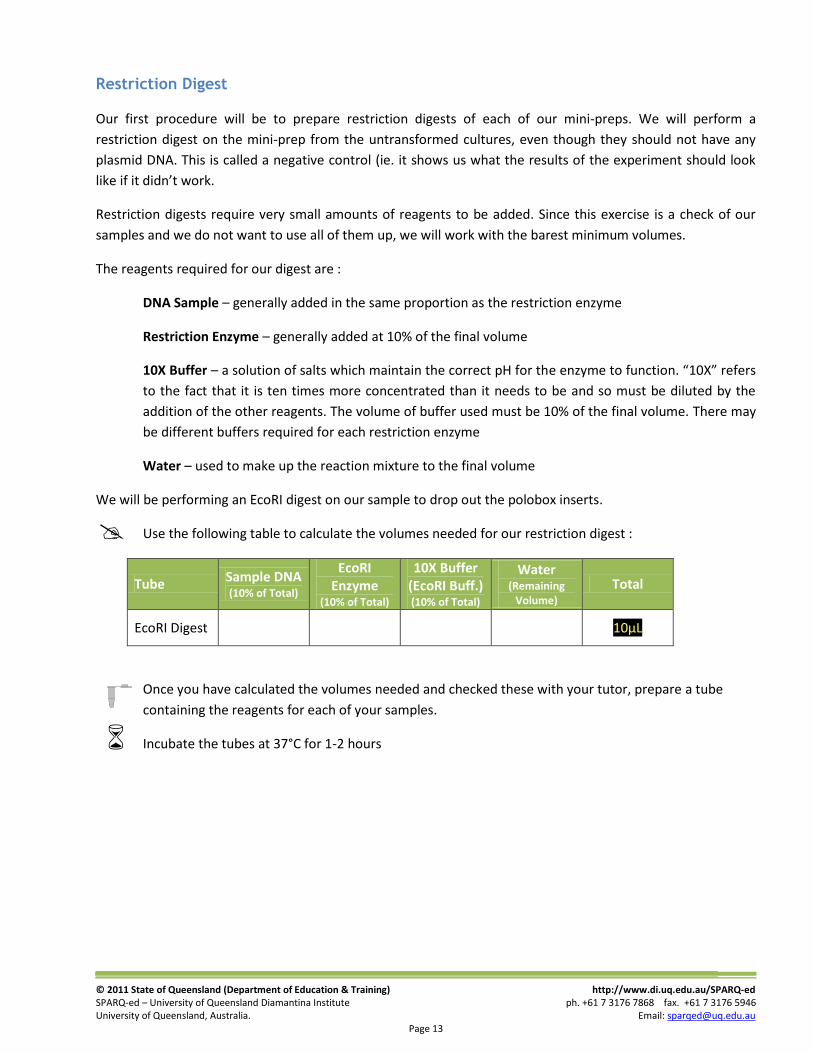
Use the following table to calculate the volumes needed for our restriction digest :
Tube Sample DNA (10% of Total)
EcoRI Enzyme
(10% of Total)
10X Buffer (EcoRI Buff.) (10% of Total)
Water (Remaining
Volume) Total
EcoRI Digest
10μL
Once you have calculated the volumes needed and checked these with your tutor, prepare a tube
containing the reagents for each of your samples.
Incubate the tubes at 37°C for 1-2 hours
© 2011 State of Queensland (Department of Education & Training) http://www.di.uq.edu.au/SPARQ-ed SPARQ-ed – University of Queensland Diamantina Institute ph. +61 7 3176 7868 fax. +61 7 3176 5946 University of Queensland, Australia. Email: [email protected]
Page 14
Electrophoresis
In order to check for the presence of the plasmid, we need to examine the size of the DNA fragments which
result from our restriction digest. We do this using agarose gel electrophoresis.
Preparation of TAE Buffer
Electrophoresis uses an electric field to “push” DNA fragments through the gel. To ensure that this occurs
efficiently, all of the DNA must have a negative charge (to ensure that it is pushed away from the negative
terminal). This is done using a buffer which keeps the experiment at a pH where all of the DNA is negatively
charged.
The buffer most commonly used in DNA analysis is TAE, which stands for Tris – Acetate – EDTA (where EDTA
stands for ethylenediaminetetracetic acid). The buffer is usually made up at 50X concentration and then must
be diluted when needed (this allows us to make and store large amounts of the buffer without having to
remake it as often).
For your group, you will only need around 500mL of TAE buffer. You will need to prepare 500mL of 1X TAE
buffer from the 50X stock solution provided. Perform the following calculations :
Total volume = 500mL
1/50 of 500mL = 500 ÷ 50 = ____ mL
volume of 50X stock needed is ____ mL
Volume dH2O needed = Total volume - Volume stock needed
= 500mL – ____ mL
= ____ ml
Dilute ____ mL stock in ____ mL of dH2O
Use the calculations above to prepare 500mL of 1X TAE buffer
© 2011 State of Queensland (Department of Education & Training) http://www.di.uq.edu.au/SPARQ-ed SPARQ-ed – University of Queensland Diamantina Institute ph. +61 7 3176 7868 fax. +61 7 3176 5946 University of Queensland, Australia. Email: [email protected]
Page 15
Preparation of Gel
The gel used to studying DNA is made from agarose, a jelly-like substance derived from seaweed. This material
is supplied in powder form, and must be dissolved in the TAE buffer. For our experiment, we require a gel
containing 0.8% agarose, ie. 0.8g of agarose powder dissolved in 100mL of buffer.
Weigh out 0.8g of agarose powder and suspend in 100mL of TAE buffer in a conical flask. One
quantity is sufficient for the entire class
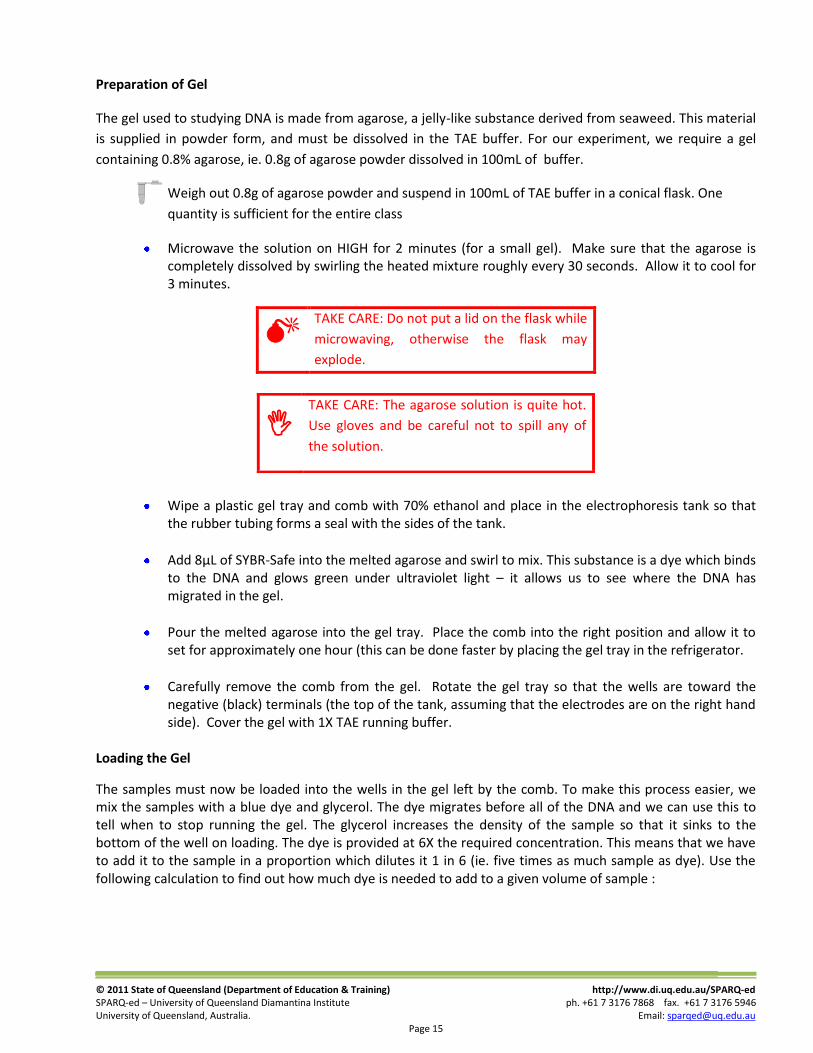
Microwave the solution on HIGH for 2 minutes (for a small gel). Make sure that the agarose is completely dissolved by swirling the heated mixture roughly every 30 seconds. Allow it to cool for 3 minutes.
Wipe a plastic gel tray and comb with 70% ethanol and place in the electrophoresis tank so that the rubber tubing forms a seal with the sides of the tank.
Add 8µL of SYBR-Safe into the melted agarose and swirl to mix. This substance is a dye which binds to the DNA and glows green under ultraviolet light – it allows us to see where the DNA has migrated in the gel.
Pour the melted agarose into the gel tray. Place the comb into the right position and allow it to set for approximately one hour (this can be done faster by placing the gel tray in the refrigerator.
Carefully remove the comb from the gel. Rotate the gel tray so that the wells are toward the negative (black) terminals (the top of the tank, assuming that the electrodes are on the right hand side). Cover the gel with 1X TAE running buffer.
Loading the Gel
The samples must now be loaded into the wells in the gel left by the comb. To make this process easier, we mix the samples with a blue dye and glycerol. The dye migrates before all of the DNA and we can use this to tell when to stop running the gel. The glycerol increases the density of the sample so that it sinks to the bottom of the well on loading. The dye is provided at 6X the required concentration. This means that we have to add it to the sample in a proportion which dilutes it 1 in 6 (ie. five times as much sample as dye). Use the following calculation to find out how much dye is needed to add to a given volume of sample :
TAKE CARE: Do not put a lid on the flask while
microwaving, otherwise the flask may
explode.
TAKE CARE: The agarose solution is quite hot.
Use gloves and be careful not to spill any of
the solution.
© 2011 State of Queensland (Department of Education & Training) http://www.di.uq.edu.au/SPARQ-ed SPARQ-ed – University of Queensland Diamantina Institute ph. +61 7 3176 7868 fax. +61 7 3176 5946 University of Queensland, Australia. Email: [email protected]
Page 16
We are going to use all 10µL of our digest product
if the volume of dye added is “x” :
x + Volume of DNA = 6x
Volume of dye needed to add to 10µL of digest product = _______ µL
Prepare loading solutions for each of your samples and DNA ladder.
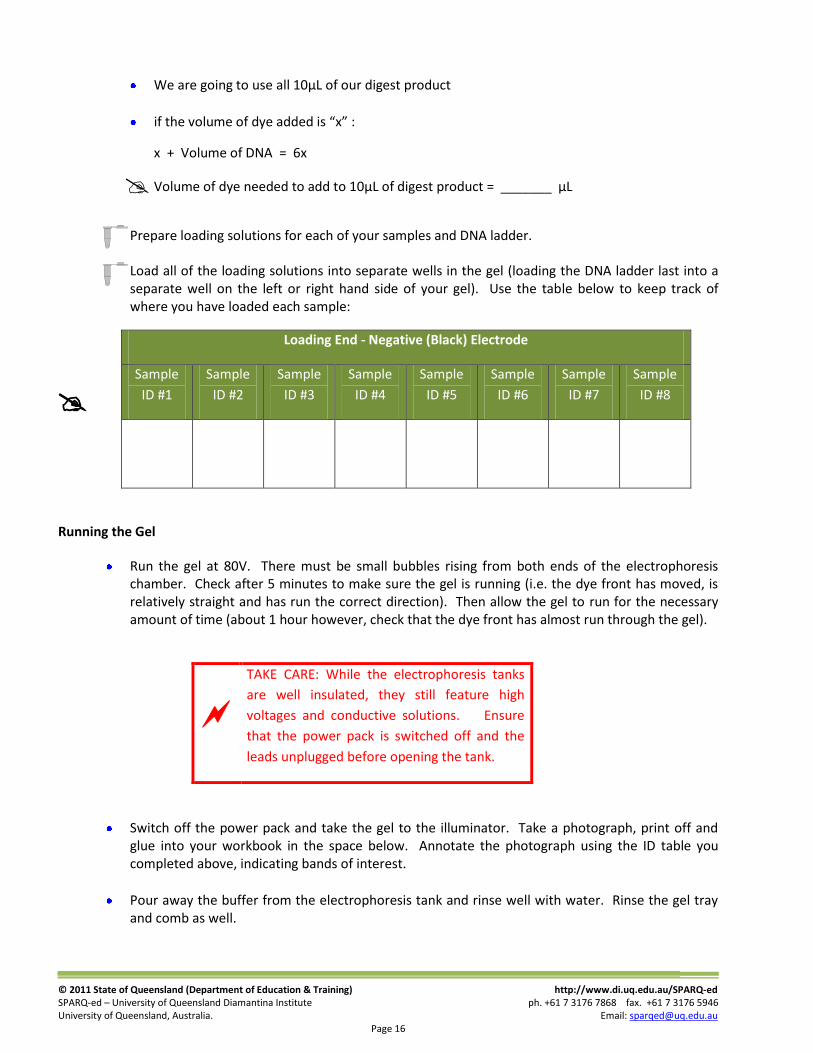
Load all of the loading solutions into separate wells in the gel (loading the DNA ladder last into a separate well on the left or right hand side of your gel). Use the table below to keep track of where you have loaded each sample:
Loading End - Negative (Black) Electrode
Sample
ID #1
Sample
ID #2
Sample
ID #3
Sample
ID #4
Sample
ID #5
Sample
ID #6
Sample
ID #7
Sample
ID #8
Running the Gel
Run the gel at 80V. There must be small bubbles rising from both ends of the electrophoresis chamber. Check after 5 minutes to make sure the gel is running (i.e. the dye front has moved, is relatively straight and has run the correct direction). Then allow the gel to run for the necessary amount of time (about 1 hour however, check that the dye front has almost run through the gel).
TAKE CARE: While the electrophoresis tanks
are well insulated, they still feature high
voltages and conductive solutions. Ensure
that the power pack is switched off and the
leads unplugged before opening the tank.
Switch off the power pack and take the gel to the illuminator. Take a photograph, print off and glue into your workbook in the space below. Annotate the photograph using the ID table you completed above, indicating bands of interest.
Pour away the buffer from the electrophoresis tank and rinse well with water. Rinse the gel tray and comb as well.
© 2011 State of Queensland (Department of Education & Training) http://www.di.uq.edu.au/SPARQ-ed SPARQ-ed – University of Queensland Diamantina Institute ph. +61 7 3176 7868 fax. +61 7 3176 5946 University of Queensland, Australia. Email: [email protected]
Page 17
(Affix your gel photograph here)
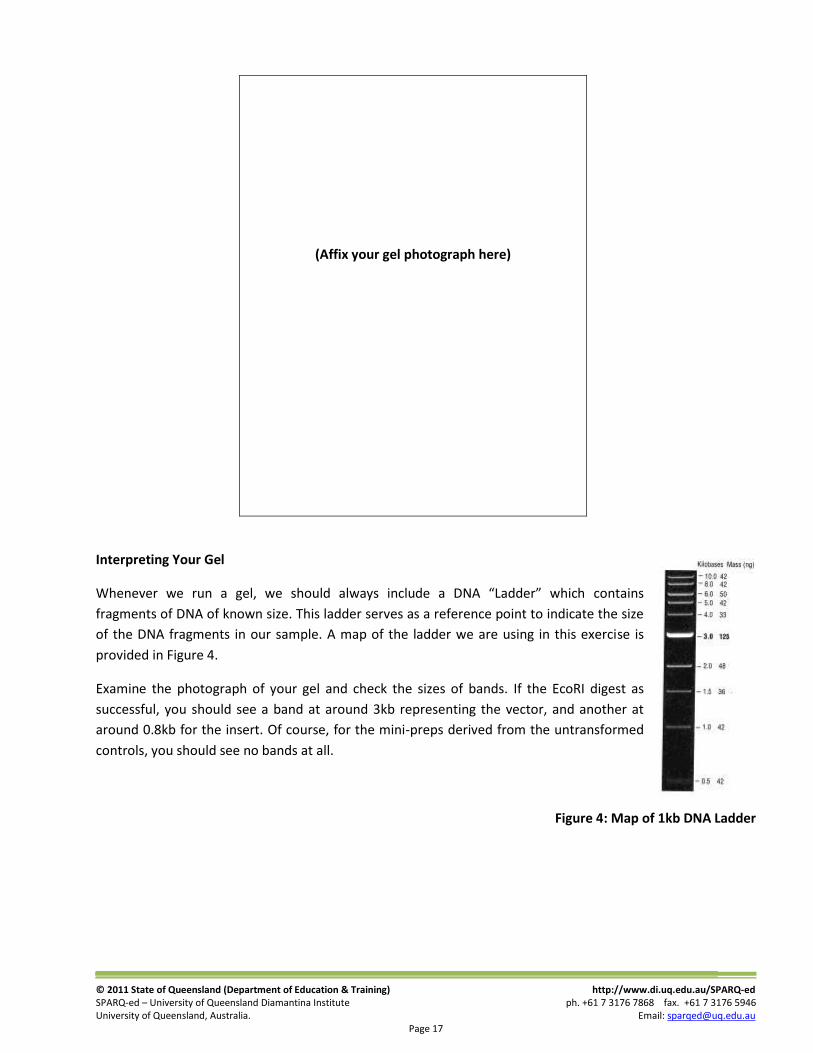
Interpreting Your Gel
Whenever we run a gel, we should always include a DNA “Ladder” which contains
fragments of DNA of known size. This ladder serves as a reference point to indicate the size
of the DNA fragments in our sample. A map of the ladder we are using in this exercise is
provided in Figure 4.
Examine the photograph of your gel and check the sizes of bands. If the EcoRI digest as
successful, you should see a band at around 3kb representing the vector, and another at
around 0.8kb for the insert. Of course, for the mini-preps derived from the untransformed
controls, you should see no bands at all.
Figure 4: Map of 1kb DNA Ladder
© 2011 State of Queensland (Department of Education & Training) http://www.di.uq.edu.au/SPARQ-ed SPARQ-ed – University of Queensland Diamantina Institute ph. +61 7 3176 7868 fax. +61 7 3176 5946 University of Queensland, Australia. Email: [email protected]
Page 18
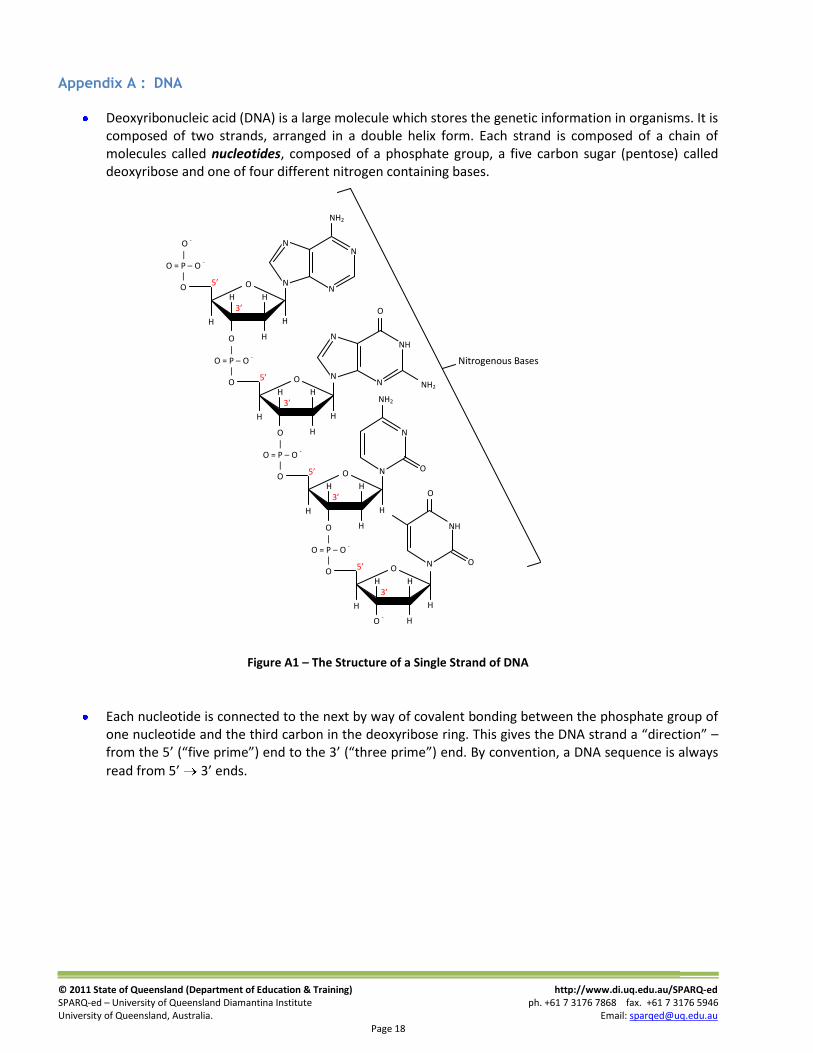
Appendix A : DNA
Deoxyribonucleic acid (DNA) is a large molecule which stores the genetic information in organisms. It is composed of two strands, arranged in a double helix form. Each strand is composed of a chain of molecules called nucleotides, composed of a phosphate group, a five carbon sugar (pentose) called deoxyribose and one of four different nitrogen containing bases.
Figure A1 – The Structure of a Single Strand of DNA
Each nucleotide is connected to the next by way of covalent bonding between the phosphate group of one nucleotide and the third carbon in the deoxyribose ring. This gives the DNA strand a “direction” – from the 5’ (“five prime”) end to the 3’ (“three prime”) end. By convention, a DNA sequence is always
read from 5’ 3’ ends.
O = P – O -
O |
| O O
H
H
H H
H
5’
3’
O = P – O -
O |
| O O
H
H
H H
H
5’
3’
O -
O = P – O -
O |
| O O
H
H
H H
H
5’
3’
O
H
H
H H
H
5’
3’
O = P – O -
O -
|
| O
N
N N
N
NH2
N
N N
NH
O
NH2
NH2
N O
N
O
NH
N O
Nitrogenous Bases
© 2011 State of Queensland (Department of Education & Training) http://www.di.uq.edu.au/SPARQ-ed SPARQ-ed – University of Queensland Diamantina Institute ph. +61 7 3176 7868 fax. +61 7 3176 5946 University of Queensland, Australia. Email: [email protected]
Page 19
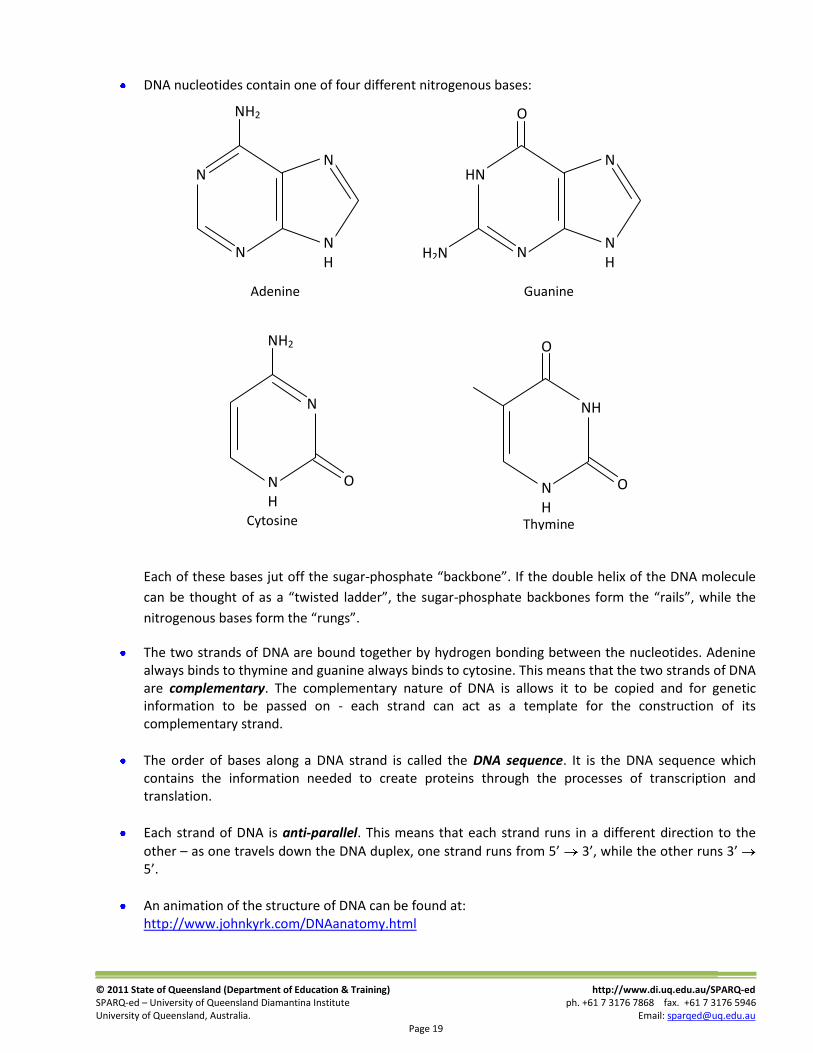
DNA nucleotides contain one of four different nitrogenous bases:
Each of these bases jut off the sugar-phosphate “backbone”. If the double helix of the DNA molecule
can be thought of as a “twisted ladder”, the sugar-phosphate backbones form the “rails”, while the
nitrogenous bases form the “rungs”.
The two strands of DNA are bound together by hydrogen bonding between the nucleotides. Adenine always binds to thymine and guanine always binds to cytosine. This means that the two strands of DNA are complementary. The complementary nature of DNA is allows it to be copied and for genetic information to be passed on - each strand can act as a template for the construction of its complementary strand.
The order of bases along a DNA strand is called the DNA sequence. It is the DNA sequence which contains the information needed to create proteins through the processes of transcription and translation.
Each strand of DNA is anti-parallel. This means that each strand runs in a different direction to the
other – as one travels down the DNA duplex, one strand runs from 5’ 3’, while the other runs 3’ 5’.
An animation of the structure of DNA can be found at: http://www.johnkyrk.com/DNAanatomy.html
Adenine
NH2
N
N NH
N
Cytosine
NH2
O
N
NH
Thymine
O
NH
NH
O
O
Guanine
H2N
HN
N NH
N
© 2011 State of Queensland (Department of Education & Training) http://www.di.uq.edu.au/SPARQ-ed SPARQ-ed – University of Queensland Diamantina Institute ph. +61 7 3176 7868 fax. +61 7 3176 5946 University of Queensland, Australia. Email: [email protected]
Page 20
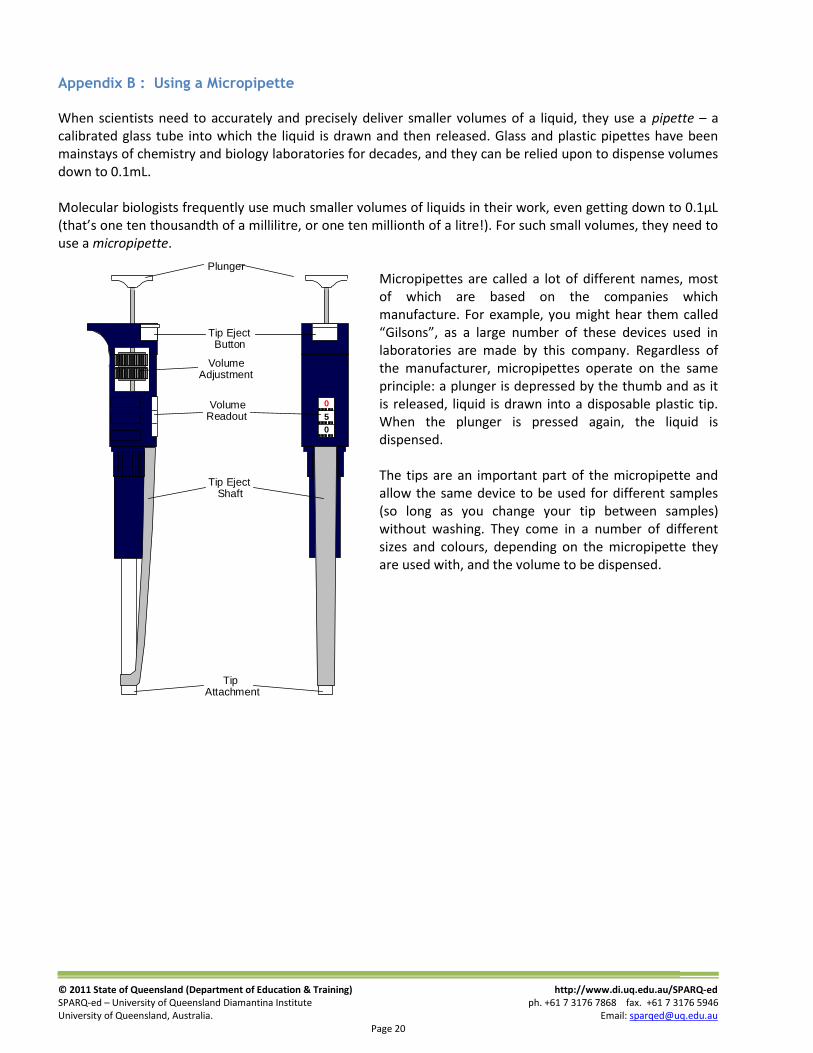
Appendix B : Using a Micropipette
When scientists need to accurately and precisely deliver smaller volumes of a liquid, they use a pipette – a calibrated glass tube into which the liquid is drawn and then released. Glass and plastic pipettes have been mainstays of chemistry and biology laboratories for decades, and they can be relied upon to dispense volumes down to 0.1mL. Molecular biologists frequently use much smaller volumes of liquids in their work, even getting down to 0.1µL (that’s one ten thousandth of a millilitre, or one ten millionth of a litre!). For such small volumes, they need to use a micropipette.
Micropipettes are called a lot of different names, most of which are based on the companies which manufacture. For example, you might hear them called “Gilsons”, as a large number of these devices used in laboratories are made by this company. Regardless of the manufacturer, micropipettes operate on the same principle: a plunger is depressed by the thumb and as it is released, liquid is drawn into a disposable plastic tip. When the plunger is pressed again, the liquid is dispensed. The tips are an important part of the micropipette and allow the same device to be used for different samples (so long as you change your tip between samples) without washing. They come in a number of different sizes and colours, depending on the micropipette they are used with, and the volume to be dispensed.
0
5
0
Plunger
VolumeAdjustment
VolumeReadout
Tip Eject Button
Tip Eject Shaft
TipAttachment
© 2011 State of Queensland (Department of Education & Training) http://www.di.uq.edu.au/SPARQ-ed SPARQ-ed – University of Queensland Diamantina Institute ph. +61 7 3176 7868 fax. +61 7 3176 5946 University of Queensland, Australia. Email: [email protected]
Page 21
The most commonly used tips are:
Large Blue – 200-1000µL
Small Yellow – 2-200µL
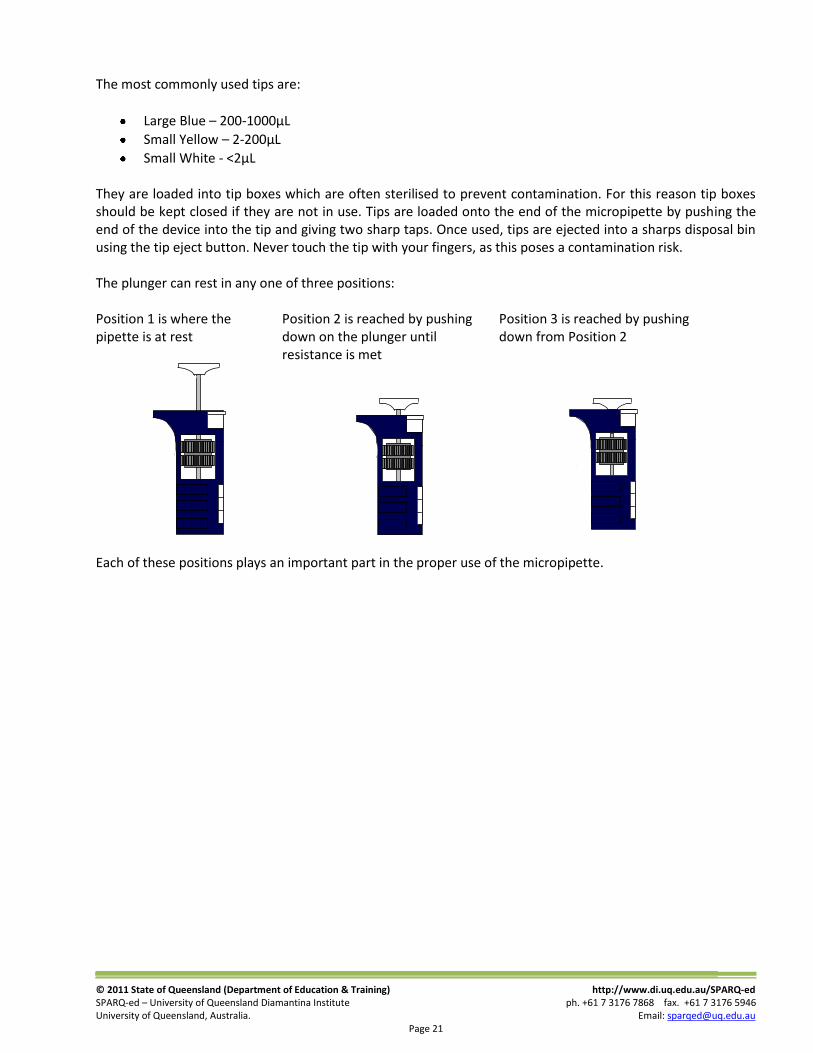
Small White - <2µL They are loaded into tip boxes which are often sterilised to prevent contamination. For this reason tip boxes should be kept closed if they are not in use. Tips are loaded onto the end of the micropipette by pushing the end of the device into the tip and giving two sharp taps. Once used, tips are ejected into a sharps disposal bin using the tip eject button. Never touch the tip with your fingers, as this poses a contamination risk. The plunger can rest in any one of three positions: Position 1 is where the pipette is at rest
Position 2 is reached by pushing down on the plunger until resistance is met
Position 3 is reached by pushing down from Position 2
Each of these positions plays an important part in the proper use of the micropipette.
© 2011 State of Queensland (Department of Education & Training) http://www.di.uq.edu.au/SPARQ-ed SPARQ-ed – University of Queensland Diamantina Institute ph. +61 7 3176 7868 fax. +61 7 3176 5946 University of Queensland, Australia. Email: [email protected]
Page 22
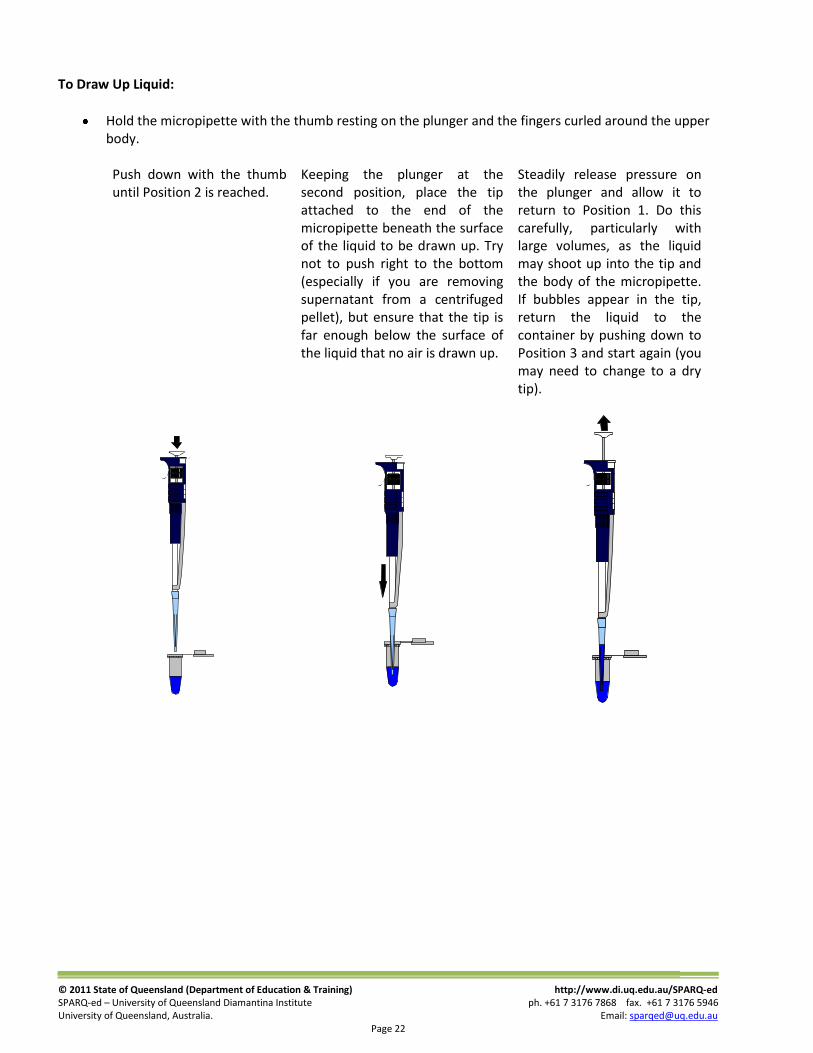
To Draw Up Liquid:
Hold the micropipette with the thumb resting on the plunger and the fingers curled around the upper body.
Push down with the thumb until Position 2 is reached.
Keeping the plunger at the second position, place the tip attached to the end of the micropipette beneath the surface of the liquid to be drawn up. Try not to push right to the bottom (especially if you are removing supernatant from a centrifuged pellet), but ensure that the tip is far enough below the surface of the liquid that no air is drawn up.
Steadily release pressure on the plunger and allow it to return to Position 1. Do this carefully, particularly with large volumes, as the liquid may shoot up into the tip and the body of the micropipette. If bubbles appear in the tip, return the liquid to the container by pushing down to Position 3 and start again (you may need to change to a dry tip).
© 2011 State of Queensland (Department of Education & Training) http://www.di.uq.edu.au/SPARQ-ed SPARQ-ed – University of Queensland Diamantina Institute ph. +61 7 3176 7868 fax. +61 7 3176 5946 University of Queensland, Australia. Email: [email protected]
Page 23
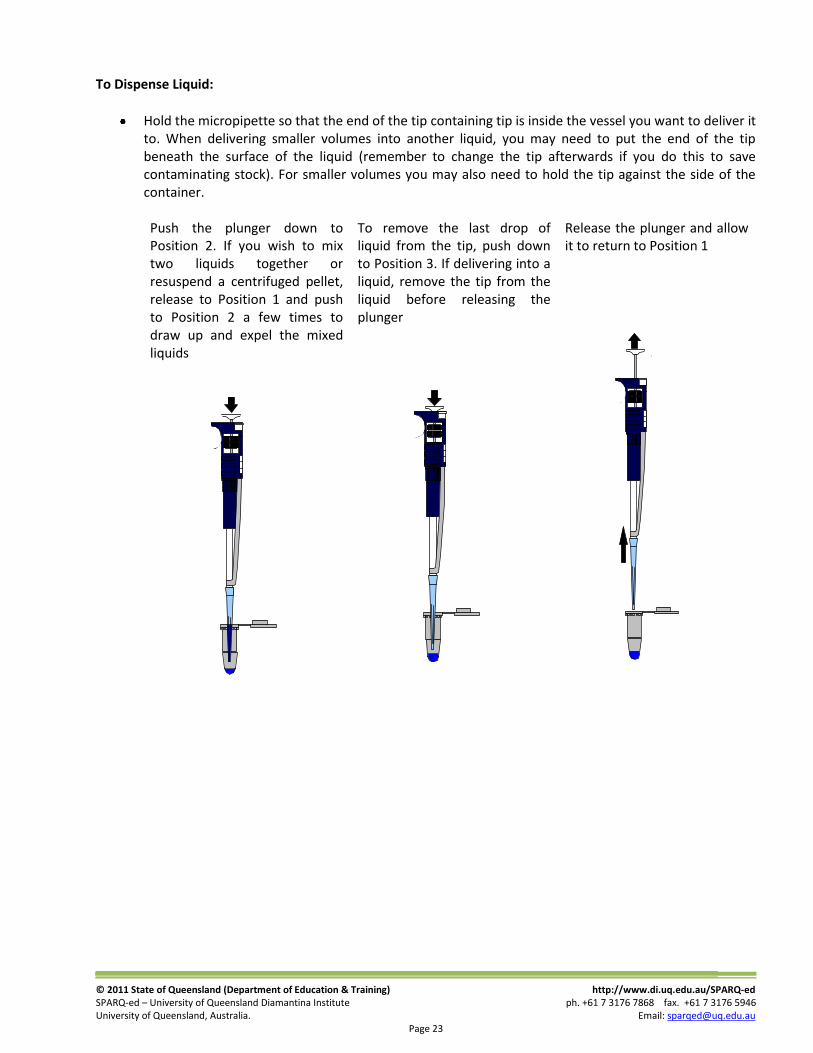
To Dispense Liquid:
Hold the micropipette so that the end of the tip containing tip is inside the vessel you want to deliver it to. When delivering smaller volumes into another liquid, you may need to put the end of the tip beneath the surface of the liquid (remember to change the tip afterwards if you do this to save contaminating stock). For smaller volumes you may also need to hold the tip against the side of the container.
Push the plunger down to Position 2. If you wish to mix two liquids together or resuspend a centrifuged pellet, release to Position 1 and push to Position 2 a few times to draw up and expel the mixed liquids
To remove the last drop of liquid from the tip, push down to Position 3. If delivering into a liquid, remove the tip from the liquid before releasing the plunger
Release the plunger and allow it to return to Position 1
© 2011 State of Queensland (Department of Education & Training) http://www.di.uq.edu.au/SPARQ-ed SPARQ-ed – University of Queensland Diamantina Institute ph. +61 7 3176 7868 fax. +61 7 3176 5946 University of Queensland, Australia. Email: [email protected]
Page 24
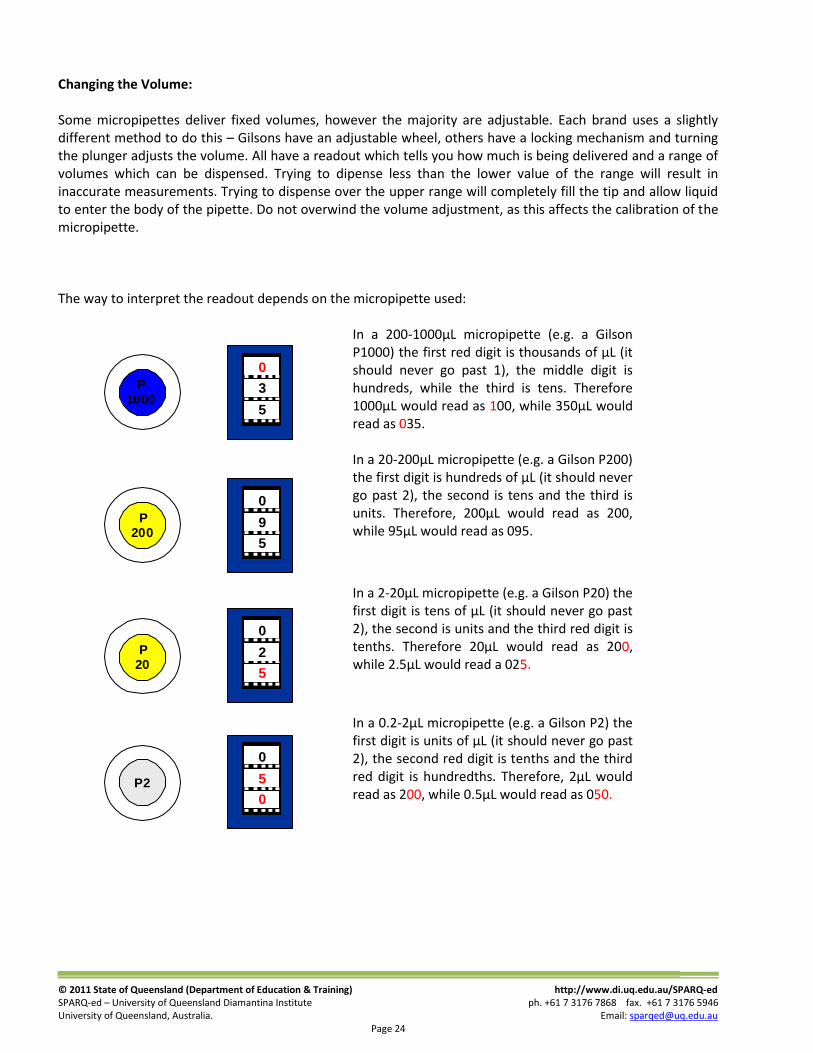
Changing the Volume: Some micropipettes deliver fixed volumes, however the majority are adjustable. Each brand uses a slightly different method to do this – Gilsons have an adjustable wheel, others have a locking mechanism and turning the plunger adjusts the volume. All have a readout which tells you how much is being delivered and a range of volumes which can be dispensed. Trying to dipense less than the lower value of the range will result in inaccurate measurements. Trying to dispense over the upper range will completely fill the tip and allow liquid to enter the body of the pipette. Do not overwind the volume adjustment, as this affects the calibration of the micropipette. The way to interpret the readout depends on the micropipette used: In a 200-1000µL micropipette (e.g. a Gilson
P1000) the first red digit is thousands of µL (it should never go past 1), the middle digit is hundreds, while the third is tens. Therefore 1000µL would read as 100, while 350µL would read as 035.
In a 20-200µL micropipette (e.g. a Gilson P200) the first digit is hundreds of µL (it should never go past 2), the second is tens and the third is units. Therefore, 200µL would read as 200, while 95µL would read as 095.
In a 2-20µL micropipette (e.g. a Gilson P20) the first digit is tens of µL (it should never go past 2), the second is units and the third red digit is tenths. Therefore 20µL would read as 200, while 2.5µL would read a 025.
In a 0.2-2µL micropipette (e.g. a Gilson P2) the first digit is units of µL (it should never go past 2), the second red digit is tenths and the third red digit is hundredths. Therefore, 2µL would read as 200, while 0.5µL would read as 050.
P1000
0
3
5
P200
0
9
5
P20
0
2
5
P2
0
5
0
© 2011 State of Queensland (Department of Education & Training) http://www.di.uq.edu.au/SPARQ-ed SPARQ-ed – University of Queensland Diamantina Institute ph. +61 7 3176 7868 fax. +61 7 3176 5946 University of Queensland, Australia. Email: [email protected]
Page 25
Appendix C : Using a Bench Centrifuge
If a suspension of materials containing different densities are allowed to sit, gravity will separate them; with
the materials of the highest density sinking to the bottom and the lower densities floating on top. This is the
reason why air floats above water and why cells in a blood sample will sink towards the bottom of the tube. In
laboratories, we cannot afford to wait around for gravity to take its course, so we use centrifuges. Centrifuges
are devices which use high rotational speeds to increase the rate at which materials settle out according to
density.
In molecular biology, centrifuges are used for a variety of purposes – spinning down small volumes of liquids
which may have collected on the sides of a vessel, separating and washing cells and forcing liquids through
separation columns as in gel purification. At high enough rotational speeds (ultracentrifugation), we can even
separate cell components and organelles, or even macromolecules based on their size.
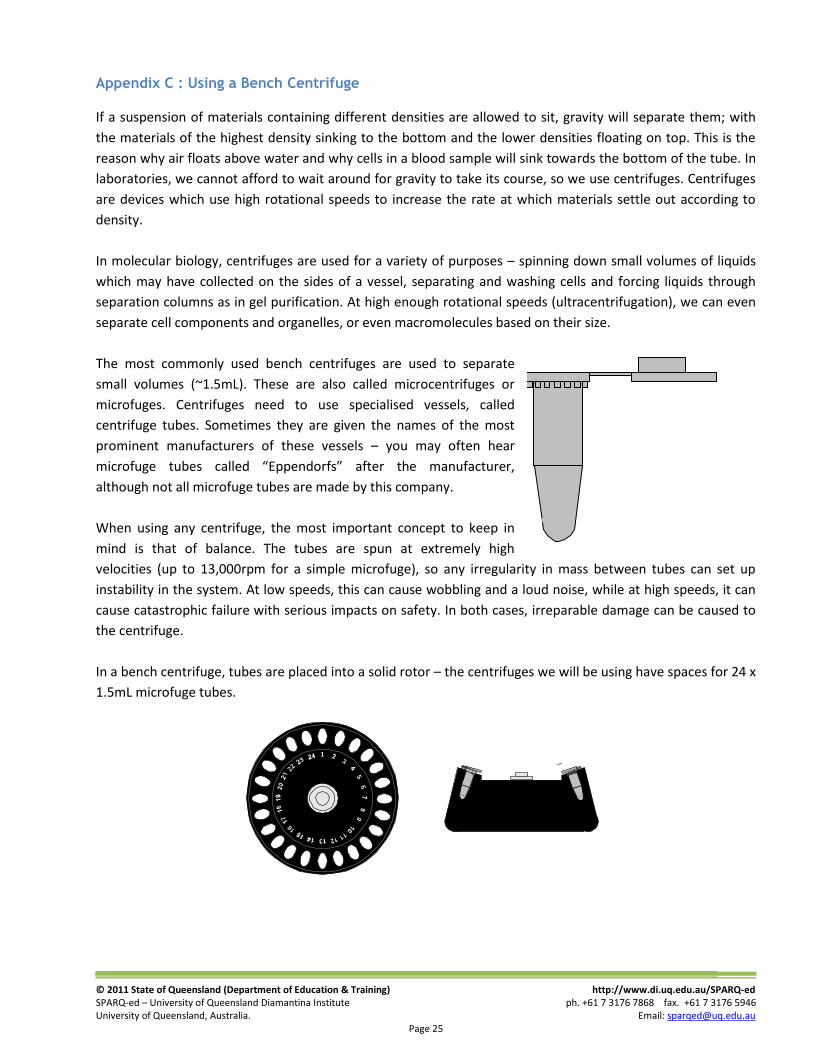
The most commonly used bench centrifuges are used to separate
small volumes (~1.5mL). These are also called microcentrifuges or
microfuges. Centrifuges need to use specialised vessels, called
centrifuge tubes. Sometimes they are given the names of the most
prominent manufacturers of these vessels – you may often hear
microfuge tubes called “Eppendorfs” after the manufacturer,
although not all microfuge tubes are made by this company.
When using any centrifuge, the most important concept to keep in
mind is that of balance. The tubes are spun at extremely high
velocities (up to 13,000rpm for a simple microfuge), so any irregularity in mass between tubes can set up
instability in the system. At low speeds, this can cause wobbling and a loud noise, while at high speeds, it can
cause catastrophic failure with serious impacts on safety. In both cases, irreparable damage can be caused to
the centrifuge.
In a bench centrifuge, tubes are placed into a solid rotor – the centrifuges we will be using have spaces for 24 x
1.5mL microfuge tubes.
1
© 2011 State of Queensland (Department of Education & Training) http://www.di.uq.edu.au/SPARQ-ed SPARQ-ed – University of Queensland Diamantina Institute ph. +61 7 3176 7868 fax. +61 7 3176 5946 University of Queensland, Australia. Email: [email protected]
Page 26
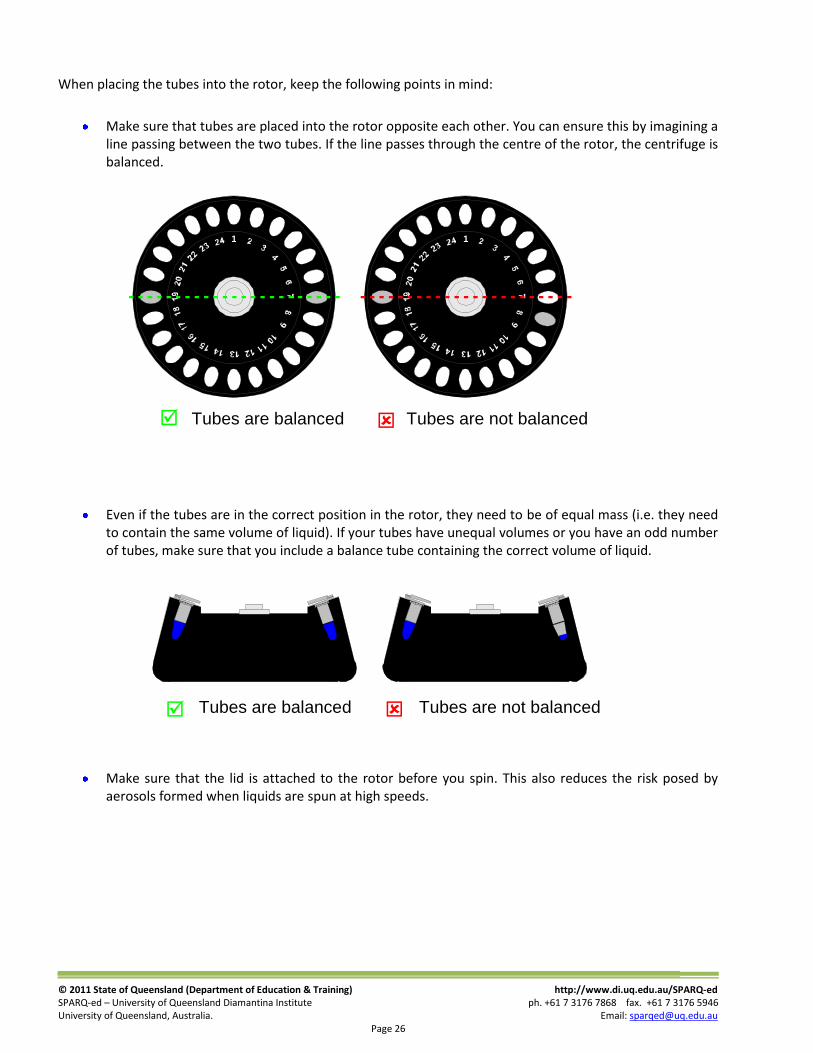
When placing the tubes into the rotor, keep the following points in mind:
Make sure that tubes are placed into the rotor opposite each other. You can ensure this by imagining a line passing between the two tubes. If the line passes through the centre of the rotor, the centrifuge is balanced.
Even if the tubes are in the correct position in the rotor, they need to be of equal mass (i.e. they need
to contain the same volume of liquid). If your tubes have unequal volumes or you have an odd number of tubes, make sure that you include a balance tube containing the correct volume of liquid.
Make sure that the lid is attached to the rotor before you spin. This also reduces the risk posed by
aerosols formed when liquids are spun at high speeds.
1
Tubes are balanced
1
Tubes are not balanced
Tubes are balanced Tubes are not balanced
© 2011 State of Queensland (Department of Education & Training) http://www.di.uq.edu.au/SPARQ-ed SPARQ-ed – University of Queensland Diamantina Institute ph. +61 7 3176 7868 fax. +61 7 3176 5946 University of Queensland, Australia. Email: [email protected]
Page 27
Appendix D : Glossary of Terms
Acidic – having a low pH.
Alkaline – having a high pH.
Alkaline Lysis Mini-Plasmid Preparation – a laboratory procedure which recovers plasmid DNA from
transformed bacterial cultures. Mini-preps use an alkaline solution to release the plasmids from the bacterial
cells, and then a column to separate plasmid DNA from other cell contents.
Agarose – a substance derived from seaweed which forms a gel when dissolved in water. Agarose gels are
used in DNA electrophoresis.
Ampicillin – an antibiotic used to select strains of bacteria which have been transformed using a plasmid vectors. These vectors contain a gene for ampicillin resistance and so only bacteria which contain the vector will be able to grow in culture media containing the antibiotic. Antibiotic – a chemical agent which kills or inhibits the growth of microorganisms. Antibiotics are sometimes
used as selective agents in bacterial culture.
Bacterium – a microorganism with a cell wall but which lacks membrane-bound organelles.
Band – a region of a gel containing DNA or protein fragments of a particular size.
Bases – the four organic molecules which are found in nucleotides. The bases found in DNA are adenine,
thymine, guanine and cytosine. In RNA, thymine is replaced by uracil.
Biochemistry – the study of the chemistry of living things.
Biomolecule – a complex organic compound which is made as the result of a biological process. Also called
macromolecules, because most are quite large.
Buffer – a compound which helps to keep the pH of a solution stable and constant.
Cancer – a condition characterized by abnormal cell growth and multiplication, as well as migration of affected
cells throughout the body.
Cell – the basic unit of all living things. Cells are metabolically active membrane bound bodies capable of
reproduction.
Cell Biology – the study of processes which cells use to survive.
© 2011 State of Queensland (Department of Education & Training) http://www.di.uq.edu.au/SPARQ-ed SPARQ-ed – University of Queensland Diamantina Institute ph. +61 7 3176 7868 fax. +61 7 3176 5946 University of Queensland, Australia. Email: [email protected]
Page 28
Cell Cycle – the progression of stages which a cell passes through in its growth and development. It consists of
G1 (Gap 1) phase, where organelles are produced and the cell starts to increase in size, S (Synthesis) phase,
where DNA is replicated so that each daughter cell has a complete copy of the genome, G2 (Gap 2) phase,
where the cell checks that all is in order for division, and M (Mitosis) phase, where the chromosomes are
separated (mitosis) and the cell divides into two daughter cells (cytokinesis). Following M phase, cells return to
G1 phase should they need to divide again. Most cells go from G1 phase into G0 phase, where they carry out
their normal cellular functions, as most cells do not need to constantly divide. Changes to the cell cycle can
lead to a situation where the cells are constantly dividing, a state which may progress to cancer. An
understanding of the processes which control the cell cycle can lead to ways to treat cancer, either by stopping
the cell cycles of cancerous cells, or preventing cells from turning cancerous in the first place.
Centrifuge – a device which increases the rate at which substances settle out of suspension by spinning them
at high speeds.
Chromosome – A length of DNA. Human cells have 46 linear chromosomes, while bacteria have a single
circular chromosome.
Cloning – the process of introducing a new gene into a test cell for the purposes of producing multiple copies
of that gene.
Comb – a device used to create the wells in a gel into which the samples are loaded.
Culture – the practice of growing cells by providing them with the right temperature and nutrient
requirements.
Denaturation – the process of disrupting the tertiary structures of proteins using heat or a change in pH.
Because denaturation changes the properties of the protein (eg. its solubility in water), it may be used as a
means of precipitating proteins to remove them from a solution.
Dilution – reducing the concentration of a solution by adding more solvent.
DNA – deoxyribonucleic acid – the biomolecule which stores the genetic information in most living things. DNA
consists of two strands of deoxynucleotides linked by phosphodiester bonds. The bases in the two nucleotide
strands bind in complementary pairs (adenine to thymine, cytosine to guanine) through hydrogen bonds. This
gives the molecule the appearance of a twisted ladder, with the sugar-phosphate chains forming the runners
and the base pairs forming the rungs. The sugar in the nucleotides which make up DNA is deoxyribose.
Downstream – towards the 3’ end of a strand of nucleic acid.
Electrophoresis – a technique which uses an electric field to separate DNA fragments or proteins by size
through a gel.
Eluate – the liquid that flows through a chromatography column.
Enzyme – a protein which acts as a biological catalyst – it speeds along reactions which would normally be too
slow to be useful.
Fragment – a piece of DNA.
© 2011 State of Queensland (Department of Education & Training) http://www.di.uq.edu.au/SPARQ-ed SPARQ-ed – University of Queensland Diamantina Institute ph. +61 7 3176 7868 fax. +61 7 3176 5946 University of Queensland, Australia. Email: [email protected]
Page 29
Gel – a semi-solid material used to separate DNA fragments or proteins by size during the process of
electrophoresis.
Gene – a small section of DNA which contains the information used to produce a protein, or which controls
and regulates the expression of other genes.
Incubation – a waiting period, to allow a reaction time to take place, or organisms time to grow and multiply.
Insert – a small sequence of DNA (eg. a single gene) placed inside another piece of DNA (eg. a plasmid).
Kilobase – a unit representing 1000 bases along a strand of DNA or RNA.
Ladder – a collection of bands in a gel produced by including a standard sample of DNA of known sizes. Used
to estimate the size of DNA in test samples.
Linearisation – the process of changing a circular length of DNA into a linear one by cutting the DNA strand at
one or more points. This is performed using targeted restriction digests.
Medium – a combination of salts and nutrients dissolved in a liquid (broth) or semi-solid material (plate) in
which cells are grown.
Micropipette – a device used to accurately and precisely deliver small quantities (<1mL) of liquid.
Molecular Biology – the study of how chemical processes contribute to living systems. Molecular biology
concentrates largely on the nature of DNA and proteins.
Nucleic Acid – a biomolecule consisting of a chain of nucleotides connected by phosphodiester bonds. DNA
and RNA are nucleic acids.
Nucleoside – a combination of one of the nitrogenous bases (adenine, guanine, thymine, cytosine or uracil)
and a five carbon (pentose) sugar – deoxyribose in DNA or ribose in RNA.
Nucleotide – a nucleoside joined to a phosphate (PO4) group. Nucleotides make up nucleic acids.
pH – the degree of acidity (low pH) or alkalinity (high pH) of a solution.
Plasmid – a small, circular “satellite” chromosome found in bacteria and capable of genetic exchange between
bacteria.
PLKI – pololike kinase I – an enzyme which plays an important regulatory role in the cell cycle.
Polobox Domain – a region within PLKI which allows it to attach to other proteins and sub-cellular
components.
Protein – a biomolecule consisting of polypeptide chains folded up into three dimensional forms. Proteins play
many roles in organisms, including being the building blocks of cellular structures, control and regulation of
chemical reactions (enzymes), recognition and communication between cells (receptors and hormones) and
defense (antibodies).
© 2011 State of Queensland (Department of Education & Training) http://www.di.uq.edu.au/SPARQ-ed SPARQ-ed – University of Queensland Diamantina Institute ph. +61 7 3176 7868 fax. +61 7 3176 5946 University of Queensland, Australia. Email: [email protected]
Page 30
Precipitation – changing the solubility of proteins through denaturation to allow their removal through
centrifugation.
Restriction Digest – an enzyme-mediated reaction which cuts DNA at specific base pair sequences.
Restriction Endonucleases – enzymes which cut DNA strands at specific sequences of nucleotide bases.
Restriction endonucleases originate in bacteria where they form part of the defense of the cell against attack
by viruses.
Restriction Site – a sequence of nucleotide bases where a restriction endonuclease cuts the DNA strand.
Stock Solution – a concentrated solution used to store reagents. Stock solutions are usually made to be a
certain number of times more concentrated that the working solutions and so must be diluted by the factor to
create the working solution. eg. 50X stock must be diluted 1 in 50 before it can be used.
TAE – tris-acetate-EDTA – a buffer used to run DNA gels because it keeps the solution at a pH where all of the
DNA is negatively charged.
Transformation – the process of introducing genes into prokaryotic cells.
Upstream – towards the 5’ end of a strand of nucleic acid.
Vector – something which is used to introduce a new gene into a cell. Plasmids are commonly used to
introduce genes into bacteria.
Well – a “hole” cast in a gel using a comb into which the sample is loaded for electrophoresis.
Working Solution – the solution which is used in a chemical solution. Working solutions may be made up fresh
or diluted from stock solutions. They are normally given the name “1X” to differentiate them from their stock
solutions.