Embed Size (px)
Citation preview
No. 12
How to UseSpancrete Precast
for Inexpensive SpaceUnder Your Garage
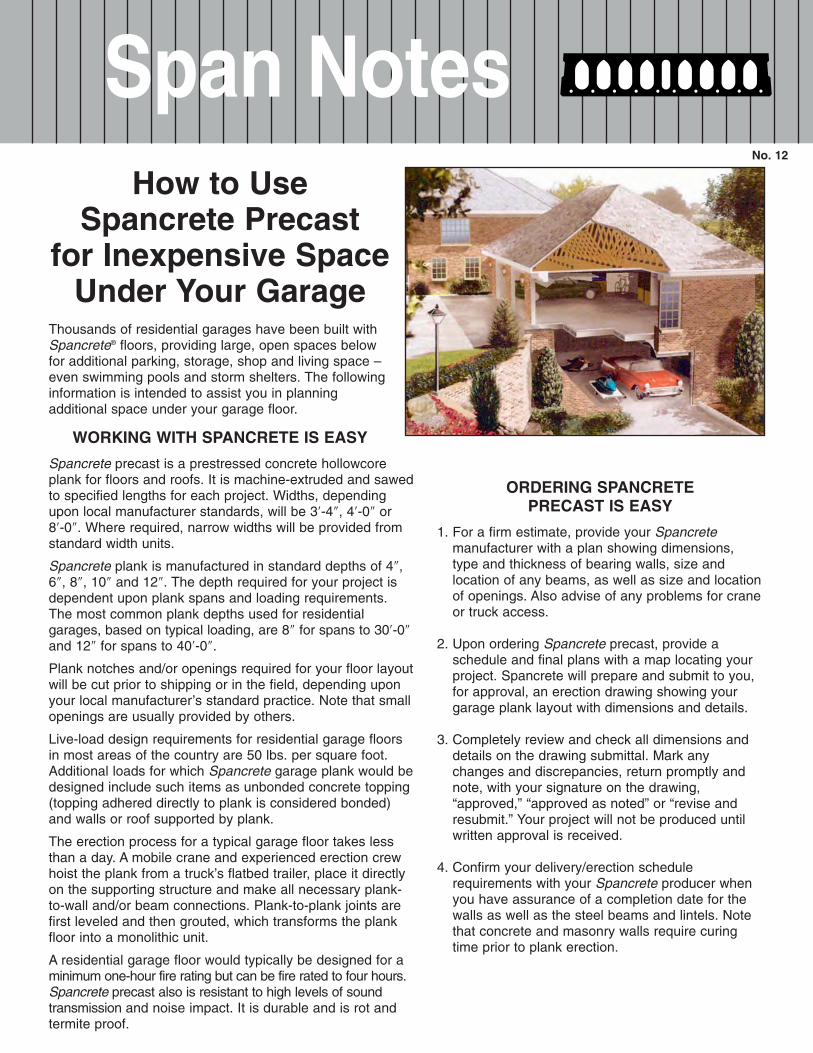
Thousands of residential garages have been built withSpancrete® floors, providing large, open spaces belowfor additional parking, storage, shop and living space –even swimming pools and storm shelters. The followinginformation is intended to assist you in planningadditional space under your garage floor.
WORKING WITH SPANCRETE IS EASY
Spancrete precast is a prestressed concrete hollowcoreplank for floors and roofs. It is machine-extruded and sawedto specified lengths for each project. Widths, dependingupon local manufacturer standards, will be 3′-4″, 4′-0″ or 8′-0″. Where required, narrow widths will be provided fromstandard width units.
Spancrete plank is manufactured in standard depths of 4″,6″, 8″, 10″ and 12″. The depth required for your project isdependent upon plank spans and loading requirements.The most common plank depths used for residentialgarages, based on typical loading, are 8″ for spans to 30′-0″and 12″ for spans to 40′-0″.
Plank notches and/or openings required for your floor layoutwill be cut prior to shipping or in the field, depending uponyour local manufacturer’s standard practice. Note that smallopenings are usually provided by others.
Live-load design requirements for residential garage floorsin most areas of the country are 50 lbs. per square foot.Additional loads for which Spancrete garage plank would bedesigned include such items as unbonded concrete topping(topping adhered directly to plank is considered bonded)and walls or roof supported by plank.
The erection process for a typical garage floor takes lessthan a day. A mobile crane and experienced erection crewhoist the plank from a truck’s flatbed trailer, place it directlyon the supporting structure and make all necessary plank-to-wall and/or beam connections. Plank-to-plank joints arefirst leveled and then grouted, which transforms the plankfloor into a monolithic unit.
A residential garage floor would typically be designed for aminimum one-hour fire rating but can be fire rated to four hours.Spancrete precast also is resistant to high levels of soundtransmission and noise impact. It is durable and is rot andtermite proof.
ORDERING SPANCRETEPRECAST IS EASY
1. For a firm estimate, provide your Spancretemanufacturer with a plan showing dimensions,type and thickness of bearing walls, size andlocation of any beams, as well as size and locationof openings. Also advise of any problems for craneor truck access.
2. Upon ordering Spancrete precast, provide aschedule and final plans with a map locating yourproject. Spancrete will prepare and submit to you,for approval, an erection drawing showing yourgarage plank layout with dimensions and details.
3. Completely review and check all dimensions anddetails on the drawing submittal. Mark anychanges and discrepancies, return promptly andnote, with your signature on the drawing,“approved,” “approved as noted” or “revise andresubmit.” Your project will not be produced untilwritten approval is received.
4. Confirm your delivery/erection schedulerequirements with your Spancrete producer whenyou have assurance of a completion date for thewalls as well as the steel beams and lintels. Notethat concrete and masonry walls require curingtime prior to plank erection.
Span Notes
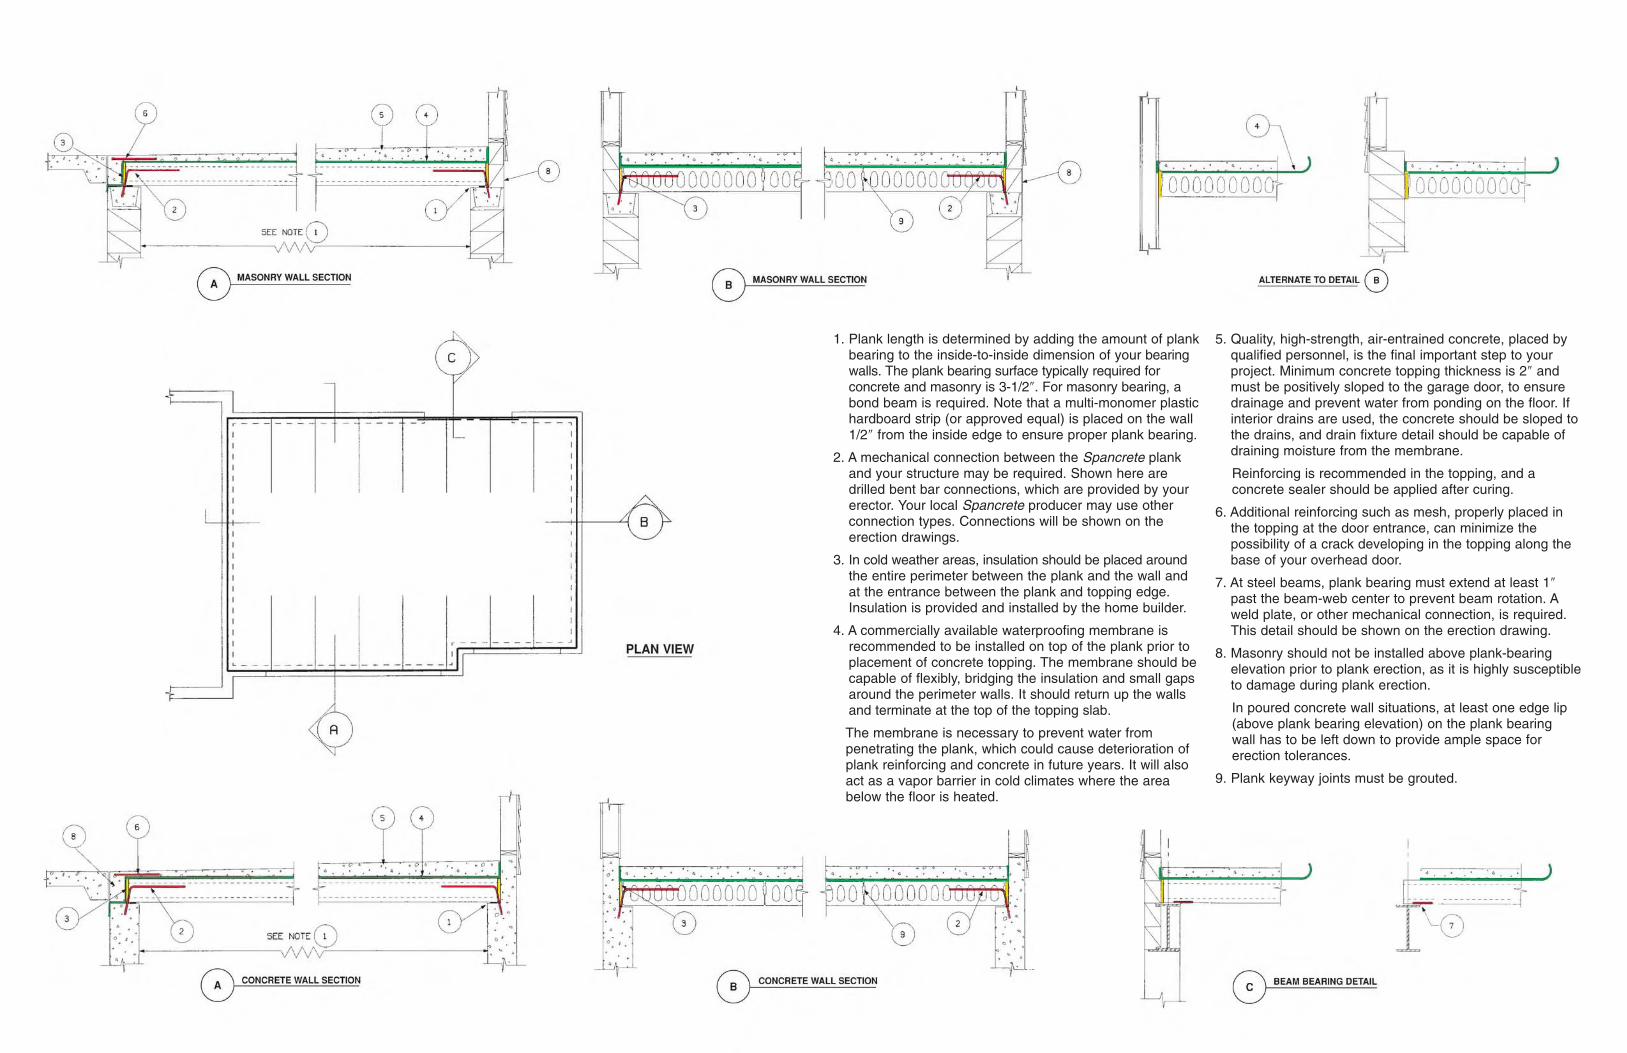
1. Plank length is determined by adding the amount of plankbearing to the inside-to-inside dimension of your bearingwalls. The plank bearing surface typically required forconcrete and masonry is 3-1/2″. For masonry bearing, abond beam is required. Note that a multi-monomer plastichardboard strip (or approved equal) is placed on the wall1/2″ from the inside edge to ensure proper plank bearing.
2. A mechanical connection between the Spancrete plankand your structure may be required. Shown here aredrilled bent bar connections, which are provided by yourerector. Your local Spancrete producer may use otherconnection types. Connections will be shown on theerection drawings.
3. In cold weather areas, insulation should be placed aroundthe entire perimeter between the plank and the wall andat the entrance between the plank and topping edge.Insulation is provided and installed by the home builder.
4. A commercially available waterproofing membrane isrecommended to be installed on top of the plank prior toplacement of concrete topping. The membrane should becapable of flexibly, bridging the insulation and small gapsaround the perimeter walls. It should return up the wallsand terminate at the top of the topping slab.
The membrane is necessary to prevent water frompenetrating the plank, which could cause deterioration ofplank reinforcing and concrete in future years. It will alsoact as a vapor barrier in cold climates where the areabelow the floor is heated.
5. Quality, high-strength, air-entrained concrete, placed byqualified personnel, is the final important step to yourproject. Minimum concrete topping thickness is 2″ andmust be positively sloped to the garage door, to ensuredrainage and prevent water from ponding on the floor. Ifinterior drains are used, the concrete should be sloped tothe drains, and drain fixture detail should be capable ofdraining moisture from the membrane.
Reinforcing is recommended in the topping, and aconcrete sealer should be applied after curing.
6. Additional reinforcing such as mesh, properly placed inthe topping at the door entrance, can minimize thepossibility of a crack developing in the topping along thebase of your overhead door.
7. At steel beams, plank bearing must extend at least 1″past the beam-web center to prevent beam rotation. Aweld plate, or other mechanical connection, is required.This detail should be shown on the erection drawing.
8. Masonry should not be installed above plank-bearingelevation prior to plank erection, as it is highly susceptibleto damage during plank erection.
In poured concrete wall situations, at least one edge lip(above plank bearing elevation) on the plank bearing wall has to be left down to provide ample space forerection tolerances.
9. Plank keyway joints must be grouted.