Embed Size (px)
Citation preview

Source-Connect® Pro 3.1 User Guide © 2004-2009 Source Elements http://source-elements.com 1
Source-Connect® Pro 3.1 User Guide
* For Source-Connect Pro including version 2.9 and apt-X™

Source-Connect® Pro 3.1 User Guide © 2004-2009 Source Elements http://source-elements.com 2
Source-Connect® Pro 3.1 User Guide 1. Introducing Source-Connect Source-Connect is an HTDM/RTAS and VST plug-in for Digidesign Pro Tools TDM or LE and supported VST hosts. Source-Connect provides professional studio access to the encoding and decoding of high quality, real-time audio streaming from within your editing environment, along with Remote Transport Sync (RTS), for remote synchronization of recording sessions. To reduce the channel bandwidth requirements while maintaining low delay and high quality communications. Source-Connect uses a state-of-the-art AAC codec, developed by Fraunhofer IIS. Source-Connect Pro with apt-X® also uses the apt-X Extended algorithm from APT.
In addition to streaming and RTS capabilities, Source-Connect also provides Contacts management and Instant Messaging features. You can add or remove contacts and edit your personal settings and profile by logging in to your account on the Source-Connect website. This manual applies to Source-Connect Pro and Source-Connect Pro with apt-X versions 2.9 and up, with differences in functionality noted where applicable. What’s new in Source-Connect 3.1? Source-Connect 3.1 comes in several versions:
• Source-Connect Standard • Source-Connect Pro • Source-Connect Pro with apt-X
Support is now available for VST and Audio Units formats. For an overview of the new features in Source-Connect 3.1 see: http://www.source-elements.com/source-connect/3.1 For an overview of the new features in Source-Connect 3.0 see: http://www.source-elements.com/source-connect/3.0 For a general overview of the Source-Connect versions and features see: http://www.source-elements.com/source-connect/features

Source-Connect® Pro 3.1 User Guide © 2004-2009 Source Elements http://source-elements.com 3
2. Installation 2.1: System requirements Supported Host versions and Hardware Pro Tools: Source-Connect Pro supports Pro Tools LE or TDM versions 6.4 or higher, running on the software and hardware configurations required to run Digidesign Pro Tools LE or TDM. See the Supported Versions on the website for more details and specific tutorials. As of the writing of this document, this includes Digidesign Pro Tools MIX, Pro Tools LE and M-Powered and Pro Tools H|D hardware. Theoretically, Source-Connect may work on any version of Pro Tools from 6.0 and up, however we only offer technical support for 6.4 and above. Please refer to the Digidesign website (see link below) for more information on compatibility with Pro Tools. VST: NOTE: Currently Source-Connect Pro is not available for VST, however you can use the Standard version with your Pro license. Source-Connect Pro for VST is scheduled for later development. Source-Connect Pro supports any VST host that runs VST version 3.2 and is capable of sending and receiving a live input. This includes Steinberg Nuendo and Cubase, Ableton Live, Adobe Audition 2.0 and higher, Calkwalk Sonar and others. See the Supported Versions on the website for more details and specific tutorials. http://source-elements.com/resources/vst Audio Units: NOTE: Currently Source-Connect Pro is not available for Audio Units, however you can use the Standard version with your Pro license. Source-Connect Pro for Audio Units is scheduled for later development. Source-Connect Pro supports any Audio Units host that is capable of sending and receiving a live input. This includes Logic, Digital Performer, Sound Track Pro, GarageBand, Ardour and others. See the Supported Versions on the website for more details and specific tutorials. http://source-elements.com/resources/au

Source-Connect® Pro 3.1 User Guide © 2004-2009 Source Elements http://source-elements.com 4
Minimum recommended configurations: 1ghz G4, 768mb RAM, OSX 10.4 2ghz P4 PC (or equivalent), 1GB RAM, Windows XP Windows Vista is not supported by Source Elements software at this time. Source-Connect supported sample-rates: Source-Connect currently only supports 44.1khz and 48khz. Source-Connect supported bit-rates: Source-Connect supports 16bit and 24bit sessions. Compatibility Source-Connect 3.1 is compatible with version 2.9 for Pro Tools 6, and all 3.0 versions and up. Source-Connect 2.9 Source-Connect 2.9 is the version for Pro Tools 6. This version does not include the Q Manager nor ability to send or receive Restore and Replace requests. If Restore and Replace is a priority for you we recommend installing Pro Tools 7 where possible.

Source-Connect® Pro 3.1 User Guide © 2004-2009 Source Elements http://source-elements.com 5
2.2: Network configuration To establish an audio session between two studios, direct peer-to-peer communication is required between two hosts each running Source-Connect. Internet communication occurs over the UDP protocol, which is a low level and very fast Internet Protocol. It is therefore required that your firewall and/or router is configured properly to enable such communication. For most operations you will open UDP 6000-6002 in your firewall and/or port forward these ports to your computer’s IP address. Please review the online Network Guide for specific details on getting your Network configured for Source-Connect: http://source-elements.com/networkguide Bandwidth: Source-Connect requires an Internet connection with bandwidth of at least 300 kbps in both directions. You may need to configure your firewall and/or router if you are inside a network or have an active firewall. Corporate firewalls and routers may be able to provide QoS services to increase your application bandwidth. Please refer to our detailed network-specific information if you have difficulty connecting successfully. You can get an idea of your bandwidth via Internet Speed test sites, such as http://www.speakeasy.net/speedtest. However, please note that a report from a site in California does not mean that you will be getting the same bandwidth when connecting to a peer in, say, Australia. Additional firewall information: Source-Connect will make outgoing requests from any available TCP port to ports 80 and 5222 on our server (www.source-elements.com). All TCP ports should be allowed to make outgoing connections to and from the firewall. Most networks allow these connections by default. For additional information on configuring your network, please refer to: http://source-elements.com/networkguide You will find here an illustrated step-by-step guide on configuring your network, along with Advanced documentation for IT administrators. For detailed assistance please contact Support.
Source-Connect® Pro 3.1 User Guide © 2004-2009 Source Elements http://source-elements.com 6
2.3: Downloading and Installing Source-Connect All Source Elements software is obtained by download directly from your account on the website. To get access to the Downloads page you will need:
1. A physical iLok dongle 2. A valid evaluation or purchased license for Source-Connect
For more information on the iLok: http://source-elements.com/iLok If you requested an evaluation license, or purchased a license you should have also created a new Source Elements account at the same time. Use this account to login to your account and download the software. If you did not receive an account please contact Support. Installing Source-Connect You should now have downloaded the correct software for your iLok license. Launch the installer and follow the instructions. Newer versions of Source-Connect will install over existing installations. On Windows it is recommended that you first uninstall Source-Connect and the Q Manager for a cleaner upgrade experience. Installing InterLok Extensions: You must have the InterLok Extensions installed to allow Source-Connect to recognise your iLok. InterLok extensions are installed with the Installer Application. The installer will not overwrite extensions which are more recent, and will only upgrade older versions. You may need to restart the computer if this is the first time you have installed the InterLok Extensions. Uninstalling: Mac OSX To uninstall Source-Connect, run the Installer and select ‘Uninstall’ in the ‘Customize section. Uninstalling: Windows XP To uninstall Source-Connect, go to your Control Panel and select ‘Add or Remove Programs’. Select 'Source-Connect' in the menu and run the uninstaller. To uninstall the Q Manager select 'Q Manager' in the menu and run the uninstaller.

Source-Connect® Pro 3.1 User Guide © 2004-2009 Source Elements http://source-elements.com 7
3. Setup and Settings 3.1: Basics The following is a quick guide, which does not include working with Auto-Restore, Auto-Replace or Remote Transport Sync. See the section 7 in this guide for information on working with these technologies. Basic steps in using Source-Connect are as follows:
1. Instantiate Source-Connect on an auxiliary channel in your Pro Tools session or follow the VST tutorial for your application.
2. Log in with your username and password.
3. Setup your audio session parameters. Parameters that can be set are
bitrate, resilience and buffer size. You may also need to specify a port. If in doubt, use the default settings.
4. Click on the ‘EDIT’ button in the Status panel. Your browser will open to the
Source-Connect Support site: log in and go to your Contacts section. You can add users to your Contacts list here. Next time you login to Source-Connect you will see your new user(s) listed in the Contacts panel, and whether their status is ONLINE and available for connecting with.
5. Select an ONLINE contact in your list and press ‘Connect’ in the Status
panel. This will connect both studios with a real-time streaming-audio session. Instant Messaging and RTS (Remote Transport Sync) will also be enabled. During the session, you send compressed audio data to each other over the Internet. Be advised that if either user does not have sufficient bandwidth or has excess packet loss there is a possibility of an audible dropout. To minimize dropouts, see the support documentation online.
6. Disconnect. This will end your audio session with the remote studio.
7. Log out.

Source-Connect® Pro 3.1 User Guide © 2004-2009 Source Elements http://source-elements.com 8
3.2: Initializing Source-Connect To initialize Source-Connect follow these instructions: Create a new 44.1khz or 48khz sample-rate session. Pro Tools TDM 6.x: (Source-Connect 2.9 only) Create a new Aux track. Open the Inserts -> TDM menu, then choose Other -> Source-Connect. Pro Tools LE 6.x: (Source-Connect 2.9 only) Create a new Aux track. Open the Inserts -> RTAS menu, then choose Other -> Source-Connect. Pro Tools TDM 7.x: Create a new Aux track. Open the Inserts -> RTAS menu, then choose Other -> Source-Connect. Pro Tools 7.x LE and M-Powered: Create a new Aux track. Open the Inserts menu, then choose Other -> Source-Connect. VST: See the VST tutorial specific to your application. http://source-elements.com/resources/vst Audio Units: See the Audio Units tutorial specific to your application. http://source-elements.com/resources/au

Source-Connect® Pro 3.1 User Guide © 2004-2009 Source Elements http://source-elements.com 9
3.3 Audio Input and Output Pro Tools The input to Source-Connect is determined by the input to the auxiliary track that Source-Connect is inserted on. For the quickest and easiest set-up it should be set to “Mic 1” or your microphone input. Likewise, the output of the Receiver is sent out though the output of the auxiliary track that Source-Connect is on. For the quickest and easiest set-up it should be set to “main out”. See our download section for more advanced setups and example Protocols setup files. Note: It is possible to get a feedback loop due to situations when removing Source-Connect from an aux track. It is therefore recommended that you mute the aux track before removing Source-Connect. VST See the VST tutorial specific to your application: http://source-elements.com/resources/vst Audio Units: See the Audio Units tutorial specific to your application. http://source-elements.com/resources/au

Source-Connect® Pro 3.1 User Guide © 2004-2009 Source Elements http://source-elements.com 10
3.4: Getting Around Source-Connect consists of multiple panels, each of which is individually expandable. To expand or collapse a panel, click on the dark green title bar. The Status panel is always visible. To collapse or expand all panels at once: • Option-click or Right-Click on any panel heading Source-Connect includes several keyboard shortcuts for features such as getting to your Instant Message window quickly, and using the RTS panel. For a full list of quick commands see our Shortcuts Guide in section 9. 3.5: About Box The About Box provides information on which version of Source-Connect you have installed. To view the About box, click on the Source Elements logo at the top of Source-Connect window. You can close the About box by clicking anywhere in that box. Opening the About Box:

Source-Connect® Pro 3.1 User Guide © 2004-2009 Source Elements http://source-elements.com 11
3.6: Source-Connect Pro: Setting session parameters - Overview Ultimately the actual capability of your network connection will determine the consistency of your sending and receiving reception. However you can optimize the quality of reception with the bitrate, buffer and resilience settings you choose to use. To modify your settings, open the Settings panel (Click on the Settings panel bar).
In the Settings panel, the following parameters can be specified: • Send Settings (Bitrate and Resilience) • Receive Settings (Port, Buffer, Restore and Replace) • Autologin • Alert You can also test and view the status of the specific UDP ports via the Connect Test button. Additional Preferences Additional Preferences are available for advanced users. Please see the Advanced settings page for information on the Advanced settings: http://source-elements.com/source-connect/advanced

Source-Connect® Pro 3.1 User Guide © 2004-2009 Source Elements http://source-elements.com 12
3.6.1: Setting session parameters - Bitrate These settings affect the audio stream that you will be sending: NOTE: You cannot change these settings while you are connected to a remote user. To change your settings you must first disconnect, make your changes, and then reconnect. IMPORTANT: In OSX with sessions at 48khz, sending bitrates below 64kbps mono and 128kbps stereo will require sample-rate conversion as we cannot transfer the lower bitrates at the native sample-rate. If you are working with RTS or Restore or Replace and your session is at 48khz sample-rate you must work with at least 64kbps mono or 128kbps stereo minimum.
Source-Connect Pro available AAC bitrates: 32, 48, 56, 64, 56, 96, 112, 128, 160 kbps mono 64, 56, 112, 128, 192, 224, 256, 320 kbps stereo Source-Connect Pro with apt-X users will also have the ‘apt-X Extended’ option. The higher the bit rate, the higher the quality of the stream at sending side. However, higher bit rates require more resources as they increase the network load. For example, using a bitrate of 64kbps (kilobits) will require approximately 20KB (KiloBytes) of data per second on your actual network, which corresponds to about 200k in required network speed. In an ideal world, you should be able to achieve a rate equal to your purchased speed (divided by 8 (to get bytes), less 10% (TCP/IP and general Internet overhead). It is unlikely you will ever see that speed however, due to issues including network congestion or overloading on your local network, ISP level, or backbone, and extended hop counts. Generally, therefore, we recommend a minimum of 300kbps up and down to achieve a reasonable stream at 64kbps. For higher bitrate transfers you will need more resources - with business cable (1.5mb up/down) or a T1 you may find you are able to transfer multiple streams of 320kbps stereo!

Source-Connect® Pro 3.1 User Guide © 2004-2009 Source Elements http://source-elements.com 13
3.6.2: Setting session parameters - Resilience In general a resilience setting of ‘1’ should be used.
Resilience determines how the stream will be sent (and ultimately how it will be received). Which resilience setting you will use depends on several factors: Network bandwidth, your upload speed and your remote user’s download speed will influence this setting. With higher resilience settings, more forward error correction data is sent. Higher resilience settings than ‘1’ are generally more effective over very high speed connections. A resilience setting of ‘0’ is not recommended unless you are on the same LAN or you have a dedicated network with no other traffic inteference. 3.6.3: Setting session parameters - Port Source-Connect requires a set of UDP ports to be available to establish a connection.
This should be a number between 1024 - 65534. For proper operation, 3 successive UDP ports should be opened in your firewall and/or mapped in your router (where the first port is the number you specify in the Port field in the Settings panel). For example, if you wish to use port 6000, ports 6000, 6001 and 6002 should be opened and mapped to your computer’s internal IP address. The last port of the set, e.g. 6002, is used for the Q Manager operations and should be specified in the Q Manager advanced panel. Verify the port status with the Connection Test button. It should return ‘successful’. Please see the online Network Guide for more information on the Connection Test.

Source-Connect® Pro 3.1 User Guide © 2004-2009 Source Elements http://source-elements.com 14
3.6.4: Setting session parameters - Buffer The higher the buffer value, the higher the possibility of avoiding audible packet loss. On the other hand, a higher buffer value means a longer communication delay. If you are on a T1 or higher connection (both remote plug-ins) you may find that reducing the buffer size offers lower delay with the same quality experience. If you or your remote connection are on cable or DSL, a higher buffer is recommended.
A value of at least 200ms is recommended, as values lower than this disable additional recovery algorithms designed to avoid packet loss. Additionally, the ideal setting for our recovery algorithms to work is to set the buffer to at least double the ping time between you and your connected user. If your latency increases too much you can set a higher buffer on the side of the connection that needs to receive the highest quality stream. 3.6.5: Setting session parameters - Recommended defaults Setting the bitrate at 96kbps, resilience of 1 and a receiver buffer of 200ms is the ideal setting for most voice situations as it requires the least resources, consumes less bandwidth and provides excellent audio quality. Lower bitrates provide easier transmission in less-than-ideal network situations. We recommend understanding your network resources as much as possible, as this allows you to achieve optimal results. 3.6.6: Autologin When Autologin is checked, you are automatically logged in with your existing settings intact upon initializing Source-Connect. Each time you open a session with Source- Connect enabled, and Autologin checked, you will be automatically logged in and be ready to connect.

Source-Connect® Pro 3.1 User Guide © 2004-2009 Source Elements http://source-elements.com 15
3.6.7: Alert Not staring at your monitor? Source-Connect will let you know with an brief aural alert when someone is requesting a connection. If you prefer to switch this off, simply uncheck the option in your Settings panel.
With Source-Connect Pro you can also set the alert to repeat for 30 seconds. See the Advanced settings section online for more information on how to set this: http://source-elements.com/source-connect/advanced

Source-Connect® Pro 3.1 User Guide © 2004-2009 Source Elements http://source-elements.com 16
4. Your Profile and Contacts 4.1: Configuring your Profile Your Contacts list and profile is managed on the Source-Connect website under your Account, which you can access by pressing the ‘Edit button in the Settings panel, or logging in to your account online. You can choose what information to display (or not to display). Your basic profile information is available to your Contacts via the Source-Connect software and, depending on the level of privacy you choose, may be viewable to all other users of Source-Connect. See the Account and Profile pages for available options: http://source-elements.com/account 4.2: Managing your Contacts list online IMPORTANT: Newly added Contacts may not be immediately visible in your list while you are logged in to the Source-Connect plug-in. If you have added a new Contact, or know that a Contact has added you, please log out, and log back in to refresh the list. The website will let you know if you need to do this once you add a new Contact. To add a new Contact, simply search or browse for the contact you wish to add and click on the ‘Add contact’ button: http://source-elements.com/contacts

Source-Connect® Pro 3.1 User Guide © 2004-2009 Source Elements http://source-elements.com 17
5. Using Source-Connect 5.1: Logging in To login, enter your username and password and press the “Log in” button. If your login is successful, the Status panel will change its view: it will now show that you are able to establish an audio session.
5.2 Establishing a session Upon logging in, the Contacts panel will list the users you have chosen to display in your Contacts list. Detailed user information is shown in the section at the left of the panel, and can be viewed by selecting a user from the list and pressing the “View profile” button.
Before connecting to a user and establishing an audio session, it is always recommended that you check your settings.

Source-Connect® Pro 3.1 User Guide © 2004-2009 Source Elements http://source-elements.com 18
To initiate an audio session, select the user in the Contacts panel with whom the session is to be established. It is only possible to connect to users who have Online status: that is, the users who are currently online and not already engaged in a session. Upon selecting a user in the list, press the ‘View profile’ button. You will see that their name, email address and any personal details they may have provided appear in the left part of the Contacts panel. This can help you to confirm that you are actually connecting to the user you want. To connect: Select the user you wish to connect with in the Contacts list and press the ‘Connect’ button in the Status panel to request a connection.
If the remote user agrees to the dialog that appears immediately on their screen, the session is established. If both users’ port settings are correctly set and the audio settings are appropriate for your respective bandwidths, sending and receiving will begin.
Audio activity is displayed in the signal meter. Otherwise (if the remote user disagrees or the request times out), the session is not established and a corresponding alert message is displayed. Failed connection: If you do not see a blinking ‘sending’ or ‘receiving’ light at the top of the plug-in it means that there is a problem with the network. Please review the Network Guide for information on how to resolve this: http://source-elements.com/networkguide

Source-Connect® Pro 3.1 User Guide © 2004-2009 Source Elements http://source-elements.com 19
5.3 Network timeouts Request timeout: 30 seconds This is the time required to reply to the confirmation dialog when establishing audio session. If you make a request, and see that your user stays listed as ‘busy’, you know that they are online, but are away from their computer. You can cancel your request at any time by pressing disconnect. Streaming timeout If the audio session is established but no audio data is received your ‘receiving’ blinker light will stop blinking to let you know that the network is not sending you any audio. If this happens during your session, try disconnecting and reconnecting with a lower bitrate and resilience setting. Source-Connect session timeout Source-Connect keeps your connection alive indefinitely, until you either log out, close your Pro Tools session or disconnect your network. In some cases you may receive a dialogue ‘Connection reset by peer’: this means you were unexpectedly disconnected – usually because your network was no longer responding. Go ahead and reconnect. If the problem persists it is due to insufficient bandwidth resources.
Source-Connect® Pro 3.1 User Guide © 2004-2009 Source Elements http://source-elements.com 20
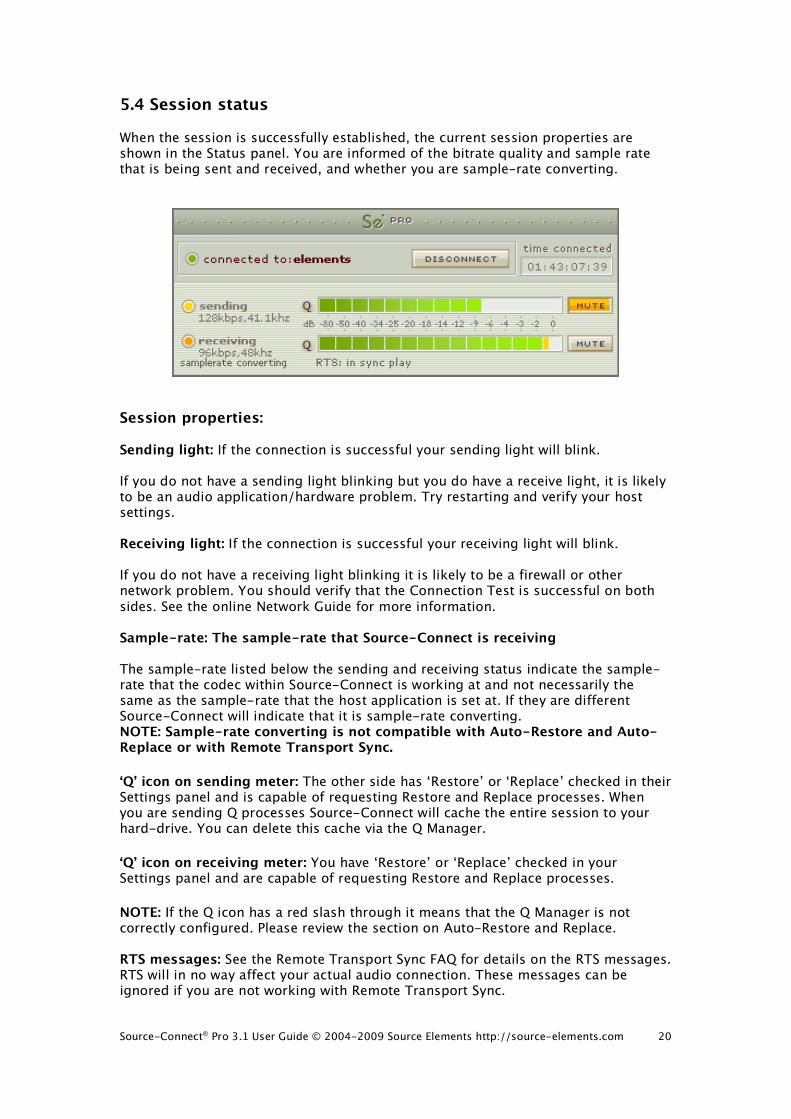
5.4 Session status When the session is successfully established, the current session properties are shown in the Status panel. You are informed of the bitrate quality and sample rate that is being sent and received, and whether you are sample-rate converting.
Session properties: Sending light: If the connection is successful your sending light will blink. If you do not have a sending light blinking but you do have a receive light, it is likely to be an audio application/hardware problem. Try restarting and verify your host settings. Receiving light: If the connection is successful your receiving light will blink. If you do not have a receiving light blinking it is likely to be a firewall or other network problem. You should verify that the Connection Test is successful on both sides. See the online Network Guide for more information. Sample-rate: The sample-rate that Source-Connect is receiving The sample-rate listed below the sending and receiving status indicate the sample-rate that the codec within Source-Connect is working at and not necessarily the same as the sample-rate that the host application is set at. If they are different Source-Connect will indicate that it is sample-rate converting. NOTE: Sample-rate converting is not compatible with Auto-Restore and Auto-Replace or with Remote Transport Sync. ‘Q’ icon on sending meter: The other side has ‘Restore’ or ‘Replace’ checked in their Settings panel and is capable of requesting Restore and Replace processes. When you are sending Q processes Source-Connect will cache the entire session to your hard-drive. You can delete this cache via the Q Manager. ‘Q’ icon on receiving meter: You have ‘Restore’ or ‘Replace’ checked in your Settings panel and are capable of requesting Restore and Replace processes. NOTE: If the Q icon has a red slash through it means that the Q Manager is not correctly configured. Please review the section on Auto-Restore and Replace. RTS messages: See the Remote Transport Sync FAQ for details on the RTS messages. RTS will in no way affect your actual audio connection. These messages can be ignored if you are not working with Remote Transport Sync.

Source-Connect® Pro 3.1 User Guide © 2004-2009 Source Elements http://source-elements.com 21
5.5 Instant Messaging During an audio session it is often useful to exchange instant messages with remote user, for example if you are not able to send or receive a signal for any reason, or you do not wish to interrupt the audio signal with a message to the other side. To send a message, type in the lower textbox at the bottom of Instant Messaging panel and enter your message. Press either enter or return key or click the Send button. Sent and received messages appear in the text display panel above.
Quick key access: Use these shortcuts to quickly access your Instant Messaging panel: • Open and close IM panel: Option+\ • Open IM panel and place cursor in text input window: Control+\ For a full list of quick commands see the Shortcuts Guide in section 9 of this guide. Pro Tools: Scrolling the messages The text display panel can be scrolled by clicking in the panel and pressing your up and down keys. Pro Tools focus: After sending an IM message with the ‘Return’ key the keyboard focus is automatically returned to Pro Tools. If your cursor is in the Instant Message panel (i.e. you are typing a message, or about to) you can return focus to Pro Tools immediately via the ESC (escape) button.

Source-Connect® Pro 3.1 User Guide © 2004-2009 Source Elements http://source-elements.com 22
5.6 Remote Transport Sync (RTS) RTS is an integrated method of synchronizing remotely connected Pro Tools transports. Purpose-built for ADR, over-dubbing and remote monitoring RTS makes distance collaboration easier and more efficient than it’s ever been. The following is a very brief overview. For specific instructions and screenshots, please see the comprehensive Remote Transport Sync FAQ: http://source-elements.com/support/rts How to enable RTS:
1. Create a new mono Audio track alongside your Source-Connect track. 2. From the Inserts->RTAS-> Instruments menu, instantiate ‘Se ReWire’. 3. When you establish a session over Source-Connect the SEND and RECEIVE
buttons will be enabled in the RTS panel. Using RTS To use RTS, one user must be in SEND mode and the other in RECEIVE. The RECEIVE user has no transport controls - effectively they are now slaved to the SEND user who has 2 possible types of operation: ADR mode or Mix/review mode. Source-Connect Pro has both ADR or Mix/review modes. Source-Connect Standard can only send and receive ADR modes. Please review the Remote Transport Sync FAQ for details on ADR or Mix/review modes and running an RTS session. http://source-elements.com/support/rts

Source-Connect® Pro 3.1 User Guide © 2004-2009 Source Elements http://source-elements.com 23
5.7 Closing a Source-Connect session A Source-Connect session can be closed manually by pressing the Disconnect button in Status panel. You will then be able to reconnect to the same user, or any other available user in your Contacts list who agrees to establish a session. A session is closed automatically if either user quits or logs out. In the event of a hardware, software or network failure, the user is disconnected by the server after 60 seconds. To expedite the process of the server recognising that a user has inadvertently logged out, users can log out and log back in. 5.8 Logging out of Source-Connect Logging out can be performed manually by pressing the Log out button in the Settings panel. Once you are logged out, you can log in again at any time and with any valid Source-Connect account. Closing the audio session will also log you out. You do not need to manually log out to exit from Source-Connect. 5.9 Privacy Once you have established a connection and you are sending and receiving audio, you are sending data directly to and only from your remote user. Instant Messages are not captured or stored on our servers and we do not capture or store identifying connection information. For a comprehensive outline of our Privacy policy, please read: http://source-elements.com/privacy

Source-Connect® Pro 3.1 User Guide © 2004-2009 Source Elements http://source-elements.com 24
6. VPN Mode 6.1 About Source-Connect Pro and VPN mode Source-Connect operates as a peer-to-peer type application over the UDP protocol, and this can cause connectivity problems when attempting to establish a two-way data connection in an unconfigured network. Factors such as firewalls and multi-layer subnets will generally make it difficult to walk into a venue and be confident of establishing a two-way Source-Connect session. Additionally, certain environments have strict security policies, so allowing firewall and network configurations are not possible. As a solution, Source-Connect Pro can operate in VPN mode. This solves 2 problems: connectivity confidence, and security and privacy. VPN mode and connectivity confidence VPN connections operate over the TCP protocol and can function even within strict networks and proxy servers because it is possible to tunnel over HTTP. If a suitable VPN solution is implemented, all the end-user requires is a software client that they need to run when they wish to connect. Access can be strictly managed with unique, time- critical passwords. Cisco, for example, has such a VPN solution available where the client software is freely distributable and operates transparently under both Mac OSX and Windows XP platforms. Or, solutions utilising IPSEC may be suitable, which can be activated with built-in Mac OSX software for example. VPN Security / Privacy Where security and privacy are concerns, the best solution is one where you have complete control over the security methods. When Source-Connect Pro is in VPN mode it is configured to disallow connections to external IP addresses, so you can be confident that your network is secure. 6.2 Activating VPN mode: When launching Source-Connect, instead of logging in with your username and password, press the ‘VPN mode’ button on the left of the login panel. Source-Connect will now open in VPN mode. When VPN mode is activated, your own private IP address is available under the ‘this address’ menu. To connect to a user on your private network, simply enter their IP address and port in the ‘connect to’ section. Once you know a user’s address and port, you can save and name this as a setting with the standard Pro Tools plug-in settings. When your settings are correctly entered, simply connect as you would in Source-Connect. The remote user will be asked if they wish to connect. Upon accepting the request your session now begins.

Source-Connect® Pro 3.1 User Guide © 2004-2009 Source Elements http://source-elements.com 25
6.3 Using VPN mode 1. Ensure your VPN network is running. Generally, you can check that your VPN is active by opening a terminal window or DOS window and running a ‘ping’ to the computer you wish to connect to. If you can’t ping that computer, you won’t be able to connect via Source-Connect VPN. 2. Launch Pro Tools, and instantiate Source-Connect Pro on a auxiliary track. Select ‘VPN Mode’, and if you are on an active Internet Connect it will be ready to make and accept a connection. If VPN mode cannot find a valid private IP address you will receive a dialog informing you of this. Please quit Pro Tools and check your Internet Connection if this occurs. 3. Once instantiated and ready to connect, you will see your IP address listed in the ‘this address’ menu. If you have more than one select the IP address that corresponds to the network interface you to use. At least one side of the connection needs to communicate their IP address to the other side. You should also let them know what port you are using (if it is not the default 6000). 4. To connect to another user, simply type in their IP address in the ‘connect to’ section. Note that this can only be a private IP address. This is to ensure complete security on your part, so you are confident knowing VPN mode will never send traffic to an unauthorized network. 5. If you are on a complex network, for example you are on different subnets, you may need to administer your common router so it knows to connect you. For information on managing your network, contact your IT personnel or get in touch with us at support. 6. When you are ready to connect press the ‘CONNECT’ button in the Status panel. If the network is properly configured, you will be immediately connected and your session will run like a normal Source-Connect session. For technical support, you are welcome contact us. Please note, however, that when working with private networks we are unable to offer assistance directly on Source- Connect without being given access credentials to your VPN. 6.4 VPN mode and Hamachi Source-Connect Pro now supports the free Hamachi VPN application. This allows you to make a secure connection over most firewalled networks without requiring any previous setup. A full guide on using Hamachi is available here: http://source-elements.com/hamachi

Source-Connect® Pro 3.1 User Guide © 2004-2009 Source Elements http://source-elements.com 26
7. Auto-Restore and Auto-Replace This section provides a complete overview on using Source-Connect 3.1 Pro with Restore and Replace. This section is divided into five parts:
7.1 Understanding the Q Manager: Lifecycle of a recording 7.2 Installing and configuring the Q Manager settings 7.3 Using Auto-Restore and Auto-Replace 7.4 What is Auto-Restore and Auto-Replace? 7.5 Comprehensive Q Manager interface overview 7.6 Troubleshooting
This section starts with a step-by-step guide to using Auto-Restore and Auto-Replace. It is important that you understand what settings need to be verified, so please review section 7.2. Installing and QuickStart. A ‘Quick Start’ guide is also available to you on the Q Manager setup panel. You can refer to this guide whenever you apply changes. If you have any questions on working with the Q Manager and Auto-Restore and Auto-Replace please contact Support.

Source-Connect® Pro 3.1 User Guide © 2004-2009 Source Elements http://source-elements.com 27
7.1. Understanding the Q Manager: ‘Lifecycle’ of a recording This section is a step-by-step guide to using Source-Connect 3.1 for Auto-Restore and Auto-Replace. It shows how the Q Manager works by describing the ‘lifecycle’ of a file recorded in Pro Tools and the subsequent restore and final replace process. 1. Enabled Restore and Replace in your Source-Connect Pro settings To request Restore data you must have the ‘restore’ checkbox checked in the Source-Connect Pro Settings panel. To request Replace data you must have the Replace checkbox checked. You can use either or if you need, or disable both if you are just monitoring the connection.
2. Request a Source-Connect session When you request a Source-Connect session with Restore or Replace checked, your connection partner will be show a dialog indicating that you wish to receive Restore or Replace data.

Source-Connect® Pro 3.1 User Guide © 2004-2009 Source Elements http://source-elements.com 28
3. Ready to record If your partner accepts you have now established a Source-Connect session with Restore and Replace enabled. You should now see a Q icon to the left of the Receiving meter, indicating that you can receive Restore and Replace data. If your connection partner also has Source-Connect Pro and has the Restore/Replace boxes checked you will see a Q by your Sending meter also.
4. Recording an audio file In this example we are sending a sine-tone signal via the Signal Generator plug-in to be recorded, and for the purposes of demonstration we are causing a significant number of dropped packets. You can see on the waveform in Pro Tools that the recording is significantly degraded:
IMPORTANT: As noted previously in this document it is necessary to ensure that your recorded signal is passed directly to your record track via a bus, with no volume changes or other plug-in processes in between Source-Connect and the record track. You can see in the above session that Source-Connect is on an Auxiliary track and the outgoing signal is bussed to a record track. This ensures that the Q Manager will able to fully restore and replace your recordings.

Source-Connect® Pro 3.1 User Guide © 2004-2009 Source Elements http://source-elements.com 29
5. Restoring the audio file in the background Once you stop recording the Q Manager will start the restore process. You can continue recording multiple files as the restore process does not interrupt your session in any way. If you have the ‘Send IM Notifications’ option enabled in the Advanced settings of the Q Manager, you will see the result of the process in your Source-Connect Instant Message window as files are processed:
6. Taking a look at the restored file Since we have recorded a sine-tone signal, it is simple to see visually how the restore process works. Select the filename in the Pro Tools bin and choose ‘Recalculate waveform overviews’. We can now compare the files before and after the restore process visually: Before and after the restore process:
We can now see (and hear on playback) that we have a completely restored audio file with perfect playback.

Source-Connect® Pro 3.1 User Guide © 2004-2009 Source Elements http://source-elements.com 30
7. Replacing the file with full resolution PCM data It is not necessary to restore your audio files if you only need the replace process. However, if your files are currently being restored you’ll need to wait until this process completes before activating the replace process. To activate the replace process there are two options: manually per file or all available files at once. Replace now To process files individually, highlight that file in the Q Requests panel and select ‘Replace now’:
Start Replace process To process all available files in the Q Requests menu, select the ‘Start Replace process’ from the Q Menubar dropdown menu:

Source-Connect® Pro 3.1 User Guide © 2004-2009 Source Elements http://source-elements.com 31
You will see an Instant Message (if IM is enabled) to let you know that the Replace process has completed and the status of the file in the Q Requests panel will be ‘Replaced’. Depending on the size of your files and the available bandwidth between you and your connection partner, this process can take longer than the restore process. Click on the arrow next to the filename to show the current progress. The percentage is shown to the right in the Info box.
Once the process is complete you now have the full resolution PCM files in your edit. 8. Detecting whether your audio files are ready for Restore and Replace It is possible that because of your Pro Tools routing, the Q signal is not being found in your recorded Source-Connect audio even though you have the Q icon displayed. Often this is because there the auxiliary you are sending audio through to be recorded is also used with other input sources. To verify whether this is the case, or if you have set the wrong Audio Files folder in the Q Manager you can try manually scanning a file. If the file status comes back 'Q not present' it means that it was either not recorded from Source-Connect, or the aux you used was not a clean aux. We recommend creating a brand new aux channel in the I/O settings of Pro Tools and testing your record again.

Source-Connect® Pro 3.1 User Guide © 2004-2009 Source Elements http://source-elements.com 32
7.2. Versions, Installation and configuring the Q Manager settings Source-Connect 3.1 versions There are 3 available versions for Source-Connect 3.1: Standard: Source-Connect Standard with Auto-Restore send-only. This version is also available for VST and Audio Units. Pro: Source-Connect Pro with Auto-Restore send and receive and Auto-Replace send-only Pro with Replace: Source-Connect Pro with Auto-Restore and Replace send and receive What does this mean? If you are using Source-Connect Pro and you are connecting to Source-Connect Standard, you’ll be able to request a restore process. The Source-Connect Standard side of the connection will not be able to request a restore or replace process. If you are using Source-Connect Pro with the Advanced Q Manager and you are connecting to Source-Connect Pro, you’ll be able to request both restore and replace processes. The other side of the connection will be able to request a restore process however they will not be able to request a replace process unless the have the Advanced Q Manager If you are connecting with another user who has Source-Connect Pro with Advanced Q, you’ll both be able to request replace and restore processes. NOTE: The apt-X codec is currently not compatible with the restore process. If you are working with the apt-X codec you will need the Advanced version of Q to ensure you can request the replace process. See Appendix 1 for a table of the features available for each version.

Source-Connect® Pro 3.1 User Guide © 2004-2009 Source Elements http://source-elements.com 33
Installing Source-Connect 3.1 with Q Manager When you download and install the latest version of Source-Connect 3.1 you will also have the option to run the Q Manager installer. If you only wish to install the Source-Connect plug-in choose ‘Customize’ from the Install menu. Run the installers (make sure Pro Tools or your Audio host is not running). You will need to restart your computer, so make sure you have saved any open documents. The installer will ask you if you wish to start the Q Manager service on reboot. If your computer is a permanent installation and you work with Source-Connect often this is the best recommendation. For laptops and occasional use you can choose to manually start the Q Manager as needed. OSX: When you have relaunched, you’ll see the ‘Se’ Q Manager icon on your MenuBar. Click on the icon and select ‘Show Setup panel’.
WINDOWS XP: After installation you will see a new icon in the System Tray. Right click on the icon and select ‘Show Setup panel’.
Configuring the Q Manager settings You must first configure the Q Manager before working with Source-Connect 3.1 Auto-Restore and Auto-Replace. For basic use, you will only need to verify four settings:
1. Open the Q Manager setup panel via the MenuBar/System Tray icon or the Q Manager button on Source-Connect Pro Settings panel. Enter your Source Elements username and password.
2. Choose the Audio Files folder of your Pro Tools session 3. Verify that you have UDP port 6002 available, or change it to an available port
in the Advanced panel. NOTE: This must be a different port than the two ports required for Source-Connect.
4. If possible, enter the address of an FTP server that you have read/write access to. If this is not possible, you will receive a warning message upon Apply which can be ignored. We highly recommend setting up FTP.

Source-Connect® Pro 3.1 User Guide © 2004-2009 Source Elements http://source-elements.com 34
When you have completed these settings, click 'Apply'. It will take a few seconds to confirm. If you have incorrectly entered your username you will be informed, and you will see a port status message to verify if your port settings are valid.

Source-Connect® Pro 3.1 User Guide © 2004-2009 Source Elements http://source-elements.com 35
7.3 Using Auto-Restore and Auto-Replace with Source-Connect
1. To enable Auto-Restore and Auto-Replace recording on your end, make sure 'restore' and ‘replace’ is checked in the Settings panel. If your remote contact wishes to record with Auto-Restore/Replace enabled, they should also enable these settings. It is not necessary to both sides to enable restore, only the side which will be recording. Also, you don’t need to enable Restore if you just want Replace.
2. Connect to your remote contact over Source-Connect. If Auto-Restore and/or Replace is enabled, you will see a 'Q' icon on your receiving meter, meaning that you can record and receive Auto-Restore and Replace data. Note: sample-rate converting is not supported at this time, and the apt-X® codec is only available for Auto-Replace operations.
3. Record the original signal received from Source-Connect. IMPORTANT: If you pass the Source-Connect signal through any filters, reverbs or any other kind of signal processing including changes in volume the file will NOT be restored or replaced. We recommend you use bussing to send the signal from Source-Connect to your record track. Source-Connect 3.1 fully supports mono and stereo recordings.
4. If any dropped packets occurred during your recording, Source-Connect 3.1 will repair your recorded file in the background and send an Instant Message to the IM window of Source-Connect with the status of the file process.
If you don’t need to receive an IM message for each file processed, you can disable this option in the Advanced settings of the Q Manager.

Source-Connect® Pro 3.1 User Guide © 2004-2009 Source Elements http://source-elements.com 36
Activating Auto-Replace If the 'replace' option was enabled in Source-Connect, you will be able to easily replace the encoded and decoded recorded audio with the original PCM audio from your remote contact. There are two ways you can replace recorded audio files: per file individually, or all available files at once. Manual Auto-Replace To activate the Auto-Replace process for a single recorded file, simply select the audio file you wish to replace in the Q Requests menu of the Activity panel and select 'Replace Now' from the drop-down menu. The time required to replace the file with the original PCM depends on the size of the file, the available bandwidth, and whether you have selected the 'Only limit transfer speed during Source-Connect session' (recommended). We recommend that you wait until your session is complete before activating the Auto-Replace process, as the process will be much faster and will utilize all your bandwidth without disrupting your Source-Connect session.
Auto-Replace all To Auto-Replace all available files at once, select the 'Start Replace process' from the MenuBar drop-down menu. All available recorded files will be processed, and if your remote contact has not paused transfers, deleted that particular Q Uploads session, or shut down the machine or the Source-Connect Q Manager, you can activate the Auto-Replace process at any time after your session, whether it is an hour later or a week.

Source-Connect® Pro 3.1 User Guide © 2004-2009 Source Elements http://source-elements.com 37
7.4. What is Auto-Restore and Auto-Replace? With traditional long-distance recording, whether with Source-Connect, ISDN or any network-based transmission, the send signal is subject to various issues which may cause dropped packets and therefore ‘glitches’ in your recorded audio. Previously the only method to ensure a fully complete recording was to ensure your connection partner was also recording locally, so you could transfer this audio after your session and manually replace it in your edit. Source-Connect with Q is the only available automated method to ensure that your recordings are perfect every time, with our Auto-Restore functionality. Additionally, with Auto-Replace you can request the original PCM audio and replace the compressed AAC or apt-X® recording without requiring any additional effort. How does it work?
First, an overview of how audio is transferred and recorded over packet-based transmission lines.
1. The audio signal is sent through Source-Connect, and is split into packets. 2. These packets are sent sequentially to your connected partner over the
internet. 3. If a network error occurs, a packet may not arrive in time. 4. If this occurs you will hear a minor glitch in the received audio signal. Source-Connect has built-in error correction modes to try and resolve these dropped packet issues in realtime, however under certain circumstances a packet may not be retrieved in time to recover the signal before it is recorded. Auto-Restore resolves this problem by working in the background in non-realtime and restoring your recorded audio files.

Source-Connect® Pro 3.1 User Guide © 2004-2009 Source Elements http://source-elements.com 38
5. The audio file is scanned when recording completes. 6. If any missing packets are detected they are requested from your connected
partner, who has stored them during the connection. 7. Your file is restored and is now available for flawless playback. Auto-Replace Auto-Replace works in a similar way, except the packets which are requested from your connected partner are of the original PCM data which was sent into the Source-Connect plug-in, and instead of only requesting those packets which did not arrive in time, all packets are requested. A complete replacement of the decoded AAC audio is then made with the full resolution PCM audio. An important distinction between Replace and Restore, is that Replace operations can take longer to transfer due to PCM being uncompressed data. Generally we would recommend you activate the Replace process once your session is complete.

Source-Connect® Pro 3.1 User Guide © 2004-2009 Source Elements http://source-elements.com 39
7.5. Comprehensive Q Manager overview This section is a complete overview of all available options and their functions. Setup panel
1. Login and Password Enter your Source Elements username and password. If you enter your details incorrectly you’ll receive an error notification upon applying your settings. 2. Session folder Your Session folder is very important – you must select the folder you are going to be recording into or the Q Manager will not be able to detect the files to be processed. Choose the Audio Files folder of your Pro Tools session. You can either click the Choose button and find your Audio Files folder in the dialog that pops up, or you can drag the folder from your Finder window. 3. Scan options You have two options when applying your settings: Scan new files only or Rescan all files.

Source-Connect® Pro 3.1 User Guide © 2004-2009 Source Elements http://source-elements.com 40
Scan new files only This is the default setting. It means that if there are any existing audio files in your Session folder they will be ignored. This is useful when you are using a Pro Tools session with many existing files which are not related to any Source-Connect session. Rescan all files This option is useful for when you have existing files in your Audio Files folder which require processing. For example, you may not have restored or replaced your Source-Connect recorded files, or there may have been an error which required a reboot, for example. Rescanning all files can recover files which need to be processed. Rescan all files can be used to reload a session which contains multiple files for which processing has been delayed for some reason, for example you are using FTP mode and you wish to Replace all files at the end of the day in a batch. If you select ‘Rescan all files’ the menu will revert to the default automatically. 4. VPN mode Generally this is left unchecked, unless you are working in VPN mode. You must check this and Apply settings if you are working in VPN mode 5. Apply When you have entered your login and password and selected your Session folder, click on the Apply button. The Q Manager will require a few seconds to validate your settings and load the new session. You’ll see the following while the Q Manager is applying:
When the Q Manager is ready, the status will say ‘Q Manager: ON’. You are now ready to being recording with Source-Connect 3.1. If you see that the Q Manager status is Offline, it may mean that the Q Manager is not allowed, or able, to connect to the internet. Verify your network settings if this is the case. NOTE: If for some reason the Q Manager cannot go online for your session, you can still record using Source-Connect and later process your files, as long as your connected partner does not delete the corresponding data. See the section about the Activity Panel for more details.

Source-Connect® Pro 3.1 User Guide © 2004-2009 Source Elements http://source-elements.com 41
Invalid Q Manager settings and warnings If your Q Manager settings are invalid for some reason, you’ll be given a dialog warning. Possible warnings are:
• Invalid username or password • Invalid FTP settings • Duplicate login, possibly on different machines • Q Manager is unable to connect to the internet
Invalid username or password
This means that your username and password are incorrectly entered, or your username has not be validated to work with Source-Connect 3.0. If you are sure that your username and password are correct, you can validate your details for 3.0 simply by visiting the Download page on the Source Elements website: http://source-elements.com/downloads Then click on the Download page for your Source-Connect version. The username and password that you are logging into Support with will now be validated to work with Source-Connect 3.1. Invalid FTP settings
This means that you entered either none or incorrect FTP settings in the Advanced panel of the Q Manager. It is not critical that you enter FTP settings, if you do not have an available FTP service to use, however it is highly recommended as it can assist in ensuring transfers are complete should there be network errors, or if your connection partner can only use FTP mode.
Source-Connect® Pro 3.1 User Guide © 2004-2009 Source Elements http://source-elements.com 42
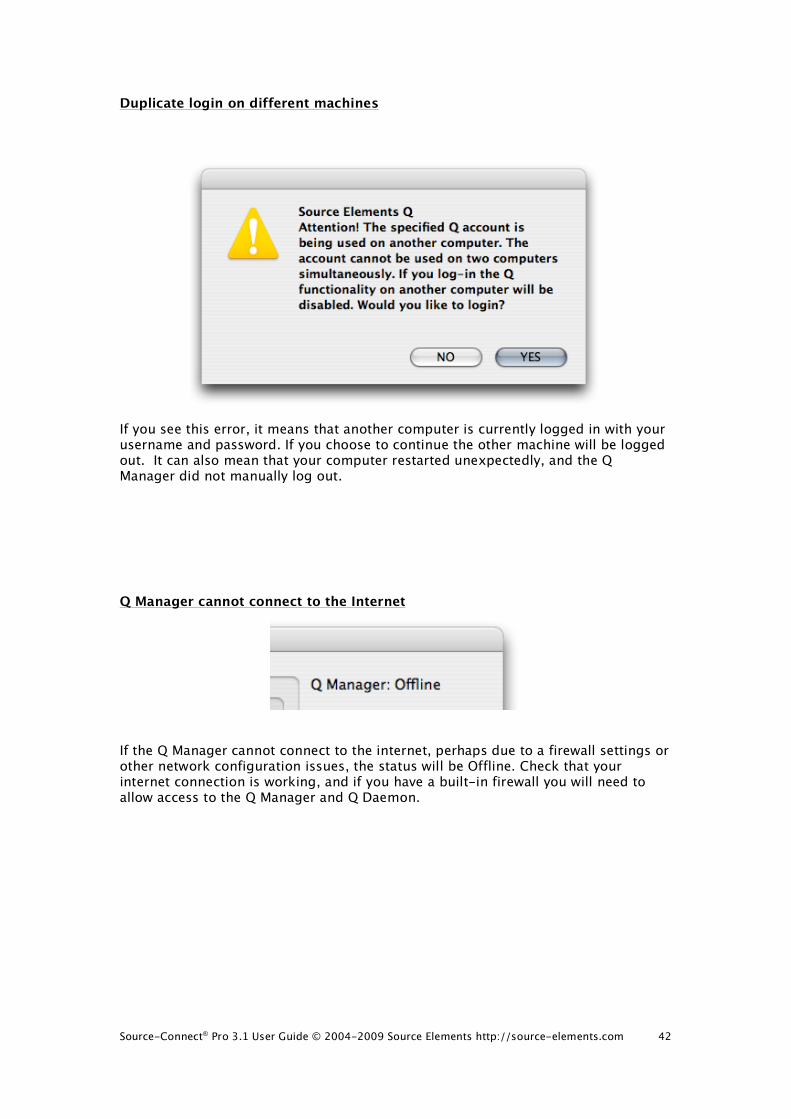
Duplicate login on different machines
If you see this error, it means that another computer is currently logged in with your username and password. If you choose to continue the other machine will be logged out. It can also mean that your computer restarted unexpectedly, and the Q Manager did not manually log out. Q Manager cannot connect to the Internet
If the Q Manager cannot connect to the internet, perhaps due to a firewall settings or other network configuration issues, the status will be Offline. Check that your internet connection is working, and if you have a built-in firewall you will need to allow access to the Q Manager and Q Daemon.

Source-Connect® Pro 3.1 User Guide © 2004-2009 Source Elements http://source-elements.com 43
Advanced Setup panel Generally you will only need to verify your FTP settings in the Advanced panel. This section of the manual informs you of the advanced settings available and when they are useful to modify and why.
1. Q transfer mode: Peer to Peer (P2P) or FTP By default, Source-Connect 3.1 will transfer restore and replace data directly between you and your connected partner. Select FTP mode if you are unable to transfer over P2P mode due to network configuration conflicts. P2P mode is generally recommended, however it is recommended that you enter valid FTP settings as it can improve transfer success in the event of a network conflict with P2P mode, or if your connected partner has selected FTP mode.
Source-Connect® Pro 3.1 User Guide © 2004-2009 Source Elements http://source-elements.com 44
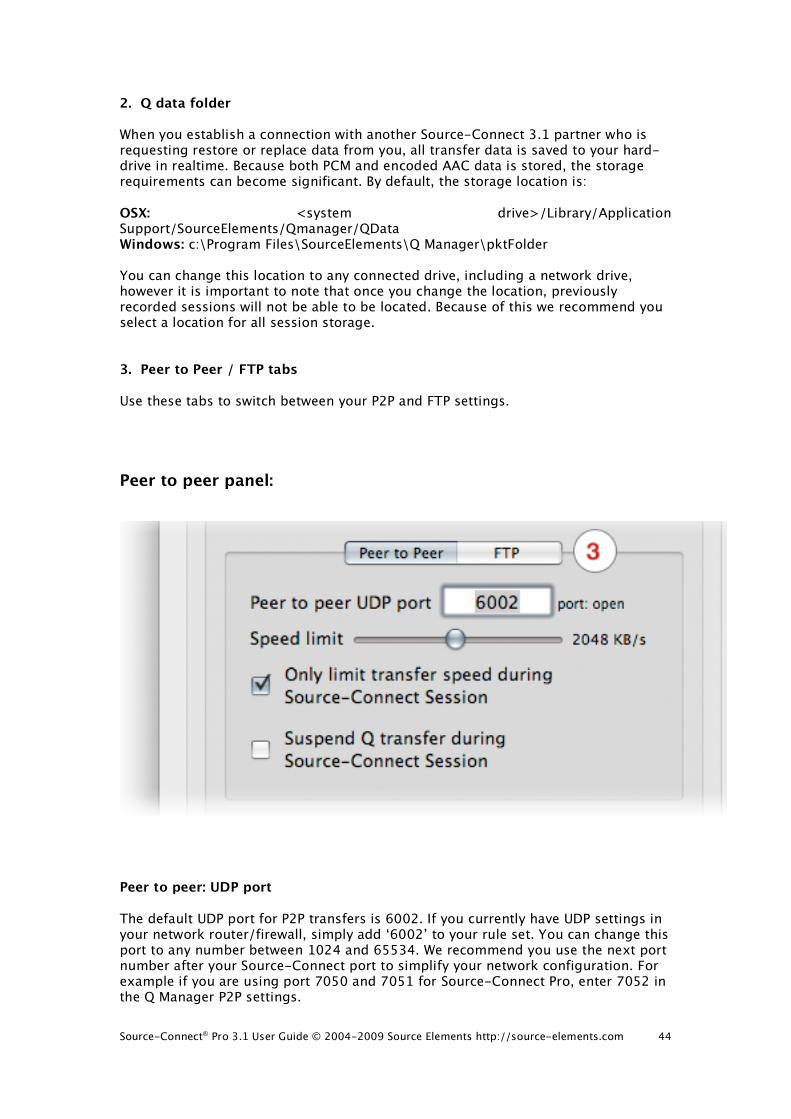
2. Q data folder When you establish a connection with another Source-Connect 3.1 partner who is requesting restore or replace data from you, all transfer data is saved to your hard-drive in realtime. Because both PCM and encoded AAC data is stored, the storage requirements can become significant. By default, the storage location is: OSX: <system drive>/Library/Application Support/SourceElements/Qmanager/QData Windows: c:\Program Files\SourceElements\Q Manager\pktFolder You can change this location to any connected drive, including a network drive, however it is important to note that once you change the location, previously recorded sessions will not be able to be located. Because of this we recommend you select a location for all session storage. 3. Peer to Peer / FTP tabs Use these tabs to switch between your P2P and FTP settings. Peer to peer panel:
Peer to peer: UDP port The default UDP port for P2P transfers is 6002. If you currently have UDP settings in your network router/firewall, simply add ‘6002’ to your rule set. You can change this port to any number between 1024 and 65534. We recommend you use the next port number after your Source-Connect port to simplify your network configuration. For example if you are using port 7050 and 7051 for Source-Connect Pro, enter 7052 in the Q Manager P2P settings.

Source-Connect® Pro 3.1 User Guide © 2004-2009 Source Elements http://source-elements.com 45
There are three possible messages for the port field:
• port: open • port: not mapped • port: unavailable
port: open This means that your network is properly configured. You will be able to successfully transfer restore and replace data assuming your connected partner also has a properly configured network. port: not mapped This means that your network has not been properly configured to allow inbound traffic to the specified UDP port. If you are sure the port should be open, try rebooting your computer if changes have just been made, verify your IP address matches the rules on your router, or contact your network administrator. See the online guide for assistance: http://source-elements.com/networkguide NOTE: With port: not mapped there it is generally likely that Source-Connect restore and replace transfers will still be possible. We recommended entering valid FTP details as the Q Manager will revert to FTP mode should P2P mode fail. port: unavailable This means that there is likely a firewall or other conflict on your network regarding the specified UDP port. Make sure your firewall allows the Q Manager and Q Daemon access to the network, and that there is no conflict in your network. We recommended entering valid FTP details as the Q Manager will revert to FTP mode should P2P mode fail. See the online guide for assistance: http://source-elements.com/networkguide Peer to peer: Speed limit The speed limit is an important setting if you are working on a network with limited bandwidth. When you are connected in a Source-Connect session, your audio files will be restored and replaced in the background. The speed limit is designed to not interrupt your Source-Connect signal. If you have limited bandwidth, lowering this limit can improve a better signal between you and your connected partner. Conversely, if you have plenty of bandwidth and would like more responsive restore and replace processes, you can increase this speed limit. The minimum limit is 128 Kilobytes per second. The maximum limit is 4096 Kilobytes per second. Generally we recommend leaving the default setting. If you are experiencing higher-than-expected signal issues you can lower the value. If you are on a T1 or better and can work with higher transfer rates you can increase the value.

Source-Connect® Pro 3.1 User Guide © 2004-2009 Source Elements http://source-elements.com 46
Peer to peer: Only limit transfer speed during Source-Connect Session This option is enabled by default and relates to the Peer to Peer speed limit. When this option is checked, it means that when you disconnect from your Source-Connect session any remaining transfers will not be limited in speed. We highly recommend leaving this setting checked. For example, replace data can be quite large in size as it is PCM data, so if you request the replace process on files while you are either connected with Source-Connect, or you have unchecked this option, the transfer can take quite a long time. On the other hand, if there are other Source-Connect sessions ongoing on the same network, or you need to preserve low-bandwidth usage for some reason, leaving this setting checked will ensure the Q Manager does not utilize all your bandwidth during the transfer process. Peer to peer: Suspend Q transfer during Source-Connect Session This option is recommended in situations where there is limited bandwidth to conduct Source-Connect sessions, and it is critical that the signal is not interrupted by restore or replace transfers. If you check this option and establish a Source-Connect session, all restore processes will be ‘paused’ and you will see in your Activity panel that the ‘pause all’ button is highlighted and now says ‘unpause all’. If the Suspend Q transfer option is checked and you need to process a file or files, you have the option to click on ‘unpause all’ for Q Requests or Uploads in the Activity panel, or to select the file in the Q Requests panel and choose ‘Restore now’ or ‘Replace now’. These actions will override the Suspend Q transfer mode. See section 2.3 for more information on these operations.

Source-Connect® Pro 3.1 User Guide © 2004-2009 Source Elements http://source-elements.com 47
FTP panel:
FTP server Enter the server or IP address of an FTP server where you have read and write access. FTP login Enter the username associated with your FTP account FTP password Enter the password associated with your FTP account FTP directory If you don’t have write access to the root directory of the FTP account, or you prefer to store your temporary data to another directly, enter the full path. You must add a forward slash (‘/’) at the beginning, however it is not required at the end. Validate To verify that your FTP settings have been entered correctly, click on the Validate button. The Q Manager will test your FTP server for read and write access. We recommend validating your FTP settings whenever you make changes to this panel. If you get a failed validation, you may want to have someone outside your network test your FTP server. Often personal FTP servers are not accessible from the outside.

Source-Connect® Pro 3.1 User Guide © 2004-2009 Source Elements http://source-elements.com 48
4. Use FTP for replace This option is highly recommended, as FTP is a slower yet more stable transfer method for large files. P2P is perfect for Restore data, so this allow you to have the ideal settings for each mode.
5. Backup before replace To ensure the integrity of your original recorded data in case of error, the recorded files will be backed up in your Q Data directory. If a replace process returns failed, or with another error, the Q Manager will fully restore your original recording. We recommend leaving this option checked, however note that it will increase the storage requirements on your hard-drive. 6. Send status notifications to Source-Connect IM For each available recorded file in your Audio Files folder, the status of the file can be sent as an IM message to your Source-Connect Instant Messaging panel. This can be useful for quickly monitoring the status of your recorded files. Note that this feature requires that you are logging into Source-Connect as the same username as entered in the Q Manager. For example, if you are logged in as ‘username’ in the Q Manager, you cannot be logged in as ‘username*b’ in Source-Connect or you will not receive the IM messages. If this is the case, the next time you login as ‘username’ into Source-Connect your IM messages will be shown to you. 7. Show Q Manager window on startup Uncheck this option to not display the Q Manager window when you reboot. 8. Launch at startup The Q Manager will launch at startup and be available to you for use. If you choose to uncheck this option you can manually launch the Q Manager by double-clicking on the Q Manager icon in this directory: /<system drive>/Library/Application Support/SourceElements/Q Manager 9. Shut down Q If you no longer need the Q Manager service to scan your Audio Files directory, you can shut down the Manager to reserve CPU or memory usage. See above regarding restarting the Q Manager. 10. Apply This button has the same function as the Apply button on the Setup panel.

Source-Connect® Pro 3.1 User Guide © 2004-2009 Source Elements http://source-elements.com 49
Activity panel This panel gives you a full overview of what files are being processed, what the result was, and allows you to fully manage your restore and replace processes. When you record a file in your Audio Files folder, the Q Manager will analyze the file to determine whether it is suitable for processing. If the recorded file was created with Source-Connect and the Q Manager is set to ‘listen’ to the Audio Files folder that this file was recorded to, the Q Manager will list it immediately after the recording is completed and, if needed and the settings are at the default, a restore process will take place. Depending on the length of the file, the number of dropped packets, and the available bandwidth, the file can be fully restored within a few seconds. All files are subsequently listed in the Activity panel with the corresponding process status.

Source-Connect® Pro 3.1 User Guide © 2004-2009 Source Elements http://source-elements.com 50
Activity panel: Q Requests Q Requests Overview Each time you establish a Source-Connect session, the Q Manager will create a new Session in the ‘Q Requests’ panel. All files recorded during this particular session will be listed under this session, allowing you to manage your files per session.
File status: Next to the filename will be the status of that file. When the Q Manager first detects a file, it is scanned to see if any restore operations are required. If not, the file status will be ‘Restore not required’. Otherwise, the file proceeds to be restored, or if you or the other side has transfers paused, the file will remain ‘Waiting for requested’ until transfers are resumed. Additionally, if you manually scan a file (see next section) and the audio file was not recorded with Source-Connect the status with be 'Q not present'. File process status: There are two possible processes for files: restore and replace. Each process can be viewed by clicking on the arrow next to the filename. The status will change according to the stage of the process. When a process is complete the status is ‘done’. For each process, a progress bar will show to indicate the process is underway. Depending on the length of the recorded file and the transfer speed between you and the other side, the progress bar can be an indication of how much time the process will take. Note that there are many factors involved and the time required will vary depending on the size, bandwidth and requested process type. Restore processes are generally very fast. For Replace processes a full replacement of the decoded AAC audio is made with the full resolution PCM audio. Thus the transfer of an entire Replace session this may require some time.

Source-Connect® Pro 3.1 User Guide © 2004-2009 Source Elements http://source-elements.com 51
Q Requests: Options menu For each file and session, you have additional options available to you via the Options menu. Depending on what you have highlighted, various options will be available to you.
File actions: Scan file(s) This option allows you to scan a particular file or files which have not been processed. This can be useful if there has been a system error and certain file processes have not been completed, or if you have a very large number of files from a previous session and only need to process particular files. This option can also be useful when there are certain errors which result in a newly recorded file not showing up in the Requests menu, for example a Pro Tools CPU error may result in new files remaining undetected. Multiple files can be selected in the File dialog by holding down the ‘Shift’ or ‘Command’ keys. Reveal in finder Reveal the highlighted file in the Mac OSX finder Cancel This option is available to use when a file is currently being processed. This option is useful, for example, when you have a very large file which is being processed or a transfer is underway and you prefer to cancel the process. You can restart the process by selecting Restore or Replace now.

Source-Connect® Pro 3.1 User Guide © 2004-2009 Source Elements http://source-elements.com 52
Restore now To start the Restore process on an individual file, highlight the file to be processed and select Restore now. If the file has not been restored already, and the other side has not deleted or moved the corresponding data and is online, your file will be restored. Replace now To start the Replace process on an individual file, highlight the file to be processed and select Replace now. If the other side is compatible with the Replace process and has not deleted or moved the corresponding data and is online, your file will be replaced. Transfer actions: These options apply to your overall network transfers, not to individual files. Cancel Cancel all current Request transfers. Any current file transfers underway will be cancelled. You can restart transfers by using the appropriate Restore or Replace option. Pause / Resume Pause all current Request transfers. Resume will start the transfers from where they left off. NOTE: This option is only available for Peer to Peer transfers, not for FTP. Session actions: Rename It is highly recommended that you rename the Session name for easier management. You can do this by highlighting the Session name and selecting ‘Rename’ from the Q Requests Options menu. You can rename the session at any time. Remove from view Over time your Q Requests panel will become full of session data. Once your session is complete and your data transfers are successful, you can remove a session from view. This does not delete existing files or data, it only ‘hides’ the session. To show a session again, select the Audio Files folder in the Setup panel with ‘Rescan all files’ selected and Apply. Your session will show up again in the Requests panel. Undo Replace To ensure the integrity of your recorded audio files, the Q Manager allows you the option to undo the Replace process in the event of a corrupted process. NOTE: This option requires that ‘Backup before replace’ is checked in the Advanced panel. Delete Backup This option deletes the Replace data backup for your highlighted session. Once your session is fully replaced or other processes are completed successfully as required, you can delete the backup to preserve disk space. Remove all from view This is the same as 'Remove from view', however it will remove all visible sessions in your Requests panel. This is a great way to quickly clear the panel.

Source-Connect® Pro 3.1 User Guide © 2004-2009 Source Elements http://source-elements.com 53
Activity panel: Q Uploads Q Uploads Overview If your connected partner is recording and requesting Restore or Replace data, you’ll be storing data on your side to enable the Restore and Replace processes. You will see the status of this data storage and any requested transfers in the ‘Q Uploads’ panel.
Each upload process will show a progress bar and the current status. The currently active session will be displayed in blue lettering, for easy viewing. When the upload is completed successfully the status will be ‘Done’. The current disk usage is displayed to help you know when you may need to allocate additional resources, or delete the session data from disk (see further in this section). Q Uploads: Options menu For session you have additional options available to you via the Options menu.

Source-Connect® Pro 3.1 User Guide © 2004-2009 Source Elements http://source-elements.com 54
Rename session For easier session management and later session recognition you can rename the session. Delete selected session Once your connected partner has successfully completed all required transfers you can delete the Uploads session to preserve disk space. Note that this option is not undoable. It will mean that your connected partner will no longer be able to request any further restore or replace operations.
Delete all session data from disk If you know that your recording partner has successful completed all Restore and Replace processes, you can now delete all session data from disk. This will permanently remove all stored data to date. You will be asked to confirm this action. After deleting all data you will see that the disk usage at the bottom of the panel has gone down to a small number.

Source-Connect® Pro 3.1 User Guide © 2004-2009 Source Elements http://source-elements.com 55
Activity panel: Export session as PCM or MP4
This new feature in Source-Connect 3.1 allows the export of the stored session data from the Sending side. What this means is that if Auto-Restore or Replace fails for any reason, you'll always have a perfect back up of the entire session from the moment you were connected. How do I use this? There are two requirements to use this feature: 1. You need to make sure about is that you both have a valid Q on the Sending and Receiving meters of Source-Connect. So, the side that is sending audio needs to have a Q icon on the sending meter and the side that is receiving audio needs to have the Q icon on their receiving meter like so: Sending side:
Receiving side:
2. With this in place, the next step is to ensure that the Receiving side is recording at least one file. This triggers the Q Manager to prepare the stored session data in case of drop-outs or Replace requests. Once there are drop-outs (if any!), the Sending side will see that a Session has been created in the Uploads panel of the Q Manager Activity. Once you disconnect the session is now available to be exported.

Source-Connect® Pro 3.1 User Guide © 2004-2009 Source Elements http://source-elements.com 56
Export MP4 This option is available for all Source-Connect users assuming the above requirements are met. To export the session as an mp4, select the Session name in Q Uploads, and choose 'Export mp4' from the Uploads options menu.
The export helper application will launch, and you will be asked to save the file.
By default the filename is blank, you should name it something.mp4 so your file system recognizes it as a MP4 file.
You can choose the cancel the export process by hitting the Abort button. Once the Export is complete you can now playback your complete session without network dropouts, and email or FTP this to your connection partner. Export PCM This option is ONLY available for Source-Connect Pro, if the Receiving side has the Replace option for Source-Connect Pro, and the Replace checkbox was enabled for that connection. The same method applies as for Export MP4 above.

Source-Connect® Pro 3.1 User Guide © 2004-2009 Source Elements http://source-elements.com 57
Activity panel: Pause all / Unpause all
Pause / Unpause all If a transfer is in process and you need to conserve bandwidth, the Pause All button will pause all P2P transfers currently in process. Click on ‘Unpause all’ to resume all pending transfers. You can also enabled ‘Suspend Q transfers’. While you are connected over Source-Connect, all transfers will be paused until you disconnect. Transfers will begin immediately upon disconnecting. NOTE: Pause does not work with FTP mode. Set your mode to P2P in the Advanced panel to use this feature.

Source-Connect® Pro 3.1 User Guide © 2004-2009 Source Elements http://source-elements.com 58
Activity panel: Information panel Information about each session, file and transfer process is available by highlighting a line in the Q Requests panel and viewing the info panel to the right.
The information available is: Filename: Name of the file State: Current status of the file Restored: How many packets (or ‘drops’) were detected and recovered by the restore process Replaced: How many replace ‘pieces’ are to be transferred and processed Duration: Duration of the file Created: Date that the file was recorded Time: Time that the file was recorded Restore: Whether the restore process is available to you Replace: Whether the replace process is available to you Session ID: The session ID used for file management Error: For successful processes the error number is zero (0). If an error
occurred the number will indicate the nature of the error. See Troubleshooting and Error reporting for more information on finding out what the possible errors are and how to resolve them.
Note that currently no information is available for the Q Uploads panel.

Source-Connect® Pro 3.1 User Guide © 2004-2009 Source Elements http://source-elements.com 59
Q Menubar options The Q Manager has several functions available to you via the Menubar and also provides a quick glance at what processes are active:
Set session folder Use this option to quickly change your Audio Files folder between sessions. After you select the folder the Setup panel will show and you’ll need to click on Apply to save the new folder setting. Q Requests This shows all files available for restore and replace and the total overall percentage processed. Start Replace process This option is only available to you via this menu: it will start the replace process for all available files in your Q Requests menu. Note this may take some time if you have a large number of files. Individual processes can be cancelled as needed via the Q Requests option menu. Pause all requests This option pauses all currently active requests (downloads). Q Uploads This shows all files being requested from you for restore and replace processing and the total overall percentage processed. Pause all uploads This option pauses all currently active uploads. Pause all Q network operations This option pauses all network activity, both uploads and downloads. Show Activity / Setup panel Open the Activity or Setup panel.

Source-Connect® Pro 3.1 User Guide © 2004-2009 Source Elements http://source-elements.com 60
7.6. Troubleshooting For each file and process there is a status. For successful files the status will be Restored or Replaced depending on the type of process last completed. If you see that the status for a file, or files, is ‘Failed to restore’ or ‘Failed to replace’ it means that either you or your connection partner has invalid settings or a component is not properly installed or configured. There are various reasons as to why a file may fail to replace or restore. To find out the exact reason for a failed process, select the file in the Q Requests panel:
Now, look at the error code message to the very bottom right. If you hold the mouse over the error code number you will be shown a message explaining why the file failed to be processed.
For example, this error tells us that the other side was unable to upload the restore data via FTP. This means that your FTP settings were not valid or the FTP server was not available. To resolve this, validate your FTP settings and request the Restore or Replace process again from the Q Requests options menu. See Appendix 2 for a overview of possible error messages and how to resolve them.

Source-Connect® Pro 3.1 User Guide © 2004-2009 Source Elements http://source-elements.com 61
7.7 Common Q Manager issues A comprehensive guide is available online: http://source-elements.com/support/q The following are common reasons why Auto-Restore and Auto-Replace may fail. Verify the following: 1. Check that Q is enabled. You should have a Q icon to the left of your Source-Connect receiving meter if you are the recording end, and on the Sending meter if you are the sending end. Verify that the Restore and/or Replace checkboxes are checked in the Source-Connect Pro Settings panel before establishing a connection. 2. It is important that you do not have any audio plug-ins or volume level changes between the signal from Source-Connect and your record channel. You must have both the Source-Connect aux track and your record track set to 0dB or the Q Manager will not be able to process your files, and you cannot insert any other plug-ins between Source-Connect and your record track. 3. Pro Tools errors, for example CPU errors, may cause the Q Manager to not detect the file. If this is the case, reapply the Q Manager with ‘Rescan all files’ selected or select ‘Scan file(s)’ from the Q Requests menu in the Activity panel. 4. Verify your Q Manager settings: - Your username and password should be correctly entered - Ensure that you have selected the correct Audio Files folder for your current Pro Tools session - Your port should be ‘open’ or ‘not mapped’. If the port status is ‘failed’ you will encounter transfer errors - FTP mode requires that both sides have valid FTP settings. 5. Q Manager should be launched: make sure you can view the Q Manager via the MenuBar icon. NOTE: Files which are recorded with Source-Connect when the Q Manager is not launched can be later processed by rescanning the Audio Files directory. 6. Files should be recorded while Source-Connect session was established. Files recorded when Source-Connect is not established will not appear for processing in the Q Manager. 7. Sample-rate converting is not supported. Verify your connection is not sample-rate converting. 8. Use of the apt-X codec currently only allows support for Replace functionality.

Source-Connect® Pro 3.1 User Guide © 2004-2009 Source Elements http://source-elements.com 62
8. Troubleshooting Source-Connect and Known Issues 8.1 Troubleshooting The Support section of the website provides much more detail on troubleshooting. Most issues are network related, you should follow the Network Guide: http://source-elements.com/networkguide A quick overview of common issues follows: Low audio quality, many artifacts Try to reduce your bitrate and increase the buffer size. You may also be experiencing hardware issues: for example, check that your hardware matches your session sample-rate and try increasing your hardware playback buffer size. Pro Tools: Packet loss increases on record, H/W buffer errors It is important to set your H/W buffer size to 512 or 1024 and your CPU Usage Limit to at least 85% (90% if you are able to). In Pro Tools HD make sure you have 1 RTAS processor and if you can lower the DSP voices to 16 or 32 this can help a lot with RTAS plug-in issues. The settings can be found in the Setup->Playback menu in Pro Tools. Limiting the running of any other plug-ins at the same time can also help. Automatically disconnected, ‘Connection reset by peer’ dialogue There may be severe network congestion occurring. This can happen if you are inside a LAN where many other users are downloading and uploading large files. Reduce your bitrate, increase the buffer size and reconnect. User has suddenly gone offline In the event of an unexpected disconnect, due to hardware, software or network failure, your remote user may not re-appear until the server has recognised that they have timed-out. This can take up to 60 seconds. To expedite the process of the server recognising that a user has inadvertently logged out, users can log out and log back in. See the following section on Known Issues for additional information.

Source-Connect® Pro 3.1 User Guide © 2004-2009 Source Elements http://source-elements.com 63
8.2 Known Issues Unsupported Pro Tools versions: Source-Connect does not officially support Pro Tools versions below 6.4. The Q Manager with Auto-Restore and Replace is not available for any Pro Tools 6 version. Unsupported VST hosts: Source-Connect will not work on ‘editing’ audio applications, such as SoundForge or Peak, or on older applications which do not support VST 3.2. Pro Tools 7 TDM and RTAS With Pro Tools 7 you may find that the RTAS engine loses it’s connection with the TDM engine. If this occurs your connection may appear to have been dropped. The reality is that audio is not passing to and from Pro Tools. To resume press play and stop. Dropping your DSP voices down to 16 or 32 can alleviate this issue greatly. Source-Connect non-network-related signal degradation At times it can appear that your receive signal is experiencing packet loss. This loss may not actually be due to network packet loss. If it has a consistent, grainy sound it is more likely that Pro Tools is upset. Toggling your hardware buffer between 512 or 1024 will resolve this issue. CPU speed / RAM configurations: Source-Connect performs best on a TDM-equipped 1ghz G4 with at least 1GB RAM, or 2ghz P4 with 1GB RAM. If your computer is configured lower than this, you may experience difficulty while reading and writing to disk, and your Pro Tools or VST host may tell you that you have insufficient resources. Because USB devices (for example, if you are using an Mbox) also require additional resources we recommend running Source-Connect with Pro Tools LE on newer machines. It is not recommended that you connect your Mbox via a USB hub unless it is self-powered. Network bandwidth: The most common cause of difficulty is insufficient network resources. Assuming your network has sufficient bandwidth the issue may be due to internal congestion, for example an FTP server is running or other people are heavily using the network. A common fix for this is to install a dedicated DSL line, or apply QoS (‘Quality of Service’) settings on the router. For further details and tools see the Support section online or contact Support.

Source-Connect® Pro 3.1 User Guide © 2004-2009 Source Elements http://source-elements.com 64
8.3 Reporting Issues To report an issue, please provide the following information:
1. Source-Connect build number (available from the About box) 2. System configuration (Operating system, computer hardware) 3. Pro Tools version and hardware 4. Network configuration i.e. LAN, DSL, wireless etc 5. Source-Connect settings: username, bitrate, buffer and port. 6. Bandwidth report, for example from http://speakeasy.net/speedtest 7. Description of what action(s) you were taking when the issue occurred, for
example who you were connected to and what the settings were. Technical Support is available via email, telephone and directly over Source-Connect. 9. Shortcut Guide You can access the following functions with keyboard shortcuts (both XP and OSX): Remote Transport Sync (RTS): Start ADR mode playback: If you are in SEND mode, and the remote user in RECEIVE, you can begin ADR mode playback with this key command: Option+Shift+\ Start Mix/review mode playback: For Source-Connect Pro you can start Mix/review mode playback using the standard Pro Tools transport controls or spacebar. Instant Messaging: Open and close IM window: Option+\ Open IM window (if not open) and insert cursor: Control+\ Return: Using the Return key when sending an Instant Message will return control to Pro Tools. Enter: Using the Enter key when sending an Instant Message will return the cursor to the Instant Messaging input panel, so you can continue typing. Logging in: In Pro Tools and some VST hosts the Tab key will toggle between the username and password field. When you have entered your details you can hit the Return or Enter key to login.

Source-Connect® Pro 3.1 User Guide © 2004-2009 Source Elements http://source-elements.com 65
10. Contact Support Contact Source Elements for technical and general support: Please use the online support available on our website as the first stop for all technical and other questions. If your question is not answered you may contact us via telephone or email. Online support: http://www.source-elements.com/support Online forum: http://source-elements.com/forum Telephone: Chicago: +1 312 706 5555 London: +44 (0)20 7193 3700 Telephone hours: 9am - 5pm PST (Chicago time). After hours: Please leave a message with your name and phone number and we will return your call as soon as possible. We can generally schedule an appointment for a convenient time for you. Email: Technical support: [email protected] Sales: [email protected] General: [email protected] When emailing Support, please provide us with the information required to resolve the issue: for example, your Source-Connect login, computer type, host version, and as much detail about the problem you are having as possible. This will assist us in responding to you with relevant assistance more rapidly. Mailing address: Source Elements LLC 515 N. State St 25th Floor Chicago, Illinois 60610 United States

Source-Connect® Pro 3.1 User Guide © 2004-2009 Source Elements http://source-elements.com 66
Appendix 1: Source-Connect 3.1 Versions and Compatibility table The following table shows a complete overview of what Restore and Replace processes are available to all versions of Source-Connect 3.1.

Source-Connect® Pro 3.1 User Guide © 2004-2009 Source Elements http://source-elements.com 67
Appendix 2: Q Manager Error messages Providing Support with the error message provided for any files which failed to restore or replace will allow us to respond to you with a possible solution more rapidly. There are various reasons as to why a file may fail to replace or restore. To find out the exact reason for a failed process, select the file in the Q Requests panel:
Now, look at the error code message to the very bottom right. If you hold the mouse over the error code number you will be shown a message explaining why the file failed to be processed.
For example, this error means that the other side was unable to upload the restore data via FTP. This usually means that the FTP service was not available. You should validate your FTP settings. When contacting Support with Q Manager / Restore / Replace issues we will need to know the error message number(s).

Source-Connect® Pro 3.1 User Guide © 2004-2009 Source Elements http://source-elements.com 68
Appendix 3: System requirements Source-Connect 3.1 Pro with Replace is currently only available as an RTAS plug-in for Pro Tools 7.x and higher systems including Pro Tools HD, LE and M-Powered. Source-Connect 2.9 is essentially the same as Source-Connect 3.1 however it does not have the Q Manager feature. The Q Manager software is qualified for Mac OS X 10.4 and 10.5, and Window XP. Source Elements software does not support Windows Vista at this time.