Embed Size (px)
Citation preview

Sound Magic – Neo Piano Manual
1
SOUNDMAGIC
Neo Piano Manual
Developed by:
Copyright © 2018 Sound Magic Co. Ltd. All Rights Reserved.

Sound Magic – Neo Piano Manual
2
Operational Manual
The information in this document is subject to change without notice and does not represent a
commitment by Sound Magic Co. Ltd. The software described in this document is subject to a
License Agreement and may not be copied, shared or distributed in any form. No part of this
publication may be copied, reproduced or recorded, for any purpose, without prior written
permission by Sound Magic Co. Ltd. All product and company names are trademarks of their
respective owners.
Sound Magic Co. Ltd
http://www.supremepiano.com
1-201 No.3 Building,No.3 District, Tiantongyuan, Changping, Beijing
P.R.China 102218
Version 1.0
Sound Magic – Neo Piano Manual
3
Contents
1. Installing Neo Piano ....................................................................................................................................................... 4
2. Selecting a Piano Instrument & Register Keycode .......................................................................................................... 4
2.1 Getting the Keycode ............................................................................................................................................................ 5
3. A.I. Tool Panel................................................................................................................................................................ 6
3.1 Checking your pedals ........................................................................................................................................................... 6
3.2 Checking your dynamic ....................................................................................................................................................... 7
4. Key Dynamics Panel ....................................................................................................................................................... 8
4.1 Checking and adjust the Key Velocity response .................................................................................................................. 8
4.2 Velocity Curve ...................................................................................................................................................................... 8
5. Noises and Style Panel ................................................................................................................................................. 10
5.1 Noises................................................................................................................................................................................. 10
5.2 Style ................................................................................................................................................................................... 11
6. Damping & Resonance Panel ....................................................................................................................................... 12
6.1 Damping ............................................................................................................................................................................. 12
6.2 Sympathetic Resonance .................................................................................................................................................... 13
6.3 What is Sympathetic Resonance? ..................................................................................................................................... 13
7. Tuning System Panel .................................................................................................................................................... 13
7.1 Tuning ................................................................................................................................................................................ 13
8. Harmonic, Perspective & Tone Panel............................................................................................................................ 14
8.1 Harmonic ........................................................................................................................................................................... 14
8.2 Tone ................................................................................................................................................................................... 15
8.3 Mic Perspective.................................................................................................................................................................. 15
9. Reverb & E.R. Panel ..................................................................................................................................................... 15
9.1 Early Reflections ................................................................................................................................................................ 16
10. Presets System .......................................................................................................................................................... 17
11. Optimising Sample Performance ................................................................................................................................ 17
12. Live on Stage Performance......................................................................................................................................... 18
13. Using Add-on Effects .................................................................................................................................................. 19
14. Stand-Alone Mode..................................................................................................................................................... 21
15. Troubleshooting ........................................................................................................................................................ 22
16. Switch GUI Mode ....................................................................................................................................................... 23

Sound Magic – Neo Piano Manual
4
1. Installing Neo Piano
Neo Piano is provided as an installer package.
After downloading, simply double-click the installer file to install Neo Piano to your computer.
Neo Piano for Apple Mac VST and AU versions are 32 Bit / 64 Bit universal.
Neo Piano for Windows VST has separate 32 Bit and 64 Bit versions. Both Versions will be
installed to the same Folder. If you use a different folder for your 64 Bit plug-ins, please
manually copy the 64 Bit dll file (has ‘x64’ at the end of the file name) into your 64 Bit plugin
folder.
2. Selecting a Piano Instrument & Register Keycode
Click inside the loader panel (highlighted #1) to open a window to choose a piano instrument
(.ins) file you want to play.

Sound Magic – Neo Piano Manual
5
It is recommend that you put instrument files to default location, then you can use quick load.
Default folder under windows system should be:
C:/Users/Public/Public Documents/SoundMagic/Neo_Piano/Instruments/
Default folder under macOS should be: Users/SoundMagic/Neo_Piano/
If the instrument requires a Keycode, then “Enter Keycode Required” will be displayed in the
Keycode panel (highlighted #2). You’ll need to enter your Keycode into this panel. You’ll only
need to enter the Keycode once for each instrument. After you enter a valid Keycode, “Keycode
Active” will be displayed. But you must ensure you’ve entered the correct Keycode for the
instrument selected, otherwise it will not play correctly.
By default, instruments are set to play directly from disk which is suitable for most today’s computers with fast hard
disks and enough free system resources. If you have an older computer, or you want to play live on stage then you can
choose to load “all” or “part” of the piano instrument into RAM which will reduce the demands on your hard disk.
See ‘Optimising Sample Performance’ for more details.
2.1 Getting the Keycode
To receive a Keycode for the instrument, email your Machine I.D. code and instrument file
name (i.e. Imperial Grand) to our customer service. You can find your Machine I.D. code on the
“info” panel, click on the SoundMagic logo on the top left to open the panel.
You can play the piano as soon as it loads, but it would be a good idea to set some of the

Sound Magic – Neo Piano Manual
6
physical and tone parameters of the piano to suit your playing style or musical taste. Next you
will learn how to set these parameters.
3. A.I. Tool Panel
The A.I Tools panel allows you to check your keyboard pedals and keyboard velocity response.
3.1 Checking your pedals
Press each pedal in turn or in combination and the appropriate pedal indicators should
illuminate on the panel. Each indicator should extinguish when the hardware pedal is released;
if you find a pedal remains illuminated when you release your hardware pedal then you should
have your pedals serviced or repaired.

Sound Magic – Neo Piano Manual
7
Neo Piano supports true half pedalling, to check if your hardware sustain pedal supports this
feature, slowly press your sustain pedal from the Off to the fully On position, the ‘Half
Pedalling’ indicator will illuminate and a Bar meter will display the sustain position if your
hardware supports half pedalling.
If your hardware does not support dynamic sustain, the sustain bar meter will be either full On
or Off and the half pedalling indicator will not illuminate.
3.2 Checking your dynamic
Press any notes on your keyboard can check the dynamic. If your keyboard supports HD
velocity, the indicator will illuminate.

Sound Magic – Neo Piano Manual
8
4. Key Dynamics Panel
4.1 Checking and adjust the Key Velocity response
Play a key with various amounts of force to see the response on the panel. The key’s velocity is
indicated using the standard bands between PPP and FFF and as a bar meter. You can change
the dynamics sensitivity and key tracking using the two dials, and the velocity curve. Alter these
settings to suit your hardware keyboard and particular playing style ensuring the full range
from PPP to FFF is active, providing the most expressive range of the piano.
4.2 Velocity Curve
Velocity response curves. This setting has a major impact on how the piano response to your
play and how it sounds. So if you want to tweak the sound, this option is the first one you
should consider.
Linear

Sound Magic – Neo Piano Manual
9
Volume changes with constant rate as velocity changes.
Exponential
Volume changes slowly first and then gets faster as velocity increases.
Inverted Exponential
Volume changes fast first and then gets slower as velocity increases.
Exponential 2
Volume changes more slowly at first and gets faster as velocity increases.
Curve
Volume changes as an “S” shape as velocity changes. It changes more slowly in both ends and
gets faster while in the middle range.

Sound Magic – Neo Piano Manual
10
Curve 2
Volume changes as an “S” shape as velocity changes. Changes are slowest in both ends and
fastest while in the middle range.
Inverted Curve
Volume changes as an inverted “S” shape as velocity changes. It changes fast in both ends and
gets slow while in the middle range.
5. Noises and Style Panel
5.1 Noises
You set the amount of noise for Key-Off, Pedal Noise, and String Noise. Key-Off noise allows
you to use Velocity On or Velocity Off level, or if your keyboard does not support Key-Off

Sound Magic – Neo Piano Manual
11
velocity you can use the Auto setting – this reduces the Key-Off noise level the longer the key is
held down.
Neo Piano supports Key-Off Velocity but some hardware keyboards do not support this feature.
To check if your keyboard supports Key-Off velocity, release the key with varying amounts of
speed, if the ‘Velocity Off’ bar meter shows the same reading each time, then your keyboard
does not support Key-Off velocity.
Neo Piano supports ‘High Definition Velocity’. If your Keyboard supports ‘High Definition
Velocity’ the “HD Velocity” indicator will illuminate on A.I. Tools panel.
String Noise only sounds when you press the sustain pedal, all the strings will begin to vibrate.
But this sound has a very low volume. You can hear a bit if it is in maximum position.
Pedal Noise has different sound when you press or release the pedal. The suitable pedal noise
volume will add realistic to your piano recordings.
5.2 Style
The Style option applies multi-band EQ providing different genres from Pop, Rock, Jazz and
Soft styles. The dial sets how much of the EQ is applied, from 0 to 100%.

Sound Magic – Neo Piano Manual
12
6. Damping & Resonance Panel
6.1 Damping
On real Pianos the strings are damped (traditionally using felt or leather) and this stops the
strings from continuing to sound after the key is released. Bass strings have more energy and
require more damping to stop them sounding. However, on real pianos, over time these
dampers can become worn and become less effective resulting in an ‘after-tone’ sound which
can be heard after the key is released. This explains why brand new pianos have a ‘tighter’
sound than an old piano or one that has not been well maintained.
Neo Piano allows you precise control over the dampers; the main dial sets the damping time
for Middle C and the smaller dial sets the damping key tracking from Off to Full. At Off, all keys
will be damped within the same time. At Full, the bass keys will take longer to damp and the
high keys will take a shorter time. On many pianos some of the highest notes have no damping
at all, Neo Piano allows you to define at what point notes are not damped from F6 to C8. Neo
Piano’s damping emulation system allows you to decide what type of piano you want to play, a
new ‘tight/staccato’ piano, an older ‘loose/worn-in’ piano, or anything in between - the choice is
yours.

Sound Magic – Neo Piano Manual
13
6.2 Sympathetic Resonance
This sets the amount of Sympathetic Resonance for your performance. The On/Off button
allows you to perform A/B listening tests to hear the effect of Sympathetic Resonance on your
performance.
6.3 What is Sympathetic Resonance?
In simple terms, when notes are held or the sustain pedal is pressed the strings of the piano
are not damped and are free to resonate. In this state, strings that are harmonically related to
keys being played can vibrate (resonate) and this can result in a richer harmonic sound.
*Note: Sympathetic Resonance emulation requires a large amount of resources; your system must have enough performance and free resources to support this feature.
7. Tuning System Panel
7.1 Tuning
By default Neo Piano uses the equal temperament tuning system; with physical piano tuning
variations being contained in the raw samples (Neo Piano samples every note).
Sound Magic – Neo Piano Manual
14
But Neo Piano also supports different tuning scales using Scala tuning files (which can be
freely downloaded)
Scala tuning files do not define the root Key or its root tuning, therefore you can set which Key
to apply tuning from and its relative tuning in cents (+/-100)
Click the on/off button (top left) to apply Scala tuning to the piano.
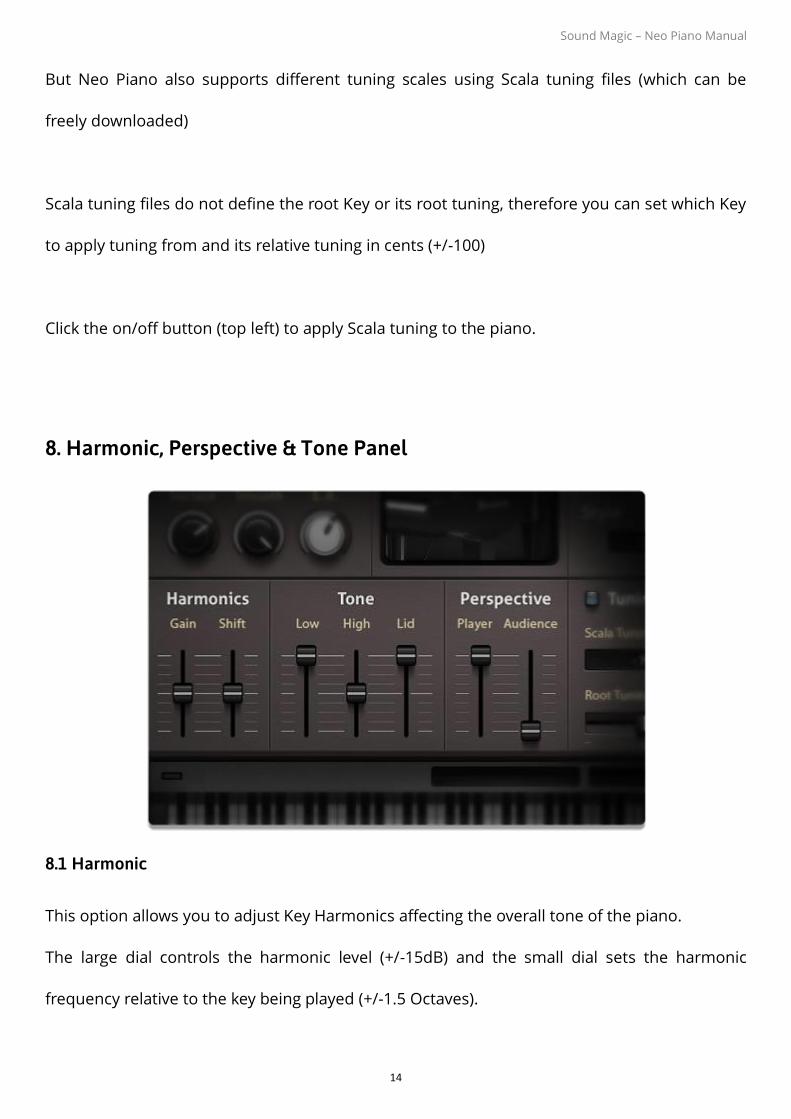
8. Harmonic, Perspective & Tone Panel
8.1 Harmonic
This option allows you to adjust Key Harmonics affecting the overall tone of the piano.
The large dial controls the harmonic level (+/-15dB) and the small dial sets the harmonic
frequency relative to the key being played (+/-1.5 Octaves).

Sound Magic – Neo Piano Manual
15
8.2 Tone
These settings adjust the physical aspects that affect the piano’s tone.
The large dial controls the piano’s lid position which has a major effect on the sound; a closed
lid has a significant damping effect on the high frequencies.
The small dial on the left adjusts the bass tone and the right adjusts the brightness.
8.3 Mic Perspective
The two dials set the close and distant microphone levels. This changes the listening position
relative to the piano; close would be the player, and distant would be the audience.
9. Reverb & E.R. Panel
The Reverb & E.R. panel allows you to apply room acoustics to your performance.

Sound Magic – Neo Piano Manual
16
Neo Piano’s Reverb is comprised of two main elements, Early Reflections (E.R.) and Reverb
space.
9.1 Early Reflections
Early Reflections utilises convolution to emulate the initial reflections from the surfaces of the
environment.
The E.R. dial controls the E.R. level and the option box allows you to select from various pre-set
environments.
The surface dial defines the type of surface in the environment from soft to hard. This
determines how quickly the sounds are absorbed by the surfaces. The softer the surface the
more high frequencies are absorbed. Examples of hard surfaces are rock, steal or glass. Soft
surfaces would be cloth, curtains or tapestries.
The “Time” dial sets the overall reverb time(s).
The “Smooth” dial sets the ‘smoothness’ of the decay from smooth to echo.
The “Width” dial sets the stereo width of the reverb sound.
The “Mix” dial sets the mix between the Reverb space and the Dry+E.R. sound.

Sound Magic – Neo Piano Manual
17
10. Presets System
Neo Piano has an internal presets system which is more flexible than the default presets
system on your host. You can switch between presets, load and save presets and also copy
and paste them. It’s a full function presets management system.
To switch between presets, click on the left and right arrows to move forward or backward.
The displayed text is the current preset’s name.
The downward arrow on the right will bring up the presets system menu.
11. Optimising Sample Performance
Modern computers with fast hard disks and enough free system resources should have no
problem playing instruments directly from disk. However, if you are using an older computer
or you have enough installed RAM you can choose to load all or part of the instrument into
RAM to reduce the demand on your hard disk by selecting [RAM] mode.

Sound Magic – Neo Piano Manual
18
The total amount of RAM (MB) required to load the whole instrument into RAM is displayed
next to the instrument file name. If you are sure you have enough ‘Available RAM’ resources to
load the instrument then set the ‘RAM allocation’ value higher than this amount.
You can restrict the amount of RAM available for samples by setting ‘RAM Allocation’. In this
mode some samples will be loaded into RAM and the rest will still be played from disk. You can
optimise which samples are stored in RAM by ‘Analysing’ your track.
To ‘Analyse’ your track simply press the ‘Analyse’ button (flashes when active) and play your
music either manually or from your music program. Once finished, press the ‘Analyse’ button
again and the optimal RAM samples will be loaded.
The Sample-RAM settings are saved with the patch – so the optimal Sample-RAM usage can be
recalled without having to ‘Analyse’ the song each time.
On Windows system, 250 MB of ‘Available Ram’ will be left free to allow the Windows system to operate smoothly** On Mac system, a maximum of 66% of physical RAM will be utilised** **NOTE: If you open more programs or resources after loading a large Piano instrument into RAM, then your system may slow down if the OS needs to utilise the Page/Swap File system – this should be avoided. This is generally only an issue on systems with less than 4 GB installed RAM.
12. Live on Stage Performance
Live performance is stressful enough without having to worry about the technology!

Sound Magic – Neo Piano Manual
19
Today’s computers are excellent at playing samples directly from disk, however there are
occasions when the Operating System or Anti-Virus scanners block access to the hard disk and
it’s ‘sod’s law’ that this will happen when you least expect or want it to.
To ensure a flawless live performance we recommend you load the whole instrument into RAM on a 64 bit machine with at least 8 GB of RAM installed.
13. Using Add-on Effects
The SoundMagic Add-on System provides a convenient way to use Add-on effects with Neo
Piano. To obtain Add-ons Effects, visit our website or use the recommended links shown.
Neo MasterTool
Neo MasterTool Product Page
Neo MasterTool is a powerful multi-band multi process mastering and enhancement system in
one plug-in. With Neo MasterTool, you can quickly and effectively polish your piano sound and
ready to release it.

Sound Magic – Neo Piano Manual
20
Neo EQ
Neo EQ Product Page
Neo EQ is a new type of EQ which automatically tracks the dominant pitch bands of the signal.
With the free Piano Extension Pack, it can serve Neo Piano really well with quicker and precise
result.
Neo DynaMaster
Neo DynaMaster Product Page

Sound Magic – Neo Piano Manual
21
Neo DynaMaster is a stereo dynamics processer which can shape very complex dynamic
response curves and provides nearly all types of dynamic processes in one plug-in. The Piano
Extension Pack provides presets tailored specifically for Neo Piano.
14. Stand-Alone Mode
TheWindows version provides a stand-alone option; double click the EXE file with the same name of the dll file to open Neo Piano in stand-alone mode.
Record to wave file
In Stand-Alone mode, you can record performances into wave files. To do this, you need to
click the record button:
Then when you want to save to the wave file, you need to click the stop button:
A dialog box will appear:
Click the Yes (Y) button to save your wave file.
Adjust tempo/Speed
Clicking this icon will bring up speed/tempo menu.

Sound Magic – Neo Piano Manual
22
You can set your tempo here.
Switch presets
Click on the arrow to step through the presets.
If you want to choose a preset quickly, you can also use the menu: Plugin->Programs 0-15 and
choose the preset you want to load.
There are a total of 16 factory presets available to customize. Just click the black box and a
down drop list will appear. Click to choose your preferred preset. You can also load your own
custom presets.
15. Troubleshooting
Why does the piano only play noise like white noise?
• The Keycode might be wrong in this case, please contact our customer service to solve this
issue.

Sound Magic – Neo Piano Manual
23
Can I put the .ins file (Sample Set file) anywhere on my hard drive?
• Yes, you can.
Can I rename the .ins file?
• No, the keycode will be invalid if you change the .ins filename.
16. Switch GUI Mode
An option top left, SD/4K - the GUI window has to be closed then reopened to view the new
size. SD suitable for standard resolution such as 1080P and 2K, 4K mode is best for resolution
of 4K (3840*2160).

Sound Magic – Neo Piano Manual
24
Copyright © 2018 Sound Magic Co. Ltd
All Rights Reserved.
VST plugin technology by Steinberg
VST is a trademark of Steinberg Media Technologies GmbH
Audio Unit version implemented using Symbiosis from NuEdge Development.
![1.qigroup.nibs.ac.cn/wp-content/uploads/2019/10/Cum-10...neo 9C!q neo gqqugou neo OH OH [01 neo Slqol neo All_JÀloaone D!GCOXISUU HSo HOOC.„, OH HO neo OH OH [o] o neo OH o (2+5)](https://img.pdfslide.us/doc/110x75/5ea8e1ec34c7047f4e7d0df4/1-neo-9cq-neo-gqqugou-neo-oh-oh-01-neo-slqol-neo-alljloaone-dgcoxisuu.jpg)