Embed Size (px)
Citation preview

46982-02 September 2010
Thermo Fisher Scientific
Sorvall MTX 150Micro-ultracentrifuges
Instruction Manual

IMPORTANT! Please reference this page for the most up-to-date information on the
following* • web site addresses • contact information
• copyright and trademark information
*All subsequent pages in this manual may have incorrect web site addresses and contact information.
©2013 Thermo Fisher Scientific Inc. All rights reserved. Delrin, TEFLON, and Viton are registered trademarks of DuPont. Noryl is a registered trademark of SABIC. POLYCLEAR is a registered trademark of Hongye CO., Ltd. Hypaque is a registered trademark of Amersham Health As. RULON A and Tygon are registered trademarks of Saint-Gobain Performance Plastics. Alconox is a registered trademark of Alconox. Ficoll is a registered trademark of GE Healthcare. Haemo-Sol is a registered trademark of Haemo-Sol. Triton X-100 is a registered trademark of Sigma-Aldrich Co. LLC. All other trademarks are the property of Thermo Fisher Scientific Inc. and its subsidiaries. Manufacturer Thermo Fisher Scientific Robert-Bosch-Straße 1 D - 63505 Langenselbold Germany Thermo Fisher Scientific Inc. provides this document to its customers with a product purchase to use in the product operation. This document is copyright protected and any reproduction of the whole or any part of this document is strictly prohibited, except with the written authorization of Thermo Fisher Scientific Inc. The contents of this document are subject to change without notice. All technical information in this document is for reference purposes only. System configurations and specifications in this document supersede all previous information received by the purchaser. Thermo Fisher Scientific Inc. makes no representations that this document is complete, accurate or error-free and assumes no responsibility and will not be liable for any errors, omissions, damage or loss that might result from any use of this document, even if the information in the document is followed properly. This document is not part of any sales contract between Thermo Fisher Scientific Inc. and a purchaser. This document shall in no way govern or modify any Terms and Conditions of Sale, which Terms and Conditions of Sale shall govern all conflicting information between the two documents

Thermo Scientific Sorvall MTX 150 i
C
Chapter 1 Description..............................................................................................................................1-1External view of micro-ultracentrifuge .......................................................................1-2Structure....................................................................................................................1-2
Touchscreen ..........................................................................................................1-2Rotor chamber.......................................................................................................1-6Safety devices .........................................................................................................1-6
Chapter 2 Operation.................................................................................................................................2-1Run preparation.........................................................................................................2-3
Starting up this machine ........................................................................................2-3Preparing tubes/bottles and rotors..........................................................................2-3Applicable rotors....................................................................................................2-4
Basic operation ..........................................................................................................2-5Setting run conditions ...........................................................................................2-5Operational procedure .........................................................................................2-10Acceleration rate and deceleration rate .................................................................2-14
How to use the option function...............................................................................2-15Programmed operation ........................................................................................2-16Step-mode operation............................................................................................2-30Displaying and setting RCF.................................................................................2-38Selecting the rotor................................................................................................2-39Displaying and setting RCF.................................................................................2-41User login ............................................................................................................2-44
Features of the MENU screenFeatures of the MENU scree .....................................2-46Displaying the Run History and loading the information about run
parameters ........................................................................................................2-47Rotor Catalog ......................................................................................................2-48Rotor Management..............................................................................................2-49
RTC (real-time control) operation...........................................................................2-54Customizing the settings......................................................................................2-58Administrator (Admin) functions ........................................................................2-62
Emergency recovery from power failure ...................................................................2-70
Chapter 3 Maintenance...........................................................................................................................3-1Rotor chamber...........................................................................................................3-3Drive shaft (Spindle)..................................................................................................3-3Cabinet......................................................................................................................3-3Chamber door seal.....................................................................................................3-3
Removing the door seal O-ring ..............................................................................3-4Vacuum pump...........................................................................................................3-4
Contents

Contents
ii Sorvall MTX 150 Thermo Scientific
Others .......................................................................................................................3-4
Chapter 4 Troubleshooting .................................................................................................................... 4-1Alarm indicators ........................................................................................................ 4-2User-corrected problem .............................................................................................4-4
Chapter 5 Installation ............................................................................................................................. 5-1
Chapter 6 Specifications........................................................................................................................ 6-1
Chapter 7 Supply list ............................................................................................................................... 7-1
Appendix A Chemical Compatibility Chart ............................................................................................A-1
Appendix B Warranty .................................................................................................................................B-1
Appendix C Contact Information ..............................................................................................................C-1
Thermo Scientific Sorvall MTX 150 iii
P
Preface
General descriptionThe Thermo Scientific Sorvall MTX 150 micro-ultracentrifuge is designed to separate liquid-suspended materials having different densities and particle size.The Sorvall® MTX 150 is a product that delivers user-friendliness and reliability based on our many years of experience in developing centrifuges. This micro-ultracentrifuge offers many features that we are confident of satisfying your requirements. These features include the following.
1. The maximum speed (g-force) is 150,000 rpm (1,048,680 x g).
2. Small and compact tabletop type for use as a personal micro-ultracentrifuge.
3. The touchscreen with easy-to-see color liquid crystal screen.
4. The displayed language can be switched between Japanese and English.
5. Various alarm indicators can notify users of the causes and necessary actions of the troubles. It can make troubleshooting easier and quicker.
6. Rotors are automatically secured to the drive shaft in the rotor chamber eliminating the need for push buttons and tools.
7. Samples can be balanced visually (see “Preparing tubes/bottles and rotors” on page 2-3).
8. This product operates very quietly, and is thus well suited for personal use on the lab bench.
9. A CFC-free thermomodule cooling system is employed featuring a powerful cooling capacity.(Samples can be kept at 0°C at maximum speed when the ambient temperature is 30°C.)
10. The real-time control (RTC) feature enables setting a start time or a finish time, thus letting you run your machine at a desired date and time.
11. Either Rotations Per Minute (RPM) or Relative Centrifugal Force (RCFmax and RCFavg) can be displayed and set.
12. Twenty varieties of nine stepped modes can be programmed for a wide range of applications such as step running.
13. In addition to a door lock and an imbalance detector, two independent microprocessors are incorporated for overspeed detection (a dual CPU overspeed prevention mechanism) for even greater safety.

P
iv Sorvall MTX 150 Thermo Scientific
Safety notices
Safety reminders
Carefully read and fully understand the following safety instructions.
• Operate your instrument according to the instruction manual.
• Be sure to observe all safety precautions in the instruction manual and safety instructions on your instrument. If neglected, personal injury and/or instrument damage can be caused.
• If the equipment is used in a manner not specified by the manufacturer, the protection provided by the equipment may be impaired.
• The safety reminders are indicated as shown below. The signal words “DANGER”, “WARNING” and “CAUTION” are indicated together with the hazard alert symbols in this manual.
This hazard alert symbol indicated together with a signal word is a reminder to emphasize important safety instructions.
• Do not perform any operation not specified in the instruction manual. If any problem is found on your instrument, contact a Thermo Fisher Scientific authorized sales/service representative.
• Although the safety precautions in the instruction manual and safety instructions on your instrument have been fully considered, an unexpected situation may arise. Observe the instructions in the instruction manual and always be careful when operating this instrument.
DANGER This note indicates an imminently hazardous situation, which if not strictly observed, could result in personal severe injury or possible death.
WARNING This note indicates a potentially hazardous situation, which if not strictly observed, could result in personal severe injury or possible death.
CAUTION This note indicates a potentially hazardous situation, which if not strictly observed, could result in personal injury or severe damage to the instrument.
Note indicates a note which has no direct bearing on personal safety.

P
Thermo Scientific Sorvall MTX 150 v
Mechanical SafetyWARNING • Do not open the door while the rotor is spinning.• Do not attempt to slow or stop the spinning rotor by hand.• Do not incline or move the instrument while the rotor is spinning. Do not place any object on the instrument or lean on the instrument.• Do not attempt to unlock the door forcefully while the rotor is spinning.• For operator safety, maintain a 30-cm “clearance envelope” around the instrument while the rotor is spinning. Do not store dangerous substances capable of developing flammable or explosive vapors on or near the micro-ultracentrifuge.• Repairs, disassembly, and other modifications to the micro-ultracentrifuge are strictly prohibited unless performed by a Thermo Fisher Scientific authorized sales/service representative.• Do not use the other’s manufacturer’s rotor without Thermo Fisher Scientific’s permission.• Always use a quick-setting rotor for this micro-ultracentrifuge. The screw-type rotors are inapplicable. • Check the chemical resistance chart attached to the rotor, and do not use any sample inapplicable to the rotor (including the buckets). Using such a sample could corrode the rotor (including the buckets).• Do not exceed the maximum rated speed of the rotor or buckets in use.• Do not use corroded, scratched or cracked rotor and buckets. Check that the rotor and buckets are free of such abnormalities before operation.• When using a swing rotor, check that the buckets are properly engaged with the rotor pins before operation. Wrong setting can cause severe damage to the instrument. Make sure that all the rotor buckets are of the same type.• If abnormal sound or vibration occurs, stop the operation immediately and contact a Thermo Fisher Scientific authorized sales/service representative.

P
vi Sorvall MTX 150 Thermo Scientific
Safety during installation and maintenance
CAUTION • Position the micro-ultracentrifuge on a level surface, such as a table or laboratory bench that can support the weight of the micro-ultracentrifuge and resist vibration. • Be sure to remove the rotor from the rotor chamber when micro-ultracentrifuge is not used for a long time or when the machine is moved. Otherwise the drive shaft (crown) may be damaged.• Before using a rotor, be sure to read through the rotor instruction manual.• Check the chemical resistance chart attached to the rotor, and do not use any sample inapplicable to the tubes, tube caps, bottles, or bottle caps, etc. Using such a sample could corrode or deteriorate such parts.• Use the rotor tubes and bottles within their actual capacities.• Mount the rotor onto the drive shaft gently and properly.• Do not drop the rotor or apply excessive force to the drive shaft to avoid damage to the drive shaft.• Maximum rotor speed depends on the tubes or adapters to be used. Follow the instructions on the rotor instruction manual.• This micro-ultracentrifuge might convey vibration to a table while the rotor is rotating. If a measuring device is positioned on a table and near this micro-ultracentrifuge, use a measuring device carefully.• Approximately even quantities of sample in the tubes are sufficient for balancing, and extremely different sample quantities must be avoided (Refer to “Preparing tubes/bottles and rotors” on page 2-3 for the sample balancing).• Clean the inside of the drive hole (crown hole) of the rotor and the surface of the drive shaft (crown) of the micro-ultracentrifuge once a month.• When storing the rotors on a shelf, take appropriate safety measures in areas prone to earthquakes• Do not pour any solution such as water, detergent, or disinfectant directly into the rotor chamber and be careful not to spill the sample into the rotor chamber. If you do so, the bearings of the drive unit might corrode or deteriorate and it might cause vacuum failure.• Do not operate the display panel (Touchscreen) using a ball-point pen.
DANGER • Before removing the cover, top deck, or other component for maintenance, always turn off the POWER switch of the instrument, unplug the power cord from the wall outlet, and wait at least three minutes to avoid the risk of electrical shock.
WARNING • For maintenance and repairing of the rotors, tubes, etc., see the rotors and tubes instruction manual. • After installation and before any test-run, this micro-ultracentrifuge always needs the internal check by a Thermo Fisher Scientific authorized sales/service representative.• Repairs, disassembly, and other modifications to the micro-ultracentrifuge are strictly prohibited unless performed by a Thermo Fisher Scientific authorized sales/service representative.

P
Thermo Scientific Sorvall MTX 150 vii
Electrical Safety
Safety against Risk of Fire
Chemical and Biological Safety
CAUTION • If the micro-ultracentrifuge is exposed to ultraviolet rays for a long time, the color of the covers may be changed or the coating may be peeled off. After use, cover the micro-ultracentrifuge with a cloth to protect it from direct exposure.
WARNING • Your micro-ultracentrifuge must be grounded properly to avoid electrical shock hazards.
CAUTION • Do not place containers holding liquid in the rotor chamber or on or near the instrument. If they spill, liquid may get into the instrument and damage electrical components.• If the machine will not be used for a long time, turn off the main circuit breaker.
WARNING • This micro-ultracentrifuge is not explosion-proof. Never use explosive or flammable samples or materials that chemically react vigorously. Do not centrifuge such materials in this instrument or handle or store them near the instrument.
WARNING • Take all necessary safety measures before using samples that are toxic or radioactive, or blood samples that are pathogenic or infectious. You use such samples at your own responsibility.• Take all necessary safety measures when Risk Group II materials (as identified in the World Health Organization “Laboratory Biosafety Manual”) are handled, and that more than one level of protection shall be provided in the case of materials of a higher group.• If the micro-ultracentrifuge, rotor, or an accessory is contaminated by samples that toxic or radioactive, or blood samples that pathogenic or infectious, be sure to decontaminate the item according to good laboratory procedures and methods.• If there is a possibility that the micro-ultracentrifuge, rotor, or an accessory is contaminated by samples that might impair human health (for example, samples that are toxic or radioactive, or blood samples that are pathogenic or infectious), it is your responsibility to sterilize or decontaminate the micro-ultracentrifuge, rotor, or the accessory properly before requesting repairs from a Thermo Fisher Scientific authorized sales/service representative.• It is your responsibility to sterilize and/or decontaminate the micro-ultracentrifuge, rotor, or parts properly before returning them to a Thermo Fisher Scientific authorized sales/service representative.

P
viii Sorvall MTX 150 Thermo Scientific
Notice for an Earthquake
Depending on the magnitude, an earthquake might damage micro-ultracentrifuge. If you observe some abnormality, stop using the micro-ultracentrifuge immediately and ask for inspection by the Thermo Fisher Scientific service representative.

Thermo Scientific Sorvall MTX 150 1-1
1
Description
Contents
• “External view of micro-ultracentrifuge” on page 1-2
• “Structure” on page 1-2
1
1-2 Sorvall MTX 150 Thermo Scientific
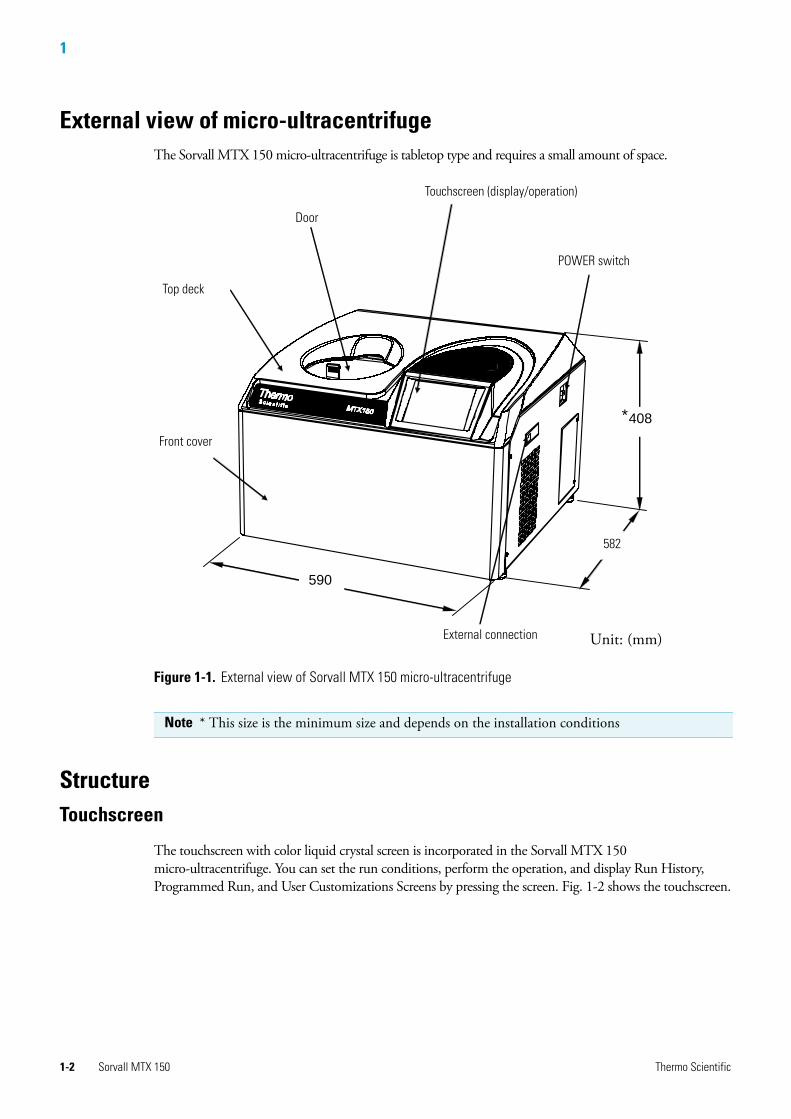
External view of micro-ultracentrifugeThe Sorvall MTX 150 micro-ultracentrifuge is tabletop type and requires a small amount of space.
Figure 1-1. External view of Sorvall MTX 150 micro-ultracentrifuge
StructureTouchscreen
The touchscreen with color liquid crystal screen is incorporated in the Sorvall MTX 150 micro-ultracentrifuge. You can set the run conditions, perform the operation, and display Run History, Programmed Run, and User Customizations Screens by pressing the screen. Fig. 1-2 shows the touchscreen.
Note * This size is the minimum size and depends on the installation conditions
590
582
408 *
Unit: (mm)
Touchscreen (display/operation)
POWER switch
Door
Top deck
Front cover
External connection
582

1
Thermo Scientific Sorvall MTX 150 1-3
Display at the normal operation
The following screen appears by pressing the SPEED, TIME, or TEMP button.
Display when setting the run conditions such as the speed etc.)Figure 1-2. Touchscreen
Tabs of each screen
(7) RTC button
(6) PROGRAM button
(5) STOP button
(4) START button
(3) VACUUMbutton/Indicator
(2) Rotor indicator
(8) USER button
(1) Field display
(9) Keypad display

1
1-4 Sorvall MTX 150 Thermo Scientific
Table 1-1.Functions of the Run screen
No. Name and Symbol Functions and Actions
(1) Field display
SPEED column(RCF column)
TIME column
TEMP column
button
button
Display various fields.The SPEED (RCF), TIME, and TEMP fields give the current status indicator in the top row and the setting indicator in the bottom row. (For setting, see “Setting run conditions” on page 2-5.)
• SPEED (Speed indicator)(Top row) Displays speeds in increments of 10 rpm at lower than 5,000 rpm, and in steps of 100 rpm at 5,000 rpm or more.(Bottom row) Sets speeds from 5,000 to maximum speed in increments of 1,000 rpm. The lower three digits (one, ten, and one-hundred positions) display zeros.Maximum speed: 150,000 rpmFor RCF, see “Displaying and setting RCF” on page 2-41.
• TIME(running time indicator)(Top row) Displays the remaining operation time. If the running time is set to HOLD, this field displays time elapsed.(Bottom row) Specifies a setting in the range from 1 minute to 99 hours 59 minutes in steps of minutes and hours.
• TEMP(temperature indicator)When the pressure in the rotor chamber equals the atmospheric pressure, the temperature of the inside of the rotor chamber is kept at 25 °C to prevent condensation.(Top row) Displays in steps of 0.1 °C.(Bottom row) Sets a setting in the range from 0 °C to 40 °C in increments of 1 °C
The column is shifted from SPEED (RCF) column to RCF (SPEED) column by pressing this button.The Acceleration rate and Deceleration rate are set by pressing this button.
• ACCEL(acceleration mode indicator)Displays acceleration modes 1 through 9.
• DECEL(deceleration mode indicator)Displays deceleration modes 1 through 9, along with free coast (F).
(2) Rotor indicator ROTOR CATALOG is displayed by pressing this button and you can select the desired rotor.
(3) VACUUM button • Press this button to turn the vacuum pump on or off. When the vacuum pump is turned off, the pressure in the rotor chamber will change to equal the atmospheric pressure. (While the rotor is rotating, you can not turn off the vacuum pump.)
• Temperature control starts as soon as the vacuum pump is turned on. Displays the following four stages according to the vacuum of the rotor chamber.
(1) Atmospheric state.
The vacuum pump is not activated.
(2) Low vacuum. The rotor waits at 5,000 rpm until the vacuumreaches an intermediate level.
(3) Intermediate vacuum.
(4) High vacuum.
(4) button Starts rotor rotation. If VACUUM is off, pressing this button activates the vacuum pump and starts temperature control.
NOTE: If the sample is sensitive to a temperature rise, do not press the START button until the chamber is at a high vacuum level

1
Thermo Scientific Sorvall MTX 150 1-5
(5) button Stops rotor rotation.
(6) button Displays the program No. if program operation has been selected. Press this button to specify program settings (see “Programmed operation” on page 2-16).
(7) button Displays the start time or finish time for centrifugation. Press this button to set a start time or finish time (see “RTC (real-time control) operation” on page 1-1).
(8) button Displays the user name (see “Administrator (Admin) functions” on page 2-62).
Table 1-2.Functions of the keypad display
No. Name and Symbol Functions and Actions
(9) Keypad display
When entering the deceleration rate, FREE is displayed in the position of Hold.
Use the keypad display to enter numeric values for run parameters.
: When entering a time: Switches from hours to minutes
Hold When entering the operation time: Sets continuous running.
Free When entering deceleration conditions: Sets free coasting.
CE Press this to cancel input (for example, if you enter the wrong numberor the wrong value for a run parameter)
Enter Press this to save the entered setting.
X Press this to close the keypad display.
Table 1-3.External connection
No. Name and Symbol Functions and Actions
(10) USB (host side) Use the USB connection to output the operation history of the micro-ultracentrifuge to USB memory.
(11) USB (device side) Use for connecting optional items.
Table 1-1.Functions of the Run screen
No. Name and Symbol Functions and Actions

1
1-6 Sorvall MTX 150 Thermo Scientific
Rotor chamber
The structure of the rotor chamber (vacuum chamber) is shown in Fig. 1-3.
Figure 1-3. Rotor Chamber
Safety devices
1. Protection of rotor chamberShould the rotor fail at high speed (or comes off the drive shaft), the safety of the operator is ensured by the thick armored barrier ring enclosing the cooling bowl (Fig. 1-3).
2. Imbalance detectorIf during operation the vibration of the rotor becomes excessive due to serious imbalance or improper bucket setting, the imbalance detector detects the situation and decelerates the rotor immediately. However, the micro-ultracentrifuge is designed to tolerate imbalance associated with visual balancing - it is equipped with an imbalance tolerant drive. (For more information on the balancing of rotors, see “Preparing tubes/bottles and rotors” on page 2-3.)
3. Door lock systemThe chamber door automatically locks for safety while the rotor is spinning. When the power supply is off, the door remains locked. The door can only be opened and closed when the rotor is at rest and the rotor chamber vacuum has been vented. To open the door in the event of a power failure, see “Emergency recovery from power failure” on page 2-70.
4. Overspeed detectorThis micro-ultracentrifuge incorporates a detector designed to prevent the rotor from spinning at a speed exceeding the maximum allowable speed.
Two independent microprocessors (CPUs) check the rotor for overspeed, thus increasing safety
Cooling bowl (Rotor Chamber)Cools the rotor.
Drive shaft (crown)Sets the rotor and rotates.
Protector(Barrier Ring)
Temperature sensor Measures the temperature in the rotor chamber.Imbalance detection device
Detects abnormal balance and stops the rotor.
Over-speed sensorStops the rotor if it rotates faster than the maximum allowable speed of the rotor. (Two sensors provided)
Chamber door seal

1
Thermo Scientific Sorvall MTX 150 1-7
further (dual CPU overspeed preventive mechanism).
The first CPU detects overspeed and performs control and display. Should the rotor be set to a speed exceeding the permissible speed, this CPU detects an alarm massage of “SPEED” from the low speed range (about 2,000 rpm), and stops the rotor.
(But this second CPU does not display an alarm message, because it is not connected to the display-performing CPU. Should the alarm device be activated, pressing START button will not run the instrument. Turn off the POWER switch, wait for several minutes, turn the POWER switch on again, then pressing START button.)
Thermo Scientific Sorvall MTX 150 2-1
2
Operation
Contents
• “Run preparation” on page 2-3
• “Basic operation” on page 2-5
• “How to use the option function” on page 2-15
• “Features of the MENU screen” on page 2-46
• “Emergency recovery from power failure” on page 2-70
2
2-2 Sorvall MTX 150 Thermo Scientific
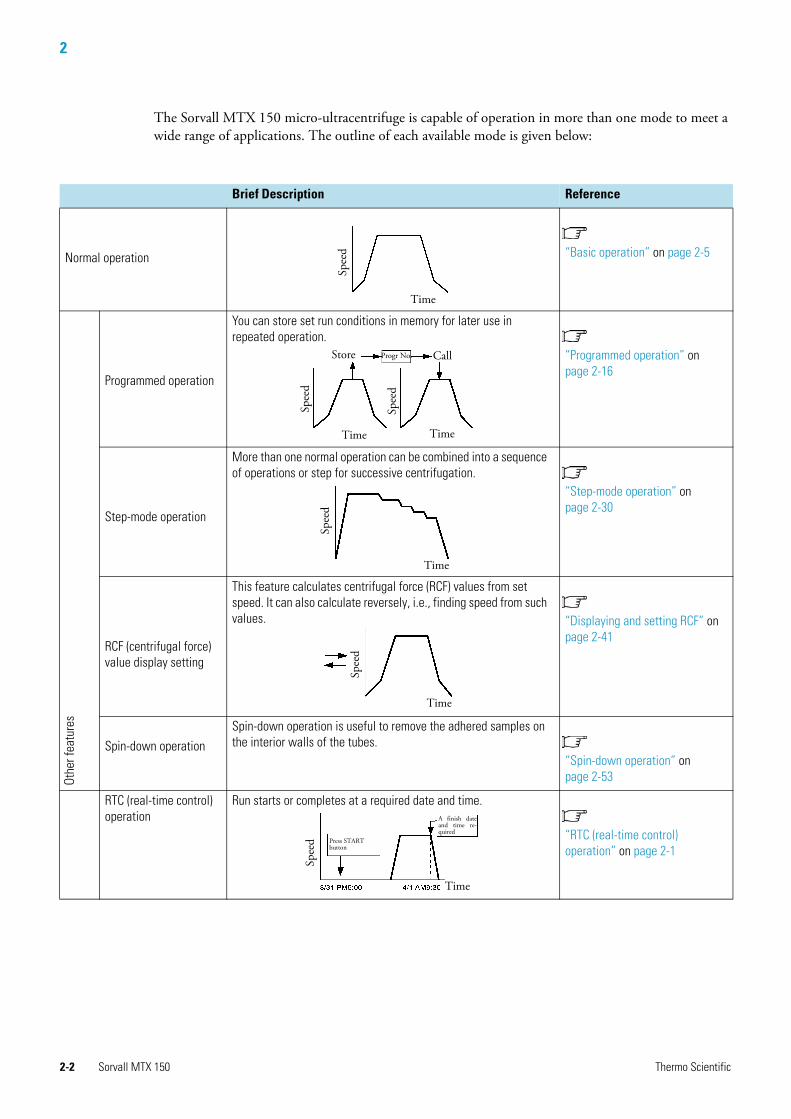
The Sorvall MTX 150 micro-ultracentrifuge is capable of operation in more than one mode to meet a wide range of applications. The outline of each available mode is given below:
Brief Description Reference
Normal operation “Basic operation” on page 2-5
Othe
r fea
ture
s
Programmed operation
You can store set run conditions in memory for later use in repeated operation.
“Programmed operation” on page 2-16
Step-mode operation
More than one normal operation can be combined into a sequence of operations or step for successive centrifugation.
“Step-mode operation” on page 2-30
RCF (centrifugal force)value display setting
This feature calculates centrifugal force (RCF) values from set speed. It can also calculate reversely, i.e., finding speed from such values. “Displaying and setting RCF” on
page 2-41
Spin-down operation
Spin-down operation is useful to remove the adhered samples on the interior walls of the tubes.
“Spin-down operation” on page 2-53
RTC (real-time control) operation
Run starts or completes at a required date and time.
“RTC (real-time control) operation” on page 2-1
Spee
d
TimeSp
eed
Spee
d
Time Time
Store CallProgr No.
Spee
d
Time
Spee
d
Time
Spee
d
Time
A finish dateand time re-quired
Press START button

2
Thermo Scientific Sorvall MTX 150 2-3
Run preparation
Starting up this machine
Before setting run conditions, display the Run screen (Screen for setting run conditions)(1) Displaying the Run screen (Screen for setting run conditions)
Figure 2-1. Initial screen and Run screen
Preparing tubes/bottles and rotors
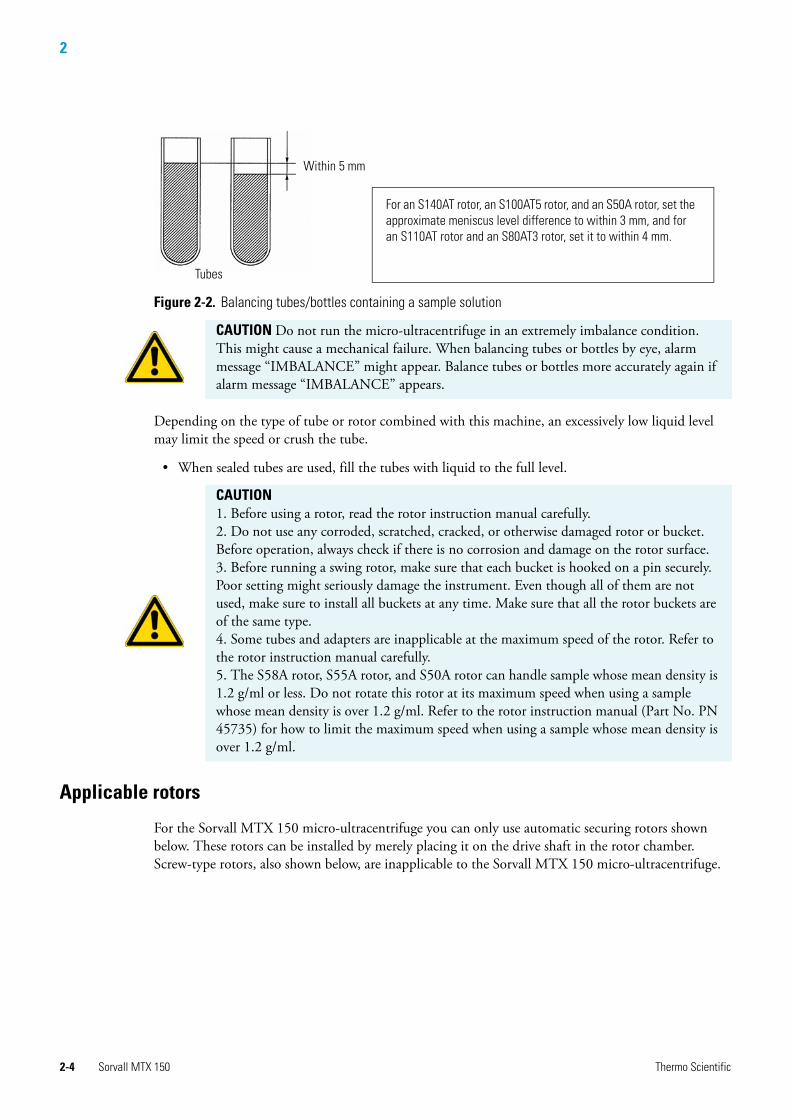
The Sorvall MTX 150 micro-ultracentrifuge allows you to balance, by eye, tubes or bottles containing a sample solution and then centrifuge them. Make sure that the approximate difference between meniscus levels of sample solution in tubes or bottles is within 5 mm (See Fig. 2-2).
WARNING 1. This micro-ultracentrifuge is not explosion-proof. Never use explosive or flammable samples, or materials that chemically react vigorously. Do not centrifuge such materials in this instrument nor handle or store them near the instrument.2. Take all necessary safety measures before using samples that are toxic or radioactive, or blood samples that are pathogenic or infectious. You use such samples at your own responsibility.
CAUTION Do not place containers holding liquid in the rotor chamber, on the micro-ultracentrifuge, or near the micro-ultracentrifuge. If split, liquid might get into the instrument and damage electrical and mechanical components.
Initial screen
1. Turn on the POWER switch.
2. The initial screen appears.
3. The Run screen appears.
2
2-4 Sorvall MTX 150 Thermo Scientific
Figure 2-2. Balancing tubes/bottles containing a sample solution
Depending on the type of tube or rotor combined with this machine, an excessively low liquid level may limit the speed or crush the tube.
• When sealed tubes are used, fill the tubes with liquid to the full level.
Applicable rotors
For the Sorvall MTX 150 micro-ultracentrifuge you can only use automatic securing rotors shown below. These rotors can be installed by merely placing it on the drive shaft in the rotor chamber. Screw-type rotors, also shown below, are inapplicable to the Sorvall MTX 150 micro-ultracentrifuge.
Tubes
Within 5 mm
For an S140AT rotor, an S100AT5 rotor, and an S50A rotor, set the approximate meniscus level difference to within 3 mm, and for an S110AT rotor and an S80AT3 rotor, set it to within 4 mm.
CAUTION Do not run the micro-ultracentrifuge in an extremely imbalance condition. This might cause a mechanical failure. When balancing tubes or bottles by eye, alarm message “IMBALANCE” might appear. Balance tubes or bottles more accurately again if alarm message “IMBALANCE” appears.
CAUTION 1. Before using a rotor, read the rotor instruction manual carefully.2. Do not use any corroded, scratched, cracked, or otherwise damaged rotor or bucket. Before operation, always check if there is no corrosion and damage on the rotor surface.3. Before running a swing rotor, make sure that each bucket is hooked on a pin securely. Poor setting might seriously damage the instrument. Even though all of them are not used, make sure to install all buckets at any time. Make sure that all the rotor buckets are of the same type. 4. Some tubes and adapters are inapplicable at the maximum speed of the rotor. Refer to the rotor instruction manual carefully.5. The S58A rotor, S55A rotor, and S50A rotor can handle sample whose mean density is 1.2 g/ml or less. Do not rotate this rotor at its maximum speed when using a sample whose mean density is over 1.2 g/ml. Refer to the rotor instruction manual (Part No. PN 45735) for how to limit the maximum speed when using a sample whose mean density is over 1.2 g/ml.

2
Thermo Scientific Sorvall MTX 150 2-5
Basic operation
Setting run conditions
This section will first describe the screen for basic operation (the Run screen). For the display at the normal operation and the display when setting the run conditions, refer to “Touchscreen” on page 1-2.
Cap (blue)(without a screw hole)
Cover (black)
Rotor set handle
Screw cap (with a screw hole)
Cover (blue)
Automatic securing type(1) Applicable rotor
Screw - type for older models(2) Inapplicable
CAUTION 1. Always use an automatic securing rotor for this micro-ultracentrifuge. The screw-type rotors are inapplicable.Automatic securing rotors are not applicable in older models(RC-M100, RC-M120, and RC-M120EX Centrifuges).2. The rotor must be gently placed on the drive spindle to avoid damaging the drive shaft.3. Use only rotors approved for use in the Sorvall MTX 150 (see list of approved rotors in “Specifications” on page 6-1).
WARNING Do not incline or move the instrument while the rotor is spinning.Do not place any object on the instrument or lean on the instrument.
CAUTION 1. Do not press the touchscreen with a sharp-pointed object such as a ballpoint pen.2. If abnormal sound is heard during the operation, stop the operation immediately and contact a Thermo Fisher Scientific authorized sales/service representative.

2
2-6 Sorvall MTX 150 Thermo Scientific
[Run Screen]
The screen for displaying run conditions and operational status is called the Run screen.Speed, time, and temperature are displayed in two rows: the top row displays the current actual run conditions, while the bottom row displays the set run conditions.The acceleration (ACCEL) and the deceleration (DECEL) fields display set conditions.
Figure 2-3. Run screen
Operation statedisplay field
Setting valuedisplay field

2
Thermo Scientific Sorvall MTX 150 2-7
[Display and operations when entering the run parameters]
The keypad display appears by pressing the SPEED column, TIME column, button.
Figure 2-4. Setting value display field
ACCEL: DECEL:
(1) Press the column of the desired item to turn the first digit blue.
Color of the first digit: Blue
(2) Enter the desired numeric value with the keypad display.(e.g.) SPEED:150,000rpmPress the 1, 5, 0.
[Keypad display]
(3) If you do not want to change any other setting, press the ENTER button on the keypad display. If you do want to change other setting, press the column of the desired item, and the pressed column will become the input wait state. The new setting is displayed on the setting value display field.
Setting value display field

2
2-8 Sorvall MTX 150 Thermo Scientific
The next page describes how to set run condition by citing some examples.
• How to set speed, running time, temperature, and other parameters
Here are some examples and descriptions:
Note 1. If you enter the wrong value, press the CE button and then enter the correct value.If you have pressed the Enter button, repeat step (1) of the previous page, and then enter the correct value.2. When setting the two or more of three run conditions (SPEED, TIME, and TEMP), you do not have to press the Enter button after each setting. You can store the setting by pressing the desired item.3. If the system is running in (HOLD) and you want to set it to shut down at a future time, enter a new time setting while the instrument is in operation; enter the sum of the time elapsed plus the time remaining. If, for example, this machine has run continuously for five hours and you want to stop it one and a half hours later, press the TIME column, then enter
6 3 : 0

2
Thermo Scientific Sorvall MTX 150 2-9
Setting item RPM (SPEED Running time (TIME) Temperature (TEMP)
Typical setting 150,000 rpm 2 hours 30 minutes 4°C
Oper
atio
n pr
oced
ure
1 Press the SPEED, TIME, or TEMP column to show the keypad dis-play.
2 The last entered value is displayed on each column. Press the column of the desired item again if the color of the first digit is white.Go to procedure 3 if the color of the first digit is blue.
3 Enter the desired numeric value with the keypad display.
Entered numbers are moved to the left every time a new number is entered.
4 Make a check, then if you want to change other setting, press the column of the desired item. If you do not want to change any other setting, press the ENTER button. Use the CE button to cancel input.
Set it to 150,000 rpm. Set it to 2: 30.(2 hours 30 minutes)
Set it to 4°C.
Setting range and units Can be set to any value in the range from 5,000 rpm to maximum speed in increments of 1,000 rpm.
Can be set to any value up to 99 hours 59 minutes in increments of 1 minute.
Can be set to any value in the range from 0 to 40 °C in increments of 1 °C.
1 5 0
Color: Blue
The last three digits are fixed.
2 ? 3 0
Color: Blue
Press the: button to turn the number of minutes blue.
For a continuous run, press the Hold button.
:
4
Color: Blue 7 8 9 CE
4 5 6 ?
1 2 3 Hold
0 Enter
× :

2
2-10 Sorvall MTX 150 Thermo Scientific
Operational procedure
Given below is a description of the operational procedure for a normal run.
Setting item Acceleration(ACCEL)
Deceleration(DECEL)
Typical setting 9 7
Oper
atio
n pr
oced
ure
1 Press the button
to show the keypad display.
2 Press the column of the desired item.
3 Enter the desired numeric value with the keypad display.
5 Make a check, then if you want to change other setting, press the column of the desired item. If you do not want to change any other setting, press the ENTER button.
Use the CE button to cancel input.
Set it to 9. Set it to 7.
Setting range and units 1-9 1-9+free coast (FREE)
ACCEL:5 DECEL:5
9
7
For free coast, press the FREE button.
7 8 9 CE
4 5 6 ?
1 2 3 FREE
0 Enter
×
:
Note Before starting up this machine, carefully read the operation manual for your rotor and make sure that you have selected the correct type of tubes and entered the correct amount of sample.

2
Thermo Scientific Sorvall MTX 150 2-11
Operatperation
Process Touch panel operation Screen display and notice
1 Turn on the POWER switch on this machine. • The touchscreen is displayed.
• The door is unlocked.
2 Install the rotor (the quick setting rotor.) • Install the rotor securely on the crown. (It does not have to be screwed into the crown.)
• Always use a quick setting rotor (see “Applicable rotors” on page 2-4).
3 Set run conditions. • See “Setting run conditions” on page 2-5 and set run conditions.
4 Press the VACUUM button.
(You can omit this step.)
• The machine starts evacuating the rotor chamber.
• Temperature control starts.
• The degree of vacuum in the rotor chamber is displayed on the vacuum indicator on the VACUUM button.
• If the rotor compartment has moisture or frost on it, it takes a long time to reach an intermediate high vacuum. In that case, wipe it off with a clean, dry cloth or sponge.
• If the sample is sensitive to a temperature rise, do not press the START button until the chamber is at high vacuum level.
5 Press the START button. • The START button blinks and the rotor starts turning.
• The timer begins operating. (When the actual run timer is activated, the timer begins operating after the speed reaches the set speed.)
• When the speed reaches the set speed, the START button lights up.
• This micro-ultracentrifuge waits at 5,000 rpm until an intermediate vacuum is reached.
6 The specified centrifugation time elapses (time-out).
Or press the STOP button.
• The STOP button blinks and the rotor starts decelerating.
7 The rotor stops. • The STOP button lights up.
• The stop signal sounds to indicate that the rotor has stopped.
(1) In a low vacuum
(2) In an intermediate vacuum
(1) In a high vacuum
(1 indicator)
(2 indicator)
(3 indicator)

2
2-12 Sorvall MTX 150 Thermo Scientific
8 Press the VACUUM button. • The vacuum stops, the air leak valve becomes activated, and the rotor chamber reaches atmospheric pressure.
• The door unlocks, and is able to be opened and closed.
9 Take out the rotor. • Stop the rotor completely before taking it out.
Process Touch panel operation Screen display and notice
Note When the rotor chamber is vacuumed insufficiently before starting operation or the ambient temperature is low (10°C or below), the vacuum waiting time at 5,000rpm may become longer. Also, during acceleration up to the set speed, the instrument may become a vacuum waiting state. Therefore, before starting operation, vacuum the rotor chamber sufficiently (approx. 15 minutes) and then press the VACUUM button and check that the displayed vacuum is at a high vacuum level (3 indicator).

2
Thermo Scientific Sorvall MTX 150 2-13
Fig. 2-5 summarizes the operational procedure.
Figure 2-5. Operational procedure
START
Turn on the POWER switch.
Open the chamber door and install the rotor.
Close the door and set the run conditions.
For information on how to set the run conditions, see “Setting run conditions” on page 2-5.
*Press the VACUUM button.
(1) Vacuum pump is ON.Temperature control starts.
(2) If the sample in the rotor is sensitive to a temperature rise, wait until the rotor chamber is at high vacuum level.
Press the START button.
The rotor is rotating at set speed.
Open the chamber door, re- move the rotor, then turn micro- ultracen-trifuge power off.
End
*This step may be omitted, in which case pressing the START button later in the procedure turns on the vacuum pump and the rotor stays at 5,000 rpm to wait for chamber vacuum to reach its intermediate level.
Both of the vacuum pump and temperature control turn off. Air vent opens and the door lock is released.
Press the VACUUM button.
Reaches the set time or press the STOP button.

2
2-14 Sorvall MTX 150 Thermo Scientific
Acceleration rate and deceleration rate
In order to meet various experimental protocols, the acceleration and deceleration rates can be adjusted. The figure and table below show the relationship between ACCEL/DECEL code numbers selected and resulting approximate acceleration/deceleration times.
Typical examples of application of acceleration and deceleration rates
Code No.
Acceleration time (minutes)
from rest to 5000 rpm
Deceleration time (minutes)
from 5000 rpm to rest9 8 7 6 5 4 3 2 1 F
Minimum time* 0.5 1
1.5 2
2.5 3
3.5 4 -
Minimum time* 1 2 3 4 5 6 7 8
Coasting deceleration
1 - 9 : ACCEL/DECEL code numbers
Spee
d (rp
m)
(No Brake)
Time
* The minimum time is the one that occurs when the rotor is being accelerated or decelerated with the maximum torque of the driving motor. This time varies with the type of rotor in use.
1 - 9 : ACCEL/DECEL code numbers
Note The times for acceleration and deceleration may be longer than the values listed above, depending upon the type of rotor in use.
Type of centrifugationCode No.
Characteristic of separationACCEL DECEL
Density gradient centrifugation using a vertical rotor
5 7 The sample and gradient in tubes reorient during acceleration and deceleration. Therefore, the sample and gradient can become mixed, especially in wide tubes, if you use rapid acceleration or deceleration.
DNA separation by CsCl isopycnic separation (self-forming gradients)
9 7 You can operate at maximum acceleration because the density gradient is not formed during the run. As for the deceleration, it is better to decelerate slowly to obtain sharp bands.
Pelleting using a fixed angle rotor 9 9 Rapid pelleting of samples is possible (the run time decreases).
Density gradient centrifugation using a swinging bucket rotor
5 to 8 5 to 8 The sample and gradient do not reorient. Therefore, mixing of the layers is less than that in the case of using a vertical rotor. But it is safe not to accelerate or decelerate the rotor by selecting minimum time.

2
Thermo Scientific Sorvall MTX 150 2-15
How to use the option function
How to use the option functionThis micro-ultracentrifuge incorporates a number of features, such as step-mode and other programmed running, display and setting of centrifugal force, and RTC (real-time control) that can run the micro-ultracentrifuge at a required date and time. Buttons for these features are displayed and specified on the Run screen.
Figure 2-6. Option buttons
Type of centrifugationCode No.
Characteristic of separationACCEL DECEL
Density gradient centrifugation using a vertical rotor
5 7 The sample and gradient in tubes reorient during acceleration and deceleration. Therefore, the sample and gradient can become mixed, especially in wide tubes, if you use rapid acceleration or deceleration.
DNA separation by CsCl isopycnic separation (self-forming gradients)
9 7 You can operate at maximum acceleration because the density gradient is not formed during the run. As for the deceleration, it is better to decelerate slowly to obtain sharp bands.
Pelleting using a fixed angle rotor
9 9 Rapid pelleting of samples is possible (the run time decreases).
Density gradient centrifugation using a swinging bucket rotor
5 to 8 5 to 8 The sample and gradient do not reorient. Therefore, mixing of the layers is less than that in the case of using a vertical rotor. But it is safe not to accelerate or decelerate the rotor by selecting minimum time.
RTC button
PROGRAM buttonSPEED/RCF button

2
2-16 Sorvall MTX 150 Thermo Scientific
The above features can be used in combination.
Programmed operation
When a centrifugal condition is to be used frequently, entering the same condition every time you want to perform centrifugation is inconvenient.
This micro-ultracentrifuge has a programmed operation feature that stores run conditions. Storing run conditions which you often use allows you to call those conditions however often you may wish, thus saving time in setting. (Even while the POWER switch is OFF, this micro-ultracentrifuge retains the conditions entered.)
This micro-ultracentrifuge incorporates the program areas indicated below. It has twenty memory areas and nine steps in each memory unit.
Running this machine with each memory unit retaining multiple steps will allow you to change the speed, run time, temperature, and others while in operation.
PROGRAMbutton:
Programs, stores, and recalls run conditions. This feature also offers a step-mode operation: a continuous run of multiple run conditions.
SPEED/RCFbutton:
This feature is used to cause the system to automatically calculate and display an RCF value. It also sets an RCF value and calculates the speed. RCFmax indicates the maximum centrifugal force for the maximum radius Rmax of the rotor which is used. RCFavg indicates the average centrifugal force for the average radius Ravg of the rotor which is used.
RTC button: Sets a start time or a finish time and runs the micro-ultracentrifuge at a desired date and time.
Fig. 2-3-2 Rotor radius
RmaRavg
Figure 2-7. Rotor radius
x
Note To perform a combination of PROGRAM and RTC, first set PROGRAM and then set the RTC.Once RTC is activated, you cannot change the run time. You therefore cannot activate PROGRAM.

2
Thermo Scientific Sorvall MTX 150 2-17
(Step-mode operation)
Figure 2-8. Program areas
Memory 1 Step 1 Step 2 ······ Step 9
Memory 2 Step 1 Step 2 ······ Step 9
Memory 3 Step 1 Step 2 ······ Step 9
· · · · ·
· · · · ·
· · · · ·
······ ······ ······ ······ ······
· · · · ·
Memory 20 Step 1 Step 2 ······ Step 9

2
2-18 Sorvall MTX 150 Thermo Scientific
(Basic operation of the programmed operation feature)
1. Programming procedure for run conditions (creating or changing)
Press the PROGRAM button. Program No. which stores the run
parameters is displayed.
If you load the run parameters, into the micro-ultracentrifuge, see the note below.
*Press the column of the desired Program No.
Programmed operation possible
Press the Run button to go back to the Run screen. The loaded run parameters are displayed on the Run screen.
If you create, change, or delete a program, see the note below.
If you create or change a program, Press the Select button.
If you delete a program, Press the Delete button.
Note You cannot create, change, or delete a program while in running. Perform these operations while not in running. However, you can search the PROGRAM screen every time. * If you do not know Program No. of the program which you need, see “Programmed operation” on page 2-16 (2) (b).

2
Thermo Scientific Sorvall MTX 150 2-19
Shown below is the procedure for storing (creating) or changing a run condition.If you want to store the user name in the program, you have to load the user name into the micro-ultracentrifuge in advance (see “Administrator (Admin) functions” on page 2-62 (1)).
Process Touch panel operation Screen display and notice
1 Press the PROGRAM button on the Run screen.
PROGRAM button
PROGRAM screen appears
• If Program name and Parameter are displayed in the column of the Program No., it indicates that the run parameters has been already stored in this program.
• If you want to create the program, press the column where Program name and Parameter have not been displayed.
2
2-20 Sorvall MTX 150 Thermo Scientific
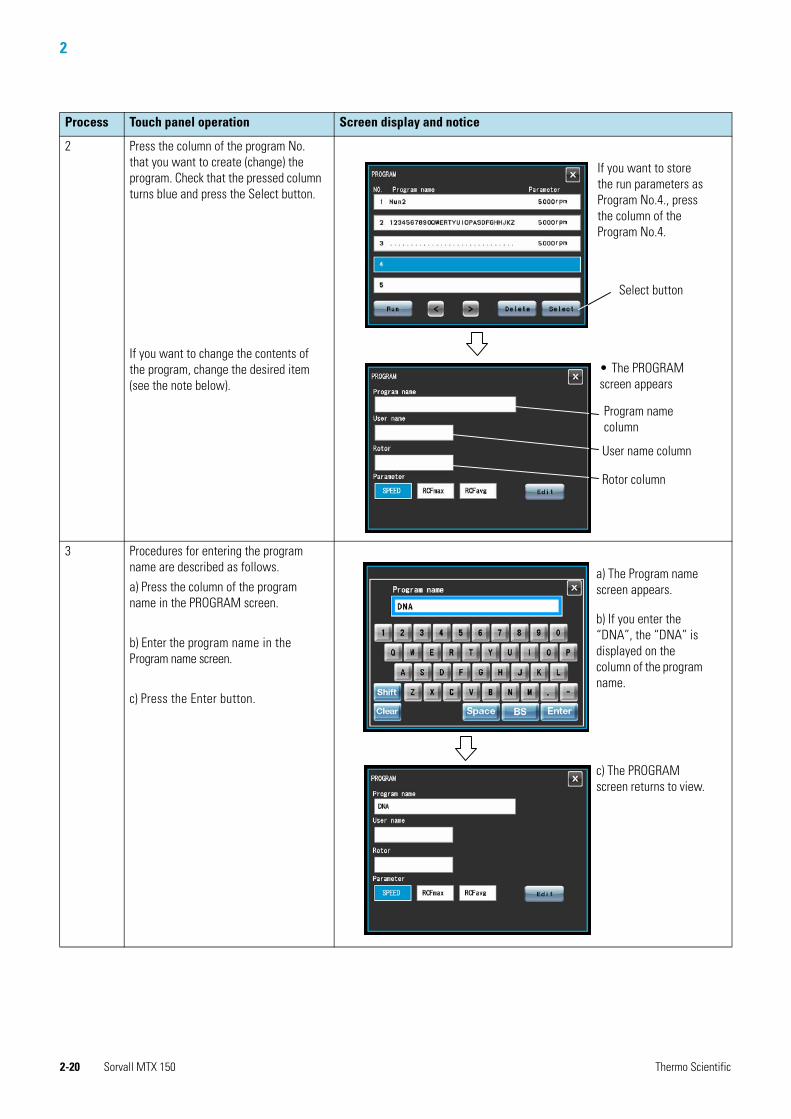
2 Press the column of the program No. that you want to create (change) the program. Check that the pressed column turns blue and press the Select button.
If you want to change the contents of the program, change the desired item (see the note below).
3 Procedures for entering the program name are described as follows.
a) Press the column of the program name in the PROGRAM screen.
b) Enter the program name in the Program name screen.
c) Press the Enter button.
Process Touch panel operation Screen display and notice
If you want to store the run parameters as Program No.4., press the column of the Program No.4.
Select button
• The PROGRAM screen appears
Program name column
User name column
Rotor column
a) The Program name screen appears.
b) If you enter the “DNA”, the “DNA” is displayed on the column of the program name.
c) The PROGRAM screen returns to view.

2
Thermo Scientific Sorvall MTX 150 2-21
4 Procedures for selecting the user name are described as follows.
a) Press the column of the user name in the PROGRAM screen.
b) Select the user name and press the column of the selected user name.
Then press the Enter button.
Process Touch panel operation Screen display and notice
T h e r m o
T h e r m o
a) The PROGRAM User name screen appears.
b) The PROGRAM screen returns to view.If you selected the “Thermo”, the “Thermo” is displayed on the column of the user name.

2
2-22 Sorvall MTX 150 Thermo Scientific
5 Procedures for selecting the rotor are described as follows.
a) Press the column of the rotor in the PROGRAM screen.
b) Press the Rotor Catalog button in the PROGRAM Rotor Management screen.
c) Select the rotor in the PROGRAM ROTOR CATALOG screen and press the column of the selected rotor. Then press the Enter button.
Process Touch panel operation Screen display and notice
T h e r m o
a) The PROGRAM Management screen appears.
• You can select your rotor in the PROGRAM Rotor Management screen, if you registered your rotor in advance (see “Rotor Management” on page 2-49).
b) The PROGRAM ROTOR CATALOG screen appears.
c) The PROGRAM screen returns to view. If you selected the “S150AT”, the “S150AT” is displayed on the column of the Rotor.

2
Thermo Scientific Sorvall MTX 150 2-23
6 Procedures for selecting the run parameters are described as follows.
[Entering the SPEED value]
If you want to enter the SPEED value as the parameter, press the Edit button after checking that the color of the SPEED column is blue.
7 [Entering the RCF value]
If you want to enter the RCF value as the parameter, press the RCFmax (RCFavg) column.
Press the Edit button after checking that the color of the RCFmax (RCFavg) column turns blue.
Process Touch panel operation Screen display and notice
T h e r m o
SPEED column Edit button
• The Enter PROGRAM screen appears.
T h e r m o
RCFmax column RCFavg column Edit button

2
2-24 Sorvall MTX 150 Thermo Scientific
8 Procedures for entering the run parameters are described as follows.
a) Press the Edit button after checking that the color of the STEP1 column is blue. Enter the run parameters on the keypad display (see “Preparing tubes/bot-tles and rotors” on page 2-3). If you want to enter the acceleration and deceleration rate, press the ACCEL/DECEL button.
b) Press the OK button after entering the run parameters. (If you want to change the run parameters, press the column of the desired STEP. Press the Edit button after checking that the pressed column is blue and enter the run parameters.)
9 Press the Run button in the PROGRAM screen
Process Touch panel operation Screen display and notice
Example: SPEED:150,000 rpm TIME:2hr.30min. TEMP:20°C ACCEL:9
a) The keypad display is shown.
ACCEL/DECEL button OK button
b) The entered run parameters are displayed in the Enter PROGRAM screen.
Run button Edit button• To enter the run parameters in multiple steps in a step-mode operation, continue the operation from the above (see “Step-mode operation” on page 2-30). • You can not skip a step. (You can not enter anything in STEP 2 with nothing entered into STEP1.)
• The Run screen appears.
Program name
Note 1. If you make and store changes in a column that already stores run parameters, the previous parameters are replaced by the new parameters.2. You cannot store a run parameter while in running (while the rotor is rotating). Always perform this function while not in running.

2
Thermo Scientific Sorvall MTX 150 2-25
OperationHow to use the option function
1. How to perform a programmed operation
Shown below is how to perform a “programmed operation”, that is, how to call a stored set of run parameters and run this micro-ultracentrifuge accordingly.(a) If you know the program name you need.
Process Touch panel operation Screen display and notice
1 Turn on the POWER switch on the micro-ultracentrifuge.
• Touchscreen appears.
• The door unlocks.
2 Install a rotor. • Install the rotor securely on the shaft. (The rotor does not have to be screwed into the shaft.)
• Always use a quick setting rotor (see “Applicable rotors” on page 2-4.)
3 Press the PROGRAM button on the Run screen.
PROGRAM button
• The PROGRAM screen appears.
2
2-26 Sorvall MTX 150 Thermo Scientific
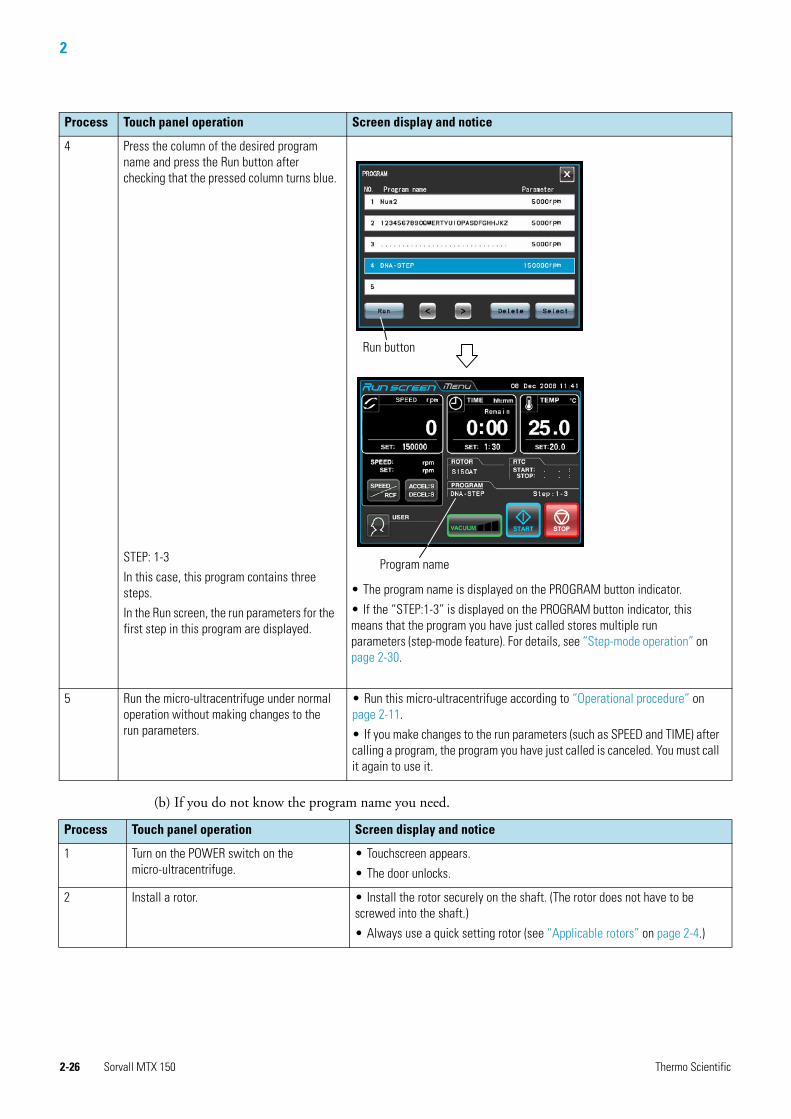
(b) If you do not know the program name you need.
4 Press the column of the desired program name and press the Run button after checking that the pressed column turns blue.
STEP: 1-3
In this case, this program contains three steps.
In the Run screen, the run parameters for the first step in this program are displayed.
5 Run the micro-ultracentrifuge under normal operation without making changes to the run parameters.
• Run this micro-ultracentrifuge according to “Operational procedure” on page 2-11.
• If you make changes to the run parameters (such as SPEED and TIME) after calling a program, the program you have just called is canceled. You must call it again to use it.
Process Touch panel operation Screen display and notice
Run button
Program name
• The program name is displayed on the PROGRAM button indicator.
• If the “STEP:1-3” is displayed on the PROGRAM button indicator, this means that the program you have just called stores multiple run parameters (step-mode feature). For details, see “Step-mode operation” on page 2-30.
Process Touch panel operation Screen display and notice
1 Turn on the POWER switch on the micro-ultracentrifuge.
• Touchscreen appears.
• The door unlocks.
2 Install a rotor. • Install the rotor securely on the shaft. (The rotor does not have to be screwed into the shaft.)
• Always use a quick setting rotor (see “Applicable rotors” on page 2-4.)

2
Thermo Scientific Sorvall MTX 150 2-27
3 Press the PROGRAM button on the Run screen.
Process Touch panel operation Screen display and notice
PROGRAM button
• The PROGRAM screen appears.

2
2-28 Sorvall MTX 150 Thermo Scientific
4 Press the column of the desired program name whose contents you want to check. Then press the Select button after checking that the pressed column turns blue.
Check the user name and rotor name in the Program screen and decide whether this selected program is the program that you need or not.
If you think that the selected program is the program you need, press the Edit button to check the run parameters.
If you do not think that the selected program is the program you need, press the x button to switch to the previous screen.
After checking the run parameters, press the Run button if the selected program is the program you need.
STEP: 1-3
In this case, this program has three steps.
In the Run screen, the run parameters for the first step in this program are displayed.
5 Run the micro-ultracentrifuge under normal operation without making changes to the run parameters.
• Run this micro-ultracentrifuge according to “Operational procedure” on page 2-11.
• If you make changes to the run parameters (such as SPEED and TIME) after calling a program, the program you have just called is canceled. You must call it again to use it.
Process Touch panel operation Screen display and notice
T h e r m o
Select button
Edit button
Run button
Program name
• The program name is displayed on the PROGRAM button indicator.
• If the “STEP:1-3” is displayed on the PROGRAM button indicator, this means that the program you have just called stores multiple run parameters (step-mode feature). For details, see “Step-mode operation” on page 2-30.

2
Thermo Scientific Sorvall MTX 150 2-29
2. Deleting a program
This section explains how to delete a program. To delete a program, delete all steps in that program.
Note 1. To perform a combination of a programmed run with RTC (real-time control) (see “RTC (real-time control) operation” on page 2-1), call a programmed memory unit, then set RTC. The system will then calculate the total of the running times of all steps of the programmed run and calculate the start time for RTC. Therefore, cannot call the program memory after setting RTC.
Note You cannot delete a program while in running (while the rotor is rotating). Always perform this function while not in running.
Process Touch panel operation Screen display and notice
1 Press the PROGRAM button on the Run screen.
PROGRAM button
• The PROGRAM screen appears.

2
2-30 Sorvall MTX 150 Thermo Scientific
OperationHow to use the option function
Step-mode operation
This micro-ultracentrifuge incorporates a step-mode operation feature, which stores two or more run conditions in one program memory area and switches between different values of speed, running time, temperature, and other parameters while in operation. This micro-ultracentrifuge can store up to nine steps. This section explains how to make settings by citing some examples.
1. How to activate a step-mode operation
[Typical settings]Shown below is the example of a three-step run and how to activate a step-mode operation.
2 Press the column of the program name which you want to delete. Then press the Delete button after checking that the pressed column turns blue.
3 Press the Yes button on the deletion confirmation box.
Process Touch panel operation Screen display and notice
• The deletion confirmation box is displayed.
• The program is deleted.
Step 1 Step 2 Step 3
Speed 150,000 rpm 120,000 rpm 100,000 rpm
Run time 1 h 30 min 1 h 30 min
Temperature 20°C 20°C 20°C
Acceleration mode 9 9 9
Deceleration mode 9 9 7

2
Thermo Scientific Sorvall MTX 150 2-31
Figure 2-9. A typical step-mode run
Step 1
Step 2
Step 3
Spe
ed (r
pm)
100,000
120,000
150,000
1 h 30 min 1 h 30 min
Run time
Run time
Process Touch panel operation Screen display and notice
1 Press the PROGRAM button on the Run screen.
• If a Program name and Parameter are displayed in the column of a Program No., run parameters have already been stored for that program.
• If you want to create a new program, press a column that does not display a Program name or Parameter.
PROGRAM button
• The PROGRAM screen appears.
2
2-32 Sorvall MTX 150 Thermo Scientific
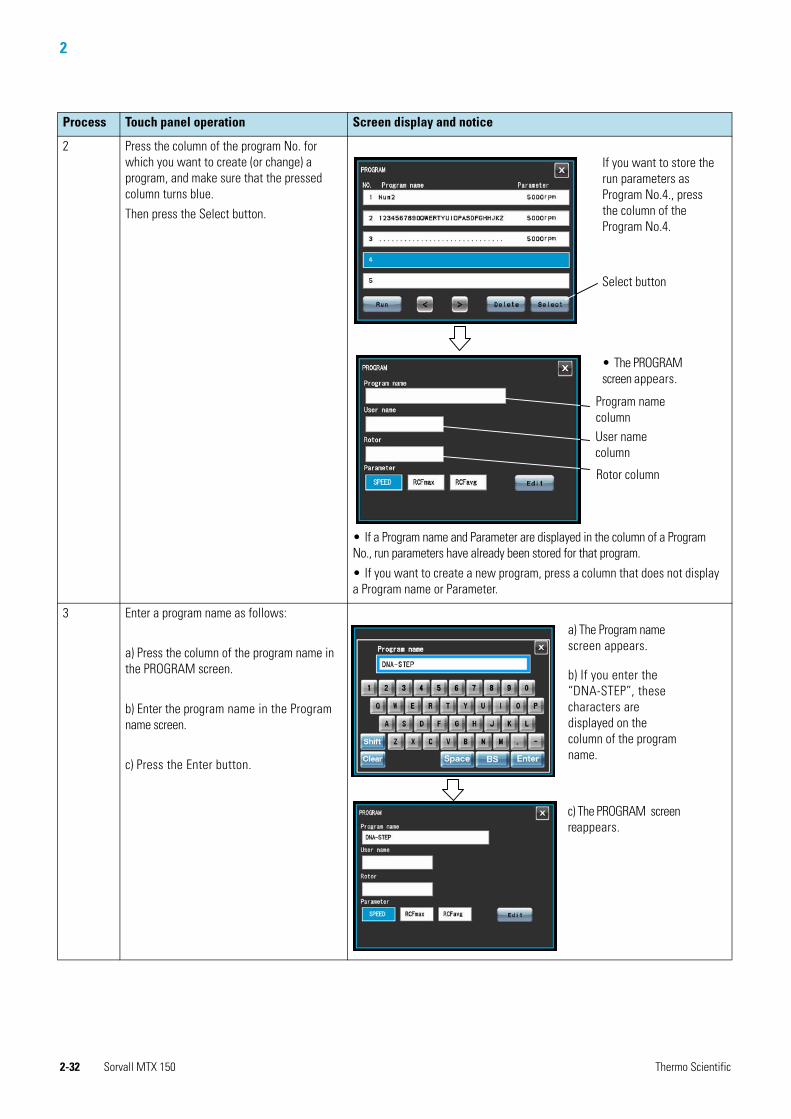
2 Press the column of the program No. for which you want to create (or change) a program, and make sure that the pressed column turns blue.
Then press the Select button.
• If a Program name and Parameter are displayed in the column of a Program No., run parameters have already been stored for that program.
• If you want to create a new program, press a column that does not display a Program name or Parameter.
3 Enter a program name as follows:
a) Press the column of the program name in the PROGRAM screen.
b) Enter the program name in the Program name screen.
c) Press the Enter button.
Process Touch panel operation Screen display and notice
Select button
If you want to store the run parameters as Program No.4., press the column of the Program No.4.
• The PROGRAM screen appears.
Program name columnUser name column
Rotor column
a) The Program name screen appears.
b) If you enter the “DNA-STEP”, these characters are displayed on the column of the program name.
c) The PROGRAM screen reappears.

2
Thermo Scientific Sorvall MTX 150 2-33
4 Select a user name as follows:
a) Press the column of User name in the PROGRAM screen.
b) Press the column of the user name you want to select. Then press the Enter button.
Process Touch panel operation Screen display and notice
a) The PROGRAM User name screen appears.
b) The PROGRAM screen reappears. If you selected the “Thermo”, these characters are displayed on the column of the user name.
T h e r m o
Thermo

2
2-34 Sorvall MTX 150 Thermo Scientific
5 Select a rotor as follows:
a) Press the column of the rotor in the PROGRAM screen.
b) Press the Rotor Catalog button in the PROGRAM Rotor Management screen.
c) In the PROGRAM ROTOR CATALOG screen, press the column of the rotor you want to select.
Then press the Enter button.
Process Touch panel operation Screen display and notice
a) The Program Rotor Management screen appears.
• If you registered your rotor in advance (see “Rotor Management” on page 2-49), you can select it in this PROGRAM Rotor Management screen,
T h e r m o
b) The PROGRAM ROTOR CATALOG screen appears..
c) The PROGRAM screen reappears. If you selected the “S150AT”, these characters are displayed on the column of the Rotor.

2
Thermo Scientific Sorvall MTX 150 2-35
6 Select run parameters as follows:
[To enter a SPEED value]If you want to enter a SPEED value as a parameter, press the SPEED column and make sure that it turns blue.
Then press the Edit button.
[To enter a RCF value]
If you want to enter a RCF value as a parameter, press the RCFmax (or RCFavg) column and make sure that it turns blue.
Then press the Edit button.
Process Touch panel operation Screen display and notice
T h e r m o
SPEED column Edit column
• The Enter PROGRAM screen appears.
T h e r m o
RCFmaxcolumn
RCFavg column
Edit button

2
2-36 Sorvall MTX 150 Thermo Scientific
7 Enter run parameters as follows:
a) Make sure that the STEP 1 column is blue, and then press the Edit button. Enter the run parameters for the STEP 1 on the keypad display (see “Preparing tubes/bottles and rotors” on page 2-3). If you want to enter an acceleration or deceleration rate, press the ACCEL/DECEL button.
b) After entering the run parameters, press the OK button (If you want to change run parameters, press the column of the desired STEP, and make sure that it turns blue. Then press the Edit button.
c) Enter the run parameters for STEP 2 on the keypad display in a similar way.
d) Enter the run parameters for the STEP 3 on the keypad display in a similar way.
Process Touch panel operation Screen display and notice
Run parameters of the STEP 1: SPEED: 150,000 rpm TIME: 1hr.30min. TEMP: 20°C ACCEL: 9 DECEL: 9
Run parameters of the STEP 2: SPEED: 120,000 rpm TIME: 1hr. TEMP: 20°C ACCEL: 9 DECEL: 9
Run parameters of the STEP 3: SPEED: 100,000 rpm TIME: 30min. TEMP: 20°C ACCEL: 9 DECEL: 9
a) The keypad display appears.
ACCEL/DECEL button OK button
Run button Edit button
b) The run parameters entered for STEP 1 are displayed in the Enter PROGRAM screen.
• You can not skip a step. (If you enter nothing in STEP 1, you cannot enter anything in STEP 2.)
c) The run parameters entered for STEP 2 are displayed in the Enter PROGRAM screen.
d) The run parameters entered for STEP 3 are displayed in the Enter PROGRAM screen.
2
Thermo Scientific Sorvall MTX 150 2-37
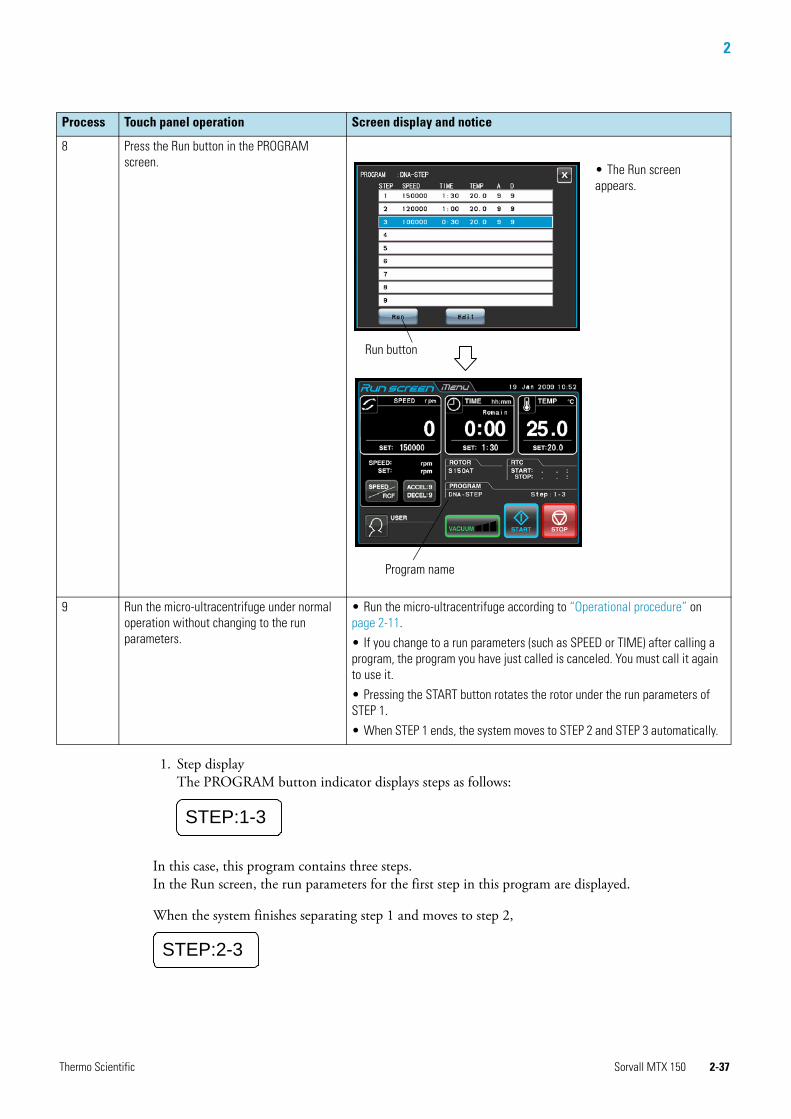
1. Step displayThe PROGRAM button indicator displays steps as follows:
In this case, this program contains three steps.In the Run screen, the run parameters for the first step in this program are displayed.
When the system finishes separating step 1 and moves to step 2,
8 Press the Run button in the PROGRAM screen.
9 Run the micro-ultracentrifuge under normal operation without changing to the run parameters.
• Run the micro-ultracentrifuge according to “Operational procedure” on page 2-11.
• If you change to a run parameters (such as SPEED or TIME) after calling a program, the program you have just called is canceled. You must call it again to use it.
• Pressing the START button rotates the rotor under the run parameters of STEP 1.
• When STEP 1 ends, the system moves to STEP 2 and STEP 3 automatically.
Process Touch panel operation Screen display and notice
Program name
Run button
• The Run screen appears.
STEP:2-3 STEP:1-3
STEP:2-3 STEP:2-3

2
2-38 Sorvall MTX 150 Thermo Scientific
Displaying and setting RCF
This micro-ultracentrifuge stores the maximum and average radii of each rotor in the internal memory. Setting a speed causes this micro-ultracentrifuge to automatically calculate and display the RCF (relative centrifugal force) value, while setting an RCF value causes the micro-ultracentrifuge to automatically calculate and display the speed. Given below is a description of how to display and set RCF.
Note 1. Selecting the rotor is required to display and set an RCF value (see “Displaying and setting RCF” on page 2-38).2. You can select your rotor in the Rotor Management screen, if you registered your rotor in advance (see “Rotor Management” on page 2-49).3. Selecting the rotor is required when the rotor lockout function is enabled (see “Administrator (Admin) functions” on page 2-62 (3) “Rotor Lockout”).
Process Touch panel operation Screen display and notice
1 Press the PROGRAM button on the Run screen.
2 Press the column of the program name which you want to delete. Then press the Delete button after checking that the pressed column turns blue.
PROGRAM button
• The PROGRAM screen appears.
• The deletion confirmation box is displayed.

2
Thermo Scientific Sorvall MTX 150 2-39
OperationHow to use the option function
1. Other procedures
1. Making changes to the run parameters Call the memory unit you want to make changes to and make the changes. Alternatively, delete the memory unit, then store a new set of run parameters.To make a change that will result in fewer steps, delete the memory unit and then enter a new set of run conditions and store them.
2. Running the micro-ultracentrifuge starting from an intermediate step You cannot run the micro-ultracentrifuge starting from an intermediate step in a memory unit that contains multiple steps.Store (register) run parameters for the intermediate step and later steps in another memory unit. Then call the memory unit and run it.
3. What if a SPEED alarm goes on?If a step stores a speed exceeding the maximum allowable speed of your rotor, the system will detect it in the STEP1 run and display the SPEED alarm.Double-check the speed of all steps and correct any wrong ones.
4. Stopping the micro-ultracentrifuge in operation Press STOP button. The rotor stops and the system does not move to the next step.
Selecting the rotor
This micro-ultracentrifuge stores the maximum and average radii of each rotor in the internal memory. Setting a speed causes this micro-ultracentrifuge to automatically calculate and display the RCF (relative centrifugal force) value, while setting an RCF value causes the micro-ultracentrifuge to automatically calculate and display the speed.
You can control the rotor data such as total operation hours and number of runs by registering your rotors in the micro-ultracentrifuge.
(1) Procedure for selecting the rotor.
Process Touch panel operation Screen display and notice
3 Press the Yes button on the deletion confirmation box. • The program is deleted.

2
2-40 Sorvall MTX 150 Thermo Scientific
Process Touch panel operation Screen display and notice
1 Check that the desired rotor is displayed in the ROTOR indicator of the RUN SCREEN. When the desired rotor is not displayed, pess the ROTOR indicator.
2 Check whether the desired rotor is displayed in the Rotor Management screen or not. When the desired rotor is displayed, press the column of the desired rotor and press the OK button. When the desired rotor is not displayed, press the Rotor Catalog button.
3 Press the column of the desired rotor on the ROTOR CATALOG screen. Check that the pressed column turns blue and press the Enter button.
4 The desired rotor is displayed in the ROTOR indicator of the Run screen.
ROTOR indicator
• The Rotor Management screen appears.
Nothing is displayed in the ROTOR indicater by pressing the Cancel button.
• You can select your rotor in the Rotor Management screen, if you registered your rotor in advance (see “Rotor Management” on page 2-49).
NO registered rotor
• The ROTOR CATALOG screen appears.
The pressed column turns from white to blue.
• The Run screen returns to view.
ROTOR indicator

2
Thermo Scientific Sorvall MTX 150 2-41
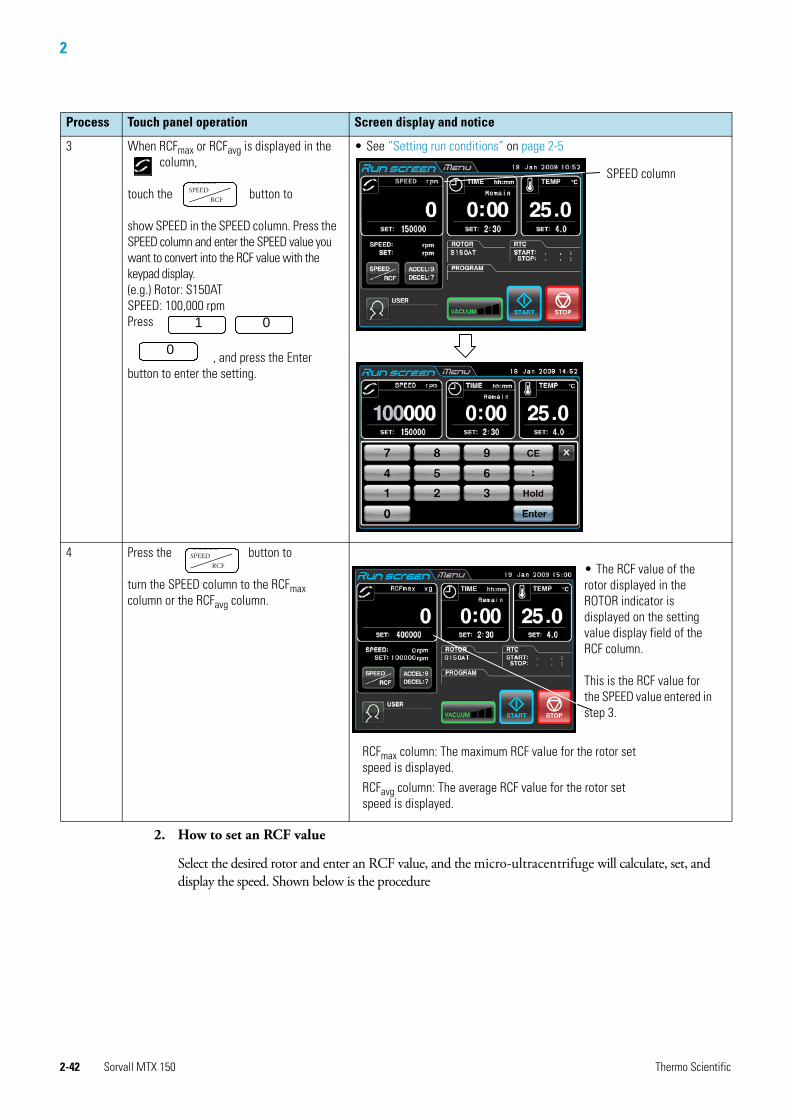
Displaying and setting RCF
This micro-ultracentrifuge stores the maximum and average radii of each rotor in the internal memory. Setting a speed causes this micro-ultracentrifuge to automatically calculate and display the RCF (relative centrifugal force) value, while setting an RCF value causes the micro-ultracentrifuge to automatically calculate and display the speed. Given below is a description of how to display and set RCF.
1. How to display an RCF value
Note 1. Selecting the rotor is required to display and set an RCF value (see “Displaying and setting RCF” on page 2-41).2. You can select your rotor in the Rotor Management screen, if you registered your rotor in advance (see “Rotor Management” on page 2-49).3. Selecting the rotor is required when the rotor lockout function is enabled (see “Administrator (Admin) functions” on page 2-62 (3) “Rotor Lockout”).
Process Touch panel operation Screen display and notice
1 Check that the desired rotor is displayed in the ROTOR indicator of the Run screen. Go to step 3 when the desired rotor is displayed. When the desired rotor is not displayed, pess the ROTOR indicator to show the ROTOR CATALOG screen.
2 Press the column of the rotor you want to see the RCF value. The column turns from white to blue. Check that the pressed column turns blue and press the Enter button.
ROTOR indicator
The pressed column turns from white to blue.
2
2-42 Sorvall MTX 150 Thermo Scientific
2. How to set an RCF value
Select the desired rotor and enter an RCF value, and the micro-ultracentrifuge will calculate, set, and display the speed. Shown below is the procedure
3 When RCFmax or RCFavg is displayed in the column,
touch the button to
show SPEED in the SPEED column. Press the SPEED column and enter the SPEED value you want to convert into the RCF value with the keypad display. (e.g.) Rotor: S150ATSPEED: 100,000 rpmPress
, and press the Enter button to enter the setting.
• See “Setting run conditions” on page 2-5
4 Press the button to
turn the SPEED column to the RCFmax column or the RCFavg column.
Process Touch panel operation Screen display and notice
SPEED RCF
SPEEDRCF
1 0
0
SPEED column
SPEED RCF
SPEEDRCF
• The RCF value of the rotor displayed in the ROTOR indicator is displayed on the setting value display field of the RCF column.
This is the RCF value for the SPEED value entered in step 3.
RCFmax column: The maximum RCF value for the rotor setspeed is displayed.
RCFavg column: The average RCF value for the rotor setspeed is displayed.

2
Thermo Scientific Sorvall MTX 150 2-43
OperationHow to use the option function
Process Touch panel operation Screen display and notice
1 Check that the desired rotor is displayed in the ROTOR indicator of the Run screen. Go to step 3 when the desired rotor is displayed. When the desired rotor is not displayed, press the ROTOR column to show the ROTOR CATALOG screen.
2 Press the column of the rotor you want to see the RCF value. The column turns from white to blue. Check that the pressed column turns blue and press the Enter button.
3 When “SPEED” is displayed in the column, press the
button to show
“RCFmax” (“RCFavg”) in the RCFmax (RCFavg) column. Press the RCFmax (RCFavg) column and enter the SPEED value you want to convert into the SPEED value with the keypad display.
(e.g.) Rotor: S150AT
RCFmax: 850x1,000 xg
Press
, and press the Enter button to enter the setting.
• See “Setting run conditions” on page 2-5.
ROTOR indicator
The pressed column turns from white to blue.
SPEED RCF
SPEEDRCF
8 5 0
RCFmax column

2
2-44 Sorvall MTX 150 Thermo Scientific
User login
After logging in, individual users can control the operation history of the micro-ultracentrifuge.
1. Procedure for user login
4 Press the button to turn
the RCFmax (RCFavg) column to the SPEED column.
Process Touch panel operation Screen display and notice
SPEED RCF
SPEEDRCF
• The SPEED value of the rotor displayed in the ROTOR indicator is displayed on the setting value display field of the SPEED column.
This is the SPEED value for the RCF value entered in step 3.
Note 1. To shift from the SPEED column to the RCF column, press the button.2. This micro-ultracentrifuge is not capable of checking rotors. Select the correct rotor.Especially when you wish to determine a speed based on an RCF value, selecting the wrong rotor and thus setting an RCF value exceeding the capacity of your rotor will cause the system to calculate and set a speed exceeding the maximum allowable speed. (However, this micro-ultracentrifuge has an overspeed detector, which prevents an overspeed run.)3. When you run this micro-ultracentrifuge at a speed determined based on an RCF value, there may occur a slight error (of up to 2%) between the set RCF value and the actual value, because the speed setting is set in increments of 1,000 rpm.
SPEED RCF
SPEEDRCF
Process Touch panel operation Screen display and notice
1 Press the USER column on the Run screen.
USER column

2
Thermo Scientific Sorvall MTX 150 2-45
2 Press the column of the desired user name on the User Management screen. Check that the pressed column turns blue and press the LOGIN button.
(“Admin” was registered as a user name for this micro- ultracentrifuge before shipment.)
3 Enter the desired PIN on the keypad display and press the Enter button.
PIN is the number (4 digits) which you entered on the PIN registration screen (see “Administrator (Admin) functions” on page 2-62 (1)).
(“1111” is the PIN of “Admin” registered as a user name for this micro-ultracentrifuge before shipment. If necessary, change the PIN.)
4 The user name is displayed on the user column of the Run screen.
Process Touch panel operation Screen display and notice
• The User Management screen appears. The pressed column turns from white to blue.
LOGIN button
• The login screen appears.
PIN box
• The masked PIN is displayed.
Enter button
• Run screen returns to view.
USER column

2
2-46 Sorvall MTX 150 Thermo Scientific
Features of the MENU screenFeatures of the MENU screeThe Menu screen appears by pressing the MENU screen tab on the Touchscreen. These features are designed to allow you to use the Sorvall MTX 150 micro-ultracentrifuge with additional options (see Figure 2-10).
Figure 2-10. MENU screen
The functions of each icon on the MENU screen are described in the table below.
3 Enter the desired PIN on the keypad display and press the Enter button.
PIN is the number (4 digits) which you entered on the PIN registration screen (see “Administrator (Admin) functions” on page 2-62 (1)).
(“1111” is the PIN of “Admin” registered as a user name for this micro-ultracentrifuge before shipment. If necessary, change the PIN.)
Process Touch panel operation Screen display and notice
• The login screen appears.
PIN box
• The masked PIN is displayed.
Enter button
Note 1. User login is required to start operation when the user lockout function has been enabled as described in “Administrator (Admin) functions” on page 2-62 (2) “User Lockout.” You cannot operate the micro-ultracentrifuge without logging in. Perform registration according to “Administrator (Admin) functions” on page 2-62 “User Management” before attempting to log in.
MENU tab

2
Thermo Scientific Sorvall MTX 150 2-47
Press the desired icon. Then the corresponding item is displayed.
Displaying the Run History and loading the information about run parameters
The information about the run parameters of a previous normal operation can be stored automatically in the micro-ultracentrifuge and you can load it for a new run.
Function Icon Description
Run History The information about the run parameters of a previous normal operation can be stored automatically in the micro-ultracentrifuge and you can load it for a new run (see “Displaying the Run History and loading the information about run parameters” on page 2-47).
Rotor Catalog You can view the applicable rotor names and their specifications (see “Rotor Catalog” on page 2-48).
Rotor Management You can use and control the rotor data such as total operation hours and number of runs (see “Rotor Management” on page 2-49).
Spin-down operation While you press the PULSE button on the Run screen and are holding down it, the micro-ultracentrifuge accelerates up to the set speed at the maximum acceleration rate. When you release this button, it starts deceleration. This feature is useful to remove the adhered samples on the interior walls of the tubes (see “Spin-down operation” on page 2-53).
RTC
(real-time control)
operation
Run starts or completes at a required date and time (see “RTC (real-time control) operation” on page 2-1).
Customize You can select rotor stop signal etc. which enable you to easily run the micro-ultracentrifuge (see “Customizing the settings” on page 2-58).
Manager(Admin)
You can set the items which the administrator should set such as language (see “Administrator (Admin) functions” on page 2-62).
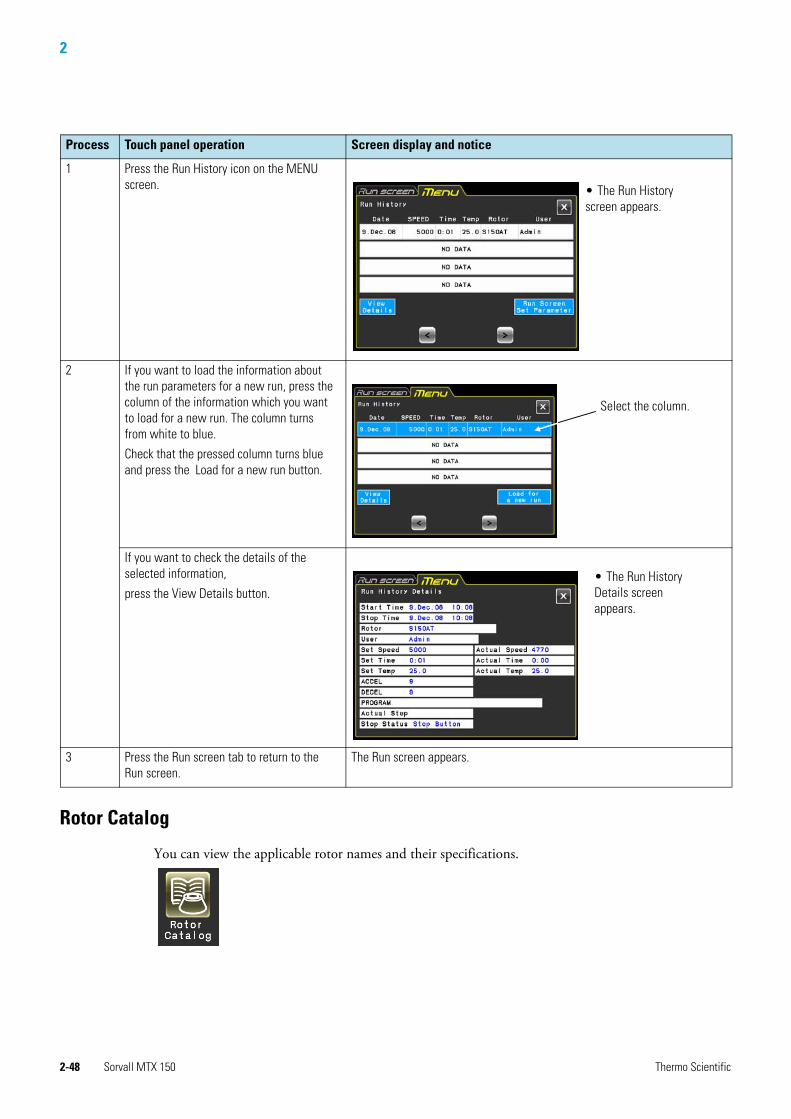
2
2-48 Sorvall MTX 150 Thermo Scientific
Rotor Catalog
You can view the applicable rotor names and their specifications.
Process Touch panel operation Screen display and notice
1 Press the Run History icon on the MENU screen.
2 If you want to load the information about the run parameters for a new run, press the column of the information which you want to load for a new run. The column turns from white to blue.
Check that the pressed column turns blue and press the Load for a new run button.
If you want to check the details of the selected information,
press the View Details button.
3 Press the Run screen tab to return to the Run screen.
The Run screen appears.
• The Run History screen appears.
Select the column.
• The Run History Details screen appears.

2
Thermo Scientific Sorvall MTX 150 2-49
OperationFeatures of the MENU screen
Rotor ManagementYou can use and control the rotor data such as total operation hours and number of runs by registering your rotors in the micro-ultracentrifuge in advance. (It is recommended to use the rotor lockout function (see “Administrator (Admin) functions” on page 2-62 (3)) together in order to control the rotor data such as total operation hours and number of runs.)
(1) Registering the rotor
Process Touch panel operation Screen display and notice
1 Press the Rotor Catalog icon on the MENU screen.
<: Previous Page button
>: Next Page button
2 If you want to view the MENU screen, press the x button or MENU screen tab.
If you want to view the Run screen, press the Run screen tab.
• The MENU screen appears.
• The Run screen appears.
• The Rotor Catalog screen appears.
Numbers of tubes x ml
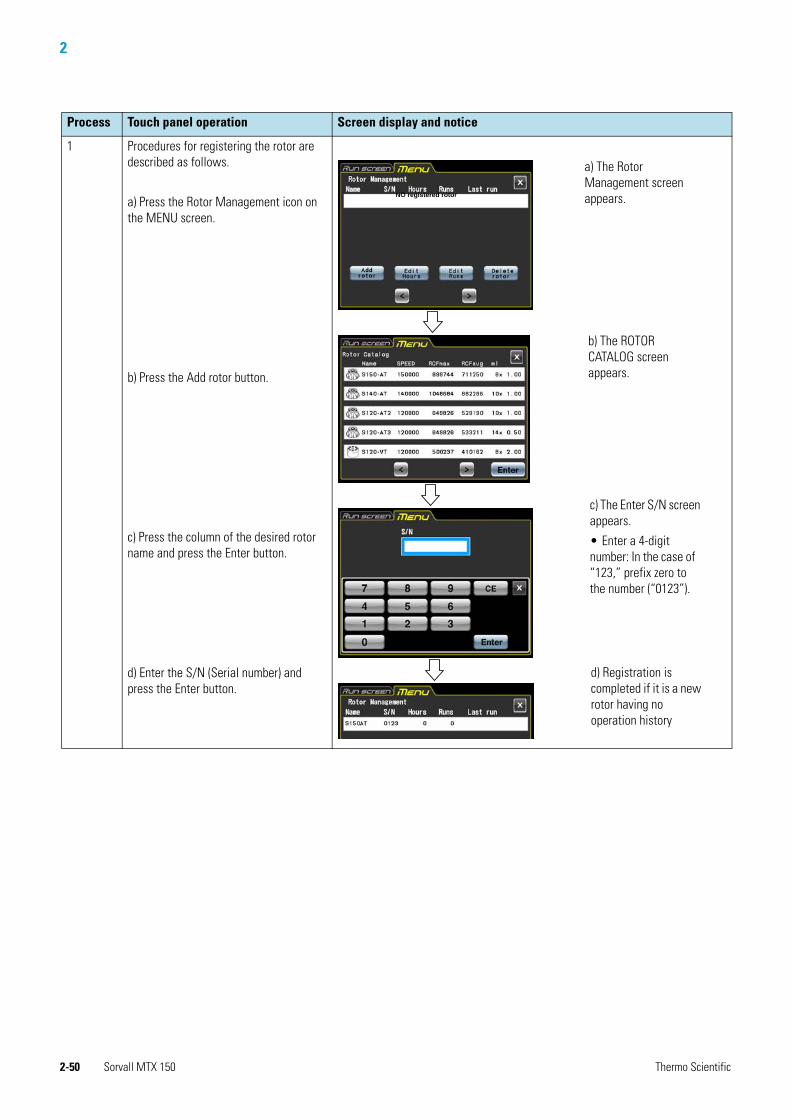
2
2-50 Sorvall MTX 150 Thermo Scientific
Process Touch panel operation Screen display and notice
1 Procedures for registering the rotor are described as follows.
a) Press the Rotor Management icon on the MENU screen.
b) Press the Add rotor button.
c) Press the column of the desired rotor name and press the Enter button.
d) Enter the S/N (Serial number) and press the Enter button.
a) The Rotor Management screen appears.
b) The ROTOR CATALOG screen appears.
c) The Enter S/N screen appears.
• Enter a 4-digit number: In the case of “123,” prefix zero to the number (“0123”).
d) Registration is completed if it is a new rotor having no operation history
NO registered rotor
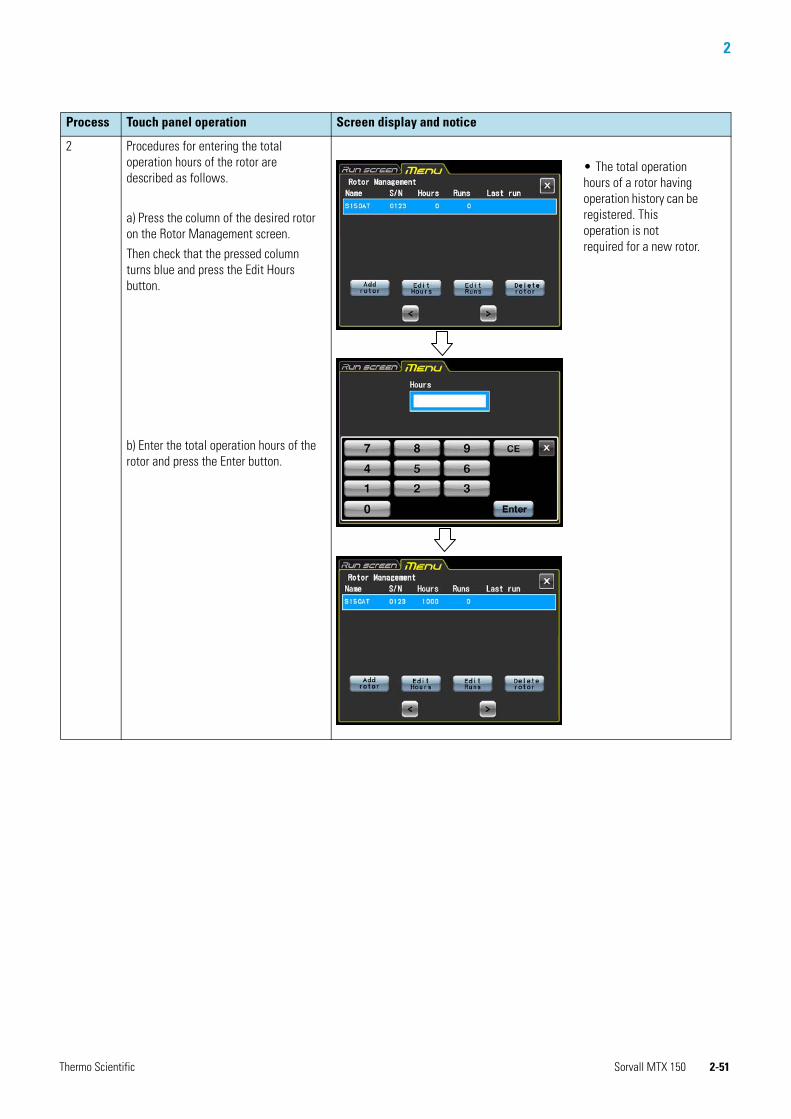
2
Thermo Scientific Sorvall MTX 150 2-51
2 Procedures for entering the total operation hours of the rotor are described as follows.
a) Press the column of the desired rotor on the Rotor Management screen.
Then check that the pressed column turns blue and press the Edit Hours button.
b) Enter the total operation hours of the rotor and press the Enter button.
Process Touch panel operation Screen display and notice
• The total operation hours of a rotor having operation history can be registered. This operation is not required for a new rotor.
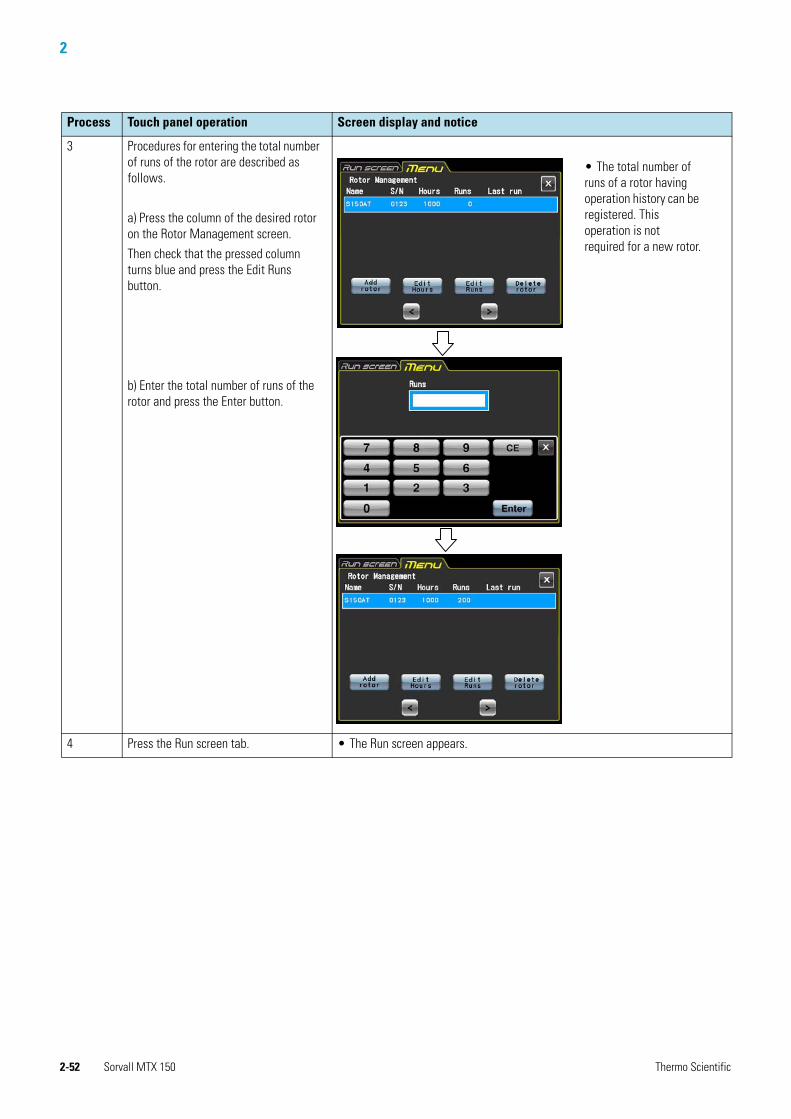
2
2-52 Sorvall MTX 150 Thermo Scientific
3 Procedures for entering the total number of runs of the rotor are described as follows.
a) Press the column of the desired rotor on the Rotor Management screen.
Then check that the pressed column turns blue and press the Edit Runs button.
b) Enter the total number of runs of the rotor and press the Enter button.
4 Press the Run screen tab. • The Run screen appears.
Process Touch panel operation Screen display and notice
• The total number of runs of a rotor having operation history can be registered. This operation is not required for a new rotor.

2
Thermo Scientific Sorvall MTX 150 2-53
(2) Deleting a registered roto
Spin-down operation
While you press this button and are holding down it, the micro-ultracentrifuge accelerates up to the set speed at the maximum acceleration rate. When you release this button, it starts deceleration. This feature is useful to remove the adhered samples on the interior walls of the tubes.
Process Touch panel operation Screen display and notice
1 Press the Rotor Management icon on the MENU screen.
2 Press the column of the rotor which you want to delete on the Rotor Management screen.
Then check that the pressed column turns blue and press the Delete rotor button.
3 Press the Yes button on the deletion confirmation box.
• The Rotor Management screen appears.
• The deletion confirmation box is displayed.
• The registered rotor is deleted.
NO registered rotor

2
2-54 Sorvall MTX 150 Thermo Scientific
RTC (real-time control) operationThe Sorvall MTX 150 micro-ultracentrifuge contains an internal clock, allowing you to run the machine at a specified start or finish time for centrifugation. This feature for running the machine at a specified time is called the RTC (real-time control) feature. The feature saves you the trouble of calculating the delay time for “delayed-start operation”. Explained below is how to perform an RTC operation, with an example.
Example: If you wish to install your rotor on the micro-ultracentrifuge under the run conditions listed below on the evening of January 10 and to take out the samples around 8:00 the next morning;
1. Rotor: S150AT2. RPM: 150,000 rpm3. Separation time: 2 hours4. Control temperature: 4°C5. Acceleration mode: 96. Deceleration mode: 7
Process Touch panel operation Screen display and notice
1 Press the PULSE Operation icon on the MENU screen.
2 While you press the PULSE button and are holding down it, the rotor rotates.
• When the rotor stops, the PULSE button disappears and the START button and the STOP button appears.
• To cancel the spin-down operation, press the tab of the MENU screen tab and press the PULSE Operation icon again.
• The PULSE button is displayed on the Run screen.
Note 1. While performing the spin-down operation, you cannot change run parameters until the rotor stops

2
Thermo Scientific Sorvall MTX 150 2-55
OperationFeatures of the MENU screen
Figure 2-11. A typical RTC operation
In this example, you set the above run conditions (2) through (6), set the start time for RTC operation to 6:00, January 11 and start the micro-ultracentrifuge. (You can make an identical setting by setting the finish time to 8:00 instead of setting the start time to 6:00.)
January 10 January 11
2h
150,000
4:30 6:00 8:04
8:00 am

2
2-56 Sorvall MTX 150 Thermo Scientific
1. How to perform RTC an operation
Process Touch panel operation Screen display and notice
1 Enter the run parameters on the Run screen.
Press the RTC button.
If you want to set a run to start on a particular date and time, press the Start Time button.
If you want to set a run to stop on a particular date and time, press the Stop Time button.
Enter the start time or stop time on the keypad display.
• To specify the run time (centrifugation time), do not set HOLD. Enter the desired numeric value.
RTC button
Start time button Stop time button
• The Set RTC screen appears.
• If you want to change any of the Month, Day, Hour, or Minutes setting, press the column of the desired item and enter the numeric value.
• To set the hours, use a number between 0 and 23 (in the 24-hours system).
• Enter a time later than the current time. When setting the “stop time”, allow for centrifugation time and set the centrifugation start time to a time later than the current time.
• You cannot set the centrifugation start time to a date more than 20 days in the future.
• You can enter the start time or stop time on the keypad display.

2
Thermo Scientific Sorvall MTX 150 2-57
1. You cannot make an RTC setting in any of the following cases:(1) When the Run screen is set to HOLD (continuous run)
Set the run time (centrifugation time) not to HOLD but to a numerical value.
(2) When it is past the start time Set the start time to a time later than the current time.
(3) When the start time is more than 20 days after the current timeSet the time to a time no more than 20 days afterwards.
2. To change the run time (centrifugation time) after making an RTC setting, cancel RTC and then set a new run time.
3. To perform a combination of a programmed operation (including a step-mode operation) with an RTC run, call a program memory unit, then set RTC.The system calculates the total run times of all steps of the programmed operation and calculates
2 Press the Enter button
3 Press the OK button and the START button.
The RTC run does not get activated unless you press the START button.
Process Touch panel operation Screen display and notice
• The START confirmation box appears.
• The START time and STOP time for centrifugation are displayed on the RTC field by pressing the START button. This micro-ultracentrifuge will turn the rotor automatically at the specified time.
• Once the RTC setting is made, you cannot change the run time (centrifugation time). If you wish to make a change to the run time, cancel RTC first. If you want to cancel the RTC, press the RTC button on the Run screen and press the Cancel button on the SET RTC screen.
• Pressing the START button enters the system into a condition causing the micro-ultracentrifuge to wait until the set time comes. This micro-ultracentrifuge will turn the rotor automatically at the specified time and run it for the specified time.

2
2-58 Sorvall MTX 150 Thermo Scientific
the start time for RTC.Therefore, cannot call the program memory unit after setting RTC.
4. To stop this micro-ultracentrifuge in RTC operation, press the STOP button. The system then stops RTC and stops the rotor.
Customizing the settingsYou can customize the settings on the Run screen and the settings on the CUSTOM screen such as the stop signal, sound volume and backlight.
Press the Customize icon on the MENU screen. Then the CUSTOM screen showing the five functions is displayed as shown in Fig. 2-12.
Figure 2-12. CUSTOM screen
The functions of each icon on the CUSTOM screen are described in the table below.
Function Icon Description
Zoom The display on the Run screen can be zoomed in (see “Customizing the settings” on page 2-58 (1)).
Stop signal The rotor stop signal can be selected from six kinds of sound including five tunes and electric beep (see “Customizing the settings” on page 2-58 (2)).
Volume The volume of the stop signal can be adjusted (see “Customizing the settings” on page 2-58 (3)).
Brightness The brightness of the screen can be adjusted (see “Customizing the settings” on page 2-58 (4)).
VacuumStandbySetting
The conditions of the waiting for the vacuum of the rotor acceleration state can be specified (see “Customizing the settings” on page 2-58 (5)).
Tab of each screen

2
Thermo Scientific Sorvall MTX 150 2-59
Press the desired icon. Then the corresponding item is displayed. After setting, press the tab of the desired screen.
1. Zoom
The display on the Run screen can be zoomed in.
1. Normal: Displays the ordinary Run screen2. Zoom: The speed and time display is zoomed when 20 seconds have passed after reaching the set speed.
• Press either the NORMAL or ZOOM button and make sure that the selected button is surrounded with a green frame.
• Then press the x button or the CUSTOM tab to store the setting.• To return from the zoom screen to the normal screen during operation, press anywhere except the
STOP button. Then the screen returns to the normal screen. Press the Customize icon of the MENU screen and select the NORMAL according to the above procedure.
2. Stop signal
The rotor stop signal can be selected from six kindsof sound including five tunes and electric beep.
• Press the column of the desired stop signal. Then the stop signal sounds and the column of the selected stop signal turns blue.
• Press the Enter button to store the setting. To set another function on the CUSTOM screen, press the x button or the CUSTOM tab.
Figure 2-13. Zoom Setting screen

2
2-60 Sorvall MTX 150 Thermo Scientific
3. Volume Adjustment
The volume of the stop signal can be adjusted.
• The sound volume is turned up as the green range in the volume setting indicator increases. The stop signal does not sound if there is only the black range. Adjust the sound volume by pressing the following buttons.
< The volume is lowered by pressing this button.> The volume is turned up by pressing this button.
The stop signal does not sound by pressing this button The stop signal sounds at full volume by pressing this button
• Press the x button or the CUSTOM screen tab to store the setting.
4. Backlight setting
The brightness of the screen can be adjusted.
• The backlight brightens up as the green range in the backlight setting indicator increases. The backlight level is darkest if there is only the black range. Press the following buttons to adjust the brightness of the screen. Press the x button or the CUSTOM screen tab to store the setting.
< The brightness is decreased by pressing this button.> The brightness is increased by pressing this button.
Figure 2-14. Stop signal Setting screen
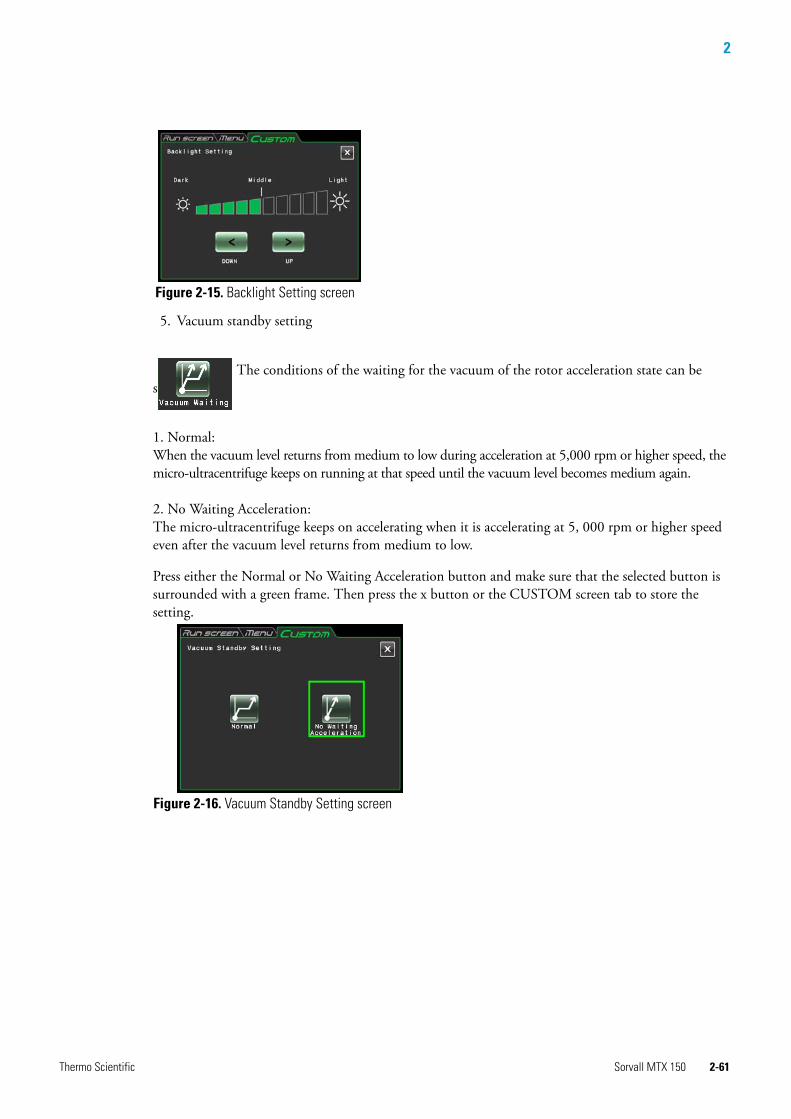
2
Thermo Scientific Sorvall MTX 150 2-61
5. Vacuum standby setting
The conditions of the waiting for the vacuum of the rotor acceleration state can be specified.
1. Normal:When the vacuum level returns from medium to low during acceleration at 5,000 rpm or higher speed, the micro-ultracentrifuge keeps on running at that speed until the vacuum level becomes medium again.
2. No Waiting Acceleration:The micro-ultracentrifuge keeps on accelerating when it is accelerating at 5, 000 rpm or higher speed even after the vacuum level returns from medium to low.
Press either the Normal or No Waiting Acceleration button and make sure that the selected button is surrounded with a green frame. Then press the x button or the CUSTOM screen tab to store the setting.
Figure 2-15. Backlight Setting screen
Figure 2-16. Vacuum Standby Setting screen

2
2-62 Sorvall MTX 150 Thermo Scientific
Administrator (Admin) functions
You can set the administrative items such as language mainly.
Press the Manager(Admin) icon on the MENU screen. Then the ADMIN screen showing the eight functions is displayed as shown in Fig. 2-17.
Figure 2-17. ADMIN screen
Note 1. Select Normal mode when using the sample that is sensitive to a temperature rise. If you select No Waiting Acceleration, the rotor does not wait until the vacuum reaches an intermediate level and it might cause the rise in the rotor retention temperature by the friction heat.2. If the rotor chamber has frost on it by the repeated operation, it takes a long time to reach an intermediate vacuum. In that case, wipe it off with a cloth, a sponge, etc.3. Once you select the condition of the waiting for the vacuum (Normal or No Waiting Acceleration), your micro-ultracentrifuge memorizes this condition of the waiting for the vacuum. If necessary, change the condition of the waiting for the vacuum.4. If the low vacuum condition persists for more than one minute in the No Waiting Acceleration mode while the rotor rotates at the set speed, the alarm message “VACUUM ERROR” is displayed and the rotor is stopped.
Tab of each screen

2
Thermo Scientific Sorvall MTX 150 2-63
The functions of each icon on the ADMIN screen are described in the table below.
Press the desired icon. Then the corresponding item is displayed. After setting, press the tab of the desired screen.
1. User Management
You can register up to 40 users with the system. How to store (register) and how to change a user name are described below.
Function Icon Description
User Management The user name can be registered and deleted
(see “Administrator (Admin) functions” on page 2-62 (1)).
User Lockout User login can be required to start operation
(see “Administrator (Admin) functions” on page 2-62 (2)).
Rotor Lockout Run history of each rotor can be controlled
(see “Administrator (Admin) functions” on page 2-62 (3)).
Japanese English and Japanese can be toggled in display
(see “Administrator (Admin) functions” on page 2-62 (4)).
Actual Run Timer Actual run timer can be selected
(see “Administrator (Admin) functions” on page 2-62 (5)).
Date and time display The date and the time can be set
(see “Administrator (Admin) functions” on page 2-62 (6)).
Centrifuge IDService contact
Centrifuge ID can be set for identification
(see “Administrator (Admin) functions” on page 2-62 (7)).
USB/LANcommunication
The operation history data of the micro-ultracentrifuge can be exported
(see “Administrator (Admin) functions” on page 2-62 (8)).

2
2-64 Sorvall MTX 150 Thermo Scientific
Process Touch panel operation Screen display and notice
1 Press the User Management icon. Then press the Add User button.
(“Admin” whose PIN is “1111” has been registered in this micro-ultracentrifuge before shipment. If necessary, change the PIN.)
• The User Management appears.
Add User button
User name box
x button
• A screen to register a user name is displayed.
Enter buttonBS button
Space buttonClear button
Shift button
• Press the Shift button to toggle case.
• Press the Clear button to delete all the characters in the user name box.
• Press the Space button to put one space after the last character in the user name box.
• Press the BS button to delete the last character in the user name box.
• Press the Enter button to turn the screen to the PIN registration screen.
• Press the x button to return to the user administration screen.

2
Thermo Scientific Sorvall MTX 150 2-65
2 Register the user name and touch the Enter button
3 Enter the desired PIN number (4 digits) in the PIN box and touch the Enter button.
Process Touch panel operation Screen display and notice
T h e r m o
Enter button
PIN box
• The PIN registration screen is displayed.
• The PIN confirmation screen is displayed.
• The masked PIN number is displayed..

2
2-66 Sorvall MTX 150 Thermo Scientific
4 Enter the same PIN number (4 digits) as the one entered in the above step 3 in the PIN (confirm) box. Press the Enter button.
Difference of access level
Admin: The administrator can do every operation of this micro-ultracentrifuge.
User: The user cannot use the Admin functions when the user lockout function is enabled.
5 To place the registered user on the same access level with the administrator, press Administrator in the access level selec-tion box. If you do not want to place the registered user on the same access level with the administrator, press User
(The screen display shows the case when placing the registered user on the same access level with the administrator.)
For the difference of access level, refer to “Administrator (Admin) functions” on page 2-62 (2).
Process Touch panel operation Screen display and notice
PIN (confirm) box
Enter button
• The masked PIN number is displayed.
• The access level selection box is displayed
Access level selection box
T h e r m o
• The screen returns to the User Management screen.”Thermo” is added to the user name and “Administrator” is displayed as the access level.
PIN buttonAccess level button
• To change the access level or the PIN number after registration of the user name, press the column of the desired user name and check that the column turns blue. Press the Access level button or the PIN button to make a change.
• To delete the user name after registration, press the column of the desired user name and check that the column turns blue. Press the Delete User button to delete it.

2
Thermo Scientific Sorvall MTX 150 2-67
sockout
Enable: User login is required to start operation. The micro-ultracentrifuge does not operate without logging in. Prior userregistration is required.
(See “Administrator (Admin) functions” on page 2-62 “User control” and “User login.”)
In addition, login of a user having the administrator access level is required to call up the Admin screen.)
Disable: User login is not required to start operation.
Press either the Enable or Disable button and make sure that the selected button is surrounded with a red frame. Then press the x button or the ADMIN screen tab to store the setting.
1. Rotor Lockout
Enable: Select a rotor from the registered rotors to start operation. It is impossible to select from the rotor catalog. (See “Rotor Management” on page 2-49).
Disable: The micro-ultracentrifuge is operable without selecting the rotor. It is possible to select a rotor from the rotor catalog.
Press either the Enable or Disable button and make sure that the selected button is surrounded with a red frame. Then press the x button or the ADMIN screen tab to store the setting.
2. Japanese
Figure 2-18. User Lockout Setting screen
Figure 2-19. Rotor Lockout Setting screen

2
2-68 Sorvall MTX 150 Thermo Scientific
You can select whether to give displays in English or Japanese by pressing this button.
3. Actual Run Timer setting
<Actual Run Timer is enabled.> When you press the Enable button, the timer starts counting after reaching the set speed.
<Actual Run Timer is not enabled.> When you press the Disable button, the timer starts counting immediately after the start of operation.
Press either the Enable or Disable button and make sure that the selected button is surrounded with a red frame. Then press the x button or the ADMIN screen tab to store the setting.
4. Date and time
Use this function to precisely set the current time setting of the internal clock. Set an exact date and time for RTC operation.
Figure 2-20. Actual Run Timer Setting screen
Figure 2-21. Setting at time screen

2
Thermo Scientific Sorvall MTX 150 2-69
Press the column of the desired item (Year, Month, Day, Hour, or Minute). Check that the pressed column turns to red and enter the date and time on the keypad display. If you want to change the other items, press the column of the other items. You can also turn the desired column to red by pressing the > button and < button.If you do not want to change the other items, press the Enter button on the keypad display.
If you want to change the setting of the other items on the ADMIN screen, press the ADMIN screen tab.
5. ID /Contact
When you have two or more centrifuges, you can set the centrifuge ID for each micro-ultracentrifuge for identification.
Figure 2-22. Setting at time screen
Example: Year: 2008Month: DecemberDay: 11thTime: 8:58am
Service contact:Make a memo of your service person’s contactaddress.
Set the centrifuge ID(4-digit number)
Figure 2-23. (1) Centrifuge ID and service contact setting screen
Press the Machine ID column. Press the Service contact column.
Figure 2-23. (2) Enter Centrifuge ID screen Fig. 2-23. (3) Enter Service contact screen
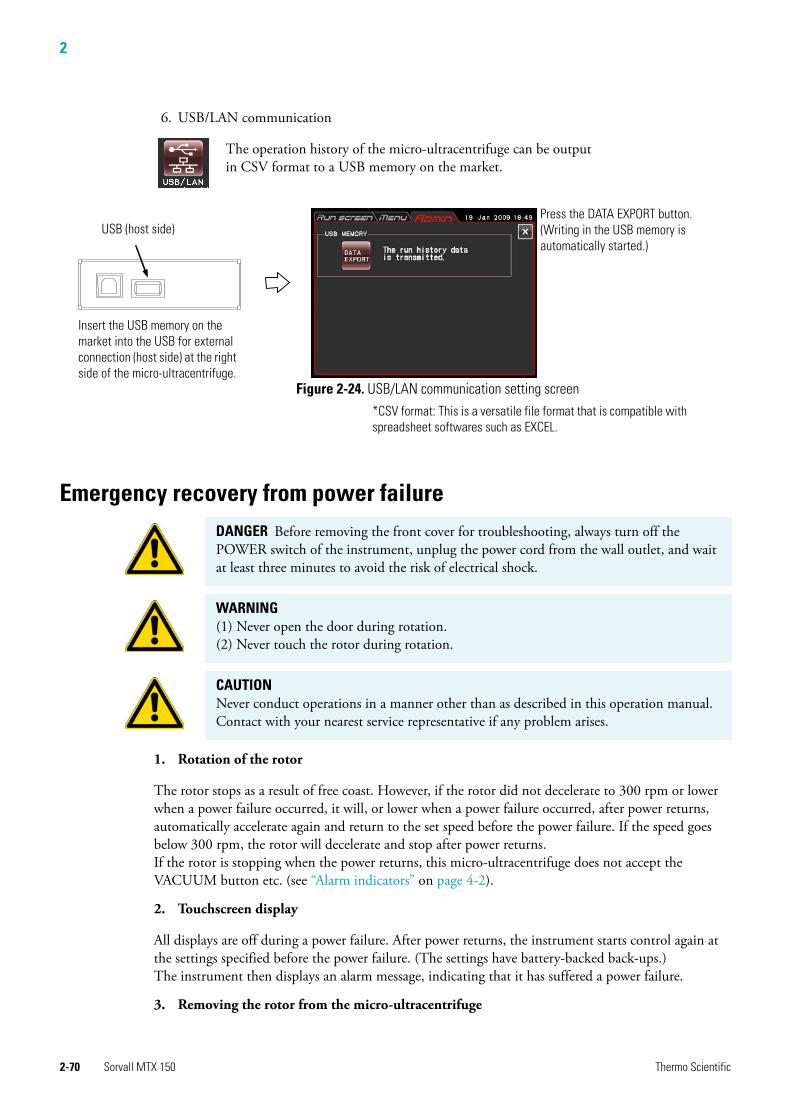
2
2-70 Sorvall MTX 150 Thermo Scientific
6. USB/LAN communication
The operation history of the micro-ultracentrifuge can be output in CSV format to a USB memory on the market.
Emergency recovery from power failure
Emergency recovery from power failure
1. Rotation of the rotor
The rotor stops as a result of free coast. However, if the rotor did not decelerate to 300 rpm or lower when a power failure occurred, it will, or lower when a power failure occurred, after power returns, automatically accelerate again and return to the set speed before the power failure. If the speed goes below 300 rpm, the rotor will decelerate and stop after power returns.If the rotor is stopping when the power returns, this micro-ultracentrifuge does not accept the VACUUM button etc. (see “Alarm indicators” on page 4-2).
2. Touchscreen display
All displays are off during a power failure. After power returns, the instrument starts control again at the settings specified before the power failure. (The settings have battery-backed back-ups.)The instrument then displays an alarm message, indicating that it has suffered a power failure.
3. Removing the rotor from the micro-ultracentrifuge
DANGER Before removing the front cover for troubleshooting, always turn off the POWER switch of the instrument, unplug the power cord from the wall outlet, and wait at least three minutes to avoid the risk of electrical shock.
WARNING (1) Never open the door during rotation.(2) Never touch the rotor during rotation.
CAUTION Never conduct operations in a manner other than as described in this operation manual. Contact with your nearest service representative if any problem arises.
USB (host side)
Insert the USB memory on the market into the USB for external connection (host side) at the right side of the micro-ultracentrifuge.
Press the DATA EXPORT button.(Writing in the USB memory is automatically started.)
Figure 2-24. USB/LAN communication setting screen*CSV format: This is a versatile file format that is compatible with spreadsheet softwares such as EXCEL.

2
Thermo Scientific Sorvall MTX 150 2-71
If a power failure may last a long time, open the door and take out the rotor as described below.
The rotor chamber is in a vacuum with low air resistance. The rotor may therefore go on turning for approximately 120 minutes before stopping. Allow enough time before opening the door.
1. Make sure that the rotor has stopped.
2. Unplug the power cord of the micro-ultracentrifuge from the wall outlet.
3. Remove the four screws that fasten the both sides of the front cover by Hex key, remove the front cover while pulling it towards you, and remove the cover.
Figure 2-25. Removing the front cover
4. Remove the vacuum release knob at the left of the vacuum chamber (by turning its tip counterclockwise) to allow air to enter the rotor chamber. When the rotor chamber reaches atmospheric pressure, do not forget to return the vacuum release knob to its previous position.
5. Pull the release wire of the door lock in the left side of the vacuum chamber toward you, and open the door. After opening the door, make sure that the rotor is not rotating. If it is rotating, close the door immediately.
WARNING Before following this procedure, listen carefully for sound from within the rotor chamber and make sure that the rotor is not turning.While the rotor is rotating, never unlock the chamber door.
Vacuum release knob
Front cover fastening screw Front cover hook
Top deck
Front cover
WARNING Never touch the rotor while it is rotating.

2
2-72 Sorvall MTX 150 Thermo Scientific
.
Figure 2-26. Door lock and vacuum release knob
6. After taking out the rotor, insert the hooks (which are on both sides of the front cover) into the frame, and insert the front cover into the gap between the top deck and the front cover supporting plate while holding up the front cover a little. Then fasten them with the fastening screws.
Figure 2-27. Inserting the front cover
7. Plug the power cord into the wall outlet.
8. After the power returns, turn on the power switch of the micro-ultracentrifuge. Press the VACUUM button to turn on the vacuum pump for approximately 15 minutes, and then press the VACUUM button to turn off the vacuum pump. Then turn off the power switch on the micro-ultracentrifuge. (These procedures are effective ways of keeping the vacuum pump in good condition.)
Vacuum chamber
Vacuum release knob
Release wire of the door lock
Square hole of the frame
Front cover supporting plate
Top deck
Front cover
Hook

Thermo Scientific Sorvall MTX 150 3-1
3
Maintenance
Contents
• “Rotor chamber” on page 3-3
• “Drive shaft (Spindle)” on page 3-3
• “Cabinet” on page 3-3
• “Chamber door seal” on page 3-3
• “Vacuum pump” on page 3-4
• “Others” on page 3-4

3
3-2 Sorvall MTX 150 Thermo Scientific
Be sure to read and keep in mind the following cautionary information before maintenance.
This micro-ultracentrifuge does not require complicated maintenance and inspection. For longer and safe use of this micro-ultracentrifuge without trouble, observe the following instructions.
DANGER Before removing the cover, top deck, or other component for maintenance, always turn off the POWER switch of the instrument, unplug the power cord from the wall outlet, and wait at least three minutes to avoid the risk of electrical shock.
WARNING (1) If the micro-ultracentrifuge, rotor, or an accessory is contaminated by samples that are toxic or radioactive, or blood samples that are pathogenic or infectious, be sure to decontaminate the item according to good laboratory procedures and methods.
(2) If there is a possibility that the micro-ultracentrifuge, rotor, or an accessory is contaminated by samples that might impair human health (for example, samples that are toxic or radioactive, or blood samples that are pathogenic or infectious), it is your responsibility to sterilize or decontaminate the micro-ultracentrifuge, rotor, or the accessory properly before requesting repairs from a Thermo Fisher Scientific authorized sales/service representative. Note that Thermo Fisher Scientific cannot repair the micro-ultracentrifuge, rotor, or the accessory unless sterilization or decontamination is completed.
(3) It is your responsibility to sterilize and/or decontaminate the micro-ultracentrifuge, rotor, or parts properly before returning them to a Thermo Fisher Scientific authorized sales/service representative. In such cases, copy the decontamination sheet at the end of this manual and fill out the copied sheet, then attach it to the item to be returned.
Thermo Fisher Scientific may ask you about the treatment for the micro-ultracentrifuge, rotor or the part if the decontamination is checked and judged as insufficient by Thermo Fisher Scientific. It is your responsibility to bear the cost of sterilization or decontamination.
Note that Thermo Fisher Scientific cannot repair or inspect the micro-ultracentrifuge, the rotor or the accessory unless sterilization or decontamination is completed.
CAUTION Do not perform any operation not specified in this manual. If any problem is found on your micro-ultracentrifuge, contact a Thermo Fisher Scientific authorized sales/service representative.
CAUTION Using a cleaning or sterilization method other than the ones recommended in this instruction manual might cause corrosion or deterioration of the micro-ultracentrifuge. Refer to the chemical resistance chart provided with the rotor, or contact Thermo Fisher Scientific.
CAUTION Disconnect the power cord from the outlet before cleaning or sterilizing the micro-ultracentrifuge.
3
Thermo Scientific Sorvall MTX 150 3-3
For information on the maintenance of rotors and tubes, see the rotor instruction manual provided with the rotor.
Rotor chamber
To maintain the rotor chamber, follow the instructions given below:
1. When the micro-ultracentrifuge is not in use, keep the rotor chamber ventilated.
2. If the bowl is moist, wipe it with a clean, dry cloth or sponge.
3. If the rotor chamber is dirty, wipe it with a clean cloth wrung out in a diluted solution of a mild, non-alkaline detergent. For sterilization, wipe it with a cloth etc. dampened with 70% ethanol.
Drive shaft (Spindle)
This drive shaft is very important because the rotor is mounted on it and the drive shaft transmits motor torque to the rotor. Before mounting a rotor, wipe the outer surface of the drive shaft with a soft cloth dampened with water.
CabinetAlways keep the top deck and the cabinet of the micro-ultracentrifuge clean to prevent dust and other materials from falling into the rotor chamber. Wipe the top deck and the cabinet with a cloth or sponge dampened with a diluted solution of neutral detergent. If any solution that is toxic, radioactive, or pathogenic is spilled inside or outside the micro-ultracentrifuge, take necessary action according to your proper laboratory procedures and methods.
Chamber door sealIf the door seal O-ring is dusty or scratched, high vacuum level will not be obtainable. Always keep the door seal O-ring clean. When the micro-ultracentrifuge is used frequently, take out the door seal O-ring and wipe it with a clean, soft cloth and then put a thin coat of vacuum grease on it every three to four months (ordinarily, once a year). If the door seal O-ring is damaged, replace it. Wipe the groove for the door seal O-ring with a clean, soft cloth dampened with alcohol or a similar solvent.
CAUTION Do not pour any solution such as water, detergent, or disinfectant directly into the rotor chamber and be careful not to spill the sample into the rotor chamber. If you do so, the bearings of the drive unit might corrode or deteriorate and it might cause vacuum failure.
CAUTION Clean the inside of the drive hole of the rotor and the surface of the drive shaft of the micro-ultracentrifuge once a month. If the drive hole or the drive shaft is stained or any foreign matter is adhered, the rotor may be improperly installed and come off during operation.

3
3-4 Sorvall MTX 150 Thermo Scientific
Removing the door seal O-ring
1. While the door is open, turn off the POWER switch and unplug the power cord from the wall outlet.
2. Open the door completely. Then hold the handle of the door and pull up the door.
Figure 3-1. Removing the door seal O-ring
3. Use a toothpick etc. to take the door packing out of the groove. At that time, be careful not to damage the door seal O-ring or groove.
4. Clean the door seal O-ring and groove. If the door seal O-ring is damaged, replace it.
5. Apply a thin coat of vacuum grease to the door seal O-ring, insert it into the groove, and close the door.
Vacuum pumpIf the VACUUM alarm is displayed frequently, the vacuum pump oil may have deteriorated, the oil mist trap may be clogged or the vacuum pump may have problem. The vacuum pump oil should be changed once a year to prevent deterioration of the vacuum pump and clogging of the oil mist trap. Note that the oil change frequency may differ depending on the use conditions and the environment. Call a service representative when an oil change is required or any trouble occurs.
Oil for the vacuum pump is furnished with this micro-ultracentrifuge. Store it in a safe place and give it to the service representative if requested.
Others(1) Support period for service partsService parts are kept in stock seven years after the discontinuation of production.The term “service parts” means the parts that are necessary to ensure the correct functioning of the micro-ultracentrifuge.
Handle
Door seal O-ring
Thermo Scientific Sorvall MTX 150 4-1
4
Troubleshooting
Contents
• “Alarm indicators” on page 4-2
• “User-corrected problem” on page 4-4
4
4-2 Sorvall MTX 150 Thermo Scientific
Be sure to read and keep in mind the following cautionary information before troubleshooting.
Before removing the cover, top deck, or other component for troubleshooting, always turn off the POWER switch of the instrument, unplug the power cord from the wall outlet, and wait at least three minutes to avoid the risk of electrical shock.This micro-ultracentrifuge incorporates a “self-diagnosis feature” that diagnoses the cause of any problem which may occur when you start the micro-ultracentrifuge or while in operation.
Alarm indicatorsIf any trouble occurs, this machine gives a buzzer sound and displays an alarm message in the message field of the Run screen to warn of the trouble.
DANGER Before removing the cover, top deck, or other component for troubleshooting, always turn off the POWER switch of the instrument, unplug the power cord from the wall outlet, and wait at least three minutes to avoid the risk of electrical shock.
WARNING (1) If the micro-ultracentrifuge, rotor, or an accessory is contaminated by samples that are toxic or radioactive, or blood samples that are pathogenic or infectious, be sure to decontaminate the item according to good laboratory procedures and methods.
(2) If there is a possibility that the micro-ultracentrifuge, rotor, or an accessory is contaminated by samples that might impair human health (for example, samples that are toxic or radioactive, or blood samples that are pathogenic or infectious), it is your responsibility to sterilize or decontaminate the micro-ultracentrifuge, rotor, or the accessory properly before requesting repairs from a Thermo Fisher Scientific authorized sales/service representative. Note that Thermo Fisher Scientific cannot repair the micro-ultracentrifuge, rotor, or the accessory unless sterilization or decontamination is completed.
(3) It is your responsibility to sterilize and/or decontaminate the micro-ultracentrifuge, rotor, or parts properly before returning them to a Thermo Fisher Scientific authorized sales/service representative. In such cases, copy the decontamination sheet at the end of this manual and fill out the copied sheet, then attach it to the item to be returned.Thermo Fisher Scientific may ask you about the treatment for the micro-ultracentrifuge, rotor or the part if the decontamination is checked and judged as insufficient by Thermo Fisher Scientific. It is your responsibility to bear the cost of sterilization or decontamination.Note that Thermo Fisher Scientific cannot repair or inspect the micro-ultracentrifuge, the rotor or the accessory unless sterilization or decontamination is completed.
CAUTION Do not perform any operation not specified in this manual. If any problem is found on your micro-ultracentrifuge, contact a Thermo Fisher Scientific authorized sales/service representative.

4
Thermo Scientific Sorvall MTX 150 4-3
1. Responding to an alarm signalIf an alarm message appears, remove the cause of the trouble as described below and press the CE button. You will then be able to resume your centrifugation.
If the alarm message persists even after you have done what is specified below, contact service representative to order a repair.
WARNING Unspecified repairs, remodeling or disassembly of the micro-ultracentrifuge that is not listed below is strictly prohibited by any person other than a Thermo Fisher Scientific authorized services representative.
Alarm Cause Action
CLOSE DOOR
Close the door completely.
Press the VACUUM or START button.
1. The VACUUM or START button has been pressed with the chamber door left open.
Close the door completely and press the VACUUM or START button.
CLOSE DOOR
Close the door completely.
Press the VACUUM or START button.
1. The VACUUM or START button has been pressed with the chamber door left open.
Close the door completely and press the VACUUM or START button.
VACUUM ERROR
Wipe off moisture inside the rotor chamber, or check a sample leakage.
1. Required level of vacuum cannot be reached.
2. After a satisfactorily high level of vacuum was reached, it lowered (due to, for instance, sample leakage).
Wipe off the moisture from inside the rotor chamber.
Clean the door packing, then apply a thin coat of vacuum grease. (Refer to “Chamber door seal” on page 3-3)
Check if the sample is leaking from the rotor and/or tubes. If so, the tubes may be overfilled or may be cracked or broken. In these cases, reduce the amount of sample in the tubes or change the tubes.
SET ROTOR
Set the rotor. Wait up to 20 min.
If the alarm is not cleared.
1. The rotor is not installed. Install the rotor.
IMBALANCE
Check balance of samples.
Tighten rotor cover or cap securely.
1. Rotor is not properly balanced, and abnormal vibration has occurred in the rotor.
2. Rotor cover or cap is not properly tightened.
Check if the sample tubes exceed allowable imbalance level.
Check if any one of the tubes is deformed, and if there is any sign of sample leakage.
Tighten rotor cover or cap securely.
INVALID SPEED
Check max. speed of the rotor.
Set its max. or lower speed again.
1. Rotor speed is set higher than the maximum allowable speed.
Set the speed within their permitted limits.

4
4-4 Sorvall MTX 150 Thermo Scientific
If any alarm message between E11 and E64 appears, this micro-ultracentrifuge requires maintenance by a service representative. When ordering a repair, inform us of the alarm code you have received.
User-corrected problemSome problems are not identified and reported by the self-diagnostic capability of the micro-ultracentrifuge.To correct these problems, take the action(s) described in the table below.
POWER FAILURE
Running re-started automatically or is suspended. Check status.
1. A power failure occurred while the rotor was rotating.
Unless the set run time has elapsed, restart the run.
If the instrument was automatically restored and the rotor is rotating at set speed, then let the run continue.
Refer also to “Emergency recovery from power failure” on page 2-70
POWER FAILURE: ***** rpmDoor is closed. Refer to manual for further detail.
1. A power failure occurred while the rotor was rotating and the speed could not be detected after power returned.(This alarm code appears when the detector of this micro-ultracentrifuge could not identify which status (status 1 or status 2) occurred.
Status 1: The rotor stopped normally.Status 2: Although the rotor continued to rotate, the speed of the rotor was not detected due to a failure of the speed detector.If this alarm code appears, this micro-ultracentrifuge does not accept the CE or VACUUM button for 120 minutes to ensure safety (The same thing can be said of “E13”).
• This micro-ultracentrifuge does not accept the CE or VACUUM button for 120 minutes from power failure.If you are convinced that the rotor has come to a complete stop, press the SPEED column,HOLD , 9 , 0 , 1 , HOLD and Enter button in order when the Run screen is displayed. Then press the VACUUM button. This micro-ultracentrifuge accepts the VACUUM button.
First open the door a little to confirm that rotor has come to a complete stop.Then open the door properly.
Refer also to “Emergency recovery from power failure” on page 2-70.
E11-E64 Refer to NOTE. • Call a service representative.
Note If a “SET ROTOR” alarm message appears, this micro-ultracentrifuge does not accept the CE or VACUUM button for 20 minutes to ensure safety. Wait at least 20 minutes, then press the CE button.
Note 13 is an alarm code that indicates a failure of the speed detector.If this alarm code appears, this machine does not accept the CE or VACUUM button for 120 minutes to ensure safety.These 120 minutes are required for the rotor to stop.Wait at least 120 minutes before pressing the CE button.(This “120 minutes” is the time which passed after a power failure occurs.)
Alarm Cause Action

4
Thermo Scientific Sorvall MTX 150 4-5
Symptom Possible cause Action
Micro-ultracentrifuge will not start up when its power is on.
1. Building power circuit breaker is open.2. The power cord is unplugged from the outlet.
• Close the circuit breaker.• Plug the cord into the outlet.
Rotor does not cool, or rotor temperature is rising.
1. Rotor was accelerated at low or intermediate vacuum level.
• Start accelerating the rotor when the rotor chamber is at high vacuum level (after the vacuum indicator is displayed as the following).
In a high vacuum
2. High vacuum level cannot be reached. • Inspect the door seal O-ring (see “Chamber door seal” on page 3-3).
You press the START button, but the rotor will not turn.
1. If the “SET ROTOR” alarm message appears, the overspeed detector may issue a signal that prevents the rotor from rotating even though you pressed the CE button. (This is not a fault.)
• Turn off the POWER switch, wait several minutes, turn on the POWER switch again, and press the START button.If this procedure still does not activate this micro- ultracentrifuge, call a service representative.
The backlight level of the screen is too dark or too bright.
1. The brightness of the screen is not adjusted.
• Make the adjustment while referring to the clause “Backlight setting” in “Customizing the settings” on page 2-58.
You can not open the door because the STOP button continues to blink.
1. You pressed the START button, and then you pressed the STOP button before the rotor started to rotate.
• Because the detector of this micro-ultracentrifuge could not identify which status (status 1 or status 2) occurred, the safety devices function.The micro-ultracentrifuge maintains deceleration status at that time.Status 1: The rotor stops normally.Status 2: The speed detector is faulty.Open the door of the micro-ultracentrifuge after the safety devices are released (after from 10 seconds to approximately four minutes).

Thermo Scientific Sorvall MTX 150 5-1
5
Installation
This chapter describes the electrical power requirements, location and environment that you must provide for your micro-ultracentrifuge prior to its installation by an authorized Thermo Fisher Scientific representative.
1. Place of installation
(1) Position the micro-ultracentrifuge on a level surface, such a table or laboratory bench that can support the weight of the micro-ultracentrifuge and resist vibration. (Place the micro-ultracentrifuge at least 5 cm away from the edge of the laboratory bench.)
(2) Ambient temperature for operation is 5 to 35°C. If the room temperature rises above 35°C, the temperature of the rotor may become too high. Avoid installing the micro-ultracentrifuge in direct sunlight.
(3) Keep the back of the instrument at least 8 cm away from the wall. We recommend you install the sides of the instrument about 13cm away from the walls. Make sure that the air can circulate adequately around this micro-ultracentrifuge. Avoid installing this micro-ultracentrifuge close to a heat-generating device, which might reduce this micro-ultracentrifuge’s cooling capacity.
DANGER Before removing the cover or other component, always turn off the POWER switch of the instrument, unplug the power cord from the wall outlet, and wait at least three minutes to avoid the risk of electrical shock.
Note The installation and leveling of your micro-ultracentrifuge must be done by an authorized Thermo Fisher Scientific representative. If they are done by anyone else, the micro-ultracentrifuge warranty will be null and void.
WARNING For operator safety, maintain a 30-cm “clearance envelope” around the instrument and keep out that area while the rotor is spinning. Do not store dangerous substances capable of developing flammable or explosive vapors on nor near the micro-ultracentrifuge.

5
5-2 Sorvall MTX 150 Thermo Scientific
Figure 5-1. Clearance for micro-ultracentrifuge
2. Electrical power requirement
An emergency switch (circuit breaker) should be installed that turns off the main power supply in the event of malfunctioning. (The desirable installation location of the emergency switch is outside the room or near the exit.)
Do not position an object so that it is difficult to disconnect the power cord from the outlet. If you do so, you cannot disconnect the power cord from the outlet when you observe some abnormality.
Your micro-ultracentrifuge can operate on one of the following six power voltages:110 or 120 Vac (50/60 Hz, 15 A)208, 220, 230, or 240 Vac (50/60 Hz, 8 A)
The voltage requirement for your micro-ultracentrifuge is mentioned on the rectangular marking plate (rating plate) affixed near the power cord connector, which is visible in the rear panel of the micro-ultracentrifuge. Be sure to read the marking plate before plugging the micro-ultracentrifuge.
If the voltage requirement does not match the voltage of the available power source, quit plugging and call your Thermo Fisher Scientific representative.
3. Leveling
(1) Turn the leveling screws with a spanner.
8 cm or more
13 cm or more
13 cm or more
CAUTION Your micro-ultracentrifuge can be damaged if connected to a wrong voltage.Check the voltage before plugging the micro-ultracentrifuge into a power source.
WARNING Your micro-ultracentrifuge must be grounded properly.

5
Thermo Scientific Sorvall MTX 150 5-3
Figure 5-2. Leveling adjustment
(2) Turn on the power to micro-ultracentrifuge, open the chamber door, and then turn off the power. If this micro-ultracentrifuge is still unplugged, refer to “Emergency recovery from power failure” on page 2-70, remove the front cover, and open the chamber door.
(3) Place the level furnished with this micro-ultracentrifuge on the drive shaft in the rotor chamber and turn the four leveling screws to adjust the levelness of this micro-ultracentrifuge (Fig. 5-3).
(4) After adjusting the levelness, make sure that the four leveling screws are fastened securely to the surface where the micro-ultracentrifuge is positioned.
Figure 5-3. Level placement
4. Moving the micro-ultracentrifugeBefore moving the micro-ultracentrifuge, disconnect the power cord, and move this micro-ultracentrifuge with the cart. After moving this micro-ultracentrifuge, always install and level it again.
Spanner
Leveling screw Nut
Frame
Level
Drive shaft
CAUTION Your micro-ultracentrifuge must be grounded properly. After installation and before any test-run, this micro-ultracentrifuge always needs the internal check by a service representative.
CAUTION Before moving the micro-ultracentrifuge, take the rotor out of the rotor chamber. Pay attention to unevenness or an inclination of the floor, and move the micro-ultracentrifuge so that it is not fallen down. When holding the micro-ultracentrifuge, be careful not to injure your fingers by the screws at the bottom of the micro-ultracentrifuge.
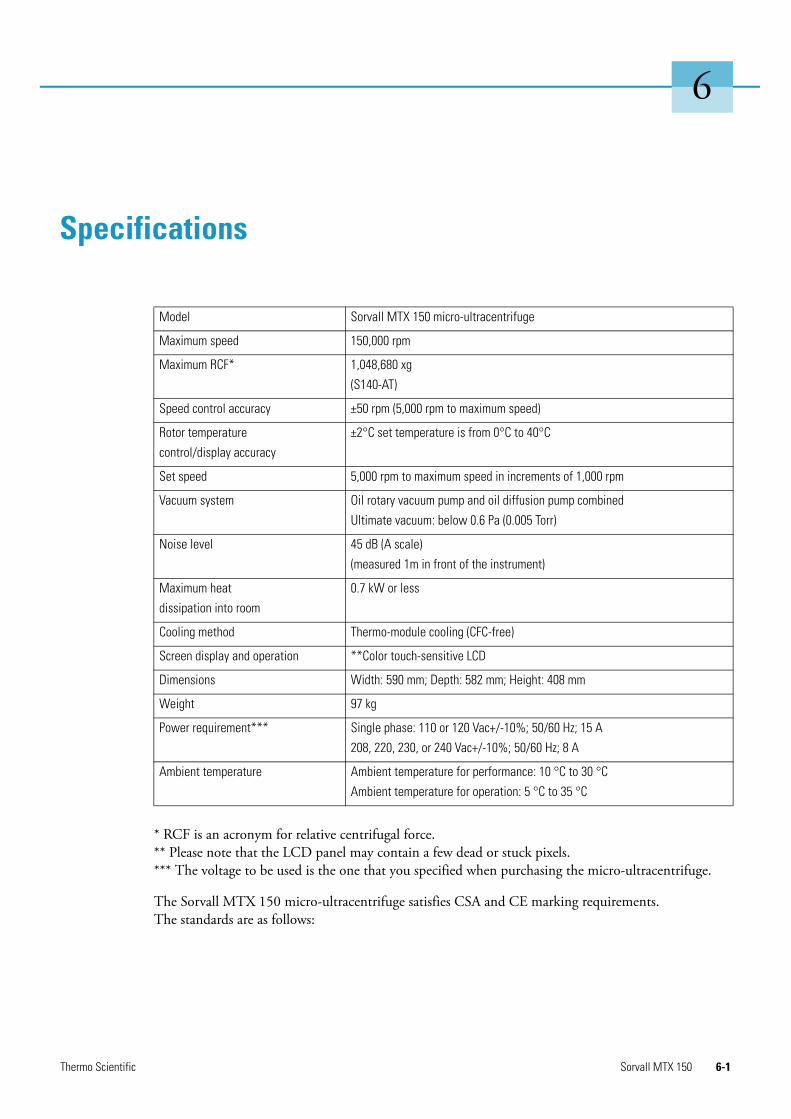
Thermo Scientific Sorvall MTX 150 6-1
6
Specifications
* RCF is an acronym for relative centrifugal force.** Please note that the LCD panel may contain a few dead or stuck pixels. *** The voltage to be used is the one that you specified when purchasing the micro-ultracentrifuge.
The Sorvall MTX 150 micro-ultracentrifuge satisfies CSA and CE marking requirements. The standards are as follows:
Model Sorvall MTX 150 micro-ultracentrifuge
Maximum speed 150,000 rpm
Maximum RCF* 1,048,680 xg
(S140-AT)
Speed control accuracy ±50 rpm (5,000 rpm to maximum speed)
Rotor temperature
control/display accuracy
±2°C set temperature is from 0°C to 40°C
Set speed 5,000 rpm to maximum speed in increments of 1,000 rpm
Vacuum system Oil rotary vacuum pump and oil diffusion pump combined
Ultimate vacuum: below 0.6 Pa (0.005 Torr)
Noise level 45 dB (A scale)
(measured 1m in front of the instrument)
Maximum heat
dissipation into room
0.7 kW or less
Cooling method Thermo-module cooling (CFC-free)
Screen display and operation **Color touch-sensitive LCD
Dimensions Width: 590 mm; Depth: 582 mm; Height: 408 mm
Weight 97 kg
Power requirement*** Single phase: 110 or 120 Vac+/-10%; 50/60 Hz; 15 A
208, 220, 230, or 240 Vac+/-10%; 50/60 Hz; 8 A
Ambient temperature Ambient temperature for performance: 10 °C to 30 °C
Ambient temperature for operation: 5 °C to 35 °C

6
6-2 Sorvall MTX 150 Thermo Scientific
• Product safety (EN 61010-1 and EN 61010-2-020)Environment requirements:• indoor use; • altitude up to 2000 m;• maximum relative humidity 80% for temperatures up to 31 °C decreasing linearly to 50% relative humidity at 40 °C;
• Electromagnetic compatibility (EN 61326-1, EN 61000-3-2, and EN 61000-3-3)
Table 6-1. List of approved rotors
Pollution degree 2
Installation category II
PN Rotor Capacity(# places x vol-ume)
Volume ml (nominal)
Max. Speed(rpm)
Max. RCF (x g)
k-factor
Rminmm
Ravemm
Rmaxmm
Tube Angle
Fixed Angle Rotors
45582 S150-AT 8 x 2.0 mL 16 mL 150,000 899,744 6.1 20.8 28.3 35.8 30
45978 S140-AT 10 x 2.0 mL 20 mL 140,000 1,048,684 5.0 32.6 40.3 47.9 35
45584 S120-AT3 14 x 0.5 mL 7 mL 120,000 649,826 7.8 25.9 33.2 40.4 30
45583 S120-AT2 10 x 2.0 mL 20 mL 120,000 649,826 7.8 25.9 33.2 40.4 30
45539 S110-AT 8 x 5.0 mL 40 mL 110,000 690,652 15 24.5 37.8 51.1 30
45588 S100-AT6 8 x 5.0 mL 40 mL 100,000 603,180 18 26.9 40.5 54.0 30
45586 S100-AT4 6 x 3.5 mL 21 mL 100,000 540,628 16 25.8 37.1 48.4 30
45585 S100-AT3 20 x 0.2 mL 4 mL 100,000 435,630 7.0 29.6 34.3 39.0 30
45589 S80-AT2 30 x 0.5 mL 15 mL 80,000 357,440 14 35.5 42.8 50.0 30
45590 S80-AT3 8 x 8.3 mL 66.4 mL 80,000 414,630 23 32.3 45.2 58.0 30
45591 S70-AT 20 x 0.5 mL 10 mL 70,000 307,052 31 31.0 43.6 56.1 30
45866 S58-A 8 x 13.5 mL 108 mL 58,000 288,958 50 39.6 58.3 76.9 35
45865 S55-A2 12 x 1.5 mL 18 mL 55,000 201,046 40 37.0 48.3 59.5 45
45979 S55-A 8 x 13.5 mL 108 mL 55,000 259,839 56 39.6 58.3 76.9 35
45540 S50-A 6 x 30 mL 180 mL 50,000 209,438 61 41.2 58.1 75.0 35
45592 S45-A 12 x 1.5 mL 18 mL 45,000 124,858 67 32.4 43.8 55.2 45
Swinging Bucket Rotors
45594 S55-S 4 x 2.2 mL 8.8 mL 55,000 258,826 44 45.4 61.0 76.6 90
45977 S52-ST 4 x 5.0 mL 20 mL 52,000 275,458 79 39.4 65.3 91.2 90
45541 S50-ST 4 x 7.0 mL 28 mL 50,000 252,721 77 42.5 66.5 90.5 90
Vertical Rotors
45593 S120-VT 8 x 2.0 mL 16 mL 120,000 500,237 7.9 19.9 25.5 31.1 0
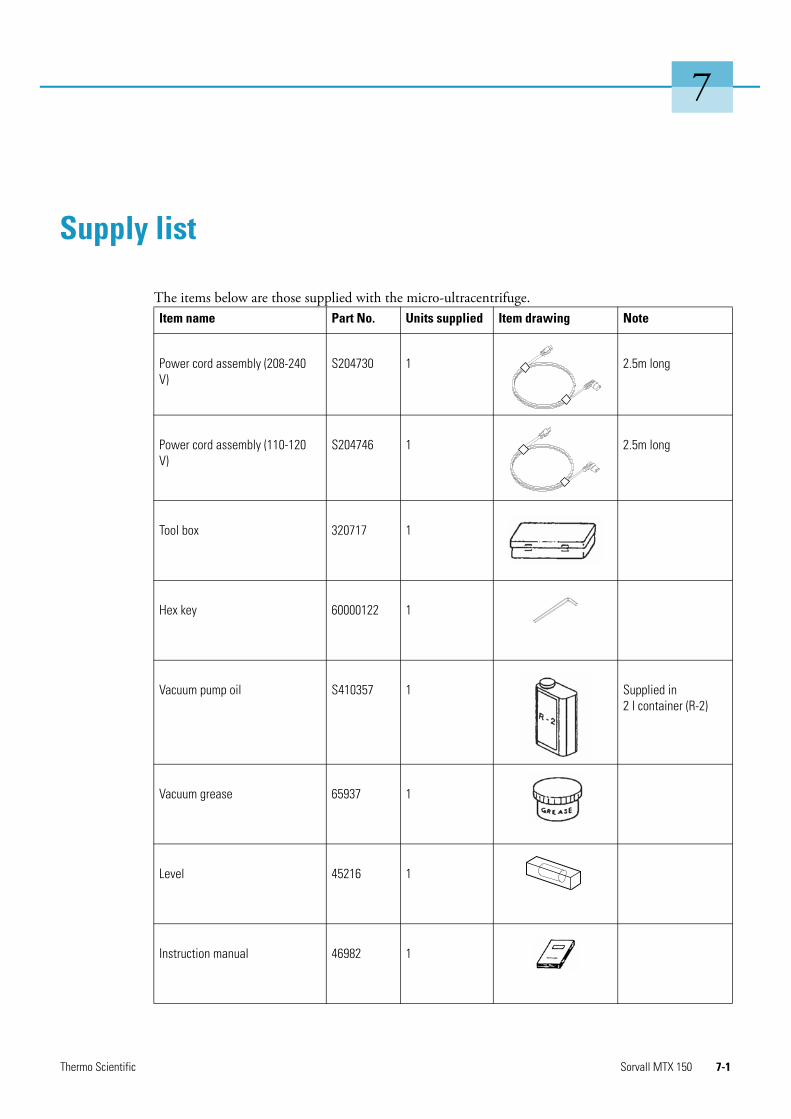
Thermo Scientific Sorvall MTX 150 7-1
7
Supply list
The items below are those supplied with the micro-ultracentrifuge.Item name Part No. Units supplied Item drawing Note
Power cord assembly (208-240 V)
S204730 1 2.5m long
Power cord assembly (110-120 V)
S204746 1 2.5m long
Tool box 320717 1
Hex key 60000122 1
Vacuum pump oil S410357 1 Supplied in2 l container (R-2)
Vacuum grease 65937 1
Level 45216 1
Instruction manual 46982 1

Thermo Scientific Sorvall MTX 150 A-1
A
Chemical Compatibility Chart
CHEMICAL
MAT
ERIA
LAL
UMIN
UM
ANOD
IC C
OATI
NG
for A
LUM
INUM
BUN
A N
CELL
ULOS
E AC
ETAT
E BU
TYRA
TE
POLY
URET
HAN
E RO
TOR
PAIN
T
COM
POSI
TE C
arbo
n Fi
ber/
Epox
y
DELR
IN®
ETHY
LEN
E PR
OPYL
ENE
GLAS
S
NEO
PREN
E
NOR
YL®
NYL
ON
PET* , P
OLYC
LEAR
®,C
LEAR
CRIM
P®CC
CLEA
RCRI
MP®
POLY
ALLO
MER
POLY
CARB
ONAT
E
POLY
ESTE
R, G
LASS
THE
RMOS
ET
POLY
THER
MID
E
POLY
RTHY
LEN
E
POLY
PROP
YLEN
E
POLY
SULF
ONE
POLY
VIN
YL C
HLOR
IDE
RULO
N A
®, T
EFLO
N®
SILI
CON
E RU
BBER
STAI
NLE
SS S
TEEL
TITA
NIU
M
TYGO
N®
VITO
N®
2-mercaptoethanol S S U - S M S - S U S S U S S - S S S S U S S S S S S
Acetaldehyde S - U U - - - M - U - - - M U U U M M - M S U - S - U
Acetone M S U U S U M S S U U S U S U U U S S U U S M M S U U
Acetonitrile S S U - S M S - S S U S U M U U - S M U U S S S S U U
Alconox® U U S - S S S - S S S S S S M S S S S S S S S S S S U
Allyl Alcohol - - - U - - S - - - - S - S S M S S S - M S - - S - -
Aluminum Chloride U U S S S S U S S S S M S S S S - S S S S S M U U S S
Formic Acid (100%) - S M U - - U - - - - U - S M U U S S - U S - U S - U
Ammonium Acetate S S U - S S S - S S S S S S S U - S S S S S S S S S S
Ammonium Carbonate M S U S S S S S S S S S S S U U - S S S S S S M S S S
Ammonium Hydroxide (10%) U U S U S S M S S S S S - S U M S S S S S S S S S M S
Ammonium Hydroxide (28%) U U S U S U M S S S S S U S U M S S S S S S S S S M S
Ammonium Hydroxide (conc.) U U U U S U M S - S - S U S U U S S S - M S S S S - U
Ammonium Phosphate U - S - S S S S S S S S - S S M - S S S S S S M S S S
Ammonium Sulfate U M S - S S U S S S S S S S S S - S S S S S S U S S U
Amyl Alcohol S - M U - - S S - M - S - M S S S S M - - - U - S - M
Aniline S S U U S U S M S U U U U U U U - S M U U S S S S U S
Sodium Hydroxide (<1%) U - M S S S - - S M S S - S M M S S S S S S M S S - U
Sodium Hydroxide (10%) U - M U - - U - M M S S U S U U S S S S S S M S S - U
Barium Salts M U S - S S S S S S S S S S S M - S S S S S S M S S S
Benzene S S U U S U M U S U U S U U U M U M U U U S U U S U S
Benzyl Alcohol S - U U - - M M - M - S U U U U U U U - M S M - S - S
Boric Acid U S S M S S U S S S S S S S S S U S S S S S S S S S S
Cesium Acetate M - S - S S S - S S S S - S S - - S S S S S S M S S S

A Chemical Compatibility Chart
A-2 Sorvall MTX 150 Thermo Scientific
Cesium Bromide M S S - S S S - S S S S S S S - - S S S S S S M S S S
Cesium Chloride M S S U S S S - S S S S S S S - - S S S S S S M S S S
Cesium Formate M S S - S S S - S S S S S S S - - S S S S S S M S S S
Cesium Iodide M S S - S S S - S S S S S S S - - S S S S S S M S S S
Cesium Sulfate M S S - S S S - S S S S S S S - - S S S S S S M S S S
Chloroform U U U U S S M U S U U M U M U U U M M U U S U U U M S
Chromic Acid (10%) U - U U S U U - S S S U S S M U M S S U M S M U S S S
Chromic Acid (50%) U - U U - U U - - - S U U S M U M S S U M S - U M - S
Cresol Mixture S S U - - - S - S U U U U U U - - U U - U S S S S U S
Cyclohexane S S S - S S S U S U S S U U U M S M U M M S U M M U S
Deoxycholate S S S - S S S - S S S S S S S - - S S S S S S S S S S
Distilled Water S S S S S S S S S S S S S S S S S S S S S S S S S S S
Dextran M S S S S S S - S S S S S S S S S S S S S S S M S S S
Diethyl Ether S S U U S S S U S U U S U U U U U U U U U S S S S M U
Diethyl Ketone S - U U - - M - S U - S - M U U U M M - U S - - S U U
Diethylpyrocarbonate S S U - S S S - S S U S U S U - - S S S M S S S S S S
Dimethylsulfoxide S S U U S S S - S U S S U S U U - S S U U S S S S U U
Dioxane M S U U S S M M S U U S U M U U - M M M U S S S S U U
Ferric Chloride U U S - - - M S - M - S - S - - - S S - - - M U S - S
Acetic Acid (Glacial) S S U U S S U M S U S U U U U U M S U M U S U U S - U
Acetic Acid (5%) S S M S S S M S S S S S M S S S S S S S M S S M S S M
Acetic Acid (60%) S S U U S S U - S M S U U M U S M S M S M S M U S M U
Ethyl Acetate M M U U S S M M S S U S U M U U - S S U U S M M S U U
Ethyl Alcohol (50%) S S S S S S M S S S S S U S U S S S S S S S S M S M U
Ethyl Alcohol (95%) S S S U S S M S S S S S U S U - S S S M S S S U S M U
Ethylene Dichloride S - U U - - S M - U U S U U U U U U U - U S U - S - S
Ethylene Glycol S S S S S S S S S S S S - S U S S S S S S S S M S M S
Ethylene Oxide Vapor S - U - - U - - S U - S - S M - - S S S U S U S S S U
Ficoll-Hypaque® M S S - S S S - S S S S - S S - S S S S S S S M S S S
Hydrofluoric Acid (10%) U U U M - - U - - U U S - S M U S S S S M S U U U - -
Hydrofluoric Acid (50%) U U U U - - U - - U U U U S U U U S S M M S U U U - M
CHEMICAL
MAT
ERIA
LAL
UMIN
UM
ANOD
IC C
OATI
NG
for A
LUM
INUM
BUN
A N
CELL
ULOS
E AC
ETAT
E BU
TYRA
TE
POLY
URET
HAN
E RO
TOR
PAIN
T
COM
POSI
TE C
arbo
n Fi
ber/
Epox
y
DELR
IN®
ETHY
LEN
E PR
OPYL
ENE
GLAS
S
NEO
PREN
E
NOR
YL®
NYL
ON
PET* , P
OLYC
LEAR
®,C
LEAR
CRIM
P®CC
CLEA
RCRI
MP®
POLY
ALLO
MER
POLY
CARB
ONAT
E
POLY
ESTE
R, G
LASS
THE
RMOS
ET
POLY
THER
MID
E
POLY
RTHY
LEN
E
POLY
PROP
YLEN
E
POLY
SULF
ONE
POLY
VIN
YL C
HLOR
IDE
RULO
N A
®, T
EFLO
N®
SILI
CON
E RU
BBER
STAI
NLE
SS S
TEEL
TITA
NIU
M
TYGO
N®
VITO
N®

A Chemical Compatibility Chart
Thermo Scientific Sorvall MTX 150 A-3
Hydrochloric Acid (conc.) U U U U - U U M - U M U U M U U U - S - U S U U U - -
Formaldehyde (40%) M M M S S S S M S S S S M S S S U S S M S S S M S M U
Glutaraldehyde S S S S - - S - S S S S S S S - - S S S - - S S S - -
Glycerol M S S - S S S S S S S S S S S S - S S S S S S S S S S
Guanidine Hydrochloride U U S - S S S - S S S S S S S - - S S S S S S U S S S
Haemo-Sol® S S S - - - S - S S S S S S S - - S S S S S S S S S S
Hexane S S S - S S S - S S U S U M U S S U S S M S U S S U S
Isobutyl Alcohol - - M U - - S S - U - S U S S M S S S - S S S - S - S
Isopropyl Alcohol M M M U S S S S S U S S U S U M S S S S S S S M M M S
Iodoacetic Acid S S M - S S S - S M S S M S S - M S S S S S M S S M M
Potassium Bromide U S S - S S S - S S S S S S S S S S S - S S S M S S S
Potassium Carbonate M U S S S S S - S S S S S S U S S S S S S S S S S S S
Potassium Chloride U S S - S S S S S S S S S S S - S S S S S S S U S S S
Potassium Hydroxide (5%) U U S S S S M - S S S S - S U S S S S S S S M U M S U
Potassium Hydroxide (conc.) U U M U - - M - M S S - U M U U U S M - M U - U U - U
Potassium Permanganate S S S - S S S - S S S U S S S M - S M S U S S M S U S
Calcium Chloride M U S S S S S S S S S S S S M S - S S S S S S M S S S
Calcium Hypochlorite M - U - S M M S - M - S - S M S - S S S M S M U S - S
Kerosene S S S - S S S U S M U S U M M S - M M M S S U S S U S
Sodium Chloride (10%) S - S S S S S S - - - S S S S S - S S S S - S S M - S
Sodium Chloride (sat'd) U - S U S S S - - - - S S S S S - S S - S - S S M - S
Carbon Tetrachloride U U M S S U M U S U U S U M U S S M M S M M M M U S S
Aqua Regia U - U U - - U - - - - - U U U U U U U - - - - - S - M
Solution 555 (20%) S S S - - - S - S S S S S S S - - S S S - S S S S S S
Magnesium Chloride M S S - S S S S S S S S S S S S S S S S S S S M S S S
Mercaptoacetic Acid U S U - S M S - S M S U U U U - S U U S M S U S S S S
Methyl Alcohol S S S U S S M S S S S S U S U M S S S S S S S M S M U
Methylene Chloride U U U U M S S U S U U S U U U U U M U U U S S M U S U
Methyl Ethyl Ketone S S U U S S M S S U U S U S U U U S S U U S S S S U U
Metrizamide® M S S - S S S - S S S S - S S - - S S S S S S M S S S
Lactic Acid (100%) - - S - - - - - - M S U - S S S M S S - M S M S S - S
CHEMICAL
MAT
ERIA
LAL
UMIN
UM
ANOD
IC C
OATI
NG
for A
LUM
INUM
BUN
A N
CELL
ULOS
E AC
ETAT
E BU
TYRA
TE
POLY
URET
HAN
E RO
TOR
PAIN
T
COM
POSI
TE C
arbo
n Fi
ber/
Epox
y
DELR
IN®
ETHY
LEN
E PR
OPYL
ENE
GLAS
S
NEO
PREN
E
NOR
YL®
NYL
ON
PET* , P
OLYC
LEAR
®,C
LEAR
CRIM
P®CC
CLEA
RCRI
MP®
POLY
ALLO
MER
POLY
CARB
ONAT
E
POLY
ESTE
R, G
LASS
THE
RMOS
ET
POLY
THER
MID
E
POLY
RTHY
LEN
E
POLY
PROP
YLEN
E
POLY
SULF
ONE
POLY
VIN
YL C
HLOR
IDE
RULO
N A
®, T
EFLO
N®
SILI
CON
E RU
BBER
STAI
NLE
SS S
TEEL
TITA
NIU
M
TYGO
N®
VITO
N®

A Chemical Compatibility Chart
A-4 Sorvall MTX 150 Thermo Scientific
Lactic Acid (20%) - - S S - - - - - M S M - S S S S S S S M S M S S - S
N-Butyl Alcohol S - S U - - S - - S M - U S M S S S S M M S M - S - S
N-Butyl Phthalate S S U - S S S - S U U S U U U M - U U S U S M M S U S
N, N-Dimethylformamide S S S U S M S - S S U S U S U U - S S U U S M S S S U
Sodium Borate M S S S S S S S S S S U S S S S - S S S S S S M S S S
Sodium Bromide U S S - S S S - S S S S S S S S - S S S S S S M S S S
Sodium Carbonate (2%) M U S S S S S S S S S S S S U S S S S S S S S S S S S
Sodium Dodecyl Sulfate S S S - S S S - S S S S S S S - S S S S S S S S S S S
Sodium Hypochlorite (5%) U U M S S M U S S M S S S M S S S S M S S S M U S M S
Sodium Iodide M S S - S S S - S S S S S S S - - S S S S S S M S S S
Sodium Nitrate S S S - S S S S S S S S S S S S - S S S S S U S S S S
Sodium Sulfate U S S - S S S S S S S S S S S S S S S S S S S M S S S
Sodium Sulfide S - S S - - - S - - - S S S U U - - S - - - S S M - S
Sodium Sulfite S S S - S S S S M S S S S S S M - S S S S S S S S S S
Nickel Salts U S S S S S - S S S - - S S S S - S S S S S S M S S S
Oils (Petroleum) S S S - - - S U S S S S U U M S M U U S S S U S S S S
Oils (Other) S - S - - - S M S S S S U S S S S U S S S S - S S M S
Oleic Acid S - U S S S U U S U S S M S S S S S S S S S M U S M M
Oxalic Acid U U M S S S U S S S S S U S U S S S S S S S S U M S S
Perchloric Acid (10%) U - U - S U U - S M M - - M U M S M M - M S U - S - S
Perchloric Acid (70%) U U U - - U U - S U M U U M U U U M M U M S U U S U S
Phenol (5%) U S U - S M M - S U M U U S U M S M S U U S U M M M S
Phenol (50%) U S U - S U M - S U M U U U U U S U M U U S U U U M S
Phosphoric Acid (10%) U U M S S S U S S S S U - S S S S S S S S S U M U S S
Phosphoric Acid (conc.) U U M M - - U S - M S U U M M S S S M S M S U M U - S
Physiologic Media (Serum, Urine) M S S S - - S - S S S S S S S S S S S S S S S S S S S
Picric Acid S S U - S M S S S M S U S S S U S S S S U S U M S M S
Pyridine (50%) U S U U S U U - U S S U U M U U - U S M U S S U U U U
Rubidium Bromide M S S - S S S - S S S S S S S - - S S S S S S M S S S
Rubidium Chloride M S S - S S S - S S S S S S S - - S S S S S S M S S S
Sucrose M S S - S S S S S S S S S S S S S S S S S S S S S S S
CHEMICAL
MAT
ERIA
LAL
UMIN
UM
ANOD
IC C
OATI
NG
for A
LUM
INUM
BUN
A N
CELL
ULOS
E AC
ETAT
E BU
TYRA
TE
POLY
URET
HAN
E RO
TOR
PAIN
T
COM
POSI
TE C
arbo
n Fi
ber/
Epox
y
DELR
IN®
ETHY
LEN
E PR
OPYL
ENE
GLAS
S
NEO
PREN
E
NOR
YL®
NYL
ON
PET* , P
OLYC
LEAR
®,C
LEAR
CRIM
P®CC
CLEA
RCRI
MP®
POLY
ALLO
MER
POLY
CARB
ONAT
E
POLY
ESTE
R, G
LASS
THE
RMOS
ET
POLY
THER
MID
E
POLY
RTHY
LEN
E
POLY
PROP
YLEN
E
POLY
SULF
ONE
POLY
VIN
YL C
HLOR
IDE
RULO
N A
®, T
EFLO
N®
SILI
CON
E RU
BBER
STAI
NLE
SS S
TEEL
TITA
NIU
M
TYGO
N®
VITO
N®

A Chemical Compatibility Chart
Thermo Scientific Sorvall MTX 150 A-5
Sucrose, Alkaline M S S - S S S - S S S S S S U S S S S S S S S M S S S
Sulfosalicylic Acid U U S S S S S - S S S U S S S - S S S - S S S U S S S
Nitric Acid (10%) U S U S S U U - S U S U - S S S S S S S S S M S S S S
Nitric Acid (50%) U S U M S U U - S U S U U M M U M M M S S S U S S M S
Nitric Acid (95%) U - U U - U U - - U U U U M U U U U M U U S U S S - S
Hydrochloric Acid (10%) U U M S S S U - S S S U U S U S S S S S S S S U M S S
Hydrochloric Acid (50%) U U U U S U U - S M S U U M U U S S S S M S M U U M M
Sulfuric Acid (10%) M U U S S U U - S S M U S S S S S S S S S S U U U S S
Sulfuric Acid (50%) M U U U S U U - S S M U U S U U M S S S S S U U U M S
Sulfuric Acid (conc.) M U U U - U U M - - M U U S U U U M S U M S U U U - S
Stearic Acid S - S - - - S M S S S S - S S S S S S S S S M M S S S
Tetrahydrofuran S S U U S U U M S U U S U U U - M U U U U S U S S U U
Toluene S S U U S S M U S U U S U U U S U M U U U S U S U U M
Trichloroacetic Acid U U U - S S U M S U S U U S M - M S S U U S U U U M U
Trichloroethane S - U - - - M U - U - S U U U U U U U U U S U - S - S
Trichloroethylene - - U U - - - U - U - S U U U U U U U U U S U - U - S
Trisodium Phosphate - - - S - - M - - - - - - S - - S S S - - S - - S - S
Tris Buffer (neutral pH) U S S S S S S - S S S S S S S S S S S S S S S S S S S
Triton X-100® S S S - S S S - S S S S S S S S S S S S S S S S S S S
Urea S - U S S S S - - - - S S S M S S S S - S S S M S - S
Hydrogen Peroxide (10%) U U M S S U U - S S S U S S S M U S S S S S S M S U S
Hydrogen Peroxide (3%) S M S S S - S - S S S S S S S S M S S S S S S S S S S
Xylene S S U S S S M U S U U U U U U M U M U U U S U M S U S
Zinc Chloride U U S S S S U S S S S S S S S S S S S S S S S U S S S
Zinc Sulfate U S S - S S S S S S S S S S S S S S S S S S S S S S S
Citric Acid (10%) M S S M S S M S S S S S S S S S M S S S S S S S S S S*Polyethyleneterephthalate
CHEMICAL
MAT
ERIA
LAL
UMIN
UM
ANOD
IC C
OATI
NG
for A
LUM
INUM
BUN
A N
CELL
ULOS
E AC
ETAT
E BU
TYRA
TE
POLY
URET
HAN
E RO
TOR
PAIN
T
COM
POSI
TE C
arbo
n Fi
ber/
Epox
y
DELR
IN®
ETHY
LEN
E PR
OPYL
ENE
GLAS
S
NEO
PREN
E
NOR
YL®
NYL
ON
PET* , P
OLYC
LEAR
®,C
LEAR
CRIM
P®CC
CLEA
RCRI
MP®
POLY
ALLO
MER
POLY
CARB
ONAT
E
POLY
ESTE
R, G
LASS
THE
RMOS
ET
POLY
THER
MID
E
POLY
RTHY
LEN
E
POLY
PROP
YLEN
E
POLY
SULF
ONE
POLY
VIN
YL C
HLOR
IDE
RULO
N A
®, T
EFLO
N®
SILI
CON
E RU
BBER
STAI
NLE
SS S
TEEL
TITA
NIU
M
TYGO
N®
VITO
N®

A Chemical Compatibility Chart
A-6 Sorvall MTX 150 Thermo Scientific
Chemical resistance data is included only as a guide to product use. Because no organized chemical resistance data exists for materials under the stress of centrifugation, when in doubt we recommend pretesting sample lots.
Key
S Satisfactory
M M = Moderate attack, may be satisfactory for use in centrifuge depending on length of exposure, speed involved, etc.; suggest testing under actual conditions of use.
U U = Unsatisfactory, not recommended.
-- Performance unknown; suggest testing, using sample to avoid loss of valuable material.
Thermo Scientific Sorvall MTX 150 B-1
B
Warranty
Thermo Fisher Scientific warrants that the Products will operate substantially in conformity with Thermo Fisher Scientific published specifications, when subjected to normal, proper and intended usage by properly trained personnel, for a period of 12 MONTHS after shipment to the Customer (the “Warranty Period”). In addition, the drive is warranted for 5 years after shipment to the Customer. Thermo Fisher Scientific agrees during the Warranty Period, provided it is promptly notified in writing upon the discovery of any material defect and further provided that all costs of returning the defective Goods to the Thermo Fisher Scientific are pre-paid by the Customer, to repair or replace, at Thermo Fisher Scientific’s option, defective Goods so as to cause the same to operate in substantial conformance with the said specifications. Replacement parts may be new or refurbished, at the election of Thermo Fisher Scientific. All replaced parts shall become the property of Thermo Fisher Scientific. All consumable or expendable items are expressly excluded from the warranty under this Clause. Thermo Fisher Scientific’s sole liability with respect to equipment, materials, parts or software furnished to Thermo Fisher Scientific by its third party suppliers shall be limited to the assignment by Thermo Fisher Scientific to the Customer of any such third party supplier’s warranty, to the extent the same is assignable. In no event shall Thermo Fisher Scientific have any obligation to make repairs, replacements or corrections required, in whole or in part, as the result of (i) normal wear and tear, (ii) accident, disaster or event of force majeure, (iii) misuse, fault or negligence of or by or on behalf of the Customer, (iv) use of the Goods in a manner for which they were not designed, (v) causes external to the Goods such as, but not limited to, power failure or electrical power surges or (vi) use of the Goods in combination with equipment or software not supplied by Thermo Fisher Scientific. If Thermo Fisher Scientific determines that Goods for which the Customer has requested warranty services are not covered by the warranty hereunder, the Customer shall pay or reimburse Thermo Fisher Scientific for all costs of investigating and responding to such request at Thermo Fisher Scientific then prevailing time and material rates. If Thermo Fisher Scientific provides repair services or replacement parts that are not covered by the warranty provided in this Clause, the Customer shall pay Thermo Fisher Scientific therefore at Thermo Fisher Scientific then prevailing time and materials rates. Any installation, maintenance, repair, service, relocation or alteration to or of, or other tampering with, the Goods, performed by any person or entity other than Thermo Fisher Scientific without Thermo Fisher Scientific prior written approval, or any use of replacement parts not supplied by Thermo Fisher Scientific, shall immediately void and cancel all warranties with respect to the affected Goods.
Terms may vary by country. Please contact your local sales office for further information.
Thermo Scientific Sorvall MTX 150 C-1
C
Contact Information
United States 866-9-THERMO
+1 866 984 3766
Canada +1 866 984 3766
Austria +43 1 801 400
Belgium +32 2 482 30 30
Germany 08001 536 376
+49 6184 90 6940
France +33 2 2803 2180
Italy +39 02 02 95059 434-254-375
Netherlands +31 76 571 4440
Nordic / Baltic Countries +35 89 329 100
Russia/CIS +7 (812) 703 42 15
C
C-2 Sorvall MTX 150 Thermo Scientific
Spain +34 932 23 09 18
Portugal +34 932 23 09 18
Switzerland +41 44 454 12 12
UK / Ireland +44 870 609 9203
China +86 21 6865 4588
+86 10 8419 3588
India 1800 22 8374
+91 22 6716 2200
Japan +81 45 453 9220
Other Asian Countries +852 2885 4613
Other Countries +49 6184 90 6940
+33 2 2803 2180