Embed Size (px)
Citation preview

Court Recorder 8
INSTALLATION GUIDE

About This Manual
This manual covers the installation procedures for the SoniClear Court Recorder 8.
Revision Date: 01/03/11
Printed in the United States.
Copyright 1998 - 2011 Trio Systems LLC
All rights reserved. No part of this publication may be reproduced, stored in a retrieval
system, or transmitted, in any form or by any means, electronic, mechanical,
photocopying, recording, or otherwise, without the prior written permission of the
publisher.
SoniClear and Trio Systems are registered trademarks of Trio Systems LLC.
Court Recorder, Transcriber Live and VoiceBoost is a trademark of Trio Systems.

Court Recorder Installation Guide Table of Contents
Table of Contents Installation........................................................................................................................... 7
Hardware Requirements.................................................................................................. 7 Computer Hardware .................................................................................................... 7 Disk Storage Space ..................................................................................................... 7 Audio Hardware .......................................................................................................... 8
Floating License System ................................................................................................. 8 Technical Support ........................................................................................................... 9
Computer Setup ................................................................................................................ 10 Power Management .................................................................................................. 10 System Sounds .......................................................................................................... 10
Drive Indexing .......................................................................................................... 10 Performance .............................................................................................................. 11
Automatic Updates.................................................................................................... 11 Internet Time ............................................................................................................. 11
Court Recorder General Configuration ............................................................................. 12 Overview ....................................................................................................................... 12
Display On Top ............................................................................................................. 12 Optimize for Touch Screen ........................................................................................... 12
Force Display to Full Screen Only................................................................................ 13 Selection Window Options ........................................................................................... 13 Display Font Size .......................................................................................................... 13
Enable Notes ................................................................................................................. 14 Enable Transcriber Live ................................................................................................ 14
Court Recorder 2-Channel Configuration ......................................................................... 15
Overview ....................................................................................................................... 15
Built-In Sound Card Configuration .................................................................................. 16 Software Installation ..................................................................................................... 16 Hardware Installation .................................................................................................... 16
MobilePre Configuration .................................................................................................. 17 Overview ....................................................................................................................... 17
Software Installation ..................................................................................................... 17 Hardware Installation .................................................................................................... 17 Court Recorder Software Configuration for MobilePre ............................................... 19
Recording Device Selection ...................................................................................... 19 Playback Device Selection ........................................................................................ 20 Advanced Playback Options ..................................................................................... 20
Transcriber Live Software Configuration for MobilePre ............................................. 22
Recording Device Selection ...................................................................................... 22 Playback Device Selection ........................................................................................ 22 Advanced Playback Options ..................................................................................... 22
Adjusting MobilePre Recording and Playback Volume ............................................... 23 iMic Audio Interface Configuration ................................................................................. 24
Overview ....................................................................................................................... 24 Software Installation ..................................................................................................... 24
Hardware Installation .................................................................................................... 24

Court Recorder Installation Guide Table of Contents
Court Recorder Software Configuration ....................................................................... 26
Recording Device Selection ...................................................................................... 26 Advanced Recording Options ................................................................................... 26 Playback Device Selection ........................................................................................ 27
Advanced Playback Options ..................................................................................... 27 Transcriber Live Software Configuration ..................................................................... 29
Recording Device Selection ...................................................................................... 29 Playback Device Selection ........................................................................................ 29 Advanced Playback Options ..................................................................................... 29
Other USB Adapter Configurations .................................................................................. 31 Xitel Inport Adapter Configuration .............................................................................. 31 Adjusting USB Interface Recording and Playback Volume ......................................... 31
Recording Volume .................................................................................................... 31
Playback Volume ...................................................................................................... 32 Court Recorder Multichannel Installation ........................................................................ 33
Overview ....................................................................................................................... 33 Firewire Connections .................................................................................................... 33
Built-in Firewire Connections ................................................................................... 33 Laptop Firewire Add-On Cards ................................................................................ 33 Desktop Firewire Add-On Cards .............................................................................. 34
Motu 8Pre Configuration .................................................................................................. 35 Motu 8Pre Installation................................................................................................... 35
Power and Data Interface Cables .............................................................................. 35 Motu 8Pre Software Installation ................................................................................... 35
Driver and Control Panel Installation ....................................................................... 35
Driver Configuration ................................................................................................. 36
Court Recorder Software Configuration ....................................................................... 37 Recording Device Selection ...................................................................................... 37 Advanced Recording Options ................................................................................... 37
Playback Device Selection ........................................................................................ 38 Advanced Playback Options ..................................................................................... 38
Transcriber Live Software Configuration ..................................................................... 40 Recording Device Selection ...................................................................................... 40
Playback Device Selection ........................................................................................ 40 Advanced Playback Options ..................................................................................... 40
Motu 8Pre Audio Connections...................................................................................... 42 Using Microphones ................................................................................................... 42 Using Analog Line Input or Digital Input................................................................. 42
Antex Electronics DMX-4 Configuration ......................................................................... 43 DMX-4 Installation ....................................................................................................... 43
Power and Data Interface Cables .............................................................................. 43 DMX-4 Software Installation ....................................................................................... 43
Driver and Control Panel Installation ....................................................................... 43 Driver Configuration ................................................................................................. 43
Court Recorder Software Configuration ....................................................................... 45 Recording Device Selection ...................................................................................... 45
Court Recorder Installation Guide Table of Contents
Advanced Recording Options ................................................................................... 45
Playback Device Selection ........................................................................................ 46 Advanced Playback Options ..................................................................................... 46
Transcriber Live Software Configuration ..................................................................... 48
Recording Device Selection ...................................................................................... 48 Playback Device Selection ........................................................................................ 48 Advanced Playback Options ..................................................................................... 48
DMX-4 Audio Connections .......................................................................................... 50 Using Microphones ................................................................................................... 50
DMX-8 Audio Interface ................................................................................................ 50 DMX-4 and DMX-8 Alternative Configuration ........................................................... 50
Recording Device Selection ...................................................................................... 51 RME Fireface Configuration ............................................................................................ 52
Operation Notes ............................................................................................................ 52 RME Hardware Installation .......................................................................................... 53
Firewire Interface Requirements ............................................................................... 53 Power and Cables ...................................................................................................... 53
Software Installation ..................................................................................................... 54 Drivers and Flash Update .......................................................................................... 54 Windows XP Firewire Patch ..................................................................................... 54
Driver Configuration ................................................................................................. 55 Recording Mixer Configuration ................................................................................ 56
Court Recorder Software Configuration ....................................................................... 59 Recording Device Selection ...................................................................................... 59 Advanced Recording Options ................................................................................... 59
Playback Device Selection ........................................................................................ 60
Advanced Playback Options ..................................................................................... 60 Transcriber Live Software Configuration ..................................................................... 62
Recording Device Selection ...................................................................................... 62
Playback Device Selection ........................................................................................ 62 Advanced Playback Options ..................................................................................... 62
Using Court Recorder With Dragon Voice Recognition ................................................. 64 Real Time Voice Writing .......................................................................................... 64
Batch Transcription ................................................................................................... 65 Marantz PMD 560 Recorder Configuration ..................................................................... 66
Overview ................................................................................................................... 66 Power and Cables ...................................................................................................... 66 Setup ......................................................................................................................... 66
Recording and Playback ........................................................................................... 66 Marantz PMD 570 Recorder Configuration ..................................................................... 67
Overview ................................................................................................................... 67 Power and Cables ...................................................................................................... 67 Setup ......................................................................................................................... 67 Recording and Playback ........................................................................................... 67
Running SoniClear from the Command Line ................................................................... 68 Input Data Format ..................................................................................................... 68

Court Recorder Installation Guide Table of Contents
Sample Import File ................................................................................................... 69
Create Agenda Template........................................................................................... 69 Create New File ........................................................................................................ 69 Create New File and Import Agenda ........................................................................ 70
Create New File and Start Recording ....................................................................... 70 Create New File, Import Agenda, and Start Recording ............................................ 71 Stop and Exit Program .............................................................................................. 71 Stop, Archive, and Exit Program .............................................................................. 72 Sample Batch File ..................................................................................................... 72
Using Windows Scheduler Tasks to Start and Stop Recording ................................ 73 Using Windows Command Line to Schedule SoniClear .......................................... 75

Court Recorder Installation Guide - 7 -
Installation
Hardware Requirements
Court Recorder is a computer-based system for recording court proceedings, depositions,
and administrative hearings. See the Court Recorder User Guide for detailed operating
instructions.
Court Recorder software runs on a Windows computer with additional audio interface
hardware. For reliable operation, and to ensure effective support, Court Recorder
software should be used with the recommended hardware, when possible. Other types of
equipment may work as well, but satisfactory results are not assured for untested devices.
Computer Hardware
Court Recorder requires the following computer hardware:
Laptop or Desktop Computer
Windows XP, Vista, or Windows 7 (XP Professional recommended)
Single Core Processor, 1.0GHz or faster, for 1-2 channel recording
Dual Core Processor, 1.5 GHz or faster, for Vista and multichannel recording.
Adequate disk space for recording (see “Disk Storage Space” below).
Disk Storage Space
Court Recorder stores the recorded audio data on the disk drive of the laptop computer
that is running the program. A network or remote drive cannot be used for storage during
recording. Playback from a network drive is possible for files converted to MP3 format,
but this will depend on the speed of the network and shared server involved. Storage
requirements for the various recording modes are as follows:
2 Channel WAV 316 Megabytes per hour
4 Channel WAV 948 Megabytes per hour
6 Channel WAV 1264 Megabytes per hour
8 Channel WAV 1580 Megabytes per hour
2 Channel MP3 44 Megabytes per hour
4 Channel MP3 132 Megabytes per hour
6 Channel MP3 352 Megabytes per hour
8 Channel MP3 440 Megabytes per hour

Court Recorder Installation Guide - 8 -
Audio Hardware
Court Recorder 8 works with the following audio hardware:
M-Audio MobilePre
Griffin Technology iMic
Andrea USB Adapter
VXI USB Adapter
Xitel inPort
MXL MicMate USB Mic Adapter
Centrance MicPort
Motu 8Pre
RME Audio Fireface 800
M-Audio Delta 44
M-Audio Delta 1010
Antex Electronics DMX-4 USB Adapter
Backup Recorder Options:
Marantz PMD 660
Marantz PMD 560
Floating License System
SoniClear is sold as a boxed product incorporating the Floating License System. This
allows for the purchased license to be locked to a specific machine, moved to another
machine, or “floated” from machine to machine, using the supplied USB Key device. The
Floating License System offers the greatest flexibility.
The Floating License System uses the SoniClear USB Key to deliver and manage the
software license. When the user receives the software initially, the SoniClear software
license is stored on the USB Key. The software can be installed on any number of
computers. SoniClear will only run when the USB Key device holding the “floating
license” is plugged into the computer prior to running the software. This mode of usage is
the same as the "Roving License" option offered with prior SoniClear releases.
The user has the option to leave the floating license stored in the USB Key, or lock the
license to a specific computer. Once the license is locked, the USB Key device does not
need to be plugged into the computer.
Once a license has been locked to a computer it cannot be used as a floating license with
the USB Key. The user has the option of unlocking the license from the computer at any
time. Then the license reverts to floating status, stored in the USB Key device. The USB

Court Recorder Installation Guide - 9 -
Key can then be used to authorize use of the software on other machines, either as a
Floating License, or locked to another computer.
The status of the SoniClear license is managed using the License tab of the Preferences
dialog. See the section Editing Program Preferences in this manual for more information.
Technical Support
Contact your Court Recorder dealer or view the SoniClear Support Page at
www.soniclear.com for current release and technical support information.

Court Recorder Installation Guide - 10 -
Computer Setup
The computer must be configured specifically for audio recording. Following are
recommended steps to ensure that the computer will run reliably when running Court
Recorder.
Power Management
Turn Off all Hibernation, Screen Saver, and Power Saving options:
To prevent the system from powering down to reduce power usage, from Control Panel –
> Power Options, activate the “Always On” power scheme. For Plugged in and Running
on Batteries alternatives, set “Turn off monitor”, “Turn off hard disks”, and “System
standby” to Never.
To prevent hibernation, from Control Panel -> Power Options -> Hibernate tab, Uncheck
“Enable Hibernation”.
Turn off Screen Saver, Right Click on Desktop -> Properties -> Screen Saver tab, select
“(None)” for the type of screen saver.
Some manufacturers use the default power management included in Windows XP.
However, some systems include extra control panels for this purpose. Consult the
computer documentation for more details.
System Sounds
Turn off System Sounds to prevent these from becoming recorded, from Control Panel ->
Sounds and Audio Devices.
In the Audio tab, set Default device to internal sound card.
In the Sounds tab, under Sound Scheme, choose “No Sounds” (select No to saving the
previous Scheme). Then click Apply
Drive Indexing
Turn off drive indexing for all NTFS drives. Open My Computer, right click on the
NTFS drive and select Properties. Uncheck “Allow Indexing Service…” and click Apply.
In the confirmation dialog, select “Apply Changes to C:\subfolders and files”. If you get
the Access Denied error message, click Ignore All.
Court Recorder Installation Guide - 11 -
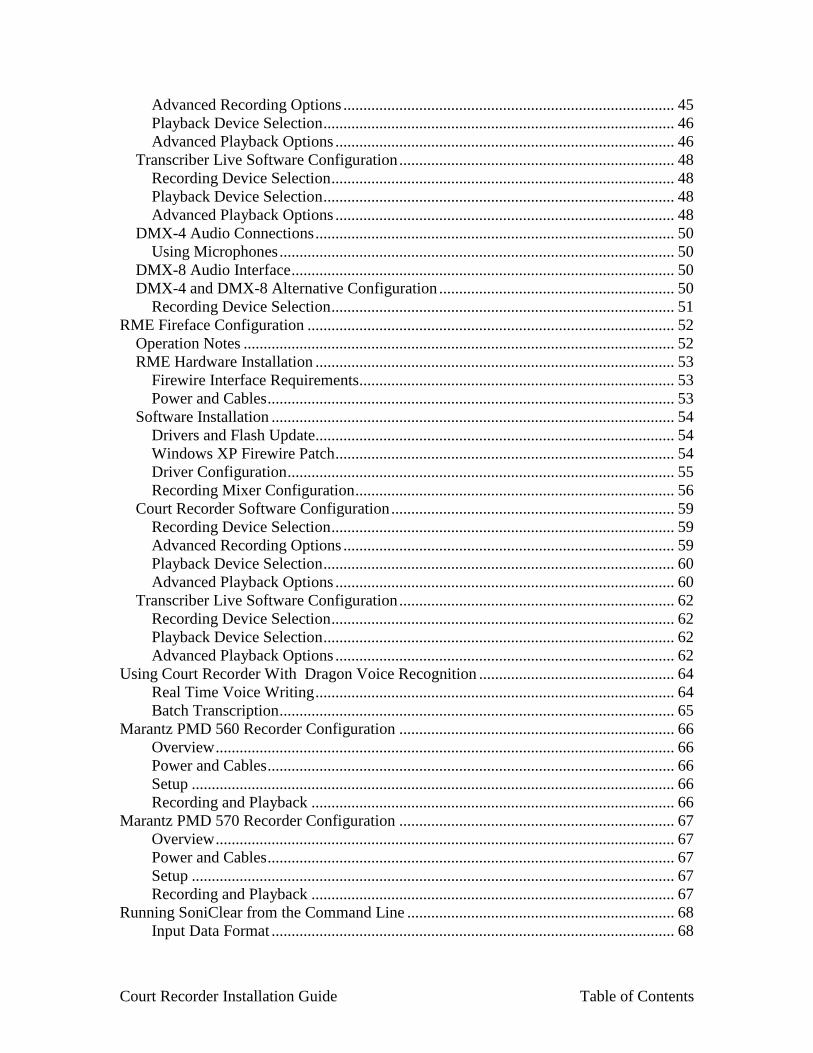
Performance
Performance options are set in the dialog Control Panel -> System -> Advanced ->
Performance -> Settings.
In the Visual Effects tab, select “Let Windows choose what’s best for my computer”. On
slower computers, moving a window around on the screen can cause interruption of
recording. If that occurs, uncheck “Show Window contents while dragging”. This will
automatically switch the type to Custom and will change the display to optimize the
performance of window movement. This may also change the appearance of windows on
the screen.
In the Advanced tab, set Processor scheduling to “Program”.
In the Advanced tab, set Memory Usage to “Program”.
In the Advanced tab, Virtual memory, click Change, select Custom size and enter the
same size in both Initial size and Maximum size. The required value will depend on how
much memory is installed and how many programs are used simultaneously. As a
minimum value, enter the following:
For 256MB RAM - Enter 512 for Min and Max
For 512MB RAM - Enter 768 for Min and Max
For 1024MB RAM - Enter 1536 for Min and Max
Automatic Updates
Turn off Windows Automatic Update service. From Control Panel -> System ->
Automatic Updates tab, select “Turn off Automatic Updates”. For systems that are
always network connected, it may be safer to select “Notify me but don’t automatically
download or install them.” This will ensure that the user is away of the need to perform
an update, without interfering with recording processes.
Internet Time
Turn off the automatic updating of the system time with a central server. From Control
Panel -> Date and Time -> Internet Time, Uncheck “Automatically synchronize with an
Internet time server”. Click Apply.
Desktop Cleanup Wizard
Disable the automatic Desktop Cleanup Wizard. From Control Panel -> Display ->
Desktop -> Customize Desktop -> Uncheck “Run Desktop Cleanup Wizard every 60
days”.

Court Recorder Installation Guide - 12 -
Court Recorder General Configuration
Overview
Court Recorder features can be configured for a number of different applications to
provide optimal operation. These configurations apply for all of the different hardware
setups described in this manual. For example, when using SoniClear with computers that
have small screens, there are several options that can make the user interface more
functional. And support for touch screens allow SoniClear to be used much like a
conventional tape recorder, pressing the “buttons” on the screen with the finger to control
program operation.
Display On Top
In the preference dialog Edit/Preferences/Options, the On Top feature can be enabled.
With “Enable On Top Feature” is checked, the main window will display an additional
check box labeled “On Top”. When the user checks the On Top option, the main window
will always display on top, even when other applications are selected (“receiving focus”).
An additional option is the “Small On Top Window” When this option is selected in the
preferences dialog, the size of the On Top display window is small. The user can switch
between On Top display and normal display at any time.
The Display On Top feature is available in both Court Recorder and Transcriber Live. It
is useful when monitoring recording or playback while another program is running (such
as a Court Management application, or Microsoft Word while transcribing).
Optimize for Touch Screen
In the preference dialog Edit/Preferences/Options, the check box “Optimize for touch
screen” turns on a number of changes to the program behavior that makes it work better
on touch screen computers. For example, double click actions are disabled and spacing
on the Marker and Docket popup windows is set to double to make it easier to pick an
item. This option is disabled (unchecked) by default and should be enabled only for use
on touch screen computers.

Court Recorder Installation Guide - 13 -
Force Display to Full Screen Only
In the preference dialog Edit/Preferences/Options, the check box “Force display to full
screen only” makes the program always display as a “maximized” window that fills the
entire screen. With this option enabled, the user will not be able to resize the window to
an arbitrary size. It will always be displayed at maximum size. This feature is useful for
running the program on computers with small screens. It can also be helpful for
computers that are set up to only run SoniClear. The recording computer can be
configured by the IT staff or computer consultant to run SoniClear automatically when
Windows boots up. The user only needs to turn on the computer to see a ready-to-use
recording screen.
Selection Window Options
In the preference dialog Edit/Preferences/Options, the controls labeled “Options for
Selection Widows” controls how Marker and Docket popup windows behave.
“Display Floating Popups” is the default behavior and is how SoniClear has worked on
previous versions. When the user selects to display a Marker or Docket popup selections,
the appropriate popup window is displayed and remains visible until the user explicitly
closes the window. This is the recommend setting for most computers with medium and
large displays.
“”Display Floating Popups, Close on Selection” is a useful option when using very small
screens (such as 800x600). The advantage of this setting is that the popup closes as soon
as the user selects an item to add to the notes, or closes the window manually. This
allows the popup window to be displayed over the main window, but be hidden when the
note taking action has been made.
“Display Popups over Main Window” is useful for smaller displays with at least
1024x600 pixels (such as most netbook computers). The Marker and Docket windows are
displayed inside the main window on the right hand side. This keeps them available at all
times, neat and out of the way of other program controls. This option is also suitable for
touch screen computers, to simplify note taking without a keyboard or mouse.
Display Font Size
In the preference dialog Edit/Preferences/Files, the Font Size can be adjusted to any size
between 10 and 18 points. Choose a size that looks good on the type of screen being use.
The size setting applies only to input fields in the main window. Text in buttons and
various popup displays display using the system font size, regardless of the font size
selected in preferences.

Court Recorder Installation Guide - 14 -
Enable Notes
Check the Enable Notes check box to allow the user to take notes within Court Recorder.
For court reporting where the Transcriber Live program is used for taking notes, this can
be unchecked to avoid confusion between the two programs. However, with the Notes
feature enabled in Court Recorder, the Transcriber Live program can still be used for
taking notes, monitoring, and readbacks.
Enable Transcriber Live
Check the Enable Transcriber Live check box to allow the user see the Transcriber
button. This allows the user to invoke the Transcriber Live program from within Court
Recorder. For court reporting where the Transcriber Live program is used for taking
notes, this should be checked to make it easy to switch between the two programs. With
the Transcriber button disabled in Court Recorder, the Transcriber Live program can still
be started from a desktop icon or the Start menu. However, when starting Transcriber
Live this way, the user will have to manually select the current recording file to open
using the Open button (or File/Open pulldown menu selection).

Court Recorder Installation Guide - 15 -
Court Recorder 2-Channel Configuration
Overview
Court Recorder can be set up to record one or two channels of audio. This could be a
single microphone, two microphones, or a single microphone and a stenomask for voice
reporting. The microphone connection feeds the audio into the computer using either the
built-in sound card, or an external audio interface device. Playback can be monitored
using headphones. If an external audio device is used, the software controls whether
audio is played through headphones or through speakers using a selection check box on
the screen.
One of the following configurations is typically used:
Built-In Sound Card (single microphone channel)
MobilePre USB Interface (one or two professional microphones)
iMic USB Interface (single microphone, separate headphone monitor channel)
Inport USB Interface (stereo connection to external mixers)
Other USB Interface Devices (various options)
Select the interface option that includes the features that are needed for the type of court
reporting work involved. The MobilePre is generally the best option for court reporting.
It provides professional microphone inputs (using reliable XLR connectors). It also
provides convenient control of levels using knobs on the interface box.
When recording with a single computer-compatible microphone, either the built-in sound
card option or the iMic option are good choices. The advantage of the iMic interface is
that it provides a second playback channel that can be dedicated to headphones for
monitoring.
For recording more than two channels, or when microphones (or a stenomask) need to be
connected using multiple audio adapters, see the section of this manual on multichannel
recording configuration, “Court Recorder Multichannel Installation”.
Contact SoniClear support for additional information on configuration options that might
not be covered in this manual. Audio interface devices are constantly being updated,
providing new options for configuring court reporter systems.
Court Recorder Installation Guide - 16 -
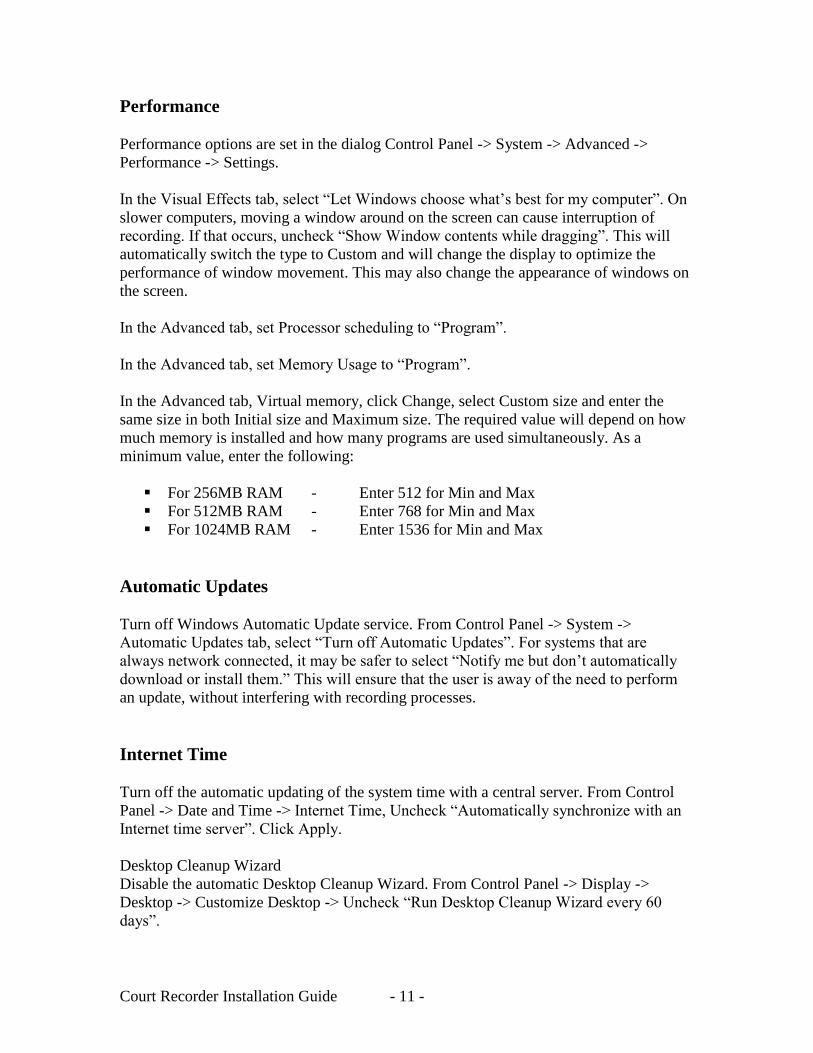
Built-In Sound Card Configuration
This is the recommended setup for recording in situations that require a single
microphone (such as a Labtec 333, CM3 or Voice Tracker), or where you are trying to
reduce the size and weight of items to carry and a less advanced microphone is adequate.
The computer-compatible microphone (such as Labtec 333 or Voice Tracker) connects
directly to the internal sound card in the computer.
The typical hardware for this configuration consists of the following items:
Laptop or Desktop Computer
Windows XP Professional
Labtec 333, Centrum Sound CM-3 or Voice Tracker microphone
Speakers and/or Headphones
Software Installation
Court Recorder is installed from the supplied software CD. Insert the CD into the
computer drive. The system should automatically start the installation program. If it does
not start, run the installation program manually from the CD.
The internal sound card does not require a driver to be installed, as it uses the Windows
audio driver that is built into every Windows XP system.
Hardware Installation
Once the Court Recorder software has been installed, the microphone can be plugged
directly into the microphone jack on the computer. This is a 1/8” audio input jack that can
be used only with microphones designed specifically to work with computers.
Microphones intended for use with cassette recorders will not work correctly. Be sure to
connect the microphone to the correct jack, as it is easy to confuse with the headphone
jack on most computers.
The recorded audio can be played back into the room through speakers using the sound
card in the computer. When using a laptop computer, if the speakers are not high enough
quality, use a portable external speaker. A suitable speaker would be the type used for
portable music players, connected to the headphone output of the computer.

Court Recorder Installation Guide - 17 -
MobilePre Configuration
Overview
This configuration based on the MobilePre audio interface is the recommended setup for
recording in situations that require professional microphones, such as two conference
microphones, or a conference microphone on one channel and a stenomask microphone
on the second channel.
The M-Audio MobilePre is a professional audio interface. Microphones are connected to
the XLR connectors on the MobilePre and the audio signal is sent to the computer
through a USB cable.
The typical hardware for this configuration consists of the following items:
Laptop or Desktop Computer
Windows XP Professional
M-Audio MobilePre Audio Interface
Conference microphones (one or two)
Optional stenomask for voice reporting with XLR connector
Digital backup recorder
Speakers
Software Installation
Court Recorder is installed from the supplied software CD. Insert the CD into the
computer drive. The system should automatically start the installation program. If it does
not start, run the installation program manually from the CD.
The M-Audio MobilePre driver software must be installed from the disk supplied with
the unit. Alternatively, the latest version can be downloaded and installed from the M-
Audio website (www.m-audio.com). Follow the instructions provided by M-Audio.
Hardware Installation
Once the SoniClear and MobilePre software have been installed, the MobilePre can be
plugged directly into the USB port of the computer. You should not connect the
MobilePre to a USB hub, as this may result in unreliable audio recording.
The microphones must be connected to the XLR connectors of the MobilePre. For
microphones that do not have the correct connector, an adapter must be used. Do not
connect a microphone to the ¼” phone jacks, as these are designed for line level signals.

Court Recorder Installation Guide - 18 -
The first time the software is run after installing the device drivers and plugging in the
unit, the recording and playback levels must be set in the MobilePre control panel (the
control panel is installed automatically along with the device drivers). Double click on
the M-Audio icon in the system tray to bring up this control panel (a small round icon
that looks like a white greater-than “>” symbol on a red background).
The USB Record setting should be set to zero (near the middle of the scale), and with the
mute button Unchecked. The Direct Monitor must be muted (Mute check box Checked).
The Device Output must be set to zero (top of the scale, maximum volume). Device
Output should have the mute option off (Mute check box Unchecked).
Court Recorder Installation Guide - 19 -
Court Recorder Software Configuration for MobilePre
After installation of the software and hardware, Court Recorder must be configured to
match the hardware in use. To do this, start Court Recorder and select Edit/Preferences
from the pulldown menu. Then select the Hardware tab and modify the settings according
the following instructions.
Recording Device Selection
The Recording Device Selection section of the Hardware tab controls the usage of the
sound cards in the computer during recording.
Default Recording Device
This is the default sound card that will be used as the audio source for the Stereo Mix
channels stored in the primary recording file. It should be set to the M-Audio MobilePre
driver. When this is selected it will automatically set the Input Source to Wave In.
Removable Recording Device
Court Recorder does not normally use the automatic removable devices selection feature.
The “Use Removable Device If Present” and “Automatic Removable Device Selection”
check boxes should be unchecked.
Advanced Recording Options
These options control how recording is processed. These fields should only be changed in
the event of problems with recording using the default settings. Consult SoniClear
support for assistance.
Recording Process Priority
Default value should be set to Medium.
Buffer Size
The default value should be set to Automatic.
Disk Update Time
The default value should be set to 5000 milliseconds.
Force Recording at 44.1KHz.
The default value should be set to Unchecked.
Court Recorder Installation Guide - 20 -
Playback Device Selection
The Playback Device Selection section of the Hardware tab controls the usage of the
sound cards in the computer during playback.
Speaker Device Selection
This is the sound card that will be used for playback through speakers (when the Speaker
option is checked in the main window). This can be set to the device driver of the
computer internal sound card.
Headphone Monitor Device Selection
Does not apply to Court Recorder.
Removable Recording Device
Court Recorder does not use the automatic removable devices selection feature in this
configuration. The “Use Removable Device If Present” and “Automatic Removable
Device Selection” check boxes should be unchecked.
Advanced Playback Options
These options control how playback is processed. These fields should only be changed in
the event of problems with playback using the default settings. Consult SoniClear support
for assistance.
Playback Buffers
The default value should be set to 2 buffers.
Buffer Size
The default value should be set to 1000mSec.
Monitor Delay
Monitor Delay should be set to the default of 3 seconds.
Force Recording at 44.1KHz.
This field should be set to the default value of Unchecked.

Court Recorder Installation Guide - 21 -
Recording Options Tab - Sound Quality
In the Recording Options preferences tab, set the recording type to Multichannel (MP3).
Then set the combo box to the number of channels: 2 (for the two channels provided by
the MobilePre).

Court Recorder Installation Guide - 22 -
Transcriber Live Software Configuration for MobilePre
In addition to Court Recorder, the Transcriber Live program must be configured to match
the hardware in use. To do this, start Transcriber Live and select Edit/Preferences from
the pulldown menu. Then select the Hardware tab and modify the settings according the
following instructions.
Recording Device Selection
This is not used for Transcriber Live, as it is a playback-only program.
Playback Device Selection
The Playback Device Selection section of the Hardware tab controls the usage of the
sound cards in the computer It should be set to the internal audio card for playback
through the computer speakers.
Default Speaker Device Selection
This is the sound card that will be used for playback through speakers (when the Speaker
option is checked in the main window). This should be set to the device driver of the
computer internal sound card so that the built-in speakers can be used for playback into
the room.
Headphone Monitor Device Selection
This is the sound card that will be used for playback through headphones. It should be set
to the MobilePre device driver.
Removable Recording Device
In this configuration, Transcriber Live does not use the automatic removable devices
selection feature. The “Use Removable Device If Present” and “Automatic Removable
Device Selection” check boxes should be unchecked.
Advanced Playback Options
These options control how playback is processed. These fields should only be changed in
the event of problems with playback using the default settings. Consult SoniClear support
for assistance.
Playback Buffers
The default value should be set to 2 buffers.

Court Recorder Installation Guide - 23 -
Buffer Size
The default value should be set to 1000mSec.
Monitor Delay
Monitor Delay should be set to the default of 3 seconds.
Force Recording at 44.1KHz.
This field should be set to the default value of Unchecked.
Adjusting MobilePre Recording and Playback Volume
Volume for recording is controlled using the MobilePre volume control knobs on the
front of the unit. Playback volume on the headphones is also set using the volume knob
on the front of the unit.
Volume for playback through the computer speakers is set using the Windows Volume
Control Panel. The default Windows Volume Control that is displayed when using an
external audio interface is generally not the internal sound card. To display the correct
panel, follow these instructions:
Double click on the speaker icon in the system tray. If the speaker icon is not
visible:
o Click the Start button and select Control Panel
o Double click “Sounds and Audio Devices”.
o Make sure the option “Place volume icon in the taskbar” is checked and
click Apply.
o The Volume icon should appear in the system tray of the taskbar. If this
does not cause the speaker icon to be displayed, consult with technical
support for the computer. In any case you will be able to select the Audio
tab and click the Volume button to display it from this dialog.
When the Volume Control dialog is displayed:
o From the Options pulldown, select from the Properties command.
o In the Mixer device control, select the sound card in your computer, and
make sure the “Adjust volume for” control is set to Playback. This will
display the system sound card playback Volume Control panel.
o In the Volume Control panel, make sure that the Wave output is not muted
and that the rest of the audio sources are muted.
o The Wave and Volume Control sliders control the volume of the playback.
Adjust to a suitable level.

Court Recorder Installation Guide - 24 -
iMic Audio Interface Configuration
Overview
This configuration based on the Griffin Technology iMic audio interface is the
recommended setup when using a computer compatible microphone and when readback
feature is going to be used.
The iMic is a consumer-grade audio interface records from a computer-compatible
microphone (such as the Labtec 333 or Centrum Sound CM-3). The microphone is
connected to the 1/8” input jack on the iMic and the audio signal is sent to the computer
through a USB cable. The input can also be used with “consumer” line level signals,
which could be supplied by a sound system or a portable microphone mixer.
The iMic also includes a headphone output that can be configured for monitoring while
recording, with the computer speakers configured to play back into the room for
readbacks.
The typical hardware for this configuration consists of the following items:
Laptop or Desktop Computer
Windows XP Professional
Griffin Technology iMic
Digital backup recorder
Speakers
Software Installation
Court Recorder is installed from the supplied software CD. Insert the CD into the
computer drive. The system should automatically start the installation program. If it does
not start, run the installation program manually from the CD.
The Griffin Technology iMic does not require a driver to be installed, as it uses the
Windows USB audio driver that is built into every Windows XP system. Support
information for the iMic can be obtained from the Griffin Technology website
(www.griffintechnology.com).
Hardware Installation
Once the Court Recorder software has been installed, the iMic can be plugged directly
into the USB port of the computer. You should not connect the iMic to a USB hub, as this
may result in unreliable audio recording.

Court Recorder Installation Guide - 25 -
The iMic includes a single 1/8” audio input jack that can be used either as a mono
microphone input (for use with computer-compatible microphones only), or as a line
level input. The function of the input jack is set using the switch on the side of the iMic
unit.
The first time the software is run after installing the device drivers and plugging in the
unit, the recording and playback levels must be set in the Windows Volume control panel
(the control panel is installed automatically along with the device drivers). Double click
on the speaker icon in the system tray to bring up this control panel. See detailed
instructions below, “Adjusting iMic Recording and Playback Volume”.
For monitoring audio from the computer on headphones, connect the headphones to the
headphone jack on the iMic. Playback from the computer will be heard on the
headphones when the Speaker check box is unchecked in the Transcriber Live screen.
Volume can be adjusted using the volume control slider displayed in the Transcriber Live
main window.
The recorded audio can be played back into the room through speakers using the sound
card in the computer. When using a laptop computer, if the speakers are not high enough
quality, use a portable external speaker. A suitable speaker would be the type used for
portable music players, connected to the headphone output of the computer.

Court Recorder Installation Guide - 26 -
Court Recorder Software Configuration
After installation of the software and hardware, Court Recorder must be configured to
match the hardware in use. To do this, start Court Recorder and select Edit/Preferences
from the pulldown menu. Then select the Hardware tab and modify the settings according
the following instructions.
Recording Device Selection
The Recording Device Selection section of the Hardware tab controls the usage of the
sound cards in the computer during recording.
Default Recording Device
This is the default sound card that will be used as the audio source for the two audio
channels stored in the recording file. It should be set to the iMic USB driver (“iMic USB
audio system”, or similar wording). When this is selected it will automatically set the
Input Source to “Capture” (or similar wording).
Removable Recording Device
Court Recorder does not use the automatic removable devices selection feature in this
configuration. The “Use Removable Device If Present” and “Automatic Removable
Device Selection” check boxes should be unchecked.
Advanced Recording Options
These options control how recording is processed. These fields should only be changed in
the event of problems with recording using the default settings. Consult SoniClear
support for assistance.
Recording Process Priority
Default value should be set to Medium.
Buffer Size
The default value should be set to Automatic.
Disk Update Time
The default value should be set to 5000 milliseconds.

Court Recorder Installation Guide - 27 -
Force Recording at 44.1KHz.
The default value should be set to Unchecked.
Playback Device Selection
The Playback Device Selection section of the Hardware tab controls the usage of the
sound cards in the computer during playback. It should be set to the internal audio card
for playback through the computer speakers.
Speaker Device Selection
This is the sound card that will be used for playback through speakers when playing a
recording in Court Recorder. This should be set to the device driver of the computer
internal sound card.
Headphone Monitor Device Selection
This selection does not apply to Court Recorder. Recordings are monitored in Transcriber
Live.
Removable Recording Device
Court Recorder does not use the automatic removable devices selection feature in this
configuration. The “Use Removable Device If Present” and “Automatic Removable
Device Selection” check boxes should be unchecked.
Advanced Playback Options
These options control how playback is processed. These fields should only be changed in
the event of problems with playback using the default settings. Consult SoniClear support
for assistance.
Playback Buffers
The default value should be set to 2 buffers.
Buffer Size
The default value should be set to 1000mSec.
Monitor Delay
Monitor Delay should be set to the default of 3 seconds.

Court Recorder Installation Guide - 28 -
Force Recording at 44.1KHz.
This field should be set to the default value of Unchecked.
Recording Options - Sound Quality
In the Recording Options preferences tab, set the recording type to Multichannel (MP3).
Then set the combo box to the number of channels: 2 (the stereo audio provided by the
iMic driver).
Court Recorder Installation Guide - 29 -
Transcriber Live Software Configuration
In addition to Court Recorder, the Transcriber Live program must be configured to match
the hardware in use. To do this, start Transcriber Live and select Edit/Preferences from
the pulldown menu. Then select the Hardware tab and modify the settings according the
following instructions.
Recording Device Selection
This is not used for Transcriber Live, as it is a playback-only program.
Playback Device Selection
The Playback Device Selection section of the Hardware tab controls the usage of the
sound cards in the computer.
Default Speaker Device Selection
This is the sound card that will be used for playback through speakers (when the Speaker
option is checked in the main window). This should be set to the device driver of the
computer internal sound card so that the built-in speakers can be used for playback into
the room.
Headphone Monitor Device Selection
This is the sound card that will be used for playback through headphones. It should be set
to the iMic device driver.
Removable Recording Device
In this configuration, Transcriber Live does not use the automatic removable devices
selection feature. The “Use Removable Device If Present” and “Automatic Removable
Device Selection” check boxes should be unchecked.
Advanced Playback Options
These options control how playback is processed. These fields should only be changed in
the event of problems with playback using the default settings. Consult SoniClear support
for assistance.
Playback Buffers
The default value should be set to 2 buffers.
Court Recorder Installation Guide - 30 -
Buffer Size
The default value should be set to 1000mSec.
Monitor Delay
Monitor Delay should be set to the default of 3 seconds.
Force Recording at 44.1KHz.
This field should be set to the default value of Unchecked.

Court Recorder Installation Guide - 31 -
Other USB Adapter Configurations
It is possible to use any standard USB audio adapter device with Court Recorder. The
choice of adapter will depend on factors such as size, availability, and personal
preference.
Setup may be similar to the Griffin Technology iMic or the M-Audio MobilePre. Contact
SoniClear support for assistance.
Xitel Inport Adapter Configuration
The Xitel Inport device is designed for connection to “consumer” line level signals, such
as a microphone mixer or sound systems that have RCA jacks. Setup is similar to the
configuration for the iMic, except that the Inport does not have a headphone output. The
Court Recorder and Transcriber Live software must be configured to prevent the software
from attempting to play back through the Inport. In Transcriber Live, the Headphone
Monitor Device Selection should be set to play through the internal sound card.
Adjusting USB Interface Recording and Playback
Volume
In most cases, the recording and playback volume will be set using the sliders displayed
in Court Recorder and Transcriber Live. In the event that the software does not recognize
the USB Audio device volume controls, the levels must be set using the Windows
Volume Control panel.
Recording Volume
To access the recording panel for the USB audio adapter, follow these instructions:
Double click on the speaker icon in the system tray. If the speaker icon is not
visible:
o Click the Start button and select Control Panel
o Double click “Sounds and Audio Devices”.
o Make sure the option “Place volume icon in the taskbar” is checked and
click Apply.
o The Volume icon should appear in the system tray of the taskbar. If this
does not cause the speaker icon to be displayed, consult with technical
support for the computer. In any case you will be able to select the Audio
tab and click the Volume button to display it from this dialog.

Court Recorder Installation Guide - 32 -
When the Volume Control dialog is displayed:
o From the Options pulldown, select from the Properties command.
o In the Mixer device control, select the driver name that matches the USB
audio device, set the “Adjust volume for” control to Recording, and make
sure all of the volume control inputs are checked (the will usually be only
one). Click OK, the USB audio device Record Volume Control panel for
the “Capture” device (the input audio source).
o In the Volume Control panel, make sure that the desired device is selected.
o The Volume slider controls the volume of the recording signal. Adjust to a
suitable level.
Playback Volume
Volume for playback through the computer speakers is set using the Windows Volume
Control Panel. The default Windows Volume Control that is displayed when using an
external audio interface may or may not be the internal sound card.
To display the correct panel, follow these instructions:
Double click on the speaker icon in the system tray. If the speaker icon is not
visible:
o Click the Start button and select Control Panel
o Double click “Sounds and Audio Devices”.
o Make sure the option “Place volume icon in the taskbar” is checked and
click Apply.
o The Volume icon should appear in the system tray of the taskbar. If this
does not cause the speaker icon to be displayed, consult with technical
support for the computer. In any case you will be able to select the Audio
tab and click the Volume button to display it from this dialog.
When the Volume Control dialog is displayed:
o From the Options pulldown, select from the Properties command.
o In the Mixer device control, select the relevant sound card in your
computer, and make sure the “Adjust volume for” control is set to
Playback. This will display the system sound card playback Volume
Control panel.
o In the Volume Control panel, make sure that the Wave output is not muted
and that the rest of the audio sources are muted.
o The Wave and Volume Control sliders control the volume of the playback.
Adjust to a suitable level.

Court Recorder Installation Guide - 33 -
Court Recorder Multichannel Installation
Overview
Court Recorder can be configured to capture multiple channels of audio into separate
channels in the recorded file. Most installations will use an audio interface that uses a
firewire connection. Alternatively, multichannel PCI sound cards can be used when line-
level inputs are available from a sound system. Following are example configurations
using a firewire interface. For assistance with other multichannel audio interface options,
contact SoniClear support.
Firewire Connections
Depending on the type of desktop or laptop computer used a firewire interface device
may need to be added to the computer system. If the computer has a built-in firewire port,
it must be compatible with the supplied interface. If the built-in interface is incompatible,
or if the computer does not have a firewire interface, a firewire card must be added to the
computer.
Contact Trio Systems for a current list of supported firewire interface card options.
Built-in Firewire Connections
Many computers include a built-in firewire interface. This can be used provided that it
has a chipset that compatible with the firewire audio interface being used.
For systems incorporating the Motu 8Pre interface, the Texas Instruments, Via, and
Lucent laptop chipsets are supported. For the RME Fireface 800 interface, most Firewire
400 or Firewire 800 chipsets are supported.
Laptop Firewire Add-On Cards
If a laptop computer is being used for recording that does not include a firewire port, an
add-on firewire PCMCIA PC Card or ExpressCard can be added to the computer. The
card plugs into the PCMCIA card slot. No device drivers need to be installed.
Be sure the laptop is turned off when plugging it in. It is also recommended that the
computer and firewire interface be turned off when connecting the laptop to the audio
interface.

Court Recorder Installation Guide - 34 -
Note: the firewire interface may not work correctly if the computer has gone into a power
saving mode, such as sleep mode or hibernation. You will need to reboot the computer
before using the firewire interface if this should occur.
Desktop Firewire Add-On Cards
If a desktop computer is being used for recording that does not include a firewire port, an
add-on firewire PCI card can be added to the computer. No device drivers need to be
installed.

Court Recorder Installation Guide - 35 -
Motu 8Pre Configuration
Motu 8Pre Installation
The Motu 8Pre firewire audio interface is used for connecting microphone and line-level
audio signals to the computer. When connecting to user-supplied computer systems, the
8Pre device drivers must be installed and the system configured for use with the Court
Recorder software.
Power and Data Interface Cables
The Motu 8Pre requires a connection to a power outlet. It does not support battery
operation. Be sure to obtain extension power cables for providing power to the audio
interface unit and the computer in the meeting room where recordings will be made.
The Motu 8Pre connects to the computer using a standard firewire cable. Because power
is not derived from the firewire bus, both 4 and 6 pin connectors are satisfactory. You
will need to ensure that the method of connecting the cable to the computer is physically
sound so that the cable cannot be accidentally disconnected from the computer during
recording. Loose connectors or situations where the cable can become snagged and
pulled out of the plug need to be addressed in the setup of the equipment. In addition, use
of an inflexible firewire cable for connection to a laptop may result in unreliable
recording and damage to the laptop connector. For this reason it is important to use thin
firewire cables, such as the proprietary, very thin, Apple Computer firewire cables.
Motu 8Pre Software Installation
Driver and Control Panel Installation
The Motu 8Pre provides drivers and control panel software with the product on CDROM.
Installation of drivers should be performed by a qualified computer technician.
When installing a new system, the CDROM drivers can be used. It is recommended,
however, that you download the latest Windows software available from the Motu
website if there are more recent updates (see www.motu.com).
To install from the supplied CD, insert the disk and follow the instructions in the manual
and on screen. To install the downloaded drivers follow the instructions provided on the
Motu support website.
After installing the drivers, reboot the computer to complete the installation process.
Depending on the driver version, it will normally display additional installation messages
Court Recorder Installation Guide - 36 -
after rebooting. If the system prompts you to install the new hardware, do not select the
option to search Windows Update, and use the Automatic Install option. This prompt
may occur several times. Carefully follow the written and on-screen instructions to
ensure proper installation.
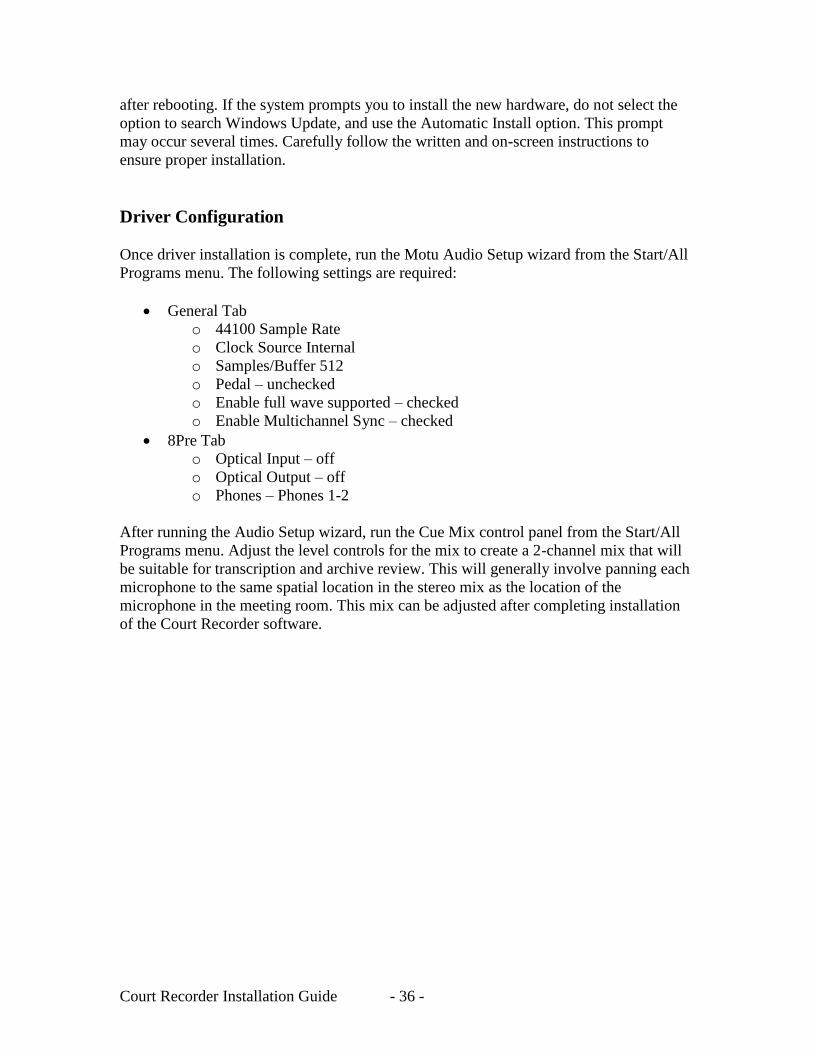
Driver Configuration
Once driver installation is complete, run the Motu Audio Setup wizard from the Start/All
Programs menu. The following settings are required:
General Tab
o 44100 Sample Rate
o Clock Source Internal
o Samples/Buffer 512
o Pedal – unchecked
o Enable full wave supported – checked
o Enable Multichannel Sync – checked
8Pre Tab
o Optical Input – off
o Optical Output – off
o Phones – Phones 1-2
After running the Audio Setup wizard, run the Cue Mix control panel from the Start/All
Programs menu. Adjust the level controls for the mix to create a 2-channel mix that will
be suitable for transcription and archive review. This will generally involve panning each
microphone to the same spatial location in the stereo mix as the location of the
microphone in the meeting room. This mix can be adjusted after completing installation
of the Court Recorder software.

Court Recorder Installation Guide - 37 -
Court Recorder Software Configuration
After installation of the software and hardware, Court Recorder must be configured to
work with the Motu 8Pre unit. To do this, start Court Recorder and select
Edit/Preferences from the pulldown menu. The select the Hardware tab and modify the
settings according the following instructions.
Recording Device Selection
The Recording Device Selection section of the Hardware tab controls the usage of the
sound cards in the computer during recording.
Default Recording Device
This is the default sound card that will be used as the audio source for the Stereo Mix
channels stored in the primary recording file. The default value should be set to 8Pre Mix
Input source.
First Recording Array Device
Multi-channel recordings accept audio input from a series of audio interface channels that
are numbered sequentially. The value in this field should be set to the first input source in
the sequence (“Array” of inputs). The default value should be set to 8Pre channels 1+2.
Click the Edit button, select the 8Pre channels 1+2 in the first array device and click the
Default button to set the remaining devices. Click OK to save.
Removable Recording Device
Court Recorder does not use the automatic removable devices selection feature in this
configuration. The “Use Removable Device If Present” and “Automatic Removable
Device Selection” check boxes should be unchecked.
Advanced Recording Options
These options control how recording is processed. These fields should only be changed in
the event of problems with recording using the default settings. Contact SoniClear
support for assistance.
Recording Process Priority
Default value should be set to Medium.

Court Recorder Installation Guide - 38 -
Buffer Size
The default value should be set to Automatic.
Disk Update Time
The default value should be set to 5000 milliseconds.
Force Recording at 44.1KHz.
The default value should be set to Checked.
Playback Device Selection
Normally the Transcriber Live program will be used for playback. However, Court
Recorder must be configured correctly in the event that playback is selected by the user.
The Playback Device Selection section of the Hardware tab controls the usage of the
sound cards in the computer during playback from the Court Recorder program.
Default Speaker Device Selection
This is the sound card that will be used for playback through speakers (when the Speaker
option is checked in the main window). The default value should be set to the internal
sound card device.
Headphone Monitor Device Selection
This does not apply to Court Recorder.
Removable Recording Device
Court Recorder does not use the automatic removable devices selection feature in this
configuration. The “Use Removable Device If Present” and “Automatic Removable
Device Selection” check boxes should be unchecked.
Advanced Playback Options
Playback Buffers
The default value should be set to 4 buffers.
Buffer Size
The default value should be set to 1000mSec.
Court Recorder Installation Guide - 39 -
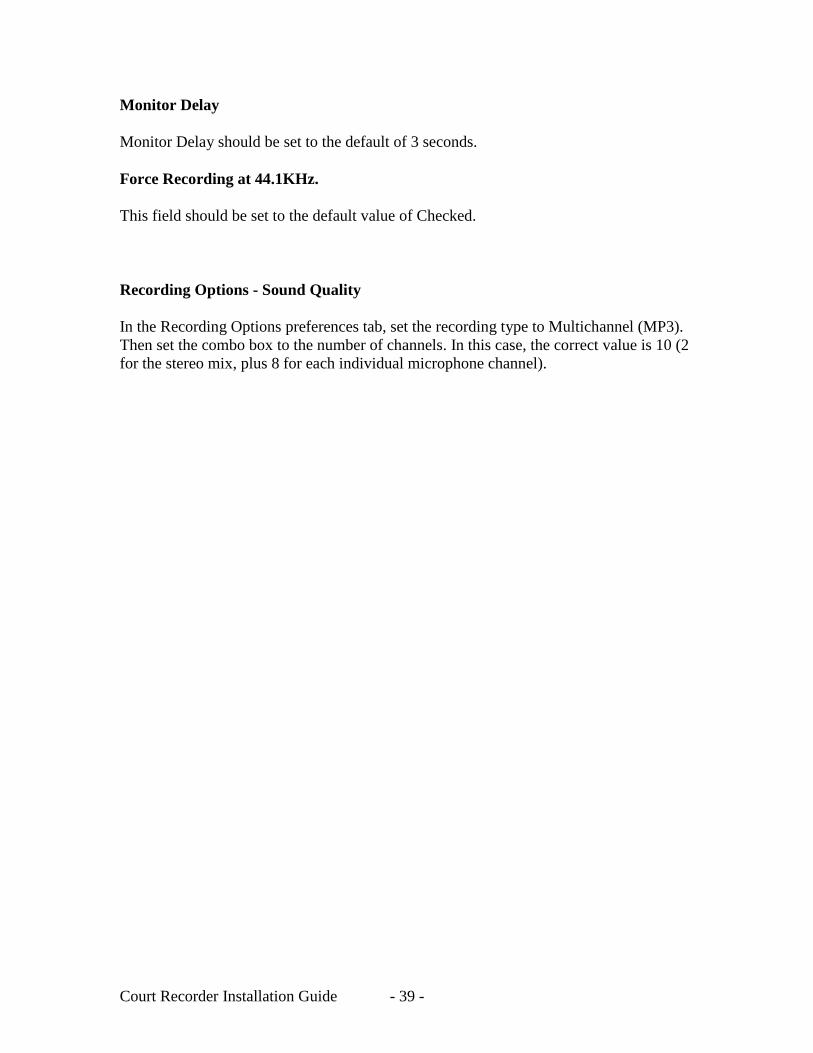
Monitor Delay
Monitor Delay should be set to the default of 3 seconds.
Force Recording at 44.1KHz.
This field should be set to the default value of Checked.
Recording Options - Sound Quality
In the Recording Options preferences tab, set the recording type to Multichannel (MP3).
Then set the combo box to the number of channels. In this case, the correct value is 10 (2
for the stereo mix, plus 8 for each individual microphone channel).

Court Recorder Installation Guide - 40 -
Transcriber Live Software Configuration
To configure Transcriber Live, start the program and select Edit/Preferences from the
pulldown menu. The select the Hardware tab and modify the settings according the
following instructions.
Recording Device Selection
The Recording Device Selection section does not apply to Transcriber Live, as it is a
playback only program.
Playback Device Selection
The Playback Device Selection section of the Hardware tab controls the usage of the
sound cards in the computer during playback.
Default Speaker Device Selection
This is the sound card that will be used for playback through speakers (when the Speaker
option is checked in the main window). The default value should be set to the internal
sound card device.
Headphone Monitor Device Selection
This is the sound card that will be used for playback through headphones. The default
value should be set to Motu 8Pre Phones.
Removable Recording Device
Court Recorder does not use the automatic removable devices selection feature in this
configuratoin. The “Use Removable Device If Present” and “Automatic Removable
Device Selection” check boxes should be unchecked.
Advanced Playback Options
Playback Buffers
The default value should be set to 4 buffers.
Buffer Size
The default value should be set to 1000mSec.

Court Recorder Installation Guide - 41 -
Monitor Delay
Monitor Delay should be set to the default of 3 seconds.
Force Recording at 44.1KHz.
This field should be set to the default value of Checked.

Court Recorder Installation Guide - 42 -
Motu 8Pre Audio Connections
Using Microphones
Microphones are attached to the Motu 8Pre using standard balanced XLR connectors. If
the microphones require phantom power, this must be turned on using the front panel
switch for each microphone channel (up position). In addition, the Pad switch should be
set to Up (no Pad).
When purchasing Court Recorder as a complete system, the 8Pre unit may be supplied
with a microphone “snake” cable. This will allow placement of the microphones at a
greater distance from the recording system. The snake can be left connected to the
interface unit. For portable recording applications, the snake can be rolled up and stored
inside the portable case. Care should be taken to avoid physical damage to the
microphone cables and microphone snake, such as smashing or crimping the cable. If the
cables are not kept in good condition, hum and/or intermittent signal may result.
When connecting the 8Pre to a microphone-level output from a sound system (instead of
microphones), isolation transformers may be required to prevent ground loop hum
problems. Consult with an audio installation technician regarding this application.
Using Analog Line Input or Digital Input
Line-level analog audio connections to the Motu 8Pre use ¼” TRS balanced line
connections. Digital inputs and outputs are also provided using standard ADAT optical
connections.
When connecting the Motu 8Pre to a sound system using analog line-level signals,
isolation transformers may be required to prevent ground loop problems. Consult with an
audio installation technician regarding this application.

Court Recorder Installation Guide - 43 -
Antex Electronics DMX-4 Configuration
DMX-4 Installation
The DMX-4 USB audio interface is used for connecting up to four microphones or line-
level inputs to the computer. When connecting to user-supplied computer systems, the
DMX-4 device drivers must be installed, and the system configured for use with the
Court Recorder software.
Power and Data Interface Cables
The DMX-4 requires a connection to a power outlet. It does not support battery
operation. Be sure to obtain extension power cables for providing power to the audio
interface unit and the computer in the meeting room where recordings will be made.
The DMX-4 connects to the computer using a standard USB cable. You will need to
ensure that the method of connecting the cable to the computer is physically sound so that
the cable cannot be accidentally disconnected from the computer during recording. Loose
connectors or situations where the cable can become snagged and pulled out of the plug
need to be addressed in the setup of the equipment. In addition, use of an inflexible USB
cable for connection to a laptop may result in unreliable recording and damage to the
laptop connector.
DMX-4 Software Installation
Driver and Control Panel Installation
The DMX-4 provides drivers and control panel software with the product on CDROM or
by download from the manufacturer’s website. Installation of drivers should be
performed by a qualified computer technician.
To install from the supplied CD, insert the disk and follow the instructions in the manual
and on screen. To install the downloaded drivers, follow the instructions provided on the
Antex Electronics support website.
Driver Configuration
Once driver installation is complete, run the DMX-4 Configuration program from the
Start/All Programs menu. Set the following values:
- Select Line or Microphone input type

Court Recorder Installation Guide - 44 -
- Turn the channels button to ON for each channel that is used.
- Click Phantom Power for microphones requiring power.
- Assign a recording channel for each. Normally this would be assigning input #1 to
Recording Channel 1, input #2 to Channel 2, and so forth.
- Adjust the Input Level to appropriate recording levels, depending on the type of
microphone used and the recording situation.

Court Recorder Installation Guide - 45 -
Court Recorder Software Configuration
After installation of the software and hardware, Court Recorder must be configured to
work with the DMX-4 unit. To do this, start Court Recorder and select Edit/Preferences
from the pulldown menu. The select the Hardware tab and modify the settings according
the following instructions.
Recording Device Selection
The Recording Device Selection section of the Hardware tab controls the usage of the
sound cards in the computer during recording.
Default Recording Device
This is the default sound card that will be used as the audio source for the Stereo Mix
channels stored in the primary recording file. The default value should be set to “Antex
Electronic” source.
First Recording Array Device
Multi-channel recordings accept audio input from a series of audio interface channels that
are numbered sequentially. The value in this field should be set to the first input source in
the sequence (“Array” of inputs). The default value should be set to the second stereo pair
provided by the DMX-4, labeled with “Antex Electronic (1)” in the title.
Removable Recording Device
Court Recorder does not use the automatic removable devices selection feature in this
configuration. The “Use Removable Device If Present” and “Automatic Removable
Device Selection” check boxes should be unchecked.
Advanced Recording Options
These options control how the recording is processed. These fields should only be
changed in the event of problems with recording using the default settings. Contact
SoniClear support for assistance.
Recording Process Priority
Default value should be set to Medium.

Court Recorder Installation Guide - 46 -
Buffer Size
The default value should be set to Automatic.
Disk Update Time
The default value should be set to 5000 milliseconds.
Force Recording at 44.1KHz.
The default value should be set to unchecked.
Playback Device Selection
Normally the Transcriber Live program will be used for playback. However, Court
Recorder must be configured correctly in the event that playback is selected by the user.
The Playback Device Selection section of the Hardware tab controls the usage of the
sound cards in the computer during playback from the Court Recorder program.
Default Speaker Device Selection
This is the sound card that will be used for playback through speakers (when the Speaker
option is checked in the main window). The default value should be set to the internal
sound card device.
Headphone Monitor Device Selection
This does not apply to Court Recorder.
Removable Playback Device
Court Recorder does not use the automatic removable devices selection feature in this
configuration. The “Use Removable Device If Present” and “Automatic Removable
Device Selection” check boxes should be unchecked.
Advanced Playback Options
Playback Buffers
The default value should be set to 4 buffers.
Buffer Size
The default value should be set to 1000mSec.

Court Recorder Installation Guide - 47 -
Monitor Delay
Monitor Delay should be set to the default of 3 seconds.
Force Recording at 44.1KHz.
This field should be set to the default value of unchecked.
Recording Options - Sound Quality
In the Recording Options preferences tab, set the recording type to Multichannel (MP3).
Then set the combo box to the number of channels. In this case, the correct value is 4 (2
for the first stereo pair, 2 for the second stereo pair).
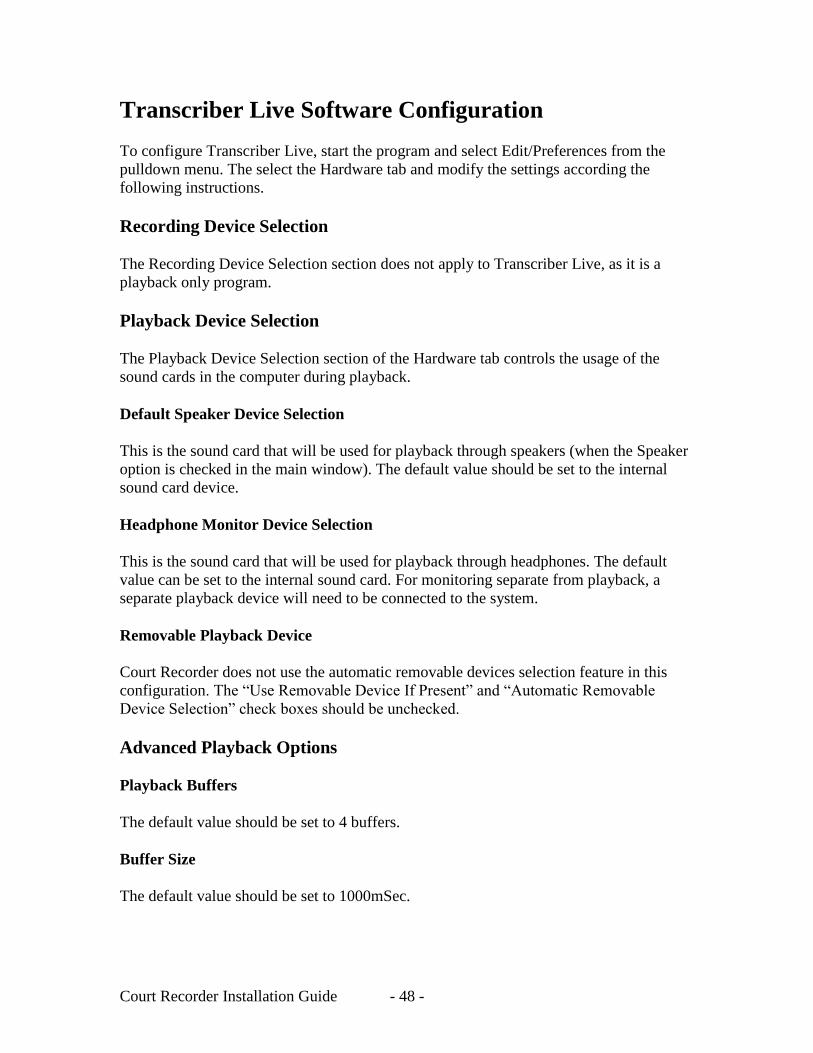
Court Recorder Installation Guide - 48 -
Transcriber Live Software Configuration
To configure Transcriber Live, start the program and select Edit/Preferences from the
pulldown menu. The select the Hardware tab and modify the settings according the
following instructions.
Recording Device Selection
The Recording Device Selection section does not apply to Transcriber Live, as it is a
playback only program.
Playback Device Selection
The Playback Device Selection section of the Hardware tab controls the usage of the
sound cards in the computer during playback.
Default Speaker Device Selection
This is the sound card that will be used for playback through speakers (when the Speaker
option is checked in the main window). The default value should be set to the internal
sound card device.
Headphone Monitor Device Selection
This is the sound card that will be used for playback through headphones. The default
value can be set to the internal sound card. For monitoring separate from playback, a
separate playback device will need to be connected to the system.
Removable Playback Device
Court Recorder does not use the automatic removable devices selection feature in this
configuration. The “Use Removable Device If Present” and “Automatic Removable
Device Selection” check boxes should be unchecked.
Advanced Playback Options
Playback Buffers
The default value should be set to 4 buffers.
Buffer Size
The default value should be set to 1000mSec.
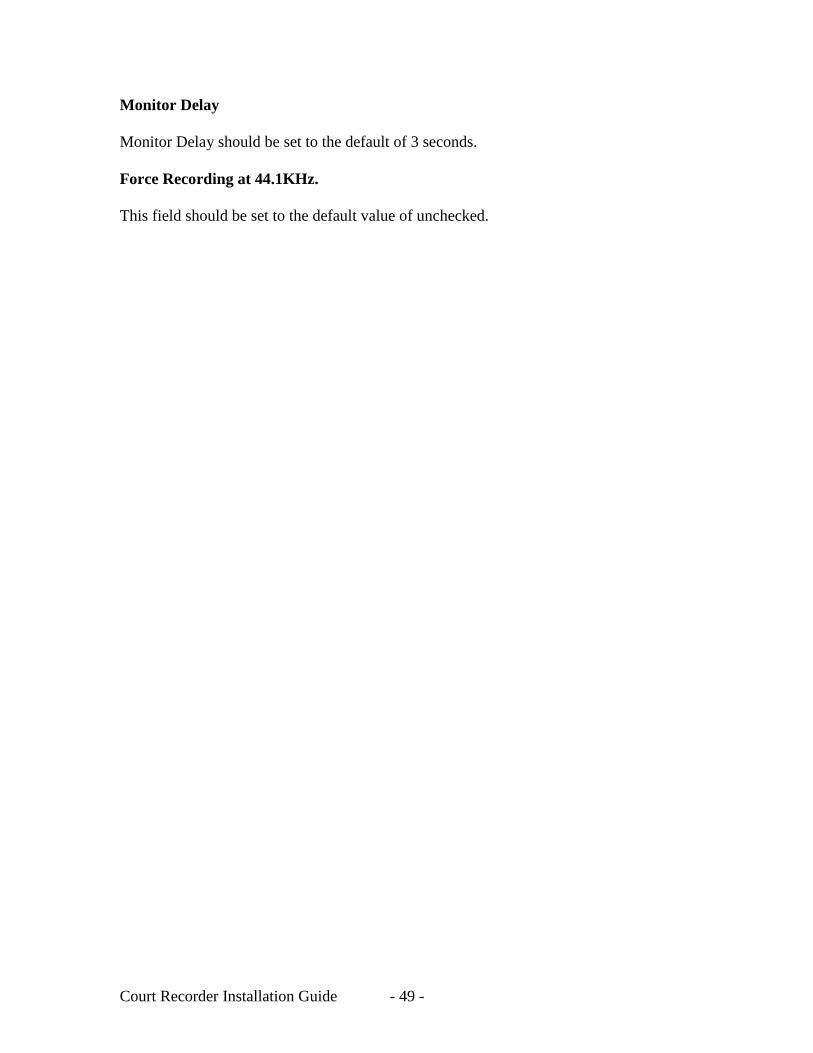
Court Recorder Installation Guide - 49 -
Monitor Delay
Monitor Delay should be set to the default of 3 seconds.
Force Recording at 44.1KHz.
This field should be set to the default value of unchecked.
Court Recorder Installation Guide - 50 -
DMX-4 Audio Connections
Using Microphones
Microphones are attached to the DMX-4 using standard balanced XLR connectors. If the
microphones require phantom power, this must be turned on using the screen control
displayed in the DMX-4 Configuration program.
When purchasing Court Recorder as a complete system, the DMX-4 unit may be supplied
with a microphone “snake” cable. This will allow placement of the microphones at a
greater distance from the recording system. The snake can be left connected to the
interface unit. For portable recording applications, the snake can be rolled up and stored
inside the portable case. Care should be taken to avoid physical damage to the
microphone cables and microphone snake, such as smashing or crimping the cable. If the
cables are not kept in good condition, hum and/or intermittent signal may result.
When connecting the DMX-4 to a sound system (instead of microphones), isolation
transformers may be required to prevent ground loop hum problems. Consult with an
audio installation technician regarding this application.
DMX-8 Audio Interface
The Antex Electronics DMX-8 USB audio interface can be used for connecting up to
eight microphones or line-level inputs to the computer. When connecting to user-supplied
computer systems, the DMX-8 device drivers must be installed, and the system
configured for use with the Court Recorder and Transcriber Live software. The same
instructions for the DMX-4 apply to the DMX-8. The only difference is that there are 8
microphone channels that mix down to 4 recording channels. These microphone settings
can be seen on the DMX-8 control panel.
DMX-4 and DMX-8 Alternative Configuration
When using the DMX-4 or DMX-8 interface, the interface drivers do not provide a stereo
mix of all of the channels. It is preferable to provide the user with a stereo mix, and the
software was designed with that as a typical configuration.
To provide that effect of a stereo mix, it is possible to connect the Monitor Mix output
from the DMX-4 or DMX-8 interface unit directly to the computer sound card. With
some courtroom sound systems, there may also be a separate mono or stereo mix feed
available, as an alternative to using the DMX Monitor Mix.

Court Recorder Installation Guide - 51 -
If you are configuring a desktop computer, connect the monitor mixer output to the line
input of the computer. This will require RCA to 1/8” mini plug cable. If you are using a
laptop, a separate USB adapter that accepts line-level signals must be used to send the
stereo mix signal to the computer. Following are settings for recording from an MXL
Line Level USB interface.
Recording Device Selection
The Recording Device Selection section of the Hardware tab controls the usage of the
sound cards in the computer during recording.
Default Recording Device
This is the default sound card that will be used as the audio source for the Stereo Mix
channels stored in the primary recording file. The default value should be set to “USB
audio CODEC” as the source.
First Recording Array Device
Multi-channel recordings accept audio input from a series of audio interface channels that
are numbered sequentially. Click the Edit button. The value for the First Recording Array
Device should be set to the first stereo pair provided by the DMX-4 (or DMX-8), labeled
with “Antex Electronic” in the title. The value for the 2nd Recording Array Device
should be set to the second stereo pair provided by the DMX-4 (or DMX-8), labeled with
“Antex Electronic (1)” in the title. The rest of the array device settings are not used and
will be disregarded.
Recording Options - Sound Quality
In the Recording Options preferences tab, set the recording type to Multichannel (MP3).
Then set the combo box to the number of channels. In this case, the correct value is 6 (2
for the stereo mix, 4 for each individual microphone channel).

Court Recorder Installation Guide - 52 -
RME Fireface Configuration
Court Recorder and Transcriber Live can be configured to use the RME Fireface audio
interface for recording and playback of audio data. A typical multichannel Court
Recorder system using the RME Fireface includes the following components:
Laptop or Desktop Computer
Windows XP Professional
RME Fireface 800 Audio Interface
Marantz backup recorder
Conference microphones
Optional stenomask for voice reporting
Optional Microphone Preamplifier for additional microphone channels
Speakers
Desktop or rolling equipment rack mount case
The RME Fireface 800 audio interface is a professional quality product for connecting a
wide variety of audio sources to the computer. SoniClear products are certified to work
with the Fireface, provided it has been set up according to these instructions.
When installing the Fireface, it will include default settings for recording using
conventional recording studio audio products. Court Recorder requires that the equipment
be configured specifically for the Court Recorder product. For recording with two
channels, the Fireface can be configured to mix any or all of the input channels into a
mono or stereo source for recording. For multi-channel recording, the Fireface can be
configured for recording more than two channels at a time, with a variety of mixing
options, depending on the application requirements.
Installation and configuration of the Fireface should be performed by audio technicians or
computer support staff familiar with professional audio equipment.
Operation Notes
The firewire interface may not work correctly if the computer has gone into a power
saving mode, such as hibernation. You will need to reboot the computer before using the
firewire interface if this should occur.
Court Recorder Installation Guide - 53 -
RME Hardware Installation
Firewire Interface Requirements
The Fireface requires a reliable firewire connection on the computer. The manufacturer
claims that their system will work reliably with any computer using a firewire 400
interface. However, RME also lists many examples of improperly designed firewire 800
circuitry. For that reason, Court Recorder is only certified to work with firewire 400
connections, and only with the patches and fixes listed in these instructions.
For up-to-date compatibility information, consult the support section of the SoniClear
website, or contract SoniClear support.
Power and Cables
The Fireface includes a universal power supply for connection to a power outlet. It does
not support battery operation.
The Fireface connects to the computer using a standard firewire cable. Because power is
not derived from the firewire bus, both 4 and 6 pin connectors are satisfactory. You will
need to ensure that the method of connecting the cable to the computer is physically
sound so that the cable cannot be accidentally disconnected from the computer during
recording. Loose connectors or situations where the cable can become snagged and
pulled out of the plug need to be addressed in the setup of the equipment.
Microphones are connected using standard balanced XLR connectors. All other analog
audio connections use ¼” TRS balanced line connections. Digital inputs and outputs are
provided using ADAT, SPDIF, and AES digital standards.
Court Recorder Installation Guide - 54 -
Software Installation
Drivers and Flash Update
The Fireface provides drivers and control panel software with the product on CDROM. It
is recommended, however, that you download the latest Windows software available
from the RME website if there are more recent updates (see www.rme-audio.com). The
site also includes a download for updating the Flash memory in the unit to the latest
firmware revision, which may be required for using the latest drivers. Consult the Court
Recorder release Readme.txt file for any additional driver requirements that may apply to
the current Court Recorder software.
To install from the supplied CD, insert the disk and follow the instructions in the manual
and on screen.
To install the downloaded drivers you need to first unzip them into a directory where the
files can be located during the installation process. Then plug in the firewire cable and
turn on the Fireface power. The Windows New Hardware Wizard will be displayed.
Select NO to the request to use Windows Update, select “Install from a list or specific
location”, and then choose the directory where the downloaded files have been extracted.
To update the firmware, follow the instructions provided in the firmware update
download. You must perform the exact sequence of steps indicated, or the update will not
be installed correctly. In particular, ensure that you specify the downloaded version of
driver, do not let Windows pick the driver it thinks is best.
After installing the drivers and updating the firmware, reboot the computer to ensure the
installation is correct and to see the driver and mixer control panels in the task bar.
Windows XP Firewire Patch
A patch is required for Windows XP when recording using a Fireface interface device.
When Microsoft released Service Pack 2 for Windows XP, they changed the handling of
the firewire port in such a way as to render it unusable for audio recording. Instead of
handling the full 400 Megabits/sec transfer rate, it only reportedly runs at 100
Megabits/sec. This is insufficient for reliable audio recording when there are many
channels involved.
A patch for this problem is available from Microsoft that must be installed as part of the
driver installation process. Consult the Microsoft article on the subject and follow their
directions to fix this problem: http://support.microsoft.com/kb/885222/en-us.

Court Recorder Installation Guide - 55 -
Driver Configuration
After rebooting, double click on the Fireface Settings icon in the system tray to open the
configuration dialog. The following are the correct values for each field of this dialog.
Fireface (1) Tab
Buffer Size: 256 Samples
Inputs (1): Rear
Inputs (7): Front+Rear
Inputs (8): Front+Rear
Limit Bandwidth: Analog+SPDIF+ADAT1
SPDIF In: Coaxial
SPDIF Out: nothing checked
Input Level: +4 dBu
Output Level: +4 dBu
Phantom Power: Check Mic 7-10 to turn on phantom power, if needed.
If using dynamic or self-powered microphones, do no check.
Instrument Options: NA (any setting is OK)
Word Clock Out: Unchecked
Options
Check Input: Unchecked
SyncAlign: Check
TMS: Check
Interleaved: Unchecked
Clock Mode: Master
Pref. Sync Ref: Word Clock
DDS Tab
DDS Active: Checked
Frequency: 44.100
Freq. Multiplier x1
Coarse: 0
Active: Unchecked
Fine: 0
Active: Unchecked
Court Recorder Installation Guide - 56 -
After entering and confirming these settings, click the Store in Flash Memory (on the
Fireface (1) tab) and click OK to close the settings dialog.
Recording Mixer Configuration
Court Recorder supports either two-channel recording or multi-channel recording,
depending on the configuration of the software. Right click on the Fireface Mixer icon in
the system tray and select Mixer to display the mixer control panel. If this is the first time
setting up the system, click the Preset 5 button to load that preset provided by RME. Then
select View/Matrix from the pulldown menu to display the patching matrix display. Click
once on each of the matrix cells that shows a green background. This will turn off those
matrix connections and you will have a completely blank set of connections.
Mixer Presets
The SoniClear software includes a set of preset controls stored in a .FPR Fireface mixer
setting file (such as RME_Presets_RevM.fpr). For release versions of SoniClear these
preset files are copied into the SoniClear program directory when SoniClear is installed.
You load all of the presets for the type of recording software at once using File/Open All
Presets, then select the correct preset from the Mixer panel.
Preset 4
This preset is designed to mix four microphone sources from the internal microphone
channels (connectors 7-10 on the front panel). These are panned evenly across the stereo
“field” The microphones are then fed into the computer as the audio driver selection
FireFaceAN1+2. This two-channel mix is available from the Analog outputs on the back
of the unit (channels 1 and 2) for feeding into a PMD 560 digital backup recorder. This
mix is also fed into the SPDIF output for input into a PMD 570 digital backup recorder.
Preset 8
This preset is designed to mix eight microphone sources (from an external microphone
preamp) connected into analog lines 1-8. The eight signals are panned evenly across the
stereo “field” to give the sense of microphones coming from a stage with the source of
the speaking distributed from left to right. The front panel microphone inputs 9 and 10
are also included in the mix, panned to the left and right channels, respectively.
The 8 input channels are available as individual input sources for the Court Recorder
“recording array” devices as ADAT1, channels 1-8. This is specified in the Hardware
preferences by selecting the first ADAT1 sound card (channels 1+2).
The 8 inputs are then fed into the computer as the audio driver selection FireFaceAN1+2.
This two-channel mix is available from the Analog outputs on the back of the unit

Court Recorder Installation Guide - 57 -
(channels 1 and 2) for feeding into a PMD 560 digital backup recorder. This mix is also
fed into the SPDIF output for input into a PMD 570 digital backup recorder.
The option is available to feed external audio into the Fireface using ADAT input. The
ADAT1 channels 1-8 are mixed into the output channels 1-8. In addition, the odd
numbered ADAT channels are fed into the left channel of the stereo mix and the even
numbered ADAT channels are fed into the right channel of the stereo mix.
Presets 1-3 and 5-7
Reserved for future use.
Manual Two-Channel Setup
You can also recreate the Court Recorder preset mixer settings manually. To accomplish
the two-channel mix, the Mixer and Matrix control panels require the following
adjustments:
Mixer Settings
The two channel input submix set up in the Matrix control panel needs to be “looped
back” as an input value for recording. Using a control-click command in the Mixer
window enables Loopback mode. In the mixer strip section labeled “AN 1” (first mixer
column of the output section, which is the bottom row of strips), Control-Click the white
label below the mixer slider (hold down Control key while clicking on the white text that
says “AN 1”). This will turn this label to a red color, indicating the loopback mode is on.
Matrix Settings
Set up the new patch connections in the Matrix control panel using the following table.
The first number is input channel, listed on SIDE of matrix. The second number is the
output channel, shown on TOP of matrix display. Turn each of the patch connections on
by clicking once on the intersection of the input (row) and output (column). This will set
the value to 0.0, shown on a green background color. To set the level, hold down the
control key and click on the cell. While holding down the mouse button, slide mouse up
or down to adjust to the desired value.

Court Recorder Installation Guide - 58 -
In 1 SP L 0.0
In 2 SP L -1.3 SP R -16.9
In 3 SP L -2.5 SP R -12.0
In 4 SP L -5.4 SP R -6.7
In 5 SP L -6.7 SP R -5.4
In 6 SP L -12.0 SP R -2.5
In 7 SP L -16.9 SP R -1.3
In 8 SP R 0.0
Stereo Mix
Matrix
Settings
Input
Row
Output
Column
Left
Mix
(Pan)
Value
Output
Column
Right
Mix
(Pan)
Value
In 1 AN 1 0.0
In 2 AN 1 -1.3 AN 2 -16.9
In 3 AN 1 -2.5 AN 2 -12.0
In 4 AN 1 -5.4 AN 2 -6.7
In 5 AN 1 -6.7 AN 2 -5.4
In 6 AN 1 -12.0 AN 2 -2.5
In 7 AN 1 -16.9 AN 2 -1.3
In 8 AN 2 0.0
In 9 SP L 0.0
In 10 SP R 0.0
Out 1 PH L 0.0
Out 2 PH R 0.0
Out 3 PH L 0.0 AN 3 0.0
Out 4 PH R 0.0 AN 4 0.0

Court Recorder Installation Guide - 59 -
Court Recorder Software Configuration
After installation of the software and hardware, Court Recorder must be configured to
work with the RME Fireface 800 unit. To do this, start Court Recorder and select
Edit/Preferences from the pulldown menu. The select the Hardware tab and modify the
settings according the following instructions.
Recording Device Selection
The Recording Device Selection section of the Hardware tab controls the usage of the
sound cards in the computer during recording.
Default Recording Device
This is the default sound card that will be used as the audio source for the Stereo Mix
channels stored in the primary recording file. The default value should be set to Fireface
800 Analog (1+2). Input source will automatically be set to Recording Control.
Recording Array Devices
Multi-channel recordings accept audio input from a series of audio interface channels that
are numbered sequentially. Click the Edit button. From the popup dialog, set the value in
first device field to Fireface 800 ADAT (1+2). Click the Defaults button to set the rest of
the devices in the recording array.
Removable Recording Device
Court Recorder does not use the automatic removable devices selection feature in this
configuration. The “Use Removable Device If Present” and “Automatic Removable
Device Selection” check boxes should be unchecked.
Advanced Recording Options
These options control how recording is processed. These fields should only be changed in
the event of problems with recording using the default settings. Contact SoniClear
support for assistance.
Recording Process Priority
Default value should be set to Medium.
Court Recorder Installation Guide - 60 -
Buffer Size
The default value should be set to Automatic.
Disk Update Time
The default value should be set to 5000 milliseconds.
Force Recording at 44.1KHz.
The default value should be set to Checked.
Playback Device Selection
Normally the Transcriber Live program will be used for playback. However, Court
Recorder must be configured correctly in the event that playback is selected by the user.
The Playback Device Selection section of the Hardware tab controls the usage of the
sound cards in the computer during playback from the Court Recorder program.
Default Speaker Device Selection
This is the sound card that will be used for playback through speakers. Select the internal
sound card device for playback through the computer speakers.
Headphone Monitor Device Selection
This does not apply to Court Recorder.
Removable Recording Device
Court Recorder does not use the automatic removable devices selection feature in this
configuration. The “Use Removable Device If Present” and “Automatic Removable
Device Selection” check boxes should be unchecked.
Advanced Playback Options
Playback Buffers
The default value should be set to 4 buffers.
Buffer Size
The default value should be set to 1000mSec.

Court Recorder Installation Guide - 61 -
Monitor Delay
Monitor Delay should be set to the default of 3 seconds.
Force Recording at 44.1KHz.
This field should be set to the default value of Checked.
Recording Options - Sound Quality
In the Recording Options preferences tab, set the recording type to Multichannel (MP3).
Then set the combo box to the number of channels. In this case, the correct value is 10 (2
for the stereo mix, plus 8 for each individual microphone channel).

Court Recorder Installation Guide - 62 -
Transcriber Live Software Configuration
To configure Transcriber Live, start the program and select Edit/Preferences from the
pulldown menu. The select the Hardware tab and modify the settings according the
following instructions.
Recording Device Selection
The Recording Device Selection section does not apply to Transcriber Live, as it is a
playback only program.
Playback Device Selection
The Playback Device Selection section of the Hardware tab controls the usage of the
sound cards in the computer during playback.
Default Speaker Device Selection
This is the sound card that will be used for playback through speakers (when the Speaker
option is checked in the main window). The default value should be set to Fireface 800
Analog (3+4). When using the Fireface, plug portable speakers into the analog output
lines 3 and 4 for playback into the room. Alternatively, the Default Speaker Device can
be set to the internal sound card device of the computer. In that setting, playback when
the Speaker option is checked will be heard through the computer speakers.
Headphone Monitor Device Selection
This is the sound card that will be used for playback through headphones. The default
value should be set to Fireface 800 Analog (1+2). Monitoring headphones should be
connected to the headphone jack on the front of the Fireface unit.
Removable Recording Device
Court Recorder does not use the automatic removable devices selection feature in this
configuration. The “Use Removable Device If Present” and “Automatic Removable
Device Selection” check boxes should be unchecked.
Advanced Playback Options
Playback Buffers
The default value should be set to 4 buffers.

Court Recorder Installation Guide - 63 -
Buffer Size
The default value should be set to 1000mSec.
Monitor Delay
Monitor Delay should be set to the default of 3 seconds.
Force Recording at 44.1KHz.
This field should be set to the default value of Checked.

Court Recorder Installation Guide - 64 -
Using Court Recorder With
Dragon Voice Recognition
It is possible for voice writer court reporters to use Court Recorder in conjunction with
Nuance Dragon voice recognition software. This allows a draft transcript to be produced
from dictation spoken into a stenomask microphone.
For real-time usage, the Court Recorder, Transcriber Live, and Dragon programs run at
the same time.
For batch transcription, Court Recorder can record both the room microphone and the
stenomask in separate tracks during the session. After completing the recording, the two
channels can be split into separate files. The room microphone channel can be stored in a
file for delivery to clients. The stenomask channel can be stored in a file to be opened in
the Dragon software for processing into a draft transcript.
Dragon will not be able to convert the room microphone audio into a transcript. At this
time there is no product or technology able to recognize unlimited voices and unlimited
vocabularies. The only way that voice recognition software can convert speaking to text
is with a known speaking voice and with a known vocabulary. By speaking into a
stenomask during the session (or repeating words spoken in the recording into a
microphone at a later time), the software voice recognition software will be able to
translate into text with a usable level of accuracy.
Using Dragon requires the development of special speaking techniques that will be
recognized by the Dragon voice recognition processing. The use must also train the
Dragon software to create a user profile to recognize the characteristics of the user’s
voice. Trio Systems does not support the Dragon software, nor does it offer assistance in
developing the Dragon profile. Consult with Nuance and court reporting support groups
for suggestions on how this can be accomplished.
Real Time Voice Writing
The key to making Court Recorder and Dragon work together in real time is to ensure
that two uniquely named audio input devices are being used. Typically this will be a
MobilePre for the Court Recorder recording and an Andrea USB audio interface
connected to a stenomask. It is also possible to use the iMic connected to a Voice
Tracker, with the stenomask connected to an Andrea USB adapter, or the computer sound
card. What will not work is using two USB adapters of the same make (such as two
Andrea adapters or two iMic adapters). In that case Court Recorder and Dragon cannot
recognize which device is the correct one to access for audio input.
Once you have selected the input devices that will work together, install and configure
Court Recorder as directed above in this Installation Guide. Then follow the Dragon

Court Recorder Installation Guide - 65 -
installation and configuration instructions for the stenomask audio adapter. You should
then be able to run both programs at the same time, switching between the two program
windows as required.
Court Recorder software and Dragon automatic voice recognition software both require
significant computer processing power. Not all computers will be fast enough to support
both programs running at the same time. You will need to test your system to determine
if it is capable of doing this.
Batch Transcription
For batch transcription of stenomask audio after a recording session using Dragon, you
will need to record the mask audio in a separate channel from the room microphone. This
requires using the MobilePre audio interface, which has separate jacks for each input
channel.
Connect the room microphone to the left channel (labeled “Channel 1” on the MobilePre)
and the stenomask microphone to the right channel (labeled “Channel 2” on the
MobilePre). The reason for using room microphone on the left channel is that the
File/Export to Image Folder function will export only the left channel when creating the
archive disk for distribution, which should be the room microphone.
When using a MobilePre as the interface device, the stenomask must be connected to the
XLR microphone input #2. Do not use the line level ¼” phone input.

Court Recorder Installation Guide - 66 -
Marantz PMD 560 Recorder
Configuration
Overview
The Fireface configuration listed above is set up to feed the PMD 560 recorder with a
stereo mix of all microphones as a backup recording system. When the Fireface starts up,
it will automatically load the last configuration setting from internal memory. If the
computer is not functioning for any reason, the PMD 560 can continue to record from the
Fireface without the need for control from the computer.
Power and Cables
The PMD 560 includes an internal power supply that can be used with US or European
standards, depending on the model. It does not operate from battery power.
The PMD 560 should be connected from the Analog output channels 1 and 2 of the
Fireface to the consumer line-level input on the PMD 560 (left and right, respectively).
Use a stereo cable that has TRS or TS ¼” male phone plugs on one end and RCA male
plugs on the other.
The option exists to connect the PMD 560 directly to the computer for accessing the data
on the flash memory drive. It is recommended instead that when you need to access the
backup recording on the flash disk that you remove the flash card from the PMD 570 and
plug it into a computer using an appropriate CF Flash Card adapter.
Setup
Follow the PMD 560 installation manual to program the unit for recording from the
analog input at the sample rate of 44.1K, storing in MP3 stereo with 128kbps encoding.
This will provide for over 17 hours of recording time on a 1 Gigabyte flash card.
Recording and Playback
Consult the PMD 560 instruction manual for directions on how to record and play back
recordings. The headphone jack can be used to monitor recording.

Court Recorder Installation Guide - 67 -
Marantz PMD 570 Recorder
Configuration
Overview
The Fireface configuration listed above is set up to feed the PMD 570 recorder with a
stereo mix of all microphones as a backup recording system. When the Fireface starts up,
it will automatically load the last configuration setting from internal memory. If the
computer is not functioning for any reason, the PMD 570 can continue to record from the
Fireface without the need for control from the computer.
The unit can be connected using input and output signals that use SPDIF, balanced
professional line, and consumer line standards. These instructions are specified using the
SPDIF connection from the Fireface to reduce the number digital to analog conversions
needed in the signal chain.
Power and Cables
The PMD 570 includes an internal power supply that can be used with US or European
standards, depending on the model. It does not operate from battery power.
The SPDIF connection is made using an RCA male to RCA mail cable designed
specifically for digital use. Connect the Fireface SPDIF output to the PMD 570 input, and
Fireface SPDIF input to the PMD 570 output.
The option exists to connect the PMD 570 directly to the computer for accessing the data
on the flash memory drive. It is recommended instead that when you need to access the
backup recording on the flash disk that you remove the flash card from the PMD 570 and
plug it into a computer using an appropriate CF Flash Card adapter.
Setup
Follow the PMD 570 installation manual to program the unit for recording from the
SPDIF input at the sample rate of 44.1K, storing in MP3 stereo with 128kbps encoding.
This will provide for over 17 hours of recording time on a 1 Gigabyte flash card.
Recording and Playback
Consult the PMD 570 instruction manual for directions on how to record and play back
recordings. The headphone jack can be used to monitor recording.

Court Recorder Installation Guide - 68 -
Running SoniClear from the Command
Line
SoniClear can be run from a command line statement. This is useful for integrating
SoniClear with other programs that need to control the management of files and
workflow.
The general command line syntax is:
<program path>SoniClear8.exe <command> <output file> <input file >
The commands available are:
Action Command
Create Agenda Template (Docket) CreateAgenda
Create New File CreateRecording
Create New File and Start Recording StartRecording
Stop and Exit Program StopExit
Stop, Auto Archive, and Exit Program StopArchiveExit
Input Data Format
SoniClear will accept Agenda and Marker data from a text file when that file is specified
in the command line statement. The text file is a “tab delimited ascii” file in the following
format:
Column Value
1 “A” or “M” character indicating Agenda item or Marker
2 Title
3 Detail (Agenda Items) or Function Key # (Markers)
4 Don’t Export This Note To Archive (1=True, 0=False)
5 Add as separate note (1=True, 0=False)
Notes:
Marker function key number is indicated by the letter F followed by the key
number. For example F1, F2, F3, etc.

Court Recorder Installation Guide - 69 -
The Title and Detail text fields can incorporate the RTF markup for New
Paragraph: “\par”, where the backslash functions as a escape character. To include
the backslash character in the text string, it must also be escaped, i.e: “\\”.
Sample Import File
Following is an example data import text file including agenda items and markers:
A FINANCE COMMISSION MEETING June 14, 2010 0 1 A CALL TO ORDER 0 1 A ROLL CALL 0 1 A PLEDGE OF ALLEGIANCE 0 1 A PRESENTATIONS Award Ceremony 0 1 A COMMITTEE REPORTS School Financing Plan 0 1 A PUBLIC COMMENTS Public comments
regarding the Finance Commission committee reports.
0 1
A ADJOURNMENT 0 1 M Motion F1 0 1 M Vote F2 0 1 M Action Item F3 0 1 M Next Speaker F4 0 1 M Board Member Jim Smith F5 0 1 M Board Member Sally Jones F6 0 1 M Board Member Robert Garcia F7 0 1 M Hidden Note F12 1 1
Create Agenda Template
SoniClear can create an agenda template ( referred to in Court Recorder as a “Docket”)
automatically from a specially formatted text file. The command line syntax is:
<program path>SoniClear8.exe CreateAgenda <output file> <input file >
For example (on one line):
“c:\Program Files\SoniClear8\SoniClear8.exe” CreateAgenda
“c:\My Documents\SampleAgenda.agd”
“c:\BatchImports\SampleAgenda.txt”
Create New File
SoniClear can create a new file and leave the program displayed and ready to start
recording. The command line syntax is:

Court Recorder Installation Guide - 70 -
<program path>SoniClear8.exe CreateRecording <output file>
For example (on one line):
“c:\Program Files\SoniClear8\SoniClear8.exe” CreateRecording
“c:\My Documents\MeetingXYZ.wav”
Notes:
The output file type must match the default recording type set in the SoniClear
preferences.
Create New File and Import Agenda
SoniClear can create a new file and leave the program displayed and ready to start
recording. The command line syntax is:
<program path>SoniClear8.exe CreateRecording <output file> <input file >
For example (on one line):
“c:\Program Files\SoniClear8\SoniClear8.exe” CreateRecording
“c:\My Documents\MeetingXYZ.wav”
“c:\BatchImports\SampleDocket.txt”
Notes:
The output file type must match the default recording type set in the SoniClear
preferences.
The input file is the Agenda and Marker information in a text file in the format
required for importing data.
Create New File and Start Recording
SoniClear creates a new file and starts recording. The command line syntax is:
<program path>SoniClear8.exe StartRecording <output file>
For example (on one line):

Court Recorder Installation Guide - 71 -
“c:\Program Files\SoniClear8\SoniClear8.exe” StartRecording
“c:\My Documents\MeetingXYZ.wav”
Notes:
The output file type must match the default recording type set in the SoniClear
preferences.
Create New File, Import Agenda, and Start Recording
SoniClear creates a new file, imports the agenda (docket) and marker data, and starts
recording. The command line syntax is:
<program path>SoniClear8.exe StartRecording <output file> <input file >
For example (on one line):
“c:\Program Files\SoniClear8\SoniClear8.exe” StartRecording
“c:\My Documents\MeetingXYZ.wav”
“c:\BatchImports\SampleAgenda.txt”
Notes:
The output file type must match the default recording type set in the SoniClear
preferences.
The input file is the Agenda and Marker information in a text file in the format
required for importing data.
Stop and Exit Program
SoniClear stops recording or playing (if in one of those modes) and then exits the
program. The command line syntax is:
<program path>SoniClear8.exe StopExit
For example (on one line):
“c:\Program Files\SoniClear8\SoniClear8.exe” StopExit

Court Recorder Installation Guide - 72 -
Notes:
If SoniClear is not already running, no action is taken.
Stop, Archive, and Exit Program
SoniClear stops recording or playing (if in one of those modes), performs Auto Archive
action, and then exits the program. The command line syntax is:
<program path>SoniClear8.exe StopArchiveExit
For example (on one line):
“c:\Program Files\SoniClear8\SoniClear8.exe” StopArchiveExit
Notes:
If SoniClear is not already running, no action is taken.
If SoniClear is running as Meeting Recorder 8 StartArchiveExit has the same
behavior as StopExit. The Auto Archive process does not run because Auto
Archive is not a feature in Meeting Recorder 8.
When Auto Archive completes successfully, it displays a completion dialog
requiring confirmation by user.
If an error occurs while performing Auto Archive, displays an error dialog
requiring confirmation by user.
Sample Batch File
For convenience, the SoniClear command can be included in a text file with the .BAT
extension. Then the user can double click on that file each time the command should be
run. Following is a sample batch file that launches SoniClear and generates an agenda
template from a text file:
cls @ECHO OFF ECHO. ************************************ ECHO. ** Create Agenda Import Data ECHO. *************************************
“c:\Program Files\SoniClear8\SoniClear8.exe” CreateAgenda “c:\My Documents\SampleAgenda.agd” "c:\BatchImports\SampleAgenda.txt" cls EXIT

Court Recorder Installation Guide - 73 -
Using Windows Scheduler Tasks to Start and Stop Recording
SoniClear recording can be run on a timed basis using the Windows Scheduled Tasks
feature. The SoniClear command to run the program and start recording process
(StartRecording) is added as a scheduled task, set to run when the recording should start.
A command to exit SoniClear (StopExit) is added as a second scheduled task, set to run
at the time when the recording should stop.
Windows XP Instructions
To set up the scheduled tasks in Windows XP, follow these instructions:
1. Click the Start button.
2. Select All Programs, Accessories, System Tools and then Scheduled Tasks.
3. Add the StartRecording command task to initiate recording at the desired time:
3.1. Double click on “Add Scheduled Task”.
3.2. Click Next (it may take a long time to get to next step, please wait).
3.3. Select SoniClear 8 from the list of programs. If SoniClear 8 is not shown on the
list, select it manually as follows:
3.3.1. Click Browse button.
3.3.2. Navigate to the SoniClear program directory (usually c:\Program
Files\SoniClear8\).
3.3.3. Select SoniClear8.exe and click Open button.
3.4. Enter a suitable title, such as “Start SoniClear for Monday Meeting”
3.5. Select One time only, or which ever schedule is appropriate, and click Next.
3.6. Select the start time and date, and click Next.
3.7. Enter the user account for running the program (or select the current account)
3.8. Enter the password (twice), and click Next.
3.9. Check the box next to “Open advanced properties…”, and click Finish.
3.10. In the field labeled “Run”, add the StartRecording command after the
location of the recording. The field value will then look something like:
C:\PROGRA~1\SO7C83~1\SoniClear8.exe StartRecording or "C:\Program Files\SoniClear8\SoniClear8.exe" StartRecording
Note that the spelling and capitalization must be exactly correct. Any other
command string will result in an error.
3.11. Click OK.
3.12. Enter the password (twice) in the Set Account Information dialog, and
click OK
4. Add the StopExit command task to stop recording at the desired time:
4.1. Double click on “Add Scheduled Task”.
4.2. Click Next (it may take a long time to get to next step, please wait).

Court Recorder Installation Guide - 74 -
4.3. Select SoniClear 8 from the list of programs. If SoniClear 8 is not shown on the
list, select it manually as follows:
4.3.1. Click Browse button.
4.3.2. Navigate to the SoniClear program directory (usually c:\Program
Files\SoniClear8\).
4.3.3. Select SoniClear8.exe and click Open button.
4.4. Enter a suitable title, such as “Stop SoniClear for Monday Meeting”
4.5. Select One time only, or which ever schedule is appropriate, and click Next.
4.6. Select the stop time and date, and click Next.
4.7. Enter the user account for running the program (or select the current account)
4.8. Enter the password (twice), and click Next.
4.9. Check the box next to “Open advanced properties…”, and click Finish.
4.10. In the field labeled “Run”, add the StopExit command after SoniClear.exe.
The field value will then look something like:
C:\PROGRA~1\SO7C83~1\SoniClear8.exe StopExit or "D:\Program Files\SoniClear8\SoniClear8.exe" StopExit
Note that the spelling and capitalization must be exactly correct. Any other
command string will result in an error.
4.11. Click OK.
4.12. Enter the password (twice) in the Set Account Information dialog, and
click OK
5. You can test that the program will record and stop by manually activating these
scheduled tasks:
5.1. Right click the start recording task (that you labeled “Start SoniClear for Monday
Meeting”, or whatever)
5.2. Select Run – SoniClear should run and start recording immediately.
5.3. Right click the stop recording task and select Run – SoniClear should stop
recording and exit.
Windows 7 Instructions
To set up the scheduled tasks in Windows 7, follow these instructions:
1. Click the Start button.
2. Select All Programs, Accessories, System Tools and then Task Scheduler.
3. Add the StartRecording command task to initiate recording at the desired time:
3.1. Click on “Create Task”.
3.2. Enter a suitable title, such as “Start SoniClear for Monday Meeting”
3.3. Click the Trigger tab.
3.4. Click the New button.
3.5. Select when you want the recording to start and click OK
3.6. Select the Actions tab.
3.7. Click New button.

Court Recorder Installation Guide - 75 -
3.8. Click Browse button.
3.9. Navigate to the SoniClear program directory (usually Local Disk (C:), Program
Files, SoniClear8).
3.10. Select SoniClear8.exe and click Open button.
3.11. In the “Add arguments” field, enter “StartRecording”.
3.12. Click OK button.
3.13. Click OK to store the new task.
4. Add the StopExit command task to stop recording at the desired time:
4.1. Click on “Create Task”.
4.2. Enter a suitable title, such as “Stop SoniClear for Monday Meeting”
4.3. Click the Trigger tab.
4.4. Click the New button.
4.5. Select when you want the recording to start and click OK
4.6. Select the Actions tab.
4.7. Click the New button.
4.8. Click Browse button.
4.9. Navigate to the SoniClear program directory (usually Local Disk (C:), Program
Files, SoniClear8).
4.10. Select SoniClear8.exe and click Open button.
4.11. In the “Add arguments” field, enter “StopExit”.
4.12. Click OK button.
4.13. Click OK to store the new task.
5. You can test that the program will record and stop by manually activating these
scheduled tasks:
5.1. Right click the start recording task (that you labeled “Start SoniClear for Monday
Meeting”, or whatever)
5.2. Select Run – SoniClear should run and start recording immediately.
5.3. Right click the stop recording task and select Run – SoniClear should stop
recording and exit.
Using Windows Command Line to Schedule SoniClear
A batch file to schedule recording could be created using the Windows schtasks
command. This command could be used to set up the SoniClear tasks for starting and
stopping recording. The syntax for schtasks is:
schtasks /create /tn TaskName /tr TaskRun /sc schedule [/mo modifier] [/d day] [/m mo
nth[,month...] [/i IdleTime] [/st StartTime] [/sd StartDate] [/ed EndDate] [/s computer [/u
[domain\]user /p password]] [/ru {[Domain\]User | "System"} [/rp Password]] /?
Consult with the Windows documentation for more details.