Embed Size (px)
Citation preview

Solar Science StationBuild your own solar data gathering tool for the classroom or use as a science faire project.
Written By: Joshua
Solar Science Station Release: 1.0 - 2017-11-22
© 2017 browndoggadgets.dozuki.com/ Page 1 of 8

INTRODUCTION
Build your own solar data gathering tool for the classroom or use as a science faire project. Recordlocal solar data using the build in solar panel and volt meter.
TOOLS:Screw Driver (1)
Wire Stripper (1)
PARTS:Solar Science Station Kit (1)
Solar Science Station Release: 1.0 - 2017-11-22
© 2017 browndoggadgets.dozuki.com/ Page 2 of 8

Step 1 — Strip The Wire
Cut the red and black stranded core wires in half. These are the two long wires in the kit.
Strip both ends of all the stranded core wires. (The ones you just cut)
Do the same for the solar cell.
Optional: If you're using a battery holder, also strip the wire on it.
Step 2 — Add Velcro
Add velcro the back of the solarpanel and the wooden mount.
Weave wires from the solar cellthrough the two wooden piecesshown in the diagram. (The oneswith the big holes in them.)
Using the velcro, stick the solar cellto it's wooden mount.
Solar Science Station Release: 1.0 - 2017-11-22
© 2017 browndoggadgets.dozuki.com/ Page 3 of 8

Step 3 — Banana Sockets
Screw the red and black Banana Sockets to the wooden face.
Attach one of the stripped wires to each of the Banana Sockets.
If they're not staying in place, try putting the wire between the two screw nuts and tightening themdown.
Solar Science Station Release: 1.0 - 2017-11-22
© 2017 browndoggadgets.dozuki.com/ Page 4 of 8

Step 4 — USB Circuit
Move the small white switch so that it is next to the negative terminal.
Using your remaining stranded core wire, wrap the exposed metal ends around two metalterminals on the USB circuit.
Tip: If you're having issues, use your wire strippers and expose more wire. This will make thingseasier for wrapping.
Solar Science Station Release: 1.0 - 2017-11-22
© 2017 browndoggadgets.dozuki.com/ Page 5 of 8
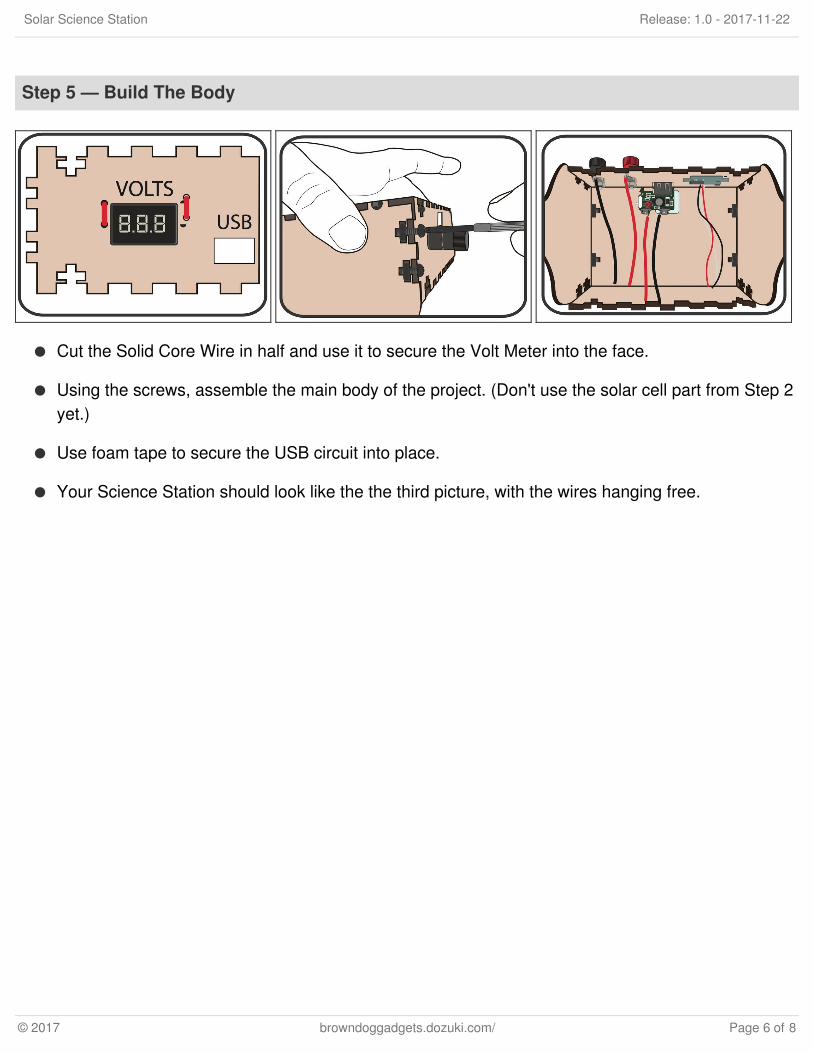
Step 5 — Build The Body
Cut the Solid Core Wire in half and use it to secure the Volt Meter into the face.
Using the screws, assemble the main body of the project. (Don't use the solar cell part from Step 2yet.)
Use foam tape to secure the USB circuit into place.
Your Science Station should look like the the third picture, with the wires hanging free.
Solar Science Station Release: 1.0 - 2017-11-22
© 2017 browndoggadgets.dozuki.com/ Page 6 of 8

Step 6 — Wire Things Up
Start by connecting all the Black,Negative wires, together.
Follow the example diagram above,and put two black wires on one sideof the terminal block and two on theother. They're now connected.
Do the same thing with all the Red,Positive, wires. (And the white wirefrom the Volt Meter.)
Attach half to one side of theTerminal Block and half to the otherside.
Note: You won't be using the twomiddle spots on the Terminal Blockunless you're using a battery holder.
Step 7 — Battery Holder
If you're using an optional BatteryHolder & Rechargeable Batteriesyou'll want to follow this diagram.
Note: Be sure to pay attention towhich way your Diode is facing. Theblack bar should be on the sameside as all your Red, Positive, wires.
Solar Science Station Release: 1.0 - 2017-11-22
© 2017 browndoggadgets.dozuki.com/ Page 7 of 8

Try taking basic data readings throughout the day. Try recording voltage readings at 3-4 angles and ateach cardinal directions (North, South, East, and West). Do this over several days. Graph your data.
This document was last generated on 2017-12-05 10:25:31 PM.
Step 8 — Attach The Solar Cell
Screw your remaining partstogether.
Take this project outside and test inbright, full, sunlight. The LED VoltMeter will automatically power onwhen enough sun is shining.
Note: You need real sunlight.Artificial light does not work.
Solar Science Station Release: 1.0 - 2017-11-22
© 2017 browndoggadgets.dozuki.com/ Page 8 of 8