Embed Size (px)
Citation preview
Solar Fountain Project Hands-on Build and Assessment Criteria Replicable hands-on activity emphasizing the creative aspect of engineering that is often lost in the static textbook approach to teaching mechanical systems. The activity is meant to introduce the design process and build confidence in populations that did not have the opportunity to tinker with things in their childhood. The solar fountain combines a small DC pump with a readily available solar panel. The fountain design is left to the student who is encouraged to mix artistic sensitivity into an engineering process. The fountain symbolizes the human need for water and energy. The assessment criteria incorporate the design process documented in a lab notebook and a written instruction manual enabling the student to build a fountain at home. Research phase- Brainstorming Session Diagram/Draw charts in lab notebook – done interactively in class, notes from class discussion used to create 3 engineering charts. Grading Criteria: Charts are clearly labeled and legible in lab notebooks.
1. State project objective and customer. Identify the required function. Lists components required to accomplish the task. Describe the components in non-technical terms.
2. Customer Requirements Answers the question: What does the customer want?
3. Engineering Specifications Describe the components in technical terms.
4. Draw a Quality Function Deployment Matrix (QFD); matrix with customer requirements on one axis and the engineering specifications on the other axis. Make sure all objectives and requirements are met.
Concept Generation Main components: pump and solar panels handed out to students. Gather ideas for fountains from websites provided and in-class books. Draw sketch of proposed fountain in lab notebook. Describe in detail component placement. Grading Criteria: Sketch clearly shows creative design thought with sufficient attention to pump and panel location. All components clearly labeled. Description clearly indicates thought process. Build Phase Three parts to the build
1. Solar panel & pump assembly 2. Fountain composition 3. Panel holder
1. Solar panel & pump assembly
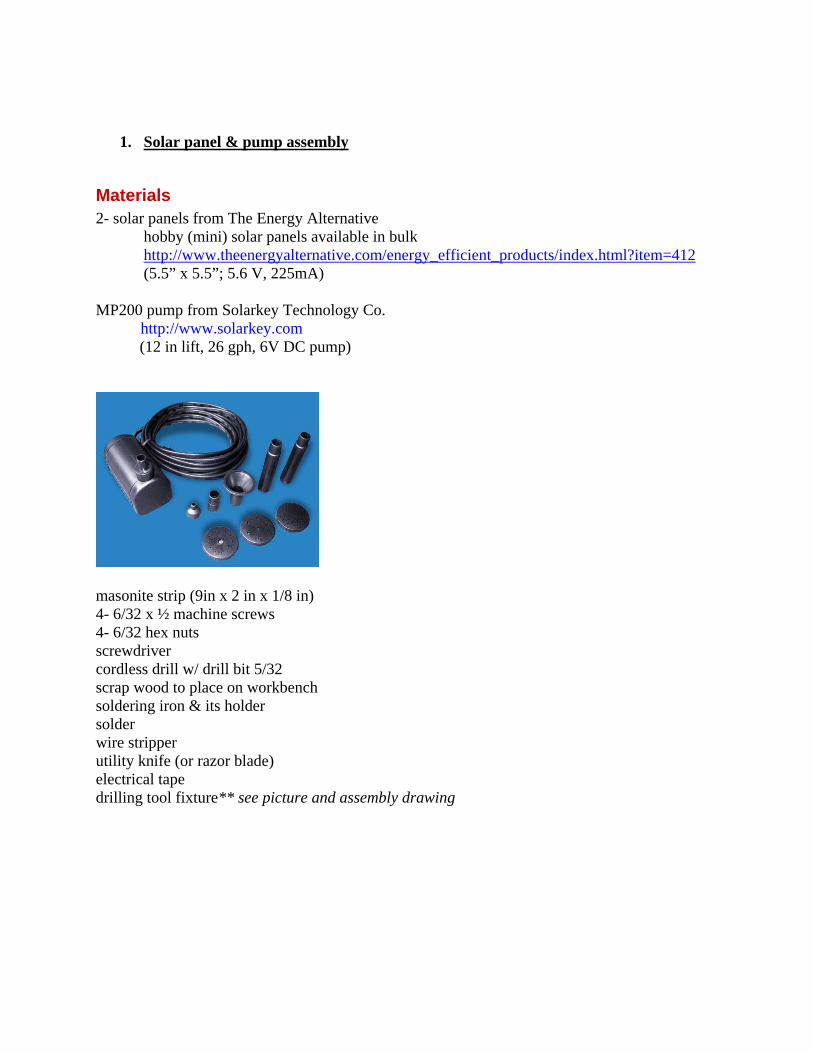
Materials 2- solar panels from The Energy Alternative hobby (mini) solar panels available in bulk http://www.theenergyalternative.com/energy_efficient_products/index.html?item=412 (5.5” x 5.5”; 5.6 V, 225mA) MP200 pump from Solarkey Technology Co. http://www.solarkey.com (12 in lift, 26 gph, 6V DC pump)
masonite strip (9in x 2 in x 1/8 in) 4- 6/32 x ½ machine screws 4- 6/32 hex nuts screwdriver cordless drill w/ drill bit 5/32 scrap wood to place on workbench soldering iron & its holder solder wire stripper utility knife (or razor blade) electrical tape drilling tool fixture** see picture and assembly drawing
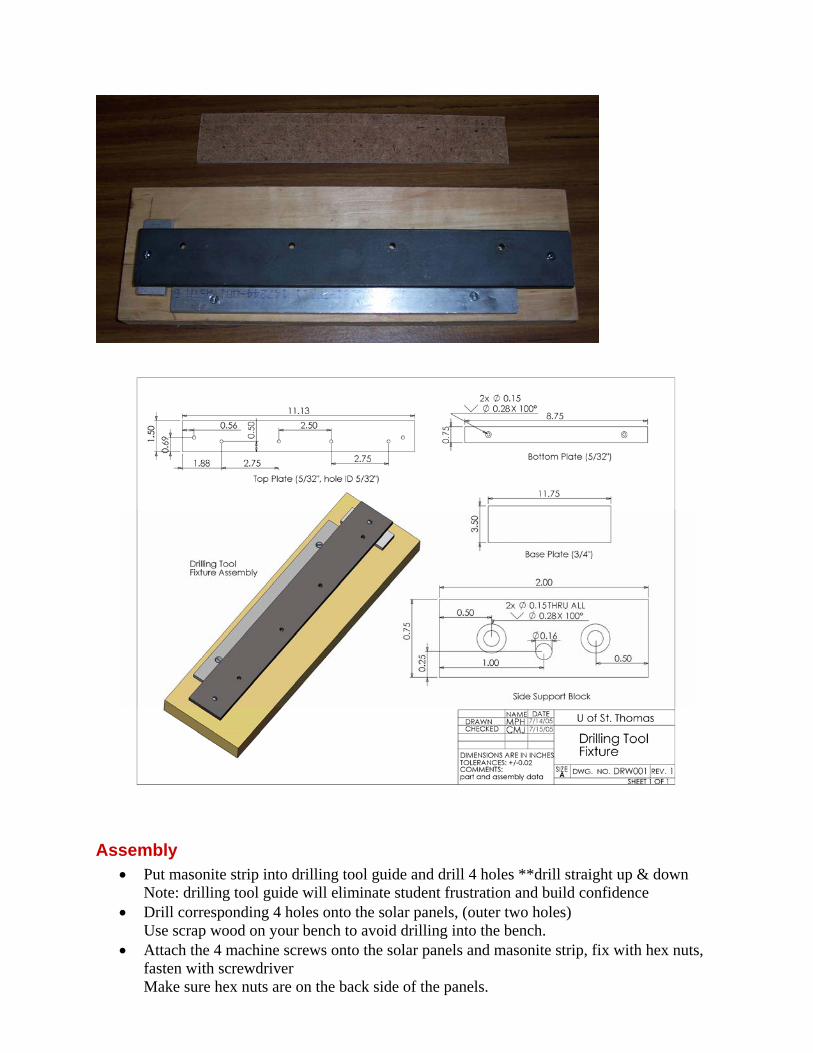
Assembly • Put masonite strip into drilling tool guide and drill 4 holes **drill straight up & down
Note: drilling tool guide will eliminate student frustration and build confidence • Drill corresponding 4 holes onto the solar panels, (outer two holes)
Use scrap wood on your bench to avoid drilling into the bench. • Attach the 4 machine screws onto the solar panels and masonite strip, fix with hex nuts,
fasten with screwdriver Make sure hex nuts are on the back side of the panels.
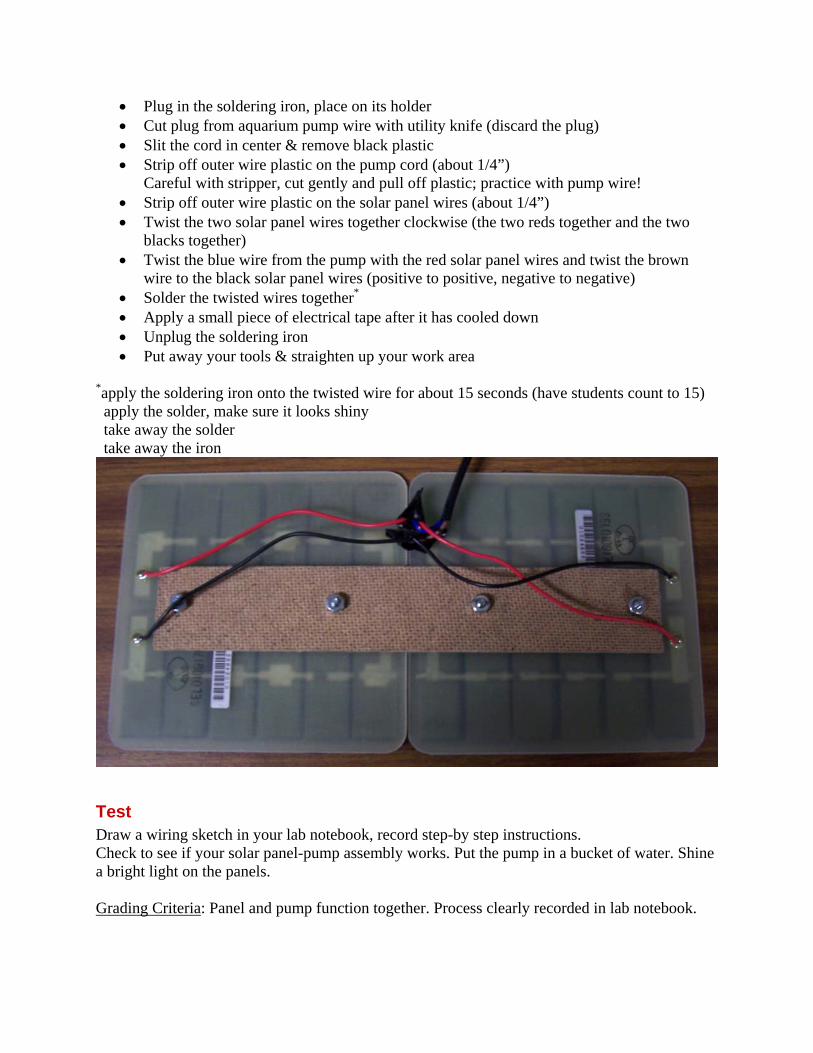
• Plug in the soldering iron, place on its holder • Cut plug from aquarium pump wire with utility knife (discard the plug) • Slit the cord in center & remove black plastic • Strip off outer wire plastic on the pump cord (about 1/4”)
Careful with stripper, cut gently and pull off plastic; practice with pump wire! • Strip off outer wire plastic on the solar panel wires (about 1/4”) • Twist the two solar panel wires together clockwise (the two reds together and the two
blacks together) • Twist the blue wire from the pump with the red solar panel wires and twist the brown
wire to the black solar panel wires (positive to positive, negative to negative) • Solder the twisted wires together* • Apply a small piece of electrical tape after it has cooled down • Unplug the soldering iron • Put away your tools & straighten up your work area
*apply the soldering iron onto the twisted wire for about 15 seconds (have students count to 15) apply the solder, make sure it looks shiny take away the solder take away the iron
Test Draw a wiring sketch in your lab notebook, record step-by step instructions. Check to see if your solar panel-pump assembly works. Put the pump in a bucket of water. Shine a bright light on the panels. Grading Criteria: Panel and pump function together. Process clearly recorded in lab notebook.
2. Fountain Composition
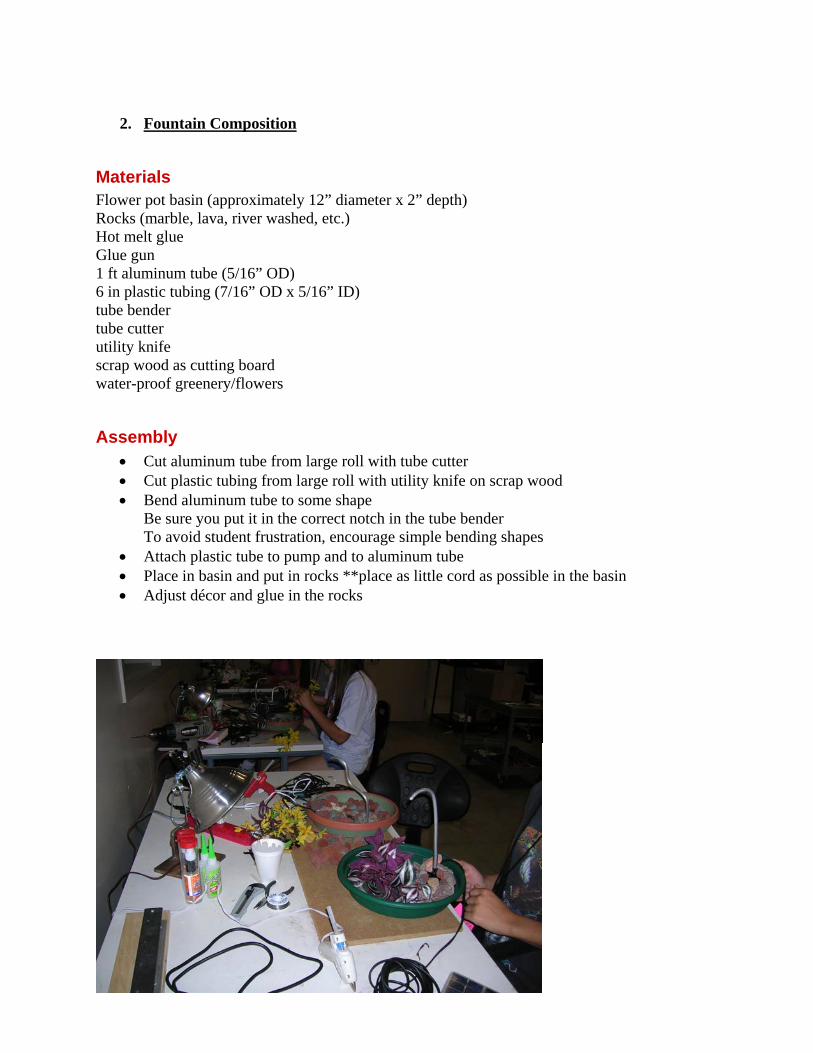
Materials Flower pot basin (approximately 12” diameter x 2” depth) Rocks (marble, lava, river washed, etc.) Hot melt glue Glue gun 1 ft aluminum tube (5/16” OD) 6 in plastic tubing (7/16” OD x 5/16” ID) tube bender tube cutter utility knife scrap wood as cutting board water-proof greenery/flowers
Assembly • Cut aluminum tube from large roll with tube cutter • Cut plastic tubing from large roll with utility knife on scrap wood • Bend aluminum tube to some shape
Be sure you put it in the correct notch in the tube bender To avoid student frustration, encourage simple bending shapes
• Attach plastic tube to pump and to aluminum tube • Place in basin and put in rocks **place as little cord as possible in the basin • Adjust décor and glue in the rocks
3. Panel holder (20˚ angle)
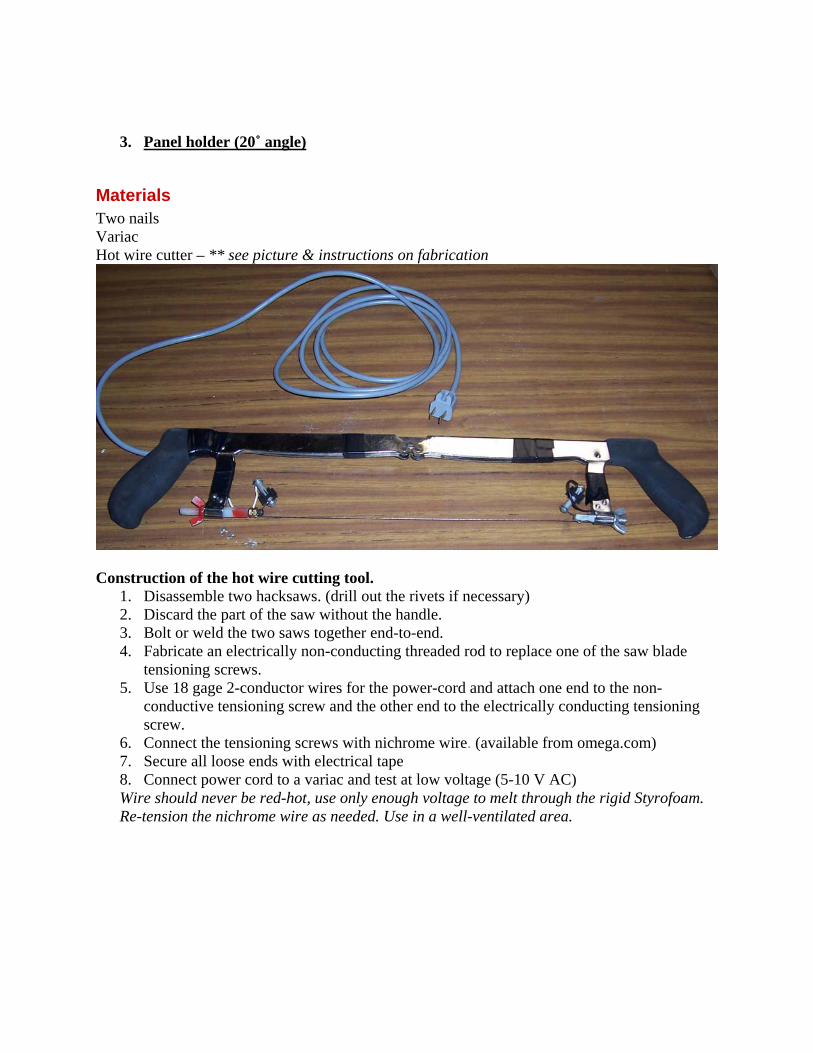
Materials Two nails Variac Hot wire cutter – ** see picture & instructions on fabrication
Construction of the hot wire cutting tool.
1. Disassemble two hacksaws. (drill out the rivets if necessary) 2. Discard the part of the saw without the handle. 3. Bolt or weld the two saws together end-to-end. 4. Fabricate an electrically non-conducting threaded rod to replace one of the saw blade
tensioning screws. 5. Use 18 gage 2-conductor wires for the power-cord and attach one end to the non-
conductive tensioning screw and the other end to the electrically conducting tensioning screw.
6. Connect the tensioning screws with nichrome wire. (available from omega.com) 7. Secure all loose ends with electrical tape 8. Connect power cord to a variac and test at low voltage (5-10 V AC) Wire should never be red-hot, use only enough voltage to melt through the rigid Styrofoam. Re-tension the nichrome wire as needed. Use in a well-ventilated area.
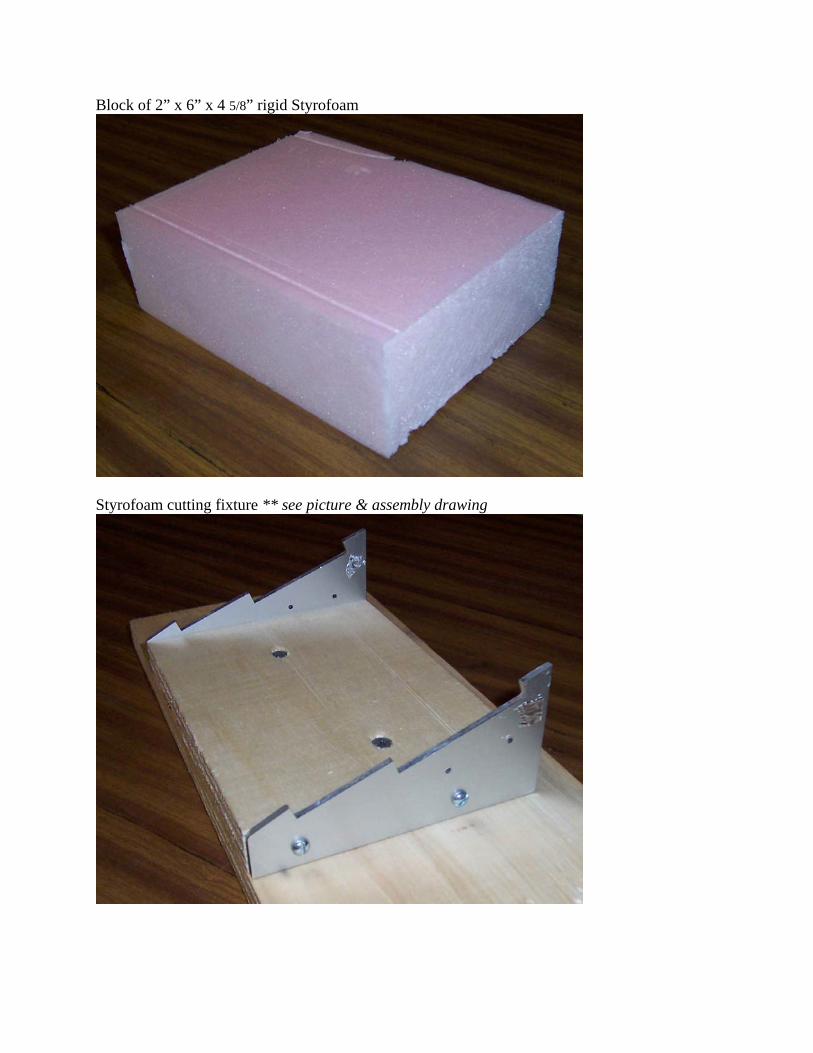
Block of 2” x 6” x 4 5/8” rigid Styrofoam
Styrofoam cutting fixture ** see picture & assembly drawing
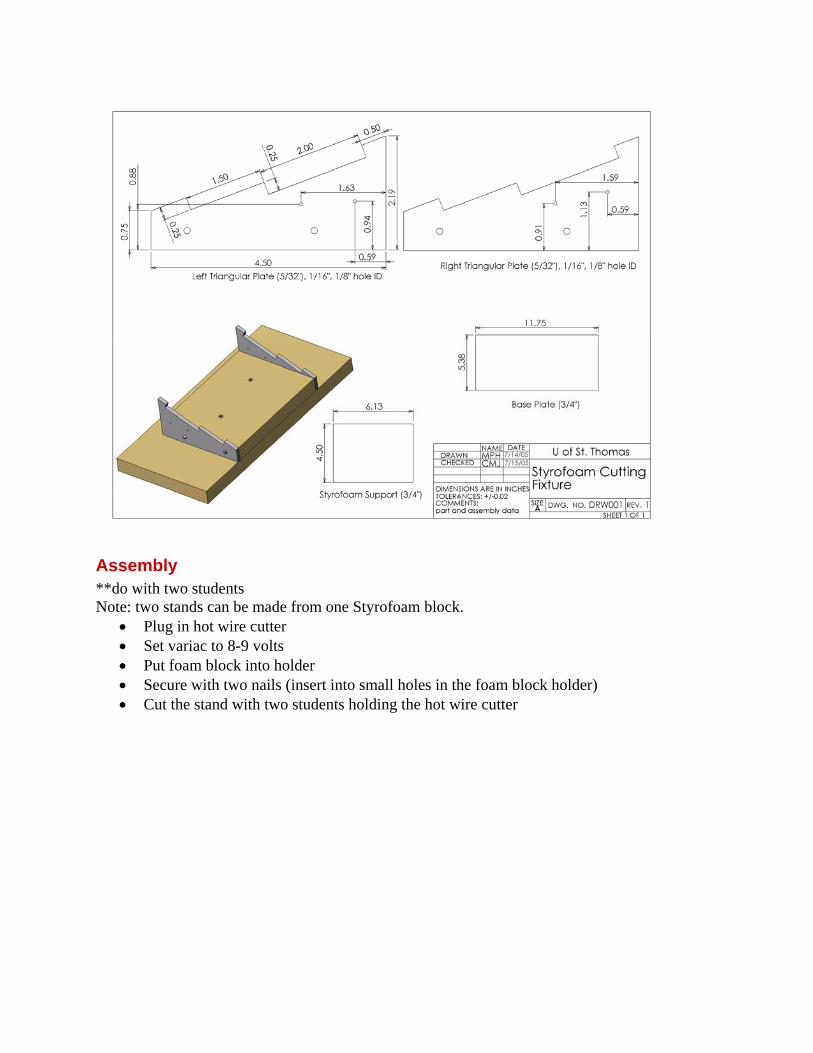
Assembly **do with two students Note: two stands can be made from one Styrofoam block.
• Plug in hot wire cutter • Set variac to 8-9 volts • Put foam block into holder • Secure with two nails (insert into small holes in the foam block holder) • Cut the stand with two students holding the hot wire cutter
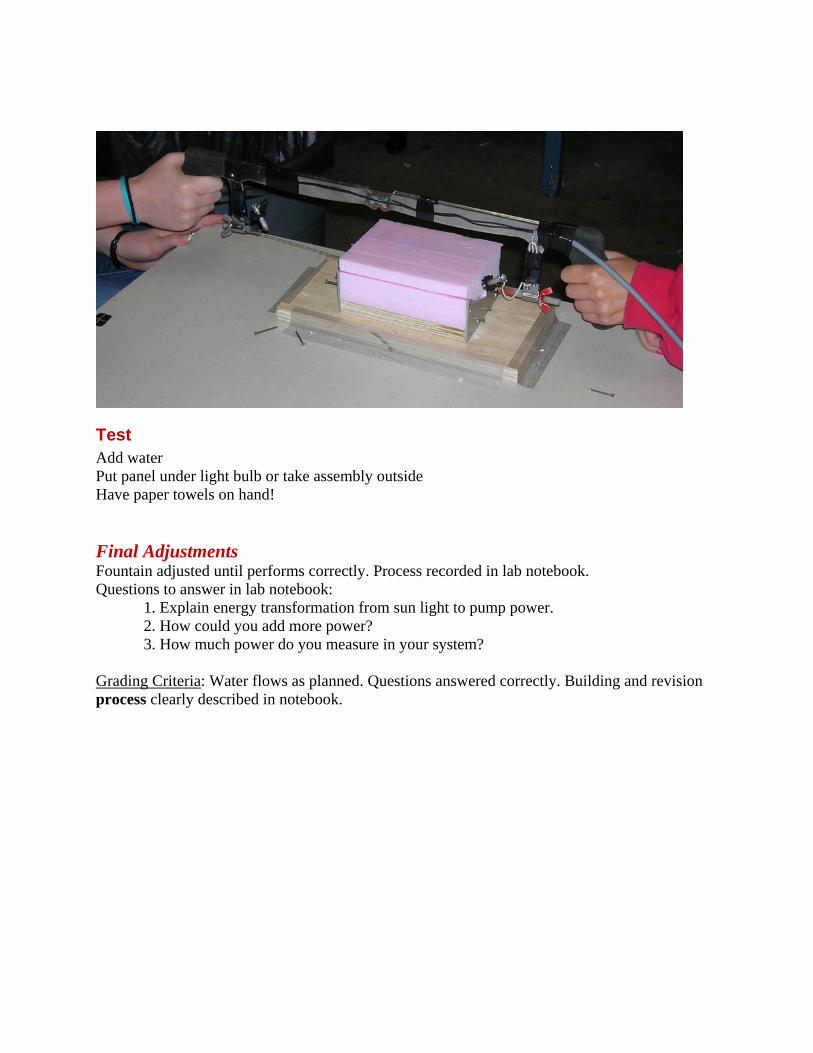
Test Add water Put panel under light bulb or take assembly outside Have paper towels on hand! Final Adjustments Fountain adjusted until performs correctly. Process recorded in lab notebook. Questions to answer in lab notebook:
1. Explain energy transformation from sun light to pump power. 2. How could you add more power? 3. How much power do you measure in your system?
Grading Criteria: Water flows as planned. Questions answered correctly. Building and revision process clearly described in notebook.
End Report Write an instruction manual with a bill of materials to build at home. Grading Criteria: Must have good writing quality, a lay explanation of how it works, list of materials, sequence of steps, list of materials and reflective caution/tips.
Assessment Criteria
1. Lab Notebook (design process) a. Charts in notebook clearly labeled / legible ; all information included b. Pre-build sketch of solar fountain in lab notebook with all components labeled c. Thought into design evident from detailed description d. Attention given to creatively hiding the pump e. Questions answered correctly in notebook f. Adjustment/ revision process documented
2. End Report (manual to build) a. Lay persons explanation of how it works- good writing quality b. List of materials c. Sequence of steps d. Caution / tips e. Reflection on hands-on build f. Pump works correctly and is aesthetically pleasing
Resources for Solar Fountain Internet Sites for Solar Fountain1 www.atlanticfountains.com – look over the components page and the design and planning page to clarify your concept generation. www.eponds.com- look over the pond design page http://www.wetdesign.com – most famous fountain designer in the USA; look over the Process page and the Elements Page, and if you have never been to Las Vegas then check out the Bellagio fountain video! Artist’s sites with fountain art (for fun and inspiration) www.nayerkazemi.com – site with artistic tabletop fountains www.williampye.com – look over his Vocabulary of Water, it clarifies how to get a certain effect www.orrstudio.com –nice video, a site to visit for fun Books for Solar Fountain Project Dorcas Adkins. Simple Fountains for Indoors & Outdoors, 20 step-by-step projects. (1999) Storey Books, Vermont. ISBN 1-58017-190-7 Yvonne Rees. Indoor Water Garden Design, 20 Eye-catching designs to bring the outdoors into your home. (2002) Barron’s Educational Series, NY. ISBN 0-7641-5374-9 Paris Mannion. Create your own Tabletop Fountains. (1999)) North Light Books, Ohio. ISBN 1-58180-103-3. References 1. Shakerin, S., Water Fountains Blend Art and Engineering: A Resource for Engineering Education. Proceedings of the 2004 American Society for Engineering Education Annual Conference & Exhibition.
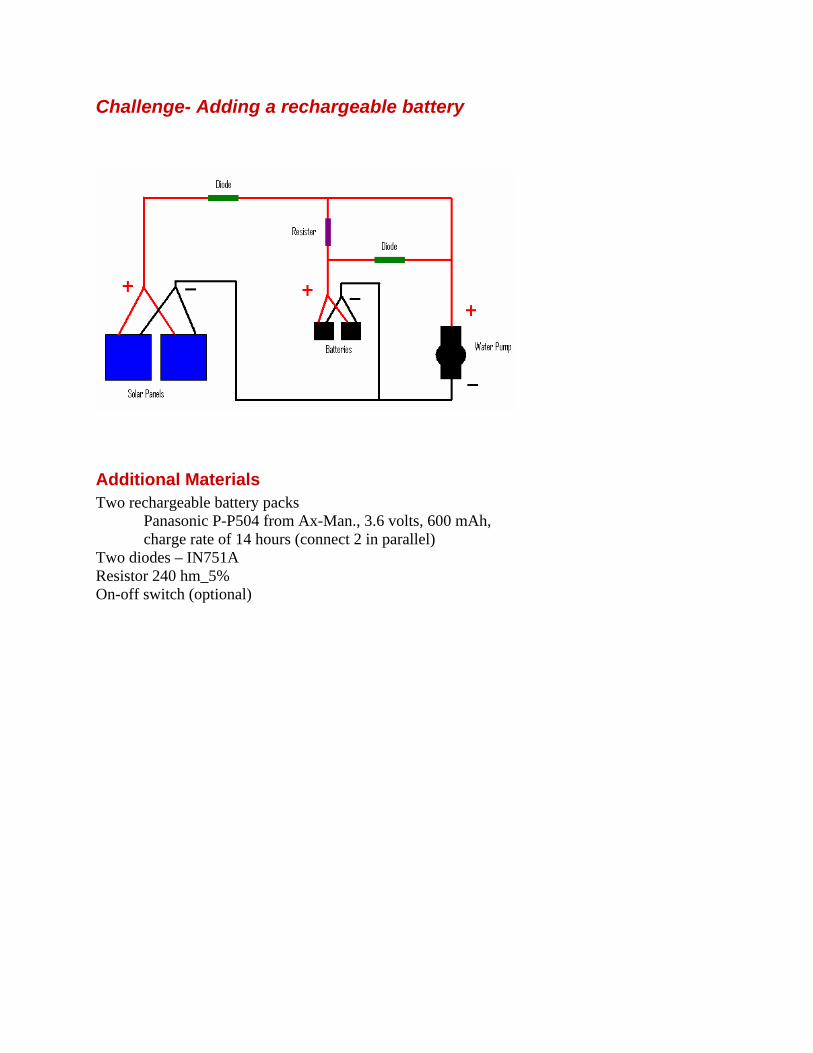
Challenge- Adding a rechargeable battery
Additional Materials Two rechargeable battery packs
Panasonic P-P504 from Ax-Man., 3.6 volts, 600 mAh, charge rate of 14 hours (connect 2 in parallel)
Two diodes – IN751A Resistor 240 hm_5% On-off switch (optional)