Embed Size (px)
Citation preview

SOFTWARE USER’S GUIDE
For DCP users; This documentation is for both MFC and DCP models. Where it says ‘MFC’ in this user’s guide, please read ‘MFC’ as ‘DCP’.
Version 0

i
Table of Contents1 Printing
Accessing the printer driver settings..........................................................................................................1Basic tab ....................................................................................................................................................1
Media Type..........................................................................................................................................1Quality .................................................................................................................................................2Page Layout ........................................................................................................................................2
Support tab ................................................................................................................................................3
2 ScanningScanning a document using the TWAIN driver..........................................................................................5
Accessing the Scanner........................................................................................................................5Using the Scan key (For USB cable users) ...............................................................................................6
Scan to E-mail .....................................................................................................................................6Scan to Image .....................................................................................................................................6Scan to OCR .......................................................................................................................................7Scan to File..........................................................................................................................................7Scan to Card (Not available for MFC-240C and MFC-3360C) ............................................................8
3 ControlCenter3Using ControlCenter3 ..............................................................................................................................10
SCAN.................................................................................................................................................10CUSTOM SCAN................................................................................................................................10PHOTOCAPTURE (USB only) (Not available for MFC-3360C) ........................................................10COPY ................................................................................................................................................11PC-FAX (MFC models only) ..............................................................................................................11DEVICE SETTING.............................................................................................................................11
4 Network Scanning (For models with built-in network support)
Before using Network Scanning ..............................................................................................................12Configuring Network Scanning ..........................................................................................................12
Using the Scan key..................................................................................................................................14Scan to E-mail (PC)...........................................................................................................................14Scan to Image ...................................................................................................................................14Scan to OCR .....................................................................................................................................15Scan to File........................................................................................................................................15
5 Remote Setup (Not available for DCP models and MFC-240C)
Remote Setup..........................................................................................................................................16

ii
6 Brother PC-FAX Software (MFC models only)
PC-FAX sending ......................................................................................................................................17Setting up user information................................................................................................................17Sending setup....................................................................................................................................17Address Book ....................................................................................................................................18Sending a file as a PC-FAX using the Facsimile style user interface................................................19
PC-FAX receiving (Not available for MFC-240C and MFC-3360C).........................................................20Enabling the PC-FAX Receiving software on your machine ............................................................20Running the PC-FAX Receiving software on your PC.......................................................................21Setting up your PC ............................................................................................................................21Configuring the Network PC-FAX Receiving Settings .......................................................................22Viewing new PC-FAX messages.......................................................................................................23
7 PhotoCapture Center™(Not available for MFC-3360C)
For USB cable users................................................................................................................................24For Network users (For models with built-in network support) ................................................................25
A Index

1
11
Accessing the printer driver settings 1
a Click File, then Print in your application.
b Choose Brother MFC-XXXX USB Printer or Brother MFC-XXXX Printer (where XXXX is your model name) and click Properties.The printer properties dialog box appears.
Basic tab 1
Media Type 1
To achieve the best print results, the media being printed on should be selected in the driver. The machine changes the way it prints depending on the selected media type.
Plain PaperInkjet PaperBrother Premium Glossy Photo Paper Other Photo Paper Transparencies
Printing 1
Printing
2
1Quality 1
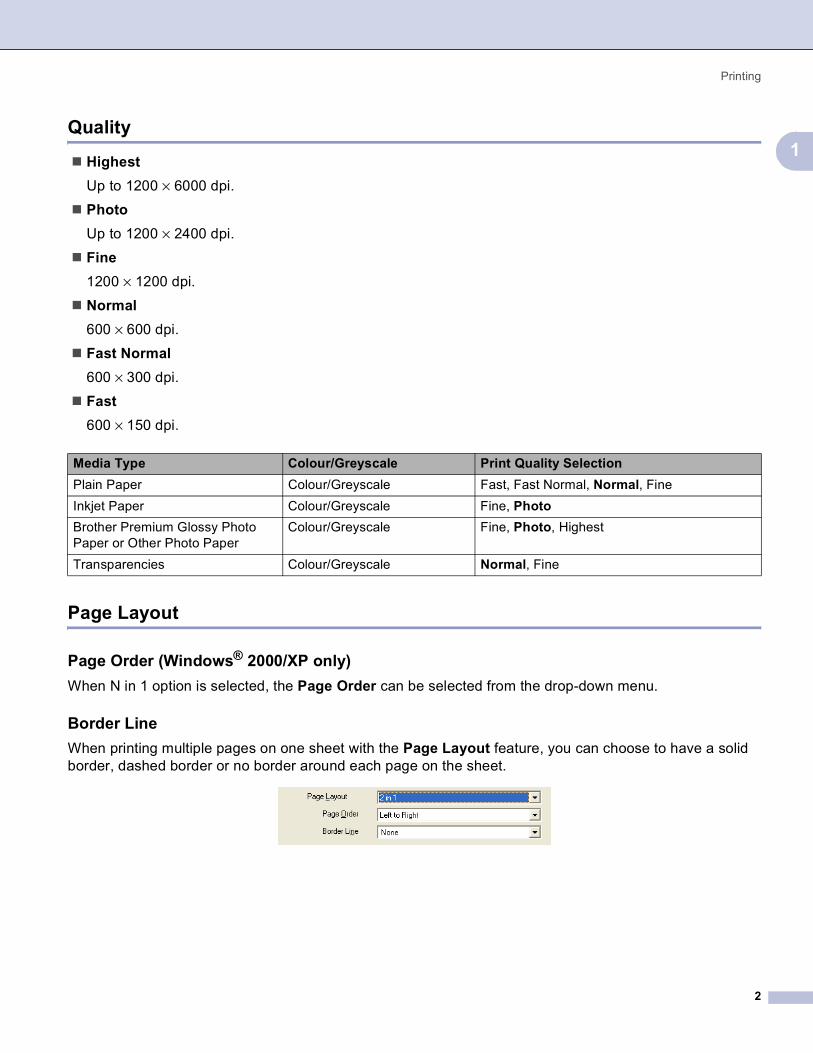
Highest Up to 1200 × 6000 dpi.
Photo
Up to 1200 × 2400 dpi.
Fine1200 × 1200 dpi.
Normal600 × 600 dpi.
Fast Normal600 × 300 dpi.
Fast600 × 150 dpi.
Page Layout 1
Page Order (Windows® 2000/XP only) 1
When N in 1 option is selected, the Page Order can be selected from the drop-down menu.
Border Line 1
When printing multiple pages on one sheet with the Page Layout feature, you can choose to have a solid border, dashed border or no border around each page on the sheet.
Media Type Colour/Greyscale Print Quality SelectionPlain Paper Colour/Greyscale Fast, Fast Normal, Normal, FineInkjet Paper Colour/Greyscale Fine, PhotoBrother Premium Glossy Photo Paper or Other Photo Paper
Colour/Greyscale Fine, Photo, Highest
Transparencies Colour/Greyscale Normal, Fine

Printing
3
1Support tab 1
Brother Solutions CenterThe Brother Solutions Center is a web site offering information about your Brother product including FAQs (Frequently Asked Questions), User’s Guides, driver updates and tips for using your machine.
Web UpdateYou can check the Brother web site for automatic downloads to update the printer driver on your PC.
Check Setting

4
2
2Scanning operations and the drivers used will differ depending on the operating system you are using. As default, the machine uses a TWAIN compliant driver when scanning documents from your applications.
For Windows® XP
Two scanner drivers are installed. A TWAIN compliant scanner driver and a Windows® Imaging Acquisition (WIA) driver. Windows® XP users can select either driver when scanning documents.
NoteIf your PC is protected by a firewall and is unable to scan, you may need to configure the firewall settings to allow communication through port number 137 and 54925. Visit the Brother Solutions Center (http://solutions.brother.com) for more information.
Scanning 2

Scanning
5
2
Scanning a document using the TWAIN driver 2
Accessing the Scanner 2
a Start the ScanSoft® PaperPort® SE software that was installed during the MFL-Pro Suite installation to scan a document.
b Click File, then Scan. Or click the Scan button. The Scan panel appears in the left side of the screen.
c Choose the scanner you are using from the Scanner drop-down list.
d Click Scan.The Scanner Setup dialog box appears:
Scanning
6
2
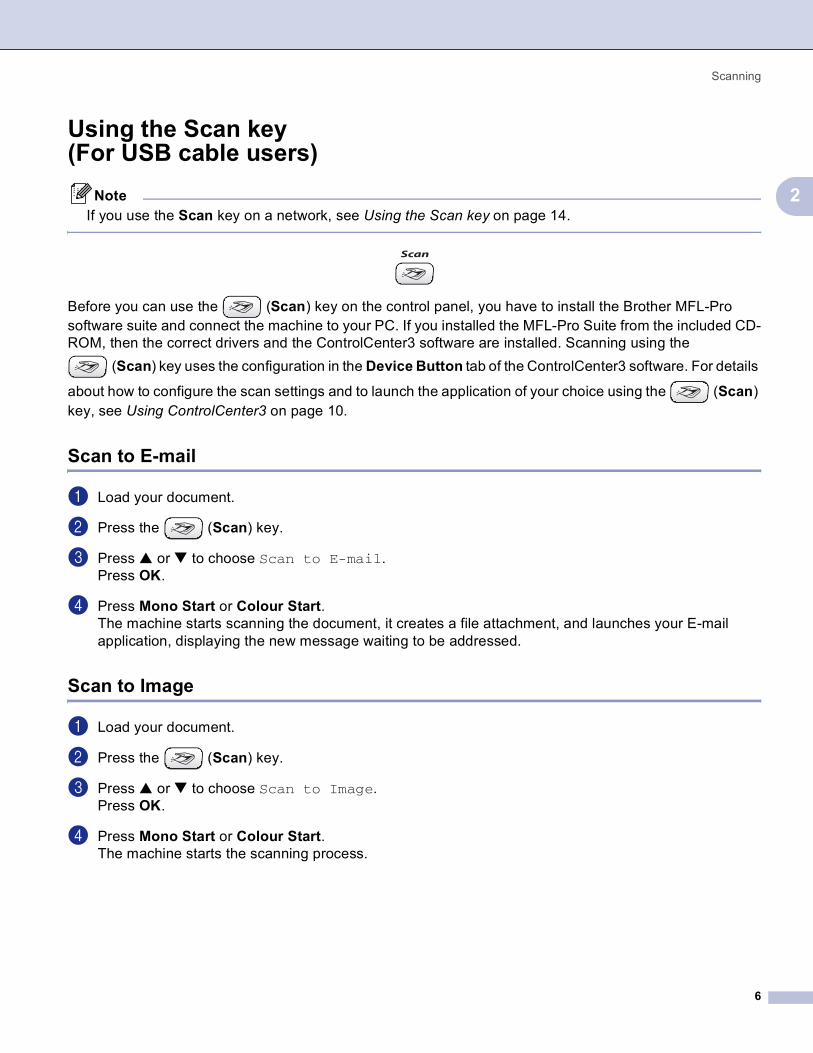
Using the Scan key (For USB cable users) 2
NoteIf you use the Scan key on a network, see Using the Scan key on page 14.
Before you can use the (Scan) key on the control panel, you have to install the Brother MFL-Pro software suite and connect the machine to your PC. If you installed the MFL-Pro Suite from the included CD-ROM, then the correct drivers and the ControlCenter3 software are installed. Scanning using the
(Scan) key uses the configuration in the Device Button tab of the ControlCenter3 software. For details
about how to configure the scan settings and to launch the application of your choice using the (Scan) key, see Using ControlCenter3 on page 10.
Scan to E-mail 2
a Load your document.
b Press the (Scan) key.
c Press a or b to choose Scan to E-mail.Press OK.
d Press Mono Start or Colour Start.The machine starts scanning the document, it creates a file attachment, and launches your E-mail application, displaying the new message waiting to be addressed.
Scan to Image 2
a Load your document.
b Press the (Scan) key.
c Press a or b to choose Scan to Image.Press OK.
d Press Mono Start or Colour Start.The machine starts the scanning process.

Scanning
7
2
Scan to OCR 2
If your original document is text, you can use ScanSoft® PaperPort® SE to scan the document and convert it into a text file which can then be edited in your favourite word processing software. You can change the
(Scan) key configuration.
a Load your document.
b Press the (Scan) key.
c Press a or b to choose Scan to OCR.Press OK.
d Press Mono Start or Colour Start.The machine starts the scanning process.
Scan to File 2
You can scan a black and white or a colour document into your PC and save it as a file in the folder you choose. The file type and specific folder are based on the settings you have chosen in the Scan to File configuration screen of ControlCenter3.
a Load your document.
b Press the (Scan) key.
c Press a or b to choose Scan to File.Press OK.
d Press Mono Start or Colour Start.The machine starts the scanning process.
NoteYou can choose colour or black and white scanning in the scan type option in the Device Button tab of the ControlCenter3 configuration screen.
Scanning
8
2
Scan to Card (Not available for MFC-240C and MFC-3360C) 2
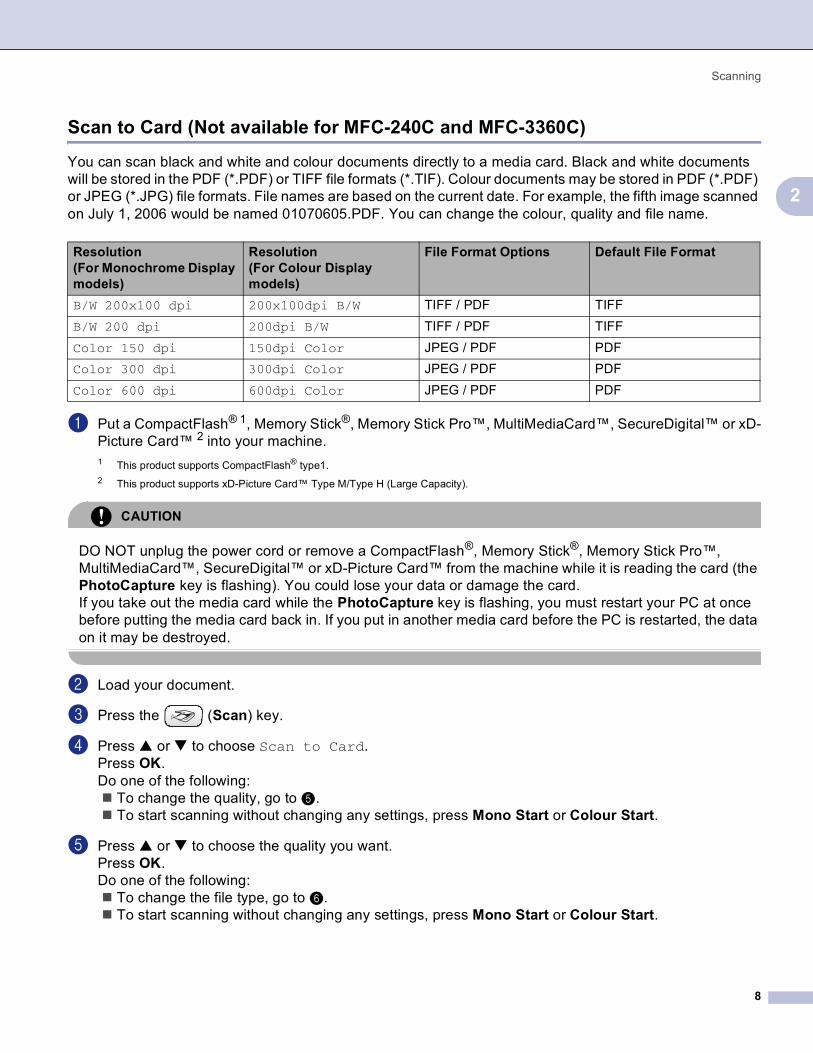
You can scan black and white and colour documents directly to a media card. Black and white documents will be stored in the PDF (*.PDF) or TIFF file formats (*.TIF). Colour documents may be stored in PDF (*.PDF) or JPEG (*.JPG) file formats. File names are based on the current date. For example, the fifth image scanned on July 1, 2006 would be named 01070605.PDF. You can change the colour, quality and file name.
a Put a CompactFlash® 1, Memory Stick®, Memory Stick Pro™, MultiMediaCard™, SecureDigital™ or xD-Picture Card™ 2 into your machine.1 This product supports CompactFlash® type1.2 This product supports xD-Picture Card™ Type M/Type H (Large Capacity).
CAUTION
DO NOT unplug the power cord or remove a CompactFlash®, Memory Stick®, Memory Stick Pro™, MultiMediaCard™, SecureDigital™ or xD-Picture Card™ from the machine while it is reading the card (the PhotoCapture key is flashing). You could lose your data or damage the card.If you take out the media card while the PhotoCapture key is flashing, you must restart your PC at once before putting the media card back in. If you put in another media card before the PC is restarted, the data on it may be destroyed.
b Load your document.
c Press the (Scan) key.
d Press a or b to choose Scan to Card.Press OK. Do one of the following:
To change the quality, go to e.To start scanning without changing any settings, press Mono Start or Colour Start.
e Press a or b to choose the quality you want.Press OK. Do one of the following:
To change the file type, go to f.To start scanning without changing any settings, press Mono Start or Colour Start.
Resolution(For Monochrome Display models)
Resolution(For Colour Display models)
File Format Options Default File Format
B/W 200x100 dpi 200x100dpi B/W TIFF / PDF TIFFB/W 200 dpi 200dpi B/W TIFF / PDF TIFFColor 150 dpi 150dpi Color JPEG / PDF PDFColor 300 dpi 300dpi Color JPEG / PDF PDFColor 600 dpi 600dpi Color JPEG / PDF PDF

Scanning
9
2
f Press a or b to choose the file type you want.Press OK. Do one of the following:
To change the file name, go to g.To start scanning without changing any settings, press Mono Start or Colour Start.
Note• If you choose colour in the resolution setting, you cannot choose TIFF.• If you choose monochrome in the resolution setting, you cannot choose JPEG.
g The file name is set automatically. However, you can create a name of your choice using the dial pad. You can only change the first 6 digits of the file name. (MFC models only)Press OK.
NotePress Stop/Exit or Clear/Back to delete the letters you entered.
h Press Mono Start or Colour Start to start scanning.
10
3
3
Using ControlCenter3 3
SCAN 3
There are four scan options: Scan to Image, Scan to OCR, Scan to E-mail and Scan to File.
Image (Default: Microsoft® Paint)
Lets you scan a page directly into any graphic viewer/editor application.
OCR (Default: Microsoft® NotePad)
Lets you scan a page or document, automatically run the OCR application and put text (not a graphic image) into a word processing application.
E-mail (Default: your default E-mail software)
Lets you scan a page or document directly into an E-mail application as a standard attachment.
FileLets you scan directly to a disk file. You can change the file type and destination folder, as needed.
ControlCenter3 gives you the ability to configure the hardware Scan key on your machine and the ControlCenter3 Software button for each scan feature. To configure the hardware Scan key on your machine choose the Device Button tab in the configuration menu for each of the SCAN buttons. To configure the Software button in ControlCenter3 choose the Software Button tab in the configuration menu for each of the SCAN buttons.
CUSTOM SCAN 3
You can configure the button name and settings for each of these buttons to meet your specific needs by right-clicking a button and following the configuration menus.
PHOTOCAPTURE (USB only) (Not available for MFC-3360C) 3
Open PCC FolderLets you see the files and folders that are on the media card. (See For USB cable users on page 24.)
Copy From PCCLets you copy the files on the media card to a specific folder on your PC. You can choose the destination folder.
Copy To ApplicationLets you copy the files on the media card directly to a specific application.
ControlCenter3 3

ControlCenter3
11
3
COPY 3
Lets you use the PC and any printer driver for enhanced copy operations.
PC-FAX (MFC models only) 3
SendLets you scan a page or document and automatically send the image as a fax from the PC using the Brother PC-FAX software. (See PC-FAX sending on page 17.)
Receive (Not available for MFC-240C and MFC-3360C)
By clicking this button, the PC-FAX receive software is activated and your PC starts receiving fax data from your Brother machine. After activating the PC-FAX option, the icon name changes to View Received which when clicked will open the PC-FAX viewer application and display the received faxes. Before using the PC-FAX Receive option, you must select the PC-FAX Receive option from the control panel menu of the Brother machine. (See PC-FAX receiving (Not available for MFC-240C and MFC-3360C) on page 20.)
Address BookSetup
DEVICE SETTING 3
Remote Setup (Not available for DCP models and MFC-240C)
See Remote Setup on page 16.
Quick-Dial (Not available for DCP models and MFC-240C)
See Remote Setup on page 16.
Ink LevelUser’s GuideLets you view the Software User’s Guide and the Network User’s Guide.
12
4
4
Before using Network Scanning 4
Configuring Network Scanning 4
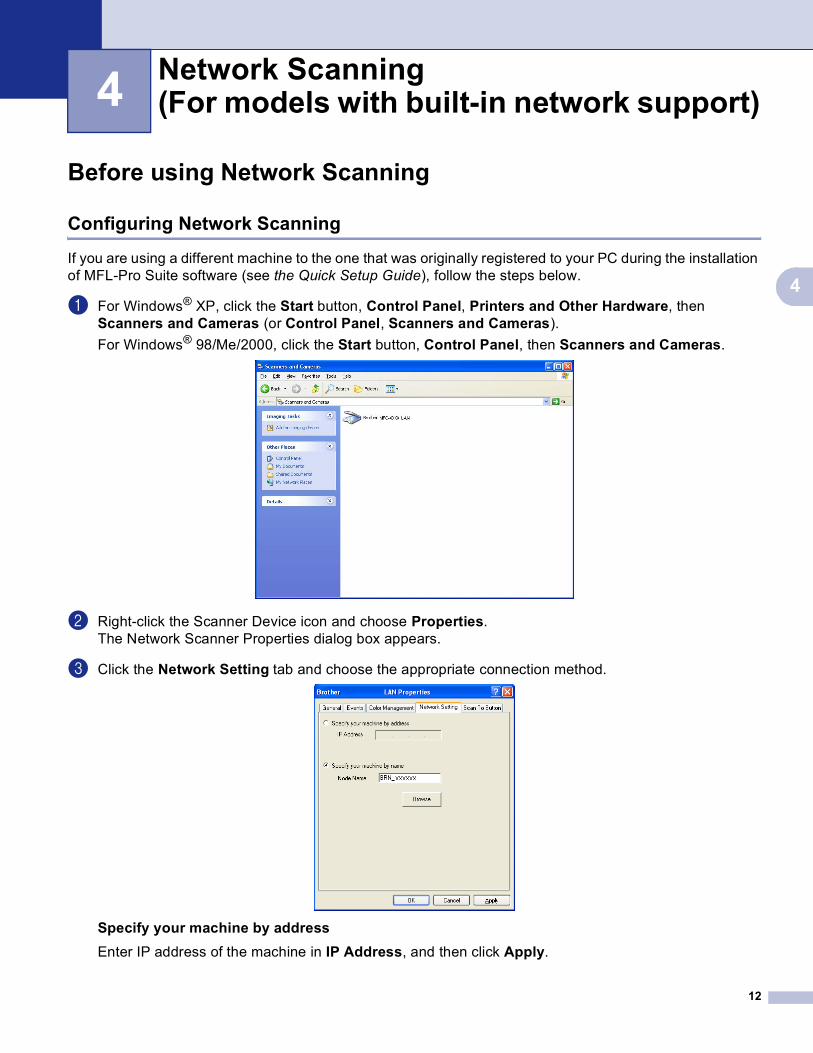
If you are using a different machine to the one that was originally registered to your PC during the installation of MFL-Pro Suite software (see the Quick Setup Guide), follow the steps below.
a For Windows® XP, click the Start button, Control Panel, Printers and Other Hardware, then Scanners and Cameras (or Control Panel, Scanners and Cameras).For Windows® 98/Me/2000, click the Start button, Control Panel, then Scanners and Cameras.
b Right-click the Scanner Device icon and choose Properties.The Network Scanner Properties dialog box appears.
c Click the Network Setting tab and choose the appropriate connection method.
Specify your machine by addressEnter IP address of the machine in IP Address, and then click Apply.
Network Scanning (For models with built-in network support)4

Network Scanning (For models with built-in network support)
13
4
Specify your machine by name 4
1 Enter the machine node name in Node Name, or click Browse and choose the device you want to use.
2 Click Apply.
d Click the Scan To Button tab and enter your PC name in the Display Name field. The machine’s LCD displays the name you enter. The default setting is your PC name. You can enter any name that you like.
e If you want to avoid receiving unwanted documents, enter a 4-digit PIN number in the Pin number and Retype Pin number field. To send data to a PC protected by a PIN number, the LCD prompts you to enter the PIN number before the document can be scanned and sent to the machine. (See Using the Scan key on page 14.)
Network Scanning (For models with built-in network support)
14
4
Using the Scan key 4
NoteIf you use the Scan key with a USB connection, see Using the Scan key (For USB cable users) on page 6.
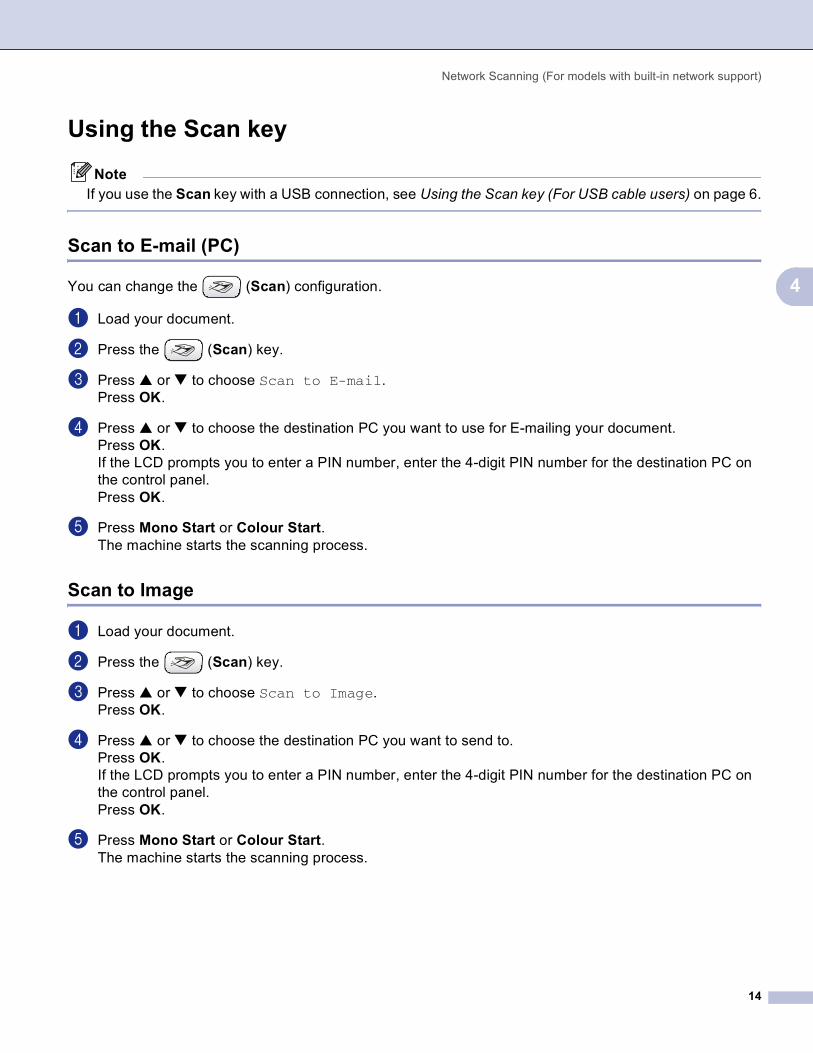
Scan to E-mail (PC) 4
You can change the (Scan) configuration.
a Load your document.
b Press the (Scan) key.
c Press a or b to choose Scan to E-mail.Press OK.
d Press a or b to choose the destination PC you want to use for E-mailing your document.Press OK. If the LCD prompts you to enter a PIN number, enter the 4-digit PIN number for the destination PC on the control panel.Press OK.
e Press Mono Start or Colour Start.The machine starts the scanning process.
Scan to Image 4
a Load your document.
b Press the (Scan) key.
c Press a or b to choose Scan to Image.Press OK.
d Press a or b to choose the destination PC you want to send to.Press OK. If the LCD prompts you to enter a PIN number, enter the 4-digit PIN number for the destination PC on the control panel.Press OK.
e Press Mono Start or Colour Start.The machine starts the scanning process.

Network Scanning (For models with built-in network support)
15
4
Scan to OCR 4
a Load your document.
b Press the (Scan) key.
c Press a or b to choose Scan to OCR.Press OK.
d Press a or b to choose the destination PC you want to send to.Press OK. If the LCD prompts you to enter a PIN number, enter the 4-digit PIN number for the destination PC on the control panel.Press OK.
e Press Mono Start or Colour Start.The machine starts the scanning process.
Scan to File 4
a Load your document.
b Press the (Scan) key.
c Press a or b to choose Scan to File.Press OK.
d Press a or b to choose the destination PC you want to send to.Press OK. If the LCD prompts you to enter a PIN number, enter the 4-digit PIN number for the destination PC on the control panel.Press OK.
e Press Mono Start or Colour Start.The machine starts the scanning process.
16
5
5
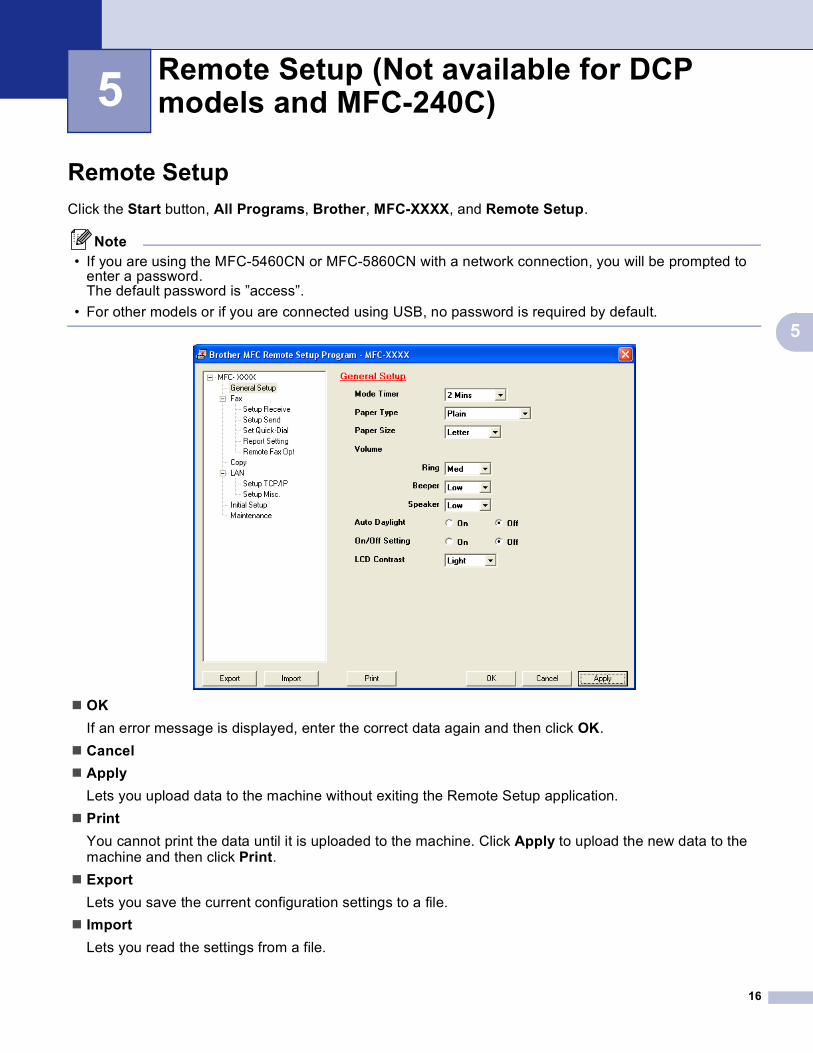
Remote Setup 5
Click the Start button, All Programs, Brother, MFC-XXXX, and Remote Setup.
Note• If you are using the MFC-5460CN or MFC-5860CN with a network connection, you will be prompted to
enter a password.The default password is ”access”.
• For other models or if you are connected using USB, no password is required by default.
OKIf an error message is displayed, enter the correct data again and then click OK.CancelApplyLets you upload data to the machine without exiting the Remote Setup application.PrintYou cannot print the data until it is uploaded to the machine. Click Apply to upload the new data to the machine and then click Print.ExportLets you save the current configuration settings to a file.ImportLets you read the settings from a file.
Remote Setup (Not available for DCP models and MFC-240C) 5

17
6
6
PC-FAX sending 6
Setting up user information 6
a Click the Start button, All Programs, Brother, MFC-XXXX (where XXXX is your model name), PC-FAX sending, then PC-FAX Setup.The Brother PC-FAX Setup dialog box appears:
b Enter this information to create the fax header and cover page.
c Click OK to save the User Information.
Sending setup 6
Outside line accessEnter a number to access an outside line here. This is sometimes required by local PBX telephone systems (for example, dialling 9 to get an outside line in your office).Include headerTo add header information to the top of the fax pages, check Include header.User interface
Brother PC-FAX Software (MFC models only) 6
Brother PC-FAX Software (MFC models only)
18
6
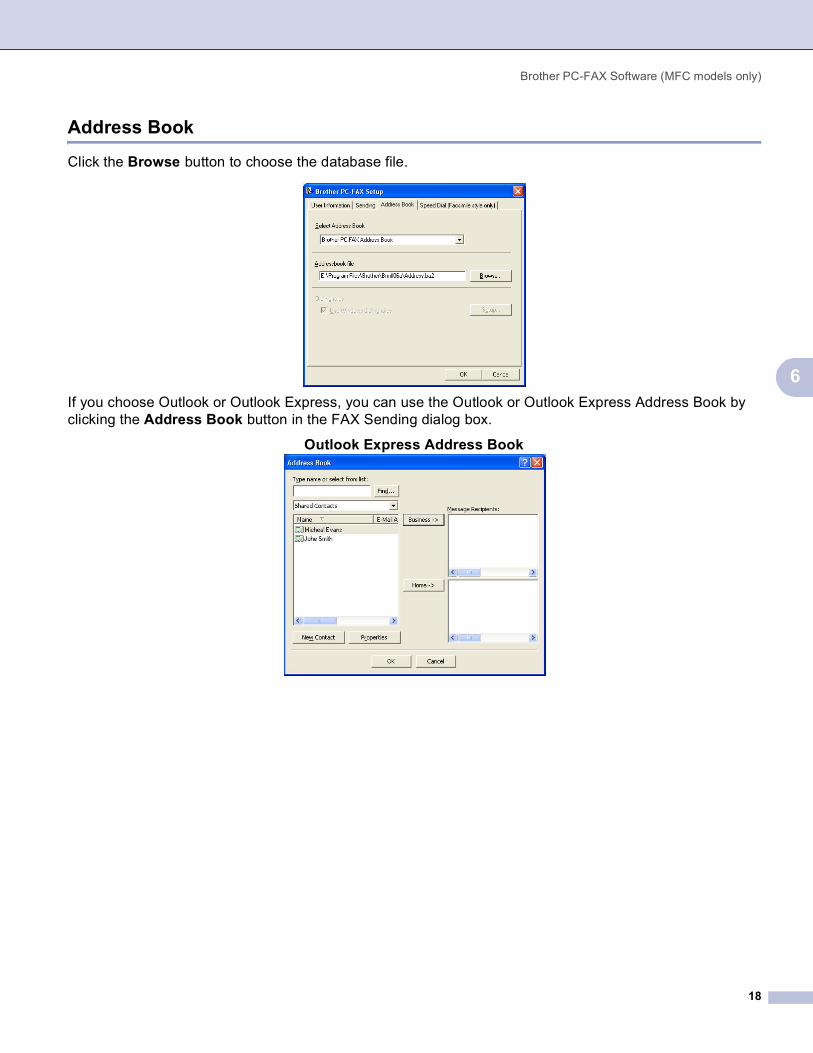
Address Book 6
Click the Browse button to choose the database file.
If you choose Outlook or Outlook Express, you can use the Outlook or Outlook Express Address Book by clicking the Address Book button in the FAX Sending dialog box.
Outlook Express Address Book 6
Brother PC-FAX Software (MFC models only)
19
6
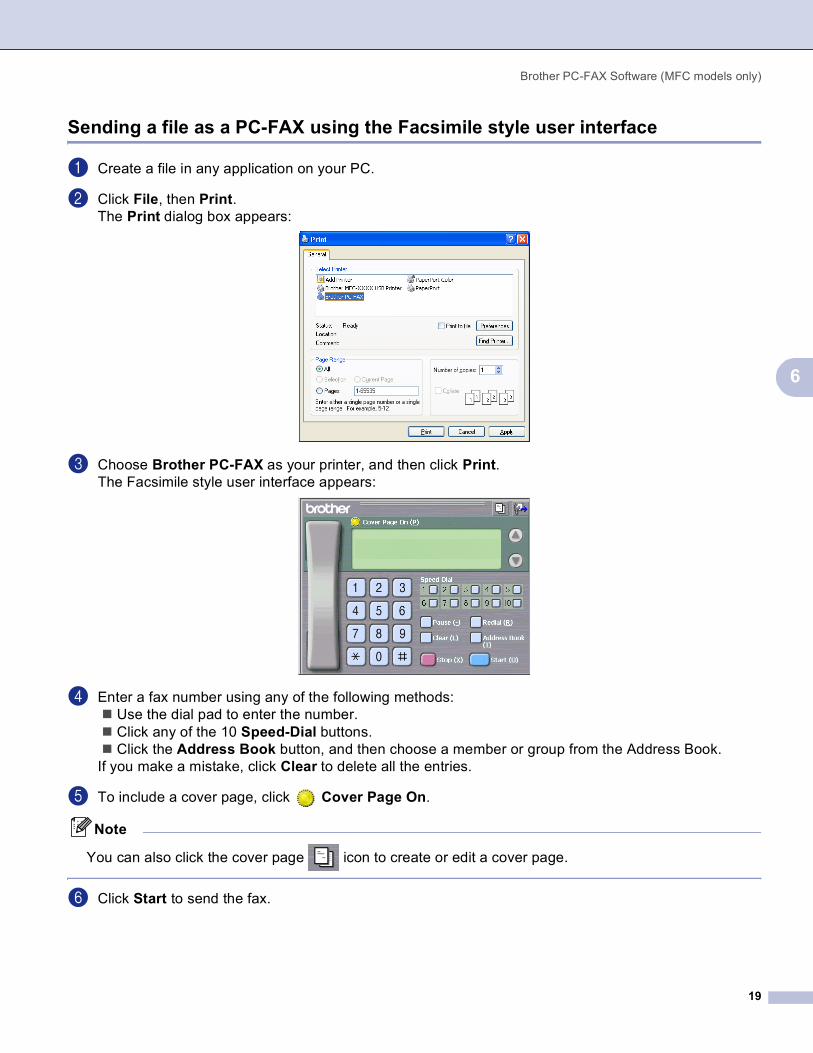
Sending a file as a PC-FAX using the Facsimile style user interface 6
a Create a file in any application on your PC.
b Click File, then Print. The Print dialog box appears:
c Choose Brother PC-FAX as your printer, and then click Print. The Facsimile style user interface appears:
d Enter a fax number using any of the following methods:Use the dial pad to enter the number.Click any of the 10 Speed-Dial buttons.Click the Address Book button, and then choose a member or group from the Address Book.
If you make a mistake, click Clear to delete all the entries.
e To include a cover page, click Cover Page On.
Note
You can also click the cover page icon to create or edit a cover page.
f Click Start to send the fax.
Brother PC-FAX Software (MFC models only)
20
6
PC-FAX receiving (Not available for MFC-240C and MFC-3360C) 6
The Brother PC-FAX Receive Software lets you view and store faxes on your PC. It is automatically installed when you install the MFL-Pro Suite and works on locally or network connected machines.
When enabled, your machine will receive faxes in its memory. Once it has received the fax, it will automatically be sent to your PC.
If you turn your PC off, your machine will continue to receive and store your faxes in its memory. The machine LCD will display the number of stored faxes received, for example:
PC-Fax Msgs:001
When you switch your PC on, the PC-FAX Receive Software automatically transfers your faxes to your PC.
To enable the PC-FAX Receive Software, do the following:
Before you use the PC-FAX Receive function, you must choose PC-FAX Receive from the menu on the machine.
Run the Brother PC-FAX Receive software on your PC. (We recommend select the Add to Startup folder check box, so that the software automatically runs and can transfer any faxes on PC startup.)
Enabling the PC-FAX Receiving software on your machine 6
You can optionally enable the Backup Print option. When enabled, the machine will print a copy of the fax before the fax is sent to the PC or the PC is switched off.
a Press Menu 2, 5, 1.
b Press a or b to choose PC Fax Receive.Press OK.
c Press a or b to choose USB or your PC name if connected on a network.Press OK.
d Press a or b to choose Backup Print:On or Backup Print:Off.Press OK.
e Press Stop/Exit.

Brother PC-FAX Software (MFC models only)
21
6
Running the PC-FAX Receiving software on your PC 6
Click the Start button, All Programs, Brother, MFC-XXXX, PC-FAX Receiving and Receive.
The PC-FAX icon appears in your PC tasktray.
Setting up your PC 6
a Right-click the PC-FAX icon on your PC tasktray, and then click
PC-Fax RX Setup.The PC-Fax RX Setup dialog box appears:
b In Save file to, click the Browse button if you want to change the path where PC-FAX files are saved.
c In File Format, choose .tif or .max as the received document format. The default format is .tif.
d To play wave files (.wav sound files) when receiving a fax, check Play wave file when receiving FAX, and enter the path of the wave file.
e To automatically start the PC-FAX receiving software when you start Windows®, check Add to Startup folder.
f If you want to use the PC-FAX Receiving software, see Configuring the Network PC-FAX Receiving Settings on page 22.

Brother PC-FAX Software (MFC models only)
22
6
Configuring the Network PC-FAX Receiving Settings 6
The settings to send received faxes to your computer were automatically configured during the installation of MFL-Pro Suite (See the Quick Setup Guide).If you are using a different machine to the one that was registered to your PC during the installation of the MFL-Pro Suite software, follow the steps below.
a In the PC-FAX RX Setup dialogue box, click the Network Settings button. The Network Settings dialog box appears.
b You must specify the IP address or name of your machine.Choose the appropriate connection method.
Specify your machine by addressEnter the IP address of the machine in IP Address.
Specify your machine by nameEnter the machine node name in Node Name, or click the Browse button and choose the correct Brother machine you want to use from the list.
Specify your PC nameYou can specify the PC name that will appear on the display of the machine. To change the name, enter the new name in Display Your PC Name.
Brother PC-FAX Software (MFC models only)
23
6
Viewing new PC-FAX messages 6
Each time your PC is receiving a PC-FAX, the icon will alternate between and . Once the fax has
been received, the icon will change to . The icon will change to once the received fax has
been viewed.
a Run PaperPort®.
b Open the Fax Received folder.
c Double-click any new faxes to open and view them.
NoteThe name title of your unread PC message will be based on the date and time that the messages were received until you assign a file name. For example ‘Fax 2-20-2006 16:40:21.tif’.

24
7
7
CAUTION
DO NOT start your PC with a media card installed in the media drive of the machine. You could lose your data or damage the card.
For USB cable users 7
a Put a CompactFlash® 1, Memory Stick®, Memory Stick Pro™, MultiMediaCard™, SecureDigital™ or xD-Picture Card™ 2 into your machine.1 This product supports CompactFlash® type1.2 This product supports xD-Picture Card™ Type M/Type H (Large Capacity).
b In Windows® Explorer, click the Removable Disk icon 1. The files and folders on the media card appear on your PC screen.You can edit a file and save it to another drive on your PC.
1 If you are using Windows® XP and you create a name for the volume label of the media card, this name appears instead of ‘Removable Disk’.
When you take out a media card, do the following to prevent damage to the media card: 7
a In Windows® Explorer, right-click the removable disk icon and choose Eject.
b Wait until the (PhotoCapture) key stops blinking before taking out the media card.
PhotoCapture Center™(Not available for MFC-3360C) 7
PhotoCapture Center™ (Not available for MFC-3360C)
25
7
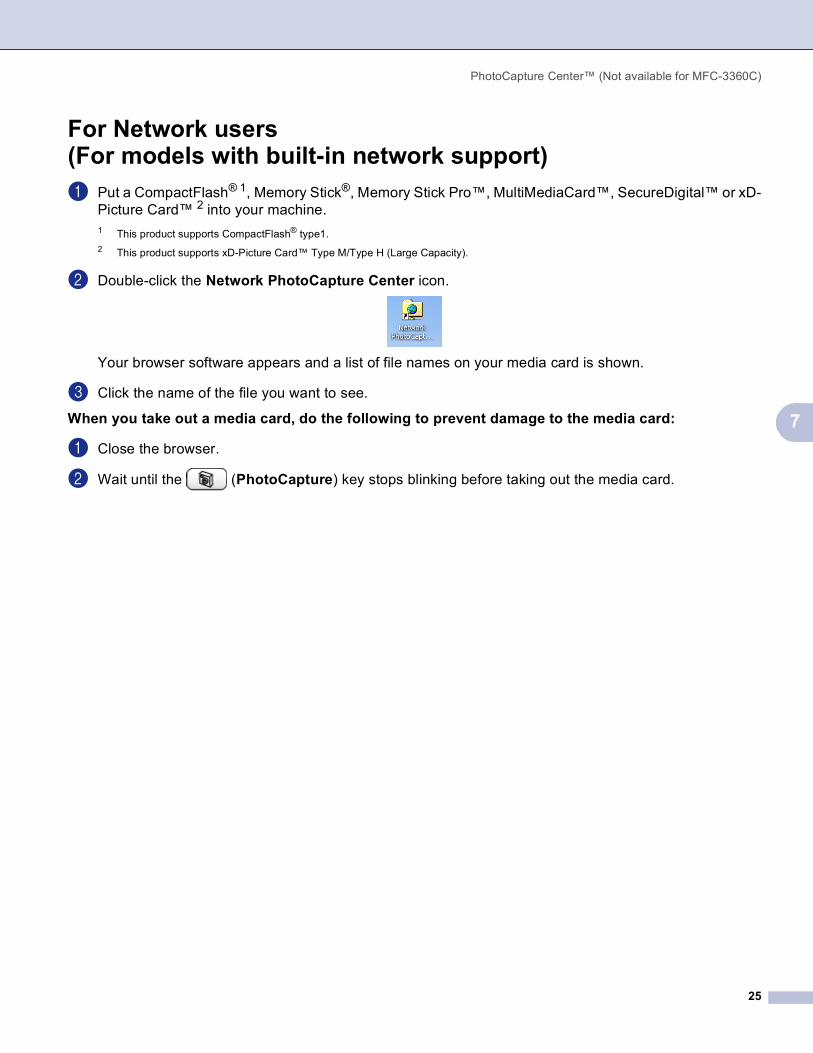
For Network users (For models with built-in network support) 7
a Put a CompactFlash® 1, Memory Stick®, Memory Stick Pro™, MultiMediaCard™, SecureDigital™ or xD-Picture Card™ 2 into your machine.1 This product supports CompactFlash® type1.2 This product supports xD-Picture Card™ Type M/Type H (Large Capacity).
b Double-click the Network PhotoCapture Center icon.
Your browser software appears and a list of file names on your media card is shown.
c Click the name of the file you want to see.
When you take out a media card, do the following to prevent damage to the media card: 7
a Close the browser.
b Wait until the (PhotoCapture) key stops blinking before taking out the media card.

Index
26
ACControlCenter3
Windows® .............................................................. 10
DDrivers
Windows®
TWAIN .................................................................. 4
FFAX (PC-FAX)
Windows®
facsimile style ..................................................... 19receiving ............................................................. 20sending ............................................................... 17
PPhotoCapture Center™
Windows® .............................................................. 24
RRemote Setup
Windows® .............................................................. 16
SScan
Windows®
Network ............................................................... 12Scan key .........................................................6, 14
Visit us on the World Wide Webhttp://www.brother.com
This product is approved for use in the country of purchase only. Local Brother companies or their dealers will only support machines purchased in their own countries.
EEU_ENG


![SOFTWARE USER’S GUIDE - Brotherdownload.brother.com/welcome/docp000768/ptp700... · After the software is removed from your computer, the [Maintenance Complete] ... Cuts labels](https://img.pdfslide.us/doc/110x75/5f44e93be2e0a25668125181/software-useras-guide-after-the-software-is-removed-from-your-computer-the.jpg)