Embed Size (px)
Citation preview
Software manual
Version 2013.02
Software Manual
©2012 IRTrans GmbH 2
Inhalt
1. Introduction ................................................................................ 4
2. IRTrans Server ........................................................................... 5
2.1 Installing the software and first tests ................................................ 5
2.2 launching the IRTrans Server automatically ..................................... 5
2.2.1 IRServer as Windows service .................................................. 6
2.3 IRServer menu ................................................................................. 6
2.4 IRServer parameters ........................................................................ 7
3. IR Database ................................................................................ 8
3.1 Learning IR commands .................................................................... 8
3.1.1 special modes .......................................................................... 10
3.1.2 additional parameters .............................................................. 10
3.2 Database files (.rem) ........................................................................ 12
3.3 learn CCF codes .............................................................................. 12
3.4 Linked commands ............................................................................ 13
3.5 Import IRTrans HEX ......................................................................... 13
3.6 add RS232 command....................................................................... 13
4. Sending IR codes ....................................................................... 14
4.1 IRTrans GUI Client ........................................................................... 14
4.2 IRTrans ASCII (Batch) Client ........................................................... 15
4.2.1 sending IR commands ............................................................. 15
4.2.2 IR Database ............................................................................. 15
5. settings ....................................................................................... 16
5.1 Device Status Dialogue .................................................................... 16
5.1.1 General .................................................................................... 16
5.1.2 IR receive ................................................................................. 17
5.1.3 IR Codes .................................................................................. 19
5.1.4 Device Info / Firmwareupdate .................................................. 20
5.1.5 WLAN / IP ................................................................................ 21
5.1.6 IP Access ................................................................................. 22
5.1.7 IP Relay ................................................................................... 23
5.1.8 IR Bus ...................................................................................... 24
5.1.9 Power On ................................................................................. 25
5.1.10 RS232 .................................................................................... 26
Software Manual
© 2012 IRTrans GmbH 3
5. settings (cont.)
5.2 Webinterface .................................................................................... 27
5.3 IRConfig für Windows....................................................................... 27
5.4 IRConfig JAVA application ............................................................... 28
6. Clients .......................................................................................... 28
6.1 APIs ................................................................................................. 28
7. Advanced options ...................................................................... 29
7.1 Devices with integrated IR database (IRDB) .................................... 29
7.2 Administration of the IRDB ............................................................... 29
7.3 IR Translation ................................................................................... 31
7.4 advanced IRServer configuration ..................................................... 34
7.4.1 IRServer command line options ............................................... 35
7.5 Database files (additional information) ............................................. 36
7.6.1 IRTrans standard format .......................................................... 36
7.6.2 IRTrans RAW Format .............................................................. 37
7.6 IRRemote ......................................................................................... 38
Software Manual
©2012 IRTrans GmbH 4
1. Introduction
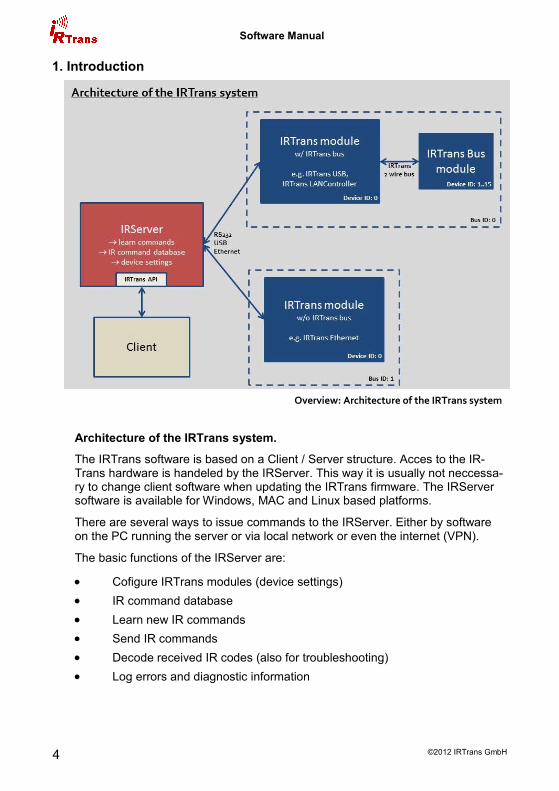
Architecture of the IRTrans system.
The IRTrans software is based on a Client / Server structure. Acces to the IR-Trans hardware is handeled by the IRServer. This way it is usually not neccessa-ry to change client software when updating the IRTrans firmware. The IRServer software is available for Windows, MAC and Linux based platforms.
There are several ways to issue commands to the IRServer. Either by software on the PC running the server or via local network or even the internet (VPN).
The basic functions of the IRServer are:
Cofigure IRTrans modules (device settings)
IR command database
Learn new IR commands
Send IR commands
Decode received IR codes (also for troubleshooting)
Log errors and diagnostic information
Overview: Architecture of the IRTrans system
Software Manual
© 2012 IRTrans GmbH 5
2. IRTrans Server
2.1 Installing the software and first tests
The core of the IRTrans system is the IRServer application. The setup program (setup.exe) installs the IRServer as well as other tools with default settings for the type of IRTrans module chosen during the installation process. These settings can be modified, for simplicity it is best to choose the type of IRTrans module that will be used during initial testing. The installation program creates (unless otherwise selected during installation) start menu shortcuts to the IRTrans software. After the installation is finished the IRServer can be started. The IRServer will search for IRTrans devices automati-cally and launch as a taskbar utility. The IRServer functions can be accessed by right clicking the IRTrans taskbar icon.
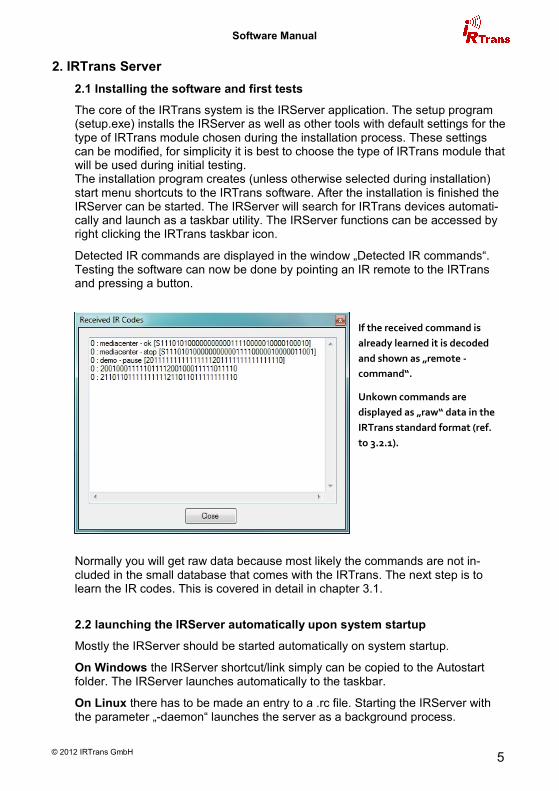
Detected IR commands are displayed in the window „Detected IR commands“. Testing the software can now be done by pointing an IR remote to the IRTrans and pressing a button.
Normally you will get raw data because most likely the commands are not in-cluded in the small database that comes with the IRTrans. The next step is to learn the IR codes. This is covered in detail in chapter 3.1.
2.2 launching the IRServer automatically upon system startup
Mostly the IRServer should be started automatically on system startup.
On Windows the IRServer shortcut/link simply can be copied to the Autostart folder. The IRServer launches automatically to the taskbar.
On Linux there has to be made an entry to a .rc file. Starting the IRServer with the parameter „-daemon“ launches the server as a background process.
If the received command is
already learned it is decoded
and shown as „remote -
command“.
Unkown commands are
displayed as „raw“ data in the
IRTrans standard format (ref.
to 3.2.1).
Software Manual
©2012 IRTrans GmbH 6
2.2.1 IRServer as Windows service
During setup the IRServer may be installed as a Windows service. This is only recommended for experiencecd users since access rights to services are very limited. Additionally when running as a service the IRServer can not control the PC because services are not allowed to emulate keyboard or mouse inputs.
2.3 IRServer menu
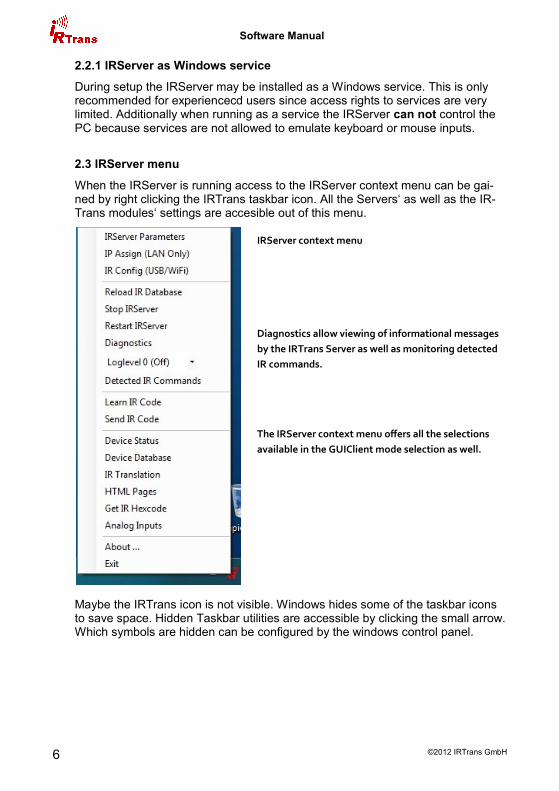
When the IRServer is running access to the IRServer context menu can be gai-ned by right clicking the IRTrans taskbar icon. All the Servers‘ as well as the IR-Trans modules‘ settings are accesible out of this menu.
Maybe the IRTrans icon is not visible. Windows hides some of the taskbar icons to save space. Hidden Taskbar utilities are accessible by clicking the small arrow. Which symbols are hidden can be configured by the windows control panel.
IRServer context menu
Diagnostics allow viewing of informational messages
by the IRTrans Server as well as monitoring detected
IR commands.
The IRServer context menu offers all the selections
available in the GUIClient mode selection as well.
Software Manual
© 2012 IRTrans GmbH 7
2.4 IRServer parameters
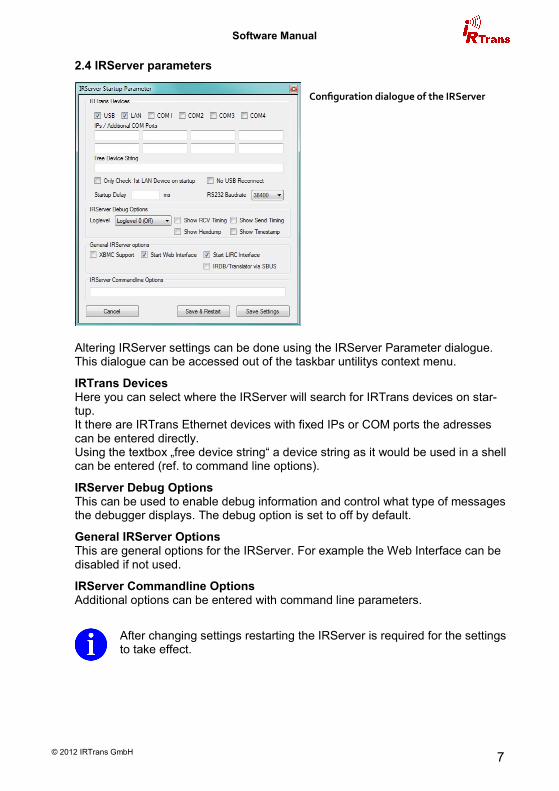
Altering IRServer settings can be done using the IRServer Parameter dialogue. This dialogue can be accessed out of the taskbar untilitys context menu.
IRTrans Devices Here you can select where the IRServer will search for IRTrans devices on star-tup. It there are IRTrans Ethernet devices with fixed IPs or COM ports the adresses can be entered directly. Using the textbox „free device string“ a device string as it would be used in a shell can be entered (ref. to command line options).
IRServer Debug Options This can be used to enable debug information and control what type of messages the debugger displays. The debug option is set to off by default.
General IRServer Options This are general options for the IRServer. For example the Web Interface can be disabled if not used.
IRServer Commandline Options Additional options can be entered with command line parameters.
After changing settings restarting the IRServer is required for the settings to take effect.
Configuration dialogue of the IRServer

Software Manual
©2012 IRTrans GmbH 8
3. IR database
3.1 learning IR commands
Learning IR codes can be done by the „learn command“ dialogue which is acces-sible through the „mode“ menu of the GUIClient or the IRServer taskbar utility.
First a remote must be selected. Enter a new name to the textbox or select a remote in the dropdown menu.
This name is also the filename for the IR command database file.
When selecting an existing remote this database file will be amended with new commands and already existing commands will be overwritten.
Remote and command names are not case sensitive.
IRTrans only supports basic ASCII characters. Special characters and mutuated vowels will result in errors.
First select a remote or write a new name
to the textbox. „Open / Create Remote“
opens the remote for learning.
Select the appropriate device if more than
one IRTrans is connected.

Software Manual
© 2012 IRTrans GmbH 9
After naming the remote commands can be learned. For learning the remote should be held at a distance of about 0.5m/2ft from the IRTrans. Holding the re-mote closer to the IRTrans may result in overdriving the receiver. Then the IR codes will not work correclty. Additionally the button of the remote should only be pressed as short as possible.
The software will output the detected IR code and an case the universal codelearning receiver is used the measured frequency:
Repeat these steps for all commands you want to learn.
Now new commands can be learned:
Assign a name for the command and click
on „Learn Command“. After that the
button on the remote has to be pressed
briefly.
Usually commands are learned in „Learn
command with timing“ mode
After successfully learning a command the
window should look like this.
Software Manual
©2012 IRTrans GmbH 10
3.1.1 special modes
The default settings most likely do not need to be modified but there are few cases when special learning modes are delivering better results.
Learning Repeat Codes
Some remotes use a different code when holding a button. This mode can be used to learn these type of codes. When using this learning mode hold down the button for a few seconds.
RAW mode
The IRTrans firmware normally decodes IR commands and stores them in a less space consuming format. Refer to database format for details. In rare cases this will not work correctly so it may be necessary to store the command as raw data. Storing commands this way requires multiple times the memory so this mode is only recommended if the remote cannot be learned any other way.
RAW Repeat It is possible to learn repeat codes in raw mode as well. As when learning normal repeat codes hold down the button on the remote.
Toggle Command
Very rarely remotes use multiple commands in turns when buttons are pressed repeatedly. Use the Toggle Command mode to learn this type of commands.
3.1.2 additional parameters
Device
If multiple IRTrans devices are connected to the PC a selection can be made with wich device codes are to be learned.
Carrier Frq
If the carrier frequency is known it can be entered here. When using the universal codelearning receiver the measured carrier frequency will be shown here. Inac-curacies of a few kHz ususally have no adverse effects. Entering a frequency the receiver cannot analyze will not enable the IRTrans to receive this type of carrier frequency. Generally it is not required to input anything in this box.
Software Manual
© 2012 IRTrans GmbH 11
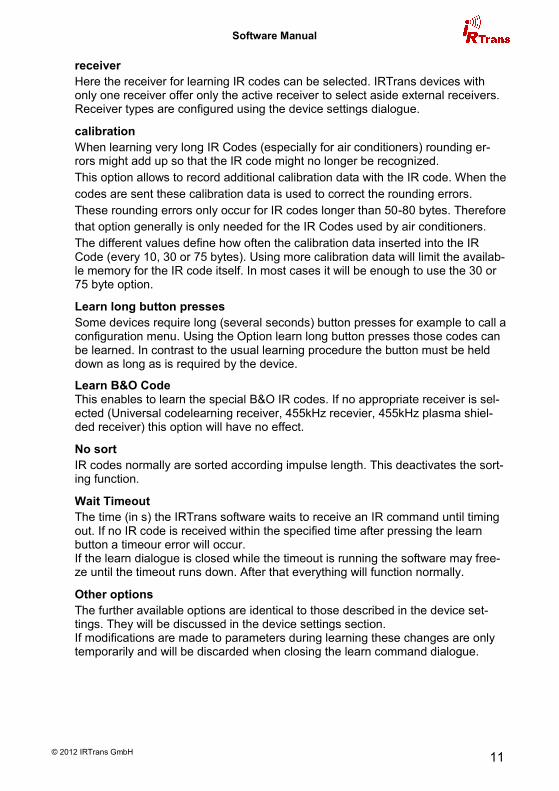
receiver
Here the receiver for learning IR codes can be selected. IRTrans devices with only one receiver offer only the active receiver to select aside external receivers. Receiver types are configured using the device settings dialogue.
calibration
When learning very long IR Codes (especially for air conditioners) rounding er-rors might add up so that the IR code might no longer be recognized.
This option allows to record additional calibration data with the IR code. When the
codes are sent these calibration data is used to correct the rounding errors.
These rounding errors only occur for IR codes longer than 50-80 bytes. Therefore
that option generally is only needed for the IR Codes used by air conditioners.
The different values define how often the calibration data inserted into the IR Code (every 10, 30 or 75 bytes). Using more calibration data will limit the availab-le memory for the IR code itself. In most cases it will be enough to use the 30 or 75 byte option.
Learn long button presses
Some devices require long (several seconds) button presses for example to call a configuration menu. Using the Option learn long button presses those codes can be learned. In contrast to the usual learning procedure the button must be held down as long as is required by the device.
Learn B&O Code This enables to learn the special B&O IR codes. If no appropriate receiver is sel-ected (Universal codelearning receiver, 455kHz recevier, 455kHz plasma shiel-ded receiver) this option will have no effect.
No sort
IR codes normally are sorted according impulse length. This deactivates the sort-ing function.
Wait Timeout
The time (in s) the IRTrans software waits to receive an IR command until timing out. If no IR code is received within the specified time after pressing the learn button a timeour error will occur. If the learn dialogue is closed while the timeout is running the software may free-ze until the timeout runs down. After that everything will function normally.
Other options
The further available options are identical to those described in the device set-tings. They will be discussed in the device settings section. If modifications are made to parameters during learning these changes are only temporarily and will be discarded when closing the learn command dialogue.
Software Manual
©2012 IRTrans GmbH 12
3.2 Database files (.rem)
IR commands are stored in ASCII type database files. They usually are managed by the IRServer software but can be changed manually with any texteditor. Detai-led information how to manually write database files can be found in chapter 7.5.
Deleting the database file will delete the appropriate remote from the command database.
It is important to stick to the correct syntax. Errors may lead to instability of the software.
When altering or deleting database files it is neccessary to reload the IR database. This can be achieved be restarting the IRServer software or by selecting „reload IR database“ in the context menu.
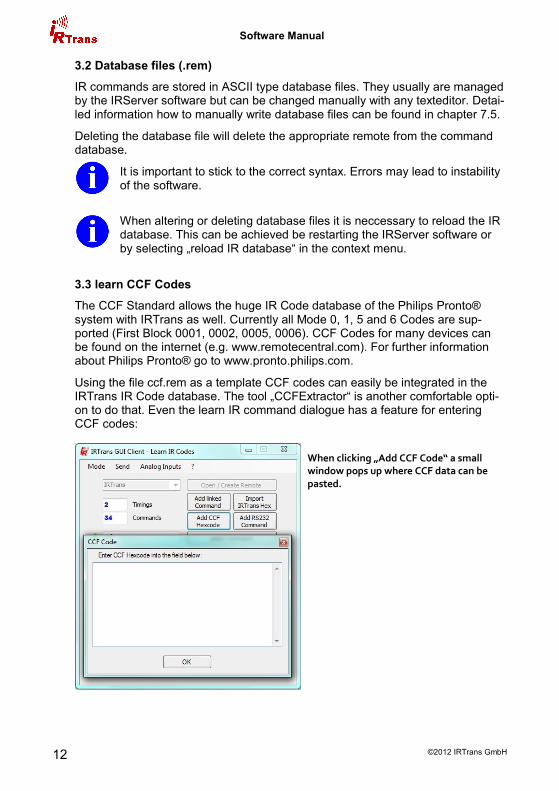
3.3 learn CCF Codes
The CCF Standard allows the huge IR Code database of the Philips Pronto® system with IRTrans as well. Currently all Mode 0, 1, 5 and 6 Codes are sup-ported (First Block 0001, 0002, 0005, 0006). CCF Codes for many devices can be found on the internet (e.g. www.remotecentral.com). For further information about Philips Pronto® go to www.pronto.philips.com.
Using the file ccf.rem as a template CCF codes can easily be integrated in the IRTrans IR Code database. The tool „CCFExtractor“ is another comfortable opti-on to do that. Even the learn IR command dialogue has a feature for entering CCF codes:
When clicking „Add CCF Code“ a small window pops up where CCF data can be pasted.
Software Manual
© 2012 IRTrans GmbH 13
3.4 Linked commands
Already learned commands can be linked to other remotes. After selecting the remote and naming the command click on „add link“. Now select the remote and command the link will point to.
3.5 Import IRTrans Hex IR command data in the IRTrans Hex format can be pasted directly using the import IRTrans Hex feature. To get IRTrans Hex data call „get IRTrans Hex“ from the IRServers context menu.
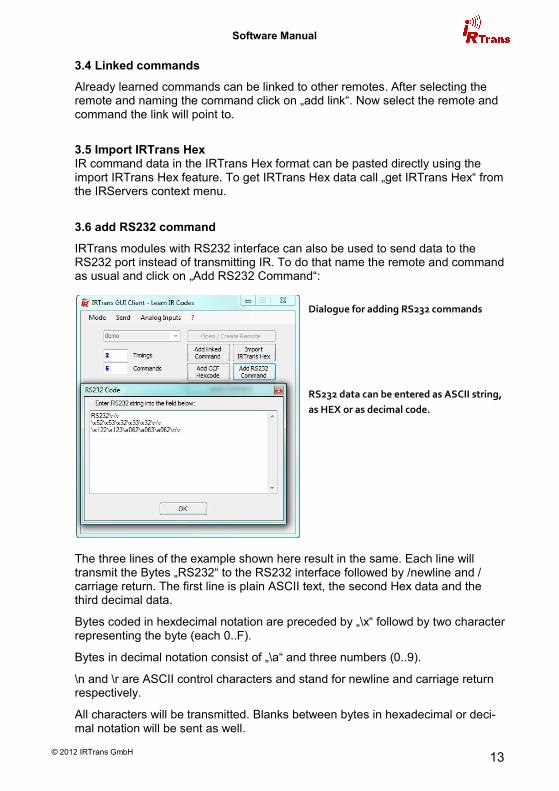
3.6 add RS232 command
IRTrans modules with RS232 interface can also be used to send data to the RS232 port instead of transmitting IR. To do that name the remote and command as usual and click on „Add RS232 Command“:
The three lines of the example shown here result in the same. Each line will transmit the Bytes „RS232“ to the RS232 interface followed by /newline and /carriage return. The first line is plain ASCII text, the second Hex data and the third decimal data.
Bytes coded in hexdecimal notation are preceded by „\x“ followd by two character representing the byte (each 0..F).
Bytes in decimal notation consist of „\a“ and three numbers (0..9).
\n and \r are ASCII control characters and stand for newline and carriage return respectively.
All characters will be transmitted. Blanks between bytes in hexadecimal or deci-mal notation will be sent as well.
Dialogue for adding RS232 commands
RS232 data can be entered as ASCII string,
as HEX or as decimal code.
Software Manual
©2012 IRTrans GmbH 14
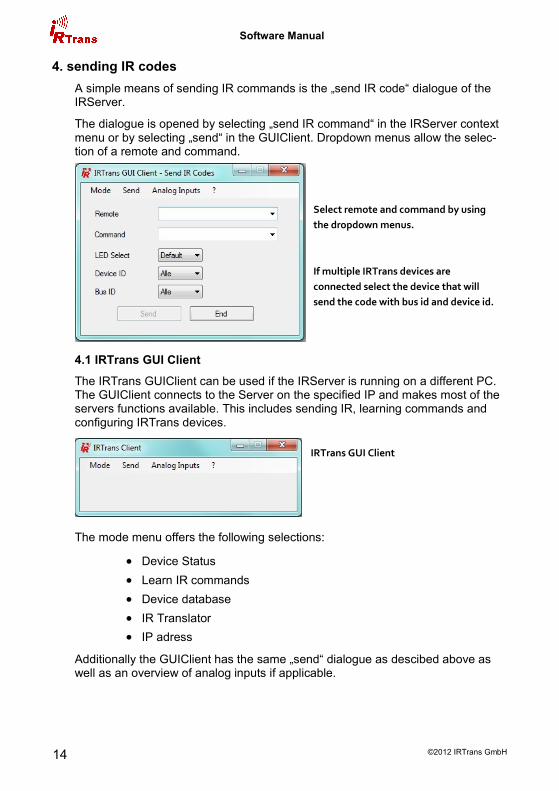
4. sending IR codes
A simple means of sending IR commands is the „send IR code“ dialogue of the IRServer.
The dialogue is opened by selecting „send IR command“ in the IRServer context menu or by selecting „send“ in the GUIClient. Dropdown menus allow the selec-tion of a remote and command.
4.1 IRTrans GUI Client
The IRTrans GUIClient can be used if the IRServer is running on a different PC. The GUIClient connects to the Server on the specified IP and makes most of the servers functions available. This includes sending IR, learning commands and configuring IRTrans devices.
The mode menu offers the following selections:
Device Status
Learn IR commands
Device database
IR Translator
IP adress
Additionally the GUIClient has the same „send“ dialogue as descibed above as well as an overview of analog inputs if applicable.
Select remote and command by using
the dropdown menus.
If multiple IRTrans devices are
connected select the device that will
send the code with bus id and device id.
IRTrans GUI Client

Software Manual
© 2012 IRTrans GmbH 15
4.2 IRTrans ASCII (Batch) Client
The IRTrans ASCII Client works on Windows and Linux. The Client uses the command line interface and allows learning and sending commands as well as setting status flags of the IRTrans.
When starting the ASCII client the IRServers IP adress must be included in the call, if the server runs on the same machine this will be: „./irclient localhost“ Re-place „localhost“ with the servers IP if running on a different computer.
The IRClient offers a text based menu but can be used for batch control.
4.2.1 sending IR commands
irclient <ip> <remote> <command> [sendmask] [bus] [led]
Parameters: <ip> IP adress of the IRServer <remote> name of remote
<command> name of command
[sendmask] sendmask for IRTrans bus (ref. to 5.1.8) [bus] Bus ID
[led] LED selection (i=internal, e=external, 1..8=LED #)
Parameters in square brackets are optional but must be used in the shown order.
4.2.2 IR database
irclient <ip> -flashirdb <bus> <actionstring> <remotelist>
irclient <ip> -loadirdb <bus> <filename>
irclient <ip> -reload
irclient <ip> -remotelist
irclient <ip> -commandlist <remote>
Parameter:
-flashirdb load a list of remotes to the IR database
<bus> Bus ID
<actionstring> Action string for received commands (ref. to 7.2)
<remotelist> list of remotes
-loadirdb load GUIClient .irdb file
<bus> Bus ID
<filename> filename of the database file (without .irdb)
-reload reload IR database of the server
-remotelist print a list of remotes
-commandlist print a list of commands for <remote>
Software Manual
©2012 IRTrans GmbH 16
5. Settings
5.1 IRTrans Device Status dialogue
The IRTrans modules offer a wide range of settings and parameters. Theycan be configured using the Device Status dialogue. The Device Status dialogue can be opened with the IRServer taskbar utility, the GUIClients mode selection or with IRRemote. IRTrans devices can also be configured using the IRConfig Java application. This makes using the IRTrans possible an a variety of platforms. No matter how the device status dialogue is opened there are always the same options and parameters available. Because there are numerous parameters they have been divided to a number of tabs. If an option should not be available with the IRTrans connected it will show but be disabled (grey).
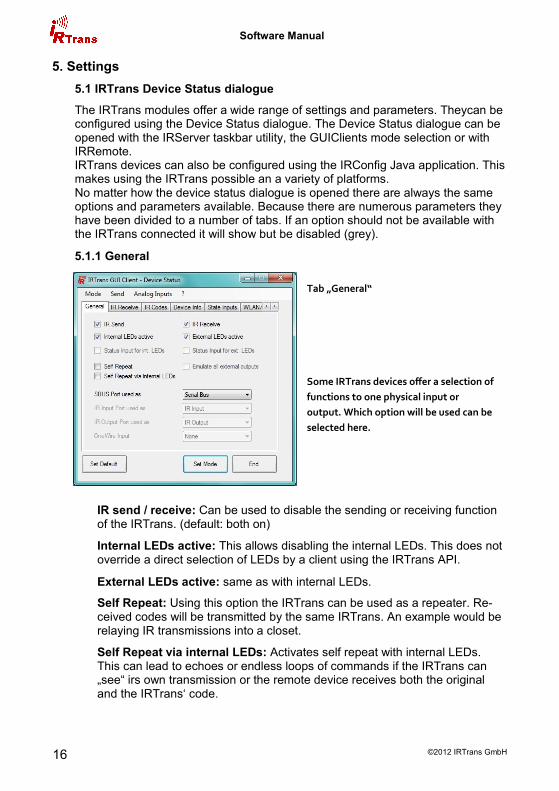
5.1.1 General
IR send / receive: Can be used to disable the sending or receiving function of the IRTrans. (default: both on)
Internal LEDs active: This allows disabling the internal LEDs. This does not override a direct selection of LEDs by a client using the IRTrans API.
External LEDs active: same as with internal LEDs.
Self Repeat: Using this option the IRTrans can be used as a repeater. Re-ceived codes will be transmitted by the same IRTrans. An example would be relaying IR transmissions into a closet.
Self Repeat via internal LEDs: Activates self repeat with internal LEDs. This can lead to echoes or endless loops of commands if the IRTrans can „see“ irs own transmission or the remote device receives both the original and the IRTrans‘ code.
Tab „General“
Some IRTrans devices offer a selection of
functions to one physical input or
output. Which option will be used can be
selected here.
Software Manual
© 2012 IRTrans GmbH 17
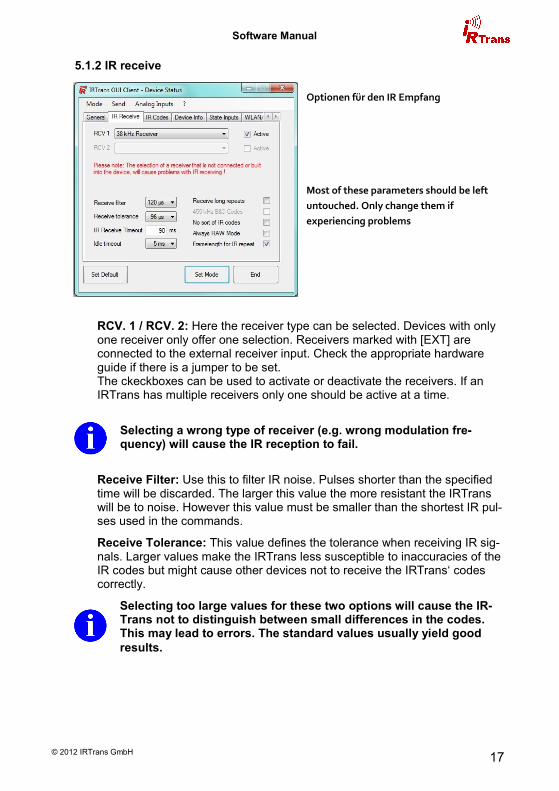
5.1.2 IR receive
RCV. 1 / RCV. 2: Here the receiver type can be selected. Devices with only one receiver only offer one selection. Receivers marked with [EXT] are connected to the external receiver input. Check the appropriate hardware guide if there is a jumper to be set. The ckeckboxes can be used to activate or deactivate the receivers. If an IRTrans has multiple receivers only one should be active at a time.
Selecting a wrong type of receiver (e.g. wrong modulation fre-quency) will cause the IR reception to fail.
Receive Filter: Use this to filter IR noise. Pulses shorter than the specified time will be discarded. The larger this value the more resistant the IRTrans will be to noise. However this value must be smaller than the shortest IR pul-ses used in the commands.
Receive Tolerance: This value defines the tolerance when receiving IR sig-nals. Larger values make the IRTrans less susceptible to inaccuracies of the IR codes but might cause other devices not to receive the IRTrans‘ codes correctly.
Selecting too large values for these two options will cause the IR-Trans not to distinguish between small differences in the codes. This may lead to errors. The standard values usually yield good
results.
Optionen für den IR Empfang
Most of these parameters should be left
untouched. Only change them if
experiencing problems
Software Manual
©2012 IRTrans GmbH 18
IR Receive Timeout: This value controls maximum pause lenghts within an IR code. A pause longer than the specified value will terminate the code. Setting this value too small will cause the IRTrans to stop receiving prematu-rely. On the other hand smaller values can improve performance with repea-ted codes. When altering this value it is recommended to make small steps and test the results.
When learning codes for the database the timeout value should better be too large rather than too small. Otherwise it can happen that codes are not learned completely.
Idle Timeout: This timeout is used to resynchronize between two different IR codes. It is the minimum time between discrete IR commands. The standard valus (5ms) is usually suitable for most scenarios, smaller values might im-prove the repeat speed when holding a button depressed.
Receive long repeats: Normally 2 IR repeats are evaluated when receiving an IR code. Rarely IR codes consist of 2 repeats and a 3rd different code. This option can be used to relay such codes. Normal learning is not affected because during learning the IRTrans uses more repeat cycles. Checking whether this option is needed is pretty straightforward: Relaying doesn‘t work and the codes in the .rem file are longer than the codes displayed by „Detected IR commands“.
455 kHz B&O Codes: Using this checkbox learning of 455kHz B&O codes will be enabled. This will only work when a 455kHz receiver is selected (either Universal colearning receiver, 455kHz receiver or 455kHz plasma shielded receiver). All other learn / receive options are set to optimized valu-es for B&O codes automatically
No sort of IR Codes: Received IR codes will not be sorted according pulse length. This might ease recognition of codes especially with codes that use many different timings.
Always RAW Mode: All IR codes will be received in RAW mode. Also all IR codes will be relayed in RAW mode. This option is rarely needed.
Framelength for IR Repeat: When measuring timings for IR repeats the whole code frame length will be used (IR code + pause). Without this option the pause length will be measured. This was the operating mode of ealier firmware versions. Normally the new mode will work more reliable, this option is available only to be compatible to earlier versions and should normally be left activated.
Software Manual
© 2012 IRTrans GmbH 19
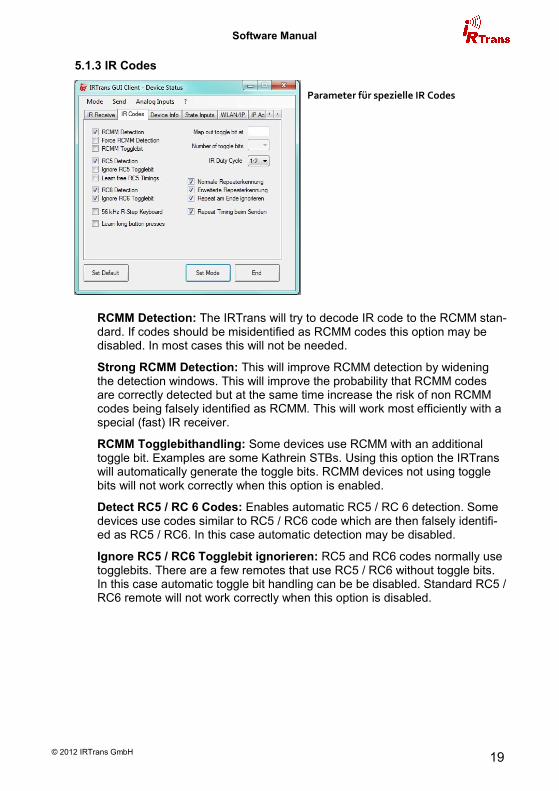
5.1.3 IR Codes
RCMM Detection: The IRTrans will try to decode IR code to the RCMM stan-dard. If codes should be misidentified as RCMM codes this option may be disabled. In most cases this will not be needed.
Strong RCMM Detection: This will improve RCMM detection by widening the detection windows. This will improve the probability that RCMM codes are correctly detected but at the same time increase the risk of non RCMM codes being falsely identified as RCMM. This will work most efficiently with a special (fast) IR receiver.
RCMM Togglebithandling: Some devices use RCMM with an additional toggle bit. Examples are some Kathrein STBs. Using this option the IRTrans will automatically generate the toggle bits. RCMM devices not using toggle bits will not work correctly when this option is enabled.
Detect RC5 / RC 6 Codes: Enables automatic RC5 / RC 6 detection. Some devices use codes similar to RC5 / RC6 code which are then falsely identifi-ed as RC5 / RC6. In this case automatic detection may be disabled.
Ignore RC5 / RC6 Togglebit ignorieren: RC5 and RC6 codes normally use togglebits. There are a few remotes that use RC5 / RC6 without toggle bits. In this case automatic toggle bit handling can be be disabled. Standard RC5 / RC6 remote will not work correctly when this option is disabled.
Parameter für spezielle IR Codes

Software Manual
©2012 IRTrans GmbH 20
56kHz R-Step Keyboard: Allows using an IR keyboard with R-Step protocol. A 56kHz receiver is needed.
Learn long button presses: Some devices use long button presses (several seconds) to call up configuration menus for exmaple. Using this option these codes can be learned. In contrast to the normal learning procedure the but-ton needs to be depresses as long as needed when using this option.
Map out Togglebit at / Number of Togglebits: This allows manually map-ping out toggle bits in an IR code. To do that the position of the toggle bit(s) has to be set (0..62). Furthermore the Number of togglebits must be selec-ted. The codes have to be learned using this setting and the option „map out toggle bit“ of the learn dialogue.
IR Duty Cycle: The IRTrans devices have high power IR transmitters. Some-times these transmitters are too powerful so the receiver will be overdriven and receive errors occur. The parameter duty cycle allows to reduce trans-mitting power. (Standard: 1:2 = high power)
Einstellungen für Wiederholcodes (Repeat Erkennung etc.): Normally this should not be changed. The IRTrans will automatically detect repetitions of IR codes. Very rarely there are problems with code repetitions. In this case repeat detection can be adapted as well as deactivated.
5.1.4 Device Info / Firmwareupdate
From this tab the firmware update dialogue can be opened. A firmware up-date is usually not recommended unless there are problems with the current version.
The device info tab shows hardware
revision, firmware versions and
capabilities of the device.
Software Manual
© 2012 IRTrans GmbH 21
5.1.5 WLAN / IP
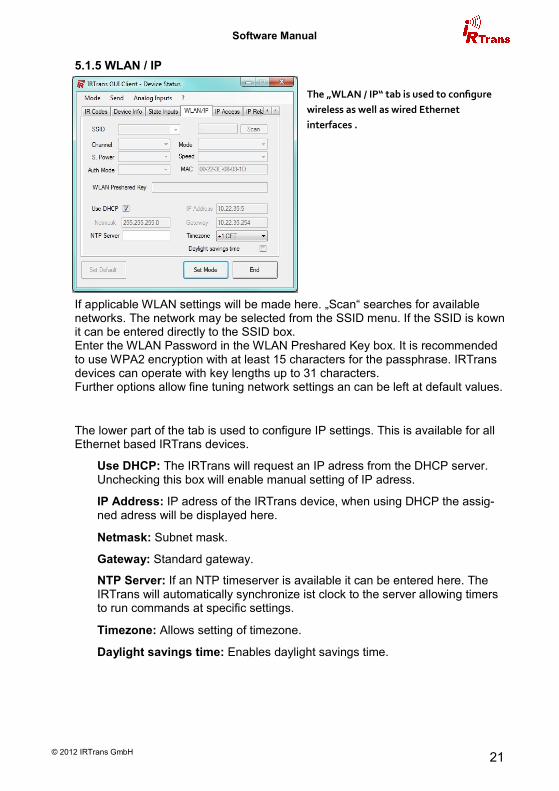
If applicable WLAN settings will be made here. „Scan“ searches for available networks. The network may be selected from the SSID menu. If the SSID is kown it can be entered directly to the SSID box. Enter the WLAN Password in the WLAN Preshared Key box. It is recommended to use WPA2 encryption with at least 15 characters for the passphrase. IRTrans devices can operate with key lengths up to 31 characters. Further options allow fine tuning network settings an can be left at default values.
The lower part of the tab is used to configure IP settings. This is available for all Ethernet based IRTrans devices.
Use DHCP: The IRTrans will request an IP adress from the DHCP server. Unchecking this box will enable manual setting of IP adress.
IP Address: IP adress of the IRTrans device, when using DHCP the assig-ned adress will be displayed here.
Netmask: Subnet mask.
Gateway: Standard gateway.
NTP Server: If an NTP timeserver is available it can be entered here. The IRTrans will automatically synchronize ist clock to the server allowing timers to run commands at specific settings.
Timezone: Allows setting of timezone.
Daylight savings time: Enables daylight savings time.
The „WLAN / IP“ tab is used to configure
wireless as well as wired Ethernet
interfaces .
Software Manual
©2012 IRTrans GmbH 22
5.1.6 IP Access
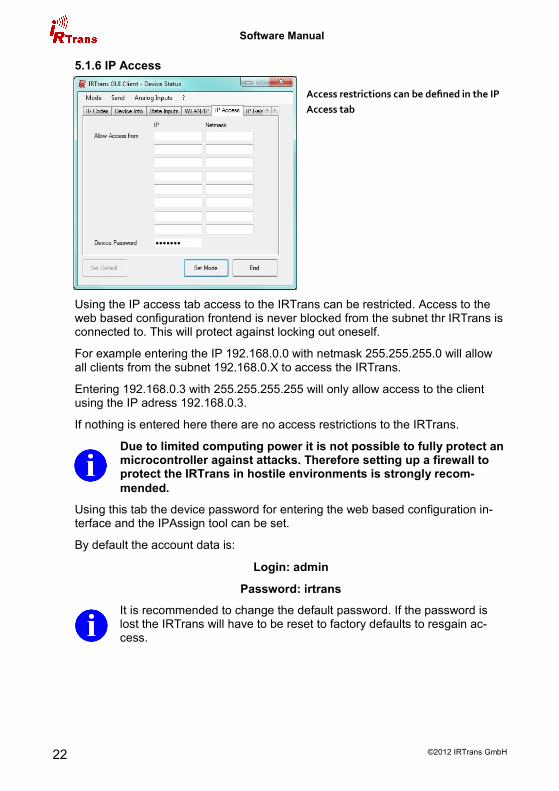
Using the IP access tab access to the IRTrans can be restricted. Access to the web based configuration frontend is never blocked from the subnet thr IRTrans is connected to. This will protect against locking out oneself.
For example entering the IP 192.168.0.0 with netmask 255.255.255.0 will allow all clients from the subnet 192.168.0.X to access the IRTrans.
Entering 192.168.0.3 with 255.255.255.255 will only allow access to the client using the IP adress 192.168.0.3.
If nothing is entered here there are no access restrictions to the IRTrans.
Due to limited computing power it is not possible to fully protect an microcontroller against attacks. Therefore setting up a firewall to protect the IRTrans in hostile environments is strongly recom-
mended.
Using this tab the device password for entering the web based configuration in-terface and the IPAssign tool can be set.
By default the account data is:
Login: admin
Password: irtrans
It is recommended to change the default password. If the password is lost the IRTrans will have to be reset to factory defaults to resgain ac-cess.
Access restrictions can be defined in the IP
Access tab

Software Manual
© 2012 IRTrans GmbH 23
5.1.7 IP Relay
IP Relay allows using Ethernet to relay IR code to other IRTrans devices. This works without additional hardware, Servers and IRDB.
By default alle received IR commands are distributed as broadcast to the network and transmitted by all IRTrans devices.
Accept IR Relay from: This can be used to accept IR relay only from spe-cific IP adresses.
Send IR Relay to: Here specific targets for IP relay can be configured. Nor-mally it is sufficient to use broadcasts but when relaying to a different net-work specific targets must be entered. Broadcasts will not be routed.
Broadcast IR Relay: Sends out a bradcast for every IR code received.
The receiving function of the IRServer utilizes these broadcasts. If the server is located in a different subnet it must be entered as targed using „Send IR relay to“.
Send UDP ASCII Results to Sourceport: When receiving commands via the UDP ASCII interface the IRTrans can send the acknowledgement either to the sourceport or the default IRTrans port (21000). Selection is made by checking or unchecking this box.
UDP RCV IP/Port: If the IRTrans is equipped with IRDB it can send the de-coded command to the specified adress upon reception.
IP Relay configures how received IR
commands are forwarded to the network.
Software Manual
©2012 IRTrans GmbH 24
5.1.8 IR Bus
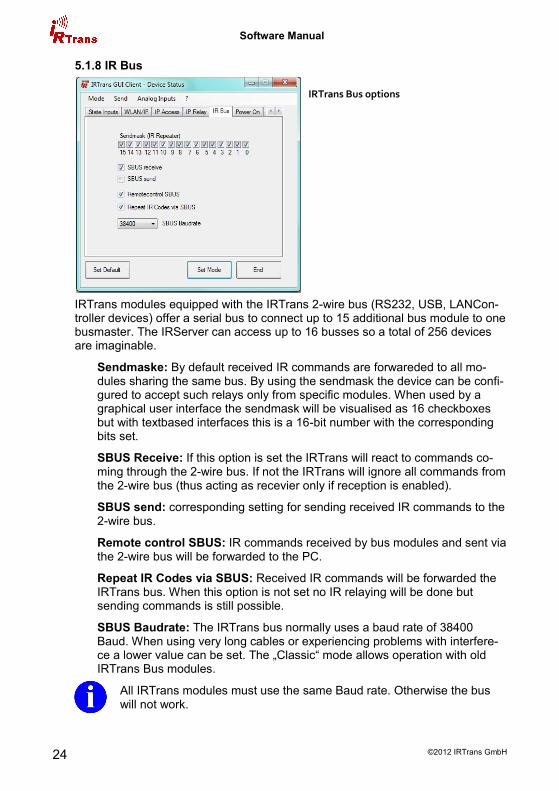
IRTrans modules equipped with the IRTrans 2-wire bus (RS232, USB, LANCon-troller devices) offer a serial bus to connect up to 15 additional bus module to one busmaster. The IRServer can access up to 16 busses so a total of 256 devices are imaginable.
Sendmaske: By default received IR commands are forwareded to all mo-dules sharing the same bus. By using the sendmask the device can be confi-gured to accept such relays only from specific modules. When used by a graphical user interface the sendmask will be visualised as 16 checkboxes but with textbased interfaces this is a 16-bit number with the corresponding bits set.
SBUS Receive: If this option is set the IRTrans will react to commands co-ming through the 2-wire bus. If not the IRTrans will ignore all commands from the 2-wire bus (thus acting as recevier only if reception is enabled).
SBUS send: corresponding setting for sending received IR commands to the 2-wire bus.
Remote control SBUS: IR commands received by bus modules and sent via the 2-wire bus will be forwarded to the PC.
Repeat IR Codes via SBUS: Received IR commands will be forwarded the IRTrans bus. When this option is not set no IR relaying will be done but sending commands is still possible.
SBUS Baudrate: The IRTrans bus normally uses a baud rate of 38400 Baud. When using very long cables or experiencing problems with interfere-ce a lower value can be set. The „Classic“ mode allows operation with old IRTrans Bus modules.
All IRTrans modules must use the same Baud rate. Otherwise the bus will not work.
IRTrans Bus options
Software Manual
© 2012 IRTrans GmbH 25
5.1.9 Power On
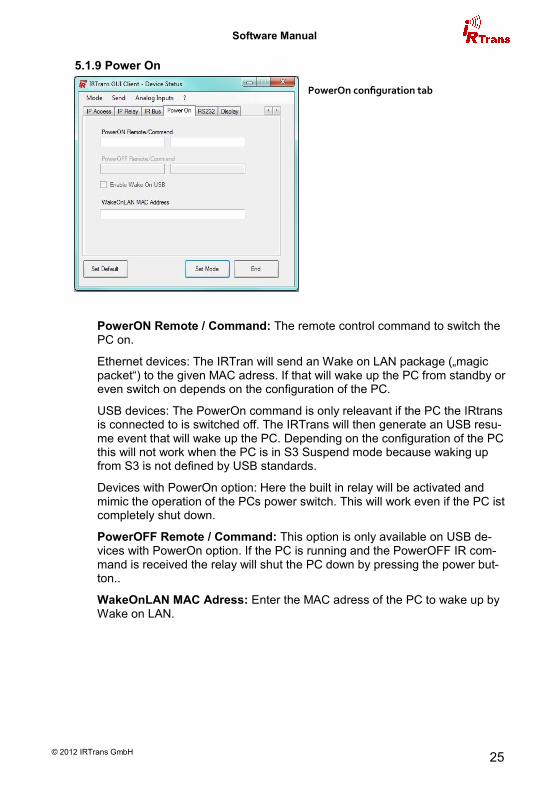
PowerON Remote / Command: The remote control command to switch the PC on.
Ethernet devices: The IRTran will send an Wake on LAN package („magic packet“) to the given MAC adress. If that will wake up the PC from standby or even switch on depends on the configuration of the PC.
USB devices: The PowerOn command is only releavant if the PC the IRtrans is connected to is switched off. The IRTrans will then generate an USB resu-me event that will wake up the PC. Depending on the configuration of the PC this will not work when the PC is in S3 Suspend mode because waking up from S3 is not defined by USB standards.
Devices with PowerOn option: Here the built in relay will be activated and mimic the operation of the PCs power switch. This will work even if the PC ist completely shut down.
PowerOFF Remote / Command: This option is only available on USB de-vices with PowerOn option. If the PC is running and the PowerOFF IR com-mand is received the relay will shut the PC down by pressing the power but-ton..
WakeOnLAN MAC Adress: Enter the MAC adress of the PC to wake up by Wake on LAN.
PowerOn configuration tab

Software Manual
©2012 IRTrans GmbH 26
5.1.10 RS232
Port: Some IRTrans modules can switch the RS232 interface between se-veral physical connectors. They can be selected by using the „Port“ selec-tion.
RS232 Mode: Sets the RS232 mode. IRTrans modules that only offer a uni-derectional RS232 interface can be set to send or receive.
Baudrate: RS232 Baudrate, 4800, 9600, 19200, 38400, 57600 und 115200 Baud are supported.
Parity / Data Bits / Stop Bits: detailed settings for RS232 communication.
RTS/CTS Handshake: activates RTS/CTS handshake
Transmit RS232 Data via UDP: data received by RS232 is forwarded via UDP.
Transmit UDP Data via RS232: data received via UDP is forwarded to the RS232 interface.
Relay IR Codes via RS232: received IR commands are forwarded to RS232
The RS232 tab configures the RS232
settings.

Software Manual
© 2012 IRTrans GmbH 27
5.2 Webinterface
Some of the settings are available through the web interface as well. The web interface can be opened by using the IRTrans‘ IP adress as an URL in any com-mon internet browser. First there is a login page:.
The available options are logically identical to those available in the device status tabs (ref. to 5.1).
Irrespective of the IP Access restrictions it is always possible to gain access to the webinterfrace from its own subnet. This prevents locking onesels out.
5.3 IRConfig for Windows
The IRConfig application included in the windows software package is identical to the device status dialogue. It can be used to configure alle IRTrans devices with USB connection.
IRConfig will automatically detect IRTrans USB modules. If there are multiple modules present it will show a selection dialogue.
IRTrans modules with ethernet interface
(LAN, PoE, WiFi…) offer a web based
configuration tool.
Default Login and Password:
Login: admin
Password: irtrans
Software Manual
©2012 IRTrans GmbH 28
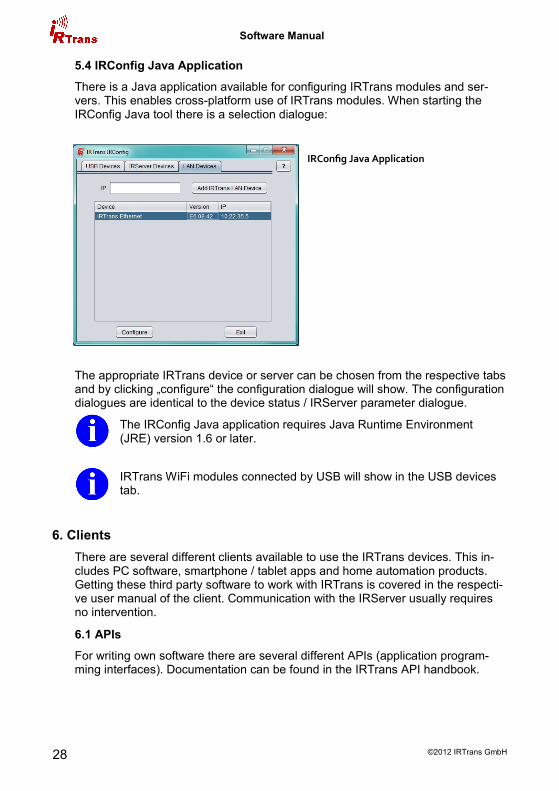
5.4 IRConfig Java Application
There is a Java application available for configuring IRTrans modules and ser-vers. This enables cross-platform use of IRTrans modules. When starting the IRConfig Java tool there is a selection dialogue:
The appropriate IRTrans device or server can be chosen from the respective tabs and by clicking „configure“ the configuration dialogue will show. The configuration dialogues are identical to the device status / IRServer parameter dialogue.
The IRConfig Java application requires Java Runtime Environment (JRE) version 1.6 or later.
IRTrans WiFi modules connected by USB will show in the USB devices tab.
6. Clients
There are several different clients available to use the IRTrans devices. This in-cludes PC software, smartphone / tablet apps and home automation products. Getting these third party software to work with IRTrans is covered in the respecti-ve user manual of the client. Communication with the IRServer usually requires no intervention.
6.1 APIs
For writing own software there are several different APIs (application program-ming interfaces). Documentation can be found in the IRTrans API handbook.
IRConfig Java Application
Software Manual
© 2012 IRTrans GmbH 29
7. Advanced Options
7.1 Devices with integrated IR database (IRDB option)
The integrated IR database allows operation without a PC running the server software. Parts of the servers functionality have been integrated in the IRTrans. It is however not possible to implement the entire IRServer on a microcontroller.
Devices with integrated IR database can offer the following IRServer functions on their own:
Send IR codes from the database
Send CCF codes
Receive IR codes and decode to plain text if present in the database
Listing of remotes and commands enclosed in the databse
Administration of the IR database has to be done by a PC with the IRServer soft-ware. This includes learning commands, programming macros etc. The IR datab-se memory is sufficient for 1000-1500 IR commands.
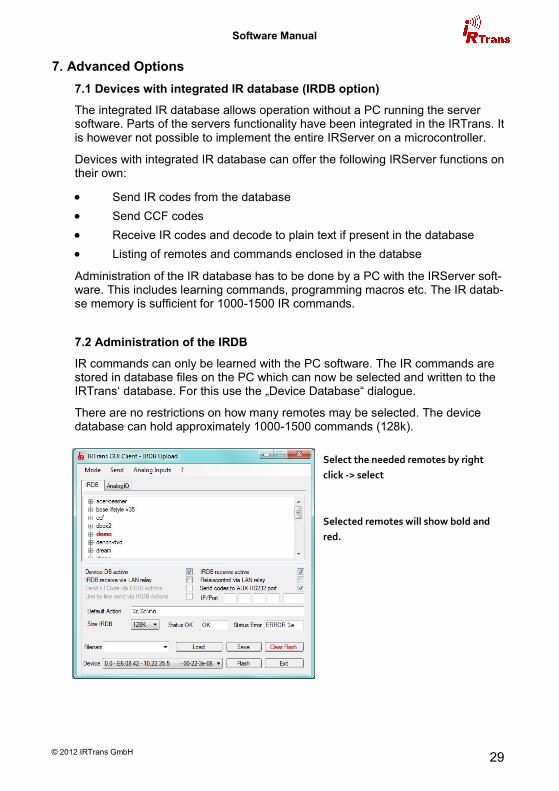
7.2 Administration of the IRDB
IR commands can only be learned with the PC software. The IR commands are stored in database files on the PC which can now be selected and written to the IRTrans‘ database. For this use the „Device Database“ dialogue.
There are no restrictions on how many remotes may be selected. The device database can hold approximately 1000-1500 commands (128k).
Select the needed remotes by right
click -> select
Selected remotes will show bold and
red.
Software Manual
©2012 IRTrans GmbH 30
When flashing the database to the device the entire memory is overwrit-ten. Therefore all needed remotes must be selected every time the IRDB is flashed.
Transfer of the database to the IRTrans is done by pressing the button „flash“.
Concluding the procedure the IRDB file may be saved on the PC. Write a filena-me to the textbox and click „save“. Saved IRDB files may be loaded again by selecting them from the dropdown menu and clicking „Load“.
It is not possible to read the IRDB data from the IRTrans.
The built in IR database may be deactivated by unchecking „IR database active“. Then the IRTrans will behave like an equivalent model without IRDB.
„IRDB receive active“ means that the IRTrans will search for the IR command in ist database and send the decoded command to the network.
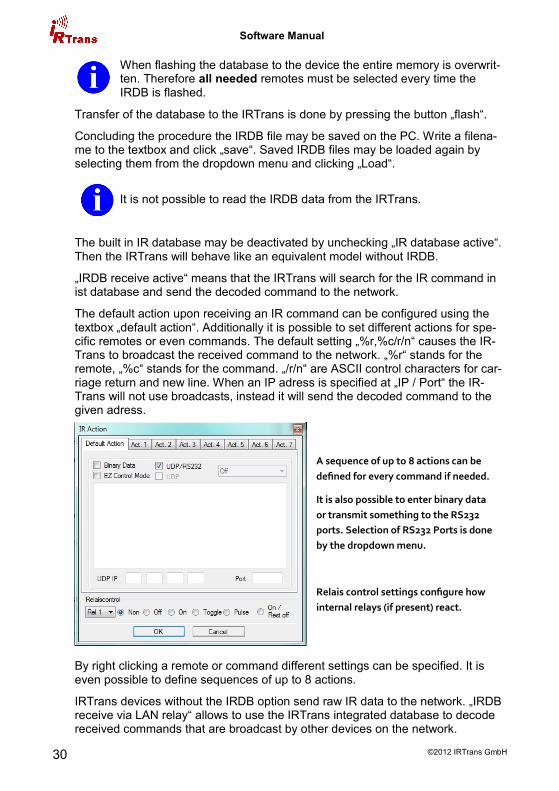
The default action upon receiving an IR command can be configured using the textbox „default action“. Additionally it is possible to set different actions for spe-cific remotes or even commands. The default setting „%r,%c/r/n“ causes the IR-Trans to broadcast the received command to the network. „%r“ stands for the remote, „%c“ stands for the command. „/r/n“ are ASCII control characters for car-riage return and new line. When an IP adress is specified at „IP / Port“ the IR-Trans will not use broadcasts, instead it will send the decoded command to the given adress.
By right clicking a remote or command different settings can be specified. It is even possible to define sequences of up to 8 actions.
IRTrans devices without the IRDB option send raw IR data to the network. „IRDB receive via LAN relay“ allows to use the IRTrans integrated database to decode received commands that are broadcast by other devices on the network.
A sequence of up to 8 actions can be
defined for every command if needed.
It is also possible to enter binary data
or transmit something to the RS232
ports. Selection of RS232 Ports is done
by the dropdown menu.
Relais control settings configure how
internal relays (if present) react.

Software Manual
© 2012 IRTrans GmbH 31
7.3 IR Translation (only IRTranslator)
The IRTranslator database is administered in the „IR Translation“ dialogue. In principle this is identical to the regular IRDB.
First enter a name for the new remote and click on „new remote“. This will be the IRTranslator remote and shows in the left collumm of the window.
The received commands can now be selected above the left collumm. „Add com-mand“ will generate a new translation. Simply select the remote where the com-mand to be sent is stored and drag the command from the right collumm to the appropriate received command.
In the example shown below the IRTranslator will transmit „irtrans - vol+“ when „mediacenter - vol+“ was received. Translations that have been contructed like this are always executed.
If different devices need to be operated by the same buttons but different com-mands they will need to be divided into groups. In the example there are two groups of commands, one activated by „mediacenter - red“ the other by „mediacenter - green“. Groups can be generated by selecting a received command and clicking „add group“. The IRTranslator will now change the active group according to the received command. When the „mediacenter - red“ group is active it will transmit „denon dvd - play“ when „mediacenter - play“ is received, when the green group is active „sky-hd - play“ accordingly.
Beispielkonfiguration IR Translation
mit global gültigen Übersetzungen
und Gruppen
Software Manual
©2012 IRTrans GmbH 32
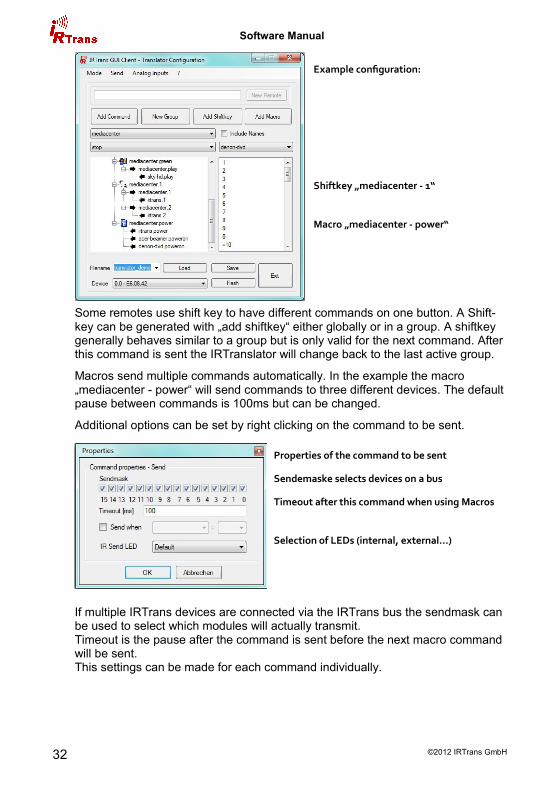
Some remotes use shift key to have different commands on one button. A Shift-key can be generated with „add shiftkey“ either globally or in a group. A shiftkey generally behaves similar to a group but is only valid for the next command. After this command is sent the IRTranslator will change back to the last active group.
Macros send multiple commands automatically. In the example the macro „mediacenter - power“ will send commands to three different devices. The default pause between commands is 100ms but can be changed.
Additional options can be set by right clicking on the command to be sent.
If multiple IRTrans devices are connected via the IRTrans bus the sendmask can be used to select which modules will actually transmit. Timeout is the pause after the command is sent before the next macro command will be sent. This settings can be made for each command individually.
Example configuration:
Shiftkey „mediacenter - 1“
Macro „mediacenter - power“
Properties of the command to be sent
Sendemaske selects devices on a bus
Timeout after this command when using Macros
Selection of LEDs (internal, external…)
Software Manual
© 2012 IRTrans GmbH 33
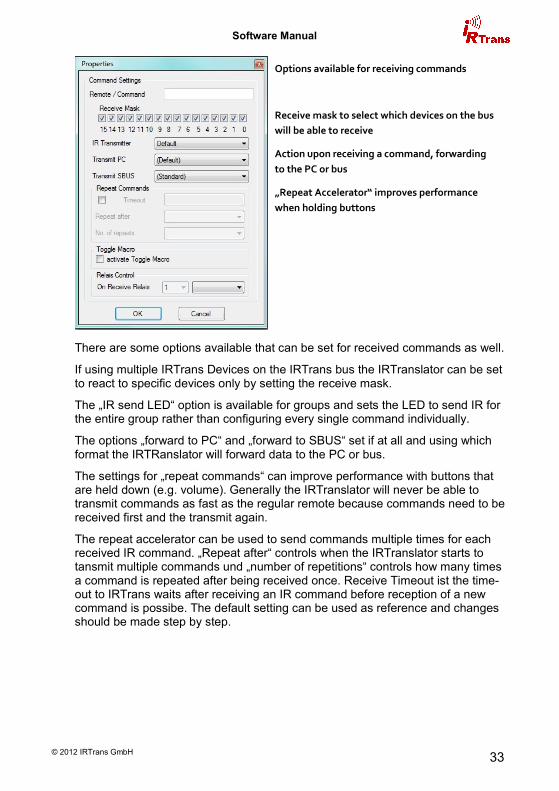
There are some options available that can be set for received commands as well.
If using multiple IRTrans Devices on the IRTrans bus the IRTranslator can be set to react to specific devices only by setting the receive mask.
The „IR send LED“ option is available for groups and sets the LED to send IR for the entire group rather than configuring every single command individually.
The options „forward to PC“ and „forward to SBUS“ set if at all and using which format the IRTRanslator will forward data to the PC or bus.
The settings for „repeat commands“ can improve performance with buttons that are held down (e.g. volume). Generally the IRTranslator will never be able to transmit commands as fast as the regular remote because commands need to be received first and the transmit again.
The repeat accelerator can be used to send commands multiple times for each received IR command. „Repeat after“ controls when the IRTranslator starts to tansmit multiple commands und „number of repetitions“ controls how many times a command is repeated after being received once. Receive Timeout ist the time-out to IRTrans waits after receiving an IR command before reception of a new command is possibe. The default setting can be used as reference and changes should be made step by step.
Options available for receiving commands
Receive mask to select which devices on the bus
will be able to receive
Action upon receiving a command, forwarding
to the PC or bus
„Repeat Accelerator“ improves performance
when holding buttons
Software Manual
©2012 IRTrans GmbH 34
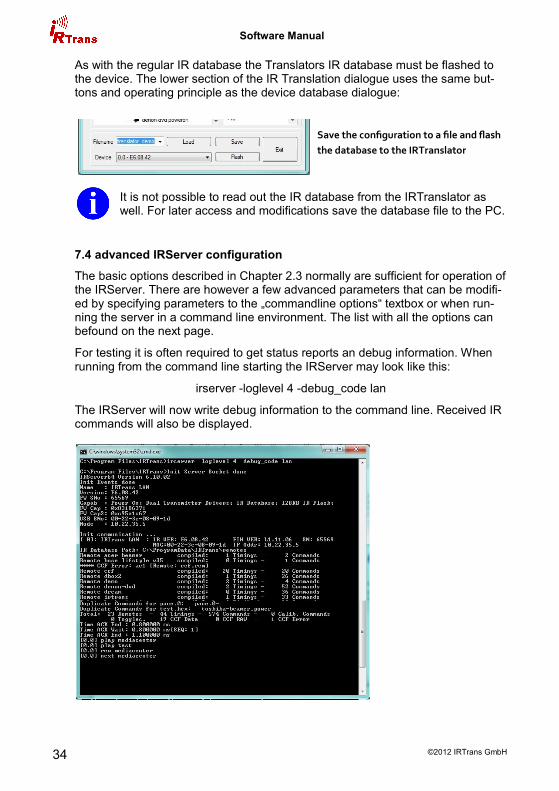
As with the regular IR database the Translators IR database must be flashed to the device. The lower section of the IR Translation dialogue uses the same but-tons and operating principle as the device database dialogue:
It is not possible to read out the IR database from the IRTranslator as well. For later access and modifications save the database file to the PC.
7.4 advanced IRServer configuration
The basic options described in Chapter 2.3 normally are sufficient for operation of the IRServer. There are however a few advanced parameters that can be modifi-ed by specifying parameters to the „commandline options“ textbox or when run-ning the server in a command line environment. The list with all the options can befound on the next page.
For testing it is often required to get status reports an debug information. When running from the command line starting the IRServer may look like this:
irserver -loglevel 4 -debug_code lan
The IRServer will now write debug information to the command line. Received IR commands will also be displayed.
Save the configuration to a file and flash
the database to the IRTranslator
Software Manual
© 2012 IRTrans GmbH 35
7.4.1 IRServer command line options
The IRTrans Server supports the following optional parameters:
-daemon Run the server as daemon (nur Linux)
-debug_code Display received IR condes.
<device> Select the IRTrans device by: device ID (COM Port, USB Device ID, IP adress) automatic search when using „usb“ or „lan“ multiple devices may be sperated by commas, the bus IDs will then be assigned according to this order.
-hexdump The server will display the entire communication between hardware and software. This can be used to send com-mands from other system through the IRTrans hardware.
-hexfile <file> as above. Output will be written to <file>
-baudrate <baud> RS232 Baud rate.
-http_port <port> Activate webserver. Listening on <port>
-logfile <file> Save log to <file>.
-loglevel <level> set loglevel: 0 no messages 1 only fatal errors 2 only errors 3 show informational messages 4 Debug Information
-netmask <mask> similar to the IP Access settings: Only clients within the spe cified netmask may access the IRTrans. The format is ip/bits. 192.168.0.0/24 defines a standard Class C network. IP/32 specifies a single client. This parameter may be used more than once.
-no_lirc disable LIRC
-no_reconnect The IRServer will not try to reconnect if communication is lost to an IRTrans device.
-set_id <id> set bus ID of new modules
-stat_timeout <to> timeout (in s) after which the cache for the device status is re-read.
-tcp IRServer starts in TCP mode
-version shows the server version
-xap Enables the built in xAP interface.
Software Manual
©2012 IRTrans GmbH 36
7.5 database files (.rem) - additional information
IR commands are stored in ASCII type database files. They usually are managed by the IRServer software but can be changed manually with any texteditor. Detai-led information how to manually write database files can be found in chapter 7.5.
Deleting the database file will delete the appropriate remote from the command database.
It is important to stick to the correct syntax. Errors may lead to instability of the software.
When altering or deleting database files it is neccessary to reload the IR database. This can be achieved be restarting the IRServer software or by selecting „reload IR database“ in the context menu.
The database file is split into three sections: [REMOTE], [TIMING] and [COMMANDS]
The section [REMOTE] contains the name of the remote irrespective of the type of database file. The name specified by [NAME] must be identical to the filename.
[TIMING] and [COMMANDS] will vary depending on the type of information stored:
7.5.1 IRTrans standard format
This format is the standard for commands learned by IRTrans devices. Timing information is stored independently from the command data. There is no restric-tion to the number of timings stored in a database file. The individual fields of a timing have the following meaning:
[TIMING]
[0][N]3[1]400 1672[2]400 2848[3]400 6168[RC]1[RP]0[FREQ]57[FREQ-MEAS]
[0] Number of the timing [N]3 number of time values [1]400 1672 1st pulse / pause pair, times in µs, resolution 8µs [RC]1 number of repetitions [RP]0 pause between repeats in ms [FL]100 Framelength of the IR signal (replaces [RP]) [FREQ]57 carrier in kHz [FREQ-MEAS] frequency has been measured [SB] Code uses a start bit [RS] Start bit is repeated [RC5]/[RC6] Code uses RC5 / RC6 standard [NOTOG] RC5 / RC6 toggle bit will not be used
Some of the fields can be left missing.
Software Manual
© 2012 IRTrans GmbH 37
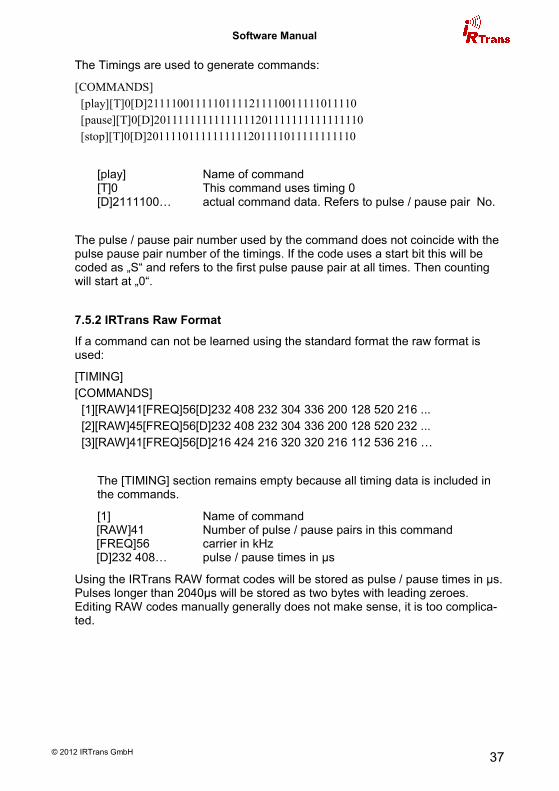
The Timings are used to generate commands:
[COMMANDS]
[play][T]0[D]21111001111101111211110011111011110
[pause][T]0[D]20111111111111111201111111111111110
[stop][T]0[D]20111101111111111201111011111111110
[play] Name of command [T]0 This command uses timing 0 [D]2111100… actual command data. Refers to pulse / pause pair No.
The pulse / pause pair number used by the command does not coincide with the pulse pause pair number of the timings. If the code uses a start bit this will be coded as „S“ and refers to the first pulse pause pair at all times. Then counting will start at „0“.
7.5.2 IRTrans Raw Format
If a command can not be learned using the standard format the raw format is used:
[TIMING]
[COMMANDS]
[1][RAW]41[FREQ]56[D]232 408 232 304 336 200 128 520 216 ...
[2][RAW]45[FREQ]56[D]232 408 232 304 336 200 128 520 232 ...
[3][RAW]41[FREQ]56[D]216 424 216 320 320 216 112 536 216 …
The [TIMING] section remains empty because all timing data is included in the commands.
[1] Name of command [RAW]41 Number of pulse / pause pairs in this command [FREQ]56 carrier in kHz [D]232 408… pulse / pause times in µs
Using the IRTrans RAW format codes will be stored as pulse / pause times in µs. Pulses longer than 2040µs will be stored as two bytes with leading zeroes. Editing RAW codes manually generally does not make sense, it is too complica-ted.
Software Manual
©2012 IRTrans GmbH 38
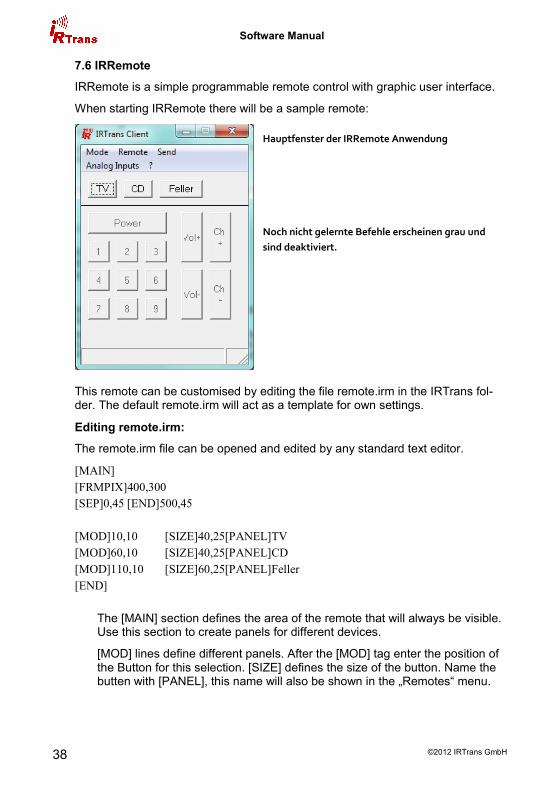
7.6 IRRemote
IRRemote is a simple programmable remote control with graphic user interface.
When starting IRRemote there will be a sample remote:
This remote can be customised by editing the file remote.irm in the IRTrans fol-der. The default remote.irm will act as a template for own settings.
Editing remote.irm:
The remote.irm file can be opened and edited by any standard text editor.
[MAIN]
[FRMPIX]400,300
[SEP]0,45 [END]500,45
[MOD]10,10 [SIZE]40,25[PANEL]TV
[MOD]60,10 [SIZE]40,25[PANEL]CD
[MOD]110,10 [SIZE]60,25[PANEL]Feller
[END]
The [MAIN] section defines the area of the remote that will always be visible. Use this section to create panels for different devices.
[MOD] lines define different panels. After the [MOD] tag enter the position of the Button for this selection. [SIZE] defines the size of the button. Name the butten with [PANEL], this name will also be shown in the „Remotes“ menu.
Hauptfenster der IRRemote Anwendung
Noch nicht gelernte Befehle erscheinen grau und
sind deaktiviert.

Software Manual
© 2012 IRTrans GmbH 39
[CD]
[FRMPIX]460,280
[LBL]10,250 [SIZE]300,30[TEXT]CD
[SLED]1
[SDEVICE]0
[POS]10,10 [SIZE]100,30[TEXT]Power On [REMOTE]Yamaha
[COMMAND]PowerOn
[POS]120,10 [SIZE]100,30[TEXT]Power Off [REMOTE]Yamaha
[COMMAND]PowerOff
…
[END]
[TV]
[FRMPIX]250,220
[LBL]10,200 [SIZE]300,30[TEXT]Topfield[FONT]14
[SLED]4
[POS]10,50 [SIZE]30,30[TEXT]1 [REMOTE]Topfield [COMMAND]1
[POS]50,50 [SIZE]30,30[TEXT]2 [REMOTE]Topfield [COMMAND]2
…
[END]
[CD] opens the section corresponding to [PANEL]CD.
[FRMPIX] allows to set window size in pixels. [LBL] adds Text.
[SDEVICE] is used to select the Bus ID for sending (vgl. Kap. X.x) and [SLED] selects the LEDs. [SLED] can have the following values:
- 1 = internal LEDs - 2 = external LEDs - 3 = All LEDs - 4-12 = External LED Nr. (output 1-8, „4“ corresponds to „output 1“) If [SDEVICE] and / or [SLED] are not specified the default values of the de-vice settings will be used.
With [POS]X,Y a button will be generated at the X (hrozintal) and Y (vertical) coordinates. 0,0 is the top left corner of the window. [REMOTE] and [COMMAND] assign the appropriate command to the button. Commands not available in the IR database will be deactivated and shown grey.
The panel is closed with the tag [END]. After that the next panel can be ope-ned.