Embed Size (px)
Citation preview

homedepotgardenclub.com
Soft PathSenderos blandos
REMOVE THE TURF Use a hoe or square shovel to remove existing turf from beneath your pathway. When that’s done, remove 2–4 inches of soil to create a bed for the material of your choice. ELIMINA EL CÉSPED. Usa una azada o pala cuadrada para eliminar el césped preexistente debajo de tu sendero. Al terminar, cava la tierra a una profundidad de 2 a 4 pulgadas para crearle un lecho al material de tu elección.
PREVENT WEEDS Spray the soil with a weed and grass killer to get rid of any remaining roots. To prevent future weed growth, cut landscape fabric to fit the pathway and lay it on top of the soil. EVITA LAS MALAS HIERBAS. Rocía el suelo con herbicida para eliminar las raíces que quedan. Para prevenir el futuro crecimiento de malas hierbas, corta la tela para jardín y extiéndela sobre el suelo.
DEFINE THE PATH Use a garden hose to outline your projected route. After you’ve determined your desired shape and size, sprinkle powdered chalk along the length of the hose to create a template from which to work. DEFINE EL SENDERO. Usa una manguera de jardinería para esbozar la ruta proyectada. Luego de haber determinado la forma y tamaño deseados, esparce tiza en polvo a lo largo de la manguera para crear la plantilla original de trabajo.
SPREAD YOUR PATH MATERIAL Put down an even layer of mulch, marble chips or pebbles in the space you’ve defined. It will settle naturally, but you can use a rake to help evenly spread materials. Use a garden hose to rinse away any mulch or gravel dust and help the material settle. EXTIENDE EL MATERIAL SOBRE TU SENDERO. Coloca una capa uniforme de mantillo, trozos de mármol o gravilla en el espacio que has definido. Se asentará por sí solo, pero puedes usar un rastrillo para extender el material con uniformidad. Usa una manguera de jardinería para enjuagar el polvo de la gravilla o mantillo y contribuir a que el material se asiente.
Garden hoseGarden hoseManguera
Powdered chalk Powdered chalk Tiza en polvo
Hoe or square shovel Hoe or square shovel Azada o pala de punta cuadrada
Weed and grass killer Weed and grass killer Weed and grass killer Weed and grass killer Herbicida
Landscape fabric Landscape fabric Tela para jardinería
Mulch, marble chips Mulch, marble chips or pebbles or pebbles Mantillo, trozos de mármol o gravilla
Metal rake Metal rake Rastrillo de metal
Wheelbarrow Wheelbarrow Carretilla
1
2
3
4
FIND A STOREBUY ALL MATERIALS NOW

homedepotgardenclub.com
D28O6536-42
Mailbox GardenJardín bajo el buzón
TopsoilTopsoilTierra de siembra
CompostCompostAbono orgánico
Plant foodPlant foodAlimento para plantas
Shovel Shovel Pala
PlantsPlantsPlantas
MulchMulchMantillo
PREP THE SITE Dig out existing turf and break up the soil to allow for new plantings. You can till the removed turf into the soil or place it grass-side down to provide natural compost. PREPARA EL SITIO. Levanta el césped existente y labra la tierra para la nueva siembra. Puedes arar, mezclando el césped removido con el suelo o virarlo hacia abajo para usarlo como abono natural.
PLANT THE BED Place the tallest plants or shrubs in the center of your bed and surround with shorter plants of varying color and texture. Consult the plant tag to determine how to space the plants. After planting, add a layer of garden soil to promote root growth.SIEMBRA EL CANTERO. Siembra las plantas o arbustos más altos al centro de tu cantero y rodéalo con plantas más pequeñas de diversos colores y texturas. Consulta la etiqueta de las plantas para determinar cómo espaciarlas. Luego de sembrar, agrega una capa de tierra de jardín para estimular el crecimiento de las raíces.
1
2
EDGE THE BED Add contrast and protect your plants from weeds by surrounding the bed with edging, such as marble chips or color-enhanced mulch. BORDEA EL CANTERO. Acentúa el contraste y protege tus plantas de las malas hierbas, rodeando el cantero con bordes tales como trozos de mármol o mantillo mejorado con color.
3
FEED YOUR PLANTS A liquid plant food is fast and easy. ALIMENTA TUS PLANTAS. El alimento líquido para plantas es una opción rápida y sencilla.4
FIND A STOREBUY ALL MATERIALS NOW

homedepotgardenclub.com
TamperTamperCompactadora
ShovelShovelPala
StringStringCuerda
Shade-tolerant plantsShade-tolerant plantsPlantas tolerantes a la sombra
Topsoil and mulchTopsoil and mulchTierra de siembra y mantillo
SandSandArena
Wall block paversWall block paversAdoquines para muro de contención
Powdered chalk or Powdered chalk or spray paintspray paintTiza en polvo o pintura en rociador
Tree RingAro para árbol
BUILD A LEVEL FOUNDATION Build the foundation row of your circle using wall block, facing the wider edge to the outside of the circle to lock stones in place. You may have to remove a stone and re-tamp the soil or use a rubber mallet and tap the stones into place to get an even surface.CONSTRUYE UN CIMIENTO NIVELADO. Construye la hilera de cimentación de tu aro con el bloque seleccionado, con el borde más ancho hacia el exterior del círculo para mantener las piedras juntas en su lugar. Puede que necesites quitar una piedra y volver a compactar el suelo o usar un mazo de goma para ajustarlas con golpecitos y lograr una superficie nivelada.
BUILD THE WALL As you stack the stones, stagger the joints so that there are no continuous vertical seams. No mortar is required, as the small lip on the bottom inner edge of the stones will keep them from moving forward once the wall is formed. The uneven shape will keep each stone from moving backward.CONSTRUYE EL MURO. Al apilar las piedras, escalona las uniones para que no haya juntas verticales continuas. No se requiere mortero, ya que el pequeño filo del borde inferior interno de las piedras evitará que se muevan hacia adelante al formar el muro. La forma irregular impedirá que las piedras se muevan hacia atrás.
CREATE AN OUTLINE & PREP THE SITE Tie a piece of string loosely around the tree; use the tail to guide you around the tree in an even circle. Mark 2 circles with powdered chalk or spray paint to define the inner and outer edges of the ring, ensuring the distance from the trunk is 3–6 feet. Remove any turf or mulch and dig 3–4 inches into the soil. Use a tamper to create an even surface. Add a 2-inch layer of bedding sand beginning 1–2 inches from the tree base. Use the tamper to even the surface again.CREA UN CONTORNO Y PREPARA EL SITIO. Rodea el árbol con una cuerda suelta y úsala como guía para delinear un círculo uniforme. Traza 2 círculos con tiza en polvo o pintura en rociador para definir los bordes interior y exterior del aro, asegurando una distancia de 3 a 6 pies desde el tronco. Elimina cualquier resto de césped o mantillo del aro definido y cava de 3 a 4 pulgadas en la tierra con una pala. Usa una compactadora para nivelar la superficie. Añade al aro una capa de 2 pulgadas de arena para canteros, comenzando 1 a 2 pulgadas alrededor de la base del árbol, y compacta de nuevo para nivelar la superficie.
PREP AND PLANT THE BED Fill your circle with topsoil to promote rootgrowth. Plant shade-tolerant plants. Top off with no more than 2 inches of mulch to help control weeds, ensuring mulch is 1–2 inches from the base of the tree to prevent bark decay.PREPARA Y SIEMBRA EL CANTERO. Llena el aro con tierra de siembra para estimular el crecimiento de las raíces. Siembra plantas tolerantes a la sombra. Completa el jardín con no más de 2 pulgadas de mantillo para controlar las malas hierbas, asegurando que el mantillo quede entre 1 y 2 pulgadas de la base del árbol para prevenir el deterioro de la corteza.
1
2
3
4
FIND A STOREBUY ALL MATERIALS NOW

homedepotgardenclub.com
D28O6536-43
Plant fertilizer Plant fertilizer Fertilizante
Plants Plants Plantas
Pots and planters Pots and planters Macetas diversas
Potting soil Potting soil Tierra de siembra
Container GardenJardín en macetas
START WITH A THEME Think like a painter composing a picture. Consider color, shape and style. For instance, you might decide on plants in dark tones, chosen for their variety of textures and leaf shapes. Don’t stop at flowers in a container. Shrubs and perennials are great for year-round container interest. Place tall plants in the center for height, smaller foliage or shrub-like plants around the middle to fill in and add interest, and vining or cascading plants to drape over the sides of the container. Grouping plants with the same sun and water requirements give them all an equal chance to thrive.COMIENZA CON UN TEMA. Piensa como pintor, componiendo una obra. Considera el color, la forma y el estilo. Por ejemplo, puedes decidirte por plantas en tonos oscuros y elegir entre variedad de formas de hojas y texturas. No dejes de poner flores en una maceta. Los arbustos y las plantas perennes son ideales para dar atractivo a las macetas todo el año. Pon las plantas más altas al centro para dar elevación, las plantas más pequeñas o arbustos alrededor, para llenar y dar atractivo, y enredaderas o plantas colgantes para cubrir los lados de la maceta. Agrupa las plantas con los mismos requerimientos de agua y sol para darles igual oportunidad de crecer con fuerza.
1
CHOOSE YOUR CONTAINERS Opt for a couple of large containers or cluster smaller containers in an uneven number for visual interest. Stack a few on upended terra cotta pots to create an arrangement of various heights. Bigger pots are easier to care for because large volumes of soil retain moisture longer, so you water less frequently. ELIGE TUS MACETAS. Opta por unas cuantas macetas grandes o grupo de macetas más pequeñas en número impar para dar atractivo visual. Apila unas pocas macetas verticales de terracota para crear una disposición de varias alturas. Las macetas más grandes son más fáciles de cuidar, porque a mayor volumen de tierra hay mayor retención de humedad, y así no tienes que regarlas con tanta frecuencia.
2
START PLANTS OFF RIGHT Pour or scoop potting soil around the roots of your plant to the top of the pot but don’t pat down. Add water to settle the soil so it’s no more than an inch below the rim. Use a plant fertilizer to give your container garden all the nutrients it needs to get established. Refer to the product label for rates of application.EMPIEZA DE INMEDIATO. Con una pala, vierte o aplica tierra para macetas alrededor de las raíces hasta el tope de la maceta, pero sin apisonar. Riégala para asentar la tierra de modo que no quede a más de una pulgada por debajo del borde de la maceta. Usa un fertilizante que dé a tu recipiente de jardín todos los nutrientes necesarios para que las plantas arraiguen. Consulta la etiqueta del producto para las dosis.
3
FIND A STOREBUY ALL MATERIALS NOW
homedepotgardenclub.com
ShovelShovelPala
Garden soil Garden soil Tierra para jardín
Edging or mulchEdging or mulchBorde o mantillo
Powdered chalkPowdered chalkTiza en polvo
Garden hoseGarden hoseManguera
Variety of plants Variety of plants and flowersand flowersVariedad de plantas y flores
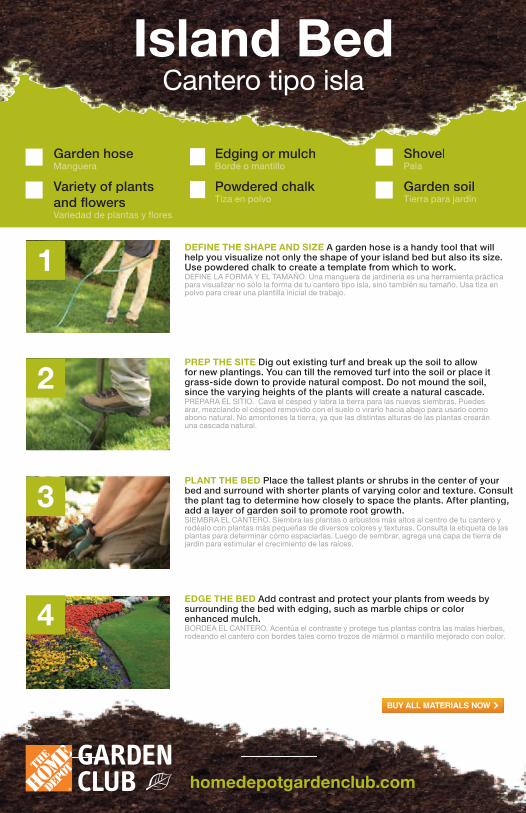
Island BedCantero tipo isla
PREP THE SITE Dig out existing turf and break up the soil to allow for new plantings. You can till the removed turf into the soil or place it grass-side down to provide natural compost. Do not mound the soil, since the varying heights of the plants will create a natural cascade. PREPARA EL SITIO. Cava el césped y labra la tierra para las nuevas siembras. Puedes arar, mezclando el césped removido con el suelo o virarlo hacia abajo para usarlo como abono natural. No amontones la tierra, ya que las distintas alturas de las plantas crearán una cascada natural.
PLANT THE BED Place the tallest plants or shrubs in the center of your bed and surround with shorter plants of varying color and texture. Consult the plant tag to determine how closely to space the plants. After planting, add a layer of garden soil to promote root growth.SIEMBRA EL CANTERO. Siembra las plantas o arbustos más altos al centro de tu cantero y rodéalo con plantas más pequeñas de diversos colores y texturas. Consulta la etiqueta de las plantas para determinar cómo espaciarlas. Luego de sembrar, agrega una capa de tierra de jardín para estimular el crecimiento de las raíces.
DEFINE THE SHAPE AND SIZE A garden hose is a handy tool that will help you visualize not only the shape of your island bed but also its size. Use powdered chalk to create a template from which to work. DEFINE LA FORMA Y EL TAMAÑO. Una manguera de jardinería es una herramienta práctica para visualizar no sólo la forma de tu cantero tipo isla, sino también su tamaño. Usa tiza en polvo para crear una plantilla inicial de trabajo.
EDGE THE BED Add contrast and protect your plants from weeds by surrounding the bed with edging, such as marble chips or color enhanced mulch. BORDEA EL CANTERO. Acentúa el contraste y protege tus plantas contra las malas hierbas, rodeando el cantero con bordes tales como trozos de mármol o mantillo mejorado con color.
1
2
3
4
FIND A STOREBUY ALL MATERIALS NOW

homedepotgardenclub.com
D28O6536-44
PLANT SEEDS AND PLANTS Sow seeds directly into soil for faster-growing plants, like salad greens. Use transplants for vegetables with longer sprouting times, like tomatoes. Follow seed package or plant tag directions. SIEMBRA LAS SEMILLAS Y PLANTAS. Siembra directamente en la tierra las semillas de plantas de rápido crecimiento, como las verduras. Para los vegetales con un mayor tiempo de crecimiento, como los tomates, usa especies transplantadas. Sigue las instrucciones del paquete de semillas o etiqueta de la planta.
WATER AND FERTILIZE Your vegetables need to be watered daily during the height of summer (less often during temperate weather) and fertilized on a regular basis. Look for complete organic fertilizers designed for container gardening and follow package directions.RIEGA Y FERTILIZA. Tus vegetales necesitan regarse a diario durante el verano (con menos frecuencia en clima templado) y fertilizarse con regularidad. Busca los fertilizantes orgánicos completos diseñados para jardinería en macetas y sigue las instrucciones del empaque.
SELECT VEGETABLES Select vegetables and herbs to plant based on your preference and your region’s growing conditions. Ask a Home Depot Certified Nursery Consultant for help choosing plants.SELECCIONA LOS VEGETALES. Selecciona las hierbas y los vegetales a sembrar según tu preferencia y las condiciones de crecimiento en tu región. Pregunta a un asesor de vivero certificado de The Home Depot para ayudarte en la selección de las plantas.
ASSEMBLE AND ADD SOIL Decide where to place the raised garden bed and assemble. Fill it with garden soil designed for vegetables. Rake the soil to create a level surface.UNE LAS PIEZAS Y AGREGA TIERRA. Decide dónde colocar el cantero elevado para jardín y ensámblalo. Llénalo con tierra de jardín diseñada para vegetales. Rastrilla la tierra para nivelar la superficie.
1
2
3
4
Raised Garden BedCantero elevado para jardín
Raised garden bed kitRaised garden bed kitKit de cantero elevado para jardín
Garden soilGarden soilTierra de jardín
Vegetable and herb Vegetable and herb seeds and plantsseeds and plantsPlantas y semillas de hierbas y vegetales
RakeRakeRastrillo
Organic fertilizerOrganic fertilizerFertilizante orgánico
FIND A STOREBUY ALL MATERIALS NOW

homedepotgardenclub.com
Herb seeds or plantsHerb seeds or plantsPlantas y semillas de hierbas
Variety of containersVariety of containersVariedad de macetas
Organic fertilizer Organic fertilizer Fertilizante orgánico
Potting soil withPotting soil withsand for drainagesand for drainageTierra para macetas con arena para drenaje
Herb Container GardenHerbario en macetas
CONSIDER A CONTAINER FOR MOBILITY Most herbs need five hours CONSIDER A CONTAINER FOR MOBILITY Most herbs need five hours CONSIDER A CONTAINER FOR MOBILITYCONSIDER A CONTAINER FOR MOBILITYof full midday sun to produce the best flavor and growth. They can be planted indoors in containers, then moved outside when it warms up. CONSIDERA UNA MACETA PARA TENER MOVILIDAD. La mayoría de las hierbas necesitan cinco horas de pleno sol del día para tener un mejor sabor y crecimiento. Se pueden sembrar en macetas en interiores y luego sacarlas cuando haya más calor.
BE SOIL SAVVY For herb container gardens, choose a light potting soil BE SOIL SAVVY For herb container gardens, choose a light potting soil BE SOIL SAVVYBE SOIL SAVVYwith a high sand content to ensure good drainage. An organic fertilizer will add nutrients and encourage growth. UTILIZA LA TIERRA INTELIGENTEMENTE. Para herbarios en macetas, elige una tierra ligera con alto contenido de arena que asegure un buen drenaje. Un fertilizante orgánico le dará nutrientes y estimulará el crecimiento.
WATER PROPERLY Don’t over water and do encourage proper WATER PROPERLY Don’t over water and do encourage proper WATER PROPERLYWATER PROPERLYdrainage. Wait until the soil is dry down to a depth of approximately 1/2 inch, then water thoroughly until soil is moist. RIEGA ADECUADAMENTE. Jamás riegues en exceso y siempre estimula el drenaje apropiado. Espera a que el suelo esté seco a profundidad de una media pulgada y, entonces, riega meticulosamente hasta que el suelo esté húmedo.
SELECT AND PLANT YOUR HERBS Consider separate containers for each herb species. If you plant your herb garden in one large container, group herbs with similar growing requirements for more efficient plant care.SELECCIONA Y SIEMBRA TUS HIERBAS. Considera tener macetas separadas para cada especie de hierba. Si optas por sembrar tu herbario en una maceta grande, agrupa las hierbas con requisitos similares de crecimiento para cuidarlas con mayor eficiencia.
Pruning shearsPruning shearsTijeras podadoras
Watering canWatering canRegadera
1
2
3
4
FIND A STOREBUY ALL MATERIALS NOW

homedepotgardenclub.com
D28O6536-45
ManureManureEstiércol
PitchforkPitchforkHorquilla
Compost binCompost binCompostador
Compost BinCompostador
LAYER Layer materials high in carbon, such as lawn clippings and green plants, with materials high in nitrogen, such as manure, alfalfa meal and hay. Almost any organic material can be added, including food scraps, eggshells, tea leaves and coffee grounds. Never add chemically-treated wood, diseased plants, human or pet waste, meat, bones, fatty foods or weeds. Add water regularly during the compost-building process and let it trickle into the pile to help get rid of air pockets.RELLENA. Rellena con materiales de alto contenido de carbono, como césped y plantas verdes cortados, con materiales ricos en nitrógeno, como estiércol, harina de alfalfa y heno. Casi todos los materiales orgánicos pueden agregarse a la cama: desperdicios de comida, cáscaras de huevo, hojas de té y granos de café. Nunca agregues madera tratada químicamente, plantas enfermas, desechos humanos o de mascotas, carne, huesos, comidas grasosas ni malas hierbas. Añade agua con regularidad durante el proceso de compostaje y déjalo escurrir hacia la pila para evitar acumulaciones de aire.
TURN IT Speed the process by turning the pile with a pitchfork once a week and adding fresh manure. Mixing it allows oxygen into the center of the pile, encouraging the growth of bacteria and fungi, which break down organic material. Regularly turned organic matter will become finished compost in 4–8 months.REVUÉLVELO. Agiliza el proceso al revolver la pila con una horquilla una vez a la semana, y al agregar estiércol fresco. Al mezclar la pila, el oxígeno pasa al centro y estimula el crecimiento de bacterias y hongos, que descomponen el material orgánico. La materia orgánica revuelta regularmente se convierte en abono orgánico entre 4 y 8 meses.
BREAK IT DOWN Compost is ready when it is dark and crumbly with an earthy smell. Sift to separate material that hasn’t finished composting. Those pieces will continue to decompose in your garden; the smaller the pieces, the faster they will break down.SEPÁRALO. El abono orgánico está listo para usar cuando se vuelve oscuro y se desintegra desprendiendo olor a tierra. Puedes tamizarlo para separar el material que aún no se ha convertido en abono orgánico; esas piezas seguirán descomponiéndose en tu jardín. Mientras más desmenuzado, más rápido se separa el material.
SPREAD IT Once it’s ready, work the compost into soil to give it an organic boost before planting. Spread it on the soil’s surface as mulch, on flower beds and around the base of landscape plants. Compost may also be used as a top dressing for lawns or as an ingredient in potting mixes.EXTIÉNDELO. Una vez listo, incorpora el abono orgánico a la tierra para estimularla antes de sembrar. Extiéndelo sobre la superficie de la tierra como mantillo, sobre los canteros de flores y alrededor de la base de las plantas del jardín. El abono orgánico puede usarse también como agregado para céspedes o ingrediente de mezclas para macetas.
1
2
3
4
FIND A STOREBUY ALL MATERIALS NOW