Embed Size (px)
Citation preview
INSTRUCTION MANUAL
www.doerrfoto.de
GB SURVEILLANCE CAMERA
SnapShot Multi 8.0i HD
SnapShot Multi 8.0i HD

2
CONGRATULATIONS on the purchase of one of our cameras. Please take your time to read these instructions carefully. It shows you
menu settings and important user information. So you can use the camera e� ciently and for a long period.
IMPORTANT NOTES
• Your camera is fi tted with a weatherproof housing according to protection class IP54 (dust and splash waterproof. So the camera
can be used outdoors. Nevertheless protect the camera from extreme weather conditions and direct sunlight. The recommended
storage and operation temperature is -10 to 40° C.
• Make sure to use fresh batteries of the same type and brand only.
• Use a soft cleaning tissue to clean the camera lens. Avoid touching the lens with your fi ngers.
• Remove dust and spots at the camera housing with a soft and slightly damp tissue.
• Store the camera at a dry, dust free and cool place when not in use.
• Remove the batteries in case you do not use the camera for a long period of time.
• Do not drop the camera onto a hard surface.
• Do not open the camera housing (except protective cover and battery cover). The warranty will become void. In case of a defect,
send the camera to an authorized service agent.
• Up-to date manuals can be found at www.download.doerrfoto.info/manuals/
NOTE The camera is high precision electrical device. Do not attempt to repair it by yourself. When opening the housing, there is a
risk of high voltage and other kind of risks.
NOTE Make sure to respect the regulations of privacy protection!
GB INSTRUCTION MANUAL
Surveillance Camera SnapShot Multi 8.0i HD

3
CONTENT
Camera Description & Overview 4
Front View 4
Control Panel Description 4
SD/SDHC Card – Installation & Information 4
SD Card Capacity Overview 5
Information on Battery Loading & Exchange 5
Camera Programming 5
Important Hints for Menu Control – Menu Navigation 5
Display Overview / Starting Menu 6
Overview Programming Options 6
Setting of Photo – Video Mode 6
Triggering Settings 7
Time Frame Settings 8
System Settings 8
Test Photo & Video – Test Recording for Orientation of the Camera 9
Viewing/Deleting Images & Video Films 9
Camera Function with WiFi SD Card 9
Camera Remote Control 10
Specifi cations 11
Optional Accessories 12
Important Hints for Camera Installation 13
Camera Positioning 13
Directing the Camera 13
Important Notes and Hint 14
Motion Sensor 14
Ambient Light 14
Weather Protection 14
FAQ 14
European Conformity Declaration Notes 16

4
CAMERA DESCRIPTION & OVERVIEW
Description of Control Panel Front View
1
2
3
4
5
6
7
8
9
Black Vision IR Flash
WiFi LED
Motion Detector (in Set-Up Mode)
Battery Indicator (when exhausted)
Microphone
Housing Closure
PIR Sensor
Camera Lens
Lead through for U-lock
1
2
3
4
5
6
7
8
9
LCD Monitor
Menu Button: Change to Video Mode
Menu Button: Test Photo/Video
Confi rm / Replay
Menu Button: Change to Photo Mode
Menu Button: Menu
Scroll Bar: OFF/SETUP/ON
USB Socket
SD Card Slot
1
2
3/4
5
7
6
8
3
4
5
9
1
2
6
7
8 9
SD/SDHC CARD INSTALLATION & INFORMATION
Open the camera’s protective housing. The SD card slot is
located at the bottom of the housing. Insert the SD memory card
as shown on the sketch at the housing. Make sure to format the
memory card and that the card is not write-protected. Or else
the display will indicate a missing or false SD memory card.
The camera supports SD/SDHC cards with a capacity of 2 GB
to 32 GB. For best results we recommend the use LEXAR brand
cards with a speed of minimum "Class 10".
5
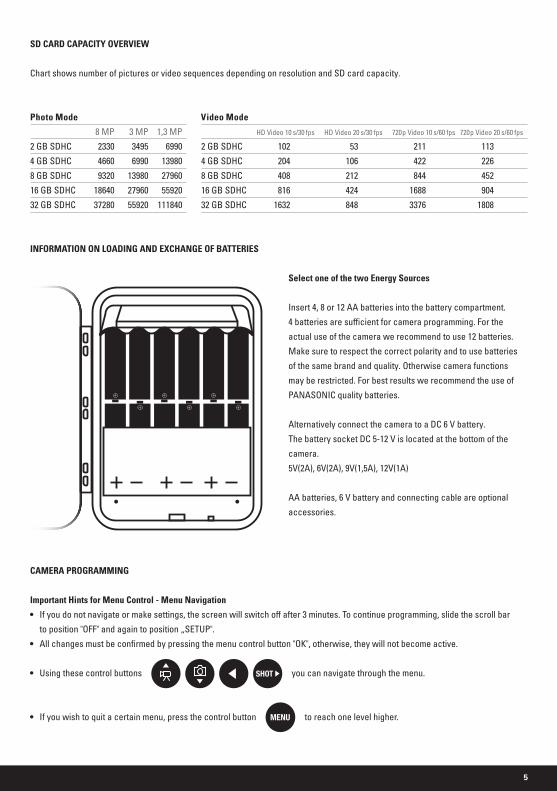
Select one of the two Energy Sources
Insert 4, 8 or 12 AA batteries into the battery compartment.
4 batteries are suffi cient for camera programming. For the
actual use of the camera we recommend to use 12 batteries.
Make sure to respect the correct polarity and to use batteries
of the same brand and quality. Otherwise camera functions
may be restricted. For best results we recommend the use of
PANASONIC quality batteries.
Alternatively connect the camera to a DC 6 V battery.
The battery socket DC 5-12 V is located at the bottom of the
camera.
5V(2A), 6V(2A), 9V(1,5A), 12V(1A)
AA batteries, 6 V battery and connecting cable are optional
accessories.
8 MP 3 MP 1,3 MP
2 GB SDHC 2330 3495 6990
4 GB SDHC 4660 6990 13980
8 GB SDHC 9320 13980 27960
16 GB SDHC 18640 27960 55920
32 GB SDHC 37280 55920 111840
HD Video 10 s/30 fps HD Video 20 s/30 fps 720p Video 10 s/60 fps 720p Video 20 s/60 fps
2 GB SDHC 102 53 211 113
4 GB SDHC 204 106 422 226
8 GB SDHC 408 212 844 452
16 GB SDHC 816 424 1688 904
32 GB SDHC 1632 848 3376 1808
SD CARD CAPACITY OVERVIEW
Chart shows number of pictures or video sequences depending on resolution and SD card capacity.
CAMERA PROGRAMMING
Important Hints for Menu Control - Menu Navigation
• If you do not navigate or make settings, the screen will switch off after 3 minutes. To continue programming, slide the scroll bar
to position "OFF" and again to position „SETUP".
• All changes must be confi rmed by pressing the menu control button "OK", otherwise, they will not become active.
• Using these control buttons
you can navigate through the menu.
• If you wish to quit a certain menu, press the control button to reach one level higher.
INFORMATION ON LOADING AND EXCHANGE OF BATTERIES
Photo Mode Video Mode
6
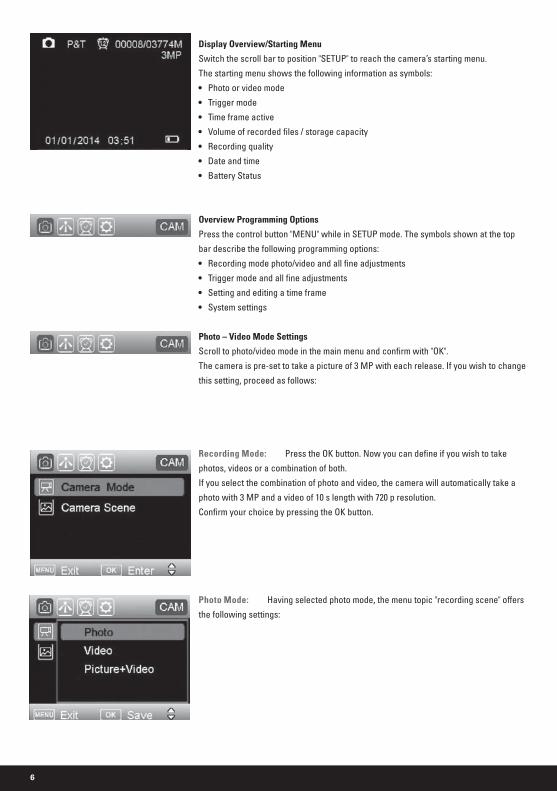
Display Overview/Starting Menu
Switch the scroll bar to position "SETUP" to reach the camera’s starting menu.
The starting menu shows the following information as symbols:
• Photo or video mode
• Trigger mode
• Time frame active
• Volume of recorded fi les / storage capacity
• Recording quality
• Date and time
• Battery Status
Overview Programming Options
Press the control button "MENU" while in SETUP mode. The symbols shown at the top
bar describe the following programming options:
• Recording mode photo/video and all fi ne adjustments
• Trigger mode and all fi ne adjustments
• Setting and editing a time frame
• System settings
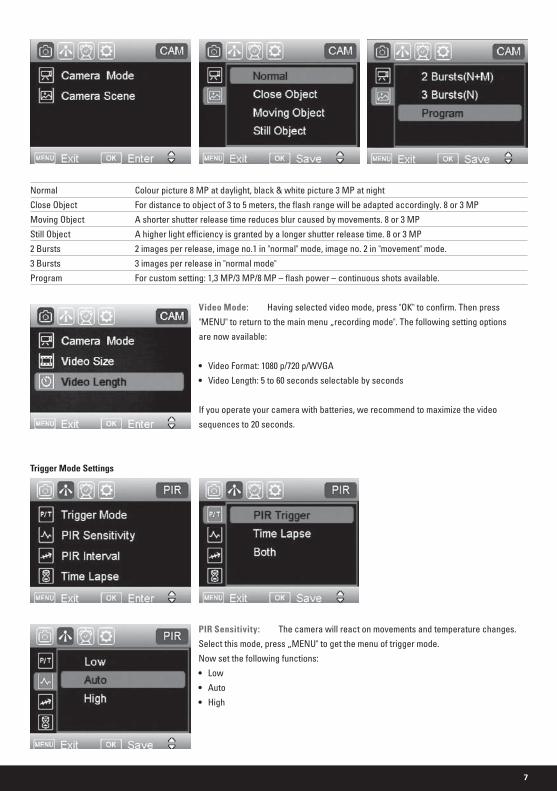
Photo – Video Mode Settings
Scroll to photo/video mode in the main menu and confi rm with "OK".
The camera is pre-set to take a picture of 3 MP with each release. If you wish to change
this setting, proceed as follows:
Recording Mode: Press the OK button. Now you can defi ne if you wish to take
photos, videos or a combination of both.
If you select the combination of photo and video, the camera will automatically take a
photo with 3 MP and a video of 10 s length with 720 p resolution.
Confi rm your choice by pressing the OK button.
Photo Mode: Having selected photo mode, the menu topic "recording scene" off ers
the following settings:
7
Video Mode: Having selected video mode, press "OK" to confi rm. Then press
"MENU" to return to the main menu „recording mode". The following setting options
are now available:
• Video Format: 1080 p/720 p/WVGA
• Video Length: 5 to 60 seconds selectable by seconds
If you operate your camera with batteries, we recommend to maximize the video
sequences to 20 seconds.
Trigger Mode Settings
PIR Sensitivity: The camera will react on movements and temperature changes.
Select this mode, press „MENU" to get the menu of trigger mode.
Now set the following functions:
• Low
• Auto
• High
Normal Colour picture 8 MP at daylight, black & white picture 3 MP at night
Close Object For distance to object of 3 to 5 meters, the fl ash range will be adapted accordingly. 8 or 3 MP
Moving Object A shorter shutter release time reduces blur caused by movements. 8 or 3 MP
Still Object A higher light e� ciency is granted by a longer shutter release time. 8 or 3 MP
2 Bursts 2 images per release, image no.1 in "normal" mode, image no. 2 in "movement" mode.
3 Bursts 3 images per release in "normal mode"
Program For custom setting: 1,3 MP/3 MP/8 MP – fl ash power – continuous shots available.

8
PIR Interval: The PIR sensor takes a break in order to avoid unnecessary recordings.
• 5 - 60 seconds in 5 second steps
• 1 - 5 minutes in steps of 1 minute
• 5 - 60 minutes in steps of 5 minutes
Interval: Camera release at defi ned intervals.
• 5 - 60 seconds in 5 second steps
• 1 - 5 minutes in steps of 1 minute
• 5 - 60 minutes in steps of 5 minutes
• 1 - 8 hours in steps of 1 hour
• 24 hours
Time Frame Setting
System Settings
Work Time 1: Select "ON" or "OFF". Select a work time for the activity of
the camera. Now select the weekdays.
Work Time 2: Repeat the steps as in work time 1, if desired.
If you wish the camera to be active permanently, select the time frame menu and
switch it "OFF".
The following settings can be done:
(Information about navigation please see chapter camera programming)

9
• Date and Time
• Remote Control Mode:
O� : Camera will not react to remote control
PIR Trigger: Remote control mode will be activated when a movement is recognized by the camera.
On: Camera will always react on the remote control. This option consumes more energy,
we therefore recommend its use only in connection with an external battery power supply.
• Language
• Password: Select "On" and enter a 4 digit code to protect the camera from unauthorized use. Be sure to note
the password and store the code at a safe place. It will not be possible to reset the code on your
own.
Select "Off " if you do not wish to use a password. The pre-set code is 0000.
• Rename: Enter a name that will be shown on each picture stamp.
• Beep: Activate or deactivate the beep tone for the control key use.
• SD Card Formatting: Deletes all data of your memory card. Be sure that you won’t need the data any more.
• Factory Setting (Default): With a reset to factory settings, all your own settings will be lost.
This makes sense, when you change the place of use of your camera or when you plan to sell it.
• Software Version: Indicates the software version in case of contact to our service agents.
Test Photo & Video – Test Recording for Orientation of the Camera
Slide the scroll bar to "SETUP" position. Use the control buttons to program photo or video, as desired. Now press the menu control
button "SHOT" to create a recording. Press the "OK" control button to view the recorded image of video. Using the "Up" and "Down"
buttons you can view all recording. Pressing the "Menu" button, you can now delete all or selected recordings.
Viewing/Deleting Images & Video Films
Slide the scroll bar to "SETUP" position and confi rm by press the "OK" button. Using the "Up" and "Down" buttons you can view all
recording. Pressing the "Menu" button, you can now delete all or selected recordings.
CAMERA FUNCTION WITH WIFI SD CARD
WiFi SD cards can store data. With their incorporated WLAN chip, they off er the possibility of wireless data transmission to a receiver
unit, which can be a PC, tablet PC or Smartphone. We recommend to use the user friendly and reliable TOSHIBA FlashAir SDHC 16 GB
card. Please ask your specializing dealer who sold the camera to you.
WiFi SD cards require energy for the data transmission. Traditional cameras will switch to stand-by mode to save energy. So the data
transmission on basis of a WiFi card won’t function with most conventional surveillance cameras. The DÖRR SnapShot Multi camera
boasts of a receiver module which will provide energy to the WiFi card and a remote control for activation.
10
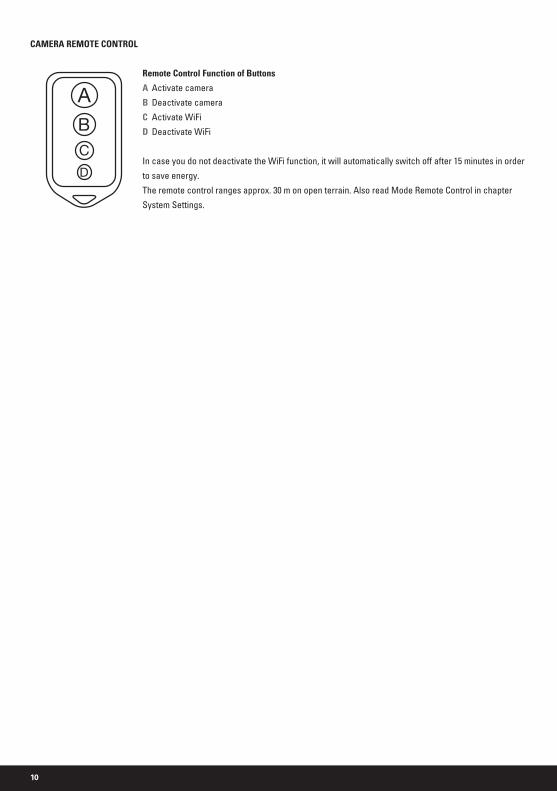
CAMERA REMOTE CONTROL
Remote Control Function of Buttons
A Activate camera
B Deactivate camera
C Activate WiFi
D Deactivate WiFi
In case you do not deactivate the WiFi function, it will automatically switch off after 15 minutes in order
to save energy.
The remote control ranges approx. 30 m on open terrain. Also read Mode Remote Control in chapter
System Settings.
11
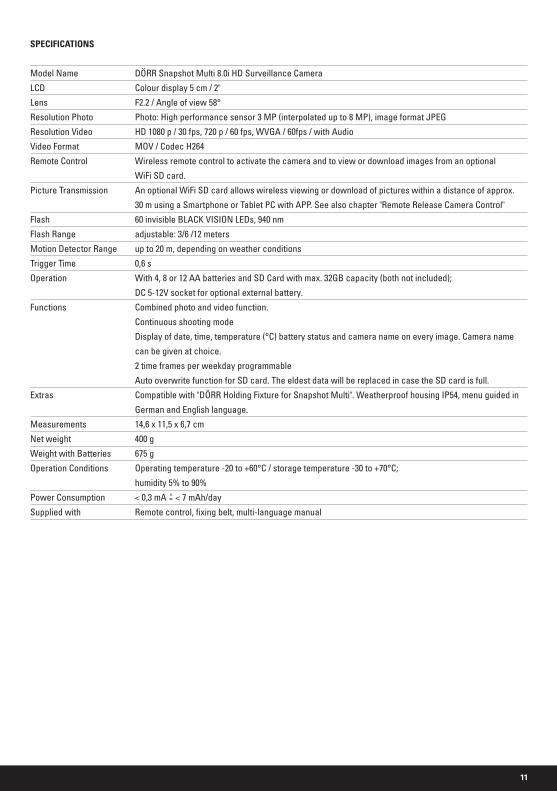
SPECIFICATIONS
Model Name DÖRR Snapshot Multi 8.0i HD Surveillance Camera
LCD Colour display 5 cm / 2"
Lens F2.2 / Angle of view 58°
Resolution Photo Photo: High performance sensor 3 MP (interpolated up to 8 MP), image format JPEG
Resolution Video HD 1080 p / 30 fps, 720 p / 60 fps, WVGA / 60fps / with Audio
Video Format MOV / Codec H264
Remote Control Wireless remote control to activate the camera and to view or download images from an optional
WiFi SD card.
Picture Transmission An optional WiFi SD card allows wireless viewing or download of pictures within a distance of approx.
30 m using a Smartphone or Tablet PC with APP. See also chapter "Remote Release Camera Control"
Flash 60 invisible BLACK VISION LEDs, 940 nm
Flash Range adjustable: 3/6 /12 meters
Motion Detector Range up to 20 m, depending on weather conditions
Trigger Time 0,6 s
Operation With 4, 8 or 12 AA batteries and SD Card with max. 32GB capacity (both not included);
DC 5-12V socket for optional external battery.
Functions Combined photo and video function.
Continuous shooting mode
Display of date, time, temperature (°C) battery status and camera name on every image. Camera name
can be given at choice.
2 time frames per weekday programmable
Auto overwrite function for SD card. The eldest data will be replaced in case the SD card is full.
Extras Compatible with "DÖRR Holding Fixture for Snapshot Multi". Weatherproof housing IP54, menu guided in
German and English language.
Measurements 14,6 x 11,5 x 6,7 cm
Net weight 400 g
Weight with Batteries 675 g
Operation Conditions Operating temperature -20 to +60°C / storage temperature -30 to +70°C;
humidity 5% to 90%
Power Consumption < 0,3 mA =̂ < 7 mAh/day
Supplied with Remote control, fi xing belt, multi-language manual
12
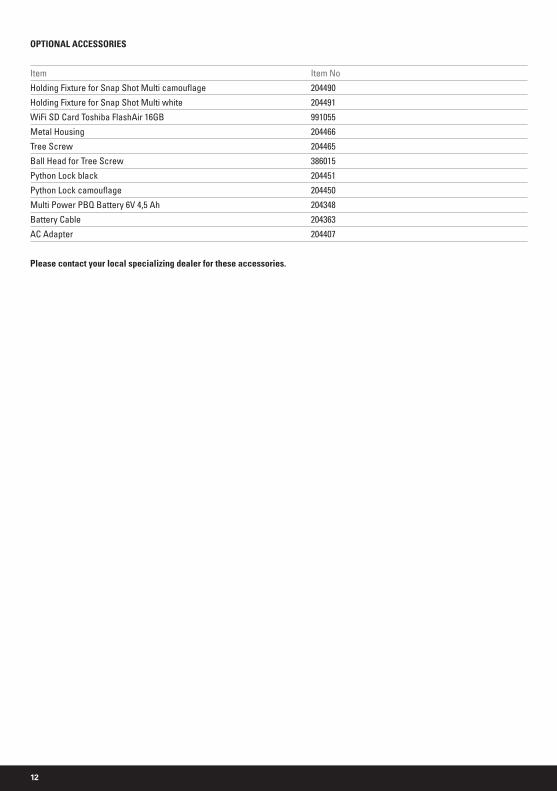
OPTIONAL ACCESSORIES
Please contact your local specializing dealer for these accessories.
Item Item No
Holding Fixture for Snap Shot Multi camoufl age 204490
Holding Fixture for Snap Shot Multi white 204491
WiFi SD Card Toshiba FlashAir 16GB 991055
Metal Housing 204466
Tree Screw 204465
Ball Head for Tree Screw 386015
Python Lock black 204451
Python Lock camoufl age 204450
Multi Power PBQ Battery 6V 4,5 Ah 204348
Battery Cable 204363
AC Adapter 204407
13
IMPORTANT HINTS FOR CAMERA INSTALLATION
Positioning the Camera
For the fastest and most comfortable way to mount the camera we recommend the use of the optionally available DÖRR holding
fi xture. Read chapter "Optional Accessories".
Mount the camera on a tree or pole or any other suitable object using the supplied belt. Do not fi x the belt fi nally at this stage. Make
sure that the camera won’t move with the wind. The optimum distance to the object is between 3 -15 meters. Theoretically, larger
distances are also possible, however with less reliability and a larger picture frame. We recommend to take a few test shots and to
fi nally fi x the camera afterwards.
Orientation of the Camera
The camera needs to be well directed for proper pictures
1. Position the camera at a height of 0,75 m to 1 m slightly inclined forwards.
2. The camera lens should now point to where the photographic object is expected to show-up.
You can position the camera at a higher level, however the coverage angle will be reduced by the fact that the camera needs
to be more inclined downwards.
3. Set the On/Off switch to position "SETUP", then close the camera.
4. If someone moves now in front of the camera, the red test light glows up, so the motion sensor is active. This is how you can try
out the range of the motion detector, to fi nd out if your object will be recognized.
5. We recommend to take a test recording. Therefore switch the camera off again. Then set the ON/OFF switch to position "ON" and
close the camera. After 30s the camera will be ready to shot. Move now with normal speed through the range of the motion sensor.
The camera will release and you can view the image taken on the monitor.
6. We recommend to direct the camera in a way that the object will be in the centre of the image. You may have to re-adjust the
camera and take another test shot. If you do not own a DÖRR holding fi xture for the camera, use a small wooden wedge to stabilize
the camera’s inclined position. Once the position is correct, the fi xing belt can be tightened to hold the camera fi rmly.
The camera is now ready for operation.
7. Switch the scroll bar to position "ON". Your camera is now ready for operation according to your settings.
14
IMPORTANT HINTS AND NOTES
Motion Sensor
The motion sensor will react under certain circumstances and within a certain range. In general the range of recognition is slightly
larger than the range covered by the image.
The recognition of the objects depends on temperature, vegetal cover, refl ecting surfaces and more circumstances. Under optimum
conditions, a perfectly oriented camera and high sensitivity level adjustment, the recognition range can be up to 20m. Usually, you
may expect a range of 10 m. It can take a few attempts to fi nd the proper position for your camera. When you test the motion detector
reaction, be aware of the facts that animals are usually remarkably smaller than human beings. So they may not be recognized.
Light Conditions
Avoid direct back light, as you do in normal photography. When you choose the camera position, make sure that there will be no
direct back light and also that the camera will not be placed in the shadow.
Weather Protection
Although the camera is weatherproof and well-suited for outdoor use, we recommend to mount it at a secured place, so not on the
weather side or in the direct sunshine. After long periods of humidity, caused by rain or fog, the camera should be stored in a dry area
for a few days. Dust and splash waterproof according to protection class IP54.
Specifi cations and design are subject to change without notice. 05.2015

15

16www.doerrfoto.de
DÖRR GmbH · Messerschmittstr. 1 · D-89231 Neu-Ulm · Fon: +49 731 97037-0 · Fax: +49 731 97037-37 · [email protected]
EUROPEAN CONFORMITY DECLARATION NOTES
ATTENTION
Batteries are marked with the symbol of a crossed out bin. This symbol indicates that empty batteries or rechargeable
batteries which can no longer be charged, should not be disposed of with household waste. Waste batteries may contain
harmful substances that can cause damage to health and to the environment. Please use the return and collection
systems available in your country for the disposal of the waste batteries.
WEEE INFORMATION
The Waste Electrical and Electronic Equipment Directive (WEEE Directive) is the European community directive on waste
electrical and electronic equipment, which became European law in February 2003. The main purpose of this directive
is to prevent electronic waste. Recycling and other forms of waste recovery should be encouraged to reduce waste. The
below symbol (trash can) on the product and on the packing means that used electrical and electronic products should
not be disposed of with general household waste. It is your responsibility to dispose of all your electronic or electrical
waste at designated collection points. Disposing of this product correctly will help to save valuable resources and it is
a signifi cant contribution to protect our environment as well as human health. For more information about the correct
disposal of electrical and electronic equipment, recycling and collection points please contact your local authorities,
waste management companies, your retailer or the manufacturer of this device.
ROHS CONFORMITY
This product is compliant with the European directive 2011/65/EU of June 08, 2011 for the restriction of use of certain
hazardous substances in electrical and electronic equipment (RoHS) and its amendments.
CE MARKING
The CE marking complies with the European directives.
You can download the relative EU declaration of conformity with following link:
http://www.doerrfoto.de/info/EG-Konformitätserklärungen