Embed Size (px)
Citation preview
Number of Wiresper Connection Point
MaximumWire Gauge
1 12 AWG
2 16 AWG
4 18 AWG
Wire Gauge Table
5.1"(13.0 cm)
6.0"(15.2 cm)
2.6"(6.6 cm)
3.5"(8.9 cm)
R = 0.28"(0.71 cm)
SMK P SM 26/28 Pivot Mount Kit • Setup Guide
This setup guide contains installation information about the Extron SMK P SM 26/28 Pivot Mount Kit.
WARNING: Potential risk of severe injury. Installation and service must be performed by authorized personnel only.
AVERTISSEMENT : Risque potentiel de blessure grave ou de mort. L’installation et l’entretien doivent être effectués par le personnel autorisé uniquement.
ATTENTION: The final installation should be able to continuously support the speaker weight. The final installation should also be able to support any short term overloading. Since applications can vary considerably, it is assumed that the installer will exercise good judgment when selecting the mounting location, method, and hardware. Installation and service must be performed by authorized personnel only.
Installing the Pivot Mount Kit
The pivot mount enables the speaker to be positioned and locked at various angles due to the adjustable ball joint feature.
NOTE: Observe all applicable building codes and local ordinances when installing the speaker.
ATTENTION: Attaching a secondary support cable to the SM 26/28 speaker is required when using the pivot mount kit.
1. Locate a suitable mounting location where the pivot mount will be installed. Allow for the dimensions of the SM 26 and SM 28, as shown below.
SM 28: SM 26:
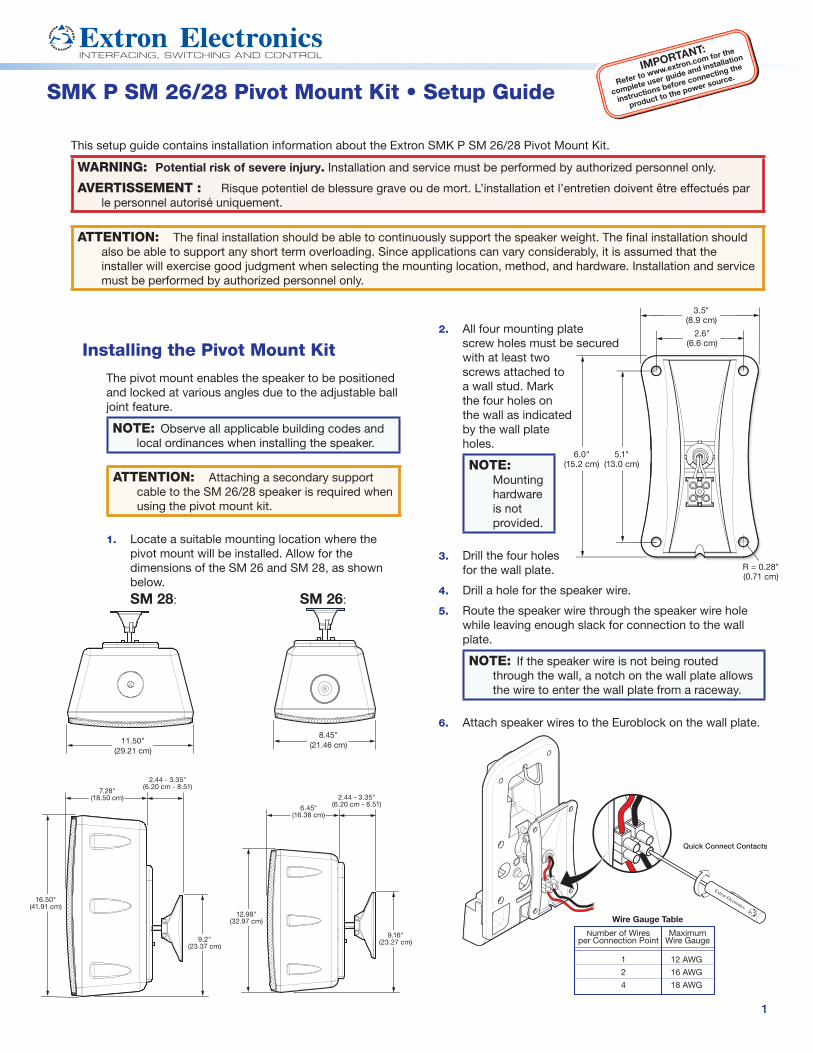
2. All four mounting plate screw holes must be secured with at least two screws attached to a wall stud. Mark the four holes on the wall as indicated by the wall plate holes.
NOTE: Mounting hardware is not provided.
3. Drill the four holes for the wall plate.
4. Drill a hole for the speaker wire.
5. Route the speaker wire through the speaker wire hole while leaving enough slack for connection to the wall plate.
NOTE: If the speaker wire is not being routed through the wall, a notch on the wall plate allows the wire to enter the wall plate from a raceway.
6. Attach speaker wires to the Euroblock on the wall plate.
Quick Connect Contacts
1
SM 28 SM 26
11.50"(29.21 cm)
8.45"(21.46 cm)
2.44 - 3.35"(6.20 cm - 8.51)
7.28"(18.50 cm) 2.44 - 3.35"
(6.20 cm - 8.51)6.45"(16.38 cm)
16.50"(41.91 cm)
12.98"(32.97 cm)
9.2"(23.37 cm)
9.16"(23.27 cm)
SM 28 SM 26
11.50"(29.21 cm)
8.45"(21.46 cm)
2.44 - 3.35"(6.20 cm - 8.51)
7.28"(18.50 cm) 2.44 - 3.35"
(6.20 cm - 8.51)6.45"(16.38 cm)
16.50"(41.91 cm)
12.98"(32.97 cm)
9.2"(23.37 cm)
9.16"(23.27 cm)

SMK P SM 26/28 Pivot Mount Kit • Setup Guide (Continued)
7. Unlock the mounting plate from the pivot ball by moving the ball lever to the Up (horizontal) position.
Pivot ball locked Pivot ball unlocked
8. Mount the wall plate to the wall using appropriate fasteners and washers in the four holes.
9. Loosen, but do not remove, the two locking screws that secure the pivot ball shaft to the wall plate, then extend the mounting plate to the desired position.
5/32” (4 mm) Hex Wrench
10. To aid in determining where the speaker tweeter is located before the speaker is actually mounted on the pivot mount, place the included tweeter alignment guide on the mounting plate of the pivot mount to determine the actual position of the tweeter after the speaker is installed.
TWEETER LOCATION
BEND AND PLACE ON FLAT MOUNT
SM 26
SM 26SM 28
SM 28
TWEETER LOCATION
BEND AND PLACE ON FLAT MOUNT
11. Adjust the mounting plate to the desired position. Articulation: a maximum angular movement of • SM 26: 30° up, 30° down, 30° left, 30° right • SM 28: 20° up, 30° down, 30° left, 30° right
30°
Turn the unit to the right or the left.
2
ATTENTION: By default, the SM 26/28 speaker is shipped unlocked. When attaching the speaker to the mounting plate be sure that the speaker is unlocked. Failure to place the speaker in the unlocked position will result in damage to the speaker lock mechanism should an attempt be made to attach speaker to the mounting plate. See the SM 26 Setup Guide or SM 28 Setup Guide for further details.

SMK P SM 26/28 Pivot Mount Kit • Setup Guide (Continued)
3
SM 28 = 20°SM 26 = 30°
Down position Up position
30°
Rotation: a maximum angular rotation of 360°
360°Unit
Rotation
12. Lock the ball joint lever (vertical down position) so that the mounting plate is securely locked in place.
13. Tighten the two screws to secure the pivot ball shaft to the wall plate.
5/32” (4 mm) Hex Wrench
14. Install the speaker on the mounting plate so that the speaker is securely attached to the mounting plate.
Catch Tab
Vertical Mounting
ATTENTION: By default, the SM 26/28 speaker is shipped unlocked. When attaching the speaker to the mounting plate be sure that the speaker is unlocked. Failure to place the speaker in the unlocked position will result in damage to the speaker lock mechanism should an attempt be made to attach the speaker to the mounting plate. See the SM 26 Setup Guide or SM 28 Setup Guide for further details.
SMK P SM 26/28 Pivot Mount Kit • Setup Guide (Continued)
Extron Headquarters+800.633.9876 Inside USA/Canada Only
Extron USA - West Extron USA - East+1.714.491.1500 +1.919.850.1000
+1.714.491.1517 FAX +1.919.850.1001 FAX
Extron Europe+800.3987.6673
Inside Europe Only
+31.33.453.4040
+31.33.453.4050 FAX
Extron Asia+65.6383.4400
+65.6383.4664 FAX
Extron Japan+81.3.3511.7655
+81.3.3511.7656 FAX
Extron China+86.21.3760.1568
+86.21.3760.1566 FAX
Extron Middle East+971.4.299.1800
+971.4.299.1880 FAX
Extron Korea+82.2.3444.1571
+82.2.3444.1575 FAX
Extron India1800.3070.3777
(Inside India Only)
+91.80.3055.3777
+91.80.3055.3737 FAX
© 2016 Extron Electronics — All rights reserved. All trademarks mentioned are the property of their respective owners. www.extron.com 68-2767-50 Rev. A 01 16
4
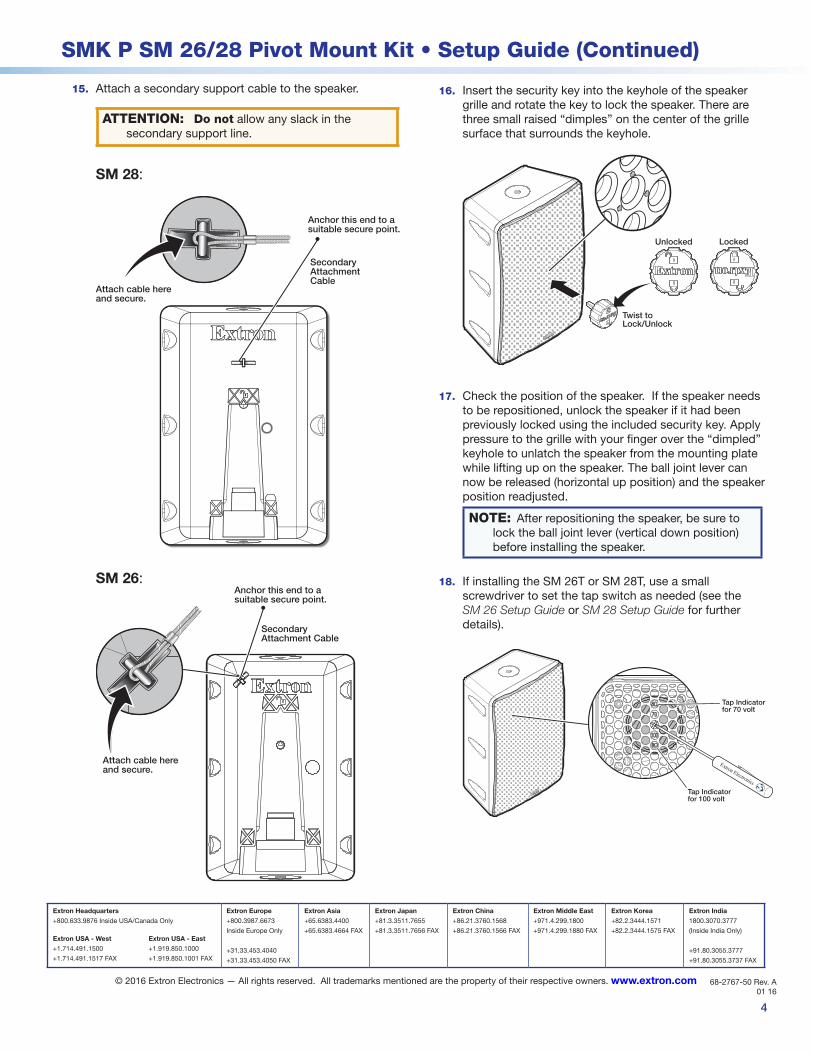
15. Attach a secondary support cable to the speaker. ATTENTION: Do not allow any slack in the
secondary support line.
SM 28:
SecondaryAttachmentCable
Anchor this end to asuitable secure point.
Attach cable hereand secure.
SM 26:
SecondaryAttachment Cable
Anchor this end to asuitable secure point.
Attach cable hereand secure.
16. Insert the security key into the keyhole of the speaker grille and rotate the key to lock the speaker. There are three small raised “dimples” on the center of the grille surface that surrounds the keyhole.
Twist toLock/Unlock
Unlocked Locked
17. Check the position of the speaker. If the speaker needs to be repositioned, unlock the speaker if it had been previously locked using the included security key. Apply pressure to the grille with your finger over the “dimpled” keyhole to unlatch the speaker from the mounting plate while lifting up on the speaker. The ball joint lever can now be released (horizontal up position) and the speaker position readjusted.
NOTE: After repositioning the speaker, be sure to lock the ball joint lever (vertical down position) before installing the speaker.
18. If installing the SM 26T or SM 28T, use a small screwdriver to set the tap switch as needed (see the SM 26 Setup Guide or SM 28 Setup Guide for further details).
8Ω
70
100
8Ω
Tap Indicatorfor 70 volt
Tap Indicatorfor 100 volt


![Scanned Imagebirohukum.jogjaprov.go.id/storage/15711_skgub223-2020.pdf · 2020. 8. 10. · SMK N SMK SMK YAPPI S ME Bantu I SMK Muh 2 Muh wates Komplek , Srimpi. u] Jl. 11. Watts](https://img.pdfslide.us/doc/110x75/60e0ae011b022f712f0bbc37/scanned-2020-8-10-smk-n-smk-smk-yappi-s-me-bantu-i-smk-muh-2-muh-wates-komplek.jpg)