Embed Size (px)
Citation preview

smile knowing you can easily keep up with home maintenance.
It’s a good feeling to take care of your home.
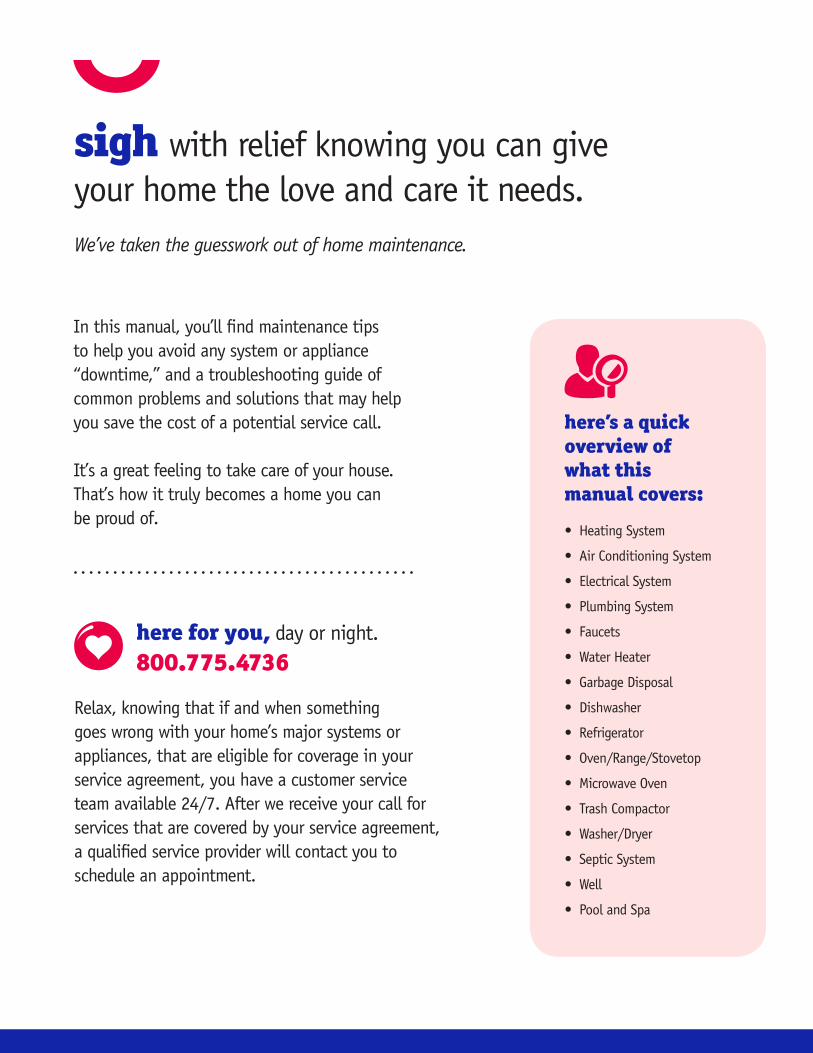
In this manual, you’ll find maintenance tips to help you avoid any system or appliance “downtime,” and a troubleshooting guide of common problems and solutions that may help you save the cost of a potential service call.
It’s a great feeling to take care of your house. That’s how it truly becomes a home you can be proud of.
here for you, day or night. 800.775.4736
sigh with relief knowing you can give your home the love and care it needs.
Relax, knowing that if and when something goes wrong with your home’s major systems or appliances, that are eligible for coverage in your service agreement, you have a customer service team available 24/7. After we receive your call for services that are covered by your service agreement, a qualified service provider will contact you to schedule an appointment.
• Heating System
• Air Conditioning System
• Electrical System
• Plumbing System
• Faucets
• Water Heater
• Garbage Disposal
• Dishwasher
• Refrigerator
• Oven/Range/Stovetop
• Microwave Oven
• Trash Compactor
• Washer/Dryer
• Septic System
• Well
• Pool and Spa
here’s a quick overview of what this manual covers:
We’ve taken the guesswork out of home maintenance.
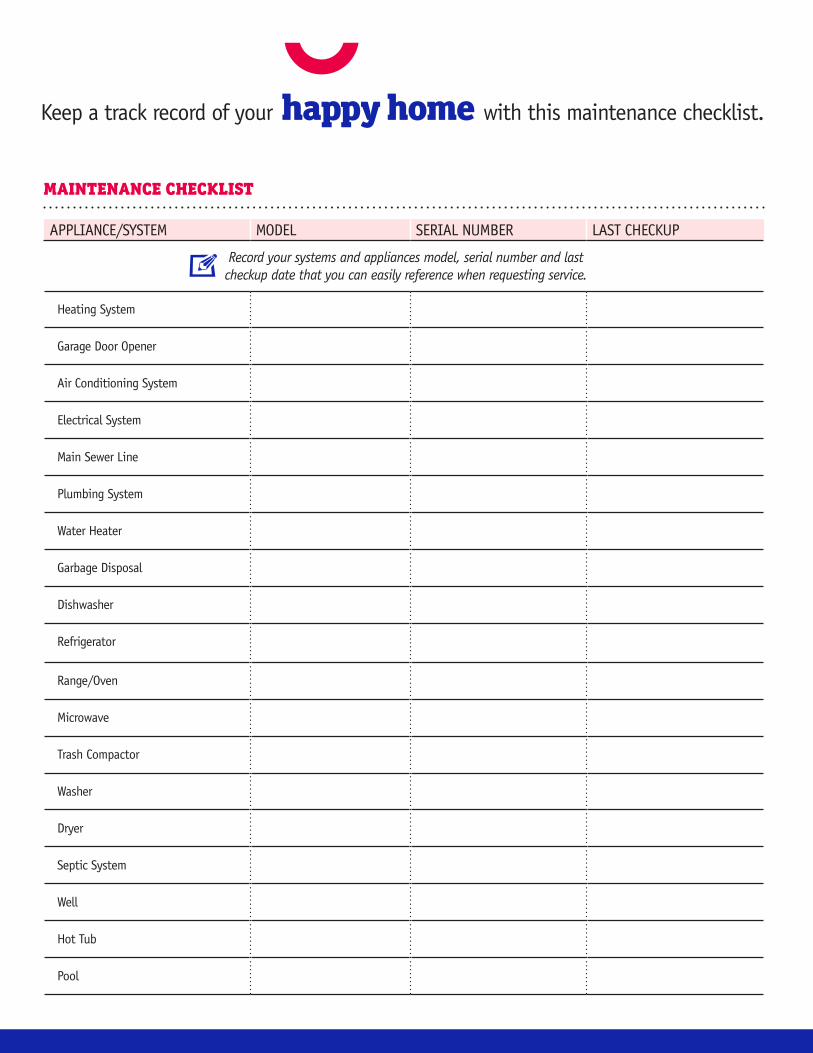
APPLIANCE/SYSTEM MODEL SERIAL NUMBER LAST CHECKUP
Heating System
Garage Door Opener
Air Conditioning System
Electrical System
Main Sewer Line
Plumbing System
Water Heater
Garbage Disposal
Dishwasher
Refrigerator
Range/Oven
Microwave
Trash Compactor
Washer
Dryer
Septic System
Well
Hot Tub
Pool
Keep a track record of your happy home with this maintenance checklist.
Record your systems and appliances model, serial number and lastcheckup date that you can easily reference when requesting service.
MAINTENANCE CHECKLIST

HEATING SYSTEM• Call the gas company immediately if you notice a gas smell.
• Check filters every month and replace as necessary.
• Have your mechanical systems serviced annually and your ductwork cleaned before each heating season.
• Blower units making excessive noise should be brought to the attention of a licensed technician.
• Clean and dust the radiators and heating vents and inspect the radiators for any signs of leakage.
• Bleed air from your radiators on an annual basis.
• Check the exhaust pipe on your gas furnace for any loose connections.
• Keep your outdoor unit clean and free of debris.
• Have your system annually serviced before each air conditioning season.
AIR CONDITIONING SYSTEM• Check filters every month and replace as necessary.
• Keep your outdoor condensing unit clean and free of debris.
• Have your system annually serviced before each season.
ELECTRICAL SYSTEM• To prevent loss of power or increased risk, do not overload any
one circuit in your home.
PLUMBING SYSTEM• Do not flush any paper products down a toilet other
than toilet paper.
• A simple plunger may solve many of your clogging problems.
• Check any of your exposed plumbing lines for corrosion or leaks.
• In the event the weather is extremely cold, allowing a faucet to drip slowly may help avoid a freezing water line.
FAUCETS• A dripping faucet may be repaired by simply replacing an
o-ring, cartridge or vinyl gasket.
• Clean and remove any hard water or mineral deposits with apple cider vinegar to avoid a slow water flow.
WATER HEATER • Check the water heater for signs of leaking or corrosion.
• Inspect the bottom of your water heater drain pan or floor for signs of rust or water staining.
• Drain and flush your water heater twice a year per recommendation of manufacture maintenance manual by attaching a common garden hose to the drain valve at the bottom of the heater or follow the manufacturer’s instructions.
• Remove the heating elements from your electric water heater and soak in vinegar to remove any corrosion or sediment build up or call a qualified plumber.
GARBAGE DISPOSAL• Remember to always run the water while you are
using the disposal.
• To avoid stoppages, continue to run the water for at least two minutes after you turn the disposal off.
• Using the disposal with a tray of ice cubes, pieces of lemon/lime, or baking soda will help keep your disposal clean and smelling fresh.
• If you drop a piece of silverware in your disposal turn the power off immediately before you attempt to remove it.
• If the disposal should become jammed, use a disposal wrench which should attach at the bottom of the disposal. Turn the wrench counter clockwise until it turns easily. Press the red reset button on your disposal and it should operate properly.
maintenance tips Keeping up on maintenance helps increase thelife-span of your home’s systems and appliances.
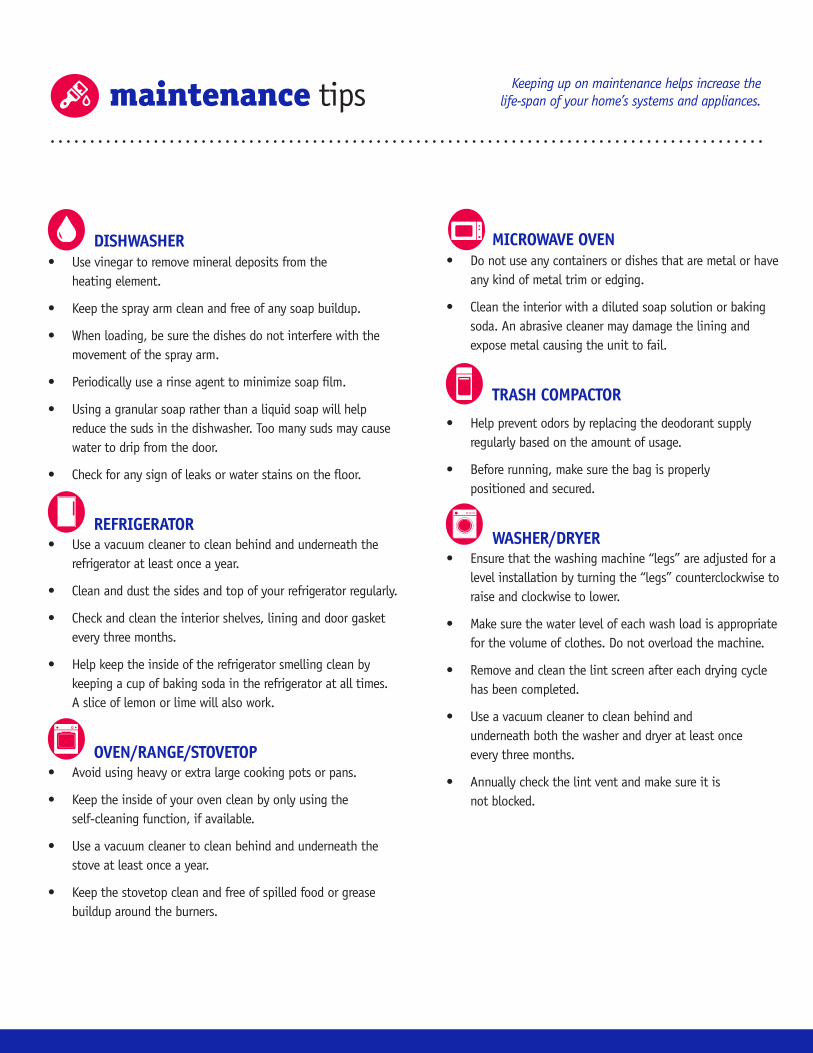
DISHWASHER • Use vinegar to remove mineral deposits from the
heating element.
• Keep the spray arm clean and free of any soap buildup.
• When loading, be sure the dishes do not interfere with the movement of the spray arm.
• Periodically use a rinse agent to minimize soap film.
• Using a granular soap rather than a liquid soap will help reduce the suds in the dishwasher. Too many suds may cause water to drip from the door.
• Check for any sign of leaks or water stains on the floor.
REFRIGERATOR • Use a vacuum cleaner to clean behind and underneath the
refrigerator at least once a year.
• Clean and dust the sides and top of your refrigerator regularly.
• Check and clean the interior shelves, lining and door gasket every three months.
• Help keep the inside of the refrigerator smelling clean by keeping a cup of baking soda in the refrigerator at all times. A slice of lemon or lime will also work.
OVEN/RANGE/STOVETOP • Avoid using heavy or extra large cooking pots or pans.
• Keep the inside of your oven clean by only using the self-cleaning function, if available.
• Use a vacuum cleaner to clean behind and underneath the stove at least once a year.
• Keep the stovetop clean and free of spilled food or grease buildup around the burners.
MICROWAVE OVEN • Do not use any containers or dishes that are metal or have
any kind of metal trim or edging.
• Clean the interior with a diluted soap solution or baking soda. An abrasive cleaner may damage the lining and expose metal causing the unit to fail.
TRASH COMPACTOR
• Help prevent odors by replacing the deodorant supply regularly based on the amount of usage.
• Before running, make sure the bag is properly positioned and secured.
WASHER/DRYER • Ensure that the washing machine “legs” are adjusted for a
level installation by turning the “legs” counterclockwise to raise and clockwise to lower.
• Make sure the water level of each wash load is appropriate for the volume of clothes. Do not overload the machine.
• Remove and clean the lint screen after each drying cycle has been completed.
• Use a vacuum cleaner to clean behind and underneath both the washer and dryer at least once every three months.
• Annually check the lint vent and make sure it is not blocked.
maintenance tips Keeping up on maintenance helps increase thelife-span of your home’s systems and appliances.
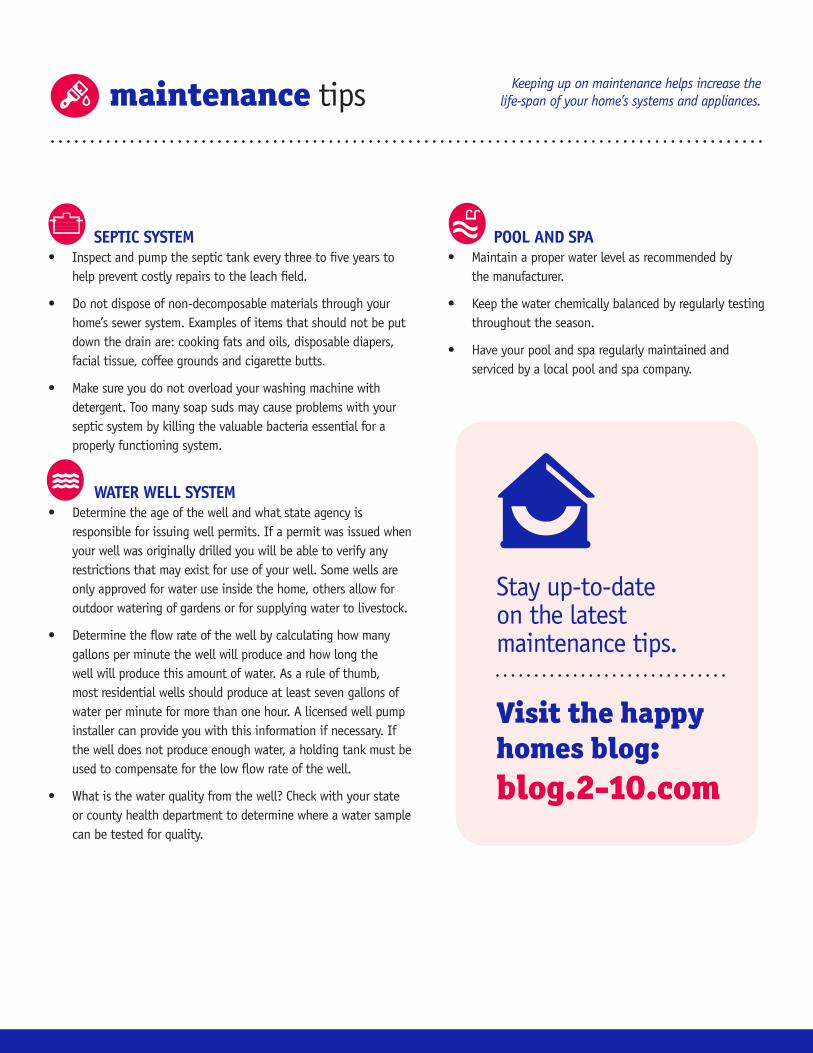
SEPTIC SYSTEM • Inspect and pump the septic tank every three to five years to
help prevent costly repairs to the leach field.
• Do not dispose of non-decomposable materials through your home’s sewer system. Examples of items that should not be put down the drain are: cooking fats and oils, disposable diapers, facial tissue, coffee grounds and cigarette butts.
• Make sure you do not overload your washing machine with detergent. Too many soap suds may cause problems with your septic system by killing the valuable bacteria essential for a properly functioning system.
WATER WELL SYSTEM • Determine the age of the well and what state agency is
responsible for issuing well permits. If a permit was issued when your well was originally drilled you will be able to verify any restrictions that may exist for use of your well. Some wells are only approved for water use inside the home, others allow for outdoor watering of gardens or for supplying water to livestock.
• Determine the flow rate of the well by calculating how many gallons per minute the well will produce and how long the well will produce this amount of water. As a rule of thumb, most residential wells should produce at least seven gallons of water per minute for more than one hour. A licensed well pump installer can provide you with this information if necessary. If the well does not produce enough water, a holding tank must be used to compensate for the low flow rate of the well.
• What is the water quality from the well? Check with your state or county health department to determine where a water sample can be tested for quality.
POOL AND SPA • Maintain a proper water level as recommended by
the manufacturer.
• Keep the water chemically balanced by regularly testing throughout the season.
• Have your pool and spa regularly maintained and serviced by a local pool and spa company.
Stay up-to-dateon the latest maintenance tips. Visit the happy homes blog:blog.2-10.com
maintenance tips Keeping up on maintenance helps increase thelife-span of your home’s systems and appliances.
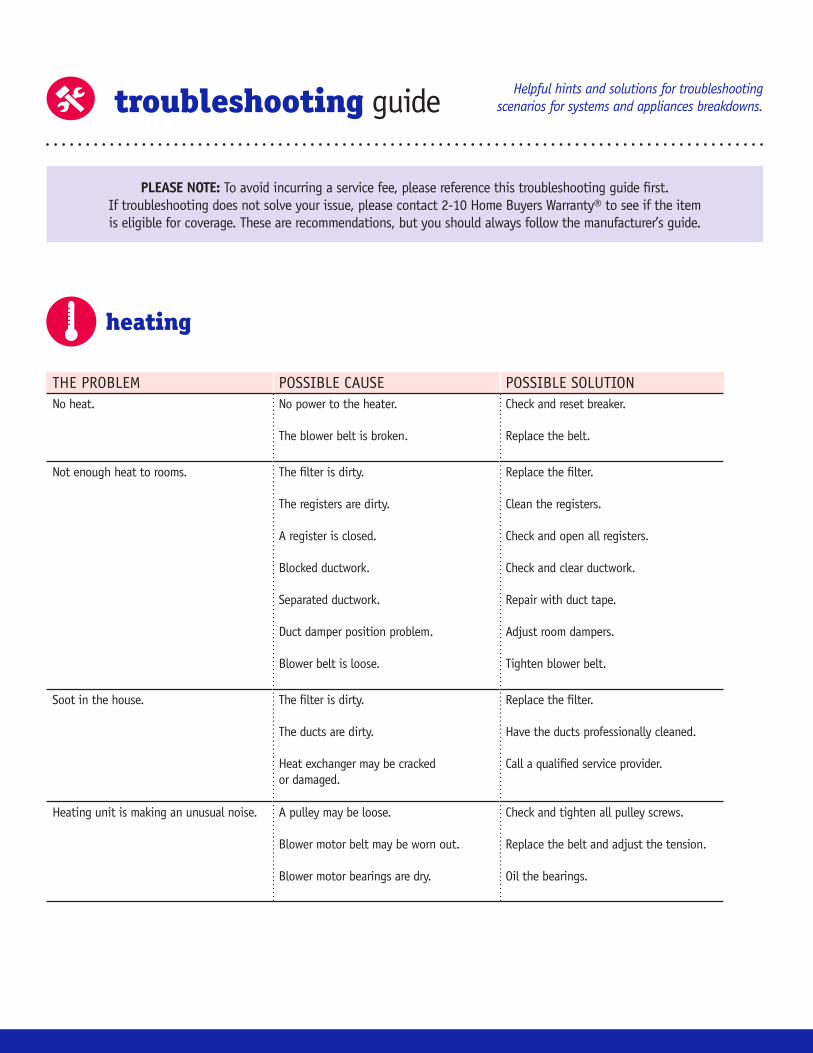
THE PROBLEM POSSIBLE CAUSE POSSIBLE SOLUTIONNo heat. No power to the heater.
The blower belt is broken.
Check and reset breaker. Replace the belt.
Not enough heat to rooms. The filter is dirty.
The registers are dirty.
A register is closed.
Blocked ductwork.
Separated ductwork.
Duct damper position problem.
Blower belt is loose.
Replace the filter.
Clean the registers.
Check and open all registers.
Check and clear ductwork.
Repair with duct tape.
Adjust room dampers.
Tighten blower belt.
Soot in the house. The filter is dirty.
The ducts are dirty.
Heat exchanger may be cracked or damaged.
Replace the filter.
Have the ducts professionally cleaned.
Call a qualified service provider.
Heating unit is making an unusual noise. A pulley may be loose.
Blower motor belt may be worn out.
Blower motor bearings are dry.
Check and tighten all pulley screws.
Replace the belt and adjust the tension.
Oil the bearings.
heating
troubleshooting guide Helpful hints and solutions for troubleshooting scenarios for systems and appliances breakdowns.
PLEASE NOTE: To avoid incurring a service fee, please reference this troubleshooting guide first. If troubleshooting does not solve your issue, please contact 2-10 Home Buyers Warranty® to see if the item is eligible for coverage. These are recommendations, but you should always follow the manufacturer’s guide.
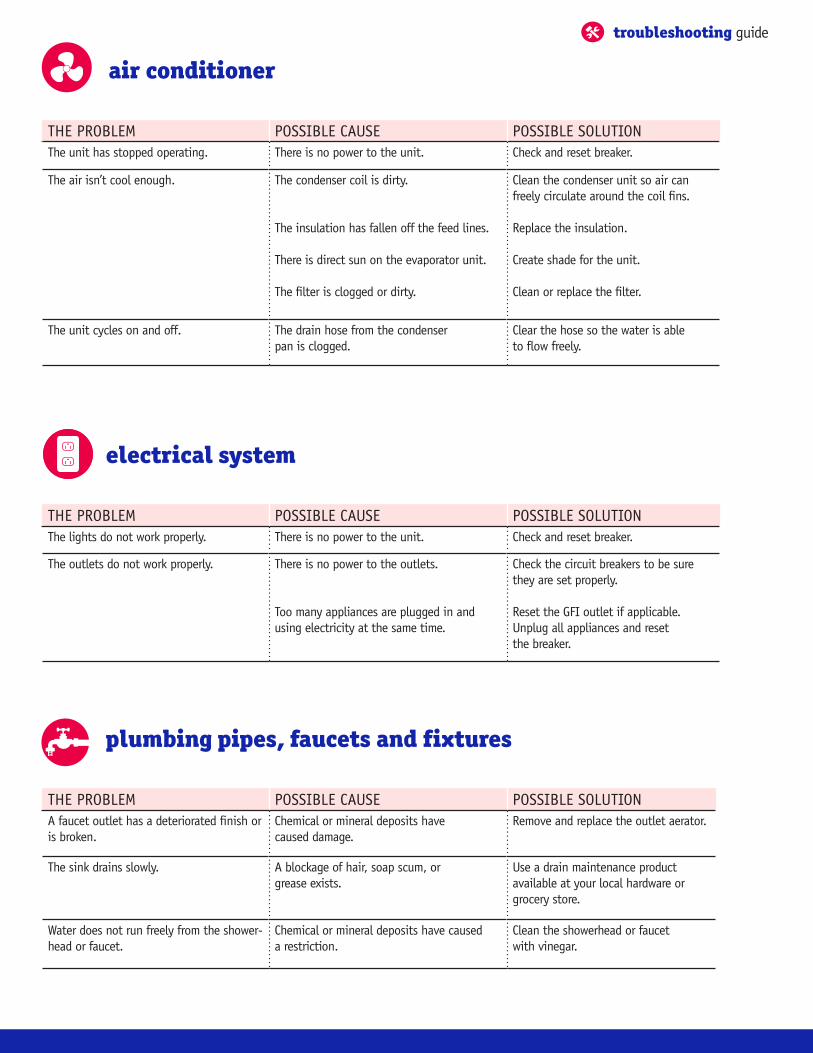
THE PROBLEM POSSIBLE CAUSE POSSIBLE SOLUTIONThe unit has stopped operating. There is no power to the unit. Check and reset breaker.
The air isn’t cool enough. The condenser coil is dirty.
The insulation has fallen off the feed lines.
There is direct sun on the evaporator unit.
The filter is clogged or dirty.
Clean the condenser unit so air can freely circulate around the coil fins.
Replace the insulation.
Create shade for the unit.
Clean or replace the filter.
The unit cycles on and off. The drain hose from the condenser pan is clogged.
Clear the hose so the water is able to flow freely.
air conditioner
THE PROBLEM POSSIBLE CAUSE POSSIBLE SOLUTIONThe lights do not work properly. There is no power to the unit. Check and reset breaker.
The outlets do not work properly. There is no power to the outlets.
Too many appliances are plugged in and using electricity at the same time.
Check the circuit breakers to be sure they are set properly.
Reset the GFI outlet if applicable. Unplug all appliances and reset the breaker.
electrical system
THE PROBLEM POSSIBLE CAUSE POSSIBLE SOLUTIONA faucet outlet has a deteriorated finish or is broken.
Chemical or mineral deposits have caused damage.
Remove and replace the outlet aerator.
The sink drains slowly. A blockage of hair, soap scum, or grease exists.
Use a drain maintenance product available at your local hardware or grocery store.
Water does not run freely from the shower-head or faucet.
Chemical or mineral deposits have caused a restriction.
Clean the showerhead or faucet with vinegar.
plumbing pipes, faucets and fixtures
troubleshooting guide
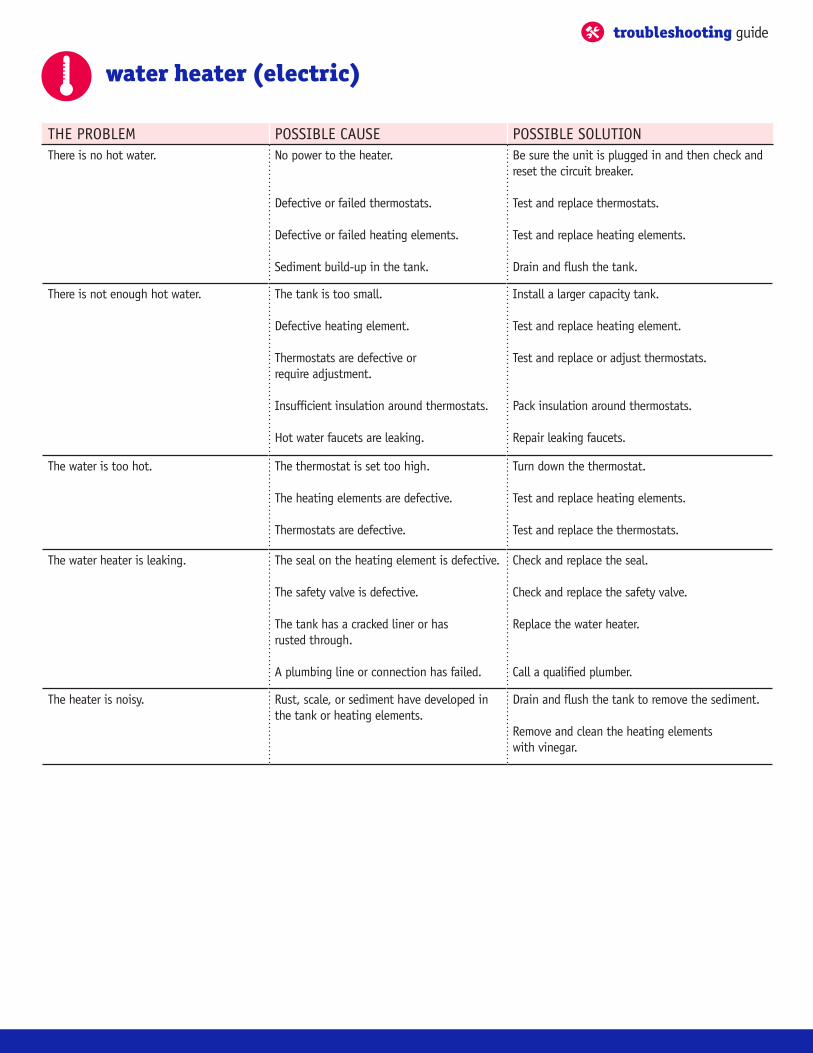
THE PROBLEM POSSIBLE CAUSE POSSIBLE SOLUTIONThere is no hot water. No power to the heater.
Defective or failed thermostats.
Defective or failed heating elements.
Sediment build-up in the tank.
Be sure the unit is plugged in and then check and reset the circuit breaker.
Test and replace thermostats.
Test and replace heating elements.
Drain and flush the tank.
There is not enough hot water. The tank is too small.
Defective heating element.
Thermostats are defective or require adjustment.
Insufficient insulation around thermostats.
Hot water faucets are leaking.
Install a larger capacity tank.
Test and replace heating element.
Test and replace or adjust thermostats.
Pack insulation around thermostats.
Repair leaking faucets.
The water is too hot. The thermostat is set too high.
The heating elements are defective.
Thermostats are defective.
Turn down the thermostat.
Test and replace heating elements.
Test and replace the thermostats.
The water heater is leaking. The seal on the heating element is defective.
The safety valve is defective.
The tank has a cracked liner or has rusted through.
A plumbing line or connection has failed.
Check and replace the seal.
Check and replace the safety valve.
Replace the water heater.
Call a qualified plumber.
The heater is noisy. Rust, scale, or sediment have developed in the tank or heating elements.
Drain and flush the tank to remove the sediment.
Remove and clean the heating elements with vinegar.
water heater (electric)
troubleshooting guide
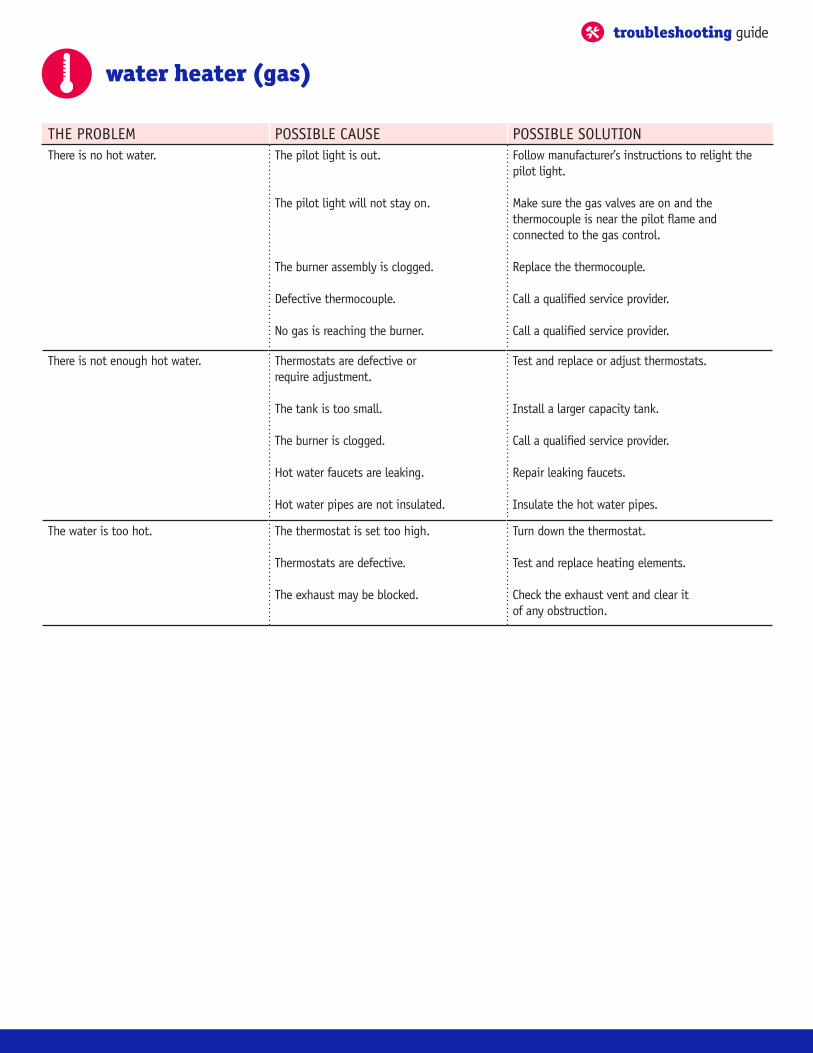
THE PROBLEM POSSIBLE CAUSE POSSIBLE SOLUTIONThere is no hot water. The pilot light is out.
The pilot light will not stay on.
The burner assembly is clogged.
Defective thermocouple.
No gas is reaching the burner.
Follow manufacturer’s instructions to relight the pilot light.
Make sure the gas valves are on and the thermocouple is near the pilot flame and connected to the gas control.
Replace the thermocouple.
Call a qualified service provider.
Call a qualified service provider.
There is not enough hot water. Thermostats are defective or require adjustment.
The tank is too small.
The burner is clogged.
Hot water faucets are leaking.
Hot water pipes are not insulated.
Test and replace or adjust thermostats.
Install a larger capacity tank.
Call a qualified service provider.
Repair leaking faucets.
Insulate the hot water pipes.
The water is too hot. The thermostat is set too high.
Thermostats are defective.
The exhaust may be blocked.
Turn down the thermostat.
Test and replace heating elements.
Check the exhaust vent and clear it of any obstruction.
water heater (gas)
troubleshooting guide
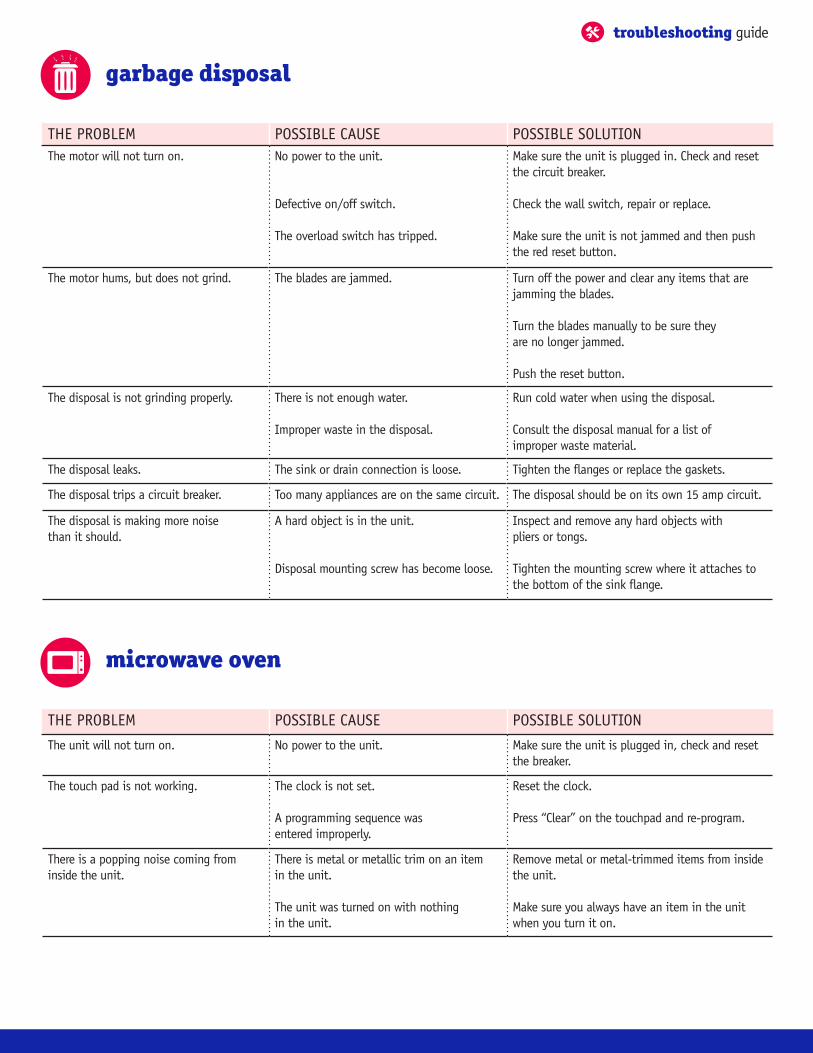
THE PROBLEM POSSIBLE CAUSE POSSIBLE SOLUTIONThe motor will not turn on. No power to the unit.
Defective on/off switch.
The overload switch has tripped.
Make sure the unit is plugged in. Check and reset the circuit breaker.
Check the wall switch, repair or replace.
Make sure the unit is not jammed and then push the red reset button.
The motor hums, but does not grind. The blades are jammed. Turn off the power and clear any items that are jamming the blades.
Turn the blades manually to be sure they are no longer jammed.
Push the reset button.
The disposal is not grinding properly. There is not enough water.
Improper waste in the disposal.
Run cold water when using the disposal.
Consult the disposal manual for a list of improper waste material.
The disposal leaks. The sink or drain connection is loose. Tighten the flanges or replace the gaskets.
The disposal trips a circuit breaker. Too many appliances are on the same circuit. The disposal should be on its own 15 amp circuit.
The disposal is making more noise than it should.
A hard object is in the unit.
Disposal mounting screw has become loose.
Inspect and remove any hard objects with pliers or tongs.
Tighten the mounting screw where it attaches to the bottom of the sink flange.
garbage disposal
microwave oven
THE PROBLEM POSSIBLE CAUSE POSSIBLE SOLUTION
The unit will not turn on. No power to the unit. Make sure the unit is plugged in, check and reset the breaker.
The touch pad is not working. The clock is not set.
A programming sequence was entered improperly.
Reset the clock.
Press “Clear” on the touchpad and re-program.
There is a popping noise coming from inside the unit.
There is metal or metallic trim on an item in the unit.
The unit was turned on with nothing in the unit.
Remove metal or metal-trimmed items from inside the unit.
Make sure you always have an item in the unit when you turn it on.
troubleshooting guide
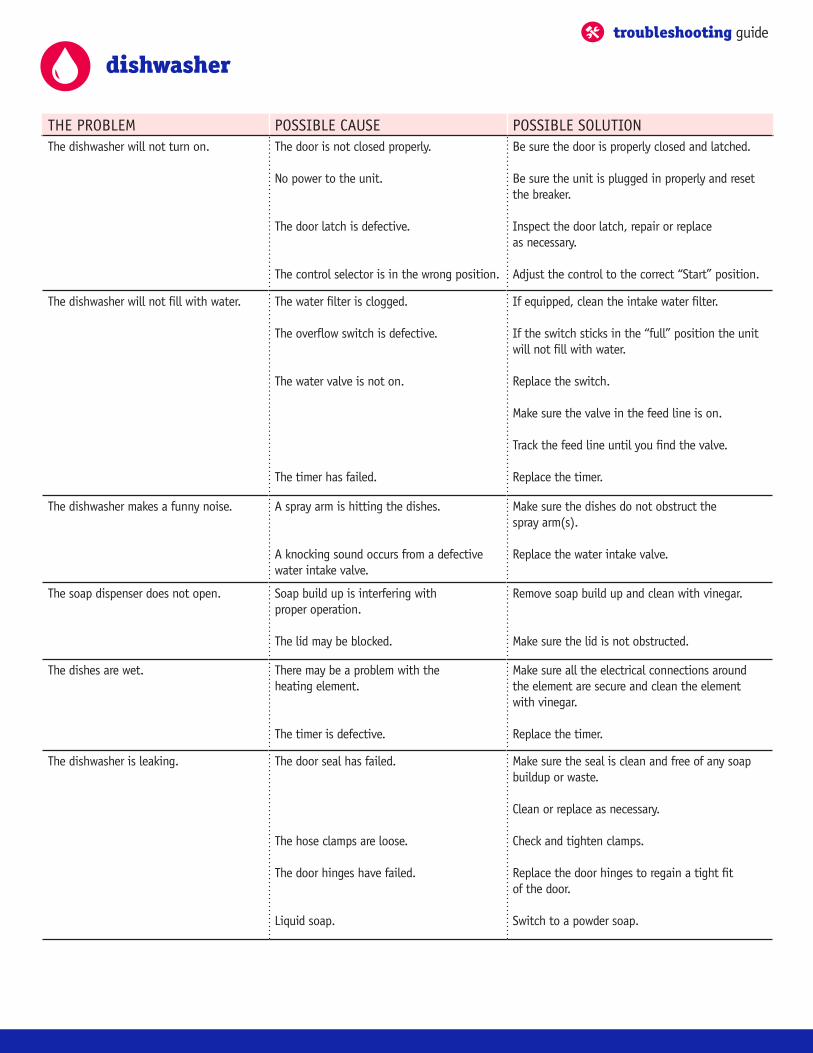
THE PROBLEM POSSIBLE CAUSE POSSIBLE SOLUTIONThe dishwasher will not turn on. The door is not closed properly.
No power to the unit.
The door latch is defective.
The control selector is in the wrong position.
Be sure the door is properly closed and latched.
Be sure the unit is plugged in properly and reset the breaker.
Inspect the door latch, repair or replace as necessary.
Adjust the control to the correct “Start” position.
The dishwasher will not fill with water. The water filter is clogged.
The overflow switch is defective.
The water valve is not on.
The timer has failed.
If equipped, clean the intake water filter.
If the switch sticks in the “full” position the unit will not fill with water.
Replace the switch.
Make sure the valve in the feed line is on.
Track the feed line until you find the valve.
Replace the timer.
The dishwasher makes a funny noise. A spray arm is hitting the dishes.
A knocking sound occurs from a defective water intake valve.
Make sure the dishes do not obstruct the spray arm(s).
Replace the water intake valve.
The soap dispenser does not open. Soap build up is interfering with proper operation.
The lid may be blocked.
Remove soap build up and clean with vinegar.
Make sure the lid is not obstructed.
The dishes are wet. There may be a problem with the heating element.
The timer is defective.
Make sure all the electrical connections around the element are secure and clean the element with vinegar.
Replace the timer.
The dishwasher is leaking. The door seal has failed.
The hose clamps are loose.
The door hinges have failed.
Liquid soap.
Make sure the seal is clean and free of any soap buildup or waste.
Clean or replace as necessary.
Check and tighten clamps.
Replace the door hinges to regain a tight fit of the door.
Switch to a powder soap.
dishwashertroubleshooting guide
dishwasher con’t.
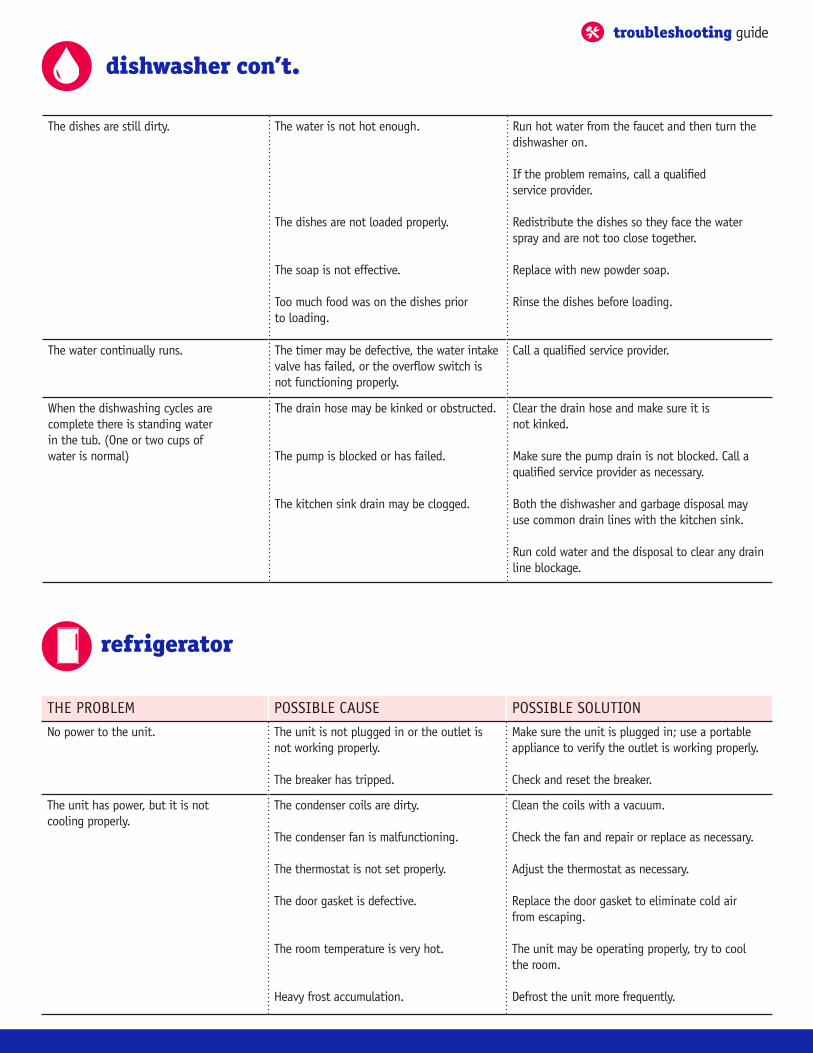
The dishes are still dirty. The water is not hot enough.
The dishes are not loaded properly.
The soap is not effective.
Too much food was on the dishes prior to loading.
Run hot water from the faucet and then turn the dishwasher on.
If the problem remains, call a qualified service provider.
Redistribute the dishes so they face the water spray and are not too close together.
Replace with new powder soap.
Rinse the dishes before loading.
The water continually runs. The timer may be defective, the water intake valve has failed, or the overflow switch is not functioning properly.
Call a qualified service provider.
When the dishwashing cycles are complete there is standing water in the tub. (One or two cups of water is normal)
The drain hose may be kinked or obstructed.
The pump is blocked or has failed.
The kitchen sink drain may be clogged.
Clear the drain hose and make sure it is not kinked.
Make sure the pump drain is not blocked. Call a qualified service provider as necessary.
Both the dishwasher and garbage disposal may use common drain lines with the kitchen sink.
Run cold water and the disposal to clear any drain line blockage.
refrigerator
THE PROBLEM POSSIBLE CAUSE POSSIBLE SOLUTIONNo power to the unit. The unit is not plugged in or the outlet is
not working properly.
The breaker has tripped.
Make sure the unit is plugged in; use a portable appliance to verify the outlet is working properly.
Check and reset the breaker.
The unit has power, but it is not cooling properly.
The condenser coils are dirty.
The condenser fan is malfunctioning.
The thermostat is not set properly.
The door gasket is defective.
The room temperature is very hot.
Heavy frost accumulation.
Clean the coils with a vacuum.
Check the fan and repair or replace as necessary.
Adjust the thermostat as necessary.
Replace the door gasket to eliminate cold air from escaping.
The unit may be operating properly, try to cool the room.
Defrost the unit more frequently.
troubleshooting guide
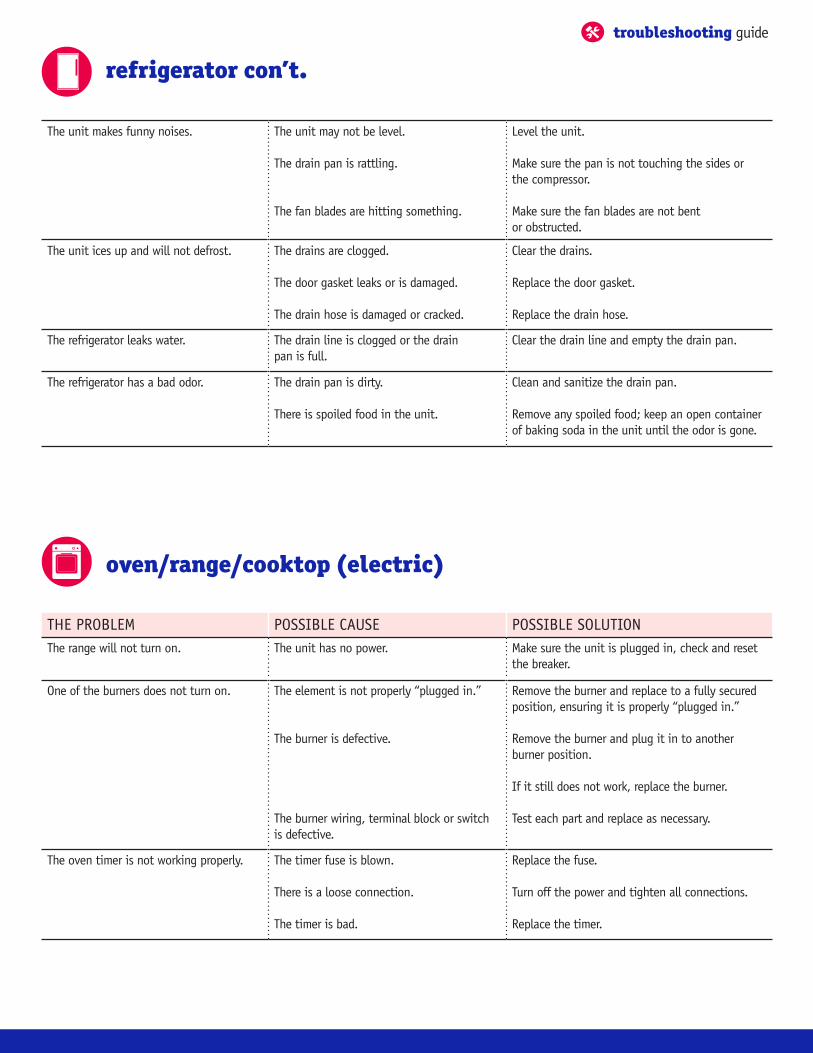
The unit makes funny noises. The unit may not be level.
The drain pan is rattling.
The fan blades are hitting something.
Level the unit.
Make sure the pan is not touching the sides or the compressor.
Make sure the fan blades are not bent or obstructed.
The unit ices up and will not defrost. The drains are clogged.
The door gasket leaks or is damaged.
The drain hose is damaged or cracked.
Clear the drains.
Replace the door gasket.
Replace the drain hose.
The refrigerator leaks water. The drain line is clogged or the drain pan is full.
Clear the drain line and empty the drain pan.
The refrigerator has a bad odor. The drain pan is dirty.
There is spoiled food in the unit.
Clean and sanitize the drain pan.
Remove any spoiled food; keep an open container of baking soda in the unit until the odor is gone.
refrigerator con’t.
THE PROBLEM POSSIBLE CAUSE POSSIBLE SOLUTIONThe range will not turn on. The unit has no power. Make sure the unit is plugged in, check and reset
the breaker.
One of the burners does not turn on. The element is not properly “plugged in.”
The burner is defective.
The burner wiring, terminal block or switch is defective.
Remove the burner and replace to a fully secured position, ensuring it is properly “plugged in.”
Remove the burner and plug it in to another burner position.
If it still does not work, replace the burner.
Test each part and replace as necessary.
The oven timer is not working properly. The timer fuse is blown.
There is a loose connection.
The timer is bad.
Replace the fuse.
Turn off the power and tighten all connections.
Replace the timer.
oven/range/cooktop (electric)
troubleshooting guide
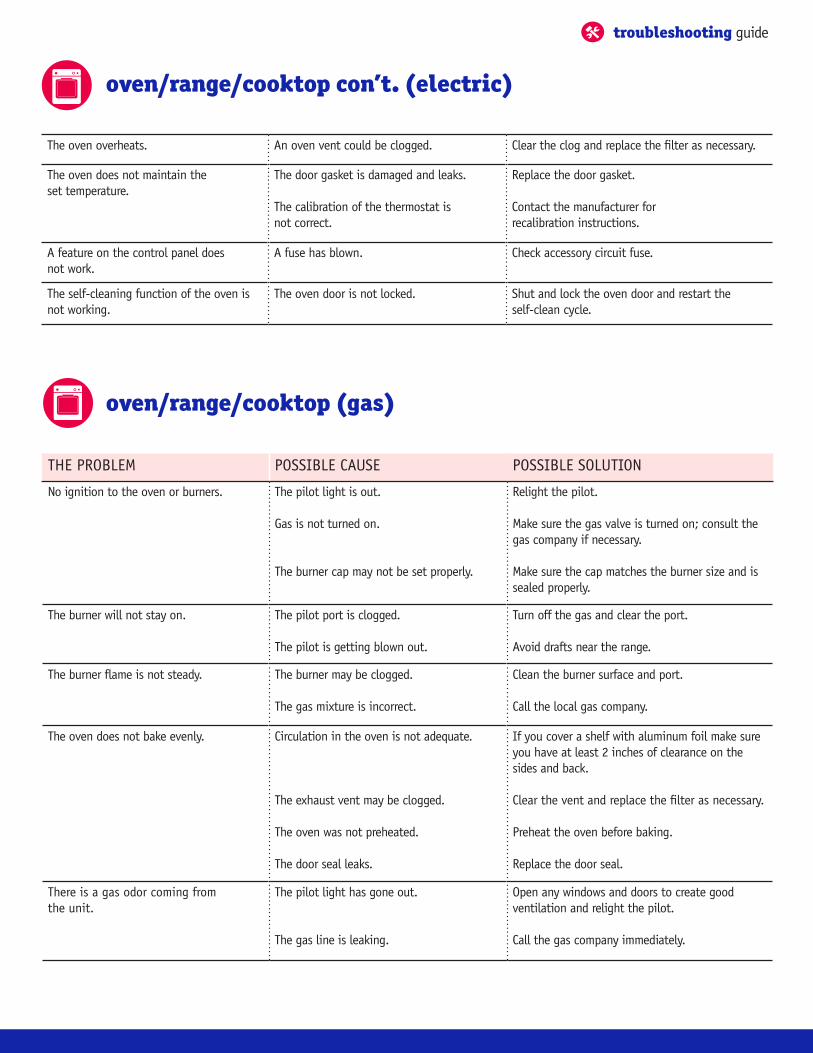
The oven overheats. An oven vent could be clogged. Clear the clog and replace the filter as necessary.
The oven does not maintain the set temperature.
The door gasket is damaged and leaks.
The calibration of the thermostat is not correct.
Replace the door gasket.
Contact the manufacturer for recalibration instructions.
A feature on the control panel does not work.
A fuse has blown. Check accessory circuit fuse.
The self-cleaning function of the oven is not working.
The oven door is not locked. Shut and lock the oven door and restart the self-clean cycle.
THE PROBLEM POSSIBLE CAUSE POSSIBLE SOLUTION
No ignition to the oven or burners. The pilot light is out.
Gas is not turned on.
The burner cap may not be set properly.
Relight the pilot.
Make sure the gas valve is turned on; consult the gas company if necessary.
Make sure the cap matches the burner size and is sealed properly.
The burner will not stay on. The pilot port is clogged.
The pilot is getting blown out.
Turn off the gas and clear the port.
Avoid drafts near the range.
The burner flame is not steady. The burner may be clogged.
The gas mixture is incorrect.
Clean the burner surface and port.
Call the local gas company.
The oven does not bake evenly. Circulation in the oven is not adequate.
The exhaust vent may be clogged.
The oven was not preheated.
The door seal leaks.
If you cover a shelf with aluminum foil make sure you have at least 2 inches of clearance on the sides and back.
Clear the vent and replace the filter as necessary.
Preheat the oven before baking.
Replace the door seal.
There is a gas odor coming from the unit.
The pilot light has gone out.
The gas line is leaking.
Open any windows and doors to create good ventilation and relight the pilot.
Call the gas company immediately.
oven/range/cooktop con’t. (electric)
oven/range/cooktop (gas)
troubleshooting guide

trash compactor
THE PROBLEM POSSIBLE CAUSE POSSIBLE SOLUTIONThe unit will not turn on. No power to the unit.
The safety lock is not on.
The drawer is open.
Make sure the unit is plugged in, check and reset the breaker.
Turn on the safety lock.
Make sure the drawer is securely shut.
The trash is not fully compacted. The pulley, gears or drive chain is loose or broken.
The ram has jammed.
Check and tighten or replace as necessary.
Oil the ram and replace the screws if stripped out.
A breaker trips during the cycle. There are too many appliances on one circuit.
There may be a short in the power cord.
Unplug other appliances, check and reset the breaker.
The unit may need its own circuit.
Make sure the cord, plug and switch are operating properly.
The unit makes loud noises. The unit needs to be lubricated.
Some parts may have come loose.
The drive chain is loose.
Oil the unit.
Check and tighten all screws and bolts.
Tighten the drive chain.
The unit has a bad odor. The deodorant is empty.
The deodorant dispenser is clogged.
Replace deodorant.
Clear the nozzle with a thin piece of wire or remove and run the nozzle under warm water.
troubleshooting guide
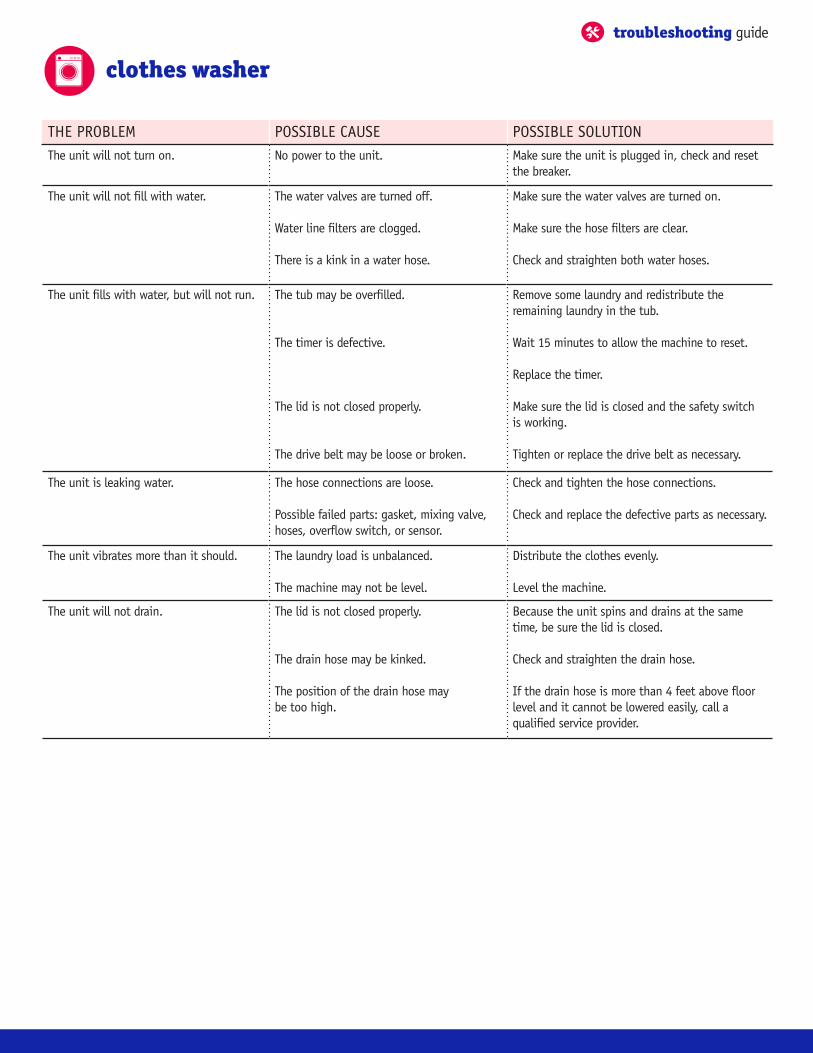
clothes washer
THE PROBLEM POSSIBLE CAUSE POSSIBLE SOLUTIONThe unit will not turn on. No power to the unit. Make sure the unit is plugged in, check and reset
the breaker.
The unit will not fill with water. The water valves are turned off.
Water line filters are clogged.
There is a kink in a water hose.
Make sure the water valves are turned on.
Make sure the hose filters are clear.
Check and straighten both water hoses.
The unit fills with water, but will not run. The tub may be overfilled.
The timer is defective.
The lid is not closed properly.
The drive belt may be loose or broken.
Remove some laundry and redistribute the remaining laundry in the tub.
Wait 15 minutes to allow the machine to reset.
Replace the timer.
Make sure the lid is closed and the safety switch is working.
Tighten or replace the drive belt as necessary.
The unit is leaking water. The hose connections are loose.
Possible failed parts: gasket, mixing valve, hoses, overflow switch, or sensor.
Check and tighten the hose connections.
Check and replace the defective parts as necessary.
The unit vibrates more than it should. The laundry load is unbalanced.
The machine may not be level.
Distribute the clothes evenly.
Level the machine.
The unit will not drain. The lid is not closed properly.
The drain hose may be kinked.
The position of the drain hose may be too high.
Because the unit spins and drains at the same time, be sure the lid is closed.
Check and straighten the drain hose.
If the drain hose is more than 4 feet above floor level and it cannot be lowered easily, call a qualified service provider.
troubleshooting guide
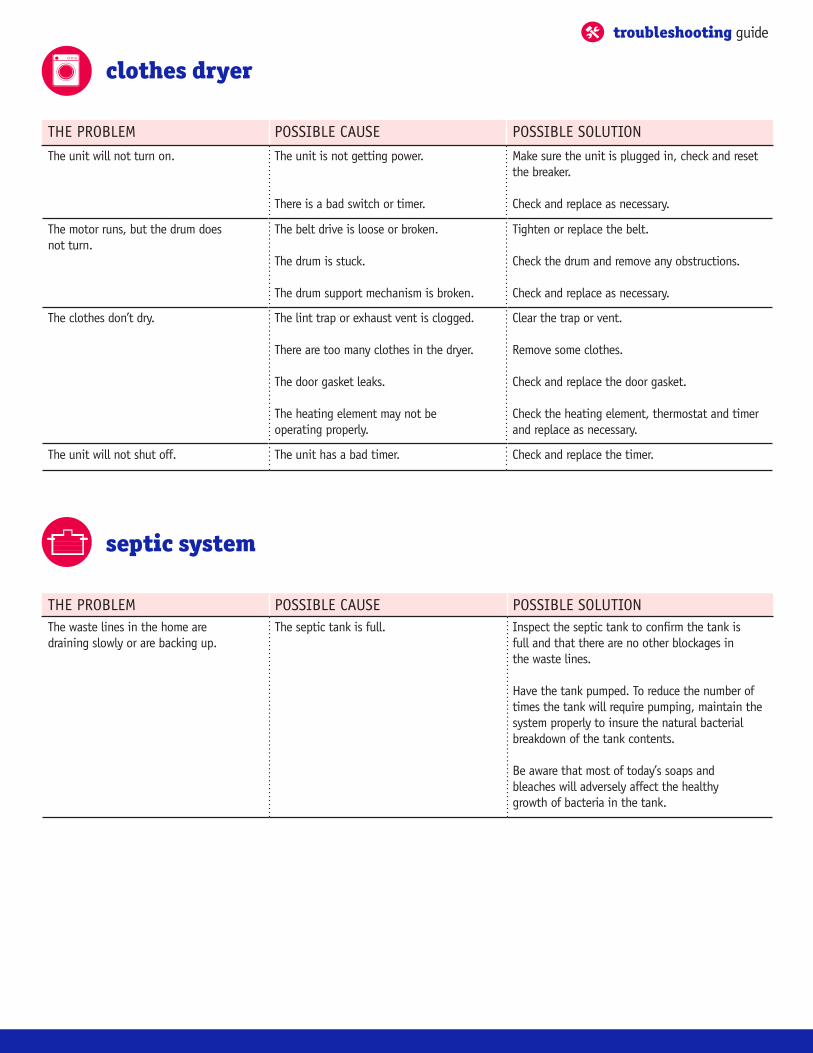
clothes dryer
THE PROBLEM POSSIBLE CAUSE POSSIBLE SOLUTIONThe unit will not turn on. The unit is not getting power.
There is a bad switch or timer.
Make sure the unit is plugged in, check and reset the breaker.
Check and replace as necessary.
The motor runs, but the drum does not turn.
The belt drive is loose or broken.
The drum is stuck.
The drum support mechanism is broken.
Tighten or replace the belt.
Check the drum and remove any obstructions. Check and replace as necessary.
The clothes don’t dry. The lint trap or exhaust vent is clogged.
There are too many clothes in the dryer.
The door gasket leaks.
The heating element may not be operating properly.
Clear the trap or vent.
Remove some clothes.
Check and replace the door gasket.
Check the heating element, thermostat and timer and replace as necessary.
The unit will not shut off. The unit has a bad timer. Check and replace the timer.
septic system
THE PROBLEM POSSIBLE CAUSE POSSIBLE SOLUTIONThe waste lines in the home are draining slowly or are backing up.
The septic tank is full. Inspect the septic tank to confirm the tank is full and that there are no other blockages in the waste lines.
Have the tank pumped. To reduce the number of times the tank will require pumping, maintain the system properly to insure the natural bacterial breakdown of the tank contents.
Be aware that most of today’s soaps and bleaches will adversely affect the healthy growth of bacteria in the tank.
troubleshooting guide
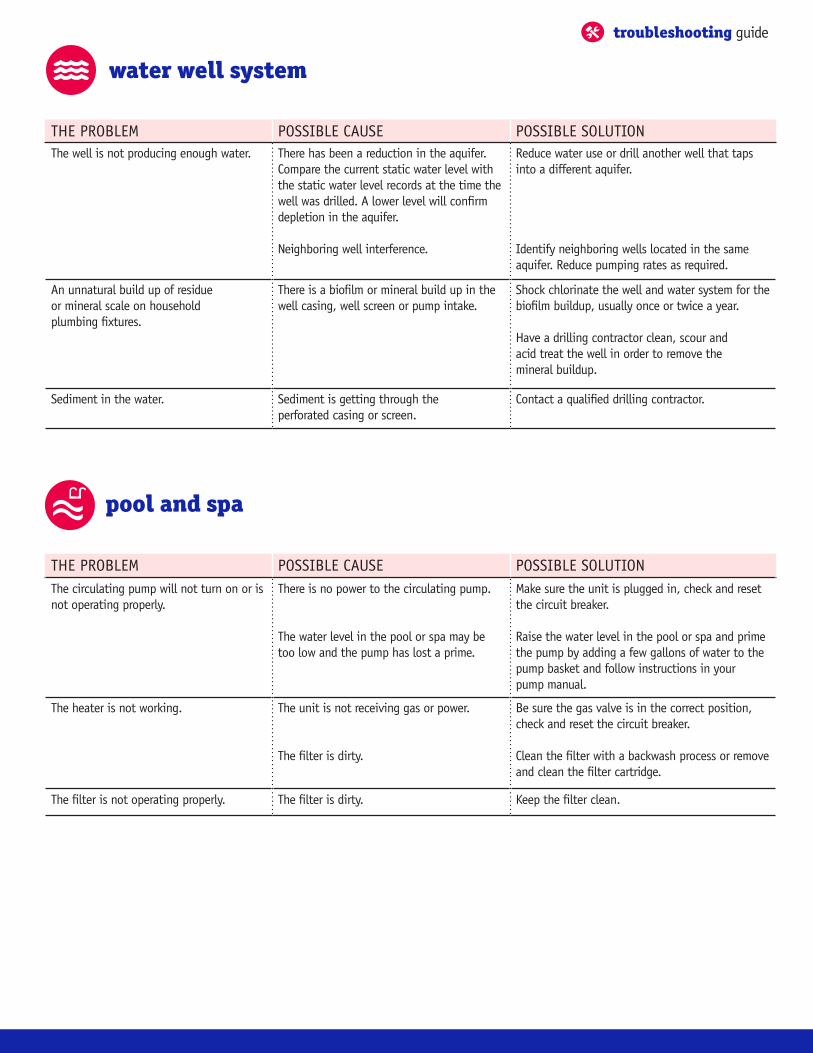
THE PROBLEM POSSIBLE CAUSE POSSIBLE SOLUTIONThe well is not producing enough water. There has been a reduction in the aquifer.
Compare the current static water level with the static water level records at the time the well was drilled. A lower level will confirm depletion in the aquifer.
Neighboring well interference.
Reduce water use or drill another well that taps into a different aquifer.
Identify neighboring wells located in the same aquifer. Reduce pumping rates as required.
An unnatural build up of residue or mineral scale on household plumbing fixtures.
There is a biofilm or mineral build up in the well casing, well screen or pump intake.
Shock chlorinate the well and water system for the biofilm buildup, usually once or twice a year.
Have a drilling contractor clean, scour and acid treat the well in order to remove the mineral buildup.
Sediment in the water. Sediment is getting through the perforated casing or screen.
Contact a qualified drilling contractor.
pool and spa
THE PROBLEM POSSIBLE CAUSE POSSIBLE SOLUTIONThe circulating pump will not turn on or is not operating properly.
There is no power to the circulating pump.
The water level in the pool or spa may be too low and the pump has lost a prime.
Make sure the unit is plugged in, check and reset the circuit breaker.
Raise the water level in the pool or spa and prime the pump by adding a few gallons of water to the pump basket and follow instructions in your pump manual.
The heater is not working. The unit is not receiving gas or power.
The filter is dirty.
Be sure the gas valve is in the correct position, check and reset the circuit breaker.
Clean the filter with a backwash process or remove and clean the filter cartridge.
The filter is not operating properly. The filter is dirty. Keep the filter clean.
water well system
troubleshooting guide
notes:

Home Warranty Service Agreement Powered By
2-10.com | 800.775.4736


![ACATacat.or.th/download/acat_or_th/journal-4/04 - 04.pdf · APmin APmax Appendix G [1] AP APmax Overpressure Relief Damper Damper 12 Relief Damper Relief Damper (Vent) Fire Damper](https://img.pdfslide.us/doc/110x75/5f7cb481641db55595223717/-04pdf-apmin-apmax-appendix-g-1-ap-apmax-overpressure-relief-damper-damper.jpg)