Embed Size (px)
Citation preview

SmartPlant Materials A-Z Training – Create a Specification
Version 2011 SP1 (7.0.1)
September 2010
DMAR1-TE-100004A
Copyright Copyright © 2010 Intergraph Corporation. All Rights Reserved. Including software, file formats, and audiovisual displays; may be used pursuant to applicable software license agreement; contains confidential and proprietary information of Intergraph and/or third parties which is protected by copyright law, trade secret law, and international treaty, and may not be provided or otherwise made available without proper authorization from Intergraph Corporation.
U.S. Government Restricted Rights Legend Use, duplication, or disclosure by the government is subject to restrictions as set forth below. For civilian agencies: This was developed at private expense and is "restricted computer software" submitted with restricted rights in accordance with subparagraphs (a) through (d) of the Commercial Computer Software - Restricted Rights clause at 52.227-19 of the Federal Acquisition Regulations ("FAR") and its successors, and is unpublished and all rights are reserved under the copyright laws of the United States. For units of the Department of Defense ("DoD"): This is "commercial computer software" as defined at DFARS 252.227-7014 and the rights of the Government are as specified at DFARS 227.7202-3. Unpublished - rights reserved under the copyright laws of the United States. Intergraph Corporation P.O. Box 240000 Huntsville, AL 35813 Street address: 170 Graphics Drive, Madison, AL 35758
Terms of Use Use of this software product is subject to the End User License Agreement and Limited Product Warranty ("EULA") delivered with this software product unless the licensee has a valid signed license for this software product with Intergraph Corporation. If the licensee has a valid signed license for this software product with Intergraph Corporation, the valid signed license shall take precedence and govern the use of this software product. Subject to the terms contained within the applicable license agreement, Intergraph Corporation gives licensee permission to print a reasonable number of copies of the documentation as defined in the applicable license agreement and delivered with the software product for licensee's internal, non-commercial use. The documentation may not be printed for resale or redistribution.
Warranties and Liabilities All warranties given by Intergraph Corporation about equipment or software are set forth in the EULA provided with the software or applicable license for the software product signed by Intergraph Corporation, and nothing stated in, or implied by, this document or its contents shall be considered or deemed a modification or amendment of such warranties. Intergraph believes the information in this publication is accurate as of its publication date. The information and the software discussed in this document are subject to change without notice and are subject to applicable technical product descriptions. Intergraph Corporation is not responsible for any error that may appear in this document. The software discussed in this document is furnished under a license and may be used or copied only in accordance with the terms of this license. No responsibility is assumed by Intergraph for the use or reliability of software on equipment that is not supplied by Intergraph or its affiliated companies. THE USER OF THE SOFTWARE IS EXPECTED TO MAKE THE FINAL EVALUATION AS TO THE USEFULNESS OF THE SOFTWARE IN HIS OWN ENVIRONMENT. Intergraph is not responsible for the accuracy of delivered data including, but not limited to, catalog, reference and symbol data. Users should verify for themselves that the data is accurate and suitable for their project work.
Trademarks Intergraph, the Intergraph logo, PDS, SmartPlant, SmartMarine, FrameWorks, I-Convert, I-Export, I-Sketch, IntelliShip, INtools, ISOGEN, MARIAN, SmartSketch, SPOOLGEN, SupportManager, and SupportModeler are trademarks or registered trademarks of Intergraph Corporation or its subsidiaries in the United States and other countries. Microsoft and Windows are registered trademarks of Microsoft Corporation. MicroStation is a registered trademark of Bentley Systems, Inc. Other brands and product names are trademarks of their respective owners.

SmartPlant Materials A-Z Training – Create a Specification i
Contents
Objectives .................................................................................................................................................... 1
Prerequisites ........................................................................................................................................... 1 Overview ................................................................................................................................................ 2
Explanation ................................................................................................................................................. 3
Workflow Diagrams ............................................................................................................................... 5 Short Codes ............................................................................................................................................ 7 Branch Tables ...................................................................................................................................... 10 Specification Types .............................................................................................................................. 12 Specification Rules............................................................................................................................... 13 Specification Management ................................................................................................................... 15 Specification Items ............................................................................................................................... 18 Spec Item Idents ................................................................................................................................... 21
Tutorial ...................................................................................................................................................... 27
Short Codes .......................................................................................................................................... 27 Specification Types .............................................................................................................................. 30 Specification Rules............................................................................................................................... 31 Specification Management ................................................................................................................... 34 Specification Items ............................................................................................................................... 36 Spec Item Idents ................................................................................................................................... 39
Quiz ............................................................................................................................................................ 43
Summary ................................................................................................................................................... 45
Quiz Answers ....................................................................................................................................... 45 Helpful References ............................................................................................................................... 45 Comments and Questions ..................................................................................................................... 45

Contents
ii SmartPlant Materials A-Z Training – Create a Specification
SmartPlant Materials A-Z Training – Create a Specification 1
In this lesson you will learn how to create a new specification in SmartPlant Reference Data. In detail, you will learn how to:
• Use Short Codes • Define Specification Rules • Define Specification Types • Define Specification Headers • Create Specification Items • Build Idents within a Specification
Prerequisites For this session, you must know how to log in to the software with the appropriate access rights from your administrator. You also need to have a consolidated knowledge about SmartPlant Materials and SmartPlant Reference Data basic functionality, which means, you should be familiar with general screen handling in the software. Additionally, you need a basic knowledge of creating components in SmartPlant Reference Data. Sessions BASICS – General Screen Handling SPRD – Create a Component
Objectives
Objectives
2 SmartPlant Materials A-Z Training – Create a Specification
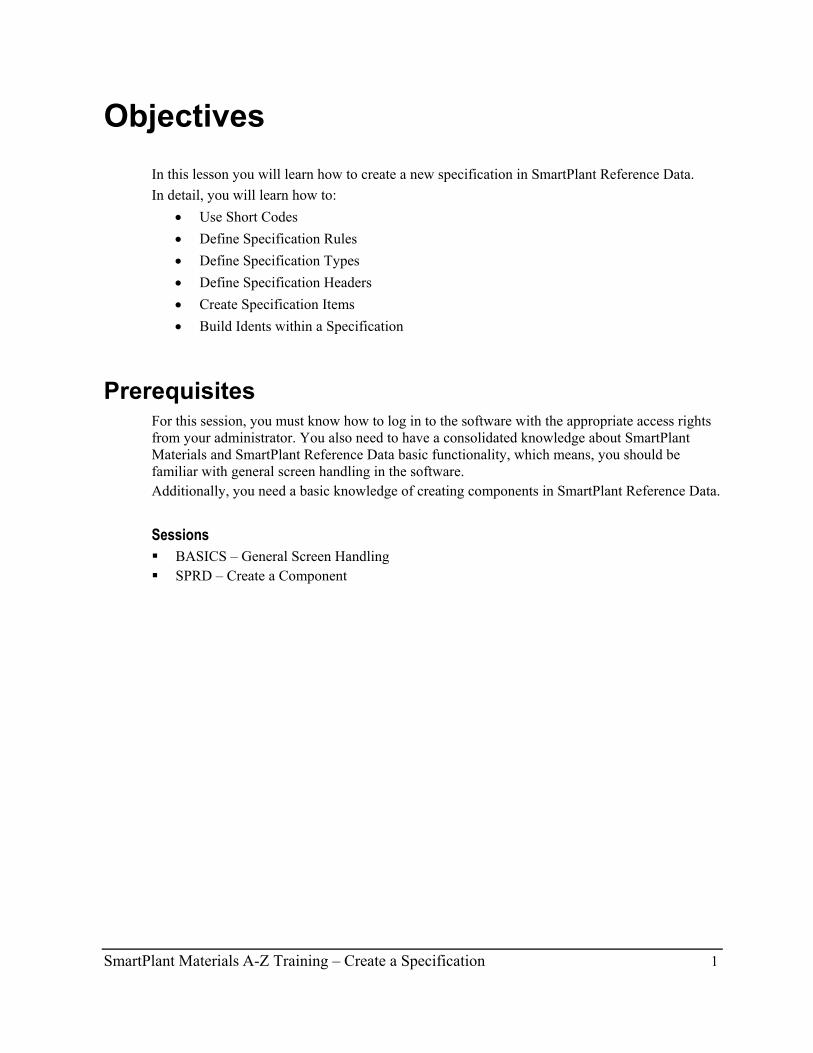
Overview This tutorial explains how to create a specification in SmartPlant Reference Data by means of a piping spec. During the tutorial you will create the specification TRAIN_1CS150 including its spec item and idents as shown below.
SmartPlant Materials A-Z Training – Create a Specification 3
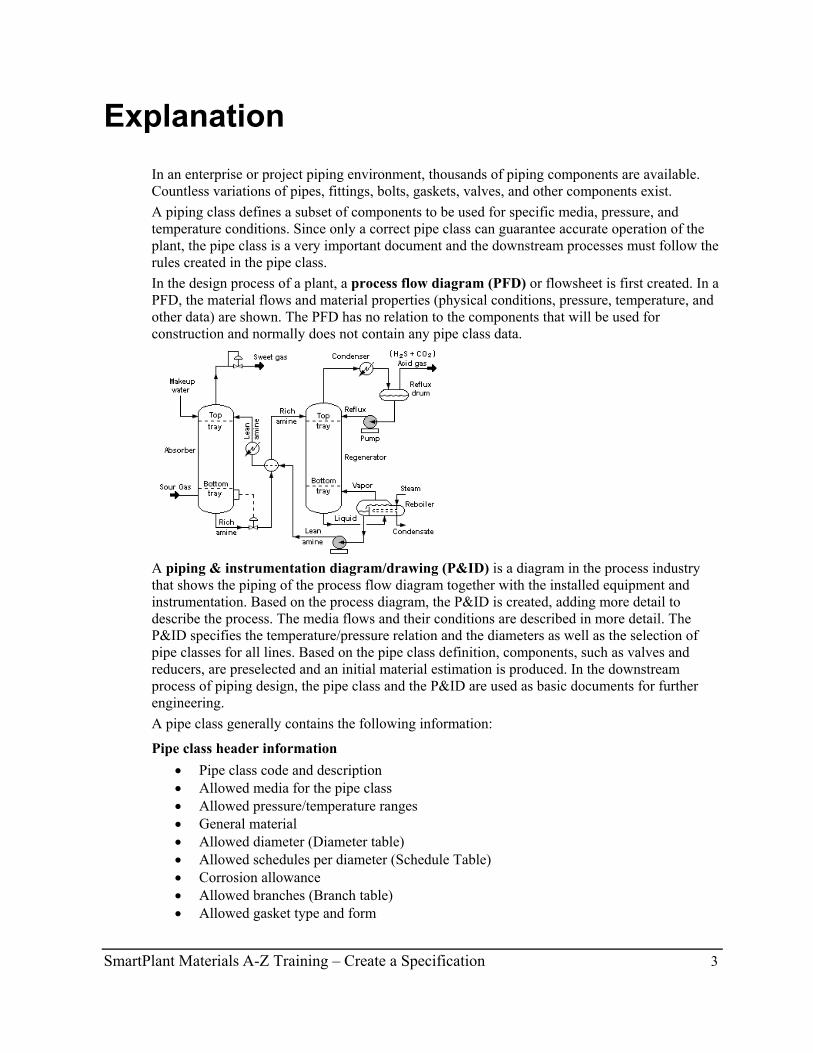
In an enterprise or project piping environment, thousands of piping components are available. Countless variations of pipes, fittings, bolts, gaskets, valves, and other components exist. A piping class defines a subset of components to be used for specific media, pressure, and temperature conditions. Since only a correct pipe class can guarantee accurate operation of the plant, the pipe class is a very important document and the downstream processes must follow the rules created in the pipe class. In the design process of a plant, a process flow diagram (PFD) or flowsheet is first created. In a PFD, the material flows and material properties (physical conditions, pressure, temperature, and other data) are shown. The PFD has no relation to the components that will be used for construction and normally does not contain any pipe class data.
A piping & instrumentation diagram/drawing (P&ID) is a diagram in the process industry that shows the piping of the process flow diagram together with the installed equipment and instrumentation. Based on the process diagram, the P&ID is created, adding more detail to describe the process. The media flows and their conditions are described in more detail. The P&ID specifies the temperature/pressure relation and the diameters as well as the selection of pipe classes for all lines. Based on the pipe class definition, components, such as valves and reducers, are preselected and an initial material estimation is produced. In the downstream process of piping design, the pipe class and the P&ID are used as basic documents for further engineering. A pipe class generally contains the following information:
Pipe class header information • Pipe class code and description • Allowed media for the pipe class • Allowed pressure/temperature ranges • General material • Allowed diameter (Diameter table) • Allowed schedules per diameter (Schedule Table) • Corrosion allowance • Allowed branches (Branch table) • Allowed gasket type and form
Explanation

Explanation
4 SmartPlant Materials A-Z Training – Create a Specification
• Special notes • Release index and revision index
Pipe class item information • Definition of components including commodity code and size range for allowed
component types
Pipe class ident information • The pipe class information ultimately defines a unique ident for each size and
specification item. Such an ident defined in a SmartPlant Reference Data pipe class is called a “Spec item ident.”
Pipe classes include components and general information created in SmartPlant Reference Data. You can create the pipe classes either in the product group (corporate standards) or at the project level. Pipe classes can be copied from the product group or other projects and can be modified for project use. Once created in the current project, they are independent from other projects and from the product group. Pipe classes in SmartPlant Reference Data/Materials are called Specifications; this functionality can also be used for other disciplines besides piping. You can find workflow diagrams showing the specification creation in SmartPlant Reference Data in the chapter below.

Explanation
SmartPlant Materials A-Z Training – Create a Specification 5
Workflow Diagrams
Explanation
6 SmartPlant Materials A-Z Training – Create a Specification
Explanation
SmartPlant Materials A-Z Training – Create a Specification 7
Short Codes The Short Code is a spec-independent abbreviation for spec materials.
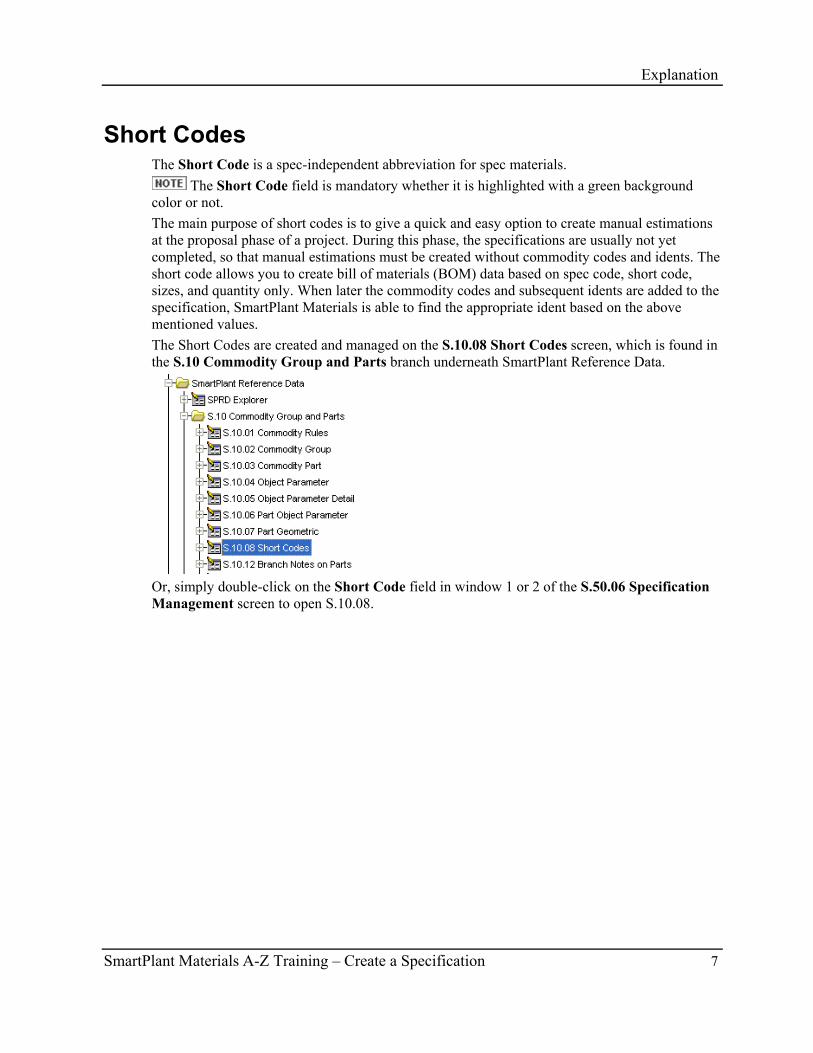
The Short Code field is mandatory whether it is highlighted with a green background color or not. The main purpose of short codes is to give a quick and easy option to create manual estimations at the proposal phase of a project. During this phase, the specifications are usually not yet completed, so that manual estimations must be created without commodity codes and idents. The short code allows you to create bill of materials (BOM) data based on spec code, short code, sizes, and quantity only. When later the commodity codes and subsequent idents are added to the specification, SmartPlant Materials is able to find the appropriate ident based on the above mentioned values. The Short Codes are created and managed on the S.10.08 Short Codes screen, which is found in the S.10 Commodity Group and Parts branch underneath SmartPlant Reference Data.
Or, simply double-click on the Short Code field in window 1 or 2 of the S.50.06 Specification Management screen to open S.10.08.
Explanation
8 SmartPlant Materials A-Z Training – Create a Specification
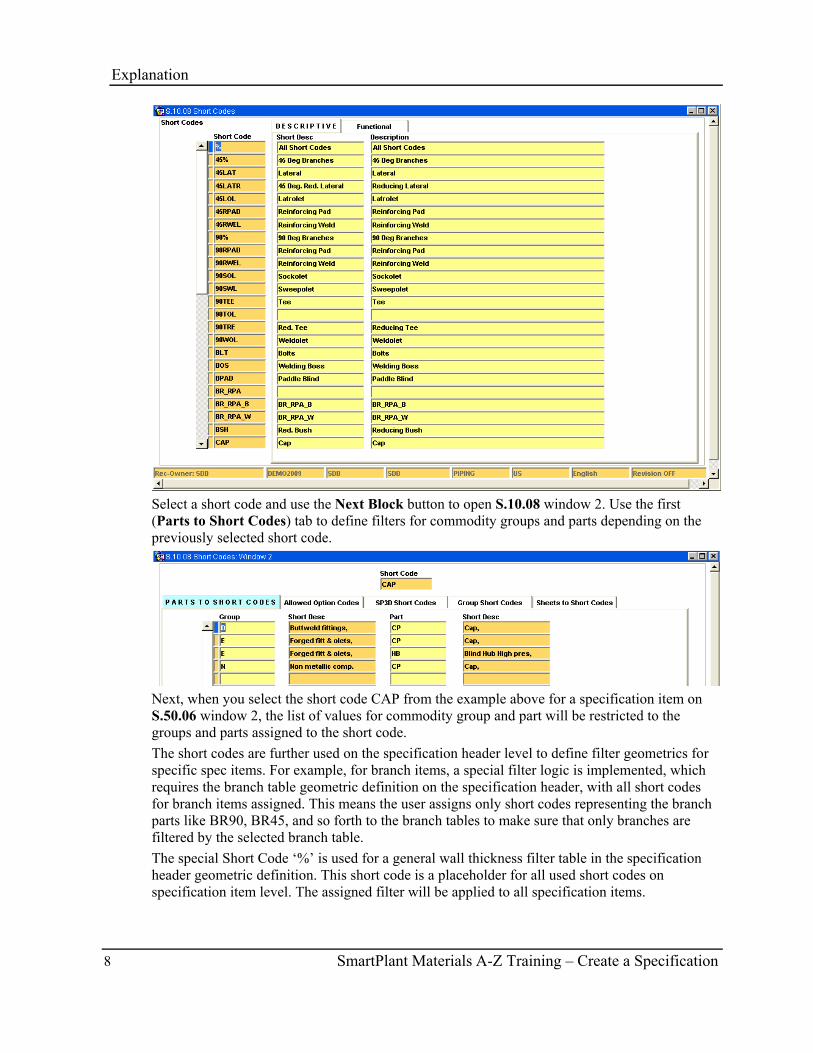
Select a short code and use the Next Block button to open S.10.08 window 2. Use the first (Parts to Short Codes) tab to define filters for commodity groups and parts depending on the previously selected short code.
Next, when you select the short code CAP from the example above for a specification item on S.50.06 window 2, the list of values for commodity group and part will be restricted to the groups and parts assigned to the short code. The short codes are further used on the specification header level to define filter geometrics for specific spec items. For example, for branch items, a special filter logic is implemented, which requires the branch table geometric definition on the specification header, with all short codes for branch items assigned. This means the user assigns only short codes representing the branch parts like BR90, BR45, and so forth to the branch tables to make sure that only branches are filtered by the selected branch table. The special Short Code ‘%’ is used for a general wall thickness filter table in the specification header geometric definition. This short code is a placeholder for all used short codes on specification item level. The assigned filter will be applied to all specification items.
Explanation
SmartPlant Materials A-Z Training – Create a Specification 9
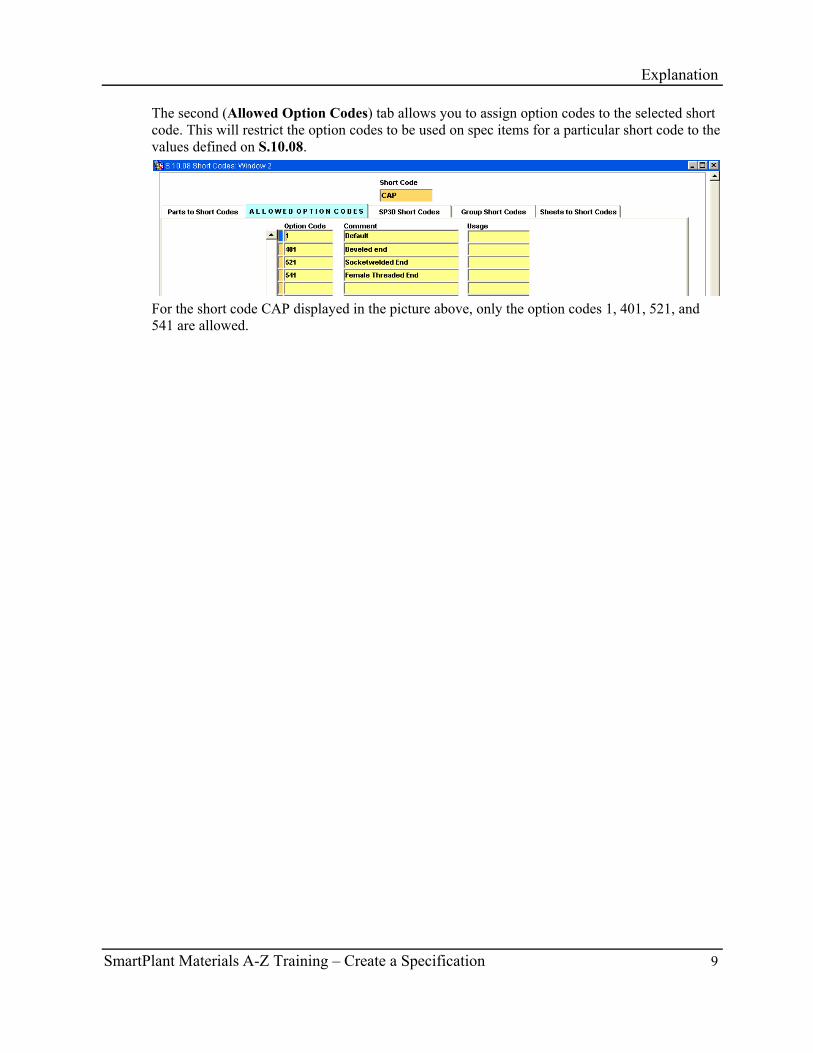
The second (Allowed Option Codes) tab allows you to assign option codes to the selected short code. This will restrict the option codes to be used on spec items for a particular short code to the values defined on S.10.08.
For the short code CAP displayed in the picture above, only the option codes 1, 401, 521, and 541 are allowed.
Explanation
10 SmartPlant Materials A-Z Training – Create a Specification
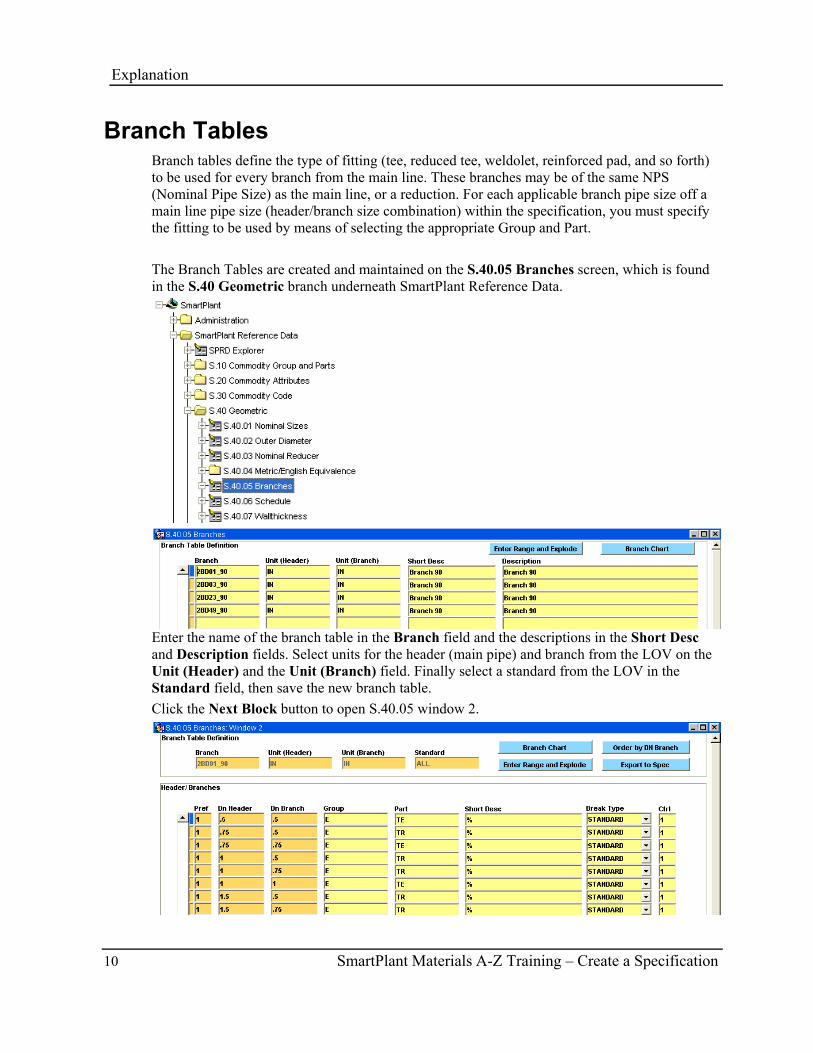
Branch Tables Branch tables define the type of fitting (tee, reduced tee, weldolet, reinforced pad, and so forth) to be used for every branch from the main line. These branches may be of the same NPS (Nominal Pipe Size) as the main line, or a reduction. For each applicable branch pipe size off a main line pipe size (header/branch size combination) within the specification, you must specify the fitting to be used by means of selecting the appropriate Group and Part. The Branch Tables are created and maintained on the S.40.05 Branches screen, which is found in the S.40 Geometric branch underneath SmartPlant Reference Data.
Enter the name of the branch table in the Branch field and the descriptions in the Short Desc and Description fields. Select units for the header (main pipe) and branch from the LOV on the Unit (Header) and the Unit (Branch) field. Finally select a standard from the LOV in the Standard field, then save the new branch table. Click the Next Block button to open S.40.05 window 2.
Explanation
SmartPlant Materials A-Z Training – Create a Specification 11
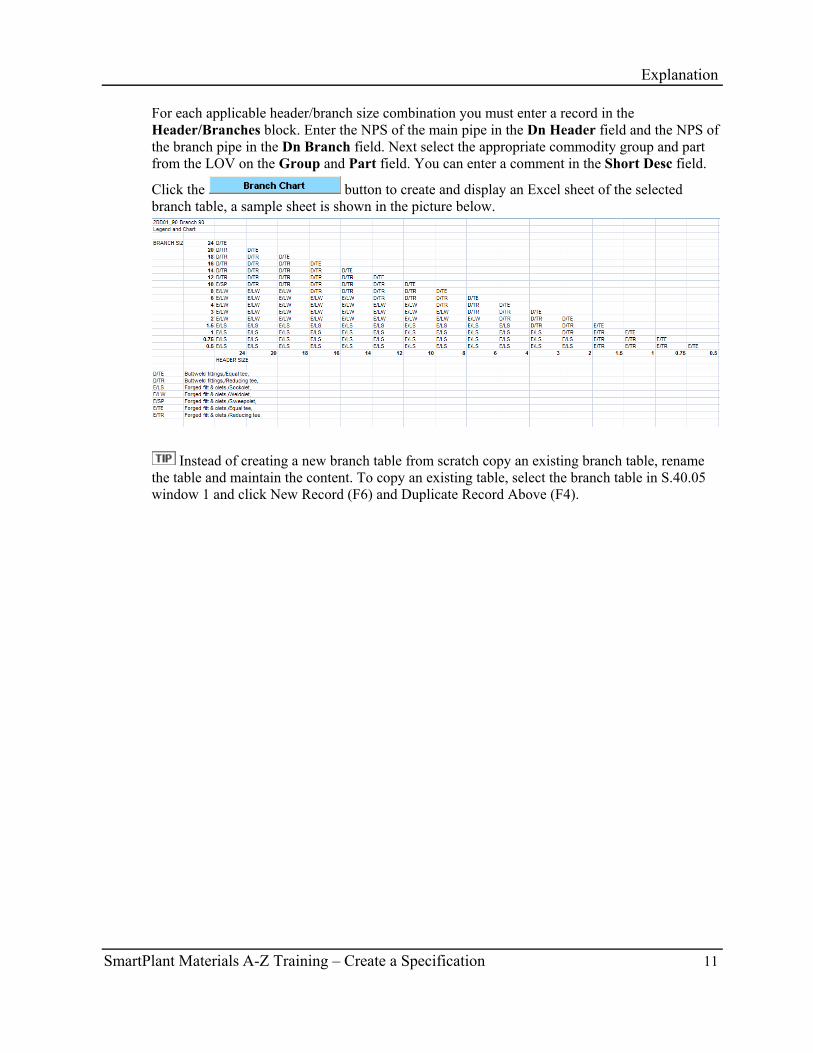
For each applicable header/branch size combination you must enter a record in the Header/Branches block. Enter the NPS of the main pipe in the Dn Header field and the NPS of the branch pipe in the Dn Branch field. Next select the appropriate commodity group and part from the LOV on the Group and Part field. You can enter a comment in the Short Desc field.
Click the button to create and display an Excel sheet of the selected branch table, a sample sheet is shown in the picture below.
Instead of creating a new branch table from scratch copy an existing branch table, rename the table and maintain the content. To copy an existing table, select the branch table in S.40.05 window 1 and click New Record (F6) and Duplicate Record Above (F4).
Explanation
12 SmartPlant Materials A-Z Training – Create a Specification
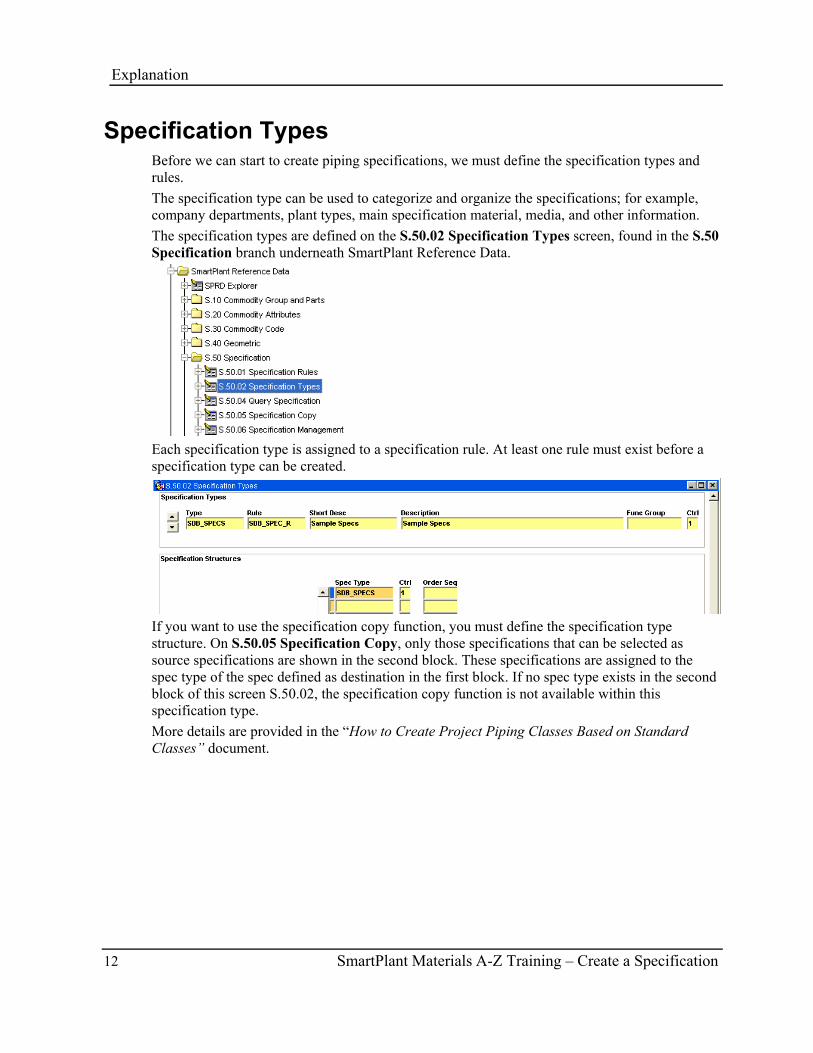
Specification Types Before we can start to create piping specifications, we must define the specification types and rules. The specification type can be used to categorize and organize the specifications; for example, company departments, plant types, main specification material, media, and other information. The specification types are defined on the S.50.02 Specification Types screen, found in the S.50 Specification branch underneath SmartPlant Reference Data.
Each specification type is assigned to a specification rule. At least one rule must exist before a specification type can be created.
If you want to use the specification copy function, you must define the specification type structure. On S.50.05 Specification Copy, only those specifications that can be selected as source specifications are shown in the second block. These specifications are assigned to the spec type of the spec defined as destination in the first block. If no spec type exists in the second block of this screen S.50.02, the specification copy function is not available within this specification type. More details are provided in the “How to Create Project Piping Classes Based on Standard Classes” document.
Explanation
SmartPlant Materials A-Z Training – Create a Specification 13
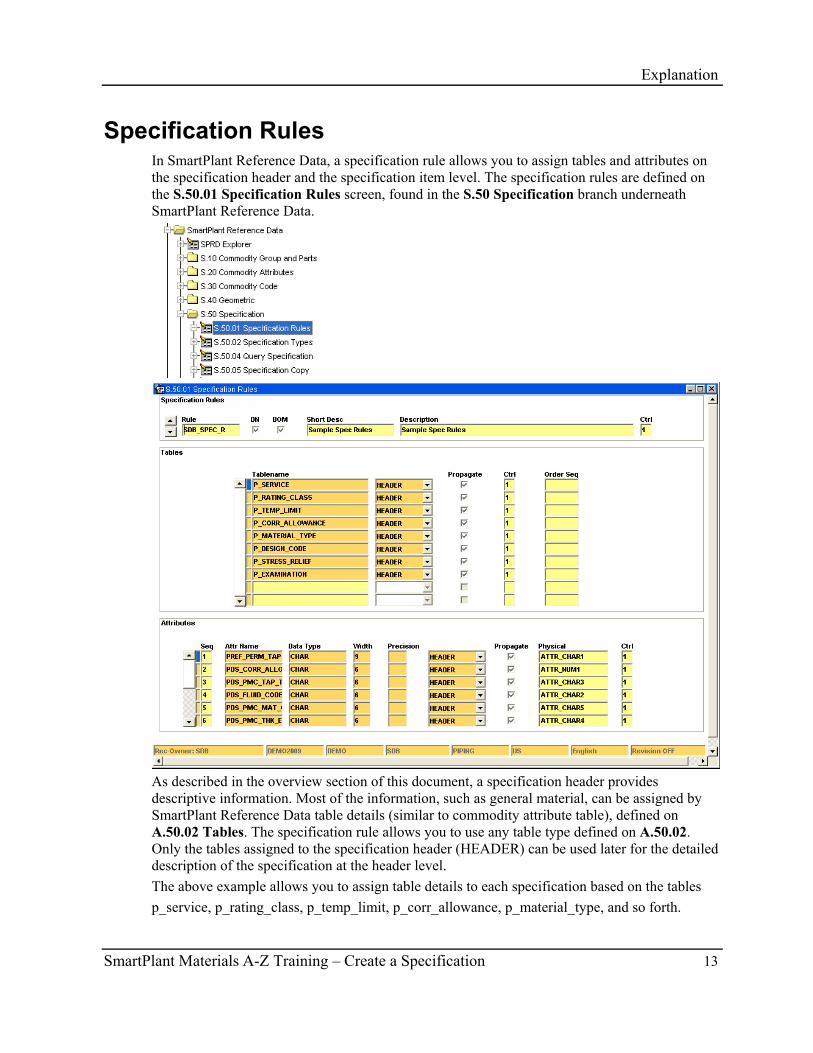
Specification Rules In SmartPlant Reference Data, a specification rule allows you to assign tables and attributes on the specification header and the specification item level. The specification rules are defined on the S.50.01 Specification Rules screen, found in the S.50 Specification branch underneath SmartPlant Reference Data.
As described in the overview section of this document, a specification header provides descriptive information. Most of the information, such as general material, can be assigned by SmartPlant Reference Data table details (similar to commodity attribute table), defined on A.50.02 Tables. The specification rule allows you to use any table type defined on A.50.02. Only the tables assigned to the specification header (HEADER) can be used later for the detailed description of the specification at the header level. The above example allows you to assign table details to each specification based on the tables p_service, p_rating_class, p_temp_limit, p_corr_allowance, p_material_type, and so forth.
Explanation
14 SmartPlant Materials A-Z Training – Create a Specification
In the third (Attributes) block of screen S.50.01, attributes are assigned to the specification header and specification line items. Both types of assignments are used for further documentation, reports, or for CIP execution in downstream SmartPlant Materials modules. There is one special attribute that can be assigned to the spec items, the hard-coded attribute “ASS_NO.” which is used for the creation of spec-dependent assemblies. For the details of defining assemblies in a spec read the “How to Define Assemblies” (BP-A1-SPRD How to define Assemblies.pdf) document, available on the Printable Guides page in the software.
Explanation
SmartPlant Materials A-Z Training – Create a Specification 15
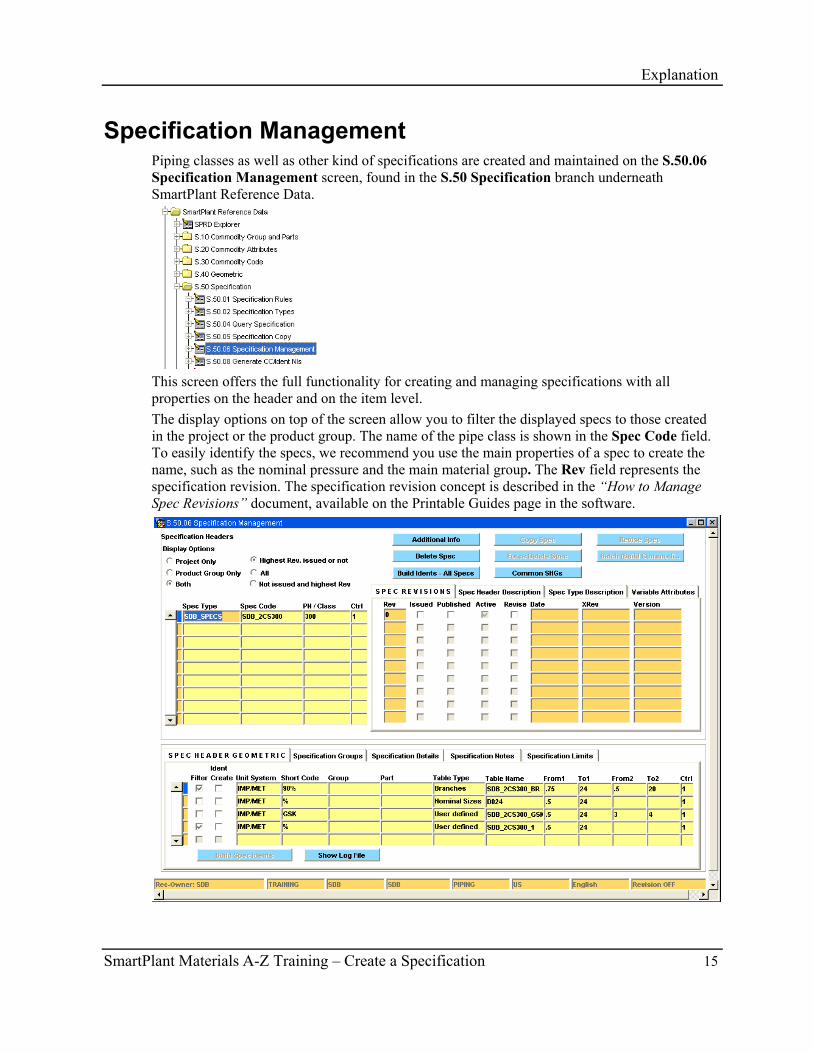
Specification Management Piping classes as well as other kind of specifications are created and maintained on the S.50.06 Specification Management screen, found in the S.50 Specification branch underneath SmartPlant Reference Data.
This screen offers the full functionality for creating and managing specifications with all properties on the header and on the item level. The display options on top of the screen allow you to filter the displayed specs to those created in the project or the product group. The name of the pipe class is shown in the Spec Code field. To easily identify the specs, we recommend you use the main properties of a spec to create the name, such as the nominal pressure and the main material group. The Rev field represents the specification revision. The specification revision concept is described in the “How to Manage Spec Revisions” document, available on the Printable Guides page in the software.

Explanation
16 SmartPlant Materials A-Z Training – Create a Specification
In the right section of the first block, tab folders are available for spec header information. The spec revision and status information can be entered on the Spec Revisions tab. The short description and description of the spec can be entered on the Spec Header Description tab. The Spec Type Description tab shows the corresponding spec type descriptions. The last tab, Variable Attributes, shows the attributes that are assigned to the spec header, pre-defined with the associated spec rule as described above. On that tab, you can enter attribute values to describe these properties for the selected spec. In the lower block of the screen, you can find the following tab folders: Spec Header Geometric Here you assign different types of geometrics to the specification. Branch tables are used to define the branch parts for particular pipe size combinations. You can assign filter tables to filter the idents to be included in the spec. Other tables can be used for additional documentation issues. The ident filtering will be described in more detail later in this exercise.
Specification Groups and Specification Details The Specification Groups and Specification Details tabs allow you to select properties based on available table names on S.50.01. The table groups and details can be used to classify the detail information of the table. For example, a table “MATERIAL” can be classified into groups such as “Stainless Steel,” “Carbon Steel,” “plastics,” and others.
These definitions are used exclusively for documentation. There are no standard
downstream processes in SmartPlant Materials that use these values or view them. You can use these values in reports and CIPs if needed.
Explanation
SmartPlant Materials A-Z Training – Create a Specification 17
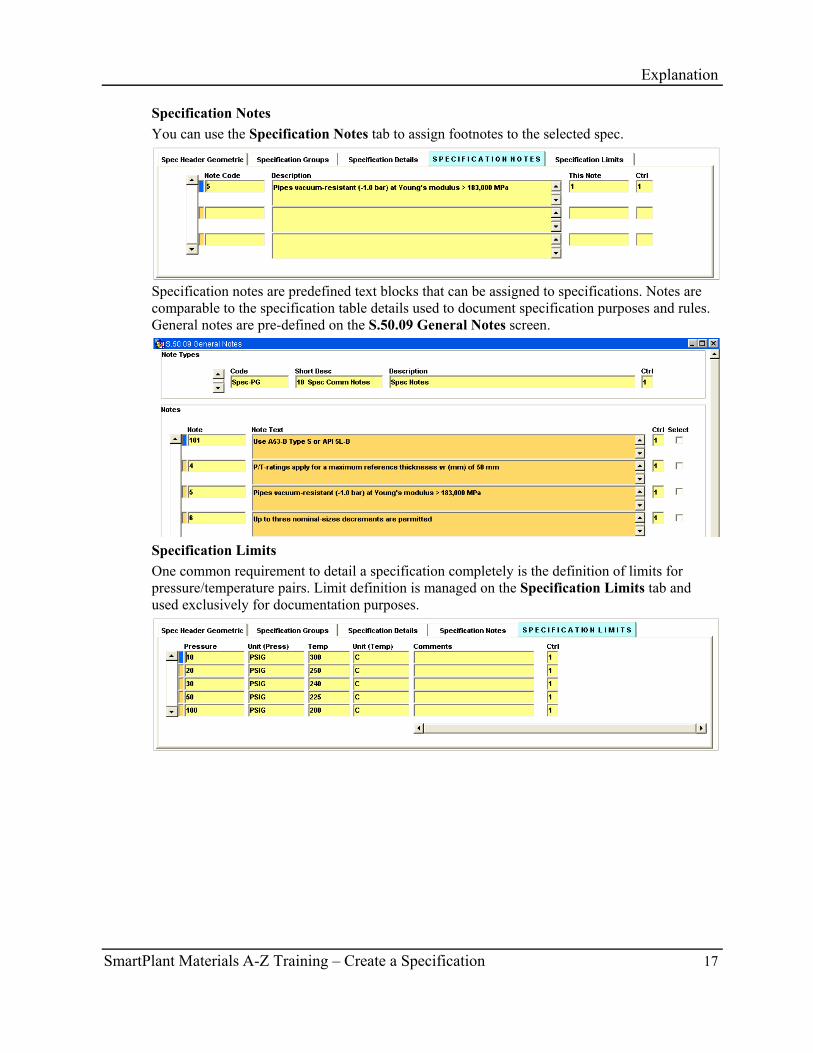
Specification Notes You can use the Specification Notes tab to assign footnotes to the selected spec.
Specification notes are predefined text blocks that can be assigned to specifications. Notes are comparable to the specification table details used to document specification purposes and rules. General notes are pre-defined on the S.50.09 General Notes screen.
Specification Limits One common requirement to detail a specification completely is the definition of limits for pressure/temperature pairs. Limit definition is managed on the Specification Limits tab and used exclusively for documentation purposes.
Explanation
18 SmartPlant Materials A-Z Training – Create a Specification
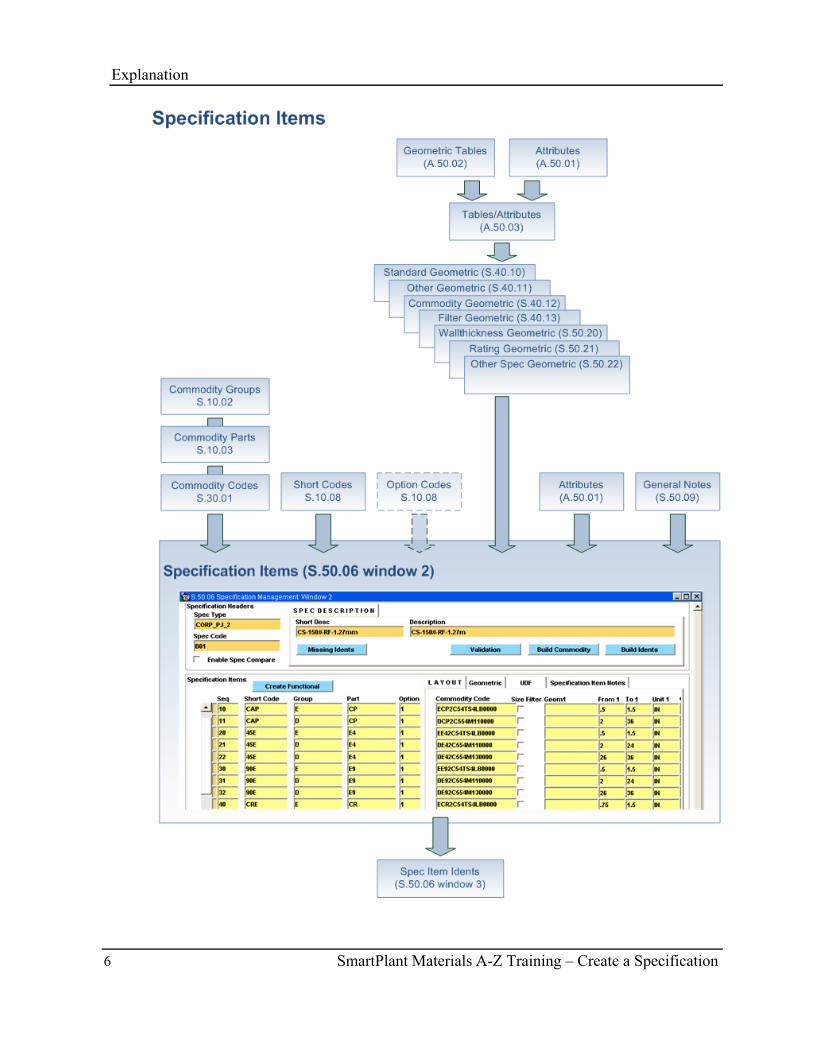
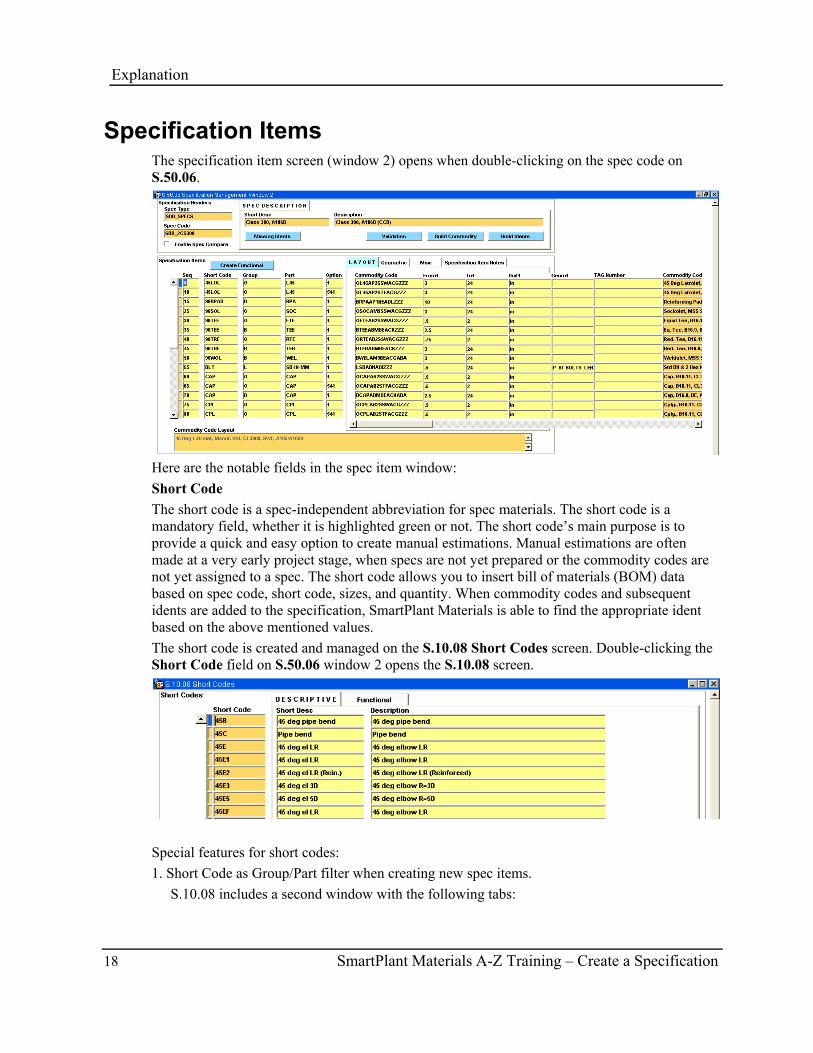
Specification Items The specification item screen (window 2) opens when double-clicking on the spec code on S.50.06.
Here are the notable fields in the spec item window: Short Code The short code is a spec-independent abbreviation for spec materials. The short code is a mandatory field, whether it is highlighted green or not. The short code’s main purpose is to provide a quick and easy option to create manual estimations. Manual estimations are often made at a very early project stage, when specs are not yet prepared or the commodity codes are not yet assigned to a spec. The short code allows you to insert bill of materials (BOM) data based on spec code, short code, sizes, and quantity. When commodity codes and subsequent idents are added to the specification, SmartPlant Materials is able to find the appropriate ident based on the above mentioned values. The short code is created and managed on the S.10.08 Short Codes screen. Double-clicking the Short Code field on S.50.06 window 2 opens the S.10.08 screen.
Special features for short codes: 1. Short Code as Group/Part filter when creating new spec items.
S.10.08 includes a second window with the following tabs:
Explanation
SmartPlant Materials A-Z Training – Create a Specification 19
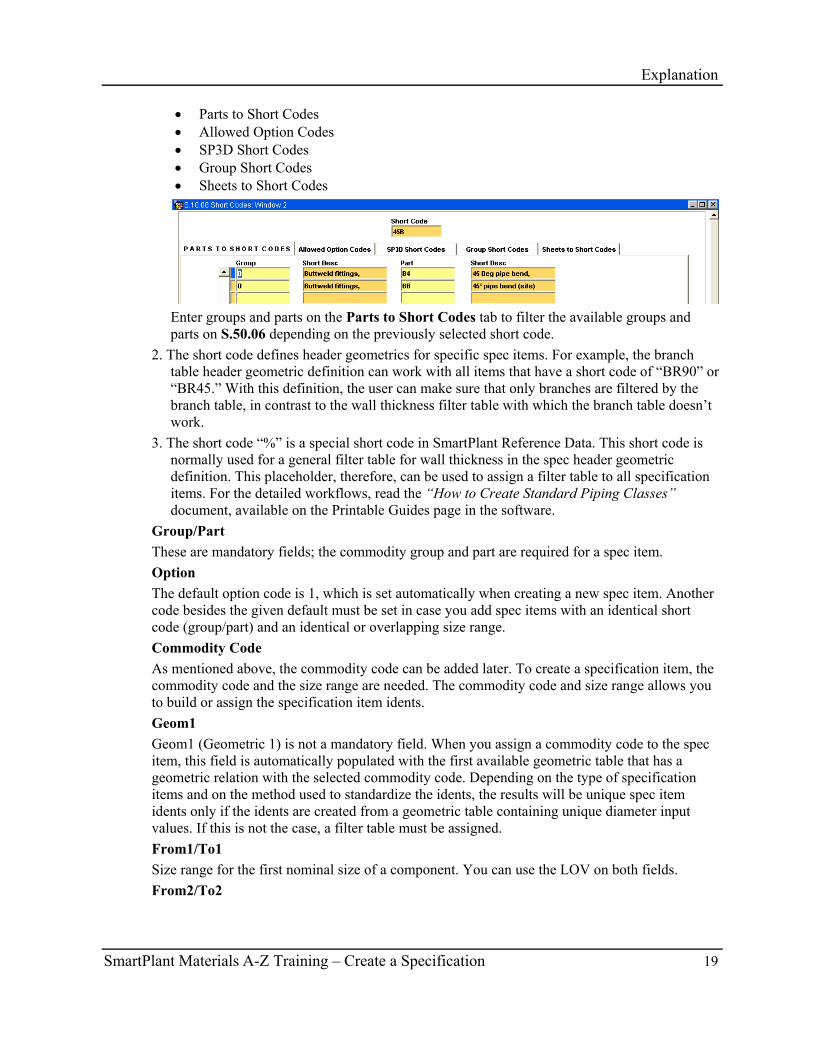
• Parts to Short Codes • Allowed Option Codes • SP3D Short Codes • Group Short Codes • Sheets to Short Codes
Enter groups and parts on the Parts to Short Codes tab to filter the available groups and parts on S.50.06 depending on the previously selected short code.
2. The short code defines header geometrics for specific spec items. For example, the branch table header geometric definition can work with all items that have a short code of “BR90” or “BR45.” With this definition, the user can make sure that only branches are filtered by the branch table, in contrast to the wall thickness filter table with which the branch table doesn’t work.
3. The short code “%” is a special short code in SmartPlant Reference Data. This short code is normally used for a general filter table for wall thickness in the spec header geometric definition. This placeholder, therefore, can be used to assign a filter table to all specification items. For the detailed workflows, read the “How to Create Standard Piping Classes” document, available on the Printable Guides page in the software.
Group/Part These are mandatory fields; the commodity group and part are required for a spec item. Option The default option code is 1, which is set automatically when creating a new spec item. Another code besides the given default must be set in case you add spec items with an identical short code (group/part) and an identical or overlapping size range. Commodity Code As mentioned above, the commodity code can be added later. To create a specification item, the commodity code and the size range are needed. The commodity code and size range allows you to build or assign the specification item idents. Geom1 Geom1 (Geometric 1) is not a mandatory field. When you assign a commodity code to the spec item, this field is automatically populated with the first available geometric table that has a geometric relation with the selected commodity code. Depending on the type of specification items and on the method used to standardize the idents, the results will be unique spec item idents only if the idents are created from a geometric table containing unique diameter input values. If this is not the case, a filter table must be assigned. From1/To1 Size range for the first nominal size of a component. You can use the LOV on both fields. From2/To2
Explanation
20 SmartPlant Materials A-Z Training – Create a Specification
Size range for the second nominal size of a component. This field only has to be filled in very rare cases such as for nipples and weldolets. In all other cases, the component is used for all size2 sizes depending on the assigned filter or ident table.
Explanation
SmartPlant Materials A-Z Training – Create a Specification 21
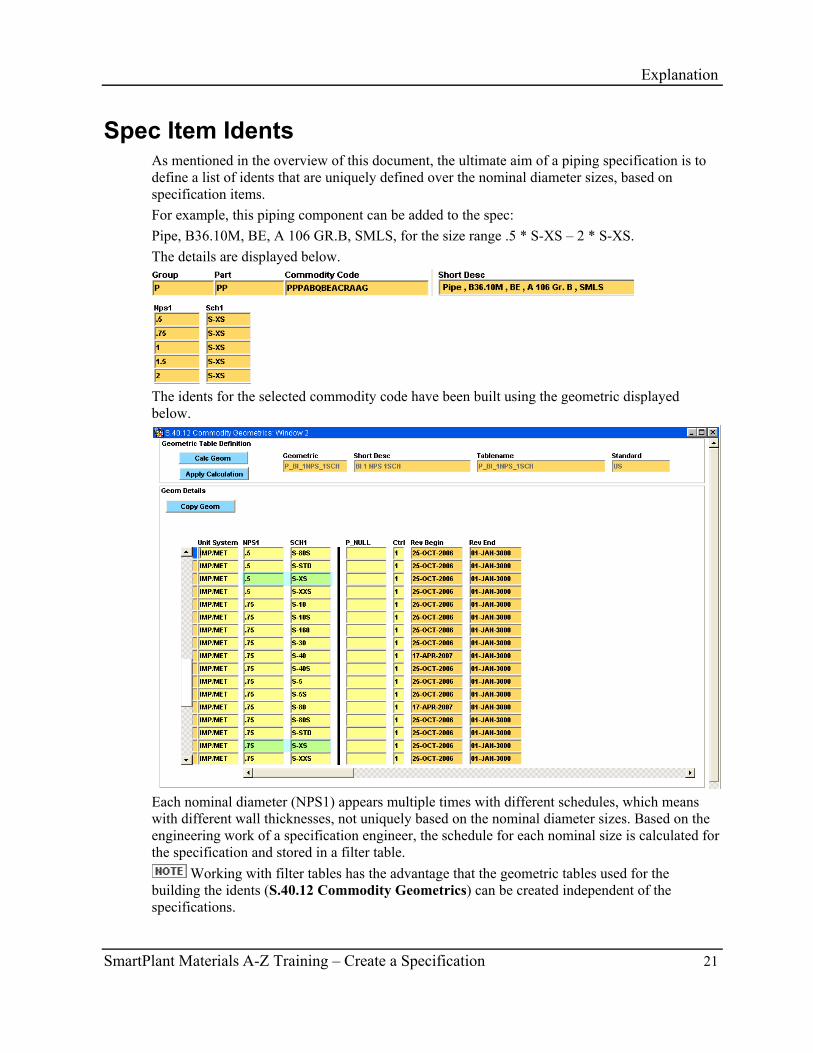
Spec Item Idents As mentioned in the overview of this document, the ultimate aim of a piping specification is to define a list of idents that are uniquely defined over the nominal diameter sizes, based on specification items. For example, this piping component can be added to the spec: Pipe, B36.10M, BE, A 106 GR.B, SMLS, for the size range .5 * S-XS – 2 * S-XS. The details are displayed below.
The idents for the selected commodity code have been built using the geometric displayed below.
Each nominal diameter (NPS1) appears multiple times with different schedules, which means with different wall thicknesses, not uniquely based on the nominal diameter sizes. Based on the engineering work of a specification engineer, the schedule for each nominal size is calculated for the specification and stored in a filter table.
Working with filter tables has the advantage that the geometric tables used for the building the idents (S.40.12 Commodity Geometrics) can be created independent of the specifications.
Explanation
22 SmartPlant Materials A-Z Training – Create a Specification
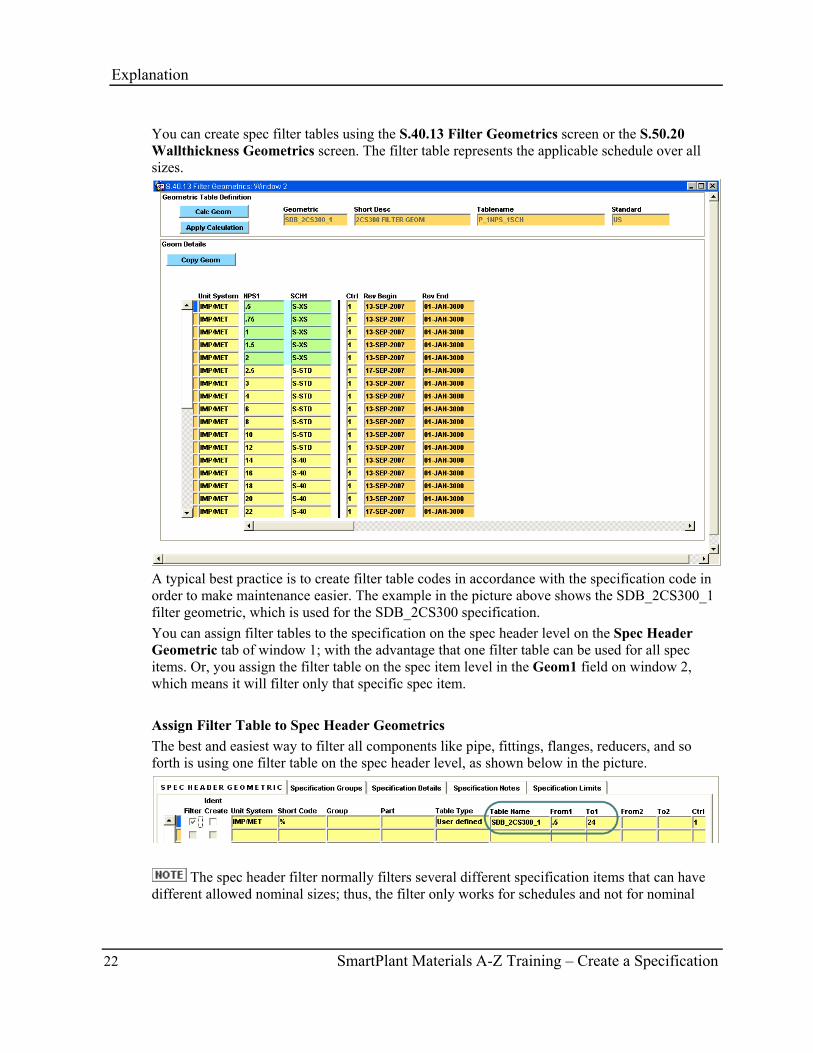
You can create spec filter tables using the S.40.13 Filter Geometrics screen or the S.50.20 Wallthickness Geometrics screen. The filter table represents the applicable schedule over all sizes.
A typical best practice is to create filter table codes in accordance with the specification code in order to make maintenance easier. The example in the picture above shows the SDB_2CS300_1 filter geometric, which is used for the SDB_2CS300 specification. You can assign filter tables to the specification on the spec header level on the Spec Header Geometric tab of window 1; with the advantage that one filter table can be used for all spec items. Or, you assign the filter table on the spec item level in the Geom1 field on window 2, which means it will filter only that specific spec item. Assign Filter Table to Spec Header Geometrics The best and easiest way to filter all components like pipe, fittings, flanges, reducers, and so forth is using one filter table on the spec header level, as shown below in the picture.
The spec header filter normally filters several different specification items that can have different allowed nominal sizes; thus, the filter only works for schedules and not for nominal
Explanation
SmartPlant Materials A-Z Training – Create a Specification 23
sizes. If nominal size and schedule filtering are required for a component, the filter table must be assigned on the spec item. Check the Filter indicator for the filter table defined in spec header geometrics. With the assigned short code %, all spec items will be filtered using this filter table.
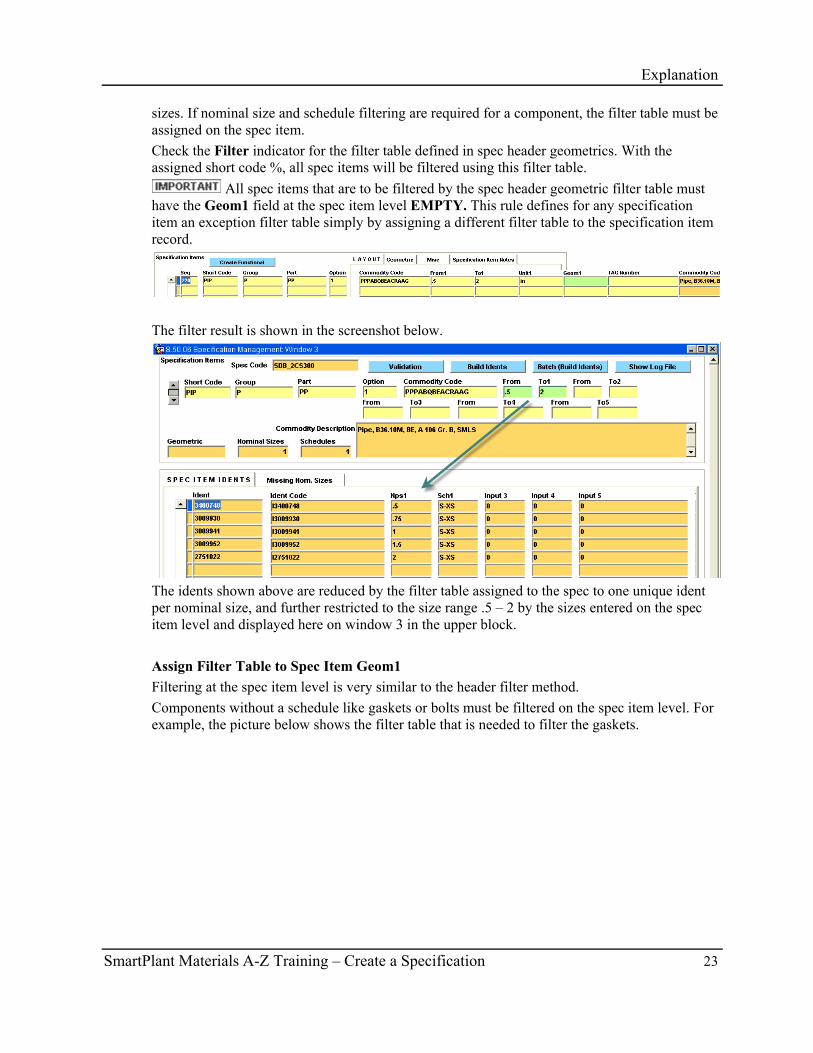
All spec items that are to be filtered by the spec header geometric filter table must have the Geom1 field at the spec item level EMPTY. This rule defines for any specification item an exception filter table simply by assigning a different filter table to the specification item record.
The filter result is shown in the screenshot below.
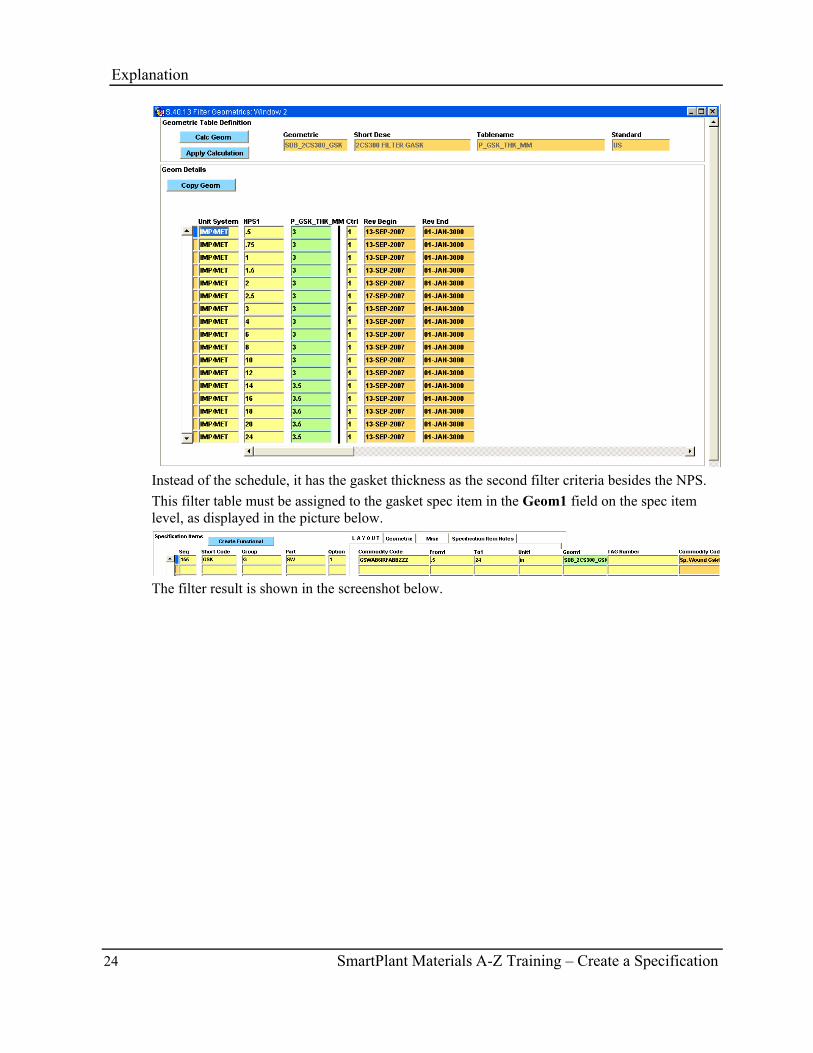
The idents shown above are reduced by the filter table assigned to the spec to one unique ident per nominal size, and further restricted to the size range .5 – 2 by the sizes entered on the spec item level and displayed here on window 3 in the upper block. Assign Filter Table to Spec Item Geom1 Filtering at the spec item level is very similar to the header filter method. Components without a schedule like gaskets or bolts must be filtered on the spec item level. For example, the picture below shows the filter table that is needed to filter the gaskets.
Explanation
24 SmartPlant Materials A-Z Training – Create a Specification
Instead of the schedule, it has the gasket thickness as the second filter criteria besides the NPS. This filter table must be assigned to the gasket spec item in the Geom1 field on the spec item level, as displayed in the picture below.
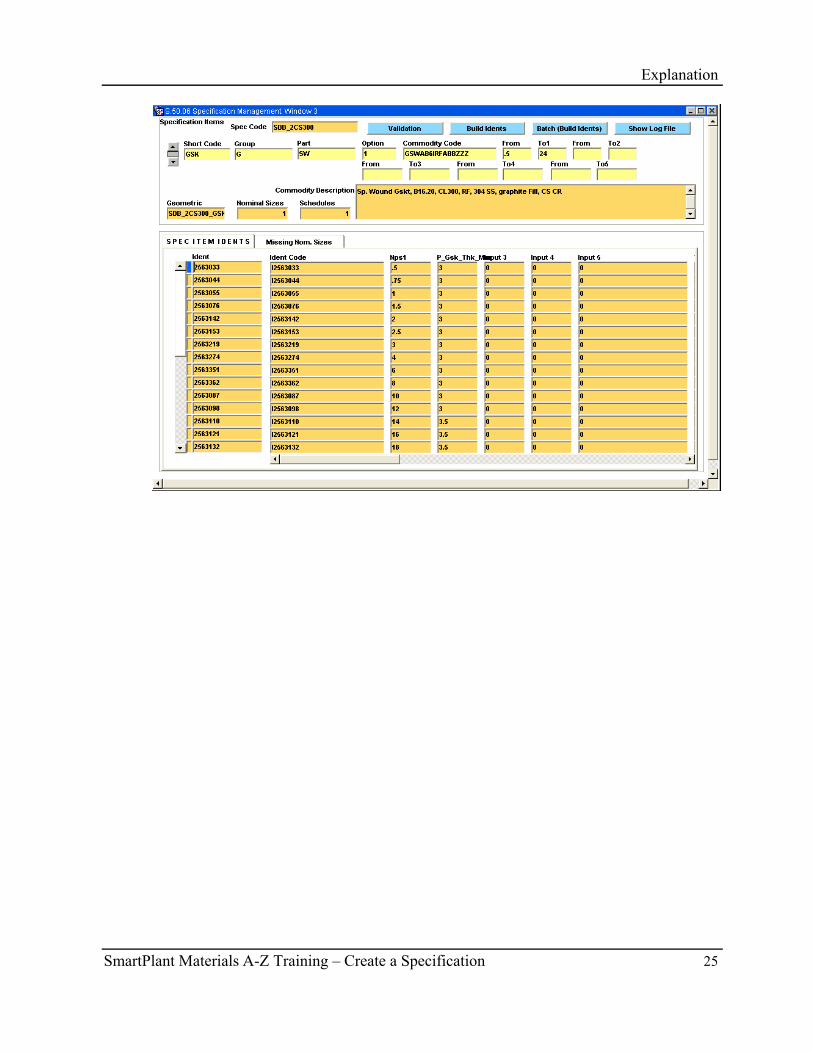
The filter result is shown in the screenshot below.
Explanation
SmartPlant Materials A-Z Training – Create a Specification 25

SmartPlant Materials A-Z Training – Create a Specification 27
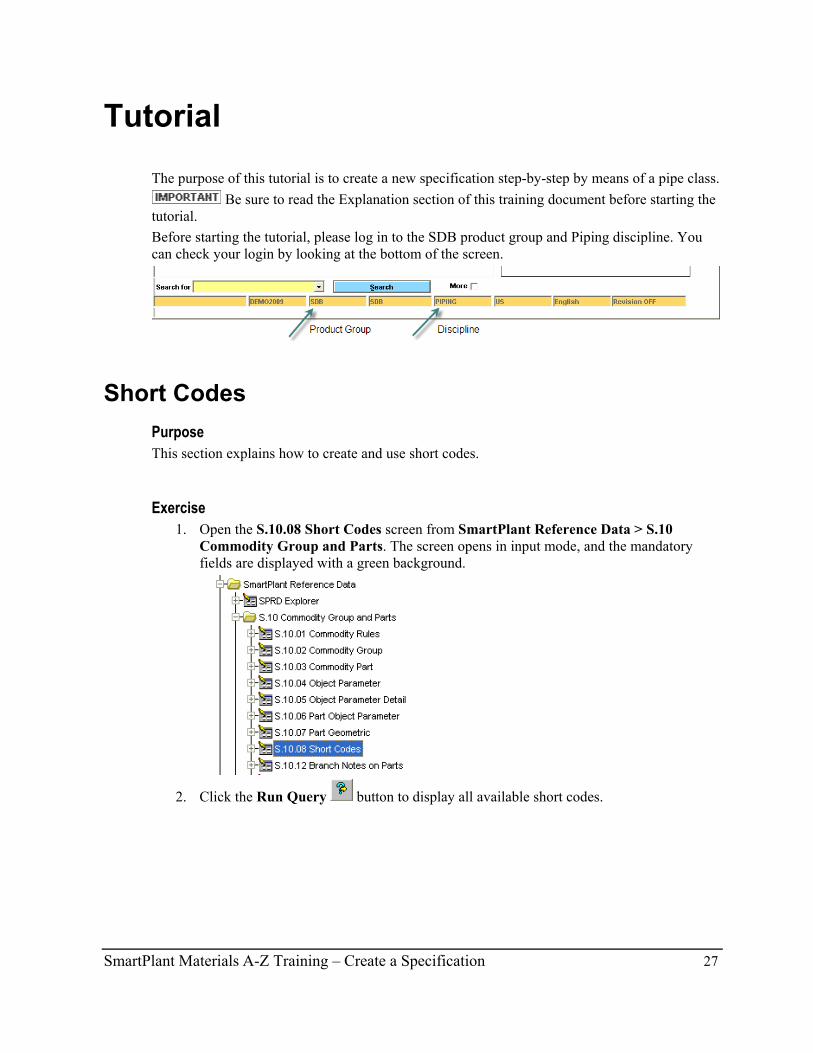
The purpose of this tutorial is to create a new specification step-by-step by means of a pipe class. Be sure to read the Explanation section of this training document before starting the
tutorial. Before starting the tutorial, please log in to the SDB product group and Piping discipline. You can check your login by looking at the bottom of the screen.
Short Codes Purpose This section explains how to create and use short codes.
Exercise 1. Open the S.10.08 Short Codes screen from SmartPlant Reference Data > S.10
Commodity Group and Parts. The screen opens in input mode, and the mandatory fields are displayed with a green background.
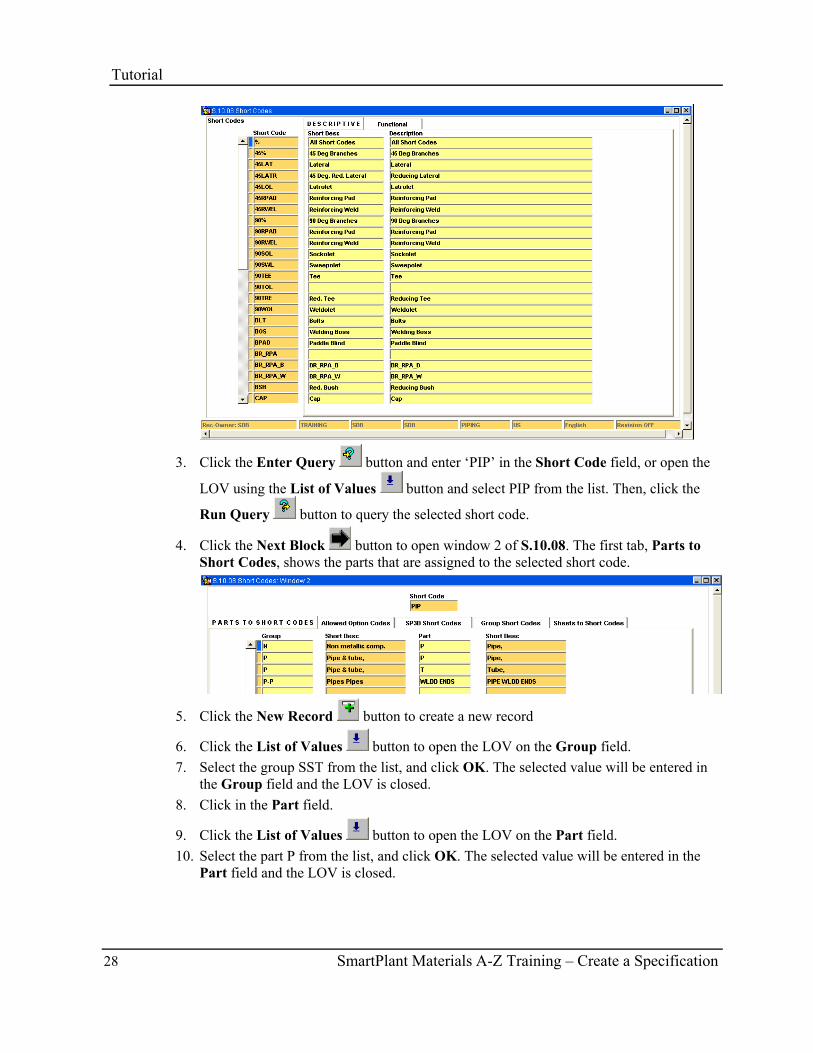
2. Click the Run Query button to display all available short codes.
Tutorial
Tutorial
28 SmartPlant Materials A-Z Training – Create a Specification
3. Click the Enter Query button and enter ‘PIP’ in the Short Code field, or open the
LOV using the List of Values button and select PIP from the list. Then, click the
Run Query button to query the selected short code.
4. Click the Next Block button to open window 2 of S.10.08. The first tab, Parts to Short Codes, shows the parts that are assigned to the selected short code.
5. Click the New Record button to create a new record
6. Click the List of Values button to open the LOV on the Group field. 7. Select the group SST from the list, and click OK. The selected value will be entered in
the Group field and the LOV is closed. 8. Click in the Part field.
9. Click the List of Values button to open the LOV on the Part field. 10. Select the part P from the list, and click OK. The selected value will be entered in the
Part field and the LOV is closed.
Tutorial
SmartPlant Materials A-Z Training – Create a Specification 29
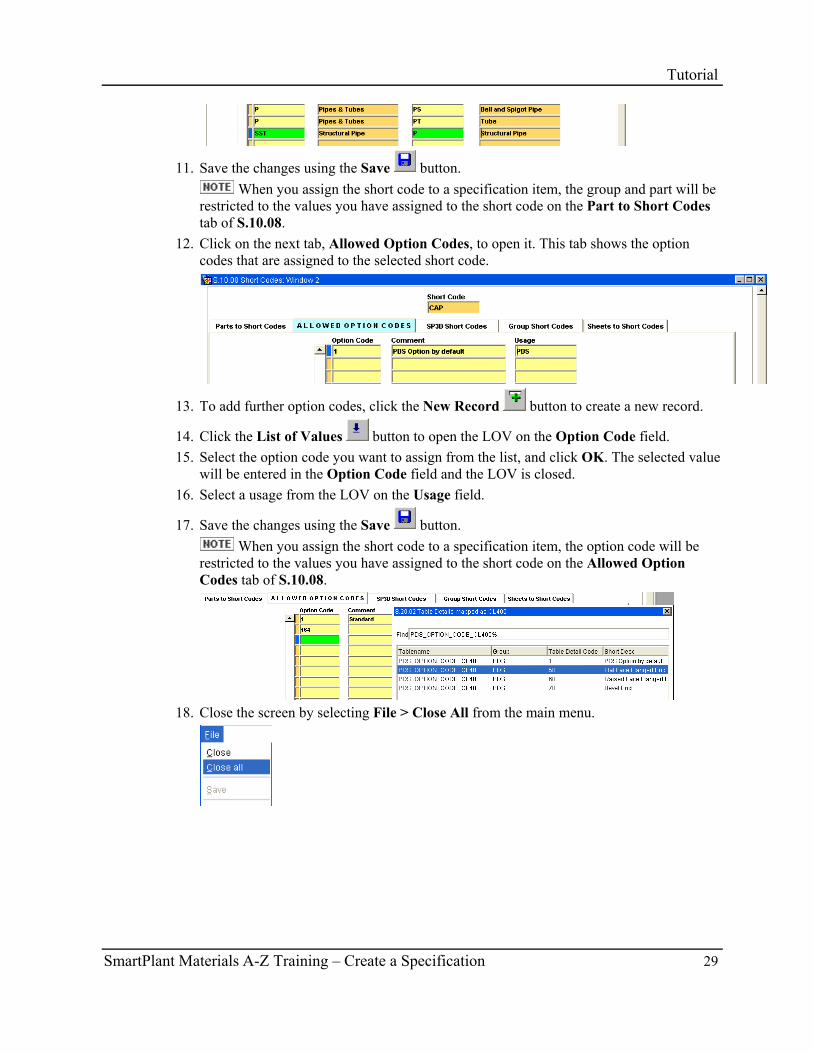
11. Save the changes using the Save button. When you assign the short code to a specification item, the group and part will be
restricted to the values you have assigned to the short code on the Part to Short Codes tab of S.10.08.
12. Click on the next tab, Allowed Option Codes, to open it. This tab shows the option codes that are assigned to the selected short code.
13. To add further option codes, click the New Record button to create a new record.
14. Click the List of Values button to open the LOV on the Option Code field. 15. Select the option code you want to assign from the list, and click OK. The selected value
will be entered in the Option Code field and the LOV is closed. 16. Select a usage from the LOV on the Usage field.
17. Save the changes using the Save button. When you assign the short code to a specification item, the option code will be
restricted to the values you have assigned to the short code on the Allowed Option Codes tab of S.10.08.
18. Close the screen by selecting File > Close All from the main menu.
Tutorial
30 SmartPlant Materials A-Z Training – Create a Specification
Specification Types Purpose This section explains how to define specification types. The specification types are needed to categorize and organize specifications. To use the Copy Specification functionality on the S.50.05 Copy Specifications screen, you must define a specification structure.
Exercise 1. Open the S.50.02 Specification Types screen from SmartPlant Reference Data > S.50
Specification. The screen opens in input mode, and the mandatory fields are displayed with a green background.
2. Click the Run Query button to display the available specification types.
3. Use the scrollbar on the left of the first block or the Go to previous record/Go to next
record buttons on the toolbar to navigate through the existing records.
4. To create a new record, click the New Record button on the toolbar. 5. Enter the new specification type, SDB_TRAIN, in the Type field, and use the Tab key
to jump to the next field.
6. Open the LOV using the List of Values button on the toolbar. Select the rule SDB_SPEC_R from the list, and click OK. The selected value will be entered in the Rule field and the LOV is closed.
7. Enter descriptions for the new type in the Short Desc and Description fields.
8. Click the Save button to save the new specification type. 9. Click in the Spec Type field in the second (Specification Structures) block.
Tutorial
SmartPlant Materials A-Z Training – Create a Specification 31
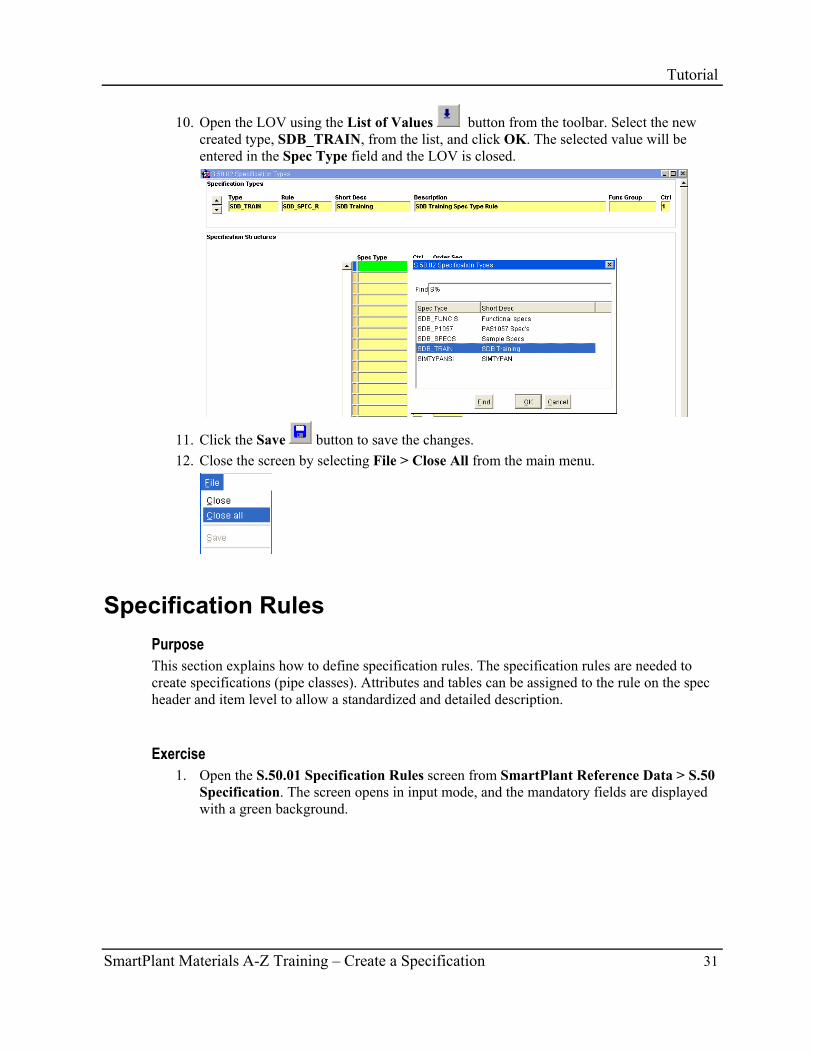
10. Open the LOV using the List of Values button from the toolbar. Select the new created type, SDB_TRAIN, from the list, and click OK. The selected value will be entered in the Spec Type field and the LOV is closed.
11. Click the Save button to save the changes. 12. Close the screen by selecting File > Close All from the main menu.
Specification Rules Purpose This section explains how to define specification rules. The specification rules are needed to create specifications (pipe classes). Attributes and tables can be assigned to the rule on the spec header and item level to allow a standardized and detailed description.
Exercise 1. Open the S.50.01 Specification Rules screen from SmartPlant Reference Data > S.50
Specification. The screen opens in input mode, and the mandatory fields are displayed with a green background.
Tutorial
32 SmartPlant Materials A-Z Training – Create a Specification
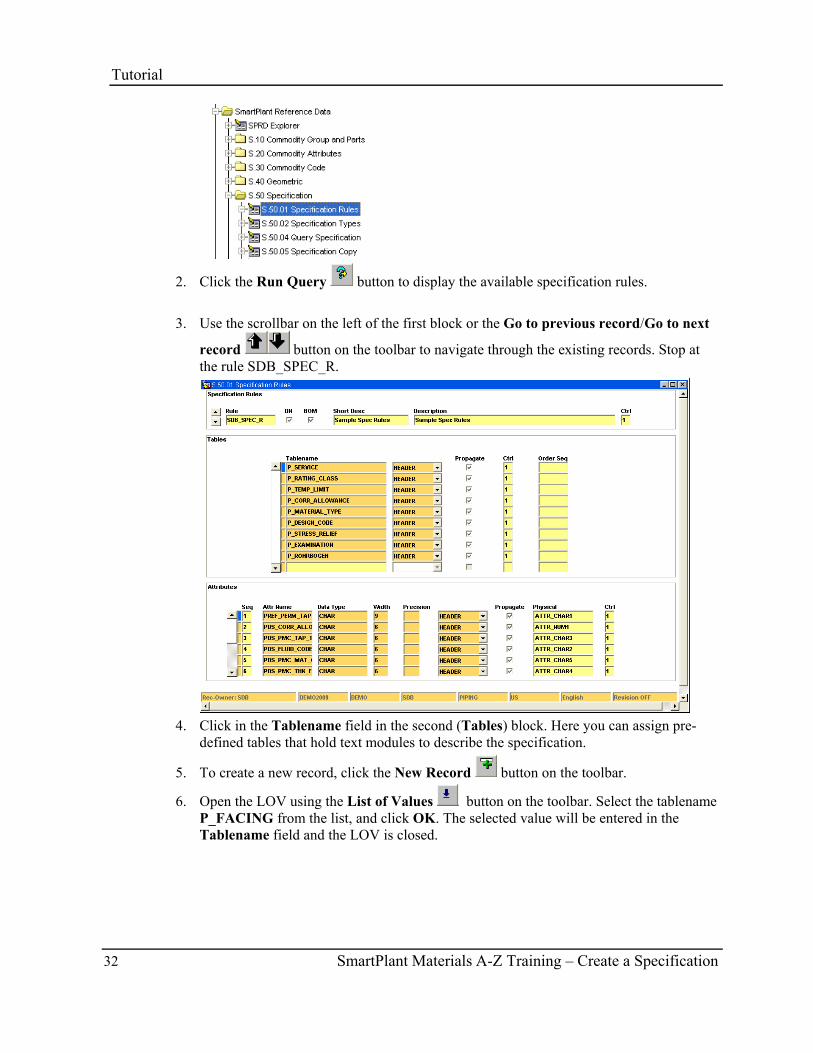
2. Click the Run Query button to display the available specification rules.
3. Use the scrollbar on the left of the first block or the Go to previous record/Go to next
record button on the toolbar to navigate through the existing records. Stop at the rule SDB_SPEC_R.
4. Click in the Tablename field in the second (Tables) block. Here you can assign pre-
defined tables that hold text modules to describe the specification.
5. To create a new record, click the New Record button on the toolbar.
6. Open the LOV using the List of Values button on the toolbar. Select the tablename P_FACING from the list, and click OK. The selected value will be entered in the Tablename field and the LOV is closed.
Tutorial
SmartPlant Materials A-Z Training – Create a Specification 33
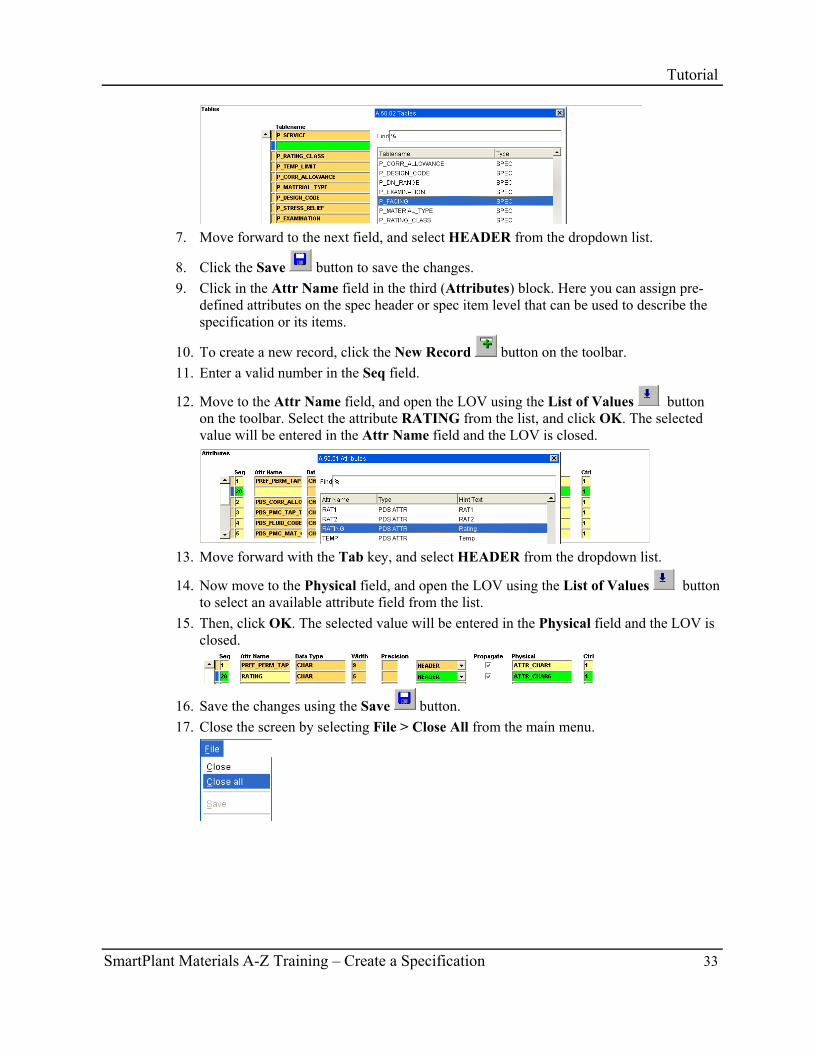
7. Move forward to the next field, and select HEADER from the dropdown list.
8. Click the Save button to save the changes. 9. Click in the Attr Name field in the third (Attributes) block. Here you can assign pre-
defined attributes on the spec header or spec item level that can be used to describe the specification or its items.
10. To create a new record, click the New Record button on the toolbar. 11. Enter a valid number in the Seq field.
12. Move to the Attr Name field, and open the LOV using the List of Values button on the toolbar. Select the attribute RATING from the list, and click OK. The selected value will be entered in the Attr Name field and the LOV is closed.
13. Move forward with the Tab key, and select HEADER from the dropdown list.
14. Now move to the Physical field, and open the LOV using the List of Values button to select an available attribute field from the list.
15. Then, click OK. The selected value will be entered in the Physical field and the LOV is closed.
16. Save the changes using the Save button. 17. Close the screen by selecting File > Close All from the main menu.
Tutorial
34 SmartPlant Materials A-Z Training – Create a Specification
Specification Management Purpose This section explains how to create a piping specification with header information.
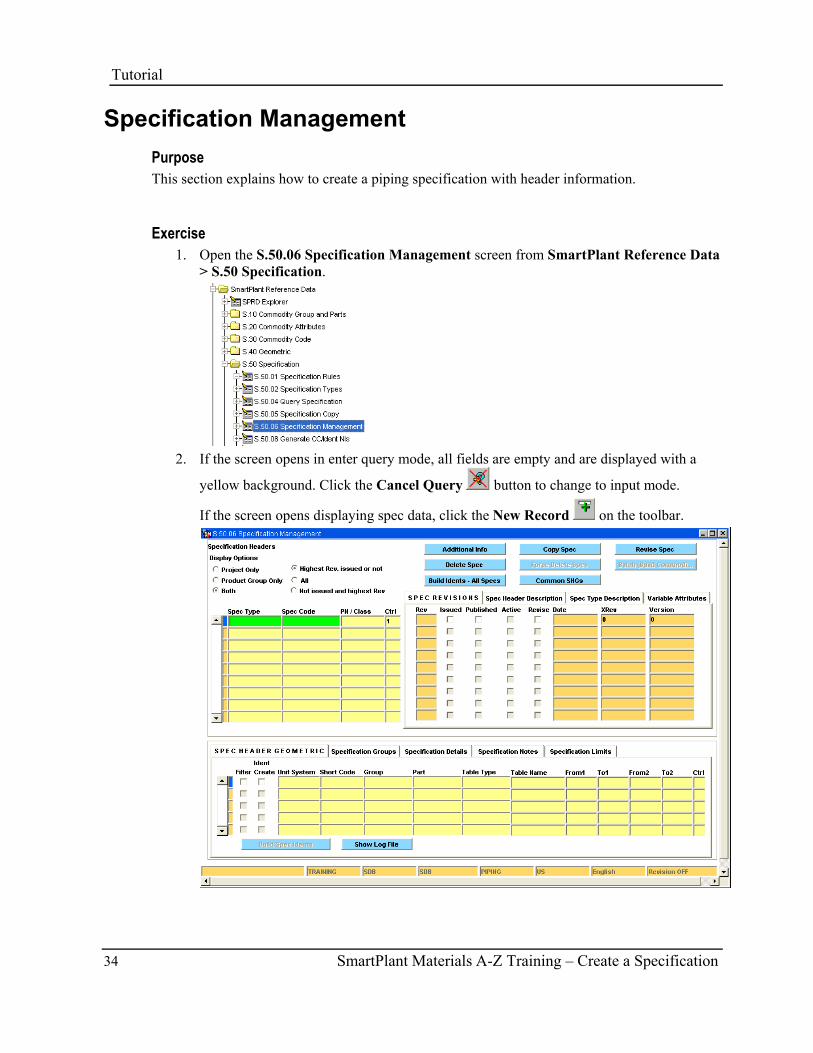
Exercise 1. Open the S.50.06 Specification Management screen from SmartPlant Reference Data
> S.50 Specification.
2. If the screen opens in enter query mode, all fields are empty and are displayed with a
yellow background. Click the Cancel Query button to change to input mode.
If the screen opens displaying spec data, click the New Record on the toolbar.
Tutorial
SmartPlant Materials A-Z Training – Create a Specification 35
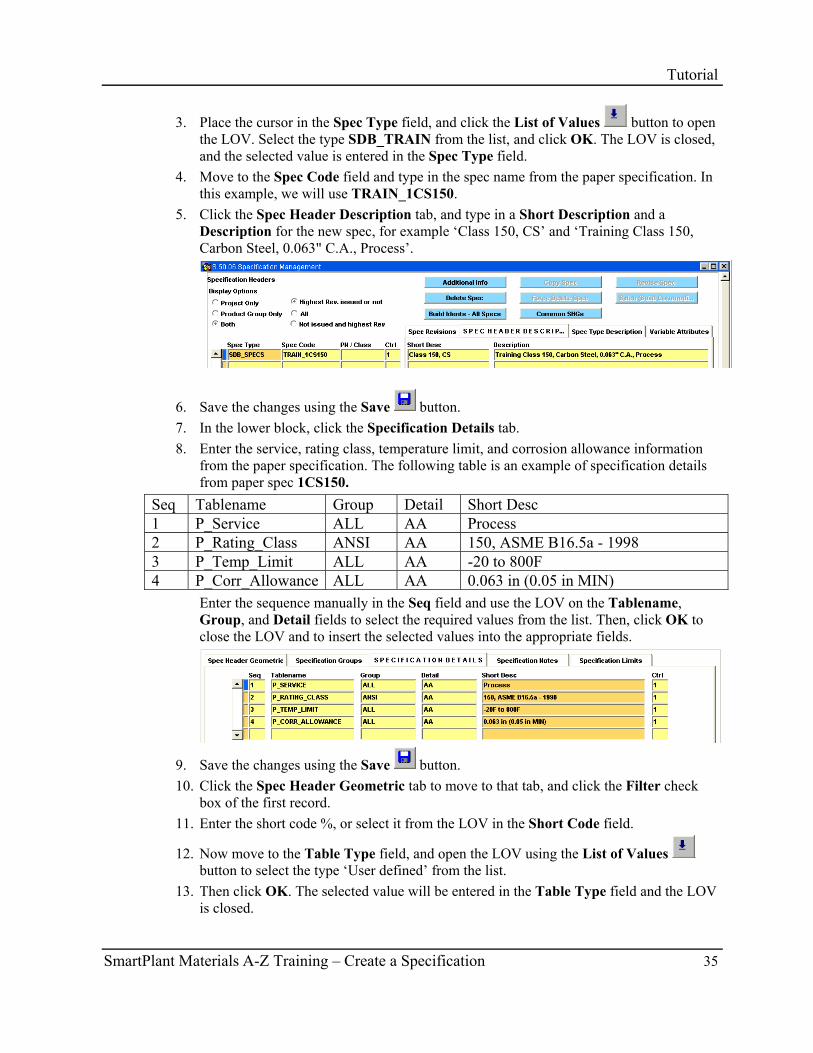
3. Place the cursor in the Spec Type field, and click the List of Values button to open the LOV. Select the type SDB_TRAIN from the list, and click OK. The LOV is closed, and the selected value is entered in the Spec Type field.
4. Move to the Spec Code field and type in the spec name from the paper specification. In this example, we will use TRAIN_1CS150.
5. Click the Spec Header Description tab, and type in a Short Description and a Description for the new spec, for example ‘Class 150, CS’ and ‘Training Class 150, Carbon Steel, 0.063" C.A., Process’.
6. Save the changes using the Save button. 7. In the lower block, click the Specification Details tab. 8. Enter the service, rating class, temperature limit, and corrosion allowance information
from the paper specification. The following table is an example of specification details from paper spec 1CS150.
Seq Tablename Group Detail Short Desc 1 P_Service ALL AA Process 2 P_Rating_Class ANSI AA 150, ASME B16.5a - 1998 3 P_Temp_Limit ALL AA -20 to 800F 4 P_Corr_Allowance ALL AA 0.063 in (0.05 in MIN)
Enter the sequence manually in the Seq field and use the LOV on the Tablename, Group, and Detail fields to select the required values from the list. Then, click OK to close the LOV and to insert the selected values into the appropriate fields.
9. Save the changes using the Save button. 10. Click the Spec Header Geometric tab to move to that tab, and click the Filter check
box of the first record. 11. Enter the short code %, or select it from the LOV in the Short Code field.
12. Now move to the Table Type field, and open the LOV using the List of Values button to select the type ‘User defined’ from the list.
13. Then click OK. The selected value will be entered in the Table Type field and the LOV is closed.
Tutorial
36 SmartPlant Materials A-Z Training – Create a Specification
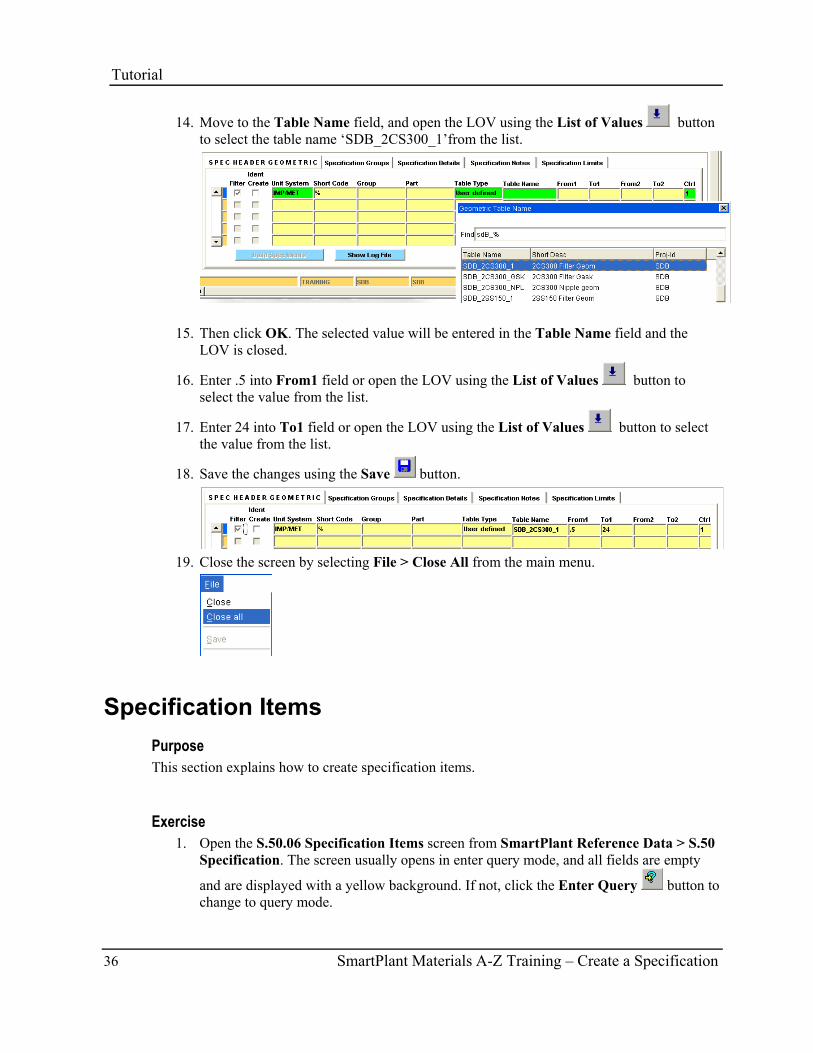
14. Move to the Table Name field, and open the LOV using the List of Values button to select the table name ‘SDB_2CS300_1’from the list.
15. Then click OK. The selected value will be entered in the Table Name field and the
LOV is closed.
16. Enter .5 into From1 field or open the LOV using the List of Values button to select the value from the list.
17. Enter 24 into To1 field or open the LOV using the List of Values button to select the value from the list.
18. Save the changes using the Save button.
19. Close the screen by selecting File > Close All from the main menu.
Specification Items Purpose This section explains how to create specification items.
Exercise 1. Open the S.50.06 Specification Items screen from SmartPlant Reference Data > S.50
Specification. The screen usually opens in enter query mode, and all fields are empty
and are displayed with a yellow background. If not, click the Enter Query button to change to query mode.
Tutorial
SmartPlant Materials A-Z Training – Create a Specification 37
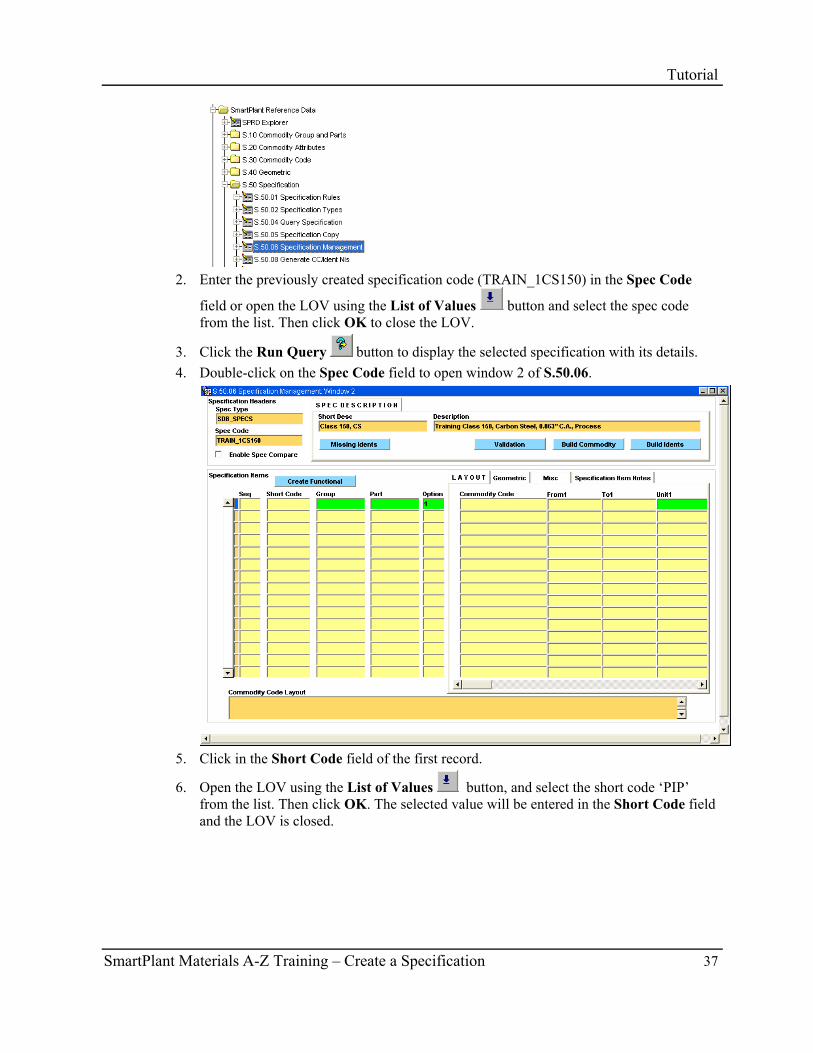
2. Enter the previously created specification code (TRAIN_1CS150) in the Spec Code
field or open the LOV using the List of Values button and select the spec code from the list. Then click OK to close the LOV.
3. Click the Run Query button to display the selected specification with its details. 4. Double-click on the Spec Code field to open window 2 of S.50.06.
5. Click in the Short Code field of the first record.
6. Open the LOV using the List of Values button, and select the short code ‘PIP’ from the list. Then click OK. The selected value will be entered in the Short Code field and the LOV is closed.

Tutorial
38 SmartPlant Materials A-Z Training – Create a Specification
7. Open the LOV on the Group field using the List of Values button, and select the group ‘P’ from the list. Then click OK. The selected value will be entered in the Group field and the LOV is closed.
8. Open the LOV on the Part field using the List of Values button, and select the part ‘PP’ from the list. Then click OK. The selected value will be entered in the Part field and the LOV is closed.
The Option field was filled automatically with Option 1 by default, and we will keep this value.
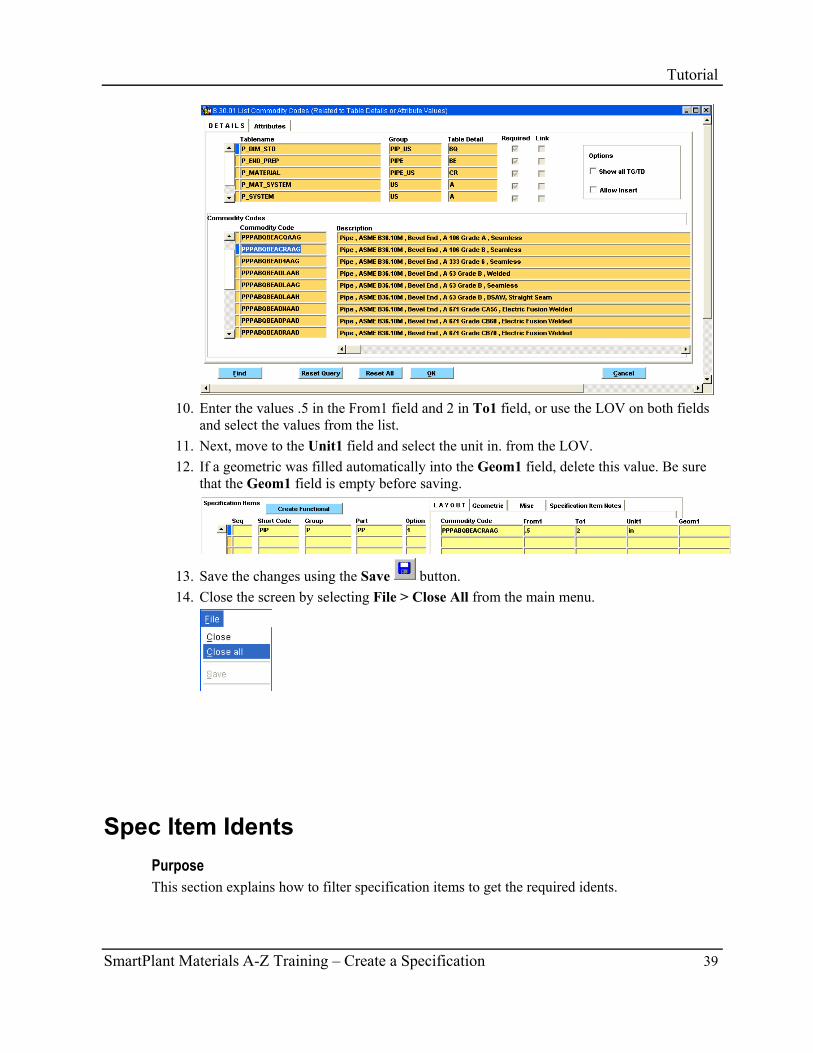
9. Move to the Commodity Code field, open the LOV using the List of Values button, click the button, and select the commodity code PPPABQBEACRAAG from the list. Then click OK. The selected value will be entered in the Commodity Code field and the LOV is closed.
Tutorial
SmartPlant Materials A-Z Training – Create a Specification 39
10. Enter the values .5 in the From1 field and 2 in To1 field, or use the LOV on both fields
and select the values from the list. 11. Next, move to the Unit1 field and select the unit in. from the LOV. 12. If a geometric was filled automatically into the Geom1 field, delete this value. Be sure
that the Geom1 field is empty before saving.
13. Save the changes using the Save button. 14. Close the screen by selecting File > Close All from the main menu.
Spec Item Idents Purpose This section explains how to filter specification items to get the required idents.
Tutorial
40 SmartPlant Materials A-Z Training – Create a Specification
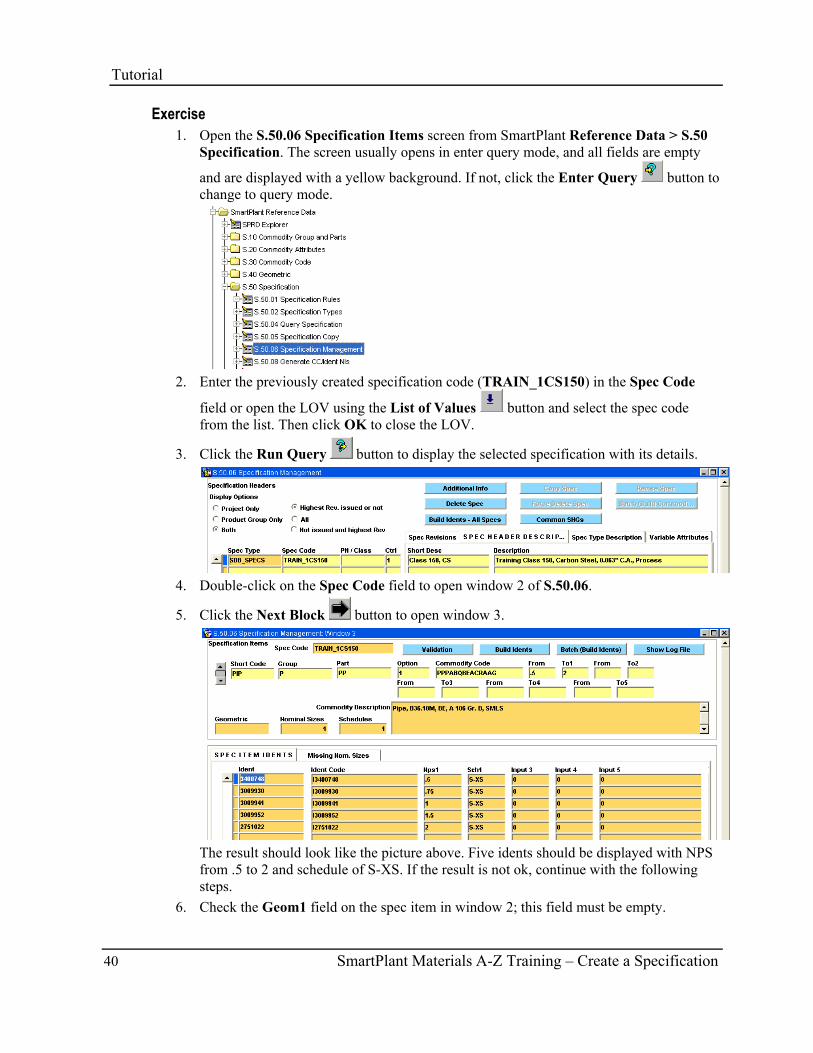
Exercise 1. Open the S.50.06 Specification Items screen from SmartPlant Reference Data > S.50
Specification. The screen usually opens in enter query mode, and all fields are empty
and are displayed with a yellow background. If not, click the Enter Query button to change to query mode.
2. Enter the previously created specification code (TRAIN_1CS150) in the Spec Code
field or open the LOV using the List of Values button and select the spec code from the list. Then click OK to close the LOV.
3. Click the Run Query button to display the selected specification with its details.
4. Double-click on the Spec Code field to open window 2 of S.50.06.
5. Click the Next Block button to open window 3.
The result should look like the picture above. Five idents should be displayed with NPS from .5 to 2 and schedule of S-XS. If the result is not ok, continue with the following steps.
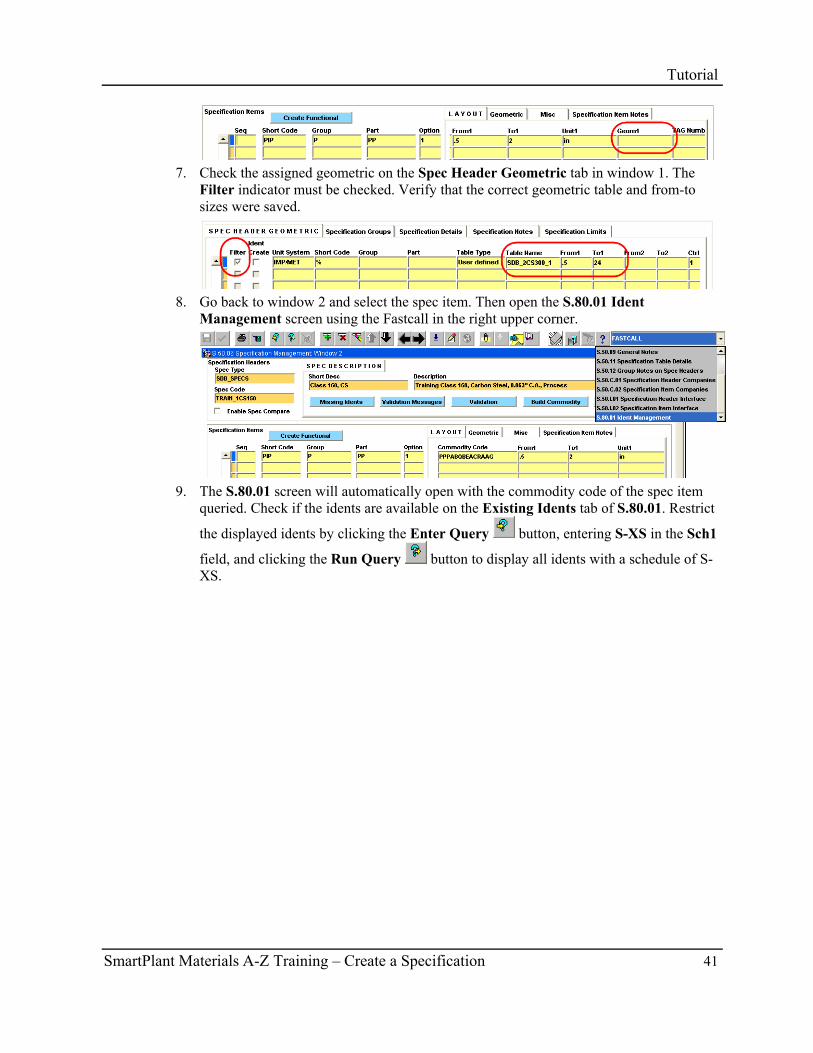
6. Check the Geom1 field on the spec item in window 2; this field must be empty.
Tutorial
SmartPlant Materials A-Z Training – Create a Specification 41
7. Check the assigned geometric on the Spec Header Geometric tab in window 1. The
Filter indicator must be checked. Verify that the correct geometric table and from-to sizes were saved.
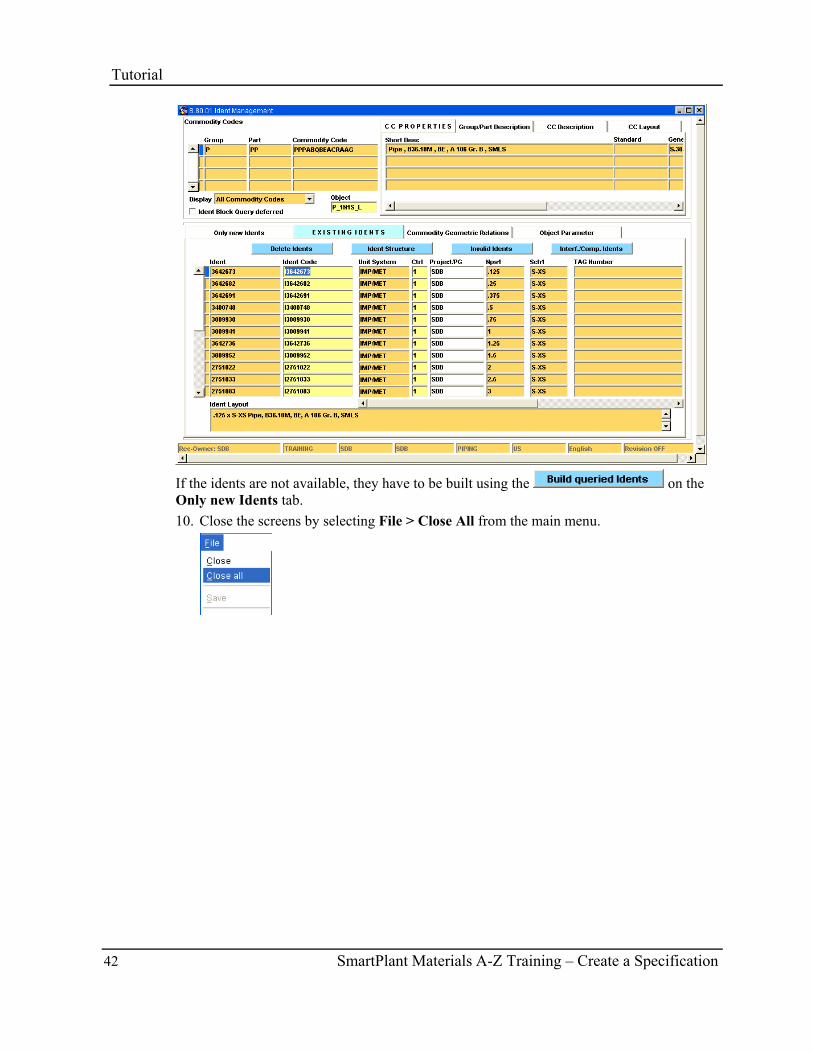
8. Go back to window 2 and select the spec item. Then open the S.80.01 Ident
Management screen using the Fastcall in the right upper corner.
9. The S.80.01 screen will automatically open with the commodity code of the spec item
queried. Check if the idents are available on the Existing Idents tab of S.80.01. Restrict
the displayed idents by clicking the Enter Query button, entering S-XS in the Sch1
field, and clicking the Run Query button to display all idents with a schedule of S-XS.
Tutorial
42 SmartPlant Materials A-Z Training – Create a Specification
If the idents are not available, they have to be built using the on the Only new Idents tab. 10. Close the screens by selecting File > Close All from the main menu.
Quiz
SmartPlant Materials A-Z Training – Create a Specification 43
1. What is the main specification header information? 2. What is the meaning of a short code? 3. Which SmartPlant Reference Data screens can be used to define filter tables? 4. Which limits are defined on the Specification Limits tab of S.50.06? 5. What might be the reasons why spec items are not filtered correctly by the spec header filter
table?
Quiz

SmartPlant Materials A-Z Training – Create a Specification 45
In this tutorial, you learned how to: • Use Short Codes • Define Specification Rules • Define Specification Types • Define Specification Headers • Create Specification Items • Filter Idents within a Specification
Quiz Answers 1. What is the main specification header information?
The allowed medium and the allowed pressure/temperature range.
2. What is the meaning of a short code? A short code is a spec-independent abbreviation for spec materials.
3. Which SmartPlant Reference Data screens can be used to define spec filter tables? Spec filter tables can be defined on the S.40.13 Filter Geometrics or the S.50.20 Wallthickness Geometrics screen.
4. Which limits are defined on the Specification Limits tab of S.50.06? The allowed pressure/temperature ratings for the spec.
5. What might be the reasons why spec items are not filtered correctly by the spec header filter table? a) Filter geometric assigned on Geom1 on spec item level. b) Filter indicator (checkbox) of the spec header filter table not checked. c) From1 and To1 not defined correctly on spec header and/or item level.
Helpful References SmartPlant Materials and Reference Data - User Interface Basics SmartPlant Materials - How to define Piping Material
Comments and Questions Please send comments or questions to [email protected].
Summary


![Manual ReportAdapter for SmartPlant Electrical [en] ReportAdapter/Manual... · CAXperts ReportAdapter for SmartPlant® Electrical Manual 4 1 Introduction ReportAdapter for SmartPlant®](https://img.pdfslide.us/doc/110x75/5aaf09b57f8b9a25088d0067/manual-reportadapter-for-smartplant-electrical-en-reportadaptermanualcaxperts.jpg)