Embed Size (px)
Citation preview

SmartMonitor
User’s Guide
Version: 1.0
Date: 2009/01/12

SmartMonitor User’s Guide ii
Copyright Information Copyright Declarations
Copyright 2009 All rights reserved. This publication contains information that is protected by copyright. No part may be reproduced, transmitted, transcribed, stored in a retrieval system, or translated into any language without written permission from the copyright holders.
Trademarks
The following trademarks are used in this document: Microsoft is a registered trademark of Microsoft Corp. Windows, Windows 95, 98, Me, NT, 2000, XP, Vista and Explorer are
trademarks of Microsoft Corp. Apple and Mac OS are registered trademarks of Apple Inc. Other products may be trademarks or registered trademarks of their respective
manufacturers.
Safety Instructions and Approval Warranty
We warrant to the original end user (purchaser) that the router will be free from any defects in workmanship or materials for a period of two (2) years from the date of purchase from the dealer. Please keep your purchase receipt in a safe place as it serves as proof of date of purchase. During the warranty period, and upon proof of purchase, should the product have indications of failure due to faulty workmanship and/or materials, we will, at our discretion, repair or replace the defective products or components, without charge for either parts or labor, to whatever extent we deem necessary tore-store the product to proper operating condition. Any replacement will consist of a new or re-manufactured functionally equivalent product of equal value, and will be offered solely at our discretion. This warranty will not apply if the product is modified, misused, tampered with, damaged by an act of God, or subjected to abnormal working conditions. The warranty does not cover the bundled or licensed software of other vendors. Defects which do not significantly affect the usability of the product will not be covered by the warranty. We reserve the right to revise the manual and online documentation and to make changes from time to time in the contents hereof without obligation to notify any person of such revision or changes.
Be a Registered Owner
Web registration is preferred. You can register your Vigor router via http://www.draytek.com.
Firmware & Tools Updates
Due to the continuous evolution of DrayTek technology, all routers will be regularly upgraded. Please consult the DrayTek web site for more information on newest firmware, tools and documents.
http://www.draytek.com
SmartMonitor User’s Guide iii
TTaabbllee ooff CCoonntteennttss
1 Introduction........................................................................................................1
1.1 Introduction ............................................................................................................................. 1 1.2 System Requirements............................................................................................................. 1 1.3 Topology.................................................................................................................................. 2 1.4 Installation ............................................................................................................................... 3
2 Basic Operation...............................................................................................14
2.1 Activating SmartMonitor ........................................................................................................ 14 2.2 Enter Web User Interface...................................................................................................... 14 2.3 Anonymous Logging.............................................................................................................. 17 2.4 Group/Department Operation ............................................................................................... 17 2.5 User List Operation ............................................................................................................... 18 2.6 Create/Modify Admin Account............................................................................................... 20 2.7 Adjust System Settings ......................................................................................................... 22
3 Advanced Operation........................................................................................23
3.1 System .................................................................................................................................. 23 3.1.1 Admin.............................................................................................................................. 23 3.1.2 Privilege .......................................................................................................................... 25 3.1.3 Setting............................................................................................................................. 27 3.1.4 Configuration Backup/Restoration.................................................................................. 28 3.1.5 Event Log........................................................................................................................ 28 3.1.6 Resources....................................................................................................................... 30 3.1.7 Log Out ........................................................................................................................... 30
3.2 User Setting .......................................................................................................................... 30 3.2.1 Group/Department .......................................................................................................... 31 3.2.2 User List.......................................................................................................................... 33 3.2.3 Tree View........................................................................................................................ 34
3.3 Service Analysis .................................................................................................................... 35 3.3.1 FTP ................................................................................................................................. 36 3.3.2 MAIL................................................................................................................................ 39 3.3.3 HTTP............................................................................................................................... 39 3.3.4 IM.................................................................................................................................... 40 3.3.5 TELNET .......................................................................................................................... 41 3.3.6 P2P ................................................................................................................................. 42 3.3.7 WEBDOWN .................................................................................................................... 43 3.3.8 STOCK............................................................................................................................ 45 3.3.9 Top 10............................................................................................................................. 46

SmartMonitor User’s Guide iv
3.4 User Analysis ........................................................................................................................ 46 3.4.1 Records & Report ........................................................................................................... 47 3.4.2 User By Traffic ................................................................................................................ 48 3.4.3 Top 10............................................................................................................................. 48
3.5 Report.................................................................................................................................... 49 3.5.1 Service Traffic................................................................................................................. 49 3.5.2 Statistics.......................................................................................................................... 50 3.5.3 Preview & Export ............................................................................................................ 50
4 Application .......................................................................................................52
4.1 Be a Good Network Administrator......................................................................................... 52 4.1.1 Reducing Web Page Visiting of Non-Work Usage ......................................................... 52 4.1.2 Reducing IM Application of Non-Work Usage ................................................................ 53 4.1.3 Best Configuration for Other Network Service ............................................................... 54
4.2 Leading in Self-Managing for Creating High Efficiency Office Environment......................... 54

SmartMonitor User’s Guide 1
1 IInnttrroodduuccttiioonn
11..11 IInnttrroodduuccttiioonn SmartMonitor, a verification software for network information, can capture, filter and analyze network information for different purposes by integrating with Vigor series router. With SmartMonitor, the administrator can adopt the content that user cares and restore the data to readability information and produce various reports for reference.
Administrator of enterprise might torment with the following things:
1. Overused IM software and affect work efficiency on duty time
2. Download file unlimitedly through bandwidth and cause congestion in normal usage.
3. Reveal company’s confidential information through IM software easily
The first thing that Smart Monitor can do for the enterprise is to solve the network problem. By verifying network information, Smart Monitor can assist enterprise’s administrator to solve different problems derived from the network application effectively. No matter network logging record, e-mail record or IM chatting record, or file download, Smart Monitor can analyze and arrange those records clearly and well for the administrator to manage and check with ease.
Smart Monitor not only can manage network, but also it can bring out new concept of auto-management for the enterprise. Traditional management mode is passive management. It means the employees always restrict their behavior in network usage after notified, even warned by the network administrator. Thus, employees might feel uncomfortable and management problems usually will be produced in such circumstance. For such situation, Smart Monitor provides Top 10 ranking function and allows users to check Top 10 of network applications at any time, such as IM Top 10, Download Top 10 and etc. When employees find the username/IP address being listed on Top 10, they will restrict their behaviors in network usage automatically. Thus, self-managing of employees can be formed naturally.
Top 10 also can carry out ranking for different service types to assist network administrator finding out network usage custom of users in local network. With such analysis, the administrator can design and plan better network management to reach the optimum work efficiency of the enterprise.
In addition to enterprise, Smart Monitor can be applied in general families. The network development not only gives us convenient information, but also it brings unhealthy information such as pornography, violence to children and threatens the growth of the children. With good deployment of Smart Monitor, parents can monitor network usage of children and adjust network configuration to discard unhealthy network visits and offer a good network environment to children.
11..22 SSyysstteemm RReeqquuiirreemmeennttss
Intel P4 1.4GHz and above /AMD CPU
20 GB free hard disk at least
1GB RAM and above

SmartMonitor Series User’s Guide 2
Vigor Router, e.g., Vigor 2910
Note: 1. FTP and e-mail applications might occupy lots of disk space. If the usage of FTP and e-mail will be large, please prepare larger disk space for installing and using Smart Monitor. 2. Smart Monitor can be operated in the condition less than the above requirement. However, in the environment of less disk space, network information might be omitted by Smart Monitor due to the high peak of network usage. 3. For Smart Monitor might be influence lots of system applicaitons, it would be better to intall it in “clear and pure” system environment. Microsoft IIS might conflict with Apache which is required for installing Smart Monitor. Therefore, do not install and operate Microsoft IIS, or change the port number for Microsoft outside 80.
11..33 TTooppoollooggyy Connect a PC with Smart Monitor installed to the mirror port of the device (such as VigorPro 5510, Vigor2950, and etc.) to capture monitored information.

SmartMonitor User’s Guide 3
11..44 IInnssttaallllaattiioonn Please follow the steps below to install SmartMonitor to the host (served as the database of SmartMonitor).
1. Insert the application software CD of SmartMonitor into the CD-ROM diskette.
2. Click the icon of SmartMonitor_Install_1.0.0RC9a. The Setup Wizard will appear as follows. Please click Next to proceed.
3. In the License Agreement page, choose “I accept the agreement” and click Next.
4. Specify the destination location for SmartMonitor. The default directory is shown as
below. You can click Browse to change the location. Then, click Next to proceed.

SmartMonitor Series User’s Guide 4
5. The setup wizard shows the destination location that you just specify. If there is no
problem, simply click Install to carry outs the installation.

SmartMonitor User’s Guide 5
6. A pop-up dialog will appear to inform you PHP is required for SmartMonitor. Simply click Yes.
7. Next, anther pop-up dialog will appear to inform you Apache is required for
SmartMonitor. Please click Yes.
8. Then, the following dialog will appear to inform you Wpcap is required for
SmartMonitor. Click Yes.

SmartMonitor Series User’s Guide 6
9. The installation starts. Please wait for a while.
10. When the file extracting is complete, a Setup dialog for installing Apache will be
popped-up. Click OK.
11. Another Installation Wizard for Apache will appear as follows. Please click Next to
carry out the installation.
If it is not necessary for you to install Apache, please go to step 20 directly.

SmartMonitor User’s Guide 7
12. On the following screen, choose “I accept the …..” and click Next.
13. In the following screen, click Next.
14. Type all the required information and click Next.

SmartMonitor Series User’s Guide 8
15. Select Typical and click Next.
16. Specify the destination folder. You can click Change. to specify another folder for
installing Apache. Then, click Next.
17. On the following screen, click Install.

SmartMonitor User’s Guide 9
18. Corresponding files will be installed to your system. Please wait for several minutes.
19. When the following screen appears, simply click Finish.
20. Next, Setup wizard will guide you to install Wpcap. Click OK to proceed.
If it is not necessary for you to install Wpcap, please go to step 26 directly.

SmartMonitor Series User’s Guide 10
21. When the following screen appears, please click Next to proceed.
22. On the following screen, please click Next again.
23. On this page, just click I Agree.

SmartMonitor User’s Guide 11
24. The setup wizard starts to install WinPcap into your host. Please wait for a while.
25. When the following page appears, the installation has been completed. Click Finish.
26. Next, Setup wizard will display the following screen. Click Next to proceed.

SmartMonitor Series User’s Guide 12
27. When the following dialog pops up, click OK.
28. Now, the following dialog appears to inform you that you are going to login
SmartMonitor home page with default username/password of admin/admin. Please click OK.
29. Before you start to use SmartMonitor, please click Finish first to exit the SmartMonitor
setup wizard.
30. After finishing the installation, SmartMonitor main program will invoke automatically
and the browser will pop up a login window (for Smart Monitor managing interface) for

SmartMonitor User’s Guide 13
you to login. If the IP address has be configured correctly, all PCs on LAN can use IE browser to visit Smart Monitor easily.
31. If network connection is not processed correctly or the IP address is not set properly, a searching screen might appear as the following figure:
SmartMonitor Series User’s Guide 14
2 BBaassiicc OOppeerraattiioonn
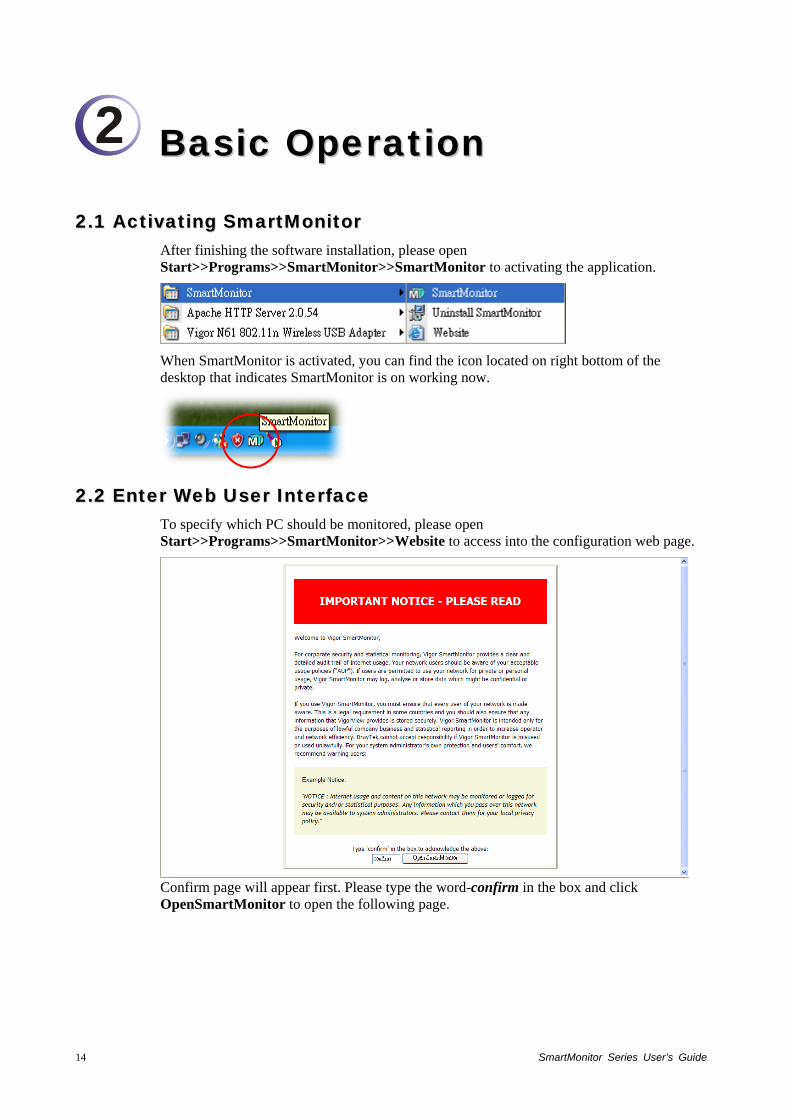
22..11 AAccttiivvaattiinngg SSmmaarrttMMoonniittoorr After finishing the software installation, please open Start>>Programs>>SmartMonitor>>SmartMonitor to activating the application.
When SmartMonitor is activated, you can find the icon located on right bottom of the desktop that indicates SmartMonitor is on working now.
22..22 EEnntteerr WWeebb UUsseerr IInntteerrffaaccee To specify which PC should be monitored, please open Start>>Programs>>SmartMonitor>>Website to access into the configuration web page.
Confirm page will appear first. Please type the word-confirm in the box and click OpenSmartMonitor to open the following page.

SmartMonitor User’s Guide 15
Next, type the username and password. The default values for user name and password are “admin” and “admin”. Click Login to access into the configuration web pag.
Below shows the home page of SmartMonitor. It can be divided into several sections.

SmartMonitor Series User’s Guide 16
Menu Bar Display available menus.
Links for Quick Start Provide links to execute basic operation.
Brief Introduction for User Analysis
Display brief introduction for the contents of user analysis.
Icons for Service Analysis Provide icons to check service analysis. Simply double-click on them. The system will open the corresponding pages.
Brief Information for Report
Display brief explanation that Report contains.
Current Top 10 Users under Monitored
Display a table of IP address, user name, group/department, total amount for current top 10 monitored users. Such table can be refreshed automatically within 10 seconds, 30 seconds or 60 seconds according to the settings that you choose. If you choose Manual Refresh, you have to press the Refresh icon to renew the table by yourself.
Icons for Service Analysis
Brief Introduction for User Analysis
Menu Bar
Links for Quick Start
Current Top 10 Users under Monitored
Brief Information for Report

SmartMonitor User’s Guide 17
22..33 AAnnoonnyymmoouuss LLooggggiinngg Smart Monitor offers the funciton of anonymous logging. This function is used for the anonymous user to check the ranking of network service usage to carry out self-managing.
Anonymous logging is unable to use/see all the functions of Smart Monitor. Only user Top 10 and traffic ranking pages are allowed. With these two web pages, users can know the usage ranking in different network service. If they find their ranking is near to the top one, they can do self-restriction and reduce non-job network usage. Thus, network usage efficiency of the enterprise can be raised.
22..44 GGrroouupp//DDeeppaarrttmmeenntt OOppeerraattiioonn By grouping the users, the administrator can set different monitoring contents for different users. Meanwhile, the administrator can dispatch the users to suitable groups quickly to make the group operation of users being easily.
Please follow the steps listed below to create a new one.
1. Click the Group/Department link from the Create Group/Department to manager users located in Quick Start area, or open User Settings>>Group/Department.
2. Click the New icon. The following screen will appear.

SmartMonitor Series User’s Guide 18
3. Type a name (e.g., office-1) for the group in the field of Group Name. Give a brief
explanation for such group. Check the Active box.
4. In the Recording field, choose the service(s) that SmartMonitor will record and monitor for such group.
5. Click Save.
Below shows a figure of new group added.
22..55 UUsseerr LLiisstt OOppeerraattiioonn To utilize SmartMonitor for monitoring, the first thing you have to do is “create a user name”. Such user account can be grouped under any group/department specified later and be monitored by SmartMonitor.
After initiating SmartMonitor, the IPs in the network segment specified by the network card of SmartMonitor will be catched and displayed automatically.

SmartMonitor User’s Guide 19
We can use setting username or grouping the user to have convenient management. Refer to the following steps for grouping or setting user name.
1. Open User Settings>>User List.
2. There are eight items with different purposes for each IP address, such as number, recording, IP address, user name, group, emphasize, LAN-to-LAN and delete.
No The index number of the IP address.
Recording Check the box to record the network usage of the IP address.
IP Define a name for each user. Such name is easily and convenient to be identified when viewing various records such as Top 10.
Group Make a group for such IP address.
Emphasize If you check the box here, a red sign “*” will be marked between the fields of user name and IP address. Such mark is used to remind the administrator that this user is “important”.
LAN-to-LAN Allow Local LAN PC communication to be monitored by SmartMonitor if such data is forwarded by monitor port.
Delete Delete this selected IP.
3. Type in username separately by mapping with each IP address.
4. Choose the group that such IP address would be combined.
5. Click Save to save the configuration.
In some cases, some servers might not send out information automatically, so they will be not listed. For this, please add the users (s) manually.
To manually add the user, please follow the steps listed below to create a new one.
1. Open User Settings>>User List.
2. Click the New User icon. The following screen will appear.

SmartMonitor Series User’s Guide 20
3. Type a name (e.g., carrie-pc) for the user in the field of User Name. Specify the IP
address of the new user. Choose one of the groups from Group drop-down list.
4. Click Save.
Below shows a figure of new user added (displayed on User List page).
Note:
In User List page, it will be convenient for management by setting a user name for every IP address
You can group the users for monitoring the configuration and easily managing. For the detailed of group, it will be introduced in later sections.
22..66 CCrreeaattee//MMooddiiffyy AAddmmiinn AAccccoouunntt It is not safe to use the default user name and password. It is strongly suggested to modify user name and password after registering SmartMonitor. Additionally, an admin account can only login one PC at a time. Therefore, please create different accounts and passwords for different administrators.

SmartMonitor User’s Guide 21
Please follow the steps listed below to create a new one. Such account will be used for accessing into SmartMonitor next time.
1. Click the Admin link from the Create your Admin Account located in Quick Start area or open System>>Admin.
2. Click the New Admin icon. The following screen will appear.
3. Type a name (e.g., carrie) as the Admin Name and type the password in the
corresponding field. Next, type the password again in confirm Password.
4. Type the E-Mail address in E-Mail field. Such address will be used to receivie the alert messages, reports files sent from SmartMonitor.
5. Language field is very important for it determines the language system display for SmartMonitor when administrators log in.
6. Determine the privilege from the drop-down list. Previlege field allows you to choose the type of administrator. There are four types of previlege. The authority of the administrator can be defined in System>>Privilege.
7. Click Save.
Below shows a figure of new user added.

SmartMonitor Series User’s Guide 22
The way to modify the password is the same as the above steps. However, it is not necessary
to click New Admin icon but click Admin Name, then modify the password field and save it.
22..77 AAddjjuusstt SSyysstteemm SSeettttiinnggss Please follow the steps listed below to modify current system settings for SmartMonitor. The default settings will be shown on such page. You can change settings for SMTP, modify the recording type, or adjust the disk space and session timeout, etc.
1. Click the Setting link from the Modify General Setting located in Quick Start area or open System >>Setting.
2. Modify the ones you want.
3. Click Save.
Notice: It’s very important to choose right Interface for SmartMonitor, especially a PC has more than one ethernet/wireless card.

SmartMonitor User’s Guide 23
3 AAddvvaanncceedd OOppeerraattiioonn
This chapter introduces all the functions and configurations in SmartMonitor in detailed.
33..11 SSyysstteemm Such menu allows you to set password/name for logging into SmartMonitor, set privilege for having different authorities, backup or restoring the configuration, set event log, and etc.
33..11..11 AAddmmiinn The name and password configured here will be utilized while logging into SmartMonitor every time. In addition, it allows you to set different privilege for different administrator account. The admin account can view records and delete records according to the privilege configured.
Admin: Display the name for administration.
E-Mail: Display the e-mail address for such account.
Language: Display the language for data recorded.
Privilege: Display the privilege for such account.
Delete: Allow to remove such account. In general, the name “admin” is the default setting and cannot be removed.
Note: The privilege of the administrator can be modified in System>>Privilege.
AAdddd aa NNeeww AAddmmiinn
Click the New Admin icon. The following screen will appear.

SmartMonitor Series User’s Guide 24
Admin Name: Type the name for the new administrator.
Password: Type the password for the new administrator.
Confirm Password: Type the new password again to make a confirmation.
E-Mail: Type an e-mail address in such field. All the records will be sent to the address specified here for reference.
Language: At present, there are only Simply Chinese and English offered. Choose any one of them for recording the monitored results.
Privilege: Please assign the privilege for the new admin account. There are
three privilege provided by SmartMonitor and each account will have different monitoring effect based on the privilege specified here.
Below shows an example:

SmartMonitor User’s Guide 25
In the above example, “admin” owns the highest privilege – Administrator. That means the one accessing into SmartMonitor with such name can view and delete all of the records for different user accounts that controlled and monitored by SmartMonitor. “Admin” is the default setting and cannot be deleted.
33..11..22 PPrriivviilleeggee There are eight services can be monitored under SmartMonitor. However, administrators with different privileges will have different authority to view, delete the records or make DB operation. There are three types of privilege, Administrator, Super User and Normal User provided here for you to specify for different purposes.
AAdddd aa NNeeww PPrriivviilleeggee TTyyppee
Click the New Privilege Type icon. The following screen will appear.
Type: Type the name for the new privilege type.
Description: Type the brief introduction for such privilege.
View Access: Check the service(s) that allows to be inspected by the admin account.

SmartMonitor Series User’s Guide 26
Delete Access: Check the service(s) that allows to be deleted by the admin account.
Save: Save the settings for such type.
Below shows a figure of new Privilege Type added.
MMooddiiffyy tthhee EExxiissttiinngg PPrriivviilleeggee TTyyppee You can change the description of the privilege, change the members under the privilege, change the items for viewing, deleting under the privilege by double clicking the name link under type filed.
Description: To change the description for the selected privilege type, simply
retype new description here.
View Access: Check the one(s) and uncheck the one(s) you desire for viewing records under the selected privilege type. Only the records of the items checked here can be inspected next time when you access into SmartMonitor by using the admin account with such privilege.
Delete Access: Check the one(s) and uncheck the one(s) you desire for deleting records under the selected privilege type. Only the records of the items checked here can be deleted next time when you access into SmartMonitor by using the admin account with such privilege.
Members: Display the admin accounts which selected such privilege.
Save: Save the modification for such privilege.

SmartMonitor User’s Guide 27
33..11..33 SSeettttiinngg
Click such icon to restore the factory default settings.
SMTP: Server – Type the IP address for the SMTP server, e.g., 172.16.3.9. Need authentication – If you check this box, you have to enter Username and Password specified here to access into the SMTP server next time. Port – Type the port number of the specified SMTP server above. Username – Type the username for accessing into the above SMTP server. It will be active only when Need authentication box is selected. Mailbox – Type the e-mail address for the SMTP Server. Password - Type the password for accessing into the above SMTP server. It will be active only when Need authentication box is selected.
Recording: You can check or uncheck these six services respectively to be used and recorded by SmartMonitor. Month to keep backup files in disk – Specify the recording period for the services. The available number is from 0 to 9. In the above example, it means the recording job will be deleted automatically after six months. Max FTP filesize – The maximum file size for downloading from or uploading on FTP web site can be restricted in this box. Max mail attached file size – The maximum file size for mail attached file can be restricted in this box.
Administration: When free diskspace below – A warning message will be shown on the firstpage of SmartMonitor and/or be sent to the dedicated e-mail address from SmartMonitor when the free disk space is lower than the number specified here. Session Timeout – SmartMonitor will be terminated automatically

SmartMonitor Series User’s Guide 28
based on the value configured here. Allow login anonymously – If you check this box, anyone can access into SmartMonitor through Anonymous Login for viewing the records easily.
The homepage of SmartMonitor will be shown as the following. Only System and User Analysis menus can be operated by the user.
Interface: Use the drop down list to choose the interface for SmartMonitor.
Save: Save the settings.
33..11..44 CCoonnffiigguurraattiioonn BBaacckkuupp//RReessttoorraattiioonn You can save current configurations as a file. Later, you can upload the file to your PC.
33..11..55 EEvveenntt LLoogg This page displays administrator’s operation records of SmartMonitor.

SmartMonitor User’s Guide 29
Log Time: Display the login time for the user or the administrator.
Admin Name: Display the privilege of the user or the administrator.
LogIP: Display the IP address of the user or the administrator.
Level: Display the menu item of the user or the administrator.
Message: Display brief description of the action executed by the user or the administrator.
Additionally, there are several icons provided for you to search specified file(s), view the traffic, refresh current page, delete selected record, delete all record, mail all record to specified mail box and print current page.
Open Search Mode
Traffic Report
Refresh Delete Selected Record
Delete All Record
Send the report to your e-mail
Print this Page
SSeeaarrcchhiinngg RReeccoorrdd
By clicking Open Search icon, you will get the following page.

SmartMonitor Series User’s Guide 30
Admin Name: Choose the name for searching the records under it.
LogIP Type the IP address for searching the records under it.
Message Type the message for searching the records with it.
Level Choose the level for searching the records based on it.
From….To… Specify the date for the downloading or uploading files you want
to search.
Search Click this button to execute searching job and display on this page.
33..11..66 RReessoouurrcceess Such page displays current system resources information about listening IP, kernel version, processor model, CPU speed, BUS speed, Cache size, total memory, memory usage and mounted file systems and etc. If there is something wrong, such as insufficient disk space, the administrator can know it and process it immediately.
33..11..77 LLoogg OOuutt Choose this menu item can quit SmartMonitor.
33..22 UUsseerr SSeettttiinngg

SmartMonitor User’s Guide 31
User Setting allows you to create new group/department and users for monitored by SmartMonitor. In addition, it also offers tree view for all the accounts to be checked in ease.
33..22..11 GGrroouupp//DDeeppaarrttmmeenntt This page can display current created group/department. It allows you to create new groups, modify existing group, and change the members to be controlled under the specified group.
Group Name: Display the name of the group/department for current user.
Description: Display the explanation for the group.
Active: Display the status for current group, Y(active) or N (inactive).
Emphasize: IP/name followed by red mark “*” can assist the administrator to find out the ones being monitored specially and quickly within lots of records.
Members: Display the number of the members included in such group.
Delete: Remove the selected group.
AAdddd aa NNeeww GGrroouupp//DDeeppaarrttmmeenntt
Click the New icon. The following screen will appear.
Group Name: Type the name for the group (maximum 36 characters).

SmartMonitor Series User’s Guide 32
Description: Make a simple explanation for such group.
Active: Check the box to monitor such group.
Emphasize: Check the box to make it as important group to be monitored (an sign * will be added to corresponding record).
Recording: There are ten services provided by SmartMonitor. Check the one(s) that you want to record for such group.
Add New Members: Click such link to add existed members into such group. If you did not create any users beforehand, you would get nothing after clicking the link. Please add new members first.
Save: Click this button to save the settings for such group.
Below shows a figure of new group added.

SmartMonitor User’s Guide 33
33..22..22 UUsseerr LLiisstt
No: Display the item number of the user.
Recording: Check this box to record data of that user.
IP: Display the IP address for the user.
User Name: Display the name of the user. You can change the name if you want.
Group: Display the group that the user belongs to. You can change the group by using the drop-down list.
Emphasize: It can assist the administrator to find out such user list in a short time. If you check this box, a “*” mark will be appended on IP address/Username of that user for identification.
LAN to LAN: Check this box to assist other users on the same subnet to find out this user and share information for each other easily. However, it is useful only for the users transferring data via this router.
Delete: Remove the selected user.
AAdddd aa NNeeww UUsseerr
Click the New User icon. The following screen will appear.

SmartMonitor Series User’s Guide 34
User Name: Type the name for the user.
IP: Type the IP address for such user.
Group: Choose the group that you want such user belonging to. You can define different groups (e.g., office-1) in User Settings>>Group/Department.
Recording: Check this box to record the network service of this user.
Emphasize: Check this box to make a sign “*” for that IP address/user name. It means that the user is monitored specially and it is convenient for the administrator to locate that one in lots of records.
LAN to LAN: Check this box to make SmartMonitor recording the communication of interior network when the data passing through. If not check, SmartMonitor will just catch the data between interior and exterior networks.
Below shows a figure of new user added.
Note: After configuring user name, any data or record of that one will be displayed with username directly for people to check conveniently.
33..22..33 TTrreeee VViieeww Such page shows the group/department with users with tree view structure.
Below shows the expanded tree view:

SmartMonitor User’s Guide 35
If you want to add new group/department with different users, simply click the New
icon to add a new group/department and click the New User icon to add a new user. The result will be displayed on Tree View immediately.
33..33 SSeerrvviiccee AAnnaallyyssiiss This menu makes an analysis for the services such as FTP, MAIL, HTTP, IM, TELNET, P2P utilized by monitored users. Also, it will show the top 10 services that users like to use. With such analysis, the administrator can easily understand what kind of service is used frequently.

SmartMonitor Series User’s Guide 36
33..33..11 FFTTPP From this page, users can download files stored in FTP site.
Date/Time: Display the date and time of the job of file uploading or
downloading.
UserName/IP: Display the name of the user who upload or download the file.
Dir: Display the direction for file download or file upload.
Host: Display the IP address of host location.
Login ID: Display the ID name of current user account.
Password: Display the password set for current user account.
File Name: Display the name of the file in FTP site.
Size: Display the file size.
Latest 20 days Such table can display daily traffic report. In addition, you can choose any day by using the drop-down list for viewing the monitoring report of other day.
Additionally, there are several icons provided for you to search specified file(s), view the traffic, refresh current page, delete selected record, delete all record, mail all record to specified mail box and print current page.
Open Search Mode
Traffic Report
Refresh Delete Selected Record
Delete All Record
Send the report to your e-mail
Print this Page

SmartMonitor User’s Guide 37
SSeeaarrcchhiinngg RReeccoorrdd
By clicking Open Search icon, you will get the following page.
User: Type the name of the user that you want to search.
File: Type the file name that you want to search.
Host: Type the IP address of the host that you want to search.
Dir: Choose the direction (uploading file or download file) for the file that you want to search.
Size: Specify the file size of the file(s) that you want to search.
From: Specify the date for the downloading or uploading files you want
to search.
Search: Click this button to execute searching job and display on this page.
VViieewwiinngg RReeccoorrdd For FTP application, the system allows you to view utilization displayed with graphic. From the pop-up window, you can clearly inspect daily traffic and weekly traffic of such
application used by all of the monitored accounts. Simply click Traffic Report icon, the following dialog will appear.

SmartMonitor Series User’s Guide 38
RReeffrreesshhiinngg CCuurrrreenntt PPaaggee
To refresh current page, simply click Refresh and the record will be refreshed.
DDeelleettiinngg SSeelleecctteedd RReeccoorrdd To delete one record, please choose that one you want to delete by checking the box. Then,
click Delete Selected Record, the records of selected item(s) will be deleted automatically.
DDeelleettiinngg AAllll RReeccoorrdd
To delete all of the records displayed on current page, click Delete All Record. All the records listed in this page will be deleted completely.
MMaaiilliinngg AAllll RReeccoorrdd
You may want to mail the records to somewhere. Simply click Mail All Record, all the records can be sent to the specified e-mail box for users to inspect conveniently.
PPrriinnttiinngg CCuurrrreenntt PPaaggee
To have a hard copy of the records, please click . Current page will be printed.

SmartMonitor User’s Guide 39
33..33..22 MMAAIILL Such page displays detailed information (including user name, mail sender, mail recipient and subject of each mail) for all of the mails that belong to different users and monitored by SmartMonitor. The administrator can access into the mail box to read or view the content of that user easily. However, the administrator cannot change the content of the mail and cannot response to that sender or recipient through such record directly.
Latest 20 days Such table can display all the mail records of that day. In addition,
you can choose any day by using the drop-down list for viewing the monitoring report of other day.
If you are interested in one of the mails, you can click the heading of that mail to view the detailed information (including sender, receiver, title, content and attachment) of that one. In which, the attachment can be downloaded easily.
Additionally, there are several icons provided for you to search specified file(s), view the traffic, refresh current page, delete selected record, delete all record, mail all record to specified mail box and print current page.
Open Search Mode
Traffic Report
Refresh Delete Selected Record
Delete All Record
Send the report to your e-mail
Print this Page
33..33..33 HHTTTTPP
Date/Time: Display the date and time for the users who visits the website.

SmartMonitor Series User’s Guide 40
UserName/IP: Display the name of the user who uses the HTTP service.
WebSite: Display the website that the user visits.
URL Number: Display the number of the URL that the user visits.
Latest 20 days Such table can display daily traffic report. In addition, you can choose any day by using the drop-down list for viewing the monitoring report of other day.
Additionally, there are several icons provided for you to search specified file(s), view the traffic, refresh current page, delete selected record, delete all record, mail all record to specified mail box and print current page.
Open Search Mode
Traffic Report
Refresh Delete Selected Record
Delete All Record
Send the report to your e-mail
Print this Page
33..33..44 IIMM In this page, you can check the IM records. At present, the supported IM software includes MSN Message, Yahoo Messenger, ICQ, QQ and etc.
Duration Time: Display the starting and ending time for this session.
UserName/IP: Display the name of the user who uses the IM service.
User Account: Display the mail address of the user who uses the IM service.
PeerAccount: Display the mail address of the peer that the user contacts.
Records: Display the length of the conversation between the user and the peer. Administrator can click the number to view the detailed content of the conversation.
Latest 20 days Such table can display daily IM usage report. In addition, you can
choose any day by using the drop-down list for viewing the monitoring report of other day.

SmartMonitor User’s Guide 41
Additionally, there are several icons provided for you to search specified file(s), view the traffic, refresh current page, delete selected record, delete all record, mail all record to specified mail box and print current page.
Open Search Mode
Traffic Report
Refresh Delete Selected Record
Delete All Record
Send the report to your e-mail
Print this Page
SSeeaarrcchhiinngg RReeccoorrdd
By clicking Open Search icon, you will get the following page.
User: Type the name of the user that you want to search.
User Account: Type the e-mail address of the user that you want to search.
PeerAccount: Type the e-mail address of the peer end that you want to search.
Type: Choose the type of IM software.
From: Specify the period for viewing the IM records between the user and the peer.
Search: Click this button to execute searching job and display on this page.
33..33..55 TTEELLNNEETT Some management of network equipment must be controlled by using Telnet. Additionally, more BBS also must be registered by using Telnet. This page can record all of such information completely for checking at any time.
Start Time Display the starting time of TELNET usage.
UserName/IP: Display the name of the user who uses the IM service.
WebSite: Display the website that the user uses.

SmartMonitor Series User’s Guide 42
Content: Display the content of TELNET usage.
Latest 20 days Such table can display daily traffic report. In addition, you can
choose any day by using the drop-down list for viewing the monitoring report of other day.
Additionally, there are several icons provided for you to search specified file(s), view the traffic, refresh current page, delete selected record, delete all record, mail all record to specified mail box and print current page.
Open Search Mode
Traffic Report
Refresh Delete Selected Record
Delete All Record
Send the report to your e-mail
Print this Page
33..33..66 PP22PP
Date/Time: Display the starting time of download.
UserName/IP: Display the user name and IP address for P2P service.
Upload speed: Display the speed of uploading.
Download speed: Display the speed of downloading.
Upload Size: Display the size of the file uploading.
Download Size: Display the size of the file downloading.
Type: Display the protocol for such service used.
File Name: Display the name of the file to be uploaded or downloaded.
Latest 20 days Such table can display daily P2P usage report. In addition, you can choose any day by using the drop-down list for viewing the monitoring report of other day.

SmartMonitor User’s Guide 43
Additionally, there are several icons provided for you to search specified file(s), view the traffic, refresh current page, delete selected record, delete all record, mail all record to specified mail box and print current page.
Open Search Mode
Traffic Report
Refresh Delete Selected Record
Delete All Record
Send the report to your e-mail
Print this Page
SSeeaarrcchhiinngg RReeccoorrdd
By clicking Open Search icon, you will get the following page.
User: Type the name of the user that you want to search.
Type: Choose the type that the user that you want to search.
Upload Size: Specify the file size of uploading file that you want to search.
From: Specify the period for viewing the P2P records between the user and the peer sides.
Download Size: Specify the file size of downloading file that you want to search.
Search: Click this button to execute searching job and display on this page.
33..33..77 WWEEBBDDOOWWNN This page displays the file downloading record through HTTP protocol (web browser, I.E, Firefox, etc.)

SmartMonitor Series User’s Guide 44
Date/Time: Display the time and date that the file downloaded.
User Name/IP: Display the user name or IP address that downloads the file.
File Name: Display the filename(s) that downloaded from web browser, e.g., I.E.
Size: Display the size of the data.
Additionally, there are several icons provided for you to search specified file(s), view the traffic, refresh current page, delete selected record, delete all record, mail all record to specified mail box and print current page.
Open Search Mode
Traffic Report
Refresh Delete Selected Record
Delete All Record
Send the report to your e-mail
Print this Page
SSeeaarrcchhiinngg RReeccoorrdd
By clicking Open Search icon, you will get the following page.

SmartMonitor User’s Guide 45
User: Type the name of the user that you want to search.
File: Choose the
Size: Specify the file size that you want to search.
From: Specify the period for viewing the WEBDOWN records.
Search: Click this button to execute searching job and display on this page.
33..33..88 SSTTOOCCKK This page display information about stock name, IP address/username of the one who review the stocks, what application software used for reviewing stock and the duration time of the stock reviewing.
Duration Time: Display the time for the stock.
User NameIP: Display the user name/IP address of the one who reviews the stock.
Stock Name: Display the name for the stock.
Stock Tool: Display the tool that user used to review the stock information.
Additionally, there are several icons provided for you to search specified file(s), view the traffic, refresh current page, delete selected record, delete all record, mail all record to specified mail box and print current page.
Open Search Mode
Traffic Report
Refresh Delete Selected Record
Delete All Record
Send the report to your
Print this Page

SmartMonitor Series User’s Guide 46
SSeeaarrcchhiinngg RReeccoorrdd
By clicking Open Search icon, you will get the following page.
User: Type the name of the user that you want to search.
Stock Name: Choose the
Stock Tool: Choose the tool of the data storage used.
From: Specify the period for viewing the STOCK records.
Search: Click this button to execute searching job and display on this page.
33..33..99 TToopp 1100 Such page display the top 10 service that users utilize most.
Service Top 10 is used to display the network records under different services that appear frequently, for example, the website which is usually visited, accounts which transfers lots of mails, and so on.
With viewing Service Top 10, it is easy to find out the using custom of the grouping network and then configure proper firewall for the network.
Latest 20 days Such table can display daily traffic report. In addition, you can
choose any day by using the drop-down list for viewing the monitoring report of other day.
33..44 UUsseerr AAnnaallyyssiiss

SmartMonitor User’s Guide 47
33..44..11 RReeccoorrddss && RReeppoorrtt Such page displays records/report for monitored users under different group/department. All the users will be listed below.
You can click the name link to see the detailed analysis. Different services shared by the user will be listed. The number shown after the service indicates that user has accessed that service at that day.
From the above figure we can see there are 52 mails, 29 HTTP records and 4 TELNET records. Click on it to access the viewing page to check the total records of the service that user utilizes within specified time.

SmartMonitor Series User’s Guide 48
33..44..22 UUsseerr BByy TTrraaffffiicc This page displays the network traffic of each user. If any abnormal usage is found, the administrator can correct it in time.
Moreover, according to the protocol (TCP/UDP/FTP/SMTP…..) used by the user, the administrator can review the ranking of each traffic and find the unreasonable network application in time.
Latest 20 days Such table can display daily traffic report. In addition, you can
choose any day by using the drop-down list for viewing the monitoring report of other day.
33..44..33 TToopp 1100 This page displays top 10 users who use that service at that day.
This page will list the ranking of network services for users. The administrator can easily find which user/which network service is used frequently. Moreover, with clicking the user name, the service using log of that user can be inspected by the administrator easily.
In addition, such function can be open to anonymous users. Even general users can check and view their network usage ranking and restraint their network behaviors.

SmartMonitor User’s Guide 49
Latest 20 days Such table can display daily traffic report. In addition, you can
choose any day by using the drop-down list for viewing the monitoring report of other day.
33..55 RReeppoorrtt
33..55..11 SSeerrvviiccee TTrraaffffiicc Such page displays the percentage for the traffic of each service that users have accessed.

SmartMonitor Series User’s Guide 50
Latest 20 days Such table can display daily service traffic report. In addition, you can choose any day by using the drop-down list for viewing the monitoring report of other day.
33..55..22 SSttaattiissttiiccss Traffic and storage utilization will be displayed with table, 3D Chart and Pie Chart for your reference. Simply click the 3D Chart/Pie Chart button to have a clear view for statistics.
33..55..33 PPrreevviieeww && EExxppoorrtt Such page displays all the data traffic volume on FTP, MAIL, HTTP, IM, TELNET, P2P and Top 10 within one day with bar chart and table.
All the data can be previewed in this page and exported with PDF files for off-line viewing by the administrator.
Besides, this page also provides reports delivering to the administrator if the radio button of E-Mail is selected. Everyday the administrator can receive the daily network report transferred by SmartMonitor to inspect the usage of network without logging into SmartMonitor.

SmartMonitor User’s Guide 51
Export To: PDF - The statistics report can be exported as a PDF file. Click the PDF radio button and click Execute. A file download dialog box will appear. In general, the file will be stored with the name of “SmartMonitro_Report.pdf”. Please click Save to save it and view it later. Or, click Open to view it right away. E-MAIL- The statistics report can be sent to the e-mail address specified in System>>Admin automatically based on the account you use for logging into SmartMonitor. If you want to get such statistics from SmartMonitor everyday, simply check the box of “Automatically sent everyday”. Next, click Execute.
Latest 20 days Such table can display statistics of the latest 20 days. You can choose any day by using the drop-down list for viewing the monitoring report.

SmartMonitor Series User’s Guide 52
4 AApppplliiccaattiioonn
44..11 BBee aa GGoooodd NNeettwwoorrkk AAddmmiinniissttrraattoorr To the network administrators, they always care about how to deploy the best firewall to maximum the enterprise efficiency. However, in configuring the firewall, corresponding information for reference always is shortage. Usually, the administrator can just configure the firewall with personal subject judge. Therefore, the best configuration of the firewall always cannot be reached easily.
After configuring SmartMonitor, the above distress can be improved. SmartMonitor not only is a monitoring tool, but also provides guidance to configure the firewall for the administrator with the rich statistics information.
44..11..11 RReedduucciinngg WWeebb PPaaggee VViissiittiinngg ooff NNoonn--WWoorrkk UUssaaggee Employers always browse various web pages for their jobs. Some of the web pages have something to do with their jobs, however, some of them do not. Therefore, the network administrator usually wishes to reduce the web page visiting that has no relationship with the work.
With the statistics function of Smart Monitor, the web sites which are visited frequently and not related to the jobs will be blocked in the firewall easily.
To achieve such purpose, follow the steps below:
A. Use the Service Top 10 function of SmartMonitor (Service Analyssi>> Top 10).
From the above figure we can see that rss.tw.msn.com,tw.stock.yahoo.com, news.chinatimes.com typically are not related to the jobs. That is, they should be forbidden.
In addition, we also can find several common keywords, rss, stock, news, chinatimes. Next, we can open firewall setting page for configuration.
B. Open Firewall>>URL Content Filter by accessing Vigor router’s web configurator.

SmartMonitor User’s Guide 53
With the above two steps, these websites being visited frequently can be blocked. Meanwhile, the related news web site, stock web site will be filtered.
However, users always will try and change another route if they find one way being blocked. To solve this problem, simply observe the usage custom for a time-spam and repeat the above steps to optimize the firewall settings. Then, the firewall configuration will be toward to be perfect in the future.
A superior administrator not only manages the users for the whole network, but also he can configure the network for different usage based on the practical conditions. Smart Monitor provides analysis tool to make the analysis of the users’ customs in web site visiting for carrying out rule settings.
44..11..22 RReedduucciinngg IIMM AApppplliiccaattiioonn ooff NNoonn--WWoorrkk UUssaaggee By following the popularization of MSN and QQ, IM software is indispensable to most of the people nowadays. However, the abuse of MSN and QQ has affected the operation efficiency of the enterprise.
Even lots of important data are revealed outside due to the convenience of IM application. SmartMonitor not only records the chatting of IM, but also restores the chatting records faithfully. Thus, all the information transferred by IM can be recorded, viewed and searched at any time.
There are two ways of recording IM offered for the administrator for a reference:
A. Chatting record of the user
The chatting record can be viewed through Service Analysis>>IM.
B. Top 10 of IM Usage

SmartMonitor Series User’s Guide 54
There are two ranking records for the administrator to check, one is user top 10 and the other is service top 10.
From these two rankings, we can know the habit of the user and the IM account appeared frequently. With these two records, the administrator can analyze the using custom of the users and provide suggestions for configuring suitable firewall settings.
For the one who often uses IM for chatting only, we can configure the firewall setting by accessing the router’s web configurator to block the application of IM of that user.
Simply check the items for disallow and configure the rule of the firewall, it can make the specified user not using some/several IM software.
44..11..33 BBeesstt CCoonnffiigguurraattiioonn ffoorr OOtthheerr NNeettwwoorrkk SSeerrvviiccee Basically, SmartMonitor contains main stream of network applications. By monitoring the application of Telnet, e-mail, and P2P, the administrator can use SmartMonitor to analyze the problems encountered or low usage efficiency via the charts and diagrams on SmartMonitor.
More important is that Vigor series firewall router also offers sufficient built-in service configuration for IM and P2P applications. The administrator can make a good control through the firewall configuration.
With the joint application of Smart Monitor and Vigor router, enterprise network can be utilized with highest efficiency.
44..22 LLeeaaddiinngg iinn SSeellff--MMaannaaggiinngg ffoorr CCrreeaattiinngg HHiigghh EEffffiicciieennccyy OOffffiiccee EEnnvviirroonnmmeenntt
The purpose of management is to increase the work efficiency of the enterprise.Many companies strengthen the management vigor in every phase just for such purpose. However, we always find that employers can not accept such limits due to the severe network rule limitations. As a result, managing problem might be brought out and affect the work efficiency.
To solve such problem, Smart Monitor offers simple system ranking to assist the users in enterprise to do self-management. Smart Monitor can carry out ranking for various network applications and list the Top 10. Such ranking can be open to anonymous users for checking.

SmartMonitor User’s Guide 55
Users can check their network ranking with anonymous logging to Smart Monitor. For example, if it is not necessary for the user to use IM software excessively in his work, the user will reduce the usage of IM software when he finds the IM application ranking has been listed in Top 10.
When all the users in the enterprise can think network application over and over and reduce the IM application, a trend of reducing IM application will be produced automatically. Thus, self-management for every user can be reached freely and easily.
Below shows the steps to make anonymous logging for all users in an enterprise:
1. Open System>>Setting and check Allow login anonymously.
2. Use a browser to open Smart Monitor interface. Click Anonymous Login.

SmartMonitor Series User’s Guide 56
3. The web page for anonymous login will be displayed on the screen with few menu items.
Anonymous user can only view top 10 of traffic usage and top 10 of users. Therefore the anonymous user can check if the usage traffic and network service of the user has been listed on Top 10.
After deploying SmartMonitor, the administrator can notify all the users of anonymous logging. Everyone can check the network application by himself at any time. Even, they can remind for each other and restrain their network behavior. Thus, self management mechanism can be achieved easily in the whole network.