Embed Size (px)
Citation preview
SmartCash SmartNode Setup Guide V1.2 Windows 10 13/01/2018 By (Jazz) yoyomonkey
Page | 1
SmartCash SmartNode Setup Guide v1.2
Windows 10
Date: 13/01/2018
By (Jazz) yoyomonkey
Introduction
Welcome to this step by step guide that will take you through the process of creating your own
SmartCash SmartNode. This guide is aimed at the casual Windows 10 PC user who has
already installed the SmartCash Wallet, purchased SmartCash from an exchange but has little
or no experience of using Linux or VPS (virtual private servers).
This is an in-depth guide that will be broken into sections. The document will attempt to give
a very concise explanation of each step accompanied by relevant screengrabs.
As a recommendation, please read through each section first and try to understand what is
going on before doing it. As soon as one section is complete, please move to the next one.
Don’t miss any steps and please take your time.
The views and opinions expressed in this document are from the author only. This document
is not an official document of the SmartCash team and has only been created by a hive
member in the hope to assist others.
Corrections and Comments
If you like the guide or would like to give any feedback please contact yoyomonkey on the
SmartCash discord channel.
Creating a Virtual Private Server (VPS)
For a small monthly fee, you can run your own Virtual Private Server to host a SmartNode
without having to create one at home and having the extra headache of worrying about having
your machine running 24/7 and managing static IP-addresses etc.
This guide has been created to give a step by step account using Digital Ocean. However, I
would like to state that there is no recommended preference from the SmartCash team for
picking a VPS service.
To demonstrate that the service offerings are very similar, I have also included an “OPTIONAL
SECTION 3” for vultr.com to show an alternate VPS setup process. Compare the 2 Sections
and pay attention that the requirements and setup are very similar.
A list has been compiled of alternate VPS providers and I would encourage all SmartNode
creators to do their own research and pick the best service that suits them.
SmartCash SmartNode Setup Guide V1.2 Windows 10 13/01/2018 By (Jazz) yoyomonkey
Page | 2
Typing “VPS Hosting Providers” in a Google Search should return a number of possible VPS
providers that can be used.
Name Link
Amazon AWS https://aws.amazon.com/
Microsoft Azure https://portal.azure.com/
Google Cloud https://cloud.google.com/
Digital Ocean https://www.digitalocean.com/
Vultr VPS https://www.vultr.com/
Chunk Host https://chunkhost.com/
VPS Net https://www.vps.net/
Host-it.co.uk https://www.host-it.co.uk
VPS City (SmartCash Accepted) https://www.vps-city.com
Offshore Hosting Space (SmartCash Accepted) http://offshorehostingspace.org/
Requirements
10,000 SmartCash for each SmartNode.
Computer for running a local wallet only to start nodes and hold funds. Windows is used in
this guide, but other QT version wallets work.
VPS server for remote node running 24hrs/day which includes:
• 1GB RAM (about half used for the OS and half for the daemon we install)
• 20GB drive (less than 1GB used for wallet, some for OS, and some for future.
• 1 Static IPV4 Address per node (IPV4 address that never changes) (No IPV6)
The remote node is actually the SmartNode, but for this guide we will call that remote node.
Section 1: Configure Windows SmartCash Wallet
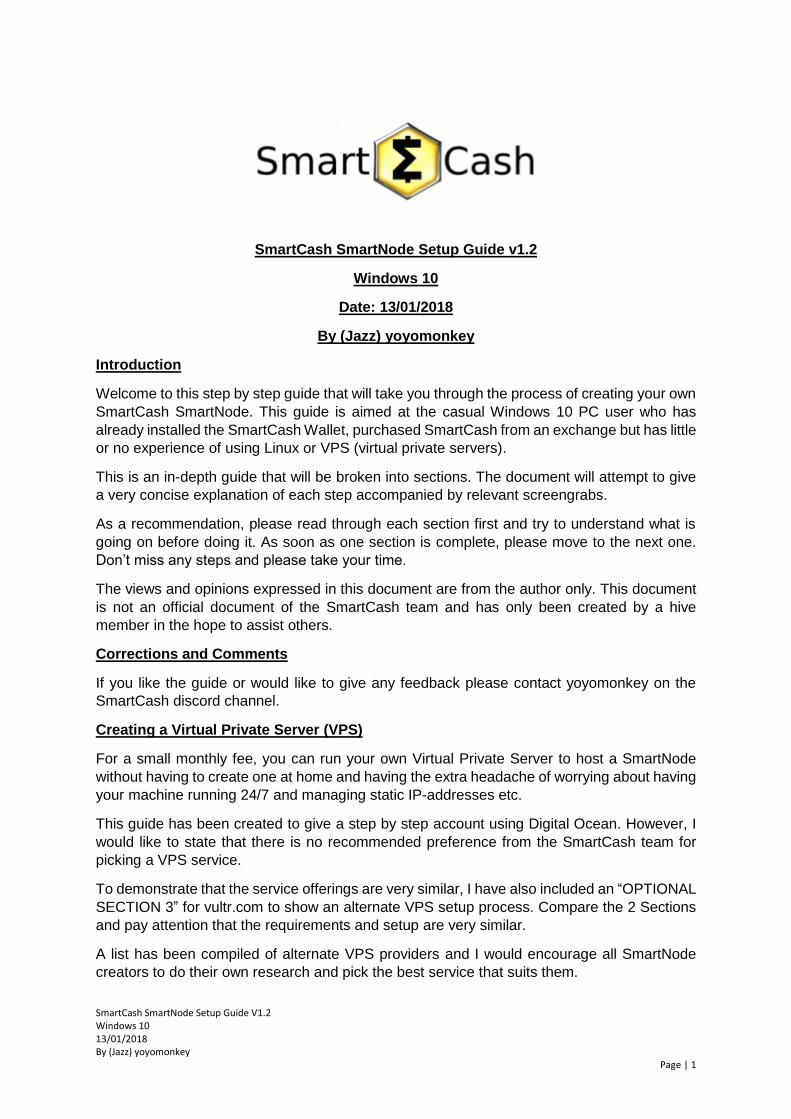
1. Install the 1.1.0 SmartCash wallet from https://smartcash.cc/wallets/
2. On your Windows machine start your SmartCash wallet.
SmartCash SmartNode Setup Guide V1.2 Windows 10 13/01/2018 By (Jazz) yoyomonkey
Page | 3
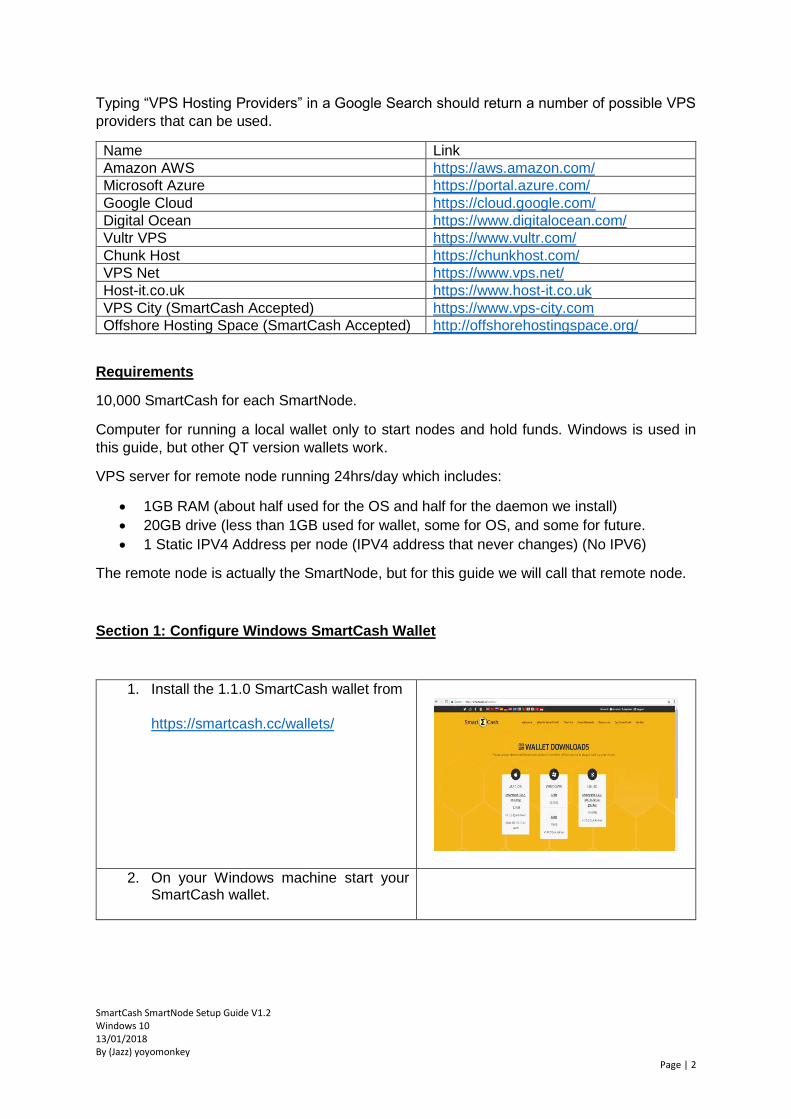
3. As soon as the wallet starts up go to the File menu and select “Exit”. We need to make a config change before syncing the wallet to make it able to manage the SmartNodes.
4. To run a SmartNode we need to create a smartcash.conf file in the %appdata%/Smartcash” folder (or the Data directory you selected when you installed the SmartCash Installer). Right click and select create text file. Right-click and edit with notepad. rpcuser=AUSERNAME rpcpassword=PASSWORD txindex=1 Go to Save As and save the file name as “smartcash.conf” BUT INCLUDE the “double quotes” to force the extension of .conf.
5. Start the SmartCash wallet again.
SmartCash SmartNode Setup Guide V1.2 Windows 10 13/01/2018 By (Jazz) yoyomonkey
Page | 4
6. Wait for the wallet to fully sync. This can take up to 8 hours depending on many factors including Network Traffic. Look for the tick in the Bottom Right Corner of the wallet to signify that the wallet has fully synced.
7. Go to File in the top menu bar and then select “Receiving addresses”.
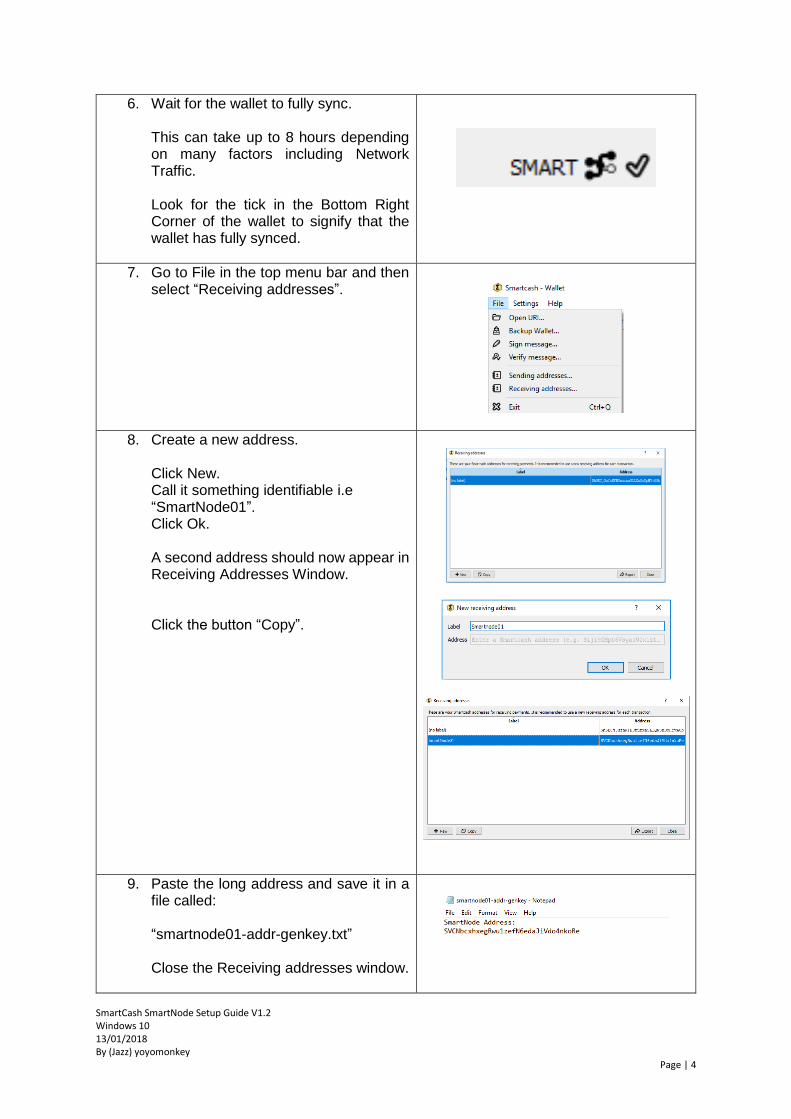
8. Create a new address. Click New. Call it something identifiable i.e “SmartNode01”. Click Ok. A second address should now appear in Receiving Addresses Window. Click the button “Copy”.
9. Paste the long address and save it in a file called: “smartnode01-addr-genkey.txt” Close the Receiving addresses window.
SmartCash SmartNode Setup Guide V1.2 Windows 10 13/01/2018 By (Jazz) yoyomonkey
Page | 5
10. In the SmartCash wallet select Help in the top menu bar. Click “Debug window”
11. In the Debug window click the console tab.
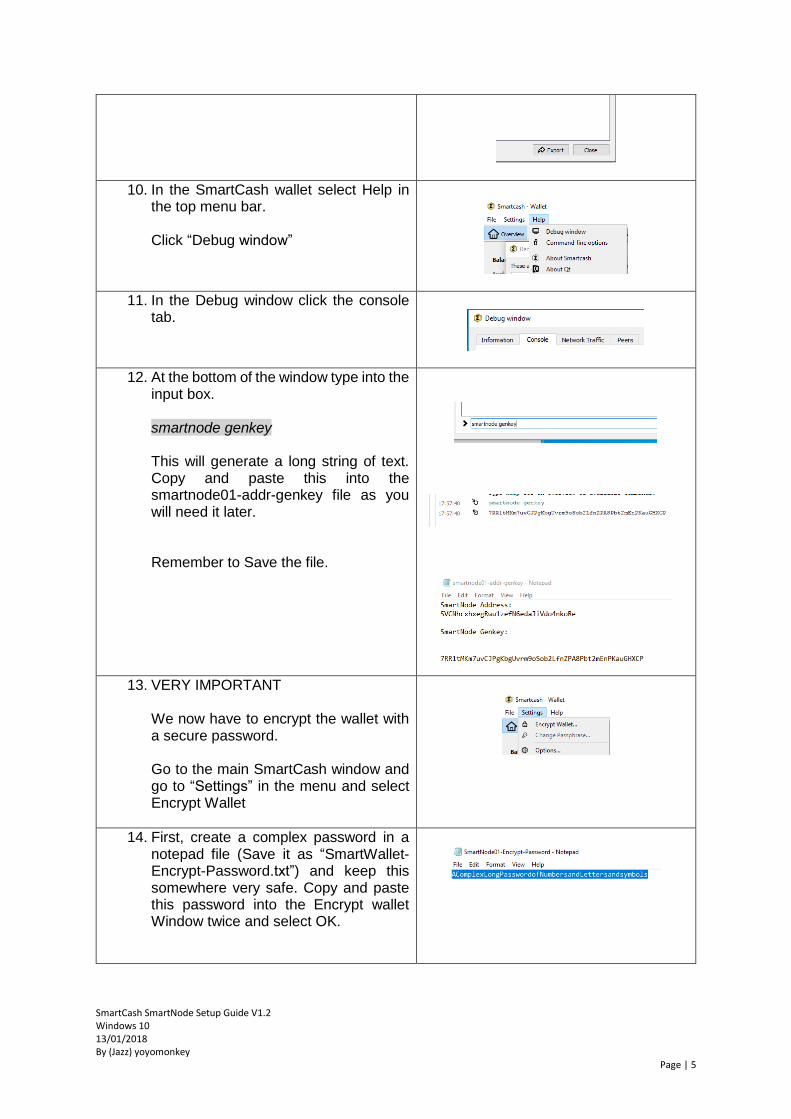
12. At the bottom of the window type into the input box. smartnode genkey This will generate a long string of text. Copy and paste this into the smartnode01-addr-genkey file as you will need it later. Remember to Save the file.
13. VERY IMPORTANT
We now have to encrypt the wallet with a secure password. Go to the main SmartCash window and go to “Settings” in the menu and select Encrypt Wallet
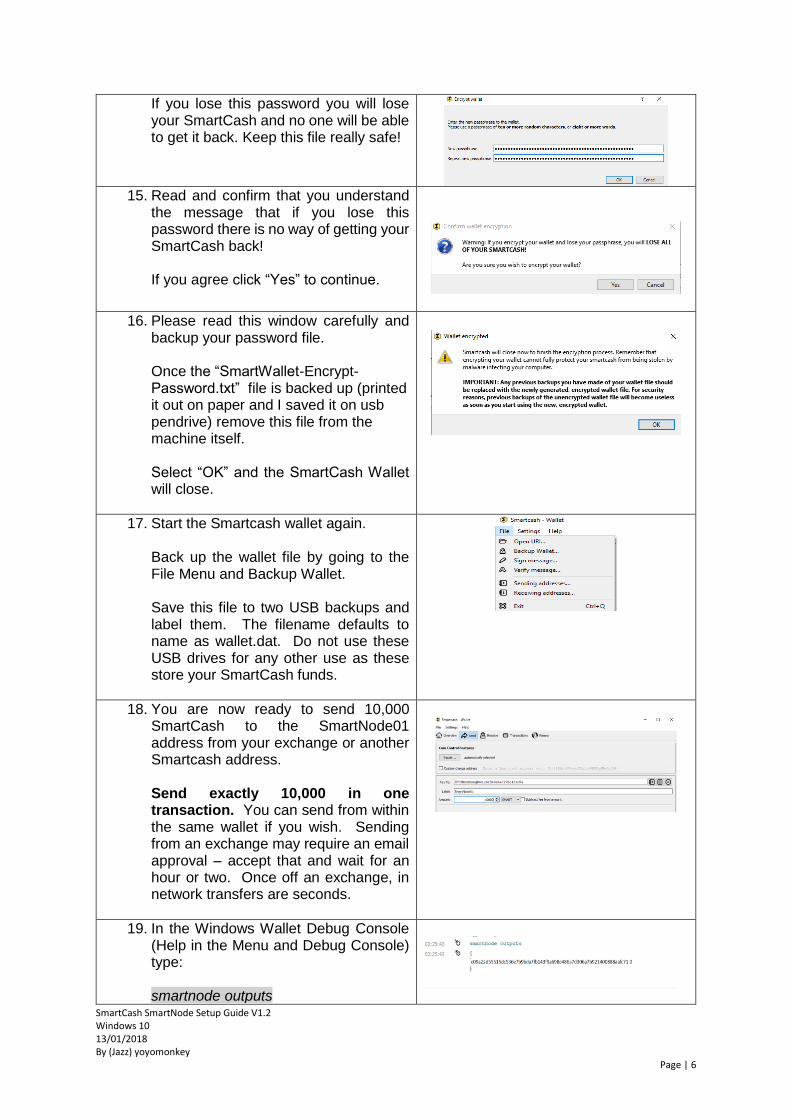
14. First, create a complex password in a notepad file (Save it as “SmartWallet-Encrypt-Password.txt”) and keep this somewhere very safe. Copy and paste this password into the Encrypt wallet Window twice and select OK.
SmartCash SmartNode Setup Guide V1.2 Windows 10 13/01/2018 By (Jazz) yoyomonkey
Page | 6
If you lose this password you will lose your SmartCash and no one will be able to get it back. Keep this file really safe!
15. Read and confirm that you understand
the message that if you lose this password there is no way of getting your SmartCash back! If you agree click “Yes” to continue.
16. Please read this window carefully and backup your password file. Once the “SmartWallet-Encrypt-Password.txt” file is backed up (printed it out on paper and I saved it on usb pendrive) remove this file from the machine itself. Select “OK” and the SmartCash Wallet will close.
17. Start the Smartcash wallet again. Back up the wallet file by going to the File Menu and Backup Wallet. Save this file to two USB backups and label them. The filename defaults to name as wallet.dat. Do not use these USB drives for any other use as these store your SmartCash funds.
18. You are now ready to send 10,000 SmartCash to the SmartNode01 address from your exchange or another Smartcash address. Send exactly 10,000 in one transaction. You can send from within the same wallet if you wish. Sending from an exchange may require an email approval – accept that and wait for an hour or two. Once off an exchange, in network transfers are seconds.
19. In the Windows Wallet Debug Console (Help in the Menu and Debug Console) type: smartnode outputs
SmartCash SmartNode Setup Guide V1.2 Windows 10 13/01/2018 By (Jazz) yoyomonkey
Page | 7
Save the key and index(0,1,2..) in the file. smartnode01-addr-genkey.txt (Section 1: Step 9) We will need this file later on.
Once that is confirmed and you have backed up your files somewhere safe. Please continue with Section 2.
Section 2: Install Bitvise SSH Client
The Bitvise SSH Client is a program which will allow you to connect to and control remote
machines using the SSH protocol, which is for command line entry communication.
The remote node will be running 24/7 on a remote server. We can setup and maintain using
Bitvise with IP-address, username and password. As the remote node will be running for a
long duration, this guide will take it a step further by using secure keys to secure the connection
further. We suggest following the extra security measure so your SmartNode is not kicked
offline. There is no risk to funds, since they are not stored in this server anyway.
1. Open Google Chrome and go to https://www.bitvise.com/ssh-client.
2. Go to Downloads and select the
“Download Bitvise SSH Client (Tunneller).
3. Download the software and install. Read the Agreement and tick the “I agree to accept all the terms of this License Agreement”.
SmartCash SmartNode Setup Guide V1.2 Windows 10 13/01/2018 By (Jazz) yoyomonkey
Page | 8
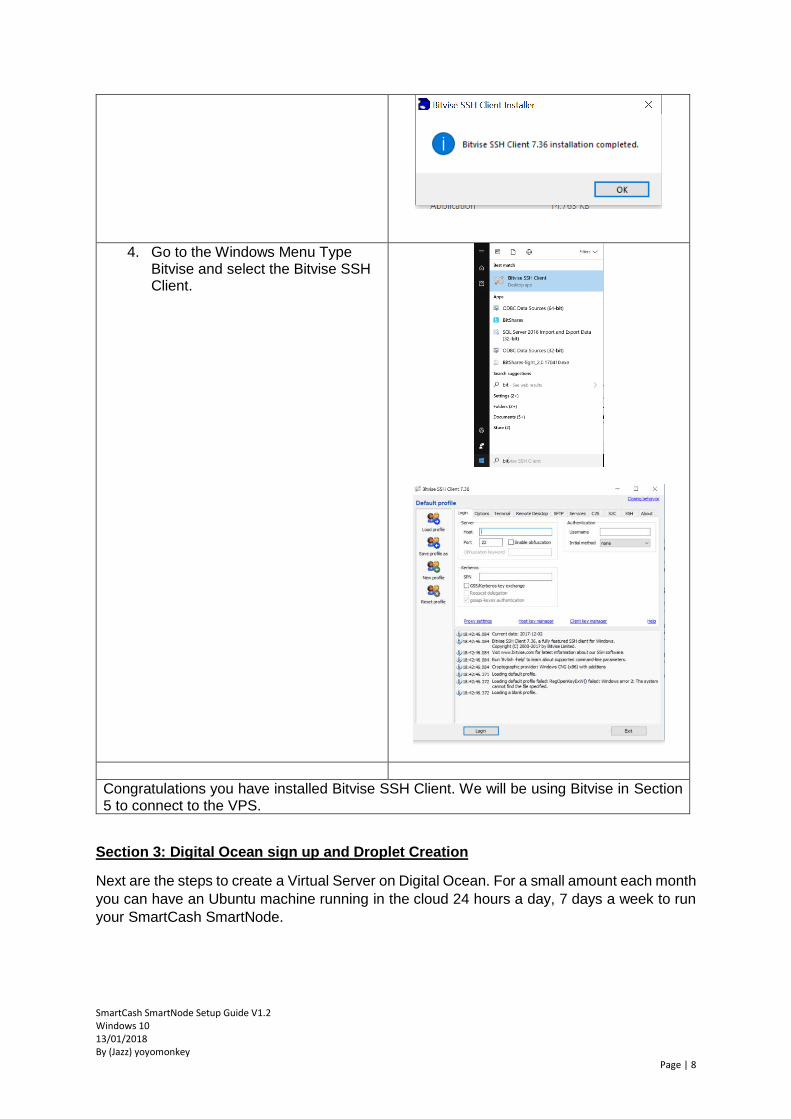
4. Go to the Windows Menu Type Bitvise and select the Bitvise SSH Client.
Congratulations you have installed Bitvise SSH Client. We will be using Bitvise in Section 5 to connect to the VPS.
Section 3: Digital Ocean sign up and Droplet Creation
Next are the steps to create a Virtual Server on Digital Ocean. For a small amount each month
you can have an Ubuntu machine running in the cloud 24 hours a day, 7 days a week to run
your SmartCash SmartNode.
SmartCash SmartNode Setup Guide V1.2 Windows 10 13/01/2018 By (Jazz) yoyomonkey
Page | 9
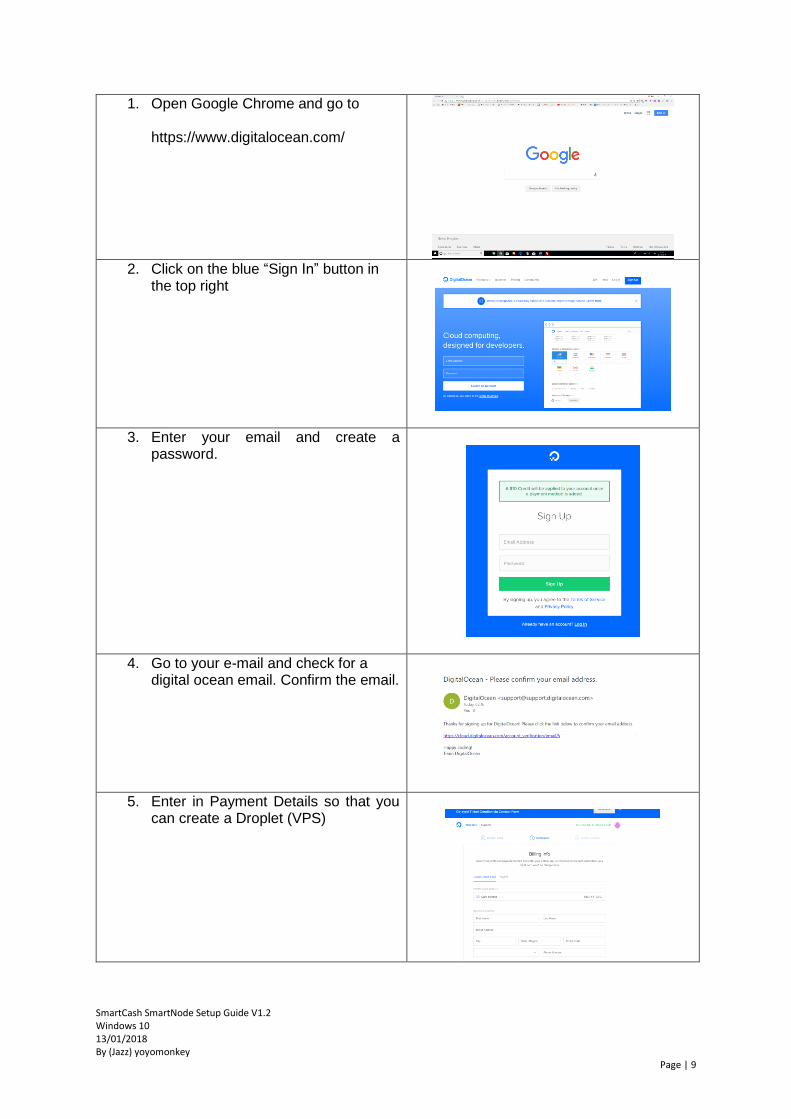
1. Open Google Chrome and go to https://www.digitalocean.com/
2. Click on the blue “Sign In” button in the top right
3. Enter your email and create a password.
4. Go to your e-mail and check for a digital ocean email. Confirm the email.
5. Enter in Payment Details so that you can create a Droplet (VPS)
SmartCash SmartNode Setup Guide V1.2 Windows 10 13/01/2018 By (Jazz) yoyomonkey
Page | 10
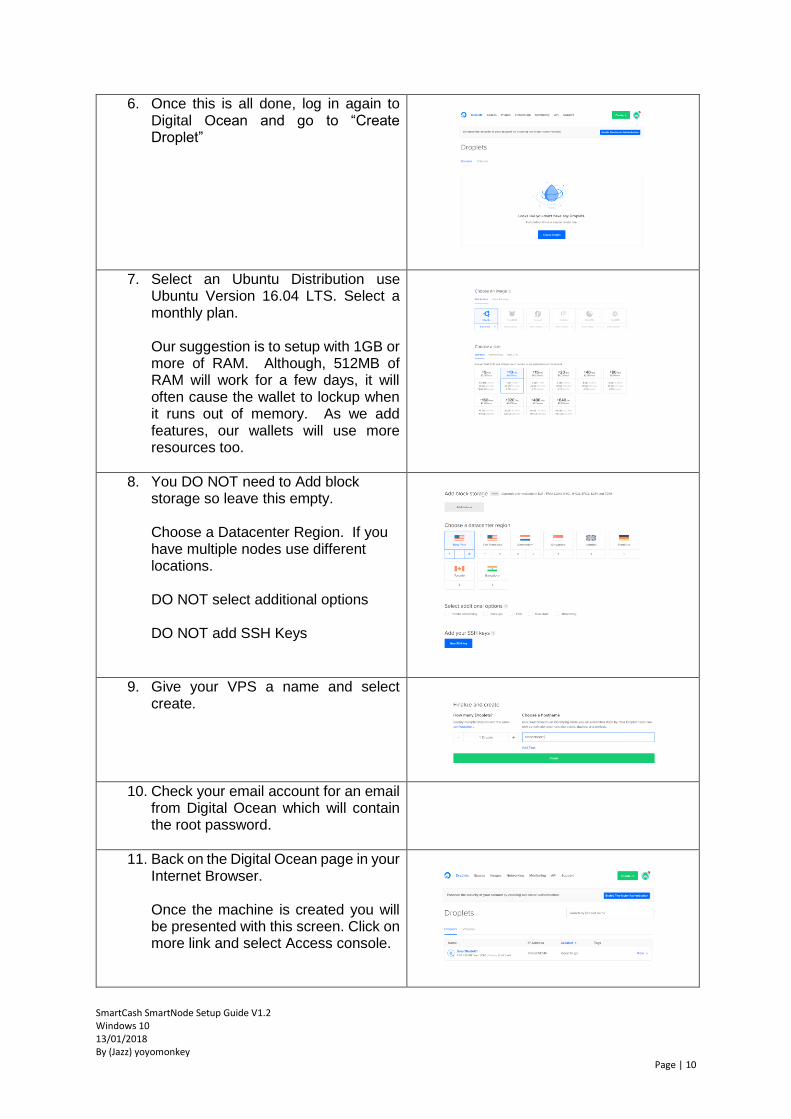
6. Once this is all done, log in again to Digital Ocean and go to “Create Droplet”
7. Select an Ubuntu Distribution use Ubuntu Version 16.04 LTS. Select a monthly plan. Our suggestion is to setup with 1GB or more of RAM. Although, 512MB of RAM will work for a few days, it will often cause the wallet to lockup when it runs out of memory. As we add features, our wallets will use more resources too.
8. You DO NOT need to Add block storage so leave this empty. Choose a Datacenter Region. If you have multiple nodes use different locations. DO NOT select additional options DO NOT add SSH Keys
9. Give your VPS a name and select create.
10. Check your email account for an email from Digital Ocean which will contain the root password.
11. Back on the Digital Ocean page in your Internet Browser. Once the machine is created you will be presented with this screen. Click on more link and select Access console.
SmartCash SmartNode Setup Guide V1.2 Windows 10 13/01/2018 By (Jazz) yoyomonkey
Page | 11
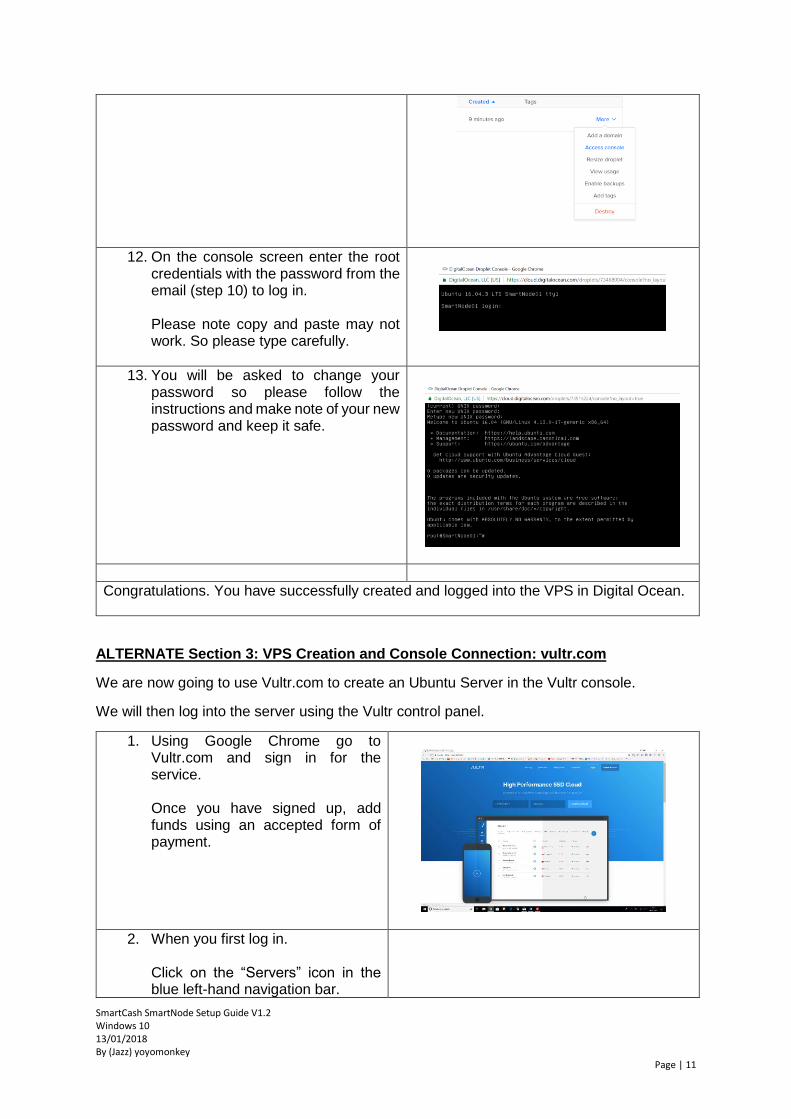
12. On the console screen enter the root credentials with the password from the email (step 10) to log in. Please note copy and paste may not work. So please type carefully.
13. You will be asked to change your password so please follow the instructions and make note of your new password and keep it safe.
Congratulations. You have successfully created and logged into the VPS in Digital Ocean.
ALTERNATE Section 3: VPS Creation and Console Connection: vultr.com
We are now going to use Vultr.com to create an Ubuntu Server in the Vultr console.
We will then log into the server using the Vultr control panel.
1. Using Google Chrome go to Vultr.com and sign in for the service. Once you have signed up, add funds using an accepted form of payment.
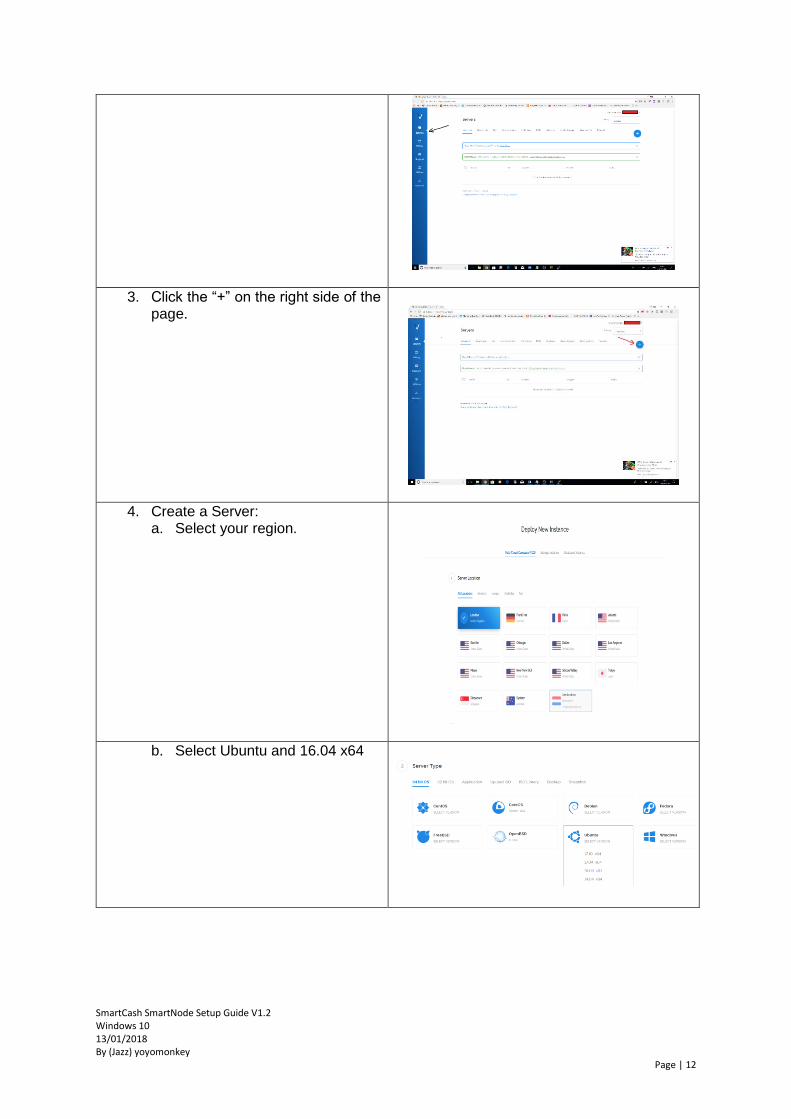
2. When you first log in. Click on the “Servers” icon in the blue left-hand navigation bar.
SmartCash SmartNode Setup Guide V1.2 Windows 10 13/01/2018 By (Jazz) yoyomonkey
Page | 12
3. Click the “+” on the right side of the page.
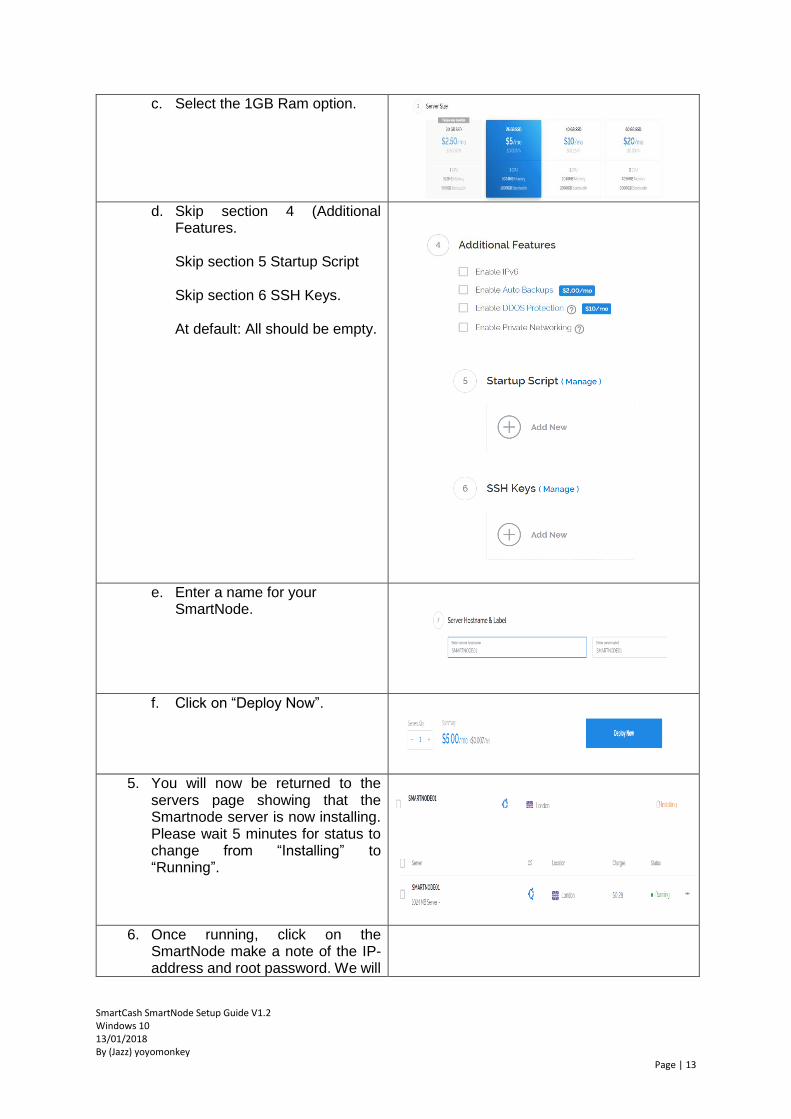
4. Create a Server: a. Select your region.
b. Select Ubuntu and 16.04 x64
SmartCash SmartNode Setup Guide V1.2 Windows 10 13/01/2018 By (Jazz) yoyomonkey
Page | 13
c. Select the 1GB Ram option.
d. Skip section 4 (Additional
Features. Skip section 5 Startup Script Skip section 6 SSH Keys. At default: All should be empty.
e. Enter a name for your SmartNode.
f. Click on “Deploy Now”.
5. You will now be returned to the servers page showing that the Smartnode server is now installing. Please wait 5 minutes for status to change from “Installing” to “Running”.
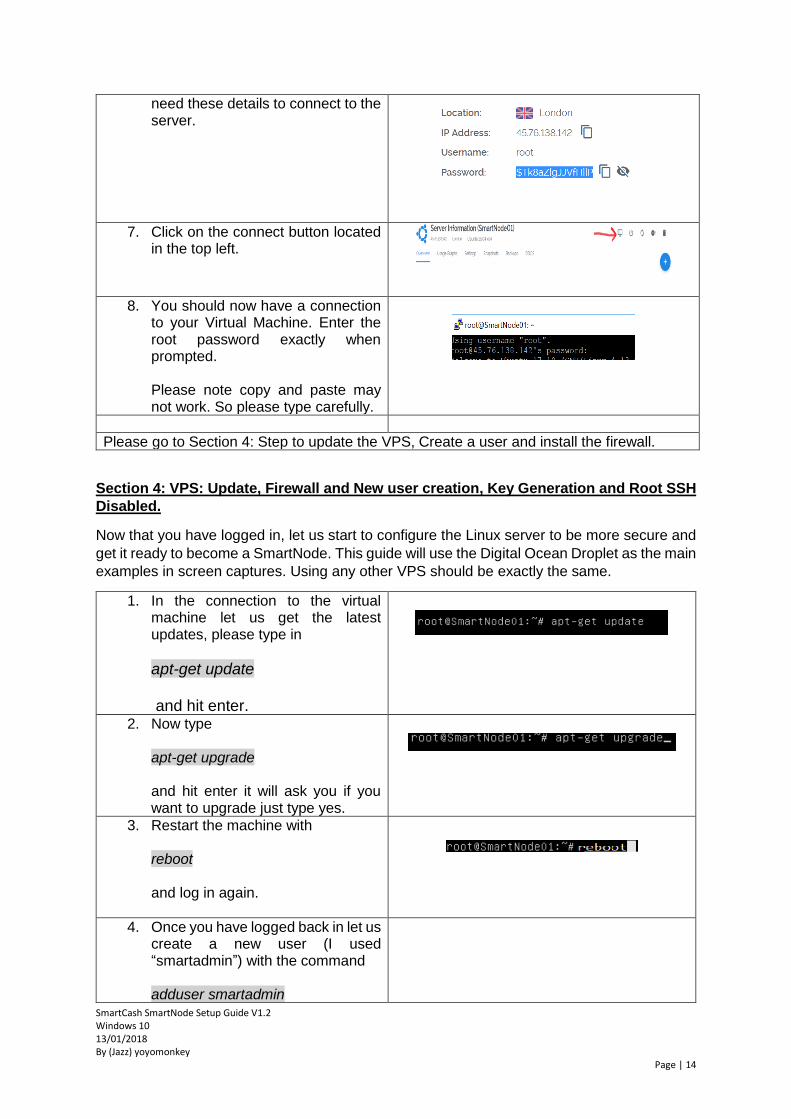
6. Once running, click on the SmartNode make a note of the IP-address and root password. We will
SmartCash SmartNode Setup Guide V1.2 Windows 10 13/01/2018 By (Jazz) yoyomonkey
Page | 14
need these details to connect to the server.
7. Click on the connect button located in the top left.
8. You should now have a connection to your Virtual Machine. Enter the root password exactly when prompted. Please note copy and paste may not work. So please type carefully.
Please go to Section 4: Step to update the VPS, Create a user and install the firewall.
Section 4: VPS: Update, Firewall and New user creation, Key Generation and Root SSH
Disabled.
Now that you have logged in, let us start to configure the Linux server to be more secure and
get it ready to become a SmartNode. This guide will use the Digital Ocean Droplet as the main
examples in screen captures. Using any other VPS should be exactly the same.
1. In the connection to the virtual machine let us get the latest updates, please type in
apt-get update and hit enter.
2. Now type apt-get upgrade and hit enter it will ask you if you want to upgrade just type yes.
3. Restart the machine with
reboot and log in again.
4. Once you have logged back in let us create a new user (I used “smartadmin”) with the command adduser smartadmin
SmartCash SmartNode Setup Guide V1.2 Windows 10 13/01/2018 By (Jazz) yoyomonkey
Page | 15
5. Enter the details for a password and
keep it safe.
6. You can enter the optional information but it is not necessary so you can just skip it by pressing enter.
7. Type Y for the question “Is this
information correct” and press enter.
8. Give the smartadmin the ability to elevate the user privileges when needed by adding the user to the sudo group with the command gpasswd -a smartadmin sudo
9. Let us install the firewall with apt-get install ufw
10. Open up the correct ports for the SmartNode to function later. ufw allow ssh/tcp ufw limit ssh/tcp ufw allow 9678/tcp ufw logging on ufw enable
11. Check the status of the firewall with ufw status
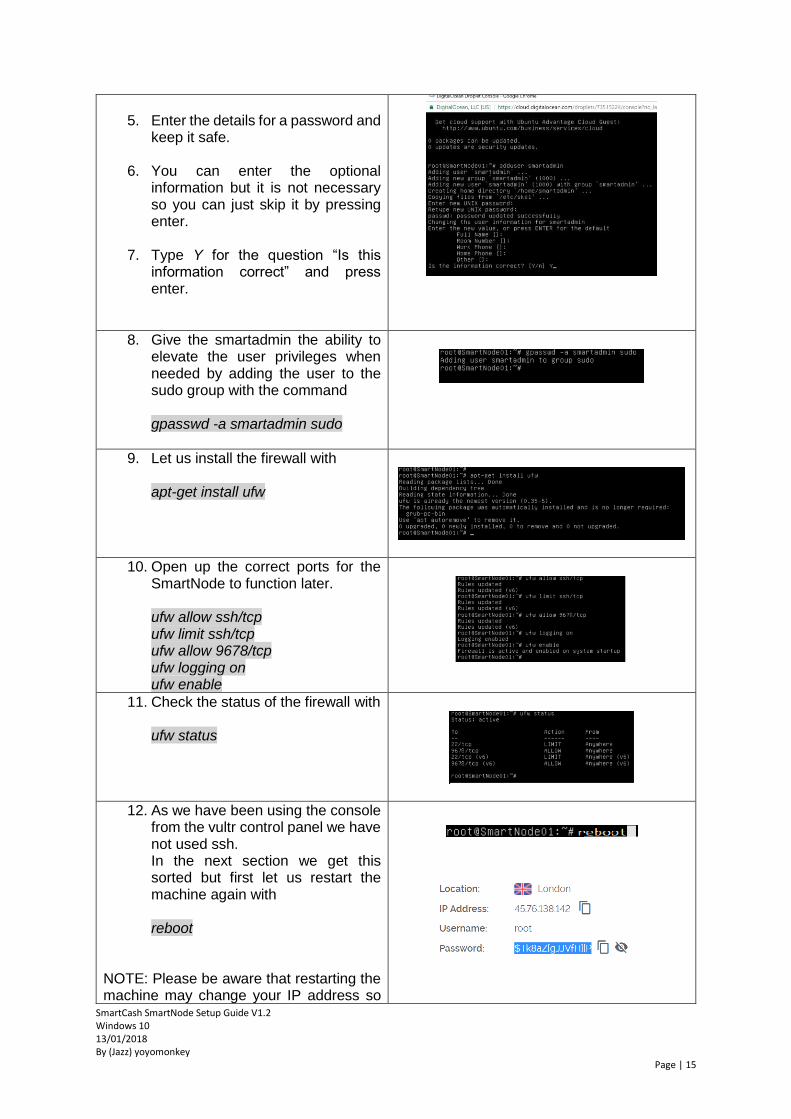
12. As we have been using the console from the vultr control panel we have not used ssh. In the next section we get this sorted but first let us restart the machine again with
reboot
NOTE: Please be aware that restarting the machine may change your IP address so
SmartCash SmartNode Setup Guide V1.2 Windows 10 13/01/2018 By (Jazz) yoyomonkey
Page | 16
please refer back to the website and check your ip has not changed in the reboot.
Congratulations you have successfully logged in as root, upgraded and updated the droplet. Created a new user smartadmin and installed/configured a firewall.
Section 5: Configure Secure Login as smartadmin using the privatekey
Now let us log in as the newly created user smartadmin and secure our SSH Connection
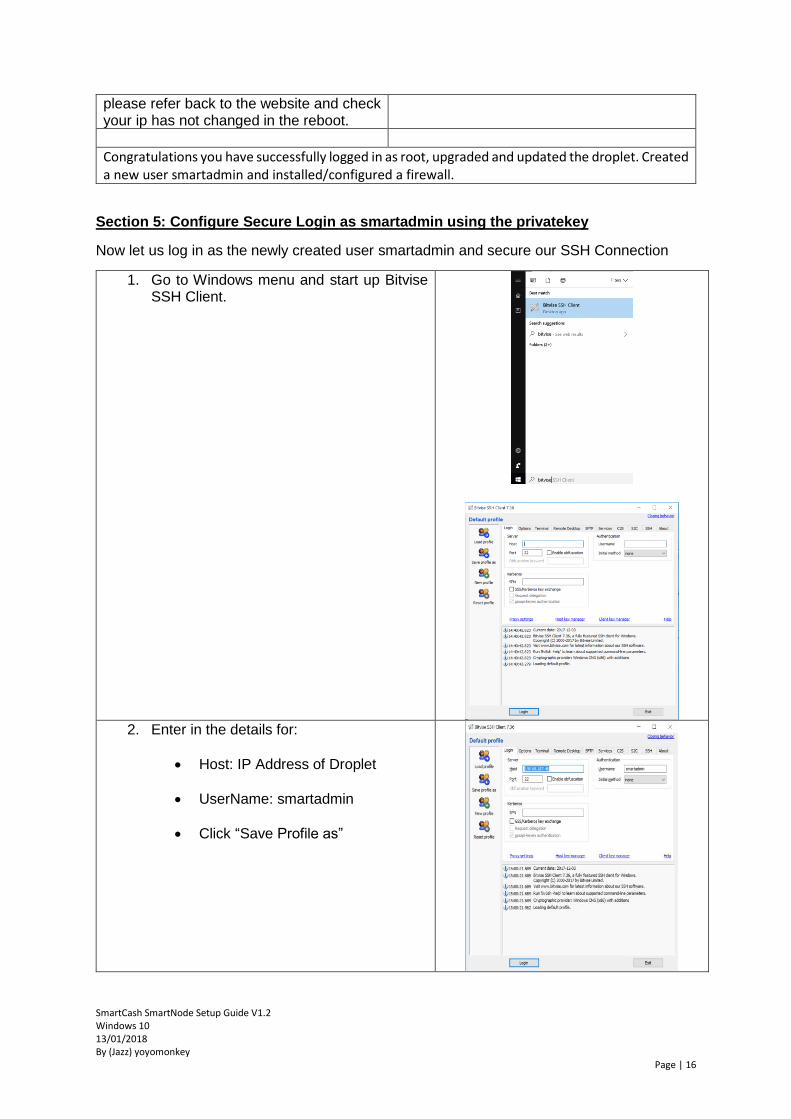
1. Go to Windows menu and start up Bitvise SSH Client.
2. Enter in the details for:
• Host: IP Address of Droplet
• UserName: smartadmin
• Click “Save Profile as”
SmartCash SmartNode Setup Guide V1.2 Windows 10 13/01/2018 By (Jazz) yoyomonkey
Page | 17
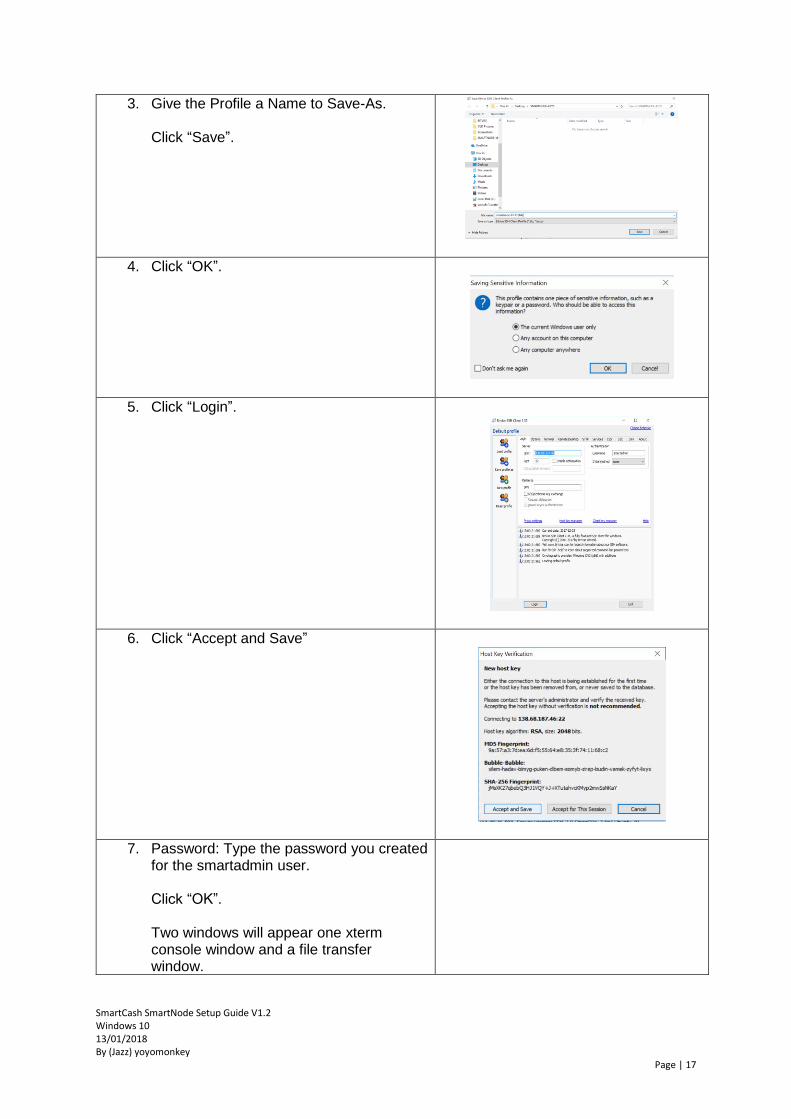
3. Give the Profile a Name to Save-As. Click “Save”.
4. Click “OK”.
5. Click “Login”.
6. Click “Accept and Save”
7. Password: Type the password you created for the smartadmin user. Click “OK”. Two windows will appear one xterm console window and a file transfer window.
SmartCash SmartNode Setup Guide V1.2 Windows 10 13/01/2018 By (Jazz) yoyomonkey
Page | 18
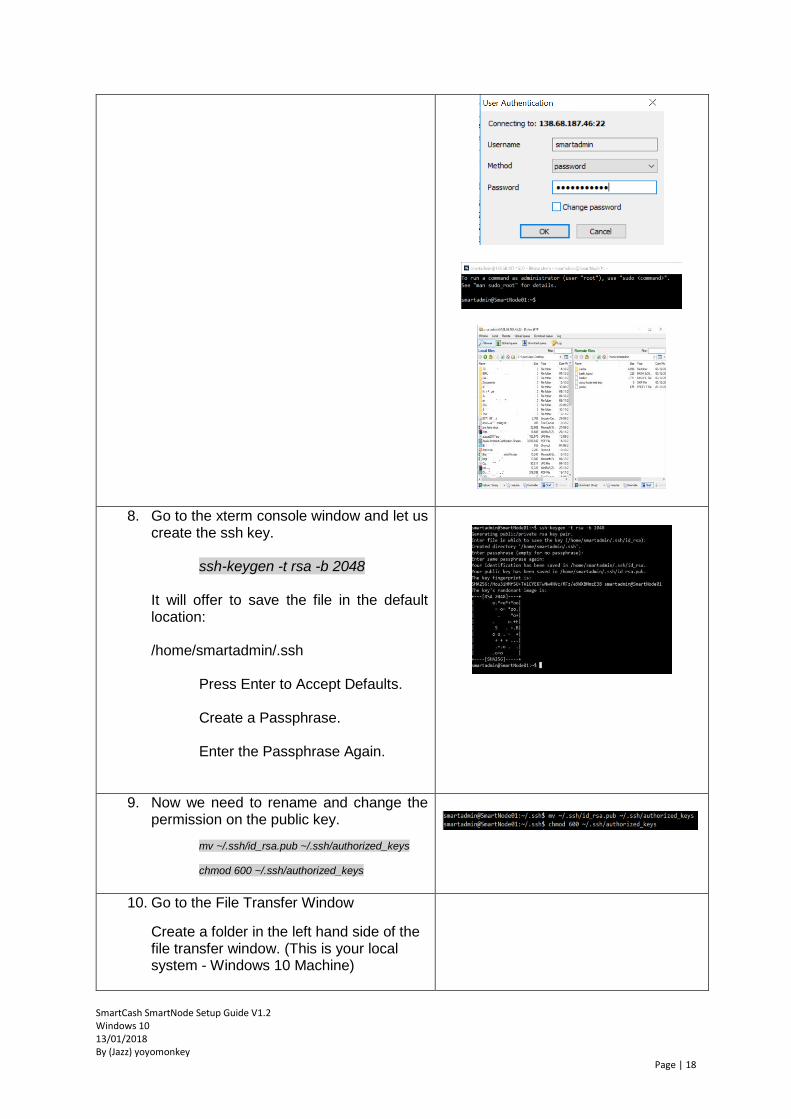
8. Go to the xterm console window and let us create the ssh key.
ssh-keygen -t rsa -b 2048 It will offer to save the file in the default location: /home/smartadmin/.ssh
Press Enter to Accept Defaults. Create a Passphrase. Enter the Passphrase Again.
9. Now we need to rename and change the permission on the public key.
mv ~/.ssh/id_rsa.pub ~/.ssh/authorized_keys
chmod 600 ~/.ssh/authorized_keys
10. Go to the File Transfer Window
Create a folder in the left hand side of the file transfer window. (This is your local system - Windows 10 Machine)
SmartCash SmartNode Setup Guide V1.2 Windows 10 13/01/2018 By (Jazz) yoyomonkey
Page | 19
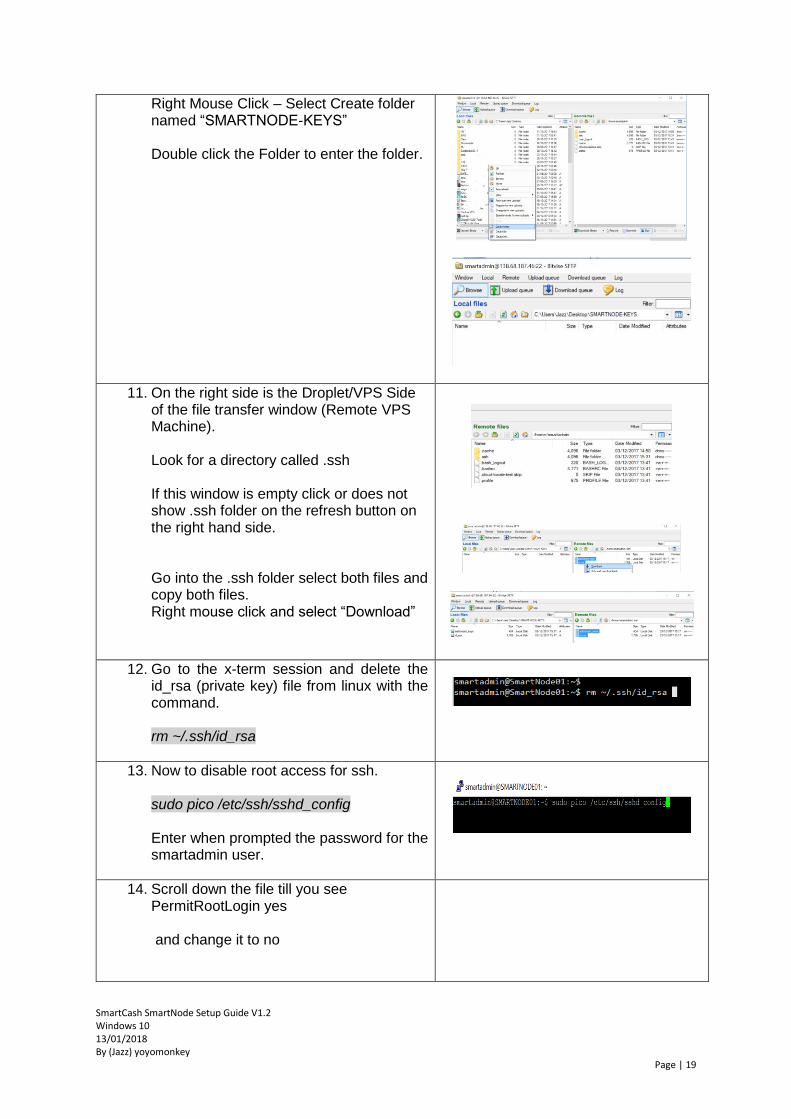
Right Mouse Click – Select Create folder named “SMARTNODE-KEYS” Double click the Folder to enter the folder.
11. On the right side is the Droplet/VPS Side of the file transfer window (Remote VPS Machine). Look for a directory called .ssh If this window is empty click or does not show .ssh folder on the refresh button on the right hand side.
Go into the .ssh folder select both files and copy both files. Right mouse click and select “Download”
12. Go to the x-term session and delete the id_rsa (private key) file from linux with the command. rm ~/.ssh/id_rsa
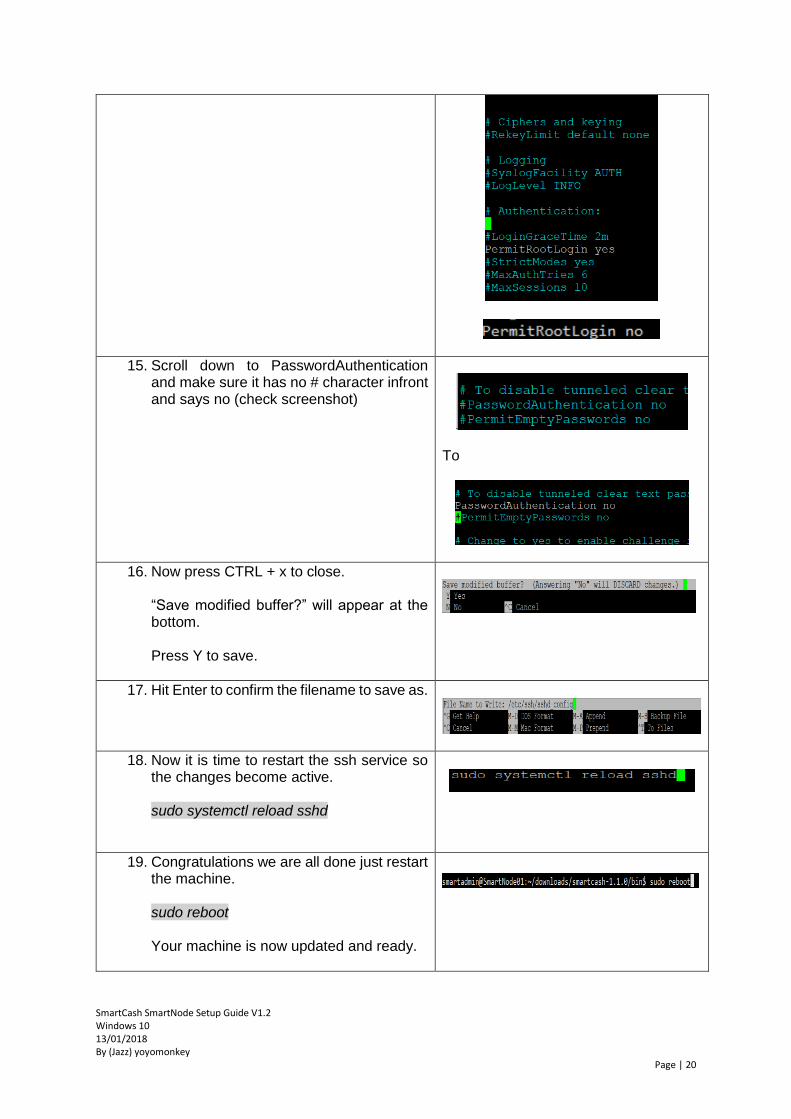
13. Now to disable root access for ssh. sudo pico /etc/ssh/sshd_config Enter when prompted the password for the smartadmin user.
14. Scroll down the file till you see PermitRootLogin yes and change it to no
SmartCash SmartNode Setup Guide V1.2 Windows 10 13/01/2018 By (Jazz) yoyomonkey
Page | 20
15. Scroll down to PasswordAuthentication and make sure it has no # character infront and says no (check screenshot)
To
16. Now press CTRL + x to close. “Save modified buffer?” will appear at the bottom. Press Y to save.
17. Hit Enter to confirm the filename to save as.
18. Now it is time to restart the ssh service so the changes become active. sudo systemctl reload sshd
19. Congratulations we are all done just restart the machine. sudo reboot Your machine is now updated and ready.
SmartCash SmartNode Setup Guide V1.2 Windows 10 13/01/2018 By (Jazz) yoyomonkey
Page | 21
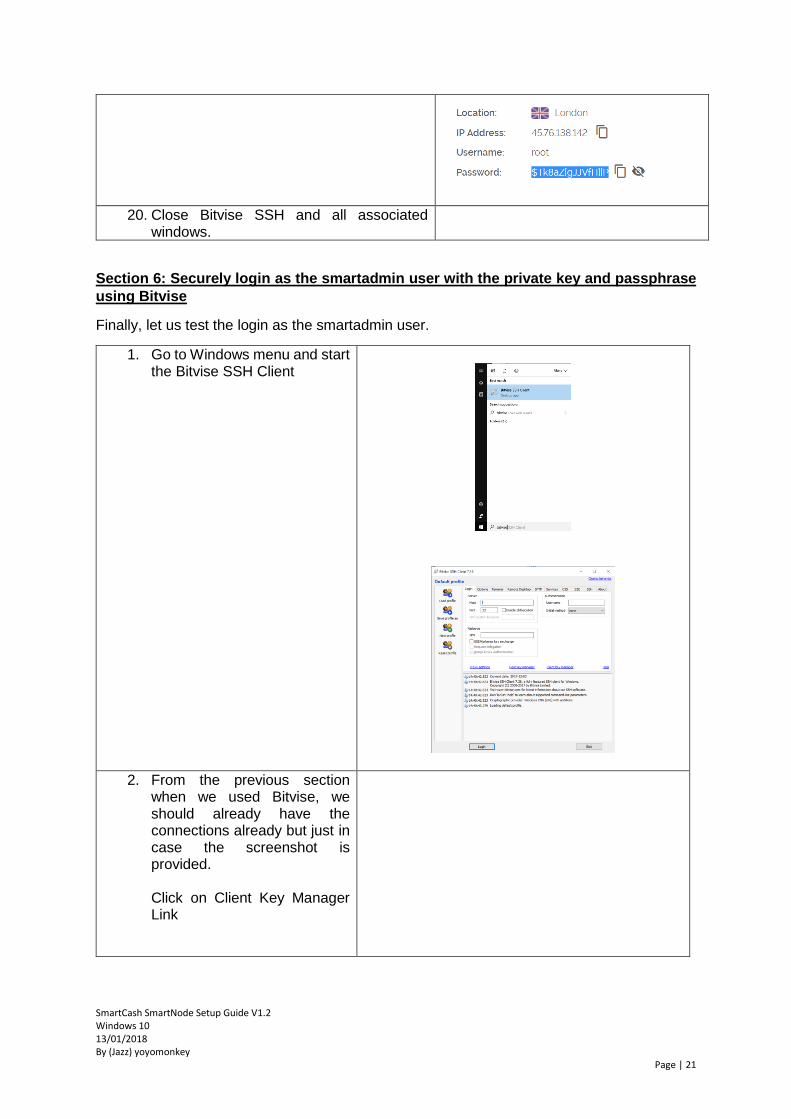
20. Close Bitvise SSH and all associated
windows.
Section 6: Securely login as the smartadmin user with the private key and passphrase
using Bitvise
Finally, let us test the login as the smartadmin user.
1. Go to Windows menu and start the Bitvise SSH Client
2. From the previous section when we used Bitvise, we should already have the connections already but just in case the screenshot is provided. Click on Client Key Manager Link
SmartCash SmartNode Setup Guide V1.2 Windows 10 13/01/2018 By (Jazz) yoyomonkey
Page | 22
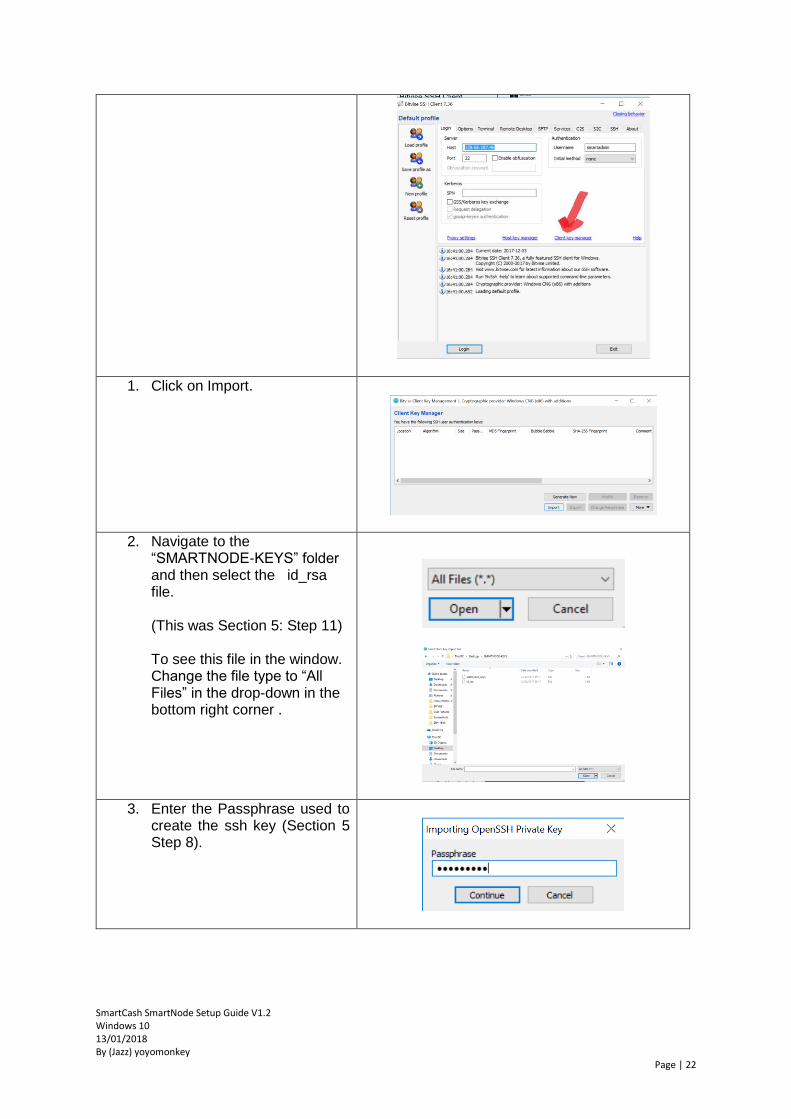
1. Click on Import.
2. Navigate to the “SMARTNODE-KEYS” folder and then select the id_rsa file. (This was Section 5: Step 11) To see this file in the window. Change the file type to “All Files” in the drop-down in the bottom right corner .
3. Enter the Passphrase used to create the ssh key (Section 5 Step 8).
SmartCash SmartNode Setup Guide V1.2 Windows 10 13/01/2018 By (Jazz) yoyomonkey
Page | 23
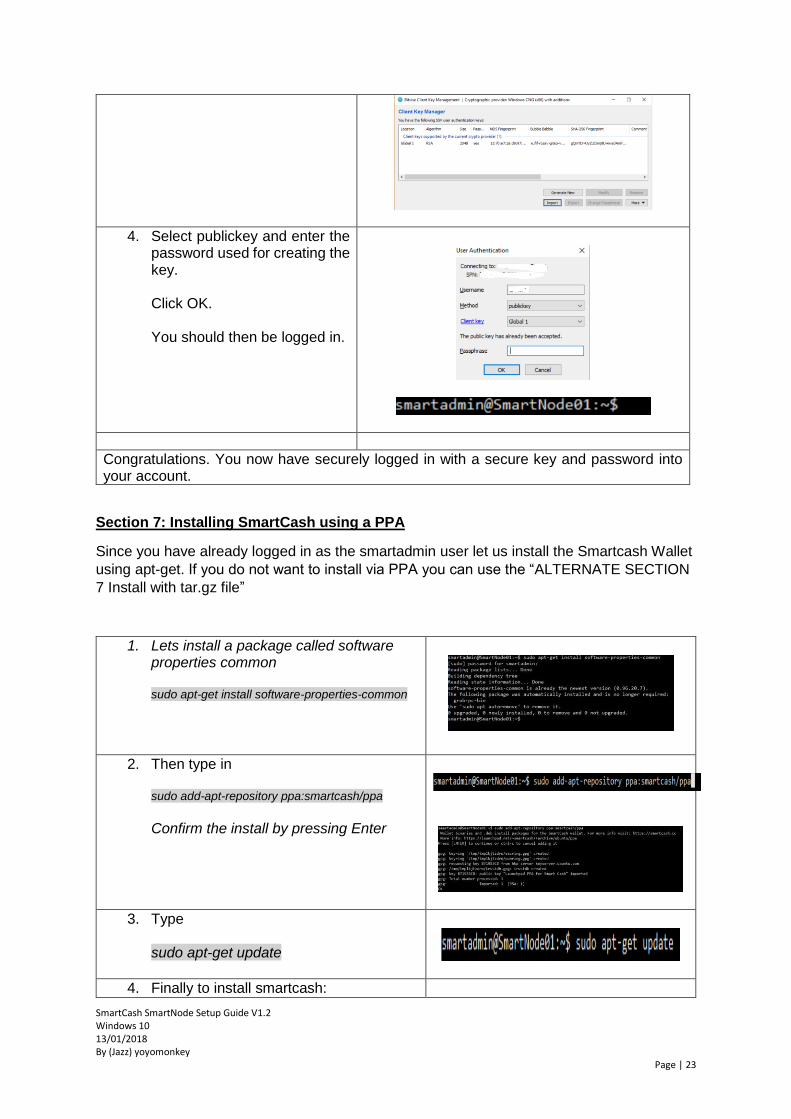
4. Select publickey and enter the password used for creating the key. Click OK. You should then be logged in.
Congratulations. You now have securely logged in with a secure key and password into your account.
Section 7: Installing SmartCash using a PPA
Since you have already logged in as the smartadmin user let us install the Smartcash Wallet
using apt-get. If you do not want to install via PPA you can use the “ALTERNATE SECTION
7 Install with tar.gz file”
1. Lets install a package called software properties common
sudo apt-get install software-properties-common
2. Then type in sudo add-apt-repository ppa:smartcash/ppa
Confirm the install by pressing Enter
3. Type sudo apt-get update
4. Finally to install smartcash:
SmartCash SmartNode Setup Guide V1.2 Windows 10 13/01/2018 By (Jazz) yoyomonkey
Page | 24
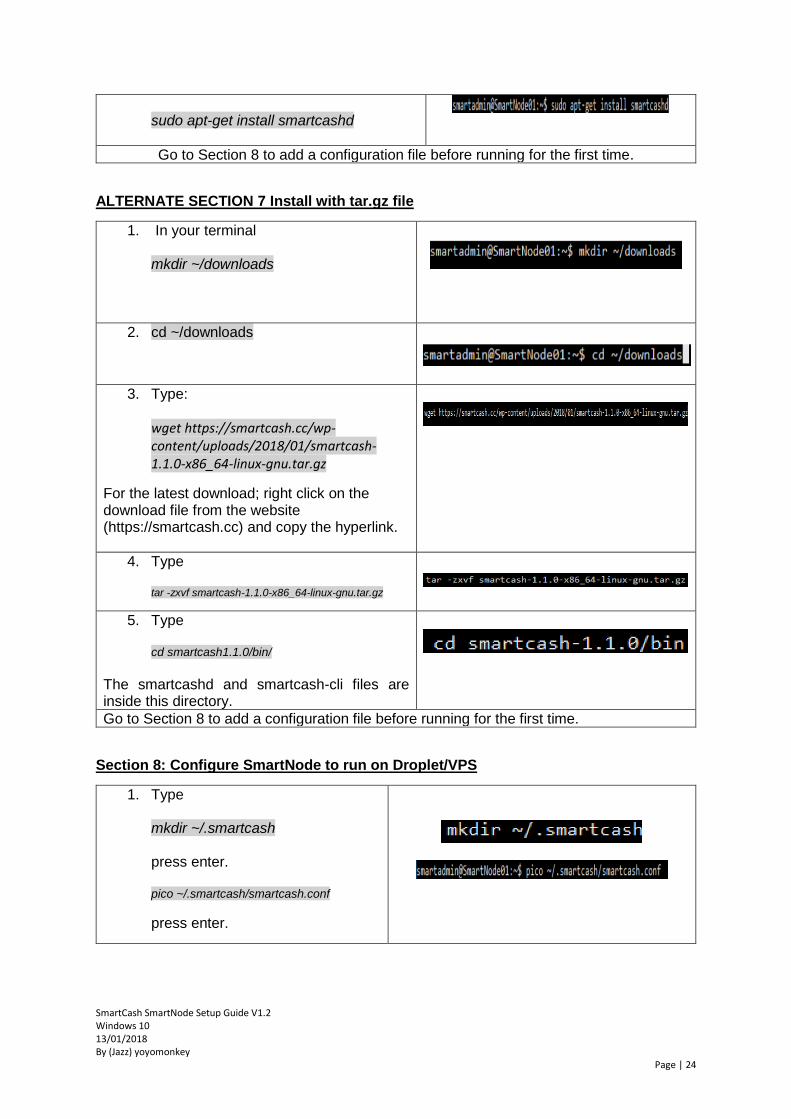
sudo apt-get install smartcashd
Go to Section 8 to add a configuration file before running for the first time.
ALTERNATE SECTION 7 Install with tar.gz file
1. In your terminal mkdir ~/downloads
2. cd ~/downloads
3. Type: wget https://smartcash.cc/wp-content/uploads/2018/01/smartcash-1.1.0-x86_64-linux-gnu.tar.gz
For the latest download; right click on the download file from the website (https://smartcash.cc) and copy the hyperlink.
4. Type tar -zxvf smartcash-1.1.0-x86_64-linux-gnu.tar.gz
5. Type cd smartcash1.1.0/bin/
The smartcashd and smartcash-cli files are inside this directory.
Go to Section 8 to add a configuration file before running for the first time.
Section 8: Configure SmartNode to run on Droplet/VPS
1. Type mkdir ~/.smartcash press enter. pico ~/.smartcash/smartcash.conf
press enter.
SmartCash SmartNode Setup Guide V1.2 Windows 10 13/01/2018 By (Jazz) yoyomonkey
Page | 25
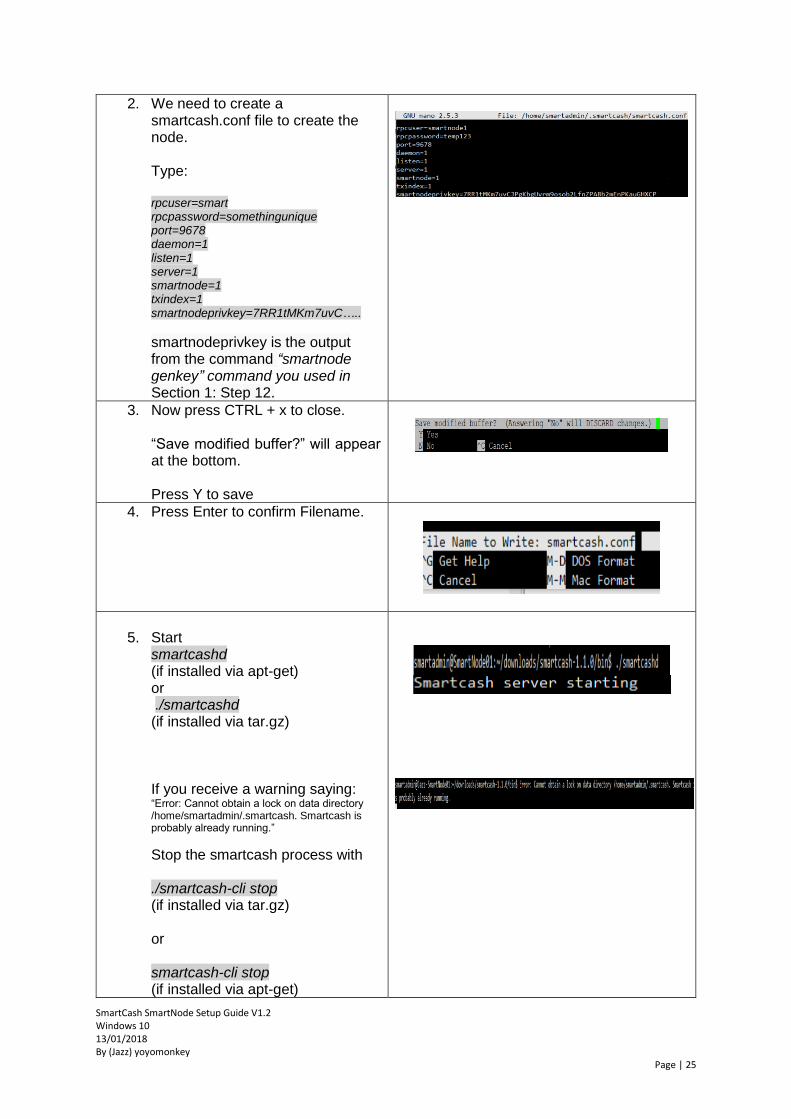
2. We need to create a smartcash.conf file to create the node. Type: rpcuser=smart rpcpassword=somethingunique port=9678 daemon=1 listen=1 server=1 smartnode=1 txindex=1 smartnodeprivkey=7RR1tMKm7uvC…..
smartnodeprivkey is the output from the command “smartnode genkey” command you used in Section 1: Step 12.
3. Now press CTRL + x to close. “Save modified buffer?” will appear at the bottom. Press Y to save
4. Press Enter to confirm Filename.
5. Start
smartcashd (if installed via apt-get) or ./smartcashd (if installed via tar.gz) If you receive a warning saying: “Error: Cannot obtain a lock on data directory /home/smartadmin/.smartcash. Smartcash is probably already running.”
Stop the smartcash process with
./smartcash-cli stop (if installed via tar.gz) or smartcash-cli stop (if installed via apt-get)
SmartCash SmartNode Setup Guide V1.2 Windows 10 13/01/2018 By (Jazz) yoyomonkey
Page | 26
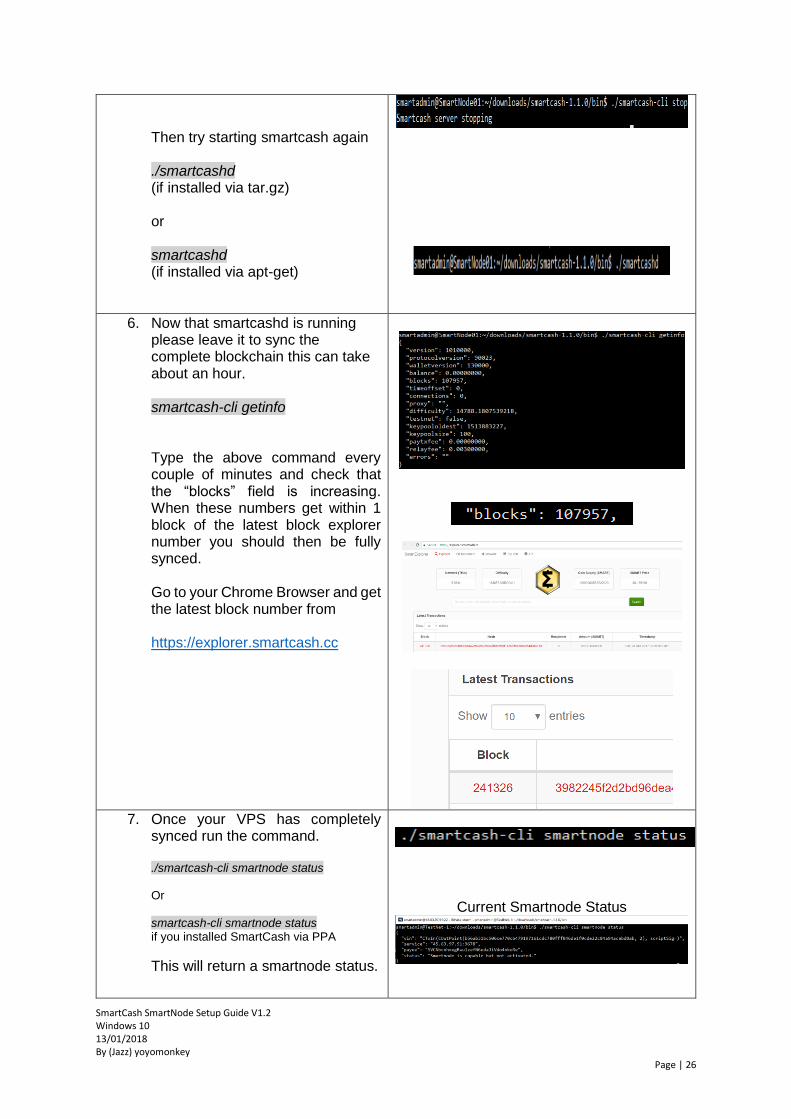
Then try starting smartcash again
./smartcashd (if installed via tar.gz) or smartcashd (if installed via apt-get)
6. Now that smartcashd is running please leave it to sync the complete blockchain this can take about an hour.
smartcash-cli getinfo Type the above command every couple of minutes and check that the “blocks” field is increasing. When these numbers get within 1 block of the latest block explorer number you should then be fully synced. Go to your Chrome Browser and get the latest block number from https://explorer.smartcash.cc
7. Once your VPS has completely
synced run the command. ./smartcash-cli smartnode status Or smartcash-cli smartnode status if you installed SmartCash via PPA
This will return a smartnode status.
Current Smartnode Status
SmartCash SmartNode Setup Guide V1.2 Windows 10 13/01/2018 By (Jazz) yoyomonkey
Page | 27
“Smartnode is capable but not activated” Once you run the start command from your LOCAL wallet (Section 9) and wait a few minutes, it will say “Smartnode successfully started”.
After Section 9 is Complete
Congratulations your SmartNode is now configured.
Section 9: Start the SmartCash SmartNode
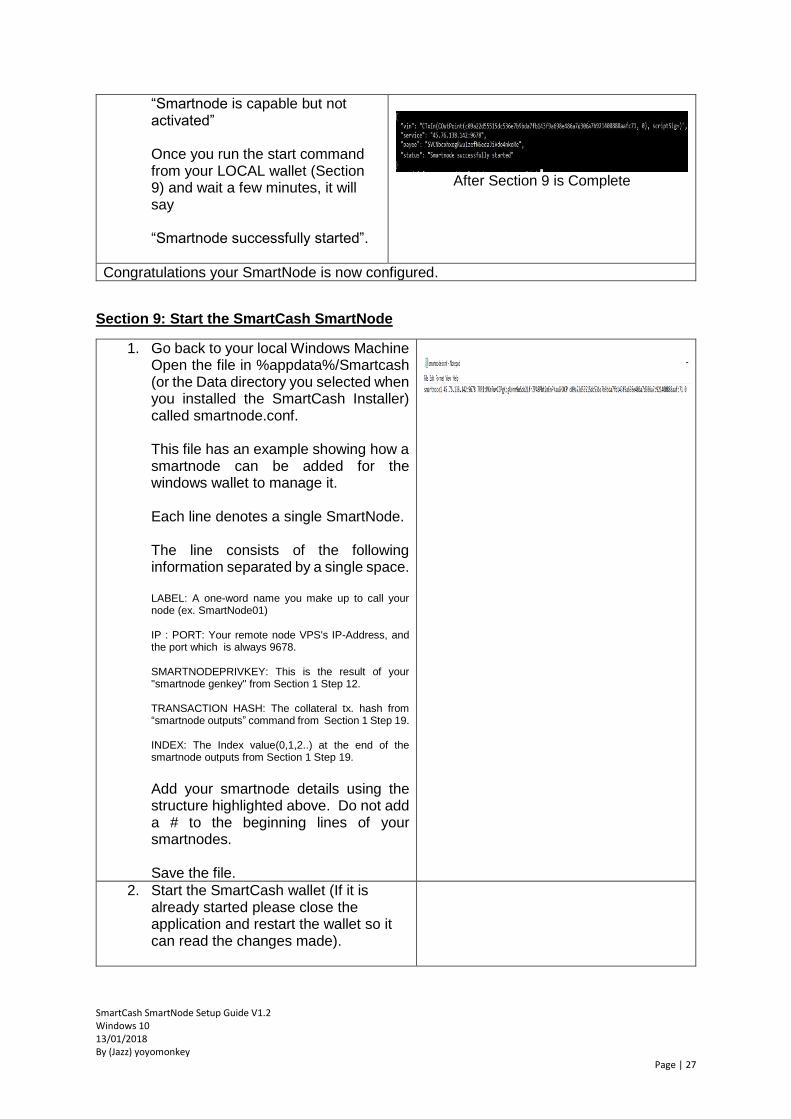
1. Go back to your local Windows Machine Open the file in %appdata%/Smartcash (or the Data directory you selected when you installed the SmartCash Installer) called smartnode.conf. This file has an example showing how a smartnode can be added for the windows wallet to manage it.
Each line denotes a single SmartNode. The line consists of the following information separated by a single space. LABEL: A one-word name you make up to call your node (ex. SmartNode01) IP : PORT: Your remote node VPS's IP-Address, and the port which is always 9678. SMARTNODEPRIVKEY: This is the result of your "smartnode genkey" from Section 1 Step 12. TRANSACTION HASH: The collateral tx. hash from “smartnode outputs” command from Section 1 Step 19. INDEX: The Index value(0,1,2..) at the end of the smartnode outputs from Section 1 Step 19.
Add your smartnode details using the structure highlighted above. Do not add a # to the beginning lines of your smartnodes. Save the file.
2. Start the SmartCash wallet (If it is already started please close the application and restart the wallet so it can read the changes made).
SmartCash SmartNode Setup Guide V1.2 Windows 10 13/01/2018 By (Jazz) yoyomonkey
Page | 28
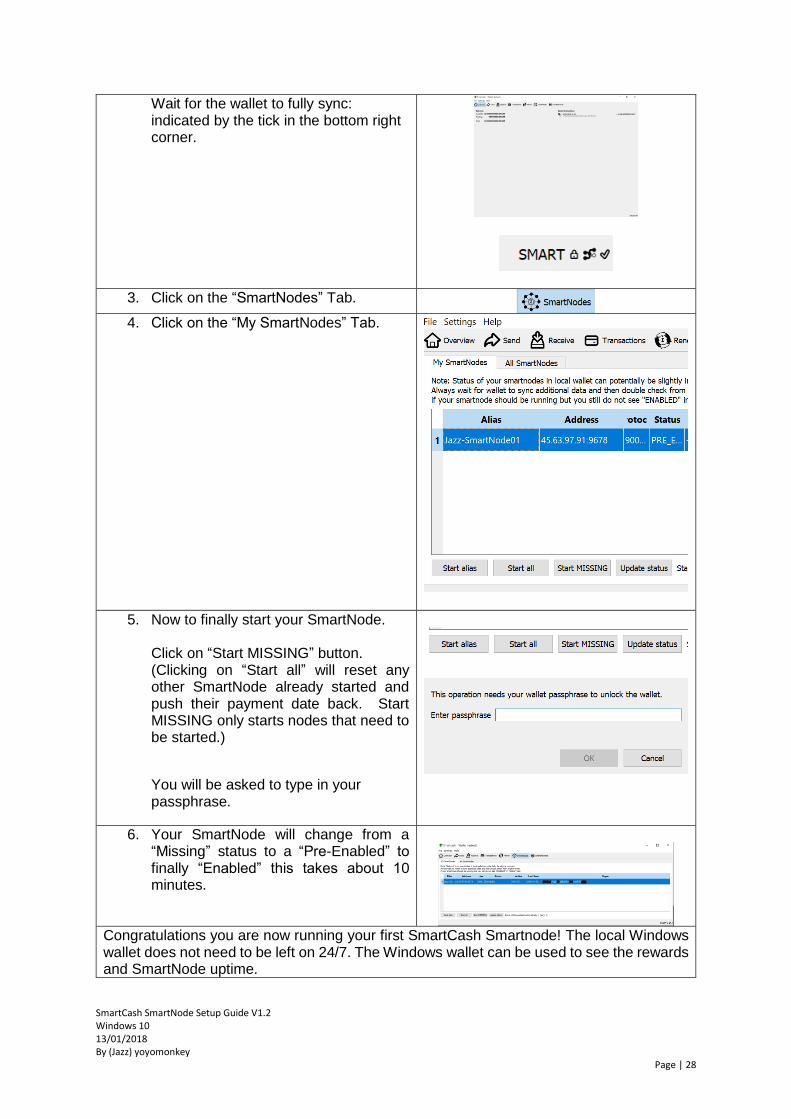
Wait for the wallet to fully sync: indicated by the tick in the bottom right corner.
3. Click on the “SmartNodes” Tab.
4. Click on the “My SmartNodes” Tab.
5. Now to finally start your SmartNode. Click on “Start MISSING” button. (Clicking on “Start all” will reset any other SmartNode already started and push their payment date back. Start MISSING only starts nodes that need to be started.)
You will be asked to type in your passphrase.
6. Your SmartNode will change from a “Missing” status to a “Pre-Enabled” to finally “Enabled” this takes about 10 minutes.
Congratulations you are now running your first SmartCash Smartnode! The local Windows wallet does not need to be left on 24/7. The Windows wallet can be used to see the rewards and SmartNode uptime.