Embed Size (px)
Citation preview

Smart VA: Technicaluser manual
Resources and Tools 7November 2016
RESOURCES AND TOOLS SMART VA: TECHNICAL USER MANUAL
About this series
Capacity-building tools and guidelines are designed to influence and align civil registration and vital statistics practice in countries with established international standards.
Other products available from the Civil Registration and Vital Statistics Data for Health Initiative:
Working Papers
Working papers are the principle knowledge products of the Civil Registration and Vital Statistics Initiative at The University of Melbourne. Easily accessible, they collectively form a lasting repository of knowledge generated under the Data for Health Initiative based on in-country experience. Working papers are intended to stimulate debate and promote the adoption of best practice in CRVS in partner countries and world-wide.
The series focuses on a range of knowledge gaps, new tools, methods and approaches, and raises and debates fundamental issues around the orientation, purpose and functioning of CRVS systems. Generally, working papers contain more detailed information than an academic paper, are written in less academic language, and are intended to inform health system dialogue in and between countries and a range of development partners.
Technical Reports
Technical reports describe the methods and findings of CRVS activities in partner countries implemented under the Data for Health Initiative. The series also reports on work in progress, particularly for large or complex initiatives, or on specific components of projects that may be of more immediate relevance to stakeholders.
The series serves to describe the state of CRVS systems in partner countries and provides a baseline for comparison between countries and over time. It also provides a preliminary diagnostic analysis for use by countries in highlighting areas needing improvement.
Acknowledgements
The Civil Registration and Vital Statistics Initiative at The University of Melbourne are grateful to a number of individuals who contributed to this manual, particularly Sonja Firth, Hafizur Chowdhury, Nicola Richards, Bryan Richards, Bernardo Prado, Martin Bratschi, and Abraham Flaxman.
Important information
The information contained in this manual provides generic information on the collection of VA data using an electronic, shortened VA questionnaire; the use of tablets and ODK for data management; and the use of Tariff. It has been developed for implementation as part of a broader package of resources and tools. As such, countries are strongly recommended to adapt the manual to meet their local needs and context. This should be done in consultation with their D4H Country Implementation team, prior to any VA activities taking place.
Published by the Civil Registration and Vital Statistics, Data for Health Initiative
The University of Melbourne Melbourne School of Population and Global Health Building 379 207 Bouverie Street Carlton VIC 3053 Australia
+61 3 9035 6560 [email protected] mspgh.unimelb.edu.au/dataforhealth

V1.0
1
The information contained in this manual provides generic information on the collection of
VA data using an electronic shortened VA questionnaire; the use of tablets and ODK for data
management; and the use of Tariff. It has been developed for implementation as part of a
broader package of resources and tools. As such, countries are strongly recommended to
adapt the manual to meet their local needs and context. This should be done in consultation
with their D4H Country Implementation Team prior to any VA activities taking place.
Version: August 2016
V1.0
2
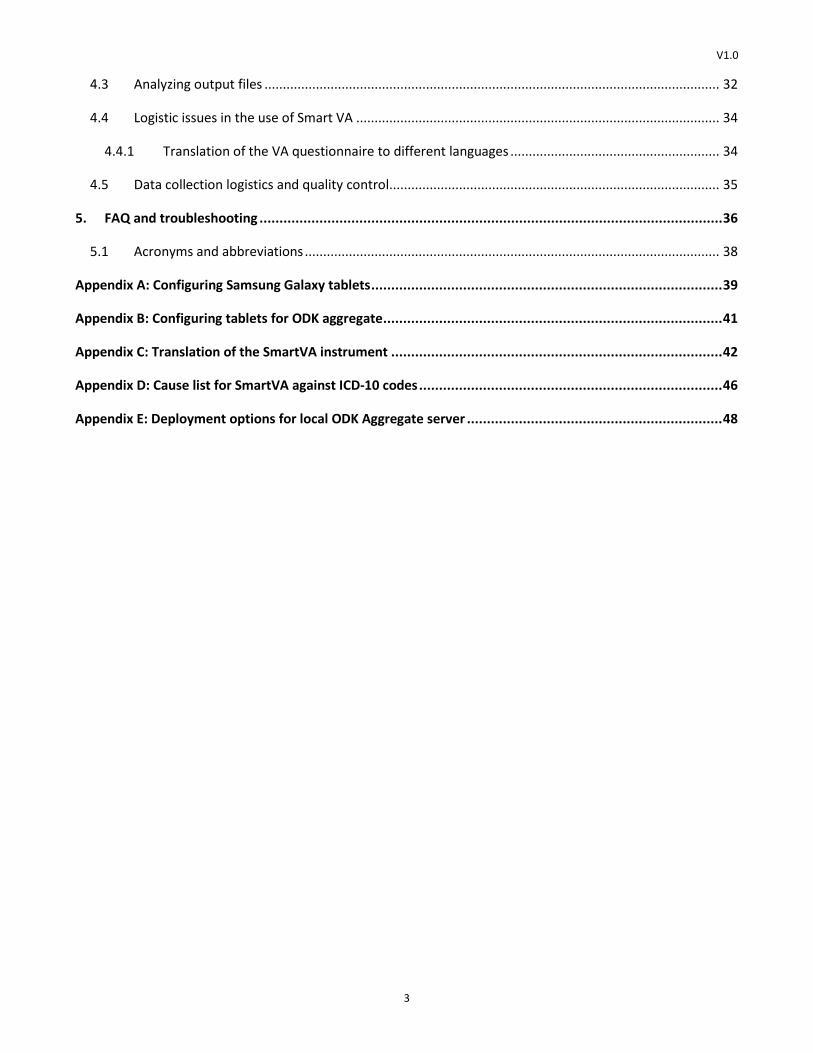
Contents Purpose of this user guide ............................................................................................................................ 4
1. Summary .............................................................................................................................................. 5
2. ODK tools for electronic data capture .................................................................................................... 6
2.1 ODK Collect ...............................................................................................................................................7
2.1.1 Steps in downloading and installing ODK Collect .............................................................................8
2.1.2 Installing a blank VA questionnaire/media file on to ODK Collect ................................................ 11
2.2 ODK Briefcase ........................................................................................................................................ 13
2.2.1 Downloading ODK Briefcase onto a computer .............................................................................. 14
2.2.2 Pulling data .................................................................................................................................... 16
2.2.3 Exporting from Briefcase ............................................................................................................... 18
2.2.4 Note on confidentiality .................................................................................................................. 18
2.3 ODK Aggregate ...................................................................................................................................... 19
3. Conducting VA interviews in the field .................................................................................................. 20
3.1 General guidelines ................................................................................................................................. 20
3.1.1 General instructions ...................................................................................................................... 20
3.1.2 Step-by-step instructions ............................................................................................................... 22
3.1.3 Completing open-ended responses ............................................................................................... 23
3.1.4 Saving the work and editing a VA .................................................................................................. 23
3.1.5 Data editing ................................................................................................................................... 24
3.1.6 Data saving step by step ................................................................................................................ 25
3.1.7 Submitting interview data ............................................................................................................. 25
3.1.8 Starting a new interview ................................................................................................................ 25
3.1.9 Data transfer and uploading .......................................................................................................... 25
4. Analysis of VAs using SmartVA Analyze ............................................................................................... 27
4.1 How can Tariff be used? ........................................................................................................................ 27
4.2 Automated analysis and results using SMARTVA .................................................................................. 28
V1.0
3
4.3 Analyzing output files ............................................................................................................................ 32
4.4 Logistic issues in the use of Smart VA ................................................................................................... 34
4.4.1 Translation of the VA questionnaire to different languages ......................................................... 34
4.5 Data collection logistics and quality control .......................................................................................... 35
5. FAQ and troubleshooting .................................................................................................................... 36
5.1 Acronyms and abbreviations ................................................................................................................. 38
Appendix A: Configuring Samsung Galaxy tablets ........................................................................................ 39
Appendix B: Configuring tablets for ODK aggregate ..................................................................................... 41
Appendix C: Translation of the SmartVA instrument ................................................................................... 42
Appendix D: Cause list for SmartVA against ICD-10 codes ............................................................................ 46
Appendix E: Deployment options for local ODK Aggregate server ................................................................ 48
V1.0
4
Purpose of this user guide The purpose of this technical user guide is to provide guidelines for the collection of verbal autopsy (VA) data
using an electronic, shortened VA questionnaire; the use of tablets and the Open Data Kit (ODK) for data
management; and for the ascertainment of cause of death (COD) using SmartVA Analyze (Tariff).
This step by step guide describes:
1. ODK tools for electronic data capture: practical steps on how to install ODK Collect, the VA
questionnaire and media files onto tablet;
2. Conducting VA interviews in the field using a tablet: practical steps on how to operate the tablets for
data collection and data management;
3. Assigning cause of death from VA interviews: including how the output of the electronic questionnaire
can be directly inputted into SmartVA and analyzed for producing results;
4. How to troubleshoot common problems with tablets;
This manual can be used in conjunction with the SmartVA Interviewer’s Manual that covers the roles and
responsibilities of VA interviewers and supervisors, ethics and sensitivities of the interview and guidance
around the questions included in SmartVA questionnaire. Both manuals can be used as a resource for trainers
and implementers of SmartVA.

V1.0
5
1. Summary Verbal autopsy (VA) is a method for collecting information about an individual’s signs and symptoms prior to
death from their family, and interpreting this to diagnose the likely or most probable cause of death (COD). VA
is increasingly recognized as the only practical alternative to medical certification of deaths in many countries
working to improve their civil registration system. VA is considered as the only practical option to increase the
availability of COD data. VA can be used in a number of ways, primarily as:
• A research tool in longitudinal demographic and epidemiological studies to determine the COD in each
individual enrolled in such studies or surveillance sites;
• A source of routine COD statistics for populations with dysfunctional vital registration systems and;
• For monitoring the process of disease control and evaluating quality of routine causes of death
statistics.
SmartVA is a verbal autopsy tool consisting of an electronic verbal autopsy data collection questionnaire and a
desktop application that runs an automatic diagnostic method, the ‘Tariff Method’, for mapping of verbal
autopsies. The SmartVA desktop application uses VA interview data collected electronically using the
Population Health Metrics Research Consortium (PHMRC) Shortened Questionnaire on the Open Data Kit (ODK)
collect system on Android devices as input, and produces COD estimates at the individual and population
levels. The Institute of Health Metrics and Evaluation (IHME) Tariff 2.0 assignment method was designed and
validated with the PHMRC Gold Standard VA database collected as part of the PHMRC Gold Standard VA
Validation Study.1 We refer to SmartVA as the whole package that includes the PHMRC shortened
questionnaire, the ODK suite for data collection, and SmartVA-Analyze for computer certification of VAs.
1 Murray CJ, et.al. Population Health Metrics Research Consortium gold standard verbal autopsy validation study: design, implementation, and development of analysis datasets. Population Health Metrics 2011, 9:27.
V1.0
6
2. ODK tools for electronic data capture The VA questionnaire can be collected in electronic platforms using Open Data Kit (ODK). ODK is an open-
source set of tools that allow survey creation, collection, and management to be simple and straightforward.
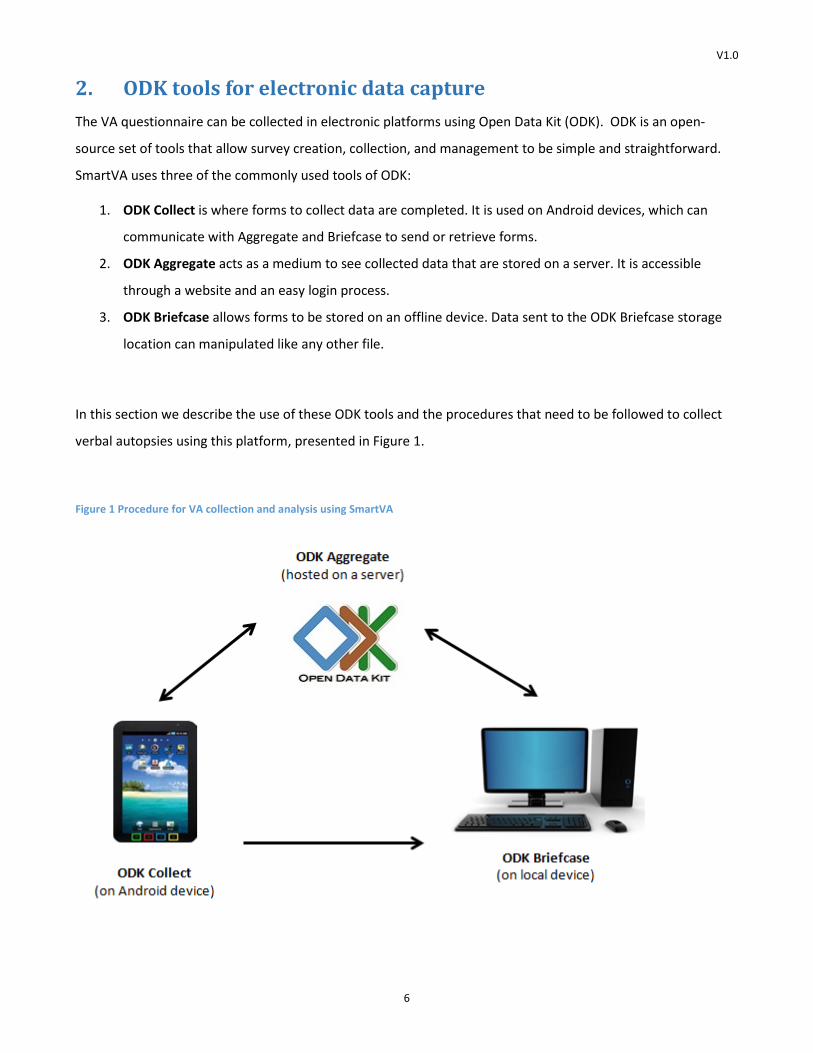
SmartVA uses three of the commonly used tools of ODK:
1. ODK Collect is where forms to collect data are completed. It is used on Android devices, which can
communicate with Aggregate and Briefcase to send or retrieve forms.
2. ODK Aggregate acts as a medium to see collected data that are stored on a server. It is accessible
through a website and an easy login process.
3. ODK Briefcase allows forms to be stored on an offline device. Data sent to the ODK Briefcase storage
location can manipulated like any other file.
In this section we describe the use of these ODK tools and the procedures that need to be followed to collect
verbal autopsies using this platform, presented in Figure 1.
Figure 1 Procedure for VA collection and analysis using SmartVA
V1.0
7
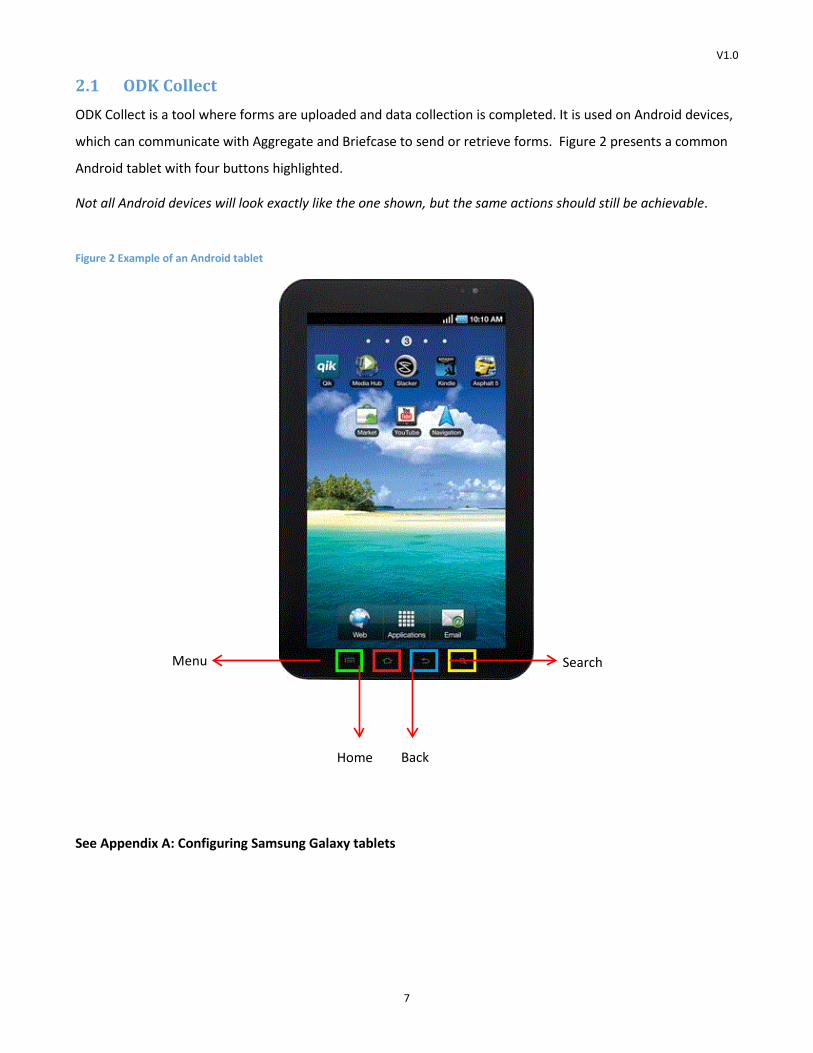
2.1 ODK Collect ODK Collect is a tool where forms are uploaded and data collection is completed. It is used on Android devices,
which can communicate with Aggregate and Briefcase to send or retrieve forms. Figure 2 presents a common
Android tablet with four buttons highlighted.
Not all Android devices will look exactly like the one shown, but the same actions should still be achievable.
Figure 2 Example of an Android tablet
See Appendix A: Configuring Samsung Galaxy tablets
Search Menu
Back Home
V1.0
8
2.1.1 Steps in downloading and installing ODK Collect
In order to use ODK Collect to send data from a mobile device to a remote server you must first prepare the
tablet for data collection, and then load an empty questionnaire in the tablet. ODK Collect can be installed
directly onto a tablet in two ways, either downloading it from the Internet through “Play Store” or from a
website, or by downloading to a computer and copying it across to the tablet for installation.
Note: Consider installing AppLock on your tablet to prevent unintended use of the tablet. For further
information see the AppLock website http://app-lock.en.uptodown.com/android
Downloading directly to a tablet Steps to download ODK Collect from the Internet through “PlayStore”
• Set a Gmail account (e.g. [email protected]) to download any software from PlayStore
o Note: for training purposes, a generic email and account can be set-up for multiple
devices/participants to use
• Register the tablet using the Gmail account and password
• Open the ‘application drawer’ (Apps)
• Open ‘Playstore’
• Search for ‘ODK’ and select ‘ODK Collect’ from the options
• Click the ‘install’ button
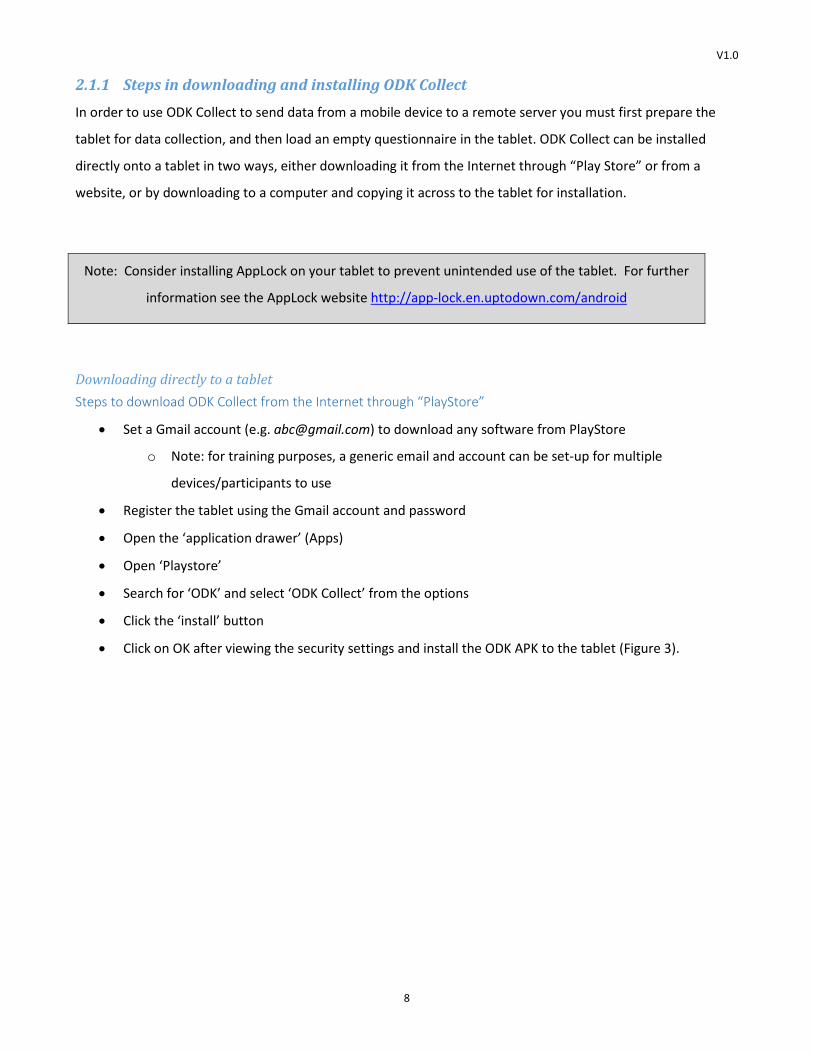
• Click on OK after viewing the security settings and install the ODK APK to the tablet (Figure 3).
V1.0
9
Figure 3 Steps in installing ODK Collect through PlayStore
Steps to download ODK Collect directly from the ODK website
• From your tablet’s application drawer, choose ‘Settings’, then ‘Security/Applications’
o Make sure ‘unknown source’ is checked
• Return to the home screen of the tablet and click ‘Internet’
• In the top URL menu, type in https://opendatakit.org/downloads/download-category/collect/ and click
on the ‘go’ button on the keyboard, or on the image of the magnifying glass
• In the download window, you will see ODK_Collect_APK
o Select it to download the file (will take you to a new screen)
• On older tablets, the APK will automatically install after you approve the security settings
• On newer tablets, you must go to the download list, rename the file to restore the .apk extension (the
extension will have been renamed to .man during the download process), then click on it to install it
(Figure 4).

V1.0
10
Figure 4 Steps in installing ODK Collect through the ODK website
Downloading to a computer • If you are experiencing reduced internet speed or have many tablets to configure at the same time,
you can download ODK Collect to your computer, copy-paste it to your tablet via a USB cable and
install it on the tablet
• From your Computer, open either Internet Explorer or Google Chrome
o Go to https://opendatakit.org/downloads/download-info/odk-collect-apk/ and click on
‘download’, and wait for the file to download
• Connect the tablet to the computer using the USB cable
o To open the tablet’s storage, go to the Start button, then click ‘Computer’
o The tablet will appear under the list of directories, on the left-hand side of the screen
• Once the ODK Collect installation file has finished downloading either drag and drop, or copy and paste
it, from the download folder of your internet browser to the tablet
• On the tablet, go to the applications drawer and click ‘My files’
o Select ODK Collect
o Click ‘install’ (Figure 5).

V1.0
11
Figure 5 Steps in downloading ODK Collect to a computer
2.1.2 Installing a blank VA questionnaire/media file on to ODK Collect
Once you have downloaded ODK Collect and installed it onto the tablet, you will need to install a blank VA
questionnaire:
• Create a folder called ‘ODK Materials’ on your computer
• To download a copy of the VA questionnaire, go to http://www.healthdata.org/verbal-autopsy/tools
from your computer
V1.0
12
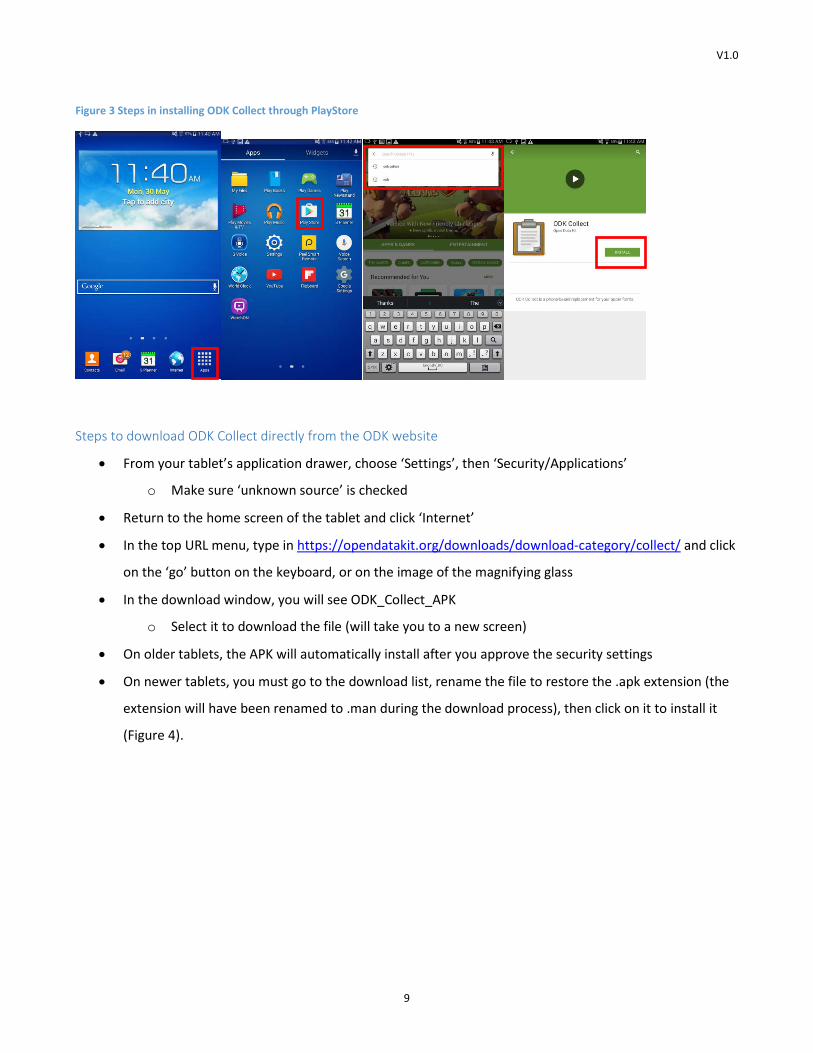
o Click on ‘ODK version of PHMRC Shortened Questionnaire’2
o By default, these files will be saved to the ‘Downloads’ folder on your computer
o Copy the downloaded .zip file from your ‘Downloads’ folder to the ‘ODK Materials’ folder you
created earlier
o Extract or ‘Unzip’ this file and confirm that you have two excel spreadsheets, one .xml
document, and a sub-folder now showing in your ODK Materials folder. Note that the .zip file
can be deleted once this has been confirmed (Figure 6)
• Ensure that the tablet is connected by USB cable to the computer
o To check if it has connected, go to ‘Computer’ and look for the tablet on the left-hand side
menu
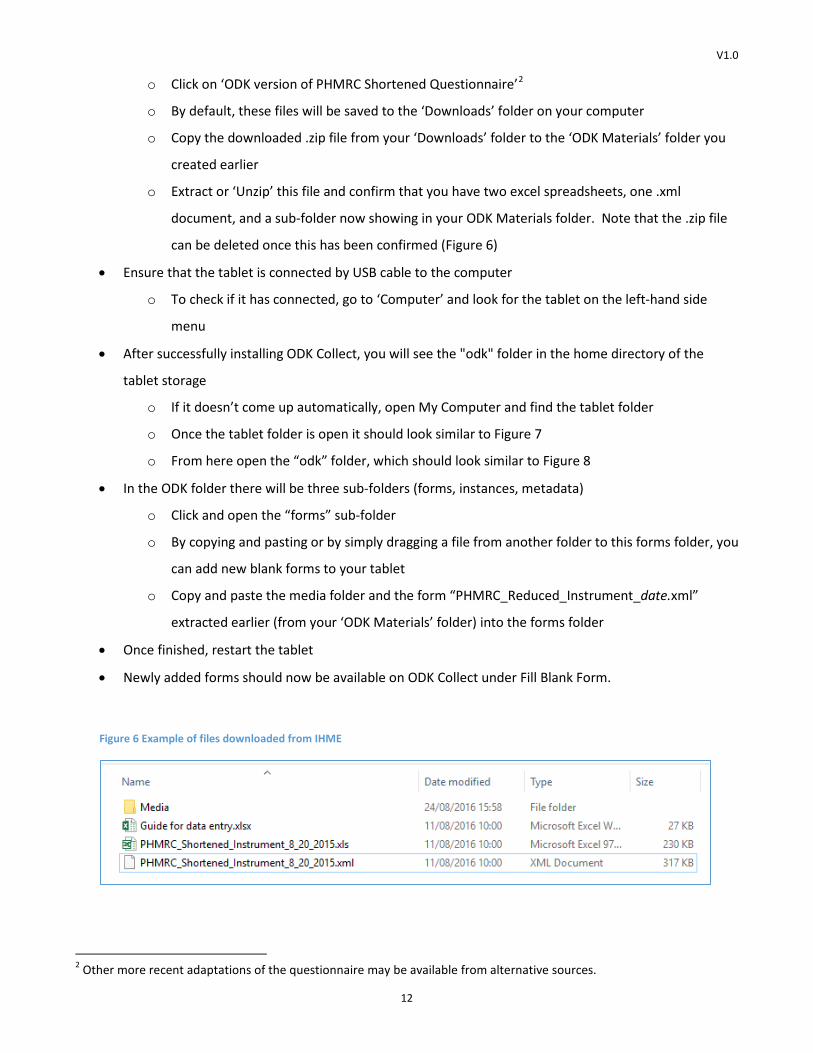
• After successfully installing ODK Collect, you will see the "odk" folder in the home directory of the
tablet storage
o If it doesn’t come up automatically, open My Computer and find the tablet folder
o Once the tablet folder is open it should look similar to Figure 7
o From here open the “odk” folder, which should look similar to Figure 8
• In the ODK folder there will be three sub-folders (forms, instances, metadata)
o Click and open the “forms” sub-folder
o By copying and pasting or by simply dragging a file from another folder to this forms folder, you
can add new blank forms to your tablet
o Copy and paste the media folder and the form “PHMRC_Reduced_Instrument_date.xml”
extracted earlier (from your ‘ODK Materials’ folder) into the forms folder
• Once finished, restart the tablet
• Newly added forms should now be available on ODK Collect under Fill Blank Form.
Figure 6 Example of files downloaded from IHME
2 Other more recent adaptations of the questionnaire may be available from alternative sources.
V1.0
13
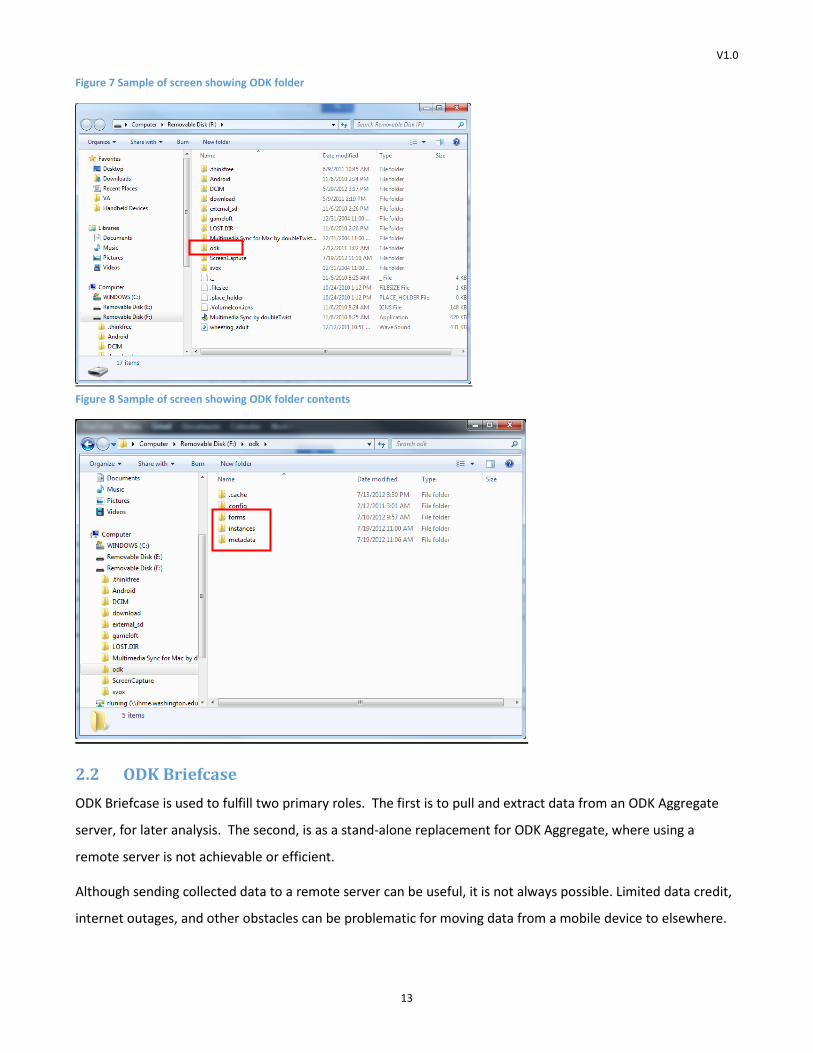
Figure 7 Sample of screen showing ODK folder
Figure 8 Sample of screen showing ODK folder contents
2.2 ODK Briefcase ODK Briefcase is used to fulfill two primary roles. The first is to pull and extract data from an ODK Aggregate
server, for later analysis. The second, is as a stand-alone replacement for ODK Aggregate, where using a
remote server is not achievable or efficient.
Although sending collected data to a remote server can be useful, it is not always possible. Limited data credit,
internet outages, and other obstacles can be problematic for moving data from a mobile device to elsewhere.
V1.0
14
As an alternative, it is possible to use ODK Briefcase to store data on a local device such as a laptop or desktop
computer without needing internet access. The following will explain how to make this achievable.
Note: If you choose to deploy ODK Briefcase for this purpose, consideration should be given to the long-term
storage and archiving of the raw VA data that is collected from your tablets.
2.2.1 Downloading ODK Briefcase onto a computer
• Download the latest version of ODK Briefcase here: https://opendatakit.org/downloads/download-
info/odk-briefcase/
• By default, the files will save to the ‘Downloads’ folder on the computer, they will also appear on the
bottom left-hand side of the website page
• Click on the ‘ODK Briefcase’ folder to open it
o A pop-up box will appear asking you to set the location on your computer where you would
like to save your forms (Figure 9)
o Click on ‘Change’ to select where you would like to save your forms (i.e. My Documents,
Desktop, etc.)
• After an initial location has been set, you will be able to change the destination with the “Change…”
button highlighted by the red circle in Figure 10
• This folder will not only store blank forms or completed surveys, but can also store forms that will be
‘pushed’ to another device
o For example, one can ‘pull’ a completed survey from a tablet to the ODK Briefcase folder
stored on a PC
o This survey can then be ‘pushed’ from the ODK Briefcase folder to an Aggregate server
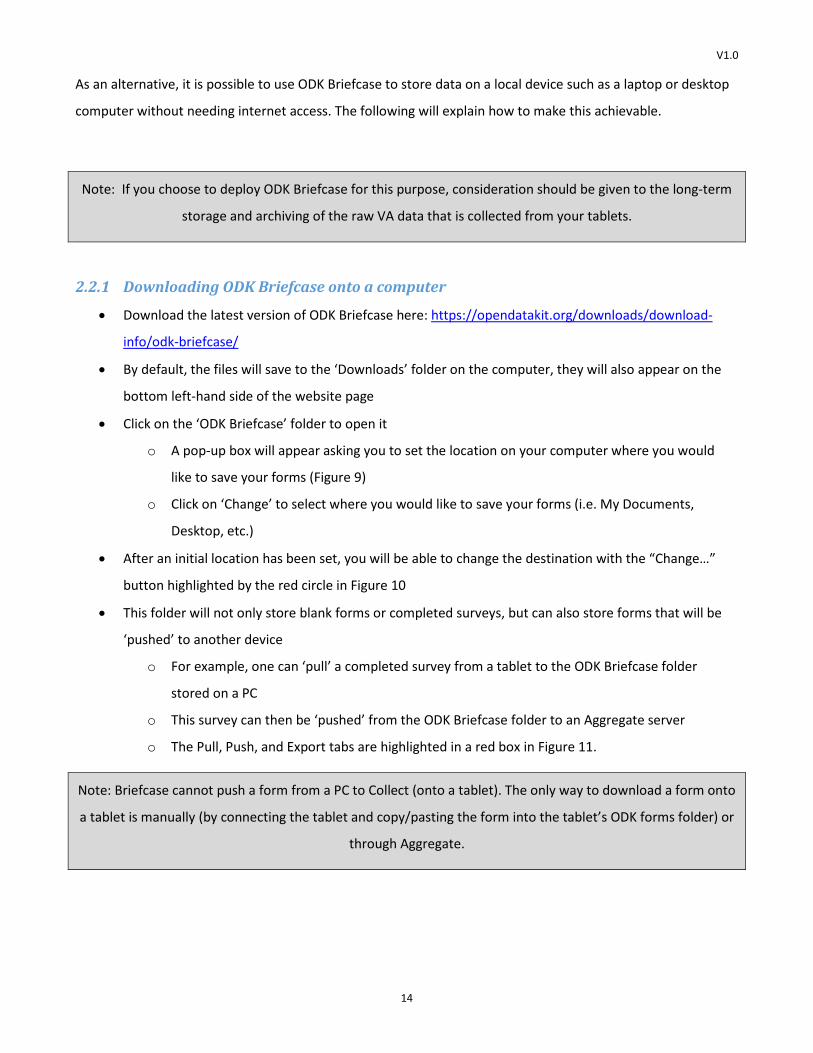
o The Pull, Push, and Export tabs are highlighted in a red box in Figure 11.
Note: Briefcase cannot push a form from a PC to Collect (onto a tablet). The only way to download a form onto
a tablet is manually (by connecting the tablet and copy/pasting the form into the tablet’s ODK forms folder) or
through Aggregate.

V1.0
15
Figure 9 Pop-up box to determine ODK Briefcase location
Figure 10 Changing the location where forms are saved
V1.0
16
Figure 11 Pulling, pushing or exporting data
2.2.2 Pulling data
Under the Pull tab is a “Pull data from” drop-down menu. This allows you to choose where you wish to pull
data from. The options are Aggregate 0.9.x, Aggregate 1.0, Mounted Android SD Card, and Custom Path to
ODK Directory.
To check what version your tablet is, open the applications draw, click on ‘Settings’ and then ‘About device’, on
the right under ‘android version’ will be a three digit-number. The first number relates to what version the
tablet is.
Mounted Android SD Card Android version 3.x or lower
• The Mounted Android SD Card refers to storage on the Android tablet. If the Mounted Android SD Card
is chosen, make sure that the tablet is connected via USB and that it is connected
• Once this happens, click “Choose…,” and the correct drive associated with the tablet should be
selected
• Click OK, and the list of forms should populate. Here you’ll be able to select the forms you wish to pull
into the ODK Briefcase Storage folder.
V1.0
17
Android version 4.x or higher
• Note: At this time ODK Briefcase is unable to recognize Android devices running 4.x or higher. Use
Custom path instead (See below).
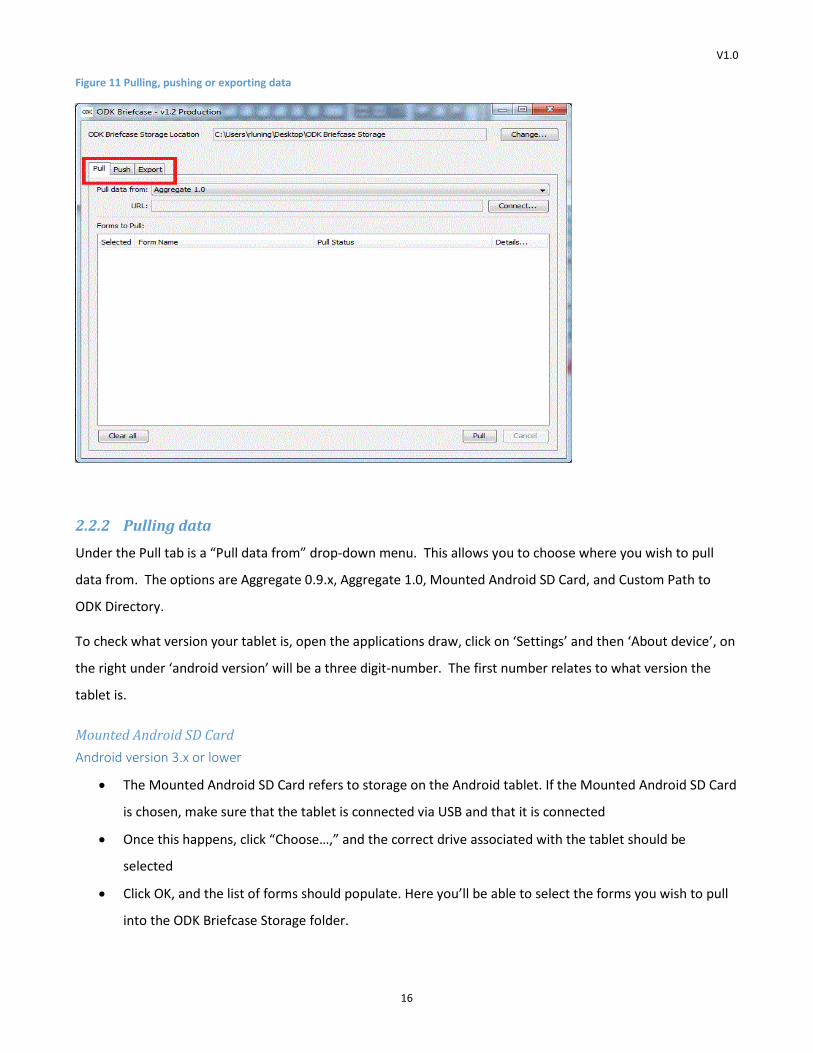
Custom Path to ODK Directory • Mount an Android device running version 4.x or higher
• Copy the “odk” directory from the mounted MTP/Android device to a local hard drive
• Point Briefcase’s “Pull” functionality to the copied “odk” directory
o To do this, on the “Pull” tab in Briefcase, you can use the “Pull data from:” dropdown to select
“Custom Path to ODK Directory”
o Then, use the browse button to point Briefcase at the copied “odk” folder on your local hard
drive
• Click the “Pull” button and your data will be pulled automatically (Figure 12).
Figure 12 Pulling data using a custom path
V1.0
18
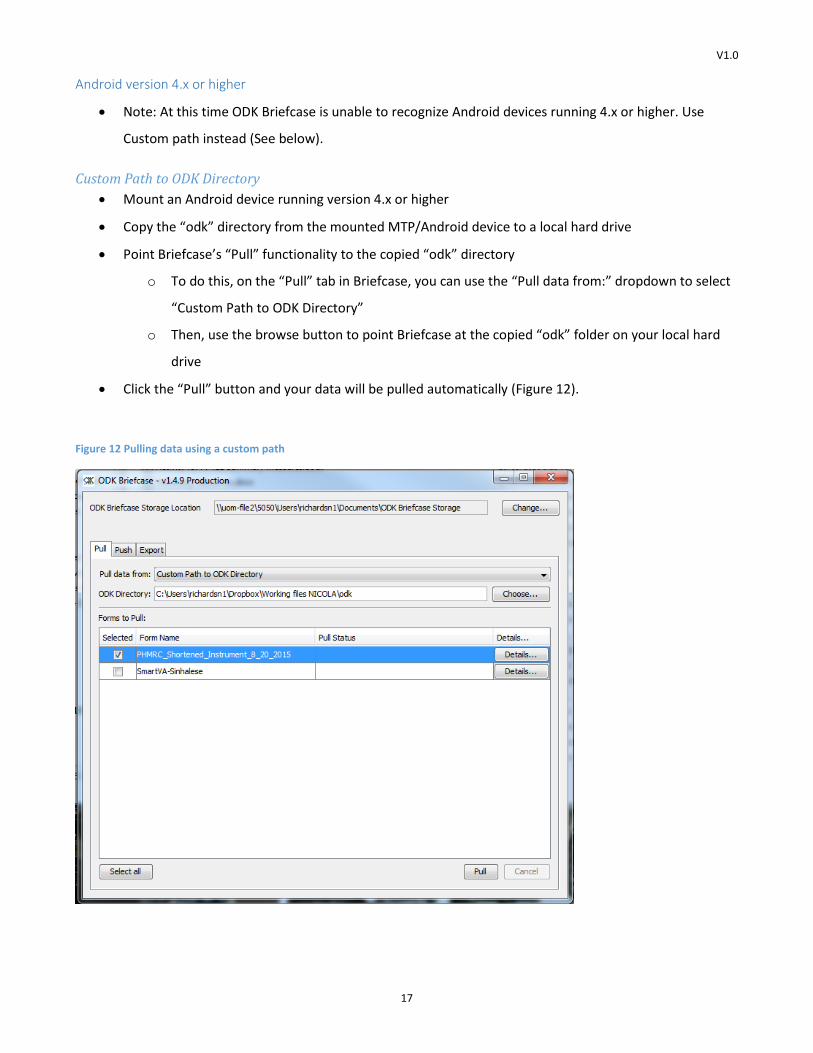
2.2.3 Exporting from Briefcase
• Lastly, ODK Briefcase allows you to export completed forms as CSV files to a specific location for use by
other applications, such as Excel. This is also the format needed for the SmartAnalyse cause of death
assignments of VA data
• Select the form from the drop-down menu highlighted in the red box in Figure 13
• Change the export directory to a place where you wish to have the CSV file saved
• Click on export
o If successful, a “succeeded” message will appear, as highlighted in the blue box in Figure 13.
Figure 13 Exporting forms in ODK
2.2.4 Note on confidentiality
Confidentiality of data is often a concern. There are two main ways that ODK users can maintain the
confidentiality of their data.
1. All ODK operations can be run locally on computers using ODK Briefcase.

V1.0
19
2. If the capability of cloud storage is necessary for your specific project, there is a method for encrypting
forms to keep data private even when using http: communications. More information on this can be
found at http://opendatakit.org/help/encrypted-forms/.
For information on ODK Briefcase from the developers, please visit http://opendatakit.org/use/briefcase/.
2.3 ODK Aggregate ODK Aggregate provides a central server for ODK Collect forms. It can provide blank forms to ODK Collect,
accept finalized forms (submissions) from ODK Collect, visualize the collected data, and export data for use in
SmartVA-Analyze.
ODK Aggregate can be deployed on Google's App Engine, enabling users to quickly get running without facing
the complexities of setting up their own scalable web service. ODK Aggregate can also be deployed locally on a
Tomcat server (or any servlet 2.5-compatible web container) backed with a MySQL or PostgreSQL database
server.
ODK Aggregate is an alternative to ODK Briefcase that can streamline operations, but requires some additional
work prior to use.
For detailed instructions on how to install and use Aggregate, see Appendix E. See also the ODK Aggregate
guide at https://opendatakit.org/use/aggregate/
See also Appendix B: Setting up tablets for ODK aggregate
V1.0
20
3. Conducting VA interviews in the field
3.1 General guidelines
3.1.1 General instructions
• The SmartVA Questionnaire consists of a general module followed by age-specific modules either for
neonate (0-28 days), child (29 days- 11 years), or an adolescent/adult (>=12 years) death
• The questionnaires include filter questions with automatic skips to an appropriate question
• The response categories include options for a mix of Text Field, Radio Button, Check Box and Date Field
for different questions
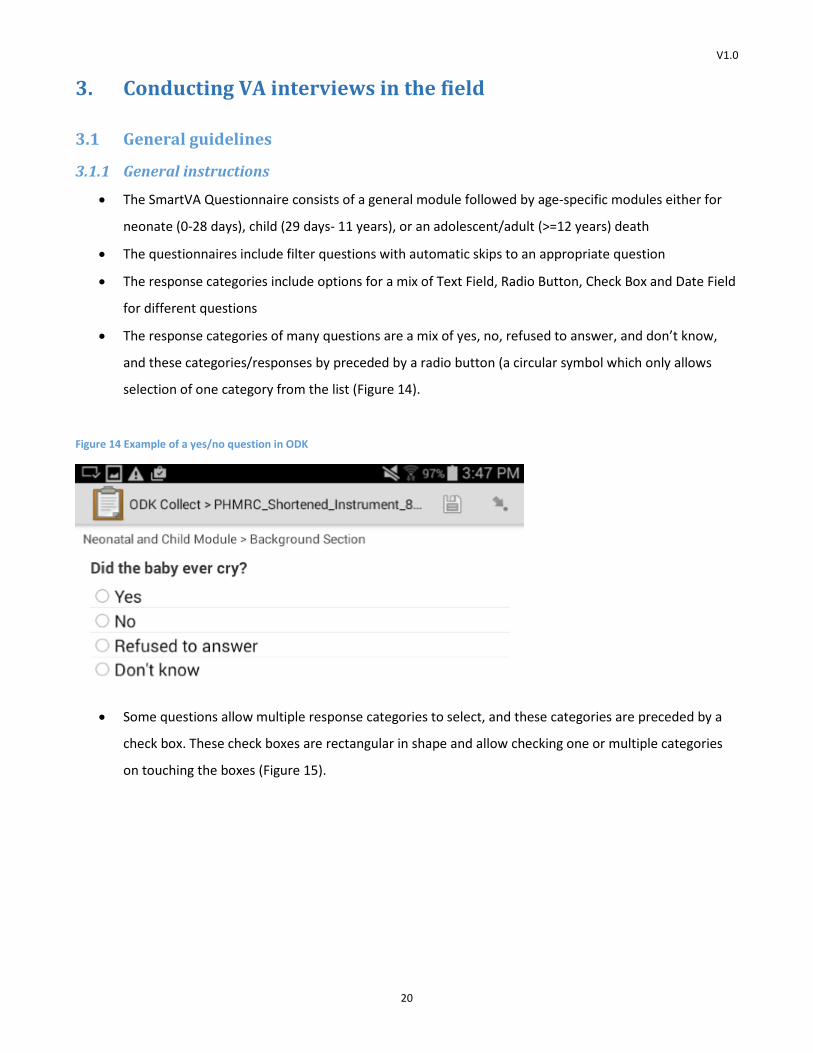
• The response categories of many questions are a mix of yes, no, refused to answer, and don’t know,
and these categories/responses by preceded by a radio button (a circular symbol which only allows
selection of one category from the list (Figure 14).
Figure 14 Example of a yes/no question in ODK
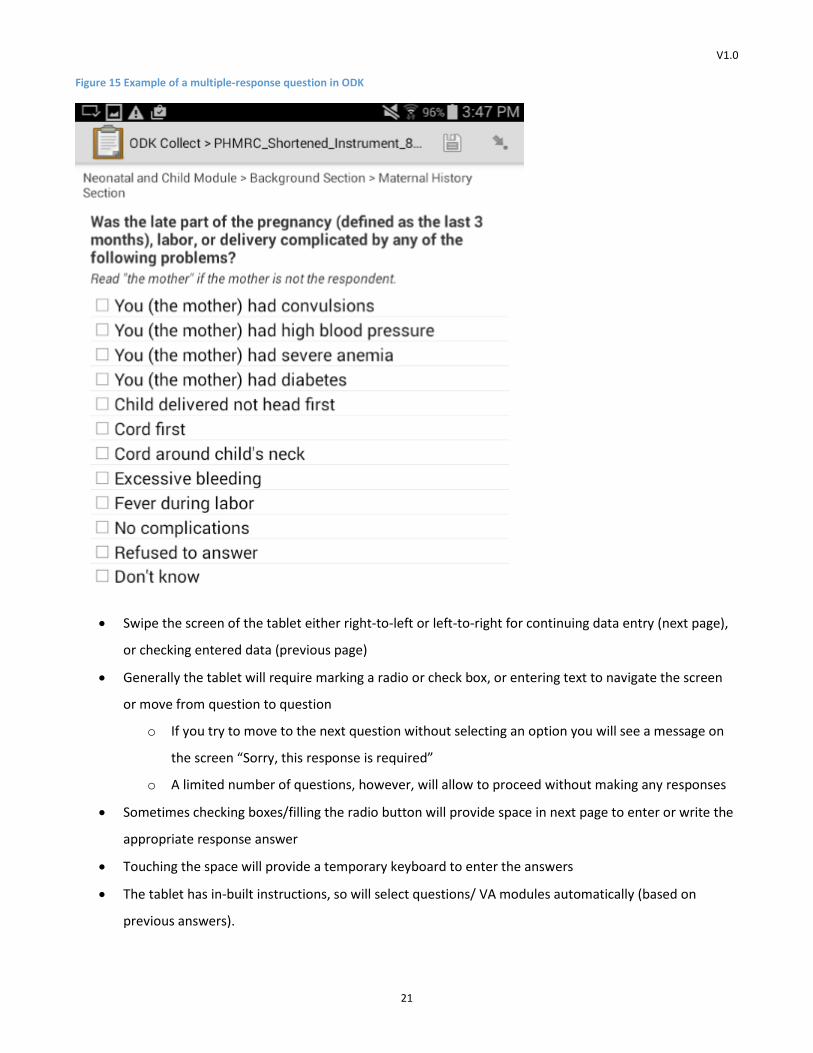
• Some questions allow multiple response categories to select, and these categories are preceded by a
check box. These check boxes are rectangular in shape and allow checking one or multiple categories
on touching the boxes (Figure 15).
V1.0
21
Figure 15 Example of a multiple-response question in ODK
• Swipe the screen of the tablet either right-to-left or left-to-right for continuing data entry (next page),
or checking entered data (previous page)
• Generally the tablet will require marking a radio or check box, or entering text to navigate the screen
or move from question to question
o If you try to move to the next question without selecting an option you will see a message on
the screen “Sorry, this response is required”
o A limited number of questions, however, will allow to proceed without making any responses
• Sometimes checking boxes/filling the radio button will provide space in next page to enter or write the
appropriate response answer
• Touching the space will provide a temporary keyboard to enter the answers
• The tablet has in-built instructions, so will select questions/ VA modules automatically (based on
previous answers).

V1.0
22
3.1.2 Step-by-step instructions
1. Start the tablet (Tab) by pressing the start button (Top-Right). After about a minute the tab will turn on
2. Press the home button of the Tab and go to the home screen/ touch the application button
3. Touch the “ODK collect” icon from the Tab home screen (Figure 16)
a. On pressing the icon, the Tab will show a screen with five options (Fill Blank Form, Edit Saved
Form, Send Finalized Form, Get Blank Form, and Delete Saved Form)
Figure 16 ODK VAQ collection menu
4. Touch the “Fill Blank Form” button from ODK Collect software to open the form
5. Touch the XML form named “SmartVA_Month_yyyy”3 to start a VA interview
a. Read the on-screen information about the questions before beginning to fill up questions
6. Swipe the screen right-to-left and continue the interview as per instruction
7. When the respondent agrees to continue the interview, read the screen instruction carefully on the
Tab and follow the instructions (more information is provided in the interviewer manual on learning to
fill up the interview process on structured questions). At the end of each age specific module, a screen
will appear for filling a pre-selected keywords checklist while asking and hearing the open narrative
section from the respondent.
3 The version may change. The latest version is June 2016

V1.0
23
3.1.3 Completing open-ended responses
The SmartVA Questionnaire includes an open-ended question, in which the informant can explain, in his/her
own words, the sequence of events that led to the death. In this section, the interviewer needs to listen
carefully to the informant, and register if he/she mentions some specific words or categories. When entering
the open-ended question, the following instructions will appear:
Say to the respondent: "Thank you for the patient responses to this exhaustive set of questions. Could
you please summarize, or tell us in your own words, any additional information about the illness and/or
death of your loved one?"
To the interviewer: Listen to what the respondent tells you in his/her own words. Do not prompt except
for asking whether there was anything else after the respondent finishes. If the respondent mentions
any of the following words, mark "mentioned". Tell the respondent to stop and start again if they
mention a word of interest, so you have time to mark it down. Follow the interactive screen message
and ask the respondent to answer each question as appropriate.
General points • The open-ended response file contain a list of pre-fixed categories preceded by check boxes and these
allow multiple answers
• Discuss with local people and health professionals and make a dictionary of synonyms (locally used) of
these categories for training local VA interview staff
• Select the categories by touching the boxes (a tick will appear)
• At the end, a screen will pop up asking for a file name
• Save and exit the screen to finish the work or start a new VA interview.
• When you get to the end of interview you will need to save the VA form completed for that death.
3.1.4 Saving the work and editing a VA
Editing can be made if anything was wrongly entered, by going back to the previous page (swiping right to left).
After the form has been completed, edits can be made on VA form by clicking the “Edit Saved Form”.
• At the end of each interview, a screen like below will pop-up (Figure 17)
V1.0
24
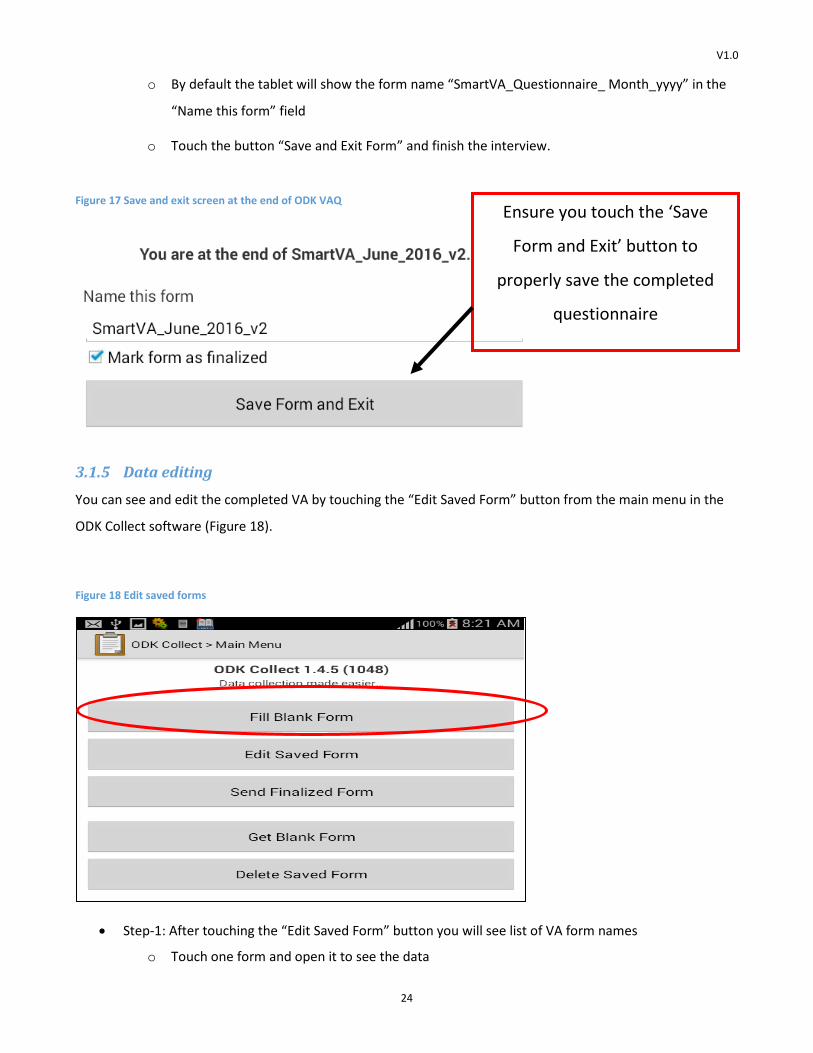
o By default the tablet will show the form name “SmartVA_Questionnaire_ Month_yyyy” in the
“Name this form” field
o Touch the button “Save and Exit Form” and finish the interview.
Figure 17 Save and exit screen at the end of ODK VAQ
3.1.5 Data editing
You can see and edit the completed VA by touching the “Edit Saved Form” button from the main menu in the
ODK Collect software (Figure 18).
Figure 18 Edit saved forms
• Step-1: After touching the “Edit Saved Form” button you will see list of VA form names
o Touch one form and open it to see the data
Ensure you touch the ‘Save
Form and Exit’ button to
properly save the completed
questionnaire
V1.0
25
o You can see the entire questionnaire by scrolling up/down
• Step-2: For editing, touch the desired question to open the question in a full screen, then correct the answer and press the save icon at the top-right corner in the Tab
o It will save the changed data and you can come back to the entire questionnaire by touching the down-arrow icon at the top-right corner of the Tab.
• You can edit multiple questions by swiping left/right and finally touch the save icon in the Tab or when you reach the last question and touch he button “Save and Exit Form”.
3.1.6 Data saving step by step
Options are available to save the VA form either after entirely doing the VA or after completing any question by
clicking "Save Changes" from the dialog box.
• For a new interview you can save the form by touching the button “Save and Exit Form” at the last
section of the questionnaire
• To save individual questions you can touch the save icon at the top-right corner of the Tab
• After completing any question from the VA questionnaire you can press the back button and touch "Save Changes" from the dialog box.
3.1.7 Submitting interview data
Save the data and exit the screen by touching the home button. Data is automatically saved in the folder
“Instances” in .xml format.
3.1.8 Starting a new interview
Go to the ODK icon from home screen and click the “fill the blank form” to start a new interview. 3.1.9 Data transfer and uploading
Once the VAs have been collected, they need to be transferred off the tablet for analysis in the SmartVA.
There are two methods of data transfer, online (through wi-fi or a cellular network) with the upload of the
filled questionnaire going directly to ODK Aggregate; or offline (by uploading data to a computer) with the
upload of the filled questionnaire using ODK Briefcase. The VA Interviewer needs to be told the method of data
transfer in advance.
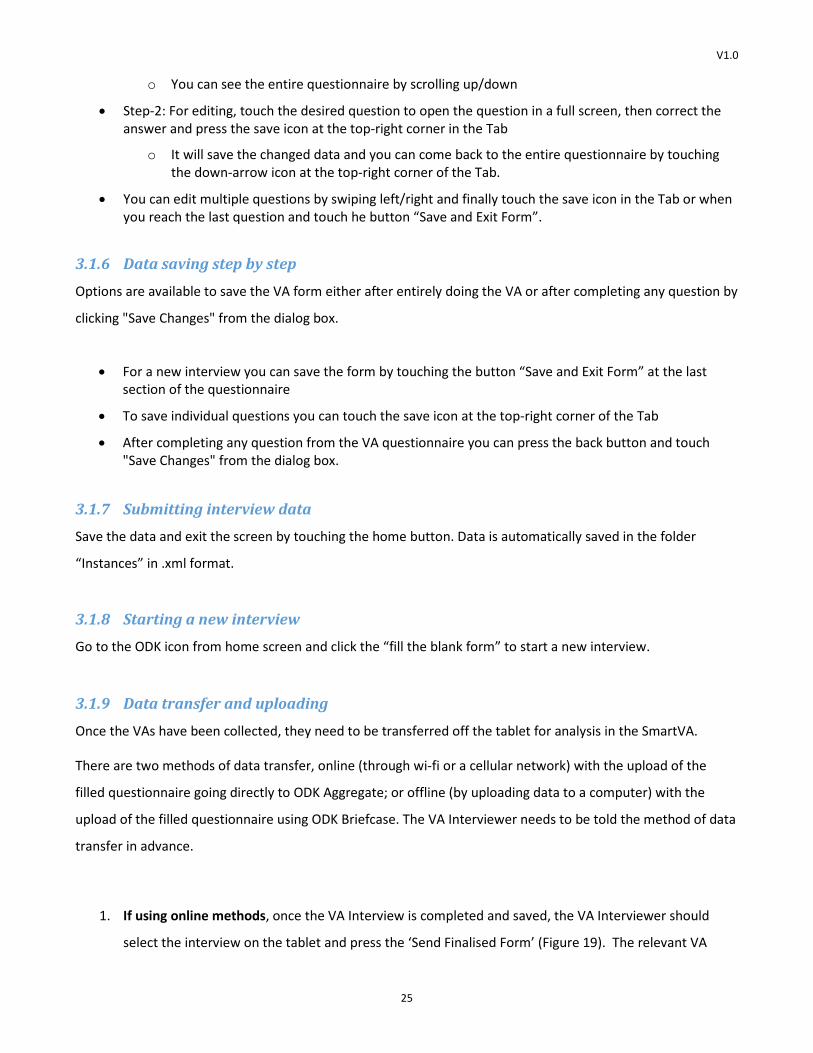
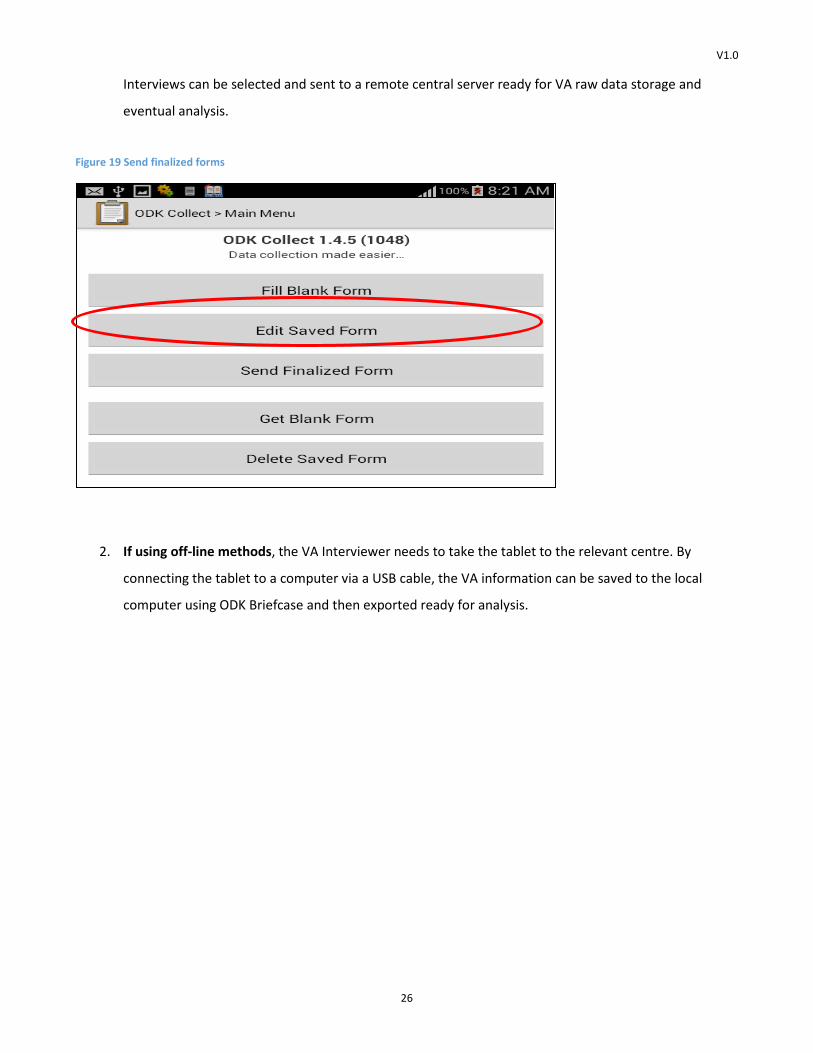
1. If using online methods, once the VA Interview is completed and saved, the VA Interviewer should
select the interview on the tablet and press the ‘Send Finalised Form’ (Figure 19). The relevant VA
V1.0
26
Interviews can be selected and sent to a remote central server ready for VA raw data storage and
eventual analysis.
Figure 19 Send finalized forms
2. If using off-line methods, the VA Interviewer needs to take the tablet to the relevant centre. By
connecting the tablet to a computer via a USB cable, the VA information can be saved to the local
computer using ODK Briefcase and then exported ready for analysis.

V1.0
27
4. Analysis of VAs using SmartVA Analyze Once a VA is collected, it is necessary to analyze it in order to diagnose the COD. Originally, this process was
done through review of the VA by physicians, called PCVA. One or more physicians would review the VA, and
diagnose a cause of death based on its information. However, this process has substantial limitations, as
described in Box 1.
Box 1. Limitations of Physician Certified Verbal Autopsy (PCVA)
Feasibility and practicality: finding and training physicians to read VAs in resource poor settings. In some cases
this led to long delays in the analysis of collected data.
Opportunity cost: where there are shortages of physicians, assigning available physicians to read VAs may
mean pulling them away from their primary role in providing essential health services to populations.
Inter-rater reliability. The same VA questionnaire, read by two different physicians, could return two different
diagnoses, with each physician bringing a unique set of knowledge, experience, training, history and personal
opinion.
4.1 How can Tariff be used? A research team at the University of Washington has developed an application that allows the collection of VA
using the PHMRC questionnaire on any Android device using ODK Collect. This has a number of advantages.
Namely, it is low cost, rapid, reliable, and includes automated data quality checks, like skip patterns, where
Interviewers must follow survey skip patterns; logic constraints (i.e. pregnancy cannot last more than 10
months), and automated data entry (data is automatically downloaded and processed). There is also picture
and audio capability (Figure 21). The questionnaire is also easily translatable into other languages.

V1.0
28
Figure 20 Example of picture capabilities of the VAQ in ODK
4.2 Automated analysis and results using SMARTVA The process of analysis of VA using Smart VA includes five basic steps:
1. Install the Tariff Software onto a laptop or PC
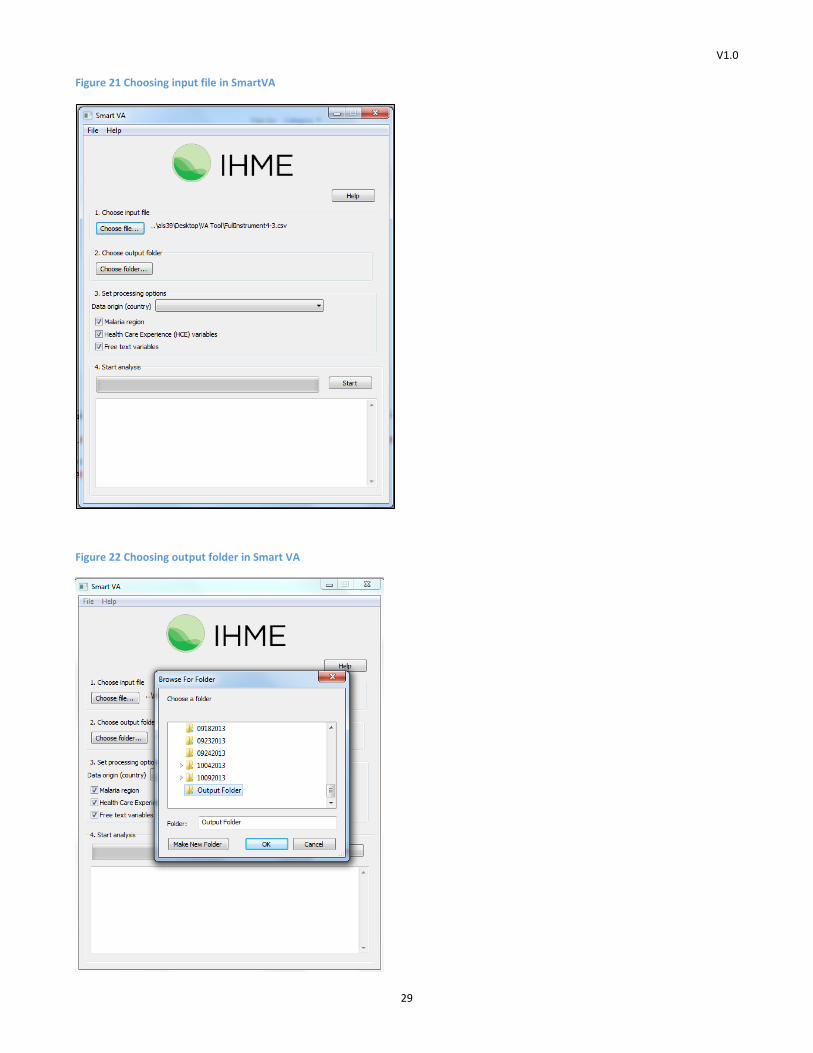
2. Choose input file
a. Once your data have been processed by ODK Briefcase, you can open SmartVA and select the
location of your input data (Figure 22)
3. Choose output folder
a. Select where you would like the output from the analysis to be saved.
b. The output from the analysis will be saved in different subfolders within the folder you select in
this step (Figure 23).
V1.0
29
Figure 21 Choosing input file in SmartVA
Figure 22 Choosing output folder in Smart VA

V1.0
30
4. Set the options parameter. Four additional options can be specified (Figure 24):
a. Country of origin.
i. The user may select the country where the VA data were collected. This information is
used for reallocation of indeterminate VAs (that is, cases in which the method was not
able to diagnose a cause of death in a reliable way based on the questionnaire) to
present results for the entire population of VAs.
ii. Individual observations from the data are not reallocated. Instead, the age and sex
distribution of the “indeterminate” VAs in your sample are used to adjust the
estimated population-level cause-specific mortality fractions (CSMFs) based on the
Global Burden of Disease estimates for the country of VA origin.
iii. If no country of origin is specified, the indeterminate VAs will not be reallocated, and
an additional category of “indeterminate” will be shown on the final CSMF graphs and
CSV files
b. Malaria region. The user must determine whether malaria is a possible cause of death in the
population from which the VAs were collected. If this box next to “Malaria region” is not
selected, the Tariff Method will not assign malaria as a cause of death.
c. Health care experience variables.
i. The user should determine whether, as part of the survey, questions regarding the
health care experience (HCE) of the deceased or his/her family is asked. If the box next
to “Health Care Experience (HCE) variables” is not checked, these variables are not
included in the analysis, and the software will use appropriate training data which are
not enhanced with HCE variables.
ii. The following questions in the PHMRC questionnaire are considered “health care
experience:”
1. For adults, the question, “Did the deceased have any of the following?”
followed by a list of chronic conditions.
2. Any data that were transcribed from health records. (This is section 6 of the
adult module and section 5 of the child/neonate module).
3. For all age modules, responses to the question, “Could you please summarize,
or tell us in your own words, any additional information about the illness
and/or death of your loved one?”
V1.0
31
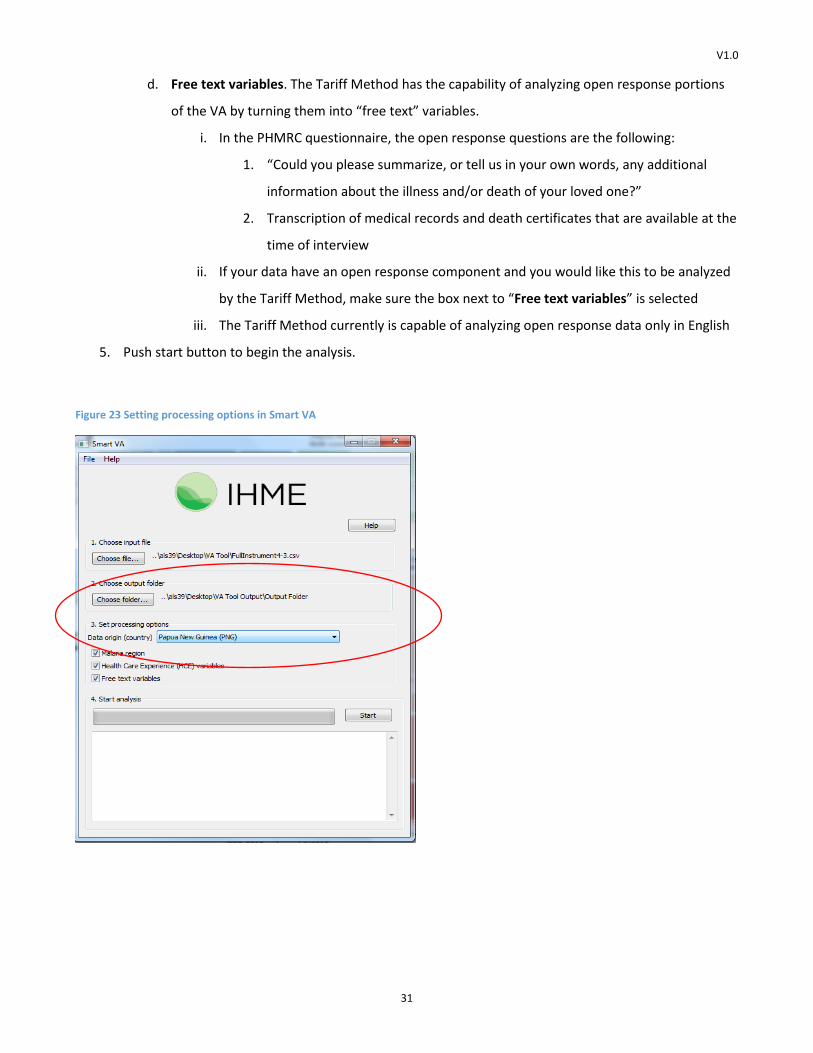
d. Free text variables. The Tariff Method has the capability of analyzing open response portions
of the VA by turning them into “free text” variables.
i. In the PHMRC questionnaire, the open response questions are the following:
1. “Could you please summarize, or tell us in your own words, any additional
information about the illness and/or death of your loved one?”
2. Transcription of medical records and death certificates that are available at the
time of interview
ii. If your data have an open response component and you would like this to be analyzed
by the Tariff Method, make sure the box next to “Free text variables” is selected
iii. The Tariff Method currently is capable of analyzing open response data only in English
5. Push start button to begin the analysis.
Figure 23 Setting processing options in Smart VA
V1.0
32
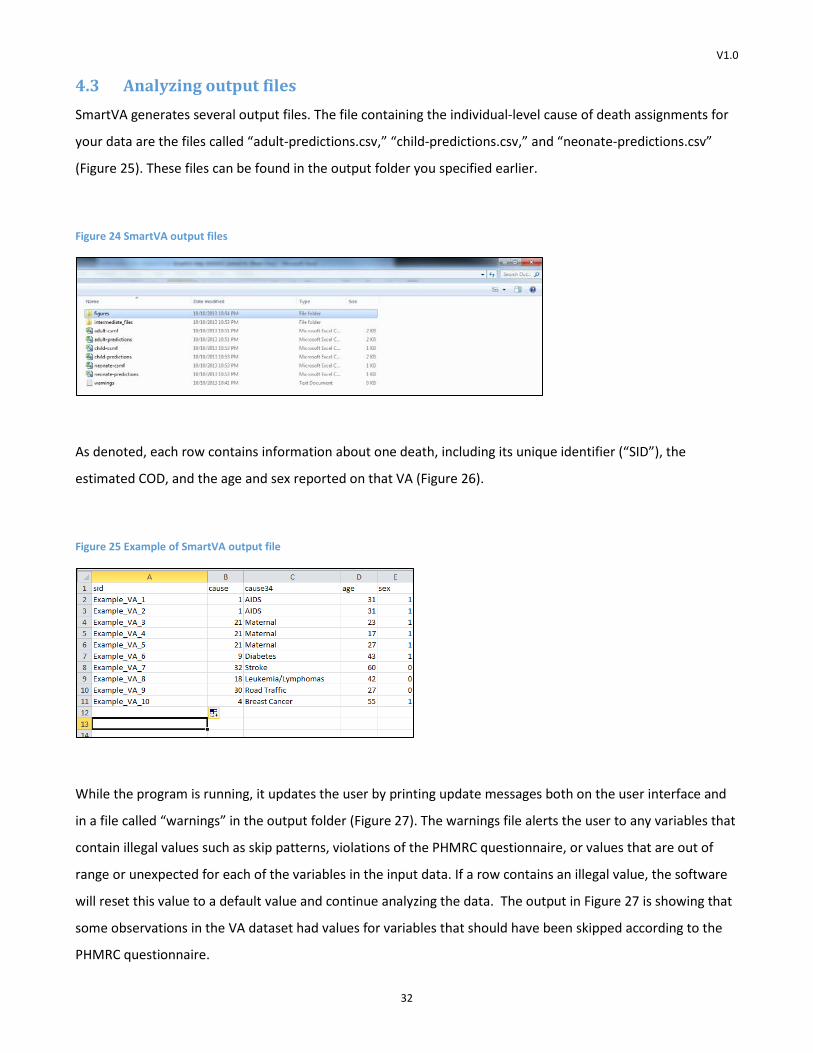
4.3 Analyzing output files SmartVA generates several output files. The file containing the individual-level cause of death assignments for
your data are the files called “adult-predictions.csv,” “child-predictions.csv,” and “neonate-predictions.csv”
(Figure 25). These files can be found in the output folder you specified earlier.
Figure 24 SmartVA output files
As denoted, each row contains information about one death, including its unique identifier (“SID”), the
estimated COD, and the age and sex reported on that VA (Figure 26).
Figure 25 Example of SmartVA output file
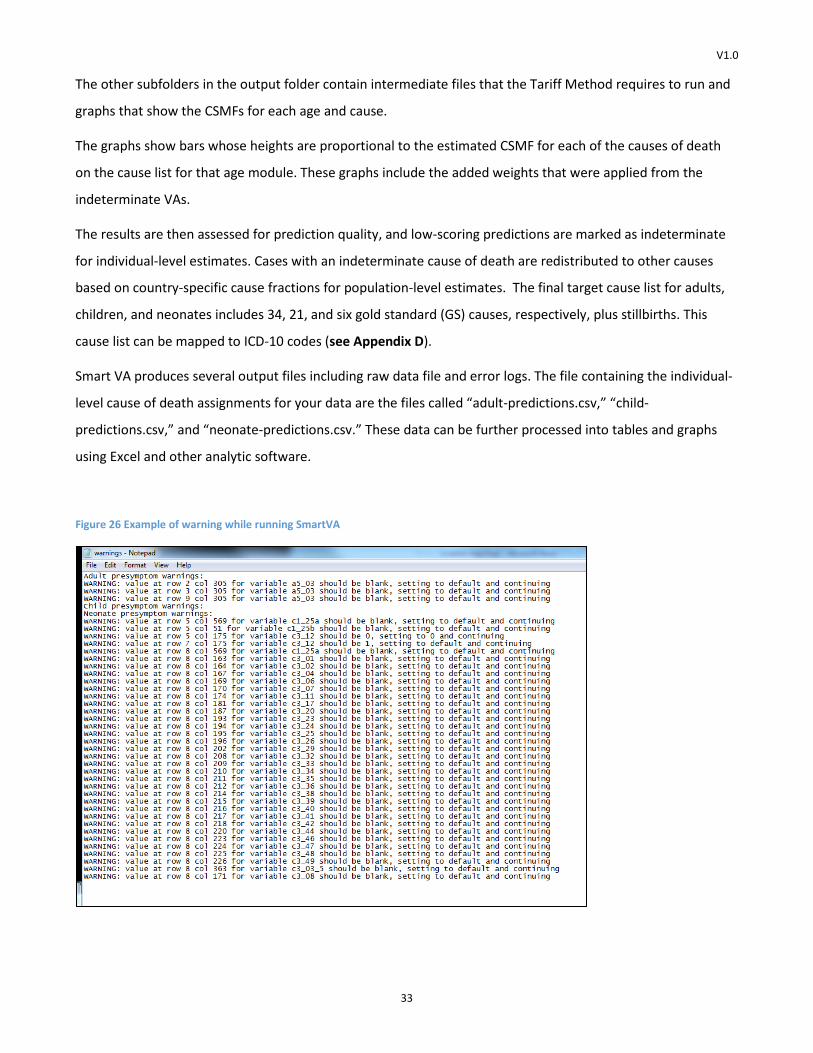
While the program is running, it updates the user by printing update messages both on the user interface and
in a file called “warnings” in the output folder (Figure 27). The warnings file alerts the user to any variables that
contain illegal values such as skip patterns, violations of the PHMRC questionnaire, or values that are out of
range or unexpected for each of the variables in the input data. If a row contains an illegal value, the software
will reset this value to a default value and continue analyzing the data. The output in Figure 27 is showing that
some observations in the VA dataset had values for variables that should have been skipped according to the
PHMRC questionnaire.
V1.0
33
The other subfolders in the output folder contain intermediate files that the Tariff Method requires to run and
graphs that show the CSMFs for each age and cause.
The graphs show bars whose heights are proportional to the estimated CSMF for each of the causes of death
on the cause list for that age module. These graphs include the added weights that were applied from the
indeterminate VAs.
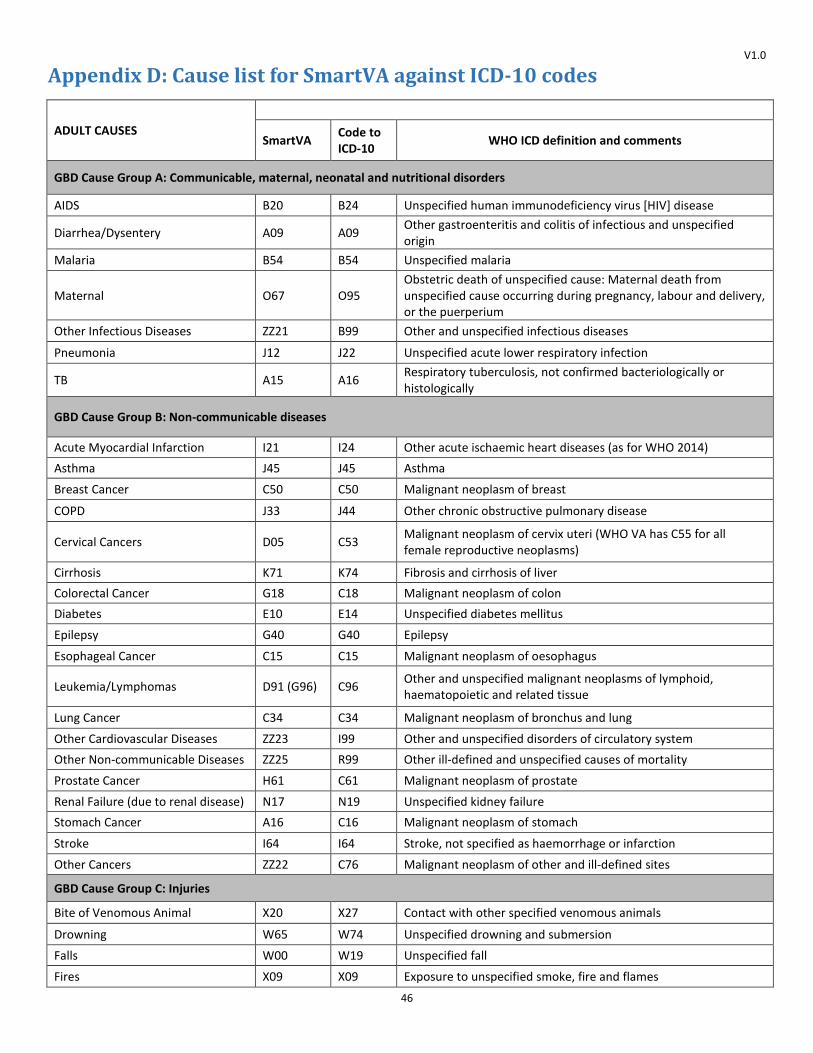
The results are then assessed for prediction quality, and low-scoring predictions are marked as indeterminate
for individual-level estimates. Cases with an indeterminate cause of death are redistributed to other causes
based on country-specific cause fractions for population-level estimates. The final target cause list for adults,
children, and neonates includes 34, 21, and six gold standard (GS) causes, respectively, plus stillbirths. This
cause list can be mapped to ICD-10 codes (see Appendix D).
Smart VA produces several output files including raw data file and error logs. The file containing the individual-
level cause of death assignments for your data are the files called “adult-predictions.csv,” “child-
predictions.csv,” and “neonate-predictions.csv.” These data can be further processed into tables and graphs
using Excel and other analytic software.
Figure 26 Example of warning while running SmartVA
V1.0
34
4.4 Logistic issues in the use of Smart VA SmartVA is suitable to collect and analyze information collected for different purposes (contribution to vital
registration systems, surveys, epidemiologic studies, etc.). In this section we discuss some logistic issues that
have to be considered for data collection.
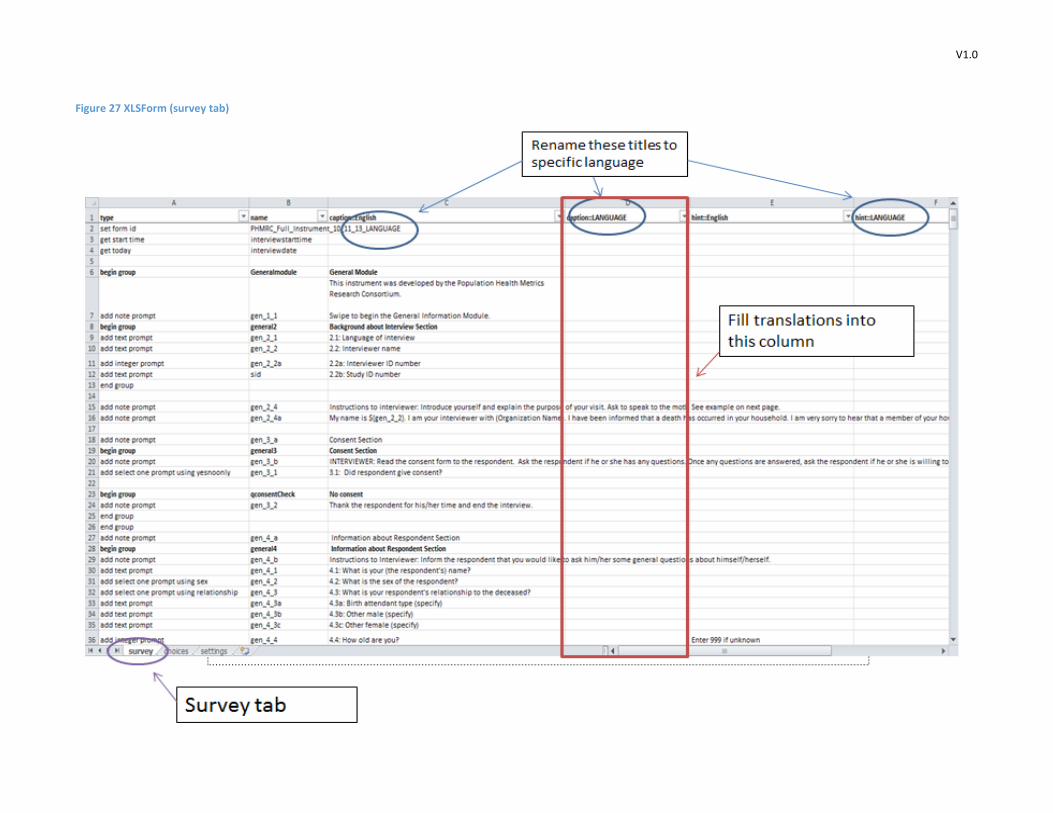
4.4.1 Translation of the VA questionnaire to different languages
The PHMRC questionnaire was developed in English, and so far has been translated to eight different languages
for application. Along with SmartVA, an interphase has been created to facilitate translation to different
languages. The user needs to write down the translation of each question in the designated column of an
Excel spreadsheet, and retrieve this information to the ODK. A step by step process is described below for how
to develop a local language questionnaire to be used in ODK Collect (Box 2).
Box 2: Developing a local language tool in Excel
Step 1: Translate all the text, from Excel file, under the caption, hint and label into the Unicode
supported local language.
Step 2: Copy and paste the translated local language text into the appropriate question under the
caption, hint, and label into the excel file, and save the file.
Step 3: Convert the excel file to “xml Form” you need to go to http://opendatakit.org/xiframe/
Step 4: Click the “Browse…” button and select the Excel file from your computer hard drive and click the
“Submit” button.
Step 5: After sometime (approximately one minute) it will show the “Download” button for downloading
the “xml Form”. If the translated local language Excel file is ok then it will show no error, otherwise it will
show an error message. Click the “Download” button and save it to you Laptop/desktop computer.
Step 6: Finally, copy the local language translated “.xml Form” and paste it to the “forms” folder under
the “ODK” folder in your Tab.
Step 7: Turn the tablet off and restart to start the ODK Collect software.
See Appendix C for more detailed instructions
V1.0
35
4.5 Data collection logistics and quality control The quality of data collected is essential for an adequate estimation of causes of death using VA. Therefore, it
is crucial to consider proper training, supervision and quality control of interviewers. Given the sensitive topics
of the VA interview, it is highly advisable to consider offering emotional support to interviewees after the
interview, and to interviewers along the field work process. Although the VA questionnaire has been
previously validated, it is very important to conduct a pilot test after training and before the final data
collection to test the whole operation.
V1.0
36
5. FAQ and troubleshooting
1. Tablet Doesn't Turn On
No matter what you do, you can't get your tablet to turn on.
• Press and Hold the Wake/Sleep Button
• Check If Battery Will Charge
o First, connect your tablet to the power adapter
o Hopefully the tablet will recognize the charger and begin to recharge the battery
o If it does not, the battery may be defective and need to be replaced.
2. Screen Doesn't Respond to Touch
Nothing happens when I touch my screen.
• Perform a Soft Reset
o A soft reset restarts your device and does not erase any of your content or data
o Begin by pressing and holding the Power key until your device turns off
o Wait a moment, then press and hold the Power key to turn your device back on.
3. Tablet Overheats
Tablet is too hot to touch.
• Reset the Device
o Hold down the power button until the device shuts off
o Let it cool down for a few minutes, then hold the power button until the device powers on.
• Bad Battery
o If the device continues to heat up, the battery is most likely defective and needs replacement
o Purchase a battery, and replace the old with the new.
4. Tablet Performs Slowly
• Safely Remove Your SD Card
o From the home screen, tap the Menu key, then tap Settings
V1.0
37
o Once in Settings, scroll to and tap Storage. In Storage, scroll to and tap unmount SD card, then
tap OK
o You can now safely remove the SD card.
• Perform a Soft Reset
o A soft reset restarts your device and does not erase any of your content or data
o Begin by pressing and holding the Power key until your device turns off
o Wait a moment, then press and hold the Power key to turn your device back on.
5. ODK folder not showing up when connected with PC/laptop
• When you connect the tablet with PC using USB cable, you should see the odk folder in the list of
folders with three subfolders within it
o These are “forms, instances and metadata”
• If it does not show up, turn off tablet and PC and turn on again, eventually it would show up and you
will be able to include xml form and unzipped media file.
6. What are the age cutoffs for “Adult,” “Child,” and “Neonate” modules?
Age-specific module Age range
Adolescent/adult 12 years and older
Child 29 days – 11 years old
Neonate 28 days or less
V1.0
38
6. What are the files “adult-prepped.csv,” “adult-presymptom.csv,” and “adult-symptom.csv”?
• These files are the input data in standardized formats that are produced by the software
• The “adult-prepped.csv” file contains the raw data from the electronic questionnaire
• The “adult-presymptom.csv” file contains the data in the PHMRC questionnaire format
• The “adult-symptom.csv” file contains dichotomized or Yes/No variables that are the direct inputs for
the Tariff Method analysis.
7. How do I interpret the graphs?
• The graphs show bars whose heights are proportional to the estimated cause-specific mortality fraction
(CSMF) for each of the causes of death on the cause list for that age module
• These graphs include the added weights that were applied from the indeterminate VAs.
5.1 Acronyms and abbreviations
CCC Chance corrected concordance
COD Cause of death
CRVS Civil registration and vital statistics
CSMF Cause specific mortality fraction
GS(C) Gold-standard cause
HCE Health care experience
ICD International Classification of Diseases
IHME Institute of Health Metrics and Evaluation
ODK Open Data Kit
PCVA Physician certified verbal autopsy
PHMRC Population Health Metrics Research Consortium
Tab Tablet
VA Verbal autopsy
VAQ Verbal autopsy questionnaire
V1.0
39
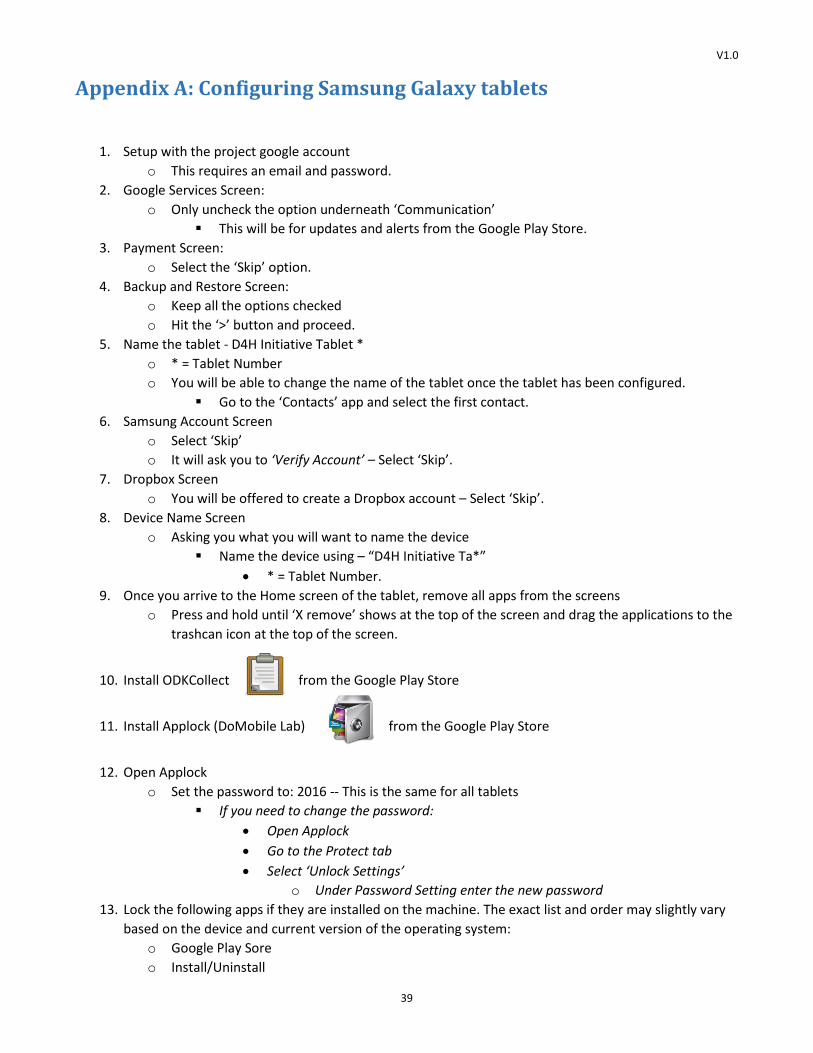
Appendix A: Configuring Samsung Galaxy tablets
1. Setup with the project google account o This requires an email and password.
2. Google Services Screen: o Only uncheck the option underneath ‘Communication’
This will be for updates and alerts from the Google Play Store. 3. Payment Screen:
o Select the ‘Skip’ option. 4. Backup and Restore Screen:
o Keep all the options checked o Hit the ‘>’ button and proceed.
5. Name the tablet - D4H Initiative Tablet * o * = Tablet Number o You will be able to change the name of the tablet once the tablet has been configured.
Go to the ‘Contacts’ app and select the first contact. 6. Samsung Account Screen
o Select ‘Skip’ o It will ask you to ‘Verify Account’ – Select ‘Skip’.
7. Dropbox Screen o You will be offered to create a Dropbox account – Select ‘Skip’.
8. Device Name Screen o Asking you what you will want to name the device
Name the device using – “D4H Initiative Ta*” • * = Tablet Number.
9. Once you arrive to the Home screen of the tablet, remove all apps from the screens o Press and hold until ‘X remove’ shows at the top of the screen and drag the applications to the
trashcan icon at the top of the screen.
10. Install ODKCollect from the Google Play Store
11. Install Applock (DoMobile Lab) from the Google Play Store
12. Open Applock o Set the password to: 2016 -- This is the same for all tablets
If you need to change the password: • Open Applock • Go to the Protect tab • Select ‘Unlock Settings’
o Under Password Setting enter the new password 13. Lock the following apps if they are installed on the machine. The exact list and order may slightly vary
based on the device and current version of the operating system: o Google Play Sore o Install/Uninstall

V1.0
40
o Email o Gmail o Messages o Chrome o Downloads o Drive o Dropbox o Earth o Google o Google+ o Hangouts o Internet o Maps o Music o Photos o Play Books o Play Games o Play Movies o Play Music o Play Newstand o Youtube o Voice Search o Galaxy Apps o Samsung Apps o Splanner o Svoice.

V1.0
41
Appendix B: Configuring tablets for ODK aggregate
1. Open ODK Collect 2. Click on the upper right corner and go to General Settings 3. Confirm that ‘Platform’ is ‘ODK Aggregate’, change if required 4. Click on 'Configure platform settings'
o Change the URL to: https://<your server URL> e.g. https://example.aggregate-server.com o Username: enter the username provided to you by your Aggregate server administrator o Password: enter the password provided to you by your Aggregate server administrator
5. Go back to the ODK Collect Main Menu 6. Click on the upper right corner and go to the Admin Settings
o Click on 'Admin Password' o Change Admin Password: enter the password provided to you by your Aggregate server
administrator o Click ok
7. Go back to 'Admin Settings' Deselect the following:
o Delete Saved Form o Platform o Platform Settings o Username o Password o Google account o Delete after send o Show splash screen
8. Go back to the ODK Collect Main Menu 9. Select 'Get Blank Form'
o Connect with auto filled credentials o You should now see the name of the survey: "PHMRC_Shortened_Instrument_8_20_2015" o Select "Get Selected"
If it successfully downloads the survey, you should see - PHMRC_Shortened_Instrument_8_20_2015 - Success
• Click 'OK'

V1.0
42
Appendix C: Translation of the SmartVA instrument
Last updated May 2016
1. Download the excel file and media folder for the VA questionnaire4.
Inside this document you will find all of the information that creates the survey including variable
names, coding, skip patterns, constraints, and information regarding media files. The majority of these
columns should be left alone. The only things you will be changing are marked with “LANGUAGE”.
From the “Survey tab” this includes “caption::LANGUAGE”, “constraint_message::LANGUAGE” and
“hint::LANGUAGE”. From the “Choices” tab it includes “label::LANGUAGE”.
2. Change all pertinent titles to say specific language you are working with instead of “LANGUAGE” (Figure 28 and Figure 29). These include:
• Excel document title o For example: “PHMRC_Shortened_Instrument_8_20_2015_LANGUAGE.xls” to
“PHMRC_Shortened_Instrument_8_20_2015_Swahili.xls” • Media folder
o For example: “PHMRC_Shortened_Instrument_8_20_2015_LANGUAGE-media” to “PHMRC_Shortened_Instrument_8_20_2015_Swahili-media”
• Within the “survey” tab: o Set form id in row 2
For Example: “PHMRC_Shortened_Instrument_8_20_2015_LANGUAGE” to “PHMRC_Shortened_Instrument_8_20_2015_Swahili”
o Caption column header For example: “caption::LANGUAGE” to “caption::Swahili”
o Hint column header For example: “hint::LANGUAGE” to “hint::Swahili”
• Within the “choices” tab o Label column header
For example: “label::LANGUAGE” to “label::Swahili”
3. Create translations within the spreadsheet. For captions, hints, and choices insert translations in corresponding row.
4 Pending what version you are using, these may be called ‘ODK version of PHMRC shortened questionnaire’, ‘PHMRC_Shortened_Instrument’, or something similar

V1.0
43
For example:
In the “caption::English” column (column C) in row 37 it states, “What is the sex of the respondent?”.
Place the Swahili translation, “Andika jinsia ya mhojiwa?”, in the “caption::Swahili” (column D) in row
37.
Translations need to be created for all captions and hints on the “survey” tab and label on the
“choices” tab.
4. Change default language setting. If you wish you can change the default language under the “settings” tab from English.
For example: Replace “English” with “Swahili” if you want to see the Swahili translations automatically
when you open the survey.
5. Submit your excel document to convert XLS into XForm. This can be done on the ODK website here: http://opendatakit.org/use/xlsform/
6. Download XForm and put it on your tablet along with your media files. The instructions for how to do this can be found on the ODK help file:
http://www.healthdata.org/verbal-autopsy/tools
7. Use the translated version of the instrument through ODK. Please note that it is possible to toggle between English and the language you have translated and put
into the XLSForm. This toggling feature is different on each Android device but it is generally found as a
part of the menu function (Figure 30).
For further assistance:
Many of users’ can be addressed by going directly to the ODK website, specifically the help page:
http://opendatakit.org/help/
There is also an ODK community group where questions can be posted:
https://groups.google.com/forum/#!forum/opendatakit
V1.0
Figure 27 XLSForm (survey tab)

V1.0
45
Figure 28 XLS Form (choices tab)
Figure 29 ODK language selection screen
V1.0
46
Appendix D: Cause list for SmartVA against ICD-10 codes
ADULT CAUSES
SmartVA Code to ICD-10 WHO ICD definition and comments
GBD Cause Group A: Communicable, maternal, neonatal and nutritional disorders
AIDS B20 B24 Unspecified human immunodeficiency virus [HIV] disease
Diarrhea/Dysentery A09 A09 Other gastroenteritis and colitis of infectious and unspecified origin
Malaria B54 B54 Unspecified malaria
Maternal O67 O95 Obstetric death of unspecified cause: Maternal death from unspecified cause occurring during pregnancy, labour and delivery, or the puerperium
Other Infectious Diseases ZZ21 B99 Other and unspecified infectious diseases
Pneumonia J12 J22 Unspecified acute lower respiratory infection
TB A15 A16 Respiratory tuberculosis, not confirmed bacteriologically or histologically
GBD Cause Group B: Non-communicable diseases
Acute Myocardial Infarction I21 I24 Other acute ischaemic heart diseases (as for WHO 2014) Asthma J45 J45 Asthma
Breast Cancer C50 C50 Malignant neoplasm of breast
COPD J33 J44 Other chronic obstructive pulmonary disease
Cervical Cancers D05 C53 Malignant neoplasm of cervix uteri (WHO VA has C55 for all female reproductive neoplasms)
Cirrhosis K71 K74 Fibrosis and cirrhosis of liver Colorectal Cancer G18 C18 Malignant neoplasm of colon Diabetes E10 E14 Unspecified diabetes mellitus
Epilepsy G40 G40 Epilepsy
Esophageal Cancer C15 C15 Malignant neoplasm of oesophagus
Leukemia/Lymphomas D91 (G96) C96 Other and unspecified malignant neoplasms of lymphoid, haematopoietic and related tissue
Lung Cancer C34 C34 Malignant neoplasm of bronchus and lung
Other Cardiovascular Diseases ZZ23 I99 Other and unspecified disorders of circulatory system Other Non-communicable Diseases ZZ25 R99 Other ill-defined and unspecified causes of mortality
Prostate Cancer H61 C61 Malignant neoplasm of prostate
Renal Failure (due to renal disease) N17 N19 Unspecified kidney failure Stomach Cancer A16 C16 Malignant neoplasm of stomach
Stroke I64 I64 Stroke, not specified as haemorrhage or infarction
Other Cancers ZZ22 C76 Malignant neoplasm of other and ill-defined sites
GBD Cause Group C: Injuries
Bite of Venomous Animal X20 X27 Contact with other specified venomous animals
Drowning W65 W74 Unspecified drowning and submersion
Falls W00 W19 Unspecified fall
Fires X09 X09 Exposure to unspecified smoke, fire and flames

V1.0
47
Homicide (assault) Y00 Y09 Assault by unspecified means
Other Injuries ZZ27 X58 Exposure to other specified factors
Poisonings (accidental) T36 X49 Accidental poisoning by and exposure to other and unspecified chemicals and noxious substances
Road Traffic V99 V89 Motor- or nonmotor-vehicle accident, type of vehicle unspecified
Suicide (intentional self-harm) X70 X84 Intentional self-harm by unspecified means
CHILD CAUSES
GBD Cause Group A: Communicable, maternal, neonatal and nutritional disorders
AIDS B20 B24 Unspecified human immunodeficiency virus [HIV] disease
Diarrhea/Dysentery A09 A09 Other gastroenteritis and colitis of infectious and unspecified origin
Encephalitis A83 G04 Encephalitis, myelitis and encephalomyelitis
Hemorrhagic fever A91 A99 Unspecified viral haemorrhagic fever
Malaria B54 B54 Unspecified malaria
Measles B05 B05 Measles
Meningitis A39 G03 Meningitis due to other and unspecified causes
Other Infectious Diseases ZZ11 B99 Other and unspecified infectious diseases
Pneumonia J12 J22 Unspecified acute lower respiratory infection
Sepsis R20 A41 Other sepsis
GBD Cause Group B: Non-communicable diseases
Other Cancers ZZ12 C76 Malignant neoplasm of other and ill-defined sites
Other Cardiovascular Diseases ZZ13 I99 Other and unspecified disorders of circulatory system Other Defined Causes of Child Deaths ZZ16 R99 Other ill-defined and unspecified causes of mortality
Other Digestive Diseases ZZ15 K92 Other diseases of digestive system
GBD Cause Group C: Injuries
Bite of Venomous Animal X20 X27 Contact with other specified venomous animals
Drowning W65 W74 Unspecified drowning and submersion
Falls W00 W19 Unspecified fall
Fires X09 X09 Exposure to unspecified smoke, fire and flames
Poisonings T36 X49 Accidental poisoning by and exposure to other and unspecified chemicals and noxious substances
Road Traffic V99 V89 Motor- or nonmotor-vehicle accident, type of vehicle unspecified
Violent Death V05 Y09 Assault by unspecified means
NEONATE CAUSES
Birth asphyxia P21 P21 Birth asphyxia
Congenital malformation Q00 Q89 Other congenital malformations, not elsewhere classified
Meningitis/Sepsis P351 P36 Bacterial sepsis of newborn
Pneumonia P353 P23/J22 Congenital pneumonia/Unspecified acute lower respiratory infection
Preterm Delivery O601 P07 Disorders related to short gestation and low birth weight, not elsewhere classified
Stillbirth Z37 P95 Fetal death of unspecified cause

V1.0
48
Appendix E: Deployment options for local ODK Aggregate server
1. Server Specifications
Operating System: Windows or Linux RAM: 512kb minimum. Increase for more performance. Disk: 20Gb free space. Increase as required as dataset grows
For more detailed information, please review the Deployment Planning guide on the ODK website: https://opendatakit.org/use/aggregate/deployment-planning/
2. Installing VM (Local or Cloud)
The ODK Aggregate VM is a fully-configured install of Aggregate that you can run on any computer. It requires very little setup, works well without Internet connectivity, and gives you complete control over your data collection campaign. Download the ODK Aggregate VM to begin.
Notes from VM install guide: Please read all instructions for installing this Virtual Machine (VM) before installing the VM. Doing so will save you a lot of time and effort. Warning: This VM has very weak default passwords. Please change them. Basic Usage
1. Download and install VirtualBox from . http://www.virtualbox.org2. Double-click ODK-Aggregate-VM-1.4.11.0.ova to import the VM. Accept the default settings. 3. After the import completes, start the VM. If asked, disable auto-capture before starting. 4. After the VM configures and reboots, wait for a web address to be shown (e.g., http://12.34.56.78). 5. Do not login into the black and white screen of the VM. Instead on your computer, open a web browser. 6. Go to the web address shown in the VM boot screen. You will see the Aggregate login screen. 7. Click “Login” at the top right of screen and then select "Sign in with Aggregate password" and login with
username and password shown below.
Aggregate username: aggregate Aggregate password: aggregate
8. Optional: Configure Network to allow access from the internet. See section C below in the Installing on Tomcat
(Local or Cloud) deployment guide for further information on Network and setup information
Advanced Usage

V1.0
49
If you need to log into the VM itself (e.g., using the Ubuntu command line to administer Tomcat), use the VM credentials (username/password) shown below.
Ubuntu user: user/aggregate Ubuntu admin: root/aggregate Tomcat admin: tomcat/aggregate MySQL user: user/aggregate MySQL admin: root/aggregate
Notes
If you have an older version of VirtualBox, make sure you upgrade to the latest version. If the newest versions of VirtualBox do not install, then try the next version down. If you are using Windows, you can also try the free VMWare Player at http://www.vmware.com/products/player. VMWare Fusion on the Mac also works.
If after unzipping the installer and launching the VM, a "File is busy" or "File access error" message is reported on Windows, it is likely due to improper unzipping or write permissions. Try right-clicking the zip file, then select Extract All and save the files to a folder on the Desktop.
If on Linux you get an error message about "PAE: Unable to boot", make sure VirtualBox has PAE/NX enabled. That setting is usually under System/Processor.
The speed of the VM depends on the speed of the host computer. The first boot will often take a few minutes. Please be patient.
If the VM reports "Network did not assign this VM an IP" error on startup, it means that the VM is on a network that did not assign it an IP. Make sure the upstream router assigns IPs via DHCP. Alternatively, switch the networking in the VM from Bridged to NAT, but then configure port forwarding on the local computer to enable external connections to it. Tomcat in the VM listens on port 80.
The VM address (e.g., http://12.34.56.78) is the server URL that you should enter into ODK Collect or ODK briefcase if you want to download blank forms or send completed forms.
In order to have external servers (e.g., Fusion Tables) or applications (e.g., CSV export) see your form images, you have to make your VM publicly accessible on the Internet with a static IP or fully-qualified domain name. Doing this requires a fair amount of technical skill and we instead recommend you install ODK Aggregate on App Engine. Alternatively, export your data using ODK Briefcase.
The ova file is the installer. Once the VM has imported, the ova file and the zip file can be deleted. It is a good idea to keep the readme (this file).
When all fails, shutdown the VM, reboot the host computer, and restart the VM.
1. Installing on Tomcat (Local or Cloud)
To run on ODK Aggregate on a Tomcat server backed with a MySQL or PostgreSQL database, see Aggregate Tomcat Install.
NOTE: The Visualization and Mapping features of ODK Aggregate do not work when the server is configured to run under certain non-US, non-English locales. We believe this occurs because, in those locales, numbers are formatted
V1.0
50
with a comma as the decimal point, and that this confuses the visualization software we are using. If you are having issues with these features not working, reconfigure your Tomcat server to run in the US English locale.
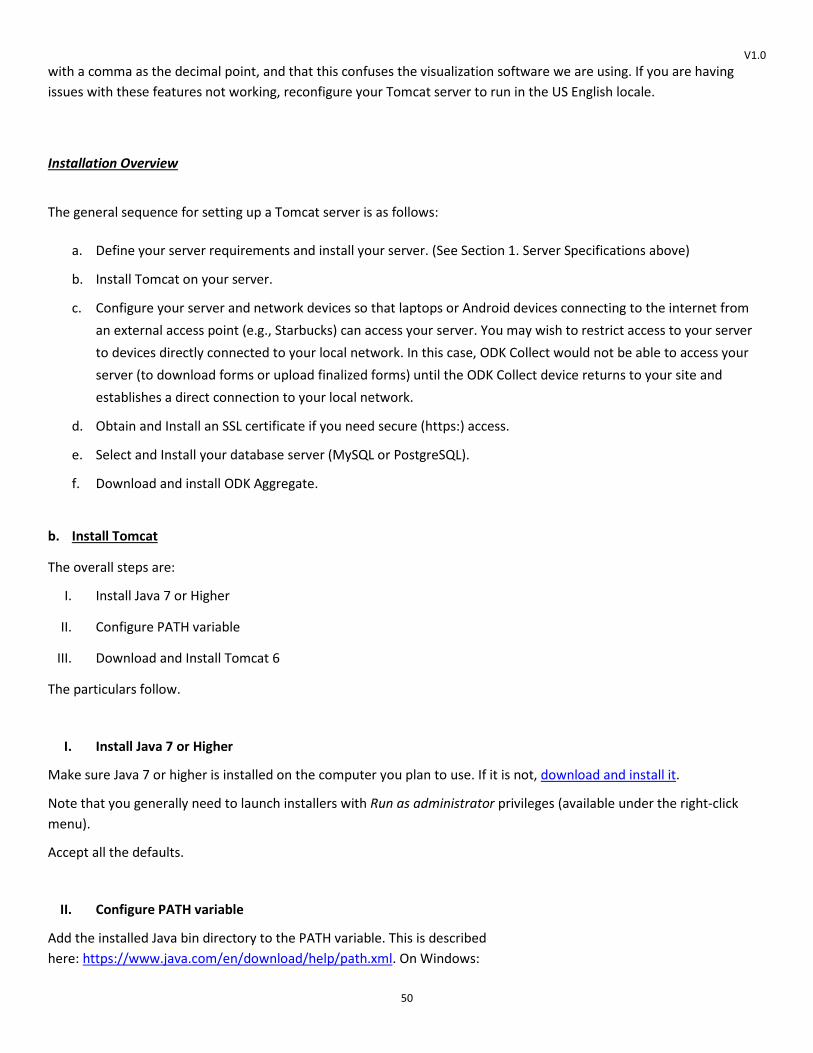
Installation Overview
The general sequence for setting up a Tomcat server is as follows:
a. Define your server requirements and install your server. (See Section 1. Server Specifications above)
b. Install Tomcat on your server.
c. Configure your server and network devices so that laptops or Android devices connecting to the internet from an external access point (e.g., Starbucks) can access your server. You may wish to restrict access to your server to devices directly connected to your local network. In this case, ODK Collect would not be able to access your server (to download forms or upload finalized forms) until the ODK Collect device returns to your site and establishes a direct connection to your local network.
d. Obtain and Install an SSL certificate if you need secure (https:) access.
e. Select and Install your database server (MySQL or PostgreSQL).
f. Download and install ODK Aggregate.
b. Install Tomcat
The overall steps are:
I. Install Java 7 or Higher
II. Configure PATH variable
III. Download and Install Tomcat 6
The particulars follow.
I. Install Java 7 or Higher
Make sure Java 7 or higher is installed on the computer you plan to use. If it is not, download and install it.
Note that you generally need to launch installers with Run as administrator privileges (available under the right-click menu).
Accept all the defaults.
II. Configure PATH variable
Add the installed Java bin directory to the PATH variable. This is described here: https://www.java.com/en/download/help/path.xml. On Windows:
V1.0
51
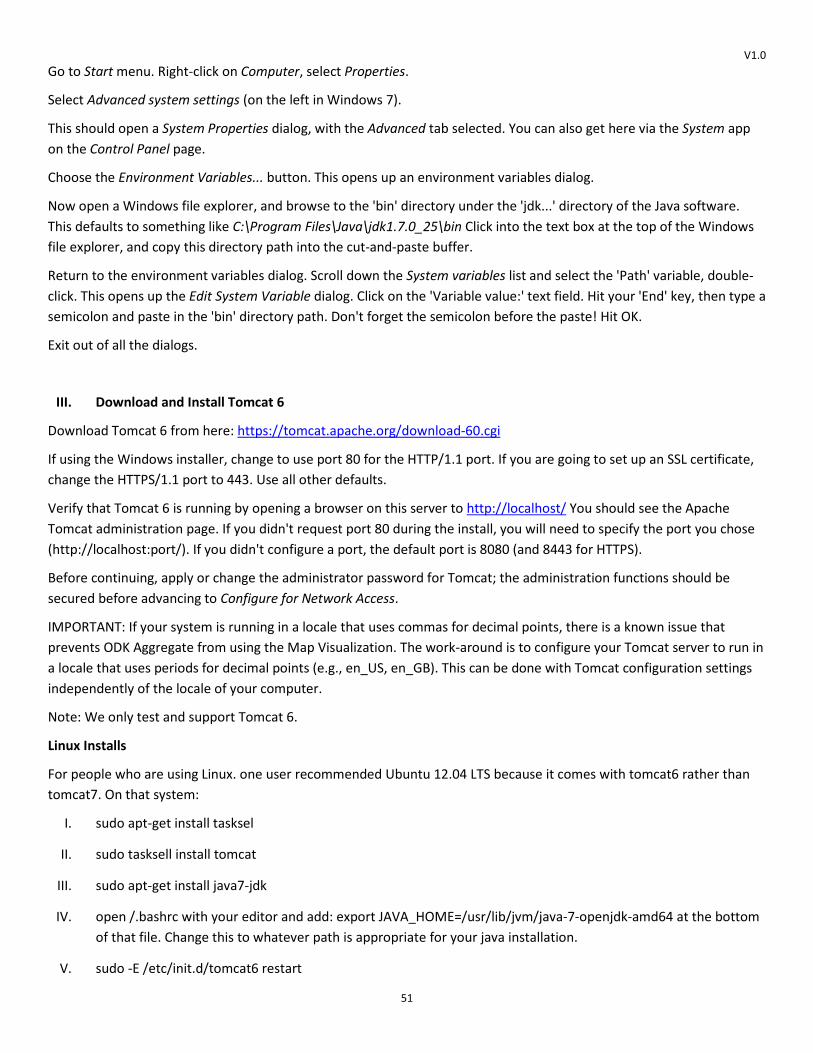
Go to Start menu. Right-click on Computer, select Properties.
Select Advanced system settings (on the left in Windows 7).
This should open a System Properties dialog, with the Advanced tab selected. You can also get here via the System app on the Control Panel page.
Choose the Environment Variables... button. This opens up an environment variables dialog.
Now open a Windows file explorer, and browse to the 'bin' directory under the 'jdk...' directory of the Java software. This defaults to something like C:\Program Files\Java\jdk1.7.0_25\bin Click into the text box at the top of the Windows file explorer, and copy this directory path into the cut-and-paste buffer.
Return to the environment variables dialog. Scroll down the System variables list and select the 'Path' variable, double-click. This opens up the Edit System Variable dialog. Click on the 'Variable value:' text field. Hit your 'End' key, then type a semicolon and paste in the 'bin' directory path. Don't forget the semicolon before the paste! Hit OK.
Exit out of all the dialogs.
III. Download and Install Tomcat 6
Download Tomcat 6 from here: https://tomcat.apache.org/download-60.cgi
If using the Windows installer, change to use port 80 for the HTTP/1.1 port. If you are going to set up an SSL certificate, change the HTTPS/1.1 port to 443. Use all other defaults.
Verify that Tomcat 6 is running by opening a browser on this server to http://localhost/ You should see the Apache Tomcat administration page. If you didn't request port 80 during the install, you will need to specify the port you chose (http://localhost:port/). If you didn't configure a port, the default port is 8080 (and 8443 for HTTPS).
Before continuing, apply or change the administrator password for Tomcat; the administration functions should be secured before advancing to Configure for Network Access.
IMPORTANT: If your system is running in a locale that uses commas for decimal points, there is a known issue that prevents ODK Aggregate from using the Map Visualization. The work-around is to configure your Tomcat server to run in a locale that uses periods for decimal points (e.g., en_US, en_GB). This can be done with Tomcat configuration settings independently of the locale of your computer.
Note: We only test and support Tomcat 6.
Linux Installs
For people who are using Linux. one user recommended Ubuntu 12.04 LTS because it comes with tomcat6 rather than tomcat7. On that system:
I. sudo apt-get install tasksel
II. sudo tasksell install tomcat
III. sudo apt-get install java7-jdk
IV. open /.bashrc with your editor and add: export JAVA_HOME=/usr/lib/jvm/java-7-openjdk-amd64 at the bottom of that file. Change this to whatever path is appropriate for your java installation.
V. sudo -E /etc/init.d/tomcat6 restart
V1.0
52
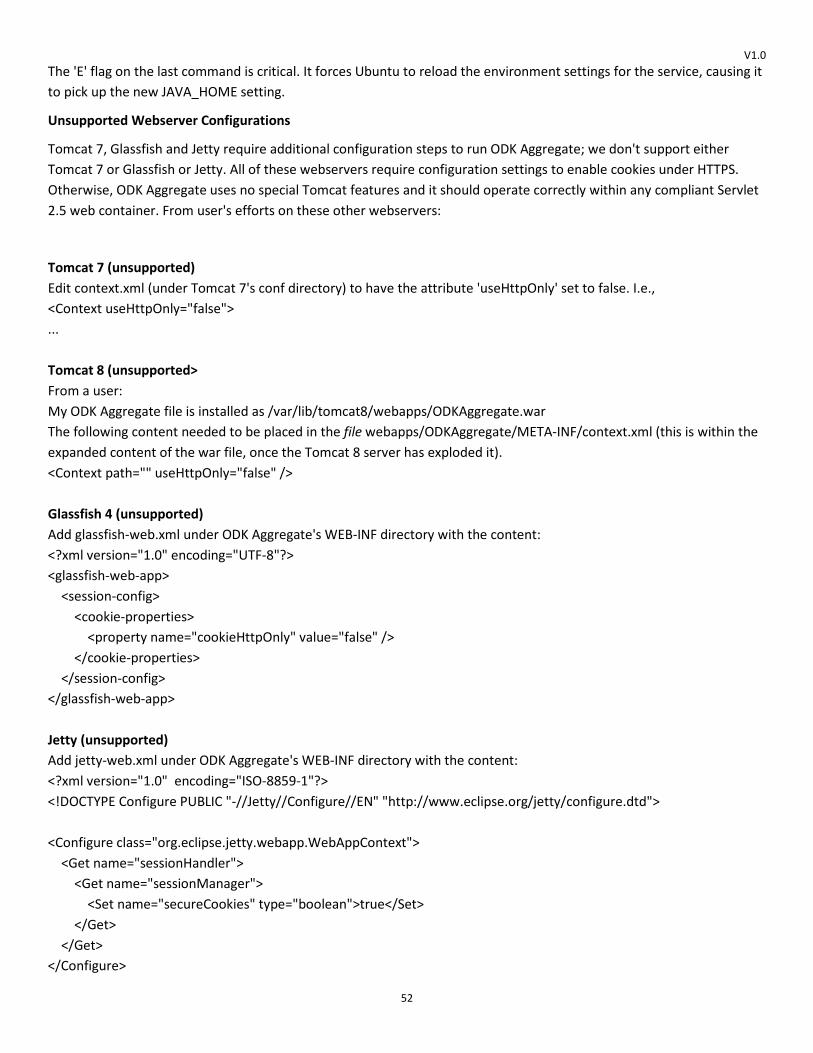
The 'E' flag on the last command is critical. It forces Ubuntu to reload the environment settings for the service, causing it to pick up the new JAVA_HOME setting.
Unsupported Webserver Configurations
Tomcat 7, Glassfish and Jetty require additional configuration steps to run ODK Aggregate; we don't support either Tomcat 7 or Glassfish or Jetty. All of these webservers require configuration settings to enable cookies under HTTPS. Otherwise, ODK Aggregate uses no special Tomcat features and it should operate correctly within any compliant Servlet 2.5 web container. From user's efforts on these other webservers:
Tomcat 7 (unsupported) Edit context.xml (under Tomcat 7's conf directory) to have the attribute 'useHttpOnly' set to false. I.e., <Context useHttpOnly="false"> ... Tomcat 8 (unsupported> From a user: My ODK Aggregate file is installed as /var/lib/tomcat8/webapps/ODKAggregate.war The following content needed to be placed in the file webapps/ODKAggregate/META-INF/context.xml (this is within the expanded content of the war file, once the Tomcat 8 server has exploded it). <Context path="" useHttpOnly="false" /> Glassfish 4 (unsupported) Add glassfish-web.xml under ODK Aggregate's WEB-INF directory with the content: <?xml version="1.0" encoding="UTF-8"?> <glassfish-web-app> <session-config> <cookie-properties> <property name="cookieHttpOnly" value="false" /> </cookie-properties> </session-config> </glassfish-web-app> Jetty (unsupported) Add jetty-web.xml under ODK Aggregate's WEB-INF directory with the content: <?xml version="1.0" encoding="ISO-8859-1"?> <!DOCTYPE Configure PUBLIC "-//Jetty//Configure//EN" "http://www.eclipse.org/jetty/configure.dtd"> <Configure class="org.eclipse.jetty.webapp.WebAppContext"> <Get name="sessionHandler"> <Get name="sessionManager"> <Set name="secureCookies" type="boolean">true</Set> </Get> </Get> </Configure>
V1.0
53
c. Configure for Network Access
The high-level network configuration steps are:
I. configure your server firewall
II. make your server visible on the internet (optional)
III. establish a DNS name for the server
If your organization has a network or systems administrator, contact them for assistance.
I. Configure your Server Firewall
To allow tablets other computers to access ODK Aggregate, you need to configure the server firewall to allow access.
On Windows, open the command window (Start, search for 'cmd'. Right-click, choose 'Run as administrator'). Assuming you configured Tomcat to use port 80, within this command window, type:
netsh firewall add portopening TCP 80 "ODK Aggregate"
If you will have an SSL certificate (required for https:), repeat this command after changing 80 to 443. Or, if you used other ports, perform the command using the specific port number(s) you selected during the Tomcat install.
To verify that other computers can now access Tomcat, on Windows, from a 'cmd' window and type:
ipconfig /all
This will list all the Ethernet adapters and WiFi adapters on your system. Beneath each, you will see an IP address and other information. e.g., there will be entries like this:
Ethernet adapter Local Area Connection:
Connection-specific DNS Suffix . : opendatakit.org
IPv4 Address. . . . . . . . . . . : 192.168.15.121
Subnet Mask . . . . . . . . . . . : 255.255.255.0
Default Gateway . . . . . . . . . : 192.168.15.100
Go to another computer on your local area network, open a browser, and enter the IP address for your server's entry similar to the one shown above. You should see the Tomcat administration screen. For the above example, you would type this into the browser:
http://192.168.15.121
If you used a port other than port 80, you must append a ':' followed by the port on which Tomcat is running (e.g., http://192.168.15.121:8080). If you don't see the Tomcat administration page, double-check that Tomcat is running and that your firewall and antivirus software have the port open.
Congratulations, your server is visible on your local area network!
II. Make your Server Visible on the Internet
V1.0
54
If you are using a web hosting service, your server is already visible to the internet (unless the web hosting service itself requires further configuration steps).
Otherwise, once you can see Tomcat from other machines on your local area network, you have the option of making this server visible from the internet. If the server is not visible from the internet, ODK Collect will only be able to reach your server when it is connected to your local area network or to a WiFi access point on your network (when the ODK Collect device has returned to your premises). If your server is visible from the internet, ODK Collect will be able to use the phone carrier's network or connect to any WiFi hotspot (e.g., Starbucks) and submit or download forms from your server.
If you decide to not make your server visible on the internet, you should still assign your server a static IP address as detailed below, but do not set up port forwarding.
If you choose to make your server visible, the general steps are to set up port forwarding on any networking equipment (your routers and the Internet Service Provider (ISP)'s boxes) upstream of your computer until you reach the piece of equipment assigned the IP address through which your server will be visible on the internet. Open a browser to this site to find out what that internet-visible IP address is:
http://www.whatismyip.com/
Begin with the router to which your server is directly connected and work upwards. If your server's IP address is 192.168.15.121, you can typically access your router's configuration page by browsing to http://192.168.15.1 -- i.e., change the last number to a one. Search the web for the user manual for your router. Cable modems generally don't have an administration page (and don't need to be configured).
Most routers are configured to be DHCP servers (to assign IP addresses to the devices connected to the router) and to have NAT (Network Address Translation) enabled (to be a firewall for the devices connected to the router). If your router has no administration page or is configured in "Bridging Mode", it does neither of these things and can be ignored; proceed to the next piece of network equipment.
Once connected to the router administration screen, you should first go to the DHCP configuration screens and configure your server (or the router to which your server is connected, if you're working up the chain of equipment) to be assigned a static (non-changing) IP address. Follow the user guide to do so.
For a system configured with a router chain with 4 routers, two acting as DHCP servers, the end result is: router 4 - configure to assign a static IP to router 2 | V router 3 - running in Bridging mode | V router 2 - configure to assign a static IP to server | V router 1 - without any administration page | V Server
V1.0
55
Next, if NAT is enabled, there should be a screen to configure port forwarding. You should forward the Tomcat ports to the server (using the static IP address you just assigned to it). Or, to the router to which your server is connected, if you're working up the chain of equipment. If you will have an SSL certificate, you need set up forwarding of both port 80 and 443 (or the port numbers used when configuring Tomcat, if different). For a system configured with a router chain with 4 routers, two with NAT enabled, the end result is:
router 4 - configure to forward port 80 (plus port 443 if SSL) to router 2 | V router 3 - running in Bridging mode | V router 2 - configure to forward port 80 (plus port 443 if SSL) to server | V router 1 - without any administration page | V Server Once these configurations are complete, return to the administration screen of the final piece of networking equipment that you changed (e.g., router 4, above). Find the network status page for this router. It should show two IP addresses. One will be the IP address you used to get to the administration screen and the other will be labeled as either the "Internet Port" or "WAN Port" IP address (or something similar).
If this does not match the IP address reported by http://www.whatismyip.com/ then you will need to contact your ISP for further configuration.
Assuming the IP address matches, you now must consider how stable you need your connection to the internet to be. Unless you purchase a static IP address from your ISP, this IP address may change. For example, every time my laptop is restarted, it gets a different IP address (because it isn't assigned a static IP address). The same is true for this last piece of equipment (router 4). The IP address can occasionally change unless you purchase a static IP address from the ISP (it is most likely to change when rebooted or power cycled — an infrequent event for these devices).
If you need data security (e.g., an SSL certificate) or require a highly-available ODK Aggregate server, you should obtain a static IP from your ISP and configure that network equipment (router 4) to use that static IP address. Otherwise, if you don't need SSL and can tolerate periods of inaccessibility or if your surveyors can call or text when they have problems reaching the server from the field, and you will have someone with server access that is able to respond, you should be able to operate with a dynamic IP address.
To verify the settings so far, ensure that Tomcat is running, venture to a WiFi hotspot (e.g., Starbucks) outside of your organization, and browse to this IP address. You should see the Tomcat administration screen.
Congratulations, your server is visible to the internet!
III. Establish a DNS name for the Server

V1.0
56
If you've completed the above configuration, your server is now reachable from anywhere in the world — provided you know its visible IP address. Or, if you have decided to only expose your server within your local area network (LAN), you have given it a static IP address (albeit one that only identifies your server when resolved in the context of your LAN).
DNS services maintain mappings of names to IP addresses; the next step is to give your server a name and assign that name to this IP address.
If your organization already has a domain name (e.g., opendatakit.org), speak with your network administrator. You will want to create a CNAME underneath this domain name (e.g., myserver.opendatakit.org, under the opendatakit.org domain) that will point to the IP address of the network equipment you configured earlier.
If you do not have a domain name, there are many free "Dynamic DNS" services. These offer the ability to give your server a domain name. You can purchase a domain name (e.g., opendatakit.org), or create a free subdomain under one of the dynamic DNS service's predefined domain names (e.g., myserver.dnsdynamic.com, under the dnsdynamic.com domain). In either case, you would then assign the IP address of the network equipment you configured earlier to this name.
Some WiMax and DSL routers (network devices supplied by your ISP or carrier), have partner DNS services that the router can continually inform of IP address changes. If you do not have a static IP address, one of these partner DNS services should be considered, as this continual update would eliminate your need to monitor and manually update the IP address of your DNS name.
Once you have set up this name and assigned it to your internet-visible IP address, you should then be able to venture to a Wi-Fi hotspot, enter this name in a browser (e.g., http://myserver.dnsdynamic.com), and see your Tomcat administration page.
d. Obtain and Install SSL Certificate
Refer to the documentation on the Apache Tomcat site and on a Certificate Authority site (e.g., Verisign) for how to do this. Configuration of SSL is beyond the scope of this document, but David Dyck has a two part tutorial for assistance.
e. Select and Install Database Server
ODK Aggregate works with either a MySQL or a PostgreSQL database server.
A database server manages one or more databases. The database server stores and retrieves data from tables within these databases. Tables are organized as columns and rows (similar to an Excel worksheet). ODK Aggregate parses and stores submissions as individual rows in a data table, one data value per column within that table.
MySQL is a defacto standard for open source development, so there are many database administrators and software professionals that understand and use it.
PostgreSQL is less common, but has found a large following in geographical information systems (GIS) applications.
Both are free and open source.
Despite MySQL's overwhelming prevalence, PostgreSQL should be considered for GIS applications or if you require very large forms. MySQL imposes a limit of 4096 columns per table and 65536 bytes per row. The later limitation is the most severe. If you have a form with more than 256 select1, string or barcode questions, it will likely require two or more tables to store all the data values because the 65536 byte limit will have been exceeded (unless you use the odk:length

V1.0
57
attribute to shorten the maximum length of these fields to less than the default 255 characters). Even when large forms are split across tables, ODK Aggregate can store and publish them; however, filtering by column value will be impacted. Only columns in the first table can be used in filters during visualization and when exporting to CSV or KML; columns in the second and subsequent overflow tables will cause the filter to fail.
For MySQL, download and install MySQL Community Server 5.1 or higher from MySQL download site. Be sure to set a root password for the database. Stop the MySQL database server, then configure the database (via the "my.cnf" or the "my.ini" file) with these lines added to the [mysqld] section:
character_set_server=utf8
collation_server=utf8_general_ci
max_allowed_packet=1073741824
and restart the MySQL databaseserver. Then, download the MySQL Connector/J, unzip it, and copy the mysql-connector-java-x.x.x-bin.jar file into the Tomcat server's libs directory. After copying it into that directory, you should stop and restart the Tomcat server. The max_allowed_packet setting defines the maximum size of the communications buffer to the server. The value used in the snippet above is 1GB, the maximum value supported. For ODK Aggregate 1.4.11 through 1.4.7, and 1.2.x, the maximum media (e.g., image or video) attachment is limited to the value you set for max_allowed_packet minus some unknown overhead -- e.g., a storage size of something less than 1GB. For ODK Aggregate 1.4.6 and earlier (excluding 1.2.x), the maximum media attachment is unlimited and the setting formax_allowed_packet does not need to be specified. For ODK Aggregate 1.4.12 and later, themax_allowed_packet value should be set to a value greater than 16842752 (this is the minimum value that should be used -- 16MB plus 64kB); with that setting, media attachments of unlimited size are once again supported. If you are upgrading to a newer ODK Aggregate, you must continue to use the setting you already have, or 16842752, whichever is greater. If you experience problems uploading large attachments, change this setting to its maximum value, 1073741824.
For PostgreSQL, download and install the appropriate binary package from PostgreSQL download site. Be sure to set the password for the postgres (root) user. And set the default character set and collation sequence.
For either database, you should ensure that the default character set is configured to be UTF-8 and that the collation sequence (dictionary order) is set appropriately for your circumstances. If it isn't, any non-Latin characters may display as question marks. Refer to the character set and collation sections of your database's documentation for how to do this.
If you need high-availability, consult with a database administrator as to whether or not you require slave databases or database clusters.
f. Install ODK Aggregate
Download ODK Aggregate v1.N.N. Select the latest Featured release for your operating system. These downloads are wizard-based installers for the various operating systems. If you are running OSX, you must unzip the downloaded file before running the installer within it. Consider using a non-Featured release during forms development (to help us identify issues prior to a production release).
The installer does not install anything, but will guide you through configuring ODK Aggregate for Tomcat and MySQL/PostgreSQL. It can be run on any machine. The installer will produce a WAR file (web archive) containing the
V1.0
58
configured ODK Aggregate server, a create_db_and_user.sql script for creating the database and user that ODK Aggregate will use to access this database, and a Readme.html file with instructions on how to complete the installation.
When asked for the fully qualified hostname of the ODK Aggregate server, you should enter the DNS name you established above. The install also asks for a database name, user and password. The user should not be root (MySQL) or postgres (PostgreSQL). ODK Aggregate will use this user when accessing this database (and it will only access this database). By specifying different databases and users, you can set up multiple ODK Aggregate servers that share the same database server, store their data in different databases, and operate without interfering with each other.
If you are upgrading to a newer version of ODK Aggregate, as long as you specify the same database name, user and password, you do not need to re-run the create_db_and_user.sql script (it only needs to be executed once).
See here for information on logging onto your ODK Aggregate instance and changing the access permissions of the server

RESOURCES AND TOOLS SMART VA: TECHNICAL USER MANUAL

unimelb.edu.au
The program partners on this initiative include: The University of Melbourne, Australia; CDC Foundation, USA; Vital Strategies, USA; Johns Hopkins Bloomberg School of Public Health, USA; World Health Organization, Switzerland.
Civil Registration and Vital Statistics partners:
CRICOS Provider Code: 00116K
Version: 1116-02
Copyright © Copyright University of Melbourne November 2016. The University of Melbourne owns the copyright in this publication, and no part of it may be reproduced without their permission.
Disclaimer The University of Melbourne has used its best endeavours to ensure that the material contained in this publication was correct at the time of printing. The University gives no warranty and accepts no responsibility for the accuracy or completeness of information and the University reserves the right to make changes without notice at any time in its absolute discretion.
Intellectual property For further information refer to: www.unimelb.edu.au/Statutes
The University of Melbourne recognises the Institute of Health Metrics and Evaluation (IHME), University of Washington, for their contribution.
For more information, contact:
E: [email protected]: mspgh.unimelb.edu.au/dataforhealth