Embed Size (px)
Citation preview

1
October 10, 2012
What is SMART Table
SMART Table is the first multitouch,
multiuser interactive learning center that
allows groups of early education students to
work simultaneously on one surface.
SMART Table
Cleaning SMART Table
Use an alcohol free glass cleaner, such as Windex
glass cleaner, to clean the surface at regular intervals.
You can also use a vinegar & water or a bleach &
water solution to clean & disinfect your table.
IMPORTANT
Avoid touching the table surface until the
projector starts up and an image appears.
Because the table is touch sensitive even
though you cannot see an image, you could
disrupt the start-up process or open activities
unintentionally.

2
Quick Start: Get Pre-Made Activities:
Once your account is created...
Sign up for an account @ http://exchange.smarttech.com
...a general search can be conducted on the home
page or you can select the search tab to conduct a more refined search.
Type to enter text
...you are then given the option to preview & download if you like the activity. The downloaded activity must be on a USB Key to utilize with the
table.Activities can be used as is, or they can be modified after downloading.

3
Using Pre-Made Activities:
SMART Table Activities
...is the primary software for your SMART
Table . It starts automatically when you turn on
your table. The SMART Table Activities menu
has two modes.

4
To Begin in Teacher Mode: •Insert USB Key on side of table.•Press power button on side of Table•Select & program the following buttons:• Orient
• Select Volume•Total Learners
Orient- when pressed on the orient screen will appear. It will then prompt you to trace a number of circles, followed by line. When this process is completed, the touch system should interact effectively. This should not need to be done often. After initial Orienting repeat process when noticing touch issues with the Table.
Volume - can be adjusted simply by circling your finger around the button.
Total Learners - can be set by pressing the + or - on the button. You may select up to 8 learners. The activity will be set up on multiple sides of the table to accommodate the number of learners selected. Multiple learners can utilize the Table in Single User Mode by working together on the activity.

5
Activity Packs - when pressed an activity screen will come up. You will notice 2 tabs. One with a Table Icon for items installed directly on the table. The second with a Key Icon for items on your key.
•Scroll through the list of activities with your finger.•Select the one you would like to use.•Press open.•Remove USB Key.•Table switches to student mode & is ready for use.• To switch Activity Packs, put USB key back in table & select new activity. Remove key to switch back to Student Mode.
Selecting An Activity Pack:
Switch to Teacher Mode without a USB• Hold 5 fingers down on the center of the table.
• After approx. 10 secs a cog wheel icon will appear in the corner of the table.
• Maintain pressure & press cogwheel w/ other hand.

6
Creating & Modifying Activity Packs:
You will need SMART Table
ToolKit in order to create &
modify activity packs.
The Tech Dept. will install Toolkit on your school computer if you put in a WO. At home you can go to smarttech.com & download the software for Macs or PS’s.Software Needed:All software needed is free for both Mac & PC. You can create packets in
both formats & should have no trouble transporting activity packs between
home, school & the Table via USB Key.Table Toolkit: Used to Create Activity PacksTable Toolkit 2.0 - Supported Operating Systems:
• Mac OS X 10.6.7, 10.5.8NOTE: Mac OS X operating system software 10.7 is not supported
• Windows Vista Home Premium, Business, Enterprise and Ultimate,
including 64-bit editions• Windows Vista SP1• Windows XP SP2 and SP3 (Windows XP SP2 doesn’t support
SMART Sync Teacher software. Windows XP SP3 must be installed
to use SMART Sync Teacher software.)• Windows XP Tablet PC edition SP3• Windows 7 32-bit and 64-bitTable Toolkit 1.5 - Supported Operating Systems:
• Mac OS X 10.4 ???• Mac OSX 10.5.8 (PPC and Intel)• Mac OSX 10.6.7• Windows Vista Home Premium, Business, Enterprise
or Ultimate including 64 bit editions• Windows Vista SP1• Windows XP SP2 and SP3• Windows XP Tablet PC Edition SP2 and SP3
• Windows 7 32-bit and 64-bit
Add-Ons:
Installs directly into Tool Kit & provide
additional activity options.
• Narrow It Down
• SMART Notebook 10.8 will work as low as 10.5
• (Heather has a copy that’s compatible w/ 10.4)
Microsoft SilverliteNeeded in order to preview activity packs.On my Mac I had to first go to:HD-Libraries-Internet Plugins-Select silverlite.plugin & delete it.
SMART TECH HELP LINE:
1-866-518-6791
1-English
1-Technical Support
4-All other Hardware Support
*All questions related to SMART Table or it’s software are directed to HARDWARE SUPPORT!

7
CreatingWe will begin by creating Activity Packs. The steps used to create an Activity Pack can be used to modify any existing Activity Pack.
Open Table Toolkit
Determine which Applications you would like
to include in your Activity Pack.
8
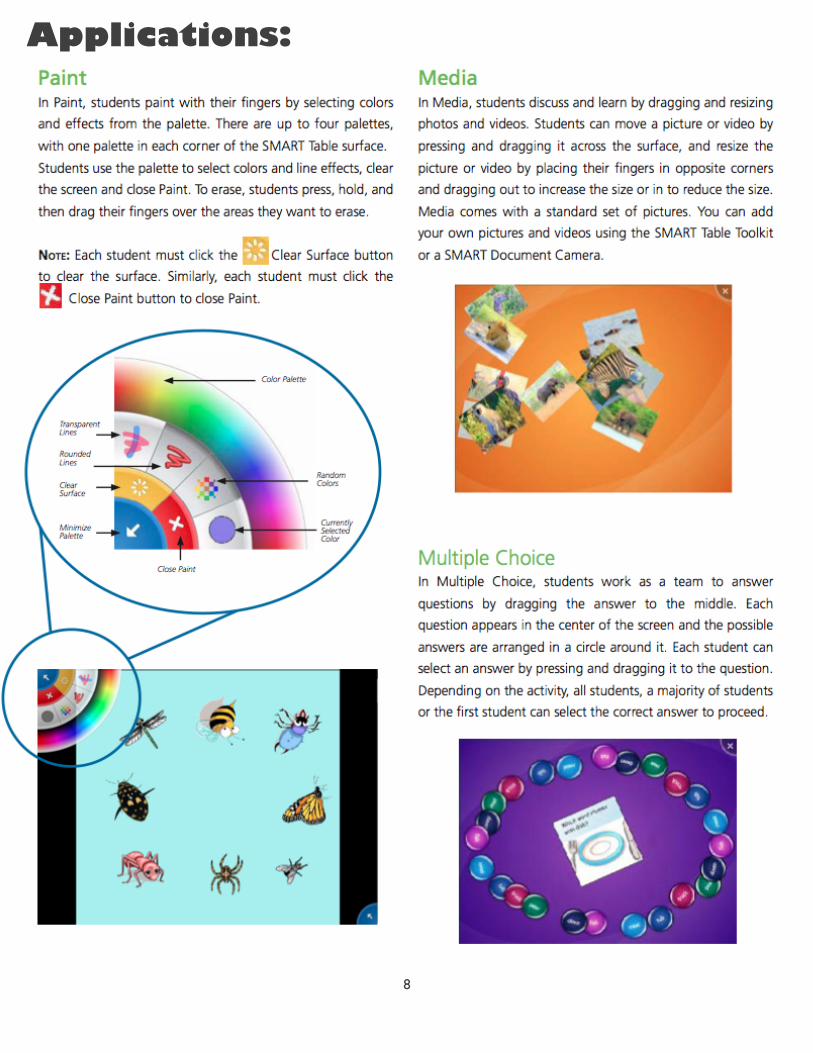
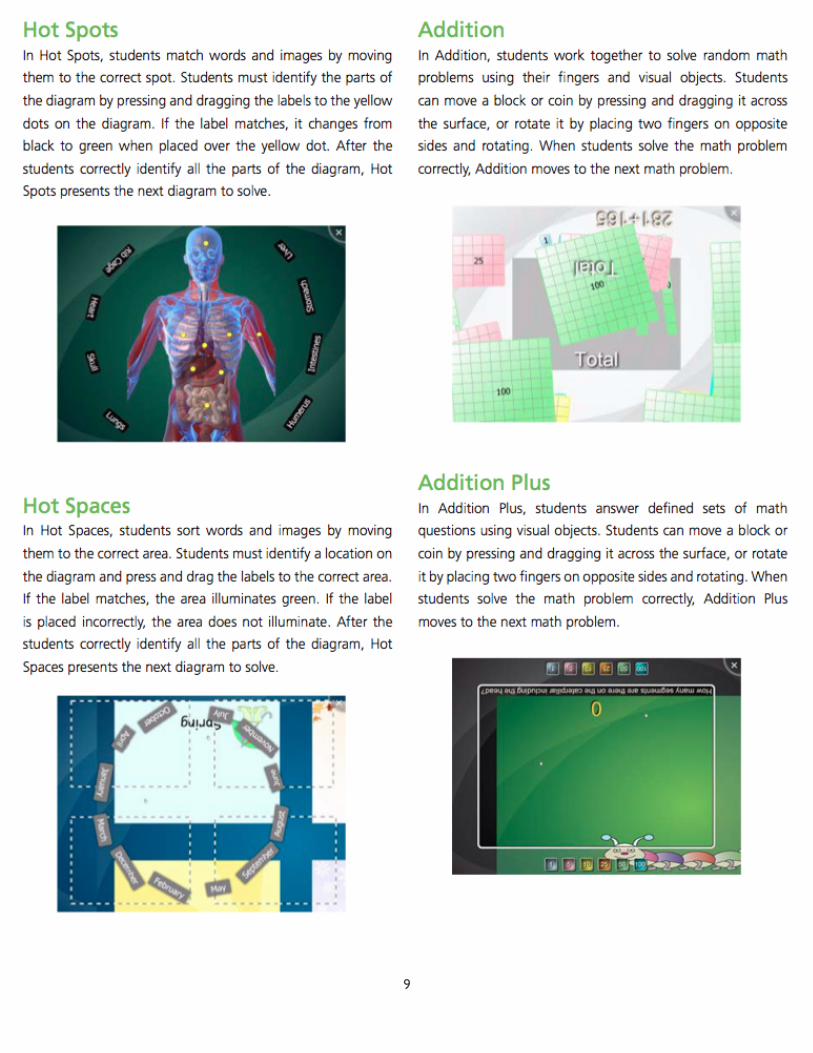
Applications:
9

10
You are allowed to
create multiple lessons
for a single Application
within an activity pack!
( You could create 3 or 4 Hot Spots Activities in
your Planets Activity Pack!)

11
Once Applications have been selected:Tabs will appear next to the home tab for each ApplicationAn Application Icon will appear on the green work area.
(These Icons
cannot be
relocated!)

12
Add a background to the Activity “Home Page”:
Options:Import from a file on your computer.(Download from Google to your computer.)
Import from Gallery.(Internet Required)
Application
Creation TIME
NOTE:To right click on a mac without right click option, you can hold the control key & click.

13
Hot Spaces Notes:
1. When defining your Hot Space if you make a mistake, select the item & press on the X by labels.
2. You can create multiple Hot Spaces Activities in one Activity Pack by selecting the + under The Create Window.


![i1 Professional Color ManageMent solutions...Macintosh® Macos X 10.5.8 or 10.6 [ with latest upgrades installed ], Intel® cPu, 1gb of available raM, 2gb of available hard disk space,](https://img.pdfslide.us/doc/110x75/5fba07d43b23180c0f57b1c3/i1-professional-color-management-solutions-macintosh-macos-x-1058-or-106.jpg)