Embed Size (px)
Citation preview
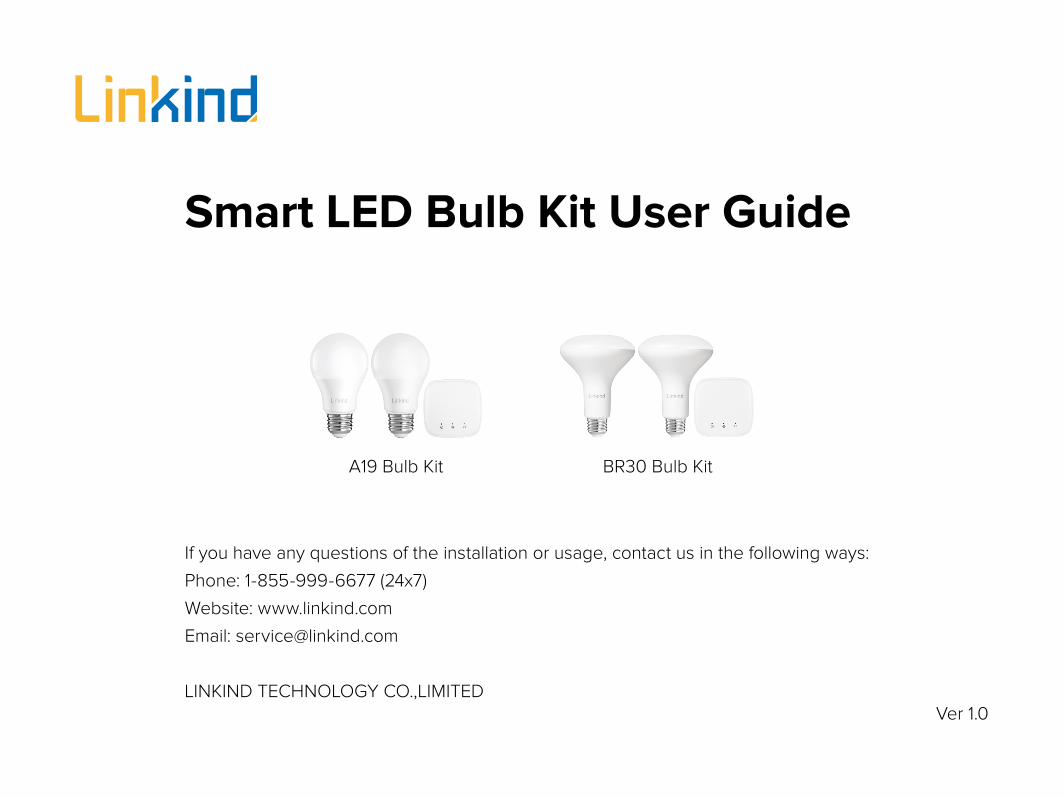
Ver 1.0
Smart LED Bulb Kit User Guide
BR30 Bulb Kit
If you have any questions of the installation or usage, contact us in the following ways:
Phone: 1-855-999-6677 (24x7)
Website: www.linkind.com
Email: [email protected]
LINKIND TECHNOLOGY CO.,LIMITED
A19 Bulb Kit

Content
Cautions ……………………………………………………………………………………1
Products Overview ………………………………………………………………… 2
Linkind APP …………………………………………………………………………… 3
Add Smart LED Bulb Kit ………………………………………………………… 4
Add Mini Hub and Smart Bulb Separately …………………………… 6
Control the Smart Bulb ………………………………………………………… 9
Remove the Smart Bulb …………………………………………………………10
Remove the Mini Hub …………………………………………………………… 11
Scenes …………………………………………………………………………………… 12
Timer ……………………………………………………………………………………… 13
IFTTT ……………………………………………………………………………………… 15
Home Setting ………………………………………………………………………… 17
Home Share …………………………………………………………………………… 18
Room ……………………………………………………………………………………… 19
Work with Alexa …………………………………………………………………… 21
FCC Compliance Statement ……………………………………………… 23
1
To avoid personal injury and/or possible product damage, the following cautions must be followed:
1. Risk of electrical shock. Disconnect power at fuse or circuit breaker before installing or servicing.
2. To prevent early lamp failure, lamp should only be installed in operating environments ranging between -20°C and +40°C (-4°F
and +104°F).
3. Not for use with dimmers.
4. Lamp dims via wireless control and will not operate with a dimmer switch.
5. Not for use in totally enclosed luminaires.
6. Not for use in emergency light fixtures or exit signs.
7. Ensure fixture can support the added weight of the lamp/bulb.
Cautions

2
Products Overview
Protocol Zigbee 3.0 Zigbee 3.0
Watt Per Bulb 9W 7.4W
Base E26 E26
Lumens Per Bulb 800lm 700lm
Light AppearanceDimmable: 2700K
Tunable: 2700-6500KDimmable: 2700K
Tunable: 2700-6500K
Light Dimming 1%-100% 1%-100%
Beam Angle 240° 110°
CRI >80 >90
Rated Life 25000hrs 25000hrs
Timing √ √
Scenes √ √
Work with Alexa √ √
A19 Bulb Kit BR30 Bulb Kit

3
1. Download Linkind APPGet the "Linkind" app from App Store or Google Play. Linkind app is applicable for iOS 8 or higher, Android 4.1 or higher.
2. Register and Log inAt Welcome page, tap "Create account", then "Agree" the Terms of Service and Privacy Policy. Input your Email address and password. To guarantee your account safety, ensure the password comply with the followings:
- At least 6 characters
- 1 uppercase letter
- 1 lowercase letter
- 1 number or symbol
After entering the Email address and password, tap "Create". Your email box will receive a verification link. Click the link and return to the Linkind APP to sign in.
Linkind APP

4
Step 1Tap at the top right corner of Home page, select"Kit" -
"Zigbee Bulb Kit" in the Device List. Plug in the Mini Hub and 2 LED Bulbs, tap "Next step";
Step 2
Wait for the indicator on the right end of the Mini Hub to flash once per second in green, then tap "Next step";
Step 3Select your Wi-Fi network and enter the right password, tap "Next step".
Step 4Tap "Take me to my settings", select "Mini-Hub-**" in the WLAN settings page. After your phone is connected to "Mini-Hub-**", return to Linkind APP.
Add Smart LED Bulb Kit

5
Step 5Wait for about 1 minute, the APP will add the Smart Bulb kit automatically, no need to add the bulbs one by one. Tap "Done" to return to the Home page, the Mini Hub and the LED Bulbs will appear.
Warm Tips:If failed to add the Smart Bulb kit, please check if you have followed the below requirements:
1. Ensure the Wi-Fi network you connect is able to access
Internet, and the Wi-Fi network is 2.4GHz.
2. Ensure you have entered the correct Wi-Fi password.
3. Ensure the Smart Bulb kit not added to another Linkind
account.
4. Make sure you have allow all the APP access. If you're
uncertain about it, please go to the Permission Settings of
the APP and check.
Reset the Mini Hub and the Smart BulbsIf still failed after followed above requirements, you can consider to reset both the Mini Hub and the Smart Bulbs.
Attention: After the resetting, the Mini Hub and Smart Bulbs cannot be added as a whole kit in the APP again. You should add the Mini Hub first, then each Smart Bulb separately. For details, please check "Add Mini Hub and Smart Bulb Separately".
Reset the Mini Hub: long press the reset button for 10 seconds, then wait for the indicator on the right end of the Mini Hub to flash once per second in green.
Reset the Smart Bulb: power on and off the bulb consecutively for 6 times, will blink twice showing it restores to factory default.
Add Smart LED Bulb Kit

6
Step 1Add Mini Hub first. Tap at the top right corner of Home page,
select "Hub" - "Zigbee Mini Hub" in the Device List. Plug in the Mini Hub, tap "Next step";
Step 2
Wait for the indicator on the right end of the Mini Hub to flash once per second in green. Then tap "Next step";
Warm tips: If LED indicator is no blinking in this step, you need to long press the reset button of the Mini Hub to reset it.
Step 3Select your Wi-Fi network and enter the right password, tap "Next step".
Step 4Select Wi-Fi: tap "Take me to my settings", select "Mini-Hub-**" in the WLAN settings page. After your phone is connected to "Mini-Hub-**", return to Linkind APP.
Add Mini Hub and Smart Bulb Separately

7
Step 5Wait for about 1 minute, the APP will add the Mini Hub automatically. Then you can choose to assign it to a room, or tap "+" to create a new room.
Step 6After adding the Mini Hub, the next step is to add Smart Bulbs.
Tap at the top right corner of Home page, select "Lighting"
- "Zigbee DIM A19"/"Zigbee CCT A19"/"Zigbee CCT A60" in the Device List;
Re-plug in the smart bulbs and it will blink twice. If not, you need to power on and off the bulb consecutively for 6 times until it blinks twice. Tap "Next step";
Add Mini Hub and Smart Bulb Separately

8
Step 7The APP will automatically search for and add the smart bulb. Once the bulb is found, it will blink once and be added in the APP. If all bulbs appear at the "Searching For Device" page, tap "Stop searching" to stop the search. Tap "Test" to check where the connected
bulb is. Tap to rename the device. In the last step, tap "Done" to finish the adding.
Warm tips: If you keep failing to add the device, please turn off then turn on the device when the APP is searching.
Add Mini Hub and Smart Bulb Separately

9
On/offYou can turn on/off the smart bulb at Home page.
DimmingTap the smart bulb at Home page into the bulb page. Then you can adjust the brightness, color temperature and color of the bulb.
Dimmable smart bulb (DIM): brightness adjustable only.
Tunable smar t bulb (CCT ): both br ightness and color temperature adjustable
Settings of the smart bulbTap at the top right corner of bulb page for setting change.
You can set the name, change the icon of the bulb, change the group it is listed in and so on.
Control the Smart Bulb

10
The smart bulb, if removed, will restore its factory defaults and no longer be listed on your account. Two ways to remove the bulb:
Method 1Long press the bulb you want to remove at Home page, tap at the top left, tap "Yes" to delete the bulb. Or tap "Remove" in the
setting page of the smart bulb.
Method 2Power on and power off the smart bulb consecutively for 6 times, will blink twice showing it restores to factory default. It is normal that later this bulb will display "Offline" on the APP. You just need to long press the device and remove it.
Remove the Smart Bulb

11
Two ways to remove the Mini Hub:
Method 1Long press the Mini Hub you want to remove at Home page, tap at the top left, tap "Yes" to delete the Mini Hub. Or tap "Remove"
in the setting page of the Mini Hub. In this way, the Mini Hub will be reset. If there were devices(e.g. bulbs) connected to the Mini Hub, they will appear together on the APP once the Mini Hub is re-added.
Method 2
Long press the reset button for 10 seconds, then wait for the indicator on the right end of the Mini Hub to flash once per second in green, showing it restores to factory default. If there were devices(e.g. bulbs) connected to the Mini Hub, they will not appear with the hub on the APP even the Mini Hub is re-added.
Remove the Mini Hub

12
Scenes function enables you save many customized smart home scenes you like. You can quickly switch to the scene you prefer if needed.
Add SceneAt Scenes page, tap at the top right corner to add a new
Scene.
At Add Scene page, fill in a Scene name and select a Scene
icon. Tap to select Devices you want to include in this scene,
then tap on the right, to designate specific status of Devices
in the Scene.
Set all Devices you need, then tap "Save" to complete the Scene settings. At Scene page, taping the corresponding Scene allows you to switch quickly to relevant Scenes.
Edit or Remove SceneAt Home page, tap at the top right corner or long press any
one of the Scenes. icons will appear. Tap to remove the
relevant Scene. You can also tap a Scene card in the middle to edit it.
Scenes

13
Set the timerAt "Smart" page, tap at the top right corner, select "Time of
Day" into timer creating page.
Fill in the name of the timer, schedule the time and select a repeat mode. For Effects, tap "Make this happen" into a new
page, then tap to select Devices or Scenes you want to
trigger by the time. Tap on the right to set the status of
Devices when triggered. If you want to remove a Device, swipe it to the left, and tap "Remove".
With all settings done, you can tap "Preview" at Time of Day page to preview all the effects going to be triggered.
In the last step, tap "Save" at the top right corner to save the timer.
Timer

14
TimerView/Edit timer
All timers saved will be listed at "Smart" page. You can enable or
disable relevant timer by taping .
At "Smart" page, tap the timer card into details page. You can view or edit this timer then. After editing, remember to tap "Save" at the top right corner.
Remove timerSwipe the timer card to the left at "Smart" page. You can remove that card by tapping "Remove".

15
Note: to perform IFTTT, make sure there is a motion sensor, or door/window sensor added on the APP.
IFTTT is a feature used to have automation over your lights with sensors. You can customize the brightness, working period etc. of the lights responding to the detection of the sensor based on your needs.
At "Smart" page, tap , select "IFTTT". Name it, then tap
"Choose a device", select a sensor you need. Continue to set the trigger. For motion sensor, the light can be triggered either by "motion" or "idle". The triggers become "open" or "close" for
door/window sensor.
Return to previous page, tap "Anytime" to set the period when the trigger is taken into effect. Then, tap "Make this happen" to choose the light to be triggered. Tap the light selected, you can adjust its trigger state.
Note: If you select two sensors in the "Device", either of them meets the condition will trigger this "smart".
After all settings are done, you can tap "Preview" to see how will the light look like when it is triggered. At last, tap "Save" at the top right corner.
IFTTT

16
View/Edit IFTTT
All IFTTT saved will be listed at "Smart" page. You can enable or
disable relevant IFTTT by taping .
At "Smart" page, tap the IFTTT card into details page. You can view or edit this IFTTT then. After editing, remember to tap "Save" at the top right corner.
Remove IFTTTSwipe the IFTTT card to the left at Smart page. You can remove that card by tapping "Remove".
IFTTT

17
Home SettingCreate Another HomeTap the "Home" you created(default name: My Home) at Home page, turn to "Home Management" page. Tap "Create" at the top right corner to create a new "Home". Once it is done, you're able to switch quickly between Homes, which are independent with each other, and manage the smart devices within.
Home SettingIn "Home Management", tap the "Home" you want to edit to do the settings. At here, you can change the Home name, share your Home with others, customize wallpaper and remove home.

18
Home ShareHome Share"Home share" option allows you to share the control over the smart devices to others.
Tap the "Home" you created to go to detailed settings. Tap "Home share", then "Add a person" in "Family management" page. In "Invite" page, fill in the name and E-mail of the Invitee you want to add. The "Name" here works as a note, not necessarily to be the same as that used in the APP. Lastly, tap "Invite". An invitation letter will be sent to the Invitee's Email box.
Note: The Invitee's email could be both a registered Linkind account or unregistered one.
Accept InvitationInvitee needs to open the letter subjected with "Home Share Invitation". Click "Accept invitation" to confirm the acceptance. Then the invitee is able to log in his Linkind account to control the shared Home.
Note: If the Invitee didn't register Linkind account, he or she will be guided by the Invitation letter to done the registration.

19
Room"Room" helps you organize the devices within "Home". If you have too many devices to remember where they are, use "Room" to manage them.
Create RoomTap at the top right in Home page to go to "Room
Management". Tap "Create Room", select an icon for the "Room", fill in the Room name, choose the devices belong to that Room. Save it.
Note: One device is exclusive to only one "Room".
Edit RoomIn "Room Management" page, choose a "Room", edit or remove the "Room" in "Room Settings". Remember to tap "Save" in the last step.
Note: "Everything Else" is not editable. Devices not distributed
to a "Room" will be put into "Everything Else".

20
RoomRoom SwitchIn Home page, slide horizontally to view "ALL", "EVERYTHING ..." and Room created in the list, switch to one with a single tap.
All ControlAll control is a function allows you to control all devices, especially smart light, included in the same Room together.
In Home page, tap to turn on/ off the devices in the
Room. Tap "All control" into the detailed page, where you can adjust the brightness, color temperature or color to the same simultaneously for these devices. If the light doesn’t support color temperature or color adjustment, it will not respond to the change.

21
Step 1Go to Alexa app, tap the icon at the top left, select "SKILLS & GAMES" and tap the search icon at the top right. Enter "Linkind" and search.
Step 2Choose the displayed "Linkind", then tap "ENABLE TO USE". In the new page, fill in your Linkind account and password, then tap "Log in".
After that, a message telling you "Linkind Smart Home has been successfully linked" will appear. Tap "Done".
Work with Alexa
22
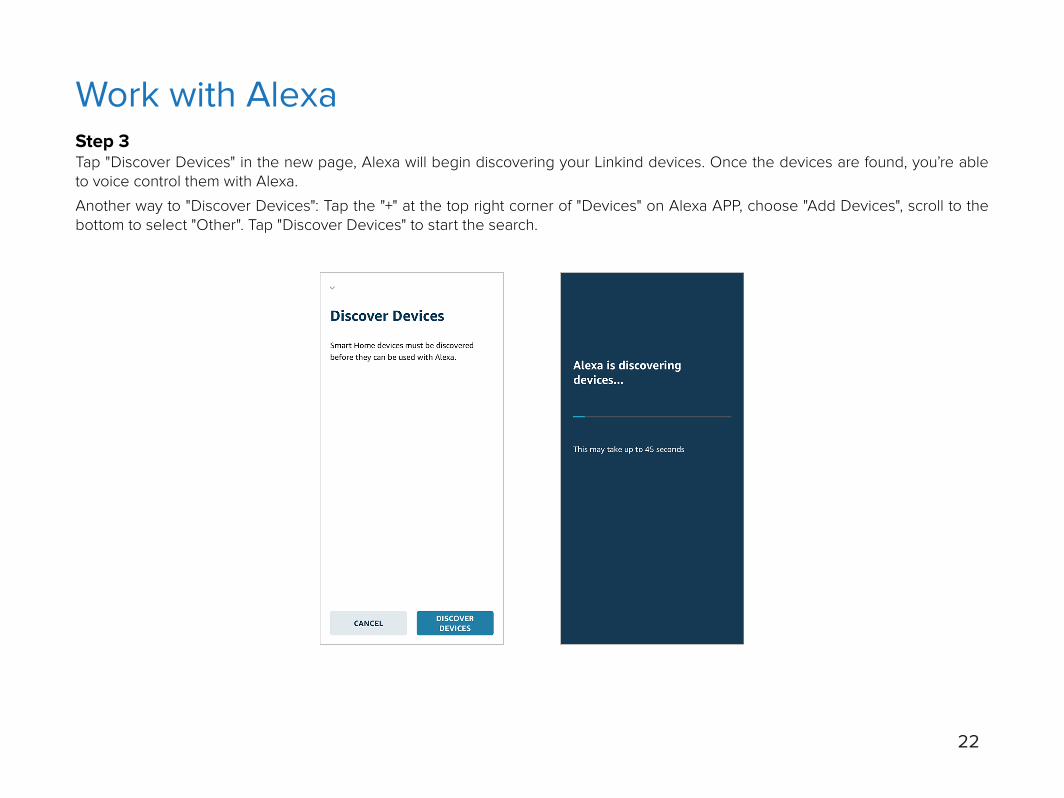
Step 3Tap "Discover Devices" in the new page, Alexa will begin discovering your Linkind devices. Once the devices are found, you’re able to voice control them with Alexa.
Another way to "Discover Devices": Tap the "+" at the top right corner of "Devices" on Alexa APP, choose "Add Devices", scroll to the bottom to select "Other". Tap "Discover Devices" to start the search.
Work with Alexa

23
Smart LED A19 Bulb (Dimmable White) FCC ID: 2ASHKZL100010006
Smart LED A19 Bulb (Tunable White) FCC ID: 2ASHKZL100010004
Smart LED BR30 Bulb (Tunable White) UL Listed: ZL100050004
Mini Hub (Zigbee 3.0) FCC ID: 2ASHKZS120000001
FCC Compliance Statement This device complies with Part 15 of the FCC Rules. Operation is subject to the following two conditions: (1) This device may not cause harmful interference, and (2) this device must accept any interference received, including interference that may cause undesired operation.
NOTE: The grantee is not responsible for any changes or modifications not expressly approved by the party responsible for compliance. Such modifications or changes could void the user's authority to operate the equipment.
NOTE: This equipment has been tested and found to comply with the limits for a Class B digital device, pursuant to part 15 of the FCC Rules. These limits are designed to provide reasonable protection against harmful interference in a residential installation.
This equipment generates uses and can radiate radio frequency energy and, if not installed and used in accordance with the instructions, may cause harmful interference to radio communications. However, there is no guarantee that interference will not occur in a particular installation. If this equipment does cause harmful interference to radio or television reception, which can be determined by turning the equipment off and on, the user is encouraged to try to correct the interference by one or more of the following measures:
- Reorient or relocate the receiving antenna.
- Increase the separation between the equipment and receiver.
-Connect the equipment into an outlet on a circuit different from that to which the receiver is connected.
-Consult the dealer or an experienced radio/TV technician for help.
RF Exposure Statement: This equipment complies with FCC radiation exposure limits set forth for an uncontrolled environment. This equipment should be installed and operated with minimum distance of 20 cm between the radiator and your body.