Embed Size (px)
Citation preview
Smart Home Monitoring
User Guide V1
Smart Home Monitoring User Guide V1
May 10th, 2011
1
Smart Home Monitoring User Guide Getting Started........................................................................................................ 2
Arming Your System ................................................................................................ 6
Disarming Your System .......................................................................................... 14
Alarms.................................................................................................................. 17
Manage your cameras, lights and thermostat with the Smart Home Monitoring system 22
TouchPad Apps ..................................................................................................... 27
Web Control Centre ............................................................................................... 37
iPhone application ................................................................................................. 54
Personalizing your Smart Home Monitoring system................................................... 58
TouchPad and Smart Home Monitoring system customization.................................... 63
Testing your system............................................................................................... 69
Troubleshooting your Smart Home Monitoring system .............................................. 72
Appendix A – Security Zones .................................................................................. 79
Index.................................................................................................................... 80
Smart Home Monitoring User Guide V1
May 10th, 2011
2
Getting Started
The Smart Home Monitoring system offers a multitude of features and benefits for you and your family. In this section you will learn about:
• The TouchPad
• The TouchPad’s features and
• Contacting emergency services

Smart Home Monitoring User Guide V1
May 10th, 2011
3
What is Smart Home Monitoring? Smart Home Monitoring is an integrated home security, remote home monitoring and home control solution that includes:
o The TouchPad
o Various TouchPad apps o Various Smart sensors, controllers and cameras
o A Web Control Centre website to let you monitor your home from any computer with Internet access
o A Mobile Control Centre to let you monitor your home from your cell phone
o A Central Monitoring Station (CMS), staffed by certified security professionals
What is the TouchPad? The TouchPad is the primary access point for Smart Home Monitoring. From it you can monitor,
interact with and control your system. The four major components of the TouchPad are:
A – The touch screen B – Alarm State/Zone Change Display messages
C – System Status Display messages D – TouchPad buttons
A
B C
D
Smart Home Monitoring User Guide V1
May 10th, 2011
4
What is the Touch Screen? You use the touch screen to communicate with Smart Home Monitoring. Tap the screen to change settings, arm or disarm your alarm and access useful programs called TouchPad apps.
Warning: Only use your finger to touch the screen. Do not use anything hard or sharp as you may damage the surface.
What is the Alarm State/Zone Change Display? This portion of the screen displays your current alarm status, so you know if your system is armed or disarmed. It also lets you know if a sensor has been tripped perhaps from an open door
or window.
What is the System Status Display? When an out of the ordinary system issue occurs, a message is displayed in the top-right corner
of the touch screen. Some examples are: o batteries are low
o a sensor is offline o Smart Home Monitoring is experiencing communication problems
Tap the error message for details regarding the issue to see information that will help resolve the problem.
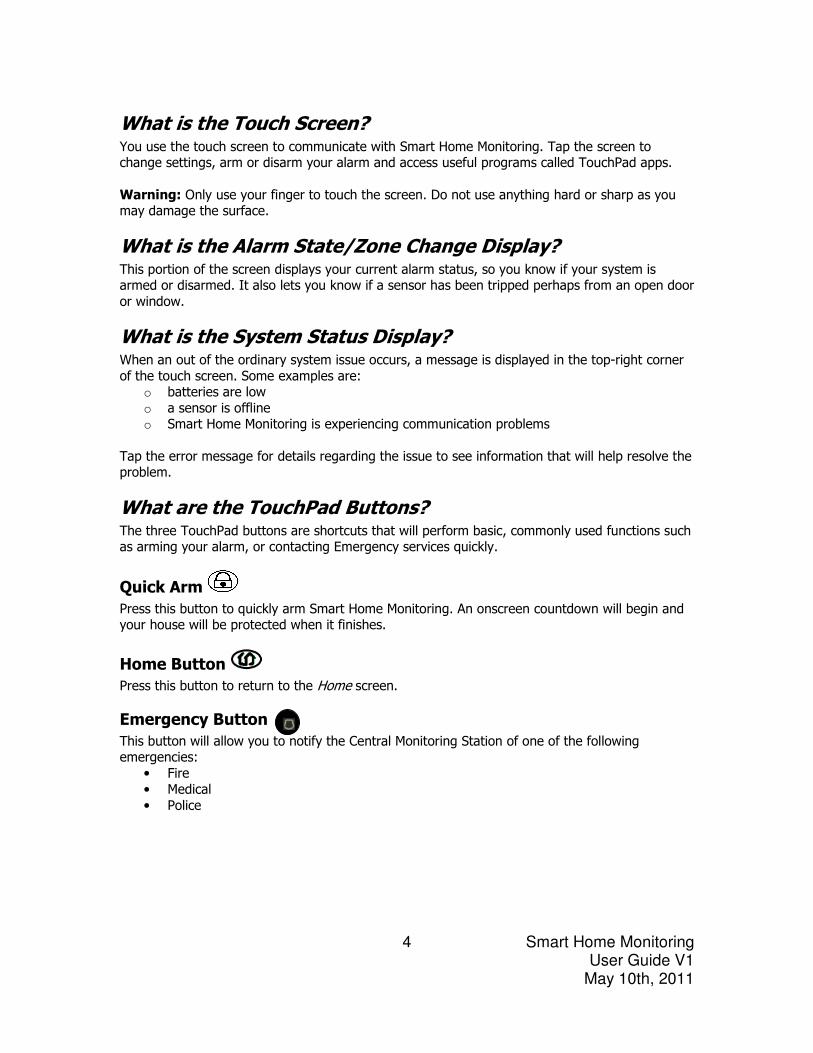
What are the TouchPad Buttons? The three TouchPad buttons are shortcuts that will perform basic, commonly used functions such as arming your alarm, or contacting Emergency services quickly.
Quick Arm
Press this button to quickly arm Smart Home Monitoring. An onscreen countdown will begin and your house will be protected when it finishes.
Home Button
Press this button to return to the Home screen.
Emergency Button
This button will allow you to notify the Central Monitoring Station of one of the following emergencies:
• Fire
• Medical
• Police
Smart Home Monitoring User Guide V1
May 10th, 2011
5
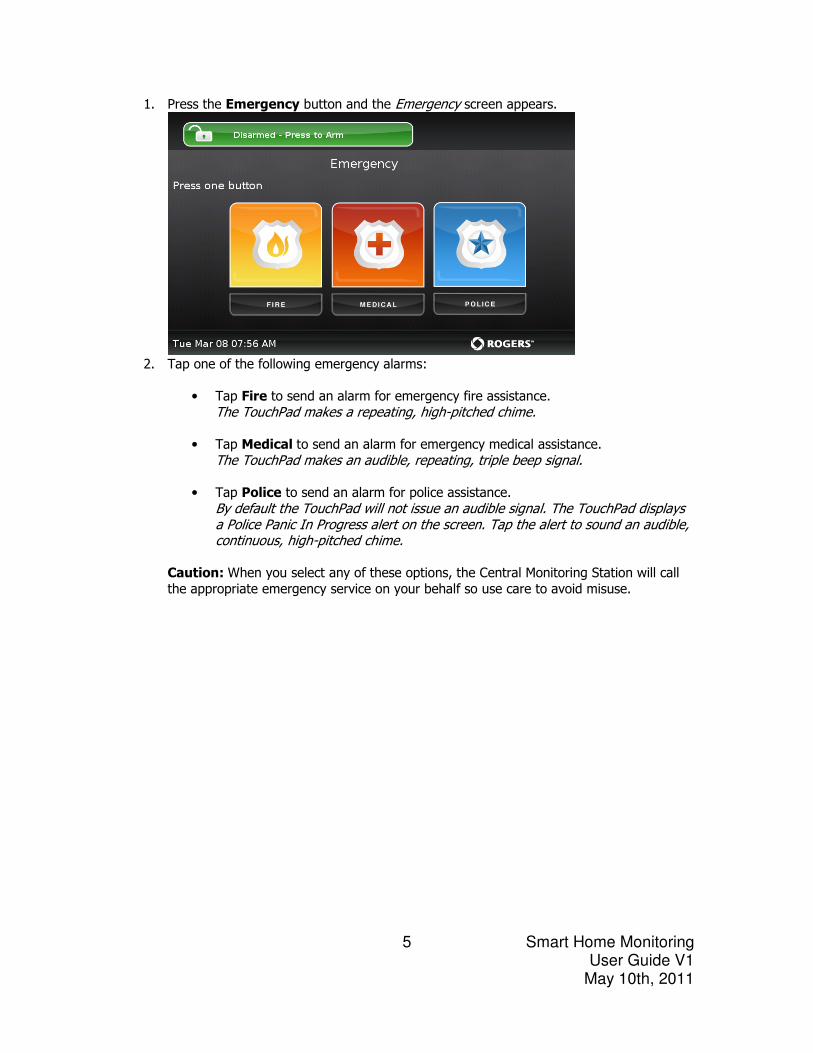
1. Press the Emergency button and the Emergency screen appears.
2. Tap one of the following emergency alarms:
• Tap Fire to send an alarm for emergency fire assistance.
The TouchPad makes a repeating, high-pitched chime.
• Tap Medical to send an alarm for emergency medical assistance.
The TouchPad makes an audible, repeating, triple beep signal.
• Tap Police to send an alarm for police assistance.
By default the TouchPad will not issue an audible signal. The TouchPad displays a Police Panic In Progress alert on the screen. Tap the alert to sound an audible, continuous, high-pitched chime.
Caution: When you select any of these options, the Central Monitoring Station will call
the appropriate emergency service on your behalf so use care to avoid misuse.
Smart Home Monitoring User Guide V1
May 10th, 2011
6
Arming Your System
With Smart Home Monitoring you can arm your system multiple ways. To arm your system use one of the following:
• Quick Arm Button
• Arm icon on the TouchPad
• Security TouchPad app
• Key Fob
• Numeric KeyPad
• Web Control Centre
• iPhone App
Smart Home Monitoring User Guide V1
May 10th, 2011
7
How do I arm my Smart Home Monitoring system using the…
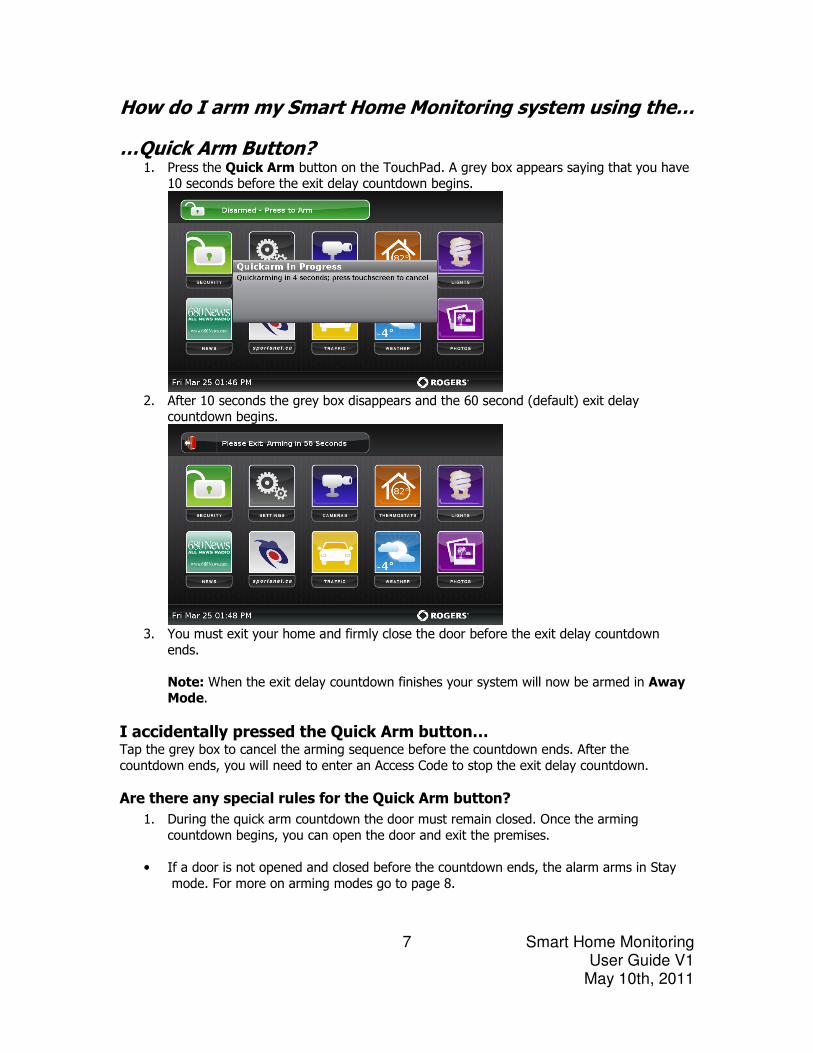
…Quick Arm Button?
1. Press the Quick Arm button on the TouchPad. A grey box appears saying that you have 10 seconds before the exit delay countdown begins.
2. After 10 seconds the grey box disappears and the 60 second (default) exit delay
countdown begins.
3. You must exit your home and firmly close the door before the exit delay countdown
ends.
Note: When the exit delay countdown finishes your system will now be armed in Away Mode.
I accidentally pressed the Quick Arm button…
Tap the grey box to cancel the arming sequence before the countdown ends. After the
countdown ends, you will need to enter an Access Code to stop the exit delay countdown.
Are there any special rules for the Quick Arm button?
1. During the quick arm countdown the door must remain closed. Once the arming
countdown begins, you can open the door and exit the premises.
• If a door is not opened and closed before the countdown ends, the alarm arms in Stay
mode. For more on arming modes go to page 8.
Smart Home Monitoring User Guide V1
May 10th, 2011
8
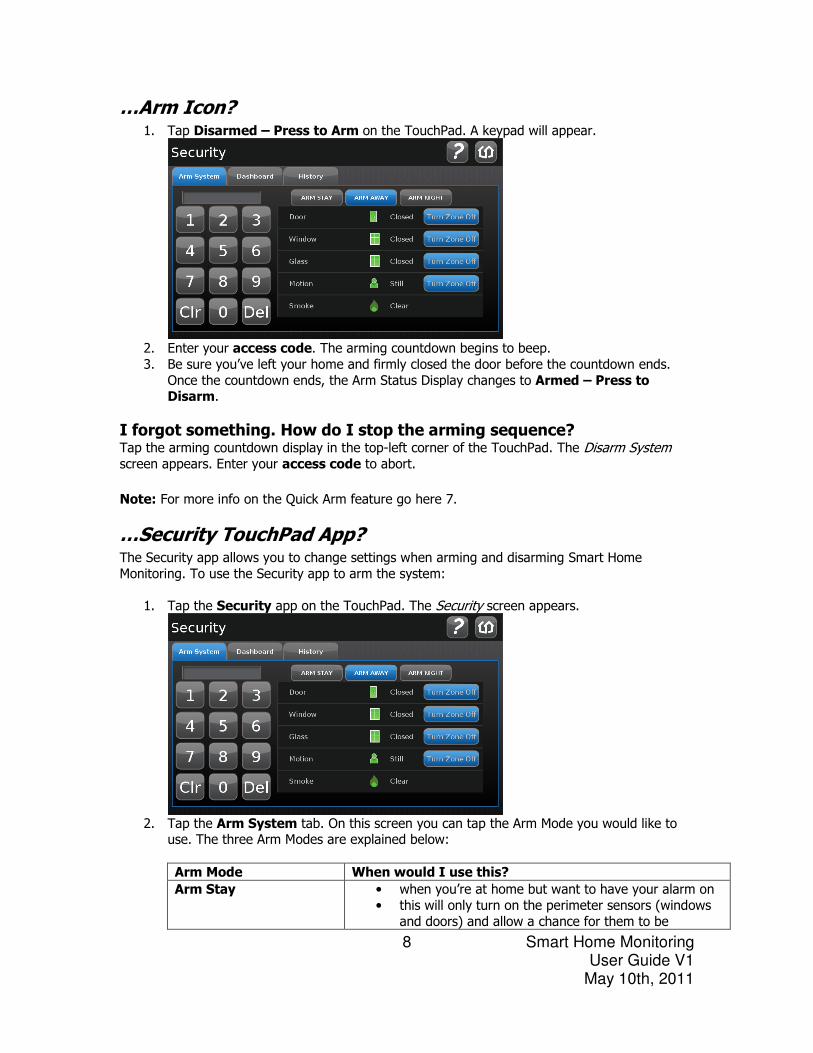
…Arm Icon? 1. Tap Disarmed – Press to Arm on the TouchPad. A keypad will appear.
2. Enter your access code. The arming countdown begins to beep.
3. Be sure you’ve left your home and firmly closed the door before the countdown ends.
Once the countdown ends, the Arm Status Display changes to Armed – Press to Disarm.
I forgot something. How do I stop the arming sequence? Tap the arming countdown display in the top-left corner of the TouchPad. The Disarm System screen appears. Enter your access code to abort.
Note: For more info on the Quick Arm feature go here 7.
…Security TouchPad App? The Security app allows you to change settings when arming and disarming Smart Home
Monitoring. To use the Security app to arm the system:
1. Tap the Security app on the TouchPad. The Security screen appears.
2. Tap the Arm System tab. On this screen you can tap the Arm Mode you would like to
use. The three Arm Modes are explained below:
Arm Mode When would I use this?
Arm Stay • when you’re at home but want to have your alarm on
• this will only turn on the perimeter sensors (windows
and doors) and allow a chance for them to be
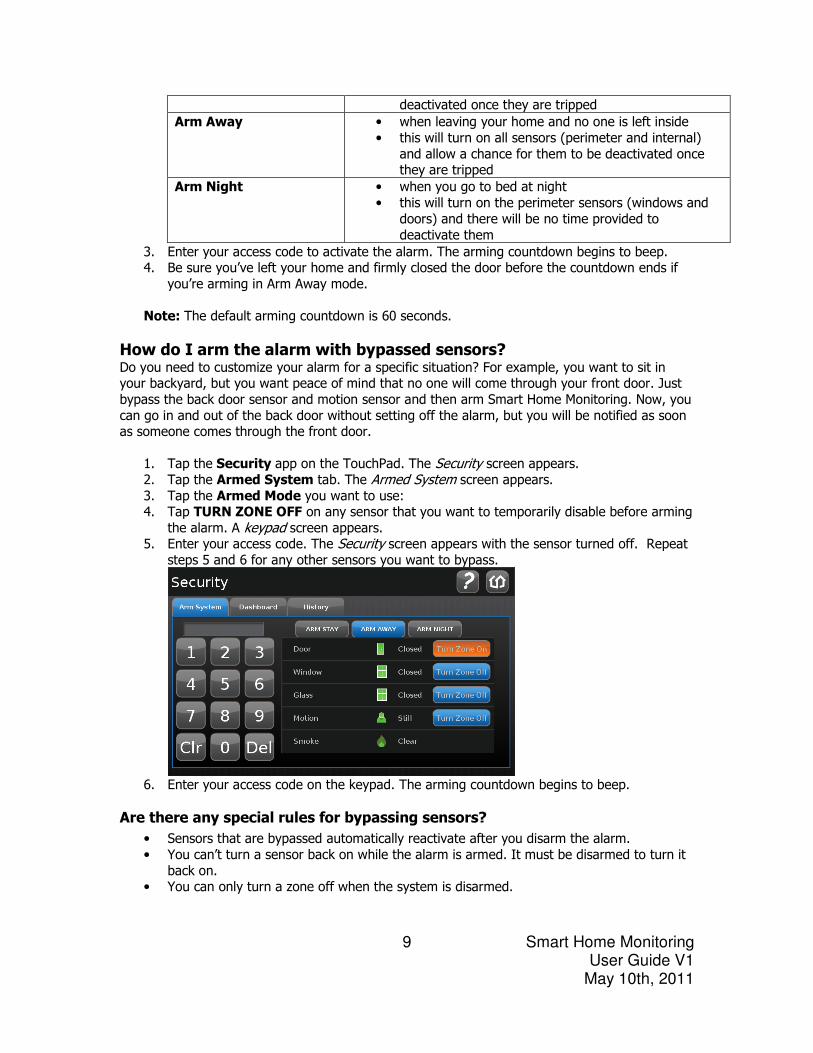
Smart Home Monitoring User Guide V1
May 10th, 2011
9
deactivated once they are tripped
Arm Away • when leaving your home and no one is left inside
• this will turn on all sensors (perimeter and internal)
and allow a chance for them to be deactivated once they are tripped
Arm Night • when you go to bed at night
• this will turn on the perimeter sensors (windows and
doors) and there will be no time provided to
deactivate them
3. Enter your access code to activate the alarm. The arming countdown begins to beep. 4. Be sure you’ve left your home and firmly closed the door before the countdown ends if
you’re arming in Arm Away mode.
Note: The default arming countdown is 60 seconds.
How do I arm the alarm with bypassed sensors? Do you need to customize your alarm for a specific situation? For example, you want to sit in your backyard, but you want peace of mind that no one will come through your front door. Just
bypass the back door sensor and motion sensor and then arm Smart Home Monitoring. Now, you
can go in and out of the back door without setting off the alarm, but you will be notified as soon as someone comes through the front door.
1. Tap the Security app on the TouchPad. The Security screen appears. 2. Tap the Armed System tab. The Armed System screen appears. 3. Tap the Armed Mode you want to use: 4. Tap TURN ZONE OFF on any sensor that you want to temporarily disable before arming
the alarm. A keypad screen appears. 5. Enter your access code. The Security screen appears with the sensor turned off. Repeat
steps 5 and 6 for any other sensors you want to bypass.
6. Enter your access code on the keypad. The arming countdown begins to beep.
Are there any special rules for bypassing sensors?
• Sensors that are bypassed automatically reactivate after you disarm the alarm.
• You can’t turn a sensor back on while the alarm is armed. It must be disarmed to turn it
back on. • You can only turn a zone off when the system is disarmed.
Smart Home Monitoring User Guide V1
May 10th, 2011
10
…KeyFob? 1. Press the [AWAY] or [STAY] button for 2 seconds. The LED flashes red once and then
solid for one second to indicate that the arming countdown has begun on the TouchPad.
2. When the countdown ends, your alarm is now armed.
Note: Be sure you keep your keyfob safe. Anyone can activate or deactivate your alarm with
it. We suggest that you don’t attach it to the keyring with your home keys.
Note: If the LED flashes orange it means the system is not ready to arm. The most likely
reason is a window or door sensor is open somewhere and must be closed before you can arm your system.
…Numeric KeyPad? 1. Enter your access code on the Numeric KeyPad. 2. Press the [AWAY] or [STAY] button. The [UNLOCK] button turns red for three seconds
to indicate that the arming countdown has begun on the TouchPad. 3. When the countdown ends, your alarm is now armed.
Note: If the [UNLOCK] button flashes orange it means the system is not ready to arm. The
most likely reason is a window or door sensor is open somewhere and must be closed before
you can arm your system.
…Web Control Centre? Direct Through MyRogers.com
1. Visit smarthome.rogers.com 1. Visit rogers.com
2. Enter your MyRogers username and password and click [Sign In]. The
Main screen of the Web Control Centre appears.
Don’t have a MyRogers account
created as of yet? Visit
www.rogers.com and click Register Now and create your MyRogers
account.
2. Enter your MyRogers username and password and click [Go]. Centre
Don’t have a MyRogers account created as of yet? Visit www.rogers.com and
click Register Now and create your MyRogers account.
3. Click the “Home Monitoring” tab at the top of the screen.
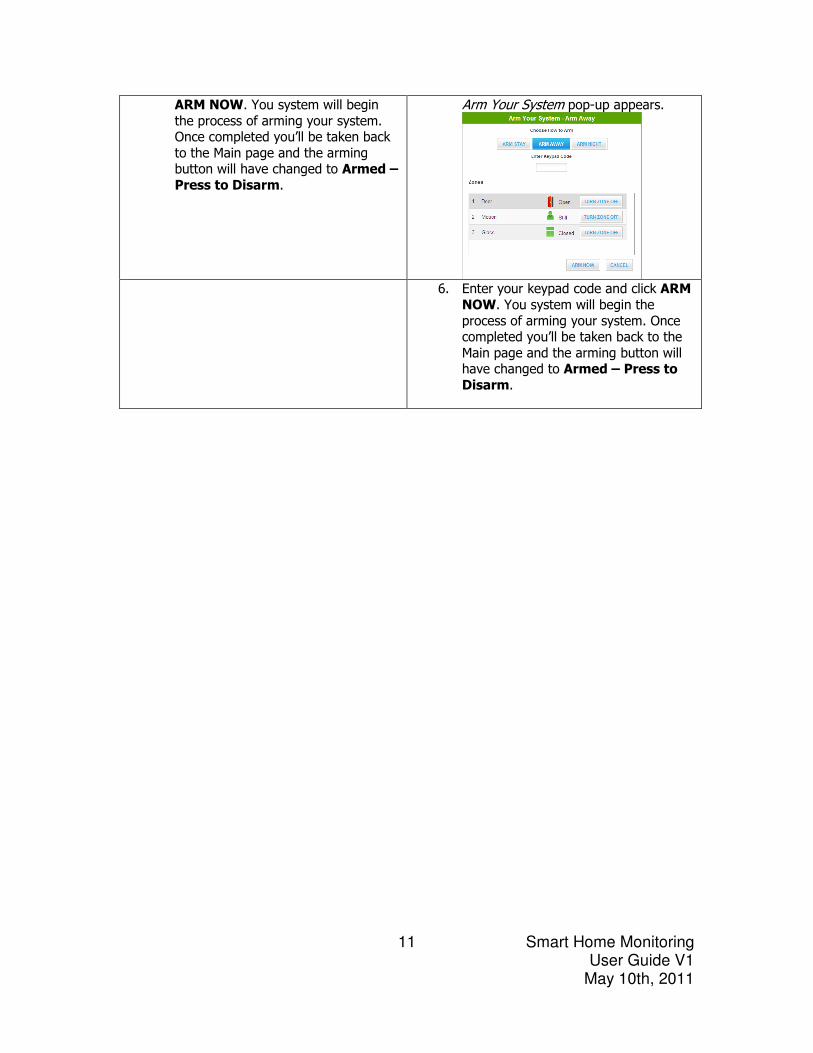
3. Click Disarmed – Press to Arm. The Arm Your System pop-up appears.
4. Click Access Web Control Centre.
The main screen of the Web Control Centre appears.
4. Enter your keypad code and click 5. Click Disarmed – Press to Arm. The
Smart Home Monitoring User Guide V1
May 10th, 2011
11
ARM NOW. You system will begin
the process of arming your system. Once completed you’ll be taken back
to the Main page and the arming button will have changed to Armed –
Press to Disarm.
Arm Your System pop-up appears.
6. Enter your keypad code and click ARM
NOW. You system will begin the
process of arming your system. Once completed you’ll be taken back to the
Main page and the arming button will have changed to Armed – Press to
Disarm.
Smart Home Monitoring User Guide V1
May 10th, 2011
12
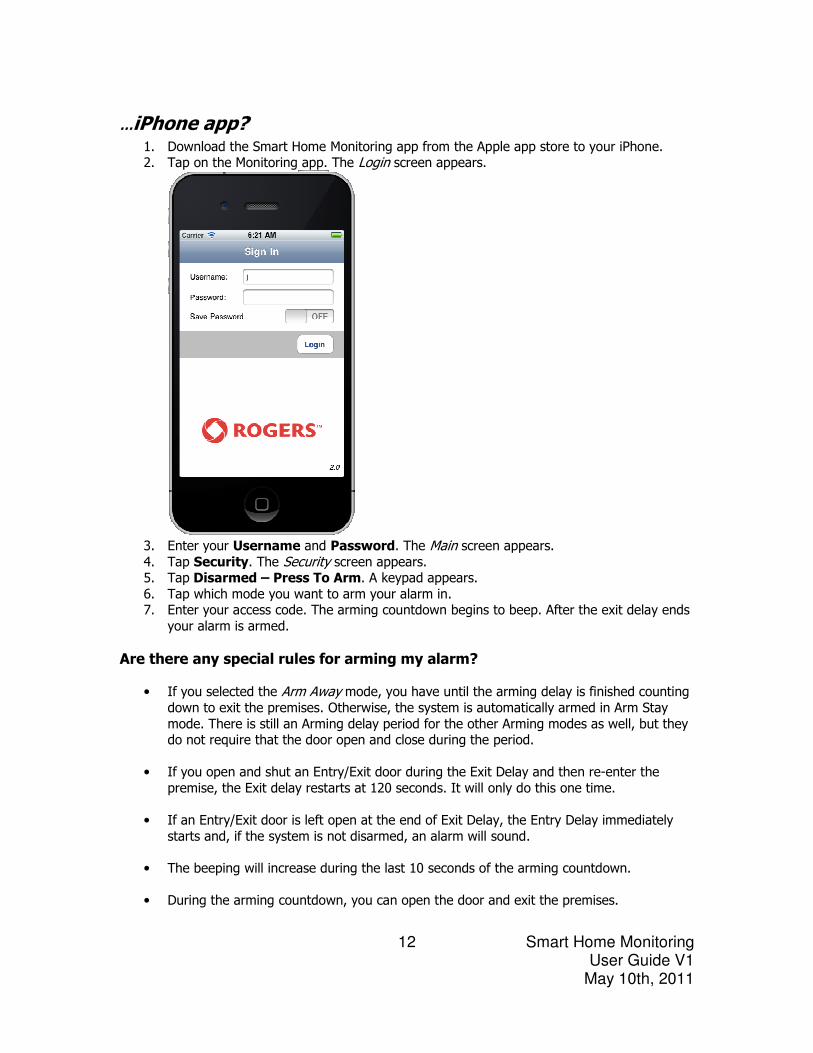
…iPhone app? 1. Download the Smart Home Monitoring app from the Apple app store to your iPhone. 2. Tap on the Monitoring app. The Login screen appears.
3. Enter your Username and Password. The Main screen appears. 4. Tap Security. The Security screen appears. 5. Tap Disarmed – Press To Arm. A keypad appears.
6. Tap which mode you want to arm your alarm in. 7. Enter your access code. The arming countdown begins to beep. After the exit delay ends
your alarm is armed.
Are there any special rules for arming my alarm?
• If you selected the Arm Away mode, you have until the arming delay is finished counting
down to exit the premises. Otherwise, the system is automatically armed in Arm Stay
mode. There is still an Arming delay period for the other Arming modes as well, but they do not require that the door open and close during the period.
• If you open and shut an Entry/Exit door during the Exit Delay and then re-enter the
premise, the Exit delay restarts at 120 seconds. It will only do this one time.
• If an Entry/Exit door is left open at the end of Exit Delay, the Entry Delay immediately
starts and, if the system is not disarmed, an alarm will sound.
• The beeping will increase during the last 10 seconds of the arming countdown.
• During the arming countdown, you can open the door and exit the premises.
Smart Home Monitoring User Guide V1
May 10th, 2011
13
• If a door is not opened and closed before the arming countdown ends, the alarm arms in
Stay mode. For more on arming modes go to page 8.
• If a door is opened, closed and then opened again while the arming countdown is
running, the countdown will restart. If the door is open when the countdown finishes, an alarm will be triggered.
How do I avoid causing false alarms?
1. Be sure that your family knows the correct code to disarm the arm. Entering an incorrect
code, or the correct code after the disarm period ends, will cause an alarm to be sent to
the Central Monitoring Station. 2. If you have a KeyFob, don’t let small children play with it as they may accidentally trigger
a panic alarm where the police will be immediately sent to your home. If it is a false alarm, call 1 888 764 3771 immediately and the Central Monitoring Station will try and
cancel any dispatched emergency services. 3. If you have a KeyFob and keep it in your pocket, there’s a chance that the emergency
button may be activated by other objects pressing against the button. Please be careful
where your KeyFob is stored.
Smart Home Monitoring User Guide V1
May 10th, 2011
14
Disarming Your System
With Smart Home Monitoring you can disarm your alarm multiple ways depending on what peripherals and service you are subscribed to. Some of the ways you can disarm Smart Home
Monitoring are the:
• Disarm icon on the touch screen
• Key fob
• Numeric key pad • Web control centre
• iPhone app

Smart Home Monitoring User Guide V1
May 10th, 2011
15
How do I disarm my Smart Home Monitoring system using the…
…Disarm Icon? 1. Tap Armed – Press to Disarm on the TouchPad. The Disarm System screen will
appear.
2. Enter your Access Code. The alarm is now deactivated.
Note: If you are being forced against your will to deactivate your alarm, use the Silent Alarm/ Duress Alarm code. This code will deactivate the alarm but simultaneously send information to
the monitoring station so that emergency services will be dispatched. Learn more about the
Duress/Silent Alarm code on page 18.
…KeyFob?
1. Press for 2 seconds. The LED flashes green once and then solid for one second.
2. Your alarm is now disarmed.
Note: Be sure you keep your KeyFob safe. Anyone can activate or deactivate your alarm with it. We suggest that you don’t attach it to the keyring with your home keys.
…Numeric KeyPad? 1. Enter your access code on the Numeric KeyPad.
2. Press . The button turns green for three seconds to indicate that the system has
been disarmed.
…Web Control Centre? Direct Through MyRogers.com
1. Visit smarthome.rogers.com 1. Visit rogers.com
2. Enter your MyRogers username and
password and click [Sign In]. The Main screen of the Web Control Centre appears.
2. Enter your MyRogers username and
password and click [Go]. Don’t have a MyRogers account created
as of yet? Visit www.rogers.com and
click Register Now and create your
Smart Home Monitoring User Guide V1
May 10th, 2011
16
Don’t have a MyRogers account
created as of yet? Visit www.rogers.com and click Register
Now and create your MyRogers account.
MyRogers account.
3. Click the Home Monitoring Tab
3. Click Armed – Press to Disarm. The
Disarm Your System pop-up appears.
4. Click Access Web Control. The Main screen of the Web Control Centre appears.
4. Enter your keypad code and click DISARM. You system will begin the
process of arming your system. Once completed you’ll be taken back to the
Main page and the arming button will have changed to Disarmed – Press
to Arm.
5. Click Armed – Press to Disarm. The Disarm Your System pop-up appears.
6. Enter your keypad code and click
DISARM. You system will begin the process of arming your system. Once
completed you’ll be taken back to the
Main page and the arming button will have changed to Disarmed – Press
to Arm.
…iPhone App? 1. Tap on the Smart Home Monitoring app. The Login screen appears. 2. Enter your Username and Password and tap Login. The Main screen appears.
3. Tap the Security TouchPad app. 4. Tap Armed – Press to Disarm. A keypad appears.
5. Enter your access code. The Security screen appears and the button changes to Disarmed – Press to Arm. Your alarm is now disarmed.
Are there any special rules for disarming my alarm?
• If a valid access code is not entered by the end of the Entry Delay period, an alarm will sound. From the time an alarm sounds during a burglary alarm, you have 30 seconds to
enter a valid Access Code to disarm the system and prevent an alarm being sent to the
Central Monitoring Station.
Smart Home Monitoring User Guide V1
May 10th, 2011
17
Alarms
One of the key benefits of the Smart Home Monitoring system is that it provides peace of mind knowing that your home is monitored by professionals. To get the most from your system, you
need to understand the different types of alarms and how to interact with your system in an
emergency.

Smart Home Monitoring User Guide V1
May 10th, 2011
18
First seven day alarm grace period To help you get used to your new Smart Home Monitoring system and minimize the chance of a
false alarm charges while learning the new system, the police will not be called when the intrusion alarm is activated during the first seven days after your system’s installation.
Some examples of when an alarm won’t trigger a police call to the Central Monitoring Station
during the seven day grace period are:
a) If you don’t deactivate the alarm or b) It you are late in deactivating the alarm and you do not call the Central Monitoring
Station
Note: During the seven-day grace period, the Central Monitoring Station will still contact you
when an intrusion alarm is activated. At this time police will be dispatched if you request police help.
Can I skip the seven day grace period? Yes you can. Just call 1 877 817-7474 and request that it be removed from your account.
Are there any special rules for the seven day grace period? • The Central Monitoring Station will still alert police services if the Emergency Button is
pushed on the TouchPad, the Key Fob or the Numeric KeyPad. Fore more information on
the Emergency Button, go to page 4. • The seven day grace period only applies to police. Fire and medical emergency personnel
will be dispatched normally.
Special Alarms The Smart Home Monitoring system can communicate a variety of ways to let the Central Monitoring Station know that require immediate help. As well, the Central Monitoring Station can
communicate with you and through identity verification, determine the best response to your
emergency.
The ways it can do this are: • Silent Alarm/Duress Alarm
• Panic Alarm
• Secret Word (password)
What is the Silent Alarm/Duress Alarm? The Silent Alarm/Duress code is a way for you make it look like you’ve disarmed your Smart Home Monitoring system; but in fact, it will have sent an immediate call for help to the Central
Monitoring Station (CMS) who will dispatch police services.
This would be used when somebody (such as a home invader or burglar) is forcing you to disarm
the system via TouchPad or KeyPad,
How do I enable my Silent Alarm/Duress Alarm code? Your Silent Alarm/Duress code is not enabled at installation. To enable it:
1. Tap the Settings app. A Pass Code screen appears. 2. Enter your Master access code. The Settings screen appears.
Smart Home Monitoring User Guide V1
May 10th, 2011
19
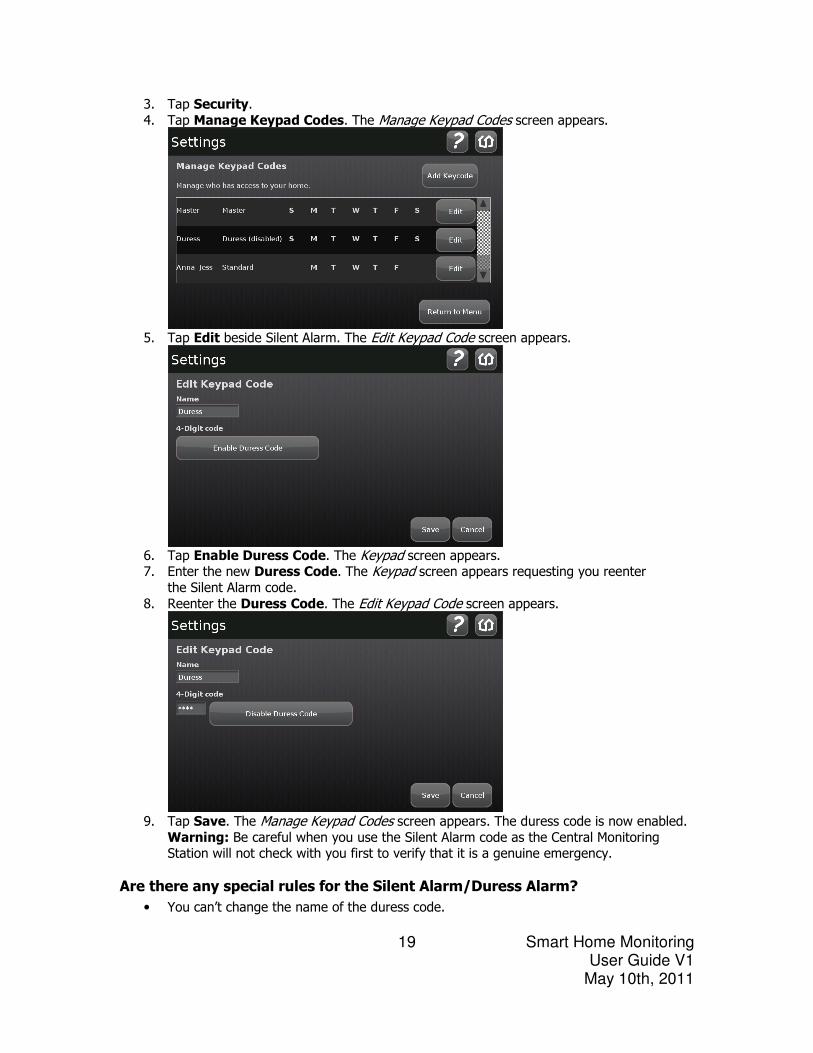
3. Tap Security.
4. Tap Manage Keypad Codes. The Manage Keypad Codes screen appears.
5. Tap Edit beside Silent Alarm. The Edit Keypad Code screen appears.
6. Tap Enable Duress Code. The Keypad screen appears. 7. Enter the new Duress Code. The Keypad screen appears requesting you reenter the Silent Alarm code.
8. Reenter the Duress Code. The Edit Keypad Code screen appears.
9. Tap Save. The Manage Keypad Codes screen appears. The duress code is now enabled.
Warning: Be careful when you use the Silent Alarm code as the Central Monitoring Station will not check with you first to verify that it is a genuine emergency.
Are there any special rules for the Silent Alarm/Duress Alarm? • You can’t change the name of the duress code.
Smart Home Monitoring User Guide V1
May 10th, 2011
20
How do I activate the Silent Alarm/Duress Alarm? After you’ve enabled your duress code you can enter it instead of your normal disarm code to alert the Central Monitoring Station that you need police assistance. This code will deactivate
your alarm just like a regular code, but it will send a Silent Alarm/Duress Alarm message to the CMS and police services will be dispatched.
Panic Alarm
What is a Panic Alarm?
The Panic alarm is a quick way to request help from the CMS. By using your TouchPad, KeyFob or KeyPad, you can call for emergency services.
How do I activate a panic alarm with the…
KeyFob
1. Press and hold on the KeyPad/KeyFob for 3 seconds. An alarm will be sent to the CMS and police services will be dispatched.
KeyPad
1. Press and holding both the and the * button. An alarm will be sent to the CMS and police services will be dispatched.
TouchPad
1. Press the Emergency button on the TouchPad. The Emergency Contact screen appears. 2. Tap the emergency service you need (Police, Fire or Medical) and a call will automatically
be initiated to the Central Monitoring Station who will dispatch emergency services.
Secret Word What is a Secret Word? Your Secret Word is very important. This is your password that the Central Monitoring Station
(CMS) asks for when they are verifying whether the person answering the call is an authorized user of the system. For example, if you are unable to disarm your alarm quickly enough after
entering your home, you will be contacted by the Central Monitoring Station and they will request your Secret Word to verify your identity.
How do I create my Secret Word? This will have been created during the installation of your Smart Home Monitoring system.
How do I change my Secret Word? To change your secret word:
1. Tap the Settings app. A Pass Code screen appears. 2. Enter your Master access code. The Settings screen appears. 3. Tap Advanced Settings. The Advanced Settings menu appears
Smart Home Monitoring User Guide V1
May 10th, 2011
21
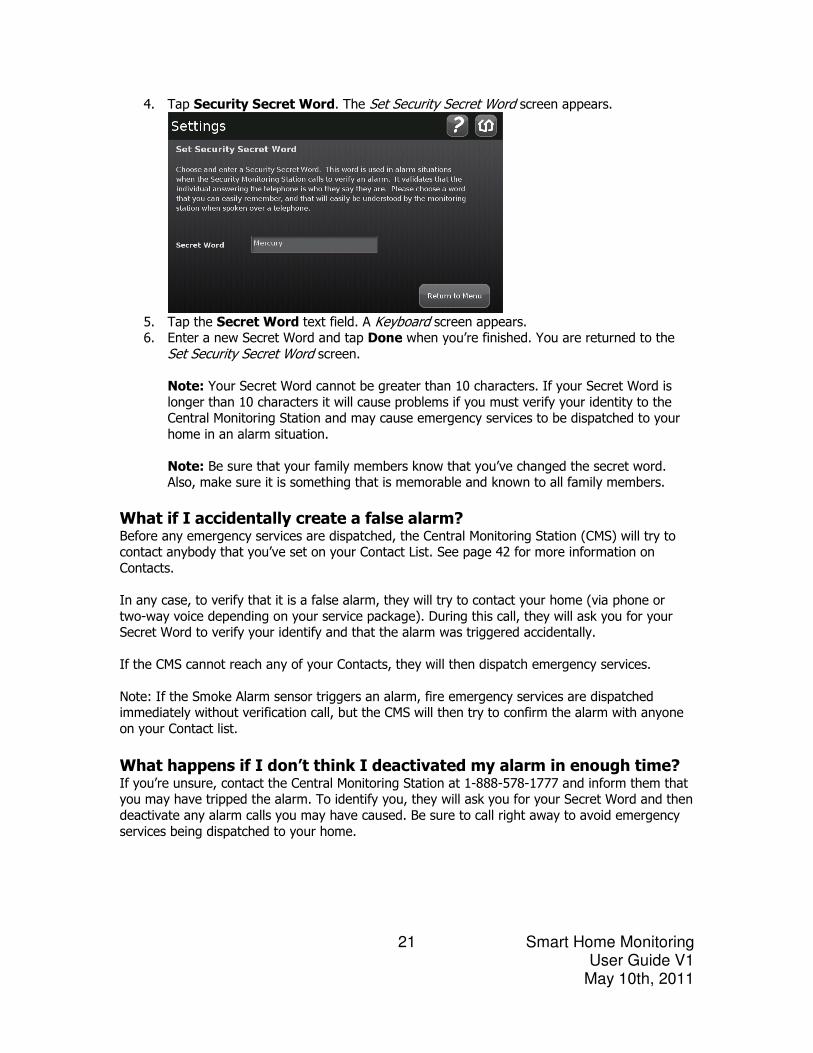
4. Tap Security Secret Word. The Set Security Secret Word screen appears.
5. Tap the Secret Word text field. A Keyboard screen appears. 6. Enter a new Secret Word and tap Done when you’re finished. You are returned to the
Set Security Secret Word screen.
Note: Your Secret Word cannot be greater than 10 characters. If your Secret Word is
longer than 10 characters it will cause problems if you must verify your identity to the Central Monitoring Station and may cause emergency services to be dispatched to your
home in an alarm situation.
Note: Be sure that your family members know that you’ve changed the secret word. Also, make sure it is something that is memorable and known to all family members.
What if I accidentally create a false alarm? Before any emergency services are dispatched, the Central Monitoring Station (CMS) will try to contact anybody that you’ve set on your Contact List. See page 42 for more information on
Contacts.
In any case, to verify that it is a false alarm, they will try to contact your home (via phone or
two-way voice depending on your service package). During this call, they will ask you for your Secret Word to verify your identify and that the alarm was triggered accidentally.
If the CMS cannot reach any of your Contacts, they will then dispatch emergency services.
Note: If the Smoke Alarm sensor triggers an alarm, fire emergency services are dispatched immediately without verification call, but the CMS will then try to confirm the alarm with anyone
on your Contact list.
What happens if I don’t think I deactivated my alarm in enough time? If you’re unsure, contact the Central Monitoring Station at 1-888-578-1777 and inform them that you may have tripped the alarm. To identify you, they will ask you for your Secret Word and then
deactivate any alarm calls you may have caused. Be sure to call right away to avoid emergency
services being dispatched to your home.
Smart Home Monitoring User Guide V1
May 10th, 2011
22
Manage your cameras, lights and thermostat with the Smart Home Monitoring system With Smart Home Monitoring you can monitor and control certain aspects of your home through
various peripherals.
Note: Some peripherals may not be available to you depending on the service that you subscribe to.
Smart Home Monitoring User Guide V1
May 10th, 2011
23
Cameras The Camera app allows you to view your home via the TouchPad.
How do I view my cameras? 1. Tap the Cameras app on the TouchPad. The Cameras screen appears. 2. On this screen your will see one or more images - one for each camera attached to your
system. Tap on an image to start a live feed. The image you selected will now take up the entire screen.
3. This image will now be live video as seen by the camera. If you wish to change your
camera selection, tap the back arrow in the top-left corner of the screen.
Light and Appliance Switches The Lights app allows you to turn on/off lights or light appliances (depending on the sensor
switch that you use) from your TouchPad.
To view your lights: 1. Tap the Lights app on the TouchPad. The Lights screen appears. 2. On this screen you will see one or more Light sensor entries with a light bulb. This light
bulb will be lit or unlit depending whether it is on or not. Tap On/Off to turn on/off the light/small appliance attached to the sensor.
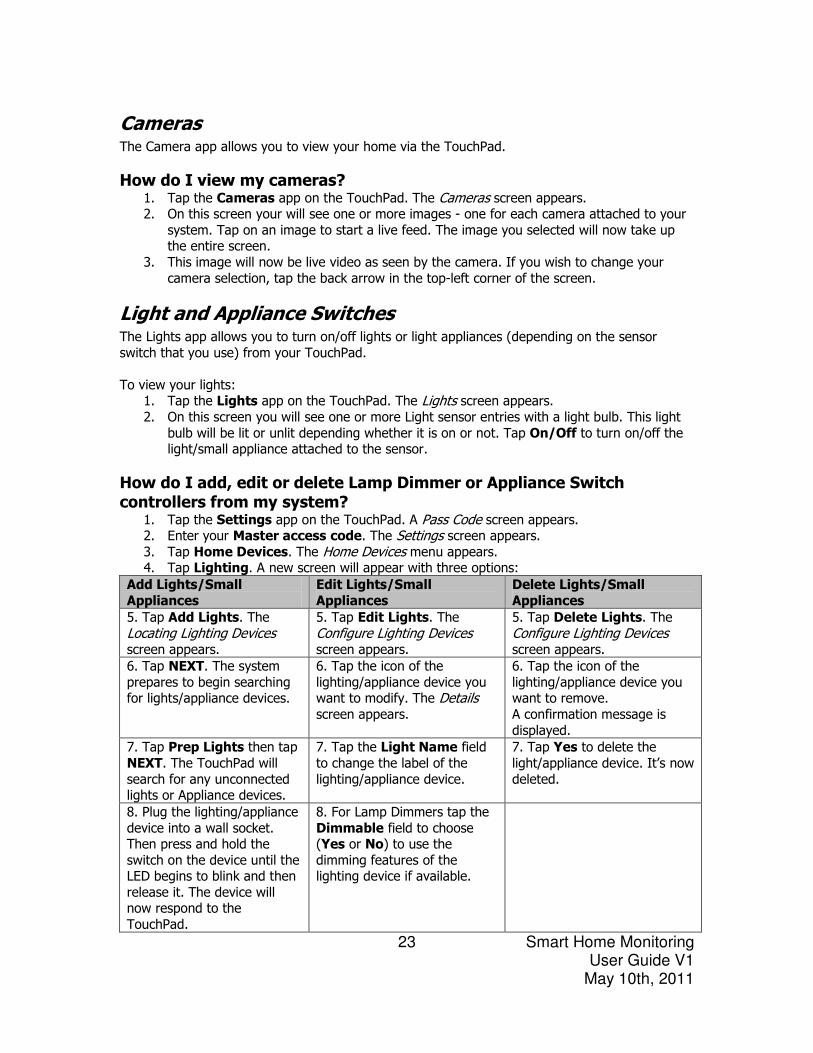
How do I add, edit or delete Lamp Dimmer or Appliance Switch controllers from my system?
1. Tap the Settings app on the TouchPad. A Pass Code screen appears. 2. Enter your Master access code. The Settings screen appears. 3. Tap Home Devices. The Home Devices menu appears. 4. Tap Lighting. A new screen will appear with three options:
Add Lights/Small
Appliances
Edit Lights/Small
Appliances
Delete Lights/Small
Appliances
5. Tap Add Lights. The
Locating Lighting Devices screen appears.
5. Tap Edit Lights. The
Configure Lighting Devices screen appears.
5. Tap Delete Lights. The
Configure Lighting Devices screen appears.
6. Tap NEXT. The system
prepares to begin searching for lights/appliance devices.
6. Tap the icon of the
lighting/appliance device you want to modify. The Details screen appears.
6. Tap the icon of the
lighting/appliance device you want to remove.
A confirmation message is
displayed.
7. Tap Prep Lights then tap
NEXT. The TouchPad will
search for any unconnected lights or Appliance devices.
7. Tap the Light Name field
to change the label of the
lighting/appliance device.
7. Tap Yes to delete the
light/appliance device. It’s now
deleted.
8. Plug the lighting/appliance
device into a wall socket. Then press and hold the
switch on the device until the LED begins to blink and then
release it. The device will now respond to the
TouchPad.
8. For Lamp Dimmers tap the
Dimmable field to choose (Yes or No) to use the
dimming features of the lighting device if available.

Smart Home Monitoring User Guide V1
May 10th, 2011
24
9. The Light/Appliance device
will appear on the TouchPad. Tap NEXT to finish the
installation.
10. When all the lighting/appliance devices are
found, tap Done.
How do I adjust my lights?
1. Tap the Lights app on the TouchPad. A Lights screen appears.
2. On this screen, all the lights and/or small appliances that you have connected to your
Smart Home Monitoring system will appear. Beside each one, it will state whether it is ON or OFF.
3. If a Lamp Dimmer sensor is ON, you will be able to adjust the light level by dragging
your finger along the dimmer control bar (0 to 100%).
Are there any special rules for using the Lamp Dimmer or Appliance Switch devices?
• There are two major differences between Small Appliance and Light switches:
1. Light switches allow the home owner to dim the lights on dimmable lamps. Small
Appliance switches do not. Small Appliance switches don’t offer the dim option.
2. Small Appliance switches can be used with electronics other than lights as they allow a greater power load.
• Ensure that you only plug the correct type of devices into the Light switch otherwise you
may damage it or potentially cause an electrical short or fire. • If the Lamp Dimmer device is set to 0%, the light will not illuminate, even when it is
turned on.
• Do not plug motors or fluorescent lights into a Light Dimmer device. Only incandescent
lamps are to be plugged into the Light Dimmer device. • Do not exceed the power rating of the Light Dimmer or Appliance Switch device.
Smart Home Monitoring User Guide V1
May 10th, 2011
25
Thermostats If your system has a thermostat sensor connected to it, you’ll be able to monitor and change your home’s temperature via the TouchPad or Web Control Centre.
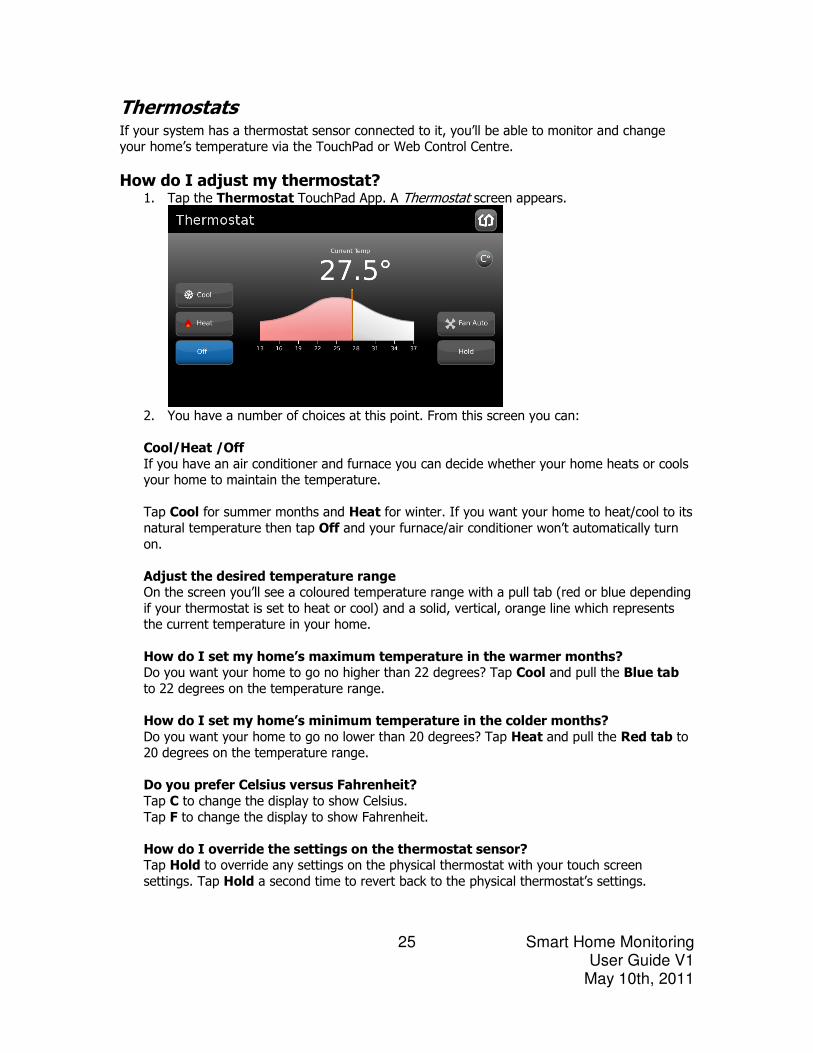
How do I adjust my thermostat? 1. Tap the Thermostat TouchPad App. A Thermostat screen appears.
2. You have a number of choices at this point. From this screen you can:
Cool/Heat /Off
If you have an air conditioner and furnace you can decide whether your home heats or cools your home to maintain the temperature.
Tap Cool for summer months and Heat for winter. If you want your home to heat/cool to its
natural temperature then tap Off and your furnace/air conditioner won’t automatically turn
on.
Adjust the desired temperature range On the screen you’ll see a coloured temperature range with a pull tab (red or blue depending
if your thermostat is set to heat or cool) and a solid, vertical, orange line which represents the current temperature in your home.
How do I set my home’s maximum temperature in the warmer months? Do you want your home to go no higher than 22 degrees? Tap Cool and pull the Blue tab
to 22 degrees on the temperature range.
How do I set my home’s minimum temperature in the colder months?
Do you want your home to go no lower than 20 degrees? Tap Heat and pull the Red tab to 20 degrees on the temperature range.
Do you prefer Celsius versus Fahrenheit?
Tap C to change the display to show Celsius.
Tap F to change the display to show Fahrenheit.
How do I override the settings on the thermostat sensor? Tap Hold to override any settings on the physical thermostat with your touch screen
settings. Tap Hold a second time to revert back to the physical thermostat’s settings.
Smart Home Monitoring User Guide V1
May 10th, 2011
26
How do I change my fan settings?
Tap Fan On to have the fan in your heating/cooling system run at all times. Tap Fan Auto to start the fan only when your heating/cooling system is running.
Are there any special rules for setting my thermostat? • The thermostat temperature settings bar range is:
o 9-33 degrees Celsius
o 51-91 degrees Fahrenheit
• Your thermostat device might have a wider range than this.
• You can use the increment buttons in the Thermostat app on your Touch Screen to change the temperature beyond these settings.
Smart Home Monitoring User Guide V1
May 10th, 2011
27
TouchPad Apps
Apps are small programs that you can download to your TouchPad and use. Some automatically come pre-loaded on your TouchPad, some only appear when you have a certain sensor attached
to your system and others are optional.
Some of the apps you will see on your TouchPad are:
• Pre-loaded apps
• Hardware dependent apps
• Optional apps
Smart Home Monitoring User Guide V1
May 10th, 2011
28
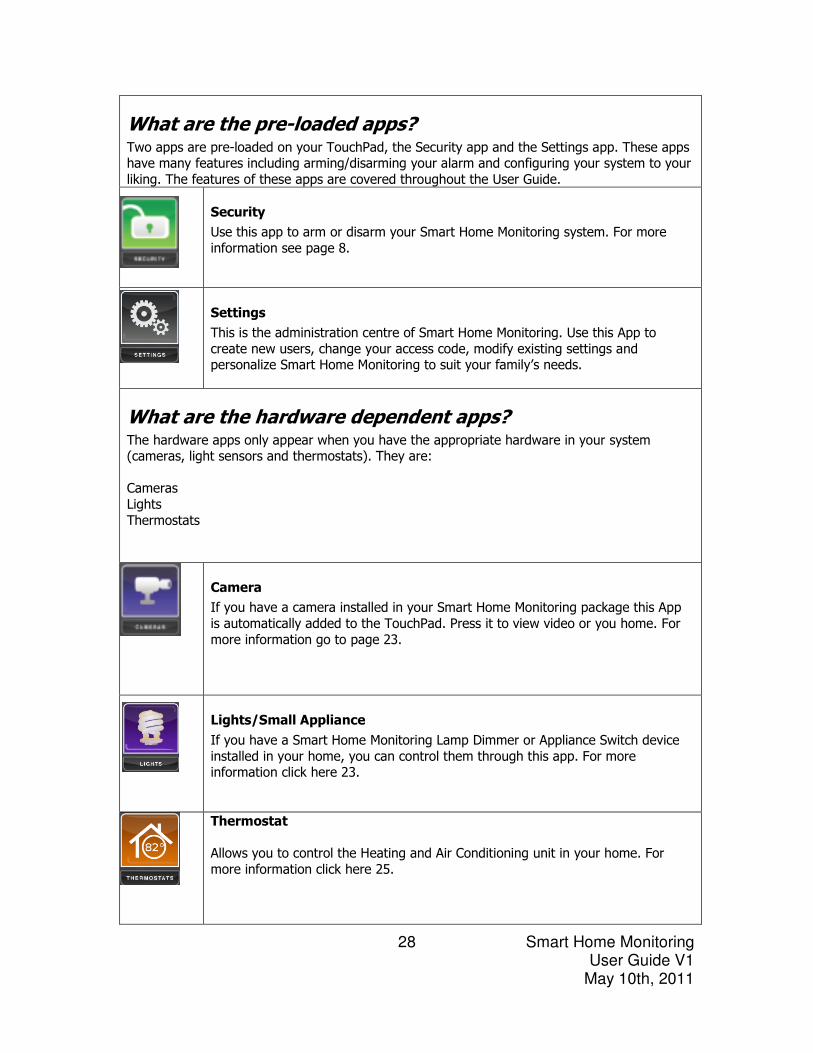
What are the pre-loaded apps? Two apps are pre-loaded on your TouchPad, the Security app and the Settings app. These apps have many features including arming/disarming your alarm and configuring your system to your
liking. The features of these apps are covered throughout the User Guide.
Security
Use this app to arm or disarm your Smart Home Monitoring system. For more
information see page 8.
Settings
This is the administration centre of Smart Home Monitoring. Use this App to
create new users, change your access code, modify existing settings and personalize Smart Home Monitoring to suit your family’s needs.
What are the hardware dependent apps? The hardware apps only appear when you have the appropriate hardware in your system (cameras, light sensors and thermostats). They are:
Cameras
Lights
Thermostats
Camera
If you have a camera installed in your Smart Home Monitoring package this App
is automatically added to the TouchPad. Press it to view video or you home. For
more information go to page 23.
Lights/Small Appliance
If you have a Smart Home Monitoring Lamp Dimmer or Appliance Switch device
installed in your home, you can control them through this app. For more information click here 23.
Thermostat
Allows you to control the Heating and Air Conditioning unit in your home. For
more information click here 25.
Smart Home Monitoring User Guide V1
May 10th, 2011
29
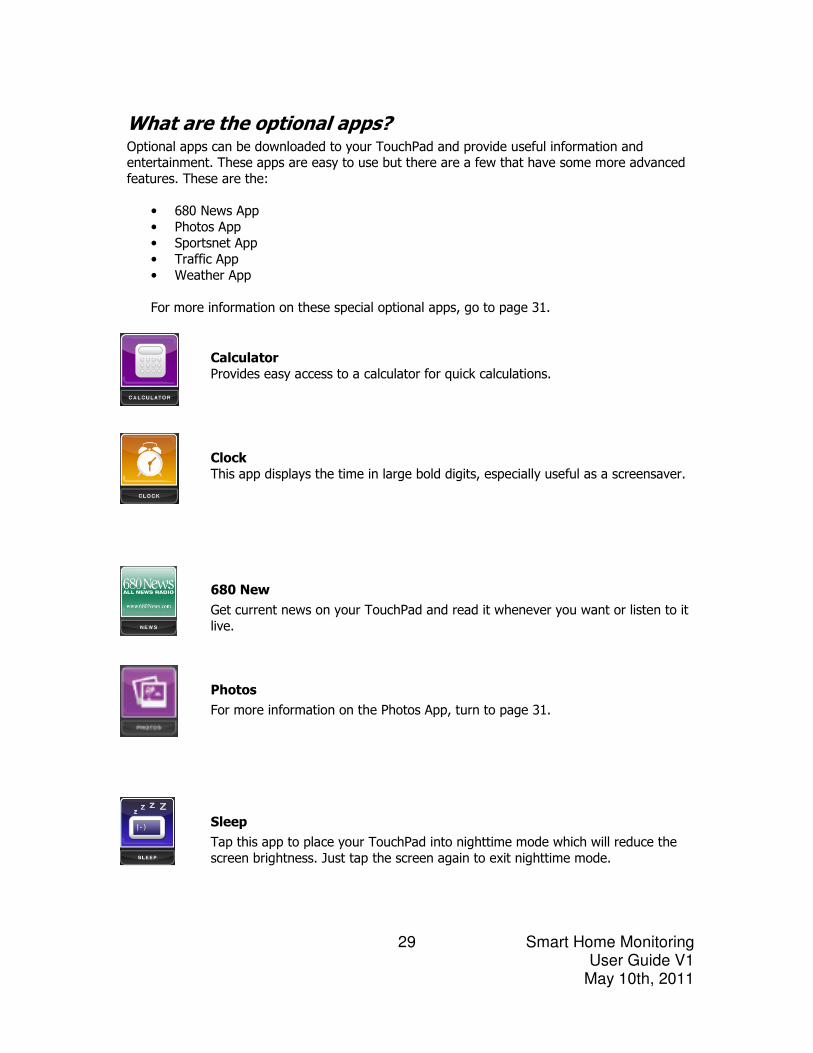
What are the optional apps? Optional apps can be downloaded to your TouchPad and provide useful information and entertainment. These apps are easy to use but there are a few that have some more advanced
features. These are the:
• 680 News App
• Photos App
• Sportsnet App
• Traffic App
• Weather App
For more information on these special optional apps, go to page 31.
Calculator
Provides easy access to a calculator for quick calculations.
Clock
This app displays the time in large bold digits, especially useful as a screensaver.
680 New
Get current news on your TouchPad and read it whenever you want or listen to it
live.
Photos
For more information on the Photos App, turn to page 31.
Sleep
Tap this app to place your TouchPad into nighttime mode which will reduce the
screen brightness. Just tap the screen again to exit nighttime mode.
Smart Home Monitoring User Guide V1
May 10th, 2011
30
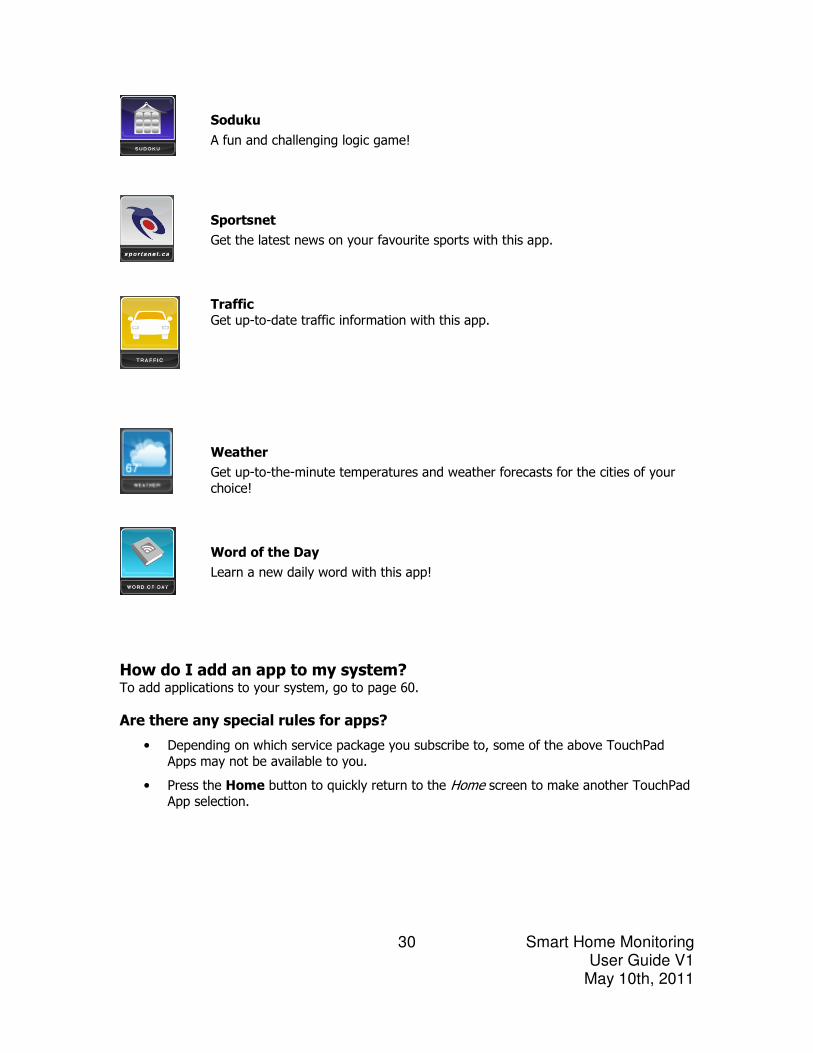
Soduku
A fun and challenging logic game!
Sportsnet
Get the latest news on your favourite sports with this app.
Traffic Get up-to-date traffic information with this app.
Weather
Get up-to-the-minute temperatures and weather forecasts for the cities of your
choice!
Word of the Day
Learn a new daily word with this app!
How do I add an app to my system? To add applications to your system, go to page 60.
Are there any special rules for apps?
• Depending on which service package you subscribe to, some of the above TouchPad
Apps may not be available to you.
• Press the Home button to quickly return to the Home screen to make another TouchPad App selection.
Smart Home Monitoring User Guide V1
May 10th, 2011
31
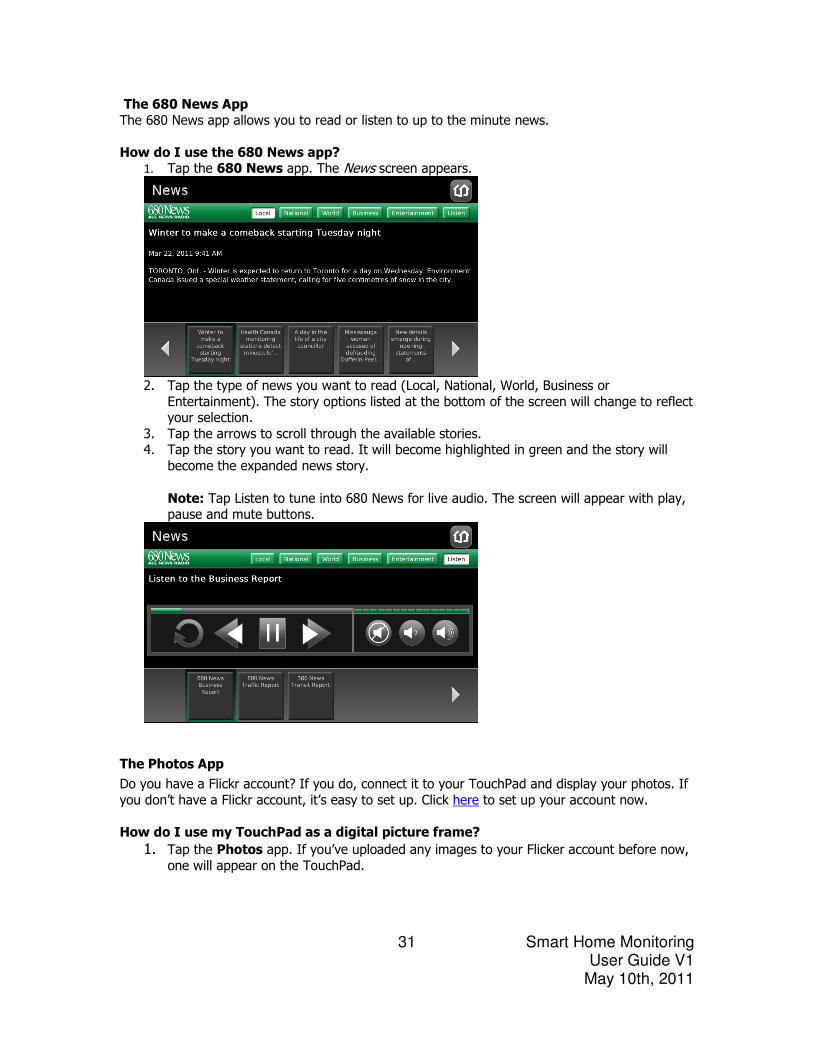
The 680 News App
The 680 News app allows you to read or listen to up to the minute news.
How do I use the 680 News app? 1. Tap the 680 News app. The News screen appears.
2. Tap the type of news you want to read (Local, National, World, Business or
Entertainment). The story options listed at the bottom of the screen will change to reflect your selection.
3. Tap the arrows to scroll through the available stories. 4. Tap the story you want to read. It will become highlighted in green and the story will
become the expanded news story.
Note: Tap Listen to tune into 680 News for live audio. The screen will appear with play, pause and mute buttons.
The Photos App
Do you have a Flickr account? If you do, connect it to your TouchPad and display your photos. If
you don’t have a Flickr account, it’s easy to set up. Click here to set up your account now.
How do I use my TouchPad as a digital picture frame?
1. Tap the Photos app. If you’ve uploaded any images to your Flicker account before now, one will appear on the TouchPad.
Smart Home Monitoring User Guide V1
May 10th, 2011
32
The Sportsnet App
The Sportsnet app allows you to stay up to date with current sports news.
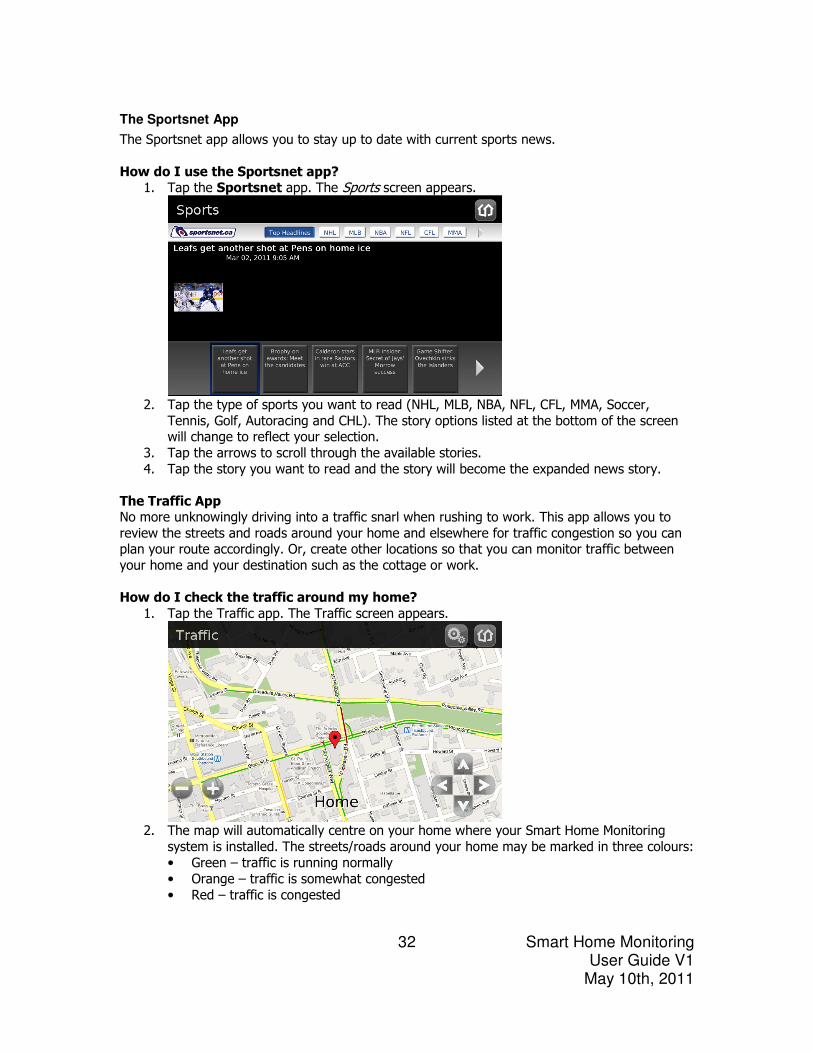
How do I use the Sportsnet app? 1. Tap the Sportsnet app. The Sports screen appears.
2. Tap the type of sports you want to read (NHL, MLB, NBA, NFL, CFL, MMA, Soccer,
Tennis, Golf, Autoracing and CHL). The story options listed at the bottom of the screen will change to reflect your selection.
3. Tap the arrows to scroll through the available stories.
4. Tap the story you want to read and the story will become the expanded news story.
The Traffic App No more unknowingly driving into a traffic snarl when rushing to work. This app allows you to
review the streets and roads around your home and elsewhere for traffic congestion so you can plan your route accordingly. Or, create other locations so that you can monitor traffic between
your home and your destination such as the cottage or work.
How do I check the traffic around my home?
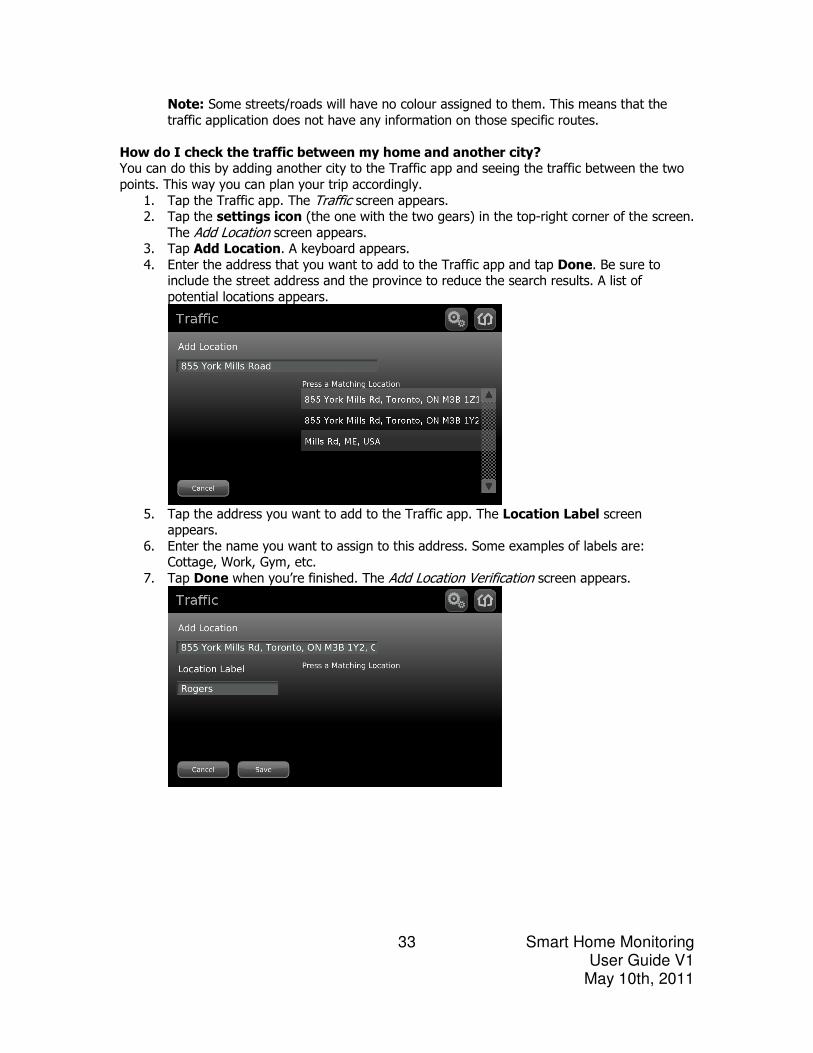
1. Tap the Traffic app. The Traffic screen appears.
2. The map will automatically centre on your home where your Smart Home Monitoring
system is installed. The streets/roads around your home may be marked in three colours:
• Green – traffic is running normally
• Orange – traffic is somewhat congested
• Red – traffic is congested
Smart Home Monitoring User Guide V1
May 10th, 2011
33
Note: Some streets/roads will have no colour assigned to them. This means that the
traffic application does not have any information on those specific routes.
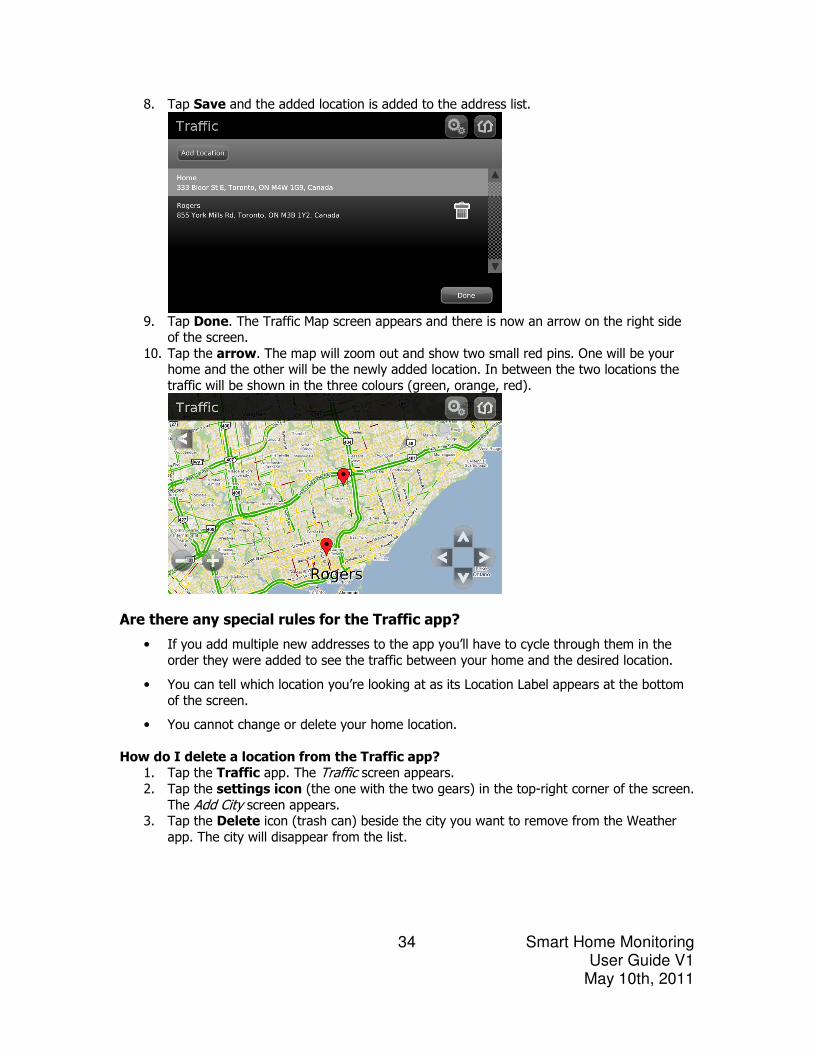
How do I check the traffic between my home and another city? You can do this by adding another city to the Traffic app and seeing the traffic between the two
points. This way you can plan your trip accordingly.
1. Tap the Traffic app. The Traffic screen appears. 2. Tap the settings icon (the one with the two gears) in the top-right corner of the screen.
The Add Location screen appears. 3. Tap Add Location. A keyboard appears.
4. Enter the address that you want to add to the Traffic app and tap Done. Be sure to include the street address and the province to reduce the search results. A list of
potential locations appears.
5. Tap the address you want to add to the Traffic app. The Location Label screen
appears.
6. Enter the name you want to assign to this address. Some examples of labels are: Cottage, Work, Gym, etc.
7. Tap Done when you’re finished. The Add Location Verification screen appears.
Smart Home Monitoring User Guide V1
May 10th, 2011
34
8. Tap Save and the added location is added to the address list.
9. Tap Done. The Traffic Map screen appears and there is now an arrow on the right side
of the screen.
10. Tap the arrow. The map will zoom out and show two small red pins. One will be your home and the other will be the newly added location. In between the two locations the
traffic will be shown in the three colours (green, orange, red).
Are there any special rules for the Traffic app?
• If you add multiple new addresses to the app you’ll have to cycle through them in the
order they were added to see the traffic between your home and the desired location.
• You can tell which location you’re looking at as its Location Label appears at the bottom
of the screen.
• You cannot change or delete your home location.
How do I delete a location from the Traffic app? 1. Tap the Traffic app. The Traffic screen appears. 2. Tap the settings icon (the one with the two gears) in the top-right corner of the screen.
The Add City screen appears. 3. Tap the Delete icon (trash can) beside the city you want to remove from the Weather
app. The city will disappear from the list.
Smart Home Monitoring User Guide V1
May 10th, 2011
35
The Weather App
Do you ask yourself questions like: What’s the weather like at the cottage? Or I wonder what the weather will be like when we go on vacation tomorrow? Use the Weather TouchPad App to
monitor the weather for cities anywhere around the world.
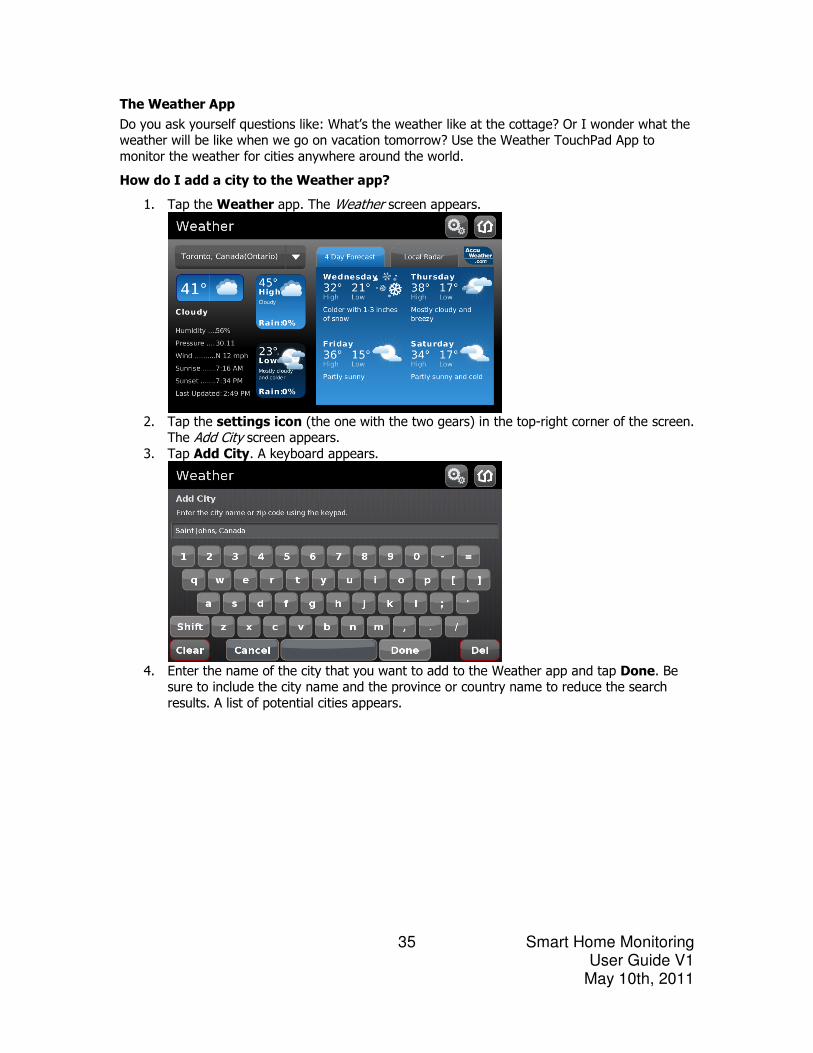
How do I add a city to the Weather app?
1. Tap the Weather app. The Weather screen appears.
2. Tap the settings icon (the one with the two gears) in the top-right corner of the screen.
The Add City screen appears. 3. Tap Add City. A keyboard appears.
4. Enter the name of the city that you want to add to the Weather app and tap Done. Be
sure to include the city name and the province or country name to reduce the search
results. A list of potential cities appears.
Smart Home Monitoring User Guide V1
May 10th, 2011
36
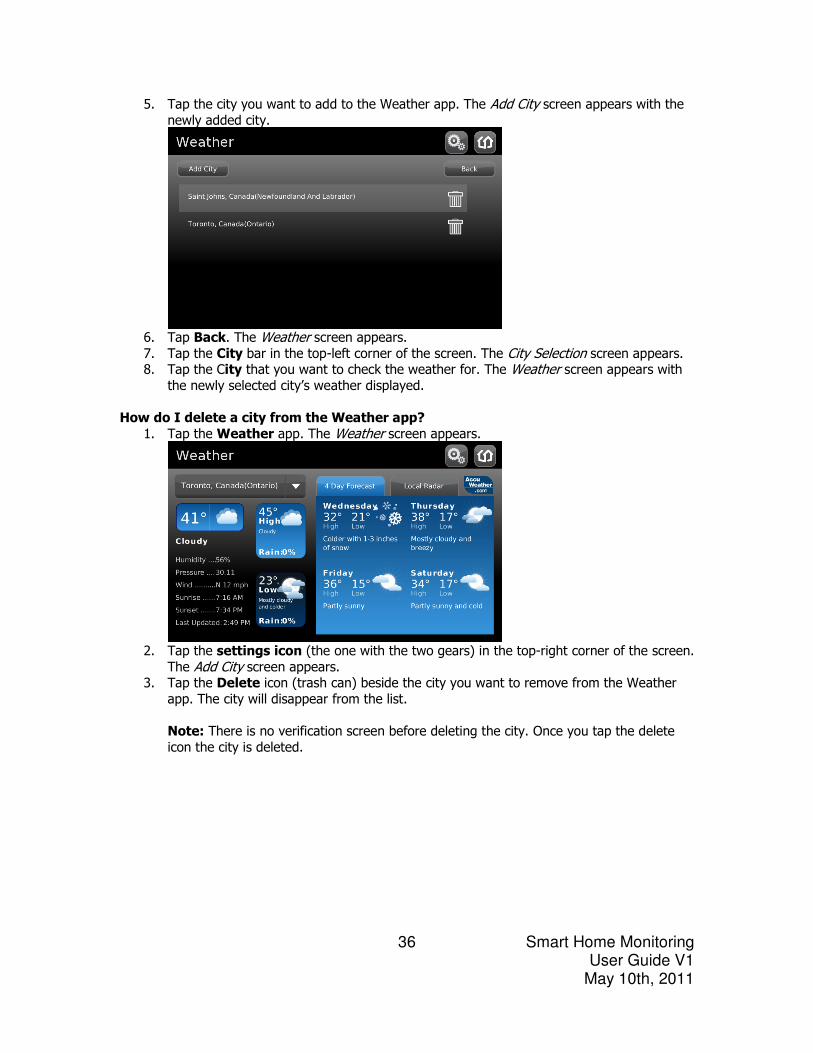
5. Tap the city you want to add to the Weather app. The Add City screen appears with the newly added city.
6. Tap Back. The Weather screen appears. 7. Tap the City bar in the top-left corner of the screen. The City Selection screen appears. 8. Tap the City that you want to check the weather for. The Weather screen appears with
the newly selected city’s weather displayed.
How do I delete a city from the Weather app?
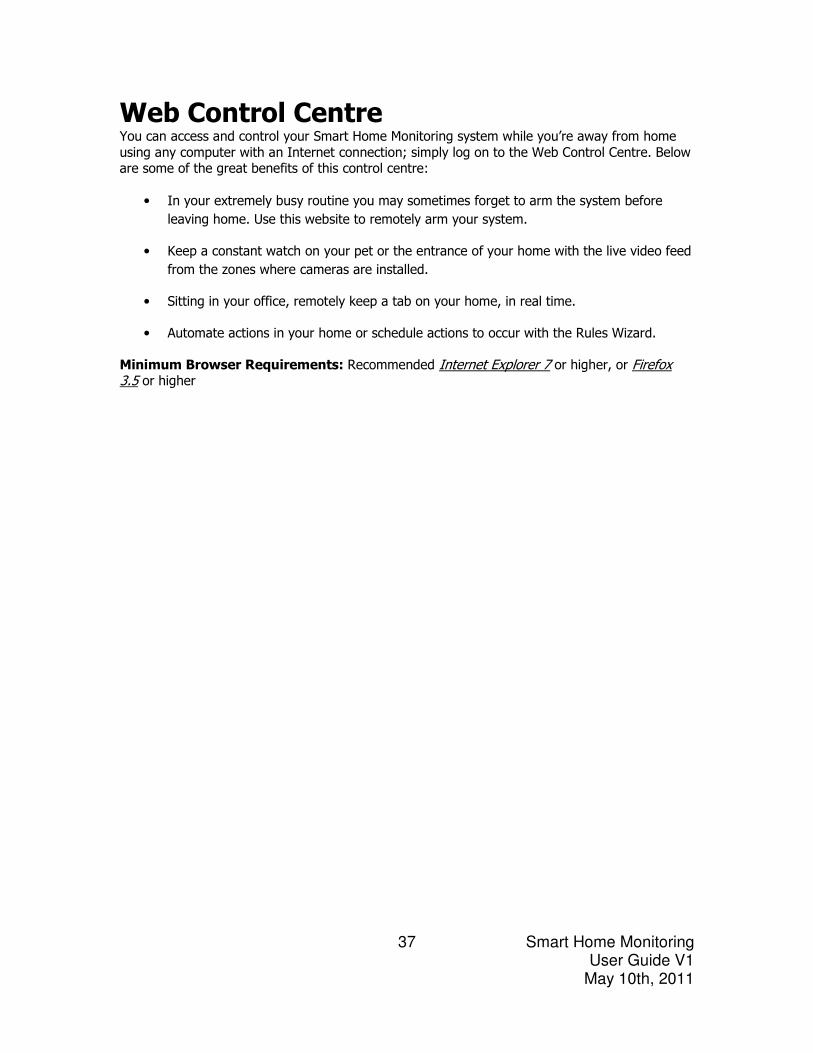
1. Tap the Weather app. The Weather screen appears.
2. Tap the settings icon (the one with the two gears) in the top-right corner of the screen.
The Add City screen appears. 3. Tap the Delete icon (trash can) beside the city you want to remove from the Weather
app. The city will disappear from the list.
Note: There is no verification screen before deleting the city. Once you tap the delete
icon the city is deleted.
Smart Home Monitoring User Guide V1
May 10th, 2011
37
Web Control Centre You can access and control your Smart Home Monitoring system while you’re away from home
using any computer with an Internet connection; simply log on to the Web Control Centre. Below are some of the great benefits of this control centre:
• In your extremely busy routine you may sometimes forget to arm the system before
leaving home. Use this website to remotely arm your system.
• Keep a constant watch on your pet or the entrance of your home with the live video feed
from the zones where cameras are installed.
• Sitting in your office, remotely keep a tab on your home, in real time.
• Automate actions in your home or schedule actions to occur with the Rules Wizard.
Minimum Browser Requirements: Recommended Internet Explorer 7 or higher, or Firefox 3.5 or higher
Smart Home Monitoring User Guide V1
May 10th, 2011
38
How do I log in? Direct Through MyRogers.com
1. Visit smarthome.rogers.com 1. Visit rogers.com
2. Enter your MyRogers username and
password and click [Sign In]. The Main screen of the Web Control Centre appears.
Don’t have a MyRogers account
created as of yet? Visit www.rogers.com and click Register
Now and create your MyRogers account.
2. Enter your MyRogers username and
password and click [Go]. Don’t have a MyRogers account created
as of yet? Visit www.rogers.com and click Register Now and create your
MyRogers account.
3. Click the Home Monitoring tab. 4. Click Access Web Control. The Main
screen of the Web Control Centre appears.
Centre.
Note: When you log out of the Web
Control Centre you will also log out of your MyRogers Account for
security reasons.
How do I arm my alarm from the Web Control Centre? 1. Click DISARMED – Press to Arm in the top-left corner of the Main screen. The Arm
Your System screen appears.
2. Enter your access code in the Enter Keypad Code field.
3. Select which armed mode you want to use:
Arm Mode When would I use this?
Arm Stay • when you’re at home but want to have
your alarm on
• this will only turn on the perimeter
sensors (windows and doors) and allow
a chance for them to be deactivated once they are tripped
Arm Night • when you go to bed at night
• this will turn on the perimeter sensors
(windows and doors) and there will be no time provided to deactivate them
Arm Away • when leaving your home and no one is
left inside
• this will turn on all sensors (perimeter
and internal) and allow a chance to be deactivated once they are tripped
Note: Click the TURN ZONE OFF button to keep a specific zone in your home
Disarmed, if required. You will have to enter your access code for each sensor/zone
that you turn off.
Smart Home Monitoring User Guide V1
May 10th, 2011
39
4. Click ARM NOW – The Main screen reappears showing the countdown, then displays the
red ARMED button as shown below. The TouchPad will also show the countdown. The
alarm is now armed.
Note: The TouchPad will not beep during the arming countdown when in Arm Away or
Arm Night until the alarm is actually armed. For Arm Stay, the alarm will not beep.
Note: The drop-down menu will display a Disarm option, if your system is already
armed.
How do I disarm my system from the Web Control Centre? 1. Click ARMED – Press to Disarm on the top-left corner of the Main screen. The Disarm
Your System screen appears.
2. Enter your access code in the Enter Keypad Code field.
3. Click DISARM. The Main screen reappears. The red ARMED button should now be a
green DISARMED button.
The system is now disarmed.
What else can I do in the Web Control Centre? The Web Control Centre allows you to control and monitor almost every aspect of your Smart
Home Monitoring system. It has at least 6 different tabs, possibly more, depending on which sensors you have. Each tab contains information about your Smart Home Monitoring system.
The default tabs that you will always see are: • Main
• Security
• History
• Contacts
• Rules
• Widgets
The tabs that appears when you have specific sensors attached to your system are: • Cameras
• Thermostats
• Lights
Smart Home Monitoring User Guide V1
May 10th, 2011
40
Main tab The Main tab displays the overall status of your Smart Home Monitoring system.
1. Zone Activity: This displays the most current status of the secured Zones in your home.
You can manage security in individual zones by clicking Manage Zones.
2. Cameras: This window displays the current still picture for all zones with a camera. If
you don’t have a camera, this window will not appear.
• To view and manage the Live Video feed for a specific camera, click View Live
Video. This will allow you to use advanced video features like video resolution, take
snapshots, control audio and even save the video as an mpeg file.
• To manage all cameras installed in your home, click Manage Cameras.
3. History: This section displays the event history report captured by your Smart Home
Monitoring system and by any security sensors. It will also show how your alarm was
disarmed and armed (via the TouchPad, Keyfob, Numeric KeyPad, Web Control Centre,
etc.).
Note: Any changes to the Thermostat, Lighting or Appliance controllers will not be
recorded.
To view a detailed history of events based on your own search criteria, click View
History.
Note: All three sections within the Main tab are customizable. You can expand or collapse each individual window and also re-arrange them using the drag-and-drop feature from the top bar to
suit your requirements.
Smart Home Monitoring User Guide V1
May 10th, 2011
41
Security Tab The Security tab enables you to manage and setup the security on your home management
system. The following options are available when Security tab is clicked. • Arm/Disarm
• Emergency Dispatch Setup and Security Certificate Information
• Keypad Codes
• Security Rules
• Security Zones
• Security Rules
How do I arm Smart Home Monitoring from the Web Control Centre Security tab?
1. Click the SECURITY tab. A drop-down menu appears.
2. Click Arm. The Arm Your System pop-up window appears. 3. Click the mode you wish to arm your system in. 4. Enter your Access Code and click ARM NOW. The arming countdown will appear on
the screen. Once the countdown is complete, you will see the button on your screen change from green to red and show that your system is now armed.
How do I disarm Smart Home Monitoring from the Web Control Centre Security tab?
1. Click the SECURITY tab. A drop-down menu appears. 2. Click Disarm. The Disarm Your System pop-up window appears. 3. Enter your Access Code and click DISARM. You will see the button on your screen
change from red to green and show that your system is now disarmed.
How do I setup the Emergency Dispatch information from the Web Control Centre? Click Emergency Dispatch Setup from the drop-down Security menu. The Emergency Dispatch screen appears.
This screen shows a list of Contacts that the Central Monitoring Station will attempt to call in case
of an emergency. You must have at least 1 contact in the list at all times. The Web Control
Centre automatically uses the Account Setup information to add the required contact information on this list.
Add a new Contact
To add a new contact in the Call Order sequence, click Add Contact.
Note: You can only add up to four contacts in this list.
Change your Secret Word
You can change the Secret Password used to confirm your identity with the Central Monitoring Station. To do this, click UNLOCK TO VIEW/EDIT and follow the onscreen instructions.
Smart Home Monitoring User Guide V1
May 10th, 2011
42
Note: Be careful when changing your Secret Word. Be sure to make it something that you and
your family can easily remember.
Modify the Call Order To modify the Call Order of a contact or change the contact information, click Edit. Use the drop-
down options, select the required information for each field and click Save.
Delete a Contact
To delete a contact from the list, click beside the name you want to remove. The Confirm Contact Delete screen appears. Click Yes.
Alarm Ordinance and Permit Registration This is where your Alarm Permit Number and its Expiry Date are stored. Depending on where you
live, you may have to go to your local Police services and purchase a Security permit. It’s this permit that puts your home and Smart Home Monitoring system in their records and allows them
to react to any trouble calls from the Central Monitoring Station.
Note: You can’t enter or edit this information via this screen.
What can I do on the keypad code screen? This screen displays a list of all Access codes and their access permissions. You can either Add Access Code, Edit access permissions for an existing code, or Delete a code.
• To add a new user access code, click Add Access Code. This allows you to enter a new
Access Code and set access permissions for the new code.
• To edit access permissions for an existing code, click Edit under the Modify column.
• To delete an existing code, click .
The codes are all shown in an encrypted format. To view a code in a readable text format, click Show. You will be prompted to enter the master access code.
How do I create a user access code from the Web Control Centre?
1. Click the SECURITY tab. A drop-down menu appears. 2. Click Key Pad Codes. The Keypad Access Codes screen appears. 3. Click ADD ACCESS CODES. The Account Verification screen appears. 4. Enter your Master Keycode and click OK. The Entry screen appears. 5. Enter a NAME, ACCESS CODE, LEVEL of access and valid DAYS that the code is active
for. For the level of access, please refer to the chart below.
6. Click SAVE.
Arming Mode Description
Standard This setting allows the user to arm, disarm and access everything except the Settings TouchPad App.
Arm Only This setting allows the user to arm the alarm and has access everything
except the Settings TouchPad App.
Smart Home Monitoring User Guide V1
May 10th, 2011
43
Arming Mode Description
Guest This setting allows the user to arm and disarm the alarm.
How do I edit a user access code from the Web Control Centre?
1. Click the SECURITY tab. A drop-down menu appears.
2. Click Key Pad Codes. The Keypad Access Codes screen appears.
3. Click the Pencil icon beside the code you want to edit. The Edit Access Code screen appears.
4. Edit the NAME, ACCESS CODE, or days that the code is valid for. Note: You can’t edit the level of access. To do this, you must delete this access code
and create a new one.
5. Click SAVE.
How do I delete a user access code from the Web Control Centre?
1. Click the SECURITY tab. A drop-down menu appears. 2. Click Key Pad Codes. The Keypad Access Codes screen appears.
3. Click the Garbage Can icon beside the access code that you want to delete. The
Confirm Access Code Delete window appears. 4. Click YES. The access code is deleted.
What are Security Rules? Rules are flexible methods for generating a variety of system actions (such as sending a text message or turning on a light) when something happens.
The Security Rules option allows you to quickly see all your existing rules on one page.
For more information on Rules, go to page 46.
How do I review the Security Zones in my home from the Web Control Centre?
1. Click the SECURITY tab. A drop-down menu appears.
2. Click Security Zones. The Security Zones screen appears.
This screen displays your sensors. From here you can do the following:
a. To change the name of a zone click Edit.
b. To turn a sensor OFF, click the corresponding TURN ZONE OFF button
c. To turn a sensor ON, click the corresponding TURN ZONE ON button
Smart Home Monitoring User Guide V1
May 10th, 2011
44
History Tab The History Tab allows you to see all or some of the events that have. This mimics the History
function on the TouchPad.
How do I access the history log from the Web Control Centre?
1. Hold your mouse cursor over the HISTORY tab. A drop-down menu will appear. 2. Select the option you want to view from the list below:
All History
This option shows: a) everything that has happened on your Smart Home Monitoring system
b) everything that has happened on your Smart Home Monitoring system within a specific date range
c) specific events that have happened on your system (alarms, arms, disarms, events, zones)
Alarms
This option will only show Alarm events.
Arms/Disarms This option will only show when your alarm was armed or disarmed.
Trouble Events This option shows if there were any issues with your Smart Home Monitoring service.
Zone Activity This option displays tripped sensors, whether your alarm is activated or not.
Last 24 Hours
This option displays all events that your RSHM service has experienced in the last 24 hours.
Note: There may not be any events displayed under some of these options, depending on
the activity in your home.
Smart Home Monitoring User Guide V1
May 10th, 2011
45
Contacts Tab The Contacts Tab lets you manage the contacts for Smart Home Monitoring. Contacts are only
used when you create “rules” for your system. Contacts receive emails or text messages when certain events are detected by your Smart Home Monitoring system.
For more information on rules, turn to page 46.
How do I add a new contact from the Web Control Centre? 1. Click CONTACTS from the tabs. The Contacts screen appears.
2. Click Add Contact. The Add Contact screen appears.
3. Enter the required information in this screen and click Save. The Contacts screen
reappears with the new contact listed.
How do I manage existing contacts from the Web Control Centre?
Edit contacts
1. Click CONTACTS from the tabs. The Contacts screen appears.
2. Click the beside the contact you want to edit. The Edit Contact screen appears.
3. Edit the required information and click Save.
Delete contacts
1. Click CONTACTS from the tabs. The Contacts screen appears.
2. Click the beside the contact you want to delete. The Delete Contact screen appears.
3. Click Yes to delete the contact.
Smart Home Monitoring User Guide V1
May 10th, 2011
46
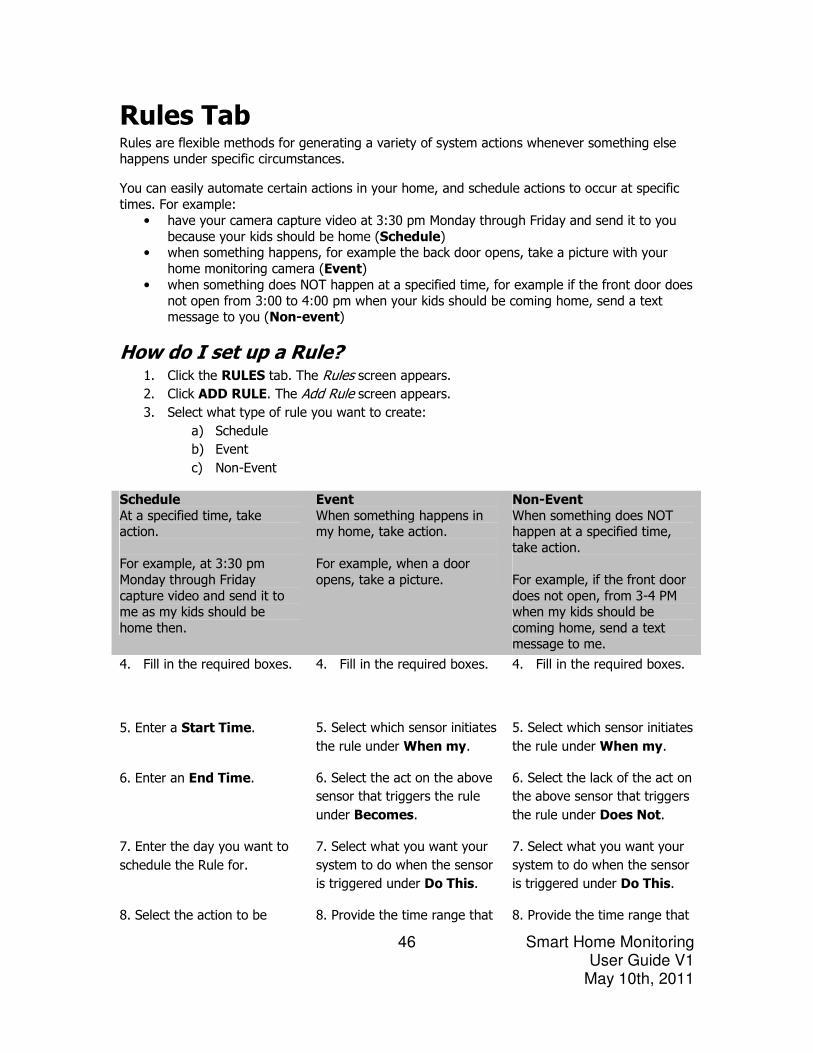
Rules Tab Rules are flexible methods for generating a variety of system actions whenever something else happens under specific circumstances.
You can easily automate certain actions in your home, and schedule actions to occur at specific
times. For example:
• have your camera capture video at 3:30 pm Monday through Friday and send it to you
because your kids should be home (Schedule) • when something happens, for example the back door opens, take a picture with your
home monitoring camera (Event)
• when something does NOT happen at a specified time, for example if the front door does
not open from 3:00 to 4:00 pm when your kids should be coming home, send a text message to you (Non-event)
How do I set up a Rule? 1. Click the RULES tab. The Rules screen appears.
2. Click ADD RULE. The Add Rule screen appears.
3. Select what type of rule you want to create:
a) Schedule
b) Event
c) Non-Event
Schedule
At a specified time, take action.
For example, at 3:30 pm
Monday through Friday
capture video and send it to me as my kids should be
home then.
Event
When something happens in my home, take action.
For example, when a door
opens, take a picture.
Non-Event
When something does NOT happen at a specified time,
take action.
For example, if the front door
does not open, from 3-4 PM when my kids should be
coming home, send a text message to me.
4. Fill in the required boxes. 4. Fill in the required boxes. 4. Fill in the required boxes.
5. Enter a Start Time. 5. Select which sensor initiates
the rule under When my.
5. Select which sensor initiates
the rule under When my.
6. Enter an End Time. 6. Select the act on the above
sensor that triggers the rule
under Becomes.
6. Select the lack of the act on
the above sensor that triggers
the rule under Does Not.
7. Enter the day you want to
schedule the Rule for.
7. Select what you want your
system to do when the sensor
is triggered under Do This.
7. Select what you want your
system to do when the sensor
is triggered under Do This.
8. Select the action to be 8. Provide the time range that 8. Provide the time range that
Smart Home Monitoring User Guide V1
May 10th, 2011
47
taken under Do this. you want this rule to work by
selecting How Often.
you want this rule to work by
selecting How Often.
9. Select the security mode
you would like this Rule to be
active for In Home Security
mode.
9. Select the security mode
you would like this Rule to be
active for In Home Security
mode.
9. Select the security mode
you would like this Rule to be
active for In Home Security
mode.
10. Provide a name and
description of the rule in
Describe the Rule. This field
will be populated with what
you’ve selected, but you can
modify it to make it more
personal to you.
10. Provide a name and
description of the rule in
Describe the Rule. This field
will be populated with what
you’ve selected, but you can
modify it to make it more
personal to you.
10. Provide a name and
description of the rule in
Describe the Rule. This field
will be populated with what
you’ve selected, but you can
modify it to make it more
personal to you.
11. Click SAVE. 11. Click SAVE. 11. Click SAVE.
A Schedule Example
When did the kids arrive home from school? (Schedule example)
For example, say you want to know when your kids get home from school. This is how you would
set up a rule to inform you when they open the door as they arrive home. To begin log in to the
Web Control Centre and follow these steps:
1. Click the RULES tab. The Rules screen
appears.
2. Click ADD RULE. The What Kind of Rule
screen appears.
Schedule At a specified time, take action. For example, at 3:30 pm Monday through Friday capture video and send it to me as my kids should be home then.
Event When something happens in my home, take action. For example, when a door opens, take a picture and send me an email.
Non-Event When something does NOT happen at a specified time, take action. For example, if the front door does not open, from 3-4 PM when my kids should be coming home, send a text message to me.
3. Select the kind of rule you want to
create: Schedule, Event or Non-event.
4. Select the following:
When my: Any Door (indicate what sensor is attached to this rule)
Becomes: Opened (what does the sensor have to do in order to
Smart Home Monitoring User Guide V1
May 10th, 2011
48
activate the rule)
Do this: Send Text Message (what happens after the rule is activated)
How Often: At a Specified Time with
Start Time as 3:00 PM and End Time as
4:00 PM. Also check Monday through
Friday in the checkboxes.
(when can this rule be activated)
5. In Home Security Mode: Armed (what state does the alarm have to be in to
activate this rule)
6. Describe the Rule: When did the kids
arrive home from school?
(name the rule for future reference)
7. Click SAVE. (save and activate your rule)
Are there any special rules for using the Wizard? • Arming and Disarming can be the resulting action of a rule as well as a rule event.
Therefore, it is possible that a rule could result in the system being armed or disarmed and that result could trigger additional rules.
• If you wish to send an alert to anyone other than the Primary contact already set up
in the system, you will first have to add contact information for them. Go to page 45 for more information.
Smart Home Monitoring User Guide V1
May 10th, 2011
49
Widgets (TouchPad Apps) Tab
The Widget tab allows you to choose the information and entertainment apps you would like to display on the TouchPad. As well, it allows you to customize some apps to suit your personal
needs.
How do I add an app to my TouchPad from the Web Control Centre?
1. Click the WIDGETS tab. The Manage Widgets screen appears. 2. Find a widget in the bar along the top of the screen that you want to put on your
TouchPad. You can use the arrows at either end to scroll through all the possible
selections.
3. Click on the widget. A pop-up box appears. 4. Click ADD WIDGET. A spinning wheel will appear showing that it is working.
On the TouchPad an Updating Installed Widgets message box appears. 5. The message box will disappear and the TouchPad will now be updated with the widget
you have just added.
Note: Some widgets may not be available to you, depending on your RSHM service
subscription.
Note: You can have only 10 widgets displayed on the TouchPad at one time. If you add more, you can scroll to the other screen by dragging your finger along the screen (from
right to left) to view your other widgets.
How do I edit an app from the Web Control Centre? You can personalize apps by editing them. Some apps let you change the location that they’re
based on (such as the Weather app) while others require editing in order for them to work (such
as the Photo app). Follow the instructions below to personalize your apps! 1. Click the WIDGETS tab. The Manage Widgets screen appears. 2. Click the app that you want to edit. If the app can be configured the option to do so
appears.
3. Follow the onscreen instructions.
Note: Some apps can’t be configured like the Security, Settings and Camera apps and
others must be configured through the TouchPad like the Weather, Photos and Traffic apps listed below.
Smart Home Monitoring User Guide V1
May 10th, 2011
50
Photos This app uses your Flickr account to turn your TouchPad into a digital picture frame. To link your Flickr account to this app:
1. Click Edit on the Photos app on the Web Control Centre. The Photos Edit screen appears. 2. Click Change my Flickr account, by signing in with another ID and clicking
Grant Permission. The Flickr Sign In web page appears. 3. Enter your Yahoo! ID and password. The Authorization screen appears. Note: If you
don’t have a Yahoo! ID click Create New Account and complete the steps requested of
you. 4. Read the terms of service and, if you agree with it, click OK, I’LL AUTHORIZE IT. The
Photos App Edit screen reappears.
5. Select a Slideshow Interval delay. This will determine the pause between photos changing on your TouchPad.
6. Click OK to save your changes.
Weather Personalize this app by adding cities so that you can receive accurate and up to date weather
reports. You can also select whether the temperature is displayed in Celsius or Fahrenheit.
Lights Use this app to dim or turn on/off any lights or small appliances connected to Smart Home
Monitoring.
Traffic Personalize this app by adding your address and destinations to the Address box. You can then
select this destination from the TouchPad and see what the traffic is like between your home and the programmed address.
How do I reposition the apps on my TouchPad from the Web Control Centre?
1. Click the WIDGETS tab. The Manage Widgets (TouchPad Apps) screen appears. 2. Drag and drop the widgets on the web TouchPad so that they are in the order you
want. 3. Click UPDATE to save your changes. An Updating TouchPad Apps pop-up screen
appears.
Note: The Security, Settings and (if applicable) Camera TouchPad Apps cannot be
repositioned. They are locked.
How do I delete an app on my TouchPad from the Web Control Centre?
1. Click the WIDGETS tab. The Manage Widgets screen appears. 2. Find a widget in the TouchPad image that you want to remove and hold your
mouse cursor over it. The option to edit or delete it will appear. 3. Click Delete. The Delete Widget pop-up box appears. 4. Click DELETE Widget. A spinning wheel will appear showing that it is working.
On the TouchPad an Updating Installed TouchPad Apps message box will appear. 5. The message box will disappear and the TouchPad will now be updated with the app
removed.
Smart Home Monitoring User Guide V1
May 10th, 2011
51
Cameras Tab (only if you have a camera in your system) The Cameras tab allows you to access a live video stream of what your home monitoring camera
is currently viewing and take a snapshot. The screen is broken into three areas: the camera image and the event log. Note: If you don’t have a camera installed in your system then you won’t see this tab.
How do I view live video from my camera(s)? 1. Hold your mouse cursor over the Cameras tab. A drop-down menu will appear. 2. Click Live Video. The Live Video screen appears. 3. If you have more than one camera, click the camera that you want to view live video on.
If you only have one camera you will see a live video feed.
How do I record video from my camera(s)? 1. Hold your mouse cursor over the Cameras tab. A drop-down menu will appear.
2. Click Live Video. The Live Video screen appears. 3. Click the camera that you want to view live video on. 4. Click TAKE VIDEO CLIP. Your system camera will start recording.
5. When it is finished recording, the movie will appear below the camera image. Click the imager to watch the video.
How do I take a snapshot from my camera(s)? 1. Hold your mouse cursor over the Cameras tab. A drop-down menu will appear.
2. Click Live Video. The Live Video screen appears. 3. Click the camera that you want to view live video on. 4. Click TAKE PICTURE. Your system camera will take a snapshot and it will appear below
the camera image. Click on it to view it.
How do I view saved pictures or videos taken by camera(s)? 1. Hold your mouse cursor over the Cameras tab. A drop-down menu will appear.
2. Click Saved Pictures and Videos. A Saved Pictures and Videos screen appears with all the saved images and videos that you’ve recorded or saved.
Are there any special rules for cameras?
• The quality of the recording is determined by the resolution that you set for your camera.
To learn how to change the resolution go to page 64.
Smart Home Monitoring User Guide V1
May 10th, 2011
52
Thermostats Tab (only if you have a thermostat in your system) The Thermostats tab allows you to access your home’s thermostat and change it’s settings via the Internet.
How do I adjust my thermostat? 1. Hover your mouse over the Thermostat tab. A drop-down menu will appear.
2. Click Thermostats. The Thermostat screen appears. From here you can do the following:
Set your home to Cool, Heat or Off If you have an air conditioner and furnace you can decide whether your home heats or cools
your home to maintain the temperature.
Tap Cool for summer months and Heat for winter. If you want your home to heat/cool to its
natural temperature, tap Off and your furnace/air conditioner won’t automatically turn on.
Adjust the desired temperature range On the screen you’ll see a coloured temperature range with a pull tab (red or blue depending
if your thermostat is set to heat or cool) and a solid, vertical, orange line which represents
the current temperature in your home.
How do I set my home’s maximum temperature in the warmer months? Do you want your home to go no higher than 22 degrees? Tap Cool and pull the Blue tab
to 22 degrees on the temperature range.
How do I set my home’s minimum temperature in the colder months?
Do you want your home to go no lower than 20 degrees? Tap Heat and pull the Red tab to 20 degrees on the temperature range.
Do you prefer Celsius versus Fahrenheit?
Tap C to change the display to show Celsius.
Tap F to change the display to show Fahrenheit.
How do I override the settings on the thermostat sensor? Tap Hold to override any settings on the physical thermostat with your touch screen
settings. Tap Hold a second time to revert back to the physical thermostat’s settings.
How do I change my fan settings?
Tap Fan On to have the fan in your heating/cooling system run at all times. Tap Fan Auto to start the fan only when your heating/cooling system is running.
What are Thermostat Rules? Rules perform system actions (such as sending a text message or turning on a light) when something happens. The Thermostat Rules option allows you to quickly see all your existing rules
on one page.
For more information on Rules, go to page 45.
Smart Home Monitoring User Guide V1
May 10th, 2011
53
Lights Tab (only if you have a Light Dimmer in your system) The Lights tab allows you to turn your lights on/off or dim them.
Note: If you don’t have a light sensor installed in your system then this tab will not exist.
How do I adjust my lights? 1. Hover your mouse over the Lights tab. A drop-down menu will appear. 2. Click Lights. The Lights screen appears. 3. If a Lamp Dimmer sensor is ON, you will be able to adjust the light level by dragging
your finger along the dimmer control bar (0 to 100%).
Note: If a light is on a Small Appliance switch, the dimming option is not available.
Smart Home Monitoring User Guide V1
May 10th, 2011
54
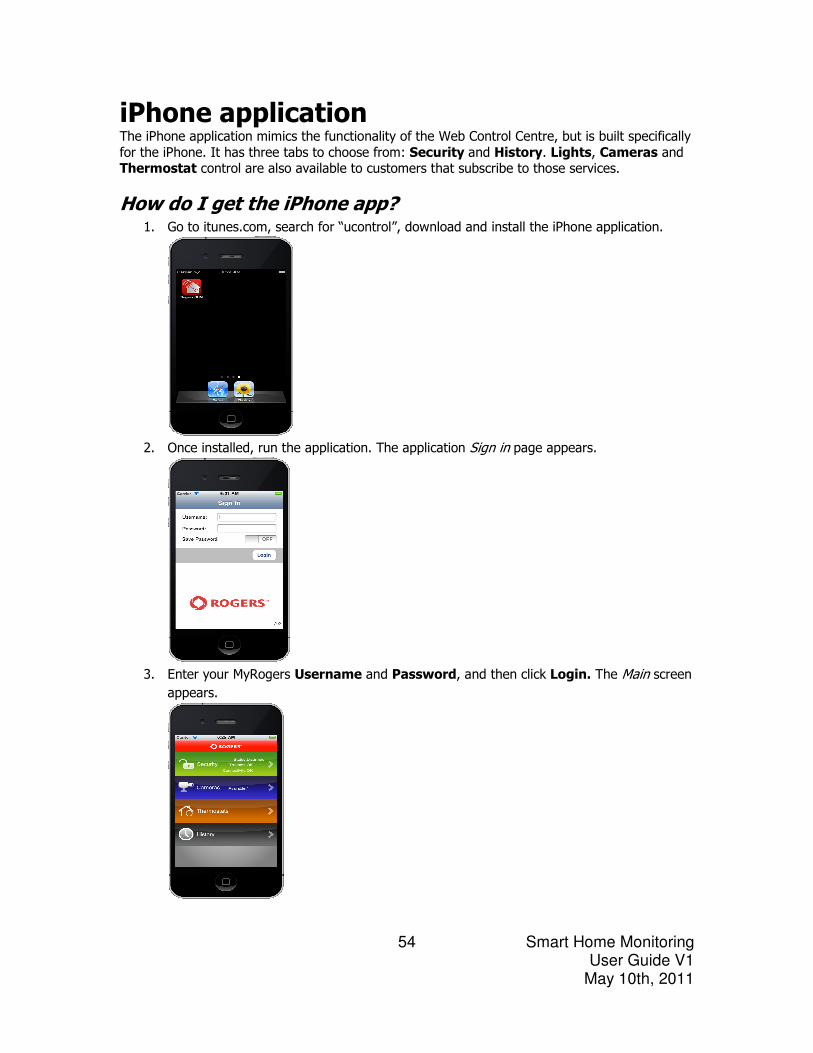
iPhone application
The iPhone application mimics the functionality of the Web Control Centre, but is built specifically
for the iPhone. It has three tabs to choose from: Security and History. Lights, Cameras and Thermostat control are also available to customers that subscribe to those services.
How do I get the iPhone app? 1. Go to itunes.com, search for “ucontrol”, download and install the iPhone application.
2. Once installed, run the application. The application Sign in page appears.
3. Enter your MyRogers Username and Password, and then click Login. The Main screen
appears.
Smart Home Monitoring User Guide V1
May 10th, 2011
55
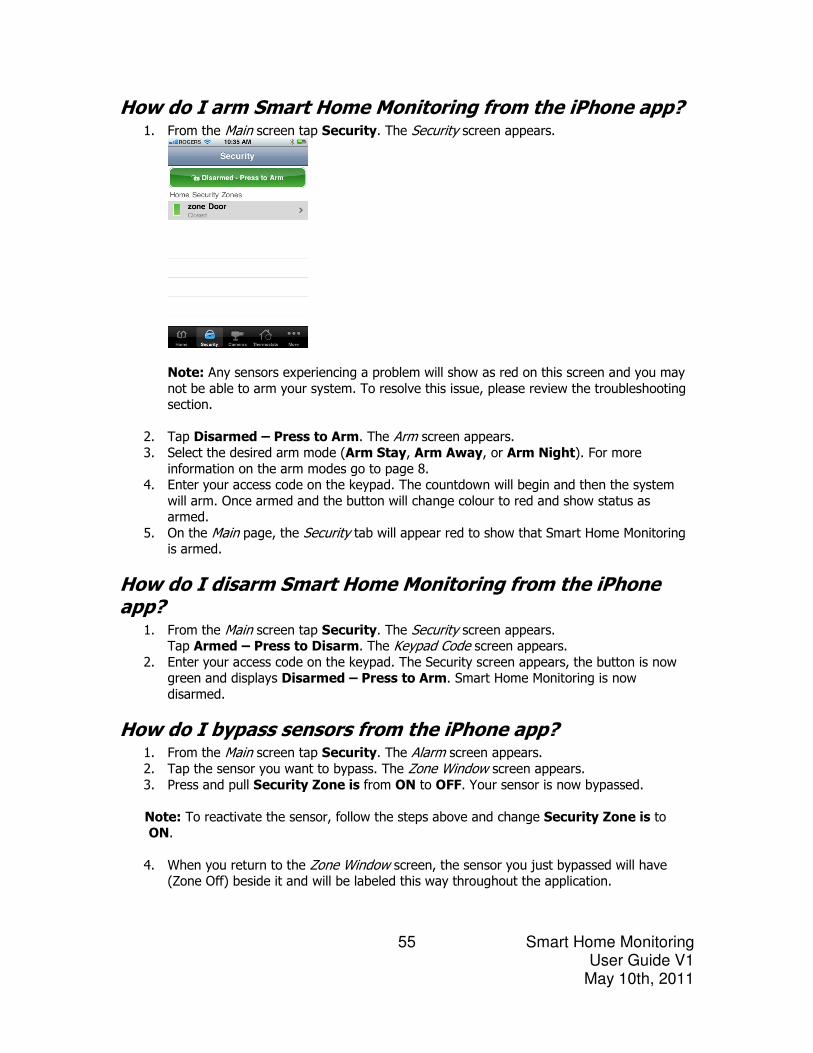
How do I arm Smart Home Monitoring from the iPhone app? 1. From the Main screen tap Security. The Security screen appears.
Note: Any sensors experiencing a problem will show as red on this screen and you may
not be able to arm your system. To resolve this issue, please review the troubleshooting section.
2. Tap Disarmed – Press to Arm. The Arm screen appears. 3. Select the desired arm mode (Arm Stay, Arm Away, or Arm Night). For more
information on the arm modes go to page 8. 4. Enter your access code on the keypad. The countdown will begin and then the system
will arm. Once armed and the button will change colour to red and show status as armed.
5. On the Main page, the Security tab will appear red to show that Smart Home Monitoring is armed.
How do I disarm Smart Home Monitoring from the iPhone app?
1. From the Main screen tap Security. The Security screen appears. Tap Armed – Press to Disarm. The Keypad Code screen appears.
2. Enter your access code on the keypad. The Security screen appears, the button is now green and displays Disarmed – Press to Arm. Smart Home Monitoring is now
disarmed.
How do I bypass sensors from the iPhone app? 1. From the Main screen tap Security. The Alarm screen appears. 2. Tap the sensor you want to bypass. The Zone Window screen appears. 3. Press and pull Security Zone is from ON to OFF. Your sensor is now bypassed.
Note: To reactivate the sensor, follow the steps above and change Security Zone is to ON.
4. When you return to the Zone Window screen, the sensor you just bypassed will have (Zone Off) beside it and will be labeled this way throughout the application.

Smart Home Monitoring User Guide V1
May 10th, 2011
56
How do I access a camera from the iPhone app? 1. From the Main screen tap Cameras. The Cameras screen appears. 2. Tap a camera on the screen that you want to view. The My Camera screen appears. If
you have multiple cameras connected to your system, they will be displayed as separate
choices. 3. You have two options: Pic or Video.
a) Pic – will show a still image of what your camera sees at the time you tapped Pic. b) Video – will show streaming video.
How do I review the history log from the iPhone app? 1. From the Main screen tap History. The History screen appears. 2. Tap a one of the following history log choices:
• All shows all Alarms, Armings/Disarmings and Zone Changes
• Alarm shows all Alarms (Panic Buttons, and Sensor trip alarms)
• Arm shows all Armings/Disarmings
• Zone shows all sensor trips (doors/windows, motion sensors, etc.)
How do I access my light and small appliance sensors from the iPhone app?
1. From the Main screen tap Light. The Lights screen appears. 2. Tap a light or appliance on the screen to turn it ON or OFF. The selected light will turn on
or off.
How do I adjust my lights? 1. Tap the Lights widget on the TouchPad. A Lights screen appears.
2. On this screen, all the lights and/or small appliances that you have connected to your
RSHM system will appear. Beside each one, it will state whether it is ON or OFF. 3. If a Lamp Dimmer sensor is ON, you will be able to adjust the light level by dragging
your finger along the dimmer control bar (0 to 100%).
How do I adjust my thermostat? 1. From the Main screen tap Thermostats. The Thermostats screen appears.
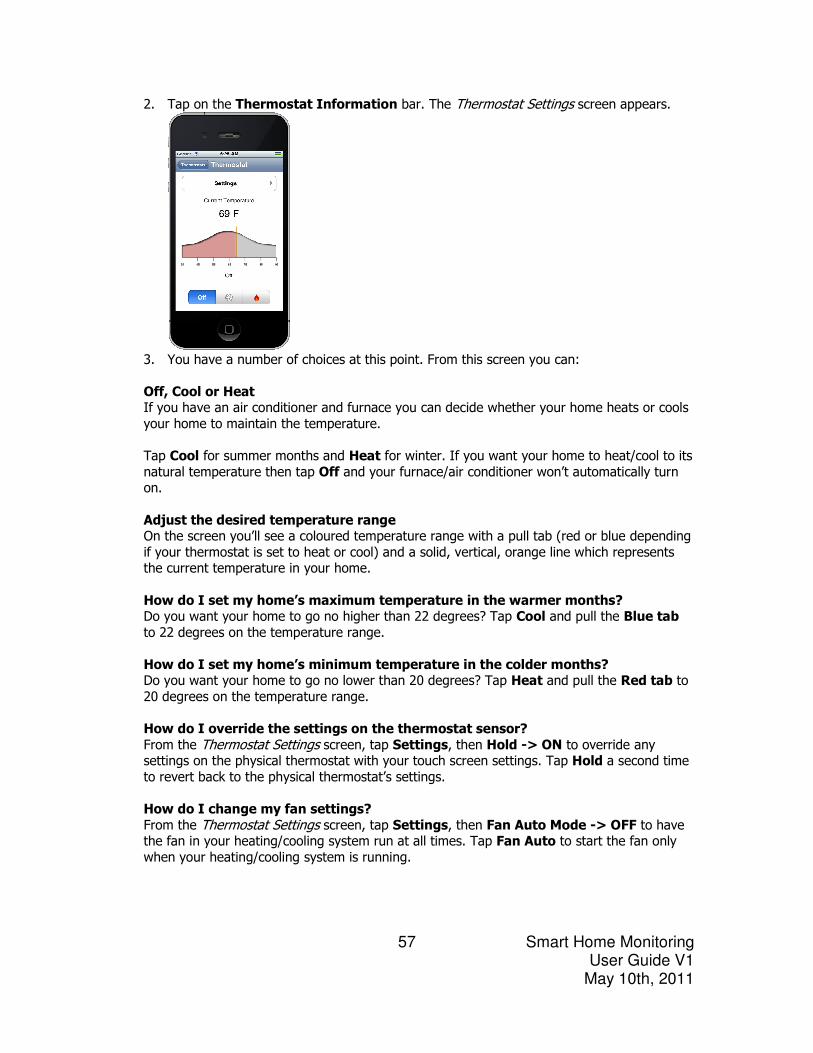
Smart Home Monitoring User Guide V1
May 10th, 2011
57
2. Tap on the Thermostat Information bar. The Thermostat Settings screen appears.
3. You have a number of choices at this point. From this screen you can:
Off, Cool or Heat If you have an air conditioner and furnace you can decide whether your home heats or cools
your home to maintain the temperature.
Tap Cool for summer months and Heat for winter. If you want your home to heat/cool to its
natural temperature then tap Off and your furnace/air conditioner won’t automatically turn on.
Adjust the desired temperature range On the screen you’ll see a coloured temperature range with a pull tab (red or blue depending
if your thermostat is set to heat or cool) and a solid, vertical, orange line which represents the current temperature in your home.
How do I set my home’s maximum temperature in the warmer months? Do you want your home to go no higher than 22 degrees? Tap Cool and pull the Blue tab
to 22 degrees on the temperature range.
How do I set my home’s minimum temperature in the colder months? Do you want your home to go no lower than 20 degrees? Tap Heat and pull the Red tab to
20 degrees on the temperature range.
How do I override the settings on the thermostat sensor?
From the Thermostat Settings screen, tap Settings, then Hold -> ON to override any settings on the physical thermostat with your touch screen settings. Tap Hold a second time
to revert back to the physical thermostat’s settings.
How do I change my fan settings?
From the Thermostat Settings screen, tap Settings, then Fan Auto Mode -> OFF to have the fan in your heating/cooling system run at all times. Tap Fan Auto to start the fan only
when your heating/cooling system is running.
Smart Home Monitoring User Guide V1
May 10th, 2011
58
Personalizing your Smart Home Monitoring system There are a lot of features that you can customize on Smart Home Monitoring. You can
personalize your TouchPad with some of the following commands.
Smart Home Monitoring User Guide V1
May 10th, 2011
59
TouchPad Customization How do I set my screen saver for the TouchPad when it isn’t in use?
1. Tap the Settings app. A Pass Code screen appears. 2. Enter your Master access code. The Settings screen appears. 3. Tap TouchScreen. A list of options appears to the right. 4. Tap Screensaver Configuration. The Screensaver Configuration screen appears. 5. Tap the App that you want to use and select how many minutes of inactivity must pass
before it appears as a screensaver.
6. Tap Return to Menu.
Your screensaver display will depend on the App that you choose. Some of the more popular TouchPad Apps are listed below.
TouchPad App Displays
None The screen never goes to screensaver and the Main page will
always be displayed.
Security The screen displays the Arm System tab from the Security
TouchPad App.
Camera The screen displays stills of the home monitoring cameras that update every 5 seconds. If there is only one camera attached to
the security system, the screen displays live video.
Clock The screen displays the current time in digital or analog.
Flickr The screen displays a slideshow of photos from your Flickr
account.
How do I set my TouchPad to make a noise every time I tap it? Do you like to hear a sound when you press the TouchScreen so that you know your selection has been made? Follow these instructions to set this up!
1. Tap the Settings app. A Pass Code screen appears. 2. Enter your Master access code. The Settings screen appears. 3. Tap TouchScreen. A list of options appears to the right.
4. Tap Touch Screen Audible Feedback. The Touchscreen Audio Feedback screen appears.
5. Set Provide Audio Feedback to Yes. 6. Tap Return to Menu.
How do I temporarily disable/bypass sensors?
You can bypass or disable specific sensors so that they don’t trip the alarm or create sound notifications when tripped. For example, let’s say that you and your family are in the back yard
relaxing for the afternoon. Bypass the back door sensor but have the alarm armed for other sensors.
1. Tap Security. The Security screen appears. 2. Tap Turn Zone Off for a specific sensor to disable it. The Keypad Code screen appears.
Smart Home Monitoring User Guide V1
May 10th, 2011
60
3. Enter your Master access code. The Security screen appears. 4. This sensor is now OFF and will no longer trigger an alarm when the alarm is armed.
Note: Sensors that have been bypassed will have their activity recorded in the History log. For more information on the History Log, go to page 65.
How do I set the TouchPad’s brightness?
1. Tap the Settings app. A Pass Code screen appears. 2. Enter your Master access code. The Settings screen appears. 3. Tap TouchScreen. A list of options appears to the right.
4. Tap Screen Configuration. The Settings screen appears. 5. Tap Screen Brightness. The Screen Brightness screen appears.
How do I set the time when my TouchPad’s screen automatically dims? You can set TouchPad’s screen to dim after you stop using it for a few minutes by following these instructions.
1. Tap the Settings app. A Pass Code screen appears. 2. Enter your Master access code. The Settings screen appears. 3. Tap TouchScreen. A list of options appears to the right.
4. Tap Screen Configuration. The Settings screen appears. 5. Tap Automatic Screen Dimming. The Automatic Screen Dimming screen appears. 6. Tap the arrows beside Idle Timeout to set the time before your screen dims. This
number is between 5 and 20 minutes with 5 minute intervals. 7. Tap the arrows beside Dimming Level to set the screen’s brightness level after it
times out. This number is between 1 and 10 with 10 being the brightest.
Note: If you never want your screen to dim, set the Brightness to 10.
How do I change the brightness of my TouchPad at night? You can set TouchPad’s screen to automatically dim at night. You would want to do this so that the TouchPad doesn’t illuminate your home at night.
1. Tap the Settings app. A Pass Code screen appears. 2. Enter your Master access code. The Settings screen appears. 3. Tap Touch Screen. A list of options appears to the right.
4. Tap Screen Configuration. The Settings screen appears. 5. Tap Screen Nighttime Settings. The Screen Nighttime Settings screen appears.
6. Set Backlight off at night to Yes. 7. Set the Backlight off time and the Backlight on time. Now the TouchPad will
automatically dim to the lowest level (1) between these times.
8. Tap Return to Menu.
Tip: To manually place the TouchPad in Night Mode, press the button twice in quick succession.
Note: During this time, the and buttons also darken completely.
Also, if anyone touches the screen, it will brighten to the default brightness level.
Smart Home Monitoring User Guide V1
May 10th, 2011
61
How do I set a specific app to appear when my system is arming? Do you want to use your TouchPad as a clock or see the weather when it’s not in use? Just follow the instructions below:
1. Tap the Settings app. A Pass Code screen appears. 2. Enter your Master access code. The Settings screen appears. 3. Tap Security.
4. Tap Default Arming Smart App. The Default Arming Smart App screen appears. 5. Select one app from the apps available on your TouchPad.
6. Tap Return to Menu to save your changes.
Note: If you remove the app that is set as your Default Arming TouchPad App, the
Default Arming Widget feature will no longer function. Just select another app that you have downloaded to your TouchPad to reactivate this feature.
How do I add/remove/reorder an app on my TouchPad? 1. Tap the Settings app. A Pass Code screen appears. 2. Enter your Master access code. The Settings screen appears. 3. Tap Widgets. A new screen will appear with three options:
Add TouchPad App Remove TouchPad App Re-order Widget
4. Tap Add Widget. A
list of available apps appears.
4. Tap Remove Widget. A
list of available apps appears.
4. Tap Reorder Widgets.
The Change Widget Order screen appears.
5. Tap the app you want
to add to your TouchPad and then tap Next.
5. Tap the app you want to
remove from your TouchPad and then tap Next.
5. Adjust the order of the
widgets by tapping Up, Down or To Top.
6. An info screen appears with a description of the
TouchPad App. Tap Next if you want to install this
TouchPad App. A
message will appear that the Widget has been
installed.
6. A warning screen appears asking you if you wish to
continue. Tap Next to continue.
6. Tap Save Widget Order to save your choices.
Note: There may be limitations on which apps you can add to your system depending on which RSHM package you subscribe to.
Smart Home Monitoring User Guide V1
May 10th, 2011
62
How do I change the colour of the TouchPad Home button? 1. Tap the Settings app. A Pass Code screen appears. 2. Enter your Master access code. The Settings screen appears. 3. Tap Touchscreen. A list of options appears to the right. 4. Tap Button Configuration. The Button Configuration screen appears. 5. Select the alarm mode (Ready, Not Ready and Armed) that you want to change the
colour for. 6. Select the colour that will be used for the [HOME] button. This change will be seen
immediately. 7. Tap Return to Menu.
How do I change my Quick Arm button to not ask me for an access code when I arm my alarm?
1. Tap the Settings app. A Pass Code screen appears. 2. Enter your Master access code. The Settings screen appears. 3. Tap Touchscreen. A list of options appears to the right.
4. Tap Quick Arm Button Configuration. The Quick Arm Button Configuration screen appears.
5. You will have two options to select from: • Quick Arm Button Starts Quick Arm (no access code required)
or
• Quick Arm Button prompts for Arming (access code required)
6. Tap Return to Menu.
Smart Home Monitoring User Guide V1
May 10th, 2011
63
TouchPad and Smart Home Monitoring system management The Smart Home Monitoring system allows you to personalize your system in many different
ways. From customizing your TouchPad with different apps to creating new user codes you can
truly make the Smart Home Monitoring system yours.
Smart Home Monitoring User Guide V1
May 10th, 2011
64
How do I change the zone order on the TouchPad? You can change the order of the zones (or sensors) on the TouchPad. This is especially useful if you have a lot of sensors in your home but you check some of them more frequently than others.
You can move those sensors to the top of the list so that you don’t have to scroll through the list to find them. To do this:
1. Tap the Settings app. A Pass Code screen appears. 2. Enter your Master access code. The Settings screen appears. 3. Tap Sensors & Zones.
4. Tap Change Zone Order. The Change Zone Order screen appears. 5. Tap Up, Down or To Top to reorder the zones.
How do I change my camera settings? You can change the camera name, the sensor that it is associated with (for some settings in the
Rules Wizard on page 45) and video quality. To do this: 1. Tap the Settings app. A Pass Code screen appears. 2. Enter your Master access code. The Settings screen appears. 3. Tap Home Devices. The Home Devices menu appears. 4. Tap Cameras. The Cameras menu appears. 5. Tap Edit Cameras. The Edit A Camera screen appears. 6. Tap the camera that you want to edit. The Keyboard screen appears.
Camera Name Associated Zone Resolution
7. Tap the Camera Name
field. The Keyboard screen appears.
7. Tap the Associated
Zone drop-down menu. All of your zone options appear
for this camera.
7. Tap the Video Quality
field. The Video Quality screen appears.
8. Change the name of the camera and tap Done. The
Edit a Camera screen appears.
8. Select the sensor that you want to have the
camera associated with and
tap Next. The Edit a Camera screen appears and you changes have now been made.
8. Tap Run speed test to determine which speed your
connection will allow. This
may take a few minutes to run.
9. Tap Next and the
camera name now reflects your changes.
9. Once the test is completed
the allowable video quality level will be displayed. Tap
Next and then select the appropriate video quality
(High, Medium or Low).
Note: Higher resolution, for
larger and more consistent video, requires a faster
Internet connection.
10. Tap Next to save your
changes.
Smart Home Monitoring User Guide V1
May 10th, 2011
65
How do I view the history log?
1. Tap the Security app. The Security screen appears. 2. Tap the History tab. The History screen appears. 3. The History screen is a chronological log of sensor activity starting from most recent and
progressively going back in time.
Note: When a sensor is tripped (a door or window is opened, etc.) it will show as a red icon. When it is no longer tripped the icon will change to green icon.
Note: Bypassed sensors will still show when they are tripped on the History screen even though they do not make a sound.
How do I lock the TouchPad so that I don’t accidentally activate my alarm when I clean it?
1. Tap the Settings app. A Pass Code screen appears. 2. Enter your Master access code. The Settings screen appears. 3. Tap Touchscreen. A list of options appears to the right.
4. Tap Clean Screen. 5. Tap Clean Screen for 30 Seconds. A message with a 30 second countdown appears.
The TouchPad is now locked so that you can clean the TouchPad without activating
anything until the timer runs out. A Clean Screen - Summary appears. 6. Tap Give Me More Time to Clean the Screen or Finish.
How do I recalibrate my TouchPad? It doesn’t seem to detect where I tap correctly.
1. Tap the Settings app. A Pass Code screen appears. 2. Enter your Master access code. The Settings screen appears. 3. Tap Touchscreen. A list of options appears to the right.
4. Tap Screen Configuration. The Settings screen appears. 5. Tap Recalibrate Touchscreen. The Recalibrate Touchscreen screen appears.
6. Tap Recalibrate Screen. Your TouchPad will now reboot. The screen will go blank and five four-headed arrow icons will appear in sequence.
7. Tap all five of the icons. The System Startup in Progress message appears. When the Main screen reappears, the recalibration is complete.
How do I create new users and access codes?
Do you have a family member visiting you and you want to create their own personal code? Do you need to create a code for cleaning staff to enter your home? Follow the steps below and
personalize each access code to the individual’s needs! 1. Tap the Settings app. A Pass Code screen appears. 2. Enter your Master access code. The Settings screen appears. 3. Tap Security. 4. Tap Manage Keypad Codes. The Manage Keypad Codes screen appears.
Smart Home Monitoring User Guide V1
May 10th, 2011
66
5. Tap Add Keycode. The Add Keypad Code screen appears.
6. Tap the 4-Digit Code field. The Add Keypad Code screen appears. 7. Enter the new 4-digit keypad code. A screen appears asking you to re-enter the code.
8. Re-enter the code. You are returned to the Add Keypad Code screen. 9. Tap the Name field (NewUser). The Keyboard screen appears. 10. Enter the name of the new user and tap Done. You are returned to the Add Keypad
Codes screen. 11. Select the days that this code is not valid for. As a default, the code is active (blue) 7
days a week. For example, if you want your babysitter to have their code work only for weekdays, tap Saturday and Sunday.
12. From the Level dropdown menu, select what authorization you would like the new user to have. Your options are: • Standard
This setting allows the user to arm, disarm and access everything except the Settings
TouchPad App. • Arm Only
This setting allows the user to arm the alarm and has access everything except the
Settings TouchPad App.
• Guest
This setting allows the user to arm and disarm the alarm. 13. Select a user arming TouchPad App. This app will be the application that is displayed
when you arm Smart Home Monitoring. 14. Tap Save.
Smart Home Monitoring User Guide V1
May 10th, 2011
67
How do I edit or delete users and their access codes? 1. Tap the Settings app. A Pass Code screen appears. 2. Enter your Master access code. The Settings screen appears. 3. Tap Security. 4. Tap Manage Keypad C odes. The Manage Keypad Codes screen appears. 5. Tap Edit beside a user. The Edit Keypad Code screen appears.
Edit a user’s
name
Edit the user’s
access code
Change which
days their code is active
Delete an existing
user
6. Tap the Name field. The Keyboard screen appears.
6. Tap the 4-Digit
Code field. 6. Tap the days
you want to deactivate the
user’s access for.
6. Tap Delete user. A
message appears asking you if you are
sure you want to proceed.
7. Change the name of the user
and tap Done. You
are returned to the Edit Keypad Codes screen.
7. Change the access code. You are asked to
re-enter the access
code.
7. Tap Save or modify other parts
of the user profile.
7. Tap Yes. The user is deleted and you are
returned to the
Manage Keypad Codes screen.
8. Tap Save or
modify other parts of the user profile.
8. Re-enter the access
code. You are returned to the Manage Keypad Codes screen.
9. Tap Save or modify
other parts of the user
profile.
Note: You can’t edit a user’s access level (Standard, Arm Only, or Guest). In order to change their access level, you must delete and then recreate the user with the desired access level.
How do I set my router to be visible to the Internet? In some cases, due to program requirements (like running a game server) or receiving
information via the web, you may have to make sure legitimate third party servers can see your computer. In this case, you would follow the instructions below to make your router “visible” to
the rest of the Internet. Follow the steps below to make your computer visible to the Internet:
1. Tap the Settings app. A Pass Code screen appears. 2. Enter your Master access code. The Settings screen appears. 3. Tap Connectivity. The Advanced Settings screen appears. 4. Tap Connectivity. The Connectivity screen appears. 5. Tap Expose Personal Router to Internet. The Expose Personal Router to Internet screen appears. 6. Tap Next. The Configured Router screen appears. 7. The system will begin to expose your router from the Internet and display the results. When this is complete you will see a checkmark.
Smart Home Monitoring User Guide V1
May 10th, 2011
68
How do I set my router to be invisible to the Internet? Some people prefer to make their computer invisible to the Internet. This adds a bit more security to your computer system as this will avoid most casual security problems associated with
the Internet. Follow the steps below to make your computer invisible to the Internet: 1. Tap the Settings widget. A Pass Code screen appears. 2. Enter your Master access code. The Settings screen appears. 3. Tap Connectivity. The Advanced Settings screen appears. 4. Tap Connectivity. The Connectivity screen appears. 5. Tap Hide Personal Router from Internet. The Hide Personal Router from Internet screen appears.
6. Tap Next. The Personal Router Setup screen appears. 7. Ensure you follow the onscreen instructions showing you how to connect your router to
the supplied Smart Home Monitoring router. Tap Next. The Search for Devices screen appears.
8. Any routers attached to the TouchPad will be listed here by MAC address. Tap the MAC
address that you want to expose to the Internet and tap Next.
How do I verify my account information? Your account information is very important to your Smart Home Monitoring service. The information that the Central Monitoring Station has must be accurate in order to direct the
appropriate emergency services to you. To verify your account information:
1. Tap the Settings app. A Pass Code screen appears. 2. Enter your Master access code. The Settings screen appears. 3. Tap Advanced Settings. The Advanced Settings menu appears. 4. Tap Account Information. The Account Information screen appears. 5. Tap Next to return to the Advanced Settings list.
Note: If you notice anything that is incorrect on your account information, contact 1-
888-764-3771.
Smart Home Monitoring User Guide V1
May 10th, 2011
69
Testing Your System You can test Smart Home Monitoring to ensure it is in working properly.
• Test your alarm capability
• Review the signal strength of the Touch Screen to your Internet router and the cellular
receivers
• Test your connectivity to the Internet and cellular servers
When testing your alarms, you can choose to report your alarms to central monitoring to ensure
end-to-end integrity. By default, the system lets you test your alarms without sending a signal to central monitoring.
Smart Home Monitoring User Guide V1
May 10th, 2011
70
How do I test my alarm system without it being detected at the Central Monitoring Station?
Note: You should always do this after replacing batteries in any sensor or after a sensor has
been offline for any reason to ensure your system is functioning normally.
Note: Ensure all security zones are ready (all doors, windows, etc. are closed) before testing your alarm.
1. Tap the Settings app. A Pass Code screen appears. 2. Enter your Master access code. The Settings screen appears. 3. Tap Security. 4. Tap Alarm Test. The Alarm test Options checklist screen appears. 5. If you don’t want to have your test alarms reported to central monitoring, ensure that
the Send Test Alarm messages setting is showing as Disabled.
Note: If you enable Send Test Alarm Messages, contact the Central Monitoring Station at 1-888-578-1777 to place the system on test as they will be notified when an alarm is
activated at your home and act accordingly. Remember to contact the CMS when you are done testing.
6. Tap Next. The Alarm Test screen appears. 7. Read the instructions on the screen and when you have finished testing the sensors, tap
Disarm. If you haven’t tested every sensor you will be warned before the test is disarmed.
8. Tap Next. The Review Alarms screen appears and display how each sensor performed during the test.
9. Tap Return to Menu to exit the Alarm Test.
Note: If you don’t see a System Status Message in the top-right corner of the TouchPad, this
test should be 100% successful. If you see System Status Message and any of your sensors have failed this test, run the test again. If the sensor fails again, contact us at 1-888
ROGERS1 (1-888-764-3771).
How do I check my Wi-Fi strength?
1. Tap the Settings app. A Pass Code screen appears. 2. Enter your Master access code. The Settings screen appears. 3. Tap Connectivity. The Connectivity screen appears. 4. Tap Wi-Fi Cellular Signal Strength. The Wi-Fi Cellular Signal Strength screen appears. 5. If Wi-Fi is in use, the Wi-Fi icon will show green signal strength or
If hardwired, it will say “Wi-Fi Not In Use” and the icon will be grayed out.
6. The system will begin the Signal Strength test automatically and display the result.
Note: You don’t need to do this unless a Rogers phone rep asks you during troubleshooting.
Smart Home Monitoring User Guide V1
May 10th, 2011
71
How do I check my connectivity? You can test to see what if you’re having connectivity problems with your Smart Home Monitoring system. To check your connectivity, follow these steps:
1. Tap the Settings app. A Pass Code screen appears. 2. Enter your Master access code. The Settings screen appears. 3. Tap Connectivity. The Connectivity screen appears. 4. Tap Test Connectivity. The Testing Connectivity screen appears. 5. Tap Next. The Testing Connectivity screen appears. 6. The system will begin the signal strength automatically and display the results. A good
result is represented by a checkmark. Tap Next.
If you receive green checkmarks your system checks out fine. If you don’t receive a
green checkmark, tap Back and retest your system.
Note: You don’t need to do this unless a Rogers phone rep asks you during troubleshooting.
Smart Home Monitoring User Guide V1
May 10th, 2011
72
Troubleshooting Your Smart Home Monitoring System
Troubleshooting the Smart Home Monitoring system is easy! Just read the System Status Message (error message) and find the answer in the following pages.
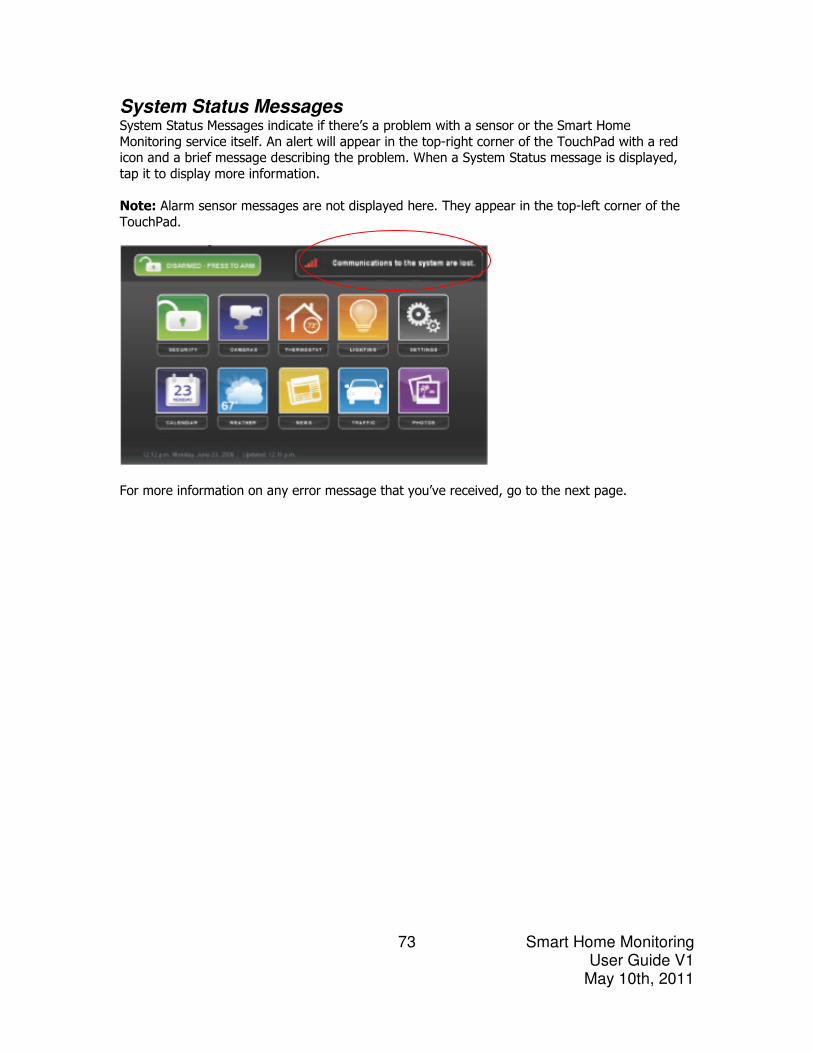
Smart Home Monitoring User Guide V1
May 10th, 2011
73
System Status Messages
System Status Messages indicate if there’s a problem with a sensor or the Smart Home
Monitoring service itself. An alert will appear in the top-right corner of the TouchPad with a red icon and a brief message describing the problem. When a System Status message is displayed,
tap it to display more information.
Note: Alarm sensor messages are not displayed here. They appear in the top-left corner of the
TouchPad.
For more information on any error message that you’ve received, go to the next page.
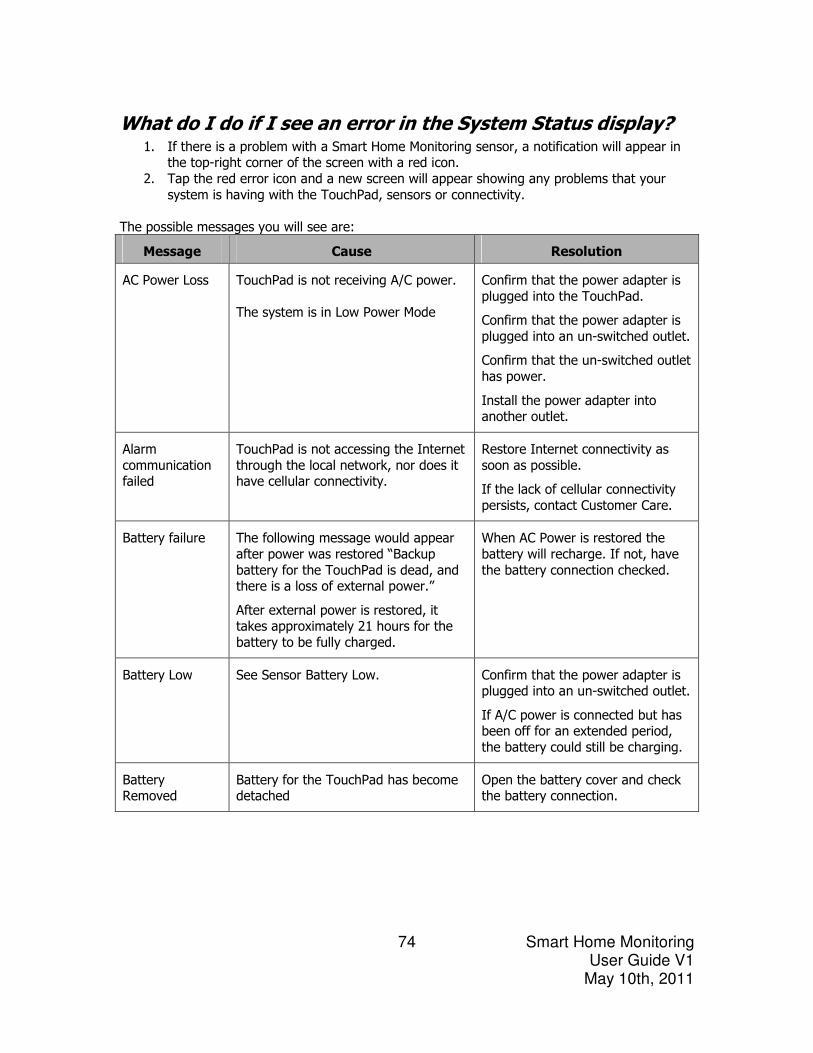
Smart Home Monitoring User Guide V1
May 10th, 2011
74
What do I do if I see an error in the System Status display? 1. If there is a problem with a Smart Home Monitoring sensor, a notification will appear in
the top-right corner of the screen with a red icon.
2. Tap the red error icon and a new screen will appear showing any problems that your
system is having with the TouchPad, sensors or connectivity.
The possible messages you will see are:
Message Cause Resolution
AC Power Loss TouchPad is not receiving A/C power.
The system is in Low Power Mode
Confirm that the power adapter is
plugged into the TouchPad.
Confirm that the power adapter is
plugged into an un-switched outlet.
Confirm that the un-switched outlet
has power.
Install the power adapter into another outlet.
Alarm
communication failed
TouchPad is not accessing the Internet
through the local network, nor does it have cellular connectivity.
Restore Internet connectivity as
soon as possible.
If the lack of cellular connectivity
persists, contact Customer Care.
Battery failure The following message would appear
after power was restored “Backup
battery for the TouchPad is dead, and there is a loss of external power.”
After external power is restored, it takes approximately 21 hours for the
battery to be fully charged.
When AC Power is restored the
battery will recharge. If not, have
the battery connection checked.
Battery Low See Sensor Battery Low. Confirm that the power adapter is plugged into an un-switched outlet.
If A/C power is connected but has been off for an extended period,
the battery could still be charging.
Battery Removed
Battery for the TouchPad has become detached
Open the battery cover and check the battery connection.
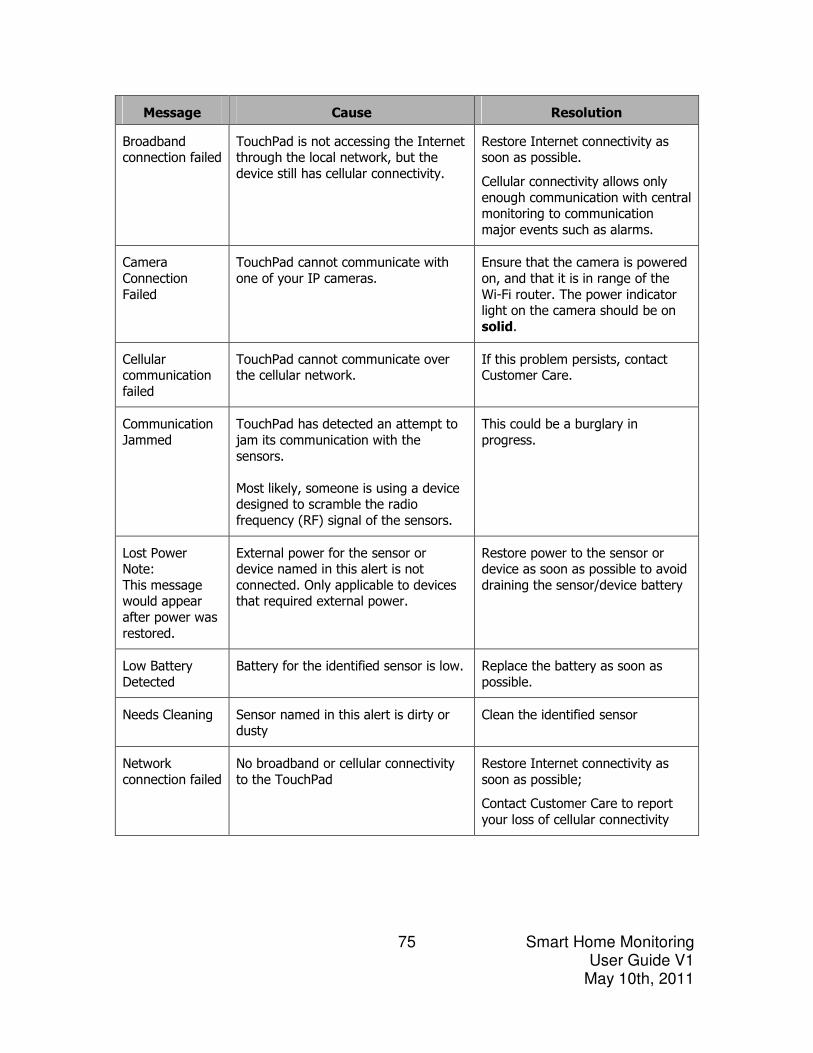
Smart Home Monitoring User Guide V1
May 10th, 2011
75
Message Cause Resolution
Broadband connection failed
TouchPad is not accessing the Internet through the local network, but the
device still has cellular connectivity.
Restore Internet connectivity as soon as possible.
Cellular connectivity allows only
enough communication with central monitoring to communication
major events such as alarms.
Camera
Connection
Failed
TouchPad cannot communicate with
one of your IP cameras.
Ensure that the camera is powered
on, and that it is in range of the
Wi-Fi router. The power indicator light on the camera should be on
solid.
Cellular communication
failed
TouchPad cannot communicate over the cellular network.
If this problem persists, contact Customer Care.
Communication
Jammed
TouchPad has detected an attempt to
jam its communication with the
sensors.
Most likely, someone is using a device designed to scramble the radio
frequency (RF) signal of the sensors.
This could be a burglary in
progress.
Lost Power Note:
This message would appear
after power was
restored.
External power for the sensor or device named in this alert is not
connected. Only applicable to devices that required external power.
Restore power to the sensor or device as soon as possible to avoid
draining the sensor/device battery
Low Battery
Detected
Battery for the identified sensor is low. Replace the battery as soon as
possible.
Needs Cleaning Sensor named in this alert is dirty or dusty
Clean the identified sensor
Network
connection failed
No broadband or cellular connectivity
to the TouchPad
Restore Internet connectivity as
soon as possible;
Contact Customer Care to report
your loss of cellular connectivity
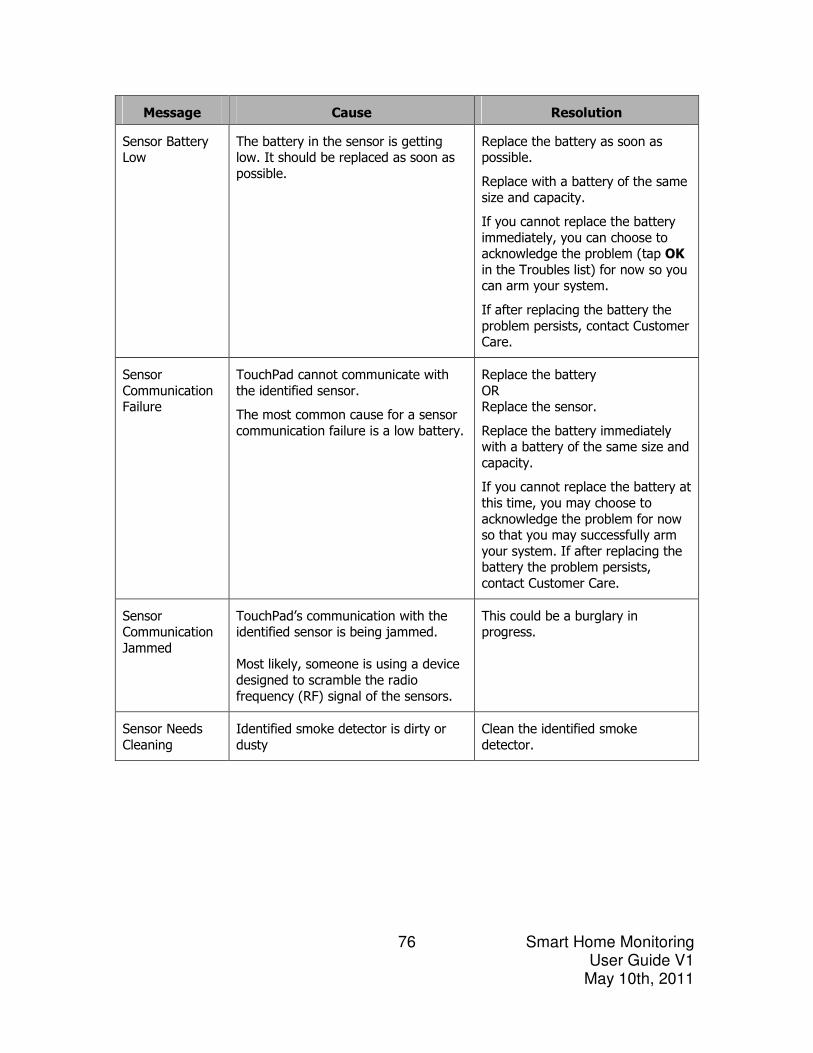
Smart Home Monitoring User Guide V1
May 10th, 2011
76
Message Cause Resolution
Sensor Battery Low
The battery in the sensor is getting low. It should be replaced as soon as
possible.
Replace the battery as soon as possible.
Replace with a battery of the same
size and capacity.
If you cannot replace the battery
immediately, you can choose to acknowledge the problem (tap OK
in the Troubles list) for now so you can arm your system.
If after replacing the battery the
problem persists, contact Customer Care.
Sensor
Communication Failure
TouchPad cannot communicate with
the identified sensor.
The most common cause for a sensor
communication failure is a low battery.
Replace the battery
OR Replace the sensor.
Replace the battery immediately with a battery of the same size and
capacity.
If you cannot replace the battery at
this time, you may choose to
acknowledge the problem for now so that you may successfully arm
your system. If after replacing the battery the problem persists,
contact Customer Care.
Sensor Communication
Jammed
TouchPad’s communication with the identified sensor is being jammed.
Most likely, someone is using a device
designed to scramble the radio
frequency (RF) signal of the sensors.
This could be a burglary in progress.
Sensor Needs
Cleaning
Identified smoke detector is dirty or
dusty
Clean the identified smoke
detector.
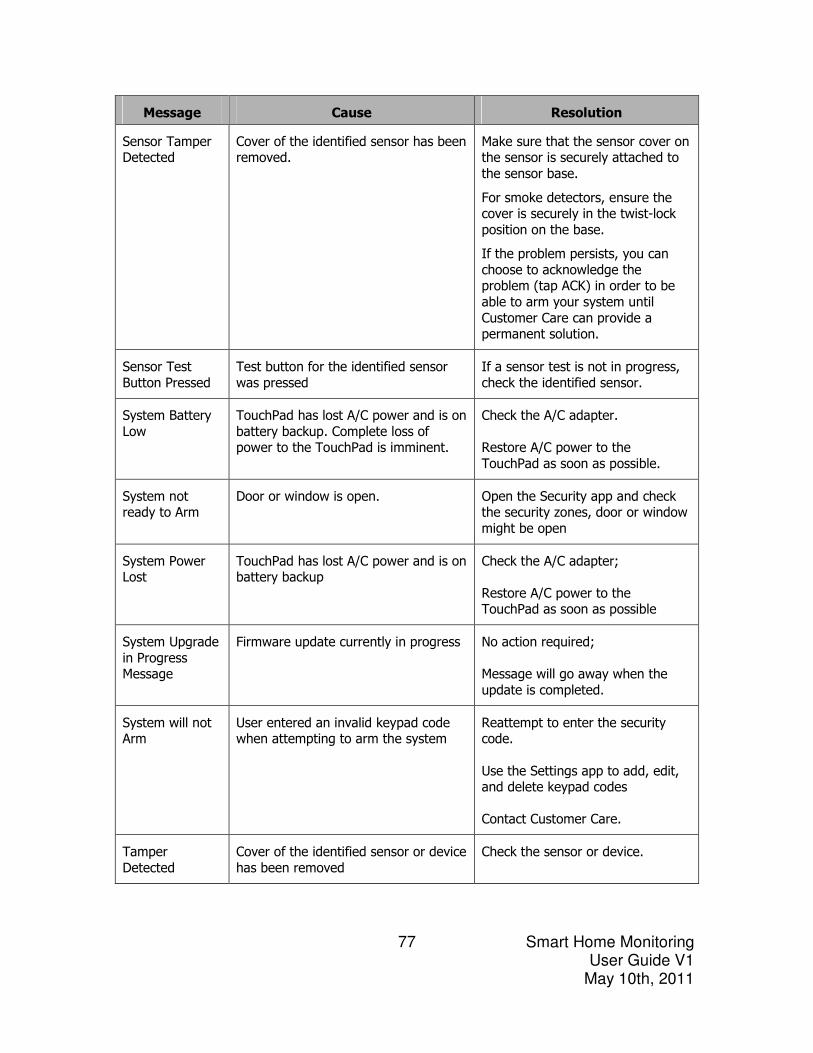
Smart Home Monitoring User Guide V1
May 10th, 2011
77
Message Cause Resolution
Sensor Tamper Detected
Cover of the identified sensor has been removed.
Make sure that the sensor cover on the sensor is securely attached to
the sensor base.
For smoke detectors, ensure the cover is securely in the twist-lock
position on the base.
If the problem persists, you can
choose to acknowledge the problem (tap ACK) in order to be
able to arm your system until
Customer Care can provide a permanent solution.
Sensor Test
Button Pressed
Test button for the identified sensor
was pressed
If a sensor test is not in progress,
check the identified sensor.
System Battery
Low
TouchPad has lost A/C power and is on
battery backup. Complete loss of power to the TouchPad is imminent.
Check the A/C adapter.
Restore A/C power to the
TouchPad as soon as possible.
System not ready to Arm
Door or window is open. Open the Security app and check the security zones, door or window
might be open
System Power Lost
TouchPad has lost A/C power and is on battery backup
Check the A/C adapter;
Restore A/C power to the TouchPad as soon as possible
System Upgrade
in Progress Message
Firmware update currently in progress No action required;
Message will go away when the
update is completed.
System will not Arm
User entered an invalid keypad code when attempting to arm the system
Reattempt to enter the security code.
Use the Settings app to add, edit, and delete keypad codes
Contact Customer Care.
Tamper
Detected
Cover of the identified sensor or device
has been removed
Check the sensor or device.
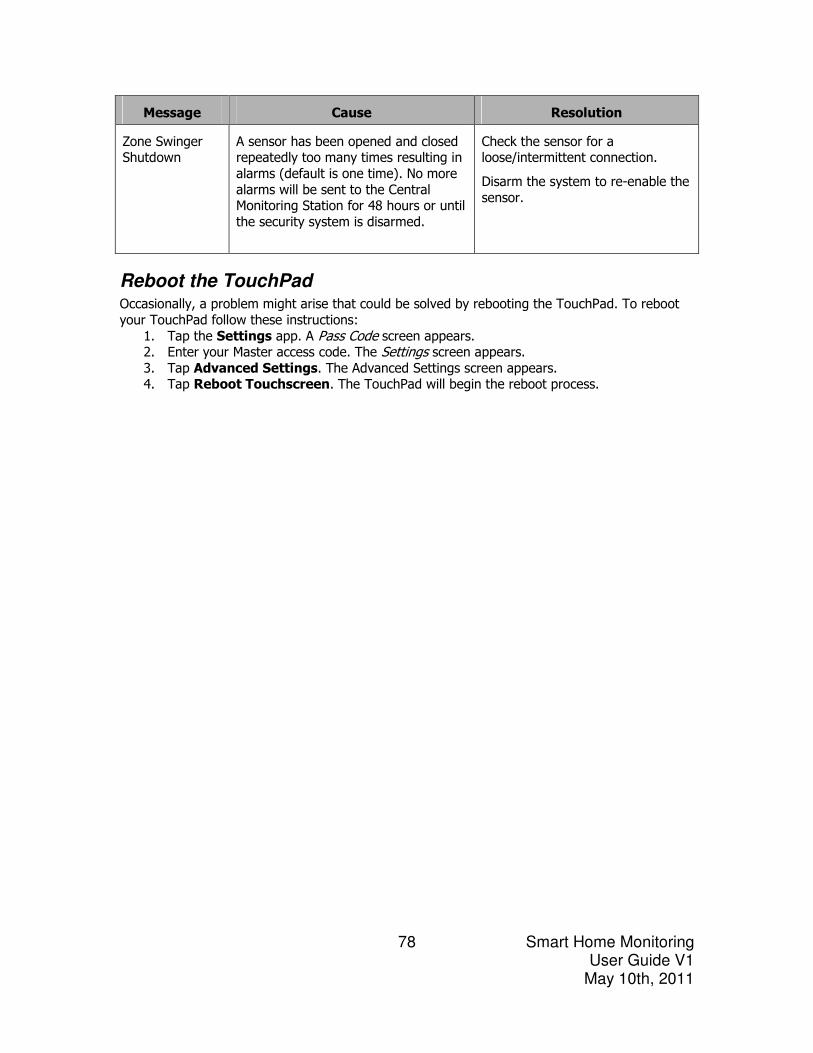
Smart Home Monitoring User Guide V1
May 10th, 2011
78
Message Cause Resolution
Zone Swinger Shutdown
A sensor has been opened and closed repeatedly too many times resulting in
alarms (default is one time). No more
alarms will be sent to the Central Monitoring Station for 48 hours or until
the security system is disarmed.
Check the sensor for a loose/intermittent connection.
Disarm the system to re-enable the
sensor.
Reboot the TouchPad Occasionally, a problem might arise that could be solved by rebooting the TouchPad. To reboot
your TouchPad follow these instructions:
1. Tap the Settings app. A Pass Code screen appears. 2. Enter your Master access code. The Settings screen appears. 3. Tap Advanced Settings. The Advanced Settings screen appears. 4. Tap Reboot Touchscreen. The TouchPad will begin the reboot process.
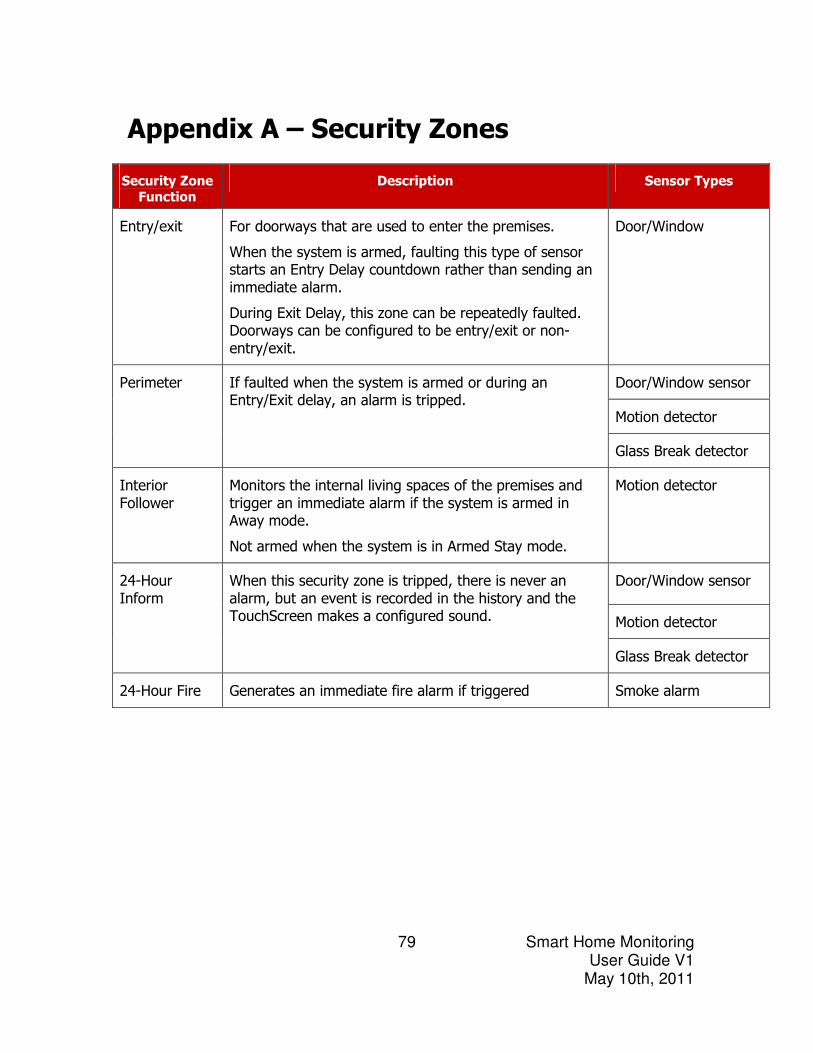
Smart Home Monitoring User Guide V1
May 10th, 2011
79
Appendix A – Security Zones
Security Zone Function
Description Sensor Types
Entry/exit For doorways that are used to enter the premises.
When the system is armed, faulting this type of sensor starts an Entry Delay countdown rather than sending an immediate alarm.
During Exit Delay, this zone can be repeatedly faulted. Doorways can be configured to be entry/exit or non-entry/exit.
Door/Window
Door/Window sensor
Motion detector
Perimeter If faulted when the system is armed or during an Entry/Exit delay, an alarm is tripped.
Glass Break detector
Interior Follower
Monitors the internal living spaces of the premises and trigger an immediate alarm if the system is armed in Away mode.
Not armed when the system is in Armed Stay mode.
Motion detector
Door/Window sensor
Motion detector
24-Hour Inform
When this security zone is tripped, there is never an alarm, but an event is recorded in the history and the TouchScreen makes a configured sound.
Glass Break detector
24-Hour Fire Generates an immediate fire alarm if triggered Smoke alarm
Smart Home Monitoring User Guide V1
May 10th, 2011
80
Index Access code
Create Via TouchPad........70
Via web................44
Delete ......................72 Via TouchPad........72
Via web................45 Edit ..........................72 Via TouchPad........72 Via web................45
Alarms ......................17
Duress Alarm............18 Activate................20
Enable..................19 Special rules .........20
False alarm Cancel ..................21
False alarms .............21 How to avoid ........13
Panic Alarm ..............20 Activate................20 Via KeyFob .......20
Via KeyPad .......20
Via TouchPad....20 Secret Word .............20 Change ................21 Create ..................21
Seven day grace period............................18 Cancel ..................18
Special rules .........18 Special Alarms ..........18
Arming
Modes ..................8, 40 Quick Arm button Special rules ...........7
Special rules .............12 Via Arm icon ...............8 Via iPhone app.... 12, 58 Via KeyFob ...............10 Via KeyPad ...............10 Via Quick Arm button ..7 Via Security app..........8 Via web.............. 10, 43 With bypassed sensors Special rules .........10 Via iPhone app......58
Via TouchPad..........9 Cameras....................24
Record Video ...................53
Settings Edit ......................69
Special rules .............53 View Live video.............53 Saved
pictures/videos .53 Snapshot ..............53
Via iPhone app......59
Via TouchPad........24 Contacts
Add.................... 43, 47 Manage ....................47
Disarming .................14
iPhone app ...............16 Special rules .............16 Via Disarm icon.........15 Via iPhone app..........58 Via KeyFob ...............15 Via KeyPad ...............15 Via web.............. 15, 43
Emergency Dispatch Setup .......................43
History log View Via iPhone ............59
Via TouchPad........70 Via web................46
iPhone app................57 Arming ............... 12, 58 Bypass sensors .........58 Camera View.....................59
Disarming........... 16, 58 Download .................57 History log View.....................59
Light sensors Access..................59 Adjust ..................59
Small appliance sensors Access..................59
KeyFob
Arming .....................10 Disarming.................15 Panic Alarm Activate................20
KeyPad
Arming .....................10 Disarming.................15 Panic Alarm Activate................20
Light and Appliance
switches................24 Add..........................24 Adjust Lights
Via TouchPad....25
Via web................56 Delete ......................24 Edit ..........................24 Special rules .............25
Light sensors
Access Via iPhone app......59
Adjust Via iPhone app......59
Quick Arm button Arming .......................7 Special rules ...............7
Rules.........................45 Create ......................48 Example ...................49 Special rules .............50
Secret Word
Change ....................43 Security app
Arming .......................8 Security Zones
Hardware coverage ...84 Silent Alarm See Duress Alarm
Small appliance sensors
Access Via iPhone app......59
System management68
Set router Invisible ...............73
Visible ..................72 Verify account info ....73
Testing your system .74
Thermostats .............26 Adjust ......................26 Via iPhone app......60 Via web................54

Smart Home Monitoring User Guide V1
May 10th, 2011
81
Cool .........................26 Min temp..............26
Heat.........................26 Max temp .............26
Off ...........................26 Override ...................27 Special rules .............27
Touch Screen ..............4
Alarm State/Zone Display ...................4
TouchPad........3, 63–67 Access code Create ..................70
Alarms Panic Alarm
Activate............20 Arming Bypassing sensors...9
Audio feedback .........63 Bypassing sensors.....63 Cameras View.....................24
Cleaning ...................70 Disarming Via disarm icon .....15
Light and Appliance switches ...............24 Add......................24 Adjust
Lights...............25
Delete ..................24 Edit ......................24
Modify apps..............66 Night settings ...........64 Quick Arm button Settings................67
Recalibrate ...............70 Screen brightness .....64 Screen saver.............63 Thermostats Adjust ..................26
Cool .....................26
Max temp .............26 Min temp..............26
Off .......................26 Override ...............27
TouchPad apps ...28, 51 Add..........................31 Via web................51
Delete ......................52 Edit Via web................51
Hardware dependent.29 Lights app ................52 Optional ...................30 Photos app ...............52 Use ......................33
Pre-loaded................29 Reposition ................52 Special rules .............32 Sportsnet app Use ......................34
The 680 News app Use ......................33
Traffic app.......... 34, 52 Add city................35
Check traffic .........34 Delete ..................36
Special rules .........36 Weather app....... 37, 52 Add city................37
Delete city ............38
TouchPad buttons.......4
Emergency .................4 Home.........................4 Quick Arm ..................4
TouchScreen
System Status Display .4 Troubleshooting .......77 Reboot TouchPad......83 System Status...........79 System Status Messages .............78
Web Control Centre ..39
Arming ............... 10, 40 Browser Requirements............................39
Disarming........... 15, 41 Login Direct ...................40
MyRogers.com ......40 Tabs Cameras...............53 Contacts...............47
History .................46 Lights...................56
Main.....................42
Rules....................48 Security................43
Thermostats .........54 Widgets................51
Widgets . See TouchPad
apps Zones
Change order............69 View Via TouchPad..........9
Via web................45


![Monitoring Details for Cisco SMARTnet Service · Smart Call Home Monitoring Details SCH 3.4.16 [September 30, 2013] Monitoring Details for Cisco SMARTnet Service Document Last Updated](https://img.pdfslide.us/doc/110x75/5f0b30f17e708231d42f4c17/monitoring-details-for-cisco-smartnet-service-smart-call-home-monitoring-details.jpg)