Embed Size (px)
Citation preview

SonicWall®Secure Mobile Access 12.4Central Management Server with Global High AvailabilityAdministration Guide

Contents
About this Guide . . . . . . . . . . . . . . . . . . . . . . . . . . . . . . . . . . . . . . . . . . . . . . . . . . . . . . . . . . . . . . . . . . . . 5
Guide Conventions . . . . . . . . . . . . . . . . . . . . . . . . . . . . . . . . . . . . . . . . . . . . . . . . . . . . . . . . . . . . . . . . . . . . 6
Part 1. CMS Configuration
Introduction to CMS . . . . . . . . . . . . . . . . . . . . . . . . . . . . . . . . . . . . . . . . . . . . . . . . . . . . . . . . . . . . . . . . . 8
Overview . . . . . . . . . . . . . . . . . . . . . . . . . . . . . . . . . . . . . . . . . . . . . . . . . . . . . . . . . . . . . . . . . . . . . . . . . . . . 8
CMS Deployment Options . . . . . . . . . . . . . . . . . . . . . . . . . . . . . . . . . . . . . . . . . . . . . . . . . . . . . . . . . . . . . 10
What’s New in This Release . . . . . . . . . . . . . . . . . . . . . . . . . . . . . . . . . . . . . . . . . . . . . . . . . . . . . . . . . . . . 10
CMS on AWS . . . . . . . . . . . . . . . . . . . . . . . . . . . . . . . . . . . . . . . . . . . . . . . . . . . . . . . . . . . . . . . . . . . . . 10
CMS on Azure . . . . . . . . . . . . . . . . . . . . . . . . . . . . . . . . . . . . . . . . . . . . . . . . . . . . . . . . . . . . . . . . . . . . 10
Transport Layer Security (TLS) 1.3 Support . . . . . . . . . . . . . . . . . . . . . . . . . . . . . . . . . . . . . . . . . . . . 11
Central Management Server . . . . . . . . . . . . . . . . . . . . . . . . . . . . . . . . . . . . . . . . . . . . . . . . . . . . . . . . . . . . 11
Central Management Console . . . . . . . . . . . . . . . . . . . . . . . . . . . . . . . . . . . . . . . . . . . . . . . . . . . . . . . . . . 12
Managed Appliances . . . . . . . . . . . . . . . . . . . . . . . . . . . . . . . . . . . . . . . . . . . . . . . . . . . . . . . . . . . . . . . . . . 12
Licensing CMS . . . . . . . . . . . . . . . . . . . . . . . . . . . . . . . . . . . . . . . . . . . . . . . . . . . . . . . . . . . . . . . . . . . . . . . 13
Central User Licenses . . . . . . . . . . . . . . . . . . . . . . . . . . . . . . . . . . . . . . . . . . . . . . . . . . . . . . . . . . . . . . . . . 13
Global Traffic Optimizer . . . . . . . . . . . . . . . . . . . . . . . . . . . . . . . . . . . . . . . . . . . . . . . . . . . . . . . . . . . . . . . 14
FIPS and CMS . . . . . . . . . . . . . . . . . . . . . . . . . . . . . . . . . . . . . . . . . . . . . . . . . . . . . . . . . . . . . . . . . . . . . . . . 14
Getting Started in Five Steps . . . . . . . . . . . . . . . . . . . . . . . . . . . . . . . . . . . . . . . . . . . . . . . . . . . . . . . . . . . 14
Installing and Configuring the Central Management Server . . . . . . . . . . . . . . . . . . . . . . . . . . . . . . . . 15
Overview . . . . . . . . . . . . . . . . . . . . . . . . . . . . . . . . . . . . . . . . . . . . . . . . . . . . . . . . . . . . . . . . . . . . . . . . . . . 15
Supported Platforms for CMS with Global HA . . . . . . . . . . . . . . . . . . . . . . . . . . . . . . . . . . . . . . . . . . . . . 15
Hardware Resource Requirements . . . . . . . . . . . . . . . . . . . . . . . . . . . . . . . . . . . . . . . . . . . . . . . . . . . . . . 16
Installation Files . . . . . . . . . . . . . . . . . . . . . . . . . . . . . . . . . . . . . . . . . . . . . . . . . . . . . . . . . . . . . . . . . . . . . . 16
Setting Up a CMS . . . . . . . . . . . . . . . . . . . . . . . . . . . . . . . . . . . . . . . . . . . . . . . . . . . . . . . . . . . . . . . . . . . . . 17
Configuring Appliances for Central Management . . . . . . . . . . . . . . . . . . . . . . . . . . . . . . . . . . . . . . . . . 22
Overview . . . . . . . . . . . . . . . . . . . . . . . . . . . . . . . . . . . . . . . . . . . . . . . . . . . . . . . . . . . . . . . . . . . . . . . . . . . 22
Firmware Compatibility with the CMS . . . . . . . . . . . . . . . . . . . . . . . . . . . . . . . . . . . . . . . . . . . . . . . . . . . . 22
Enabling Central Management and Registering an SMA Appliance with the CMS . . . . . . . . . . . . . . . . 23
Previously Configured Appliances . . . . . . . . . . . . . . . . . . . . . . . . . . . . . . . . . . . . . . . . . . . . . . . . . . . . . . . 24
Configuring Your SMA Appliance to be a SAML IdP . . . . . . . . . . . . . . . . . . . . . . . . . . . . . . . . . . . . . . . . . 25
Using the Management Console Menus . . . . . . . . . . . . . . . . . . . . . . . . . . . . . . . . . . . . . . . . . . . . . . . . 26
Overview . . . . . . . . . . . . . . . . . . . . . . . . . . . . . . . . . . . . . . . . . . . . . . . . . . . . . . . . . . . . . . . . . . . . . . . . . . . 26
Management Server . . . . . . . . . . . . . . . . . . . . . . . . . . . . . . . . . . . . . . . . . . . . . . . . . . . . . . . . . . . . . . . . . . 26
Dashboard . . . . . . . . . . . . . . . . . . . . . . . . . . . . . . . . . . . . . . . . . . . . . . . . . . . . . . . . . . . . . . . . . . . . . . 27
Alerts . . . . . . . . . . . . . . . . . . . . . . . . . . . . . . . . . . . . . . . . . . . . . . . . . . . . . . . . . . . . . . . . . . . . . . . . . . 31
Configure . . . . . . . . . . . . . . . . . . . . . . . . . . . . . . . . . . . . . . . . . . . . . . . . . . . . . . . . . . . . . . . . . . . . . . . 35
Monitor . . . . . . . . . . . . . . . . . . . . . . . . . . . . . . . . . . . . . . . . . . . . . . . . . . . . . . . . . . . . . . . . . . . . . . . . . 42
Maintain . . . . . . . . . . . . . . . . . . . . . . . . . . . . . . . . . . . . . . . . . . . . . . . . . . . . . . . . . . . . . . . . . . . . . . . . 43
SMA 12.4 Central Management Server with Global High Availability Administration Guide
Contents2

Managed Appliances . . . . . . . . . . . . . . . . . . . . . . . . . . . . . . . . . . . . . . . . . . . . . . . . . . . . . . . . . . . . . . . . . 44
Add/Remove . . . . . . . . . . . . . . . . . . . . . . . . . . . . . . . . . . . . . . . . . . . . . . . . . . . . . . . . . . . . . . . . . . . . . 45
Configure . . . . . . . . . . . . . . . . . . . . . . . . . . . . . . . . . . . . . . . . . . . . . . . . . . . . . . . . . . . . . . . . . . . . . . . 47
Monitor . . . . . . . . . . . . . . . . . . . . . . . . . . . . . . . . . . . . . . . . . . . . . . . . . . . . . . . . . . . . . . . . . . . . . . . . . 51
Maintain . . . . . . . . . . . . . . . . . . . . . . . . . . . . . . . . . . . . . . . . . . . . . . . . . . . . . . . . . . . . . . . . . . . . . . . . 53
Central User Licensing . . . . . . . . . . . . . . . . . . . . . . . . . . . . . . . . . . . . . . . . . . . . . . . . . . . . . . . . . . . . . . . 56
Overview . . . . . . . . . . . . . . . . . . . . . . . . . . . . . . . . . . . . . . . . . . . . . . . . . . . . . . . . . . . . . . . . . . . . . . . . . . . 56
How Central User Licenses Work . . . . . . . . . . . . . . . . . . . . . . . . . . . . . . . . . . . . . . . . . . . . . . . . . . . . . . . . 56
Central Spike User Licenses . . . . . . . . . . . . . . . . . . . . . . . . . . . . . . . . . . . . . . . . . . . . . . . . . . . . . . . . . 57
Central Email Licenses . . . . . . . . . . . . . . . . . . . . . . . . . . . . . . . . . . . . . . . . . . . . . . . . . . . . . . . . . . . . . 58
Perpetual Pooled Licenses . . . . . . . . . . . . . . . . . . . . . . . . . . . . . . . . . . . . . . . . . . . . . . . . . . . . . . . . . . 58
Enabling Central User Licensing . . . . . . . . . . . . . . . . . . . . . . . . . . . . . . . . . . . . . . . . . . . . . . . . . . . . . . . . . 59
Getting Started with Central User Licensing . . . . . . . . . . . . . . . . . . . . . . . . . . . . . . . . . . . . . . . . . . . . . . . 60
Setting Up CMS to Use Central User Licenses . . . . . . . . . . . . . . . . . . . . . . . . . . . . . . . . . . . . . . . . . . 60
Setting up CMS for Centralized Appliance Configuration and Management . . . . . . . . . . . . . . . . . 60
Resetting a CMS License . . . . . . . . . . . . . . . . . . . . . . . . . . . . . . . . . . . . . . . . . . . . . . . . . . . . . . . . . . . 61
Global High Availability . . . . . . . . . . . . . . . . . . . . . . . . . . . . . . . . . . . . . . . . . . . . . . . . . . . . . . . . . . . . . . 62
High Availability of the VPN Service . . . . . . . . . . . . . . . . . . . . . . . . . . . . . . . . . . . . . . . . . . . . . . . . . . . . . . 62
High Availability of the CMS . . . . . . . . . . . . . . . . . . . . . . . . . . . . . . . . . . . . . . . . . . . . . . . . . . . . . . . . . . . . 63
Disaster Recovery for the VPN Service . . . . . . . . . . . . . . . . . . . . . . . . . . . . . . . . . . . . . . . . . . . . . . . . . . . 63
Global High Availability Versus HA Pair . . . . . . . . . . . . . . . . . . . . . . . . . . . . . . . . . . . . . . . . . . . . . . . . . . . 64
Alerts and SNMP . . . . . . . . . . . . . . . . . . . . . . . . . . . . . . . . . . . . . . . . . . . . . . . . . . . . . . . . . . . . . . . . . . . 66
Overview . . . . . . . . . . . . . . . . . . . . . . . . . . . . . . . . . . . . . . . . . . . . . . . . . . . . . . . . . . . . . . . . . . . . . . . . . . . 66
Pre-Configured Alerts . . . . . . . . . . . . . . . . . . . . . . . . . . . . . . . . . . . . . . . . . . . . . . . . . . . . . . . . . . . . . . . . . 66
Configuring SNMP . . . . . . . . . . . . . . . . . . . . . . . . . . . . . . . . . . . . . . . . . . . . . . . . . . . . . . . . . . . . . . . . . . . . 68
Capture Advanced Threat Protection . . . . . . . . . . . . . . . . . . . . . . . . . . . . . . . . . . . . . . . . . . . . . . . . . . 69
Enabling Capture ATP . . . . . . . . . . . . . . . . . . . . . . . . . . . . . . . . . . . . . . . . . . . . . . . . . . . . . . . . . . . . . . . . . 69
File Options . . . . . . . . . . . . . . . . . . . . . . . . . . . . . . . . . . . . . . . . . . . . . . . . . . . . . . . . . . . . . . . . . . . . . . . . . 70
Setting the File Types . . . . . . . . . . . . . . . . . . . . . . . . . . . . . . . . . . . . . . . . . . . . . . . . . . . . . . . . . . . . . . 71
Setting the Maximum File Size . . . . . . . . . . . . . . . . . . . . . . . . . . . . . . . . . . . . . . . . . . . . . . . . . . . . . . 71
Web Services . . . . . . . . . . . . . . . . . . . . . . . . . . . . . . . . . . . . . . . . . . . . . . . . . . . . . . . . . . . . . . . . . . . . . . . . 72
Advanced Settings . . . . . . . . . . . . . . . . . . . . . . . . . . . . . . . . . . . . . . . . . . . . . . . . . . . . . . . . . . . . . . . . . . . . 72
Central FIPS Licensing . . . . . . . . . . . . . . . . . . . . . . . . . . . . . . . . . . . . . . . . . . . . . . . . . . . . . . . . . . . . . . . 73
Part 2. Global High Availability
Introduction to Global HA and GTO . . . . . . . . . . . . . . . . . . . . . . . . . . . . . . . . . . . . . . . . . . . . . . . . . . . . 75
Overview . . . . . . . . . . . . . . . . . . . . . . . . . . . . . . . . . . . . . . . . . . . . . . . . . . . . . . . . . . . . . . . . . . . . . . . . . . . 75
CMS with GTO . . . . . . . . . . . . . . . . . . . . . . . . . . . . . . . . . . . . . . . . . . . . . . . . . . . . . . . . . . . . . . . . . . . 76
Exchange ActiveSync and Outlook Anywhere . . . . . . . . . . . . . . . . . . . . . . . . . . . . . . . . . . . . . . . . . . 76
SMA 12.4 Central Management Server with Global High Availability Administration Guide
Contents3

Custom FQDN for Mapped Resources . . . . . . . . . . . . . . . . . . . . . . . . . . . . . . . . . . . . . . . . . . . . . . . . 77
Viewing GTO Status from the CMS Console . . . . . . . . . . . . . . . . . . . . . . . . . . . . . . . . . . . . . . . . . . . . 77
GTO and IPv6 . . . . . . . . . . . . . . . . . . . . . . . . . . . . . . . . . . . . . . . . . . . . . . . . . . . . . . . . . . . . . . . . . . . . 78
Deployment Notes . . . . . . . . . . . . . . . . . . . . . . . . . . . . . . . . . . . . . . . . . . . . . . . . . . . . . . . . . . . . . . . . 78
Planning GTO Deployment . . . . . . . . . . . . . . . . . . . . . . . . . . . . . . . . . . . . . . . . . . . . . . . . . . . . . . . . . . . 79
Choosing a Deployment Model . . . . . . . . . . . . . . . . . . . . . . . . . . . . . . . . . . . . . . . . . . . . . . . . . . . . . . . . . 79
SMA Appliances Located in One Data Center . . . . . . . . . . . . . . . . . . . . . . . . . . . . . . . . . . . . . . . . . . 79
SMA Appliances Geo-Distributed across Multiple Data Centers . . . . . . . . . . . . . . . . . . . . . . . . . . . 79
Mixed Mode . . . . . . . . . . . . . . . . . . . . . . . . . . . . . . . . . . . . . . . . . . . . . . . . . . . . . . . . . . . . . . . . . . . . . 80
Minimizing Configuration Differences . . . . . . . . . . . . . . . . . . . . . . . . . . . . . . . . . . . . . . . . . . . . . . . . . . . . 80
GTO Service Names and DNS Delegations . . . . . . . . . . . . . . . . . . . . . . . . . . . . . . . . . . . . . . . . . . . . . . . . . 80
Choosing a GTO Service Name . . . . . . . . . . . . . . . . . . . . . . . . . . . . . . . . . . . . . . . . . . . . . . . . . . . . . . 81
Establishing the GTO Service Name Delegations in DNS . . . . . . . . . . . . . . . . . . . . . . . . . . . . . . . . . 81
Provisioning Certificates . . . . . . . . . . . . . . . . . . . . . . . . . . . . . . . . . . . . . . . . . . . . . . . . . . . . . . . . . . . . . . . 81
Adding Certificates to SMA Appliances . . . . . . . . . . . . . . . . . . . . . . . . . . . . . . . . . . . . . . . . . . . . . . . 82
Generating a Certificate Signing Request (CSR) . . . . . . . . . . . . . . . . . . . . . . . . . . . . . . . . . . . . . . . . . 82
Importing SSL Certificates . . . . . . . . . . . . . . . . . . . . . . . . . . . . . . . . . . . . . . . . . . . . . . . . . . . . . . . . . . 83
Setting up GTO . . . . . . . . . . . . . . . . . . . . . . . . . . . . . . . . . . . . . . . . . . . . . . . . . . . . . . . . . . . . . . . . . . . . . 84
Setting up the CMS and SMA appliances . . . . . . . . . . . . . . . . . . . . . . . . . . . . . . . . . . . . . . . . . . . . . . . . . . 84
Setting up a Basic GTO Service . . . . . . . . . . . . . . . . . . . . . . . . . . . . . . . . . . . . . . . . . . . . . . . . . . . . . . . . . . 85
Registering an SMA Appliance with the CMS . . . . . . . . . . . . . . . . . . . . . . . . . . . . . . . . . . . . . . . . . . . . . . 86
Monitoring and Configuring GTO . . . . . . . . . . . . . . . . . . . . . . . . . . . . . . . . . . . . . . . . . . . . . . . . . . . . . . . . 88
Defining the Central Policy . . . . . . . . . . . . . . . . . . . . . . . . . . . . . . . . . . . . . . . . . . . . . . . . . . . . . . . . . . . . . 91
Extending GTO Deployment . . . . . . . . . . . . . . . . . . . . . . . . . . . . . . . . . . . . . . . . . . . . . . . . . . . . . . . . . . 94
Adding Additional SMA Appliances . . . . . . . . . . . . . . . . . . . . . . . . . . . . . . . . . . . . . . . . . . . . . . . . . . . . . . 94
Using Standby Appliances . . . . . . . . . . . . . . . . . . . . . . . . . . . . . . . . . . . . . . . . . . . . . . . . . . . . . . . . . . . . . . 94
How a Standby Appliance Works . . . . . . . . . . . . . . . . . . . . . . . . . . . . . . . . . . . . . . . . . . . . . . . . . . . . 95
Adding a Standby Appliance to the CMS . . . . . . . . . . . . . . . . . . . . . . . . . . . . . . . . . . . . . . . . . . . . . . 96
Enabling Cached Credentials . . . . . . . . . . . . . . . . . . . . . . . . . . . . . . . . . . . . . . . . . . . . . . . . . . . . . . . . . . . 97
Using Distributed Authentication Servers . . . . . . . . . . . . . . . . . . . . . . . . . . . . . . . . . . . . . . . . . . . . . . . . . 97
Varying Tunnel Address Pools . . . . . . . . . . . . . . . . . . . . . . . . . . . . . . . . . . . . . . . . . . . . . . . . . . . . . . . . . . . 98
Additional Deployment Notes . . . . . . . . . . . . . . . . . . . . . . . . . . . . . . . . . . . . . . . . . . . . . . . . . . . . . . . . . . 99
Notes on SMA Appliances . . . . . . . . . . . . . . . . . . . . . . . . . . . . . . . . . . . . . . . . . . . . . . . . . . . . . . . . . . 99
Web Limitations if an Appliance Fails . . . . . . . . . . . . . . . . . . . . . . . . . . . . . . . . . . . . . . . . . . . . . . . . 100
Part 3. Support
SonicWall Support . . . . . . . . . . . . . . . . . . . . . . . . . . . . . . . . . . . . . . . . . . . . . . . . . . . . . . . . . . . . . . . . . 102
About This Document . . . . . . . . . . . . . . . . . . . . . . . . . . . . . . . . . . . . . . . . . . . . . . . . . . . . . . . . . . . . . . . . 103
SMA 12.4 Central Management Server with Global High Availability Administration Guide
Contents4

About this Guide
This guide contains installation procedures and configuration guidelines for deploying the SonicWall® Central Management Server (CMS) with Global High Availability (Global HA) for Secure Mobile Access (SMA).
This guide provides the following information:
CMS Configuration• Introduction to CMS describes the Central Management Server with Global High Availability and its
features.
• Installing and Configuring the Central Management Server includes procedures for setting up and installing the CMS, setting up VPN appliances to be managed, defining the collection of managed appliances, and monitoring appliances from the CMS Dashboard.
• Configuring Appliances for Central Management includes information about configuring appliances for central management.
• Using the Management Console Menus explains the choices available with the CMS menus for operating and controlling the CMS and Managed Appliances. This includes information about Alerts, Configuration, Monitoring, and Maintenance.
• Central User Licensing includes information about the Central User Licensing (Pooled Licensing).
• Global High Availability describes the Always Online VPN service that is enabled for users when GTO is enabled.
• Alerts and SNMP contains information about how the CMS provides a new SNMP MIB that queries the CMS and managed appliances to get health and metrics data associated with the CMS as well as generating SNMP traps for critical alerts.
• Capture Advanced Threat Protection includes information about using the Capture ATP service to analyzes various types of content for malicious behavior.
GTO Configuration• Introduction to Global HA and GTO provides overview information about CMS with GTO.
• Planning GTO Deployment describes how to configure the GTO service with CMS and ensure a highly available and optimized VPN infrastructure.
• Setting up GTO describes how to make deploying GTO easier by planning and adhering to a few guidelines.
• Extending GTO Deployment describes how to deploy and configure additional SMA appliances.
SonicWall Support• SonicWall Support includes Information about contacting technical support.
SMA 12.4 Central Management Server with Global High Availability Administration Guide
About this Guide5

Guide ConventionsThe following conventions are used in this guide.
Guide Conventions
Convention Use
Bold Text Highlights field, button, and tab names. Also highlights window, dialog box, and screen names. Also used for file names and text or values you are being instructed to type into the interface.
Italic Text Indicates the name of a technical manual, emphasis on certain words in a sentence, or the first instance of a significant term or concept.
Italics text also represents a variable in an expression. It should be replaced with the real item, for example, a file name.
Menu Item > Menu Item Indicates a multiple step Management Interface menu choice. For example, System > Status means select the Status page under the System menu.
SMA 12.4 Central Management Server with Global High Availability Administration Guide
About this Guide6

SMA 12.4 Central Management Server with Global High Availability Administration Guide
CMS Configuration
Part 1
7
CMS Configuration
• Introduction to CMS
• Installing and Configuring the Central Management Server
• Configuring Appliances for Central Management
• Using the Management Console Menus
• Central User Licensing
• Global High Availability
• Capture Advanced Threat Protection
• Alerts and SNMP

1
Introduction to CMS
Topics• Overview
• CMS Deployment Options
• What’s New in This Release
• Central Management Server
• Central Management Console
• Managed Appliances
• Licensing CMS
• Central User Licenses
• Global Traffic Optimizer
• FIPS and CMS
• Getting Started in Five Steps
OverviewThis section is an introduction to the SonicWall™ Central Management Server (CMS) with Global High Availability (Global HA) and provides important concepts associated with it. CMS is an add-on product for managing multiple Secure Mobile Access (SMA) VPN appliances. It gives customers with multiple appliances a single administrative user interface from where they can manage all their VPN appliances. CMS is a virtual machine that interacts with the managed SMA appliances. CMS reduces the total cost of operation and simplifies the management of multiple VPN appliances for organizations.
Global HA enables SMA appliances to scale performance by deploying multiple appliances under the same service name (e.g. access.example.com). Global HA eliminates a single point of failure and provides resilience whether customers deploy 2 SMA appliances in the same data center or clusters of up to 100 physical and virtual appliances across multiple data centers around the globe. A distributed data store shares user session state and licensing information across the mesh network of SMA appliances in an active-active cluster. This allows for session persistence across data centers. In the event of a fail-over, users get connected to another appliance in the service. Their experience is frictionless and productivity is not impacted. The distributed data store also allows for central user licenses to be shared across appliances and data centers.
The VPN administrator uses the Central Management Console (CMC) of the CMS to manage all the VPN appliances regardless of location. CMS and managed appliances are closely integrated through native communications secured with TLS.
NOTE: SMA appliances in the Global HA mesh must be able to communicate with each other via their external interface IP addresses or internet-routable IP addresses to facilitate sharing of information in the distributed data store.
SMA 12.4 Central Management Server with Global High Availability Administration Guide
Introduction to CMS8

The CMS is a virtual machine, requiring no dedicated appliance or hardware, and provides the following features:
• A single dashboard for managing a distributed VPN infrastructure.
• Simplified license management with a centralized license that eliminates the need for separate appliance licenses. Licenses are shared by appliances
• Central Management Console (CMC) to configure, maintain, and monitor appliances.
• Reduced Total Cost of Operation (TCO) of the VPN infrastructure.
• Reduced operator errors associated with managing multiple appliances that may be in different data centers
• Centralized alerts via the console dashboard and SNMP traps.
• Global High Availability that is enabled with the Global Traffic Optimizer (GTO) service
This dashboard view in the CMC gives the administrator a summarized view of all managed appliances.
Administrators can apply a common configuration to managed appliances from the CMC. Consolidated monitoring and reporting gives the administrator an overview of all the appliances that are being managed.
An administrator can click on a single appliance in the CMC to launch the Appliance Management Console (AMC) for that appliance because of a single-sign on system.
SMA 12.4 Central Management Server with Global High Availability Administration Guide
Introduction to CMS9

CMS Deployment OptionsDepending on your operational needs, CMS can be deployed in four phases:
• Phase 1: Deploy CMS to only monitor and maintain standalone SMA appliances
This gives you a dashboard view and a single console from which to monitor and maintain all your SMA appliances.
• Phase 2: Enable Central User Licenses on CMS
Central user licenses allows you to optimize user licenses across all your SMA appliances.
• Phase 3: Use CMS to manage configurations
A centralized policy on the CMS, that is normalized across all your SMA appliances, simplifies configuration management, and gives users a consistent experience when they get connected to any appliance in your VPN infrastructure.
• Phase 4: Enable Global High Availability using the Global Traffic Optimization Service
GTO provides a highly available VPN infrastructure where users connect to a single domain name (such as access.example.com) and get redirected to an available and proximate appliance.
What’s New in This ReleaseVersion 12.4 of the Secure Mobile Access (SMA) Central Management Server (CMS) includes these new features and changes:
CMS on AWSSMA 12.4 CMS on AWS supports all the capabilities of 12.3 CMS on AWS.
Users can now install their own instances of CMS into AWS. The cloud hosted CMS will support the same features as a data center-hosted CMS. You must configure AWS SMA1000 with a fixed IP address using AWS's Elastic Network Interfaces. The dual interface configuration for AWS SMA1000 is also supported.
With CMS on the cloud, its resources are secured inside the AWS, as well as corporate networks, with an appropriate connection between AWS and the corporate networks.
For more details on how to configure the CMS on AWS, refer to the SMA 12.4 AWS Getting Started Guide.
CMS on AzureSMA 12.4 CMS on Azure supports all the capabilities of 12.1/12.3 CMS on ESXi/ Hyper-V.
For more details on how to configure CMS on Azure, refer to the SMA 12.4 Azure Getting Started Guide.
NOTE: Central User Licensing and centralized policies are required for enabling GTO.
SMA 12.4 Central Management Server with Global High Availability Administration Guide
Introduction to CMS10
Transport Layer Security (TLS) 1.3 SupportSMA has been enhanced to support TLS 1.3 for incoming and outgoing connections, which is the latest and more
secure TLS version.
For more information, refer to the SMA 12.4 Administration Guide.
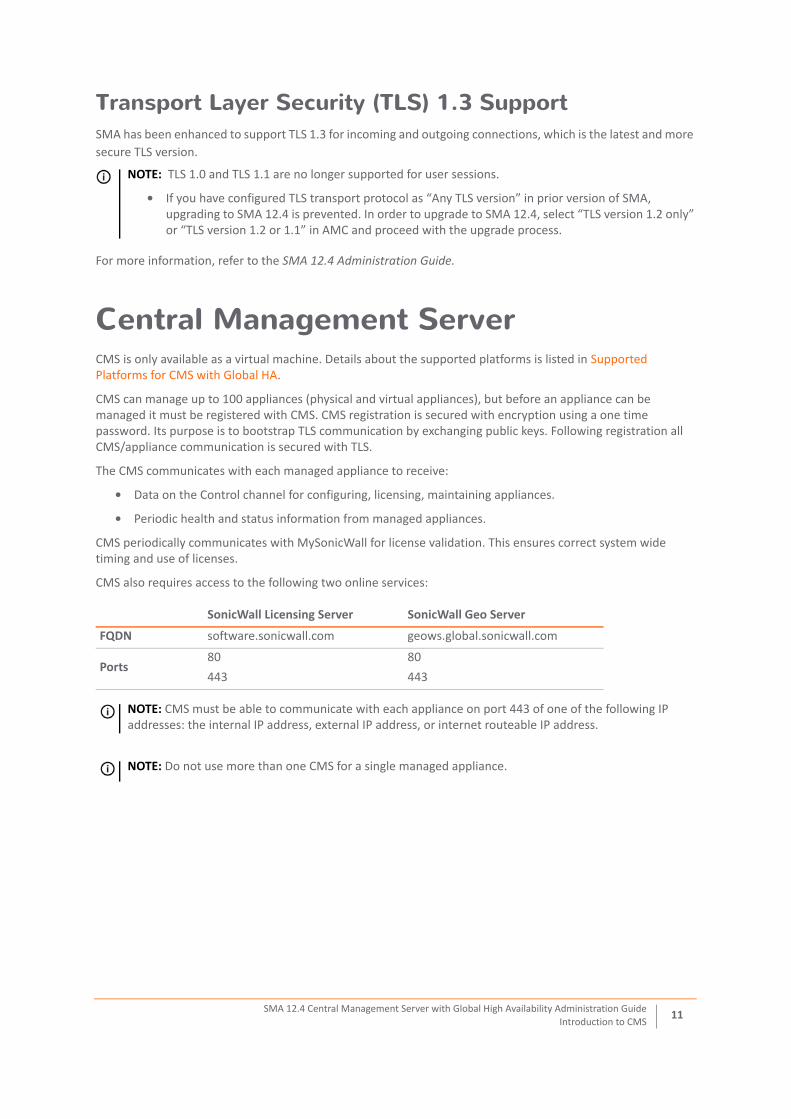
Central Management ServerCMS is only available as a virtual machine. Details about the supported platforms is listed in Supported Platforms for CMS with Global HA.
CMS can manage up to 100 appliances (physical and virtual appliances), but before an appliance can be managed it must be registered with CMS. CMS registration is secured with encryption using a one time password. Its purpose is to bootstrap TLS communication by exchanging public keys. Following registration all CMS/appliance communication is secured with TLS.
The CMS communicates with each managed appliance to receive:
• Data on the Control channel for configuring, licensing, maintaining appliances.
• Periodic health and status information from managed appliances.
CMS periodically communicates with MySonicWall for license validation. This ensures correct system wide timing and use of licenses.
CMS also requires access to the following two online services:
NOTE: TLS 1.0 and TLS 1.1 are no longer supported for user sessions.
• If you have configured TLS transport protocol as “Any TLS version” in prior version of SMA, upgrading to SMA 12.4 is prevented. In order to upgrade to SMA 12.4, select “TLS version 1.2 only” or “TLS version 1.2 or 1.1” in AMC and proceed with the upgrade process.
SonicWall Licensing Server SonicWall Geo Server
FQDN software.sonicwall.com geows.global.sonicwall.com
Ports80
443
80
443
NOTE: CMS must be able to communicate with each appliance on port 443 of one of the following IP addresses: the internal IP address, external IP address, or internet routeable IP address.
NOTE: Do not use more than one CMS for a single managed appliance.
SMA 12.4 Central Management Server with Global High Availability Administration Guide
Introduction to CMS11

Central Management Console The Central Management Console (CMC) provides the user with a single screen (called the Dashboard) to show Active alerts, Appliance status, License status, and Geographic View of all appliances on a map of the world. The Dashboard also allows you, from a single point to:
• Configure appliances (using push configuration settings).
• Maintain appliances: upgrade/hotfix, EPC update, add SSL certificates, and Restart.
• Use a one-click (single sign-on) to the AMC of managed appliance.
• View health history and reports for all appliances.
• Configure alerts, manage alert notifications for appliances or CMS.
• Install a central user license. Central licenses are available to all appliances as user demand changes between appliances.
Central Management Over the InternetWith Central Management Over the Internet, you can manage SMA appliances hosted in a data center using a CMS that is hosted outside the data center. You can also manage SMA appliances located in a different data center (without a dedicated link between the data centers) over the Internet.
Central Certificate ManagementFrom the CMS, administrators can also manage certificates for all of the appliances managed by the CMS by:
• Creating Certificate Signing Requests, facilitating the process of obtaining certificates from a Certificate Authority
• Importing certificates issued by a Certificate Authority to a centralized store on the CMS
• Deploying selected certificates to specific appliances and then configuring those appliances to use the selected certificates, either immediately or at a scheduled time.
• Reviewing the list of certificates that have been imported to the CMS.
• Being alerted when certificates are due to expire.
Managed AppliancesManaged appliances are SMA 1000 series appliances that are registered with the CMS so that they can be centrally managed.
Each managed appliance must be an SMA Version 12.4 (or later) SMA appliance. A group of managed appliances may consist of physical and/or virtual appliances.
In this document, the term SMA 1000 series appliance refers to these appliances:
• SMA 6200
• SMA 6210
• SMA 7200
• SMA 7210
• SMA 8200v
SMA 12.4 Central Management Server with Global High Availability Administration Guide
Introduction to CMS12

Managed appliances send health and status information to the CMS. They accept policy configuration, user licenses, and maintenance commands from the CMS. Managed appliance communication with a CMS is secured with TLS.
Licensing CMS CMS has the ability to manage appliances licensed with different feature sets. Unlike SMA appliances, the CMS contacts the online SonicWall License Manager service to obtain its license.
To license the CMS initially, you enter the serial number and authentication code into the CMS console. The CMS then contacts the License Manager service and obtains its license. After that, the CMS periodically contacts the License Manager service to refresh its license.
A CMS Base License is available at no cost from MySonicWall. You enable a CMS Base License by entering the serial number and the authentication code. A CMS Base License allows you to manage three appliances. A CMS Base license comes with a trial for pooled licenses for a limited period of time. A CMS Base License enables you to use the CMS without pooled licensing. A CMS Base License enables you to manage and monitor licensed SMA appliances. You can upgrade from a Trial License to a Base License.
Central User Licenses (Pooled Licenses) are shared licenses that are available to CMS-managed appliances. To use pooled licensing, you must add Central User Licenses to the CMS Base License. Central User Licenses can be subscription licenses (valid for specific periods of time, such as 1 year or 3 years), or perpetual licenses (without an expiration date).
Central User LicensesCMS supports an optional pooled licensing model that allows user licenses to be centralized on the CMS and available to the managed appliances. Individual VPN appliances no longer need their own license. Customers with appliances that are globally distributed can benefit from the fluctuating demands for user licenses due to time differences. Central user licenses are available to managed appliances where user demands have peaked when license demand has fallen in other regions due to off-work/night hours. For more information, refer to Central User Licensing.
NOTE: The Virtual Appliance name has been changed to the SMA 8200v virtual appliance.
NOTE: CMS must be able to communicate with appliances on port 443.
NOTE: SMA appliances download and import a license file from the MySonicWall portal.
NOTE: CMS subscription licenses do not have SUPPORT SKUs. CMS subscription user licenses include support costs.CMS perpetual licenses require SUPPORT SKUs.
SMA 12.4 Central Management Server with Global High Availability Administration Guide
Introduction to CMS13

Global Traffic OptimizerGTO allows customers to deploy a VPN infrastructure without the need for load balancers or global traffic management using a CMS and SMA 1000 series appliances. The SMA appliances may be located in a datacenter or globally distributed.
GTO allows customers to deploy the SonicWall GTO service. A GTO service is an online VPN service that is enabled by a cluster of SMA appliances working in concert to provide users with a highly available and optimized VPN infrastructure.
The GTO service distributes VPN connection requests from users to the appropriate SMA appliances. Load distribution is done using heuristics based on system parameters that are known and monitored by the GTO service. These parameters include appliance availability, appliance proximity to the user, user load, and appliance capacity.
FIPS and CMSFIPS can be enabled on centrally managed appliances.
• A central FIPS license allows all appliances managed by the CMS to be FIPS-enabled.
• A CMS can obtain a central license (that includes FIPS) from:
• The MySonicWall License Manager service
• A central license file (for closed networks)
• To be managed by the CMS, FIPS-enabled appliances are not required to be part of a GTO service.
• A CMS license that includes FIPS must also include central user licenses. An appliance that is not centrally licensed cannot be FIPS-enabled from a CMS-based license.
When the CMS central user license has FIPS, the administrator can enable FIPS individually for any managed appliance from its AMC. (See “Enabling FIPS” in the SMA 12.4 Administration Guide for more information.)
Getting Started in Five Steps1 Install and configure the CMS and apply the CMS license.
Refer to Installing and Configuring the Central Management Server.
2 Configure GTO.Refer to Setting up GTO
3 Setup the VPN appliances to be managed. Refer to Configuring Appliances for Central Management.
4 Define the collection of managed appliances. Refer to Add/Remove.
5 Monitor and manage appliances from the CMS Dashboard. Refer to Dashboard.
NOTE: To use GTO with Connect Tunnel, Connect Tunnel must be upgraded to 12.1 or above.
NOTE: When updating an SMA infrastructure that is already in place with upgrades and hotfixes, the managed SMA appliances are updated first, and then CMS is updated last.
SMA 12.4 Central Management Server with Global High Availability Administration Guide
Introduction to CMS14

2
Installing and Configuring theCentral Management Server
Topics• Overview
• Supported Platforms for CMS with Global HA
• Hardware Resource Requirements
• Installation Files
• Setting Up a CMS
OverviewThe Central Management Server with Global High Availability (CMS with GTO) is located inside a corporation’s intranet. CMS requires a new type of license called a CMS License that is issued by SonicWall.
The CMS runs as a virtual machine that can be hosted on VMware ESX/ESXi, Microsoft Hyper-V, AWS, and Azure. CMS is not designed to run on custom hardware such as VPN appliances.
CMS with GTO provides the following features:
• Central Management Console (CMC) to monitor, maintain, and configure SMA appliances
• Simplified license management with a centralized license that eliminates the need for individual appliance licenses
• Centralized alerts via the console dashboard and SNMP traps
• Global Traffic Optimizer (GTO)
Supported Platforms for CMS with Global HACMS with GTO runs as a virtual machine on these hypervisor platforms:
Supported Platforms
VMWare Microsoft Hyper-V
ESXi 5.5 or higher Windows Server 2016, Windows Server 2019
SMA 12.4 Central Management Server with Global High Availability Administration Guide
Installing and Configuring the Central Management Server15

CMS with GTO is supported on the following SMA 1000 series appliances:
• SMA 6200
• SMA 6210
• SMA 7200
• SMA 7210
• SMA 8200v (ESX/Hyper-V/AWS/Azure)
Hardware Resource RequirementsThe virtual instance of CMS requires the following hardware resources:
• 8 GB RAM
• 4 CPU
• 64 GB (Storage Requirements)
Installation FilesThe Central Management Server should run the same firmware version as the appliances it manages.
• To install on VMware hypervisors, the Open Virtualization Archive (.OVA) file with the following file name format is available for import and deployment to your ESX/ESXi server: ex_sra_vm_12.x.x-xxx.ova
• To install in a Microsoft Hyper-V environment, use an International Organization for Standardization (.ISO) file such as: 12.x.x-xxx.iso.
• To get the SMA AMI for AWS and Azure,contact SonicWall Sales at https://www.sonicwall.com/customers/contact-sales
ORSonicWall Support at https://www.sonicwall.com/support/contact-support
The 12.x.x indicates the SMA release version and xxx represent a build number.
For information on installing the SMA 8200v, refer to the SMA 8200v Getting Started Guide.
For information on installing the CMS on AWS and Azure, refer to the SMA AWS and Azure Getting Started Guide.
NOTE: The same firmware is used for both the CMS and the SMA 8200v. The Central Management feature is enabled during the setup process.
SMA 12.4 Central Management Server with Global High Availability Administration Guide
Installing and Configuring the Central Management Server16

Setting Up a CMSTo setup a Centrally Managed VPN infrastructure:
1 Setup a virtual instance (ESX, Hyper-V) of the release firmware.
2 Start the virtual machine and wait for a login prompt to appear.
3 Login as root (no password is required).
4 Press any key to continue.
5 Enter the network settings for the internal interface (labeled 2 on the appliance).
• IP Address
• Subnet mask
• Gateway
6 Continue until instructed to access the console from a browser at https://<Internal-IP-Address>:8443.
7 Click Next to view the License Agreement.
NOTE: For setting up a CMS on AWS and Azure, refer SMA AWS and SMA Azure Getting Started Guide.
NOTE: If you are on the same network as the appliance, press Enter when prompted for the gateway.
SMA 12.4 Central Management Server with Global High Availability Administration Guide
Installing and Configuring the Central Management Server17

8 Read the agreement and, if you agree, select I accept the terms of the license agreement.
9 Click Next to select Basic Settings.
10 Select Install this appliance as the central management server for a pool of appliances.
11 Under Administrator password, enter the password you want for the administrator and confirm it.
12 Under Date and time, select the time zone from the Time Zone menu.
13 Click Next.The Network Settings page is displayed.
14 Enter a descriptive name in the Appliance name field.
IMPORTANT: Be sure to save or write this password down in a secure location. It is encrypted and is difficult to recover if you forget it.
SMA 12.4 Central Management Server with Global High Availability Administration Guide
Installing and Configuring the Central Management Server18

15 Select the Single interface option.
16 Enter the Internal Interface IP address and Subnet mask.
17 Click Next.
18 From the Routing mode menu, select Default gateway.
19 In the Default gateway IP address field, enter the gateway IP address.
20 Click Next.
21 Enter your domain in the Default domain field.
22 Enter the IP address of the primary DNS server into the DNS Server field.
23 Click Next.
24 Under Locale, enter the Country and the Location.
IMPORTANT: CMS is restricted to a single interface; it cannot be set up with dual interfaces.
SMA 12.4 Central Management Server with Global High Availability Administration Guide
Installing and Configuring the Central Management Server19

25 Select Enable pushing policy configuration from this server to managed appliances.
26 Click Next.
27 Click Finish. The configuration changes are applied and a Logon screen appears.
SMA 12.4 Central Management Server with Global High Availability Administration Guide
Installing and Configuring the Central Management Server20

28 Login with username admin and the password that you just configured. The Central Management Console (CMC) Dashboard Page appears.
You can now download and install a CMS license from MySonicWall.com. Refer to Licensing.
SMA 12.4 Central Management Server with Global High Availability Administration Guide
Installing and Configuring the Central Management Server21

3
Configuring Appliances for CentralManagement
Topics• Overview
• Firmware Compatibility with the CMS
• Enabling Central Management and Registering an SMA Appliance with the CMS
• Previously Configured Appliances
OverviewThis section describes how to configure SMA appliances for CMS with GTO, so that they become Managed Appliances.
A CMS can manage up to 100 appliances. Managed Appliances can be any combination of physical and virtual appliances (SMA 6200, SMA 6210, SMA 7200,SMA 7210 and SMA 8200v).
Firmware Compatibility with the CMSCMS can only manage appliances running firmware that is the same version (or higher) than the CMS. The CMS and all appliances must be running 12.4 firmware (or later) to activate the CMS and GHA feature improvements contained in the 12.4 firmware.
CMS can be used to manage appliance that have been upgraded to a new release that is one version above the CMS version. However, newer features on the managed appliances may not work until the CMS is upgraded to the same version as all the managed appliances.
For more information about upgrading CMS and its managed appliances, refer to the SMA 12.4 Upgrade Guide.
NOTE: CMS cannot manage an appliance that exceeds one major version ahead of the CMS.
SMA 12.4 Central Management Server with Global High Availability Administration Guide
Configuring Appliances for Central Management22

Enabling Central Management and Registering an SMA Appliance with the CMSBefore an appliance can be registered with the CMS, it must first be enabled for Central Management. In addition, the CMS must have an unused appliance license (obtained from the CMS license) before an SMA Appliance can be registered. The administrator must enable Central Management and type the One-Time Password into the console of the SMA appliance. In addition the administrator must register the appliance with the CMS.
The One-Time Password is used to establish a secure channel, and all subsequent communications go through the secure channel. The appliance uploads its information (model, version, serial#) to the CMS. The CMS pushes a Leased License to the appliance, and then (if configured), pushes the configuration settings to the appliance.
The managed appliance is now online and ready to accept VPN connections.
To enable central management:
1 On the AMC for the appliance, navigate to System Configuration > Maintenance.
SMA 12.4 Central Management Server with Global High Availability Administration Guide
Configuring Appliances for Central Management23

2 In the System Configuration section, under Central Management, click Configure….
3 Verify that Enable central management is selected.
4 Choose Save.
5 Click on the link to Apply Pending Changes.
6 Click Apply Changes. The one time password is now active and the appliance is ready to be registered by the CMS.
Previously Configured AppliancesStandalone appliances that were originally configured from their AMC can be registered with a CMS without affecting the appliance's policy settings.
For information on how to synchronize (or not) policy on an appliance from the CMS, refer to Configure.
SMA 12.4 Central Management Server with Global High Availability Administration Guide
Configuring Appliances for Central Management24

Configuring Your SMA Appliance to be a SAML IdPFor your SMA appliance to operate as a Identity Provider, trust needs to be established between the application and your SMA appliance.
For more information, see “Using Your SMA Appliance as a SAML Identity Provider” in the SMA 12.4 Administration Guide.
To configure your SMA appliance to be SAML IdP:
1 In the CMS, navigate to the Managed Appliances > Configure > Define Policy page.
2 In the User Access section, click SAML Identity Provider.
3 Select Enable SAML 2.0 Identity Provider service to enable the SMA appliance as an Identity Provider.
4 In the Entity ID field, enter the URL that uniquely identifies your SAML Identity Provider. For example, https://idp.company.com/idp.
5 Set the value in the Assertion validity field for the time allowance (in seconds) that the application should accept for assertions from your SMA appliance.
6 In the Endpoint FQDN field, specify an FQDN to which the application will send SAML requests.
7 The Signing certificate field displays the location of the certificate used by the IdP to sign its SAML messages. The certificate is automatically selected based on the Endpoint FQDN. (You can configure certificates in the SSL Settings > SSL Certificates page. For more information, see “Certificates” in the SMA 12.4 Administration Guide.)
8 Click the Export button to export the SAML metadata to an XML file that can be imported when configuring applications to accept your SMA appliance as an Identity Provider.
9 Click Save.
NOTE: You will need to configure a WorkPlace site in order to customize the FQDN.
SMA 12.4 Central Management Server with Global High Availability Administration Guide
Configuring Appliances for Central Management25

4
Using the Management ConsoleMenus
• Overview
• Management Server
• Dashboard
• Alerts
• Configure
• Monitor
• Maintain
• Managed Appliances
• Add/Remove
• Configure
• Monitor
• Maintain
OverviewThe Central Management Console is the interface you use to manage all the registered VPN appliances. The menu is listed on the left and the content of the window varies depending on the option selected. When you first login to the console, the Dashboard page is the default screen that appears.
The menu has two sections: Management Server and Managed Appliance. Management Server has the commands for central management, licensing and so forth. Managed Appliances have the commands for managing the registered VPN appliances in your infrastructure.
Management Server This section provides information about the Management Server commands:
• Dashboard
• Alerts
• Configure
• Monitor
• Maintain
SMA 12.4 Central Management Server with Global High Availability Administration Guide
Using the Management Console Menus26

Dashboard The Dashboard page is the first screen that appears after you log in. You can also access it anytime by clicking Management Server > Dashboard from the menus.
The Dashboard is divided into the sections illustrated and explained below.
• Menus - Contains the commands for central management of your devices.
• Alerts - Contains a list of currently active alerts. Select an Alert to view more information.
• Appliance Load - an estimate of the current load on an appliance based on metrics such as CPU, Swap Usage, Bandwidth, and memory usage.
• Appliances - Shows all online appliances. Select a managed appliance to view information about it Appliances are sorted starting with the appliance with the most users.
• Central License Usage - Displays information about license usage.
• About - Displays CMS Information consisting of Model, Hypervisor platform, Version, Hotfixes, System Time, Uptime, License.
Each pane is independently refreshed with updated information/status.
The Dashboard panes use the following color codes:
• Green (OKAY)
• Yellow (WARNING)
• Red (ERROR)
Alerts
Appliances
Appliance Load
Central License Usage About CMS Pane
Menus
SMA 12.4 Central Management Server with Global High Availability Administration Guide
Using the Management Console Menus27

AlertsThe Alerts pane on the Dashboard shows a consolidated view of all currently active alerts that have not been acknowledged by the administrator. These alerts appear when specific thresholds are met. Warnings and Errors are shown on the CMC Dashboard.
Red icons represent critical alerts and yellow icons represent warnings. Errors are listed first, followed by warnings with the most recent being listed at the top of each category.
Alerts can be acknowledged by the administrator by clicking on the X to the right of the it. An acknowledged alert no longer appear in the dashboard, but it re-appears if the state changes. Alerts are automatically removed if the cause of the alert ceases. Click on an individual alert to see the details.
All alerts can be seen when you chose the Alert command. Refer to Alerts for more details.
Appliances PaneThe Appliances pane displays a quick overview of the appliances being managed. It provide real-time data for online, managed appliances and includes:
• Name
• Status
• Users
• CPU usage
• Memory usage
• Mbps, Uptime
The drop down menu on the top, right side provides toggling views of the appliances.
Topics:
• Appliance Table
• Geographic View
Appliance TableThe Appliance Table is the default view.
SMA 12.4 Central Management Server with Global High Availability Administration Guide
Using the Management Console Menus28

Geographic ViewThe Geographic View shows the geographic location of each appliance on a world map.
The Geographic View shows a visual location of the appliance based on its city and country obtained during configuration. You can reposition the icon for an appliance by dragging and dropping the icon to another location. You may need to do this if the icon for an appliance is not correctly positioned on the map, or if multiple appliance icons are positioned too closely to each other.
By moving your cursor across the colored icons on the map, details about that appliance appears. In addition, the color of the icon has meaning:
• A blue icon represent the CMS Server and displays Host name and address.
• A green icon represents a selected managed appliance that is online. The interface displays Host, Status, Users, CPU, Memory, Bandwidth information.
• A red icon represents an appliance that is offline.
Zoom (+) and UnZoom (-) buttons allow the map view to be changed. The last map viewed is saved.
Appliance LoadThe Appliance Load pane displays an estimate of the load level of the appliance based on metrics such as CPU, Swap Usage, Bandwidth, and memory usage memory usage, and the number of users logged into the appliance. For more information, see the Appliances Pane.
The dial for each appliance displays an estimate of how busy the appliance is:
• Green indicates that the appliance is not very busy.
• Yellow is a warning that the appliance is starting to get busy.
• Red indicates that the appliance is busy or has a 100% load; the user experience may degrade.
• Gray indicates that the appliance cannot be reached.
SMA 12.4 Central Management Server with Global High Availability Administration Guide
Using the Management Console Menus29

The Appliance load for an appliance is determined by its “load score”.
• The load score is a combined metric computed from several usage and performance factors (such as CPU, network, and memory) that might affect the performance of an appliance, weighted based on their known impact on the remote access experience of connecting users. For example, high CPU usage does not have a major impact on the Load Score for an appliance, but high network bandwidth usage is more highly weighted when the load score for an appliance is calculated.
• When calculating the load score, the differences in the capabilities of the different SMA appliance models in your CMS cluster are taken into account. For example, an SMA 6200 (rated at 2,000 users) with 200 users is expected will show a higher load score than an SMA 7200 (rated at 10,000 users) with 2000 users.
• The impact of different resources is normalized when calculating the load score. For example, users using a significant amount of CPU resources on one appliance will have less impact on the load score than users using excessive bandwidth on another appliance.
• The load score is used by Global HA to determine the preferred appliance toward which user connections and traffic should be routed. For example, if two appliances are located in the same data center or geographic area, Global HA will prioritize the appliance that has the lower load score.
Central License Usage PaneThis Central License Usage pane displays the history of CMS user license consumption relative to the maximum license capacity. The drop-down menu allows you to change the display to different time periods, such as Now, Hourly, Daily, Weekly, Monthly, and Quarterly.
The graph displays the number of users as a function of time and colors are use to indicate the status of the licensing:
• Green indicates that the CMS license usage is running within the Central User Licensed capacity.
• Yellow indicates that the license capacity has reached 75%, the default threshold for a CMS license usage warning.
• Red indicates that the license capacity has reached 90% threshold, default threshold for the a CMS license usage alert.
SMA 12.4 Central Management Server with Global High Availability Administration Guide
Using the Management Console Menus30

About Pane
The About pane displays the information about the Central Management Server:
• Model name
• Hypervisor platform and version number
• Installed hotfixes
• current system time
• current uptime statistics
• licensing summary
Alerts CMS generates alerts that are either Warnings or Errors. Alerts are displayed prominently on the CMS dashboard and can also be accessed by selecting the Alerts menu option. Alerts typically originate from a condition that occurs on the CMS or on a managed appliance.
This page contains these tabs:
• View Alerts tab
• Configure Alerts tab
• Notification tab
For detailed information about alerts and using alerts with SNMP, refer to Alerts and SNMP.
SMA 12.4 Central Management Server with Global High Availability Administration Guide
Using the Management Console Menus31

View Alerts tabThe View Alerts tab is the default view and shows all the alerts in table form. You can sort the table by clicking on the table headings to sort the data.
To view alerts:
1 Navigate to Management Server > Alerts.
2 Click the View Alerts tab.
Configure Alerts tabUse the Configure Alerts tab to add and manage alerts.
To configure alerts:
1 Navigate to Management Server > Alerts.
2 Select the Configure Alerts tab.
SMA 12.4 Central Management Server with Global High Availability Administration Guide
Using the Management Console Menus32

3 Click the (+) New icon. The Add Alert Trigger page displays.
4 In the Name field, enter a name for the alert.
5 Select Add trigger is enabled.
6 Select the Priority.
7 Select any other conditions and options that you want.
8 Click Save.
SMA 12.4 Central Management Server with Global High Availability Administration Guide
Using the Management Console Menus33

Notification tabUse the Notification tab to set notifications for alerts.
To set notifications for alerts:
1 Navigate to Management Server > Alerts.
2 Click the Notification tab.
3 Select the alerts for which you want to be notified:
• Critical alerts
• Warning alerts
• Acknowledged alerts
• Cleared alerts
4 Under Email Settings, enter the Email address from which alert notifications is sent.
5 To add an Email address to send alert notifications to, click the (+) New icon.
6 Enter the Name and Email Address of the recipient to be notified and click OK. Repeat to add more recipients.
7 Click Save.
SMA 12.4 Central Management Server with Global High Availability Administration Guide
Using the Management Console Menus34

ConfigureThe Configure option allows you to set various options for the Central Management Console. Navigate to Management Server > Configure to see the options.
Topics:
• Central Management Settings
• Licensing
• General Options
• Administration
• Network Settings
• Network Services
• SSL Settings
Central Management SettingsUse the Central Management Settings option to configure CMS location, central user licensing, Global Traffic Optimizer, and policy synchronization.
To configure the Central Management Settings:
1 Navigate to Management Server > Configure.
2 Click on Central Management Settings. The CMS Settings page displays.
SMA 12.4 Central Management Server with Global High Availability Administration Guide
Using the Management Console Menus35

3 Under Locale, select your Country and enter your Location.
4 Under Central User Licensing, select Enable central user licensing.
5 Under Global Traffic Optimizer Service, select Users connect to this global high availability service from anywhere in the world and are routed to a nearby appliance.
6 Under Policy Synchronization, select Enable pushing policy configuration from this server to managed appliances.
7 Under Authentication Servers, select one of the following:
• Nodes in the collection share centralized authentication servers
• Each node has its own authentication server
8 Click Save.
LicensingUse the Licensing option to review and manage the software licenses for CMS.
To manage the licenses:
1 Navigate to Management Server > Configure.
NOTE: Central User Licensing must be enabled to activate the Global Traffic Optimizer service.
SMA 12.4 Central Management Server with Global High Availability Administration Guide
Using the Management Console Menus36

2 Click on Licensing. The Manage Licenses page displays.
3 Review your license information.
4 Under Online licensing:
• Click Synchronize to synchronize with your licensed services on MySonicWall.
• Click Manage to activate, upgrade or renew services.
• Expand the Advanced section to manage spike licensing.
General OptionsUse the General Options to control security settings for users and set the date and time.
To configure the General Options:
1 Navigate to Management Server > Configure.
2 Click on General Options. The Appliance Options page displays.
SMA 12.4 Central Management Server with Global High Availability Administration Guide
Using the Management Console Menus37

3 Set the credential lifetime in minutes. This refers to he length of a user session. If it exceeds the time specified the user is asked to re-authenticate.
4 Set the date and time, if needed.
5 Click Save.
AdministrationUse the Administration option to define who the administrators are and what authentication server are used for managing the Central Management Server.
To configure the Administration settings:
1 Navigate to Management Server > Configure.
2 Click on Administration.
SMA 12.4 Central Management Server with Global High Availability Administration Guide
Using the Management Console Menus38

3 Select any of the three items: Administrators, Authentication servers, and Users & Groups.
4 Make the changes you want.
5 When finished, click Save.
SMA 12.4 Central Management Server with Global High Availability Administration Guide
Using the Management Console Menus39

Network SettingsUse Network Settings to modify server IP address, routing and name resolution.
To configure the network settings:
1 Navigate to Management Server > Configure.
2 Click Network Settings. The Network Settings page appears.
3 Click Edit to configure any of the Basic, Routing, or Name resolution settings.
4 When finished, click Save.
NOTE: It is not recommended to modify the network interface settings for AWS and Azure instances. Modifying the network interface settings will result CMS to crash.
SMA 12.4 Central Management Server with Global High Availability Administration Guide
Using the Management Console Menus40

Network Services Use the Network Services option to modify the settings for server services like NTP, SSH, SNMP and SMTP.
To configure Network Services:
1 Navigate to Management Server > Configure.
2 Click Network Services. The Services page appears.
3 Click Configure for the item you want to configure: NTP, SSH, SNMP, SMTP, or SMS.
4 Make the desired changes.
5 When finished, click Save.
SSL Settings Use the SSL Settings options to modify the management console certificate and SSL settings.
To configure SSL settings:
1 Navigate to Management Server > Configure. The SSL Settings page displays.
2 Click SSL Settings.
SMA 12.4 Central Management Server with Global High Availability Administration Guide
Using the Management Console Menus41

3 Click Edit for the item you want to edit: SSL certificates or SSL encryption.
4 Make the desired changes.
5 When finished, click Save and Apply Pending Changes.
MonitorThe Monitor option allows you to set various options for monitoring. Navigate to Managed Server > Monitor to see the options.
• To view or edit logging settings for the CMS, click Logging. Make the changes and click Save.
• To view health metrics and system information for the CMS, click System Status. Make the changes and click Save.
• To ping, lookup, view network traffic or use snapshot troubleshooting tools, click Troubleshooting. Make the changes and click Save.
SMA 12.4 Central Management Server with Global High Availability Administration Guide
Using the Management Console Menus42

MaintainThe Maintain option allows you to set various options for monitoring. Select Managed Server > Maintain to see the options. The default view is Maintain Server.
Topics:
• Maintain Server
• Maintenance Tasks
Maintain Server
To maintain the CMS:
1 Select Management Server > Maintain.
2 Click the Maintain Server tab.
3 Do any of the following:
• To restart the CMS, click Restart.
• To shutdown the CMS, click Shutdown.
• To reset the CMS, click Reset.
4 To import or export a system configuration file, click Import/Export. Provide additional information on the next window.
5 To update the system software to a newer version, click the Update button.
6 To rollback the system software to a previous version, click the Rollback button.
SMA 12.4 Central Management Server with Global High Availability Administration Guide
Using the Management Console Menus43

Maintenance Tasks
To view the maintenance tasks:
1 Select Management Server > Maintain.
2 Click the Maintenance Tasks tab. On the Task Log page, you can view the tasks that are scheduled.
3 Filter the Task log table by setting a Start Date and End Date and clicking the Refresh icon.
4 In the Scheduled Tasks panel, you can select a task and Delete, Run now, or Reschedule.
Managed Appliances This section provides information about the Managed Appliances commands:
• Add/Remove
• Configure
• Monitor
• Maintain
SMA 12.4 Central Management Server with Global High Availability Administration Guide
Using the Management Console Menus44

Add/RemoveThe Add/Remove option allows you to manage the licensing and configuration for collection of appliances from a central location. Navigate to Managed Appliances > Add/Remove to see the Appliance Collection.
To add a new appliance:
1 Click the (+) New icon.
2 In the Name field, enter a name for the new appliance. For example, Seattle-01.
3 In the Management address field, enter the IP address for the new appliance.
4 In the One Time Password field, enter the one time password obtained from the Maintenance > Central Management page of the SMA appliance.
SMA 12.4 Central Management Server with Global High Availability Administration Guide
Using the Management Console Menus45

5 Click OK. This registers the appliance with the CMS and adds it to the CMS list. The dialog changes with more options.
6 In the Display Name field, enter the name you want displayed for this appliance.
7 In the Host name field, enter a unique DNS-legal name for this appliance, for example seattle01.
8 In the Management address field, enter the IP address for the appliance.
9 In the Public IP field, enter the internet-visible, public IP address for this appliance.
10 If the appliance has an IPv6 address, enter that IP address in the Public IPv6 field.
11 In the Pool IP, field, enter the IP address that is reachable by other appliances by the same CMS. This IP address is only required if the Public IP of this appliance cannot be reached by the other managed appliances.
12 From the Country menu, select the country where the appliance is located.
13 In the Location field, enter the city, state, or province where the appliance is located.
14 Click Save.
To stop managing an appliance:
1 Select the appliance you want to delete.
2 Click the X (Delete) icon.
NOTE: The client certificate warning, DNS name field, and Public IP field are only visible when CMS is enabled for GTO.
NOTE: The Public IP should be the address by which remote users will access this appliance. The default IP address is the external IP address of the appliance. The public IP address may be different from its external IP address if the public WAN addresses are using NAT at the DMZ.
SMA 12.4 Central Management Server with Global High Availability Administration Guide
Using the Management Console Menus46

3 Click OK.
4 Apply pending changes on the CMS.
5 Log into AMC on the appliance you wish to stop managing.
6 Navigate to Maintenance > Central Management.
7 Unselect Enable Central Management.
8 Click Save.
9 Apply pending changes on the appliance.
Configure Topics:
• Overview
• Configuring the Managed Appliances
OverviewAn administrator can import policies from an existing appliance and define configurations. Policies can be applied to all appliances or just a subset. An existing managed appliance configuration may be partially imported into the CMS to startup the CMS global configuration.
Services do not need to be restarted after this configuration.
The first time the CMS synchronizes a policy with an appliance, it overwrites the policy on the appliance. This is equivalent to the appliance partially importing the CMS configuration. After the initial policy synchronization, further policy synchronizations replicate the CMS configuration onto the appliance.
Also, after the initial policy synchronization, the administrator can manually modify the address pools of the appliance and the authentication servers. The administrator changes are not overwritten during subsequent CMS policy synchronizations.
The policy settings that are replicated during synchronization are:
• Security policy, including access control rules and EPC configuration
• Network resources
• Users and groups
• Realms
• Authentication servers (the authentication server names should match those on the sending node, even if the IP addresses do not).
• WorkPlace shortcuts
• CA certificates
• Certificate revocation lists downloaded from a remote CDP (CRL distribution point)
• Agent configuration, including graphical terminal agents (Citrix and Windows Terminal Server) and Web browser profiles
NOTE: When you define a collection of appliances, you have the option of either overwriting authentication server settings (which would be typical in a deployment where there is a shared, central server), or excluding server settings from being overwritten during replication.
SMA 12.4 Central Management Server with Global High Availability Administration Guide
Using the Management Console Menus47
• Local user accounts
• Single sign-on profiles
The policy settings that are not replicated during synchronization are:
• Network settings, including IP addresses, routing information, name resolution settings (DNS and WINS), and the settings for the network services (NTP, SSH and SNMP)
• License files
• SSL certificates
• WorkPlace configuration data (customized templates)
• Administrator user accounts and role definitions
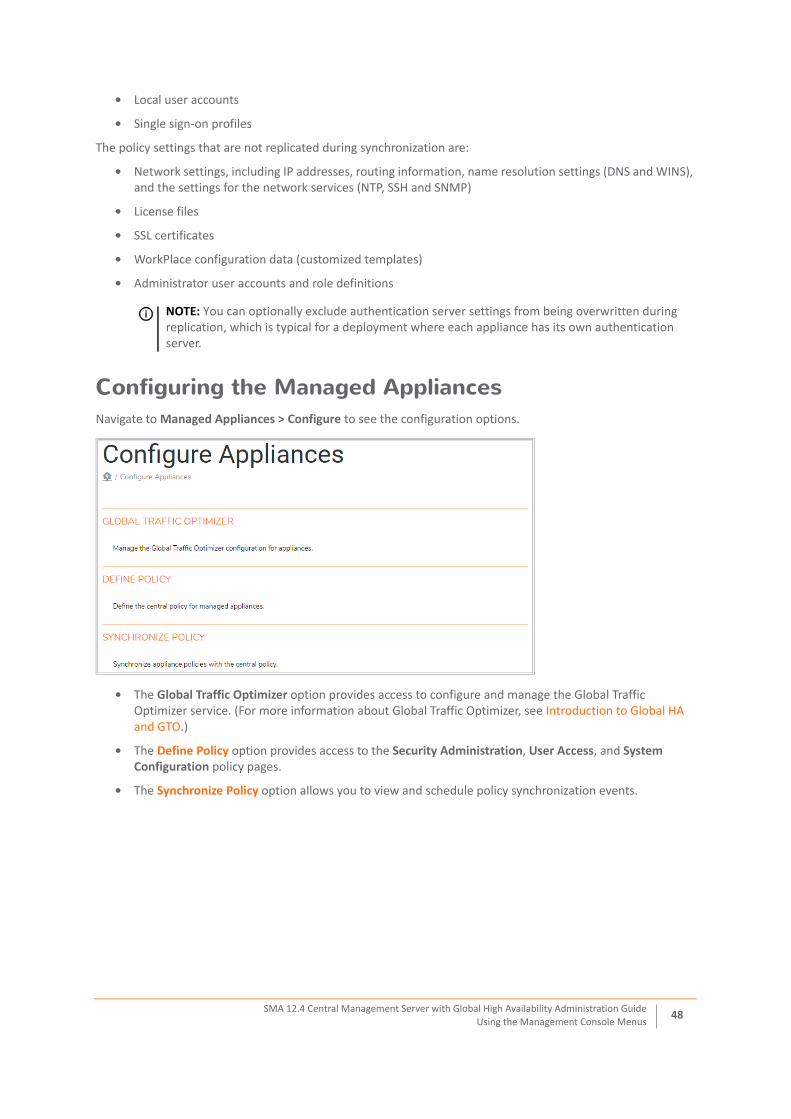
Configuring the Managed AppliancesNavigate to Managed Appliances > Configure to see the configuration options.
• The Global Traffic Optimizer option provides access to configure and manage the Global Traffic Optimizer service. (For more information about Global Traffic Optimizer, see Introduction to Global HA and GTO.)
• The Define Policy option provides access to the Security Administration, User Access, and System Configuration policy pages.
• The Synchronize Policy option allows you to view and schedule policy synchronization events.
NOTE: You can optionally exclude authentication server settings from being overwritten during replication, which is typical for a deployment where each appliance has its own authentication server.
SMA 12.4 Central Management Server with Global High Availability Administration Guide
Using the Management Console Menus48

Define Policy
To define policies:
1 Navigate to Managed Appliances > Configure.
2 Click Define Policy.
SMA 12.4 Central Management Server with Global High Availability Administration Guide
Using the Management Console Menus49

3 Under Security Administration, define:
• Access Control
• Resources (web, file, group and variables)
• Users & Groups
4 Under User Access, define:
• Realms
• Network Tunnel Service
• Web Proxy Service
• WorkPlace
• SAML Identity Provider
• Agent Configuration
• End Point Control
• Capture Advanced Threat Protection
5 Under System Configuration, define:
• Administrators
• Authentication Servers
• CA certificates
• OSCP (Online Certificate Status Protocol)
• Network Settings
6 When you are finished defining a policy, click Save or OK.
Synchronize Policy
To synchronize a policy:
1 Navigate to Managed Appliances > Configure.
2 Click Synchronize Policy.
SMA 12.4 Central Management Server with Global High Availability Administration Guide
Using the Management Console Menus50

3 Click Advanced to open the Advanced panel.
4 Select Force selected appliance to import the CMS policy if you want to reset the appliance policy to the baseline CMS policy. This triggers the next synchronization (or scheduled synchronization) to overwrite the policies of the selected appliances with the CMS policy, including all custom-defined address pools and authentication servers.
5 Select Now if you want to synchronize immediately, or select At and choose the time and date from the drop-down menus to schedule the synchronization.
6 Click Synchronize.
Synchronizing a policy does not usually terminate existing user sessions. If a synchronization does terminate any user sessions, a warning message is displayed for that appliance on the Sync Policy page.
MonitorThe Monitor option for Managed appliances provides detailed information on User Sessions, Reports and Health. Select Managed Appliances > Monitor to see the options.
User SessionsOn the User Sessions page, you can view current and past user sessions and terminate current sessions. If you select a session and then select the Terminate session-restrict logins option, it temporarily disables the user’s access for up to 10 minutes.
To monitor user sessions:
1 Navigate to Managed Appliances > Monitor.
2 Click User Sessions.
SMA 12.4 Central Management Server with Global High Availability Administration Guide
Using the Management Console Menus51

3 Define the how the data appears in the table:
a In the View field, select the number of users to show per page.
b In the sessions field select the type of session to view: Licensed, All open, or All.
c From the drop-down menus under Filters, select the items you want to view or manage.
4 If you want to filter the data further, select options from the drop down lists under Appliance, Login status, Realm, Community, Zone, Agent, and Platform.
ReportsOn the Reports page, you can view reports about Users, Access, Devices, and the Network.
• User — View reports that show the number of user sessions on appliances or realms, for example, the number of user sessions currently on selected appliances, or the count for each of the top five realms of licensed users for the last day.
• Access — View reports that show the policy rules matched and destinations accessed by users on managed appliances, for example, the top five permit rules and how many times they have been enforced over the last hour, or the count for each of the top five most accessed destinations over the last day.
• Devices — View reports that show the platforms and zones in use by users, for example, a user's platform distribution for the last week, or a user’s zone placement count for the last month.
• Network — View reports on the bandwidth consumption of appliances and the data transferred to users. For example, the top five users who transferred the most data and how much they transferred over the last hour or over the last three months, or view the top five appliances that consume the most bandwidth and how much they are currently consuming.
To view the reports:
1 Select the category: Users, Access, Devices, or the Network.
2 From the drop down lists, select the options for View.
3 Select an option from the Time drop down list.
The display adjusts according to the selections made. Select Refresh to refresh the data in the report. Select Export to export the data to a CSV file.
NOTE: The option for the View fields vary according to the type of report selected.
SMA 12.4 Central Management Server with Global High Availability Administration Guide
Using the Management Console Menus52

HealthOn the Health page, you can set up and monitor various health metrics on a graph that charts users against time. The data is downloadable to a CSV file.
To monitor health metrics:
1 Navigate to Managed Appliances > Monitor.
2 Click Health.
3 From the Appliances menu, select the appliance you want to graph.
4 From the Time period menu, select the time period you want the graph to display.
5 From the Data item menu, select the data you want the graph to display.
6 From the Plot type menu, select the type of graph you want to plot.
7 Select Refresh to refresh the data or select Download to download the data to a CSV file.
MaintainNavigate to Managed Appliances > Maintain. This page has two options:
• Maintain Appliances
• Maintenance Tasks
SMA 12.4 Central Management Server with Global High Availability Administration Guide
Using the Management Console Menus53
Maintain Appliances
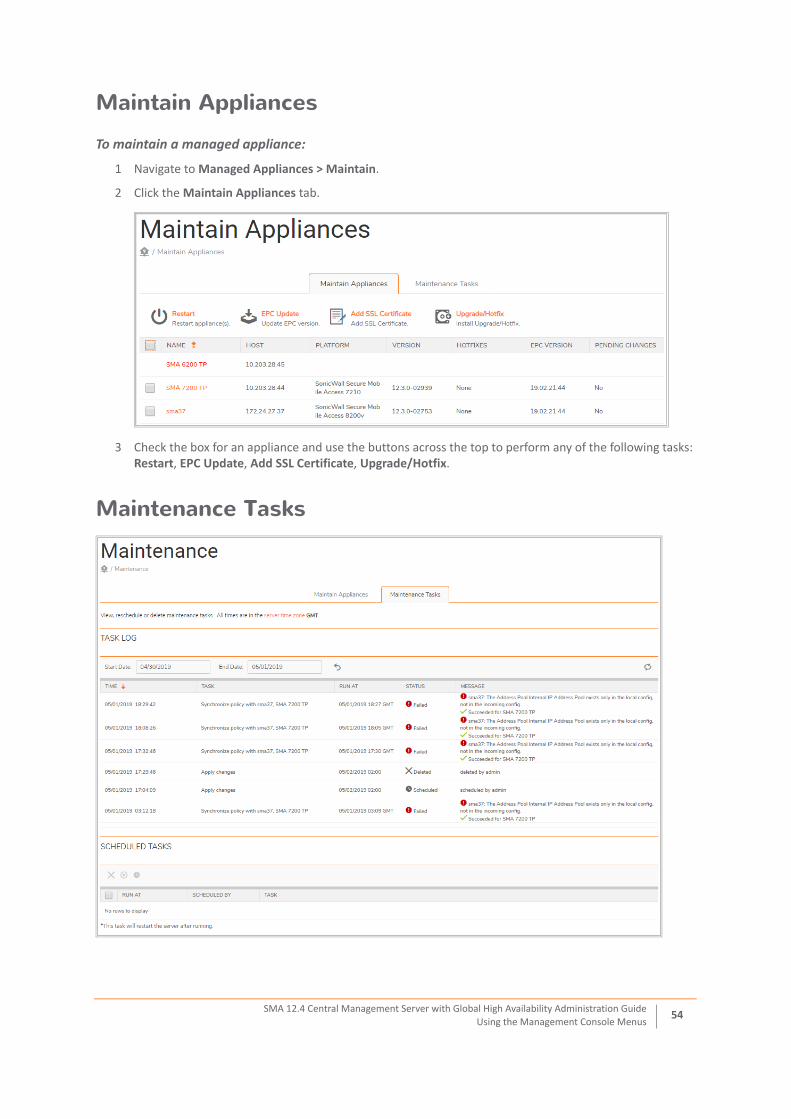
To maintain a managed appliance:
1 Navigate to Managed Appliances > Maintain.
2 Click the Maintain Appliances tab.
3 Check the box for an appliance and use the buttons across the top to perform any of the following tasks: Restart, EPC Update, Add SSL Certificate, Upgrade/Hotfix.
Maintenance Tasks
SMA 12.4 Central Management Server with Global High Availability Administration Guide
Using the Management Console Menus54

Topics:
• Viewing Maintenance Tasks
• Deleting Scheduled Maintenance Tasks
• Rescheduling Maintenance Tasks
• Performing Maintenance Tasks Immediately
Viewing Maintenance Tasks
To view maintenance tasks:
1 Navigate to Managed Appliances > Maintain.
2 Click the Maintenance Tasks tab. The Task Log lists recent and upcoming maintenance tasks.
Deleting Scheduled Maintenance Tasks
To delete scheduled maintenance tasks:
1 Navigate to Managed Appliances > Maintain.
2 Click the Maintenance Tasks tab. The Task Log lists recent and upcoming maintenance tasks.
3 In the Scheduled Tasks section, select the maintenance tasks you want to cancel.
4 Click the X (Delete) icon.
Rescheduling Maintenance Tasks
To cancel re-schedule maintenance tasks:
1 Navigate to Managed Appliances > Maintain.
2 Click the Maintenance Tasks tab. The Task Log lists recent and upcoming maintenance tasks.
3 In the Scheduled Tasks section, select the maintenance tasks you want to cancel.
4 Click the > (Reschedule) icon.
Performing Maintenance Tasks Immediately
To perform maintenance tasks immediately:
1 Navigate to Managed Appliances > Maintain.
2 Click the Maintenance Tasks tab. The Task Log lists recent and upcoming maintenance tasks.
3 In the Scheduled Tasks section, select the maintenance tasks you want to cancel.
4 Click the Run Now (clock) icon.
SMA 12.4 Central Management Server with Global High Availability Administration Guide
Using the Management Console Menus55

5
Central User Licensing
Topics• Overview
• How Central User Licenses Work
• Enabling Central User Licensing
• Getting Started with Central User Licensing
OverviewCentral User Licensing is an optional feature that allows a CMS to share a pool of user licenses among managed appliances. Customers with appliances that are globally distributed can use their licenses more efficiently with central user licenses where user demands peaks in one geographic area while it falls in a different geographic area due to off-work/night hours. Appliances that are in a datacenter can share licenses instead of having individual licenses for each appliance. When new or replacement appliances (physical or virtual) are added under CMS management, they get to share the pool of central user licenses.
Central user licensing must be enabled to use Global High Availability.
How Central User Licenses WorkUser licenses do not have to be applied to individual VPN appliances. The pooled licensing model allows central user licenses to be shared among the managed appliances. Central user licensing makes use of a distributed data store to keep track of license usage. The distributed data store has storage nodes on multiple appliances so that central user licensing is resilient to the failure of (or communication loss with) the CMS or any one appliance.
NOTE: If CMS is used to manage appliances that have their own license, the administrator is responsible for ensuring that licenses across all managed appliances have the same features. CMS cannot manage configurations on appliances with a heterogeneous set of licensed features.
NOTE: Managed appliances must be able to communicate with each other via their external interface IP addresses or internet-routable IP addresses in order for them to be able to share information in the distributed data store.
SMA 12.4 Central Management Server with Global High Availability Administration Guide
Central User Licensing56

The following drawing illustrates centrally managed licenses for globally located VPN appliances.
In the event of a CMS failure (or loss of communication):
• Managed appliances will continue to access the distributed data store and share central user licenses.
In the event an appliance is orphaned (unable to communicate with the CMS or other appliances):
• An orphaned appliance will have access to the all the central user licenses (and spike licenses) for 7 days or until communications are re-established.
In the event of a communications loss between the CMS and MySonicWall:
• The central user licenses continue to be valid for 30 days.
Topics:
• Central Spike User Licenses
• Central Email Licenses
• Perpetual Pooled Licenses
Central Spike User LicensesSpike licensing allows temporary increases in the number of available licenses to meet sudden increases in demand for licenses due to inclement weather or disaster. Spike licenses can be applied to a CMS using either a subscription user license or perpetual user license. Spike user licenses are “full” user licenses and allow any type of connection (e.g., tunnel, web, ActiveSync). A spike license is automatically activated for a day if the user
session count exceeds the CMS user license count.
When a spike is active, it allows the appliances to service up to sum of:
• the CMS base license max user count
• the spike license max user count
The CMS Dashboard and Licensing page will indicate that a spike is in effect, along with its Start and Stop times.
NOTE: Beginning with the SMA 12.1 release, CMS uses a distributed data store to track user license consumption for each appliance and to regulate the total number of pooled user licenses being used.
NOTE: If you are consuming a spike license from a managed appliance when the CMS is turned OFF, the spike activation status will be displayed as “online-inactive” even after utilizing the license.
SMA 12.4 Central Management Server with Global High Availability Administration Guide
Central User Licensing57
A central spike license allows any of these user licenses to spike:
• Subscription full-user license
• Subscription tiered-user license
• Perpetual full-user license
The CMS administrator can control whether or not to use automatic spike licensing.
Central Email LicensesDifferent terms for central email licensing are available:
Depending on which licensing terms are available for the appliance, licensing for email connections will be applied in this way:
• During operation, if an ActiveSync connection request is made and Email licenses are available, then an Email license will be used.
• If all Email licenses are consumed and an ActiveSync connection request is made (and full licenses are available), then a full license will be used.
• The license that is issued when a connection begins will remain with the connection until it ends.
Perpetual Pooled LicensesPerpetual pooled licenses are CMS-based user licenses that do not expire in the way that subscription-based licenses do:
• Perpetual licenses are full user licenses and allow any type of connection (e.g., tunnel, web, ActiveSync).
• Perpetual CMS licenses are stackable. Licenses remains perpetual after being stacked.
These licenses and components can be used with a perpetual pooled license:
• subscription email license
• subscription Capture CMS license
• time-limited subscription components
NOTE: When a spike license is installed on a CMS with a subscription user license, and the subscription license expires, the spike will remain enabled.
When SMA is licensed with a standalone license, and that license is expires, the spike license also expires.
Full license permits a connection of any of these connection types: - VPN tunnel, web, ActiveSync, or Outlook Anywhere
Tiered license permits a connection of a specific connection type: VPN tunnel, web, ActiveSync, or Outlook Anywhere
Email license a tiered license that permits an ActiveSync or Outlook Anywhere connection
NOTE: Perpetual CMS user licenses cannot be stacked with a subscription CMS user license.
SMA 12.4 Central Management Server with Global High Availability Administration Guide
Central User Licensing58
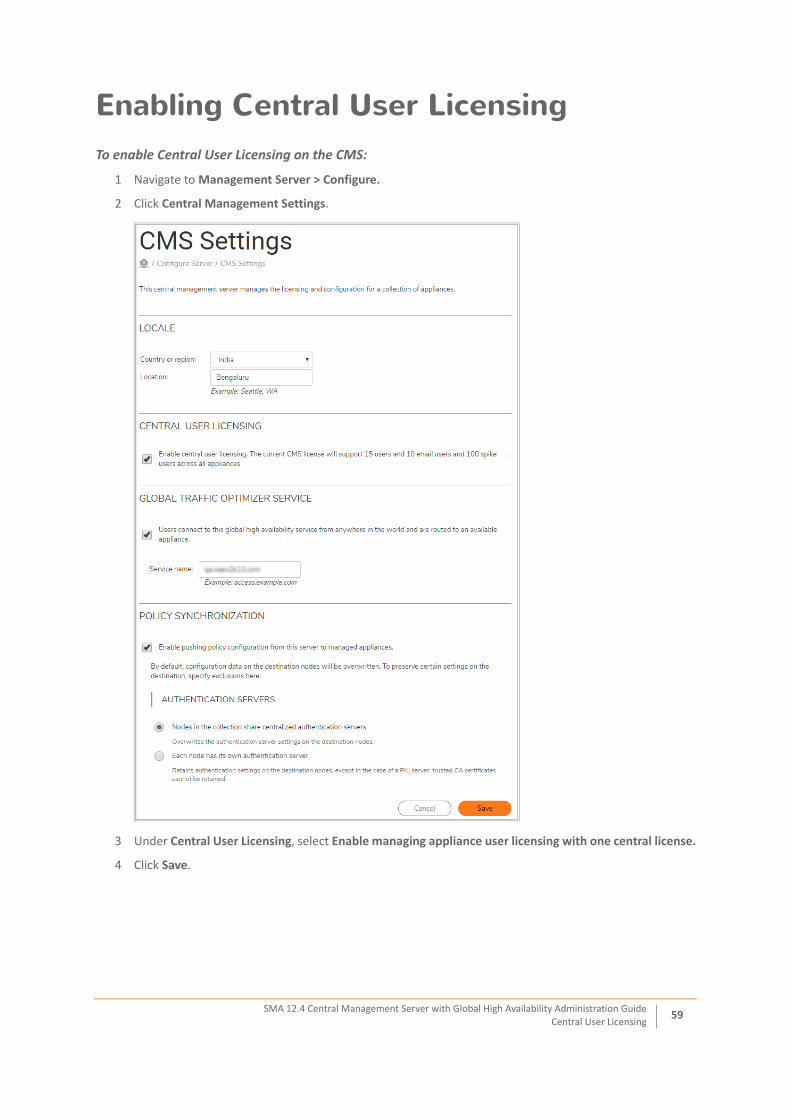
Enabling Central User LicensingTo enable Central User Licensing on the CMS:
1 Navigate to Management Server > Configure.
2 Click Central Management Settings.
3 Under Central User Licensing, select Enable managing appliance user licensing with one central license.
4 Click Save.
SMA 12.4 Central Management Server with Global High Availability Administration Guide
Central User Licensing59

Getting Started with Central User LicensingThis section describes how to migrate from a standalone appliance to CMS with Global HA and Central User Licenses.
Topics• Setting Up CMS to Use Central User Licenses
• Setting up CMS for Centralized Appliance Configuration and Management
• Resetting a CMS License
Setting Up CMS to Use Central User LicensesOnce you have SMA appliances registered with CMS, you can transition to Central User Licensing.
To transition standalone SMA appliances to use the Central User License model:
1 Log into the Central Management Console.
2 Navigate to Management Server > Configure.
3 Click Licensing.
4 Select Register.
5 Enter the MySonicWall credentials of the MySonicWall account who owns the licenses for the Central Management Server.
6 Enter the serial number and authentication code that match the license in MySonicWall.
7 Enter a friendly name to identify this CMS in your MySonicWall account.
8 Select Submit. You see the MySonicWall view of your license.
You can get back to this at any time after you are registered by navigating to Management Server > Configure and clicking on Licensing and re-entering your MySonicWall credentials.
9 Select Return. This is the normal view of a registered CMS license. It shows the licensing mode as online and how long since it was last synchronized. It should never be more than 24 hours since was last synchronized.
Setting up CMS for Centralized Appliance Configuration and ManagementOnce you have a cluster of SMA appliances that share a central license pool and you can monitor and maintain them from a single console.
NOTE: If you have an HA Pair, you need to engage with SonicWall Sales to exchange your HA pair licenses for CMS-based Central User Licenses.
NOTE: You can also select Synchronize to force an immediate synchronization with MySonicWall.
SMA 12.4 Central Management Server with Global High Availability Administration Guide
Central User Licensing60

If your appliances have very different configurations, you should normalize the differences so that you can take full advantage of CMS, GTO, and Global HA.
To use CMS to centralize appliance configuration management:
1 Normalize the appliance configurations.
2 Export the configuration from your SMA appliance.
3 Import the configuration to CMS.
4 Synchronize the CMS policy with the managed appliances.
5 Configure the CMS as described in Configure.
Resetting a CMS LicenseThe license state on a Central Management Server can be reset or undone.
1 Navigate to the Licensing page.
2 Add ?troubleshoot=1.
3 Select Reset.
This reboots the CMS with no license and it can be registered again with MySonicWall.
SMA 12.4 Central Management Server with Global High Availability Administration Guide
Central User Licensing61

6
Global High Availability
Global High Availability (Global HA) facilitates global high availability with load distribution and disaster recovery capabilities across the SMA appliances in the GTO service. The high availability can be deployed in a single datacenter or across dispersed data centers.
Topics:
• High Availability of the VPN Service
• High Availability of the CMS
• Disaster Recovery for the VPN Service
• Global High Availability Versus HA Pair
High Availability of the VPN ServiceGlobal High Availability (Global HA) is configured from the CMS console by first enabling the Global Traffic Optimizer (GTO) service. Users access the VPN using the service name (e.g. access.example.com) in the VPN tunnel clients (Connect Tunnel or Mobile Connect) or the web client. The GTO service directs user connections to an appliance that is available.
Global HA enables SMA appliances to scale performance by deploying multiple appliances under a service name. Global HA eliminates a single point of failure and provides a highly available global VPN service. Customers can deploy 2 SMA appliances in the same data center or deploy clusters of up to 100 physical and virtual appliances across multiple data centers around the globe.
A distributed data store shares user session state as well as licensing information across the mesh network of SMA appliances. This allows for session persistence across appliances. In the event of a failover, users are connected to another appliance in the service. The distributed data store also allows for central user licenses to be shared across appliances and data centers.
All of the SMA appliances that are configured for the GTO service participate in the highly available VPN service. If an appliance that is part of the service fails due to hardware, power, or network issues:
• New connection requests (by tunnel or web clients) will get directed to other available appliances.
• Existing connections (that were connected to the appliance that failed) are automatically reconnected to another available appliance. Users typically do not need to re-enter their credentials.
NOTE: Global High Availability replaces the HA Pair model. Secure Mobile Access version 11.4 is the last version of SMA that supports HA Pairs. See the Comparison of HA Pair and GTO with Global HA table for a comparison of the two models.
SMA 12.4 Central Management Server with Global High Availability Administration Guide
Global High Availability62

High Availability of the CMSCustomers can setup their CMS in a virtual infrastructure (ESXi, Hyper-V, AWS, or Azure) that supports high availability. The following HA models can be used to enable a fault tolerant CMS.
Disaster Recovery for the VPN ServiceCustomers can setup Disaster Recovery (DR) for their VPN by locating appliances that are in a Global Traffic Optimizer (GTO) service at different data centers. Configuring a standby appliance is another good way to ensure connectivity during a service outage.
Disaster recovery of the VPN service enables the continuation of remote access capabilities when a disaster or failure occurs to a major location. Users use the same GTO service name (such as access.example.com) and SMA appliances that are located at other locations that are part of the global VPN service accepts the connection requests.
Planning the Disaster Recovery for the VPN service is done in conjunction with disaster recovery planning of other essential IT services. SMA appliances (that are part of the GTO service) must be located at alternate data centers along with other key infrastructure components.
If a disaster destroys a data center that has SMA appliances, the remaining appliances continue to provide service.
CMS High Availability and Disaster Recovery Features
CMS Global HA and Disaster Recovery Scenarios
VMware ESXi
Microsoft Hyper-V
AWS Azure Comments
HA Clustering Yes Yes Yes Yes Seamless transition of CMS in a HA cluster from host 1 to host 2, when host 1 is rebooted or shutdown
Cloning of CMS Yes Yes Yes Yes CMS can be successfully cloned followed by resumption of communication with managed appliances and the License Manager service.
Export/Import Yes Yes Yes Yes CMS could be successfully exported from host 1 and imported to host 2 followed by resumption of communication with managed appliances and the License Manager service.
Snapshot/Checkpoint Yes Yes Yes Yes Successful preservation and transition
SMA 12.4 Central Management Server with Global High Availability Administration Guide
Global High Availability63

Global High Availability Versus HA PairGlobal Traffic Optimizer (GTO) with Global High Availability (Global HA) is a new solution for SMA 12.4 and later that facilitates high availability and disaster recovery for SMA products.
The Comparison of HA Pair and GTO with Global HA table compares the features of an HA Pair with the features of GTO with Global HA.
Comparison of HA Pair and GTO with Global HA
HA Pair GTO with Global HA
High availability model
Active-Standby All appliances in the cluster are active.
Number of appliances in HA cluster
Always 2 2 to 100
Licensing modelTwo separate appliance-based license files
CMS-based pooled user license obtained from the License Manager Service
Location of appliances
Appliances must be in a single data center less than 3 feet apart.
Globally distributed locations
SMA appliances supported
All physical appliances.
Virtual appliances are not supported.
All SMA physical and virtual appliances are supported.
Virtual infrastructure
Not needed Required. CMS is a virtual machine and must be hosted on virtual infrastructure (VMWare ESX/i, Microsoft Hyper-V, AWS, or Azure)
Mix of appliances Both appliances in the HA Pair must be identical (for example two SMA EX-7200s)
The cluster can have any combination of physical and virtual SMA appliances.
Release versions supported
SMA 10.7.2 and 11.4.0
Not supported after 11.4.0 support expires
SMA 12.1 and higher
No plans to back port to 11.4
End of Life April 2019 (3 years after release of 11.4)
This is the next generation of SMA HA
Disaster Recovery Not Supported. Appliances in an HA Pair must be in the same data center.
Supported. Appliances in the cluster can be globally distributed.
Redirection model Uses a VIP DNS-based redirection
Requires customers to configure DNS for Global Traffic Optimizer.
Session restoration Session is automatically restored on the paired appliance.
VPN reconnection and session restoration is supported with Global HA in SMA 12.4.
SMA 12.4 Central Management Server with Global High Availability Administration Guide
Global High Availability64

Data persistence Personal Bookmarks, Local User accounts, Device Registration.
Per-app VPN data persists across a failover.
User lock out persists across a failover.
Personal bookmarks, Local User accounts, Device Registration, per-application VPN data, and user lockouts are supported with Global HA in SMA 12.4.
Single Points of Failure
HA Pair is installed in one datacenter which is susceptible to power, network or other disasters
CMS server failure.
A CMS outage for a few minutes has little or no adverse affect on HA.
CMS is a virtual appliance and relies on the HA model of the IT department for it virtual infrastructure.
CMS has a relatively low MTTR if a full clone is instantiated or the HA Cluster model is used.
License Manager Service.
CMS queries the License Manager every 24 hours and continues to operate for 30 days without access to the License Manager.
Comparison of HA Pair and GTO with Global HA
SMA 12.4 Central Management Server with Global High Availability Administration Guide
Global High Availability65

7
Alerts and SNMP
It consists of the following topics:
• Overview
• Pre-Configured Alerts
• Configuring SNMP
OverviewThis section contains detailed information about alerts and the use of SNMP in the CMS.
The CMS generates alerts that are either Warnings or Errors. Alerts are displayed prominently on the CMS dashboard. Alerts can originate from a condition that occurs on the CMS, or from a managed appliance.
Alerts can be configured to generate SNMP traps that are monitored by any IT infrastructure Network Management System (NMS).
Pre-Configured AlertsThe Table of Pre-Configured Alerts below has a fixed set of conditions that can trigger alerts.
NOTE: The Priority symbols represent a Warning or an Error .
Table of Pre-Configured Alerts
Priority Name Measurement Condition
Unable to communicate with License Manager
CMS connection to MySonicWall Connection is lost for 10080 minutes
Unable to communicate with License Manager
CMS connection to MySonicWall Connection is lost for 10080 minutes
Temporary communication loss Manage appliance connection to CMS Connection is temporarily lost
Permanent communication loss Managed appliance connection to CMS Connection is permanently lost
Managed appliances intercommunication failure
Managed appliances intercommunication Connection is lost
License has expired CMS license expiration date Expiration date is past
License expires soon CMS license expiration date Expiration date is a certain number of days away
High user license usage CMS license usage Value is over 95 percent
High user license usage CMS license usage Value is over 75 percent
SMA 12.4 Central Management Server with Global High Availability Administration Guide
Alerts and SNMP66

The administrator can edit the pre-configured alerts as follows:
• Modify or customize these pre-configured default alerts.
• Disable them
• Make changes to the threshold, duration and message.
• Configure additional alerts. The Table of Alerts lists all the conditions that can be used to configure Alerts.
• Configure the priority of an alert to either Critical or Warning.SNMP traps are generated for all Critical alerts.
For these activities, use the following guidelines:
• When an appliance-related alert is configured, it applies to all the managed appliance, that is, alerts cannot be individually configured/tailored for a specific appliance.
• The maximum number of alerts that can be configured by the administrator on a CMS is 100.
High swap usage Swap usage Value is over 5 percent
High memory usage Memory usage Value is over 85 percent for 5 minutes
High email user license usage CMS Email license usage Value is over 95 percent
High email user license usage CMS Email license usage Value is over 75 percent
High disk usage Disk usage Value is over 95 percent
High CPU usage CPU usage Value is over 85 percent for 5 minutes
High appliance license usage Appliance license usage Value is over 89 percent
Critically high memory usage Memory usage Value is over 95 percent for 5 minutes
Critically high CPU usage CPU usage Value is over 95 percent for 5 minutes
Critically high appliance license usage Appliance license usage Value is over 98 percent
CMS Spike license is active CMS Spike license usage Spike license is active
CMS Spike license days left is low CMS Spike license days left Value is under 5 days
CMS Spike license days left is critically low CMS Spike license days left Value is under 2days
Certificate expired Time until certificate expires Value is under 0 days
Certificate about to expire Time until certificate expires Value is under 30 days
Standby appliance is active The standby appliance is active The standby appliance becomes active
Public DNS settings do not match GTO settings
The Public DNS settings and GTO settings do not match
The Public DNS settings do not match the GTO settings
Table of Pre-Configured Alerts
Priority Name Measurement Condition
SMA 12.4 Central Management Server with Global High Availability Administration Guide
Alerts and SNMP67

Alerts shown on the dashboard can be dismissed by the administrator. Dismissed alerts will no longer be displayed in the dashboard view, but can be seen in the Alerts page. If the alert condition toggles (ON->OFF->ON), a new alert for the same condition will be raised in the dashboard.
All alerts are stored in the Alerts Database. A rolling history of 90 days worth of alerts are retained in the Alerts Database. An Alerts View allows the administrator to see all Alerts in the past Day, Week, Month or Quarter.
Configuring SNMPTo enable SNMP:
1 Navigate to Management Server > Configure
2 Click Network Services.
3 Under SNMP, click Configure.
[
4 Enter the information you want in the appropriate fields.
5 Click Save and Apply Pending Changes.
SMA 12.4 Central Management Server with Global High Availability Administration Guide
Alerts and SNMP68

8
Capture Advanced ThreatProtection
Capture Advanced Threat Protection (Capture ATP) is a cloud-based service that analyzes various types of content for malicious behavior. This function is integrated with the WorkPlace File Explorer feature. When files are uploaded, the file can be sent to the Capture ATP service for analysis.
Enabling Capture ATPAfter being successfully licensed, Capture ATP must be enabled before it will begin analyzing files for malicious behavior.
To enable Capture ATP:
1 Navigate to Managed Appliances > Configure
2 Click on Define Policy.
IMPORTANT: Capture Advanced Threat Protection (Capture ATP) is an add-on security service to the SMA that helps a firewall identify whether a file is malicious.
Before you can enable Capture ATP you must first get a license. If the Capture ATP license has not been activated, an error message displays:
After Capture ATP is licensed, you can view Capture ATP status in your MySonicWall account as well as configure and receive alerts and notifications.
For further information about Capture ATP, licensing it, and using your MySonicWall account to configure and receive alerts and notifications, see the Capture Advanced Threat Protection Feature Guide.
SMA 12.4 Central Management Server with Global High Availability Administration Guide
Capture Advanced Threat Protection69

3 In the User Access section, click Capture Advanced Threat Protection.
4 Click the Capture ATP tab.
5 Select Enable Capture Advanced Threat Protection.
6 To verify the connection to the Capture ATP service, click the Test connection button.
File OptionsThe File Options settings allow you to specify which file types will be sent to the Capture ATP service for analysis and the maximum size of those files.
SMA 12.4 Central Management Server with Global High Availability Administration Guide
Capture Advanced Threat Protection70

Topics:
• Setting the File Types
• Setting the Maximum File Size
Setting the File TypesYou can select the types of files to be submitted to Capture ATP for inspection.
To set which file types are analyzed:
1 Navigate to Managed Appliances > Configure.
2 Click Define Policy.
3 In the User Access section, select Capture Advanced Threat Protection.
4 Click the Capture ATP tab.
5 Select the file types you want analyzed by the Capture ATP service. By default, only the Executables (PE, Mach-O, and DMG) file type is enabled.
6 Click Save.
Setting the Maximum File SizeYou can select the maximum size of files to be submitted to Capture ATP for inspection.
To set the maximum file size:
1 Navigate to Managed Appliances > Configure.
2 Click Define Policy.
3 In the User Access section, select Capture Advanced Threat Protection.
4 Click the Capture ATP tab.
SMA 12.4 Central Management Server with Global High Availability Administration Guide
Capture Advanced Threat Protection71

5 Choose one of the options:
• Select Use the default value (10MB) to use the default file size of 10MB.
• Restrict to __ MB to specify your own maximum file size.
6 Click Save.
Web Services
Files uploaded to your SharePoint sites can be sent to Capture ATP for inspection.
To configure Capture ATP to analyze files uploaded to SharePoint sites:
1 Navigate to Managed Appliances > Configure > Define Policy.
2 In the Web Services section, select Send SharePoint file uploads to Capture ATP service.
3 Click the Save button.
Advanced SettingsThe Advanced settings allows you to choose to block or allow uploaded files that are not evaluated by Capture ATP.
• Select Block uploads when the file size exceeds the above limit to stop files from being uploaded that exceed the maximum file size specified in the File Options section. (This is selected by default.)
• Select Block uploads when there is a failure communicating with the Capture ATP service or issues in file processing due to system disk capacity to stop files from being uploaded when the appliance cannot communicate with the Capture ATP service or when the performance of the appliance is impacted by high disk usage.(This is selected by default.)
NOTE: The maximum file size supported by SMA 12.4 is 50MB.
NOTE: The resource must be classified as a SharePoint web service for this feature to function. See “Configuring a Resource as a SharePoint Web Service” in the SMA 12.4 Administration Guide.
NOTE: The restrictions set for Capture ATP for file types and maximum sizes will apply to files uploaded to SharePoint site. See Setting the File Types and Setting the Maximum File Size for more information on configuring these options.
SMA 12.4 Central Management Server with Global High Availability Administration Guide
Capture Advanced Threat Protection72

Secure Mobile Access 12.4 Administration Guide
Central FIPS Licensing
9
73
Central FIPS Licensing
FIPS (Federal Information Processing Standard) 140-2 Level 2 is a validation standard for evaluating cryptographic modules, and includes stringent reviews of source code, algorithms, physical security, and operational testing on cryptographic security products. The United States Federal Government is required to purchase cryptographic products validated to the FIPS 140-2 standard. In the international marketplace, ISO19790 is being adopted as a standard and is a direct adaptation of FIPS 140-2.
The SonicWall SMA 7200, 7210, and SMA 6200, 6210 appliances have FIPS 140-2 Level 2 certification from NIST (the National Institute of Standards and Technology, the United States FIPS 140-2 Cryptographic Module Validation Authority) and CSE (the Communications Security Establishment, the Canadian FIPS 140-2 Cryptographic Module Authority).
FIPS mode is transparent to end users. Internally, FIPS mode enforces secure communication and system integrity.
FIPS can be enabled on centrally managed appliances.
• A central FIPS license allows all appliances managed by the CMS to be FIPS-enabled.
• To be managed by the CMS, FIPS-enabled appliances are not required to be part of a GTO service.
• A CMS license that includes FIPS must also include central user licenses. An appliance that is not centrally licensed, but has its own user license file, cannot be FIPS-enabled from a CMS-based license.
When the CMS central user license has FIPS, the administrator can enable FIPS individually for any managed appliance from its AMC. (See “Enabling FIPS” in the SMA 12.4 Administration Guide for more information.)
For more information about FIPS, see “FIPS Certification” in SMA 12.4 Administration Guide.
To enable Central FIPS Licensing:
1 Navigate to Management Server > Configure.
2 Click Licensing.
3 In the Online Licensing section, click Manage.
4 Log into your MySonicWall account with your username and password.
5 Navigate to Product Management > My Products.
6 Expand the line that contains your CMS license.
7 On the Licenses page, in the Gateway Services section, verify that FIPS Support has an active license.

SMA 12.4 Central Management Server with Global High Availability Administration Guide
Global High Availability
Part 2
74
Global High Availability
• Introduction to Global HA and GTO
• Planning GTO Deployment
• Setting up GTO
• Extending GTO Deployment

10
Introduction to Global HA and GTO
Topics• Overview
• CMS with GTO
• Exchange ActiveSync and Outlook Anywhere
• Custom FQDN for Mapped Resources
• Viewing GTO Status from the CMS Console
• GTO and IPv6
• Deployment Notes
OverviewGlobal High Availability (Global HA) is a set of SMA features that come together to deliver a highly available VPN service. Global HA presents a collection of SMA appliances to end users through a single service name (for example access.example.com). Global Traffic Optimizer (GTO) is the underlying service that is enabled from the CMS console.
SMA 12.4 Central Management Server with Global High Availability Administration Guide
Introduction to Global HA and GTO75

Previously, the benefits provided by GTO could only be achieved by deploying and coordinating an array of separate third-party appliances and services, such as content-distribution-network DNS redirectors, local traffic managers, and load balancers often under separate administrative control. GTO replaces this scenario with a single external DNS delegation, which manages all aspects of user traffic distribution automatically, including license provisioning and leveling.
Users have one consistent sign-on procedure with one GTO service name that connects them with the appropriate SMA appliance for their current location and circumstances, and gives them a similar experience every time they use the system anywhere in the world.
GTO makes intelligent routing decisions based on real-time data such as appliance availability, health, load, and geographic location. For example, it will be limit the availability of appliances with heavy utilization in order to optimize the performance of your entire GTO environment. GTO redirects user connection requests to an available appliance.
This guide provides instructions on how to deploy CMS with GTO, including DNS configuration and certificate
requirements.
CMS with GTOCMS with GTO supports the following services and features:
• Exchange ActiveSync and Outlook Anywhere
• Custom FQDN for access to resources and Workplace sites
• Administration visibility into GTO status from the CMS console
• IPv6I
Exchange ActiveSync and Outlook AnywhereFrom the CMS console, you can configure Exchange ActiveSync and Outlook Anywhere across all appliances in the GTO service. For example, if the GTO service name is access.example.com the custom FQDN could be mail.example.com.
Mail clients using Exchange ActiveSync or Outlook Anywhere protocol can connect to the GTO service, using a custom FQDN, and experience global traffic Optimizer, such connection to a proximate appliance, improved availability, and load distribution.
NOTE: Remember to keep the DNS port open on the firewall.
NOTE: Administrators can now better see and understand how GTO selects which appliances are chosen to manage user connections. The DNS TXT annotations will have all the information includes A records, NS records, descriptive text, and SOA records.
NOTE: The TXT interpreter tool can be invoked by running the following query in any GTO enabled appliance as well as CMS “gtodnstxt --name gto_service_name”.
NOTE: An SMA appliance must be dual-homed to participate in GTO.
NOTE: Public DNS must be configured for the ActiveSync and Outlook Anywhere FQDN, and the names must similar to the GTO service names.
SMA 12.4 Central Management Server with Global High Availability Administration Guide
Introduction to Global HA and GTO76

CMS with GTO supports roaming as follows:
• When an Exchange ActiveSync client connects to a GTO service it may get directed to a different appliance from the last time it connected.
• Exchange ActiveSync clients send credentials with each request and after they get authenticated, they can access the ActiveSync server.
• A new pooled license is issued for each connection.
• The license is released after the ActiveSync connection is terminated.
Custom FQDN for Mapped Resources You can configure custom FQDNs to backend resources across all appliances in a GTO service, and you can access those resources through the appliances that are part of the GTO service.
Users connecting to custom FQDNs can experience the benefits of GTO:
• GTO connection to a proximate appliance
• Improved availability
• Load distribution
Resources should be accessed with the FQDN name rather than with the IP address.
The public DNS must be configured appropriately for each custom FQDN, in that each custom FQDN name must be similar to the GTO service name. For example, if the GTO service name is access.example.com, the custom FQDN name for Email should be mail.example.com.
In Workplace, all links must point to the same appliance.
The maximum number of custom FQDNs that can be configured for all appliances is the same as that of a standalone SMA appliance. If you are already authenticated to a GTO service, you will need to re-authenticate if you enter a Vanity FQDN into a Web browser.
You can deploy configurations with the following types custom FQDNs to appliances that are configured for GTO:
• Vanity FQDNs that are currently supported on a single appliance.
• Custom FQDN Mapped Resource Access where the backend resource or server is mapped to an external fully qualified domain name (host and domain).
• Workplace site with a domain name that is different from the GTO service domain name.
Viewing GTO Status from the CMS ConsoleYou can view and monitor the following capabilities on the CMC dashboard:
• Appliances successfully enabled for GTO
• Appliances not functioning correctly with GTO
• Appliances that have the recommended certificate SANs for the primary GTO service
• Appliances that do not have the recommended certificate SANs for the primary GTO service
• DNS status of appliances delegated as authoritative servers
SMA 12.4 Central Management Server with Global High Availability Administration Guide
Introduction to Global HA and GTO77

GTO and IPv6• End users on IPv6-only networks can reach SMA appliances with IPv6 addresses through GTO.
• SMA appliances serving as authoritative DNS servers include IPv6 AAAA records in their responses where appropriate.
• IPv6 is not supported on the internal interfaces of SMA appliances.
Deployment Notes• You should configure a minimum of two SMA appliances and delegate them in DNS as authoritative
servers. This minimizes the likelihood that your users ever lose DNS resolution of the GTO service.
• You must enable UDP 53 on your firewall for all traffic that is sent to CMS-managed appliances that are configured as authoritative servers.
SMA 12.4 Central Management Server with Global High Availability Administration Guide
Introduction to Global HA and GTO78

11
Planning GTO Deployment
This section describes how to make deploying GTO easier by planning and adhering to a few guidelines as described below:
Topics• Choosing a Deployment Model
• Minimizing Configuration Differences
• GTO Service Names and DNS Delegations
• Provisioning Certificates
Choosing a Deployment ModelBefore you set up your equipment, you need to choose a deployment model that meets your organization's needs. There are several ways you can set up the network hierarchy of your GTO deployment:
• SMA Appliances Located in One Data Center
• SMA Appliances Geo-Distributed across Multiple Data Centers
• Mixed Mode
SMA Appliances Located in One Data CenterThis model is typically employed by mid-sized organizations with major operations in a single location. All their SMA appliances are located in the organization's primary data center. Users have a single GTO service name (such as access.example.com) to access the network.
GTO eliminates the need for a load balancer in the data center for VPN traffic. User connections are automatically directed to an available appliance in the data center. The CMS and SMA appliances are all located in the data center. If any one of the appliances fails, the CMS detects the failure, and GTO automatically redirects the VPN connections to another appliance.
SMA Appliances Geo-Distributed across Multiple Data CentersThis model is typically employed by mid-sized organizations with operations in more than one geographic location, and their SMA appliances are located in different geographic locations. For example, an organization deploys two SMA appliances, one located in their New York City data center and the second appliance located in their London branch office. The employees in the Americas connect to the appliance in New York City, while the employees in Europe connect to the appliance in London.
SMA 12.4 Central Management Server with Global High Availability Administration Guide
Planning GTO Deployment79
The CMS and one of their SMA appliances is located in New York City. The other SMA appliance is located in London and is also managed by the CMS. All the employees in the Americas and in Europe use a single service name: access.example.com, which directs all connections to an available and proximate appliance.
Mixed ModeThis model is typically employed by larger sized organizations with a global workforce. Their SMA appliances are located in multiple geographic locations, and they may have more than one SMA appliance in the data center. For example, an organization has six SMA appliances: three in New York City, two in London, and one in Tokyo. Employees globally use the same service name: access.example.com.
GTO automatically directs connections from employees in the Americas to the SMA appliances in New York City, connections from employees in Europe to the SMA appliances in London, and connections from employees in Asia to the SMA appliance in Tokyo. GTO eliminates the need for a global traffic manager or load balancer in the data center.
Minimizing Configuration DifferencesIn a GTO service, users can get directed to different SMA appliances frequently, and users expect the same experience, regardless. You can minimize configuration differences between SMA appliances in a GTO service by observing the following guidelines:
• Maintain the same resource set and access rules on each SMA appliance in the GTO service. The best way to do this is to define one central policy on the CMS and synchronize it with all the managed SMA appliances.
• Use only DHCP tunnel address pools at each SMA deployment site. Other types of address pools can be used, but managing SMA appliances with different configurations is difficult. However, this can be done and is described in Varying Tunnel Address Pools.
• Use a single authentication server configuration for all SMA appliances. If necessary, use transparently-distributed authentication services. CMS policy replication does include support for varying the authentication server configurations at each SMA appliance. You can do this by configuring locally-replicated authentication servers at the SMA appliance console. See Using Distributed Authentication Servers.
• Use wildcard certificates for user access. GTO makes all of its SMA appliances available under a variety of names, each of which must match the certificate. It is possible to identify all such names each time the configuration changes and generate certificates without wildcards. It is recommended that you use wildcard certificates instead.
GTO Service Names and DNS DelegationsTo establish a GTO service, you must choose a GTO service name and establish DNS delegations.
Topics• Choosing a GTO Service Name
• Establishing the GTO Service Name Delegations in DNS
SMA 12.4 Central Management Server with Global High Availability Administration Guide
Planning GTO Deployment80

Choosing a GTO Service NameThe GTO service name is a delegated DNS zone, which means you must control the parent zone and make a delegation from it to one or more SMA appliances under the GTO service.
If your organization controls the example.com DNS zone, the access.example.com or vpn.example.com could be appropriate GTO service names.
Establishing the GTO Service Name Delegations in DNSA GTO service name delegation is a DNS subzone delegation. It requires NS records that identify the authoritative server names for the subzone, and corresponding glue-A record that provides IP addresses for those authoritative server names.
DNS delegations must be created for the following components on each of the managed appliances:
• Primary GTO service
• Custom FQDN
• Custom Workplace Sites
• Outlook Anywhere
• Active Sync
The authoritative servers themselves are SMA appliances that are part of the GTO service and are identified by their public IP addresses and the NS record names in the following format:
<DNSname>.ns.<GTOserviceName>
For example, the following two DNS records in the zone configuration of example.com could establish a delegation for the GTO service and SMA appliance described above:
access.example.com. 86400 IN NS node1.ns.access.example.com.
node1.ns.access.example.com. 86400 IN A 123.231.55.77
In a typical GTO deployment with multiple SMA appliances, it is important to establish at least two such delegations. This ensures that the GTO service remains available if any one the SMA appliances is brought down for maintenance (or a network outage).
At least one authoritative server (SMA appliance) must be running at any given moment. Otherwise, users are not be able to connect.
Additional authoritative servers can provide redundancy and improved performance for some users. You should limit GTO service delegations to about three. Ideally, they should be geographically distributed.
Provisioning CertificatesYou must provision certificates on the GTO-enabled SMA appliances to facilitate the GTO service. Provisioning certificates must be created for the following components on each of the managed appliances:
• Primary GTO service
• Custom FQDN
• Custom Workplace Sites
• Outlook Anywhere
• Active Sync
SMA 12.4 Central Management Server with Global High Availability Administration Guide
Planning GTO Deployment81

Certificates, which give connecting users proof of SMA authenticity before they submit credentials, must be configured on each individual SMA appliance. A single wildcard certificate naming both the GTO service name and all names underneath it (such as access.example.com and *.access.example.com) can be copied onto every SMA appliance.
The CMS console Dashboard provides convenient links to the management consoles of each SMA appliance, where certificates are uploaded under SSL Settings.
Topics:
• Adding Certificates to SMA Appliances
• Generating a Certificate Signing Request (CSR)
• Importing SSL Certificates
Adding Certificates to SMA AppliancesTo add a certificate to a managed SMA appliance:
1 Add an SSL certificate to the CMS by either:
• Generating a Certificate Signing Request (CSR)
• Importing SSL Certificates
2 Create a maintenance task to add the certificate to the managed SMA appliances. (See Maintain for more information.)
Generating a Certificate Signing Request (CSR)To generate a certificate signing request:
1 If you want to use wildcard names in the certificate, select Allow wildcard names.
2 Select the managed appliances in the table with the missing certificate names.
3 Select the GTO Services names to be included in your certificate request.
4 Click Generate Certificate Names.
5 Review the Certificate information to ensure that all expected Subject Alternative Names (SANs) are included in the certificate signing request. Add any missing SANs to the list.
6 Click Save Certificate Signing Request to save the CSR.
7 Submit the CSR to a third-party Certificate Authority.
8 When you receive the signed certificate from the Certificate Authority, import the certificate. (See Importing SSL Certificates for more information.)
NOTE: Using wildcard names can reduce the number of alternative name entries in the certificate. However, it may cost more to get the certificate signed by a Certificate Authority (CA).
SMA 12.4 Central Management Server with Global High Availability Administration Guide
Planning GTO Deployment82

Importing SSL CertificatesTo import an SSL certificate:
1 Navigate to Management Server > Configure.
2 Click SSL Settings.
3 In the SSL certificate section, click Edit.
4 In the Certificates section, click the (+) New icon.
5 Select Import certificate… from the drop-down list.
6 Click Choose File to select the certificate file.
7 In the Password field, enter the password needed to decrypt the certificate.
8 Click Import.
SMA 12.4 Central Management Server with Global High Availability Administration Guide
Planning GTO Deployment83

12
Setting up GTO
This section describes how to configure a basic GTO deployment, consisting of a CMS that manages at two or more SMA appliances.
Topics• Setting up the CMS and SMA appliances
• Setting up a Basic GTO Service
• Registering an SMA Appliance with the CMS
• Monitoring and Configuring GTO
• Defining the Central Policy
Setting up the CMS and SMA appliancesBefore you can configure the GTO, you must first set up a CMS and at least two SMA appliances. GTO uses a distributed data store to shares session state and licensing information across the SMA appliances.
Set up a CMS by following the instructions in Installing and Configuring the Central Management Server for establishing a CMS virtual machine to control the GTO service and manage the configuration of its component SMA appliances.
Set up the SMA appliances by following the instructions in Configuring Appliances for Central Management. Follow the initial Setup Wizard configuration steps for cabling, administrator password, internal and external interface addresses, routing mode, and gateways, etc.
NOTE: Managed appliances must be able to communicate with each other via their external interface IP addresses or internet-routable IP addresses in order for them to be able to share information in the distributed data store.
SMA 12.4 Central Management Server with Global High Availability Administration Guide
Setting up GTO84

Setting up a Basic GTO ServiceAfter you set up the Central Management Server (CMS), and at least two SMA appliances, you can set up a basic GTO deployment.
To set up a basic GTO deployment:
1 Navigate to Management Server > Configure.
2 Click Central Management Settings. The CMS Settings page displays.
3 Under Central User Licensing, check box for Enable managing appliance user licensing with one central license. The current license will support 500 concurrent user sessions across all appliances.
4 Under Global Traffic Optimizer Service, check the box for Users connect to a service from anywhere in the world and are routed to the nearest managed appliance.
SMA 12.4 Central Management Server with Global High Availability Administration Guide
Setting up GTO85
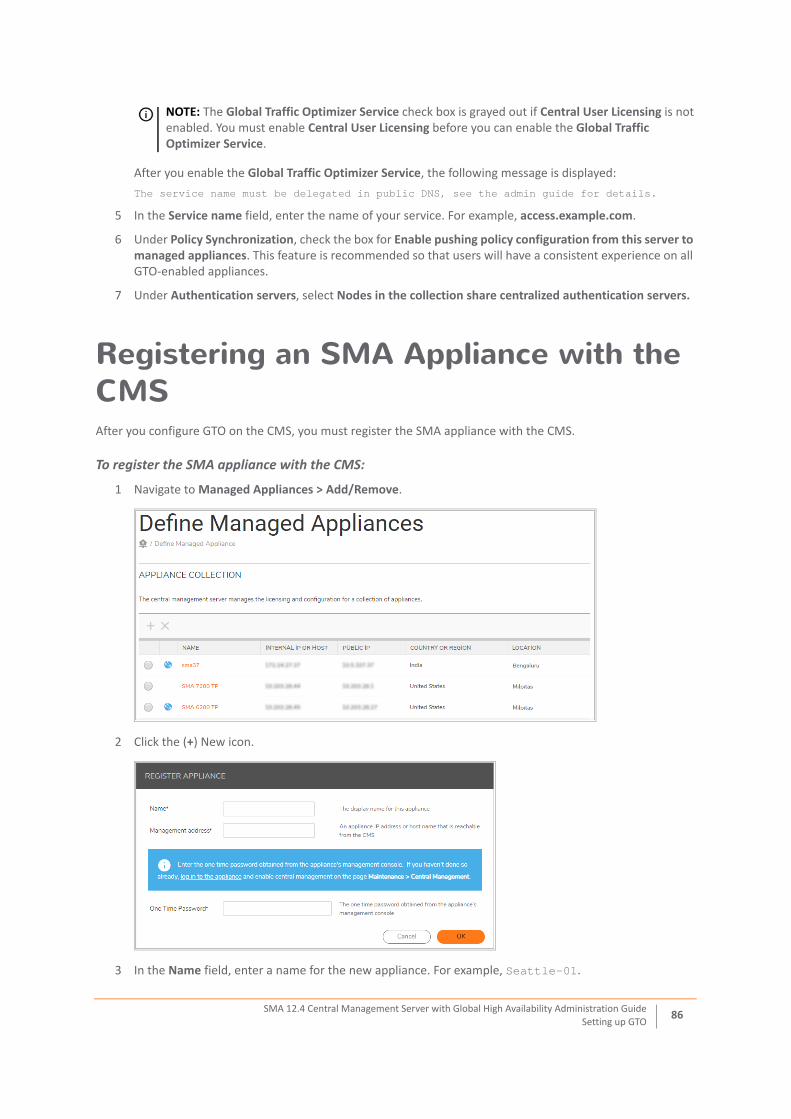
After you enable the Global Traffic Optimizer Service, the following message is displayed:
The service name must be delegated in public DNS, see the admin guide for details.
5 In the Service name field, enter the name of your service. For example, access.example.com.
6 Under Policy Synchronization, check the box for Enable pushing policy configuration from this server to managed appliances. This feature is recommended so that users will have a consistent experience on all GTO-enabled appliances.
7 Under Authentication servers, select Nodes in the collection share centralized authentication servers.
Registering an SMA Appliance with the CMSAfter you configure GTO on the CMS, you must register the SMA appliance with the CMS.
To register the SMA appliance with the CMS:
1 Navigate to Managed Appliances > Add/Remove.
2 Click the (+) New icon.
3 In the Name field, enter a name for the new appliance. For example, Seattle-01.
NOTE: The Global Traffic Optimizer Service check box is grayed out if Central User Licensing is not enabled. You must enable Central User Licensing before you can enable the Global Traffic Optimizer Service.
SMA 12.4 Central Management Server with Global High Availability Administration Guide
Setting up GTO86

4 In the Management address field, enter the IP address for the new appliance.
5 In the One Time Password field, enter the one time password obtained from the Maintenance > Central Management page of the SMA appliance.
6 Click OK. This registers the appliance with the CMS and adds it to the CMS list. The dialog changes with more options.
7 In the Display Name field, enter the name you want displayed for this appliance.
8 In the Host name field, enter a unique DNS-legal name for this appliance, for example seattle01.
9 In the Management address field, enter the IP address for the appliance.
10 In the Public IP field, enter the internet-visible, public IP address for this appliance.
11 If the appliance has an IPv6 address, enter that IP address in the Public IPv6 field.
12 In the Pool IP, field, enter the IP address that is reachable by other appliances by the same CMS. This IP address is only required if the Public IP of this appliance cannot be reached by the other managed appliances.
13 From the Country menu, select the country where the appliance is located.
14 In the Location field, enter the city, state, or province where the appliance is located.
NOTE: The client certificate warning, DNS name field, and Public IP field are only visible when CMS is enabled for GTO.
NOTE: The Public IP should be the address by which remote users will access this appliance. The default IP address is the external IP address of the appliance. The public IP address may be different from its external IP address if the public WAN addresses are using NAT at the DMZ.
SMA 12.4 Central Management Server with Global High Availability Administration Guide
Setting up GTO87
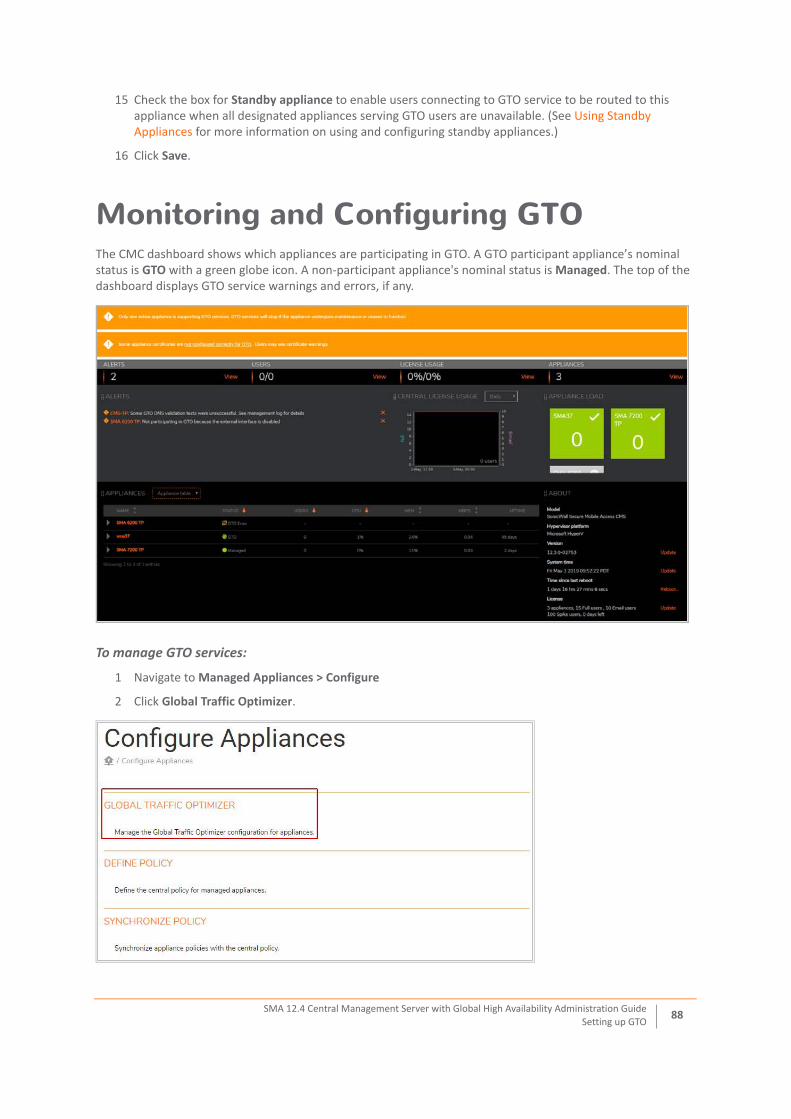
15 Check the box for Standby appliance to enable users connecting to GTO service to be routed to this appliance when all designated appliances serving GTO users are unavailable. (See Using Standby Appliances for more information on using and configuring standby appliances.)
16 Click Save.
Monitoring and Configuring GTOThe CMC dashboard shows which appliances are participating in GTO. A GTO participant appliance’s nominal status is GTO with a green globe icon. A non-participant appliance's nominal status is Managed. The top of the dashboard displays GTO service warnings and errors, if any.
To manage GTO services:
1 Navigate to Managed Appliances > Configure
2 Click Global Traffic Optimizer.
SMA 12.4 Central Management Server with Global High Availability Administration Guide
Setting up GTO88

From this page, you can manage the following items:
• Global Traffic Optimizer (GTO)
• Central policies for managed appliances
• Synchronize appliance policies with the central policy
The GTO Services page shows a table of all GTO services and their statuses. GTO services are colored green, yellow, or red to reflect their health status. On the lower part of the page is a guide for creating a GTO service with a Custom FQDN, Exchange, or Workplace Site.
The Appliance Certificates page shows which Certificate Subject Alternative Names (SANs) must be included in each appliance certificate, and notifies the administrator which SANs are missing.
SMA 12.4 Central Management Server with Global High Availability Administration Guide
Setting up GTO89

The DNS Delegations page describes the additional steps an administrator must take to configure the public DNS system for GTO, and provides a helper tool to generate DNS records in BIND format.
SMA 12.4 Central Management Server with Global High Availability Administration Guide
Setting up GTO90

Defining the Central PolicyFrom the Central Management Console (CMS), you can define the central policy for a single-appliance SMA deployment. You can define the policies for your authentication servers and realms, resources and access rules, web and tunnel access methods, end-point control, and so on.
To define the central policy:
1 On the CMS, go to the Managed Appliances > Configure > Define policy page.
NOTE: The steps in this section are optional.
SMA 12.4 Central Management Server with Global High Availability Administration Guide
Setting up GTO91

2 Define the policies you want.
See the following sections for instructions on defining server certificates, authentication servers, and tunnel address pools:
• Enabling Cached Credentials
• Using Distributed Authentication Servers
• Varying Tunnel Address Pools
3 When you have finished defining your policy, click Pending Changes. The Apply Pending Changes dialog displays.
Expand the Advanced section if you want to schedule when you want the pending changes will be applied.
4 Click Apply Changes.
5 Select the link in Click here to synchronize policy with managed appliances to synchronize the policy across all of the appliances managed by the CMS.
6 On the Synchronize policy page, select the checkbox for the SMA appliance you want to synchronize.
Expand the Advanced section if you want to schedule when you want the pending changes will be applied.
SMA 12.4 Central Management Server with Global High Availability Administration Guide
Setting up GTO92

7 Click Synchronize.
The message, “Synchronizing data, please wait...” appears as the policy is overwritten by the central policy.
8 When policy synchronization has completed, the screen displays the Status as Synchronization finished.
You can now type the GTO service name into the address bar of any standard Internet Web browser, anywhere in the world, and sign in to securely access the configured resources.
SMA 12.4 Central Management Server with Global High Availability Administration Guide
Setting up GTO93

13
Extending GTO Deployment
Topics• Adding Additional SMA Appliances
• Enabling Cached Credentials
• Using Distributed Authentication Servers
• Varying Tunnel Address Pools
• Additional Deployment Notes
Adding Additional SMA AppliancesAdditional SMA appliances can be added to the basic GTO configuration by following the steps in Setting up GTO. Each SMA appliance that is added automatically begins serving new requests for GTO user connections.
When a new SMA appliance is added to a different location than the existing appliances, it becomes available to GTO. When GTO evaluates a new user relative to the available SMA appliances, it includes the new appliance at the different location, and directs the new connection to the appropriate SMA appliance. This evaluation is repeated each time a user connects. GTO may connect users to different SMA appliances in different circumstances.
Using Standby AppliancesYou can configure one or more appliances in your CMS to function as a standby appliance.
Global HA will monitor the health of your SMA appliances to determine whether a disaster is happening and automatically activate the standby appliance (usually within 15 minutes). To further improve your disaster recovery capabilities with your Global HA environment, the standby appliance(s) can be located in a different datacenter than your other SMA appliances.
A standby appliance has access to all of the central user licenses. However, the standby appliance counts toward the maximum number of licensed appliances that can be managed by the CMS license.
Under normal operational conditions, a standby appliance does not receive user connections made to the GTO service.
Topics:
• How a Standby Appliance Works
• Adding a Standby Appliance to the CMS
SMA 12.4 Central Management Server with Global High Availability Administration Guide
Extending GTO Deployment94

How a Standby Appliance WorksIf the active appliance fails, and the CMS continues to be in service:
• The standby appliance is activated and will accept new connections that are made to the GTO service name
• The administrator is notified through an alert on the console.
However, if the CMS fails and the active appliance continues to be in service, the standby appliance will not be activated.
If the both CMS and the active appliance fail:
• The standby appliance will be activated and will accept new connections made to the GTO service name
• If the active appliance is undergoing maintenance by the CMS (such as for a configuration change, hotfix installation, or firmware upgrade), and user connections cannot be serviced, the standby appliance will be automatically activated.
When a standby appliance gets activated:
• Existing user sessions from any failed appliances may be resumed on the newly activated appliance and will be allowed to continue until the sessions are either terminated by users or by timing out.
• SMA clients, such as Connect Tunnel and Mobile Connect, will detect a connection failure and automatically reconnect to the GTO service.
• Web-based client applications will reconnect to the standby appliance when users refresh the browser window.
• ActiveSync client requests will get directed to the standby appliance.
Using a Configuration Extension Mechanism (CEM) will allow for a quicker activation of standby appliances by the CMS when the CMS is unable to communicate with the active SMA appliances.
• The CEM will have an effect only when applied to a CMS with GTO enabled and configured with at least one standby appliance.
• The CEM name will be MGMT_STANDBY_APPLIANCE_ACTIVATION_MINUTES.
• The CEM value should be an integer that represents the number of minutes after which communication is continually lost with all designated GTO appliances a standby appliances becomes active.
• When the CEM value is in the range 11 - 15, a standby appliance may become active sooner than the CEM value specifies, possibly as quickly as 10 minutes after a disaster begins.
• The CEM has no effect if the value is outside the range 0 - 15, or if the value is not an integer.
• When the CEM is in use, a standby appliance that is in communication with the CMS is guaranteed to become active a maximum of X minutes (where X is the value specified for the CEM) after the CMS detects that it cannot communicate with all of the designated GTO appliances.
• If the CMS becomes disconnected from an appliance during a disaster, the CEM will have no effect on the appliance.
NOTE: Without the CEM, a standby appliance is guaranteed to activate 10 - 15 minutes after all designated GTO appliances lose communication with the Standby appliance.
NOTE: Using the CEM may result in a standby appliance becoming active more frequently in situations where transient network glitches interfere with CMS communication with appliances.
SMA 12.4 Central Management Server with Global High Availability Administration Guide
Extending GTO Deployment95

Adding a Standby Appliance to the CMS
• In order to configure an SMA appliance as a standby appliance, there must be more than one SMA appliance in the CMS cluster.
• An active appliance with ongoing user sessions can be configured to become a standby appliance. Once the appliance becomes a standby appliance, new user connections to the GTO service name are no longer directed to that appliance.
• A standby appliance can be configured to become an active appliance by an administrator only from the Central Management Console.
To add a standby appliance to the CMS:
1 Navigate to Managed Appliances > Add/Remove.
2 Click on the name of the appliance that you want to configure as a standby appliance. The Edit Appliance Settings dialog displays.
3 Select Standby appliance.
4 Click Save.
This appliance will now start operating as a standby appliance and stop processing user connections until activated.
NOTE: Before you can configure an appliance to operate as a standby appliance, the appliance must be configured so that it is managed by the CMS. (See Enabling Central Management and Registering an SMA Appliance with the CMS for instructions for doing this.)
NOTE: When you select Standby appliance, DNS authoritative server is automatically selected. Leave this option selected.
SMA 12.4 Central Management Server with Global High Availability Administration Guide
Extending GTO Deployment96

Enabling Cached CredentialsIf your security settings allow cached credentials on end-user devices, you can assign nearly-seamless failover and high-availability capabilities to Connect Tunnel clients and Mobile Connect SSL VPN Tunnel clients. You can do this even if the SMA appliances are in different locations (and therefore do not share an internal network).
To enable cached credentials:
1 Navigate to Managed Appliances > Configure.
2 Click Define Policy.
3 Click Realms.
4 Click on the community for a realm.
5 Click the Access Methods tab.
6 In the Tunnel (IP Protocol) section, click Configure.
7 Scroll down to and expand the Tunnel Client Options section.
8 In the Cached Credentials section, configure how you want the cached credentials to operate.
For more information on using cached credentials, refer to the SMA 12.4 Administration Guide.
Using Distributed Authentication ServersThe latency and reliability of authentication services can be improved in some situations by replicating authentication servers in widely-distributed locations, and configuring specific SMA appliances to use a nearby replicated authentication server instead of the central instance, which might be on another continent.
To accomplish this:
1 Establish the authentication server settings in the central policy and then synchronize the central policy with all the managed SMA appliances. See Setting up a Basic GTO Service.
2 Navigate to Management Server > Configure.
3 Click Central Management Settings.
4 In the Policy Synchronization section, select Each node has its own authentication server.
5 Click Save.
6 Click Pending changes.
SMA 12.4 Central Management Server with Global High Availability Administration Guide
Extending GTO Deployment97

7 Click Apply Pending Changes.
Now the central authentication server settings will only be pushed to appliances during policy synchronization if an authentication server of the same name does not already exist at the SMA managed appliance. Stated another way, if an SMA appliance already has an authentication server setting whose name matches a name configured at the CMS, that setting will not be touched during policy synchronization.
For each SMA appliance that needs local modifications to authentication server settings, log onto the management console at that appliance and adjust the configuration of the existing authentication server(s).
As long as each central policy authentication server has a corresponding SMA policy authentication server with the same name, your local changes will be preserved. Don't create or delete authentication servers from the SMA policy as you cannot modify other parts of the local configuration that reference these servers. Those changes will be overwritten the next time CMS synchronizes the central policy with this SMA.
Varying Tunnel Address PoolsThe preferred tunnel address pool policy for GTO deployments is a single DHCP pool replicated to all SMA appliances, with no specific DHCP server mentioned in the policy. This is done using the Routed address pool - dynamic setting after clicking New in the IP address pools section on the Managed Appliances > Configure > Define Policy > User Access > Network Tunnel Service page and not specifying a DHCP server, so that appliances send broadcast requests to locate DHCP servers that can allocate addresses. This requires DHCP services to be available on the internal network that the appliances are on. Other policies are possible, but CMS does not help maintain them.
A tunnel address pool in the SMA policy will not be overwritten during policy synchronization if there is a corresponding tunnel address pool in the central policy with the same name. Be aware though, that the CMS
SMA 12.4 Central Management Server with Global High Availability Administration Guide
Extending GTO Deployment98

will not synchronize with an SMA appliance at all if a tunnel address pool exists at the SMA appliance, but not in the CMS configuration. So the trick here is to create a tunnel address pool at the CMS, synchronize the central policy to all SMA appliances (to create the pool there), then adjust the configuration of that pool at each individual SMA appliance.
Administrators can use DHCP option 118 (as specified in RFC 3011) to allocate VPN client addresses on a specific subnet under Advanced section.
Additional Deployment NotesTopics:
• Notes on SMA Appliances
• Web Limitations if an Appliance Fails
NOTE: You can adjust the parameters of pools (such as the address ranges in static pools or the NAT-from address in a NAT pool), but you cannot change the pool's type.
SMA 12.4 Central Management Server with Global High Availability Administration Guide
Extending GTO Deployment99

Notes on SMA AppliancesIt is recommended that you configure a minimum of two SMA appliances, and that you delegate them in DNS as authoritative servers to minimize the likelihood that your users ever lose DNS resolution of the GTO service.
You must enable UDP 53 on your firewall for all traffic that is sent to CMS-managed appliances that are configured as authoritative servers.
Web Limitations if an Appliance FailsWeb users may face some limitations with GTO if an appliance fails. GTO services should DNS-resolve to more than one MA node, and web browsers given a multi-address DNS response should connect to the first address that works. When CMS finds an MA unresponsive for a minute, it instructs the DNS authoritative server nodes to reconfigure around the broken MA, but during that reconfiguration time, the broken MA node can still appear in DNS responses. If this situation occurs and the user’s Workplace session fails, the user sees what looks like a typical failure of a website. The user needs to reconnect by retyping the GTO service name. They are redirected through a different node and can access that web site again.
SMA 12.4 Central Management Server with Global High Availability Administration Guide
Extending GTO Deployment100
Secure Mobile Access 12.4 Administration GuideSupport
Part 3
101
Support
• SonicWall Support

14
SonicWall Support
Technical support is available to customers who have purchased SonicWall products with a valid maintenance contract and to customers who have trial versions.
The Support Portal provides self-help tools you can use to solve problems quickly and independently, 24 hours a day, 365 days a year. To access the Support Portal, go to https://www.sonicwall.com/support.
The Support Portal enables you to:
• View knowledge base articles and technical documentation
• View video tutorials
• Access MySonicWall
• Learn about SonicWall professional services
• Review SonicWall Support services and warranty information
• Register for training and certification
• Request technical support or customer service
To contact SonicWall Support, visit https://www.sonicwall.com/support/contact-support.
Secure Mobile Access 12.4 Administration Guide
SonicWall Support102

About This Document
Central Management Server with Global High Availability Administration GuideUpdated - February 2020Software Version - 12.4232-005239-00 Rev A
Copyright © 2020 SonicWall Inc. All rights reserved.
SonicWall is a trademark or registered trademark of SonicWall Inc. and/or its affiliates in the U.S.A. and/or other countries. All other trademarks and registered trademarks are property of their respective owners
The information in this document is provided in connection with SonicWall Inc. and/or its affiliates’ products. No license, express or implied, by estoppel or otherwise, to any intellectual property right is granted by this document or in connection with the sale of SonicWall products. EXCEPT AS SET FORTH IN THE TERMS AND CONDITIONS AS SPECIFIED IN THE LICENSE AGREEMENT FOR THIS PRODUCT, SONICWALL AND/OR ITS AFFILIATES ASSUME NO LIABILITY WHATSOEVER AND DISCLAIMS ANY EXPRESS, IMPLIED OR STATUTORY WARRANTY RELATING TO ITS PRODUCTS INCLUDING, BUT NOT LIMITED TO, THE IMPLIED WARRANTY OF MERCHANTABILITY, FITNESS FOR A PARTICULAR PURPOSE, OR NON- INFRINGEMENT. IN NO EVENT SHALL SONICWALL AND/OR ITS AFFILIATES BE LIABLE FOR ANY DIRECT, INDIRECT, CONSEQUENTIAL, PUNITIVE, SPECIAL OR INCIDENTAL DAMAGES (INCLUDING, WITHOUT LIMITATION, DAMAGES FOR LOSS OF PROFITS, BUSINESS INTERRUPTION OR LOSS OF INFORMATION) ARISING OUT OF THE USE OR INABILITY TO USE THIS DOCUMENT, EVEN IF SONICWALL AND/OR ITS AFFILIATES HAVE BEEN ADVISED OF THE POSSIBILITY OF SUCH DAMAGES. SonicWall and/or its affiliates make no representations or warranties with respect to the accuracy or completeness of the contents of this document and reserves the right to make changes to specifications and product descriptions at any time without notice. SonicWall Inc. and/or its affiliates do not make any commitment to update the information contained in this document.
For more information, visit https://www.sonicwall.com/legal.
End User Product Agreement
To view the SonicWall End User Product Agreement, go to: https://www.sonicwall.com/en-us/legal/license-agreements. Select the language based on your geographic location to see the EUPA that applies to your region.
Open Source Code
SonicWall is able to provide a machine-readable copy of open source code with restrictive licenses such as GPL, LGPL, AGPL when applicable per license requirements. To obtain a complete machine-readable copy, send your written requests, along with certified check or money order in the amount of USD 25.00 payable to “SonicWall Inc.”, to:
General Public License Source Code Request SonicWall Inc. Attn: Jennifer Anderson1033 McCarthy BlvdMilpitas, CA 95035
Legend
WARNING: A WARNING icon indicates a potential for property damage, personal injury, or death.
CAUTION: A CAUTION icon indicates potential damage to hardware or loss of data if instructions are not followed.
IMPORTANT, NOTE, TIP, MOBILE, or VIDEO: An information icon indicates supporting information.
Secure Mobile Access 12.4 Administration Guide
SonicWall Support103