Embed Size (px)
Citation preview
SLANT-FRONT TOOL CART
© 2010 August Home Publishing Co.

1 WoodsmithShop.com © 2010 August Home Publishing Co. All Rights Reserved.
Feature Project
Slant-Front tool cartStore all sorts of tools and hardware items right where you need them with this roll-around tool cart.
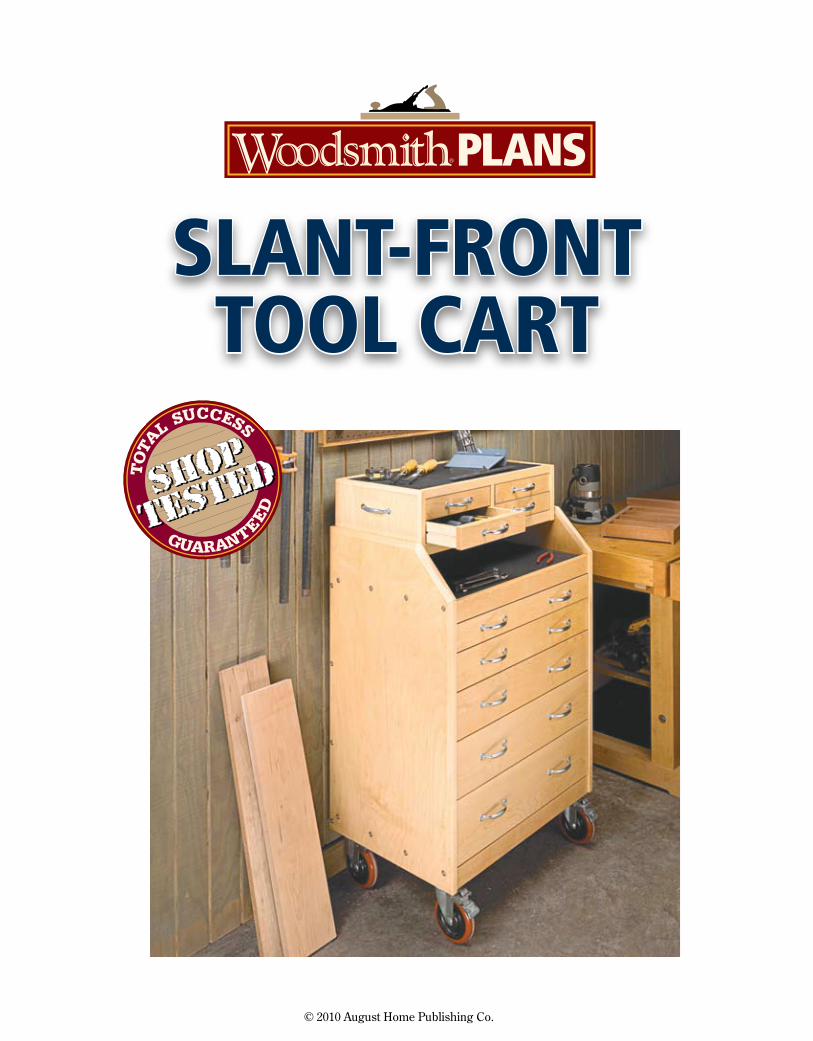
Overall Dimensions: 191⁄4" D x 271⁄2" W x 477⁄8" HConstruction Details
2 WoodsmithShop.com © 2010 August Home Publishing Co. All Rights Reserved.

I started building the tool cart by working on the main case. As you can see in the drawing above, it’s nothing more than a large ply-wood box that consists of a top and bottom, a pair of sides, and a back. Hardwood rails added to the top and bottom of the cart hide the ply-wood edges and help prevent the cart from racking.
START WITH THE SIDESTo help keep everything aligned, the top and bottom fit into dadoes cut into the sides of the case, as illustrated in Figure 2. Take some time here to ensure the good face of each plywood side faces out before cutting the dadoes.
Once the dadoes are cut, you can trim the front corner of each side to create the slant front. I did this by making a rough cut with my jig saw to remove most of the waste. Then to clean up the edge, I clamped a straightedge in place and used a hand-held router and straight bit
Plywood Case Construction
3 WoodsmithShop.com © 2010 August Home Publishing Co. All Rights Reserved.
a.
b.
c.
d.
to trim the edges perfectly straight and square. If you plan on building the upper tool chest or shelf, now’s a good time to drill a pair of shelf pin holes near the top of each side, as illustrated in Figure 2.
Add Some edging. To protect the plywood, I added some thick, hard-wood edging. Since a couple of the
edges won’t be seen, you only need to add edging to the front and top of each side (Figure 2).
It can be tricky to securely clamp the edging along the slant. For an easy way to do this, check out the clamping block on page 11. Then to trim the edging flush, take a look at the box on page 4.
1
2
TRIMMING EDGING fluSH
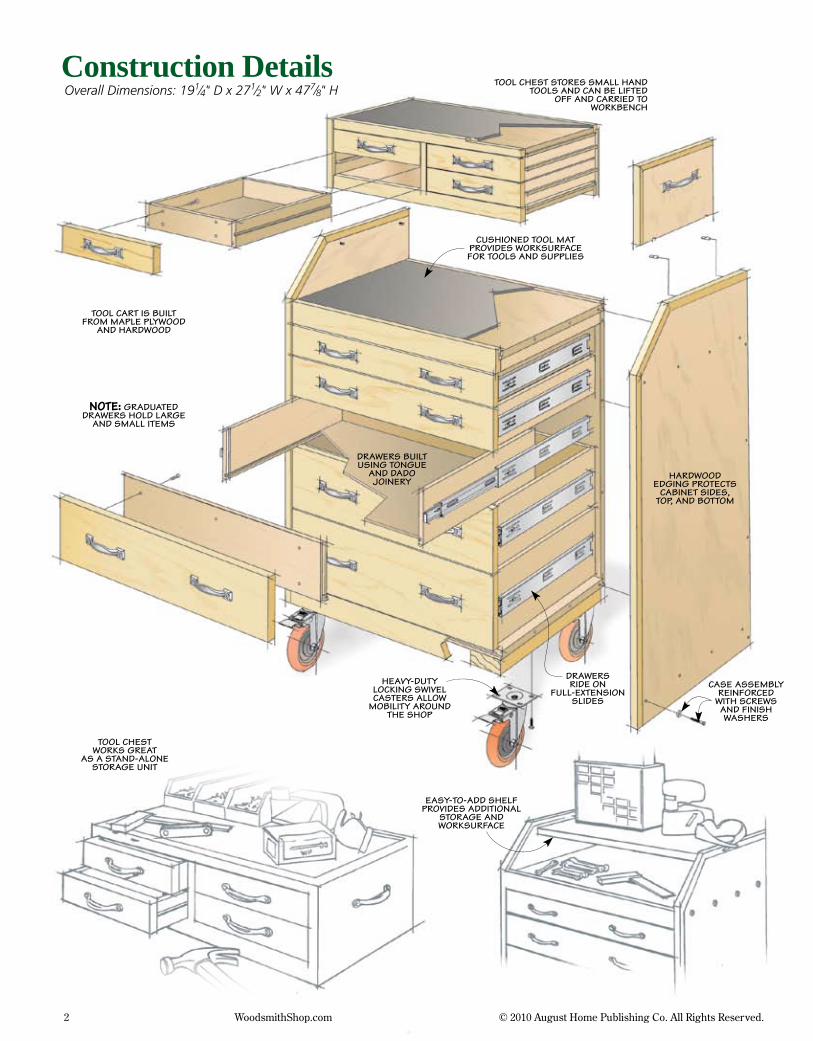
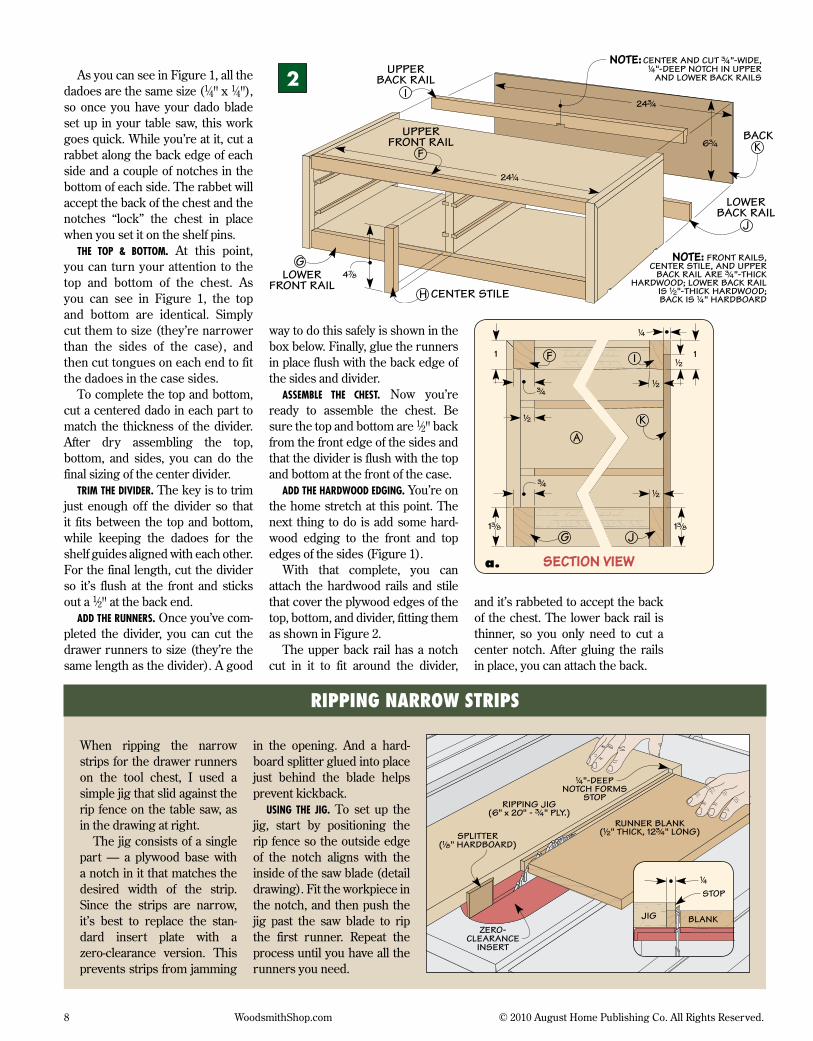
Next, you can turn your attention to the top and bottom of the cart. They’re cut to length to fit between the sides of the cart. But before cut-ting them to width, you’ll need to account for a couple of things.
Tongue & groove Joinery. First, the top and bottom have a tongue cut along the front and back edges. These tongues fit into grooves cut into rails at the top and bottom of the cart. You can see how all this works in Figures 1c and 1d.
The rails serve two purposes. For starters, they cover up the plywood edges. But more importantly, they help prevent the cart from racking as it’s rolled around the shop.
At the back of the cart, the rail is flush with the sides, but the rail at the front is recessed 1⁄4". Be sure to account for this when you cut the top and bottom to width. Then you can cut the tongues along each edge.
At this point, I dry assembled the cart using screws and finish washers (Figures 1a and 1b). This makes it easier to accurately cut the front and back rails to final length.
The next step is to cut a narrow groove in each rail. The only thing to keep in mind here is that the groove is located a bit lower in the
4 WoodsmithShop.com © 2010 August Home Publishing Co. All Rights Reserved.
Add the Top & Bottom
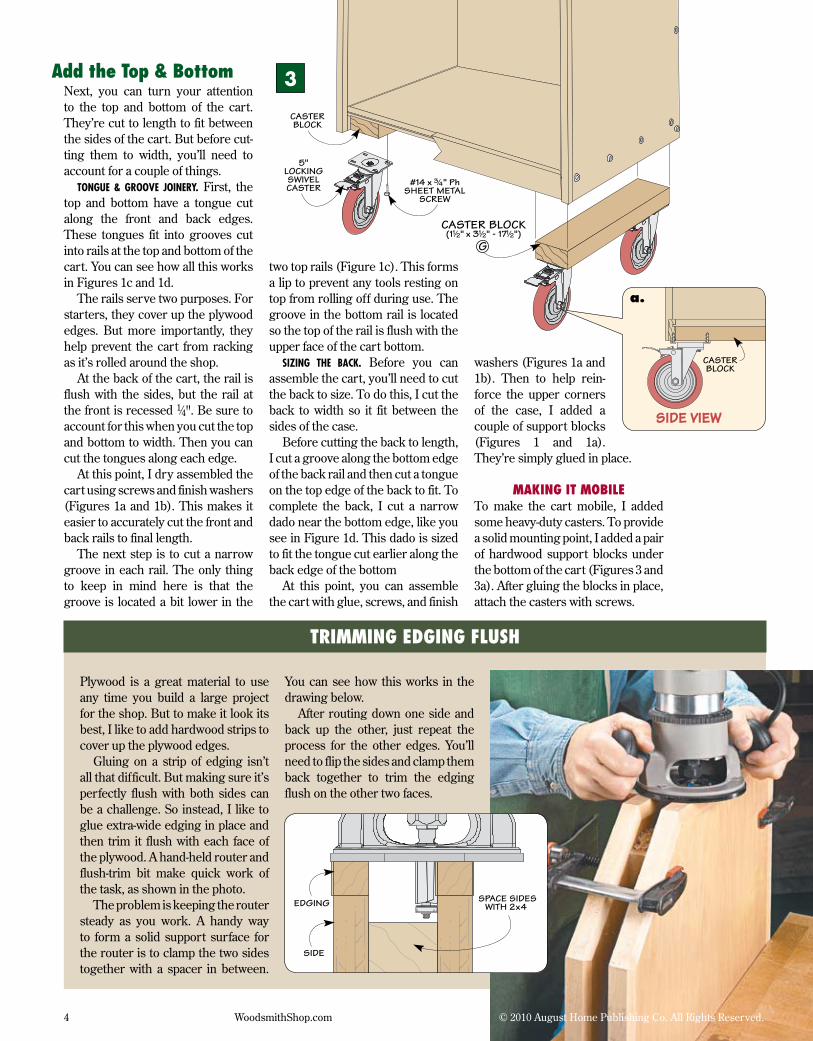
Plywood is a great material to use any time you build a large project for the shop. But to make it look its best, I like to add hardwood strips to cover up the plywood edges.
Gluing on a strip of edging isn’t all that difficult. But making sure it’s perfectly flush with both sides can be a challenge. So instead, I like to glue extra-wide edging in place and then trim it flush with each face of the plywood. A hand-held router and flush-trim bit make quick work of the task, as shown in the photo.
The problem is keeping the router steady as you work. A handy way to form a solid support surface for the router is to clamp the two sides together with a spacer in between.
You can see how this works in the drawing below.
After routing down one side and back up the other, just repeat the process for the other edges. You’ll need to flip the sides and clamp them back together to trim the edging flush on the other two faces.
3
two top rails (Figure 1c). This forms a lip to prevent any tools resting on top from rolling off during use. The groove in the bottom rail is located so the top of the rail is flush with the upper face of the cart bottom.
Sizing The BAck. Before you can assemble the cart, you’ll need to cut the back to size. To do this, I cut the back to width so it fit between the sides of the case.
Before cutting the back to length, I cut a groove along the bottom edge of the back rail and then cut a tongue on the top edge of the back to fit. To complete the back, I cut a narrow dado near the bottom edge, like you see in Figure 1d. This dado is sized to fit the tongue cut earlier along the back edge of the bottom
At this point, you can assemble the cart with glue, screws, and finish
washers (Figures 1a and 1b). Then to help rein-force the upper corners of the case, I added a couple of support blocks (Figures 1 and 1a). They’re simply glued in place.
MAKING IT MOBIlETo make the cart mobile, I added some heavy-duty casters. To provide a solid mounting point, I added a pair of hardwood support blocks under the bottom of the cart (Figures 3 and 3a). After gluing the blocks in place, attach the casters with screws.
a.
MAKING A TONGuE & DADO JOINT
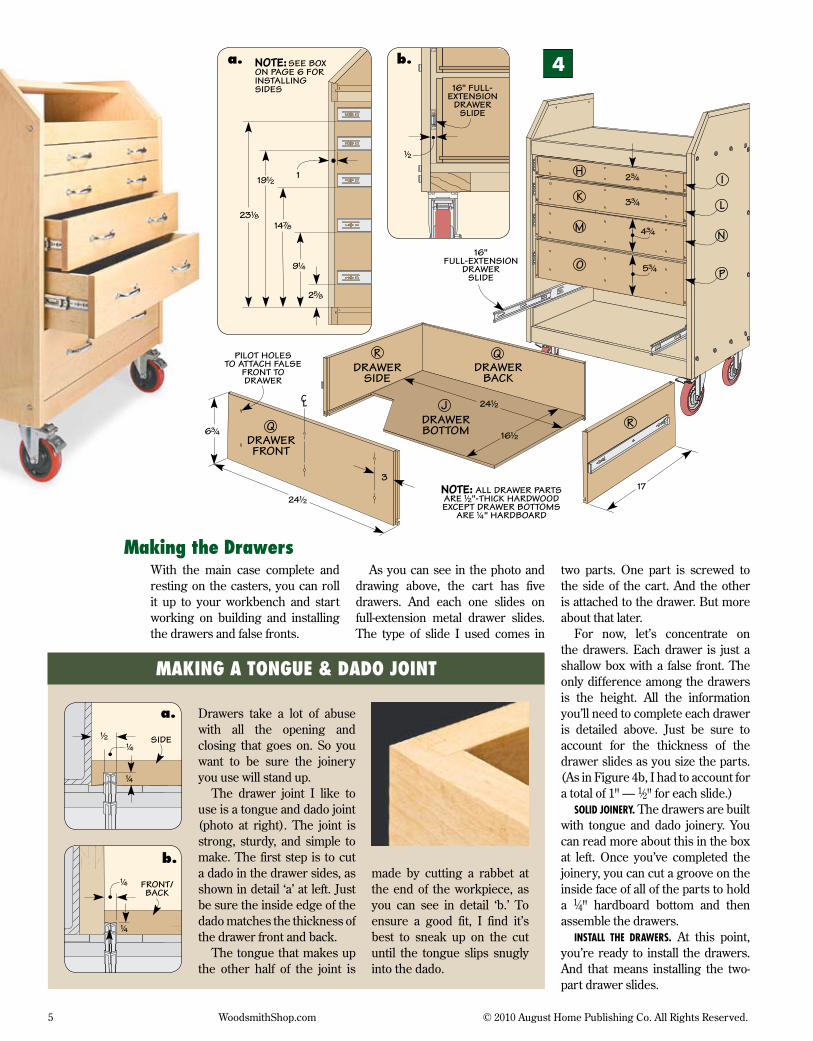
With the main case complete and resting on the casters, you can roll it up to your workbench and start working on building and installing the drawers and false fronts.
Drawers take a lot of abuse with all the opening and closing that goes on. So you want to be sure the joinery you use will stand up.
The drawer joint I like to use is a tongue and dado joint (photo at right). The joint is strong, sturdy, and simple to make. The first step is to cut a dado in the drawer sides, as shown in detail ‘a’ at left. Just be sure the inside edge of the dado matches the thickness of the drawer front and back.
The tongue that makes up the other half of the joint is
NOTE: XXXXXXXXXXXXXXXXXX NOTE: SEE BOX
ON PAGE 6 FORINSTALLINGSIDES
CALLOUT
5 WoodsmithShop.com © 2010 August Home Publishing Co. All Rights Reserved.
made by cutting a rabbet at the end of the workpiece, as you can see in detail ‘b.’ To ensure a good fit, I find it’s best to sneak up on the cut until the tongue slips snugly into the dado.
a.
b.
Making the Drawers
4
As you can see in the photo and drawing above, the cart has five drawers. And each one slides on full-extension metal drawer slides. The type of slide I used comes in
two parts. One part is screwed to the side of the cart. And the other is attached to the drawer. But more about that later.
For now, let’s concentrate on the drawers. Each drawer is just a shallow box with a false front. The only difference among the drawers is the height. All the information you’ll need to complete each drawer is detailed above. Just be sure to account for the thickness of the drawer slides as you size the parts. (As in Figure 4b, I had to account for a total of 1" — 1⁄2" for each slide.)
Solid Joinery. The drawers are built with tongue and dado joinery. You can read more about this in the box at left. Once you’ve completed the joinery, you can cut a groove on the inside face of all of the parts to hold a 1⁄4" hardboard bottom and then assemble the drawers.
inSTAll The drAwerS. At this point, you’re ready to install the drawers. And that means installing the two-part drawer slides.
a. b.
INSTAllING DRAWER SlIDES
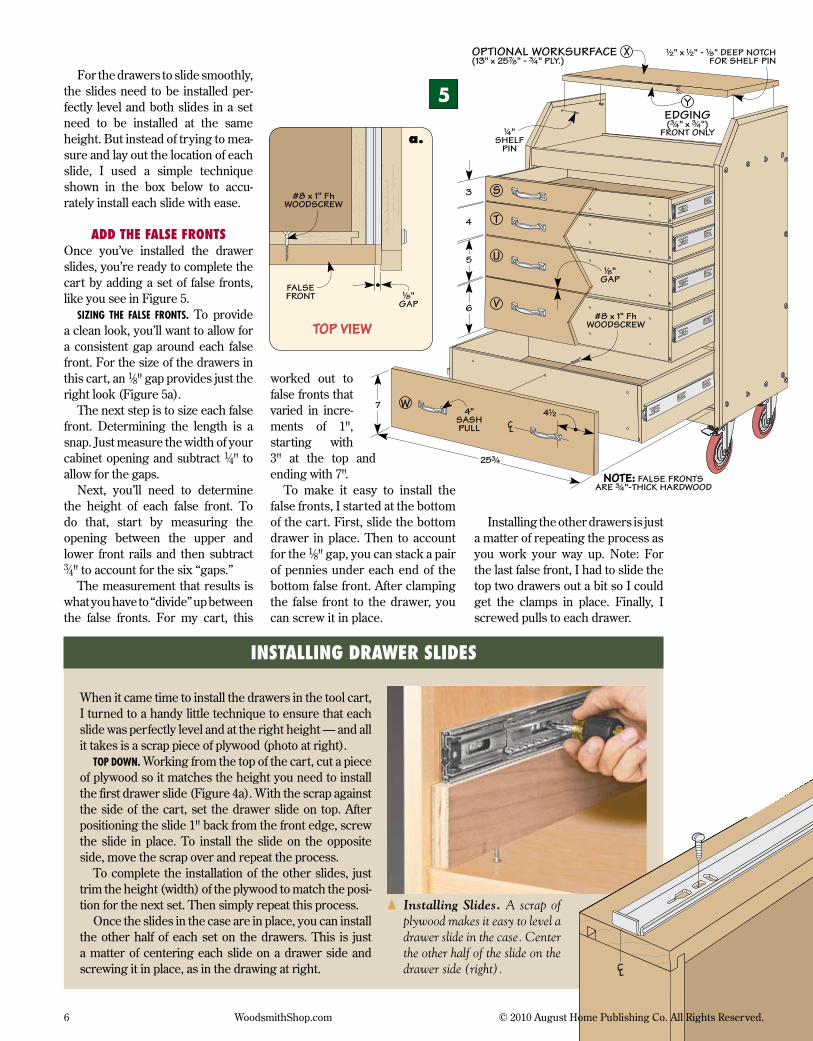
For the drawers to slide smoothly, the slides need to be installed per-fectly level and both slides in a set need to be installed at the same height. But instead of trying to mea-sure and lay out the location of each slide, I used a simple technique shown in the box below to accu-rately install each slide with ease.
ADD THE fAlSE fRONTSOnce you’ve installed the drawer slides, you’re ready to complete the cart by adding a set of false fronts, like you see in Figure 5.
Sizing The FAlSe FronTS. To provide a clean look, you’ll want to allow for a consistent gap around each false front. For the size of the drawers in this cart, an 1⁄8" gap provides just the right look (Figure 5a).
The next step is to size each false front. Determining the length is a snap. Just measure the width of your cabinet opening and subtract 1⁄4" to allow for the gaps.
Next, you’ll need to determine the height of each false front. To do that, start by measuring the opening between the upper and lower front rails and then subtract 3⁄4" to account for the six “gaps.”
The measurement that results is what you have to “divide” up between the false fronts. For my cart, this
When it came time to install the drawers in the tool cart, I turned to a handy little technique to ensure that each slide was perfectly level and at the right height — and all it takes is a scrap piece of plywood (photo at right).
Top down. Working from the top of the cart, cut a piece of plywood so it matches the height you need to install the first drawer slide (Figure 4a). With the scrap against the side of the cart, set the drawer slide on top. After positioning the slide 1" back from the front edge, screw the slide in place. To install the slide on the opposite side, move the scrap over and repeat the process.
To complete the installation of the other slides, just trim the height (width) of the plywood to match the posi-tion for the next set. Then simply repeat this process.
Once the slides in the case are in place, you can install the other half of each set on the drawers. This is just a matter of centering each slide on a drawer side and screwing it in place, as in the drawing at right.
6 WoodsmithShop.com © 2010 August Home Publishing Co. All Rights Reserved.
{ Installing Slides. A scrap of plywood makes it easy to level a drawer slide in the case. Center the other half of the slide on the drawer side (right).
a.
5
worked out to false fronts that varied in incre-ments of 1", starting with 3" at the top and ending with 7".
To make it easy to install the false fronts, I started at the bottom of the cart. First, slide the bottom drawer in place. Then to account for the 1⁄8" gap, you can stack a pair of pennies under each end of the bottom false front. After clamping the false front to the drawer, you can screw it in place.
Installing the other drawers is just a matter of repeating the process as you work your way up. Note: For the last false front, I had to slide the top two drawers out a bit so I could get the clamps in place. Finally, I screwed pulls to each drawer.
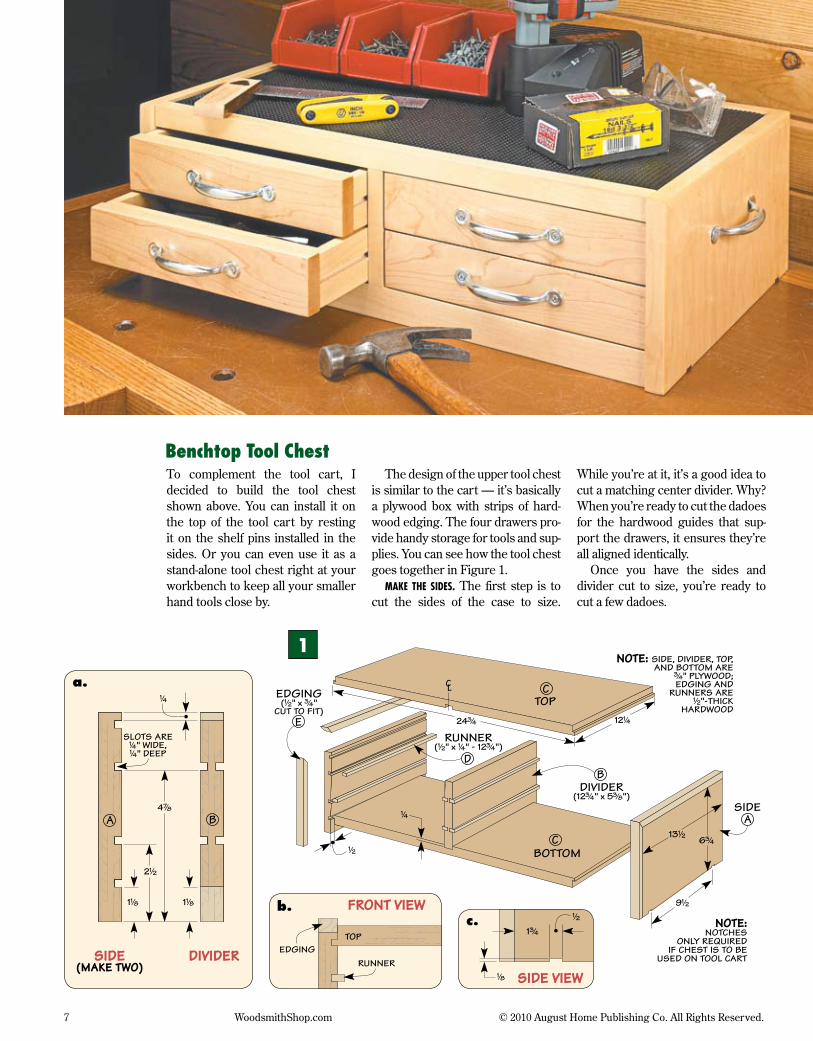
To complement the tool cart, I decided to build the tool chest shown above. You can install it on the top of the tool cart by resting it on the shelf pins installed in the sides. Or you can even use it as a stand-alone tool chest right at your workbench to keep all your smaller hand tools close by.
NOTE:NOTCHES
ONLY REQUIREDIF CHEST IS TO BE
USED ON TOOL CART
7 WoodsmithShop.com © 2010 August Home Publishing Co. All Rights Reserved.
Benchtop Tool Chest
1
The design of the upper tool chest is similar to the cart — it’s basically a plywood box with strips of hard-wood edging. The four drawers pro-vide handy storage for tools and sup-plies. You can see how the tool chest goes together in Figure 1.
mAke The SideS. The first step is to cut the sides of the case to size.
While you’re at it, it’s a good idea to cut a matching center divider. Why? When you’re ready to cut the dadoes for the hardwood guides that sup-port the drawers, it ensures they’re all aligned identically.
Once you have the sides and divider cut to size, you’re ready to cut a few dadoes.
a.
b.c.
RIPPING NARROW STRIPS
As you can see in Figure 1, all the dadoes are the same size (1⁄4" x 1⁄4"), so once you have your dado blade set up in your table saw, this work goes quick. While you’re at it, cut a rabbet along the back edge of each side and a couple of notches in the bottom of each side. The rabbet will accept the back of the chest and the notches “lock” the chest in place when you set it on the shelf pins.
The Top & BoTTom. At this point, you can turn your attention to the top and bottom of the chest. As you can see in Figure 1, the top and bottom are identical. Simply cut them to size (they’re narrower than the sides of the case), and then cut tongues on each end to fit the dadoes in the case sides.
To complete the top and bottom, cut a centered dado in each part to match the thickness of the divider. After dry assembling the top, bottom, and sides, you can do the final sizing of the center divider.
Trim The divider. The key is to trim just enough off the divider so that it fits between the top and bottom, while keeping the dadoes for the shelf guides aligned with each other. For the final length, cut the divider so it’s flush at the front and sticks out a 1⁄2" at the back end.
Add The runnerS. Once you’ve com-pleted the divider, you can cut the drawer runners to size (they’re the same length as the divider). A good
NOTE: CENTER AND CUT #/4"-WIDE,!/4"-DEEP NOTCH IN UPPER
AND LOWER BACK RAILS
When ripping the narrow strips for the drawer runners on the tool chest, I used a simple jig that slid against the rip fence on the table saw, as in the drawing at right.
The jig consists of a single part — a plywood base with a notch in it that matches the desired width of the strip. Since the strips are narrow, it’s best to replace the stan-dard insert plate with a zero-clearance version. This prevents strips from jamming
SPLITTER(!/8" HARDBOARD)
ZERO-CLEARANCE
INSERT
8 WoodsmithShop.com © 2010 August Home Publishing Co. All Rights Reserved.
in the opening. And a hard-board splitter glued into place just behind the blade helps prevent kickback.
uSing The Jig. To set up the jig, start by positioning the rip fence so the outside edge of the notch aligns with the inside of the saw blade (detail drawing). Fit the workpiece in the notch, and then push the jig past the saw blade to rip the first runner. Repeat the process until you have all the runners you need.
2
way to do this safely is shown in the box below. Finally, glue the runners in place flush with the back edge of the sides and divider.
ASSemBle The cheST. Now you’re ready to assemble the chest. Be sure the top and bottom are 1⁄2" back from the front edge of the sides and that the divider is flush with the top and bottom at the front of the case.
Add The hArdwood edging. You’re on the home stretch at this point. The next thing to do is add some hard-wood edging to the front and top edges of the sides (Figure 1).
With that complete, you can attach the hardwood rails and stile that cover the plywood edges of the top, bottom, and divider, fitting them as shown in Figure 2.
The upper back rail has a notch cut in it to fit around the divider,
and it’s rabbeted to accept the back of the chest. The lower back rail is thinner, so you only need to cut a center notch. After gluing the rails in place, you can attach the back.
a.
GRAIN-MATCHING DRAWER fRONTSGRAIN-MATCHING DRAWER fRONTS
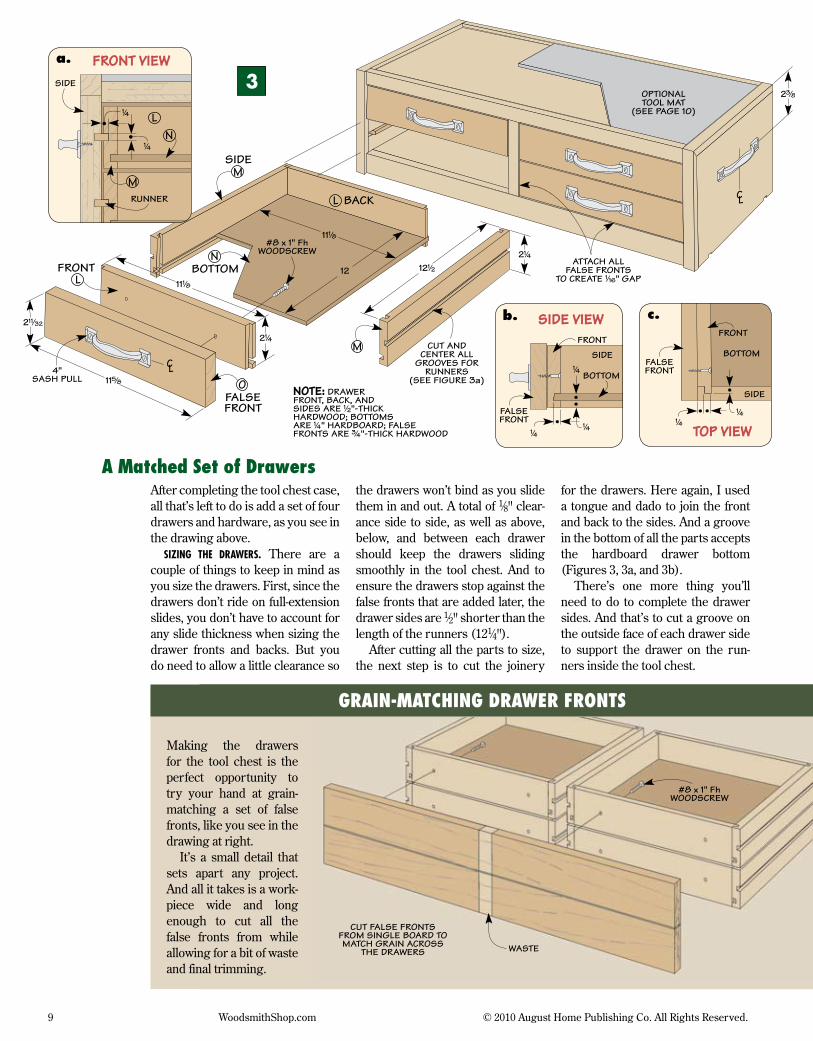
After completing the tool chest case, all that’s left to do is add a set of four drawers and hardware, as you see in the drawing above.
Sizing The drAwerS. There are a couple of things to keep in mind as you size the drawers. First, since the drawers don’t ride on full-extension slides, you don’t have to account for any slide thickness when sizing the drawer fronts and backs. But you do need to allow a little clearance so
OPTIONALTOOL MAT
(SEE PAGE 10)
ATTACH ALLFALSE FRONTS
TO CREATE !/16" GAP
CUT ANDCENTER ALL
GROOVES FORRUNNERS
(SEE FIGURE 3a)
Making the drawers for the tool chest is the perfect opportunity to try your hand at grain-matching a set of false fronts, like you see in the drawing at right.
It’s a small detail that sets apart any project. And all it takes is a work-piece wide and long enough to cut all the false fronts from while allowing for a bit of waste and final trimming.
9 WoodsmithShop.com © 2010 August Home Publishing Co. All Rights Reserved.
A Matched Set of Drawers
a.
b. c.
the drawers won’t bind as you slide them in and out. A total of 1⁄8" clear-ance side to side, as well as above, below, and between each drawer should keep the drawers sliding smoothly in the tool chest. And to ensure the drawers stop against the false fronts that are added later, the drawer sides are 1⁄2" shorter than the length of the runners (121⁄4").
After cutting all the parts to size, the next step is to cut the joinery
for the drawers. Here again, I used a tongue and dado to join the front and back to the sides. And a groove in the bottom of all the parts accepts the hardboard drawer bottom (Figures 3, 3a, and 3b).
There’s one more thing you’ll need to do to complete the drawer sides. And that’s to cut a groove on the outside face of each drawer side to support the drawer on the run-ners inside the tool chest.
3
fINISHING TOuCH — TOOl MATSfINISHING TOuCH — TOOl MATS
Extra-thick mats made from recycled tires protects tools and cart from bumps and dings
Thin, non-slip, cush-ioned mats protect tools and keep them from shifting
Non-slip, pre-sized mats come as a set to fit metal tool cart drawers, but can be sized as required for other uses
10 WoodsmithShop.com © 2010 August Home Publishing Co. All Rights Reserved.
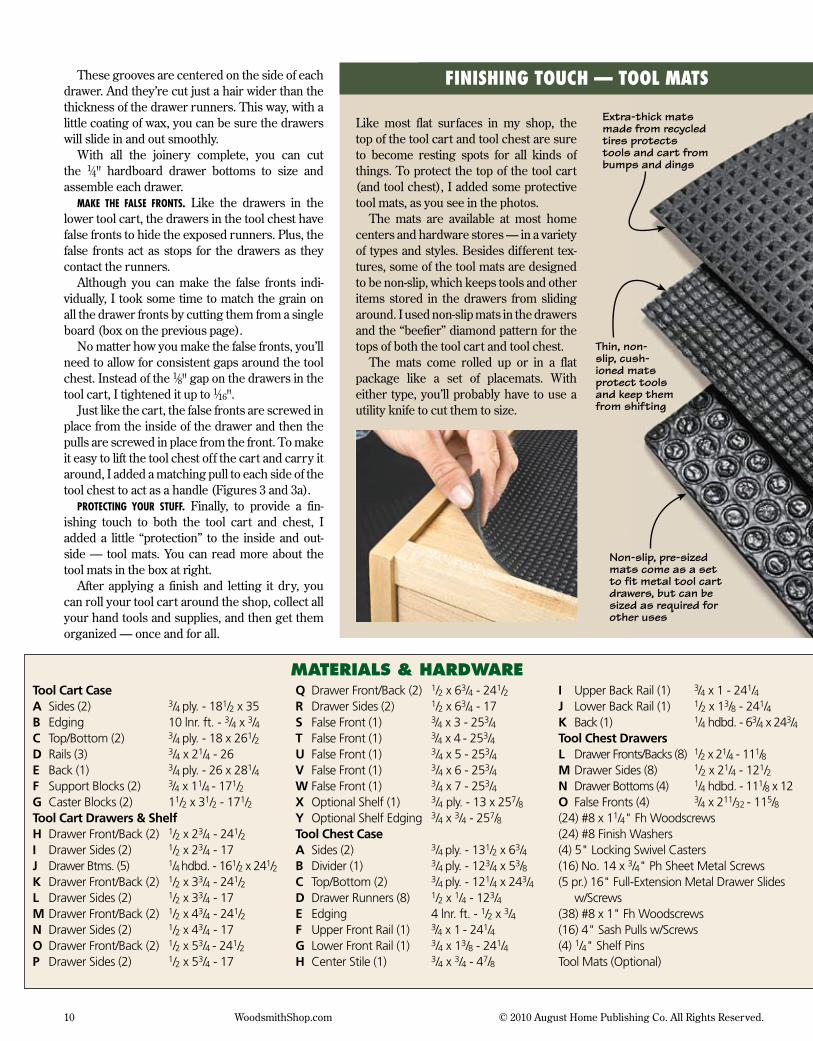
These grooves are centered on the side of each drawer. And they’re cut just a hair wider than the thickness of the drawer runners. This way, with a little coating of wax, you can be sure the drawers will slide in and out smoothly.
With all the joinery complete, you can cut the 1⁄4" hardboard drawer bottoms to size and assemble each drawer.
mAke The FAlSe FronTS. Like the drawers in the lower tool cart, the drawers in the tool chest have false fronts to hide the exposed runners. Plus, the false fronts act as stops for the drawers as they contact the runners.
Although you can make the false fronts indi-vidually, I took some time to match the grain on all the drawer fronts by cutting them from a single board (box on the previous page).
No matter how you make the false fronts, you’ll need to allow for consistent gaps around the tool chest. Instead of the 1⁄8" gap on the drawers in the tool cart, I tightened it up to 1⁄16".
Just like the cart, the false fronts are screwed in place from the inside of the drawer and then the pulls are screwed in place from the front. To make it easy to lift the tool chest off the cart and carry it around, I added a matching pull to each side of the tool chest to act as a handle (Figures 3 and 3a).
proTecTing your STuFF. Finally, to provide a fin-ishing touch to both the tool cart and chest, I added a little “protection” to the inside and out-side — tool mats. You can read more about the tool mats in the box at right.
After applying a finish and letting it dry, you can roll your tool cart around the shop, collect all your hand tools and supplies, and then get them organized — once and for all.
Like most flat surfaces in my shop, the top of the tool cart and tool chest are sure to become resting spots for all kinds of things. To protect the top of the tool cart (and tool chest), I added some protective tool mats, as you see in the photos.
The mats are available at most home centers and hardware stores — in a variety of types and styles. Besides different tex-tures, some of the tool mats are designed to be non-slip, which keeps tools and other items stored in the drawers from sliding around. I used non-slip mats in the drawers and the “beefier” diamond pattern for the tops of both the tool cart and tool chest.
The mats come rolled up or in a flat package like a set of placemats. With either type, you’ll probably have to use a utility knife to cut them to size.
Tool Cart CaseA Sides(2) 3/4ply.-181/2x35B Edging 10lnr.ft.-3/4x3/4C Top/Bottom(2) 3/4ply.-18x261/2D Rails(3) 3/4x21/4-26E Back(1) 3/4ply.-26x281/4F SupportBlocks(2) 3/4x11/4-171/2G CasterBlocks(2) 11/2x31/2-171/2Tool Cart Drawers & ShelfH DrawerFront/Back(2) 1/2x23/4-241/2I DrawerSides(2) 1/2x23/4-17J DrawerBtms.(5) 1/4hdbd.-161/2x241/2K DrawerFront/Back(2) 1/2x33/4-241/2L DrawerSides(2) 1/2x33/4-17MDrawerFront/Back(2) 1/2x43/4-241/2N DrawerSides(2) 1/2x43/4-17O DrawerFront/Back(2) 1/2x53/4-241/2P DrawerSides(2) 1/2x53/4-17
Q DrawerFront/Back(2) 1/2x63/4-241/2R DrawerSides(2) 1/2x63/4-17S FalseFront(1) 3/4x3-253/4T FalseFront(1) 3/4x4-253/4U FalseFront(1) 3/4x5-253/4V FalseFront(1) 3/4x6-253/4W FalseFront(1) 3/4x7-253/4X OptionalShelf(1) 3/4ply.-13x257/8Y OptionalShelfEdging 3/4x3/4-257/8Tool Chest CaseA Sides(2) 3/4ply.-131/2x63/4B Divider(1) 3/4ply.-123/4x53/8C Top/Bottom(2) 3/4ply.-121/4x243/4D DrawerRunners(8) 1/2x1/4-123/4E Edging 4lnr.ft.-1/2x3/4F UpperFrontRail(1) 3/4x1-241/4G LowerFrontRail(1) 3/4x13/8-241/4H CenterStile(1) 3/4x3/4-47/8
I UpperBackRail(1) 3/4x1-241/4J LowerBackRail(1) 1/2x13/8-241/4K Back(1) 1/4hdbd.-63/4x243/4Tool Chest DrawersL DrawerFronts/Backs(8) 1/2x21/4-111/8MDrawerSides(8) 1/2x21/4-121/2N DrawerBottoms(4) 1/4hdbd.-111/8x12O FalseFronts(4) 3/4x211/32-115/8(24)#8x11/4"FhWoodscrews(24)#8FinishWashers(4)5"LockingSwivelCasters(16)No.14x3/4"PhSheetMetalScrews(5pr.)16"Full-ExtensionMetalDrawerSlides w/Screws(38)#8x1"FhWoodscrews(16)4"SashPullsw/Screws(4)1/4"ShelfPinsToolMats(Optional)
Materials & Hardware
11 WoodsmithShop.com © 2010 August Home Publishing Co. All Rights Reserved.
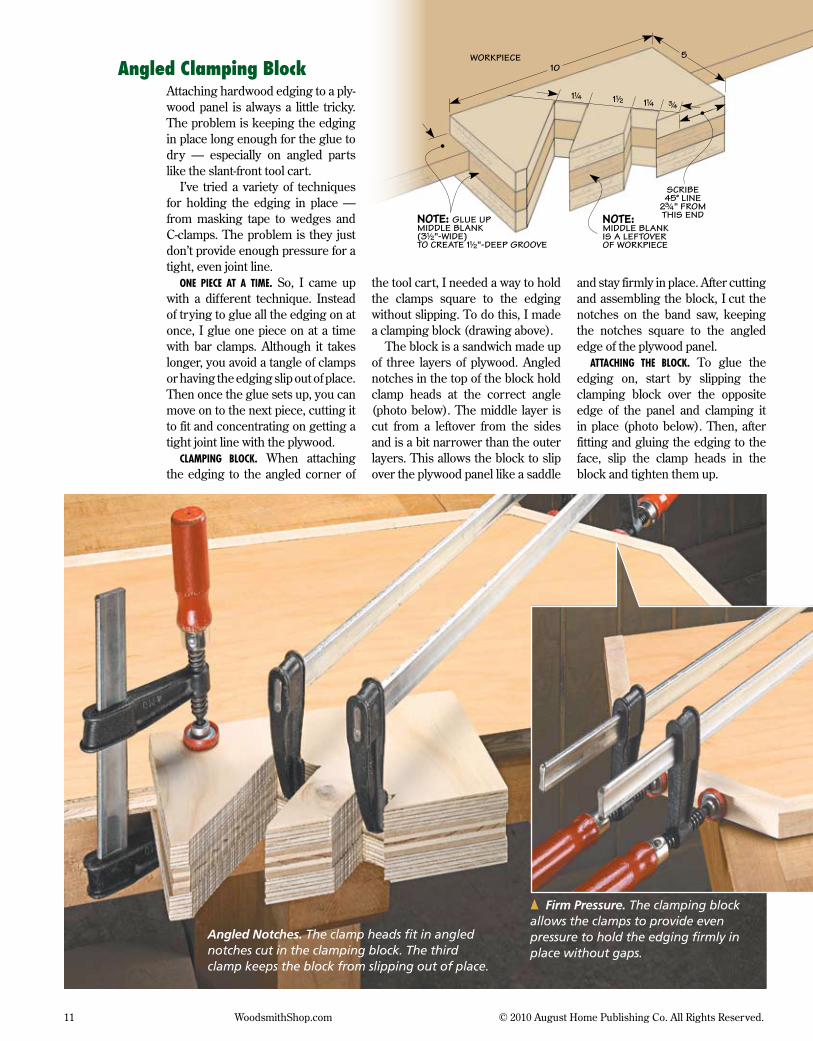
{ Firm Pressure. The clamping block allows the clamps to provide even pressure to hold the edging firmly in place without gaps.
Angled Notches. The clamp heads fit in angled notches cut in the clamping block. The third clamp keeps the block from slipping out of place.
Angled Clamping BlockAttaching hardwood edging to a ply-wood panel is always a little tricky. The problem is keeping the edging in place long enough for the glue to dry — especially on angled parts like the slant-front tool cart.
I’ve tried a variety of techniques for holding the edging in place — from masking tape to wedges and C-clamps. The problem is they just don’t provide enough pressure for a tight, even joint line.
one piece AT A Time. So, I came up with a different technique. Instead of trying to glue all the edging on at once, I glue one piece on at a time with bar clamps. Although it takes longer, you avoid a tangle of clamps or having the edging slip out of place. Then once the glue sets up, you can move on to the next piece, cutting it to fit and concentrating on getting a tight joint line with the plywood.
clAmping Block. When attaching the edging to the angled corner of
the tool cart, I needed a way to hold the clamps square to the edging without slipping. To do this, I made a clamping block (drawing above).
The block is a sandwich made up of three layers of plywood. Angled notches in the top of the block hold clamp heads at the correct angle (photo below). The middle layer is cut from a leftover from the sides and is a bit narrower than the outer layers. This allows the block to slip over the plywood panel like a saddle
and stay firmly in place. After cutting and assembling the block, I cut the notches on the band saw, keeping the notches square to the angled edge of the plywood panel.
ATTAching The Block. To glue the edging on, start by slipping the clamping block over the opposite edge of the panel and clamping it in place (photo below). Then, after fitting and gluing the edging to the face, slip the clamp heads in the block and tighten them up.