Embed Size (px)
Citation preview
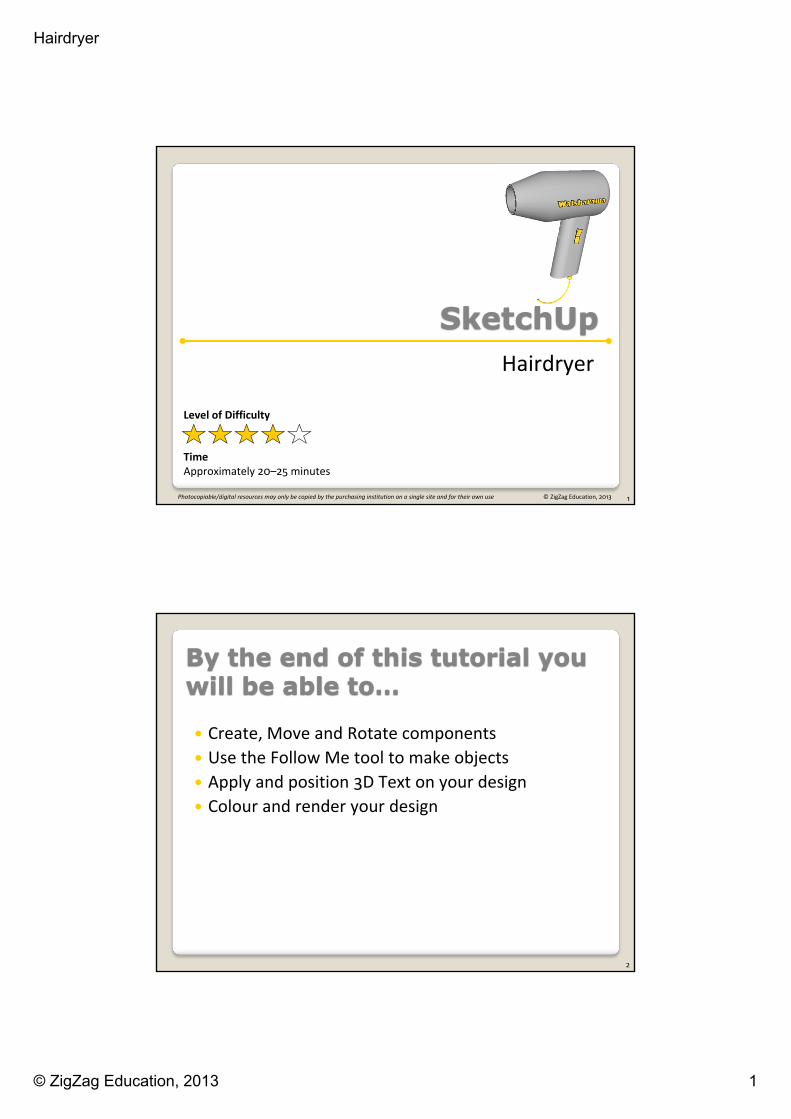
Hairdryer
© ZigZag Education, 2013 1
SketchUpHairdryer
Level of Difficulty
TimeApproximately 20–25 minutes
1Photocopiable/digital resources may only be copied by the purchasing institution on a single site and for their own use © ZigZag Education, 2013
Create, Move and Rotate components Use the Follow Me tool to make objects Apply and position 3D Text on your design Colour and render your design
By the end of this tutorial you will be able to…
2
Hairdryer
© ZigZag Education, 2013 2
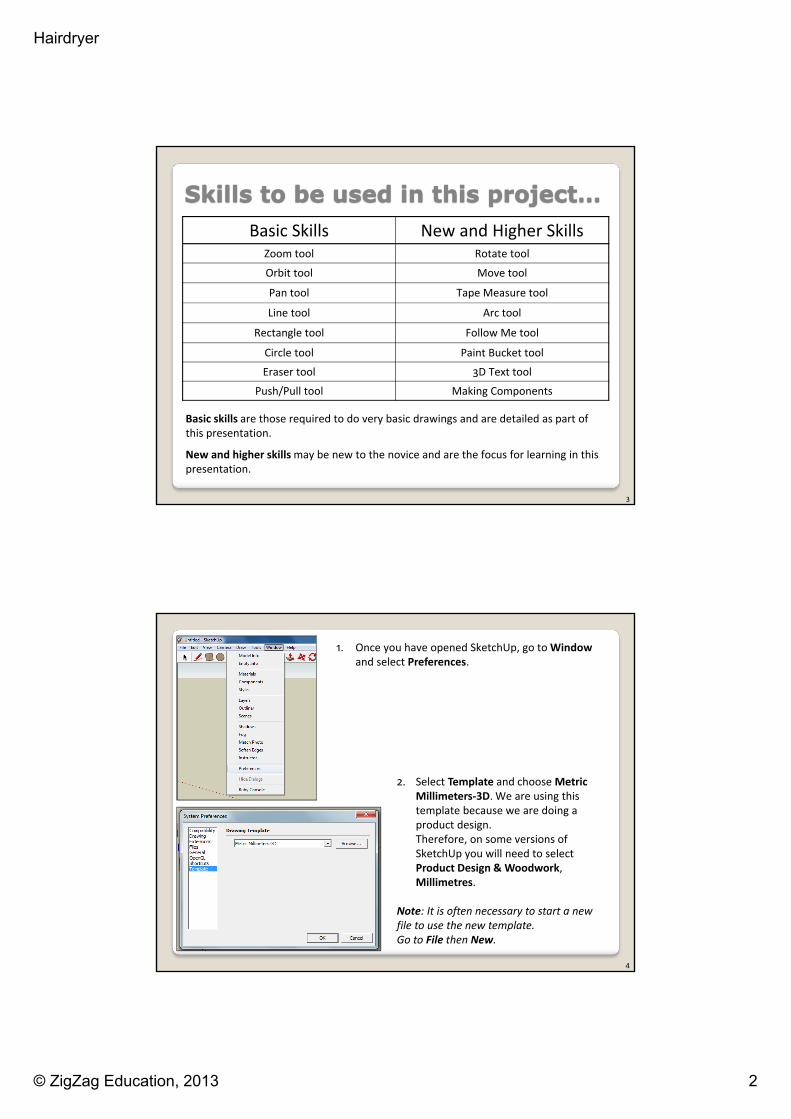
Skills to be used in this project…Basic Skills New and Higher Skills
Zoom tool Rotate tool
Orbit tool Move tool
Pan tool Tape Measure tool
Line tool Arc tool
Rectangle tool Follow Me tool
Circle tool Paint Bucket tool
Eraser tool 3D Text tool
Push/Pull tool Making Components
Basic skills are those required to do very basic drawings and are detailed as part of this presentation.
New and higher skills may be new to the novice and are the focus for learning in this presentation.
3
1. Once you have opened SketchUp, go to Windowand select Preferences.
2. Select Template and choose Metric Millimeters-3D. We are using this template because we are doing a product design.Therefore, on some versions of SketchUp you will need to select Product Design & Woodwork,Millimetres.
Note: It is often necessary to start a new file to use the new template.Go to File then New.
4
Hairdryer
© ZigZag Education, 2013 3
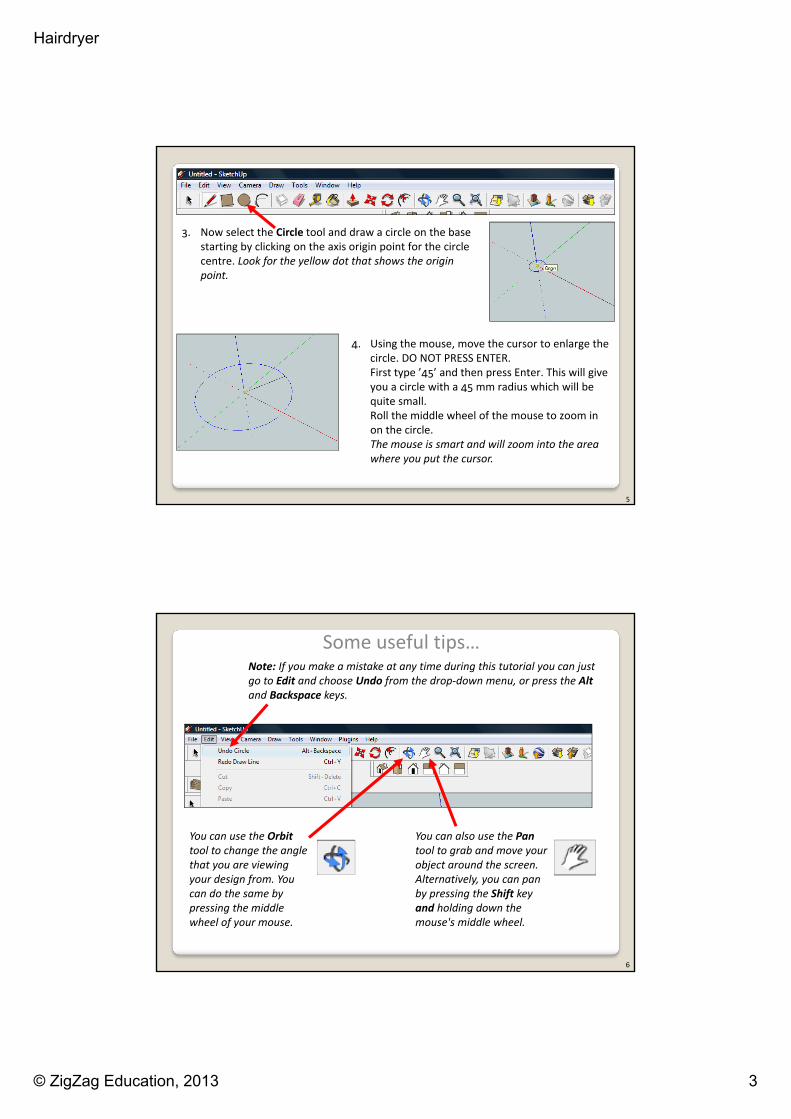
3. Now select the Circle tool and draw a circle on the base starting by clicking on the axis origin point for the circle centre. Look for the yellow dot that shows the origin point.
4. Using the mouse, move the cursor to enlarge the circle. DO NOT PRESS ENTER. First type ’45’ and then press Enter. This will give you a circle with a 45 mm radius which will be quite small.Roll the middle wheel of the mouse to zoom in on the circle.The mouse is smart and will zoom into the area where you put the cursor.
5
Note: If you make a mistake at any time during this tutorial you can just go to Edit and choose Undo from the drop-down menu, or press the Altand Backspace keys.
You can use the Orbittool to change the angle that you are viewing your design from. You can do the same by pressing the middle wheel of your mouse.
You can also use the Pantool to grab and move your object around the screen.Alternatively, you can pan by pressing the Shift key and holding down the mouse's middle wheel.
Some useful tips…
6
Hairdryer
© ZigZag Education, 2013 4
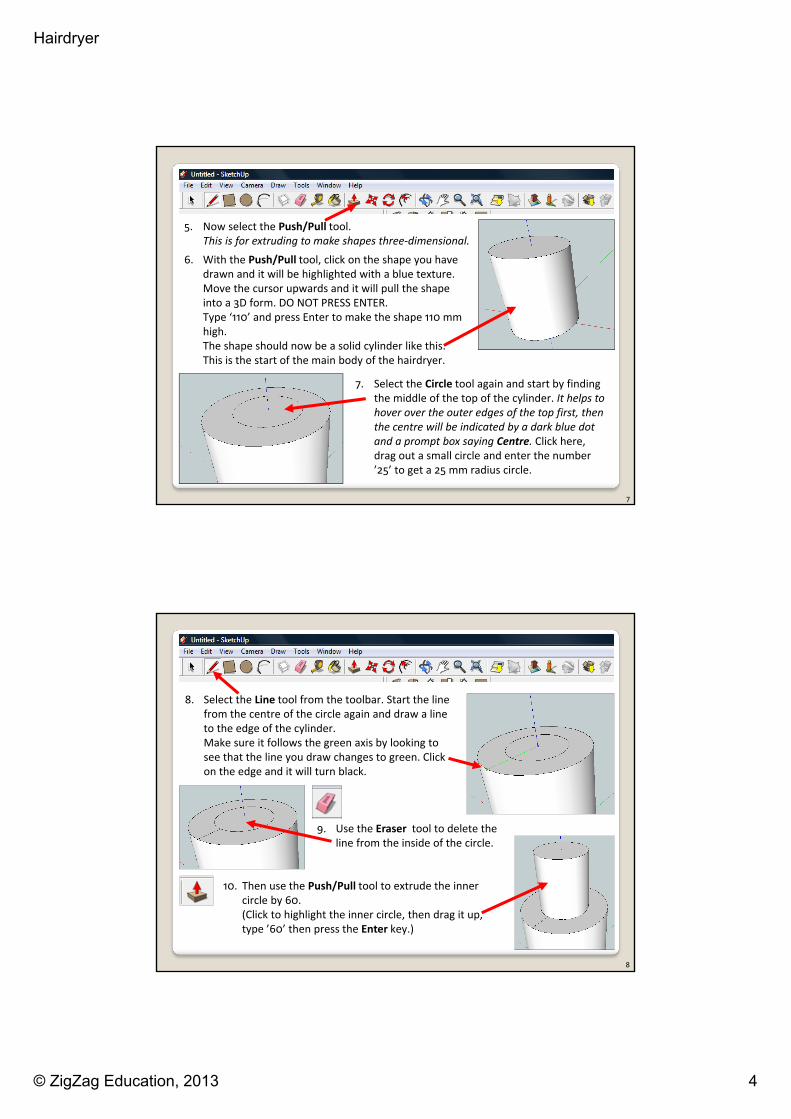
5. Now select the Push/Pull tool.This is for extruding to make shapes three-dimensional.
6. With the Push/Pull tool, click on the shape you have drawn and it will be highlighted with a blue texture.Move the cursor upwards and it will pull the shape into a 3D form. DO NOT PRESS ENTER.Type ‘110’ and press Enter to make the shape 110 mm high.The shape should now be a solid cylinder like this.This is the start of the main body of the hairdryer.
7. Select the Circle tool again and start by finding the middle of the top of the cylinder. It helps to hover over the outer edges of the top first, then the centre will be indicated by a dark blue dot and a prompt box saying Centre. Click here, drag out a small circle and enter the number ’25’ to get a 25 mm radius circle.
7
8. Select the Line tool from the toolbar. Start the line from the centre of the circle again and draw a line to the edge of the cylinder.Make sure it follows the green axis by looking to see that the line you draw changes to green. Click on the edge and it will turn black.
9. Use the Eraser tool to delete theline from the inside of the circle.
10. Then use the Push/Pull tool to extrude the inner circle by 60.(Click to highlight the inner circle, then drag it up, type ’60’ then press the Enter key.)
8
Hairdryer
© ZigZag Education, 2013 5
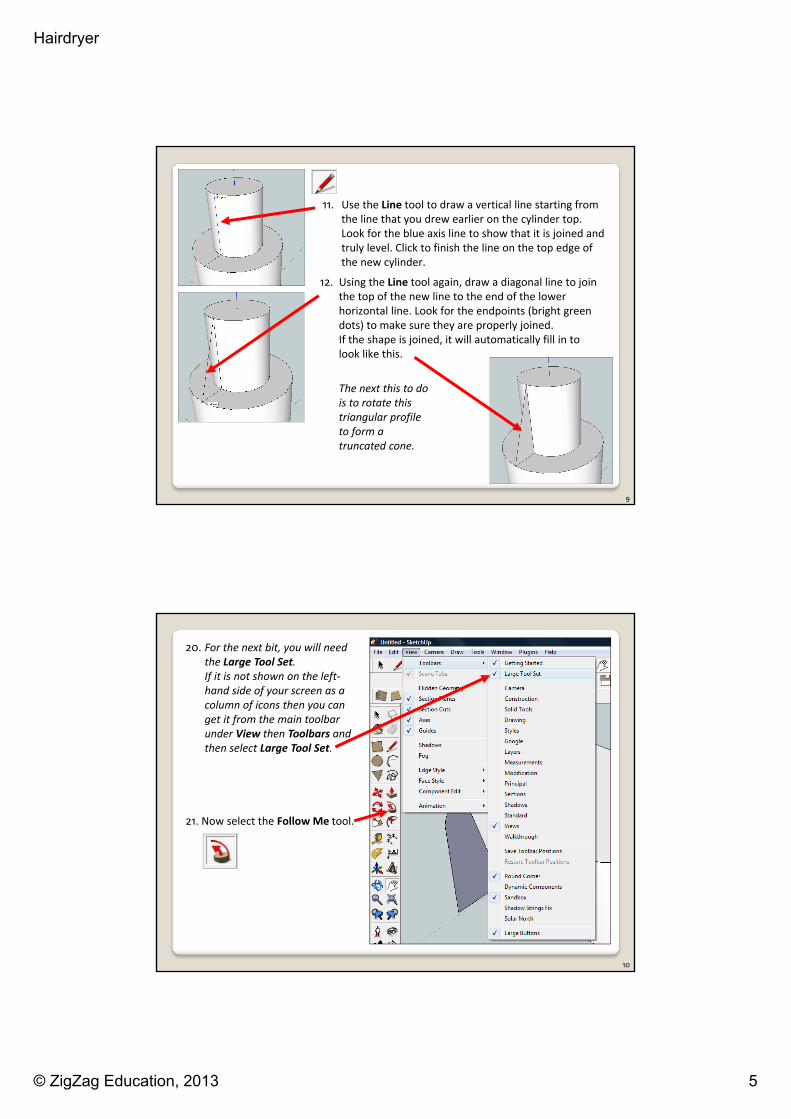
11. Use the Line tool to draw a vertical line starting from the line that you drew earlier on the cylinder top.Look for the blue axis line to show that it is joined and truly level. Click to finish the line on the top edge of the new cylinder.
12. Using the Line tool again, draw a diagonal line to join the top of the new line to the end of the lower horizontal line. Look for the endpoints (bright green dots) to make sure they are properly joined.If the shape is joined, it will automatically fill in to look like this.
The next this to do is to rotate this triangular profile to form a truncated cone.
9
20. For the next bit, you will need the Large Tool Set.If it is not shown on the left-hand side of your screen as a column of icons then you can get it from the main toolbar under View then Toolbars and then select Large Tool Set.
21. Now select the Follow Me tool.
10
Hairdryer
© ZigZag Education, 2013 6
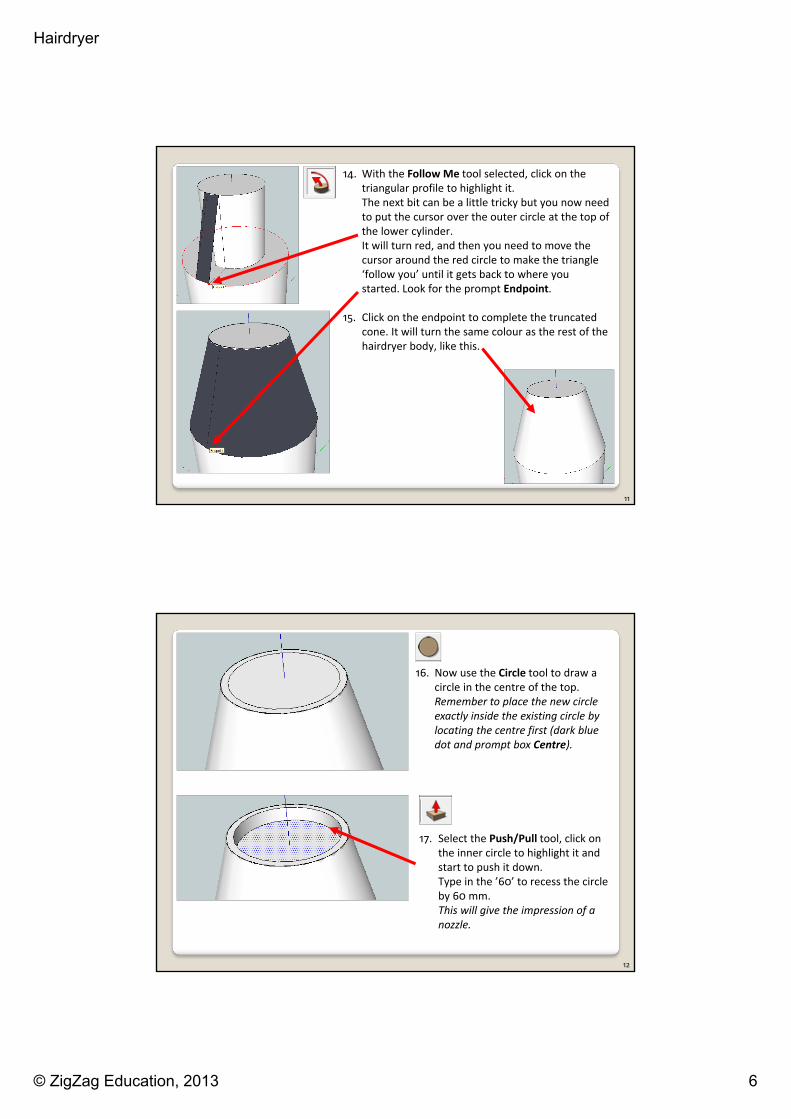
14. With the Follow Me tool selected, click on the triangular profile to highlight it.The next bit can be a little tricky but you now need to put the cursor over the outer circle at the top of the lower cylinder.It will turn red, and then you need to move the cursor around the red circle to make the triangle ‘follow you’ until it gets back to where you started. Look for the prompt Endpoint.
15. Click on the endpoint to complete the truncated cone. It will turn the same colour as the rest of the hairdryer body, like this.
11
16. Now use the Circle tool to draw a circle in the centre of the top. Remember to place the new circle exactly inside the existing circle by locating the centre first (dark blue dot and prompt box Centre).
17. Select the Push/Pull tool, click on the inner circle to highlight it and start to push it down.Type in the ’60’ to recess the circle by 60 mm.This will give the impression of a nozzle.
12
Hairdryer
© ZigZag Education, 2013 7
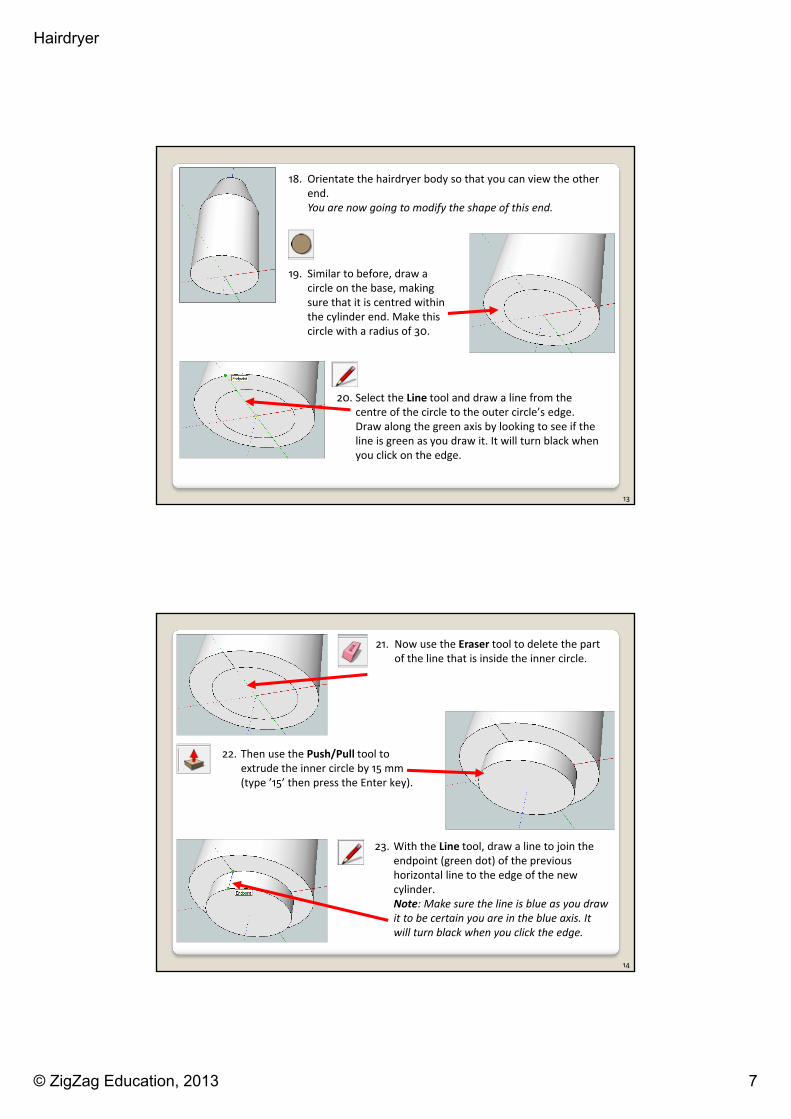
18. Orientate the hairdryer body so that you can view the other end.You are now going to modify the shape of this end.
19. Similar to before, draw a circle on the base, making sure that it is centred within the cylinder end. Make this circle with a radius of 30.
20. Select the Line tool and draw a line from the centre of the circle to the outer circle’s edge. Draw along the green axis by looking to see if the line is green as you draw it. It will turn black when you click on the edge.
13
21. Now use the Eraser tool to delete the part of the line that is inside the inner circle.
22. Then use the Push/Pull tool to extrude the inner circle by 15 mm (type ’15’ then press the Enter key).
23. With the Line tool, draw a line to join the endpoint (green dot) of the previous horizontal line to the edge of the new cylinder.Note: Make sure the line is blue as you draw it to be certain you are in the blue axis. It will turn black when you click the edge.
14
Hairdryer
© ZigZag Education, 2013 8
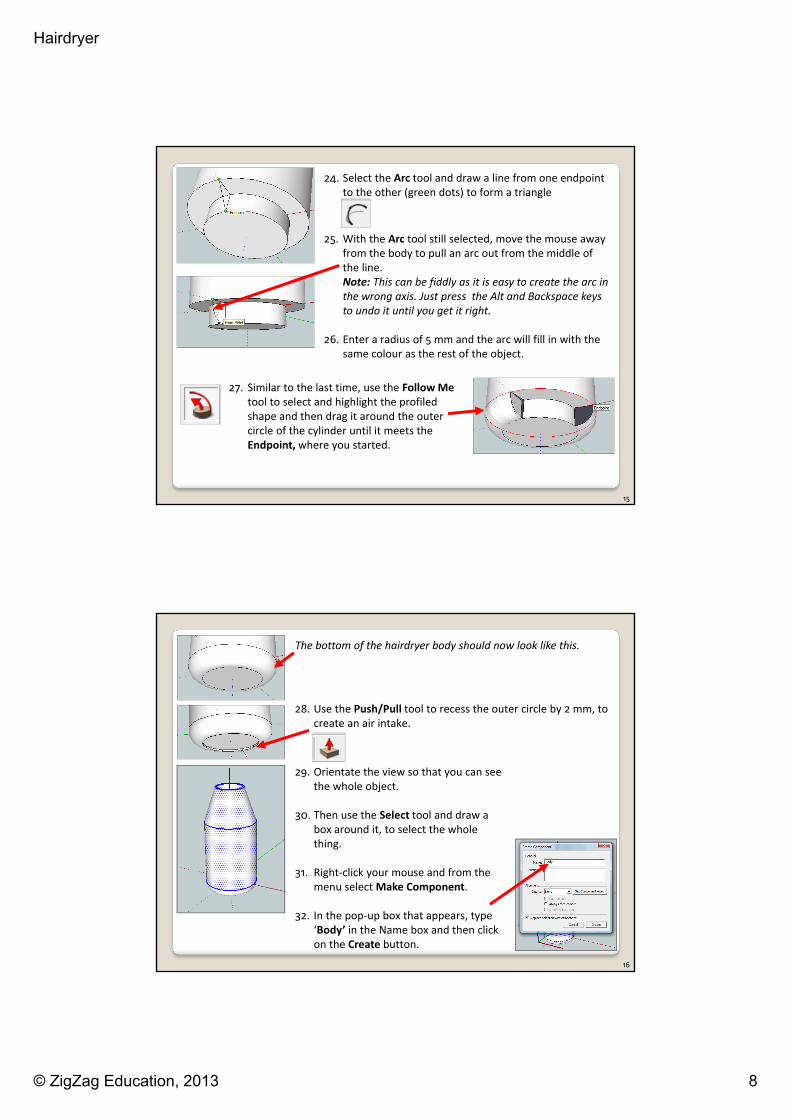
24. Select the Arc tool and draw a line from one endpoint to the other (green dots) to form a triangle
25. With the Arc tool still selected, move the mouse away from the body to pull an arc out from the middle of the line.Note: This can be fiddly as it is easy to create the arc in the wrong axis. Just press the Alt and Backspace keys to undo it until you get it right.
26. Enter a radius of 5 mm and the arc will fill in with the same colour as the rest of the object.
27. Similar to the last time, use the Follow Metool to select and highlight the profiled shape and then drag it around the outer circle of the cylinder until it meets the Endpoint, where you started.
15
The bottom of the hairdryer body should now look like this.
28. Use the Push/Pull tool to recess the outer circle by 2 mm, to create an air intake.
29. Orientate the view so that you can see the whole object.
30. Then use the Select tool and draw a box around it, to select the whole thing.
31. Right-click your mouse and from the menu select Make Component.
32. In the pop-up box that appears, type ‘Body’ in the Name box and then click on the Create button.
16

Hairdryer
© ZigZag Education, 2013 9
33. Select the Rotate tool.
Now the whole object is a single component ,and while it is selected it will have a blue box around it like this.
Note: This next bit can be tricky!
34. Click on the green axis to start with but keep your finger pressed on the left-hand mouse button.The cursor may initially become a blue protractor. Move the mouse in a gentle rotating motion until you get the protractor to turn red, and then let go of the mouse button to set the axis of rotation.
17
35. Now move the cursor along the green axis to set this as the axis of rotation. Click here to set the axis end point.
36. When you move the cursor again, you will see the object rotate about the green axis. When the hairdryer body is approximately horizontal, type ‘90’ and it will be set at 90 degrees to its starting point.
37. To put some simple graphics on the hairdryer body, first select the 3D Texttool from the Large Tool Set.
38. A pop-up box will appear. Type in the name you want to use for the hairdryer. Change the height to 10, extrude to 2, choose a font and click on Place.
18
Hairdryer
© ZigZag Education, 2013 10
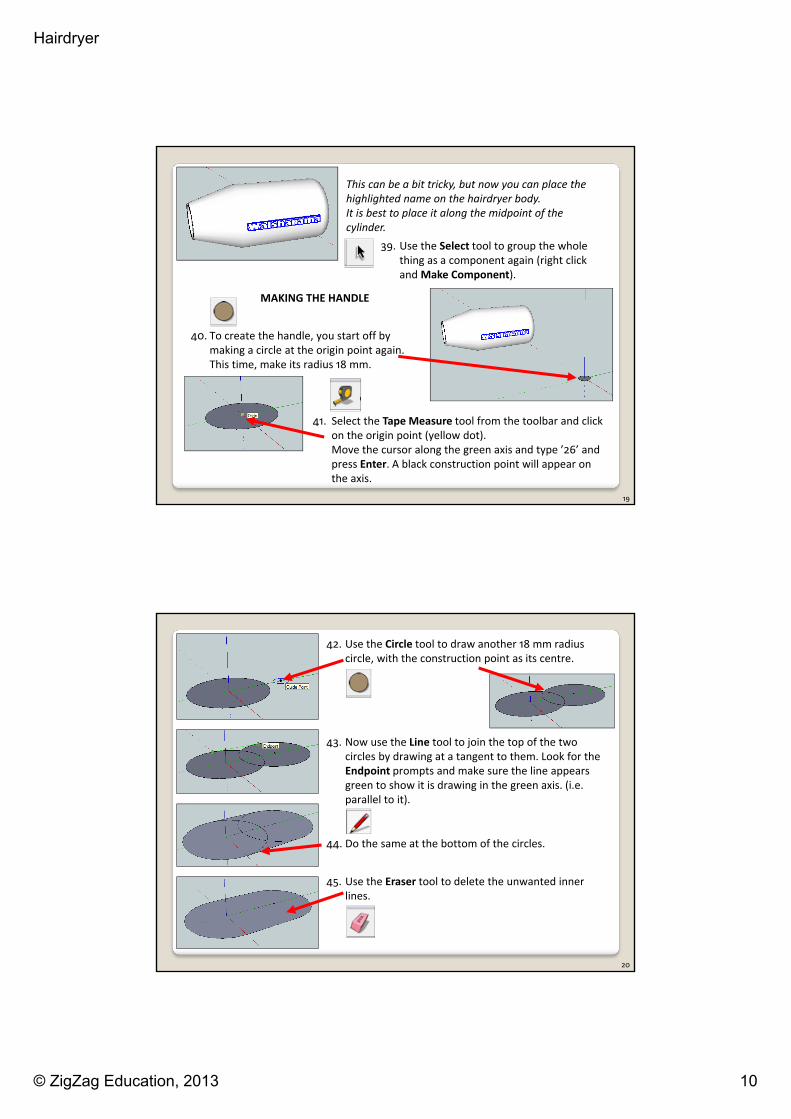
This can be a bit tricky, but now you can place the highlighted name on the hairdryer body.It is best to place it along the midpoint of the cylinder.
39. Use the Select tool to group the whole thing as a component again (right click and Make Component).
40. To create the handle, you start off by making a circle at the origin point again. This time, make its radius 18 mm.
41. Select the Tape Measure tool from the toolbar and click on the origin point (yellow dot).Move the cursor along the green axis and type ’26’ and press Enter. A black construction point will appear on the axis.
MAKING THE HANDLE
19
42. Use the Circle tool to draw another 18 mm radius circle, with the construction point as its centre.
43. Now use the Line tool to join the top of the two circles by drawing at a tangent to them. Look for the Endpoint prompts and make sure the line appears green to show it is drawing in the green axis. (i.e. parallel to it).
45. Use the Eraser tool to delete the unwanted inner lines.
44. Do the same at the bottom of the circles.
20

Hairdryer
© ZigZag Education, 2013 11
46. Extrude the shape upwards by 130 mm using the Push/Pull tool.
47. Using the Select tool, trace a square around the top face to highlight it.
48. Select the Move tool and click on the endpoint at the far end of the top face (end of the half circle, shown as 1)
1
49. With the Alt key pressed down, gently pull the selected face along the green axis so that the handle looks sloped. Type ’30’ and press Enter to set it.
Now you are going to skew or distort the handle.
Next you will make a rocker switch (on/off) to go on the handle.
21
50. Use the Rectangle tool to draw a rectangle on the handle. Type ‘30,10’ to set its size.
51. Then use the Select tool to highlight this rectangle.
52. Select the Rotate tool and click on the bottom right-hand endpoint of the rectangle (green dot).Then move the cursor to the top right-hand corner of the rectangle and click on it.
53. You will now be able to rotate the rectangle so that it is parallel to the nearby lines on the handle.
22
Hairdryer
© ZigZag Education, 2013 12
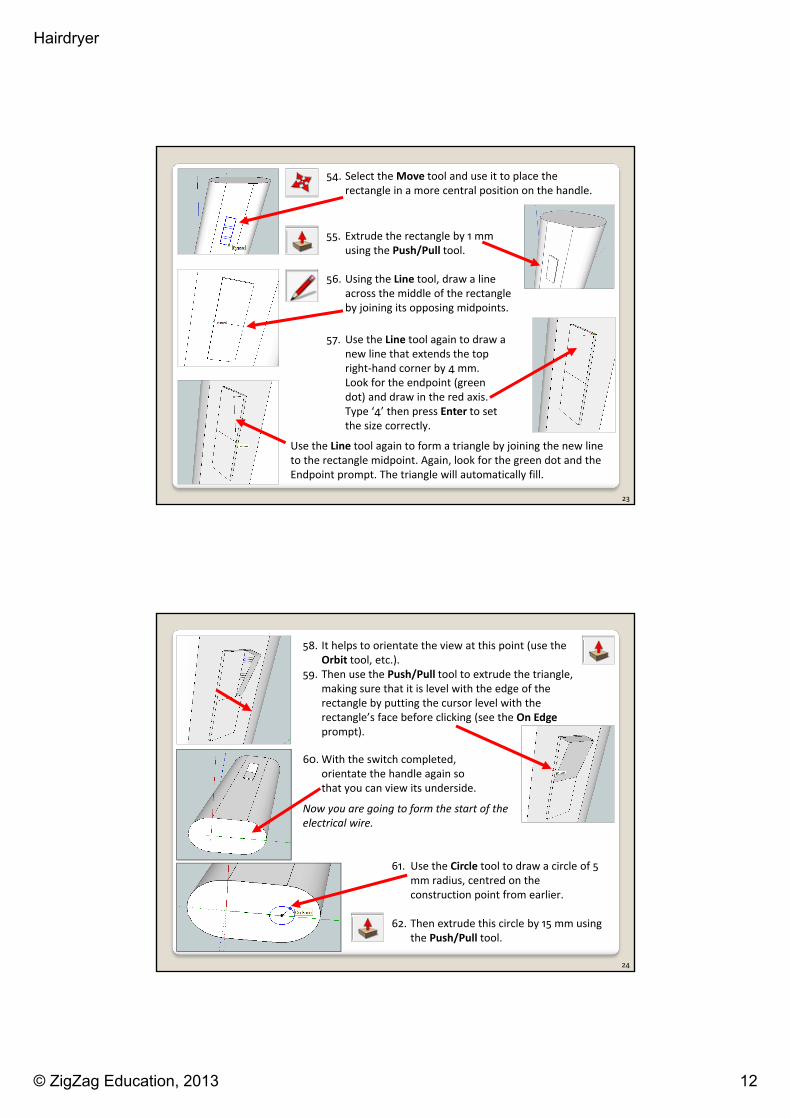
54. Select the Move tool and use it to place the rectangle in a more central position on the handle.
55. Extrude the rectangle by 1 mm using the Push/Pull tool.
56. Using the Line tool, draw a line across the middle of the rectangle by joining its opposing midpoints.
57. Use the Line tool again to draw a new line that extends the top right-hand corner by 4 mm. Look for the endpoint (green dot) and draw in the red axis. Type ‘4’ then press Enter to set the size correctly.
Use the Line tool again to form a triangle by joining the new line to the rectangle midpoint. Again, look for the green dot and the Endpoint prompt. The triangle will automatically fill.
23
58. It helps to orientate the view at this point (use the Orbit tool, etc.).
59. Then use the Push/Pull tool to extrude the triangle, making sure that it is level with the edge of the rectangle by putting the cursor level with the rectangle’s face before clicking (see the On Edgeprompt).
60. With the switch completed, orientate the handle again so that you can view its underside.
61. Use the Circle tool to draw a circle of 5 mm radius, centred on the construction point from earlier.
62. Then extrude this circle by 15 mm using the Push/Pull tool.
Now you are going to form the start of the electrical wire.
24
Hairdryer
© ZigZag Education, 2013 13
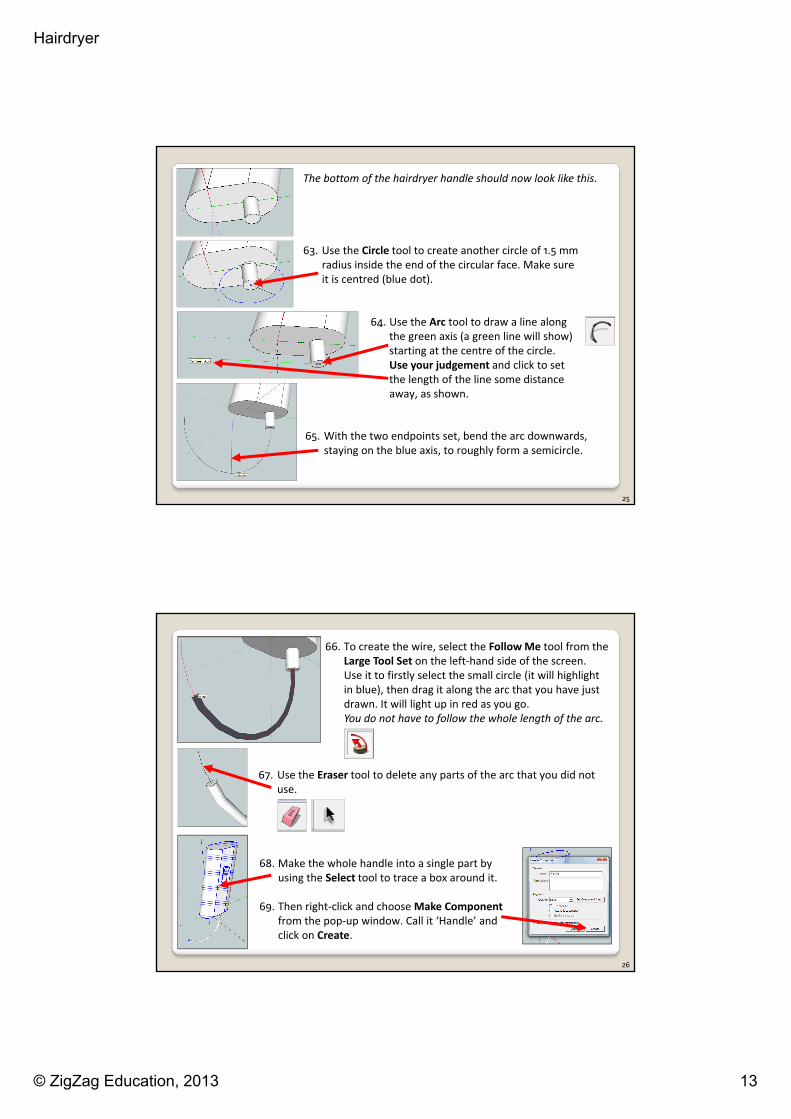
The bottom of the hairdryer handle should now look like this.
63. Use the Circle tool to create another circle of 1.5 mm radius inside the end of the circular face. Make sure it is centred (blue dot).
64. Use the Arc tool to draw a line along the green axis (a green line will show) starting at the centre of the circle.Use your judgement and click to set the length of the line some distance away, as shown.
65. With the two endpoints set, bend the arc downwards, staying on the blue axis, to roughly form a semicircle.
25
66. To create the wire, select the Follow Me tool from the Large Tool Set on the left-hand side of the screen.Use it to firstly select the small circle (it will highlight in blue), then drag it along the arc that you have just drawn. It will light up in red as you go. You do not have to follow the whole length of the arc.
67. Use the Eraser tool to delete any parts of the arc that you did not use.
68. Make the whole handle into a single part by using the Select tool to trace a box around it.
69. Then right-click and choose Make Componentfrom the pop-up window. Call it ‘Handle’ and click on Create.
26
Hairdryer
© ZigZag Education, 2013 14
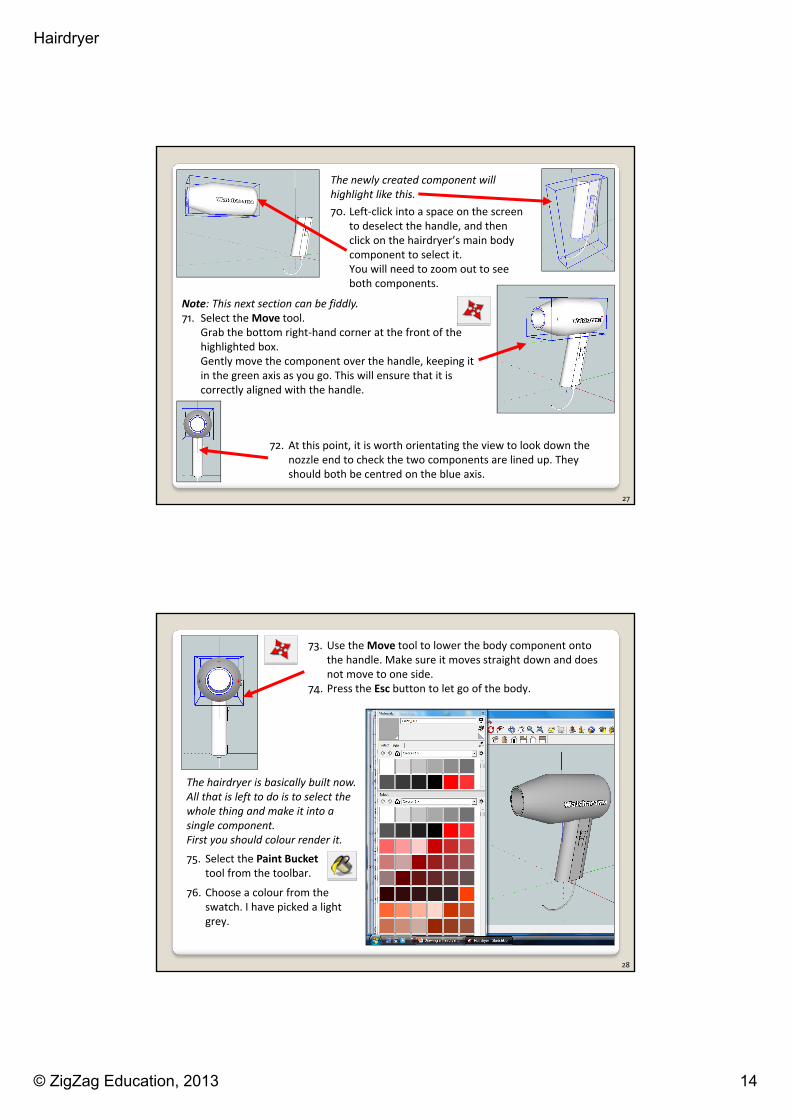
The newly created component will highlight like this.70. Left-click into a space on the screen
to deselect the handle, and then click on the hairdryer’s main body component to select it.You will need to zoom out to see both components.
Note: This next section can be fiddly.71. Select the Move tool.
Grab the bottom right-hand corner at the front of the highlighted box.Gently move the component over the handle, keeping it in the green axis as you go. This will ensure that it is correctly aligned with the handle.
72. At this point, it is worth orientating the view to look down the nozzle end to check the two components are lined up. They should both be centred on the blue axis.
27
73. Use the Move tool to lower the body component onto the handle. Make sure it moves straight down and does not move to one side.
74. Press the Esc button to let go of the body.
The hairdryer is basically built now. All that is left to do is to select the whole thing and make it into a single component. First you should colour render it.75. Select the Paint Bucket
tool from the toolbar.
76. Choose a colour from the swatch. I have picked a light grey.
28
Hairdryer
© ZigZag Education, 2013 15
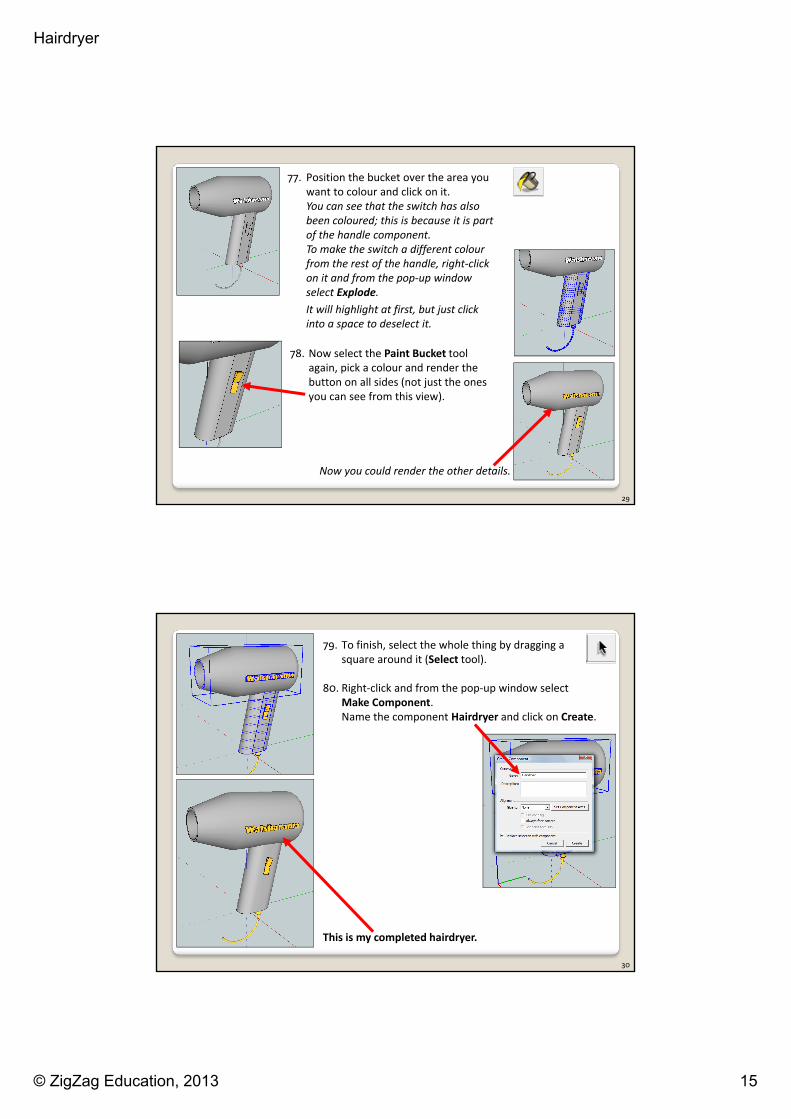
77. Position the bucket over the area you want to colour and click on it.You can see that the switch has also been coloured; this is because it is part of the handle component.To make the switch a different colour from the rest of the handle, right-click on it and from the pop-up window select Explode.It will highlight at first, but just click into a space to deselect it.
78. Now select the Paint Bucket tool again, pick a colour and render the button on all sides (not just the ones you can see from this view).
Now you could render the other details.
29
79. To finish, select the whole thing by dragging a square around it (Select tool).
80. Right-click and from the pop-up window select Make Component.Name the component Hairdryer and click on Create.
This is my completed hairdryer.
30
Hairdryer
© ZigZag Education, 2013 16
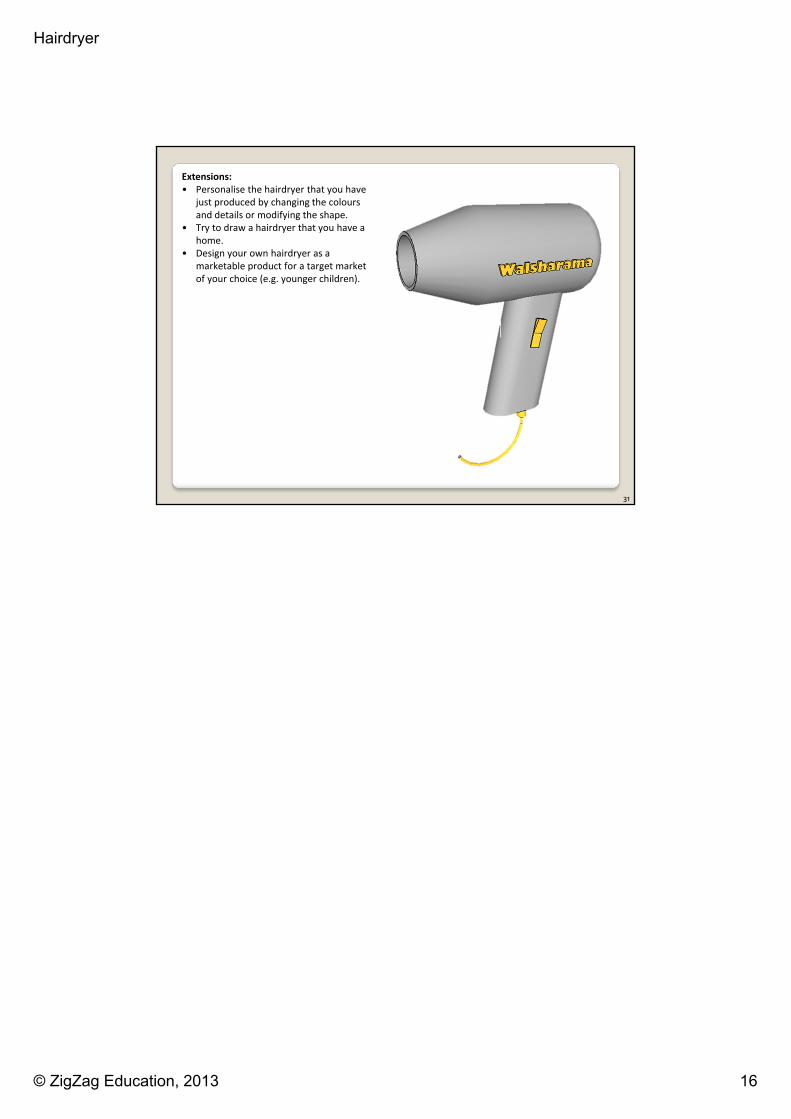
Extensions:• Personalise the hairdryer that you have
just produced by changing the colours and details or modifying the shape.
• Try to draw a hairdryer that you have a home.
• Design your own hairdryer as a marketable product for a target market of your choice (e.g. younger children).
31