Embed Size (px)
Citation preview
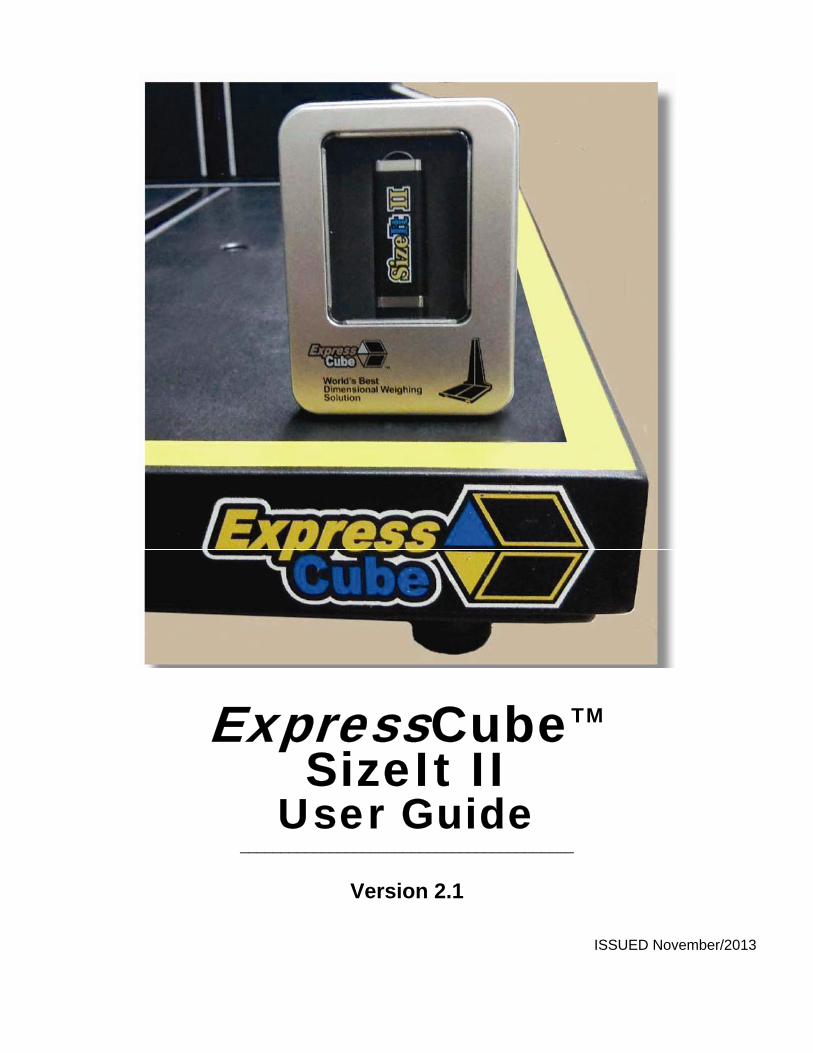
ExpressCubeTM SizeIt II
User Guide _________________________________________
Version 2.1
ISSUED November/2013

2
Important ExpressCube™ SizeIt II™ User Guide - Copyright© by Global Sensor Systems Inc. All rights reserved ExpressCube™ is one of many state-of-the-art product lines designed and manufactured by Global Sensor Systems Inc. All information contained in this User Guide is subject to change without notice. ExpressCube™ products and technology are protected by domestic and international patents both issued and pending. U.S. Patent No. 7321859, 7373722 issued. Patents Issued Canada, Japan, and Mexico Patent Pending Europe, China, and India. For more details contact Canada 905-507-0007 All ExpressCube™ , SizeIt™ software and firmware is protected by domestic and international copyrights. ExpressCube™, Global ExpressCube™ , SizeIt™, Resolution™ and the ExpressCube™ logo are registered Trademarks. Please address any comments or suggestions regarding this user guide to: Global Sensor Systems 400 Brunel Road, Mississauga, Ontario Canada L4Z 2C2 Attention: Documentation For additional product information refer to our web site: www.expresscube.com or e-mail us: [email protected] For additional technical assistance please e-mail: [email protected]

3
Index
1.1. Introduction ........................................................................................................................ 5 1.2. Specifications / Features .................................................................................................... 5
2. Operation – General .................................................................................................................. 6 2.1. Screen Layout .................................................................................................................... 6
2.1.1. Screen Layout - Idle ................................................................................................... 6 2.1.2. Screen Layout - Acquired ........................................................................................... 6 2.1.3. Screen Layout – Recorded .......................................................................................... 7 2.1.4. Screen Icon Table ....................................................................................................... 7
2.2. Preparation for Measurements ......................................................................................... 10 2.2.1. Verify Selected Units (cm/kg : in/lb) ........................................................................ 10 2.2.2. Verify / Select Dim Factors ..................................................................................... 10 2.2.3. Verify Select Trigger Mode (Manual or Automatic) ................................................ 10
2.3. Oversize Manual Record .................................................................................................. 11 2.3.1. General ...................................................................................................................... 11 2.3.2. Example 1 An Oversized Carton ............................................................................. 11 2.3.3. Example 2 Irregular Shaped Item ............................................................................ 12 2.3.4. Example 3 Weight Record Only .............................................................................. 12
2.4. Tag Record ....................................................................................................................... 13 2.5. Group Feature .................................................................................................................. 13 2.6. Multi-Pak Feature ............................................................................................................ 14
2.6.1. Description ................................................................................................................ 14 2.6.2. Package Samples in Which Multi-Pack Could Be Used .......................................... 14 2.6.3. How to Determine Multi-Pack Factors for Measuring ............................................. 15
2.7. Swap Feature .................................................................................................................... 16 2.8. Calibration of Measurement Arrays ................................................................................. 17 2.9. SizeIt II Information (About) ........................................................................................... 17
3. Installation ............................................................................................................................... 18 3.1. The SizeIt II USB Key ..................................................................................................... 18 3.2. SizeIt II USB Contents..................................................................................................... 18
3.2.1. Text Files .................................................................................................................. 18 3.2.2. (Windows) Driver ..................................................................................................... 19 3.2.3. Framework ................................................................................................................ 20
3.3. Installation of SizeIt II with the Setup Program .............................................................. 20 3.3.1. Installing SizeIt II for the First Time On A Computer ............................................. 20 3.3.2. Running Setup .......................................................................................................... 21
3.4. SizeIt II Upgrade Programs ............................................................................................. 24 4. SizeIt II Set Up – User Features .............................................................................................. 25
4.1. Verify SizeIt II USB Connection to ExpressCube Device .............................................. 25 4.2. Options Menu Activation ................................................................................................. 25 4.3. Input Dim (Dimensional) Factors .................................................................................... 26 4.4. Automatic Acquire/ Record Set-Up ................................................................................. 26 4.5. Oversized Manual Record Set-Up ................................................................................... 27 4.6. Tag Record Set-Up .......................................................................................................... 27
4.6.1. Set Up Tag Fields ..................................................................................................... 27 4.6.2. Tag Field Sample Output .......................................................................................... 27
4.7. ExpressCube ID ............................................................................................................... 28 4.8. User Feature Activation on Main Screen (Display) ......................................................... 28
4.8.1. Units Lock ................................................................................................................ 28 4.8.2. Group - Multi-Pack - Swap L/W/H ...................................................................... 29

4
4.9. Status Bar ......................................................................................................................... 29 5. SizeIt II Set Up – Data Output Format .................................................................................... 30
5.1. General ............................................................................................................................. 30 5.2. Output : Date Code .......................................................................................................... 30
5.2.1. Julian Date ................................................................................................................ 30 5.2.2. YYYYMMDD .......................................................................................................... 30 5.2.3. None ......................................................................................................................... 30
5.3. Output : Output Device .................................................................................................... 30 5.3.1. Printer (ExpressCube) ............................................................................................... 31 5.3.2. File ............................................................................................................................ 31 5.3.3. Serial Port ................................................................................................................. 32
5.4. Record Attributes - Settings ............................................................................................. 33 5.4.1. General ...................................................................................................................... 33 5.4.2. Record Delimiter ...................................................................................................... 33 5.4.3. No. of Dimensional Weights Recorded: ................................................................... 33 5.4.4. N/A Recorded As: .................................................................................................... 33 5.4.5. Include Units Descriptor ........................................................................................... 34 5.4.6. Extended Multi-Pack ................................................................................................ 34 5.4.7. Variable Length Records .......................................................................................... 34 5.4.8. Multi-Pack (Options - Operation Tab) .................................................................... 34
5.5. Record Attributes – Output Data Format (Samples) ........................................................ 34 5.5.1. General ...................................................................................................................... 34 5.5.2. Multi-Pack – OFF/ON; Extended– OFF; Variable– OFF ..................................... 35 5.5.3. Multi-Pack – OFF/ON; Extended– ON; Variable– OFF ....................................... 37 5.5.4. Multi-Pack – OFF; Extended– OFF; Variable– ON .............................................. 39 5.5.1. Multi-Pack – ON; Extended– OFF; Variable– ON ................................................ 41 5.5.2. Multi-Pack – OFF; Extended– ON; Variable– ON ................................................ 43 5.5.3. Multi-Pack – ON; Extended– ON; Variable– ON .................................................. 45 5.5.4. Sample Output: Group Measurement Feature .......................................................... 47
5.6. Special Compatibility Settings ......................................................................................... 49 5.6.1. General ...................................................................................................................... 49 5.6.2. ExpressCube Data Logger ........................................................................................ 50 5.6.3. SizeIt II 2.0 ............................................................................................................... 51 5.6.4. Universal Record Set ................................................................................................ 52
6. Appendix 1: Dimensional Weight & DIM FACTOR ............................................................. 54 6.1. The Importance of Volume and Weight of Cargo for Transportation ............................. 54 6.2. Dimensional (Volume) Weight ........................................................................................ 54 6.3. DIM Factor (Dimensional Weight Factor) ....................................................................... 55 6.4. Using DIM Factor (Dimensional Weight Factor) ............................................................ 55 6.5. Dim Factor Conversion Between in3/lb and cm3/kg ........................................................ 55
7. Appendix 3: ExpressCube Tips and Techniques .................................................................... 57 7.1. Dimensional Weight ........................................................................................................ 57 7.2. How ExpressCube Measures Packages ............................................................................ 57 7.3. How Laser & Light Curtain Conveyor Systems Measures Packages .............................. 58 7.4. Know Your Courier’s Method of Calculating Dimensional Weight ............................... 58 7.5. Minimizing Package Size ................................................................................................ 59 7.6. Measuring Packages on ExpressCube Dimensioning Systems ........................................ 60 7.7. Measuring Irregular Cartons1 With ExpressCube ............................................................ 61
5
General 1.1. Introduction
SizeIt II is a second generation of software that provides both control and data collection for ExpressCube dimensional and weighing devices. The SizeIt II runs on a computer that is running Window XP, Windows Vista or Windows 7 operating system. Note: The remote lens calibration feature will only work with ExpressCube devices manufactured after January 2012.
1.2. Specifications / Features
Size It II Computer 1 Requirements
Operating System Windows XP, Windows Vista, Windows 7
CPU Pentium IV or better ~ 2.0 GHz Clock
Minimum Memory 1 GB Ram
USB Ports Required 2 x USB 2.0 (External hub acceptable)
.NET Framework Min. 2.0 Copy Included on USB Key
Hand Scanner (ExpressCube Port Only) 2 Type RS-232
Baud Rate 9600 Parity Type None
Stop Bit 1 Stop Bit Data Bits 8
Scan Complete CR / LF
Feature Notes: 1 Computer not included; 2 Hand Scanner not included
Features Up to 4 Simultaneous Displayed Dim Weights 10 Dim Factors with auto metric / imperial conversion Automatic Acquire/ Recorder Oversize Carton Manual Measurement (Selectable) 0 to 6 Tag Records with Labels With Optional/Mandatory Settings Status Bar Group Measurement for Thin Items Multi-Pack for Package and Individual Item Measurements Swap – Permits selection of package orientation for WMS software Automatic Time File Closure for Billing Applications Universal Output – Produces data format compatible with many existing WMS, shipping and logistics programs Windows message integration ExpressCube Control Functions
6
2. Operation – General
2.1. Screen Layout
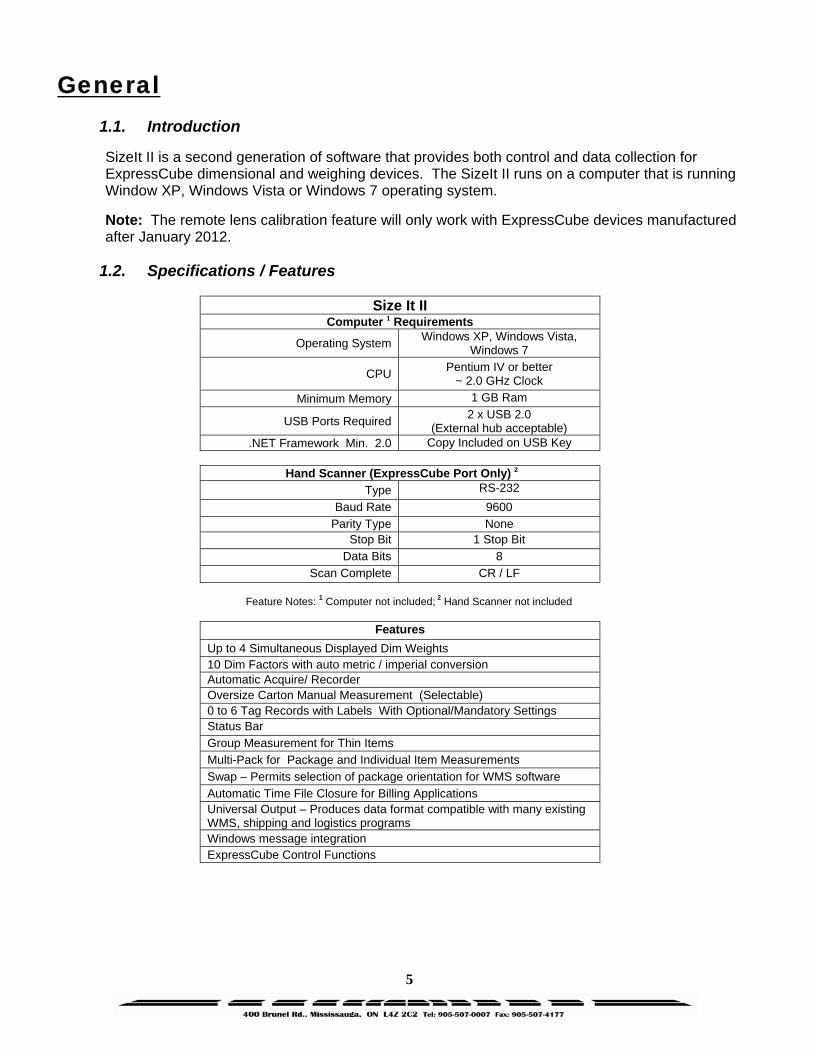
2.1.1. Screen Layout - Idle
2.1.2. Screen Layout - Acquired
7
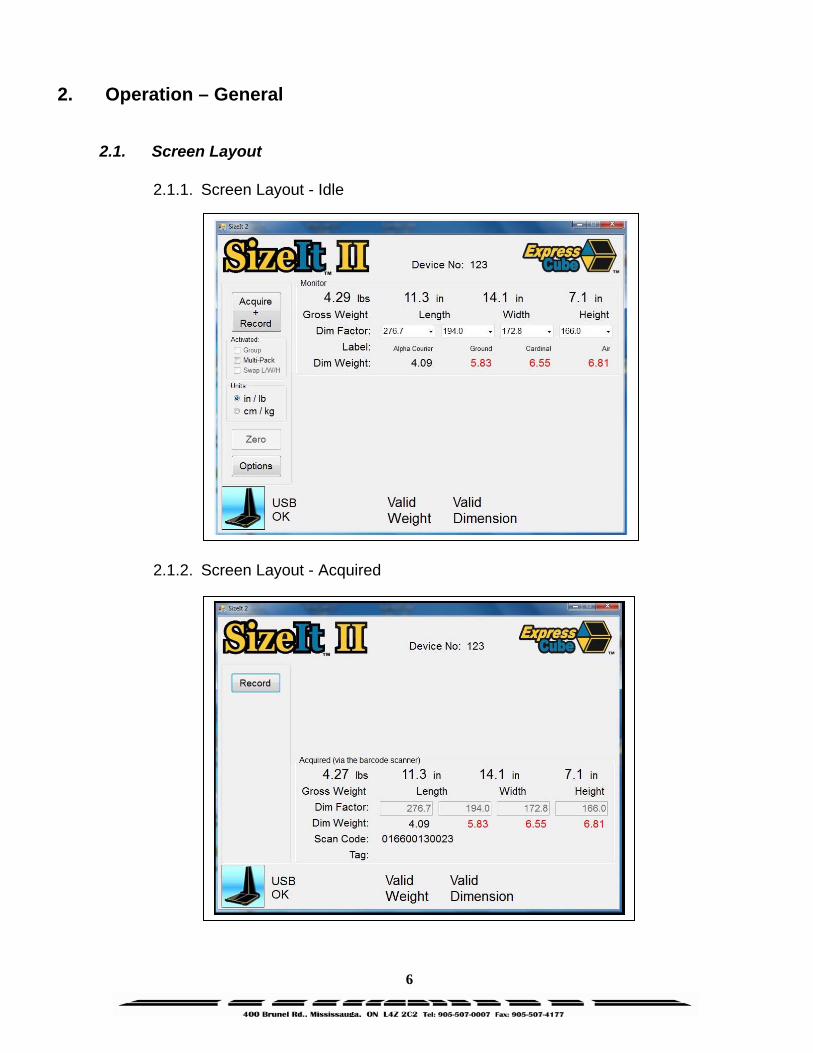
2.1.3. Screen Layout – Recorded
2.1.4. Screen Icon Table
This is the ExpressCube system identification number which is used with the branch name to generate the data file name. This is set in the options menu.
The Acquire button is used to capture (but not record) a measurement from the ExpressCube device. A valid weight & dimension must be present to capture the measurements. The function of the Acquire button can also be activated when the hand scanner reads a bar code.
The Acquire & Record but is an automatic record feature that acquires the data and records it directly to file. The recorded data is displayed in the bottom window of the window as illustrated in the next section. The function of the Acquire & Record button can also be activated when the hand scanner reads a bar code.
This button will record the displayed data that was acquired previously by either the Acquired button or hand scanner operation. The displayed weight and dimensions can be reset without recording data by moving the carton off the ExpressCube platform.
8
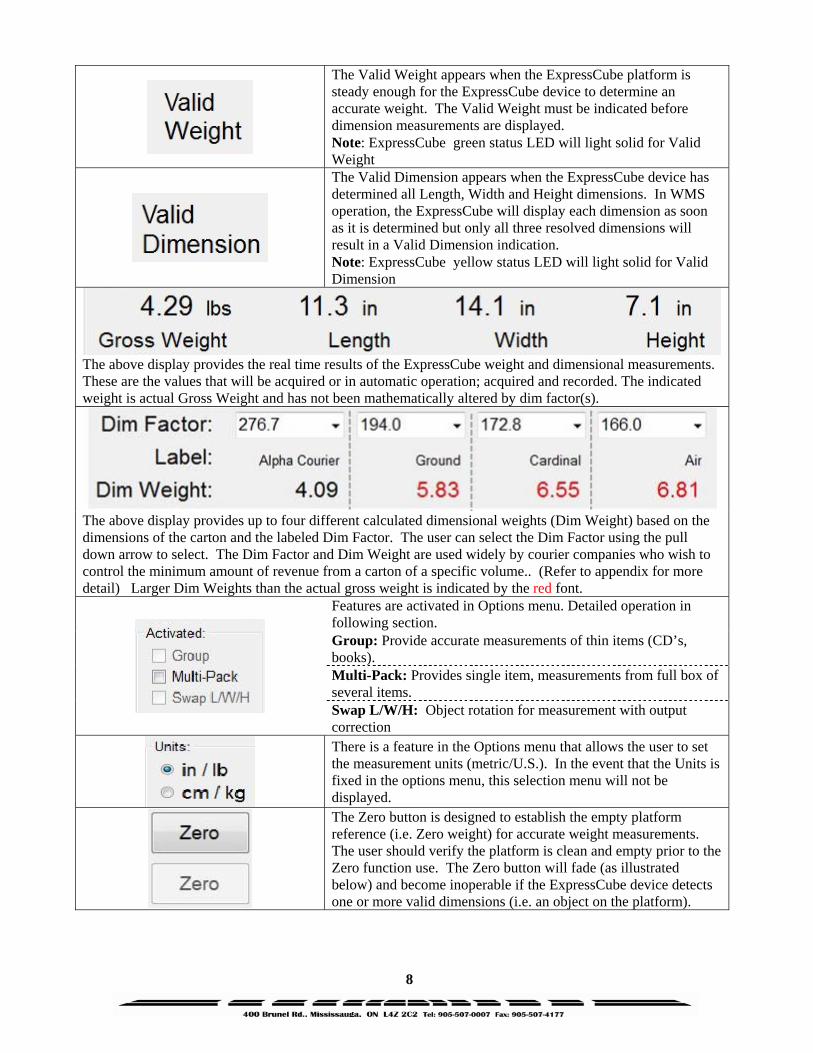
The Valid Weight appears when the ExpressCube platform is steady enough for the ExpressCube device to determine an accurate weight. The Valid Weight must be indicated before dimension measurements are displayed. Note: ExpressCube green status LED will light solid for Valid Weight
The Valid Dimension appears when the ExpressCube device has determined all Length, Width and Height dimensions. In WMS operation, the ExpressCube will display each dimension as soon as it is determined but only all three resolved dimensions will result in a Valid Dimension indication. Note: ExpressCube yellow status LED will light solid for Valid Dimension
The above display provides the real time results of the ExpressCube weight and dimensional measurements. These are the values that will be acquired or in automatic operation; acquired and recorded. The indicated weight is actual Gross Weight and has not been mathematically altered by dim factor(s).
The above display provides up to four different calculated dimensional weights (Dim Weight) based on the dimensions of the carton and the labeled Dim Factor. The user can select the Dim Factor using the pull down arrow to select. The Dim Factor and Dim Weight are used widely by courier companies who wish to control the minimum amount of revenue from a carton of a specific volume.. (Refer to appendix for more detail) Larger Dim Weights than the actual gross weight is indicated by the red font.
Features are activated in Options menu. Detailed operation in following section. Group: Provide accurate measurements of thin items (CD’s, books). Multi-Pack: Provides single item, measurements from full box of several items. Swap L/W/H: Object rotation for measurement with output correction
There is a feature in the Options menu that allows the user to set the measurement units (metric/U.S.). In the event that the Units is fixed in the options menu, this selection menu will not be displayed.
The Zero button is designed to establish the empty platform reference (i.e. Zero weight) for accurate weight measurements. The user should verify the platform is clean and empty prior to the Zero function use. The Zero button will fade (as illustrated below) and become inoperable if the ExpressCube device detects one or more valid dimensions (i.e. an object on the platform).
9
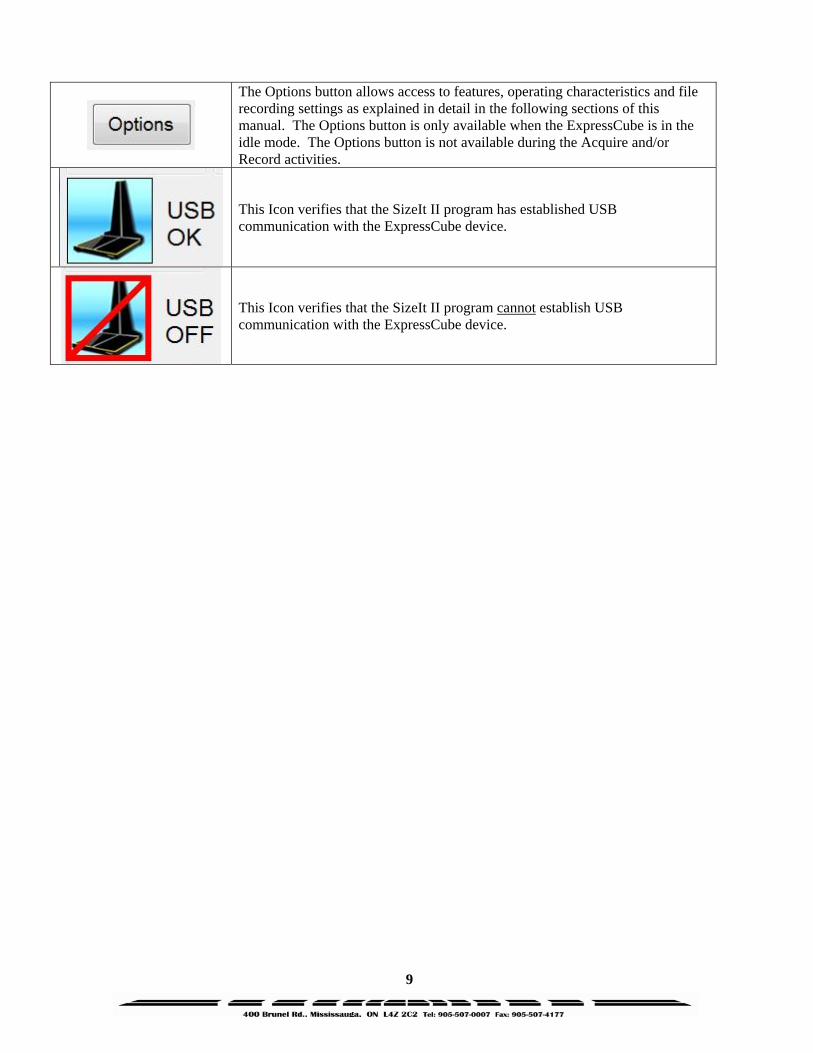
The Options button allows access to features, operating characteristics and file recording settings as explained in detail in the following sections of this manual. The Options button is only available when the ExpressCube is in the idle mode. The Options button is not available during the Acquire and/or Record activities.
This Icon verifies that the SizeIt II program has established USB communication with the ExpressCube device.
This Icon verifies that the SizeIt II program cannot establish USB communication with the ExpressCube device.
10
2.2. Preparation for Measurements
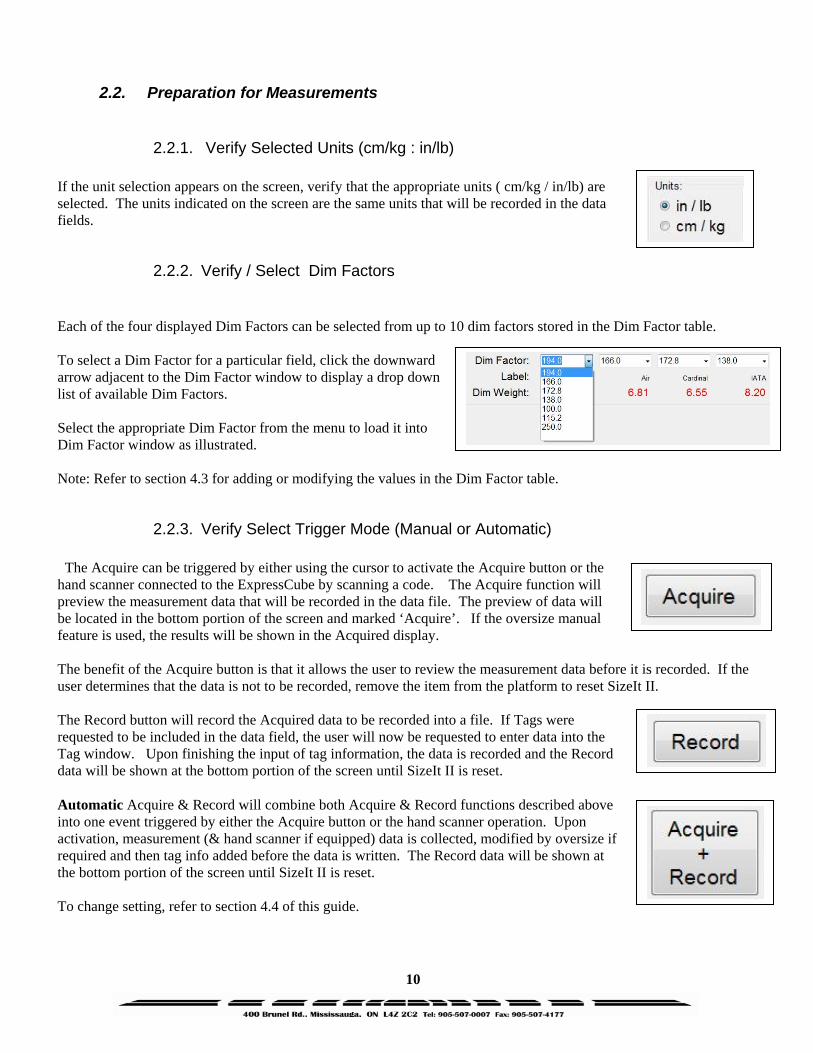
2.2.1. Verify Selected Units (cm/kg : in/lb) If the unit selection appears on the screen, verify that the appropriate units ( cm/kg / in/lb) are selected. The units indicated on the screen are the same units that will be recorded in the data fields.
2.2.2. Verify / Select Dim Factors Each of the four displayed Dim Factors can be selected from up to 10 dim factors stored in the Dim Factor table. To select a Dim Factor for a particular field, click the downward arrow adjacent to the Dim Factor window to display a drop down list of available Dim Factors. Select the appropriate Dim Factor from the menu to load it into Dim Factor window as illustrated. Note: Refer to section 4.3 for adding or modifying the values in the Dim Factor table.
2.2.3. Verify Select Trigger Mode (Manual or Automatic) The Acquire can be triggered by either using the cursor to activate the Acquire button or the hand scanner connected to the ExpressCube by scanning a code. The Acquire function will preview the measurement data that will be recorded in the data file. The preview of data will be located in the bottom portion of the screen and marked ‘Acquire’. If the oversize manual feature is used, the results will be shown in the Acquired display. The benefit of the Acquire button is that it allows the user to review the measurement data before it is recorded. If the user determines that the data is not to be recorded, remove the item from the platform to reset SizeIt II. The Record button will record the Acquired data to be recorded into a file. If Tags were requested to be included in the data field, the user will now be requested to enter data into the Tag window. Upon finishing the input of tag information, the data is recorded and the Record data will be shown at the bottom portion of the screen until SizeIt II is reset. Automatic Acquire & Record will combine both Acquire & Record functions described above into one event triggered by either the Acquire button or the hand scanner operation. Upon activation, measurement (& hand scanner if equipped) data is collected, modified by oversize if required and then tag info added before the data is written. The Record data will be shown at the bottom portion of the screen until SizeIt II is reset. To change setting, refer to section 4.4 of this guide.
11
2.3. Oversize Manual Record
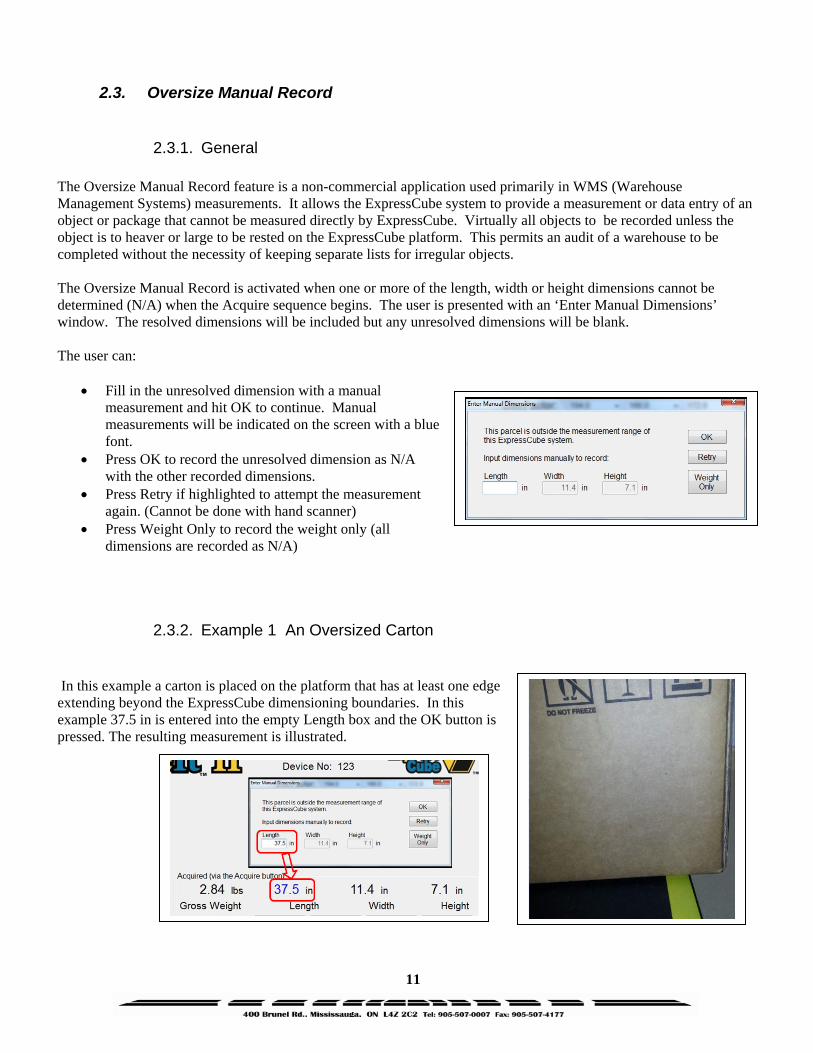
2.3.1. General The Oversize Manual Record feature is a non-commercial application used primarily in WMS (Warehouse Management Systems) measurements. It allows the ExpressCube system to provide a measurement or data entry of an object or package that cannot be measured directly by ExpressCube. Virtually all objects to be recorded unless the object is to heaver or large to be rested on the ExpressCube platform. This permits an audit of a warehouse to be completed without the necessity of keeping separate lists for irregular objects. The Oversize Manual Record is activated when one or more of the length, width or height dimensions cannot be determined (N/A) when the Acquire sequence begins. The user is presented with an ‘Enter Manual Dimensions’ window. The resolved dimensions will be included but any unresolved dimensions will be blank. The user can:
• Fill in the unresolved dimension with a manual measurement and hit OK to continue. Manual measurements will be indicated on the screen with a blue font.
• Press OK to record the unresolved dimension as N/A with the other recorded dimensions.
• Press Retry if highlighted to attempt the measurement again. (Cannot be done with hand scanner)
• Press Weight Only to record the weight only (all dimensions are recorded as N/A)
2.3.2. Example 1 An Oversized Carton In this example a carton is placed on the platform that has at least one edge extending beyond the ExpressCube dimensioning boundaries. In this example 37.5 in is entered into the empty Length box and the OK button is pressed. The resulting measurement is illustrated.
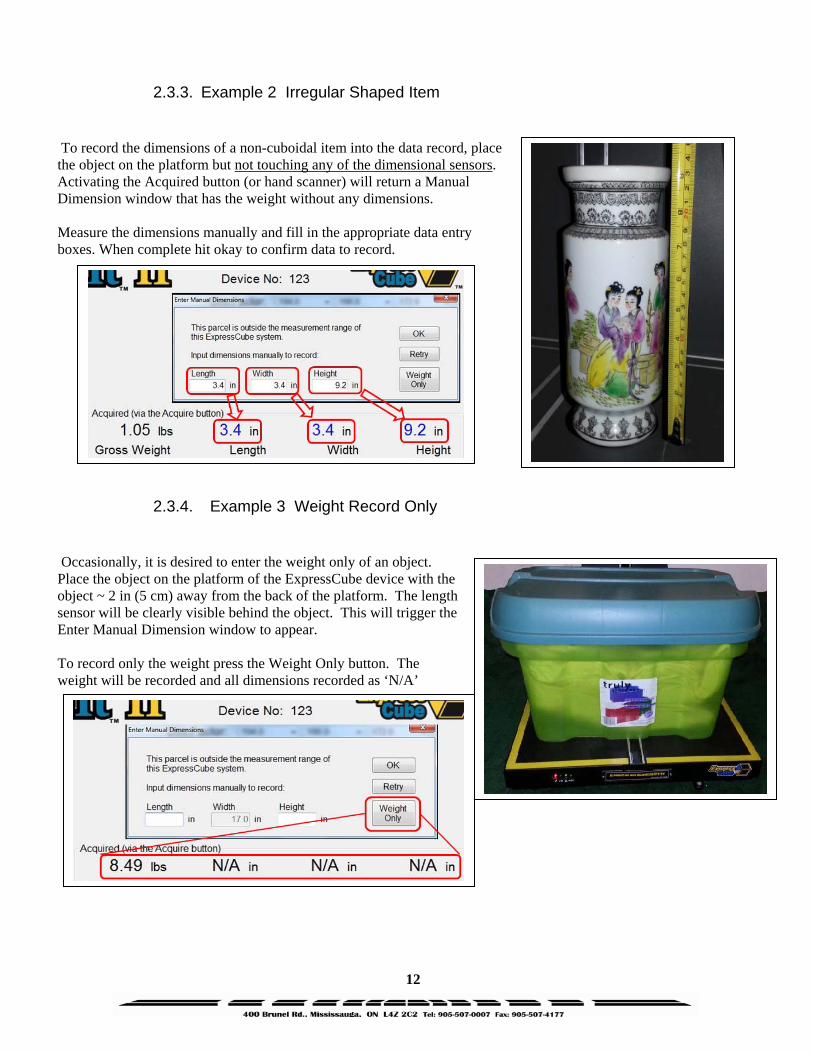
12
2.3.3. Example 2 Irregular Shaped Item To record the dimensions of a non-cuboidal item into the data record, place the object on the platform but not touching any of the dimensional sensors. Activating the Acquired button (or hand scanner) will return a Manual Dimension window that has the weight without any dimensions. Measure the dimensions manually and fill in the appropriate data entry boxes. When complete hit okay to confirm data to record.
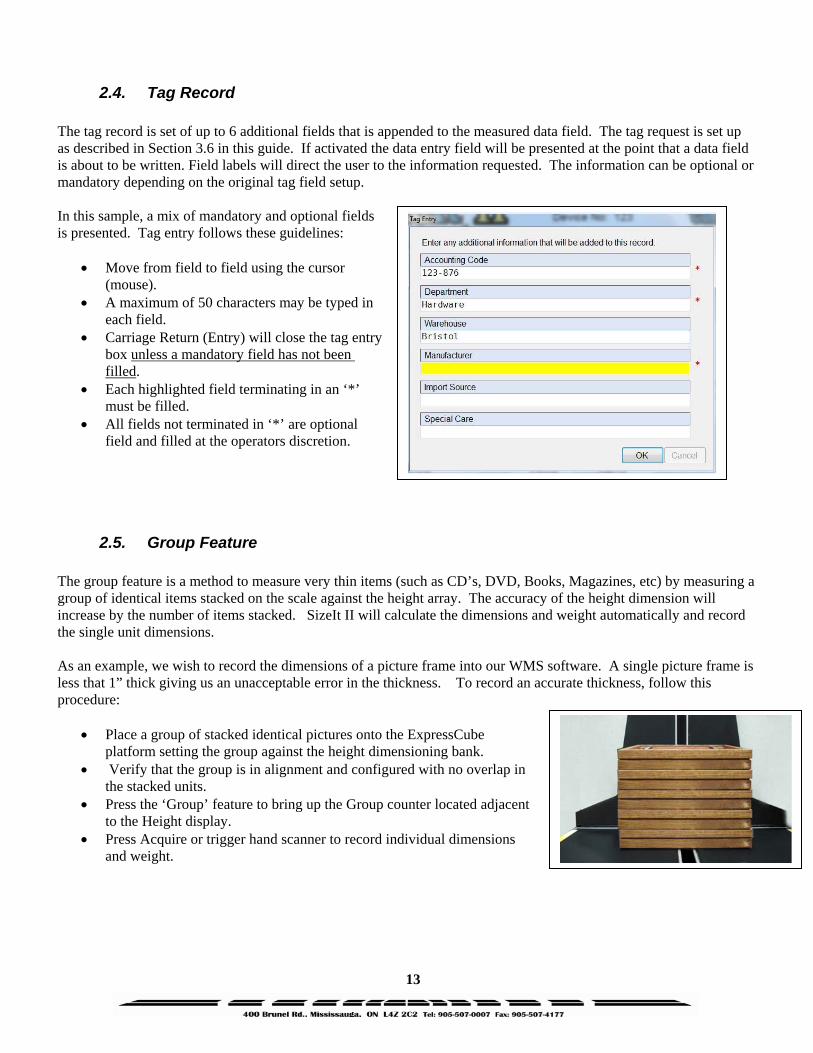
2.3.4. Example 3 Weight Record Only Occasionally, it is desired to enter the weight only of an object. Place the object on the platform of the ExpressCube device with the object ~ 2 in (5 cm) away from the back of the platform. The length sensor will be clearly visible behind the object. This will trigger the Enter Manual Dimension window to appear. To record only the weight press the Weight Only button. The weight will be recorded and all dimensions recorded as ‘N/A’
13
2.4. Tag Record The tag record is set of up to 6 additional fields that is appended to the measured data field. The tag request is set up as described in Section 3.6 in this guide. If activated the data entry field will be presented at the point that a data field is about to be written. Field labels will direct the user to the information requested. The information can be optional or mandatory depending on the original tag field setup. In this sample, a mix of mandatory and optional fields is presented. Tag entry follows these guidelines:
• Move from field to field using the cursor (mouse).
• A maximum of 50 characters may be typed in each field.
• Carriage Return (Entry) will close the tag entry box unless a mandatory field has not been filled.
• Each highlighted field terminating in an ‘*’ must be filled.
• All fields not terminated in ‘*’ are optional field and filled at the operators discretion.
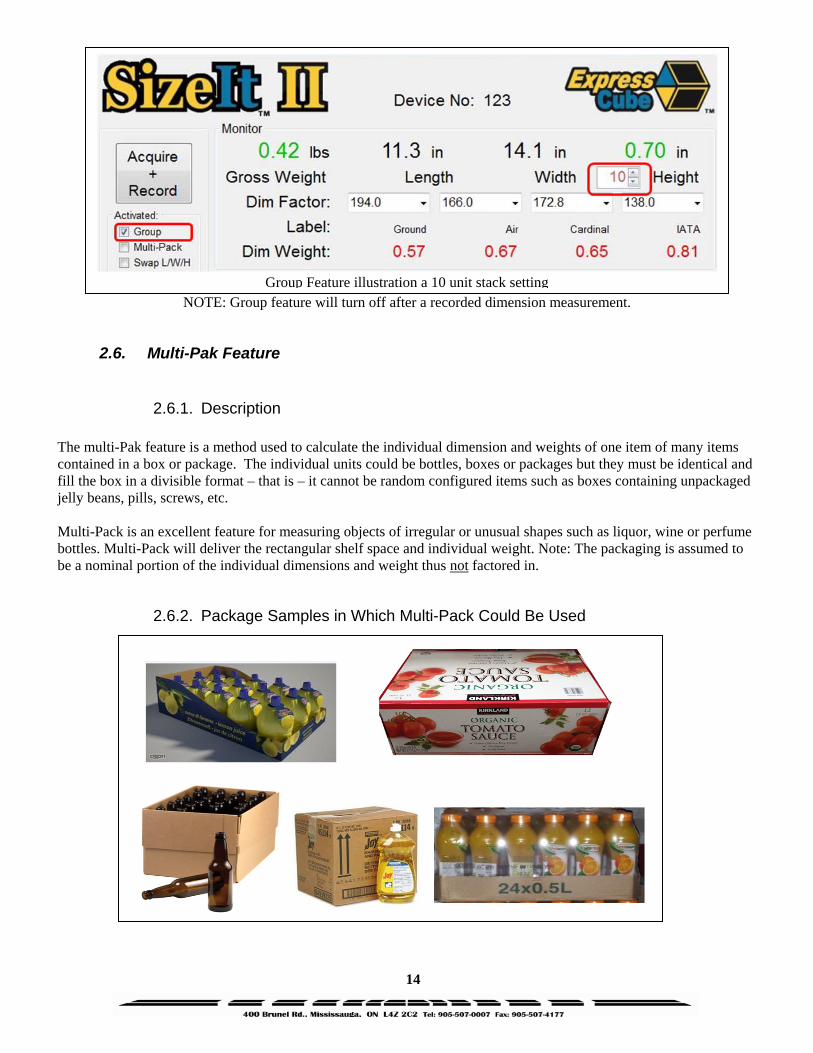
2.5. Group Feature The group feature is a method to measure very thin items (such as CD’s, DVD, Books, Magazines, etc) by measuring a group of identical items stacked on the scale against the height array. The accuracy of the height dimension will increase by the number of items stacked. SizeIt II will calculate the dimensions and weight automatically and record the single unit dimensions. As an example, we wish to record the dimensions of a picture frame into our WMS software. A single picture frame is less that 1” thick giving us an unacceptable error in the thickness. To record an accurate thickness, follow this procedure:
• Place a group of stacked identical pictures onto the ExpressCube platform setting the group against the height dimensioning bank.
• Verify that the group is in alignment and configured with no overlap in the stacked units.
• Press the ‘Group’ feature to bring up the Group counter located adjacent to the Height display.
• Press Acquire or trigger hand scanner to record individual dimensions and weight.
14
NOTE: Group feature will turn off after a recorded dimension measurement.
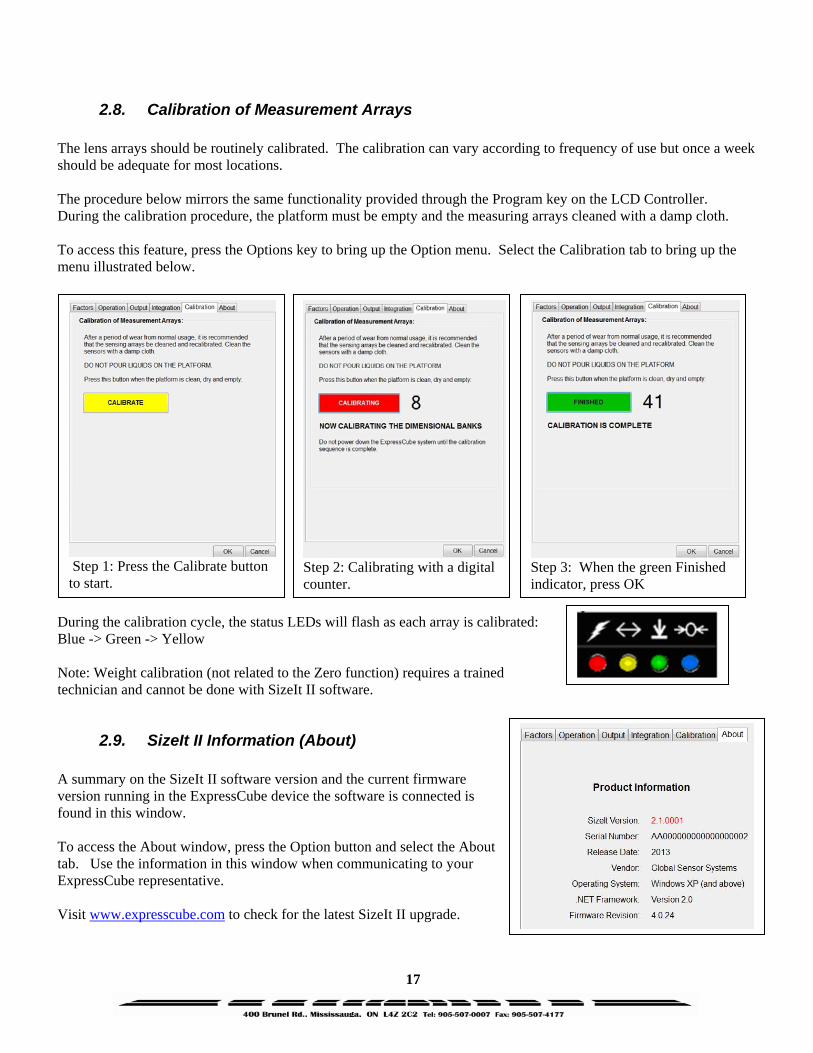
2.6. Multi-Pak Feature
2.6.1. Description The multi-Pak feature is a method used to calculate the individual dimension and weights of one item of many items contained in a box or package. The individual units could be bottles, boxes or packages but they must be identical and fill the box in a divisible format – that is – it cannot be random configured items such as boxes containing unpackaged jelly beans, pills, screws, etc. Multi-Pack is an excellent feature for measuring objects of irregular or unusual shapes such as liquor, wine or perfume bottles. Multi-Pack will deliver the rectangular shelf space and individual weight. Note: The packaging is assumed to be a nominal portion of the individual dimensions and weight thus not factored in.
2.6.2. Package Samples in Which Multi-Pack Could Be Used
Group Feature illustration a 10 unit stack setting

15
2.6.3. How to Determine Multi-Pack Factors for Measuring Sample 1 Generally the orientation (rows) of the units to be measured in a shipping carton is known. Here we are illustrating the determination of these rows with the box opened. With the longest side on the length (along the back) of the ExpressCube the count of bottles along the length is 6 bottles, width 4 bottles and height 1 bottle. Multi-Pack Factors: L =6 ; W=4 ; H=1
Sample 2 Generally the orientation (rows) of the units to be measured in a shipping carton is known. Here we are illustrating the determination of these rows with a box of 24 cans. With the longest side on the length (along the back) of the ExpressCube the count of cans along the length is 3 cans, width 2 cans and height 4 cans. Multi-Pack Factors: L =3 ; W=2 ; H=4

16
2.7. Swap Feature The swap feature permits the user to utilize the full dimensional capability of the ExpressCube machine to measure boxes and still orient the dimensions to the WMS software to reflect the proper length, width and height measurements. This will allow the WMS to allocate the proper orientation of the box on the shelf. The most common application for swap is rotating the box so that a length greater than 24” (60 cm) on the 165R or 265R can be placed on the platform so that the box length is actually being measured by the longer height. The swap feature is then activated and the box dimensions adjusted to reflect the proper orientation.
To orient the dimensions correctly, activate the Swap L/W/H feature on the SizeIt II display. Each dimension will have a yellow rectangle pointers appearing beside a dimensional result. The yellow pointer consists of three small boxes representing the actual physical location of the dimension to be recorded. The illustration has L,W & H showing but only one letter appears representing the true location of a dimension on the scale.
Sample: A box with a dimension of 33.9 in is rotated to allow the longer height array to measure it. The SizeIt II display is indicated below: Note that the length measurement appears in the Height box. This must be moved before recording the measurement. After activating the Swap Feature, the pointers appear with the default being a proper orientation (L=Length,W=Width, H=Height) Set the Length pointer to H (Height) indicated by arrow. Data is moved and now ready to be recorded.
17
2.8. Calibration of Measurement Arrays The lens arrays should be routinely calibrated. The calibration can vary according to frequency of use but once a week should be adequate for most locations. The procedure below mirrors the same functionality provided through the Program key on the LCD Controller. During the calibration procedure, the platform must be empty and the measuring arrays cleaned with a damp cloth. To access this feature, press the Options key to bring up the Option menu. Select the Calibration tab to bring up the menu illustrated below. During the calibration cycle, the status LEDs will flash as each array is calibrated: Blue -> Green -> Yellow Note: Weight calibration (not related to the Zero function) requires a trained technician and cannot be done with SizeIt II software.
2.9. SizeIt II Information (About) A summary on the SizeIt II software version and the current firmware version running in the ExpressCube device the software is connected is found in this window. To access the About window, press the Option button and select the About tab. Use the information in this window when communicating to your ExpressCube representative. Visit www.expresscube.com to check for the latest SizeIt II upgrade.
Step 1: Press the Calibrate button to start.
Step 2: Calibrating with a digital counter.
Step 3: When the green Finished indicator, press OK

18
3. Installation
3.1. The SizeIt II USB Key The SizeIt II USB key has two purposes. The SizeIt II USB key contains the initial setup program, Windows driver, Framework software and SizeIt II documentation. The SizeIt II key contains a specific key code which is installed in the host computer by the initial setup program included on the SizeIt II. The SizeIt II software will only run if the original SizeIt II key is connected to a USB port on the computer. The SizeIt II program can be installed on additional computers but the computer currently running the program must have the SizeIt II USB key connected to the USB port.
The SizeIt II USB key must be connected to the computer that the SizeIt II is running. In the event of a SizeIt II software upgrade, the original SizeIt II program must be present before the upgrade software is installed. When using a new computer, install the original software before installing the latest SizeIt II upgrade.
3.2. SizeIt II USB Contents Insert the SizeIt II USB key into a spare port on the computer. If the file explorer does not start immediately, use the right click on the Start button to start the Windows Explorer.
3.2.1. Text Files License A legal summary of the terms of use (license) and warranty for the SizeIt II product. Readme Very short installation summary.
19
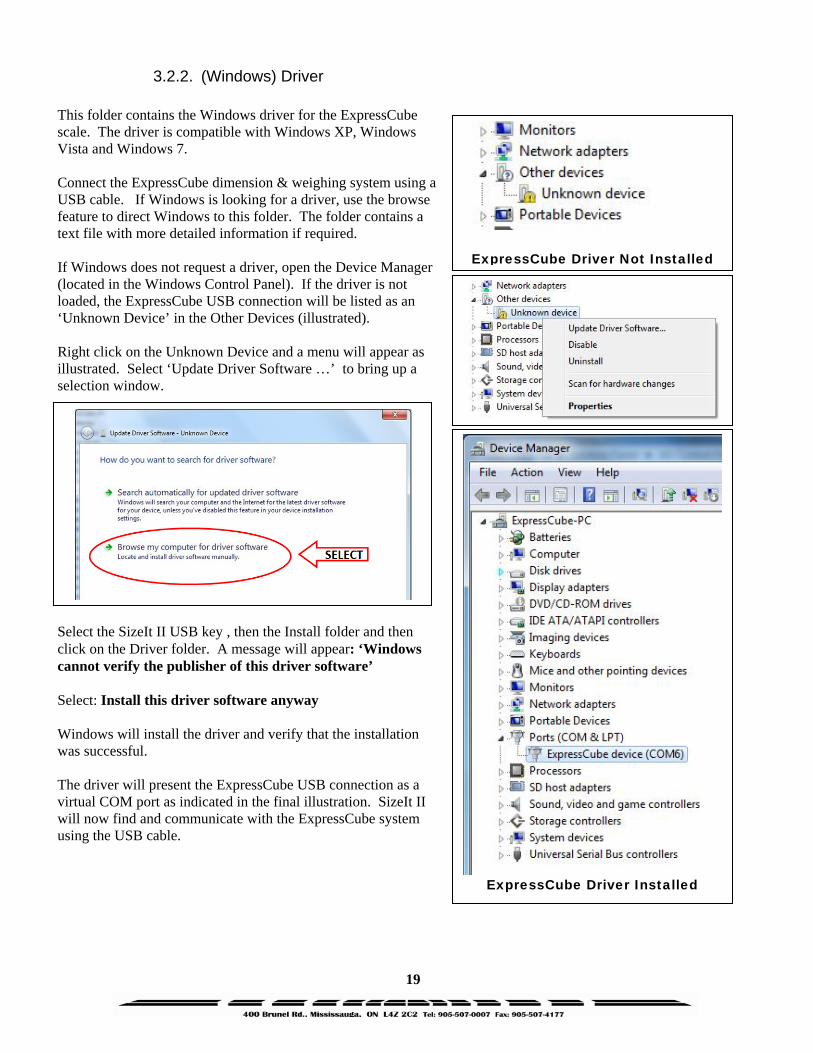
3.2.2. (Windows) Driver This folder contains the Windows driver for the ExpressCube scale. The driver is compatible with Windows XP, Windows Vista and Windows 7. Connect the ExpressCube dimension & weighing system using a USB cable. If Windows is looking for a driver, use the browse feature to direct Windows to this folder. The folder contains a text file with more detailed information if required. If Windows does not request a driver, open the Device Manager (located in the Windows Control Panel). If the driver is not loaded, the ExpressCube USB connection will be listed as an ‘Unknown Device’ in the Other Devices (illustrated). Right click on the Unknown Device and a menu will appear as illustrated. Select ‘Update Driver Software …’ to bring up a selection window.
Select the SizeIt II USB key , then the Install folder and then click on the Driver folder. A message will appear: ‘Windows cannot verify the publisher of this driver software’ Select: Install this driver software anyway Windows will install the driver and verify that the installation was successful. The driver will present the ExpressCube USB connection as a virtual COM port as indicated in the final illustration. SizeIt II will now find and communicate with the ExpressCube system using the USB cable.
ExpressCube Driver Installed
ExpressCube Driver Not Installed
20
3.2.3. Framework SizeIt II requires .NET Framework installed in Windows to run. If a copy of .NET Framework is not installed, open the folder and .NET Framework run the program in it. For the latest versions of .NET Framework and additional information, visit the following Microsoft web site: http://www.microsoft.com/net
3.3. Installation of SizeIt II with the Setup Program
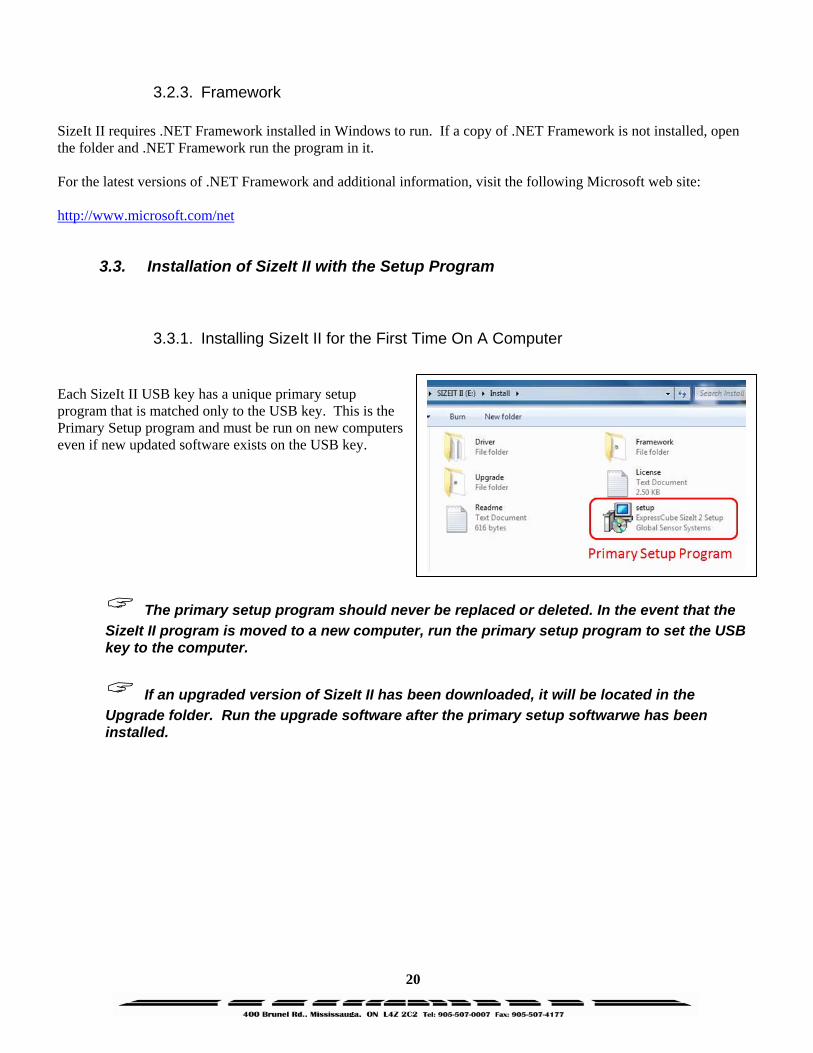
3.3.1. Installing SizeIt II for the First Time On A Computer Each SizeIt II USB key has a unique primary setup program that is matched only to the USB key. This is the Primary Setup program and must be run on new computers even if new updated software exists on the USB key.
The primary setup program should never be replaced or deleted. In the event that the SizeIt II program is moved to a new computer, run the primary setup program to set the USB key to the computer.
If an upgraded version of SizeIt II has been downloaded, it will be located in the Upgrade folder. Run the upgrade software after the primary setup softwarwe has been installed.

21
3.3.2. Running Setup Double click on the Setup icon to start the installation process. Step through the installation process using the Next > key. Read and accept the agreement to continue the installation.
The installation instructions are a brief summary of instructions covered in greater detail in this guide. Continue with the Next > key.
22
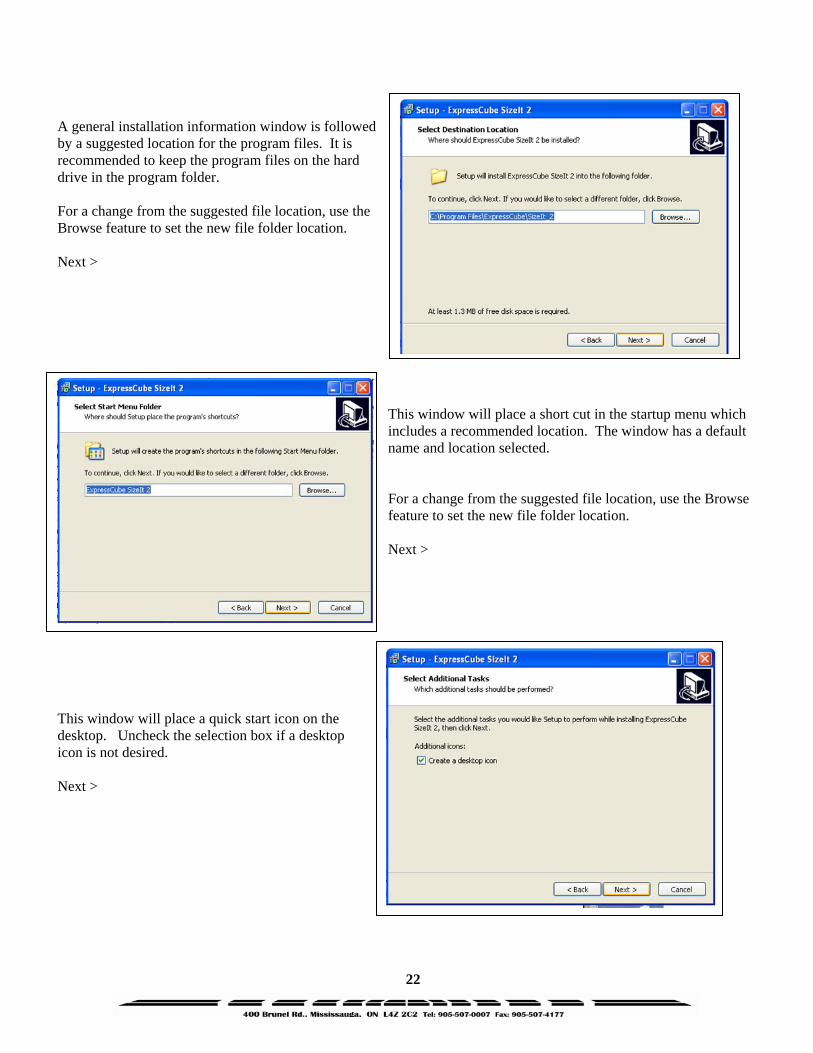
A general installation information window is followed by a suggested location for the program files. It is recommended to keep the program files on the hard drive in the program folder. For a change from the suggested file location, use the Browse feature to set the new file folder location. Next >
This window will place a short cut in the startup menu which includes a recommended location. The window has a default name and location selected. For a change from the suggested file location, use the Browse feature to set the new file folder location. Next >
This window will place a quick start icon on the desktop. Uncheck the selection box if a desktop icon is not desired. Next >
23
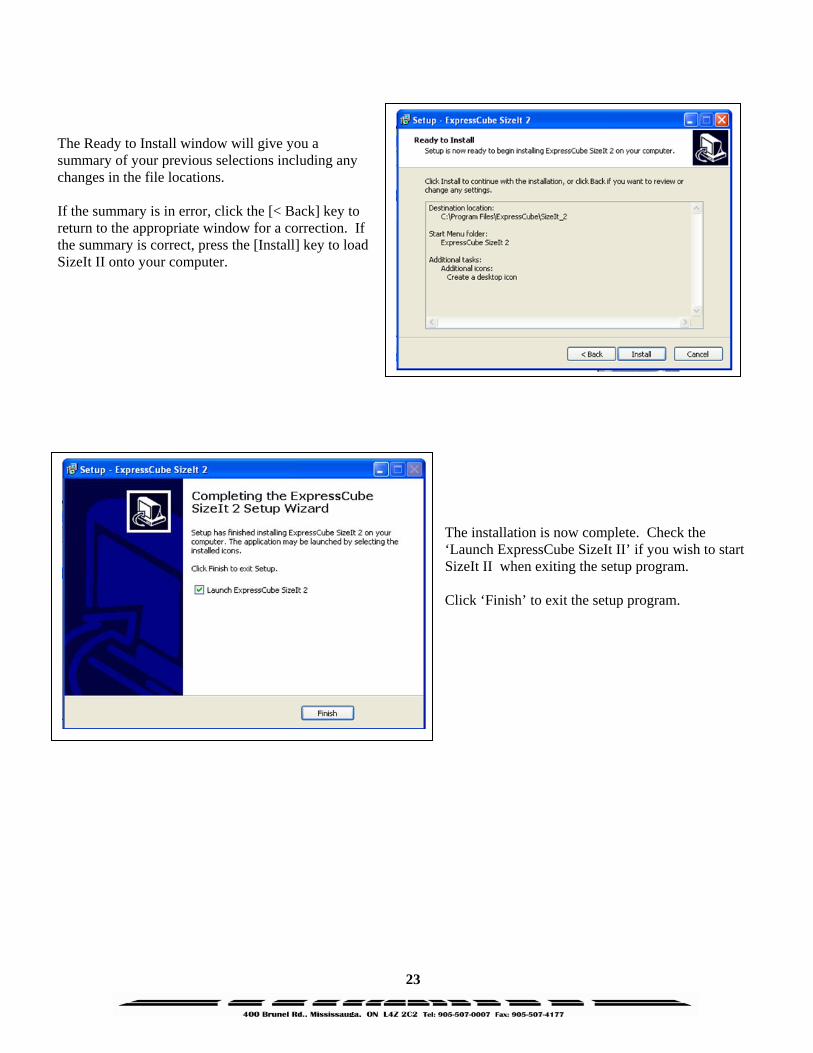
The Ready to Install window will give you a summary of your previous selections including any changes in the file locations. If the summary is in error, click the [< Back] key to return to the appropriate window for a correction. If the summary is correct, press the [Install] key to load SizeIt II onto your computer.
The installation is now complete. Check the ‘Launch ExpressCube SizeIt II’ if you wish to start SizeIt II when exiting the setup program. Click ‘Finish’ to exit the setup program.
24
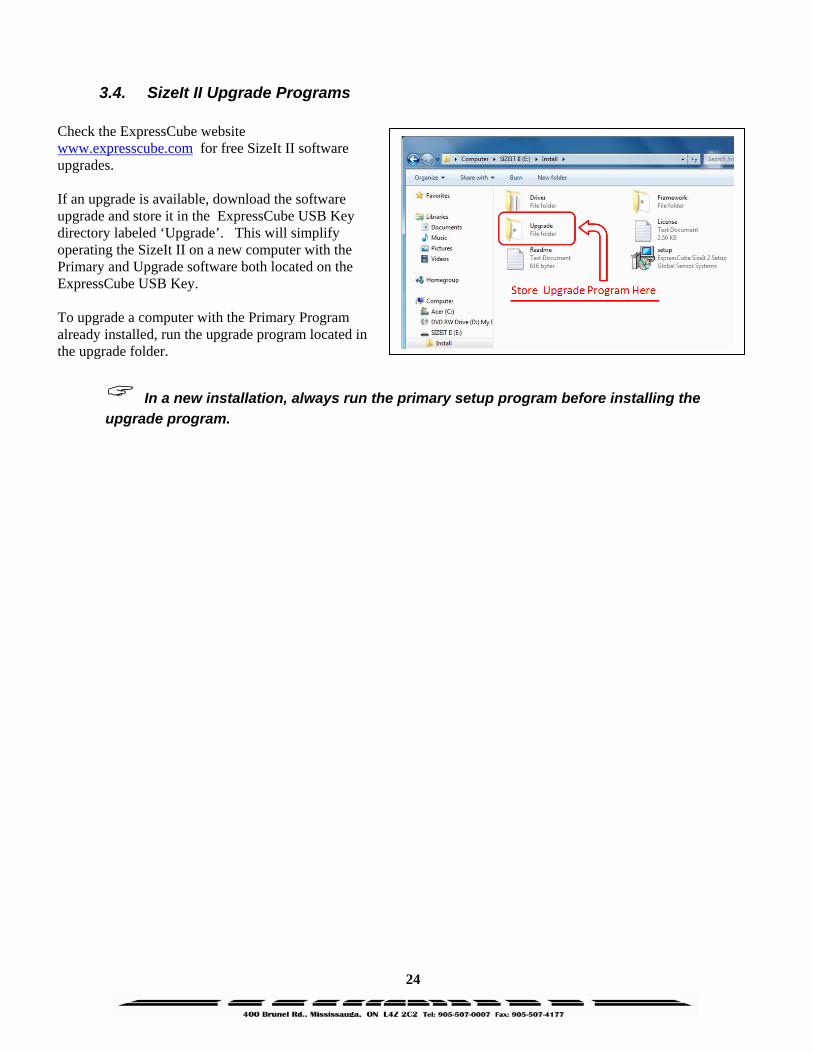
3.4. SizeIt II Upgrade Programs Check the ExpressCube website www.expresscube.com for free SizeIt II software upgrades. If an upgrade is available, download the software upgrade and store it in the ExpressCube USB Key directory labeled ‘Upgrade’. This will simplify operating the SizeIt II on a new computer with the Primary and Upgrade software both located on the ExpressCube USB Key. To upgrade a computer with the Primary Program already installed, run the upgrade program located in the upgrade folder.
In a new installation, always run the primary setup program before installing the upgrade program.
25
4. SizeIt II Set Up – User Features
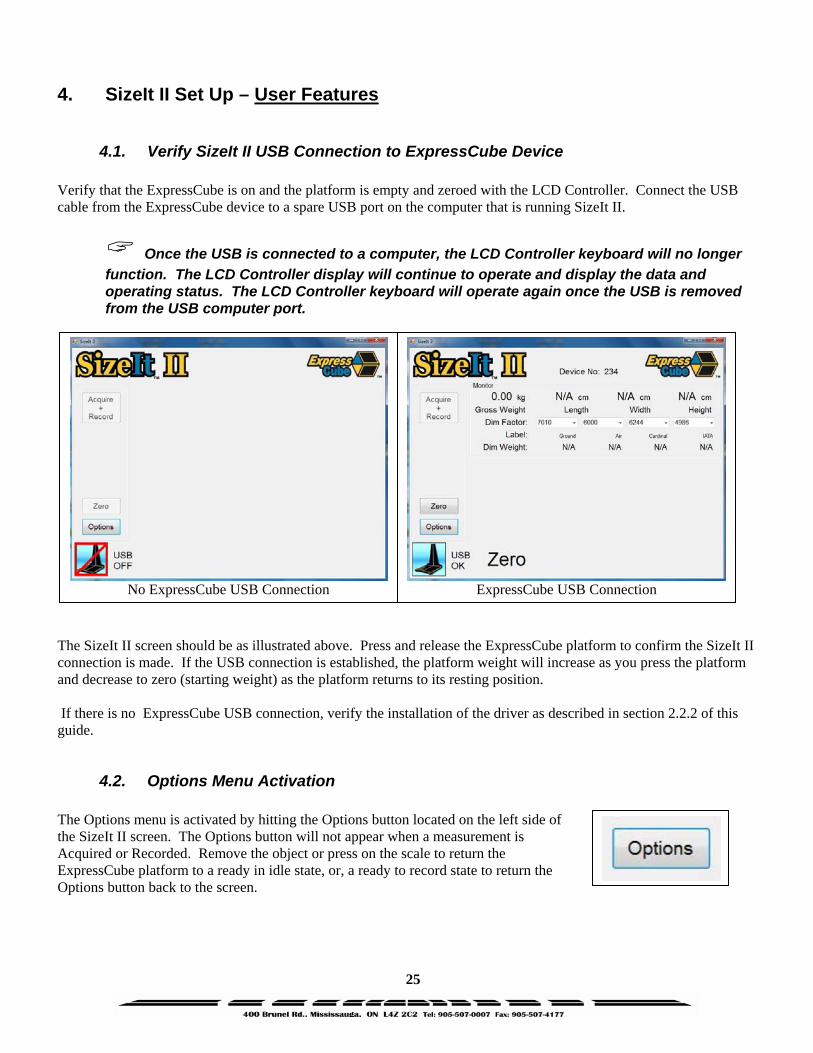
4.1. Verify SizeIt II USB Connection to ExpressCube Device Verify that the ExpressCube is on and the platform is empty and zeroed with the LCD Controller. Connect the USB cable from the ExpressCube device to a spare USB port on the computer that is running SizeIt II.
Once the USB is connected to a computer, the LCD Controller keyboard will no longer function. The LCD Controller display will continue to operate and display the data and operating status. The LCD Controller keyboard will operate again once the USB is removed from the USB computer port.
The SizeIt II screen should be as illustrated above. Press and release the ExpressCube platform to confirm the SizeIt II connection is made. If the USB connection is established, the platform weight will increase as you press the platform and decrease to zero (starting weight) as the platform returns to its resting position. If there is no ExpressCube USB connection, verify the installation of the driver as described in section 2.2.2 of this guide.
4.2. Options Menu Activation The Options menu is activated by hitting the Options button located on the left side of the SizeIt II screen. The Options button will not appear when a measurement is Acquired or Recorded. Remove the object or press on the scale to return the ExpressCube platform to a ready in idle state, or, a ready to record state to return the Options button back to the screen.
No ExpressCube USB Connection
ExpressCube USB Connection
26
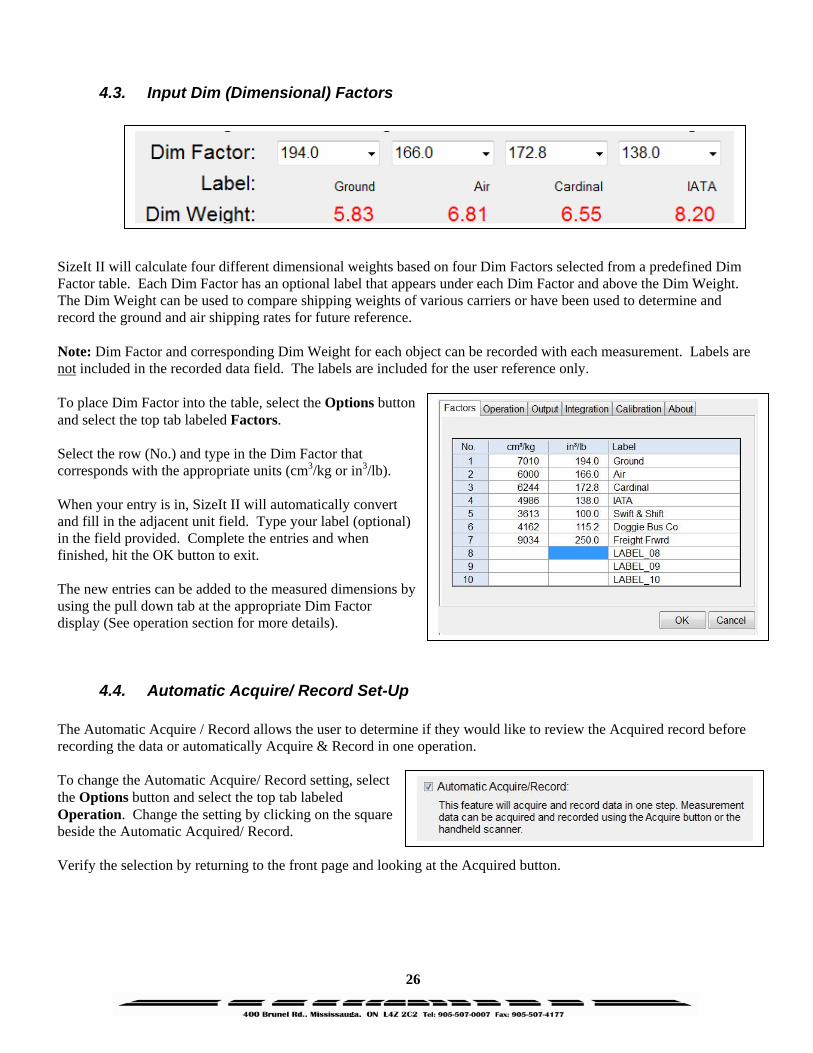
4.3. Input Dim (Dimensional) Factors SizeIt II will calculate four different dimensional weights based on four Dim Factors selected from a predefined Dim Factor table. Each Dim Factor has an optional label that appears under each Dim Factor and above the Dim Weight. The Dim Weight can be used to compare shipping weights of various carriers or have been used to determine and record the ground and air shipping rates for future reference. Note: Dim Factor and corresponding Dim Weight for each object can be recorded with each measurement. Labels are not included in the recorded data field. The labels are included for the user reference only. To place Dim Factor into the table, select the Options button and select the top tab labeled Factors. Select the row (No.) and type in the Dim Factor that corresponds with the appropriate units (cm3/kg or in3/lb). When your entry is in, SizeIt II will automatically convert and fill in the adjacent unit field. Type your label (optional) in the field provided. Complete the entries and when finished, hit the OK button to exit. The new entries can be added to the measured dimensions by using the pull down tab at the appropriate Dim Factor display (See operation section for more details).
4.4. Automatic Acquire/ Record Set-Up The Automatic Acquire / Record allows the user to determine if they would like to review the Acquired record before recording the data or automatically Acquire & Record in one operation. To change the Automatic Acquire/ Record setting, select the Options button and select the top tab labeled Operation. Change the setting by clicking on the square beside the Automatic Acquired/ Record. Verify the selection by returning to the front page and looking at the Acquired button.
27
4.5. Oversized Manual Record Set-Up The Oversized Manual Record will always prompt the user for recording options whenever an invalid dimension exists in a recorded measurement. For more detailed use of this feature, refer to the Operations section of this guide. To change the Oversized Manual Record setting, select the Options button and select the top tab labeled Operation. Change the setting by clicking on the square beside Oversized Manual Record.
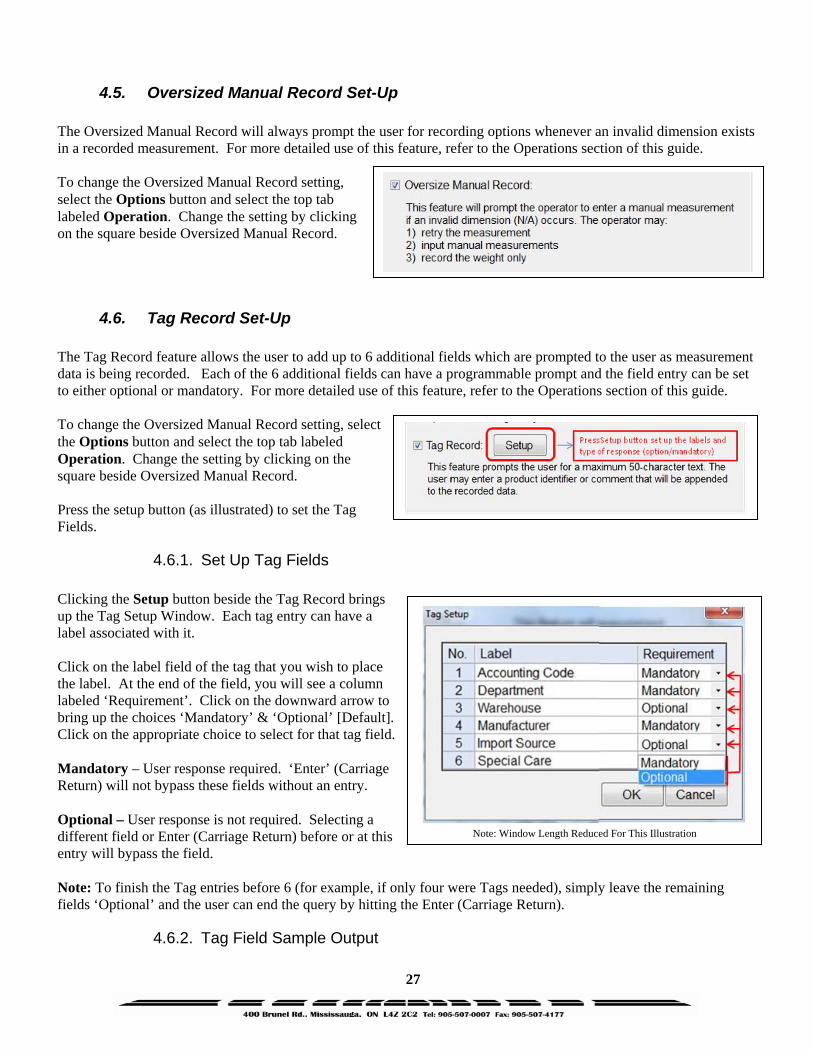
4.6. Tag Record Set-Up The Tag Record feature allows the user to add up to 6 additional fields which are prompted to the user as measurement data is being recorded. Each of the 6 additional fields can have a programmable prompt and the field entry can be set to either optional or mandatory. For more detailed use of this feature, refer to the Operations section of this guide. To change the Oversized Manual Record setting, select the Options button and select the top tab labeled Operation. Change the setting by clicking on the square beside Oversized Manual Record. Press the setup button (as illustrated) to set the Tag Fields.
4.6.1. Set Up Tag Fields Clicking the Setup button beside the Tag Record brings up the Tag Setup Window. Each tag entry can have a label associated with it. Click on the label field of the tag that you wish to place the label. At the end of the field, you will see a column labeled ‘Requirement’. Click on the downward arrow to bring up the choices ‘Mandatory’ & ‘Optional’ [Default]. Click on the appropriate choice to select for that tag field. Mandatory – User response required. ‘Enter’ (Carriage Return) will not bypass these fields without an entry. Optional – User response is not required. Selecting a different field or Enter (Carriage Return) before or at this entry will bypass the field. Note: To finish the Tag entries before 6 (for example, if only four were Tags needed), simply leave the remaining fields ‘Optional’ and the user can end the query by hitting the Enter (Carriage Return).
4.6.2. Tag Field Sample Output
Note: Window Length Reduced For This Illustration

28
The example entry shown in 4.6.1 (above) is illustrated in this window. The mandatory fields are highlighted with an asterisk at the end of the field. Attempts to bypass the mandatory field without any entry will cause a warning to appear. The fields are typed in and then the cursor used to pick the next entry. If the Enter (Carriage Return) is pressed – the OK button will be activated and the tag window will close. If a mandatory field has not been filled, the warning window will be issued without the tag window closing.
4.7. ExpressCube ID The ExpressCube ID is used to identify a particular ExpressCube operating in a particular branch. The assignment of the ExpressCube ID is determined by administration and should not be changed. The ExpressCube ID appears in the data field. The Branch Name is used in naming the file and is described in section 5.3.2.
4.8. User Feature Activation on Main Screen (Display)
4.8.1. Units Lock This option sets the units (cm/kg) or (in/lb) that will be on the display and recorded in the data records. It is recommended for consistency that the units are locked and not available to the user. The data field #04 has a units descriptor to use as a check on the displayed units. Selecting ‘User’ will put a units menu on the front screen allowing the user to select units used in the display and data fields. The user selection is illustrated below:
29
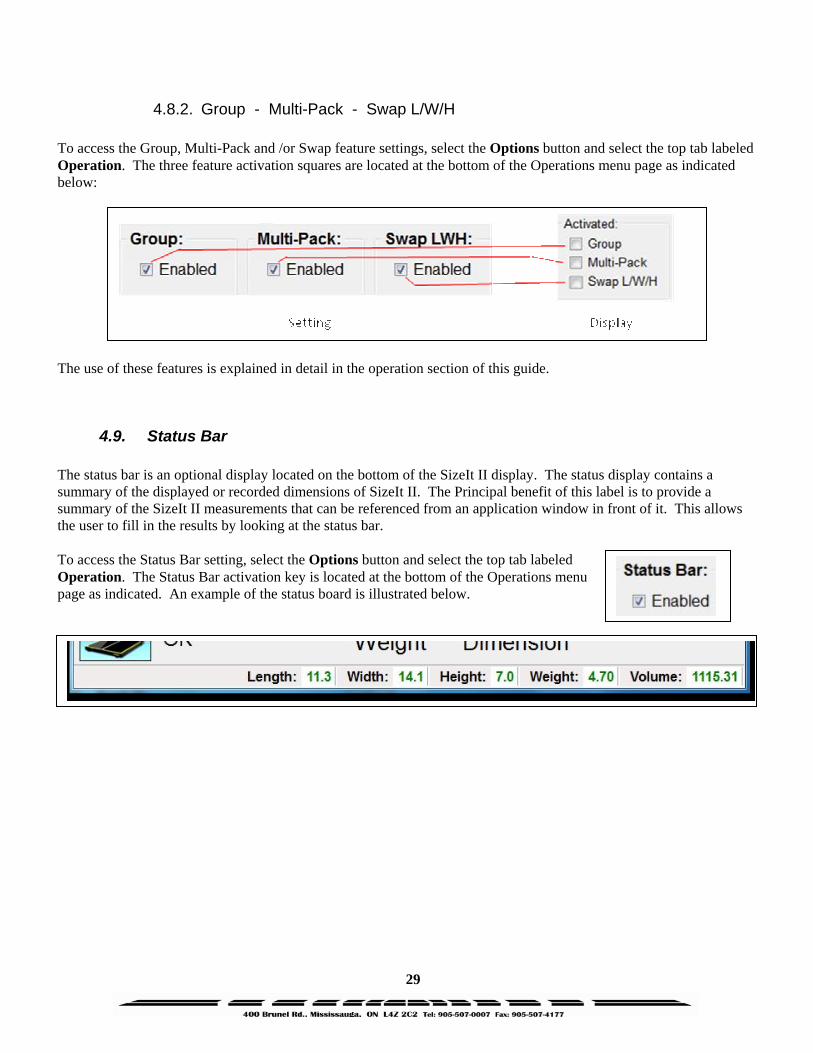
4.8.2. Group - Multi-Pack - Swap L/W/H To access the Group, Multi-Pack and /or Swap feature settings, select the Options button and select the top tab labeled Operation. The three feature activation squares are located at the bottom of the Operations menu page as indicated below: The use of these features is explained in detail in the operation section of this guide.
4.9. Status Bar The status bar is an optional display located on the bottom of the SizeIt II display. The status display contains a summary of the displayed or recorded dimensions of SizeIt II. The Principal benefit of this label is to provide a summary of the SizeIt II measurements that can be referenced from an application window in front of it. This allows the user to fill in the results by looking at the status bar. To access the Status Bar setting, select the Options button and select the top tab labeled Operation. The Status Bar activation key is located at the bottom of the Operations menu page as indicated. An example of the status board is illustrated below.

30
5. SizeIt II Set Up – Data Output Format
5.1. General The settings described in this section are for administration staff only. The settings determine the file name, location, data contents and data format of ExpressCube measurements recorded by SizeIt II. Once set, any changes in these options may cause data errors in other software programs that are utilizing a particular preset data format.
5.2. Output : Date Code A date code can be selected to form a part of the file name used to record the dimensional data from the ExpressCube device. This can make the data verification and file location much faster. There are three options that can be selected.
5.2.1. Julian Date The Julian Date code is a three digit number that represents the day of the year. In a non-leap year July 5 = 186. Example file name is: DIM-186_LONDON_123
5.2.2. YYYYMMDD Selection of the YYYYMMDD option puts a digital date format indicating year (4 digits), month (2 digits) and day (2 digits) Example file name is: DIM-20130705_LONDON_123
5.2.3. None Selection of None will generate a file name without a date reference. Example file name is: DIM-_LONDON_123
5.3. Output : Output Device The measurement data can be recorded or printed from this selection. Multiple outputs can be selected allowing a printer to be connected to the ExpressCube printer port while detailed data can be recorded to file.
31
5.3.1. Printer (ExpressCube) The serial RS-232C printer port is used to transfer measurements. The printer output from this printer port will only contain Length, Width, Height, Gross Weight, First Dim Weight, First Dim Factor and the serial hand scanner output (connected to the ExpressCube device).
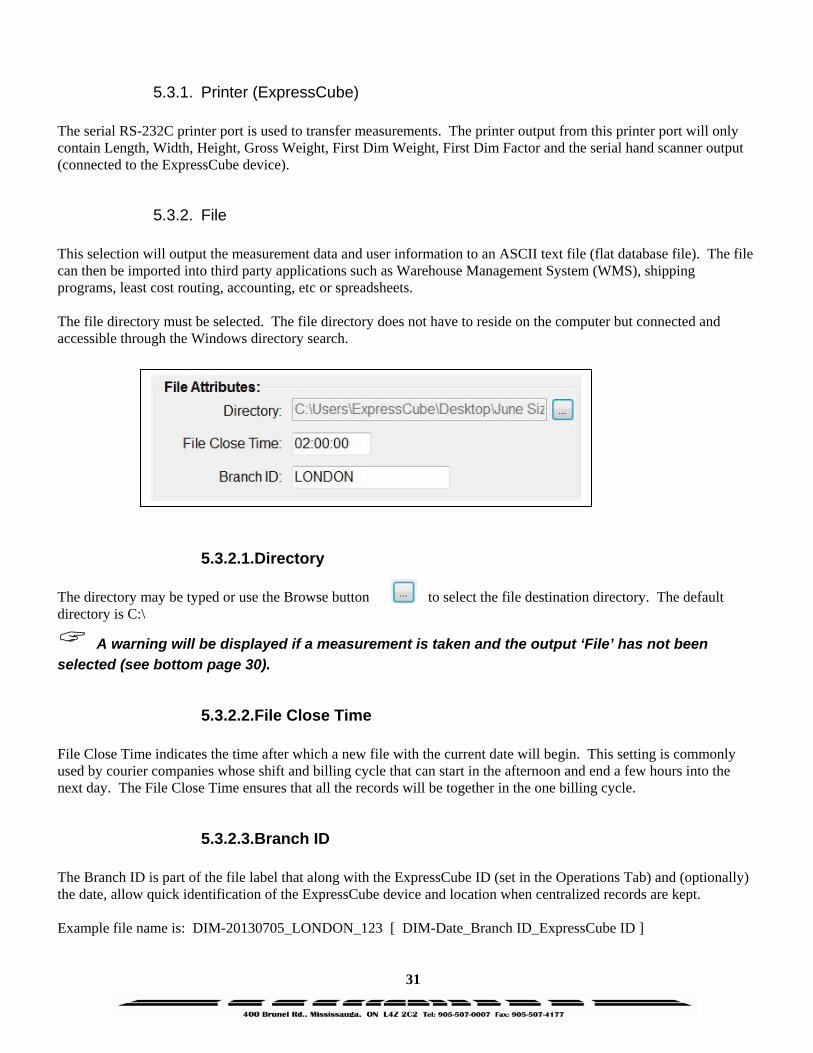
5.3.2. File This selection will output the measurement data and user information to an ASCII text file (flat database file). The file can then be imported into third party applications such as Warehouse Management System (WMS), shipping programs, least cost routing, accounting, etc or spreadsheets. The file directory must be selected. The file directory does not have to reside on the computer but connected and accessible through the Windows directory search.
5.3.2.1.Directory The directory may be typed or use the Browse button to select the file destination directory. The default directory is C:\
A warning will be displayed if a measurement is taken and the output ‘File’ has not been selected (see bottom page 30).
5.3.2.2.File Close Time File Close Time indicates the time after which a new file with the current date will begin. This setting is commonly used by courier companies whose shift and billing cycle that can start in the afternoon and end a few hours into the next day. The File Close Time ensures that all the records will be together in the one billing cycle.
5.3.2.3.Branch ID The Branch ID is part of the file label that along with the ExpressCube ID (set in the Operations Tab) and (optionally) the date, allow quick identification of the ExpressCube device and location when centralized records are kept. Example file name is: DIM-20130705_LONDON_123 [ DIM-Date_Branch ID_ExpressCube ID ]

32
5.3.3. Serial Port If the computer has a working unassigned serial port, this comm. Port selection will transfer the SizeIt II data out the selected port.
33
5.4. Record Attributes - Settings
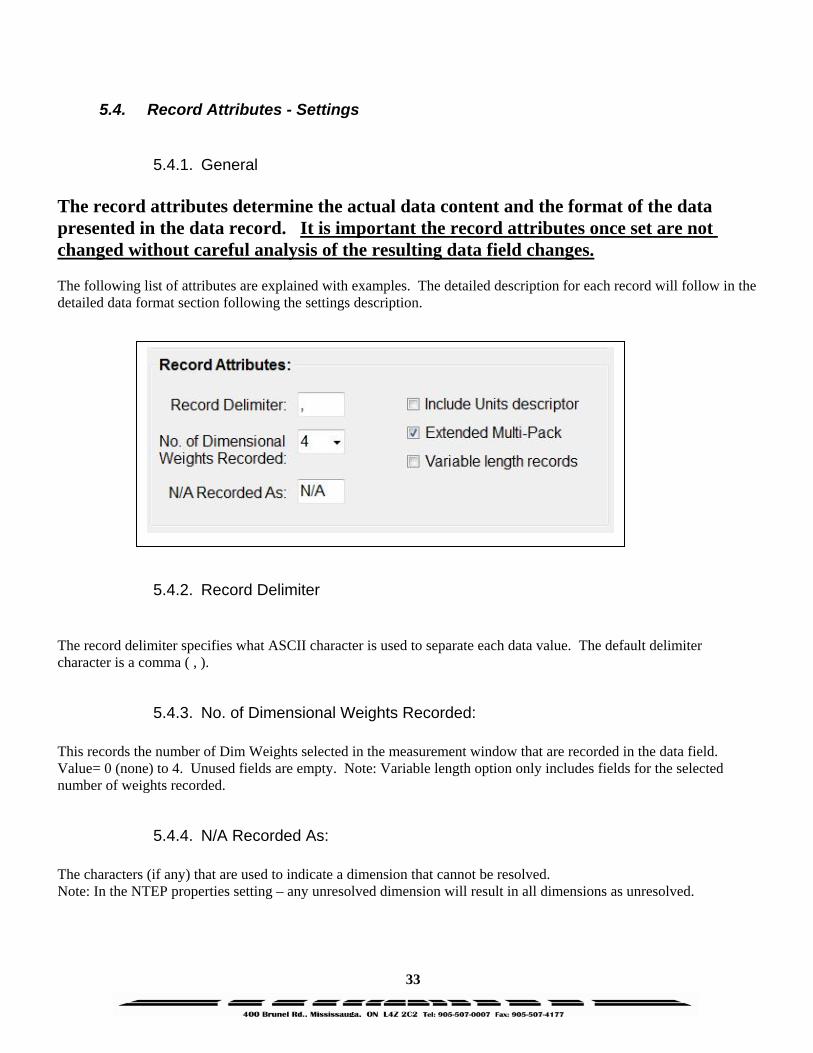
5.4.1. General The record attributes determine the actual data content and the format of the data presented in the data record. It is important the record attributes once set are not changed without careful analysis of the resulting data field changes. The following list of attributes are explained with examples. The detailed description for each record will follow in the detailed data format section following the settings description.
5.4.2. Record Delimiter The record delimiter specifies what ASCII character is used to separate each data value. The default delimiter character is a comma ( , ).
5.4.3. No. of Dimensional Weights Recorded: This records the number of Dim Weights selected in the measurement window that are recorded in the data field. Value= 0 (none) to 4. Unused fields are empty. Note: Variable length option only includes fields for the selected number of weights recorded.
5.4.4. N/A Recorded As: The characters (if any) that are used to indicate a dimension that cannot be resolved. Note: In the NTEP properties setting – any unresolved dimension will result in all dimensions as unresolved.
34
5.4.5. Include Units Descriptor Determines if unit descriptor (cm/kg/in/lb) is displayed with data. If the units descriptor is not included, an empty data field will still be present.
5.4.6. Extended Multi-Pack The selection of this field will add an additional four fields dedicated to multi-pack dimensions and weight. These fields will be present independent of the use of the multi-pack feature. In extended multi-pak, the actual measurements are recoreded with the calculated multi-pak unit in the dedicated fields. If the multi-pack feature is used without the exrended multi-pack feature – only the caculated multi-pak dimensions are recorded..
5.4.7. Variable Length Records The variable length record is an option that condenses the data field to only include the dim weight and dim factor as set in the number of dim weights recorded field (Section 4.4.3). Note: If the variable length record field is not used, the length of the field will change for multi-pack only.
5.4.8. Multi-Pack (Options - Operation Tab) The Multi-Pack feature is included in this section as it has an impact on the data format in the record file. Multi-Pack adds four additional records representing the dimension and weight of an individual package in the group of packages inside the measured carton. Note: For more a detailed description of this feature, refer to the Operation portion of this guide.
5.5. Record Attributes – Output Data Format (Samples)
5.5.1. General The data format of SizeIt II 2.1 depends on the selection of the data attributes as described in detail in section 3.4. The following data output records will use a box with the following measurements: Length 11.3 in; Width 14.1 in; Height 7.1 in; Weight 4.29 lb; Bar Code 089369976 Additional Info (if used/printed) Dim Factor #1: 194.0; Dim Factor #2: 166.0; Dim Factor #3: 172.8; Dim Factor #4: 138.0 Tags: Tag#1, Tag#2, Tag#3, Tag#4, Tag#5, Tag#6 Multi Pack: Length/2; Width/2; Height/2 Group (10): Length; Width; Height/10
35
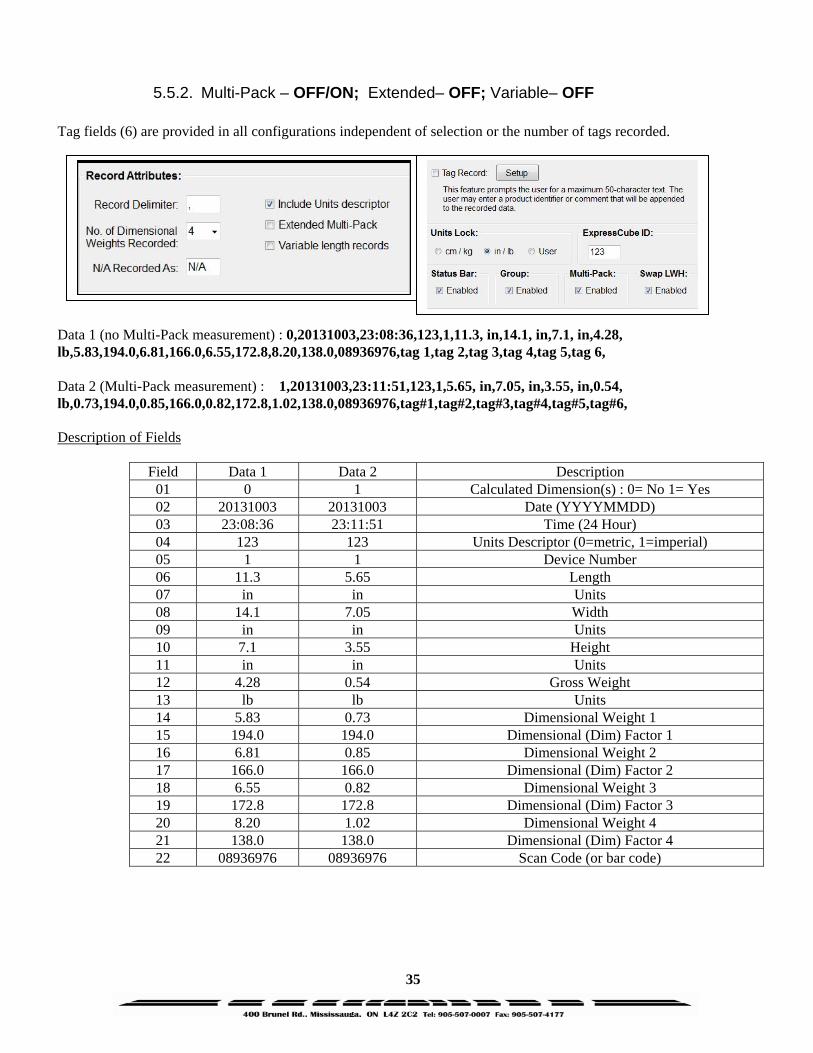
5.5.2. Multi-Pack – OFF/ON; Extended– OFF; Variable– OFF Tag fields (6) are provided in all configurations independent of selection or the number of tags recorded. Data 1 (no Multi-Pack measurement) : 0,20131003,23:08:36,123,1,11.3, in,14.1, in,7.1, in,4.28, lb,5.83,194.0,6.81,166.0,6.55,172.8,8.20,138.0,08936976,tag 1,tag 2,tag 3,tag 4,tag 5,tag 6, Data 2 (Multi-Pack measurement) : 1,20131003,23:11:51,123,1,5.65, in,7.05, in,3.55, in,0.54, lb,0.73,194.0,0.85,166.0,0.82,172.8,1.02,138.0,08936976,tag#1,tag#2,tag#3,tag#4,tag#5,tag#6, Description of Fields
Field Data 1 Data 2 Description 01 0 1 Calculated Dimension(s) : 0= No 1= Yes 02 20131003 20131003 Date (YYYYMMDD) 03 23:08:36 23:11:51 Time (24 Hour) 04 123 123 Units Descriptor (0=metric, 1=imperial) 05 1 1 Device Number 06 11.3 5.65 Length 07 in in Units 08 14.1 7.05 Width 09 in in Units 10 7.1 3.55 Height 11 in in Units 12 4.28 0.54 Gross Weight 13 lb lb Units 14 5.83 0.73 Dimensional Weight 1 15 194.0 194.0 Dimensional (Dim) Factor 1 16 6.81 0.85 Dimensional Weight 2 17 166.0 166.0 Dimensional (Dim) Factor 2 18 6.55 0.82 Dimensional Weight 3 19 172.8 172.8 Dimensional (Dim) Factor 3 20 8.20 1.02 Dimensional Weight 4 21 138.0 138.0 Dimensional (Dim) Factor 4 22 08936976 08936976 Scan Code (or bar code)

36
Description of Fields
Field Data 1 Data 2 Description 23 tag#1 tag#1 Tag 1 24 tag#2 tag#2 Tag 2 25 tag#3 tag#3 Tag 3 26 tag#4 tag#4 Tag 4 27 tag#5 tag#5 Tag 5 28 tag#6 tag#6 Tag 6
37
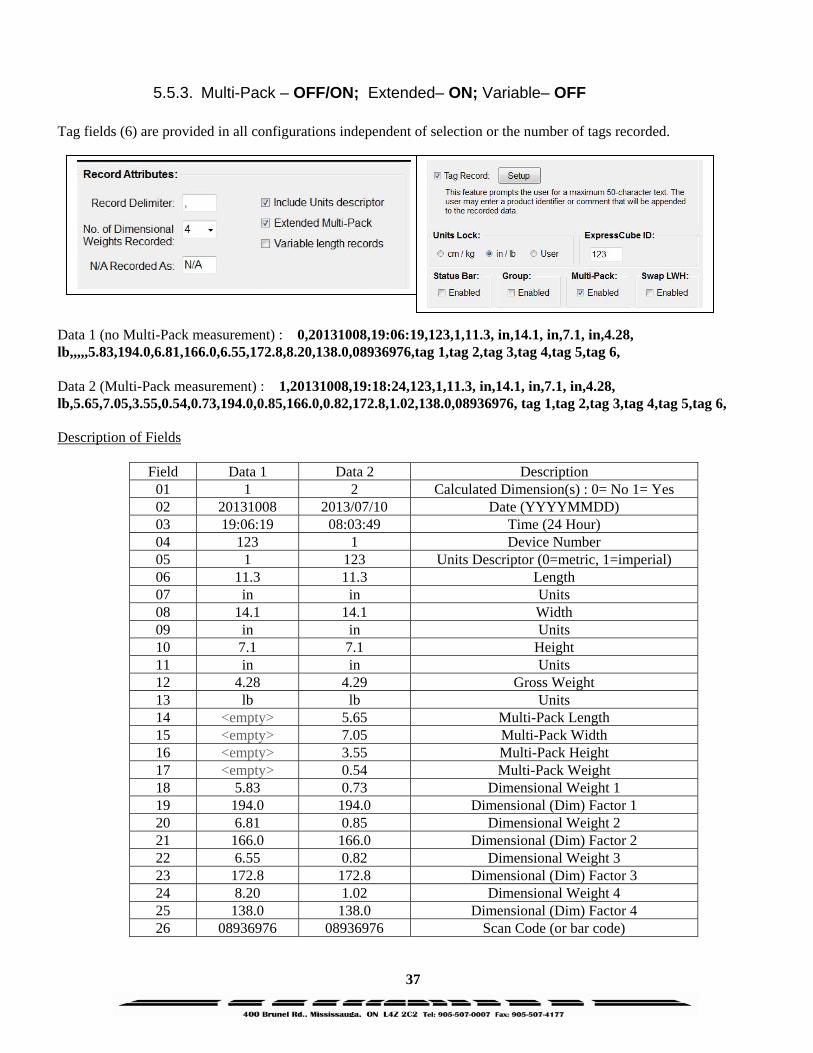
5.5.3. Multi-Pack – OFF/ON; Extended– ON; Variable– OFF Tag fields (6) are provided in all configurations independent of selection or the number of tags recorded. Data 1 (no Multi-Pack measurement) : 0,20131008,19:06:19,123,1,11.3, in,14.1, in,7.1, in,4.28, lb,,,,,5.83,194.0,6.81,166.0,6.55,172.8,8.20,138.0,08936976,tag 1,tag 2,tag 3,tag 4,tag 5,tag 6, Data 2 (Multi-Pack measurement) : 1,20131008,19:18:24,123,1,11.3, in,14.1, in,7.1, in,4.28, lb,5.65,7.05,3.55,0.54,0.73,194.0,0.85,166.0,0.82,172.8,1.02,138.0,08936976, tag 1,tag 2,tag 3,tag 4,tag 5,tag 6, Description of Fields
Field Data 1 Data 2 Description 01 1 2 Calculated Dimension(s) : 0= No 1= Yes 02 20131008 2013/07/10 Date (YYYYMMDD) 03 19:06:19 08:03:49 Time (24 Hour) 04 123 1 Device Number 05 1 123 Units Descriptor (0=metric, 1=imperial) 06 11.3 11.3 Length 07 in in Units 08 14.1 14.1 Width 09 in in Units 10 7.1 7.1 Height 11 in in Units 12 4.28 4.29 Gross Weight 13 lb lb Units 14 <empty> 5.65 Multi-Pack Length 15 <empty> 7.05 Multi-Pack Width 16 <empty> 3.55 Multi-Pack Height 17 <empty> 0.54 Multi-Pack Weight 18 5.83 0.73 Dimensional Weight 1 19 194.0 194.0 Dimensional (Dim) Factor 1 20 6.81 0.85 Dimensional Weight 2 21 166.0 166.0 Dimensional (Dim) Factor 2 22 6.55 0.82 Dimensional Weight 3 23 172.8 172.8 Dimensional (Dim) Factor 3 24 8.20 1.02 Dimensional Weight 4 25 138.0 138.0 Dimensional (Dim) Factor 4 26 08936976 08936976 Scan Code (or bar code)

38
Description of Fields (Continued)
Field Data 1 Data 2 Description 27 tag#1 tag#1 Tag 1 28 tag#2 tag#2 Tag 2 29 tag#3 tag#3 Tag 3 30 tag#4 tag#4 Tag 4 31 tag#5 tag#5 Tag 5 32 tag#6 tag#6 Tag 6

39
5.5.4. Multi-Pack – OFF; Extended– OFF; Variable– ON Tag fields (6) are provided in all configurations independent of selection or the number of tags recorded. Samples: Dim Wgt Record= 0 Tag =ON 0,20131008,18:07:17,123,1,11.3, in,14.1, in,7.1, in,4.28, lb,08936976,tag 1,tag 2,tag 3,tag 4,tag 5,tag 6, Dim Wgt Record= 2 Tag = OFF 0,20131008,18:04:28,123,1,11.3, in,14.1, in,7.1, in,4.28, lb,5.83,194.0,6.81,166.0,08936976,,,,,,, Dim Wgt Record= 4 TAG = ON 0,20131008,18:10:10,123,1,11.3, in,14.1, in,7.1, in,4.28, lb,5.83,194.0,6.81,166.0,6.55,172.8,8.20,138.0,08936976,tag 1,tag 2,tag 3,tag 4,tag 5,tag 6,

40
Description of Fields ( 3.5.4 Continued)
Dim Wgt Rec=0 Dim Wgt Rec=2 Dim Wgt Rec=4 Multi-Pack – OFF ; Extended – OFF ; Variable Records – ON
Field Data Field Data Field Data Description 01 0 01 0 01 0 Calculated Dimension(s) : 0= No 1= Yes 02 20131008 02 20131008 02 20131008 Date (YYYYMMDD) 03 18:07:17 03 18:04:28 03 18:10:10 Time (24 Hour) 04 123 04 123 04 123 Device Number 05 1 05 1 05 1 Units Descriptor (0=metric, 1=imperial) 06 11.3 06 11.3 06 11.3 Length 07 in 07 in 07 in Units 08 14.1 08 14.1 08 14.1 Width 09 in 09 in 09 in Units 10 7.1 10 7.1 10 7.1 Height 11 in 11 in 11 in Units 12 4.28 12 4.28 12 4.28 Gross Weight 13 lb 13 lb 13 lb Units
14 5.83 14 5.83 Dimensional Weight 1 15 194.0 15 194.0 Dimensional (Dim) Factor 1 16 6.81 16 6.81 Dimensional Weight 2 17 166.0 17 166.0 Dimensional (Dim) Factor 2 18 6.55 Dimensional Weight 3 19 172.8 Dimensional (Dim) Factor 3 20 8.20 Dimensional Weight 4 21 138.0 Dimensional (Dim) Factor 4
14 08936976 18 08936976 22 08936976 Scan Code (or bar code) 15 tag#1 19 <empty> 23 tag#1 Tag 1 16 tag#2 20 <empty> 24 tag#2 Tag 2 17 tag#3 21 <empty> 25 tag#3 Tag 3 18 tag#4 22 <empty> 26 tag#4 Tag 4 19 tag#5 23 <empty> 27 tag#5 Tag 5 20 tag#6 24 <empty> 28 tag#6 Tag 6
41
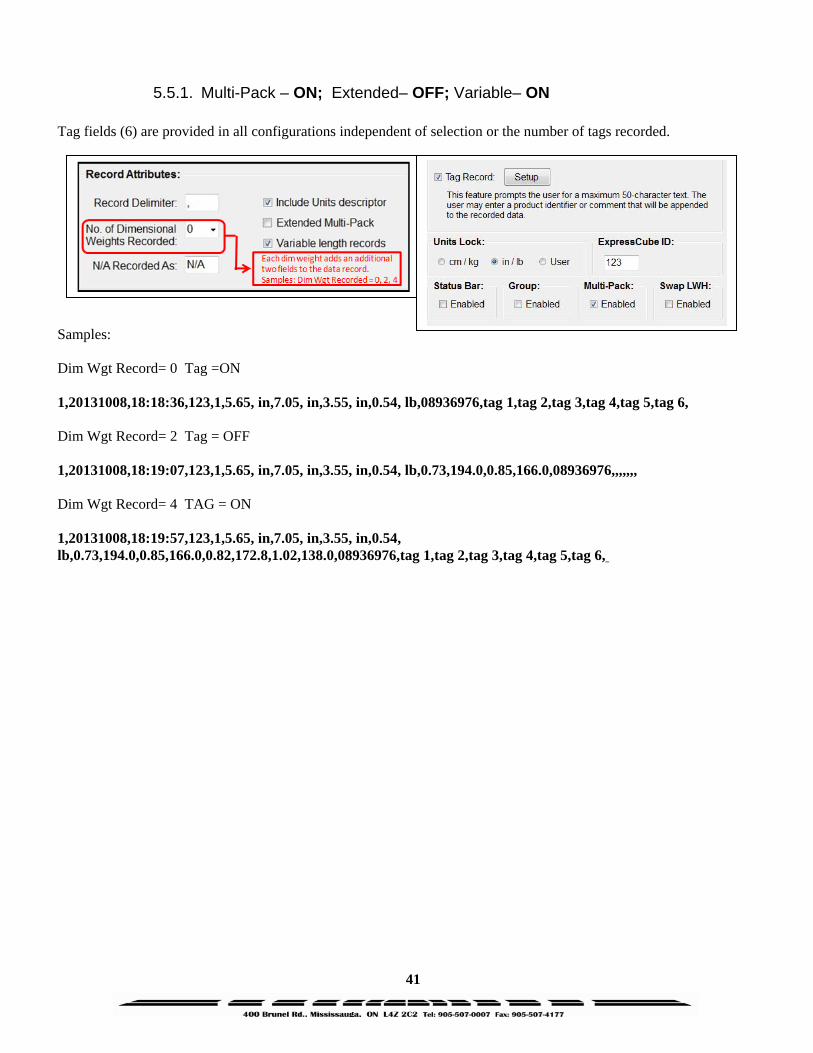
5.5.1. Multi-Pack – ON; Extended– OFF; Variable– ON Tag fields (6) are provided in all configurations independent of selection or the number of tags recorded. Samples: Dim Wgt Record= 0 Tag =ON 1,20131008,18:18:36,123,1,5.65, in,7.05, in,3.55, in,0.54, lb,08936976,tag 1,tag 2,tag 3,tag 4,tag 5,tag 6, Dim Wgt Record= 2 Tag = OFF 1,20131008,18:19:07,123,1,5.65, in,7.05, in,3.55, in,0.54, lb,0.73,194.0,0.85,166.0,08936976,,,,,,, Dim Wgt Record= 4 TAG = ON 1,20131008,18:19:57,123,1,5.65, in,7.05, in,3.55, in,0.54, lb,0.73,194.0,0.85,166.0,0.82,172.8,1.02,138.0,08936976,tag 1,tag 2,tag 3,tag 4,tag 5,tag 6,

42
Description of Fields ( 3.5.4 Continued)
Dim Wgt Rec=0 Dim Wgt Rec=2 Dim Wgt Rec=4 Multi-Pack – ON ; Extended – OFF ; Variable Records – ON
Field Data Field Data Field Data Description 01 1 01 1 01 1 Calculated Dimension(s) : 0= No 1= Yes 02 20131008 02 20131008 02 20131008 Date (YYYYMMDD) 03 18:18:36 03 18:19:07 03 18:10:10 Time (24 Hour) 04 123 04 123 04 123 Device Number 05 1 05 1 05 1 Units Descriptor (0=metric, 1=imperial) 06 5.65 06 5.65 06 5.65 Length 07 in 07 in 07 in Units 08 7.05 08 7.05 08 7.05 Width 09 in 09 in 09 in Units 10 3.55 10 3.55 10 3.55 Height 11 in 11 in 11 in Units 12 0.54 12 0.54 12 0.54 Gross Weight 13 lb 13 lb 13 lb Units
14 0.73 14 0.73 Dimensional Weight 1 15 194.0 15 194.0 Dimensional (Dim) Factor 1 16 0.85 16 0.85 Dimensional Weight 2 17 166.0 17 166.0 Dimensional (Dim) Factor 2 18 0.82 Dimensional Weight 3 19 172.8 Dimensional (Dim) Factor 3 20 1.02 Dimensional Weight 4 21 138.0 Dimensional (Dim) Factor 4
14 08936976 18 08936976 22 08936976 Scan Code (or bar code) 15 tag#1 19 <empty> 23 tag#1 Tag 1 16 tag#2 20 <empty> 24 tag#2 Tag 2 17 tag#3 21 <empty> 25 tag#3 Tag 3 18 tag#4 22 <empty> 26 tag#4 Tag 4 19 tag#5 23 <empty> 27 tag#5 Tag 5 20 tag#6 24 <empty> 28 tag#6 Tag 6
43
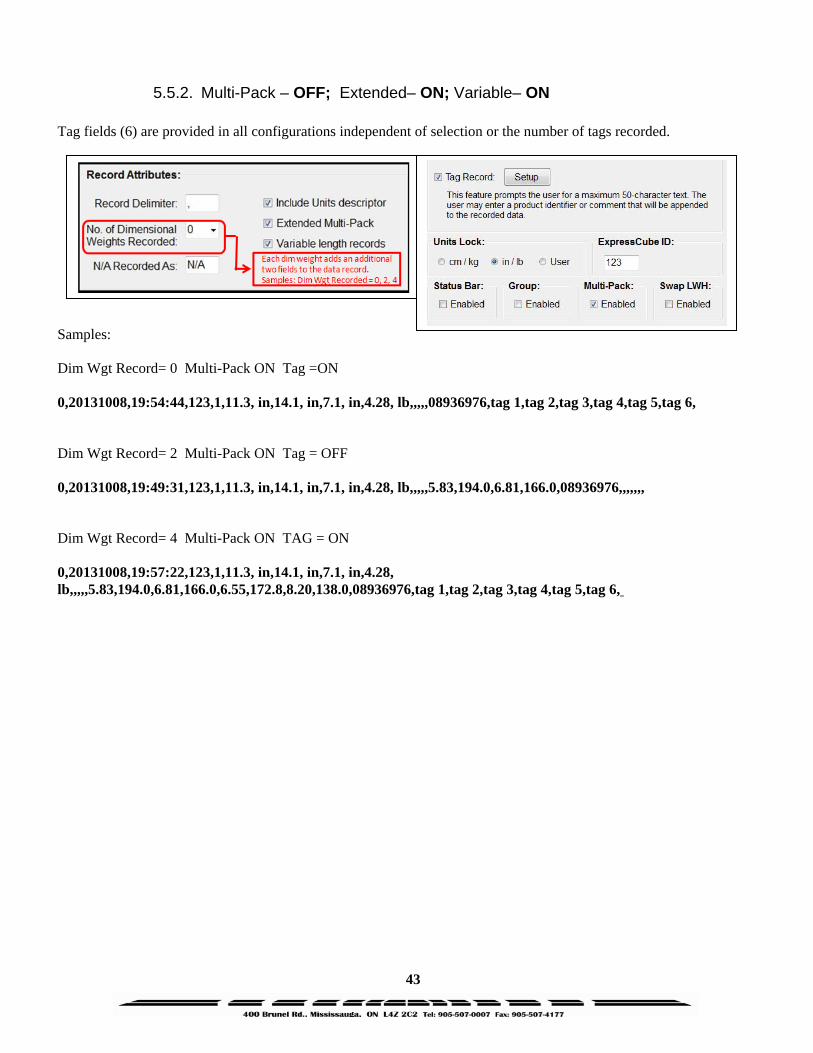
5.5.2. Multi-Pack – OFF; Extended– ON; Variable– ON Tag fields (6) are provided in all configurations independent of selection or the number of tags recorded. Samples: Dim Wgt Record= 0 Multi-Pack ON Tag =ON 0,20131008,19:54:44,123,1,11.3, in,14.1, in,7.1, in,4.28, lb,,,,,08936976,tag 1,tag 2,tag 3,tag 4,tag 5,tag 6, Dim Wgt Record= 2 Multi-Pack ON Tag = OFF 0,20131008,19:49:31,123,1,11.3, in,14.1, in,7.1, in,4.28, lb,,,,,5.83,194.0,6.81,166.0,08936976,,,,,,, Dim Wgt Record= 4 Multi-Pack ON TAG = ON 0,20131008,19:57:22,123,1,11.3, in,14.1, in,7.1, in,4.28, lb,,,,,5.83,194.0,6.81,166.0,6.55,172.8,8.20,138.0,08936976,tag 1,tag 2,tag 3,tag 4,tag 5,tag 6,

44
Dim Wgt Rec=0 Dim Wgt Rec=2 Dim Wgt Rec=4 Multi-Pack – OFF ; Extended – ON ; Variable Records – ON
Field Data Field Data Field Data Description 01 0 01 0 01 0 Calculated Dimension(s) : 0= No 1= Yes 02 20131008 02 20131008 02 20131008 Date (YYYYMMDD) 03 19:54:44 03 19:49:31 03 19:57:22 Time (24 Hour) 04 1 04 1 04 1 Device Number 05 123 05 123 05 123 Units Descriptor (0=metric, 1=imperial) 06 11.3 06 11.3 06 11.3 Length 07 in 07 in 07 in Units 08 14.1 08 14.1 08 14.1 Width 09 in 09 in 09 in Units 10 7.1 10 7.1 10 7.1 Height 11 in 11 in 11 in Units 12 4.28 12 4.28 12 4.28 Gross Weight 13 lb 13 lb 13 lb Units 14 <empty> 14 <empty> 14 <empty> Multi-Pack Length 15 <empty> 15 <empty> 15 <empty> Multi-Pack Width 16 <empty> 16 <empty> 16 <empty> Multi-Pack Height 17 <empty> 17 <empty> 17 <empty> Multi-Pack Weight
18 5.83 18 5.83 Dimensional Weight 1 19 194.0 19 194.0 Dimensional (Dim) Factor 1 20 6.81 20 6.81 Dimensional Weight 2 21 166.0 21 166.0 Dimensional (Dim) Factor 2 22 6.55 Dimensional Weight 3 23 172.8 Dimensional (Dim) Factor 3 24 8.20 Dimensional Weight 4 25 138.0 Dimensional (Dim) Factor 4
18 08936976 22 08936976 26 08936976 Scan Code (or bar code) 19 tag#1 23 <empty> 27 Tag#1 Tag 1 20 tag#2 24 <empty> 28 Tag#2 Tag 2 21 tag#3 25 <empty> 29 Tag#3 Tag 3 22 tag#4 26 <empty> 30 Tag#4 Tag 4 23 tag#5 27 <empty> 31 Tag#5 Tag 5 24 tag#6 28 <empty> 32 Tag#6 Tag 6
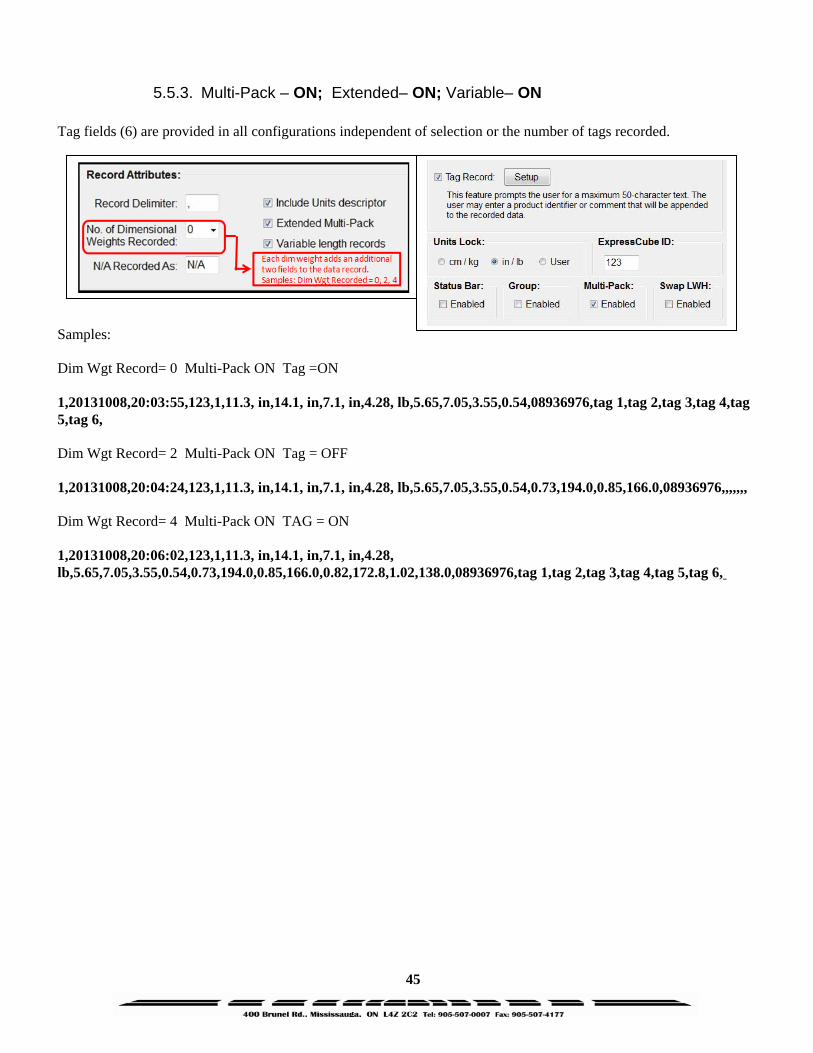
45
5.5.3. Multi-Pack – ON; Extended– ON; Variable– ON Tag fields (6) are provided in all configurations independent of selection or the number of tags recorded. Samples: Dim Wgt Record= 0 Multi-Pack ON Tag =ON 1,20131008,20:03:55,123,1,11.3, in,14.1, in,7.1, in,4.28, lb,5.65,7.05,3.55,0.54,08936976,tag 1,tag 2,tag 3,tag 4,tag 5,tag 6, Dim Wgt Record= 2 Multi-Pack ON Tag = OFF 1,20131008,20:04:24,123,1,11.3, in,14.1, in,7.1, in,4.28, lb,5.65,7.05,3.55,0.54,0.73,194.0,0.85,166.0,08936976,,,,,,, Dim Wgt Record= 4 Multi-Pack ON TAG = ON 1,20131008,20:06:02,123,1,11.3, in,14.1, in,7.1, in,4.28, lb,5.65,7.05,3.55,0.54,0.73,194.0,0.85,166.0,0.82,172.8,1.02,138.0,08936976,tag 1,tag 2,tag 3,tag 4,tag 5,tag 6,
46
Dim Wgt Rec=0 Dim Wgt Rec=2 Dim Wgt Rec=4 Multi-Pack – ON ; Extended – ON ; Variable Records – ON
Field Data Field Data Field Data Description 01 1 01 1 01 1 Calculated Dimension(s) : 0= No 1= Yes 02 20131008 02 20131008 02 20131008 Date (YYYYMMDD) 03 20:03:55 03 20:04:24 03 20:06:02 Time (24 Hour) 04 1 04 1 04 1 Device Number 05 123 05 123 05 123 Units Descriptor (0=metric, 1=imperial) 06 11.3 06 11.3 06 11.3 Length 07 in 07 in 07 in Units 08 14.1 08 14.1 08 14.1 Width 09 in 09 in 09 in Units 10 7.1 10 7.1 10 7.1 Height 11 in 11 in 11 in Units 12 4.28 12 4.28 12 4.28 Gross Weight 13 lb 13 lb 13 lb Units 14 5.65 14 5.65 14 5.65 Multi-Pack Length 15 7.05 15 7.05 15 7.05 Multi-Pack Width 16 3.55 16 3.55 16 3.55 Multi-Pack Height 17 0.54 17 0.54 17 0.54 Multi-Pack Weight
18 0.73 18 0.73 Dimensional Weight 1 19 194.0 19 194.0 Dimensional (Dim) Factor 1 20 0.85 20 0.85 Dimensional Weight 2 21 166.0 21 166.0 Dimensional (Dim) Factor 2 22 0.82 Dimensional Weight 3 23 172.8 Dimensional (Dim) Factor 3 24 1.02 Dimensional Weight 4 25 138.0 Dimensional (Dim) Factor 4
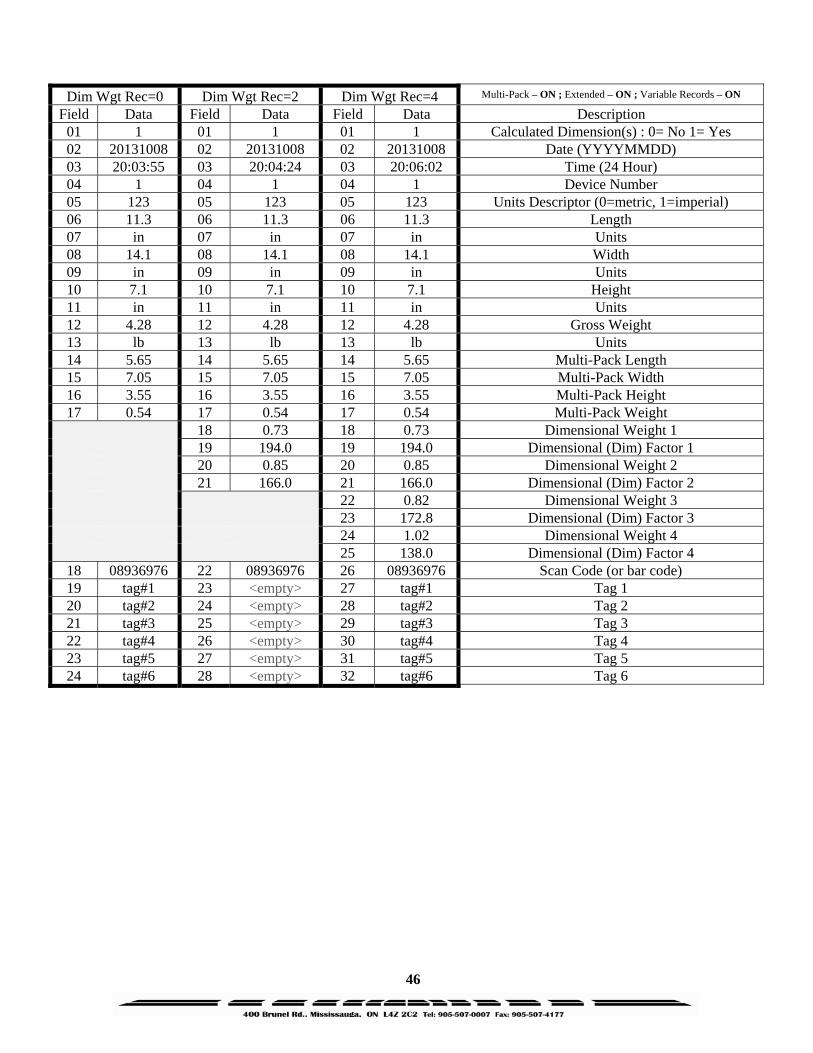
18 08936976 22 08936976 26 08936976 Scan Code (or bar code) 19 tag#1 23 <empty> 27 tag#1 Tag 1 20 tag#2 24 <empty> 28 tag#2 Tag 2 21 tag#3 25 <empty> 29 tag#3 Tag 3 22 tag#4 26 <empty> 30 tag#4 Tag 4 23 tag#5 27 <empty> 31 tag#5 Tag 5 24 tag#6 28 <empty> 32 tag#6 Tag 6
47
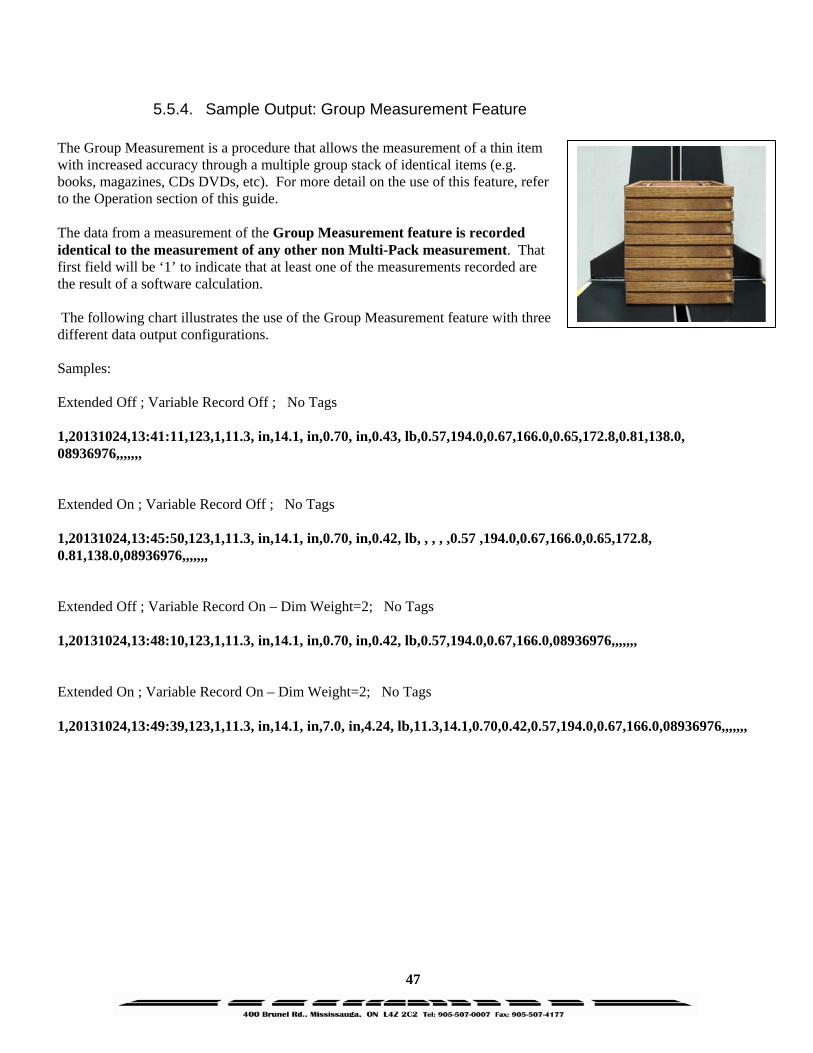
5.5.4. Sample Output: Group Measurement Feature The Group Measurement is a procedure that allows the measurement of a thin item with increased accuracy through a multiple group stack of identical items (e.g. books, magazines, CDs DVDs, etc). For more detail on the use of this feature, refer to the Operation section of this guide. The data from a measurement of the Group Measurement feature is recorded identical to the measurement of any other non Multi-Pack measurement. That first field will be ‘1’ to indicate that at least one of the measurements recorded are the result of a software calculation. The following chart illustrates the use of the Group Measurement feature with three different data output configurations. Samples: Extended Off ; Variable Record Off ; No Tags 1,20131024,13:41:11,123,1,11.3, in,14.1, in,0.70, in,0.43, lb,0.57,194.0,0.67,166.0,0.65,172.8,0.81,138.0, 08936976,,,,,,, Extended On ; Variable Record Off ; No Tags 1,20131024,13:45:50,123,1,11.3, in,14.1, in,0.70, in,0.42, lb, , , , ,0.57 ,194.0,0.67,166.0,0.65,172.8, 0.81,138.0,08936976,,,,,,, Extended Off ; Variable Record On – Dim Weight=2; No Tags 1,20131024,13:48:10,123,1,11.3, in,14.1, in,0.70, in,0.42, lb,0.57,194.0,0.67,166.0,08936976,,,,,,, Extended On ; Variable Record On – Dim Weight=2; No Tags 1,20131024,13:49:39,123,1,11.3, in,14.1, in,7.0, in,4.24, lb,11.3,14.1,0.70,0.42,0.57,194.0,0.67,166.0,08936976,,,,,,,
48
Description of Fields ( 3.5.4 Continued)
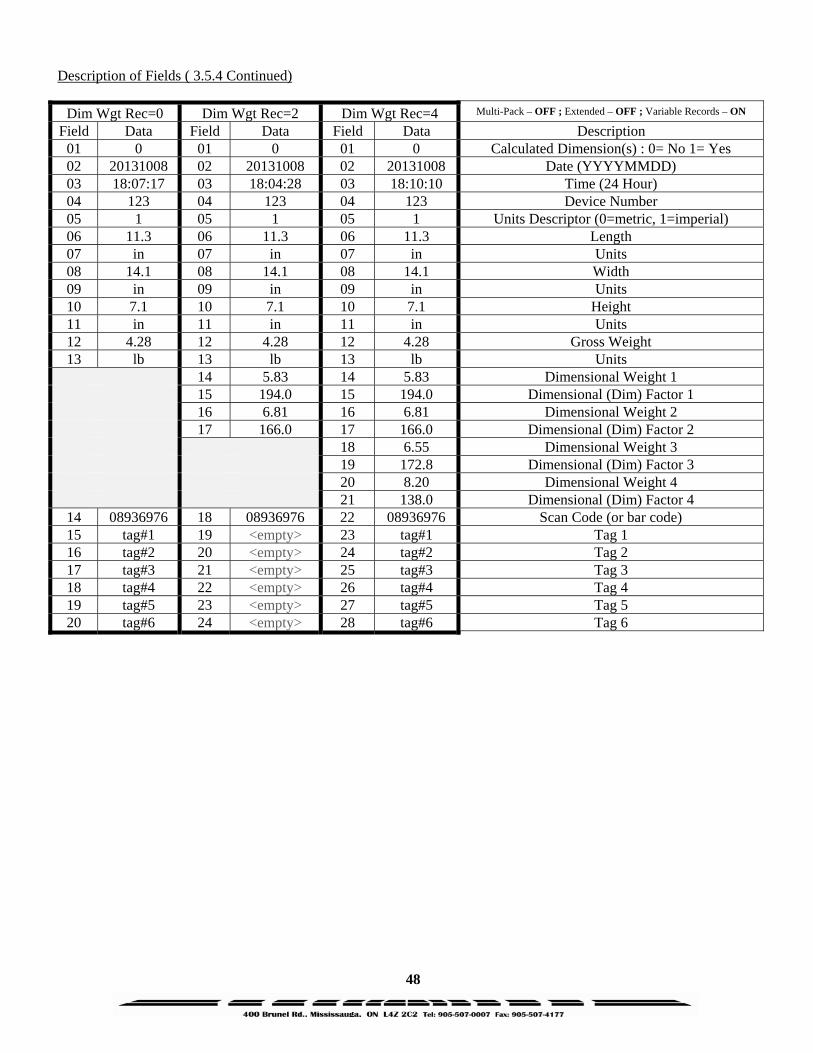
Dim Wgt Rec=0 Dim Wgt Rec=2 Dim Wgt Rec=4 Multi-Pack – OFF ; Extended – OFF ; Variable Records – ON
Field Data Field Data Field Data Description 01 0 01 0 01 0 Calculated Dimension(s) : 0= No 1= Yes 02 20131008 02 20131008 02 20131008 Date (YYYYMMDD) 03 18:07:17 03 18:04:28 03 18:10:10 Time (24 Hour) 04 123 04 123 04 123 Device Number 05 1 05 1 05 1 Units Descriptor (0=metric, 1=imperial) 06 11.3 06 11.3 06 11.3 Length 07 in 07 in 07 in Units 08 14.1 08 14.1 08 14.1 Width 09 in 09 in 09 in Units 10 7.1 10 7.1 10 7.1 Height 11 in 11 in 11 in Units 12 4.28 12 4.28 12 4.28 Gross Weight 13 lb 13 lb 13 lb Units
14 5.83 14 5.83 Dimensional Weight 1 15 194.0 15 194.0 Dimensional (Dim) Factor 1 16 6.81 16 6.81 Dimensional Weight 2 17 166.0 17 166.0 Dimensional (Dim) Factor 2 18 6.55 Dimensional Weight 3 19 172.8 Dimensional (Dim) Factor 3 20 8.20 Dimensional Weight 4 21 138.0 Dimensional (Dim) Factor 4
14 08936976 18 08936976 22 08936976 Scan Code (or bar code) 15 tag#1 19 <empty> 23 tag#1 Tag 1 16 tag#2 20 <empty> 24 tag#2 Tag 2 17 tag#3 21 <empty> 25 tag#3 Tag 3 18 tag#4 22 <empty> 26 tag#4 Tag 4 19 tag#5 23 <empty> 27 tag#5 Tag 5 20 tag#6 24 <empty> 28 tag#6 Tag 6
49
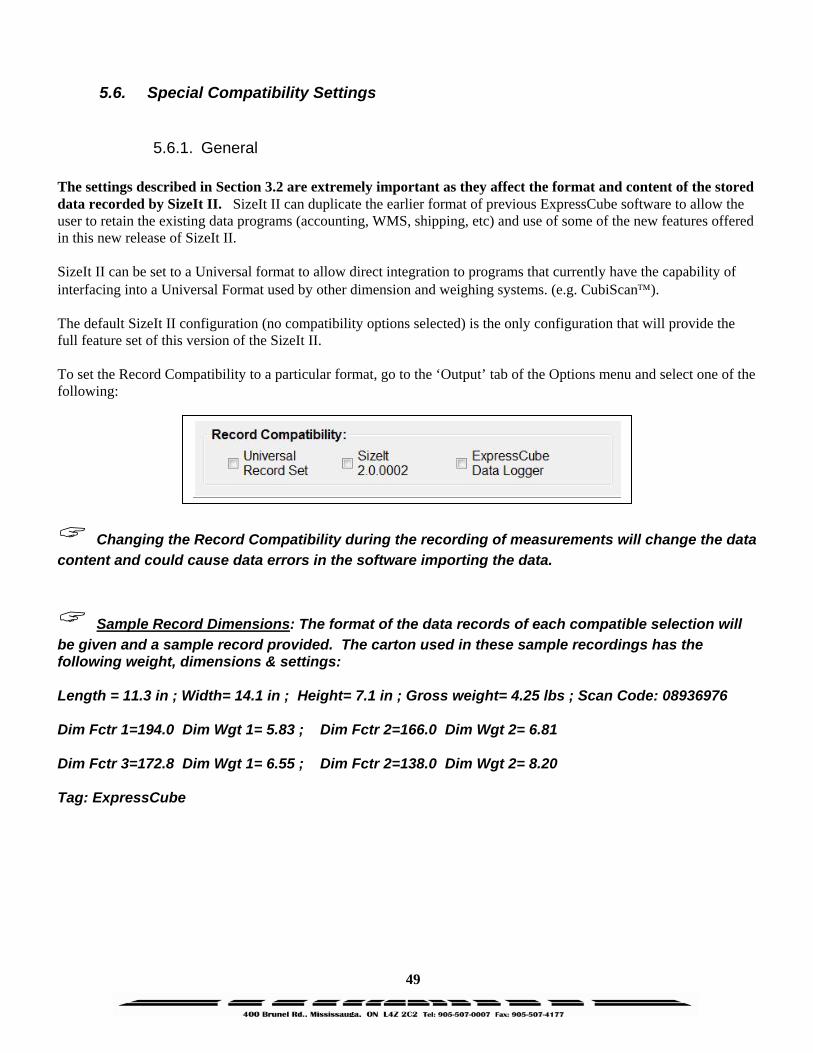
5.6. Special Compatibility Settings
5.6.1. General The settings described in Section 3.2 are extremely important as they affect the format and content of the stored data recorded by SizeIt II. SizeIt II can duplicate the earlier format of previous ExpressCube software to allow the user to retain the existing data programs (accounting, WMS, shipping, etc) and use of some of the new features offered in this new release of SizeIt II. SizeIt II can be set to a Universal format to allow direct integration to programs that currently have the capability of interfacing into a Universal Format used by other dimension and weighing systems. (e.g. CubiScan™). The default SizeIt II configuration (no compatibility options selected) is the only configuration that will provide the full feature set of this version of the SizeIt II. To set the Record Compatibility to a particular format, go to the ‘Output’ tab of the Options menu and select one of the following:
Changing the Record Compatibility during the recording of measurements will change the data content and could cause data errors in the software importing the data.
Sample Record Dimensions: The format of the data records of each compatible selection will be given and a sample record provided. The carton used in these sample recordings has the following weight, dimensions & settings: Length = 11.3 in ; Width= 14.1 in ; Height= 7.1 in ; Gross weight= 4.25 lbs ; Scan Code: 08936976 Dim Fctr 1=194.0 Dim Wgt 1= 5.83 ; Dim Fctr 2=166.0 Dim Wgt 2= 6.81 Dim Fctr 3=172.8 Dim Wgt 1= 6.55 ; Dim Fctr 2=138.0 Dim Wgt 2= 8.20 Tag: ExpressCube
50
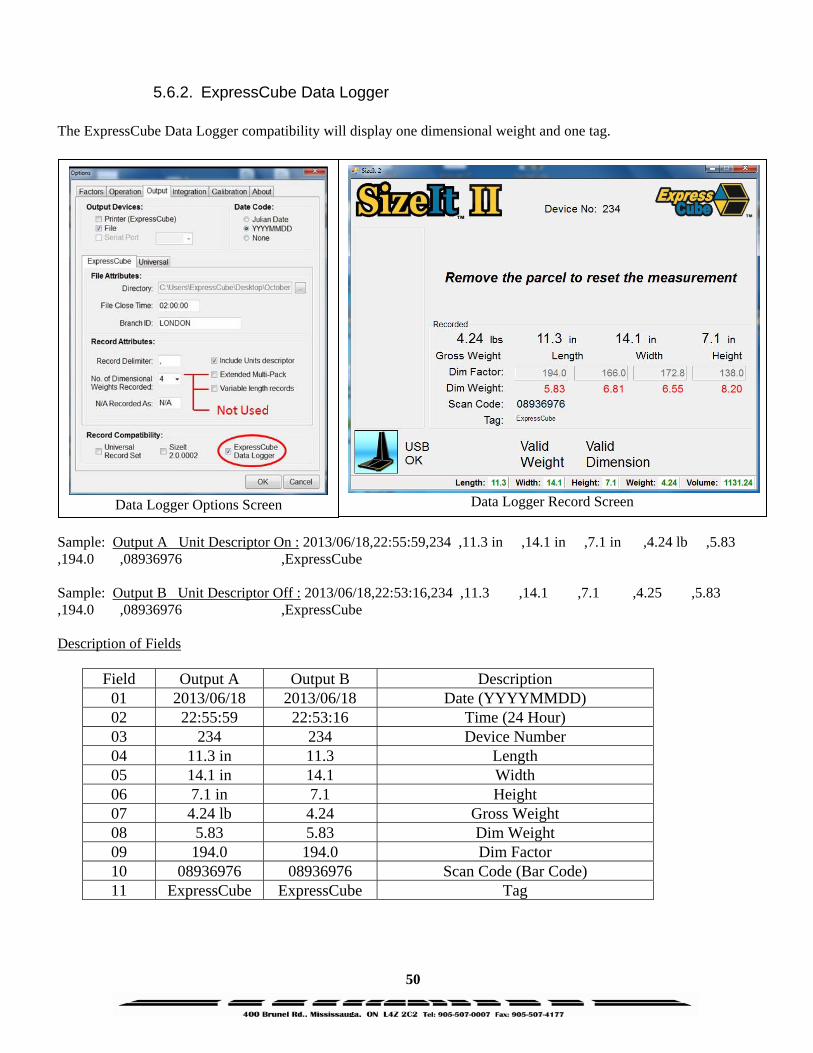
5.6.2. ExpressCube Data Logger The ExpressCube Data Logger compatibility will display one dimensional weight and one tag.
Sample: Output A Unit Descriptor On : 2013/06/18,22:55:59,234 ,11.3 in ,14.1 in ,7.1 in ,4.24 lb ,5.83 ,194.0 ,08936976 ,ExpressCube Sample: Output B Unit Descriptor Off : 2013/06/18,22:53:16,234 ,11.3 ,14.1 ,7.1 ,4.25 ,5.83 ,194.0 ,08936976 ,ExpressCube Description of Fields
Field Output A Output B Description 01 2013/06/18 2013/06/18 Date (YYYYMMDD) 02 22:55:59 22:53:16 Time (24 Hour) 03 234 234 Device Number 04 11.3 in 11.3 Length 05 14.1 in 14.1 Width 06 7.1 in 7.1 Height 07 4.24 lb 4.24 Gross Weight 08 5.83 5.83 Dim Weight 09 194.0 194.0 Dim Factor 10 08936976 08936976 Scan Code (Bar Code) 11 ExpressCube ExpressCube Tag
Data Logger Options Screen Data Logger Record Screen
51
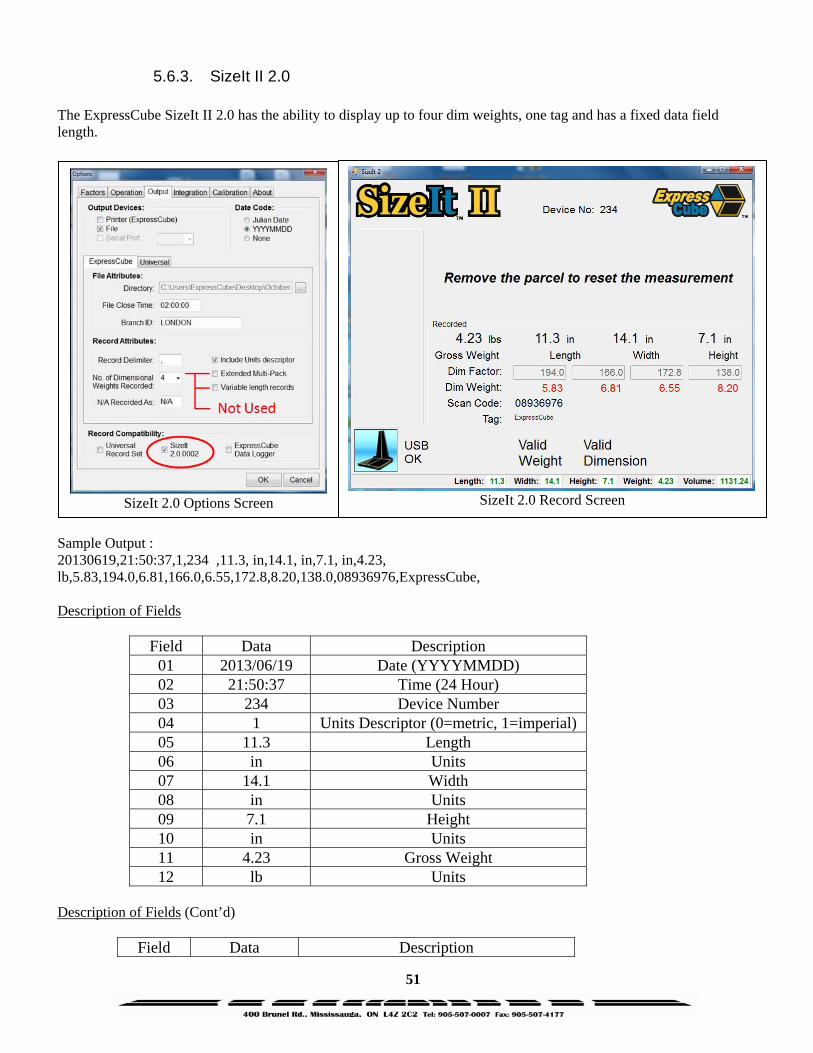
5.6.3. SizeIt II 2.0 The ExpressCube SizeIt II 2.0 has the ability to display up to four dim weights, one tag and has a fixed data field length.
Sample Output : 20130619,21:50:37,1,234 ,11.3, in,14.1, in,7.1, in,4.23, lb,5.83,194.0,6.81,166.0,6.55,172.8,8.20,138.0,08936976,ExpressCube, Description of Fields
Field Data Description 01 2013/06/19 Date (YYYYMMDD) 02 21:50:37 Time (24 Hour) 03 234 Device Number 04 1 Units Descriptor (0=metric, 1=imperial) 05 11.3 Length 06 in Units 07 14.1 Width 08 in Units 09 7.1 Height 10 in Units 11 4.23 Gross Weight 12 lb Units
Description of Fields (Cont’d)
Field Data Description
SizeIt 2.0 Options Screen
SizeIt 2.0 Record Screen
52
13 5.83 Dim Weight 1 14 194.0 Dim Factor 1 15 6.81 Dim Weight 2 16 166.0 Dim Factor 2 17 6.55 Dim Weight 3 18 172.8 Dim Factor 3 19 8.20 Dim Weight 4 20 138.0 Dim Factor 4 21 08936976 Scan Code (Bar Code) 22 ExpressCube Tag
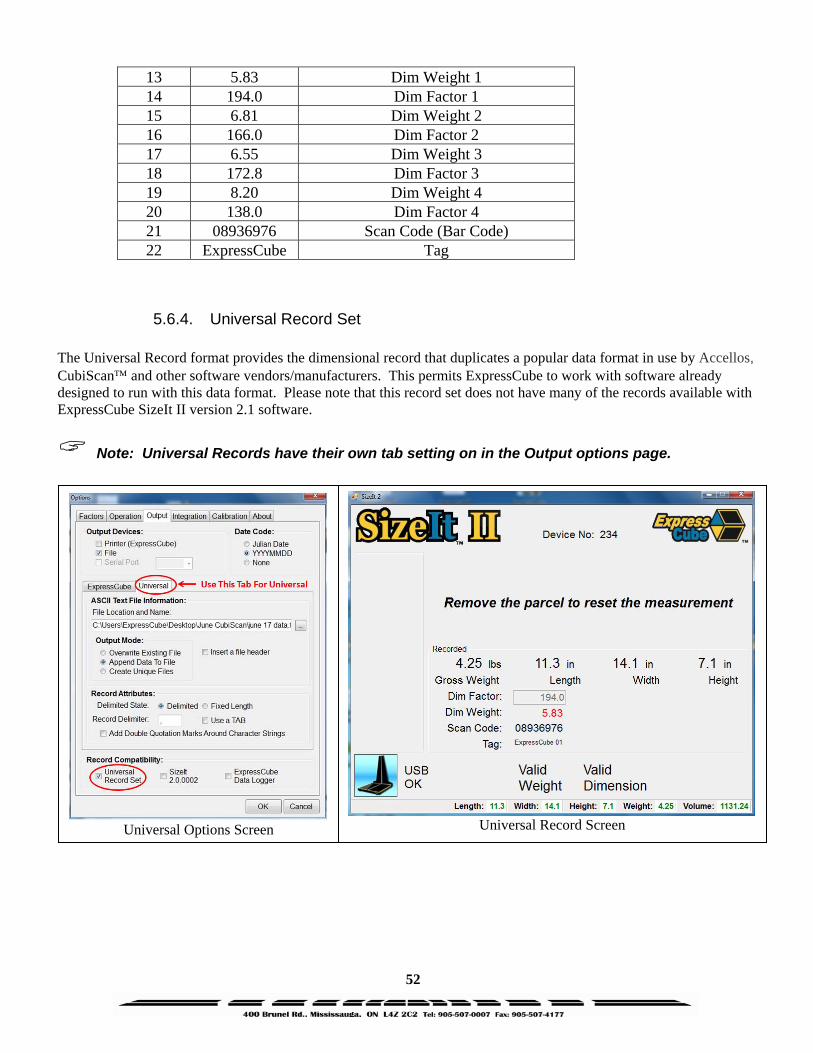
5.6.4. Universal Record Set The Universal Record format provides the dimensional record that duplicates a popular data format in use by Accellos, CubiScan™ and other software vendors/manufacturers. This permits ExpressCube to work with software already designed to run with this data format. Please note that this record set does not have many of the records available with ExpressCube SizeIt II version 2.1 software.
Note: Universal Records have their own tab setting on in the Output options page.
Universal Options Screen
Universal Record Screen

53
Sample Output (Delimited): 08936976,11.3,14.1,7.1,in,4.250,lb,1131.243,in,5.830,194.0,234,11:47:09 PM,06/23/13,ExpressCube 01,ExpressCube 02,ExpressCube 03,ExpressCube 04,ExpressCube 05,ExpressCube 06 Description of Fields
Field Data Description Fixed Length* 01 08936976 Item Number 20 02 11.3 Length 20 03 14.1 Width 20 04 7.1 Height 20 05 in Dim Unit 2 06 4.250 Weight 20 07 lb Weight Unit 2 08 1131.243 Volume 20 09 in Volume Unit 2 10 5.830 Dim Weight 20 11 194.0 Dim Factor 11 12 234 ExpressCube ID 6 13 11:47:09 PM Record Time 13 14 06/23/13 Record Date 11 15 ExpressCube 01 User Field 1 20 16 ExpressCube 02 User Field 2 20 17 ExpressCube 03 User Field 3 20 18 ExpressCube 04 User Field 4 20 19 ExpressCube 05 User Field 5 20 20 ExpressCube 06 User Field 6 20
*Fixed Length: This is an Record Attribute selection available in : Options -> Output-> Universal -> Record Attributes Delimited or Fixed Length Fixed length records consist of fields fixed quantity of characters (as described above) without delimiters. Data fields are padded with leading blanks to the required fixed length and characters are padded with trailing blanks to the required fixed length.
54
6. Appendix 1: Dimensional Weight & DIM FACTOR
6.1. The Importance of Volume and Weight of Cargo for Transportation
All cargo space involved in transporting goods has physical limits based on the volume of the cargo and the weight. Once a cargo has reached a limit in either volume or weight – the container (trailer, train, plane or shipping container) is transported. Weight has traditionally been the measurement which the transportation costs of individual packaged freight has been calculated. The difference in weight and volume costs can be appreciated if one considered the expense of transporting a large volume with little weight (e.g. large boxes of Styrofoam drinking cups). Transportation companies have recognized these variables and most have allocated a volume per weight standard in their billing to capture cargo of light density.
6.2. Dimensional (Volume) Weight The dimensional weight (also known as volume weight) is the minimum weight that a package a given size may have that is handled by a carrier. A carrier may state that any package of one cubic foot (12”x12”x12”) will have a minimum weight allowance of 10 pounds. If the cubic foot package actually weighs 8 pounds – it will be invoiced for 10 pounds. This is a minimum weight allowance – if the cubic foot package weighs 12 pounds – the charges will be based on 12 pounds.
There are no international or domestic standards concerning values of dimensional weight. A significant number of courier companies use the dimensional weight standard set by the International Air Transport Association (IATA) but many define their own dimensional weights. The value of dimensional weights will probably change as the nature of shipments change over time. Organizations such as the International Air Transport Association (IATA) have produced studies that suggest the density of packaging is changing as the commodities become more high tech. As a result the IATA itself has already passed a resolution (Resolution 501) to change the IATA dimensional weight.
55
6.3. DIM Factor (Dimensional Weight Factor)
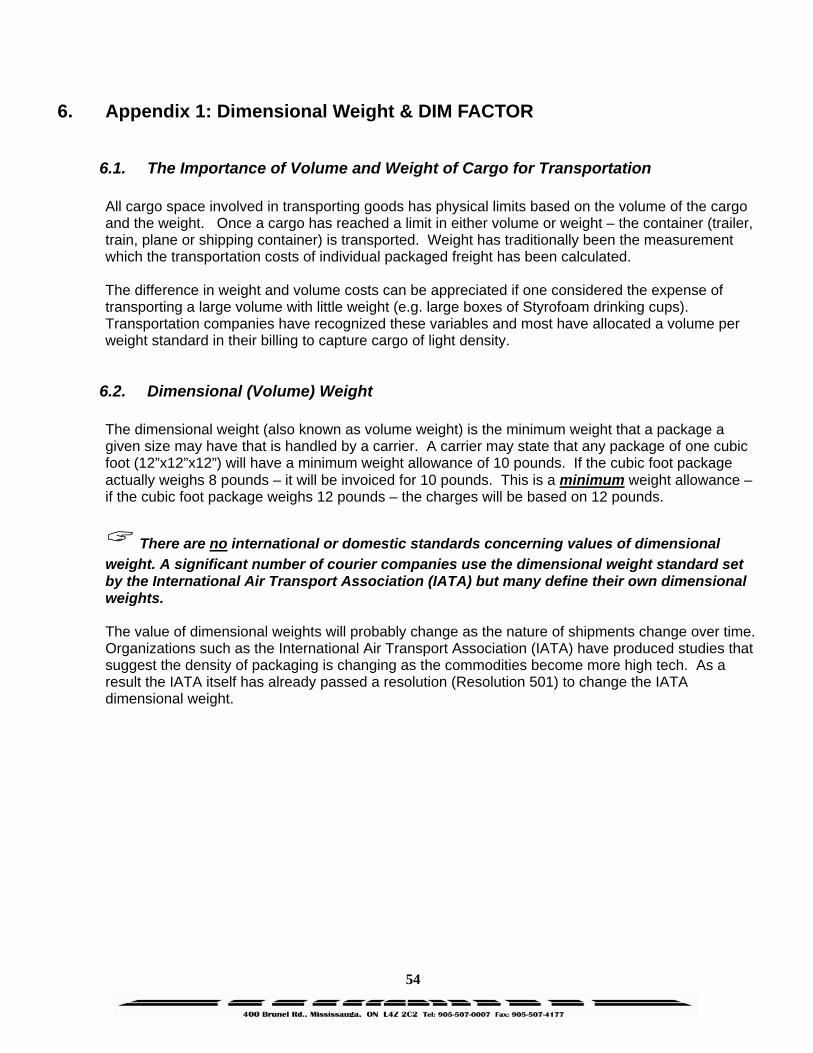
The DIM factor is a mathematical factor used to calculate the dimensional weight of an object. The DIM factor represents the volume of a package allowed per unit of weight. Although mathematically related, the DIM factor is different for measurements in units of inches/pounds and for measurements in centimeters/ kilograms. All major courier companies now apply the DIM Factor to every cuboidal (rectangular/ square) parcel that they handle to determine the dimensional weight. They then adjust customer invoicing to reflect charges based on the greater weight between actual weight and dimensional weight. Finding a DIM Factor using in/lb Find the DIM factor if each cubic foot (12”x12”x12”) has a minimum weight allowance of 10 pounds:
1 cu ft 12”x12”x12” 1728 in3 172.8 in3/lb 10 lbs 10 lbs 10 lbs Finding a DIM Factor using cm/kg Find DIM factor if each cubic meter (100cm x 100cm x 100cm) has a minimum weight allowance of 200 kg:
1 m3 100cm x100cm x100cm 1000000 cm3 5000 cm3/kg 200 kg 200 kg 200 kg
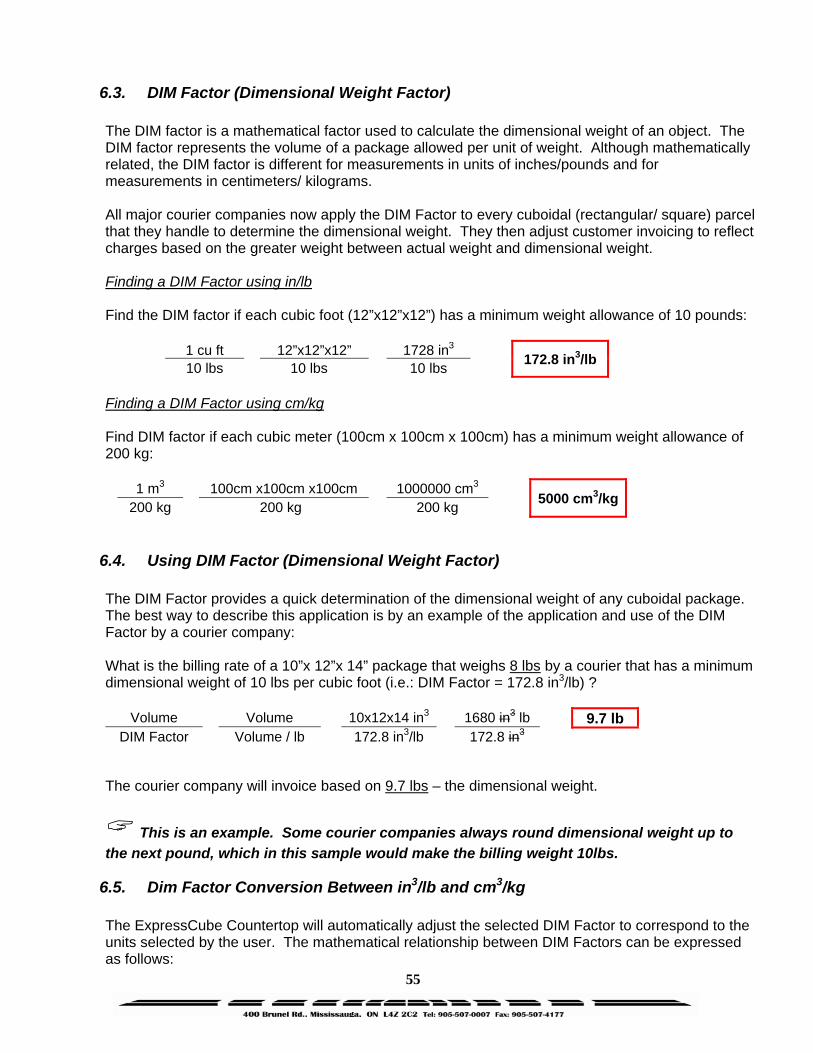
6.4. Using DIM Factor (Dimensional Weight Factor) The DIM Factor provides a quick determination of the dimensional weight of any cuboidal package. The best way to describe this application is by an example of the application and use of the DIM Factor by a courier company: What is the billing rate of a 10”x 12”x 14” package that weighs 8 lbs by a courier that has a minimum dimensional weight of 10 lbs per cubic foot (i.e.: DIM Factor = 172.8 in3/lb) ?
Volume Volume 10x12x14 in3 1680 in3 lb 9.7 lb DIM Factor Volume / lb
172.8 in3/lb 172.8 in3
The courier company will invoice based on 9.7 lbs – the dimensional weight.
This is an example. Some courier companies always round dimensional weight up to the next pound, which in this sample would make the billing weight 10lbs.
6.5. Dim Factor Conversion Between in3/lb and cm3/kg
The ExpressCube Countertop will automatically adjust the selected DIM Factor to correspond to the units selected by the user. The mathematical relationship between DIM Factors can be expressed as follows:
56
Dim Factor [cm3/kg] = Dim Factor [in3/lb] x 36.12728079
Dim Factor [in3/lb] = Dim Factor [cm3/kg] x 0.027679913
Some DIM Factors maybe provided in both units such as the IATA value of Dim Factor 166 in3/lb or Dim Factor 6000 cm3/kg. These have been slightly modified for ease of application. The ExpressCube countertop will correctly convert a user-selected input of Dim Factor 166 in3/lb to Dim Factor 5997 cm3/kg. This 0.05% difference is not large enough to affect dimensional weight readings. The user can input another DIM Factor of 6000 cm3/kg if desired and choose from two different Dim Factor selections depending on the units selected.
57
7. Appendix 3: ExpressCube Tips and Techniques
7.1. Dimensional Weight
Virtually every courier company is now calculating an allowable (dimensional) weight for the size of the package that you are shipping. If your dimensional weight exceeds the actual weight, you will be charged based on the dimensional weight1. It is important that you understand how dimensioning equipment works, how your courier company determines the dimensional weight and the impact of proper packaging to minimize shipping costs. 1 For a detailed description of the mathematics of dimensional weight and DIM factors, read Understanding Dimensional Weight and DIM FACTORS included in your ExpressCube Operators Guide or obtain a free copy from the ExpressCube website ( www.expresscube.com )
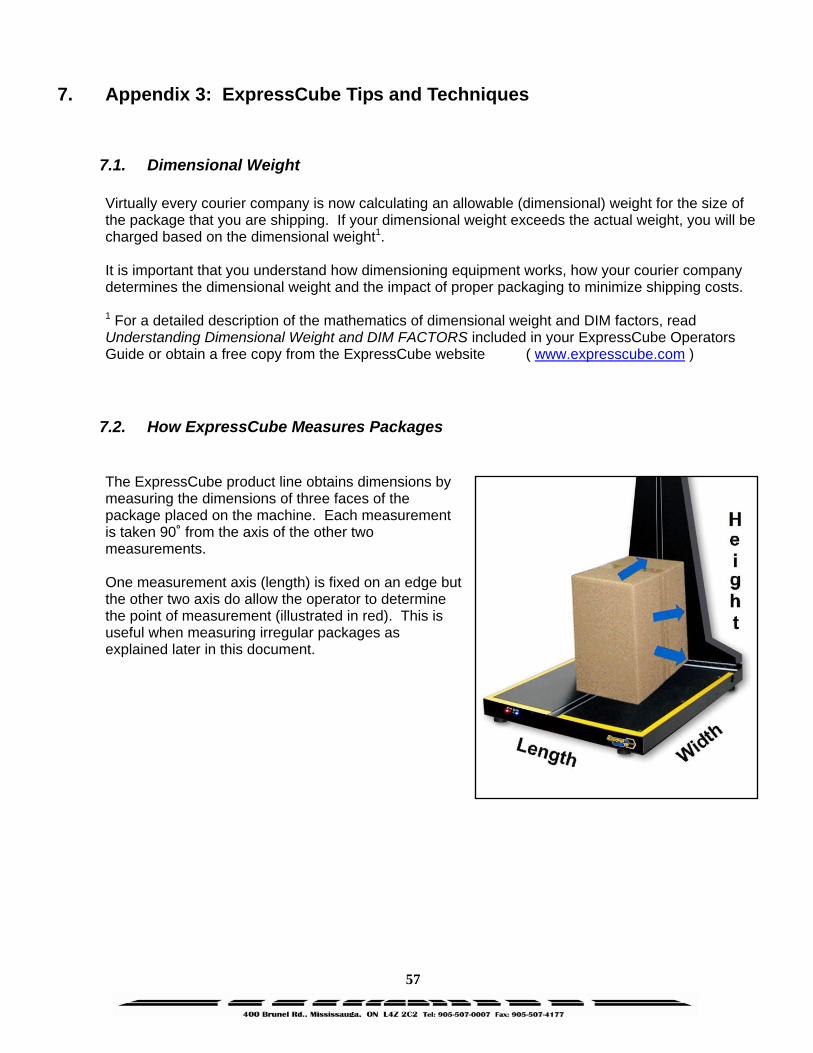
7.2. How ExpressCube Measures Packages The ExpressCube product line obtains dimensions by measuring the dimensions of three faces of the package placed on the machine. Each measurement is taken 90˚ from the axis of the other two measurements. One measurement axis (length) is fixed on an edge but the other two axis do allow the operator to determine the point of measurement (illustrated in red). This is useful when measuring irregular packages as explained later in this document.
58
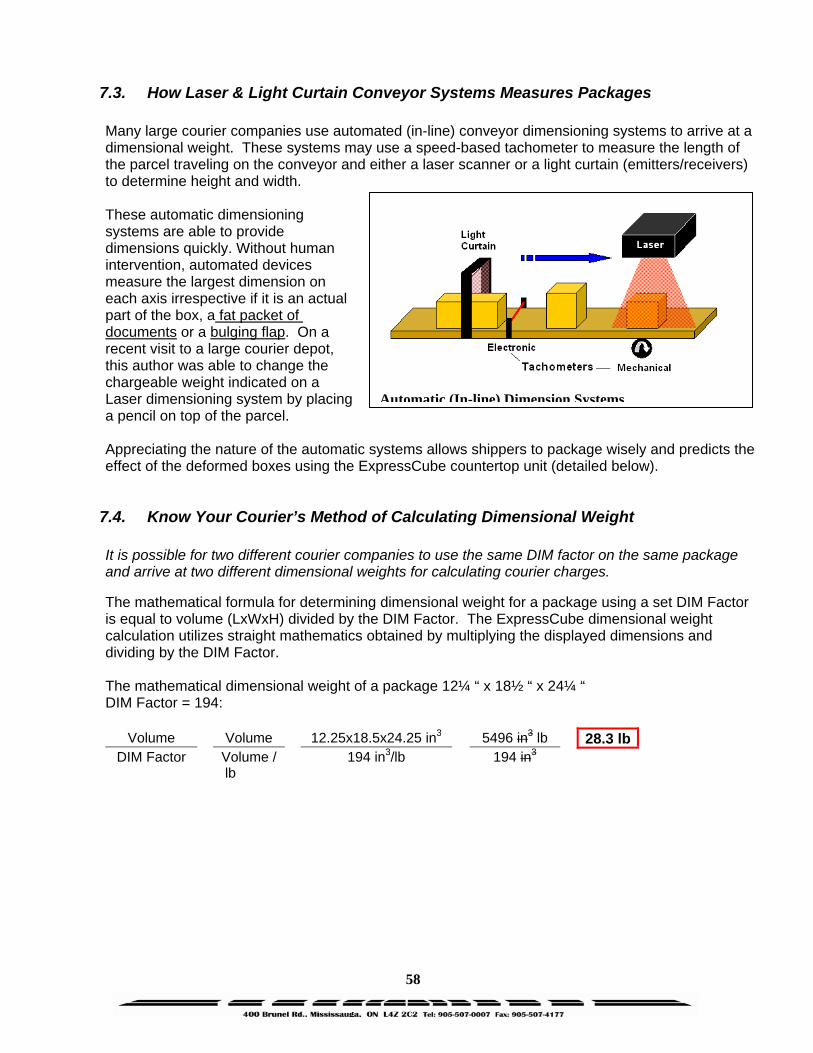
7.3. How Laser & Light Curtain Conveyor Systems Measures Packages
Many large courier companies use automated (in-line) conveyor dimensioning systems to arrive at a dimensional weight. These systems may use a speed-based tachometer to measure the length of the parcel traveling on the conveyor and either a laser scanner or a light curtain (emitters/receivers) to determine height and width. These automatic dimensioning systems are able to provide dimensions quickly. Without human intervention, automated devices measure the largest dimension on each axis irrespective if it is an actual part of the box, a fat packet of documents or a bulging flap. On a recent visit to a large courier depot, this author was able to change the chargeable weight indicated on a Laser dimensioning system by placing a pencil on top of the parcel. Appreciating the nature of the automatic systems allows shippers to package wisely and predicts the effect of the deformed boxes using the ExpressCube countertop unit (detailed below).
7.4. Know Your Courier’s Method of Calculating Dimensional Weight
It is possible for two different courier companies to use the same DIM factor on the same package and arrive at two different dimensional weights for calculating courier charges. The mathematical formula for determining dimensional weight for a package using a set DIM Factor is equal to volume (LxWxH) divided by the DIM Factor. The ExpressCube dimensional weight calculation utilizes straight mathematics obtained by multiplying the displayed dimensions and dividing by the DIM Factor. The mathematical dimensional weight of a package 12¼ “ x 18½ “ x 24¼ “ DIM Factor = 194:
Volume Volume 12.25x18.5x24.25 in3 5496 in3 lb 28.3 lb DIM Factor Volume /
lb 194 in3/lb 194 in3
Automatic (In-line) Dimension Systems

59
There are some courier companies that round up measurements before they are used in calculations. This can have a significant cost impact, particularly on smaller packages. These courier companies would calculate the dimensional weight as follows: The rounding up method to calculate dimensional weight of a package 13 (12¼) “ x 19 (18½) “ x 25 (24¼) “ DIM Factor = 194:
Volume Volume 13x19x25 in3 6175 in3 lb 31.8 lb DIM Factor Volume / lb
194 in3/lb 194 in3
In this example, subtle differences currently in use by two major couriers to calculate the dimensional weight of the same package would result in one charge based on 28.3 lb and another charge based on 31.8 lb.
7.5. Minimizing Package Size Long gone are the days when a small item is thrown in an oversized carton and then surrounded in foam chips. It is possible to quickly surpass the value of the protected item with excessive shipping cost if a careful analysis is not used to determine the appropriate insulation required to protect an item. While it is important to keep the size of the carton to a minimum, it is also important to find boxes that fit the item to be shipped properly. If an irregular item is presented to most courier companies, they will calculate the dimensional weight based on ‘the minimum dimensions of a carton that would contain the irregular package’. Loosely translated, the maximum measurements obtained by the automatic dimensioning systems will be used to determine the dimensional weight for invoicing.
These actual photos illustrate how sloppy packaging can incur extra shipping costs from dimensional weight. If the item pictured in the left photo was placed flat in a fitted box there could have been a 35% savings in shipping costs. Furthermore, irregular packaging is harder to handle and store making it much more vulnerable to damage.
Courtesy Cardinal Couriers
Courtesy Cardinal Couriers
Additional Samples of actual shipped irregular packages
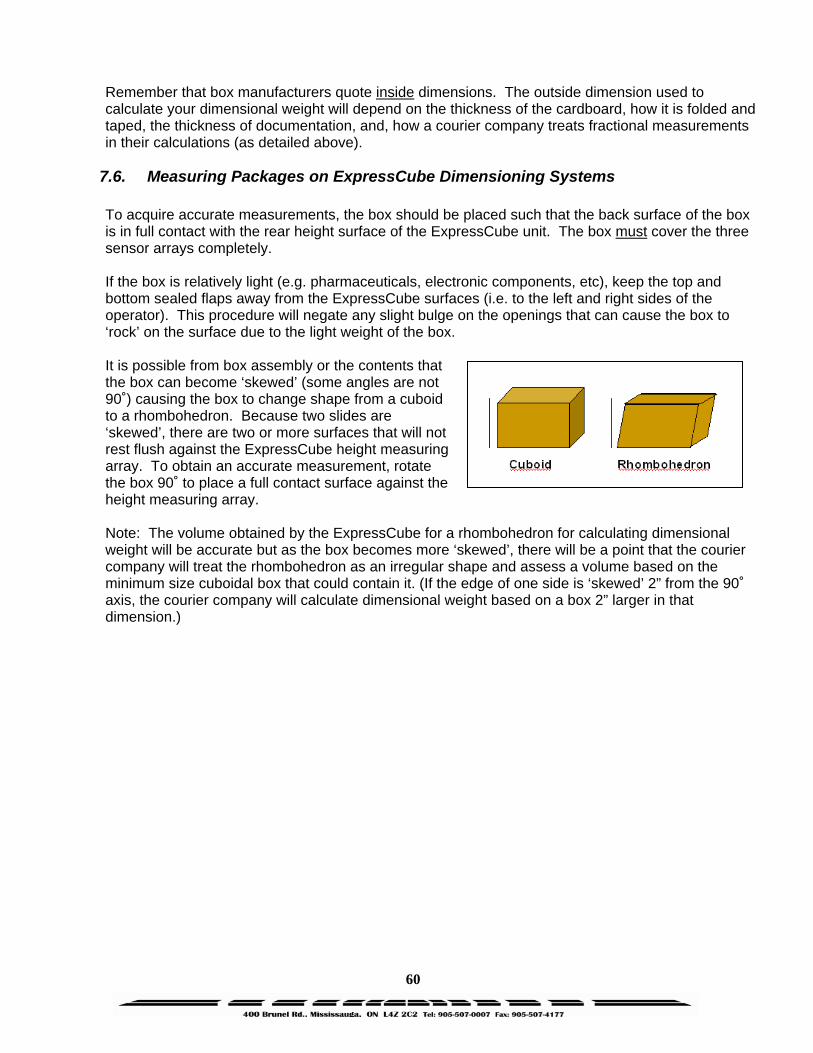
60
Remember that box manufacturers quote inside dimensions. The outside dimension used to calculate your dimensional weight will depend on the thickness of the cardboard, how it is folded and taped, the thickness of documentation, and, how a courier company treats fractional measurements in their calculations (as detailed above).
7.6. Measuring Packages on ExpressCube Dimensioning Systems
To acquire accurate measurements, the box should be placed such that the back surface of the box is in full contact with the rear height surface of the ExpressCube unit. The box must cover the three sensor arrays completely. If the box is relatively light (e.g. pharmaceuticals, electronic components, etc), keep the top and bottom sealed flaps away from the ExpressCube surfaces (i.e. to the left and right sides of the operator). This procedure will negate any slight bulge on the openings that can cause the box to ‘rock’ on the surface due to the light weight of the box. It is possible from box assembly or the contents that the box can become ‘skewed’ (some angles are not 90˚) causing the box to change shape from a cuboid to a rhombohedron. Because two slides are ‘skewed’, there are two or more surfaces that will not rest flush against the ExpressCube height measuring array. To obtain an accurate measurement, rotate the box 90˚ to place a full contact surface against the height measuring array. Note: The volume obtained by the ExpressCube for a rhombohedron for calculating dimensional weight will be accurate but as the box becomes more ‘skewed’, there will be a point that the courier company will treat the rhombohedron as an irregular shape and assess a volume based on the minimum size cuboidal box that could contain it. (If the edge of one side is ‘skewed’ 2” from the 90˚ axis, the courier company will calculate dimensional weight based on a box 2” larger in that dimension.)
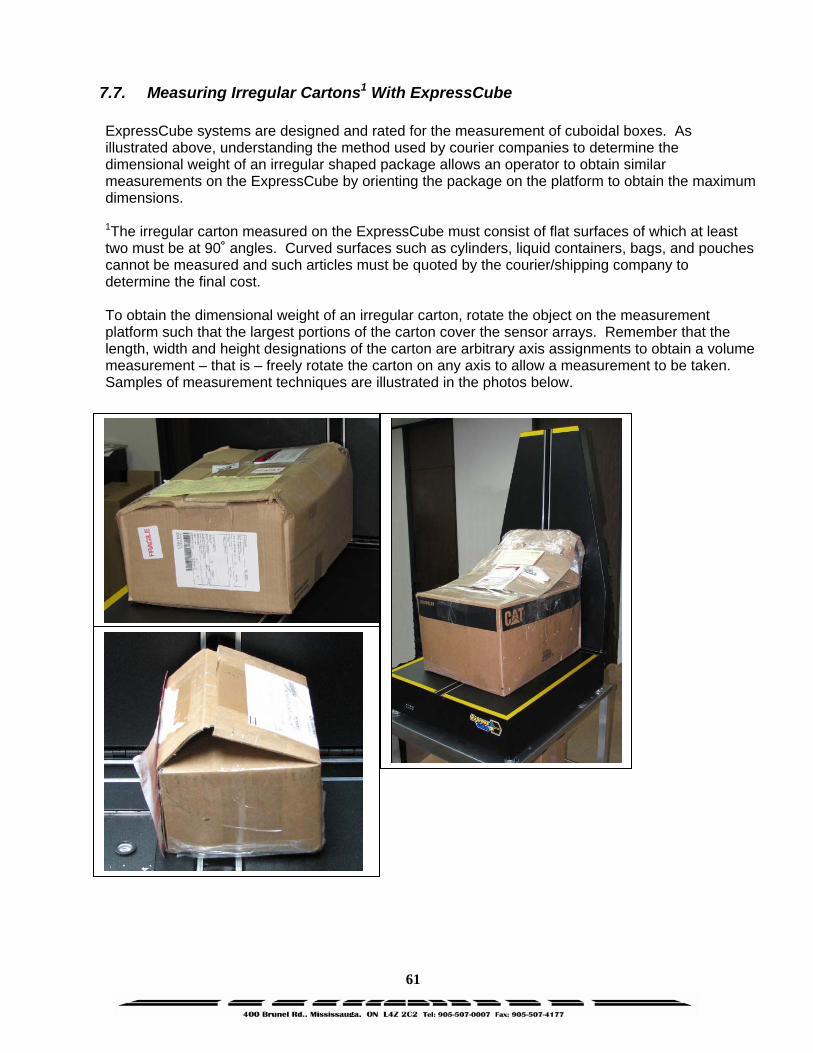
61
7.7. Measuring Irregular Cartons1 With ExpressCube
ExpressCube systems are designed and rated for the measurement of cuboidal boxes. As illustrated above, understanding the method used by courier companies to determine the dimensional weight of an irregular shaped package allows an operator to obtain similar measurements on the ExpressCube by orienting the package on the platform to obtain the maximum dimensions.
1The irregular carton measured on the ExpressCube must consist of flat surfaces of which at least two must be at 90˚ angles. Curved surfaces such as cylinders, liquid containers, bags, and pouches cannot be measured and such articles must be quoted by the courier/shipping company to determine the final cost.
To obtain the dimensional weight of an irregular carton, rotate the object on the measurement platform such that the largest portions of the carton cover the sensor arrays. Remember that the length, width and height designations of the carton are arbitrary axis assignments to obtain a volume measurement – that is – freely rotate the carton on any axis to allow a measurement to be taken. Samples of measurement techniques are illustrated in the photos below.
62
Points Summary
• Dimensional Weight calculations using identical measurements can vary with different carriers. Check with each carrier for calculation method.
• Carton dimensions quoted by manufacturers describe the inside dimensions. The
dimensions used by carriers will depend on package thickness, etc.
• Automatic (in-line) dimensioning systems generally measure the largest dimension in a direction including packaged invoices, tape bulges, skewed shapes, etc.
• Use proper fitting cartons to minimize dimensional weight and avoid damage.
• ExpressCube systems can be used to measure maximum dimensions on most
irregular cartons by rotation and placement location on the measuring surface. (See detailed description above).