Embed Size (px)
Citation preview
www.CoxBusiness.com
Property of Cox Communications, Inc. Version 1.0
Page 1 of 23
August 31th, 2012
SIP Trunking using the
EdgeMarc Network Services
Gateway and the
Mitel 5000 v5.1 IP-PBX
© 2013, Cox Communications, Inc. All rights reserved.
This documentation is the confidential and proprietary intellectual property of Cox Communications, Inc. Any unauthorized use, reproduction, preparation of derivative works,

www.CoxBusiness.com
Property of Cox Communications, Inc. Version 1.0
Page 2 of 23
Table of Contents
Overview…………………………………………………………………………………………. 3 Prerequisites…………………………………………………………………………………….. 3 Network Topology……………………………………………………………………………… 4 Description of Basic Operation and Call Flows…………………………………………… 5 Mitel PBX Configuration………………………………………………………………………. 5 System Connection.…………………………………………………………………………..6-7 Time Zone.…………………………………………………………………………….…………. 8 Software License.………………………………………………………………………………. 9 Create SIP Trunk Group.………………………………………………………………………10 SIP Trunk Parameters...……………….………………………………………………………11 Registrar…………………………………………………………………………………………12 Authentication.………………………………………………………………………………….13 Call Configurations.……………………………...…………………………………………….14 Trunk Group Configuration……….………………………………………………………….15 System Controller………..…………………………………………………………………….16 Starting Extension.…………………………………………………………………………….17 Day/Night Ring-In Type..………………………………………………………………………18 Call Routing Tables…………………………………………………………………………….19 Feature Codes….……………………………………………………………………………….20 Associated Extensions……….……………………………………………………………….21 Calling Party Name/Number………………………………………………………………….22 Flags…..………………………………………………………………………………………….23
www.CoxBusiness.com
Property of Cox Communications, Inc. Version 1.0
Page 3 of 23
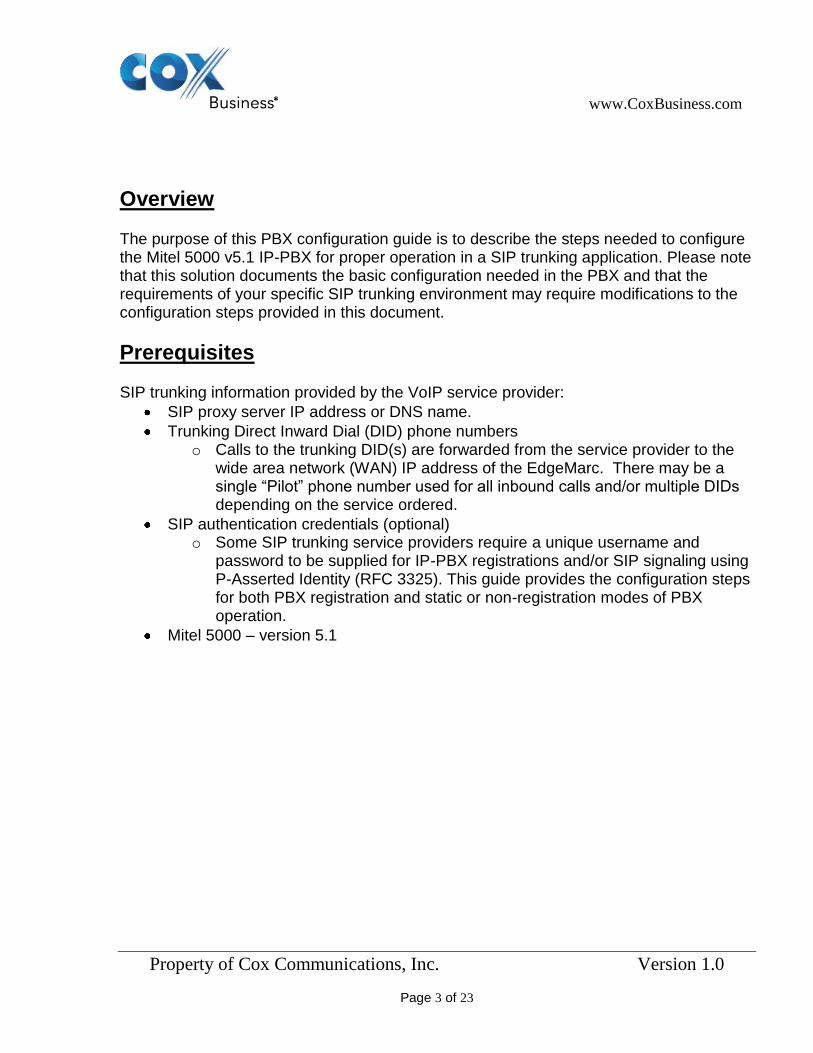
Overview
The purpose of this PBX configuration guide is to describe the steps needed to configure the Mitel 5000 v5.1 IP-PBX for proper operation in a SIP trunking application. Please note that this solution documents the basic configuration needed in the PBX and that the requirements of your specific SIP trunking environment may require modifications to the configuration steps provided in this document.
Prerequisites
SIP trunking information provided by the VoIP service provider:
SIP proxy server IP address or DNS name.
Trunking Direct Inward Dial (DID) phone numbers o Calls to the trunking DID(s) are forwarded from the service provider to the
wide area network (WAN) IP address of the EdgeMarc. There may be a single “Pilot” phone number used for all inbound calls and/or multiple DIDs depending on the service ordered.
SIP authentication credentials (optional) o Some SIP trunking service providers require a unique username and
password to be supplied for IP-PBX registrations and/or SIP signaling using P-Asserted Identity (RFC 3325). This guide provides the configuration steps for both PBX registration and static or non-registration modes of PBX operation.
Mitel 5000 – version 5.1

www.CoxBusiness.com
Property of Cox Communications, Inc. Version 1.0
Page 4 of 23
Network Topology
The PBX in the above network topology represents the Mitel 5000 v5.1 that is connected via its LAN port to the LAN port of the EdgeMarc Network Services gateway. The PBX used in our lab comprises of the following:
Mitel 5000 v5.1 equipped with a Digital Desktop Module for digital phones.
2 Inter-Tel 8560 phones.
Table 1 – PBX Information
Manufacturer: Mitel
Model: Inter-Tel 5000
Software Version: v5.1 SP2
Does the PBX send SIP
Registration messages (Yes/No)? Yes
Vendor Contact: www.mitel.com
www.CoxBusiness.com
Property of Cox Communications, Inc. Version 1.0
Page 5 of 23
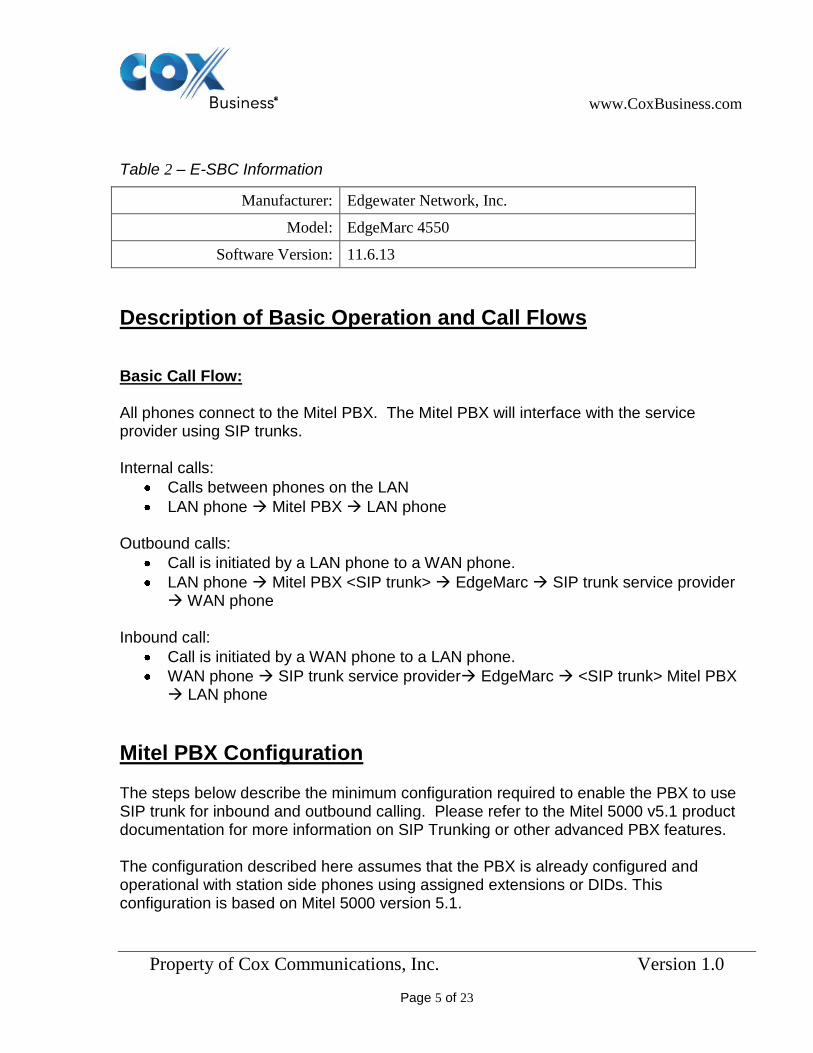
Table 2 – E-SBC Information
Manufacturer: Edgewater Network, Inc.
Model: EdgeMarc 4550
Software Version: 11.6.13
Description of Basic Operation and Call Flows
Basic Call Flow: All phones connect to the Mitel PBX. The Mitel PBX will interface with the service provider using SIP trunks. Internal calls:
Calls between phones on the LAN
LAN phone Mitel PBX LAN phone
Outbound calls:
Call is initiated by a LAN phone to a WAN phone.
LAN phone Mitel PBX <SIP trunk> EdgeMarc SIP trunk service provider WAN phone
Inbound call:
Call is initiated by a WAN phone to a LAN phone.
WAN phone SIP trunk service provider EdgeMarc <SIP trunk> Mitel PBX LAN phone
Mitel PBX Configuration
The steps below describe the minimum configuration required to enable the PBX to use SIP trunk for inbound and outbound calling. Please refer to the Mitel 5000 v5.1 product documentation for more information on SIP Trunking or other advanced PBX features. The configuration described here assumes that the PBX is already configured and operational with station side phones using assigned extensions or DIDs. This configuration is based on Mitel 5000 version 5.1.
www.CoxBusiness.com
Property of Cox Communications, Inc. Version 1.0
Page 6 of 23
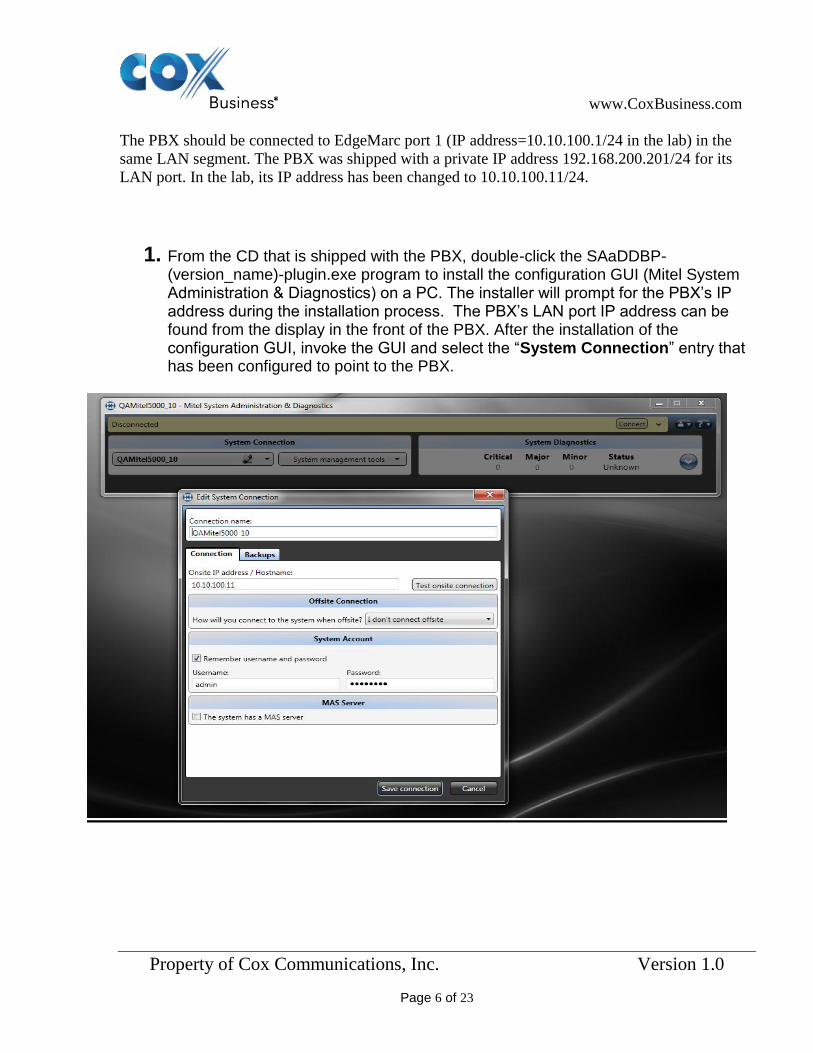
The PBX should be connected to EdgeMarc port 1 (IP address=10.10.100.1/24 in the lab) in the
same LAN segment. The PBX was shipped with a private IP address 192.168.200.201/24 for its
LAN port. In the lab, its IP address has been changed to 10.10.100.11/24.
1. From the CD that is shipped with the PBX, double-click the SAaDDBP-(version_name)-plugin.exe program to install the configuration GUI (Mitel System Administration & Diagnostics) on a PC. The installer will prompt for the PBX’s IP address during the installation process. The PBX’s LAN port IP address can be found from the display in the front of the PBX. After the installation of the configuration GUI, invoke the GUI and select the “System Connection” entry that has been configured to point to the PBX.
www.CoxBusiness.com
Property of Cox Communications, Inc. Version 1.0
Page 7 of 23
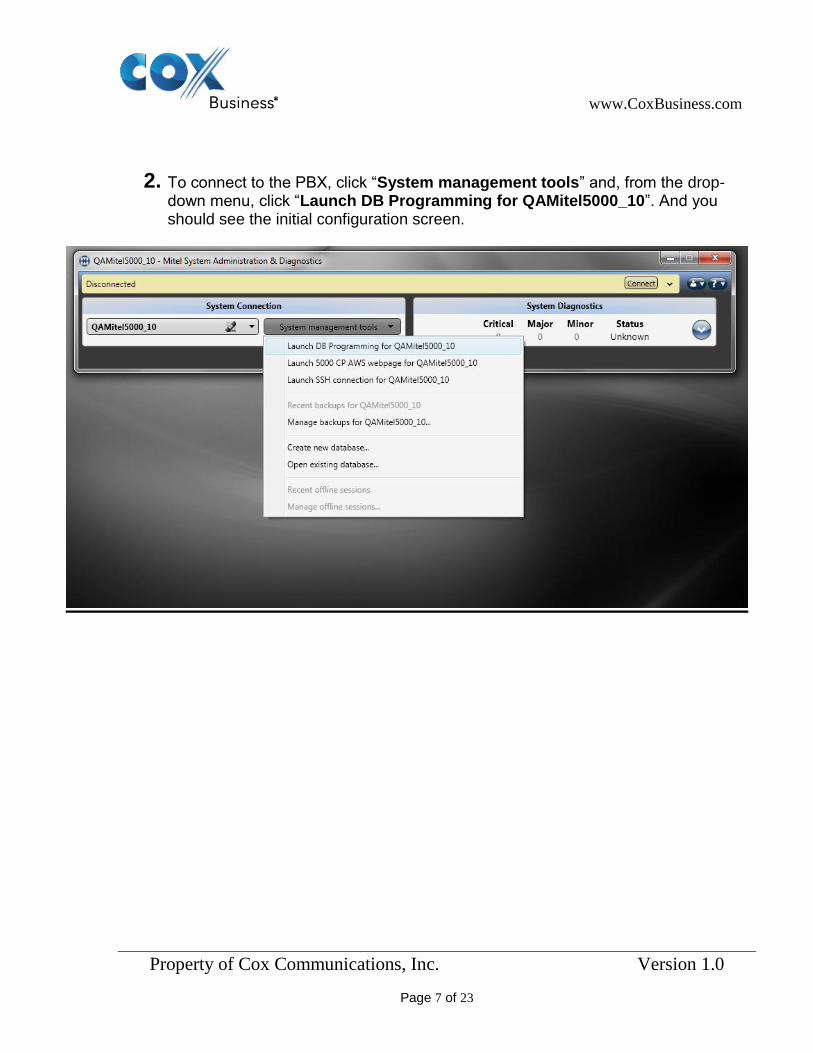
2. To connect to the PBX, click “System management tools” and, from the drop-down menu, click “Launch DB Programming for QAMitel5000_10”. And you should see the initial configuration screen.
www.CoxBusiness.com
Property of Cox Communications, Inc. Version 1.0
Page 8 of 23
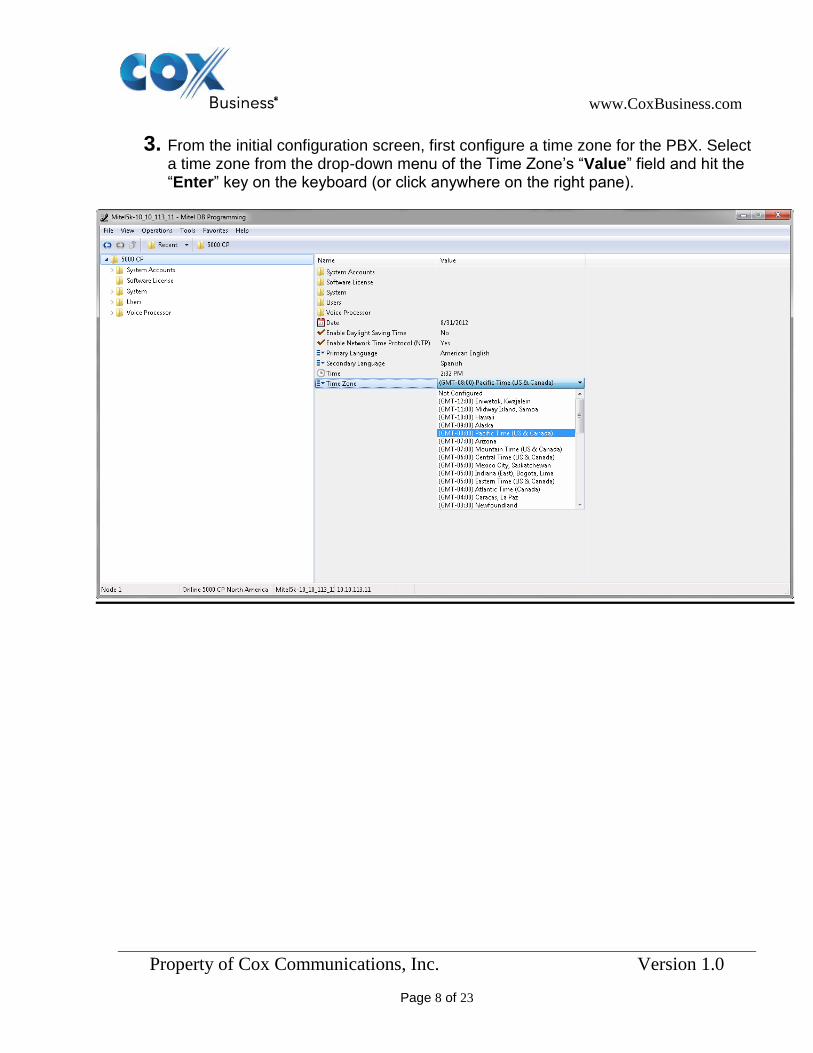
3. From the initial configuration screen, first configure a time zone for the PBX. Select a time zone from the drop-down menu of the Time Zone’s “Value” field and hit the “Enter” key on the keyboard (or click anywhere on the right pane).
www.CoxBusiness.com
Property of Cox Communications, Inc. Version 1.0
Page 9 of 23
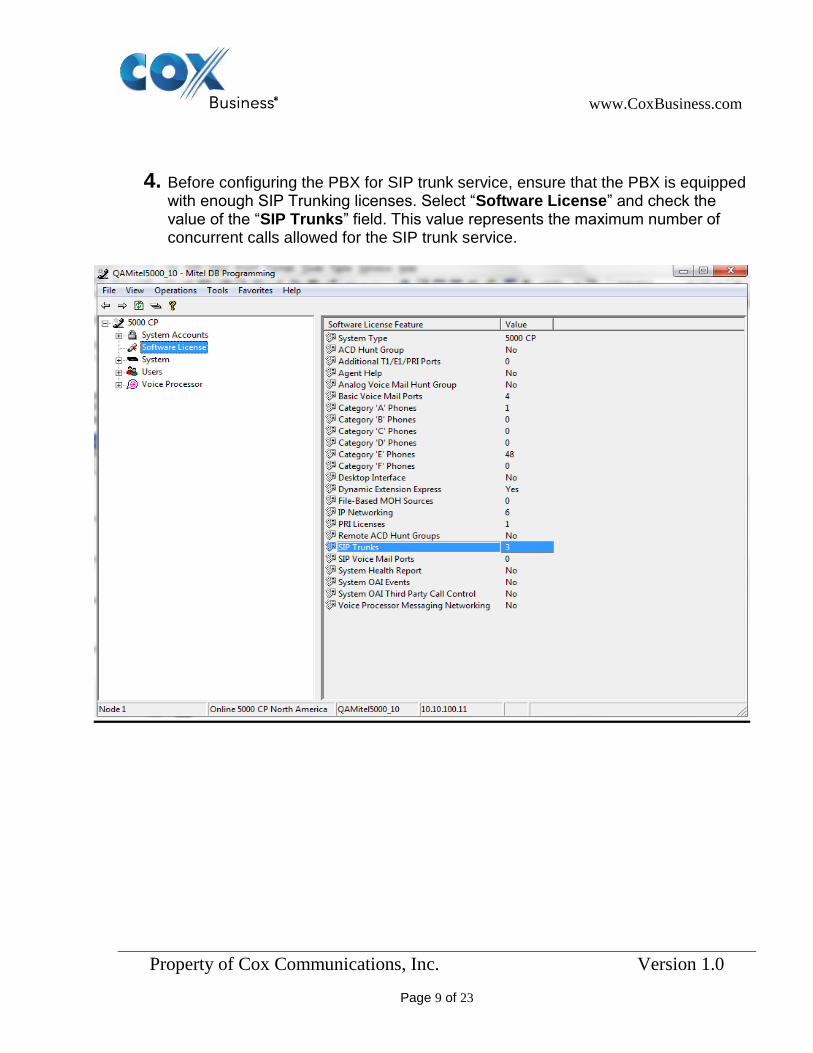
4. Before configuring the PBX for SIP trunk service, ensure that the PBX is equipped with enough SIP Trunking licenses. Select “Software License” and check the value of the “SIP Trunks” field. This value represents the maximum number of concurrent calls allowed for the SIP trunk service.
www.CoxBusiness.com
Property of Cox Communications, Inc. Version 1.0
Page 10 of 23
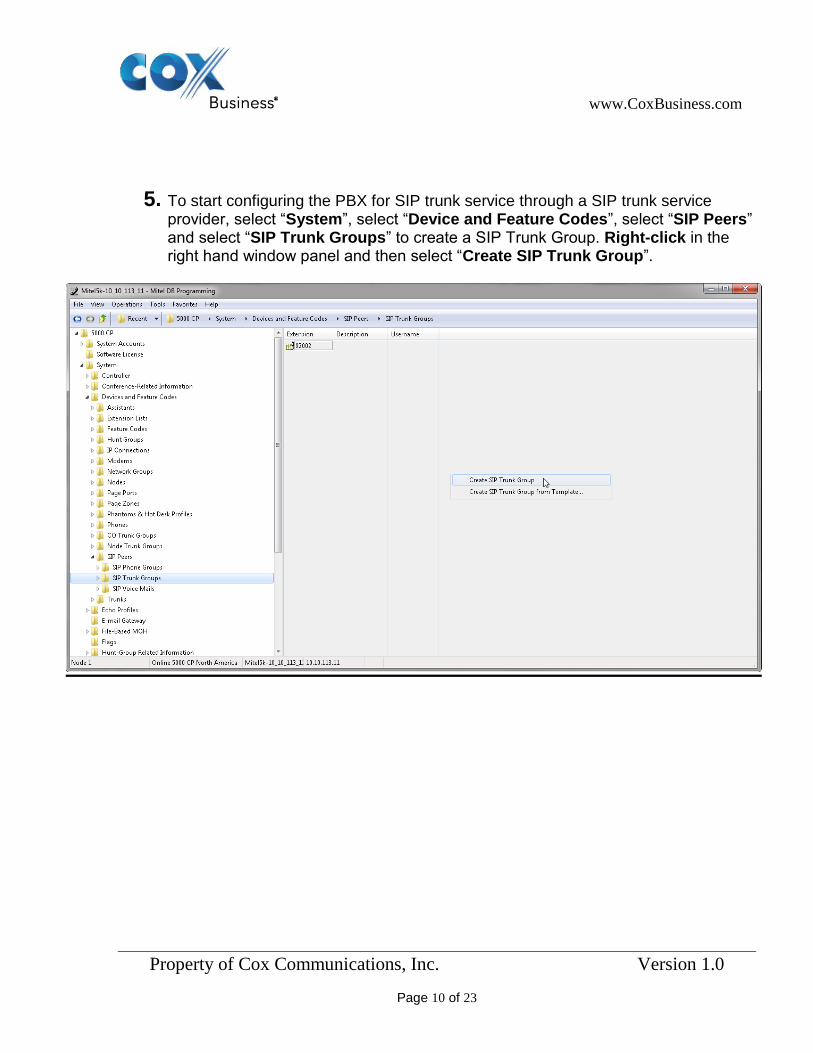
5. To start configuring the PBX for SIP trunk service through a SIP trunk service provider, select “System”, select “Device and Feature Codes”, select “SIP Peers” and select “SIP Trunk Groups” to create a SIP Trunk Group. Right-click in the right hand window panel and then select “Create SIP Trunk Group”.
www.CoxBusiness.com
Property of Cox Communications, Inc. Version 1.0
Page 11 of 23
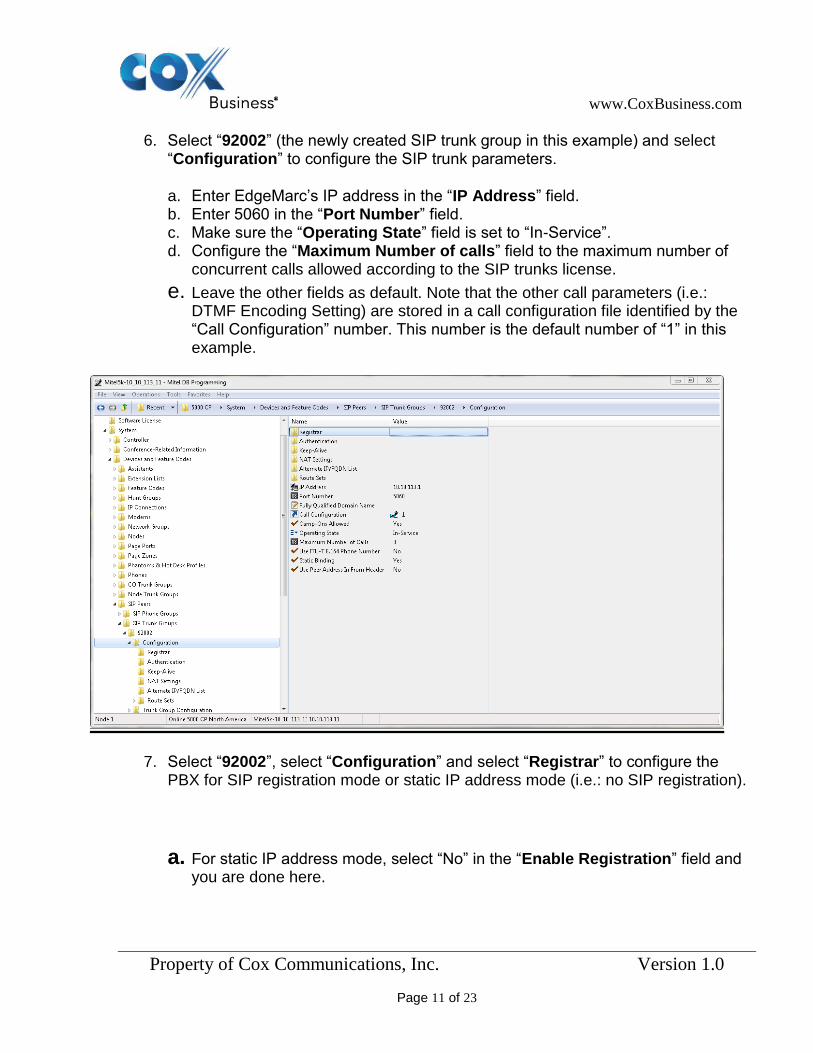
6. Select “92002” (the newly created SIP trunk group in this example) and select “Configuration” to configure the SIP trunk parameters.
a. Enter EdgeMarc’s IP address in the “IP Address” field. b. Enter 5060 in the “Port Number” field. c. Make sure the “Operating State” field is set to “In-Service”. d. Configure the “Maximum Number of calls” field to the maximum number of
concurrent calls allowed according to the SIP trunks license.
e. Leave the other fields as default. Note that the other call parameters (i.e.: DTMF Encoding Setting) are stored in a call configuration file identified by the “Call Configuration” number. This number is the default number of “1” in this example.
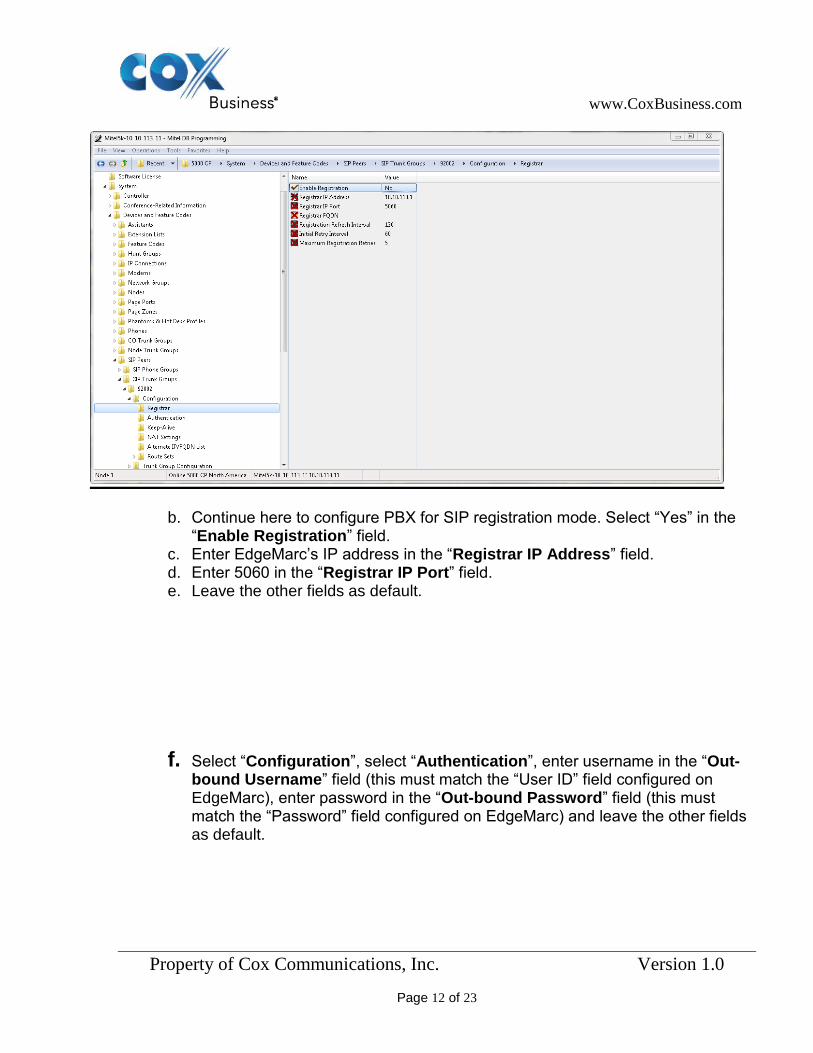
7. Select “92002”, select “Configuration” and select “Registrar” to configure the PBX for SIP registration mode or static IP address mode (i.e.: no SIP registration).
a. For static IP address mode, select “No” in the “Enable Registration” field and you are done here.
www.CoxBusiness.com
Property of Cox Communications, Inc. Version 1.0
Page 12 of 23
b. Continue here to configure PBX for SIP registration mode. Select “Yes” in the “Enable Registration” field.
c. Enter EdgeMarc’s IP address in the “Registrar IP Address” field. d. Enter 5060 in the “Registrar IP Port” field. e. Leave the other fields as default.
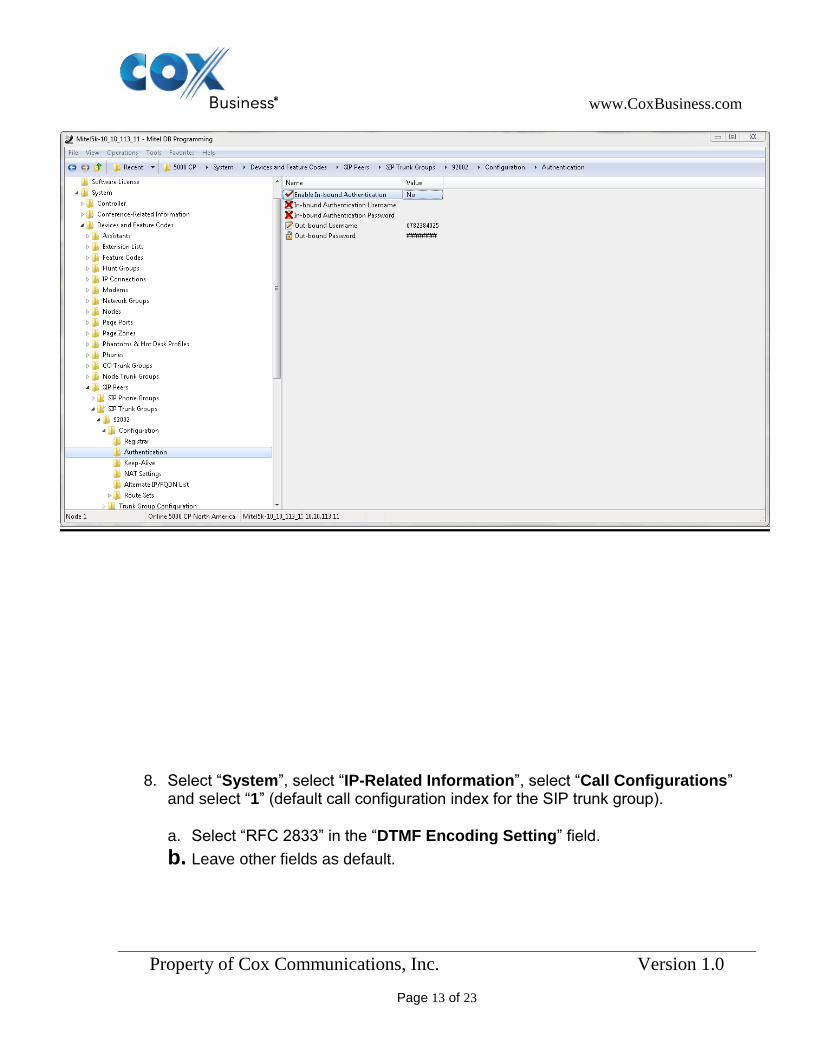
f. Select “Configuration”, select “Authentication”, enter username in the “Out-bound Username” field (this must match the “User ID” field configured on EdgeMarc), enter password in the “Out-bound Password” field (this must match the “Password” field configured on EdgeMarc) and leave the other fields as default.
www.CoxBusiness.com
Property of Cox Communications, Inc. Version 1.0
Page 13 of 23
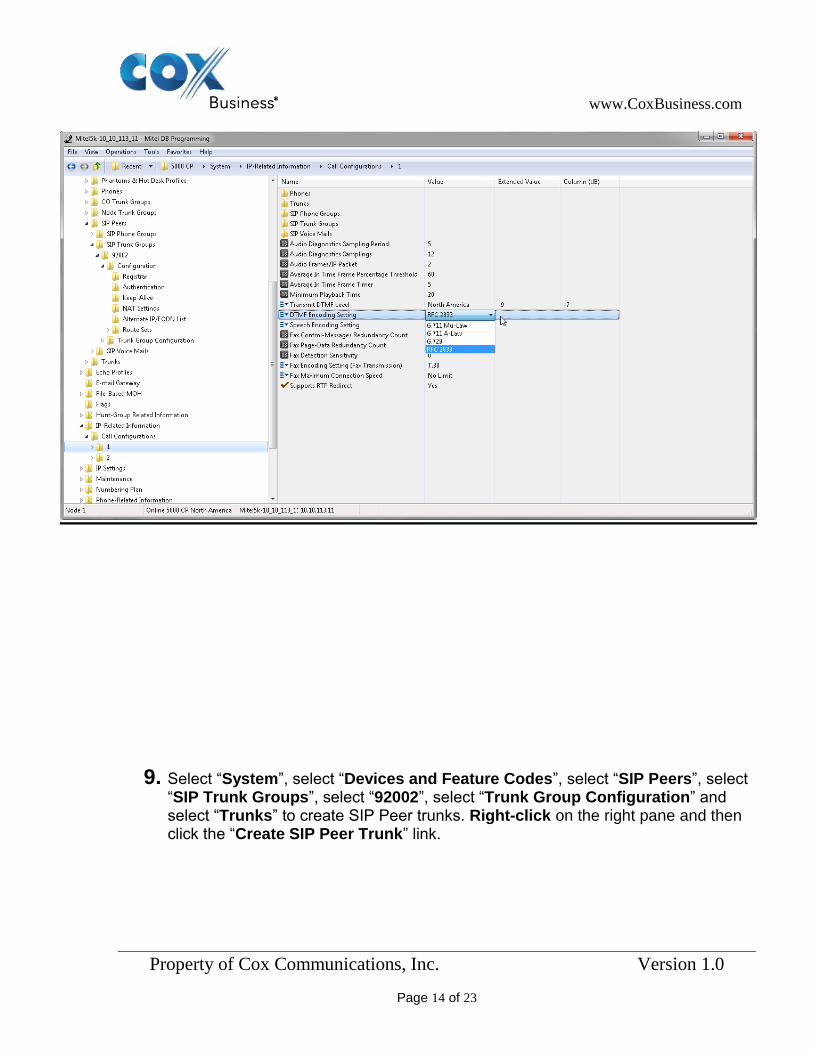
8. Select “System”, select “IP-Related Information”, select “Call Configurations” and select “1” (default call configuration index for the SIP trunk group).
a. Select “RFC 2833” in the “DTMF Encoding Setting” field.
b. Leave other fields as default.
www.CoxBusiness.com
Property of Cox Communications, Inc. Version 1.0
Page 14 of 23
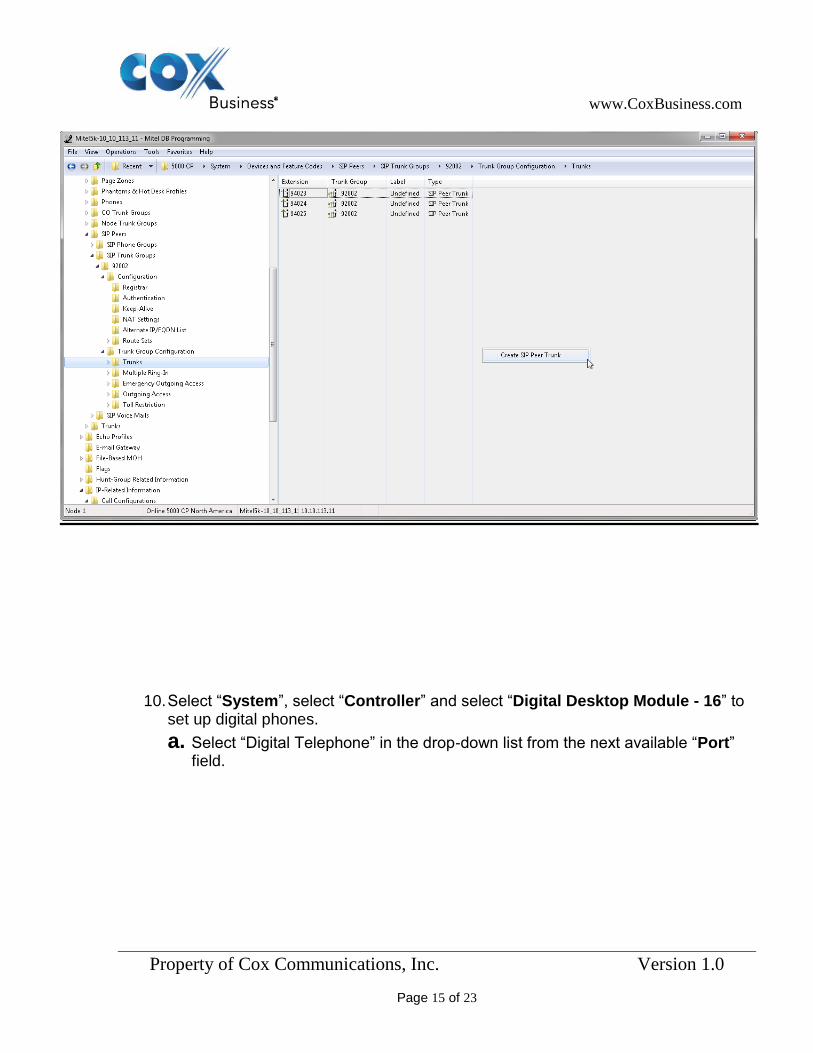
9. Select “System”, select “Devices and Feature Codes”, select “SIP Peers”, select “SIP Trunk Groups”, select “92002”, select “Trunk Group Configuration” and select “Trunks” to create SIP Peer trunks. Right-click on the right pane and then click the “Create SIP Peer Trunk” link.
www.CoxBusiness.com
Property of Cox Communications, Inc. Version 1.0
Page 15 of 23
10. Select “System”, select “Controller” and select “Digital Desktop Module - 16” to set up digital phones.
a. Select “Digital Telephone” in the drop-down list from the next available “Port” field.

www.CoxBusiness.com
Property of Cox Communications, Inc. Version 1.0
Page 16 of 23
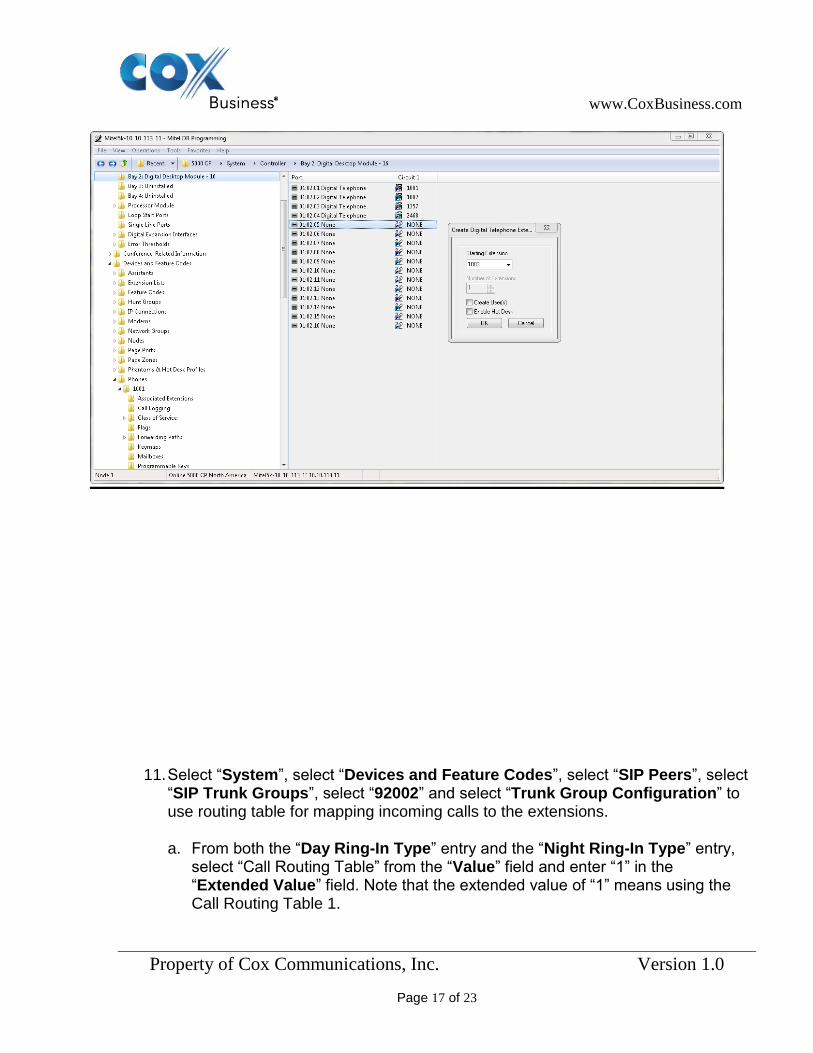
b. Click on the “Circuit 1” field, select the phone extension from the “Starting Extension” field of the pop-up box and click the “OK” button.
www.CoxBusiness.com
Property of Cox Communications, Inc. Version 1.0
Page 17 of 23
11. Select “System”, select “Devices and Feature Codes”, select “SIP Peers”, select “SIP Trunk Groups”, select “92002” and select “Trunk Group Configuration” to use routing table for mapping incoming calls to the extensions.
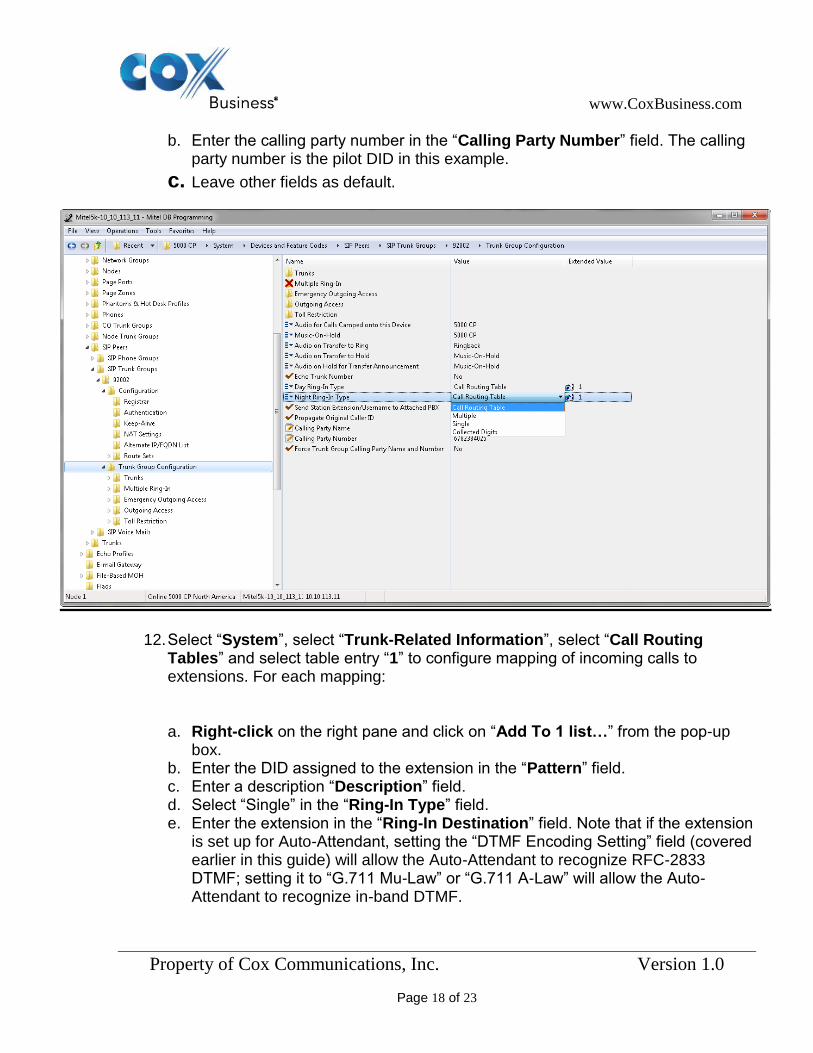
a. From both the “Day Ring-In Type” entry and the “Night Ring-In Type” entry, select “Call Routing Table” from the “Value” field and enter “1” in the “Extended Value” field. Note that the extended value of “1” means using the Call Routing Table 1.
www.CoxBusiness.com
Property of Cox Communications, Inc. Version 1.0
Page 18 of 23
b. Enter the calling party number in the “Calling Party Number” field. The calling party number is the pilot DID in this example.
c. Leave other fields as default.
12. Select “System”, select “Trunk-Related Information”, select “Call Routing Tables” and select table entry “1” to configure mapping of incoming calls to extensions. For each mapping:
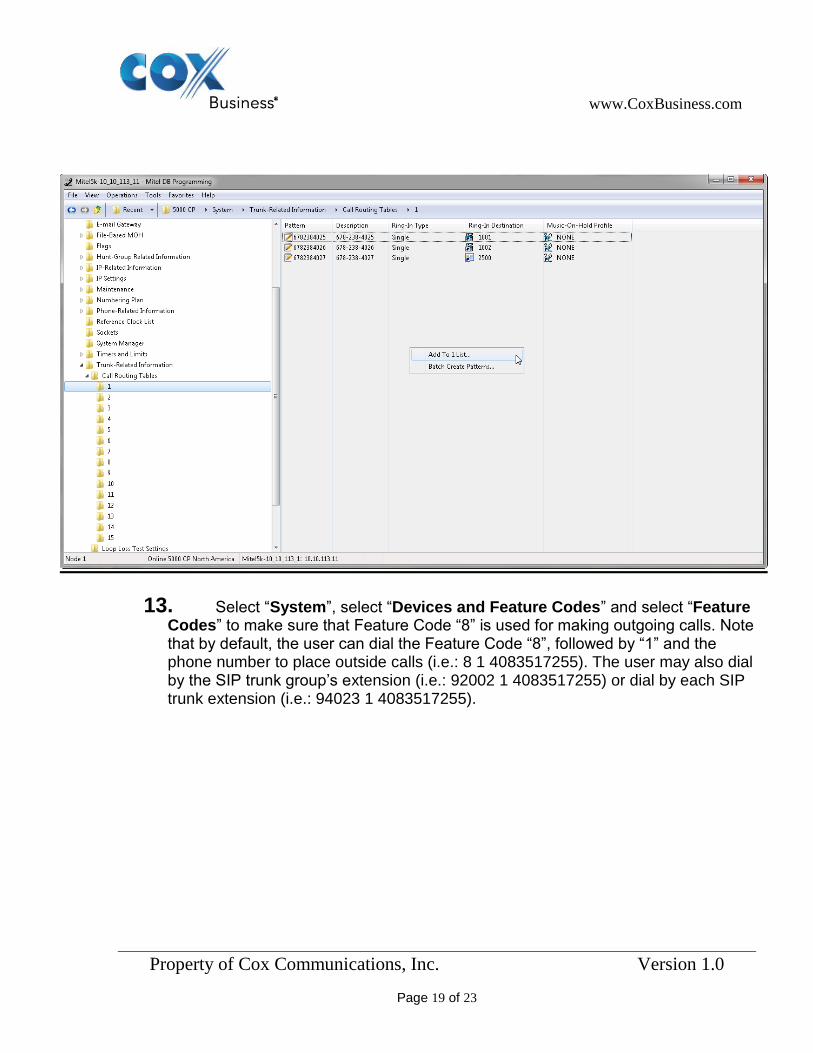
a. Right-click on the right pane and click on “Add To 1 list…” from the pop-up box.
b. Enter the DID assigned to the extension in the “Pattern” field. c. Enter a description “Description” field. d. Select “Single” in the “Ring-In Type” field. e. Enter the extension in the “Ring-In Destination” field. Note that if the extension
is set up for Auto-Attendant, setting the “DTMF Encoding Setting” field (covered earlier in this guide) will allow the Auto-Attendant to recognize RFC-2833 DTMF; setting it to “G.711 Mu-Law” or “G.711 A-Law” will allow the Auto-Attendant to recognize in-band DTMF.
www.CoxBusiness.com
Property of Cox Communications, Inc. Version 1.0
Page 19 of 23
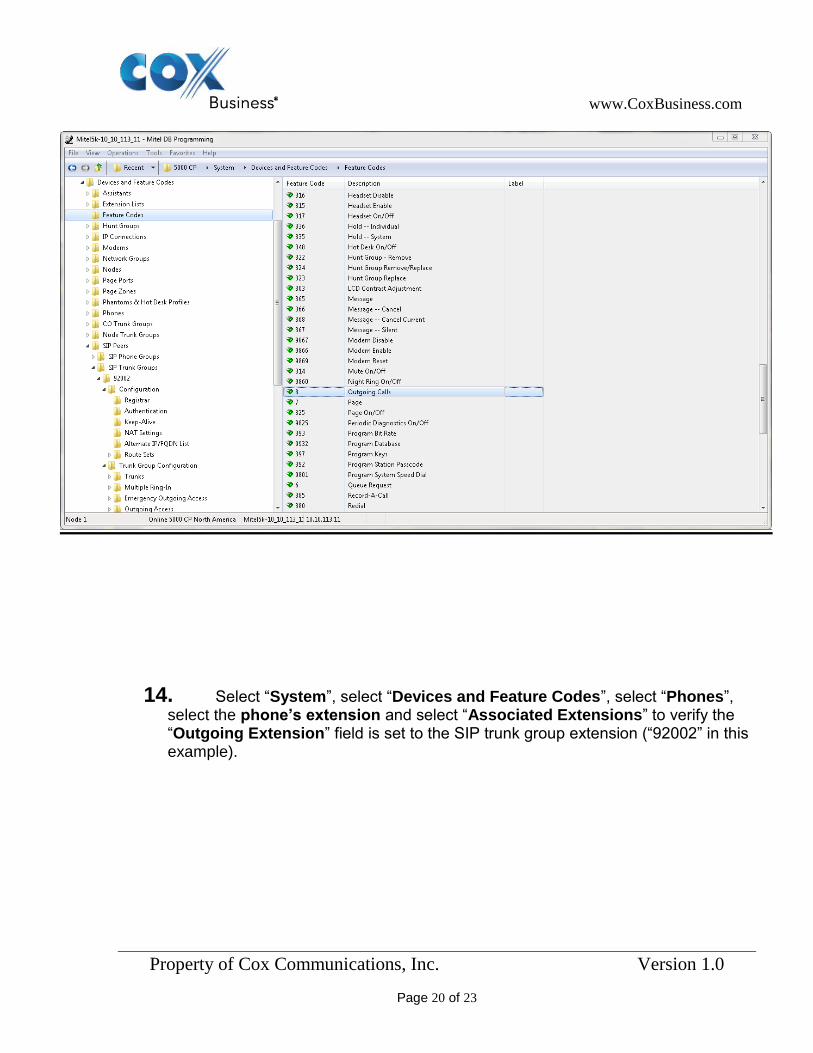
13. Select “System”, select “Devices and Feature Codes” and select “Feature Codes” to make sure that Feature Code “8” is used for making outgoing calls. Note that by default, the user can dial the Feature Code “8”, followed by “1” and the phone number to place outside calls (i.e.: 8 1 4083517255). The user may also dial by the SIP trunk group’s extension (i.e.: 92002 1 4083517255) or dial by each SIP trunk extension (i.e.: 94023 1 4083517255).
www.CoxBusiness.com
Property of Cox Communications, Inc. Version 1.0
Page 20 of 23
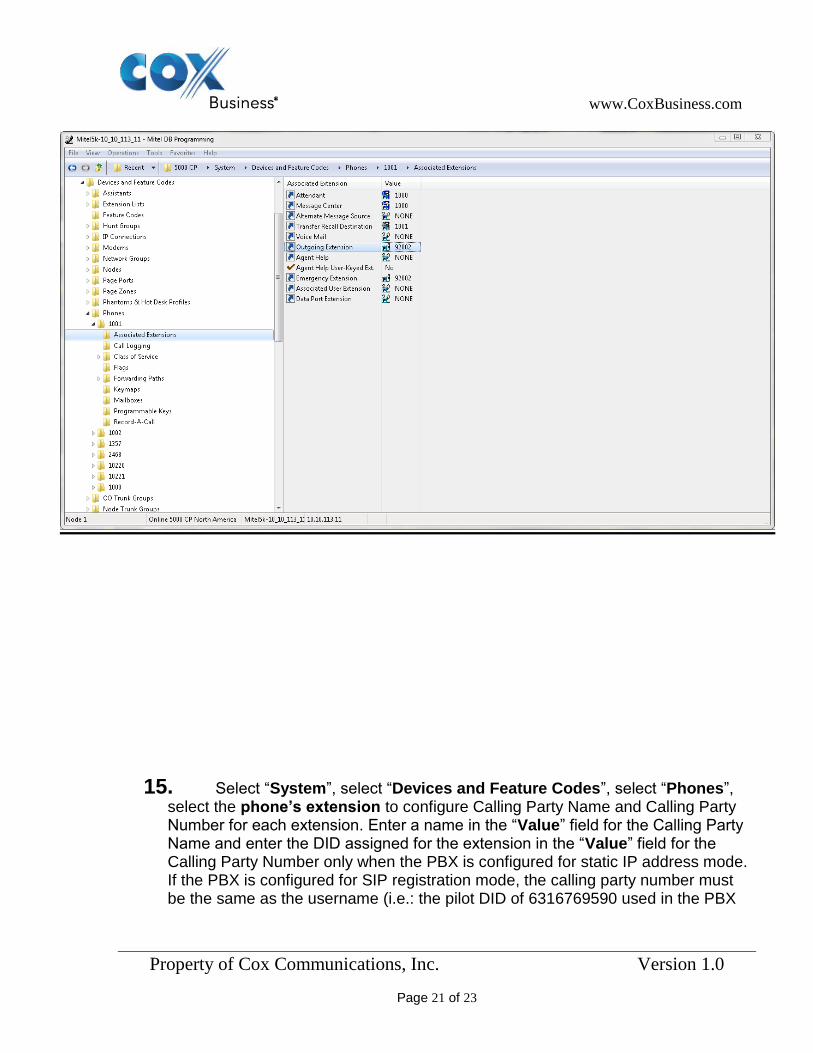
14. Select “System”, select “Devices and Feature Codes”, select “Phones”, select the phone’s extension and select “Associated Extensions” to verify the “Outgoing Extension” field is set to the SIP trunk group extension (“92002” in this example).
www.CoxBusiness.com
Property of Cox Communications, Inc. Version 1.0
Page 21 of 23
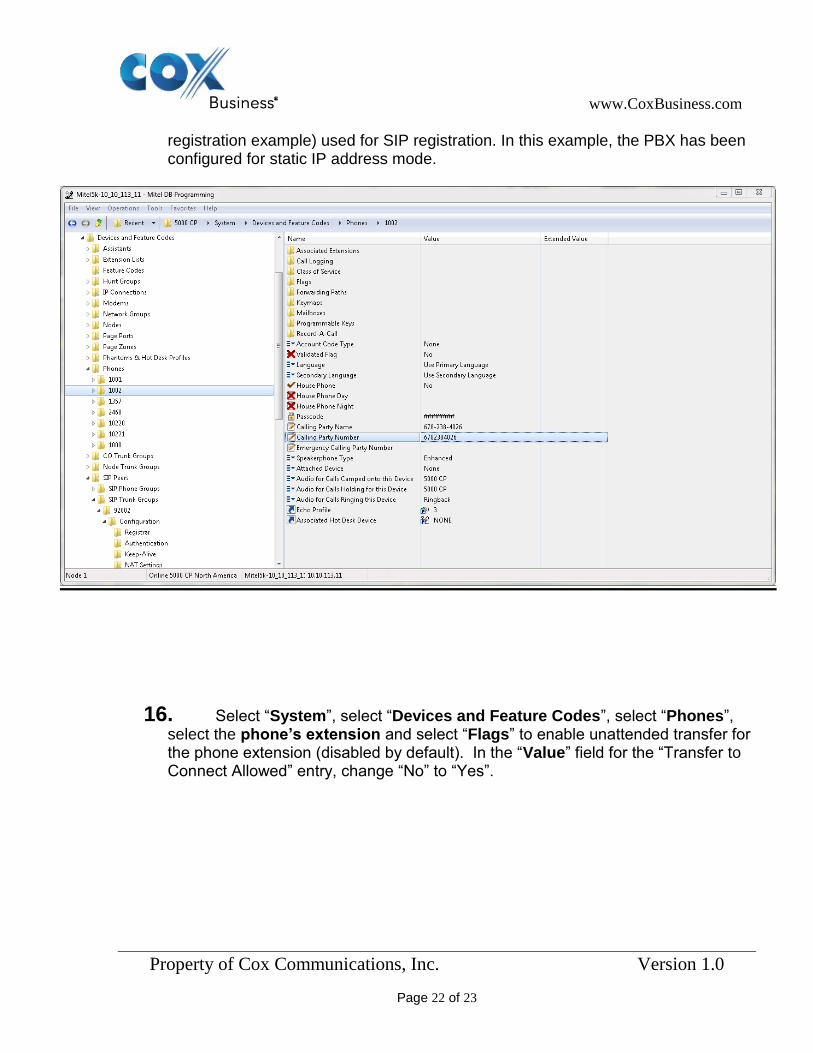
15. Select “System”, select “Devices and Feature Codes”, select “Phones”, select the phone’s extension to configure Calling Party Name and Calling Party Number for each extension. Enter a name in the “Value” field for the Calling Party Name and enter the DID assigned for the extension in the “Value” field for the Calling Party Number only when the PBX is configured for static IP address mode. If the PBX is configured for SIP registration mode, the calling party number must be the same as the username (i.e.: the pilot DID of 6316769590 used in the PBX
www.CoxBusiness.com
Property of Cox Communications, Inc. Version 1.0
Page 22 of 23
registration example) used for SIP registration. In this example, the PBX has been configured for static IP address mode.
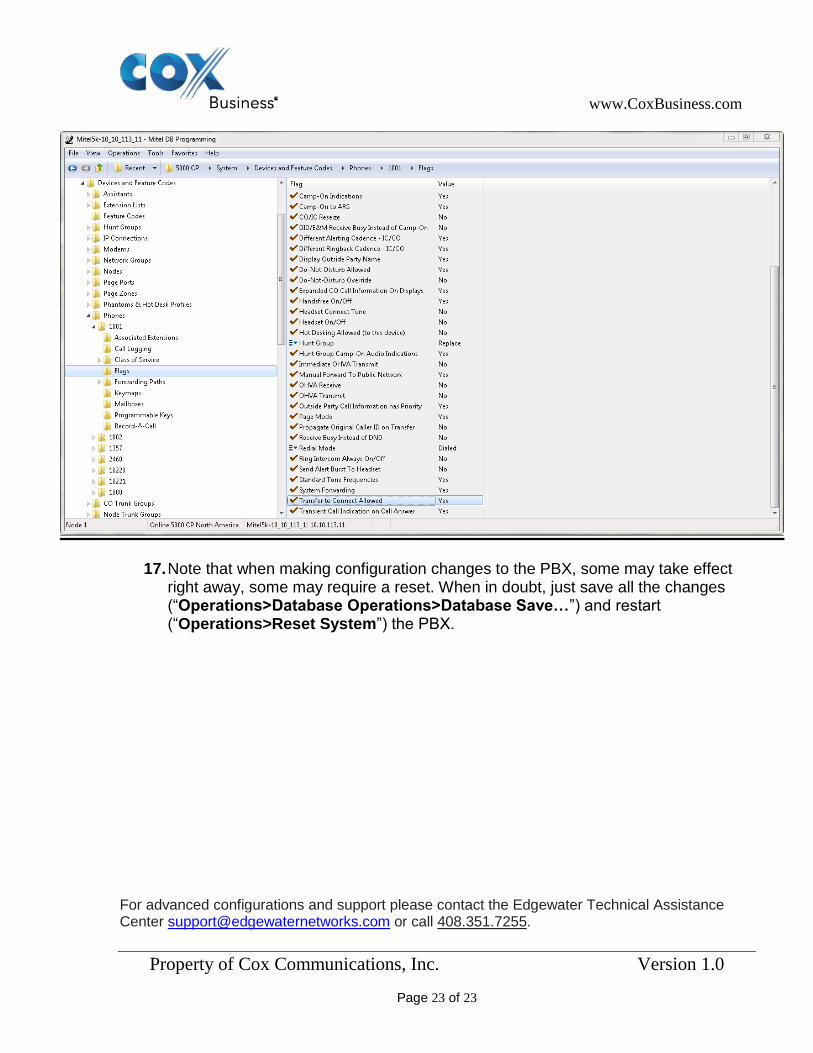
16. Select “System”, select “Devices and Feature Codes”, select “Phones”, select the phone’s extension and select “Flags” to enable unattended transfer for the phone extension (disabled by default). In the “Value” field for the “Transfer to Connect Allowed” entry, change “No” to “Yes”.
www.CoxBusiness.com
Property of Cox Communications, Inc. Version 1.0
Page 23 of 23
17. Note that when making configuration changes to the PBX, some may take effect right away, some may require a reset. When in doubt, just save all the changes (“Operations>Database Operations>Database Save…”) and restart (“Operations>Reset System”) the PBX.
For advanced configurations and support please contact the Edgewater Technical Assistance Center [email protected] or call 408.351.7255.


![[MS-SIP]: Session Initiation Protocol ExtensionsMS-SIP].pdfSession Initiation Protocol Extensions SIP. . SIP message.](https://img.pdfslide.us/doc/110x75/5e7f8669844925290d6f8357/ms-sip-session-initiation-protocol-extensions-ms-sippdf-session-initiation.jpg)


![[MS-SIP]: Session Initiation Protocol ExtensionsMS-SIP]-160714.pdf · [MS-SIP]: Session Initiation Protocol Extensions ... sip. . . .](https://img.pdfslide.us/doc/110x75/5f144311cb0953247f1ddd57/ms-sip-session-initiation-protocol-extensions-ms-sip-160714pdf-ms-sip.jpg)