Embed Size (px)
Citation preview
www.CoxBusiness.com
Property of Cox Communications, Inc. Version 0.3
Page 1 of 25
January 21st, 2014
SIP Trunking using the EdgeMarc Network Services Gateway and the
AsteriskNow IP-PBX
© 2011, Cox Communications, Inc. All rights reserved. This documentation is the confidential and proprietary intellectual property of Cox
Communications, Inc. Any unauthorized use, reproduction, preparation of derivative works, performance, or display of this document, or software represented by this
document is strictly prohibited.
www.CoxBusiness.com
Property of Cox Communications, Inc. Version 0.3
Page 2 of 25
Table of Contents 1 Overview .............................................................................................................. 3
2 Prerequisites ......................................................................................................... 3
3 Network Topology .................................................................................................. 4
4 Description of Basic Operation and Call Flows ............................................................ 5
5 AsteriskNow PBX Configuration ................................................................................ 5
5.1 Web GUI Access .............................................................................................. 6
5.2 Username and Password ................................................................................... 6
5.3 Extension Settings ........................................................................................... 7
5.4 Incoming Route ............................................................................................. 12
5.5 SIP Trunk...................................................................................................... 14
5.6 Outbound Routes ........................................................................................... 19
5.7 Call Park ....................................................................................................... 21
5.8 Auto Attendant .............................................................................................. 21
www.CoxBusiness.com
Property of Cox Communications, Inc. Version 0.3
Page 3 of 25
1 Overview
The purpose of this configuration guide is to describe the steps needed to configure the AsteriskNow PBX for proper operation in a SIP Trunking application with the e-
SBC EdgeMarc. Please note that this guide documents the basic configuration needed in the AsteriskNow PBX and that the requirements of specific SIP Trunking
environments may require modifications to the configuration steps provided in this document.
2 Prerequisites
SIP trunking information provided by the VoIP service provider:
● SIP proxy server IP address or DNS name. ● Trunking Direct Inward Dial (DID) phone numbers
Calls to the trunking DID(s) are forwarded from the service provider to the wide area network (WAN) IP address of the
EdgeMarc. There may be a single “Pilot” phone number used for all inbound calls and/or multiple DIDs depending on the
service ordered. SIP authentication credentials (optional)
Some SIP trunking service providers require a unique username and password to be supplied for IP PBX registrations
and/or SIP signaling using P-Asserted Identity (RFC 3325). This knowledgebase solution provides the configuration steps
for both PBX registration and static or non-registration modes of PBX operation.
AsateriskNow – v3.0
www.CoxBusiness.com
Property of Cox Communications, Inc. Version 0.3
Page 4 of 25
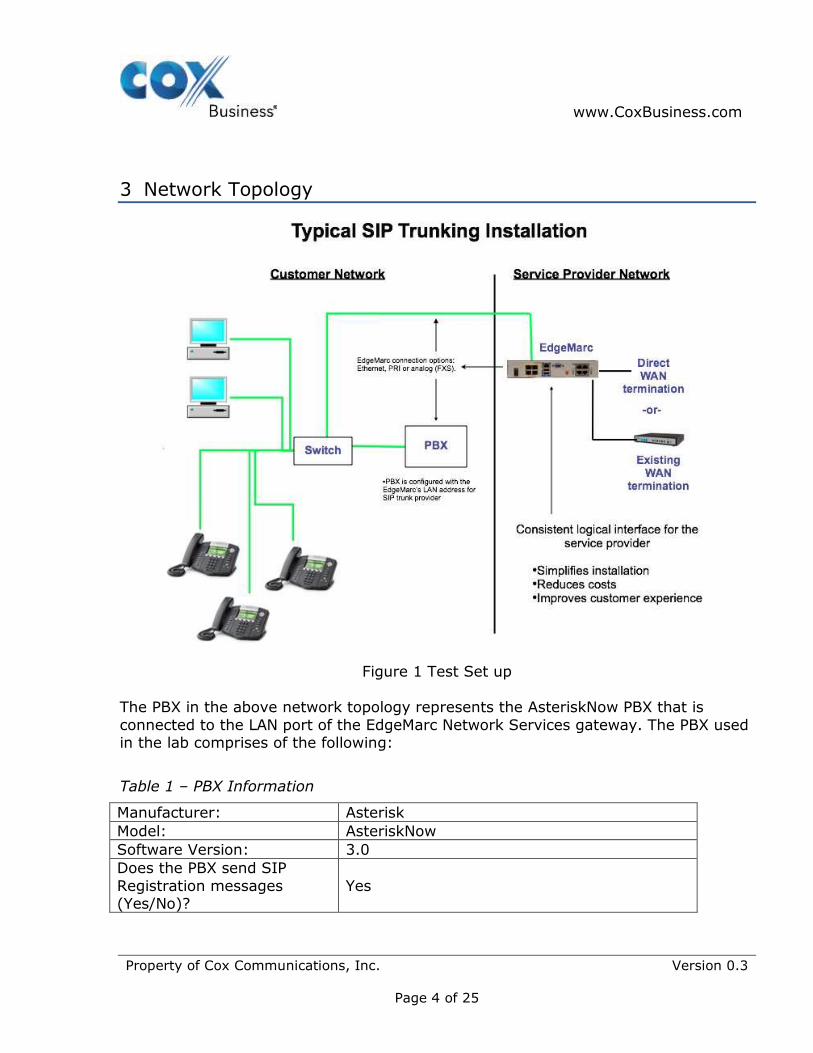
3 Network Topology
Figure 1 Test Set up
The PBX in the above network topology represents the AsteriskNow PBX that is
connected to the LAN port of the EdgeMarc Network Services gateway. The PBX used in the lab comprises of the following:
Table 1 – PBX Information
Manufacturer: Asterisk
Model: AsteriskNow
Software Version: 3.0
Does the PBX send SIP
Registration messages (Yes/No)?
Yes
www.CoxBusiness.com
Property of Cox Communications, Inc. Version 0.3
Page 5 of 25
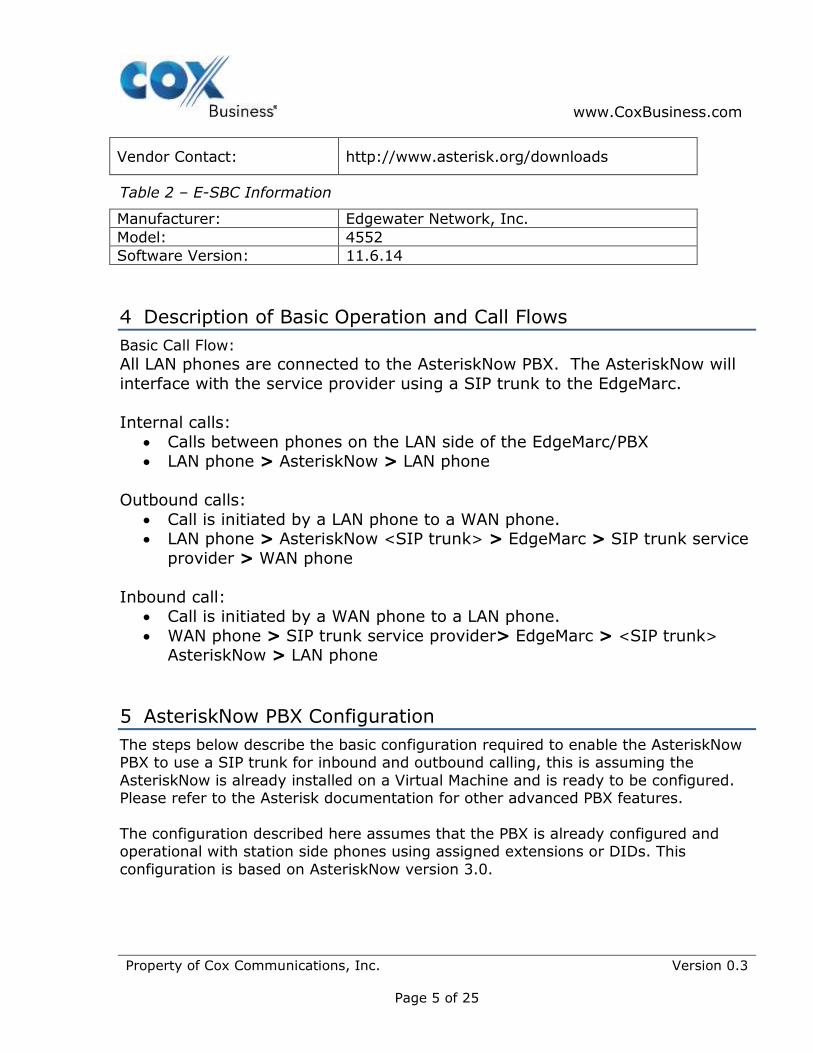
Vendor Contact: http://www.asterisk.org/downloads
Table 2 – E-SBC Information
Manufacturer: Edgewater Network, Inc.
Model: 4552
Software Version: 11.6.14
4 Description of Basic Operation and Call Flows
Basic Call Flow:
All LAN phones are connected to the AsteriskNow PBX. The AsteriskNow will
interface with the service provider using a SIP trunk to the EdgeMarc.
Internal calls:
Calls between phones on the LAN side of the EdgeMarc/PBX LAN phone > AsteriskNow > LAN phone
Outbound calls:
Call is initiated by a LAN phone to a WAN phone. LAN phone > AsteriskNow <SIP trunk> > EdgeMarc > SIP trunk service
provider > WAN phone
Inbound call: Call is initiated by a WAN phone to a LAN phone.
WAN phone > SIP trunk service provider> EdgeMarc > <SIP trunk> AsteriskNow > LAN phone
5 AsteriskNow PBX Configuration
The steps below describe the basic configuration required to enable the AsteriskNow PBX to use a SIP trunk for inbound and outbound calling, this is assuming the
AsteriskNow is already installed on a Virtual Machine and is ready to be configured. Please refer to the Asterisk documentation for other advanced PBX features.
The configuration described here assumes that the PBX is already configured and operational with station side phones using assigned extensions or DIDs. This
configuration is based on AsteriskNow version 3.0.
www.CoxBusiness.com
Property of Cox Communications, Inc. Version 0.3
Page 6 of 25
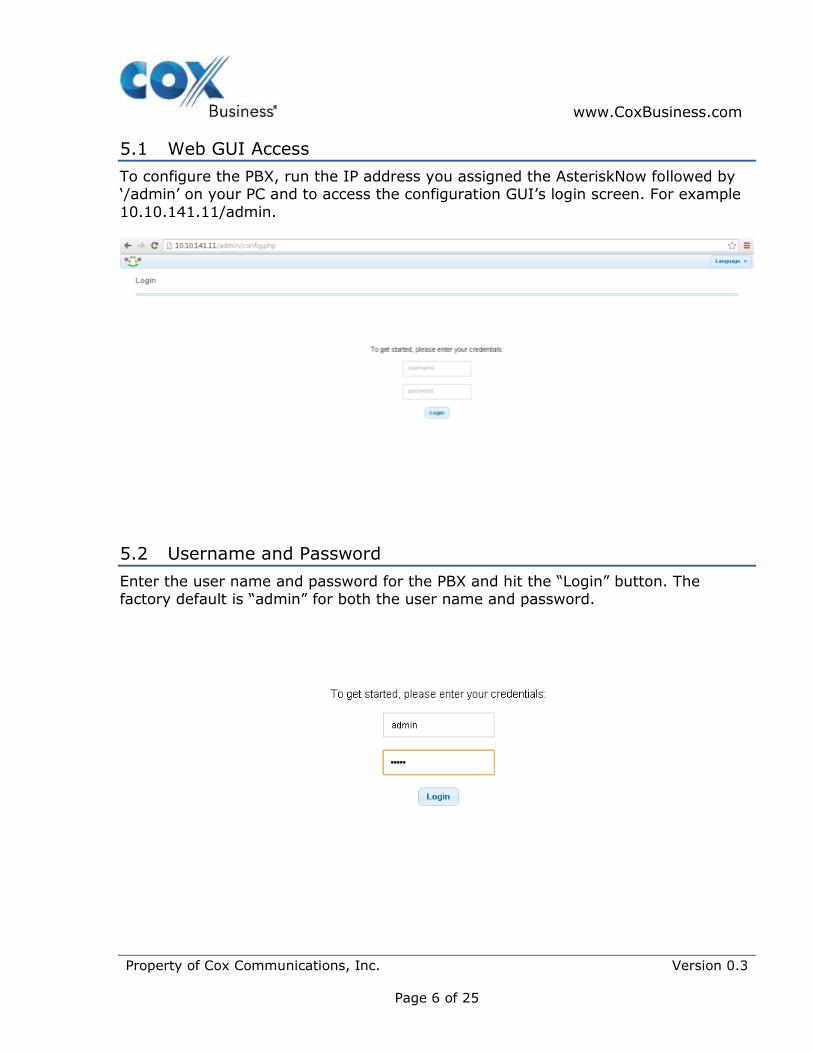
5.1 Web GUI Access
To configure the PBX, run the IP address you assigned the AsteriskNow followed by ‘/admin’ on your PC and to access the configuration GUI’s login screen. For example
10.10.141.11/admin.
5.2 Username and Password
Enter the user name and password for the PBX and hit the “Login” button. The factory default is “admin” for both the user name and password.
www.CoxBusiness.com
Property of Cox Communications, Inc. Version 0.3
Page 7 of 25
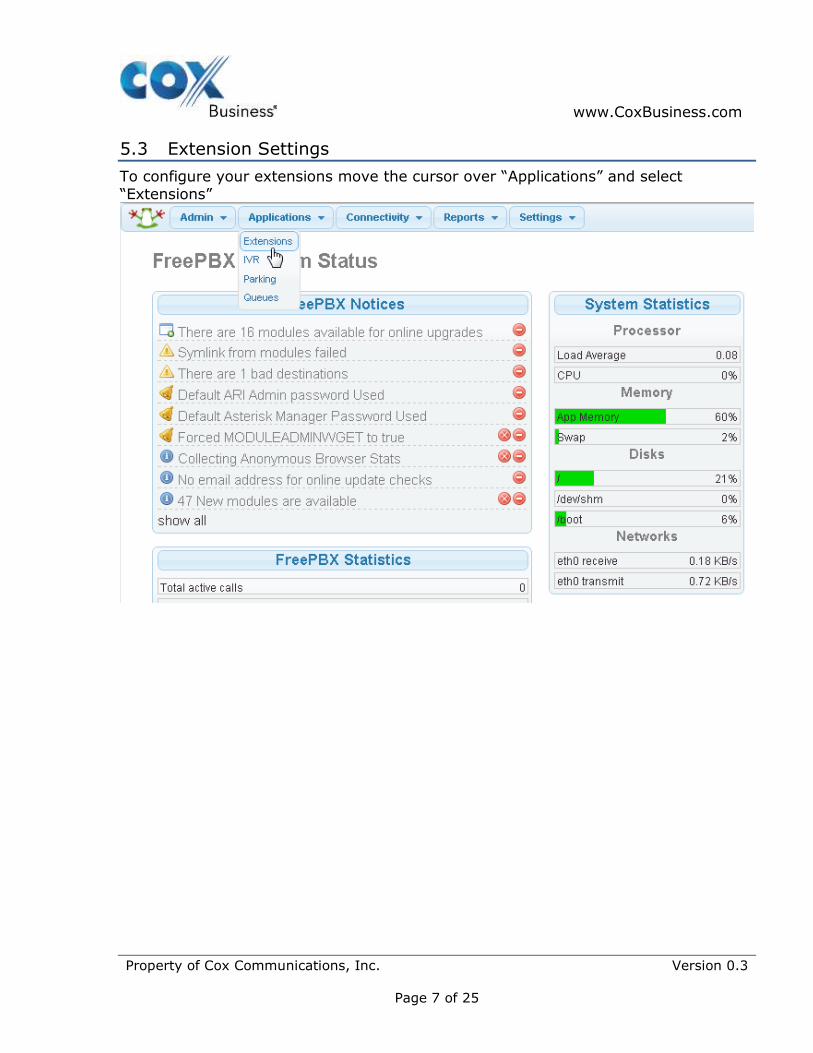
5.3 Extension Settings
To configure your extensions move the cursor over “Applications” and select “Extensions”
www.CoxBusiness.com
Property of Cox Communications, Inc. Version 0.3
Page 8 of 25
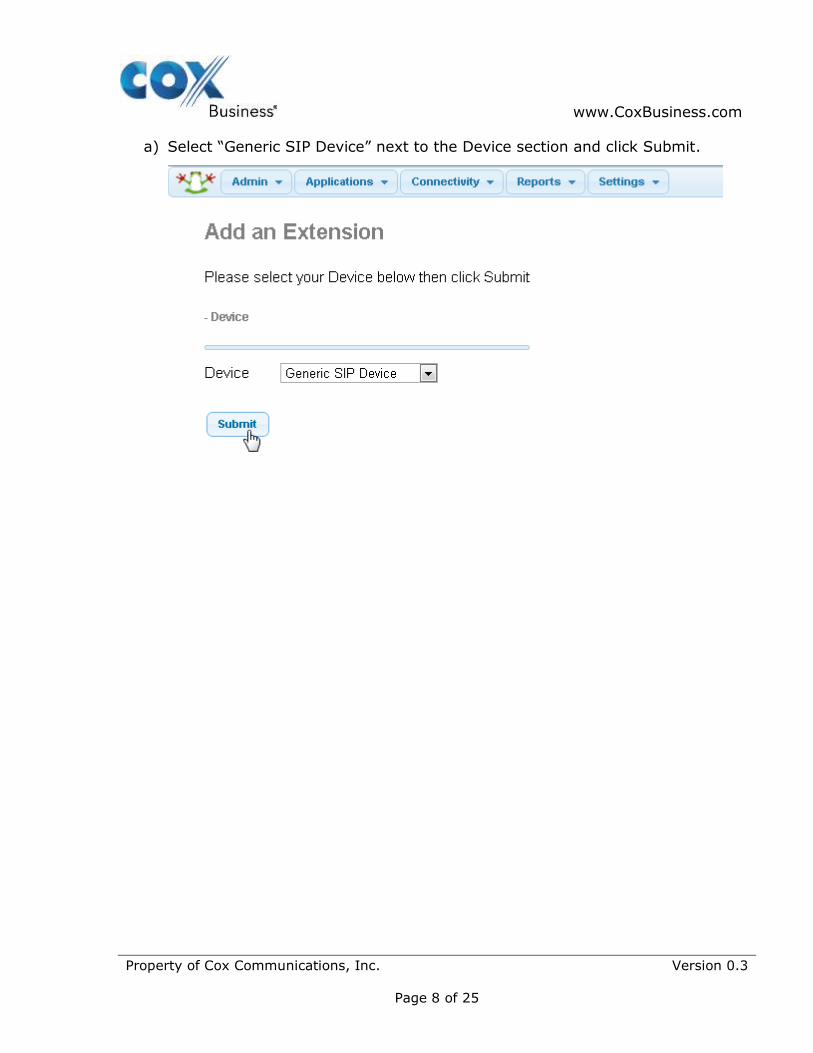
a) Select “Generic SIP Device” next to the Device section and click Submit.
www.CoxBusiness.com
Property of Cox Communications, Inc. Version 0.3
Page 9 of 25
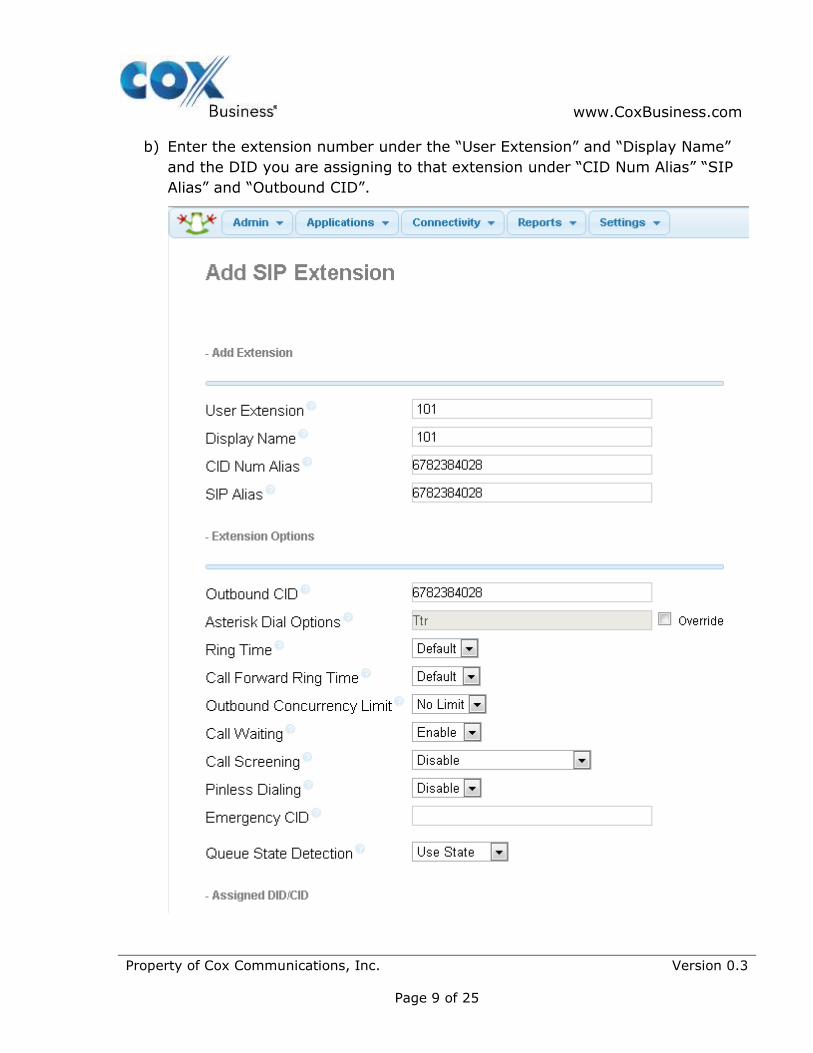
b) Enter the extension number under the “User Extension” and “Display Name”
and the DID you are assigning to that extension under “CID Num Alias” “SIP
Alias” and “Outbound CID”.
www.CoxBusiness.com
Property of Cox Communications, Inc. Version 0.3
Page 10 of 25
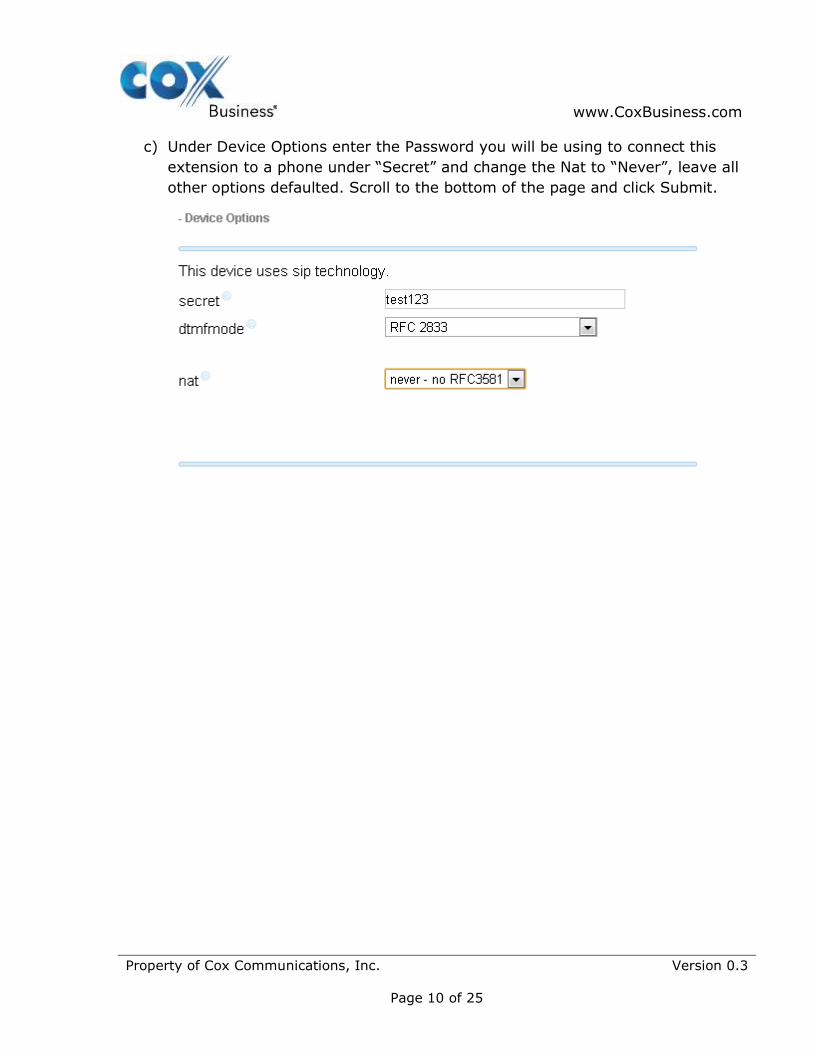
c) Under Device Options enter the Password you will be using to connect this
extension to a phone under “Secret” and change the Nat to “Never”, leave all
other options defaulted. Scroll to the bottom of the page and click Submit.
www.CoxBusiness.com
Property of Cox Communications, Inc. Version 0.3
Page 11 of 25
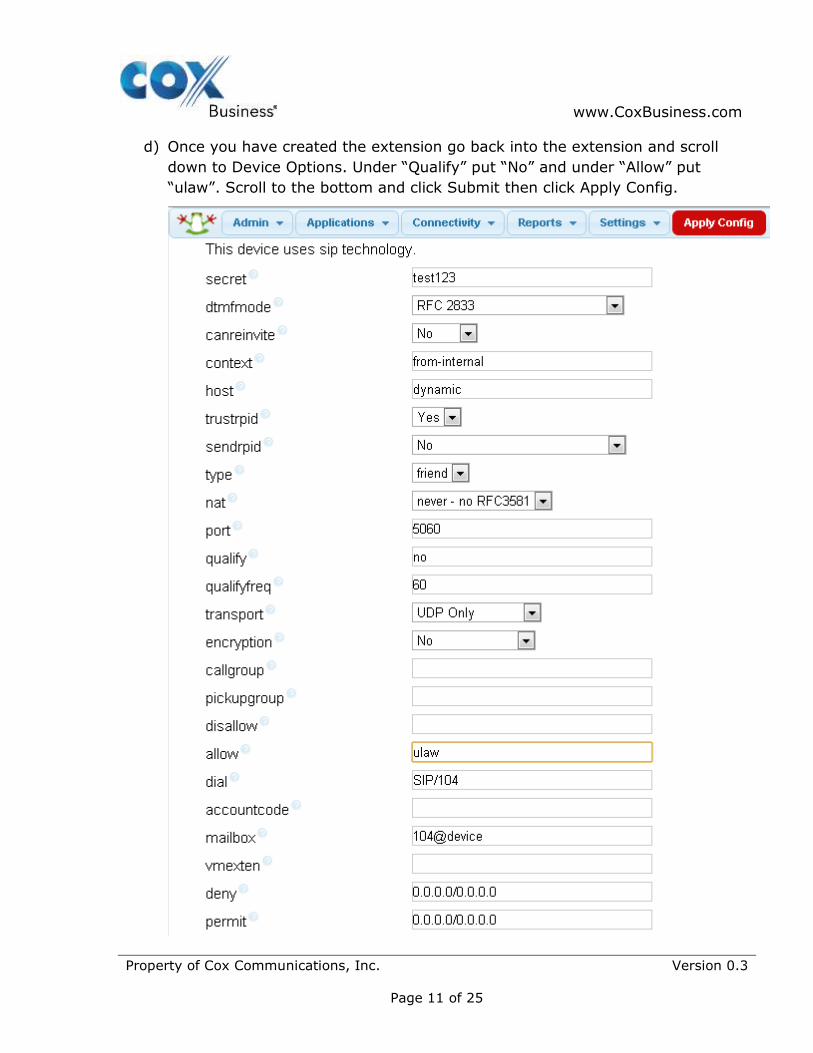
d) Once you have created the extension go back into the extension and scroll
down to Device Options. Under “Qualify” put “No” and under “Allow” put
“ulaw”. Scroll to the bottom and click Submit then click Apply Config.
www.CoxBusiness.com
Property of Cox Communications, Inc. Version 0.3
Page 12 of 25
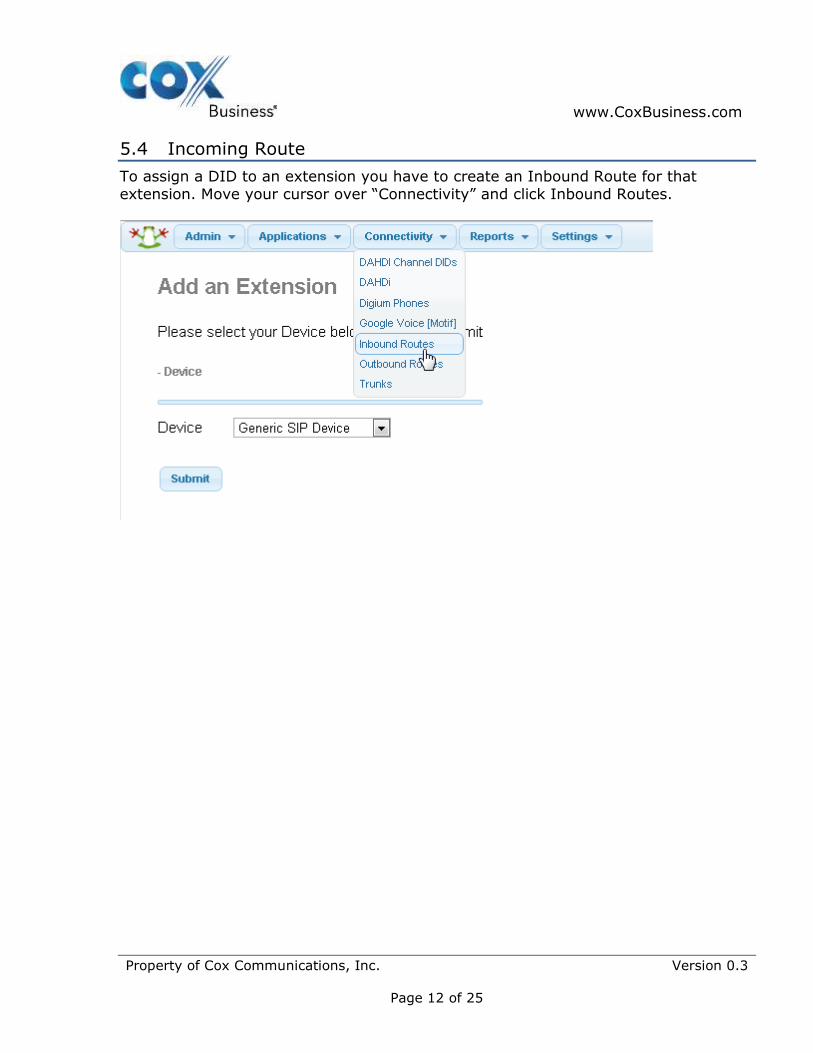
5.4 Incoming Route
To assign a DID to an extension you have to create an Inbound Route for that extension. Move your cursor over “Connectivity” and click Inbound Routes.

www.CoxBusiness.com
Property of Cox Communications, Inc. Version 0.3
Page 13 of 25
a) Enter the DID you would like to assign in the “Description” and “DID Number”
sections, under “Set Destination” select “Extensions” and the extension
number you would like to assign the DID to. Repeat this step for all other
extensions.
www.CoxBusiness.com
Property of Cox Communications, Inc. Version 0.3
Page 14 of 25
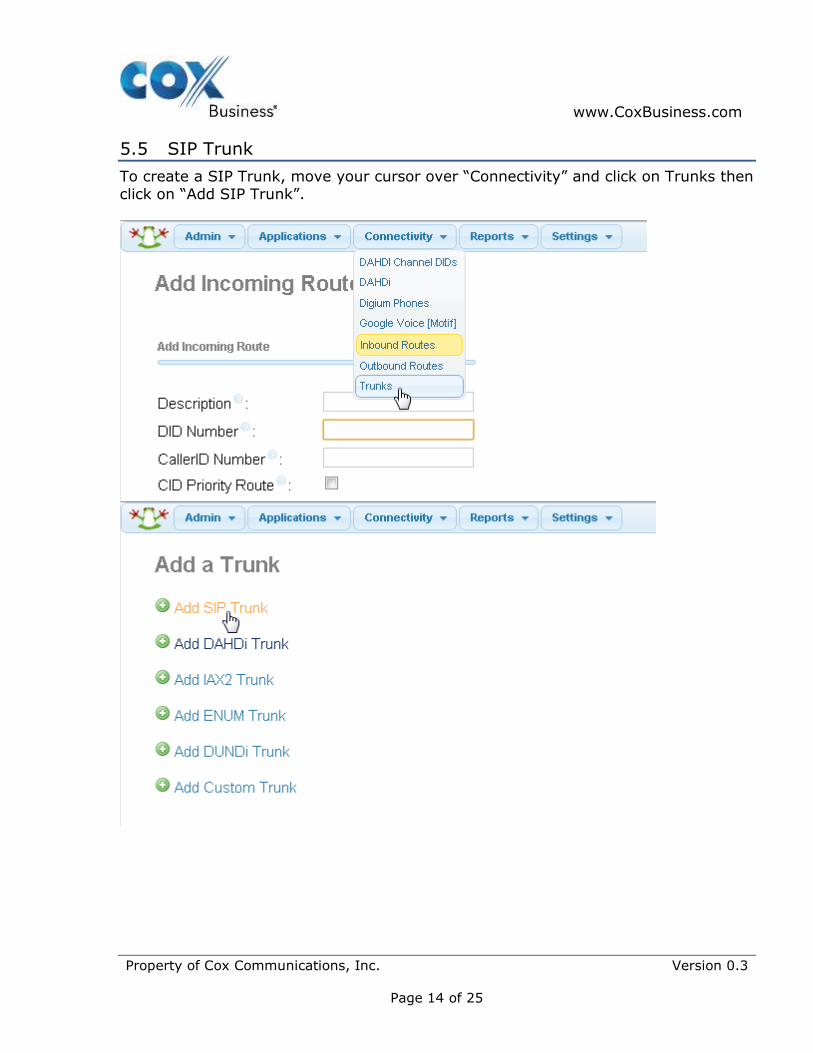
5.5 SIP Trunk
To create a SIP Trunk, move your cursor over “Connectivity” and click on Trunks then click on “Add SIP Trunk”.
www.CoxBusiness.com
Property of Cox Communications, Inc. Version 0.3
Page 15 of 25
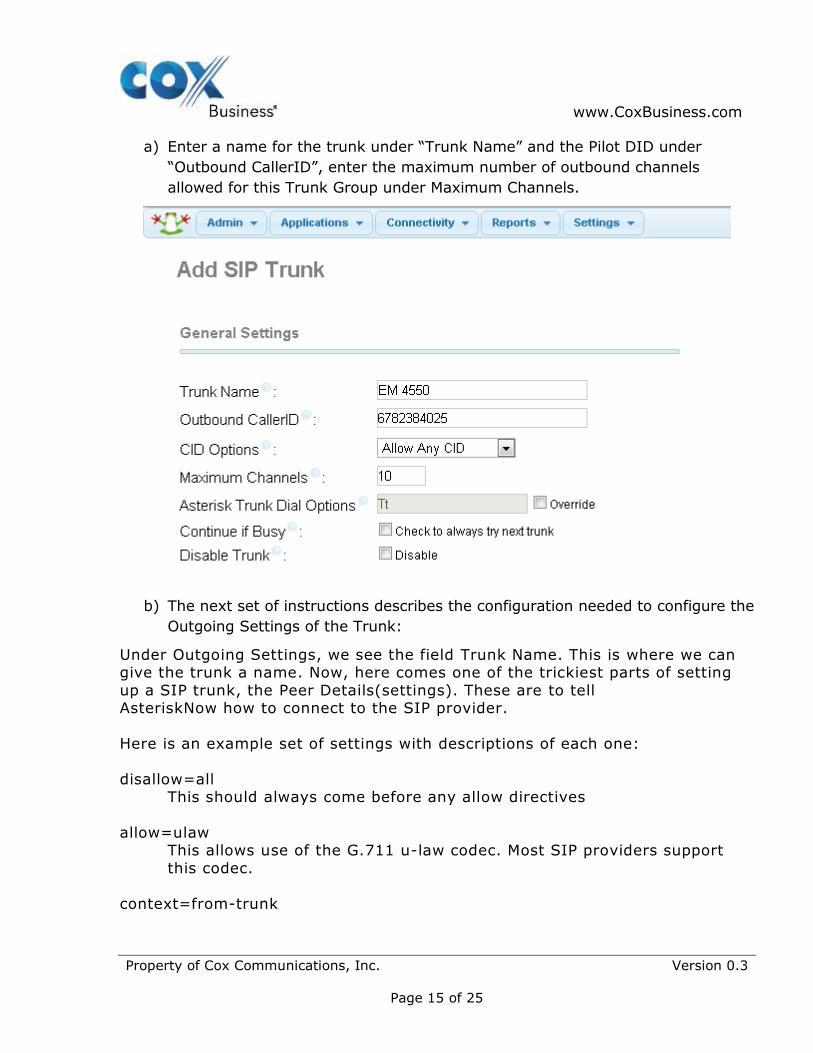
a) Enter a name for the trunk under “Trunk Name” and the Pilot DID under
“Outbound CallerID”, enter the maximum number of outbound channels
allowed for this Trunk Group under Maximum Channels.
b) The next set of instructions describes the configuration needed to configure the
Outgoing Settings of the Trunk:
Under Outgoing Settings, we see the field Trunk Name. This is where we can give the trunk a name. Now, here comes one of the trickiest parts of setting
up a SIP trunk, the Peer Details(settings). These are to tell AsteriskNow how to connect to the SIP provider.
Here is an example set of settings with descriptions of each one:
disallow=all This should always come before any allow directives
allow=ulaw
This allows use of the G.711 u-law codec. Most SIP providers support
this codec.
context=from-trunk
www.CoxBusiness.com
Property of Cox Communications, Inc. Version 0.3
Page 16 of 25
This is the context that Asterisk will dump calls coming from the trunk into this dialplan context. Without this set to a proper context, incoming
calls will not work.
dtmfmode= rfc2833 This tells Asterisk how to interpert DTMF tones. It can be auto(auto-
negotiates what mode to use - recommended), inband(sends DTMF as sounds in the audio stream), rfc2833(recommended if your SIP provider supports it), or info(DTMF info is sent inside the SIP header)
fromdomain=sip.broadvoice.com
This tells the SIP provider what domain the call comes from. Some SIP providers require this for authentication. We used the IP address of the EdgeMarc.
fromuser=<Username>
This is the username to authenticate to the SIP provider with. host=sip.broadvoice.com
This is the host to connect with to send calls, again we used the IP address of the EdgeMarc
insecure= port, invite
This determines if Asterisk should authenticate calls coming in. Your SIP
provider should tell what to set this to. Common settings are "invite", "port, invite", or "very".
qualify= no
This tells Asterisk whether or not to send SIP NOTIFY messages to the
peer to check if it's still available the latency between it and Asterisk.
secret=<Password> This is the password to authenticate to the SIP provider
type=peer This sets the type to peer. This is required.
username=<Username>
This is the username to connect to the SIP provider with.
authname<Username>
This is the authentication username to connect to the SIP provider with. This isn't normally required, but some providers like Broadvoice require
it to register.
www.CoxBusiness.com
Property of Cox Communications, Inc. Version 0.3
Page 17 of 25
canreinvite=no This tells Asterisk if it should try to set up a call between the SIP
provider and the destination phone directly. This is typically set to no. If you're behind a NAT, this should be set to "no".
c) The next set of instructions describes the configuration needed to configure the
Incoming Settings of the Trunk:
Under Incoming Settings, we see the field USER Context. Here we can
label it as “inbound”. Now, here comes another tricky part, setting up
the USER Details(settings).
username=<Username>
This is the username to connect to the SIP provider with.
type=peer This sets the type to peer. This is required.
secret=<Password>
This is the password to authenticate to the SIP provider
nat=no
A very important option is to tell Asterisk if it is behind a NAT or if it is not
behind a NAT. Even though the EdgeMarc is NAT'ing the IP headers to and
from Asterisk, the VoIP ALG built into the EdgeMarc will deal with the proper
header manipulations for SIP. Turn off NAT in the Asterisk to prevent header
manipulation conflicts
insecure= very This determines if Asterisk should authenticate calls coming in. Your SIP
provider should tell what to set this to. Common settings are "invite",
"port, invite", or "very"
host=sip.broadvoice.com
This is the host to connect with to send calls, again we used the IP
address of the EdgeMarc
fromdomain=sip.broadvoice.com This tells the SIP provider what domain the call comes from. Some SIP
providers require this for authentication. We used the IP address of the
EdgeMarc.
dtmfmode= rfc2833 This tells Asterisk how to interpert DTMF tones. It can be auto(auto-
negotiates what mode to use - recommended), inband(sends DTMF as
www.CoxBusiness.com
Property of Cox Communications, Inc. Version 0.3
Page 18 of 25
sounds in the audio stream), rfc2833(recommended if your SIP provider
supports it), or info(DTMF info is sent inside the SIP header)
disallow=all
This should always come before any allow directives
context=from-trunk This is the context that Asterisk will dump calls coming from the trunk
into this dialplan context. Without this set to a proper context, incoming
calls will not work.
bindport=5060
Set the port for Asterisk to bind/listen to
allow=ulaw This allows use of the G.711 u-law codec. Most SIP providers support
this codec.
d) Add the registration string, this is required for the AsteriskNow PBX to register
to the EdgeMarc or SIP Provider directly.
Format:
user:secret:@host[:port]/pilot did
Example:
6782384025:[email protected]:5060/6782384025
www.CoxBusiness.com
Property of Cox Communications, Inc. Version 0.3
Page 19 of 25
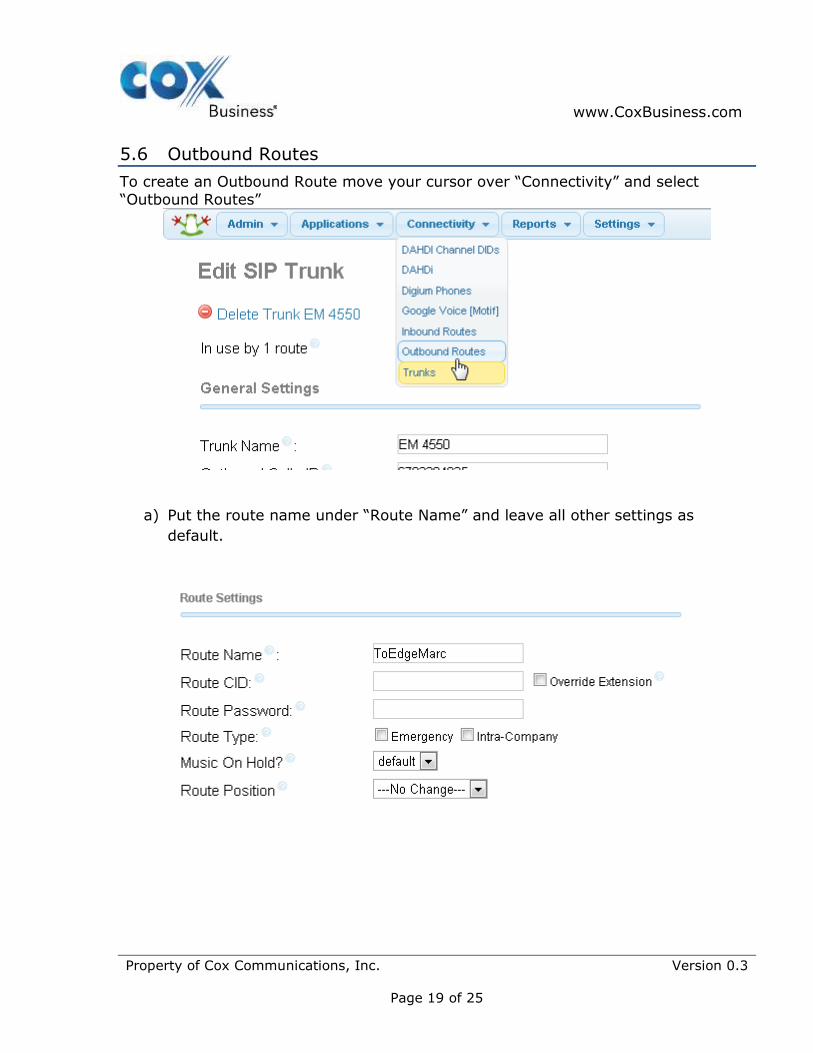
5.6 Outbound Routes
To create an Outbound Route move your cursor over “Connectivity” and select
“Outbound Routes”
a) Put the route name under “Route Name” and leave all other settings as
default.
www.CoxBusiness.com
Property of Cox Communications, Inc. Version 0.3
Page 20 of 25
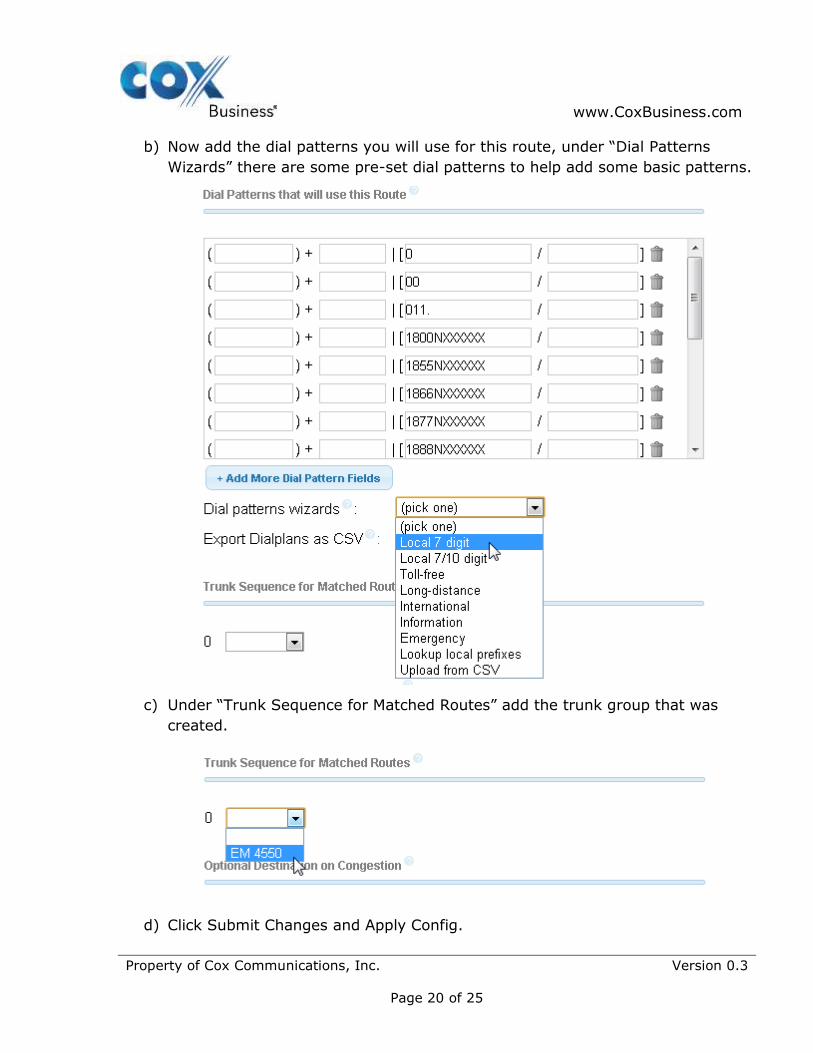
b) Now add the dial patterns you will use for this route, under “Dial Patterns
Wizards” there are some pre-set dial patterns to help add some basic patterns.
c) Under “Trunk Sequence for Matched Routes” add the trunk group that was
created.
d) Click Submit Changes and Apply Config.

www.CoxBusiness.com
Property of Cox Communications, Inc. Version 0.3
Page 21 of 25
5.7 Call Park
The default Parking Lot extension is 70, to place a call into the parking lot just transfer the call to extension 70, you will receive a conformation with the parking lot
extension it was placed into (Parking lot starting position is 71). To take a call out of the parking lot dial the extension the call was placed into from any phone in network.
5.8 Auto Attendant
Before you can setup your Auto Attendant you need to setup your greeting, to do this
move your cursor over “Admin” and select “System Recordings”
a) You can setup your greeting 2 ways, you could either make a recording from
your phone or you can choose a file from your PC if you already have one pre-
recorded
www.CoxBusiness.com
Property of Cox Communications, Inc. Version 0.3
Page 22 of 25
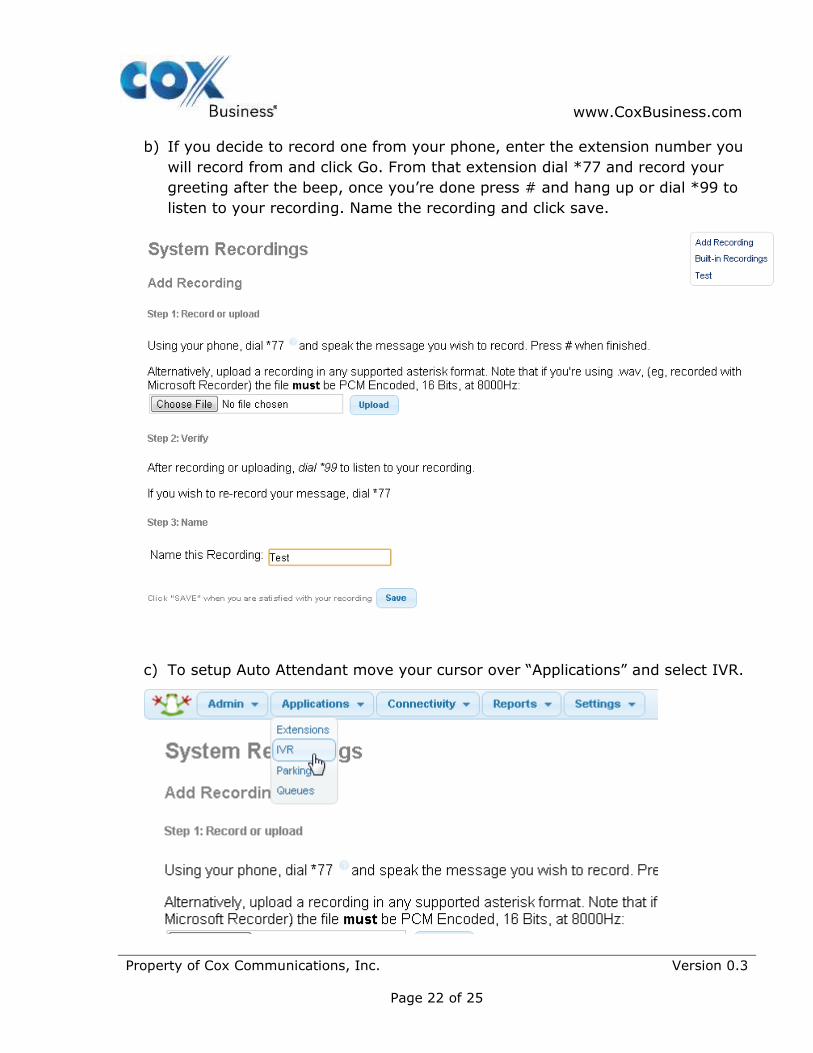
b) If you decide to record one from your phone, enter the extension number you
will record from and click Go. From that extension dial *77 and record your
greeting after the beep, once you’re done press # and hang up or dial *99 to
listen to your recording. Name the recording and click save.
c) To setup Auto Attendant move your cursor over “Applications” and select IVR.
www.CoxBusiness.com
Property of Cox Communications, Inc. Version 0.3
Page 23 of 25
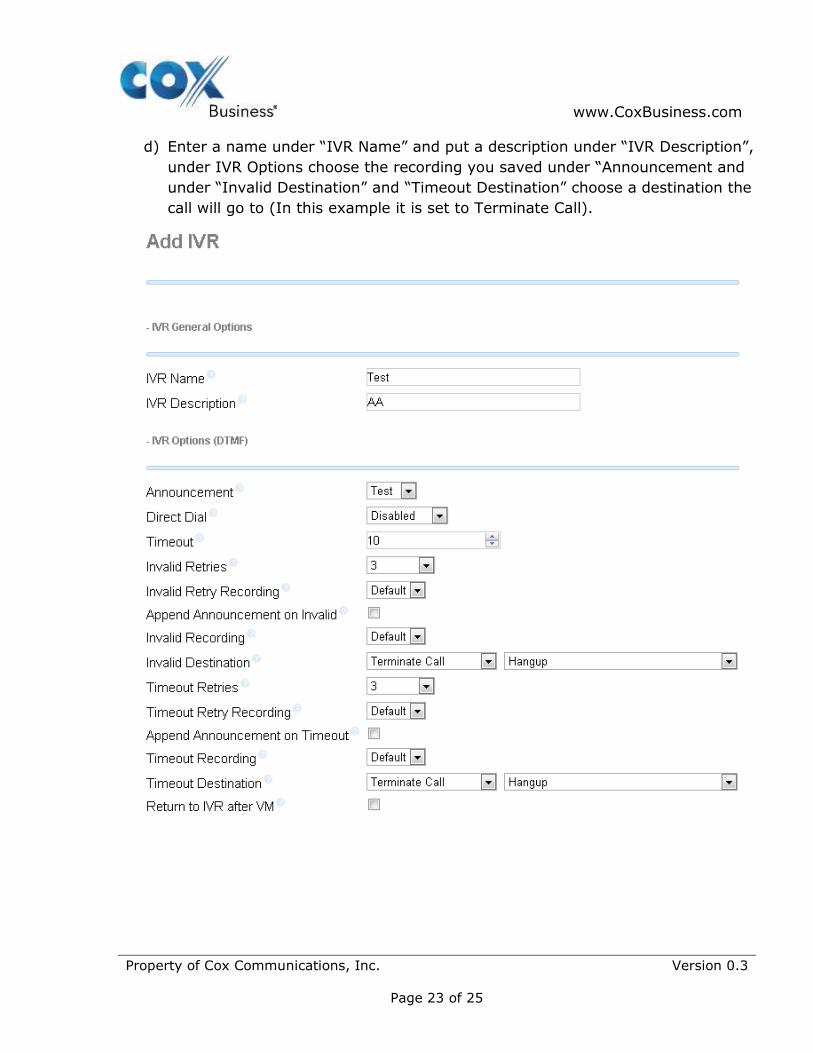
d) Enter a name under “IVR Name” and put a description under “IVR Description”,
under IVR Options choose the recording you saved under “Announcement and
under “Invalid Destination” and “Timeout Destination” choose a destination the
call will go to (In this example it is set to Terminate Call).
www.CoxBusiness.com
Property of Cox Communications, Inc. Version 0.3
Page 24 of 25
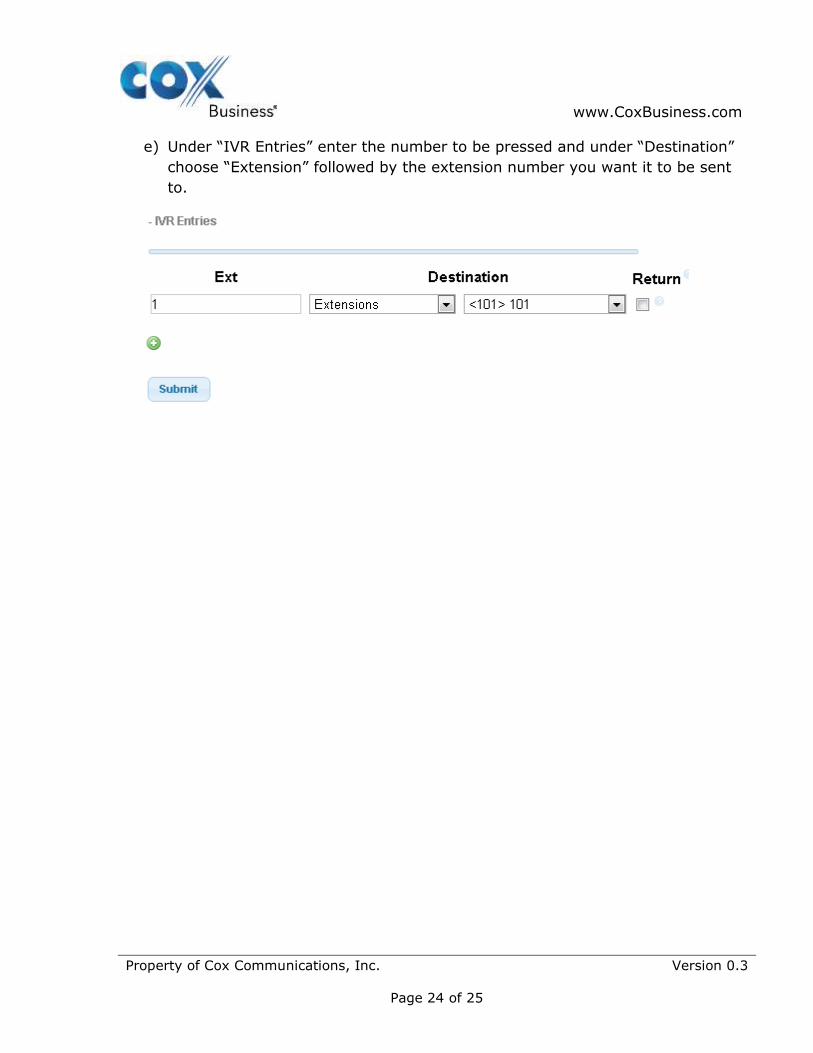
e) Under “IVR Entries” enter the number to be pressed and under “Destination”
choose “Extension” followed by the extension number you want it to be sent
to.
www.CoxBusiness.com
Property of Cox Communications, Inc. Version 0.3
Page 25 of 25
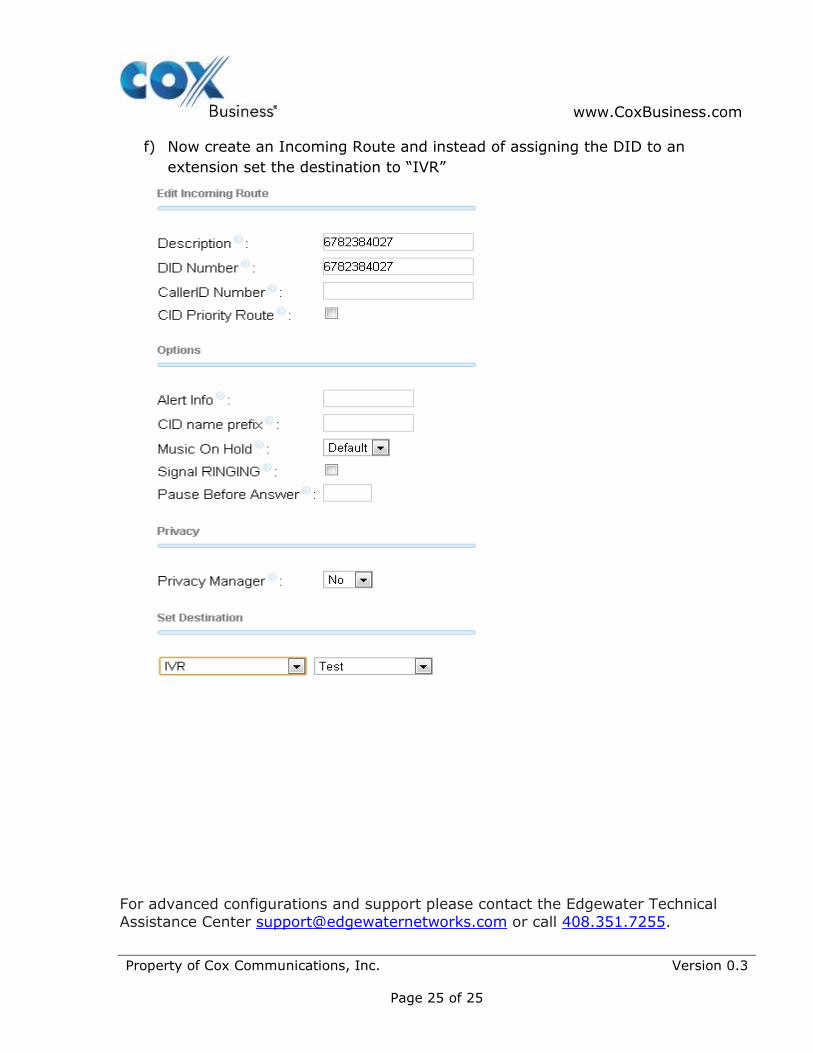
f) Now create an Incoming Route and instead of assigning the DID to an
extension set the destination to “IVR”
For advanced configurations and support please contact the Edgewater Technical
Assistance Center [email protected] or call 408.351.7255.