Embed Size (px)
Citation preview
ISBN 978-1-61564-621-0
9 781615 646210
5 2 1 9 5
Anybody can sing, but to really be a singer re-quires both musical and physical training. Even if you love music and have been singing all your life, this easy-to-follow guide helps you take it to the next level, with advice on everything from finding a voice teacher and mastering your technique to singing onstage and landing a gig. In it, you get:
• Expert guidance on singing in all different genres—classical, jazz, R&B, pop, and rock.
• Professional warm-up exercises and practice techniques to help you find your perfect pitch and tone.
• Tips on maintaining proper posture and breathing for strength and stamina.
• Lessons in rhythm, phrasing, dynamics, and articulation.
• Harmonic advice for both solo and ensemble singing.
Phyllis Fulford is a musician and educator, specializing in the vocal arts. She was a music educator at the high school and junior high level for over 25 years and continues to teach voice and piano to private students. She is also a commissioned choral composer and arranger, a lifelong performer, and a member of the American Choral Directors Association.
Cover image © Masterfi le
$21.95 U.S. / $22.95 CAN
idiotsguides.comAS EASY AS IT GETS!
Make the most of your voice!
Singing
Everything you need to know to fi nd your voice
Guidance on pinpointing your ideal
singing range
Easy instructions for singing in various
musical styles
Singing
Phyllis Fulford and Michael Miller
SECOND EDITION
Approximately 1 hour of listen-and-learn audio fi les help you learn to sing easily!
Bonus audio fi les available online!
Michael Miller is a writer and musician. He has written over 150 books, including the best-selling The Complete Idiot’s Guide® to Music Theory, The Complete Idiot’s Guide® to Music Composition, and The Complete Idiot’s Guide® to Playing Drums.
SECONDEDITION

Part 1: Finding Your Voice8 Chapter 1: Your First Singing Lesson 9
If you could take a picture of your mouth and throat, what would it look like? Try to sense the involvement (or noninvolvement) of the area around your waist or belt line.
Now repeat the same words (“yoo-hoo”) using a much-higher-pitched, elongated, sing-song voice—the type of voice that would have to travel through several rooms in order to reach some-one’s ears.
Can you feel the difference? What was the variance in the size and shape of your mouth? Your throat? To what degree was your belt line involved? Was there a sense of your head being more involved in the production of the tone than your chest or throat? Where did you feel any vibrations?
It’s easy to picture the differences between the first “yoo-hoo” (your speaking voice) and the second “yoo-hoo” (your singing voice). This shows the imagined pathway of your voice as you raise the pitch and elongate the words in a sing-song fashion.
Figure 1.1: The vocal pathway.
TongueTongue
Redirectedpathway for
singing voiceImagine
lift-uphere
Speakingvoice
Aim tone here
As you produce and compare sensations in the later exercises, refer back to this table to see how it holds true for each of the five basic vowel sounds.
CAUTION
When you’re trying to stand straight and tall, don’t lean backward and allow your back to become “swayed.” This is a common mistake you can correct by vertically aligning your spine so you feel a slight tuck of the hips.
Finding Your Singing VoiceSinging tones are sustained on five basic vowels—A, E, I, O, and U. But the vowels you use when singing are a little different than those you use when speaking, so you have to learn the proper way to pronounce each of these vowels. It’s not difficult; examples for all five vowels can be found in Table 1.2.
Table 1.2 The Basic Vowel Sounds
Vowel Sounds Like
Long U (oo) Yoo-hoo
Modified I (ah) Ah-ha
Long E (e) We
Long O (o) Oh, no
Long A (a) Hey, Ray
The following exercises help you find your singing voice through the reproduction of these five basic vowel sounds. So start up your audio recording app to record your progress, point your web browser to the book’s website (idiotsguides.com/singing) to play the examples, and get ready for your first singing lesson!
Exercise 1.1: Yoo-Hoo!Track 1.1
Once you’ve prepared your breath (as described earlier in the chapter), you’re ready to roll.
Begin by speaking the words “yoo-hoo” in your normal speaking voice. You should sound the words the same way you might say “hello” when entering someone’s office or home. Repeat the phrase and concentrate on what your mouth feels like. Focus on how much breath escapes your mouth.
Part 2: Learning to Sing—Properly60 Chapter 6: Straight and Tall: Why Posture Makes a Difference 61
TIP
You can stretch your back by pushing it (the lumbar curve) firmly into the back of a straight chair, holding that position for a few seconds and then releasing. Try this in a comfortable straight chair, and you’ll not only feel it in your back muscles, but also in your abdominals.
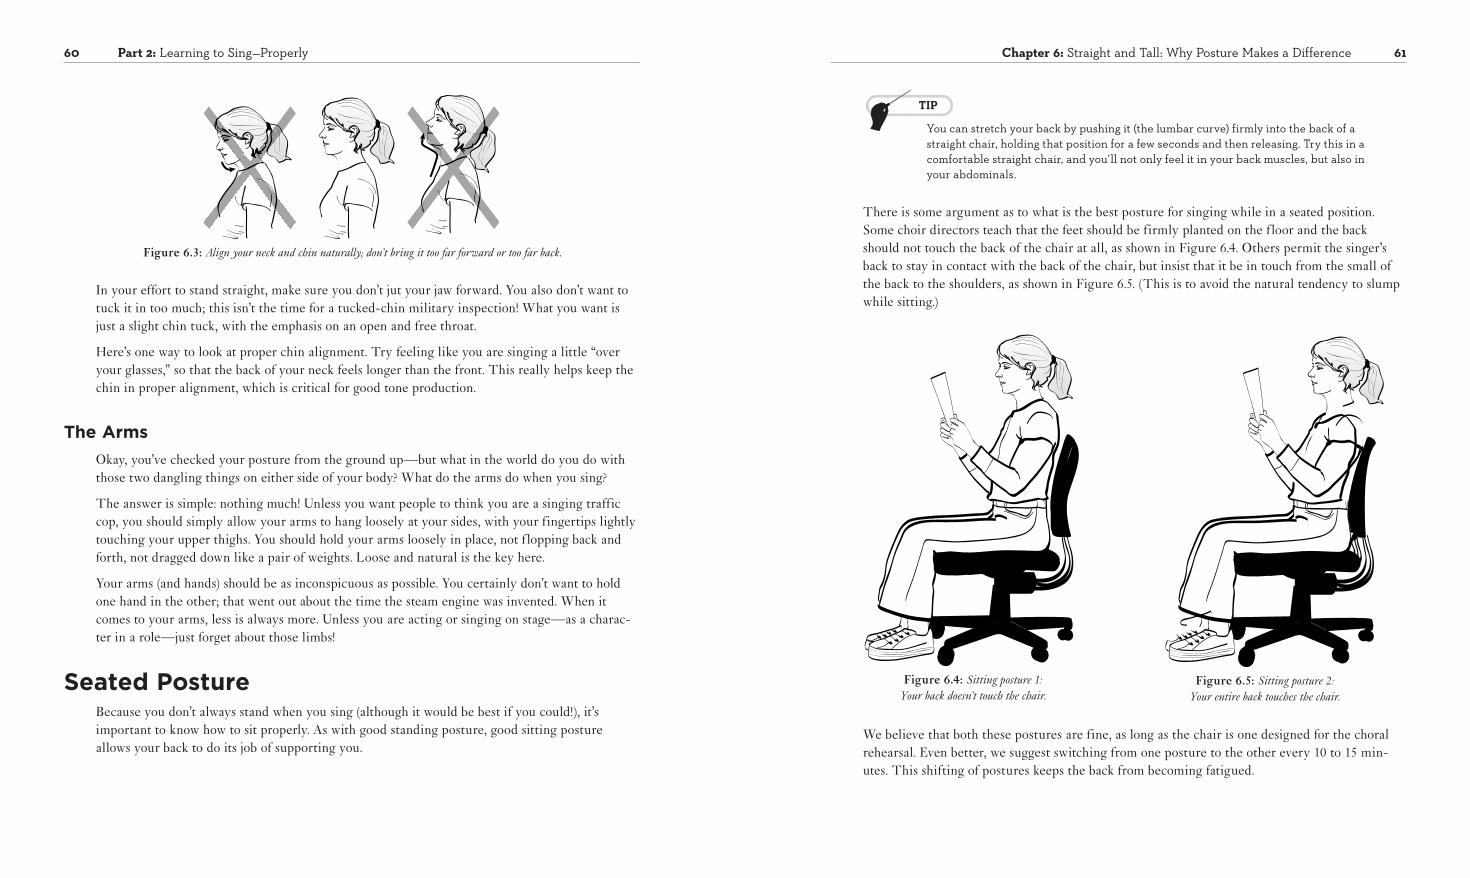
There is some argument as to what is the best posture for singing while in a seated position. Some choir directors teach that the feet should be firmly planted on the floor and the back should not touch the back of the chair at all, as shown in Figure 6.4. Others permit the singer’s back to stay in contact with the back of the chair, but insist that it be in touch from the small of the back to the shoulders, as shown in Figure 6.5. (This is to avoid the natural tendency to slump while sitting.)
Figure 6.4: Sitting posture 1: Your back doesn’t touch the chair.
Figure 6.5: Sitting posture 2: Your entire back touches the chair.
We believe that both these postures are fine, as long as the chair is one designed for the choral rehearsal. Even better, we suggest switching from one posture to the other every 10 to 15 min-utes. This shifting of postures keeps the back from becoming fatigued.
Figure 6.3: Align your neck and chin naturally; don’t bring it too far forward or too far back.
In your effort to stand straight, make sure you don’t jut your jaw forward. You also don’t want to tuck it in too much; this isn’t the time for a tucked-chin military inspection! What you want is just a slight chin tuck, with the emphasis on an open and free throat.
Here’s one way to look at proper chin alignment. Try feeling like you are singing a little “over your glasses,” so that the back of your neck feels longer than the front. This really helps keep the chin in proper alignment, which is critical for good tone production.
The ArmsOkay, you’ve checked your posture from the ground up—but what in the world do you do with those two dangling things on either side of your body? What do the arms do when you sing?
The answer is simple: nothing much! Unless you want people to think you are a singing traffic cop, you should simply allow your arms to hang loosely at your sides, with your fingertips lightly touching your upper thighs. You should hold your arms loosely in place, not flopping back and forth, not dragged down like a pair of weights. Loose and natural is the key here.
Your arms (and hands) should be as inconspicuous as possible. You certainly don’t want to hold one hand in the other; that went out about the time the steam engine was invented. When it comes to your arms, less is always more. Unless you are acting or singing on stage—as a charac-ter in a role—just forget about those limbs!
Seated PostureBecause you don’t always stand when you sing (although it would be best if you could!), it’s important to know how to sit properly. As with good standing posture, good sitting posture allows your back to do its job of supporting you.
Part 3: Sight Singing and Vocal Theory102 Chapter 10: Do, a Deer: Using Solfeggio Techniques 103
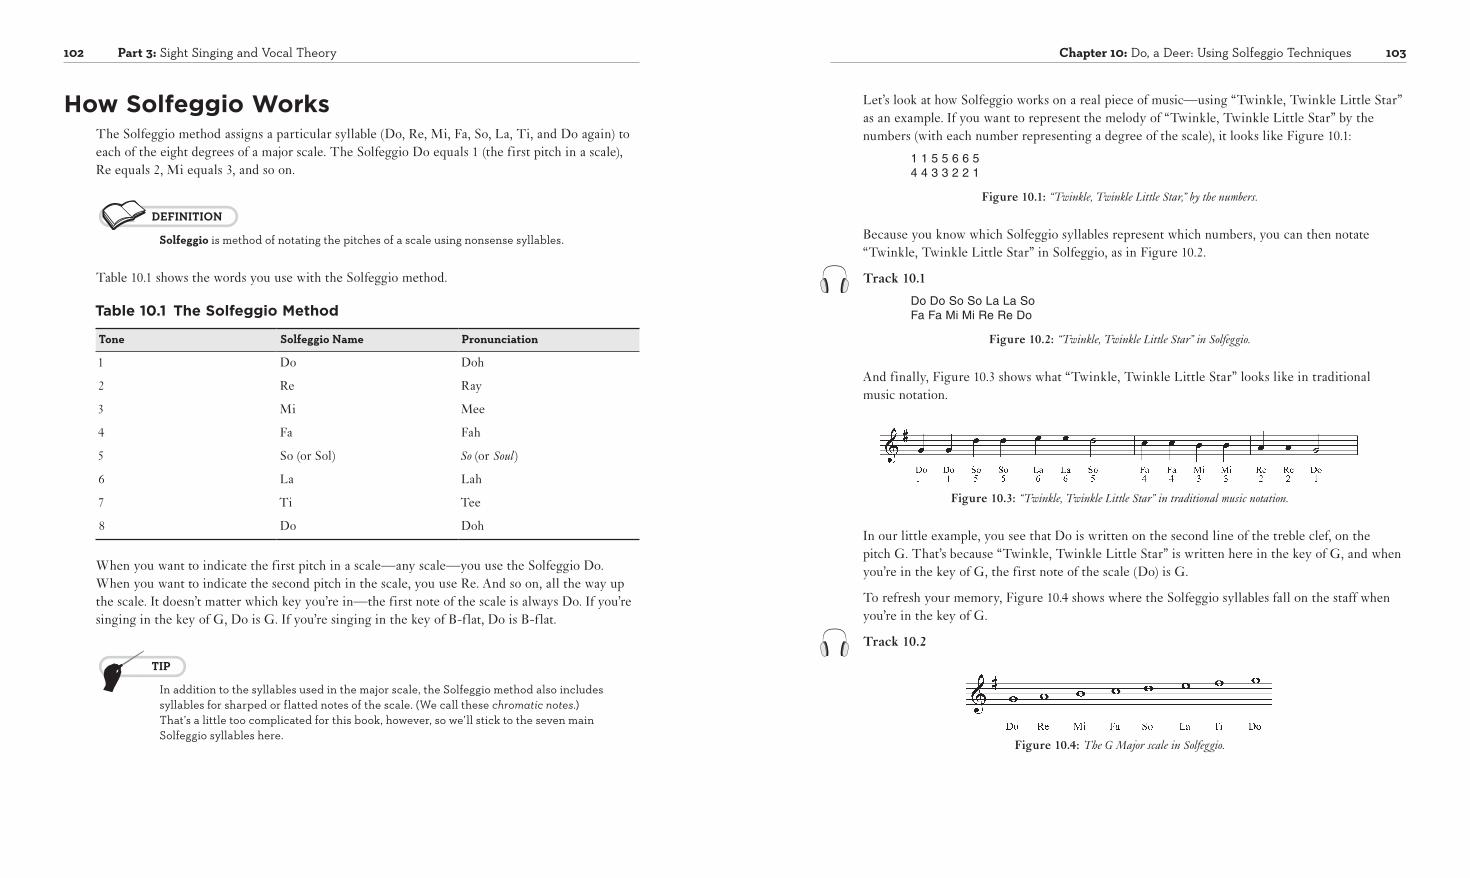
Let’s look at how Solfeggio works on a real piece of music—using “Twinkle, Twinkle Little Star” as an example. If you want to represent the melody of “Twinkle, Twinkle Little Star” by the numbers (with each number representing a degree of the scale), it looks like Figure 10.1:
1 1 5 5 6 6 5 4 4 3 3 2 2 1
Figure 10.1: “Twinkle, Twinkle Little Star,” by the numbers.
Because you know which Solfeggio syllables represent which numbers, you can then notate “Twinkle, Twinkle Little Star” in Solfeggio, as in Figure 10.2.
Track 10.1
Do Do So So La La So Fa Fa Mi Mi Re Re Do
Figure 10.2: “Twinkle, Twinkle Little Star” in Solfeggio.
And finally, Figure 10.3 shows what “Twinkle, Twinkle Little Star” looks like in traditional music notation.
Figure 10.3: “Twinkle, Twinkle Little Star” in traditional music notation.
In our little example, you see that Do is written on the second line of the treble clef, on the pitch G. That’s because “Twinkle, Twinkle Little Star” is written here in the key of G, and when you’re in the key of G, the first note of the scale (Do) is G.
To refresh your memory, Figure 10.4 shows where the Solfeggio syllables fall on the staff when you’re in the key of G.
Track 10.2
Figure 10.4: The G Major scale in Solfeggio.
How Solfeggio WorksThe Solfeggio method assigns a particular syllable (Do, Re, Mi, Fa, So, La, Ti, and Do again) to each of the eight degrees of a major scale. The Solfeggio Do equals 1 (the first pitch in a scale), Re equals 2, Mi equals 3, and so on.
DEFINITION
Solfeggio is method of notating the pitches of a scale using nonsense syllables.
Table 10.1 shows the words you use with the Solfeggio method.
Table 10.1 The Solfeggio Method
Tone Solfeggio Name Pronunciation
1 Do Doh
2 Re Ray
3 Mi Mee
4 Fa Fah
5 So (or Sol) So (or Soul)
6 La Lah
7 Ti Tee
8 Do Doh
When you want to indicate the first pitch in a scale—any scale—you use the Solfeggio Do. When you want to indicate the second pitch in the scale, you use Re. And so on, all the way up the scale. It doesn’t matter which key you’re in—the first note of the scale is always Do. If you’re singing in the key of G, Do is G. If you’re singing in the key of B-flat, Do is B-flat.
TIP
In addition to the syllables used in the major scale, the Solfeggio method also includes syllables for sharped or flatted notes of the scale. (We call these chromatic notes.) That’s a little too complicated for this book, however, so we’ll stick to the seven main Solfeggio syllables here.
Part 3: Sight Singing and Vocal Theory114 Chapter 11: Practicing Your Sight Singing 115
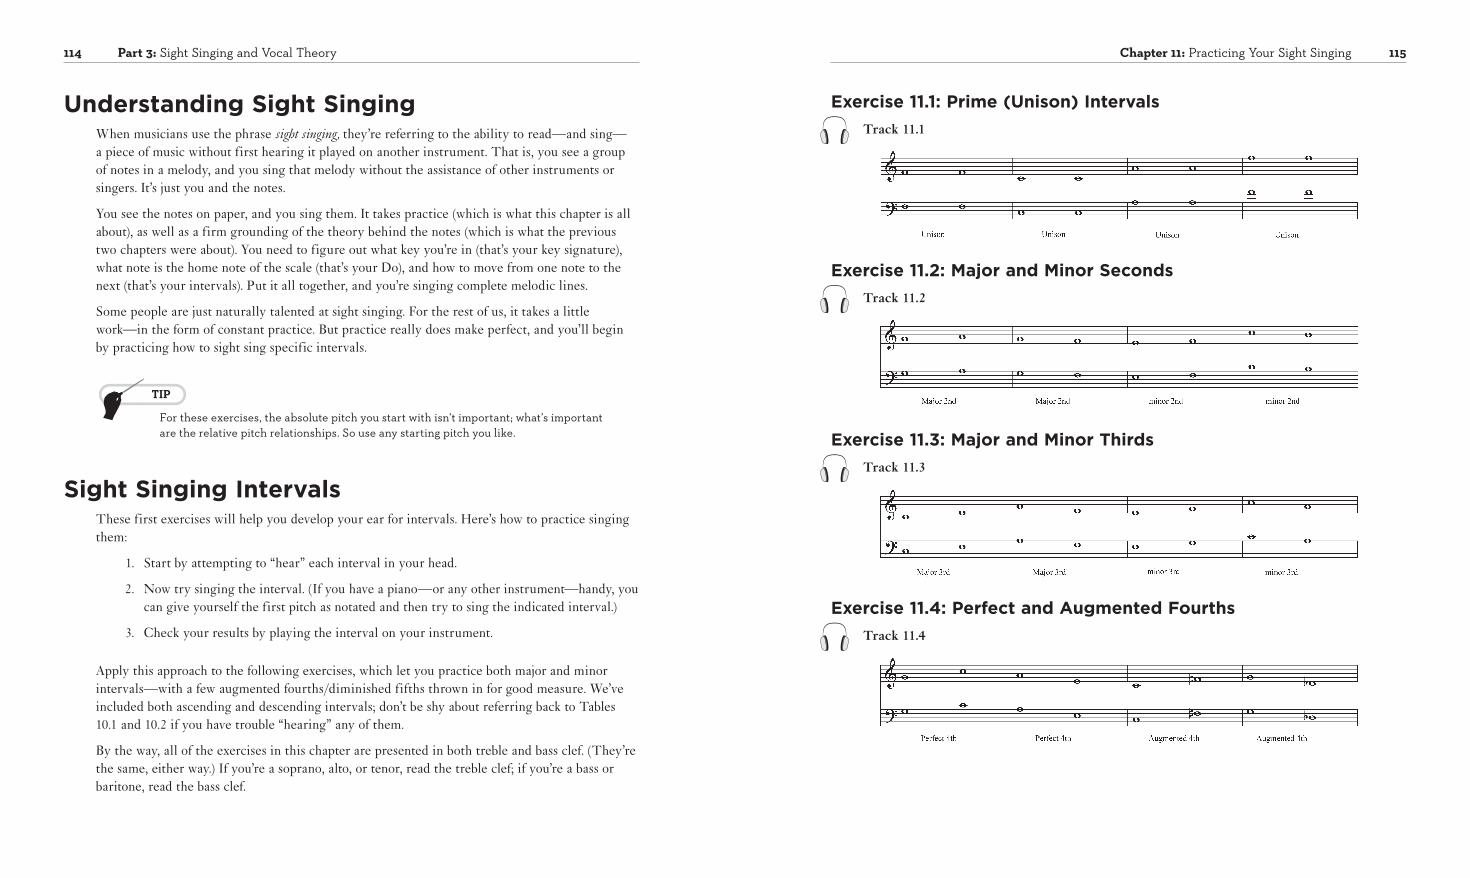
Exercise 11.1: Prime (Unison) IntervalsTrack 11.1
Exercise 11.2: Major and Minor SecondsTrack 11.2
Exercise 11.3: Major and Minor ThirdsTrack 11.3
Exercise 11.4: Perfect and Augmented FourthsTrack 11.4
Understanding Sight SingingWhen musicians use the phrase sight singing, they’re referring to the ability to read—and sing— a piece of music without first hearing it played on another instrument. That is, you see a group of notes in a melody, and you sing that melody without the assistance of other instruments or singers. It’s just you and the notes.
You see the notes on paper, and you sing them. It takes practice (which is what this chapter is all about), as well as a firm grounding of the theory behind the notes (which is what the previous two chapters were about). You need to figure out what key you’re in (that’s your key signature), what note is the home note of the scale (that’s your Do), and how to move from one note to the next (that’s your intervals). Put it all together, and you’re singing complete melodic lines.
Some people are just naturally talented at sight singing. For the rest of us, it takes a little work—in the form of constant practice. But practice really does make perfect, and you’ll begin by practicing how to sight sing specific intervals.
TIP
For these exercises, the absolute pitch you start with isn’t important; what’s important are the relative pitch relationships. So use any starting pitch you like.
Sight Singing IntervalsThese first exercises will help you develop your ear for intervals. Here’s how to practice singing them:
1. Start by attempting to “hear” each interval in your head.
2. Now try singing the interval. (If you have a piano—or any other instrument—handy, you can give yourself the first pitch as notated and then try to sing the indicated interval.)
3. Check your results by playing the interval on your instrument.
Apply this approach to the following exercises, which let you practice both major and minor intervals—with a few augmented fourths/diminished fifths thrown in for good measure. We’ve included both ascending and descending intervals; don’t be shy about referring back to Tables 10.1 and 10.2 if you have trouble “hearing” any of them.
By the way, all of the exercises in this chapter are presented in both treble and bass clef. (They’re the same, either way.) If you’re a soprano, alto, or tenor, read the treble clef; if you’re a bass or baritone, read the bass clef.