Embed Size (px)
Citation preview
AQUA Nein'
Agovi your
lang to
,t%S turning eur
sYstell 4)11.
LI
LI
AQUA JYeTM mim
iglow your
langto este:0e
beiere turning your
system on.
[email protected] I www.autopot.co.uk I +44 (0)844 8581520 [email protected] I www.autopot.co.uk I +44 (0)844 8581520
Your 1Pot system set-up guidelines
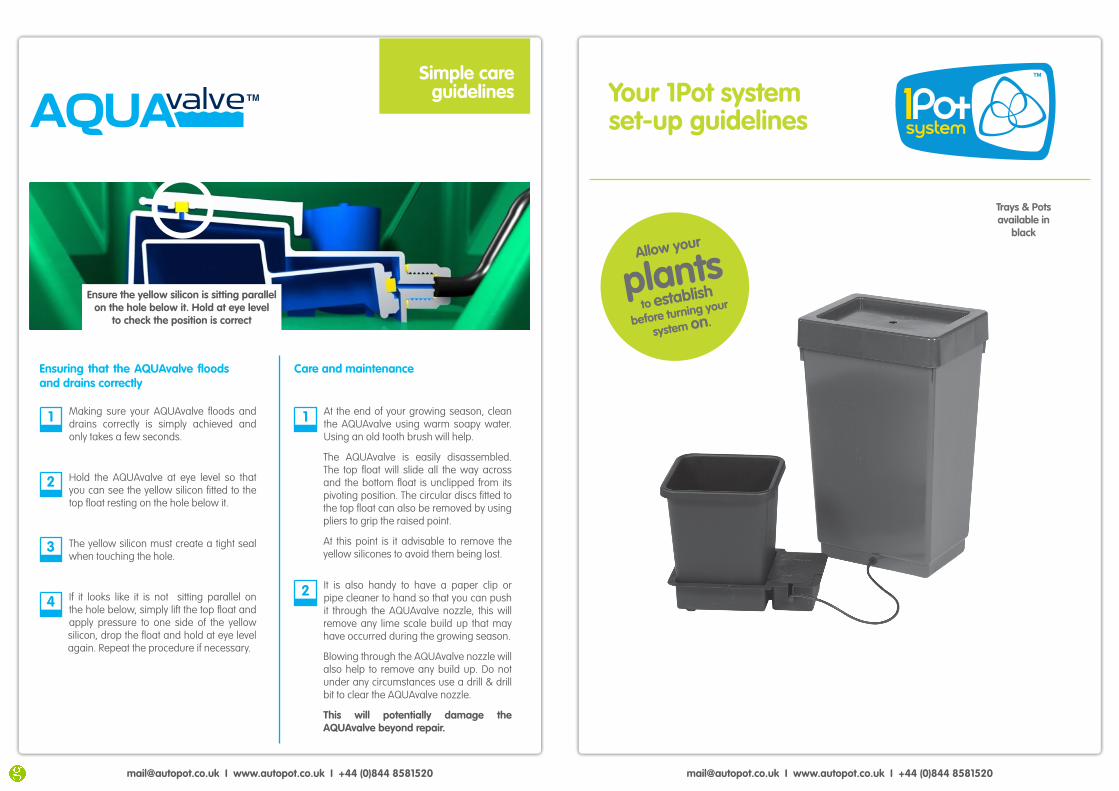
Trays & Pots available in
black
Ensuring that the AQUAvalve floods and drains correctly
Care and maintenance
Making sure your AQUAvalve floods and drains correctly is simply achieved and only takes a few seconds.
Hold the AQUAvalve at eye level so that you can see the yellow silicon fitted to the top float resting on the hole below it.
The yellow silicon must create a tight seal when touching the hole.
If it looks like it is not sitting parallel on the hole below, simply lift the top float and apply pressure to one side of the yellow silicon, drop the float and hold at eye level again. Repeat the procedure if necessary.
At the end of your growing season, clean the AQUAvalve using warm soapy water. Using an old tooth brush will help.
The AQUAvalve is easily disassembled. The top float will slide all the way across and the bottom float is unclipped from its pivoting position. The circular discs fitted to the top float can also be removed by using pliers to grip the raised point.
At this point is it advisable to remove the yellow silicones to avoid them being lost.
It is also handy to have a paper clip or pipe cleaner to hand so that you can push it through the AQUAvalve nozzle, this will remove any lime scale build up that may have occurred during the growing season.
Blowing through the AQUAvalve nozzle will also help to remove any build up. Do not under any circumstances use a drill & drill bit to clear the AQUAvalve nozzle.
This will potentially damage the AQUAvalve beyond repair.
Simple careguidelines
11
2
2
3
4
Ensure the yellow silicon is sitting parallel on the hole below it. Hold at eye level
to check the position is correct
plantsAllow your
to establish
before turning your
system on.
systemsystem
TM
1-
• 4
1 1-
• 4
1
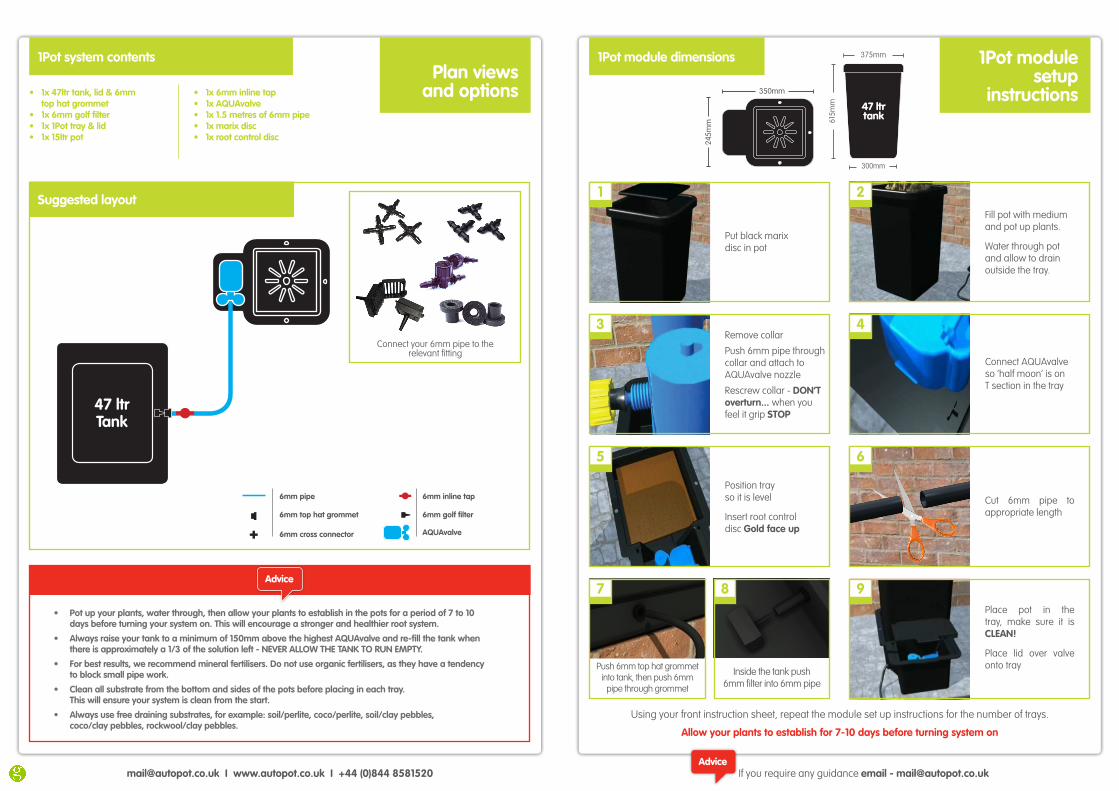
1Pot module setup
instructions
Using your front instruction sheet, repeat the module set up instructions for the number of trays.
If you require any guidance email - [email protected]
1
7 8 9
2
Put black marix disc in pot
Allow your plants to establish for 7-10 days before turning system on
[email protected] I www.autopot.co.uk I +44 (0)844 8581520
65
Position tray so it is level
Insert root control disc Gold face up
Push 6mm top hat grommet into tank, then push 6mm
pipe through grommet
Inside the tank push 6mm filter into 6mm pipe
3Remove collar
Push 6mm pipe through collar and attach to AQUAvalve nozzle
Rescrew collar - DON’T overturn... when you feel it grip STOP
Cut 6mm pipe to appropriate length
Connect AQUAvalve so ‘half moon’ is on T section in the tray
4
Plan views and options
Suggested layout
• 1x47ltrtank,lid&6mm top hat grommet
• 1x6mmgolffilter• 1x1Pottray&lid• 1x15ltrpot
• 1x6mminlinetap• 1xAQUAvalve• 1x1.5metresof6mmpipe• 1xmarixdisc• 1xrootcontroldisc
1Pot system contents 1Pot module dimensions
Advice
6mm pipe
6mm top hat grommet
6mm cross connector
6mmgolffilter
6mm inline tap
AQUAvalve
350mm
245m
m
47 ltrtank
375mm
300mm
615m
m
47 ltrTank
Fill pot with medium and pot up plants.
Water through pot and allow to drain outside the tray.
Place pot in the tray, make sure it is CLEAN!
Place lid over valve onto tray
Connect your 6mm pipe to the relevant fitting
• Potupyourplants,waterthrough,thenallowyourplantstoestablishinthepotsforaperiodof7to10days before turning your system on. This will encourage a stronger and healthier root system.
• Alwaysraiseyourtanktoaminimumof150mmabovethehighestAQUAvalveandre-fillthetankwhenthereisapproximatelya1/3ofthesolutionleft-NEVERALLOWTHETANKTORUNEMPTY.
• Forbestresults,werecommendmineralfertilisers.Donotuseorganicfertilisers,astheyhaveatendencyto block small pipe work.
• Cleanallsubstratefromthebottomandsidesofthepotsbeforeplacingineachtray. This will ensure your system is clean from the start.
• Alwaysusefreedrainingsubstrates,forexample:soil/perlite,coco/perlite,soil/claypebbles, coco/claypebbles,rockwool/claypebbles.

Deutschland: https://www.growland.net
Europe: https://www.growland.biz
France: https://www.growland.fr
España: https://www.growland.es
Österreich: https://www.growland.at
Nederland: https://www.growland.nl
Italia: https://www.growland.it
United Kingdom: https://www.growland.co.uk