Embed Size (px)
Citation preview
SIMATIC HMI
WinCC V7.3WinCC: General information and installation
System Manual
Print of the Online Help
06/2014A5E34372689-AA
What's New in WinCC 1
WinCC Installation Notes 2
WinCC Release Notes 3
Service and Support 4
Migration 5
WinCC diagnosis 6
Licensing 7
Performance Data 8
Legal informationWarning notice system
This manual contains notices you have to observe in order to ensure your personal safety, as well as to prevent damage to property. The notices referring to your personal safety are highlighted in the manual by a safety alert symbol, notices referring only to property damage have no safety alert symbol. These notices shown below are graded according to the degree of danger.
DANGER
indicates that death or severe personal injury will result if proper precautions are not taken.
WARNING
indicates that death or severe personal injury may result if proper precautions are not taken.
CAUTION
indicates that minor personal injury can result if proper precautions are not taken.
NOTICEindicates that property damage can result if proper precautions are not taken.If more than one degree of danger is present, the warning notice representing the highest degree of danger will be used. A notice warning of injury to persons with a safety alert symbol may also include a warning relating to property damage.
Qualified PersonnelThe product/system described in this documentation may be operated only by personnel qualified for the specific task in accordance with the relevant documentation, in particular its warning notices and safety instructions. Qualified personnel are those who, based on their training and experience, are capable of identifying risks and avoiding potential hazards when working with these products/systems.
Proper use of Siemens productsNote the following:
WARNING
Siemens products may only be used for the applications described in the catalog and in the relevant technical documentation. If products and components from other manufacturers are used, these must be recommended or approved by Siemens. Proper transport, storage, installation, assembly, commissioning, operation and maintenance are required to ensure that the products operate safely and without any problems. The permissible ambient conditions must be complied with. The information in the relevant documentation must be observed.
TrademarksAll names identified by ® are registered trademarks of Siemens AG. The remaining trademarks in this publication may be trademarks whose use by third parties for their own purposes could violate the rights of the owner.
Disclaimer of LiabilityWe have reviewed the contents of this publication to ensure consistency with the hardware and software described. Since variance cannot be precluded entirely, we cannot guarantee full consistency. However, the information in this publication is reviewed regularly and any necessary corrections are included in subsequent editions.
Siemens AGIndustry SectorPostfach 48 4890026 NÜRNBERGGERMANY
A5E34372689-AAⓅ 08/2014 Subject to change
Copyright © Siemens AG 2014.All rights reserved
Table of contents
1 What's New in WinCC..................................................................................................................................7 1.1 What is new in WinCC V7?...........................................................................................................7 1.2 Supported operating systems........................................................................................................8 1.3 "SIMATIC S7-1200, S7-1500 Channel" channel DLL...................................................................9 1.4 Encrypted communication in the distributed system...................................................................10 1.5 Easier configuration with WinCC Configuration Studio...............................................................11 1.6 Multiuser engineering in WinCC projects....................................................................................12 1.7 Extended functionality for WinCC Graphics Designer.................................................................13 1.8 Expanded Functionality for WinCC/WebNavigator......................................................................15 1.9 Expanded Functionality for WinCC/DataMonitor.........................................................................16 1.10 WinCC/WebUX............................................................................................................................17 1.11 Other Innovations........................................................................................................................18
2 WinCC Installation Notes............................................................................................................................21 2.1 Installation Guide.........................................................................................................................21 2.2 Scope of delivery.........................................................................................................................22 2.3 Licenses and Licensing...............................................................................................................24 2.4 Activating and testing ASIA licenses...........................................................................................26 2.5 Installation Requirements............................................................................................................28 2.5.1 WinCC Installation Requirements...............................................................................................28 2.5.2 Hardware Requirements for the Installation................................................................................29 2.5.3 Software Requirements for the Installation.................................................................................32 2.5.4 Notes on Data and System Security...........................................................................................37 2.5.5 Access rights in the operating system.........................................................................................38 2.5.5.1 Defining Access Rights in the Operating System........................................................................38 2.5.5.2 Including users in the "SIMATIC HMI" user group......................................................................41 2.5.5.3 Including domain-global user group in the "SIMATIC HMI" user group......................................42 2.5.5.4 Release existing project for "SIMATIC HMI" user group.............................................................42 2.5.6 How to Adapt the Windows Security Policies..............................................................................43 2.6 Installing WinCC..........................................................................................................................45 2.6.1 Installing WinCC..........................................................................................................................45 2.6.2 How to Install MS Message Queuing..........................................................................................46 2.6.3 How to Install WinCC..................................................................................................................47 2.6.4 How to Install Supplementary Components Later.......................................................................51 2.6.5 How to Install Supplementary Languages...................................................................................52 2.6.6 How to upgrade a standard client................................................................................................52 2.7 How to Perform an Uninstall........................................................................................................54
WinCC: General information and installationSystem Manual, 06/2014, A5E34372689-AA 3
2.8 Upgrading WinCC.......................................................................................................................56 2.8.1 Upgrading WinCC.......................................................................................................................56 2.8.2 How to Perform an Upgrade Installation.....................................................................................57 2.9 Notes about Running the Software.............................................................................................59
3 WinCC Release Notes................................................................................................................................61 3.1 Release Notes.............................................................................................................................61 3.2 Notes on operation......................................................................................................................62 3.2.1 Notes on operation......................................................................................................................62 3.2.2 Defining Access Rights in the Operating System........................................................................63 3.2.3 Windows Operating System........................................................................................................66 3.2.4 Database System........................................................................................................................70 3.2.5 Network Technology and UPS....................................................................................................71 3.3 Notes on WinCC..........................................................................................................................77 3.3.1 General information on WinCC and configurations.....................................................................77 3.3.2 WinCC CS...................................................................................................................................82 3.3.3 WinCC Runtime...........................................................................................................................84 3.3.4 Smart Tools.................................................................................................................................87 3.3.5 Process communication..............................................................................................................88 3.4 Notes on WinCC Redundancy....................................................................................................91 3.5 Notes on Process Control Options..............................................................................................92
4 Service and Support...................................................................................................................................95 4.1 Warnings.....................................................................................................................................95 4.2 Customer Support.......................................................................................................................98 4.3 Support Request.......................................................................................................................101 4.4 Help on WinCC Documentation................................................................................................103 4.4.1 WinCC Documentation..............................................................................................................103 4.4.2 Tooltips and Status Bar.............................................................................................................103 4.4.3 Direct Help ("What's This?") in WinCC......................................................................................104 4.4.4 WinCC Information System.......................................................................................................106 4.4.5 Navigation in the WinCC Information System...........................................................................108 4.4.6 Search in WinCC Information System.......................................................................................110 4.4.7 Documentation in the Internet...................................................................................................112
5 Migration...................................................................................................................................................115 5.1 Introduction................................................................................................................................115 5.2 Important differences compared to previous versions...............................................................118 5.3 Conditions for Migration............................................................................................................120 5.4 How to migrate the WinCC data................................................................................................121 5.5 How to migrate S7 projects.......................................................................................................122 5.6 Migrating Multi-User Projects....................................................................................................124 5.7 Additional Steps........................................................................................................................125 5.8 Upgrading a Redundant System in Normal Operation..............................................................126
Table of contents
WinCC: General information and installation4 System Manual, 06/2014, A5E34372689-AA
5.8.1 Upgrading a Redundant System in Normal Operation..............................................................126 5.8.2 Quick Reference Instructions: Upgrading Redundant Systems in Normal Operation...............126 5.8.3 Phase 1: Upgrading the Standby Server...................................................................................129 5.8.4 Phase 2: Upgrade WinCC clients..............................................................................................131 5.8.5 Phase 3: Upgrading Master Server...........................................................................................133 5.8.6 Phase 4: Defining Master Server and Completing Upgrade.....................................................136 5.9 Migration Diagnostics................................................................................................................138 5.10 Appendix...................................................................................................................................139 5.10.1 Documentation of Functions of Predecessor Versions.............................................................139 5.10.2 WinCC Push Button Control......................................................................................................139 5.10.2.1 The "WinCC Push Button" Control............................................................................................139 5.10.2.2 How to Change the Appearance and Labeling of the Push Button...........................................140 5.10.2.3 How to Change the Color of the Push Button...........................................................................141 5.10.2.4 How to Change the Font of the Push Button.............................................................................142 5.10.2.5 How to Assign Pictures to the Push Button...............................................................................144
6 WinCC diagnosis......................................................................................................................................147 6.1 Runtime Monitoring of Actions..................................................................................................147 6.2 Starting ApDiag.exe..................................................................................................................148 6.3 ApDiag Menu Commands.........................................................................................................149 6.3.1 Menu Bar Overview...................................................................................................................149 6.3.2 File - Exit...................................................................................................................................150 6.3.3 Diagnostics................................................................................................................................151 6.3.3.1 Start...........................................................................................................................................151 6.3.3.2 Change......................................................................................................................................152 6.3.3.3 Stop...........................................................................................................................................153 6.3.3.4 OnFile........................................................................................................................................153 6.3.3.5 Profile........................................................................................................................................156 6.3.3.6 FillTags......................................................................................................................................159 6.3.4 Output........................................................................................................................................160 6.3.4.1 Output On Screen.....................................................................................................................160 6.3.4.2 Output To File............................................................................................................................161 6.3.4.3 Reset Buffer..............................................................................................................................161 6.3.5 Info............................................................................................................................................161 6.3.5.1 FirstAction.................................................................................................................................161 6.3.5.2 Count of Connections................................................................................................................165 6.3.5.3 Count of Actions in RequestQueue...........................................................................................165 6.3.5.4 Count of TransAction.................................................................................................................165 6.3.5.5 Count of Actions of each Transaction.......................................................................................166 6.3.5.6 Count of Tags in each Transaction...........................................................................................167 6.3.5.7 Count of Actions in Cycle..........................................................................................................168 6.3.5.8 Count of Functions....................................................................................................................169 6.3.6 Trace Points - Change Level.....................................................................................................169 6.3.7 Output Window - Open / Close..................................................................................................170 6.4 Appendix...................................................................................................................................172 6.4.1 Trace points and their diagnostics level....................................................................................172 6.4.2 System messages.....................................................................................................................173
7 Licensing..................................................................................................................................................179 7.1 Software Has a Value................................................................................................................179
Table of contents
WinCC: General information and installationSystem Manual, 06/2014, A5E34372689-AA 5
7.2 Overview of the licensing..........................................................................................................180 7.3 Basic license types and license types in WinCC.......................................................................183 7.4 WinCC in the Demo Mode.........................................................................................................186 7.5 How to manage licenses...........................................................................................................187 7.6 How to Upgrade Licenses.........................................................................................................189 7.7 Diagnostics of Licensing Problems...........................................................................................190 7.8 How to Restore a License Key..................................................................................................192
8 Performance Data....................................................................................................................................195 8.1 Performance Data.....................................................................................................................195 8.2 Configurations...........................................................................................................................196 8.3 Graphics System.......................................................................................................................197 8.4 Message system.......................................................................................................................198 8.5 Archiving system.......................................................................................................................199 8.6 User archives............................................................................................................................200 8.7 Reports......................................................................................................................................202 8.8 Scripting with VBS and ANSI-C.................................................................................................203 8.9 Process Communication...........................................................................................................204
Index.........................................................................................................................................................207
Table of contents
WinCC: General information and installation6 System Manual, 06/2014, A5E34372689-AA
What's New in WinCC 11.1 What is new in WinCC V7?
IntroductionThe following chapters inform you in brief about the most important improvements in WinCC V7.3 over WinCC V7.2.
WinCC: General information and installationSystem Manual, 06/2014, A5E34372689-AA 7
1.2 Supported operating systems
Software requirements and supported operating systems
Microsoft SQL Server 2008 R2WinCC V7.3 and higher require Microsoft SQL Server 2008 R2 SP2 (32-bit). The SQL server is included in the scope of delivery of the product.
Operating systemsWinCC V7.3 and higher run on the following operating systems:
● WinCC client projects
– Windows 8.1 (Professional / Enterprise, 32-bit)
– Windows 8.1 (Professional / Enterprise, 64-bit)
– Windows 7 SP1 (Ultimate / Professional / Enterprise, 32-bit)
– Windows 7 SP1 (Ultimate / Professional / Enterprise, 64-bit)
● For WinCC single-user projects and client projects
– Windows 8.1 (Professional / Enterprise, 32-bit)
– Windows 8.1 (Professional / Enterprise, 64-bit)
– Windows 7 SP1 (Ultimate / Professional / Enterprise, 32-bit)
– Windows 7 SP1 (Ultimate / Professional / Enterprise, 64-bit)
– Windows Server 2012 R2 (standard 64-bit)
– Windows Server 2008 R2 SP1 (standard 64-bit)
– Windows Server 2008 SP2 (standard 32-bit)
● For WinCC Server
– Windows 8.1 (Professional / Enterprise 64-bit)
– Windows Server 2012 R2 (standard 64-bit)
– Windows Server 2008 R2 SP1 (standard 64-bit)
– Windows Server 2008 SP2 (standard 32-bit)
What's New in WinCC1.2 Supported operating systems
WinCC: General information and installation8 System Manual, 06/2014, A5E34372689-AA

1.3 "SIMATIC S7-1200, S7-1500 Channel" channel DLL
Symbolic addressing and loading of AS symbolsWinCC V7.3 offers an improved configuration of the communication via SIMATIC controllers S7-1200 and S7-1500.
You can configure tags in WinCC with optimized block access to the address area in the automation system.
For this, all available controller data are downloaded to the "AS Symbols" tab. The needed symbols are integrated into the Tag Management.
You have the option in Tag Management to configure offline without being connected to the controller.
What's New in WinCC1.3 "SIMATIC S7-1200, S7-1500 Channel" channel DLL
WinCC: General information and installationSystem Manual, 06/2014, A5E34372689-AA 9
1.4 Encrypted communication in the distributed system
SSL communication in distributed systemsWinCC V7.3 offers increased security for communication:
WinCC offers encrypted communication of connected computers in distributed systems.
You specify a PSK key for the computers in the "Simatic Shell" network management. This means that only those computers in which the shared specified key is known prior to communication communicate with each other. You can specify different environments in a network each with its own PSK key.
What's New in WinCC1.4 Encrypted communication in the distributed system
WinCC: General information and installation10 System Manual, 06/2014, A5E34372689-AA
1.5 Easier configuration with WinCC Configuration Studio
Efficient engineeringThe "WinCC Configuration Studio" editor replaces a large number of the previously used editors in WinCC V7.3:
● Tag Management
● Tag Logging
● Alarm Logging
● Text Library
● User Administrator
● Horn
● User Archive
This means WinCC offers a uniform configuration user interface for all important project data which is easy to operate.
The table-based editors make it easy to create and manage user data, connections, tags, archive data as well as messages and project texts.
Simple operationThe user interface is divided into two areas: a navigation area similar to Microsoft Outlook and a data area similar to Microsoft Excel. This means that the editor offers advantages in operation which will be familiar to you from spreadsheet programs.
The clearly structured navigation area and the sublevels displayed on tabs provide easy navigation and orientation in the editor, for example, in Tag Management when configuring connections, groups and tags.
The "Properties" window provides a clearly structured overview of the properties for each selected object. The configuration of a property is supported by the detailed help in the information box.
Processing of mass dataWinCC Configuration Studio also provides a simple and efficient means of configuring mass data for WinCC projects.
WinCC Configuration Studio therefore replaces the previously used editors: The functions of WinCC ConfigurationTool and WinCC Archive ConfigurationTool are now integrated in WinCC.
You can still process project data outside of WinCC by exporting and importing the data.
Easy migration to WinCC Configuration StudioTo import existing files from the WinCC Configuration Tool or WinCC Archive ConfigurationTool into the WinCC Configuration Studio, use the menu command "Import" in the WinCC Configuration Studio. In addition to the file name, select the "ConfigTool file (*.xlsx)" or "Archive Config Tool file (*.xlsx)" entry in the file selection dialog.
What's New in WinCC1.5 Easier configuration with WinCC Configuration Studio
WinCC: General information and installationSystem Manual, 06/2014, A5E34372689-AA 11
1.6 Multiuser engineering in WinCC projects
Multiuser engineering
In all WinCC project types, several users can edit a project simultaneously from different computers.
Up to WinCC V7.2: Configuration clientPrior to WinCC V7.3, you could only edit a project simultaneously via remote configuration from several configuration clients. These client computers had to be entered on the server for this purpose.
As of WinCC V7.3: Multiuser engineeringWinCC V7.3 supports efficient engineering through more flexibility in a team of project engineers in addition to the configuration client.
On the "Options" tab, select the check box "Multiuser engineering" in the project properties.
This gives all WinCC users access to the project data within the limits of their authorizations. Simultaneous editing is prevented by locking opened resources.
You can find more information in the section "How to use multiuser engineering".
Benefits compared to the configuration client● The configuration computers do not have to be entered on the server.
● You do not need to configure user authorizations in the User Administrator.
● The project engineer can edit all types of WinCC projects:
– Single-user project
– Multi-user project
– A client with its own project
● You can only activate Runtime if the project is on the local computer and has not already been opened by another computer. Accordingly, the project can no longer be opened on another computer when Runtime is activated.
What's New in WinCC1.6 Multiuser engineering in WinCC projects
WinCC: General information and installation12 System Manual, 06/2014, A5E34372689-AA
1.7 Extended functionality for WinCC Graphics Designer
Graphics DesignerWinCC V7.3 offers the following new functions in Graphics Designer:
● "Process pictures" selection window:
– All pictures and faceplates from the "GraCS" project folder are displayed and can be filtered with file filters.
– Pictures and faceplates inserted with drag&drop are automatically set up as preconfigured buttons or faceplate instance in the process picture.
– Use <Ctrl+C> to copy the list of pictures to the clipboard.
● When saving a picture, the "Output window" viewlet shows information, errors and warnings for the configuration. When you double-click a message in the output window, for example, the corresponding picture object or the property of the object containing the affected script is selected.
● Multilingual configuration of object properties: You enter texts in all configurable languages without switching the language in the "Text Input" dialog. For configurable languages, the configured languages are available in the "Text Library".
● New object properties:
– "Display name" specifies the user-defined name of the process picture.
– "Web-enabled" identifies the process picture or faceplate type as executable in the Web browser. The pictures are saved in "*.rdf" format in addition to "*.pdl" format and can be used in the WinCC/WebUX option.
– "Scaling mode" for customized objects specifies how the internal objects of the customized object are displayed when the customized object is scaled.
– "Scaling mode" for faceplates defines the size in which the objects of the faceplate instance are displayed in proportion to the faceplate type.
– "Directory for pictures" with the extended status display specifies whether or not a subdirectory for pictures is created. If pictures are stored in the subdirectory, they are available for the extended status display.
● The "Date/Time" output format is now available for the I/O field.
● Direct2D is used to display the graphics. Soft shadows are displayed. For performance reasons, you can disable the Direct2D display for individual computers in the computer properties.
● You can use SVG files as background picture of a process picture and as picture for the Graphics Designer objects "Button", "Round button", "Graphic object" and "Status display".
What's New in WinCC1.7 Extended functionality for WinCC Graphics Designer
WinCC: General information and installationSystem Manual, 06/2014, A5E34372689-AA 13

● Colors and color palette:
– The new color palette matches the colors of the Microsoft standard programs.
– You assign different colors to individual object properties with a click of the mouse and with additional keys.
– A bar is displayed in the font palette when a color is selected from the central color palette.
● With the extended status display, you can also use pictures from a subdirectory of "GraCS".
What's New in WinCC1.7 Extended functionality for WinCC Graphics Designer
WinCC: General information and installation14 System Manual, 06/2014, A5E34372689-AA

1.8 Expanded Functionality for WinCC/WebNavigator
WebNavigator V7.3Version V7.3 of the WinCC/WebNavigator option offers more convenience, functionality and security for web-based communication with WinCC.
RequirementsThe WinCC/WebNavigator V7.3 gives you access to process pictures with the following Web viewers:
● Internet Explorer V9
● Internet Explorer V10
● Internet Explorer V11
● WinCCViewerRT
WebNavigator client: Printing from WinCC controlsYou can print from the WinCC Controls in the WebNavigator client and in the WinCC ViewerRT as of WinCC V7.3.
You specify the printer using the settings in the Web navigation interface or WinCCViewerRT.
New graphic formatsYou can publish graphics of the following formats with the Web View Publisher:
● PNG
● EMF
● JPG
● GIF
● WMF
The files can also be located in a subfolder of the "GraCS" graphics folder.
What's New in WinCC1.8 Expanded Functionality for WinCC/WebNavigator
WinCC: General information and installationSystem Manual, 06/2014, A5E34372689-AA 15
1.9 Expanded Functionality for WinCC/DataMonitor
DataMonitor V7.3Version V7.3 of the WinCC/DataMonitor option offers more convenience, functionality and security for web-based communication with WinCC.
RequirementsYou can use the following tools for evaluation of process data with WinCC/DataMonitor V7.3:
● Internet Explorer V9
● Internet Explorer V10
● Internet Explorer V11
● WinCCViewerRT
● Microsoft Excel 2007 SP2
● Microsoft Excel 2010
● Microsoft Excel 2013
Excel Workbook WizardThe "Excel Workbook Wizard" offers the following improvements for configuration:
● For Excel worksheets, you configure the display of archive values and messages, for example. To do so, you specify the display properties. You can now save the property settings in templates. You can then load the settings and use them again after exiting and restarting Excel.
● For the display of archive values, you can now define the unit of time with user-defined data resolution.
● The settings for the time span have been improved and expanded. For the display of messages, you can now also configure the time span in relative or absolute time format.
● If errors occur in the display of the Excel workbook or no connection to the WinCC server is established, the log entries are displayed in a workbook. The entries contain the date, the tags or messages affected, the server, and the error message.
WebCenterYou can now display static process pictures on a language-specific basis in the Web center.
This function is only available if you have configured and published pictures in different languages. You will also have to have selected the corresponding language for the picture in the picture administration and in the web part.
You can now simultaneously configure multiple time-triggered reports with various starting times in the Webcenter. The starting and ending times can be before the report creation time. For example, a report is created at 5 PM which contains values for the time between 8 AM and 4 PM.
What's New in WinCC1.9 Expanded Functionality for WinCC/DataMonitor
WinCC: General information and installation16 System Manual, 06/2014, A5E34372689-AA

1.10 WinCC/WebUX
Web access with WinCC/WebUX with any browser
WinCC WebUX provides a solution for device- and browser-independent operator control and monitoring of the automation system.
With WinCC V7.3, limited functionality for mobile end devices is supported initially.
ConfigurationThe WinCC pictures are configured for WebUX access. The pictures are configured as executable for the Web browser in Graphics Designer using the object property "Web-enabled" and thus also saved in "*.rdf" format.
Distinction WebUX - WebNavigator
WebUX WebNavigatorBased on generally established web standards Based on ActiveX technology from MicrosoftCan be used with any browser Only supports Microsoft Internet ExplorerCan be used for a large number of devices regardless of the operating system, for example, smartphones, tablets, and PCs
Can only be used with Windows computers
Does not require a client installation Requires a client installationStandard user rights are sufficient Requires administrator rights for installation
What's New in WinCC1.10 WinCC/WebUX
WinCC: General information and installationSystem Manual, 06/2014, A5E34372689-AA 17

1.11 Other Innovations
What else is new in WinCC Version 7.3?Apart from the innovative features described above, WinCC V7.3 also offers additional functions and enhancements.
Cross ReferenceThe tags for the following objects, functions and editors are now also displayed in the list of project objects:
● Object properties of the WinCC Controls
● Report Designer
● Horn
● VBS project and standard functions
The linking dialog has been simplified.
List entry filtering has been revised.
Basic Process ControlYou can display the following additional message lists in Runtime:
● List of active messages / acknowledgeable list of active messages
● Lock list
● Split list of hidden messages
● Split list of messages to be hidden
The status display in the list of messages to be hidden distinguishes between:
● Hide - System = Message hidden automatically
● Hide - Operator = Message hidden manually
OPC - Open ConnectivityWinCC V7.3 supports the WinCC OPC UA server in the following scope:
● OPC UA Data Access: Process values
● OPC UA Historical Access: Values from tag archives
● OPC UA alarm & conditions: WinCC messages
What's New in WinCC1.11 Other Innovations
WinCC: General information and installation18 System Manual, 06/2014, A5E34372689-AA

LicensingThe following upgrade licenses are available for upgrading to WinCC V7.3:
● Upgrade from WinCC V6.2 / WinCC V7.0 to WinCC V7.3
● Upgrade from WinCC V7.2 to WinCC V7.3
What's New in WinCC1.11 Other Innovations
WinCC: General information and installationSystem Manual, 06/2014, A5E34372689-AA 19

WinCC Installation Notes 22.1 Installation Guide
ContentsThis documentation contains important information on the scope of delivery, as well as on the installation and operation of WinCC.
The information contained here takes precedence over the information contained in the manual and online help.
WinCC: General information and installationSystem Manual, 06/2014, A5E34372689-AA 21
2.2 Scope of delivery
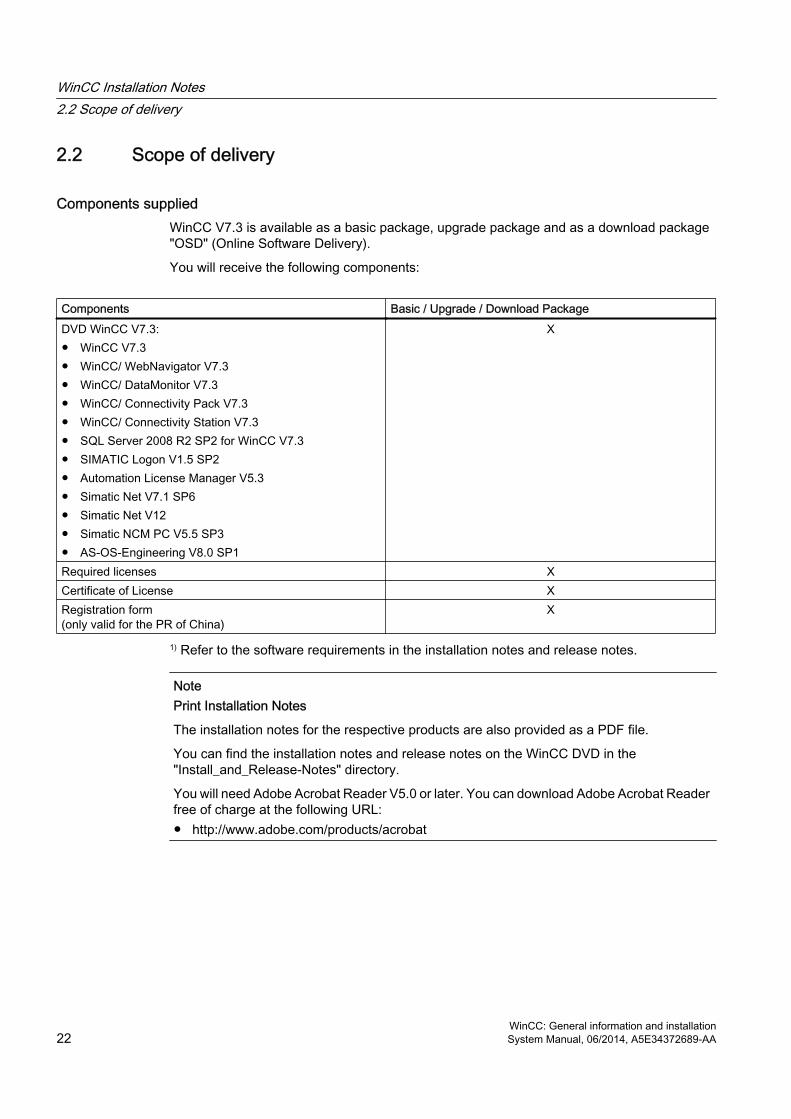
Components suppliedWinCC V7.3 is available as a basic package, upgrade package and as a download package "OSD" (Online Software Delivery).
You will receive the following components:
Components Basic / Upgrade / Download PackageDVD WinCC V7.3:● WinCC V7.3● WinCC/ WebNavigator V7.3● WinCC/ DataMonitor V7.3● WinCC/ Connectivity Pack V7.3● WinCC/ Connectivity Station V7.3● SQL Server 2008 R2 SP2 for WinCC V7.3● SIMATIC Logon V1.5 SP2● Automation License Manager V5.3● Simatic Net V7.1 SP6● Simatic Net V12● Simatic NCM PC V5.5 SP3● AS-OS-Engineering V8.0 SP1
X
Required licenses XCertificate of License XRegistration form(only valid for the PR of China)
X
1) Refer to the software requirements in the installation notes and release notes.
NotePrint Installation Notes
The installation notes for the respective products are also provided as a PDF file.
You can find the installation notes and release notes on the WinCC DVD in the "Install_and_Release-Notes" directory.
You will need Adobe Acrobat Reader V5.0 or later. You can download Adobe Acrobat Reader free of charge at the following URL:● http://www.adobe.com/products/acrobat
WinCC Installation Notes2.2 Scope of delivery
WinCC: General information and installation22 System Manual, 06/2014, A5E34372689-AA
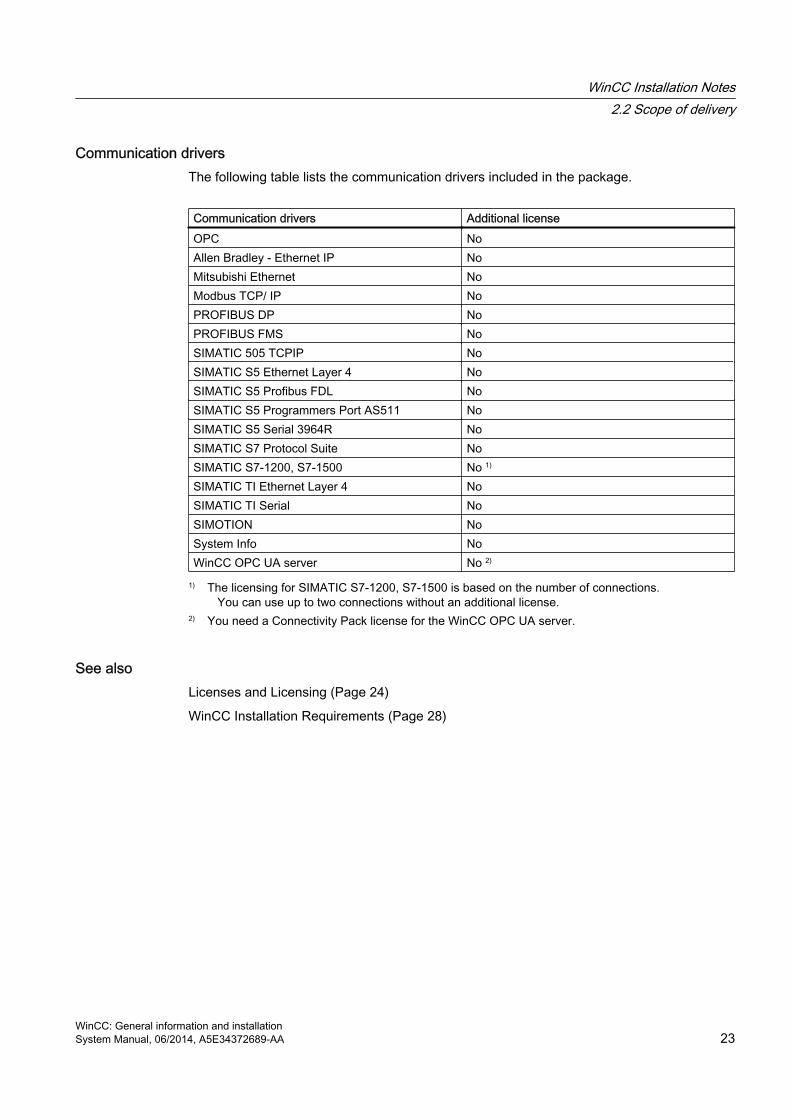
Communication driversThe following table lists the communication drivers included in the package.
Communication drivers Additional licenseOPC NoAllen Bradley - Ethernet IP NoMitsubishi Ethernet NoModbus TCP/ IP NoPROFIBUS DP NoPROFIBUS FMS NoSIMATIC 505 TCPIP NoSIMATIC S5 Ethernet Layer 4 NoSIMATIC S5 Profibus FDL NoSIMATIC S5 Programmers Port AS511 NoSIMATIC S5 Serial 3964R NoSIMATIC S7 Protocol Suite NoSIMATIC S7-1200, S7-1500 No 1)
SIMATIC TI Ethernet Layer 4 NoSIMATIC TI Serial NoSIMOTION NoSystem Info NoWinCC OPC UA server No 2)
1) The licensing for SIMATIC S7-1200, S7-1500 is based on the number of connections. You can use up to two connections without an additional license.
2) You need a Connectivity Pack license for the WinCC OPC UA server.
See alsoLicenses and Licensing (Page 24)
WinCC Installation Requirements (Page 28)
WinCC Installation Notes2.2 Scope of delivery
WinCC: General information and installationSystem Manual, 06/2014, A5E34372689-AA 23
2.3 Licenses and Licensing
Introduction The WinCC software is protected and can only be used in its full measure with a valid license. Each installed software and option used requires a valid license for unrestricted operation of WinCC. You will receive a storage medium with all necessary license keys for the installation of licenses. The licenses for optional packages must be ordered separately.
Licenses which are installed for use in WinCC are transferred from the storage medium to a local drive and are unregistered on the storage medium. The cumulation of more than one license per component subject to a license is possible only for archive licenses. Other licenses cannot be cumulated.
Note
Furthermore, the licensee confirms that the software (SW) contains licensed software by Microsoft Corporation or its subsidiaries. Thereby, licensee agrees to be bound by the terms and conditions of the appended license agreement between Microsoft SQL Server and end user, and to fulfill same.
Notes On License ConditionsPlease observe the enclosed license conditions, which are also displayed during the installation. You need V7.3 licenses for WinCC V7.3.
The SIMATIC WinCC software is copy-protected against unlicensed use. Additional information on licenses and license types may be found under "Licensing" in the WinCC Information System.
Installed licenses are required to enable proper operation of WinCC. If WinCC is installed without licenses, the program will switch to demo mode at start-up.
Note
It is not allowed to run WinCC in process mode without a valid license.
Demo ModeIf a license is missing for one or several components, WinCC will run in demo mode. WinCC also switches to demo mode when the maximum authorized number of process tags or archive tags is exceeded in a project.
In Demo mode, you can use the WinCC software fully for a maximum of one hour. After this period, the operation of WinCC violates the license agreements. After one hour, the WinCC Explorer and the editors will be closed. In runtime, the system will request the acquisition of a valid license. This dialog will appear every 10 minutes.
You can upgrade a WinCC demo version to the full version. To do this, proceed as follows:
WinCC Installation Notes2.3 Licenses and Licensing
WinCC: General information and installation24 System Manual, 06/2014, A5E34372689-AA
● Install the required licenses.
● Install the SQL Standard Server using the WinCC DVD.
Details on demo mode may be found in WinCC Information System under "Licensing".
Microsoft SQL Server 2008 R2 SP1 A license is necessary to use the Microsoft SQL Server database. This license is readily available in a licensed and proper installation of WinCC.
The licensed SQL server installed with WinCC may only be used in connection with WinCC. Its use for external applications or an internal database requires an additional license.
Installation of LicensesYou may use the Automation License Manager for installation of licenses. Licenses may be installed during installation of WinCC or after the fact. You will find the Automation License Manager in the Windows start menu in the "Siemens Automation" program group. An after-the-fact installation of a license will take effect upon restart of your computer.
For the installation of licenses, the following requirements must be met:
● The storage medium containing the licenses must not be write protected.
● You can install the RC licenses on a license server for the configuration. You do not have to install the licenses on the local drive.
● Licenses may only be installed on a non-compressed drive.
Note
After uninstalling WinCC, the licenses remain installed on the system.
See alsoHow to Perform an Upgrade Installation (Page 57)
How to Perform an Uninstall (Page 54)
How to Install Supplementary Components Later (Page 51)
How to Install WinCC (Page 47)
WinCC Installation Notes2.3 Licenses and Licensing
WinCC: General information and installationSystem Manual, 06/2014, A5E34372689-AA 25
2.4 Activating and testing ASIA licenses
Introduction The license keys for WinCC Runtime and WinCC CS are supplied on the included license storage medium.
The licensed ASIA version is executable in parallel to the European version by switching to Unicode. The supplied hardware key (dongle) checks for the following conditions:
● The runtime language of the user interface (GUI)
● The languages in the text library
● The operating system
Note
It is not allowed to run WinCC in process mode without a valid license.
Installation of LicensesYou may use the Automation License Manager for installation of licenses. Licenses may be installed during installation of WinCC or after the fact.
You will find the Automation License Manager in the Windows start menu in the "Siemens Automation" program group.
An after-the-fact installation of a license will take effect upon restart of your computer.
For the installation of licenses, the following requirements must be met:
● The storage medium containing the licenses must not be write protected.
● You can install the RC licenses on a license server for the configuration. You do not have to install the licenses on the local drive.
● Licenses may only be installed on a non-compressed drive.
Note
After uninstalling WinCC, the licenses remain installed on the system.
WinCC Installation Notes2.4 Activating and testing ASIA licenses
WinCC: General information and installation26 System Manual, 06/2014, A5E34372689-AA
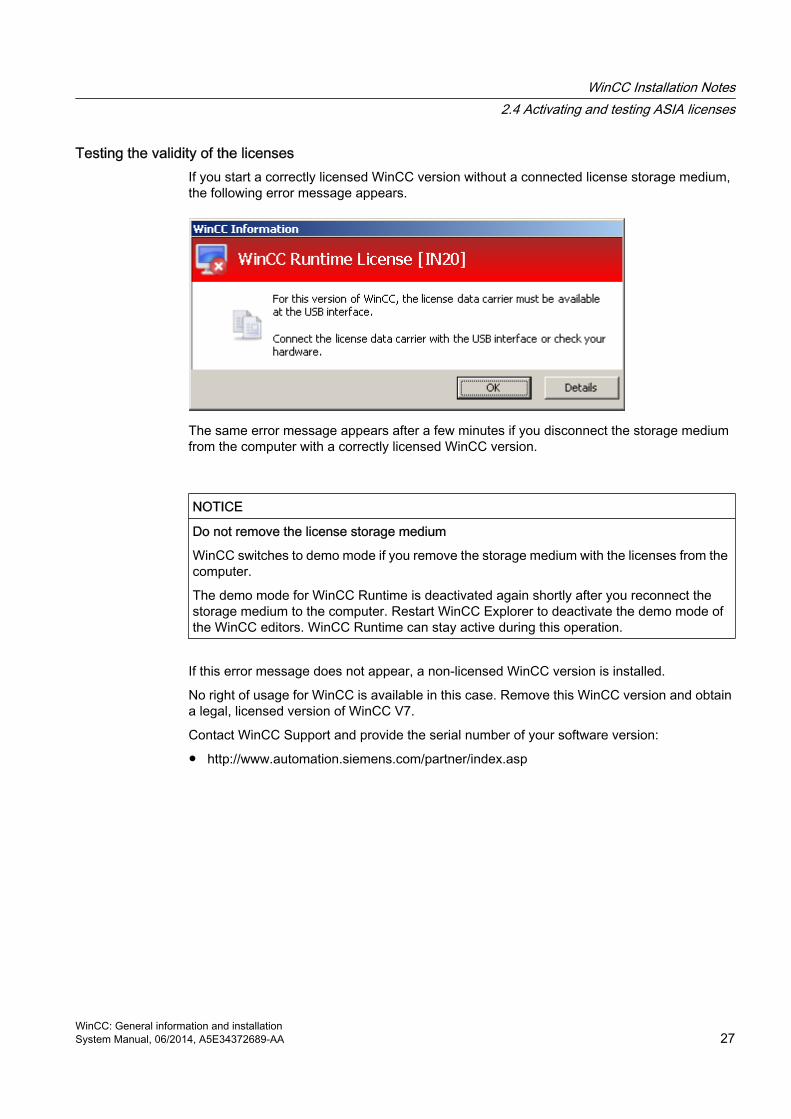
Testing the validity of the licensesIf you start a correctly licensed WinCC version without a connected license storage medium, the following error message appears.
The same error message appears after a few minutes if you disconnect the storage medium from the computer with a correctly licensed WinCC version.
NOTICE
Do not remove the license storage medium
WinCC switches to demo mode if you remove the storage medium with the licenses from the computer.
The demo mode for WinCC Runtime is deactivated again shortly after you reconnect the storage medium to the computer. Restart WinCC Explorer to deactivate the demo mode of the WinCC editors. WinCC Runtime can stay active during this operation.
If this error message does not appear, a non-licensed WinCC version is installed.
No right of usage for WinCC is available in this case. Remove this WinCC version and obtain a legal, licensed version of WinCC V7.
Contact WinCC Support and provide the serial number of your software version:
● http://www.automation.siemens.com/partner/index.asp
WinCC Installation Notes2.4 Activating and testing ASIA licenses
WinCC: General information and installationSystem Manual, 06/2014, A5E34372689-AA 27
2.5 Installation Requirements
2.5.1 WinCC Installation Requirements
Introduction You will need special hardware and software for the installation of WinCC. The requirements are described in the chapters "Hardware Requirements for Installation" and "Software Requirements for Installation".
NoteWindows operating system: Avoid changes in system
Windows settings deviating from default can have an effect on operation of WinCC.
Observe this note particularly for the following changes:
- Change of processes and services in Control Panel.
- Changes in Windows Task Manager.
- Changes in Windows registry.
- Changes in Windows security policies.
The first check if certain conditions are met is already executed during the installation of WinCC. The following conditions are checked:
● Operating system
● User Rights
● Graphic Resolution
● Internet Explorer
● MS Message Queuing
● SQL Server
● Due Complete Restart (Cold Restart)
Error MessagesIf one these conditions is not met, the WinCC installation will be aborted and an error message will be displayed. For details about the error messages displayed see the table below.
Error Message ExplanationTo execute installation properly, restart the computer
The software installed on your computer requires a restart. Before WinCC can be installed, the computer should be restarted once.
This application requires VGA or any higher resolution
Check the settings of the connected monitor and upgrade the graphic card, if necessary.
WinCC Installation Notes2.5 Installation Requirements
WinCC: General information and installation28 System Manual, 06/2014, A5E34372689-AA
Error Message ExplanationYou do not have administrator rights. Log on as administrator.
Administrator rights are required for the installation. Please log in to Windows again as a user with administrator rights.
Setup has detected that unInstallShield is active. Please close unInstallShield and restart Setup.
Close unInstallShield.This message may also indicate that you are lacking administrator rights for this installation. In this case, log on to Windows again as user with administrator rights.
The Microsoft Message Queuing services are not installed.
Install the Microsoft Message Queuing services. To do this, you will need the Windows installation CD. You can find detailed information in the section "Installing Microsoft Message Queuing".
See alsoDefining Access Rights in the Operating System (Page 38)
Licenses and Licensing (Page 24)
How to Adapt the Windows Security Policies (Page 43)
How to Install MS Message Queuing (Page 46)
Notes on Data and System Security (Page 37)
Software Requirements for the Installation (Page 32)
Hardware Requirements for the Installation (Page 29)
2.5.2 Hardware Requirements for the Installation
Introduction Certain hardware configuration conditions must be fulfilled for installation.
Hardware RequirementsWinCC supports all common IBM/AT-compatible PC platforms.
To efficiently work with WinCC, select a system with the recommended specifications.
Note
Unless noted to the contrary, the same requirements as for servers are applicable to single-user systems.
WinCC Installation Notes2.5 Installation Requirements
WinCC: General information and installationSystem Manual, 06/2014, A5E34372689-AA 29
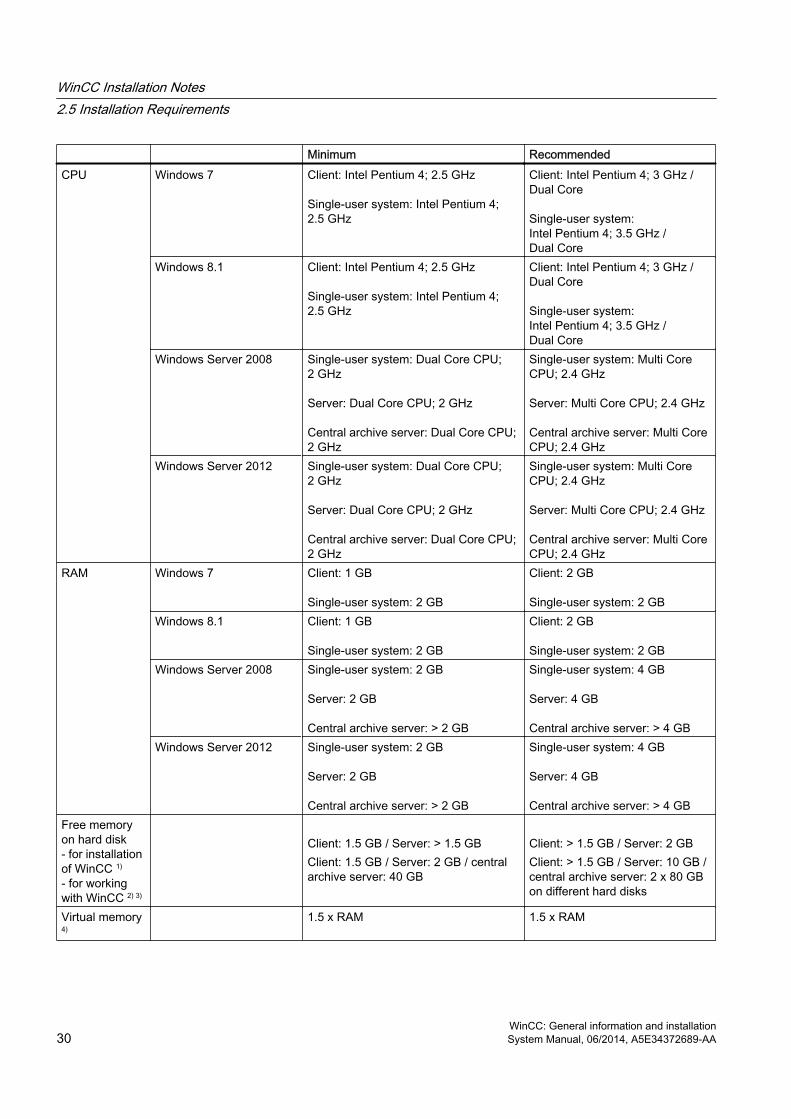
Minimum RecommendedCPU Windows 7 Client: Intel Pentium 4; 2.5 GHz
Single-user system: Intel Pentium 4; 2.5 GHz
Client: Intel Pentium 4; 3 GHz / Dual Core
Single-user system: Intel Pentium 4; 3.5 GHz / Dual Core
Windows 8.1 Client: Intel Pentium 4; 2.5 GHz
Single-user system: Intel Pentium 4; 2.5 GHz
Client: Intel Pentium 4; 3 GHz / Dual Core
Single-user system: Intel Pentium 4; 3.5 GHz / Dual Core
Windows Server 2008 Single-user system: Dual Core CPU; 2 GHz
Server: Dual Core CPU; 2 GHz
Central archive server: Dual Core CPU; 2 GHz
Single-user system: Multi Core CPU; 2.4 GHz
Server: Multi Core CPU; 2.4 GHz
Central archive server: Multi Core CPU; 2.4 GHz
Windows Server 2012 Single-user system: Dual Core CPU; 2 GHz
Server: Dual Core CPU; 2 GHz
Central archive server: Dual Core CPU; 2 GHz
Single-user system: Multi Core CPU; 2.4 GHz
Server: Multi Core CPU; 2.4 GHz
Central archive server: Multi Core CPU; 2.4 GHz
RAM Windows 7 Client: 1 GB
Single-user system: 2 GB
Client: 2 GB
Single-user system: 2 GBWindows 8.1 Client: 1 GB
Single-user system: 2 GB
Client: 2 GB
Single-user system: 2 GBWindows Server 2008 Single-user system: 2 GB
Server: 2 GB
Central archive server: > 2 GB
Single-user system: 4 GB
Server: 4 GB
Central archive server: > 4 GBWindows Server 2012 Single-user system: 2 GB
Server: 2 GB
Central archive server: > 2 GB
Single-user system: 4 GB
Server: 4 GB
Central archive server: > 4 GBFree memory on hard disk- for installation of WinCC 1)
- for working with WinCC 2) 3)
Client: 1.5 GB / Server: > 1.5 GBClient: 1.5 GB / Server: 2 GB / central archive server: 40 GB
Client: > 1.5 GB / Server: 2 GBClient: > 1.5 GB / Server: 10 GB / central archive server: 2 x 80 GB on different hard disks
Virtual memory 4)
1.5 x RAM 1.5 x RAM
WinCC Installation Notes2.5 Installation Requirements
WinCC: General information and installation30 System Manual, 06/2014, A5E34372689-AA
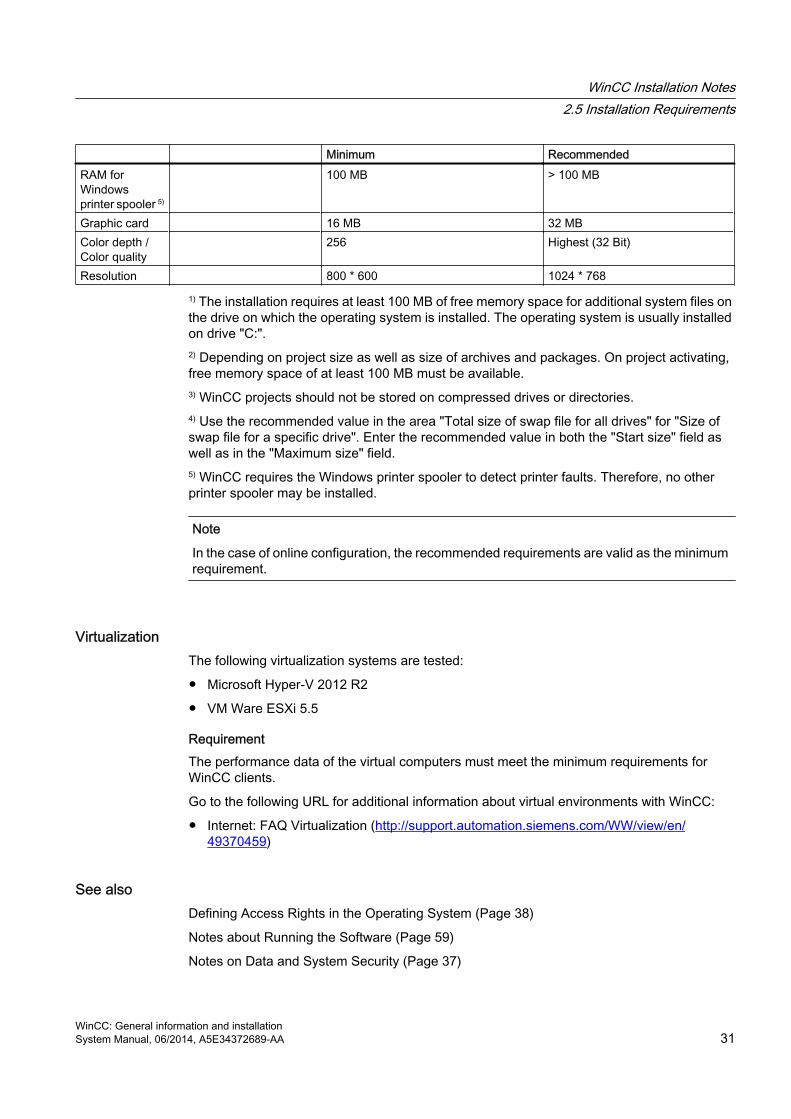
Minimum RecommendedRAM for Windows printer spooler 5)
100 MB > 100 MB
Graphic card 16 MB 32 MBColor depth / Color quality
256 Highest (32 Bit)
Resolution 800 * 600 1024 * 768
1) The installation requires at least 100 MB of free memory space for additional system files on the drive on which the operating system is installed. The operating system is usually installed on drive "C:".2) Depending on project size as well as size of archives and packages. On project activating, free memory space of at least 100 MB must be available.3) WinCC projects should not be stored on compressed drives or directories.4) Use the recommended value in the area "Total size of swap file for all drives" for "Size of swap file for a specific drive". Enter the recommended value in both the "Start size" field as well as in the "Maximum size" field.5) WinCC requires the Windows printer spooler to detect printer faults. Therefore, no other printer spooler may be installed.
Note
In the case of online configuration, the recommended requirements are valid as the minimum requirement.
VirtualizationThe following virtualization systems are tested:
● Microsoft Hyper-V 2012 R2
● VM Ware ESXi 5.5
RequirementThe performance data of the virtual computers must meet the minimum requirements for WinCC clients.
Go to the following URL for additional information about virtual environments with WinCC:
● Internet: FAQ Virtualization (http://support.automation.siemens.com/WW/view/en/49370459)
See alsoDefining Access Rights in the Operating System (Page 38)
Notes about Running the Software (Page 59)
Notes on Data and System Security (Page 37)
WinCC Installation Notes2.5 Installation Requirements
WinCC: General information and installationSystem Manual, 06/2014, A5E34372689-AA 31
Software Requirements for the Installation (Page 32)
Scope of delivery (Page 22)
2.5.3 Software Requirements for the Installation
Introduction For the installation, certain requirements concerning operating system and software configuration must be met.
Note
WinCC is enabled for operation within a domain or workgroup.
Note however that domain group policies and restrictions in the domains may prevent installation. In this case, remove the computer from the domain before installing Microsoft Message Queuing, Microsoft SQL Server and WinCC. Log on to the computer concerned locally with administrator rights. Carry out the installation. Following successful installation, the WinCC computer can be registered in the domain again. If the domain-group policies and domain restrictions do not impair the installation, the computer must not be removed from the domain during installation.
Note however that domain group policies and restrictions in the domain may also hinder operation. If these restrictions cannot be overcome, operate the WinCC computer in a work group. If necessary, contact the domain administrator.
Operating systems
Operating System LanguagesWinCC is released for the following operating system languages only:
● German
● English
● French
● Italian
● Spanish
● Chinese (Simplified, PR China)
● Chinese (Traditional, Taiwan)
● Japanese
● Korean
● Multilingual operating system (MUI version)
WinCC Installation Notes2.5 Installation Requirements
WinCC: General information and installation32 System Manual, 06/2014, A5E34372689-AA
ConfigurationsWhen using more than one server, all servers must be operated with a uniform operating system: Windows Server 2008 or 2012, each with the same Standard or Enterprise Edition.
Single-user systems and clientsWinCC runs on Windows 7 and Windows 8.1.
Operating system Configuration CommentsWindows 7 Professional Service Pack 1
Enterprise Service Pack 1Ultimate Service Pack 1
Standard installation32-bit and 64-bit
Windows 8.1 Professional Enterprise
Standard installation32-bit and 64-bit
You can also run single-user systems and clients in WinCC multi-user systems on Windows Server 2008 / 2012.
WinCC ServerYou can operate a WinCC server on Windows Server 2008 / 2012 Standard / Enterprise Edition or Windows Server 2008 R2.
WinCC server with up to three WinCC clients on Windows 7 or Windows 8.1It is also possible to operate a WinCC Runtime server on Windows 7 if you are not running more than three clients. WinCC ServiceMode is not released for this configuration.
Operating system Configuration CommentsWindows Server 2008 Standard Service Pack 2 32-bitWindows Server 2008 R2 Standard Service Pack 1 64-bitWindows Server 2012 R2 Standard 64-bit
Note
WinCC is not suitable for use on a Microsoft terminal server. You can use the Microsoft terminal server only in connection with the WinCC Web client. Note the installation instructions of the WinCC/WebNavigator.
Microsoft Message Queuing servicesWinCC requires Microsoft Message Queuing services. You can find detailed information in the section "Installing Microsoft Message Queuing".
Microsoft SQL Server 2008WinCC requires the 32-bit version of Microsoft SQL Server 2008 R2 Service Pack 2. SQL Server is included automatically in the WinCC installation.
The necessary connectivity components are also installed with the Microsoft SQL Server.
WinCC Installation Notes2.5 Installation Requirements
WinCC: General information and installationSystem Manual, 06/2014, A5E34372689-AA 33

The corresponding user rights must have been set up for accessing the SQL Server data. Observe the notes in the section "Defining access rights in the operating system".
SQL server instance "WinCC"During installation, a new "WinCC" SQL server instance is created with Microsoft SQL Serve containing the required settings.
This instance is always installed in English. The language in which existing SQL server instances have been installed has no effect on this. Existing instances are not affected by the Service Pack.
"WinCC" instance after removing WinCCWhen WinCC is removed , the "WinCC" SQL server instance remains installed and must be removed manually for licensing reasons.
Do not change the Windows computer nameDo not change the Windows computer name after installing WinCC installation.
If you change the Windows computer name, you will need to remove and reinstall the SQL Server.
Microsoft .NET Framework under Windows 8.1 / Windows Server 2012 R2Microsoft .NET Framework 3.5 and 4.5 must be installed for the Windows 8.1 and Windows Server 2012 R2 operating systems.
For this reason, make sure that the .Net Framework is installed before you install WinCC.
Operation with multiple network adaptersWhen a server is used with several network adapters, read the notes in the WinCC Information System under "Configurations > Distributed Systems > Special features of communication using a server with several network adapters".
Process communication driverFor the SIMATIC NET drivers, select the "SIMATIC NET PC Software" program during the WinCC installation.
Internet Explorer - requirementsThe following versions are released for WinCC:
● Microsoft Internet Explorer V9.0 (32-bit)
● Microsoft Internet Explorer V10.0 (32-bit)
● Microsoft Internet Explorer V11.0 (32-bit)
WinCC Installation Notes2.5 Installation Requirements
WinCC: General information and installation34 System Manual, 06/2014, A5E34372689-AA
If you wish to fully use WinCC's HTML Help, you must permit the use of JavaScript under "Internet Options" in Internet Explorer.
Note
In Windows 7 and Windows Server 2008/2012, do not disable Internet Explorer.
Adapting security policiesThe operating system must permit the installation of unsigned drivers and files. Detailed information is available in the section "Adapting Security Policies under Windows".
Note
An update of the operating system is not permitted if WinCC is started. Start the computer again after updating the operating system.
Checking the "Path" environment variableBefore starting WinCC, you should check the entries in the "Path" environment variable.
A few programs insert paths containing quotation marks in the environment variable. These paths can prevent WinCC from starting or limit its functionality. The paths with quotation marks can also interfere with the software of other manufacturers.
Open the "System properties" dialog in the Control Panel. Open the "Environment variables" dialog using the "Environment variables" button on the "Advanced" tab, and display the value of the "Path" system tag.
If the "Path" system tag contains paths with quotation marks, reorder the entries so that these paths are called last.
Windows 7 and Windows Server 2008/2012: Microsoft Internet Information Service (IIS)If you are using the OPC-XML-DA server of WinCC, you must install the Microsoft Internet Information Service (IIS) before installation.
Under Windows Server 2008/2012, configure the settings in Server Manager using the "Webserver (IIS)" role in the associated role services.
Select the following settings:
WinCC Installation Notes2.5 Installation Requirements
WinCC: General information and installationSystem Manual, 06/2014, A5E34372689-AA 35
● Web Management Tools:
– IIS Management Service
– IIS Management Console
– IIS Management Scripts and Tools
– IIS Metabase and IIS 6 configuration compatibility
– IIS 6 WMI Compatibility
● WWW Services > Common HTTP Features:
– Default Document
– Static Content
● WWW Services > Application Development Features:
– .NET Extensibility
– ASP
– ASP.NET
– ISAPI extensions
– ISAPI filters
● WWW Services > Security:
– Request Filtering
– Basic Authentication
– Windows Authentication
NoteAlways install Microsoft Internet Information Service (IIS) with ASP.NET and ASP
Always install ASP.NET and ASP when you install the Microsoft Internet Information Service (IIS).WinCC OPC XML DA Server: Firewall settings
The web service of the WinCC OPC XML DA server communicates over port: 80 (HTTP).
Make sure that the firewall rule "WWW services (HTTP)" is selected and activated for the required network areas.
See alsohttp://support.microsoft.com/kb/917607 (http://support.microsoft.com/kb/917607)
WinCC Installation Notes2.5 Installation Requirements
WinCC: General information and installation36 System Manual, 06/2014, A5E34372689-AA
2.5.4 Notes on Data and System Security
Introduction System security when using WinCC can be increased by implementing simple measures.
Preventing Access to the Operating System Layer in RuntimeIf the Windows Selection dialog is opened in an activated WinCC project, access to the Windows operating system is possible using this function. A Windows Selection dialog is opened, for example, when data is imported or files are selected.
Protect the corresponding function by executing a Permission Check via the User Administrator to prevent unauthorized access to the operating system.
Preventing access to the Windows toolbarYou can use the computer properties to prevent the Windows taskbar from being displayed in Runtime. Open the "Parameters" tab in the "Computer properties" dialog and deactivate all the shortcut keys in the "Disable Keys" area.
In addition, deactivate the "Keep the taskbar on top of other windows" setting in Windows.
Disabling shortcut keysIf you disable the <Ctrl+Esc> shortcut key, the following shortcut keys are also disabled in Runtime:
Shortcut key Function<Windows key+U> System utility program managerPress <Shift> five times Locking functionPress <Shift right> for eight seconds Impact delay<Alt left+Shift left+Num> Keyboard mouse<Alt left+Shift left+Print> High contrast
Note
The functions can be configured using the Windows Control Panel. If the functions are activated in the Windows Control Panel before activating WinCC Runtime, they are no longer locked in runtime.
Windows 7 / Windows Server 2008: Disabling shortcut keysIf you would like to disable shortcut keys in Windows 7 or Windows Server 2008, you must adjust the group policies in the operating system management.
A detailed description of this can be found in the FAQ with entry ID "44027453" in the SIMATIC Customer Online Support:
WinCC Installation Notes2.5 Installation Requirements
WinCC: General information and installationSystem Manual, 06/2014, A5E34372689-AA 37
● Internet: WinCC FAQ 44027453 (http://support.automation.siemens.com/WW/view/en/44027453)
See alsoNotes about Running the Software (Page 59)
How to Adapt the Windows Security Policies (Page 43)
Defining Access Rights in the Operating System (Page 38)
How to Install WinCC (Page 47)
WinCC Installation Requirements (Page 28)
Internet: WinCC FAQs (http://support.automation.siemens.com/WW/view/en/10805583/133000)
Internet: WinCC FAQ 44027453 (http://support.automation.siemens.com/WW/view/en/44027453)
2.5.5 Access rights in the operating system
2.5.5.1 Defining Access Rights in the Operating System
Introduction To support you in protecting your system, WinCC offers a structured user management:
● Protect your system against unauthorized access.
● Assign each user the required rights.
In order to work with WinCC, certain folders can be enabled for access via the network. For security reasons, you should only assign access rights to these folders to authorized users. You manage access rights via the Windows Standard user groups and user groups created by WinCC.
WinCC Installation Notes2.5 Installation Requirements
WinCC: General information and installation38 System Manual, 06/2014, A5E34372689-AA
Access rights specified in WinCCFollowing WinCC installation, WinCC automatically establishes the following local groups in Windows User and Group Administration:
● "SIMATIC HMI"All users must be members of the "SIMATIC HMI" user group. These members may create local projects, and may process, start, and access these projects remotely. Access to the WinCC database is limited to the minimum rights necessary (read/write). By default, the user who carries out the WinCC installation and the local administrator are members of this group. Additional members must be added manually by an administrator.
● "SIMATIC HMI Viewer"These members have read access only to configuration and runtime data in the WinCC database. This group is primarily used for accounts for Web publication services, e.g., IIS (Internet Information Services) account for operation of WinCC WebNavigator.
● Access to folder "<Installation Directory>/WinCC/aplib"Following installation, the directory "Installation Directory/WinCC/aplib" named "SCRIPTFCT" is unlocked for the "SIMATIC HMI" user group. This directory contains central libraries for project script functions.
User Groups and User RightsThe following overview contains the tasks of the different user groups with the access rights and instructions required to assign these access rights.
WinCC Installation● Task: WinCC Installation
● Role: Configuration engineer, Administrator
● Authorization: Windows Administrator rights
● Procedure:Prior to installation, ensure that you have local administrator rights on the computer.
● Explanation:You need local administrator rights to install WinCC.
Preparation for operation● Task: Access to WinCC
● Role: Configuration engineer, Administrator
● Authorization: Power user rights, Administrator rights
● Procedure:After installation, set up the administrative settings as administrator or power user.
● Explanation:Power user rights are the minimum requirements for administrative settings, e.g. the authorization of file rights or printer driver settings.To delete a WinCC project completely, you must have power user rights, at a minimum.
WinCC Installation Notes2.5 Installation Requirements
WinCC: General information and installationSystem Manual, 06/2014, A5E34372689-AA 39
Local user rights when operating WinCC● Task: Operator input in Runtime, configuration
● Role: WinCC user (operator, configuration engineer)
● Authorization:- Windows group "User"- User group "SIMATIC HMI"
● Procedure:Add the user to the "SIMATIC HMI" user group and, at a minimum, to the Windows "User" user group.
● Explanation:In order to operate WinCC or for remote access to a WinCC project on the client and server, the user must be a member of the "SIMATIC HMI" user group.
Access to distributed systems● Task: Access to distributed systems
● Role: WinCC user (operator, configuration engineer)
● Authorization: Uniform user groups on all computers
● Procedure:Enter the WinCC users on all computers in the same group.Assign the same password to all the users.
● Explanation:For access to distributed systems, the same user groups must be created on clients and servers.
Access rights for local projects● Task: Access to projects which were created as follows:
- Manual copy- Duplicate- Retrieval- Migration
● Role: WinCC user (operator, configuration engineer)
● Authorization: SIMATIC HMI, SIMATIC HMI Viewer
WinCC Installation Notes2.5 Installation Requirements
WinCC: General information and installation40 System Manual, 06/2014, A5E34372689-AA
● Procedure:Assign full access rights to the project folder for the "SIMATIC HMI" group.To do so, open the project following its creation once as administrator or power user. Alternatively, you can specify access rights in the Windows Computer Management.Even if you want to copy projects with the Project Duplicator you will need the appropriate authorizations. You will either have to grant access to the used folders or duplicate them as main user.
● Explanation:When a local project is newly created, the members of user groups "SIMATIC HMI" and "SIMATIC HMI Viewer" automatically receive the necessary access rights to the project directory.However, when projects are copied, logged, or migrated, the local authorizations are not transferred but must be reassigned.
Access rights to system information● Task: Access to system information via the WinCC channel "System Info"
● Role: Operator
● Authorization: System monitor user
● Procedure:Into the Windows group "System monitor user", accept all users who require the followingsystem information of the WinCC channel "System Info":
– CPU load
– Status of the export file
● Explanation:
Users with Windows standard user rights do not have access to certain system information.
See alsoNotes on Data and System Security (Page 37)
Notes about Running the Software (Page 59)
How to Adapt the Windows Security Policies (Page 43)
How to Install WinCC (Page 47)
WinCC Installation Requirements (Page 28)
2.5.5.2 Including users in the "SIMATIC HMI" user group
Introduction Include those local users in the "SIMATIC HMI" group whose login permits access to WinCC. You must first create local users to do so. Users of a domain may be directly included in the user group "SIMATIC HMI".
WinCC Installation Notes2.5 Installation Requirements
WinCC: General information and installationSystem Manual, 06/2014, A5E34372689-AA 41
Procedure1. Open the workstation administration under Windows.
2. Select the entry "Local Users and Groups > Users" in the navigation window .All local users are displayed in the data window.
3. Open the "New User" dialog via the shortcut menu.Create a user account with the same login for each user who is to have access to WinCC.
4. Select the entry "Local Users and Groups > Groups" in the navigation window".All groups are displayed in the data window.Select the "SIMATIC HMI" group.
5. Using the pop-up menu, open the "Add Member" dialog and include those users as members of the "SIMATIC HMI" user group.
2.5.5.3 Including domain-global user group in the "SIMATIC HMI" user group
IntroductionDuring operation of a domain, an additional domain-global user group may be created and included as a member of the "SIMATIC HMI" user group.
Requirements● The domain administrator creates a domain-global user group.
● Within the domain, the domain administrator includes those users in the domain whose login permits access to WinCC.
Procedure1. Open the workstation administration under Windows.
2. In the navigation window, select the "Local Users and Groups > Groups" entry. The data window displays all groups. Select the group "SIMATIC HMI".
3. Using the pop-up menu, open the "Add Member" dialog and include domain-global user group as members of the "SIMATIC HMI" user group.
2.5.5.4 Release existing project for "SIMATIC HMI" user group
IntroductionYou must first remove the existing release of the project directory if the user group "SIMATIC HMI" has to access an existing user group. Then the project is released again while opening WinCC Explorer.
WinCC Installation Notes2.5 Installation Requirements
WinCC: General information and installation42 System Manual, 06/2014, A5E34372689-AA
Procedure1. Open the workstation administration under Windows.
2. In the navigation window, select the entry "Shared Folders > Shares". The data window displays all unlocked directories.
3. Select the respective project directory and remove the enable through the "Cancel Share" pop-up menu.
4. If you now open the project in WinCC, the project directory is automatically unlocked for the "SIMATIC HMI" user group, and all members of the user group are granted access to the project directory.
Note
The enable name of the directory unlocked by WinCC must not be modified.
2.5.6 How to Adapt the Windows Security Policies
Introduction Before you install WinCC, you must check the operating system settings:
● The system must permit the installation of unsigned drivers and files.
● In the case of Windows 7/Server 2008/Server 2008 R2, the use of the Windows function "Fast User Switching" is not permitted for WinCC.
Procedure for Windows 7 / Windows Server 2008 1. In the Windows Start menu, select "Programs > Accessories > Execute".
2. Enter "gpedit.msc" in the input box.The "Local Group Policy Editor" dialog box opens.
3. In the left section of the window under "Policy for local computer", select "Computer Configuration > Administrative Templates > System > Device Installation > Device Installation Restrictions".
4. Check the settings of the security policies below:
– "Display a custom message when installation is prevented by policy (balloon text)"
– "Display a custom message when installation is prevented by policy (balloon title)"
"Not configured" must be set for the policy.
WinCC Installation Notes2.5 Installation Requirements
WinCC: General information and installationSystem Manual, 06/2014, A5E34372689-AA 43
5. In the left section of the window under "Policy for local computer", select "Computer Configuration > Administrative Templates > System > Login".
6. Enable the option "Hide entry points for Fast User Switching".After you have logged off, the "Fast User Switching" function is no longer available in the Windows Start menu.
See alsoNotes on Data and System Security (Page 37)
Defining Access Rights in the Operating System (Page 38)
Software Requirements for the Installation (Page 32)
WinCC Installation Requirements (Page 28)
WinCC Installation Notes2.5 Installation Requirements
WinCC: General information and installation44 System Manual, 06/2014, A5E34372689-AA
2.6 Installing WinCC
2.6.1 Installing WinCC
Introduction This section describes the installation of WinCC.
Install MS Message Queuing before you install WinCC.
Installation of a WinCC file serverIf a WinCC server is set up which is to be used for project data archiving only, only the WinCC file server needs to be installed. You can find more information in the WinCC Information System, in the section "Configurations > Fileserver".
NoteUsage only with administrator rights
If you want to use the Fileserver, you need administrator rights.Fileserver installation requirements
WinCC V7 and WinCC Fileserver V7 cannot be installed at the same time on one computer.
Installation of WinCC OptionsThe WinCC DVD contains the following options:
● WinCC/Connectivity Pack
● WinCC/DataMonitor
● WinCC/WebNavigator
● WinCC/Information Server
These options require their own licenses.
If you purchase a WinCC option at a later date, you will receive the necessary licenses on a license data carrier. An installation DVD is not supplied.
Use the WinCC DVD for installation.
See alsoUpgrading WinCC (Page 56)
How to Install Supplementary Components Later (Page 51)
How to Install WinCC (Page 47)
WinCC Installation Notes2.6 Installing WinCC
WinCC: General information and installationSystem Manual, 06/2014, A5E34372689-AA 45
How to Install MS Message Queuing (Page 46)
Hardware Requirements for the Installation (Page 29)
2.6.2 How to Install MS Message Queuing
Introduction WinCC implements the Message Queuing services from Microsoft. It is a component part of the operating system. MS Message Queuing is however not included in the standard Windows installation and must be installed separately if required.
The Windows installation CD is required to complete the installation.
Note
WinCC is enabled for operation within a domain or workgroup.
Note however that domain group policies and restrictions in the domains may prevent installation. In this case, remove the computer from the domain before installing Microsoft Message Queuing, Microsoft SQL Server 2008 and WinCC. Log on to the computer concerned locally with administrator rights. Carry out the installation. Following successful installation, the WinCC computer can be registered in the domain again. If the domain-group policies and domain restrictions do not impair the installation, the computer must not be removed from the domain during installation.
Note however that domain group policies and restrictions in the domain may also hinder operation. If these restrictions cannot be overcome, operate the WinCC computer in a work group.
If necessary, contact the domain administrator.
Procedure for Windows 71. In the operating system Start Menu, open "Control Panel > Programs and Functions".
2. Click the "Enable/Disable Functions" button on the left menu bar. The "Windows Function" dialog opens.
3. Select the "Microsoft Message Queue (MSMQ) Server" component.
4. Activate the "Microsoft Message Queue (MSMQ) Server Core" component.
5. Deactivate the subsidiary components.
6. Confirm with "OK".
Procedure for Windows 8.11. Go to "Control Panel > Programs and Features".
2. Click the "Turn Windows features on or off" button on the left menu bar. The "Windows Features" dialog opens.
WinCC Installation Notes2.6 Installing WinCC
WinCC: General information and installation46 System Manual, 06/2014, A5E34372689-AA
3. Select the "Microsoft Message Queue" component.
4. Activate the "Microsoft Message Queue Server Core" option.
5. Deactivate the subsidiary components.
6. Confirm with "OK".
Procedure for Windows Server 20081. Start the Server Manager.
2. Right-click on "Features" in the navigation area and select "Add features".
3. Activate the "Message Queuing" option, and under it also the "Message Queuing Services" and "Message Queuing Server" options.
4. Click "Install".
Procedure for Windows Server 20121. Start the Server Manager.
2. Click on "Add roles and features".
3. Click "Server selection" in the navigation area. Ensure that the current computer is selected.
4. Click "Features" in the navigation area.
5. Activate the "Message Queuing" option, and under it also the "Message Queuing Services" and "Message Queuing Server" options.
6. Click "Install".
See alsoHow to Install WinCC (Page 47)
WinCC Installation Requirements (Page 28)
2.6.3 How to Install WinCC
Introduction This section describes how to install and run WinCC.
The components already installed are displayed during setup. The following icons are used:
Icon MeaningCurrent version of program is installed.
Program is being updated.
WinCC Installation Notes2.6 Installing WinCC
WinCC: General information and installationSystem Manual, 06/2014, A5E34372689-AA 47
Icon MeaningProgram setup conditions are not met. Click the symbol for more detailed information.
Program can be selected.
Program selected for installation.
Program cannot be selected (due to dependence on other programs).
Program selected for installation (cannot be deselected).
Scope of InstallationDuring the installation of WinCC, you can choose between the following variants:
● Minimum (WinCC Runtime, WinCC CS, Basic Process Control, OPC-Server, SQL-Server)
● Typical (including SmartTools)
● Complete
● Expert mode (user-defined setup, i.e. you can enable or disable specific components)
● Client (installation for a client, with SQL-Express)
● Fileserver (WinCC Fileserver and SQL Server)
You can also install or remove components and languages at a later time. Read the sections "How to perform a supplementary installation" and "How to perform a supplementary installation of languages" for more on this.
The required drive space depends upon the installed components. An estimated value is shown in the status bar.
Installation of WinCC OptionsYou can installed the desired options during the installation of WinCC itself.
The documentation for some of the options will be available only if the concerned option package is installed.
Automatic Migration when a WinCC Project of a Previous Version is OpenedWhen you open a project that was created with a version older than WinCC V7.3, the configuration data and Runtime data are automatically migrated. Convert the pictures and libraries with the Project Migrator or manually via the Graphics Designer.
You can find detailed information about migration in the WinCC Information System under "First Steps > Migration".
WinCC Installation Notes2.6 Installing WinCC
WinCC: General information and installation48 System Manual, 06/2014, A5E34372689-AA
Requirements● You need local administrator rights to install WinCC.
Information on user rights, which is necessary for the operation of WinCC, is located in section "Instructions for Security of Data and System".
● The Windows component "MS Message Queuing" services must have been installed.
● The security policies must be adapted under Windows.
● No manually created SQL server entity with the name "WinCC" may be installed.
● The storage medium with the licenses is still not to be connected with the installation computer.
● If you want to use the OPC-XML-DA-Server from WinCC, the Microsoft Internet Information Service (IIS) must be installed before installing the OPC-XML-DA-Server.
WinCC is released for the operating languages German, English, French, Italian and Spanish or multilingual operating systems. WinCC is also released for the operating system languages simplified Chinese (PR China), traditional Chinese (Taiwan), Japanese and Korean.
Note
An error message is output if you run WinCC Setup without having the administrator rights, or if other setup conditions are not met. For additional information pertaining to error messages, refer to "Prerequisites for the installation of WinCC".
Procedure1. Start the WinCC product DVD.
The DVD starts automatically if Autorun is enabled in the operating system. If the Autorun function is not activated, start the program Setup.exe on the DVD.
2. Follow the on-screen instructions.Read the License Agreement and the Open Source License Agreement.
3. Select the languages you want to install.You may install other languages at a later time.
4. Select "Install" as the setup type. If an older WinCC version is found, you can also activate the "Update" setup type. With this setup type, it is not possible to select additional products to be installed.
5. Select the setup mode.
6. In Package installation , select the Program package "WinCC Installation".If you also want to install WinCC options, select the corresponding program packages.Select the scope of your installation in User-defined installation.The components to be installed are highlighted in Setup. Click on "Help" for a description of the displayed symbols. Click on "Readme" to open the Information System.
7. Read the license agreement for the Microsoft SQL Server.
8. The security settings that will be adapted for WinCC are displayed in the "System Settings" dialog prior to installation. The firewall is configured automatically. Confirm the changes to the system settings.
WinCC Installation Notes2.6 Installing WinCC
WinCC: General information and installationSystem Manual, 06/2014, A5E34372689-AA 49
9. Start installation.You can track the status of the installation in the displayed dialog. Select "Cancel" to cancel the installation of the current component.
10.You can transfer the product License Keys after having installed the components. To do so, click on "Transfer License Key". Select "Next" if you have already transferred the license keys or want to install them at a later time.
NoteTransferring the licenses
The license keys will not be transferred automatically. You will have to transfer missing license keys during or after installation with Automation License Manager .
11.Restart the computer to conclude the installation.
New Entries in the Windows Start MenuWinCC setup has installed new folders in the "SIMATIC" program group.
The "SIMATIC" program group can be found in the Start menu of the operating system under "Start > Programs > Siemens Automation > SIMATIC".
In this folder, you can start WinCC Explorer ("SIMATIC > WinCC > WinCC Explorer") and open various tools for working with WinCC ("SIMATIC > WinCC > Tools").
You will find the documentation for WinCC in the WinCC Information System. Select "SIMATIC > WinCC > WinCC Information System" to run the WinCC Information System in the language you installed for WinCC. Documentation in all languages can be found under "Siemens Automation > Documentation".
Licenses can be managed using the Automation License Manager ("Programs > Siemens Automation > Automation License Manager").
You can use the Security Controller to view the adapted security settings ("Programs > Siemens Automation > Security Controller").
The dialog provides you with an overview of the SIMATIC software and components installed on your system:("Programs > Siemens Automation > SIMATIC > Information > Inst. software").
See alsoUpgrading WinCC (Page 56)
Notes on Data and System Security (Page 37)
Defining Access Rights in the Operating System (Page 38)
How to Install MS Message Queuing (Page 46)
How to Adapt the Windows Security Policies (Page 43)
Notes about Running the Software (Page 59)
How to Perform an Uninstall (Page 54)
How to Install Supplementary Components Later (Page 51)
WinCC Installation Notes2.6 Installing WinCC
WinCC: General information and installation50 System Manual, 06/2014, A5E34372689-AA
Licenses and Licensing (Page 24)
WinCC Installation Requirements (Page 28)
2.6.4 How to Install Supplementary Components Later
Introduction Once you have installed WinCC, you can then install further components or options at a later date.
Installation of WinCC OptionsThe WinCC DVD contains the following WinCC Options:
● WinCC/Connectivity Pack
● WinCC/DataMonitor
● WinCC/WebNavigator
● WinCC/Information Server
These options require their own licenses.
If you purchase a WinCC option at a later date, you will receive the necessary licenses on a license data carrier. An installation DVD is not supplied.
Use the WinCC DVD for installation.
Procedure1. Start the WinCC product DVD.
If the Autorun function is not activated, start the program Setup.exe on the DVD.
2. Specify whether you wish to install individual components or options. The already installed components will be displayed.
3. Follow the on-screen instructions.
Installation path of SmartToolsRun the SmartTools setup from the following path on your WinCC DVD:
● "Instdata\Smarttools\Setup\Setup.exe"
See alsoWinCC Installation Requirements (Page 28)
How to Install WinCC (Page 47)
WinCC Installation Notes2.6 Installing WinCC
WinCC: General information and installationSystem Manual, 06/2014, A5E34372689-AA 51
How to Perform an Uninstall (Page 54)
Licenses and Licensing (Page 24)
2.6.5 How to Install Supplementary Languages
Introduction Once you have installed WinCC, you can later install additional languages.
Procedure1. Open the "Programs and Features" entry in the Control Panel.
2. Select "SIMATIC WinCC Runtime V7.3" and click the "Change" button.The WinCC Setup program opens.
3. Select the desired languages.
4. When prompted, insert the WinCC product DVD in the DVD drive.Once the start page of the DVD is opened via Autorun function, close the window with "Exit".
5. Follow the instructions on the screen.
6. If you have installed WinCC CS, select "SIMATIC WinCC Configuration V7.3" and click the "Change" button.Repeat steps 3 to 5 for WinCC CS.Repeat this procedure for any additionally installed components and options.
2.6.6 How to upgrade a standard client
Introduction A WinCC standard client only contains those WinCC components that are required for a client without a project of its own. This is why a WinCC standard client cannot be upgraded directly to a WinCC single-user system or WinCC client.
To upgrade, you first have to remove a WinCC standard client and install WinCC again.
WinCC Installation Notes2.6 Installing WinCC
WinCC: General information and installation52 System Manual, 06/2014, A5E34372689-AA

Procedure1. Remove WinCC:
Go to "Control Panel" in the operating system and then to "Programs and Functions" or "Programs and Features".Select the entries beginning with "SIMATIC WinCC" and click the "Remove" button for each one.Follow the on-screen instructions.
2. Start the WinCC DVD.
3. Select a desired program package and components.Follow the on-screen instructions. You can find additional information under "How to install WinCC".
WinCC Installation Notes2.6 Installing WinCC
WinCC: General information and installationSystem Manual, 06/2014, A5E34372689-AA 53
2.7 How to Perform an Uninstall
Introduction On your computer, you can remove WinCC completely or simply remove individual components. You cannot remove individual languages.
You can execute the removal via the WinCC product DVD or vial the control panel of the operating system.
How to remove via the WinCC product DVD1. Start the WinCC product DVD.
The DVD starts automatically if Autorun is enabled in the operating system. If the Autorun function is not activated, start the program Setup.exe on the DVD.
2. Follow the on-screen instructions.
3. Select "Remove" as the setup type.
4. Select the components that you want to remove.
Use the Control Panel to uninstall ProAgent1. Go to "Control Panel" in the operating system and then to "Programs and Functions" or
"Programs and Features".All entries of the installed WinCC components start with the prefix "SIMATIC WinCC".
2. Select the desired entry and click "Remove".This starts WinCC Setup.
3. Select the components that you want to remove.Remove any WinCC options that may have been installed before you remove the WinCC version.
4. Follow the on-screen instructions.
Microsoft SQL Server 2008Following the removal of WinCC, the "WinCC" SQL server entity must also be removed. Select "Control Panel" > "Software" and then select the "Microsoft SQL Server 2008" item for removal.
The use of the Microsoft SQL Server 2008 is only permitted when you have a valid license.
Automation License Manager / MS UpdateWhen WinCC is removed, the following programs remain installed, as they may be needed by other SIMATIC products:
● Automation License Manager
● MS Update V1.0 SP1
WinCC Installation Notes2.7 How to Perform an Uninstall
WinCC: General information and installation54 System Manual, 06/2014, A5E34372689-AA
If, after removing WinCC, you want to install an earlier version of WinCC, you will need to remove both of these programs. Open "Control Panel" > "Add/Remove Programs" and then select the corresponding item for removal.
Removal when the WebNavigator client is installedIf you remove WinCC from a computer on which the WebNavigator client is installed, you must then reinstall the WebNavigator client.
Changing the settings in the Windows Event ViewerWhen WinCC is installed, the WinCC Setup program changes the settings of the Event Viewer.
● Maximum Log Size (System Log/User Log): 1024 KB (default setting: 512 KB)
● Log Continuation (System Log/User Log): "Overwrite events" (default setting: Overwrite events that are older than 7 days)
After removing WinCC, these settings are not reset. You can adapt these settings in the Windows Event Viewer yourself.
See alsoHow to Perform an Upgrade Installation (Page 57)
How to Install WinCC (Page 47)
How to Install Supplementary Components Later (Page 51)
Licenses and Licensing (Page 24)
WinCC Installation Notes2.7 How to Perform an Uninstall
WinCC: General information and installationSystem Manual, 06/2014, A5E34372689-AA 55
2.8 Upgrading WinCC
2.8.1 Upgrading WinCC
Introduction You can upgrade to WinCC V7.3 from version WinCC V6.2 SP3 and higher by means of an upgrade installation.
Proceed as described in "Upgrading an installation" section.
Note
Restart the PC before commencing with the upgrade installation to WinCC V7.3.
Information on migrating projectsWhen you open a project of a previous version in WinCC V7.3, you are prompted to migrate it. However, you may also use WinCC Project Migrator to migrate several WinCC projects in a single step.
You still have to make some project settings after migration.
For more information about the migration of projects see section "Migration".
NoteWinCC user no longer needs to be a member of the "SQLServerMSSQLUser$<COMPUTER NAME>$WINCC" user group
When you migrate projects created prior to WinCC V7.2, you remove the WinCC users from this group.
In WinCC projects prior to V7.2, you will find the user group under the name "SQLServer2005MSSQLUser$<COMPUTER NAME>$WINCC".
Notes on licensingYou need to upgrade licenses of WinCC prior to V7.3 to the current version.
You can update the licensing retroactively. Detailed information is available in the WinCC Information System under the topic "Licensing".
See alsoHow to Perform an Upgrade Installation (Page 57)
WinCC Installation Notes2.8 Upgrading WinCC
WinCC: General information and installation56 System Manual, 06/2014, A5E34372689-AA
2.8.2 How to Perform an Upgrade Installation
Introduction If you currently have WinCC V6.2 SP3 installed on your system, you can perform an upgrade installation.
Before beginning an upgrade installation, the transfer of existing projects must be prepared.
Note
If modified standard functions (ANSI-C) are used, make backup copies of the functions prior to the upgrade installation. During the WinCC installation process, these functions are overwritten by the standard functions supplied.
Also pay attention to the notes in the WinCC Information System under "Migration".
Make a backup copy of your project before upgrading WinCC.
RequirementThe hardware configuration on which WinCC V6.2 SP3 or higher is installed is also sufficient for installing an upgrade to WinCC V7.3. However, there should not be a significant increase in data volume because otherwise the performance will be affected. If it is expected that the data volume will increase, upgrade the hardware in good time.
Upgrade preparationBefore performing an upgrade installation of WinCC, check the existing projects with regard to special characters used in the archive names, archive tag names, trend names, trend window names, column names and table window names. You will find a table with the permitted special characters in the section "Working with WinCC > Working with Projects > References".
It is possible that you must use Tag Logging in WinCC V6.2 SP3. or V7.0 to remove certain special characters from the names.
NOTICE
Transferring archives with impermissible special characters
When transferring archives, if they contain impermissible special characters, the Runtime archive may be lost.
WinCC Installation Notes2.8 Upgrading WinCC
WinCC: General information and installationSystem Manual, 06/2014, A5E34372689-AA 57
Procedure1. Prepare existing WinCC projects for migration.
Check the used names for impermissible special characters.
2. Install WinCC V7.3. Proceed as described in the section "How to install WinCC". You need the storage medium that contains the licenses for WinCC V7.3. Upgraded licenses of previous WinCC versions will be lost.
3. Migrate your existing WinCC projects.Note the corresponding "First Information > Migration" chapter in the WinCC Information System.
See alsoLicenses and Licensing (Page 24)
How to Install WinCC (Page 47)
How to Perform an Uninstall (Page 54)
Introduction (Page 115)
WinCC Installation Notes2.8 Upgrading WinCC
WinCC: General information and installation58 System Manual, 06/2014, A5E34372689-AA

2.9 Notes about Running the Software
Introduction In order to operate WinCC without problems at optimum performance, please follow the Notes on Operation under Windows.
More information is available in the following sections of the WinCC Information System:
● "Release Notes > Notes on operation"
● "Working with WinCC > Working with Projects > Making Settings for Runtime > Effect of External Applications at Runtime"
WinCC Installation Notes2.9 Notes about Running the Software
WinCC: General information and installationSystem Manual, 06/2014, A5E34372689-AA 59

WinCC Release Notes 33.1 Release Notes
ContentThese Release Notes contain important information.
The information in these Release Notes has priority over that in the manuals and online help with regard to legal validity.
Please read these Release Notes carefully since it contains information which may prove helpful.
WinCC: General information and installationSystem Manual, 06/2014, A5E34372689-AA 61
3.2 Notes on operation
3.2.1 Notes on operation
General information Avoiding loads from external applications
If several programs are run simultaneously on the same computer, the computer may be exposed to high load levels. To ensure trouble-free WinCC operations do not run any other applications that can lead to a resource crunch on the PC. Therefore, close any unnecessary programs before starting WinCC. Additional information is available in the section "Working with Projects > Making Runtime Settings > Impact of External Applications on Runtime".
Use of virus scannersThe following virus scanners have been released for use with WinCC V7.2:
● Trend Micro "Office Scan" Client-Server Suite V10.6
● Symantec Endpoint Protection V12.1 (Norton Antivirus)
● McAfee VirusScan Enterprise V8.8
Fundamental principle
The use of a virus scanner should not hamper the runtime process in a plant.
Rules for local virus scanners (virus scan clients)
● Integrated firewall of the virus scannersIn WinCC V7.2, the local Windows firewall can be programmed with SIMATIC Security Control. You may not install or activate the integrated Firewall of the virus scanners.
● Manual scanYou are not permitted to run a manual scan in runtime. Run this scan at regular intervals on all the system PCs, for e.g. during a maintenance interval.
● Automatic scanDuring automatic scan it is enough to just scan the incoming data traffic.
● Scheduled ScanYou are not permitted to run a scheduled scan in runtime.
● Pattern updatePattern update of virus scan clients (system PCs being checked for viruses) is done by the higher-level virus scan servers (the system PC that centrally manages the virus scan clients).
● DialogsTo avoid interfering with process mode, no dialog messages should be displayed on the virus scan clients.
WinCC Release Notes3.2 Notes on operation
WinCC: General information and installation62 System Manual, 06/2014, A5E34372689-AA
● DrivesOnly the local drives are scanned to prevent overlapping scans on network drives.
● You can deactivate e-mail scan except on the WinCC engineering station that receives e-mail.
Accept all other default settings.
What does this ensure?
The incoming data traffic is checked for viruses. The effect on process mode is kept to a minimum.
Note
When using a virus scanner, make sure that the computer has sufficient system resources.
Screen savers
Using a screen saver costs processor time and can lead to a system overload. Screensavers which no longer release parts of the working memory, continuously reduce the usable working memory. The Windows "Logon screen saver" can be used.
CompatibilityInformation on compatibility can be found on the Internet under FAQ-No. 21927773:
● http://www.siemens.de/automation/csi/faq (http://www.siemens.de/automation/csi/faq)
See alsohttp://www.siemens.de/automation/csi/faq (http://www.siemens.de/automation/csi/faq)
3.2.2 Defining Access Rights in the Operating System
Introduction To support you in protecting your system, WinCC offers a structured user management:
● Protect your system against unauthorized access.
● Assign each user the required rights.
In order to work with WinCC, certain folders can be enabled for access via the network. For security reasons, you should only assign access rights to these folders to authorized users. You manage access rights via the Windows Standard user groups and user groups created by WinCC.
WinCC Release Notes3.2 Notes on operation
WinCC: General information and installationSystem Manual, 06/2014, A5E34372689-AA 63
Access rights specified in WinCCFollowing WinCC installation, WinCC automatically establishes the following local groups in Windows User and Group Administration:
● "SIMATIC HMI"All users must be members of the "SIMATIC HMI" user group. These members may create local projects, and may process, start, and access these projects remotely. Access to the WinCC database is limited to the minimum rights necessary (read/write). By default, the user who carries out the WinCC installation and the local administrator are members of this group. Additional members must be added manually by an administrator.
● "SIMATIC HMI Viewer"These members have read access only to configuration and runtime data in the WinCC database. This group is primarily used for accounts for Web publication services, e.g., IIS (Internet Information Services) account for operation of WinCC WebNavigator.
● Access to folder "<Installation Directory>/WinCC/aplib"Following installation, the directory "Installation Directory/WinCC/aplib" named "SCRIPTFCT" is unlocked for the "SIMATIC HMI" user group. This directory contains central libraries for project script functions.
User Groups and User RightsThe following overview contains the tasks of the different user groups with the access rights and instructions required to assign these access rights.
WinCC Installation● Task: WinCC Installation
● Role: Configuration engineer, Administrator
● Authorization: Windows Administrator rights
● Procedure:Prior to installation, ensure that you have local administrator rights on the computer.
● Explanation:You need local administrator rights to install WinCC.
Preparation for operation● Task: Access to WinCC
● Role: Configuration engineer, Administrator
● Authorization: Power user rights, Administrator rights
● Procedure:After installation, set up the administrative settings as administrator or power user.
● Explanation:Power user rights are the minimum requirements for administrative settings, e.g. the authorization of file rights or printer driver settings.To delete a WinCC project completely, you must have power user rights, at a minimum.
WinCC Release Notes3.2 Notes on operation
WinCC: General information and installation64 System Manual, 06/2014, A5E34372689-AA
Local user rights when operating WinCC● Task: Operator input in Runtime, configuration
● Role: WinCC user (operator, configuration engineer)
● Authorization:- Windows group "User"- User group "SIMATIC HMI"
● Procedure:Add the user to the "SIMATIC HMI" user group and, at a minimum, to the Windows "User" user group.
● Explanation:In order to operate WinCC or for remote access to a WinCC project on the client and server, the user must be a member of the "SIMATIC HMI" user group.
Access to distributed systems● Task: Access to distributed systems
● Role: WinCC user (operator, configuration engineer)
● Authorization: Uniform user groups on all computers
● Procedure:Enter the WinCC users on all computers in the same group.Assign the same password to all the users.
● Explanation:For access to distributed systems, the same user groups must be created on clients and servers.
Access rights for local projects● Task: Access to projects which were created as follows:
- Manual copy- Duplicate- Retrieval- Migration
● Role: WinCC user (operator, configuration engineer)
● Authorization: SIMATIC HMI, SIMATIC HMI Viewer
WinCC Release Notes3.2 Notes on operation
WinCC: General information and installationSystem Manual, 06/2014, A5E34372689-AA 65
● Procedure:Assign full access rights to the project folder for the "SIMATIC HMI" group.To do so, open the project following its creation once as administrator or power user. Alternatively, you can specify access rights in the Windows Computer Management.Even if you want to copy projects with the Project Duplicator you will need the appropriate authorizations. You will either have to grant access to the used folders or duplicate them as main user.
● Explanation:When a local project is newly created, the members of user groups "SIMATIC HMI" and "SIMATIC HMI Viewer" automatically receive the necessary access rights to the project directory.However, when projects are copied, logged, or migrated, the local authorizations are not transferred but must be reassigned.
Access rights to system information● Task: Access to system information via the WinCC channel "System Info"
● Role: Operator
● Authorization: System monitor user
● Procedure:Into the Windows group "System monitor user", accept all users who require the followingsystem information of the WinCC channel "System Info":
– CPU load
– Status of the export file
● Explanation:
Users with Windows standard user rights do not have access to certain system information.
3.2.3 Windows Operating System
General information
WinCC interface and 64-bit operating systemThe public interface of WinCC offer no native 64-bit support. This primarily affects ODK, VBS and the WinCC OLEDB provider. To use the interface of WinCC under a 64-bit operating system, you must adhere to the following:
● You cannot launch VB scripts simply with a double-click. You must explicitly use the 32-bit version under "syswow64\wscript.exe".
● .NET applications that use the WinCC API must be explicitly compiles as 32-bit applications. With "x86" and not with "AnyCPU".
● C++ applications cannot be compiled as 64-bit applications.
WinCC Release Notes3.2 Notes on operation
WinCC: General information and installation66 System Manual, 06/2014, A5E34372689-AA
Microsoft security updates and patchesMake sure that all current patches and security updates from Microsoft are installed on your computer.
For further information, refer to the FAQs in the SIMATIC Customer Online Support:
● SIMATIC Customer Online Support: FAQ search (http://support.automation.siemens.com/WW/llisapi.dll?query=WinCC+Microsoft&func=cslib.cssearch&content=adsearch%2Fadsearch.aspx&lang=en&siteid=csius&objaction=cssearch&searchinprim=&nodeid99=)
Preventing access to Windows in runtime
Displaying the online help in runtime If you wish to ensure that operators have no access to the operating system level of a plant, deactivate online help in all controls. This prevents the Windows selection dialog from opening. Deactivate the "Help available during runtime" option in the "Project properties" dialog in the "Options" tab.
Displaying the Windows taskbar in runtimeYou can use the computer properties to prevent the Windows taskbar from being displayed in runtime. Open the "Parameters" tab in the "Computer properties" dialog and disable the option "Disable shortcut keys for operating system access" in the "Disable Keys" area.
In addition, deactivate the "Keep the taskbar on top of other windows" setting in Windows.
If you disable the <CTRL+ESC> shortcut key, the following shortcut keys are also disabled in runtime:
Shortcut key Function<Windows key+U> System utility program managerPress <SHIFT> five times Locking functionPress <SHIFT right> for eight seconds Impact delay<ALT left+SHIFT left+NUM> Keyboard mouse<ALT left+SHIFT left+PRINT> High contrast
The functions can be configured using the Windows Control Panel. If the functions are activated in the Windows Control Panel before activating WinCC Runtime, they are no longer locked in runtime.
By activating the option "Disable shortcut keys for operating system access", you are also disabling the shortcut keys for easier operation. You must install Microsoft hotfix KB2516889 when using Windows 7 SP1 (64-bit) and Windows Server 2008 R2 SP1 to prevent access to the operating system with the shortcut keys for enabling high-contrast mode:
● Internet: Microsoft hotfix KB2516889 (http://support.microsoft.com/kb/2516889)
Do not use the "On-screen Keyboard" enabled by WindowsUse the on-screen keyboard offered by WinCC instead of the "On-Screen Keyboard" enabled by Windows to prevent the display of the Windows taskbar in runtime.
WinCC Release Notes3.2 Notes on operation
WinCC: General information and installationSystem Manual, 06/2014, A5E34372689-AA 67
Do not specify print to file as standard printingDo not set the print to file as standard printing procedure in the Windows operating system. This prevents the Windows dialog for saving the file from opening when printing from WinCC.
Preventing access to Windows 7/Windows Server 2008 in runtime
Disabling shortcut keysIf you would like to disable shortcut keys in Windows 7 or Windows Server 2008, you must adjust the group policies in the operating system management.
A detailed description of this can be found in the FAQ with entry ID "44027453" in the SIMATIC Customer Online Support:
● Internet: WinCC FAQ 44027453 (http://support.automation.siemens.com/WW/view/en/44027453)
Without this adjustment, it is generally not possible to disable keys in Windows 7 and Windows Server 2008. Users can then use the shortcut key <Ctrl+Alt+Del> in WinCC Runtime to perform all related actions, e.g., lock computer, change user, log off, change password, start Task Manager.
Web Client: Display of ActiveX controls in Internet Explorer ActiveX controls are disabled in Internet Explorer by default. For this reason, the WinCC controls are not displayed correctly in Internet Explorer on a Web client.
To display the WinCC controls correctly, add the Web server as a trusted website and enable the ActiveX controls only for the "Trusted sites" zone.
To continue protecting Internet Explorer from foreign ActiveX controls, check that the restricted security settings still apply to the other zones after making the changes.
For more information, refer to the following documentation:
● WinCC/WebNavigator: "WinCC/WebNavigator Installation Notes > Installation of WebNavigator Client > Settings in Internet Explorer"
● WinCC/DataMonitor: "WinCC/DataMonitor Documentation > Configuring the DataMonitor System > Working with the DataMonitor Client > Configuring Security Settings in Internet Explorer"
Internet Explorer: Setting for WinCC without Internet connection Disable the option "Check for publisher's certificate revocation" on the "Advanced" tab in the Internet Options if you operate WinCC on computers that do not have an Internet connection.
Internet Explorer V7.0 or higher: Display of the Online Help If using Internet Explorer V7.0, verify that all current Microsoft updates have been installed.
Otherwise delays may occur when displaying the Online Help.
WinCC Release Notes3.2 Notes on operation
WinCC: General information and installation68 System Manual, 06/2014, A5E34372689-AA
Warnings with the DCOM configuration When the "Dcomcnfg.exe" program starts, there may be warnings about unregistered AppIDs of WinCC components. This reaction has no effect on the functional capability of the software. The warnings can be ignored.
Changing the screen settings
Changing the color palette If you change the color palette via the Windows Control Panel, you should expect color changes and poorer legibility of the text. When creating the project, therefore, be sure use the same color palette that will be used in runtime.
Changing the resolution In order to use a different resolution in the destination system, use the "Adapt Picture" or "Adapt Size" functions for pictures and windows. These settings can lead to blurred displays in runtime and increased system loads.
Operating system with multilanguage installation: wrong language in message boxes In message boxes in which the user must respond with Yes/No, OK/Cancel, etc., the buttons are always labeled in English in both CS and RT. This characteristic is independent of both the operating system language set and the WinCC language.
Novell Netware clients WinCC should not be installed on a system together with the Novell client software.
The installation of WinCC can have the effect that it is no longer possible to log on to the Novell system or the lock the keyboard during runtime.
We recommend you not use the Netware client software or use the Microsoft client for Netware.
Notes on Windows 7 and Windows Server 2008
Slow response of virtual keyboardIn Windows 7 and Windows Server 2008, the "Microsoft OSK" and "HMI TouchInputPC" virtual keyboards start very slowly. The delay is caused by the Internet certificate check with callback.
RemedyDeactivate the Internet certificate check with callback.
You will find the following files on the product DVD under <Tools\TouchInputPC>:
● DisableCRLCheck_LocalSystem.cmd
● DisableCRLCheck_CurrentUser.cmd
Proceed as follows:
WinCC Release Notes3.2 Notes on operation
WinCC: General information and installationSystem Manual, 06/2014, A5E34372689-AA 69
1. Run the "DisableCRLCheck_LocalSystem.cmd" file with administrator rights.To do so, enter the "Run as administrator" command in the shortcut menu of the file.
2. Restart the computer.
Proceed as follows if the problem persists:
1. Run the "DisableCRLCheck_CurrentUser.cmd" file with user rights.To do so, double-click the file.
2. Restart the computer.
NoteReactivating "Certificate check with callback"
The certificate check with callback will be disabled for all users or throughout the computer.
To restore the initial settings, run the following files from the product DVD in the <Tools\TouchInputPC> path:● RestoreDefaults_LocalSystem.cmd● RestoreDefaults_CurrentUser.cmd
See alsoSIMATIC Customer Online Support: FAQ search (http://support.automation.siemens.com/WW/llisapi.dll?query=WinCC+Microsoft&func=cslib.cssearch&content=adsearch%2Fadsearch.aspx&lang=en&siteid=csius&objaction=cssearch&searchinprim=&nodeid99=)
Internet: WinCC FAQs (http://support.automation.siemens.com/WW/view/en/10805583/133000)
Internet: WinCC FAQ 44027453 (http://support.automation.siemens.com/WW/view/en/44027453)
3.2.4 Database System
Information on DB.dllDB.dll is an ODK component for accessing databases via C API functions. The functionality is no longer supported for use with WinCC. Do not develop new applications with the database access layer DB.dll from WinCC.
Instead, use the following functions offered by Microsoft:
WinCC Release Notes3.2 Notes on operation
WinCC: General information and installation70 System Manual, 06/2014, A5E34372689-AA

● Use ADO.NET for .NET-based applications. The database interface of .NET Framework is object-oriented and designed for scalable applications. The interface is also well suited for data communication through firewalls.
● You can use OLE DB for C++ based applications. Microsoft provides templates with Visual Studio for this. They make it easier to use the OLE DB database technology with classes, which implements many commonly used OLE DB interfaces.
● You can also use ODBC C++ based applications. Microsoft provides classes for this, which facilitate programming.
You can find more detailed information and examples on the Microsoft website.
Notes on Microsoft SQL server
Error accessing the SQL master database after switching off the server while the system is runningIf a server fails unexpectedly in runtime (power failure, disconnection of power plug), the WinCC installation may be corrupted as a result and the SQL server will no longer be able to access the SQL master database following a restart. Access is only possible after reinstalling the WinCC instance.
In order to reinstall the WinCC instance, both WinCC and the SQL server must be removed and installed again.
Improved access protection for the WinCC databasesFor the purposes of improved access protection, the user names "WinCCAdmin" and "WinCCConnect" have been removed from the WinCC database. Access to the WinCC database is no longer possible using these user names. Applications which use their own SQL user names with password are not affected.
The user "SA" (system administrator) of the SQL server is deactivated during installation.
Manual detachment of WinCC project databasesA system property in Microsoft SQL server can bring about changes to the NTFS authorizations when you detach the WinCC project database.
If a WinCC database remains attached after you have closed a WinCC project or if you have manually attached the WinCC database, you always need to use the CCCleaner to detach the database. The "CCCleaner" program is located in the "bin" folder of the WinCC installation directory and must be started as administrator.
3.2.5 Network Technology and UPS
Information on networksWinCC only supports the TCP/IP network protocol on the terminal bus.
WinCC Release Notes3.2 Notes on operation
WinCC: General information and installationSystem Manual, 06/2014, A5E34372689-AA 71
Operation on network serversIt is not permitted to operate WinCC on network servers (e.g. domain controllers, file and name utility servers, routers, software firewalls, media servers, exchange servers, etc.).
Operation on systems with Windows cluster technologyWinCC cannot be used on systems implementing Windows cluster technology.
Use of redundant serversWhen redundant pairs of servers are implemented, the master and standby server must be operated in the same IP/subnet band.
Network adapters with energy-saving modeWhen using network adapters provided with energy-saving mode, the energy-saving mode must not be activated.
Operation with multiple network adaptersIf WinCC is used on a PC with more than one network adapter, observe the following:
Select the IP addresses which WinCC should use for communication with other WinCC stations. In Windows Explorer, select the "Simatic Shell" directory. Click into the navigation window of the dialog "Simatic Shell" and select "Settings..." in the shortcut menu. In the "Settings" dialog that follows, select the IP address to be used.
If problems occur with the configuration and project management despite this setting, it could be due to the assignment of the IP address by the DHCP server to the WinCC station being too slow. In this case, the network administrator must define the IP address for each network adapter on the WinCC station causing the problem.
To do this, press the Windows "Start" button and select "Settings" > "Control Panel". Open the "Network Connections" folder and then the "LAN Connection" dialog. Click "Properties" in the "General" tab. Open the "LAN Connection Properties" dialog and select the "Internet Protocol (TCP/IP)" element from the list in the "General" tab by double-clicking it. Use the "Use the following IP address" option button in the properties of Internet Protocol (TCP/IP) to define the IP addresses.
Observe the information in the following chapter: "Special features for communication with a server with multiple network adapters"
Network environment and network drivesEnsure that there are no unnecessary network drive connections.
In order to prevent delays following a restart of a distributed system, start the multi-user projects first. The reason for this is the reaction of the master browser service (responsible for displaying the network environment in the operating system) and administration of the domains and working groups.
WinCC Release Notes3.2 Notes on operation
WinCC: General information and installation72 System Manual, 06/2014, A5E34372689-AA
Operation with TCP/IP protocolIf the TCP/IP protocol is installed, the IP address must be valid and must not change in runtime operation.
Observe the following here:
1. The IP address becomes invalid when the network adapter is removed or deactivated after installation of the TCP/IP protocol.
2. The IP address may not be initialized yet. This occurs, for example, when the TCP/IP protocol is installed with the IP address derived from a DHCP server. When the computer is connected to the network, the computer undergoes a basic initialization during which an IP address is transferred. This IP address then remains valid even after the computer is disconnected from the network. After the period of the lease has expired, however, it can become invalid or changed in another way.
If the computer is not connected to the network, the user must log on via a user configured locally on this computer. This user should have local power user rights for runtime operation and for the configuration.
Leading zeros in IP addressesWhen multi-user mode is used with name derivation via "hosts" and "lmhosts", no preceding zeros may be entered in the "hosts" file. IP addresses with leading zeros are interpreted as OCTAL instead of DECIMAL.
Example:● Computer_1 199.99.99.020 is interpreted as 199.99.99.16 (decimal)
● Computer_2 199.99.99.026 is interpreted as 199.99.99.22 (decimal)
The specification can also be made hexadecimal:
● 199.99.99.0x10 for Computer_1
Using WinCC in multiple domains The correct functioning of WinCC can only be guaranteed when all the computers in a multi-user system are located in a common domain or working group. When WinCC is used in different domains or working groups, complications may arise if the access rights and/or name utility are configured incorrectly.
When the user administration is realized in a working group, all the WinCC users must be set up on all the computers in the multi-user system and have the necessary access authorization.
Use of WinCC within a domainIf problems occur accessing the Windows domains, it cannot be guaranteed that WinCC functions correctly. Therefore, in addition to a "server-stored user profile", a local user profile and local user with necessary rights for WinCC must be set up. If access problems occur with a domain logon, exit WinCC and log on again using the local user profile.
WinCC Release Notes3.2 Notes on operation
WinCC: General information and installationSystem Manual, 06/2014, A5E34372689-AA 73
Information for using routers and firewalls
Using routersWinCC V7 can also be used to connect WinCC clients to WinCC servers via routers.
WinCC clients without their own project cannot be used for configuration with the routers, only for WinCC Runtime. There are no restrictions for WinCC clients with their own project.
The following is required when using routers:
● WinCC must use the correct IP address of the WinCC stations.
● The WinCC stations must be capable of resolving the physical computer name (NETBIOS name) of the other computers in the WinCC project.
● The WinCC stations must be capable of reaching each other via TCP/IP and ICMP without any problems. When testing the connection using Ping, it must be possible to access the computers immediately.
● Activate multicast forwarding to the network routers between the servers and the clients.
Speed of the network connectionsFor slow network connections, we recommend:
● Restricting the quantity of data to be transferred, for example, by avoiding complicated graphics.
● Using the local pdl cache of the WinCC client.
● Using the ISDN router for a WinCC client in multi-link mode (channel bundling). Bandwidths below 128 Kbps have proved insufficient.
● Integrate only one WinCC client for each additional ISDN channel.
● The operation of WinCC via ISDN routers depends on the stability and availability of the ISDN network.
● Reserve the maximum bandwidth of the connection for WinCC.
Note
Connection via ISDN and operation using slow connections has not been approved for clients without a local project.
Connecting to an office network with a central firewallSome network configurations can increase the load on the firewall.
You can avoid the described reaction by assigning unique IP addresses to all WinCC stations.
WinCC Release Notes3.2 Notes on operation
WinCC: General information and installation74 System Manual, 06/2014, A5E34372689-AA
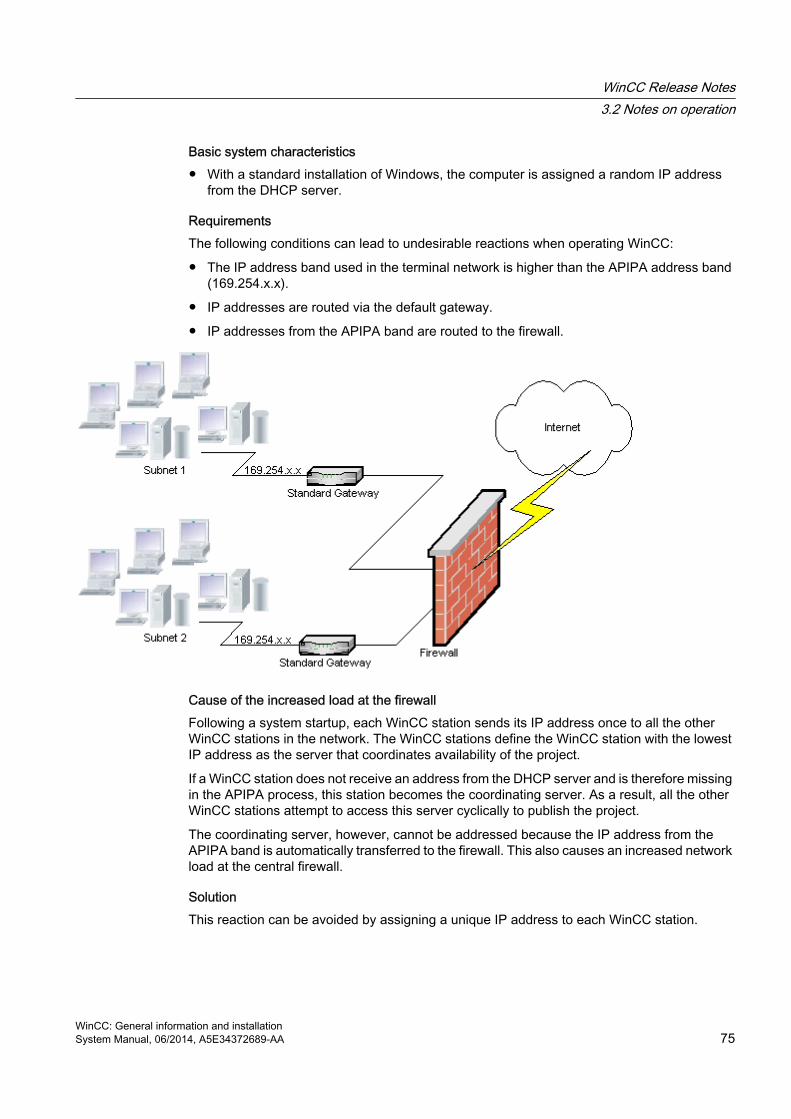
Basic system characteristics● With a standard installation of Windows, the computer is assigned a random IP address
from the DHCP server.
RequirementsThe following conditions can lead to undesirable reactions when operating WinCC:
● The IP address band used in the terminal network is higher than the APIPA address band (169.254.x.x).
● IP addresses are routed via the default gateway.
● IP addresses from the APIPA band are routed to the firewall.
Cause of the increased load at the firewallFollowing a system startup, each WinCC station sends its IP address once to all the other WinCC stations in the network. The WinCC stations define the WinCC station with the lowest IP address as the server that coordinates availability of the project.
If a WinCC station does not receive an address from the DHCP server and is therefore missing in the APIPA process, this station becomes the coordinating server. As a result, all the other WinCC stations attempt to access this server cyclically to publish the project.
The coordinating server, however, cannot be addressed because the IP address from the APIPA band is automatically transferred to the firewall. This also causes an increased network load at the central firewall.
SolutionThis reaction can be avoided by assigning a unique IP address to each WinCC station.
WinCC Release Notes3.2 Notes on operation
WinCC: General information and installationSystem Manual, 06/2014, A5E34372689-AA 75
Information on uninterruptible power systemPlease note the following:
Prevent damaged files during power outagesIf a power failure occurs while using Windows systems when the WinCC system is active, files can be corrupted or lost. Operation using the NTFS file system offers more security.
Secure continuous operation can only be guaranteed when an uninterruptible power system (UPS) is used.
Uninterruptible power system for client-server systems If the server in a client-server system should be buffered by an UPS system, it must be capable of bridging a power failure for up to 30 minutes. This value depends on the configuration and number of computers, especially in a multi-user system. A great deal of time is required for the configuration.
WinCC Release Notes3.2 Notes on operation
WinCC: General information and installation76 System Manual, 06/2014, A5E34372689-AA
3.3 Notes on WinCC
3.3.1 General information on WinCC and configurations
General information
WinCC Demo projectThe WinCC Demo Project for WinCC V7.3 can be downloaded as a self-extracting ZIP file at:
● http://support.automation.siemens.com/WW/view/en/93148272
WinCC passwords: Migration of WinCC projects As of version V7.2, WinCC offers improved encryption of passwords.
Note for migrated project that were created with WinCC prior to V7.2:
● You must re-enter the user name and the password for "WinCC Service Mode" operating mode.
● To increase security of WinCC through improved encryption, you have the re-enter the passwords in the User Administrator.
Increasing password securityMake sure that the WinCC passwords meet the usual security guidelines, for example, mandatory use of capital letters and special characters,
minimum number of characters.
Remote maintenance of WinCC systemsYou can access WinCC systems with a Remote Desktop client via a console session. Access via the Remote Desktop Protocol may only be gained by means of console takeover with the same user, or initial login (""/admin"" or ""/console"" parameter when connecting).
The RealVNC Enterprise Edition V4.6.3 software is released for use for remote service access. You can find more notes on the use of "RealVNC" on the Internet on the Customer Support pages:
● Entry ID 55422236 (http://support.automation.siemens.com/WW/view/en/55422236) (http://support.automation.siemens.com/WW/view/en/55422236)
No keyboard lock with RealVNCNote that the keyboard lock is not supported with "RealVNC" in WinCC V7.3. The keyboard lock is only in effect with a Remote Desktop Protocol connection.
WinCC Release Notes3.3 Notes on WinCC
WinCC: General information and installationSystem Manual, 06/2014, A5E34372689-AA 77
Migrating WinCC projects remotely only with UNC pathsUse only UNC paths to migrate WinCC projects remotely. Release the project path or the folder above it. Use this UNC path as project directory for the WinCC Project Migrator.
No update of the operating system with WinCC startedAn update of the operating system is not permitted if WinCC is started. Start the computer again after updating the operating system.
WinCC documentation: WinCC Information SystemThe information in the online help is more up-to-date than the information in the printable PDF files.
Openness and system stability WinCC enables high performance actions to be programmed on individual graphic objects and even complete functions and global action scripts independent of the individual components.
C scripting:WinCC and Windows API functions can be called in the action scripts. In addition, the integrated script programming contains a C interpreter with a large number of standard functions complying to ANSI-C.
Please note that, due to the openness of the system, it is possible to write actions that block the system and lead to system crashes in runtime due to continuous loops, incorrectly initialized pointers, etc. Pay attention to the availability of allocated memory.
VB scriptingVBScript (VBS) enables access to tags and objects of the graphical runtime system during runtime. In addition to VBS standard functions and constants, the Windows Scripting Host and the MS Automation interface can also be used to make the Windows environment dynamic.
There is no guarantee nor WinCC support for the VBS functionality with regard to its adaptation to the Windows environment.
You can find additional information in the following sections of the WinCC Information System:
● "ANSI-C for Creating Functions and Actions"
● "VBS for Creating Procedures and Actions"
● "Process Picture Dynamics"
Time synchronization Time synchronization between the servers and automation systems is essential for the correct functioning of:
● Redundancy synchronization
● Chronological messages
WinCC Release Notes3.3 Notes on WinCC
WinCC: General information and installation78 System Manual, 06/2014, A5E34372689-AA
● Search and sorting criteria using the time code
● Operating multi-user projects in one domain
You can find additional information in the following sections of the WinCC Information System:
● "Redundant systems"
● "Chronological reporting"
● "Multi-user systems"
● "Time synchronization"
Complete download of redundant systemsDo not perform a complete download to the redundant systems in SIMATIC Manager using the "Target system / Compile and Download Objects..." function, as this can create inconsistent data on the target system.
Instead, select the "Download" option in the SIMATIC manager in the shortcut menu of the operating system.
Installation of the examples projectsThe supplied example projects are located on the WinCC DVD in the directory "Samples\WinCC".
Installing OPC XML DA Server on a WinCC systemUse the WinCC Product DVD if you want to add an OPC XML DA Server installation to a WinCC system. Do not install the application by means of Windows Control Panel.
Information for multi-user systems
Clients without their own project in multi-user systemsIn multi-user systems, there may be a delay in the selection of the first picture following a redundancy switchover for clients without their own project.
If you are changing the runtime language of a client without its own project in a multi-user system, you will have to close WinCC on the client and exit the WinCC project on the server. Only then will the language be altered.
A client without its own project: Operation with several Windows users A user exits runtime in case of a client without its own project and logs off from Windows. If another main user or user without administrator rights logs on to this client and starts runtime, some WinCC components may not have the full range of functions.
Check the security settings for this user in the "Work.dcf" file. The file must be part of the SIMATIC HMI group. The SIMATIC HMI group must have the "Change" authorization for the
WinCC Release Notes3.3 Notes on WinCC
WinCC: General information and installationSystem Manual, 06/2014, A5E34372689-AA 79
"Work.dcf" file. You can find the hidden system file "Work.dcf" in the installation directory of Windows:
Windows 7 (depending on the installation)● "ProgramData"
● "userdata"
● "Windows/Temp"
Data loss after interruption of the remote desktop connection If the remote desktop connection was interrupted, for example, because the network cable was removed from the Remote Desktop Client, the archives and the OPC server, for example, will no longer receive values from the data manager. This status will persist until the connection has been recovered, or until a timeout of 35 seconds has expired.
Remote access from a client without their own project The server data editor is not available in the WinCC Explorer on a client without their own project.
The "Archive Configuration" entry is not available in Tag Logging and Alarm Logging.
Notes on integration into SIMATIC Manager
Symbolic data block name: Maximum of 16 characters longIf you want to transfer tags from a data block to WinCC, the symbolic name must not exceed 16 characters.
Creating a DCF file If the DCF file cannot be read after migration, a message regarding the corrupt file is written to the migration log file. In order to create another DCF file, proceed as follows. The sequence must be adhered to in all cases:
1. Open the project in the configuration mode.
2. Remember your own symbolic computer name (server prefix) needed for later export.
3. Remember the storage location of the imported server data.
4. Remember the preferred server and the default server.
5. Delete your own and imported server data.
6. Close the project.
7. Delete the DCF file in project directory (typically ProjectName.dcf).
8. Reopen the project in the configuration mode.
9. Create your own server data, making sure to maintain the original symbolic computer name (server prefix) (see step 2).
WinCC Release Notes3.3 Notes on WinCC
WinCC: General information and installation80 System Manual, 06/2014, A5E34372689-AA
10.Import all imported packages again (see step 3).
11.Reconfigure the preferred server and default server (see step 4).
12.Close the project.
Performance data for the message system and archive system The performance data specifies the maximum values for the full load and surge in the message system and for the archiving system when archiving to the database.
The specified values only apply when the central archive server is used either for the central processing archiving or for message archiving.
CPU loadIf data, transferred from a server to a client, cannot be processed at the same speed, the client rejects the data frames from a specified threshold value.
The following process control messages are issued in conjunction with this:
● 1000200: "WCCRT:Status"
You will find the following additional information in the comment of this message or in the log file "WinCC_Sys_<x>.log":
● 1000200,4,,<Computer name>, DataManager Runtime, RPC call took longer than 5000 msec (Client requires a very long time to process the data)
● 1000200,4,,<Computer name>, DataManager Runtime, Update data for Client '<client name>' lost, (message frames for the client are discarded on the server)
Data may be lost on the client. If the client involves a central archive server, this may cause old values to be stored in the process value archive.
Therefore, ensure that the central archive server has sufficient reserves for the CPU load.
See alsohttp://support.automation.siemens.com/WW/view/en/55422236 (http://support.automation.siemens.com/WW/view/en/55422236)
http://support.automation.siemens.com/WW/view/en/93148272
WinCC Release Notes3.3 Notes on WinCC
WinCC: General information and installationSystem Manual, 06/2014, A5E34372689-AA 81
3.3.2 WinCC CS
General information
Do not use several WinCC editors at the same timeDo not use several WinCC editors at the same time because the editors could access the same WinCC components, for example using the "Text Distributor" and "Cross Reference" editors or the automatic update of the Cross Reference when the Graphics Designer is accessed through several interfaces at the same time.
Information on the Graphics Designer
Custom ActiveX controls (SIMATIC WinCC/ODK) You must verify compatibility of custom ActiveX controls (SIMATIC WinCC/ODK) with the WinCC Basic System, WebNavigator Server, and WebNavigator Client. This applies to both a direct installation of ActiveX control on the computer with WinCC, Web server or Web client and the installation using a plug-in, such as on a Web client.
● With a direct installation, the ActiveX control should therefore be installed prior to WinCC Basic System, Web Server or Web Client. If the custom ActiveX controls do not function without error after this step, there is no compatibility.
● If the custom ActiveX control was packaged in a plug-in and installed via download, an upgrade of WinCC Basic System, Web Server or Web Client will also require generation of a new plug-in using this ActiveX control. When creating the plug-in, care should be taken to use compatible binaries (DLL, OCX, etc.).
The "Date/Time" data format is not available for I/O fields copied from WinCC < V7.3When you copy an I/O field created in WinCC < V7.3, the "Date/Time" data format is not available for the pasted I/O field.
Notes on Alarm Logging
Loop in Alarm/"Open Picture" function: Picture names in different languages If you are going to use multiple pictures with names from different code pages, it is advisable to use the picture names in the different "Open Picture" functions. You need to compile the corresponding "Open Picture" function with the correct language and assign it to the message.
WinCC Release Notes3.3 Notes on WinCC
WinCC: General information and installation82 System Manual, 06/2014, A5E34372689-AA
Notes on cross reference
Windows 7 / Windows Server 2008: Security question when updating the data managementIf a WinCC project contains ActiveX controls, during the updating of the data management a security notice for ActiveX controls is displayed.
Bring the dialog to the foreground if necessary in order to acknowledge the notice.
Make sure that the Graphics Designer is open during the updating of Cross Reference.
Rewiring: Tags used in object propertiesIf you rewire a tag that is used in several object properties of an object, note the following behavior:
The tag will be changed in all properties of this object and not just at the selected point of use.
Information on VBA
VBA updates The user is solely responsible for the installation of updates for VBA.
The corresponding updates for VBA are made available by Microsoft on the download pages. Siemens does not supply any updates from Microsoft.
Install the updates for VBA after installing WinCC.
Notes on the channels
Name of a channel with national characters When you enter a name with national characters in the "SIMATIC S7 Protocol Suite" channel and especially in the "Named Connections" channel unit, you must have set the corresponding code page in the language options of the operating system.
Information on ODK
ODK functions which are not available to certain users For users with Windows standard user rights, the following ODK functions are no longer available:
● CreateDatabase
● DatabaseAttach
● DatabaseDetach
WinCC Release Notes3.3 Notes on WinCC
WinCC: General information and installationSystem Manual, 06/2014, A5E34372689-AA 83
3.3.3 WinCC Runtime
Information on multi-user systems
Copying large amounts of data via the terminal bus Copying large amounts of data on a computer connected to a terminal bus can effect communication in a multi-user system. One of the possible causes is the use of hubs with a low data throughput.
Notes on single-user projects
No access to process values by means of OPC and OLE DBYou cannot use OPC and OLE DB to access the process values of a single-user project.
Information on Tag Logging / Alarm Logging
Editing archive data already saved Archived measured values/messages of previously saved archives cannot and should not be changed due to reasons of data security and consistency.
Notes on GlobalScript
C functions "SetLanguageByID" and "SetLanguageByName" for changing the Runtime language● You can use "SetLanguageByID" to switch the configured language in Runtime. The "-1"
parameter is available for this purpose, i.e. "SetLanguageByID(-1)".
● You can use "SetLanguageByName" to change the language in Runtime via the country name of the language to be set in the format "RFC1766", e.g. "SetLanguageByName("en-us")".
Information on the report system
No Runtime documentation for WinCC UserAdminControlThe Runtime documentation for WinCC UserAdminControl is not available.
Archiving the EMF files with a client without its own projectIn multi-user systems and clients without their own project, EMF files are saved in the "Windows-Temp\PRT_OUT\<Archive>_<Date+Time>" directory of the client.
WinCC Release Notes3.3 Notes on WinCC
WinCC: General information and installation84 System Manual, 06/2014, A5E34372689-AA
After creating an EMF file, an attempt is made to move this file to the project directory on the server. In redundant systems, the file is moved to the current master. The file is deleted on the client.
If the file cannot be moved to the server, it remains in the Windows Temp directory of the client. After the next EMF file has been created, an attempt is made to move all EMF files in the directory.
In addition, the OS controlling message "1004003" is generated if the move is unsuccessful. The process control message specifies the directory on the client where the EMF file is located. If the client is disconnected from all servers, this process control message can no longer be generated on a server. In this case, the message is located in the diagnostics file "WinCC_Sys_XX.log".
Information on OPC
SIMATIC WinCC OPC Server: Automatic assignment of DCOM rightsThe DCOM rights required for operation of the OPC server are assigned automatically. The settings are performed during the installation. Depending on the WinCC operating mode, further configurations are performed.
You must not edit these settings manually.
No deinstallation of SIMATIC WinCC OPC Server when the OPC channel is usedWhen you use the OPC channel, you must not remove the SIMATIC WinCC OPC DA Server.
OPC tags: Time stamp for Alarm Logging and Tag LoggingIf messages are triggered by OPC tags, the message time stamp is used by the OPC server, comparably to chronological reporting.
For Tag Logging the time stamp is generated by the Tag Logging server.
OPC Data AccessWhen running the OPC DA server on a WinCC client:During the connection establishment of the OPC client, the WinCC server with which the OPC client exchanges data must be in Runtime. If the WinCC server is deactivated, not all properties of the items will be provided.
Since the display of data types in OPC Item Manager requires a lot of time, the display should be turned off if it is not needed.
WinCC Release Notes3.3 Notes on WinCC
WinCC: General information and installationSystem Manual, 06/2014, A5E34372689-AA 85
OPC XML data access
Display of newly created tags When you create new tag folders with new tags in Runtime in the WinCC project, the tag folders and the tags will not become visible on the OPC client until you have restarted WinCC Runtime on the OPC client system. Make sure that "OPCTags" are no longer open on the OPC client.
Add TagsIf you want to add tags with the OPC Item Manager, then WinCC Runtime will have to be enabled on the OPC server.
Authentication method XML DA Web service is installed using WinCC Setup with the "Integrated Windows Authentication" authentication method. The WinCC OPC XML client supports this method. For this, the user account under which the OPC Client runs must be known to the XML server computer.
OPC historical data access
Return value OPC_E_MAXEXCEEDED for archive access using OPCIf the OPC client demands data from more than 2000 values during synchronous or asynchronous reading, the call is rejected with a return message OPC_E_MAXEXCEEDED. This limit serves to limit the computer load and duration of the call.
This restriction does not apply if the entire time range is read.
OPC Alarm&Event
Revision of the documentation "Read methods for archived messages"The following contents have been changed in the documentation on "Reading archived messages" on the page "Read methods for archived messages":
● "Read" mode
– Text added for "2. Refresh": Event packages with Refresh flag only contain historic events. The events may still be pending.The last Refresh package of the historical messages receives the identification "Last Refresh".
● "Advise" mode
– The following texts after "2. Set subscription to active using SetState" are invalid: "If you deactivate the subscription, the transmission will be interrupted." and "The last package also contains an additional flag "Last Refresh"."
Avoid bounding valuesAvoid using bounding values when reading historical alarms via the WinCC-OPC-A&E-server.
Otherwise, processing read access requests can take a long time, depending on the size of the archive.
WinCC Release Notes3.3 Notes on WinCC
WinCC: General information and installation86 System Manual, 06/2014, A5E34372689-AA

Filtering messages when using format instructions in the user text block The OPC source of a message is shown in an user text block. This is user text block 2 with the default setting.
If you use format instructions in this user text block, you need to use wild cards for the filter setting.
This ensures correct filtering when the OPC sources are generated dynamically in Runtime.
3.3.4 Smart Tools
Notes on WinCC ConfigurationTool and WinCC Archive ConfigurationTool
WinCC Configuration Studio replaces the functionality of WinCC ConfigurationTool and WinCC Archive ConfigurationTool
WinCC V7.3 is used to import and export the WinCC data via the WinCC Configuration Studio. To import already existing files from the WinCC Configuration Tool/WinCC Archive ConfigurationTool into the WinCC Configuration Studio, use the menu command "Import" in the WinCC Configuration Studio. In addition to the file name, select the "ConfigTool file (*.xlsx)" or "Archive Config Tool file (*.xlsx)" entry in the file selection dialog.
If you have configured the colors of message types in the WinCC Configuration Tool, the colors are not imported into the WinCC Configuration Studio from the Configuration Tool. You either need to create the message colors in the WinCC project before migrating the WinCC project to WinCC V7.3 or, alternatively, manually configure the message colors later after the import in the WinCC Configuration Studio.
Information on the Dynamic Wizard Editor
Opening the Dynamic Wizard EditorThe Dynamic Wizard Editor and the Graphics Designer should not be opened at the same time.
Information on the Tag Simulator
General information The update time for tag values is one second. Any change will only become active when you are activating the functions.
A maximum of 300 tags can be configured.
WinCC Release Notes3.3 Notes on WinCC
WinCC: General information and installationSystem Manual, 06/2014, A5E34372689-AA 87
3.3.5 Process communication
Notes on the WinCC channel "SIMATIC S7-1200, S7-1500 Channel"
Performance data for the channel "SIMATIC S7-1200, S7-1500 Channel"A maximum of 16 CPUs can be connected with the WinCC systems at the same time as Softnet via one network card each.
Maximum number of WinCC systems per CPU:
● S7-12xx V2.2: 1
● S7-12xx V3: 3S7-12xx V4: 4
● S7-1511: 15
● S7-1513: 23S7-1515: 29
● S7-1516: 36
During communication with S7-1200 and S7-1500 controllers, take into account that the maximum number of tags that can be used at the same time in the connection should not be exceeded permanently.
Refer to "Plc Attributes (free/max)" during runtime in the WinCC Channel Diagnostics for the number of tags currently in use. If several HMI devices access a controller, this limit applies to all HMI devices.
Information on the WinCC "SIMATIC S7 Protocol Suite" channel
Time change on an S7 automation system when using AR_SENDArchive data transferred from the S7-AS to WinCC with AR_SEND is ignored if the time is reset on the AS, e.g. following time synchronization. The archive already contains the reset time period.
S7-300 Automation System: Released CPUs for raw data communication / Named Connections"BSEND/BRCV" raw data communication via Named Connections is supported for the following S7-300 CPUs:
● CPU319-3 PN/DP as of V2.5
● CPU317-2 PN/DP as of V2.6
● CPU315-2 PN/DP as of V3.1
For S7-300 controllers, a firmware version V3.x or higher is recommended.
WinCC Release Notes3.3 Notes on WinCC
WinCC: General information and installation88 System Manual, 06/2014, A5E34372689-AA
Information on the WinCC "SIMATIC S5 PROFIBUS DP" channel
PROFIBUS DP and SIMATIC Net V12 SP2 To use the "PROFIBUS DP" channel with SIMATIC Net V12 SP2, you must disable the "OPC UA" property for the "DP" protocol in the communication settings of SIMATIC Net V12 SP2.
The following channels are no longer checked for licensesThe following channels are no longer checked for licenses:
● WinCC Profibus FMS
● WinCC S5 Ethernet Layer 4
● WinCC TI Ethernet Layer 4
● WinCC SIMATIC 505 TCP/IP
● WinCC S5 Ethernet TF
Information on the WinCC "SIMATIC 505 TCPIP" channel
LMode and LStatus data types The channel has been extended by the data types LMode and LStatus.
● LMode (Loop Mode): 16-bit value (bit array) without sign; access: write and read
● LStatus (Loop Status): 16-bit value (bit array) without sign; access: Read ONLY
The offset to be specified during the addressing identifies the loop whose mode or status should be requested.
Information on SIMATIC NET "IE SOFTNET-S7 LEAN"
Licensing During installation, the license for SIMATIC NET "IE SOFTNET-S7 LEAN" is not automatically transferred. You may transfer the license using the Automation License Manager, if necessary.
Information on communication diagnostics
Communication processor diagnostics with SIMATIC NET softwareWhen communication diagnostics are performed in WinCC, communication processors are tested with the "PG/PC Panel" application.
WinCC V7 contains a new version of the SIMATIC NET software. The "Communication Settings" application included with this software provides an additional, comprehensive
WinCC Release Notes3.3 Notes on WinCC
WinCC: General information and installationSystem Manual, 06/2014, A5E34372689-AA 89

diagnostics option for testing the communication processors. You can find a more detailed description in the SIMATIC NET help.
WinCC Release Notes3.3 Notes on WinCC
WinCC: General information and installation90 System Manual, 06/2014, A5E34372689-AA
3.4 Notes on WinCC Redundancy
Redundancy behavior in case of double failure Double failures are not covered by redundancy.
A double failure occurs, for example, when the terminal bus was pulled on server 1 while server 2 was deactivated.
Delay in swapping out archivesThe swapping of archives will be delayed if a redundant partner is not available or deactivated.. Swapping of archives will not start or continue until the partner is available once again and after archive synchronization.
An extended failure of the redundant partner may result in data loss, because the memory capacity of the circular buffer for Tag Logging and Alarm Logging is limited.
No reloading of messages after network failureThe reloading of messages after network failure is not permitted for redundant systems.
Configuring used standard gateway For redundancy, it is recommended to configure a standard gateway for the correct detection of failure scenarios. The standard gateway must be properly configured on both redundancy servers for this. This can be done manually or via DHCP.
For a configured standard gateway, ensure that this gateway cannot only be reached but is also accessible using a "ping".
Use of DHCP: Starting computer only with active network connectionIf you are using DHCP on the terminal bus network card, note the following in a redundant system:
The computer must obtain a valid IP address from the DHCP server during startup.
Otherwise, the redundancy status is always indicated as "fault". This status can only be reset by restarting the computer.
Message sequence report in a redundant systemIf you output a message sequence report on a client, you may encounter problems during logging when switching to the redundant partner.
Network connection: Firewire is no longer supportedNetwork connections via FireWire are no longer supported as of WinCC V7.3.
WinCC Release Notes3.4 Notes on WinCC Redundancy
WinCC: General information and installationSystem Manual, 06/2014, A5E34372689-AA 91
3.5 Notes on Process Control Options
Creating a New ProjectIf you create a new project manually, you must first run the OS Project Editor.
While creating an OS using PCS7 Engineering Station, the project is automatically called in the background and initialized using the default settings.
Removing unneeded "@*.PDL" pictures before migration If the OS Project Editor has processed a WinCC project, the "@*.PDL" pictures of Basic Process Control will have been installed in the Graphics Designer. If you do not need these pictures following the migration, you not only have to remove the "*@.PDL" pictures prior to migration, but also the "PAS" files and "SSM.cfg". After the migration, the files from Basic Process Control are no longer added.
OS Project Editor: Default setting for the alarm filter at SIMATIC Logon If you are using SIMATIC Logon, note the following when running the OS Project Editor:
The "Default user" logged on via SIMATIC Logon usually has the authorization level "No. 2 Authorization for area".
RecommendationTo enable acknowledgment to be restricted to only authorized users, before running the OS Project Editor, activate the option "acknowledgeable messages in separate list" for message filters on the "message display" tab.
Multilingualism Online documentation in the WinCC Information System is available only in English, French and German. The WinCC ASIA version offers online documentation in the languages English and Chinese simplified (PR China).
If you work with a French, English or German version of Windows computer software and install a different language, it is possible that terms in WinCC appear in this language even if WinCC is operated with the same language as Windows.
Different buttons have English labels especially in the multi-lingual versions of Windows independent of the language setting and independent of the WinCC language. This affects dialog boxes in particular which the user must respond with Yes/No, OK/Cancel etc.
Tags with @-prefix The project engineer my not create any tags with @ prefix. Only the WinCC PCS7 software can do this. You are not allowed to manipulate these system tags. The system tags are required so that the product works properly.
While configuring AS and OS monitoring using Lifebeat Monitoring, device names should not be identical to pictures in Picture Tree Manager or internal tags with the "@" name prefix.
WinCC Release Notes3.5 Notes on Process Control Options
WinCC: General information and installation92 System Manual, 06/2014, A5E34372689-AA
DCF77 receiver DCFRS: Driver not released for Windows 8 and Server 2012No driver is released for the DCFRS receiver under Windows 8.1 and Windows Server 2012 R2.
Chipcard reader: Driver software for WinCC V7.3The following driver software has been approved for operation of the chipcard reader with WinCC V7.3:
Omnikey 3121 USB● Windows 7 SP1 32-bit and Windows Server 2008 SP2 32-bit
– CT-API_V4_0_2_2A.exe
– hid_omnikey3x2x_x86_r1_2_20_0_0.exe
● Windows 7 SP1 64-bit and Windows Server 2008 R2 SP2 64-bit
– CT-API_V4_0_2_2A.exe
– hid_omnikey3x2x_x64_r1_2_20_0.exe
Omnikey 3111 serial● Windows 7 SP1 32-bit
– CT-API_V4_0_2_2A.exe
– 3111_1.2.20.0_win7_x86.exe
● Windows 7 SP1 64-bit
– CT-API_V4_0_2_2A.exe
– 3111_1.2.20.0_win7_x64_0.exe
Smart card: Disabling the Plug&Play serviceIf the Plug&Play service is enabled, an operating system message may occur in WinCC Runtime when scanning for drivers. This allows the access to the operating system.
Since WinCC does not require a separate smart card driver, the "Plug&Play" service for smart cards is disabled.
Area names in Alarm Logging and in the Picture Tree Manager Area names in Alarm Logging and in Picture Tree Manager must not contain any spaces at the beginning or end.
Area names in distributed systems With distributed systems, the area names in the projects of the various WinCC servers must be unique in order to ensure correct filtering and display of the messages according to the area.
WinCC Release Notes3.5 Notes on Process Control Options
WinCC: General information and installationSystem Manual, 06/2014, A5E34372689-AA 93
Image painting time To optimize the image painting time, set the "WinCC Classic" design in the WinCC project properties.
User authorization "No. 8 Controlling archives" User authorization "No. 8 Controlling archives" in User Administrator is no longer used by the system.
Authorization check in WinCC ServiceMode There are three possible scenarios for WinCC in ServiceMode that influence the Runtime behavior due to authorization check:
● No Windows user logged on.A user is defined as "User in service context" in WinCC User Administrator.The authorizations of this user in the service context will be checked in Runtime. This setting will influence the trigger authorization for the signaling device.
● No Windows user logged on.No user is defined as "User in service context" in WinCC User Administrator.The signaling device will always be activated in Runtime.
● A Windows user is logged on. Interactive user inputs are possible.If a user is defined in the service context does not have an effect in Runtime.The authorizations of the logged on WinCC user will be checked in Runtime.
WinCC Release Notes3.5 Notes on Process Control Options
WinCC: General information and installation94 System Manual, 06/2014, A5E34372689-AA
Service and Support 44.1 Warnings
Safety notesThis manual contains information that must be observed to ensure your personal safety and to prevent property damage. Notices referring to your personal safety are highlighted in the manual by a safety alert symbol; notices referring to property damage only have no safety alert symbol. Depending on the hazard level, warnings are displayed in a descending order as follows:
DANGER
means that there can be severe physical injury or even death if the corresponding safety measures are not followed.
WARNING
means that there can be severe physical injury or even death if the corresponding safety measures are not followed.
CAUTION
indicates that minor personal injury may result if proper precautions are not taken.
NOTICE
indicates that damage to property may result if proper precautions are not taken.
Note
is an important information about the product, the way to handle the product or the respective part of the documentation and we wish to especially bring this to your notice.
If multiple levels of hazards can occur, the warning is always displayed with the highest possible level. If a warning with a warning triangle is to be indicate physical injury, the same warning may also contain information about damage to property.
Qualified PersonnelThe corresponding machine/ system may only be set up and operated with the help of this documentation. A device/system must only be commissioned and operated by qualified personnel. Qualified persons in the sense of safety instructions in this documentation stand for persons who are authorized to operate, earth and mark machines, system and electrical circuits according to safety standards.
WinCC: General information and installationSystem Manual, 06/2014, A5E34372689-AA 95
Proper usePlease observe the following:
WARNING
Proper use
The machine may only be used for the application instances that have been described in the catalog and the technical description and only in combination with third-party devices and components recommended and/or approved by Siemens. Smooth and safe operations demand proper transport, proper storage, installation and assembling as well as careful operations and maintenance.
BrandsAll designations with the trademark symbol ® are registered trademarks of Siemens AG. Other designations in this documentation may be trademarks whose use by third parties for their own purposes can violate the rights of the owner.
Security informationSiemens provides products and solutions with industrial security functions that support the secure operation of plants, solutions, machines, equipment and/or networks. They are important components in a holistic industrial security concept. With this in mind, Siemens’ products and solutions undergo continuous development. Siemens recommends strongly that you regularly check for product updates.
For the secure operation of Siemens products and solutions, it is necessary to take suitable preventive action (e.g. cell protection concept) and integrate each component into a holistic, state-of-the-art industrial security concept. Third-party products that may be in use should also be considered. For more information about industrial security, visit
● http://www.siemens.com/industrialsecurity (http://www.siemens.com/industrialsecurity)
To stay informed about product updates as they occur, sign up for a product-specific newsletter. For more information, visit
● http://support.automation.siemens.com (http://support.automation.siemens.com)
Disclaimer of liabilityWe have checked the contents of the description to ensure that it matches with the hardware and the software it describes. Nevertheless, we cannot assume responsibility for any deviations that may arise. The details outlined in this description are checked regularly and the required corrections are done in the subsequent editions. Suggestions for improvement are welcomed.
The statements in the online documentation are more binding than the statements in the manuals and PDF files.
Please follow the Release Notes and Installation Notes. The information in these Release Notes and Installation Notes has priority over that in the manuals and online help with regard to legal validity.
Service and Support4.1 Warnings
WinCC: General information and installation96 System Manual, 06/2014, A5E34372689-AA
Copyright © Siemens AG 2014Änderungen vorbehalten / All rights reserved
It is prohibited to transfer, copy, evaluate or communicate this document in full or part unless the same has been explicitly approved. Violation of this rule can lead to claims for damage compensation. All rights reserved, especially for granting patents or for GM registration.
Siemens AG
Automation and Drives
SIMATIC Human Machine Interfaces
P.O. Box 4848
D-90026 Nuremberg, Germany
See alsohttp://support.automation.siemens.com (http://support.automation.siemens.com)
http://www.siemens.com/industrialsecurity (http://www.siemens.com/industrialsecurity)
Service and Support4.1 Warnings
WinCC: General information and installationSystem Manual, 06/2014, A5E34372689-AA 97
4.2 Customer Support
Customer Support and Technical Support You can reach the SIMATIC hotlines at the times specified in the following table. The SIMATIC hotline employees speak German and English. The Authorization hotline offers French, Italian or Spanish customer support in addition to German and English.
Technical support
Nuremberg (GMT +1:00)Service HoursMonday - Friday, 8:00 to 17:00 (CET/CEST)Phone +49 (0)911 895 7222Fax +49 (0)911 895 7223E-mail http://www.siemens.com/automation/support-request (http://
www.siemens.com/automation/support-request)
An overview of the Technical Support is available at the following URL:
● http://support.automation.siemens.com/WW/view/en/16605032 (http://support.automation.siemens.com/WW/view/en/16605032)
Automation Value Card (AVC)The Automation Value Card (AVC) provides extended Technical Support and is available 24 hours every day of the week. Information on the AVC can be found at the following URL:
● http://support.automation.siemens.com/WW/view/en/28448132 (http://support.automation.siemens.com/WW/view/en/16605032)
SIMATIC Customer Online Support
Service and Support An overview of the support offering for our products is available at the following URL:
● http://www.siemens.com/automation/service&support (http://www.siemens.com/automation/service&support)
In Product Support, for example, you will find downloads of firmware updates, service packs and useful utilities.
Online Help is available so that you can successfully use the Support offering. Open the Online Help by selecting the corresponding button on the Internet site or at the following URL:
● http://support.automation.siemens.com/WW/support/html_00/help/Online_Hilfe.htm (http://support.automation.siemens.com/WW/support/html_76/help/Online_Hilfe.htm)
WinCC FAQsWinCC Online Support with information on FAQs (Frequently Asked Questions) may also be found at the following URL:
Service and Support4.2 Customer Support
WinCC: General information and installation98 System Manual, 06/2014, A5E34372689-AA
● http://support.automation.siemens.com/WW/view/de/10805548/133000 (http://support.automation.siemens.com/WW/view/en/10805583/133000)
Technical ForumThe Technical Forum supports exchange with other SIMATIC users. It is available at the following URL:
● http://www.siemens.com/automation/csi/forum (http://www.siemens.de/automation/csi_en/forum)
Technical documentation for SIMATIC productsYou can find a guide to the technical documentation provided for individual SIMATIC products and systems at the following URL:
● http://www.siemens.com/simatic-tech-doku-portal (http://www.siemens.com/simatic-tech-doku-portal)
Contact person databaseTo contact your local agent, search our contact database at the following URL:
● http://www.automation.siemens.com/partner/index.asp (http://www.automation.siemens.com/partner/index.asp?lang=en)
Product Information
SIMATIC WinCCGo to the following URL for additional information about WinCC products:
● http://www.siemens.com/wincc (http://www.siemens.com/wincc)
SIMATIC ProductsGo to the following URL for additional information about SIMATIC products:
● http://www.siemens.com/simatic (http://www.siemens.com/simatic)
See alsoInternet: Support Request (http://www.siemens.com/automation/support-request)
Internet: Technical support (http://support.automation.siemens.com/WW/view/en/16605032)
Internet: Automation Validation Card (AVC) (http://support.automation.siemens.com/WW/view/en/28448132)
Internet: Service and Support (http://www.siemens.com/automation/service&support)
Internet: WinCC FAQs (http://support.automation.siemens.com/WW/view/en/10805583/133000)
Internet: Support Technical Forum (http://www.siemens.de/automation/csi_en/forum)
Internet: Support Search (http://www.siemens.de/automation/csi_en/km)
Internet: Support Online Help (http://support.automation.siemens.com/WW/support/html_76/help/Online_Hilfe.htm)
Service and Support4.2 Customer Support
WinCC: General information and installationSystem Manual, 06/2014, A5E34372689-AA 99
Internet: Technical documentation for SIMATIC products (http://www.siemens.com/simatic-tech-doku-portal)
Internet: Contact person database (http://www.automation.siemens.com/partner/index.asp?lang=en)
Internet: Information about WinCC (http://www.siemens.com/wincc)
Internet: SIMATIC Products (http://www.siemens.com/simatic)
Service and Support4.2 Customer Support
WinCC: General information and installation100 System Manual, 06/2014, A5E34372689-AA
4.3 Support RequestDear customer
In order to provide you with fast and effective support, please complete the "Support Request" form online on the Internet. Describe the problem in as much detail as possible. We would appreciate if you would provide us with all project data, so that we can reproduce the error situation or shorten the turn-around time.
Before filling out the support request, check whether your configured quantity structure is within the range of tested quantity structures (see topic "Performance Data").
Support Request formThe Support Request form is available at the following URL:
● http://www.siemens.com/automation/support-request (http://www.siemens.com/automation/support-request)
When filling out the report, you will be guided through several steps, which will ask about all required information.
A detailed description of the Support Request can be found at the following URL:
● http://support.automation.siemens.com/WW/view/en/16605654 (http://support.automation.siemens.com/WW/view/en/16605654)
Procedure1. Open the "Support Request" form using the link on the Internet. Step 1 "Select product" is
displayed:
2. Enter the project name in the "Product/Order number" box. Upper/lower case is not relevant.Search for parts of the product name or enter the full product name in the correct order. You can e. g. search for the following terms:- "WinCC Runtime"- "WinCC DataMonitor"- "wincc webnavigator"- "Connectivity"The found products are offered in the "Product selection" field.
3. Select the desired product and click on "Next" to switch to step 2 "Select use case".
4. Select a use case or describe your specific use case in the "Other use case" field.
5. Press "Next" to switch to step 3 "Our solutions".Suggested solutions and FAQs for the selected key words are listed.Once you have found a suggested solution for your problem, you can close the form in the browser.If you did not find any applicable suggested solutions, press "Next" to switch to step 4 "Describe problem".
Service and Support4.3 Support Request
WinCC: General information and installationSystem Manual, 06/2014, A5E34372689-AA 101

6. Describe your problem as exactly as possible in the "Details" field.Pay particular attention to the following questions and comments. Please also check the WinCC installation and configuration with regard to the following references.If you have any idea what has caused the error, please let us know. No detail should be omitted, even if you consider it unimportant.- Was the configuration data created with older WinCC versions?- How can the error be reproduced?- Are other programs running simultaneously with WinCC?- Have you deactivated the screen saver, virus checker and power management function?- Search the computer for log files (WinCC\Diagnose\*.log, drwatson.log, drwtsn32.log). The log files are needed for error analysis. Thus, be sure to send the log files as well.
7. Use the "Search" button to upload your affected project and the log files (e. g. as a Zip file) to the Support Request.Press "Next" to switch to step 5 "Provide contact information".
8. Enter your contact information.Read the privacy notice and choose whether your personal data should be permanently saved.Press "Next" to switch to step 6 "Summary & Send".
9. Press the "Print" button if you would like to print the support request.You close the support request by clicking the "Send" button.Your data will be transmitted to Customer Support and processed there.
Thank you for your cooperation. We hope that we can be of assistance in solving your problems.
Your WinCC Team
See alsoInternet: Error Report (http://www.siemens.com/automation/support-request)
Internet: Overview of Support Request (http://support.automation.siemens.com/WW/view/en/16605654)
Service and Support4.3 Support Request
WinCC: General information and installation102 System Manual, 06/2014, A5E34372689-AA
4.4 Help on WinCC Documentation
4.4.1 WinCC Documentation
WinCC Online InformationWinCC assists you in your tasks by providing a wide range of comprehensive information and data.
Depending on the actual situation and needs, you can access background information, call up handling instructions, study examples or refer to summary instructions regarding a single operating element.
WinCC offers the following support for configuration tasks:
● Tooltips
● Notes in the status bar
● Direct Help
● WinCC Information System with detailed documentation
● PDF files
● Web-based Help via "My Documentation Manager"
For Runtime operation, WinCC provides assistance in the form of "What's This?" help. Additional information can be accessed via a link from the "What's This?" help to the WinCC Information System.
Customized information for the user can be stored in the project. Users also have the option to configure additional help.
See alsoTooltips and Status Bar (Page 103)
Direct Help ("What's This?") in WinCC (Page 104)
WinCC Information System (Page 106)
Navigation in the WinCC Information System (Page 108)
Search in WinCC Information System (Page 110)
4.4.2 Tooltips and Status Bar
Information on Menu Commands and ButtonsAfter positioning the mouse pointer on a menu command or a button, a Tooltip on the corresponding element is displayed, providing a brief explanation of its features. Simultaneously, a brief description of the function appears in the status bar.
Service and Support4.4 Help on WinCC Documentation
WinCC: General information and installationSystem Manual, 06/2014, A5E34372689-AA 103
Information in the Status BarThe status bar is the bar at the bottom of the WinCC window. It contains general and editor-specific information. General information relates, for example, to the keyboard settings and the current editing language. Editor-specific information includes information on the position and size of a selected object in the Layout Editor.
The status bar is also used to display information on menu commands and the buttons in the toolbars.
See alsoWinCC Documentation (Page 103)
Direct Help ("What's This?") in WinCC (Page 104)
WinCC Information System (Page 106)
Navigation in the WinCC Information System (Page 108)
Search in WinCC Information System (Page 110)
4.4.3 Direct Help ("What's This?") in WinCC
Direct Help ("What's This?") in WinCCThe "What's This?" help contains information on the buttons, icons, fields, windows and dialogs in WinCC. A tooltip window opens after you call the Direct Help. From this window, you may request additional help from the WinCC Information System via links.
Show complete textA standard size for the tooltip window is defined for each component. Long texts may not be shown in full in the open window.
To read the full text, click the window and drag it with the mouse, or scroll down or to the right with the arrow keys.
Call up Using F1During configuration, you call up "What's This?" help by using the function key <F1>.
After selecting an element in a window or dialog, call up "What's This?" help on the element by pressing <F1>. The operable elements in a window can be selected by pressing the <TAB> key.
Call up Using a ButtonCall up the "What's This?" help using one of the following buttons:
● in the WinCC toolbar, in order to obtain help on buttons, icons and windows of WinCC
● in the title bar of an open dialog, in order to obtain help on the dialog
Service and Support4.4 Help on WinCC Documentation
WinCC: General information and installation104 System Manual, 06/2014, A5E34372689-AA
The mouse pointer takes the form of a question mark. After clicking an element with the question mark, the "What's This?" help opens. The links provided in the "What's This?" help enable you to access the WinCC Information System. It contains further information, step-by-step instructions and examples.
Documentation outside the WinCC Information SystemHelp appears directly on the following topics:
● "PROFIBUS DP" Channel (communication)
● "SIMATIC 505 TCPIP" Channel (communication)
By clicking the "Search" and "Index" buttons, only the above individual documents are accessed. To search the entire WinCC Information System, click the "Global Search" button.
Accessing the WinCC Information SystemIf further help is requested from the "What's This?" help, a window opens containing the WinCC Information System. You are directed to the chapter containing information related to your "What's This" query. The title of the superordinated chapter appears in the window header. If another link to the WinCC Information System is selected from the "What's This?" help, a second window is opened.
Note
Close the windows that are not currently required. This helps limiting the number of open windows.
See alsoTooltips and Status Bar (Page 103)
WinCC Documentation (Page 103)
WinCC Information System (Page 106)
Navigation in the WinCC Information System (Page 108)
Search in WinCC Information System (Page 110)
Service and Support4.4 Help on WinCC Documentation
WinCC: General information and installationSystem Manual, 06/2014, A5E34372689-AA 105
4.4.4 WinCC Information System
Contents of the WinCC Information SystemThe WinCC Information System enables you to access the entire WinCC documentation at any time during configuration. It contains the following components:
● Complete documentation on WinCC
● Documentation on installed optional packs, add-ons and drivers
● Printable PDF version of the WinCC documentation
● Release notes with important up-to-date information on WinCC
Calling up the WinCC Information System
Menu command "?" > "Help Topics"The "Contents" tab contains the graphic table of contents of the online documentation. It lists all available topics sorted by category.
Using the entry "Start Page", you can call up the WinCC Portal. It provides links to the most important topics in the WinCC Information System.
From "What's This?" helpA topic can be accessed directly from the related "What's This?" help.
From the Start MenuThe WinCC Information System can be called up using the Windows Start menu: "Start > Simatic > WinCC > WinCC Information System".
Structure of the WinCC Information SystemThe WinCC Information System is divided into two panels: The navigation panel on the left features a number of tabs for different access and search options. The topic panel on the right displays the individual help topics.
Some help topics are not directly accessible in WinCC Information System. When you click a grey button on a page, a second window is opened with the respective contents. This window provides information on how to use the "Contents", "Index" and "Search" tabs. Use the ">>" and "<<" buttons to scroll to the next or previous page. Click the "Global Search" button to return to the WinCC Information System.
Color coding in the section headings in online helpsection headings in online help are colored. The color code indicates the type of information provided in the related text. sections of the same information type have the same color.
The following table shows the different color codes used to identify the information types in online help.
Service and Support4.4 Help on WinCC Documentation
WinCC: General information and installation106 System Manual, 06/2014, A5E34372689-AA
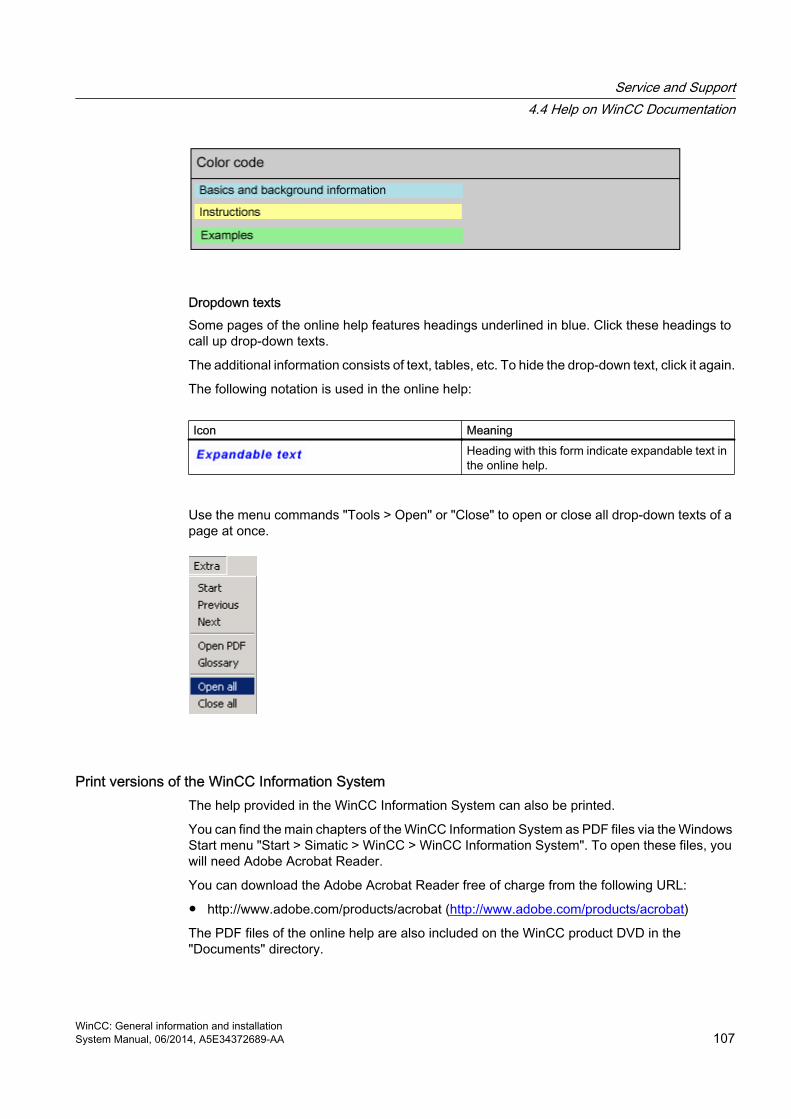
Dropdown textsSome pages of the online help features headings underlined in blue. Click these headings to call up drop-down texts.
The additional information consists of text, tables, etc. To hide the drop-down text, click it again.
The following notation is used in the online help:
Icon MeaningHeading with this form indicate expandable text in the online help.
Use the menu commands "Tools > Open" or "Close" to open or close all drop-down texts of a page at once.
Print versions of the WinCC Information SystemThe help provided in the WinCC Information System can also be printed.
You can find the main chapters of the WinCC Information System as PDF files via the Windows Start menu "Start > Simatic > WinCC > WinCC Information System". To open these files, you will need Adobe Acrobat Reader.
You can download the Adobe Acrobat Reader free of charge from the following URL:
● http://www.adobe.com/products/acrobat (http://www.adobe.com/products/acrobat)
The PDF files of the online help are also included on the WinCC product DVD in the "Documents" directory.
Service and Support4.4 Help on WinCC Documentation
WinCC: General information and installationSystem Manual, 06/2014, A5E34372689-AA 107
See alsoTooltips and Status Bar (Page 103)
Adobe Acrobat Reader (http://www.adobe.com/products/acrobat)
4.4.5 Navigation in the WinCC Information System
WinCC PortalThe start page contains the WinCC Portal links, providing an overview of the WinCC Information System.
Apart from the chapters of the WinCC Information System, you can also find links to Service and Support in the lower part of the page.
You can also easily enter the main chapter of WinCC Information by using the portal pages as the Homepage.
Navigation Area TabsThe left panel of the Online Help contains the navigation section. The tabs allow you to search and access help in different ways:
Tab Description"Contents" Contains a hierarchical overview of all help topics that can be accessed directly from
here."Index" The index terms can be used as a basis for searching for help topics."Find" Enter a search term for full text search of the entire documentation."Favorites" Use this function to store topics that you wish to refer to again. They can then be called
up without having to search for them.
Navigation using Header ButtonsThe buttons in the header provide the following access options:
Tab DescriptionClick this button to hide the navigation section with the "Contents", "Index" and "Search" tabs. The information system then requires less space on the screen.
If the navigation panel is hidden, it can be unhidden again clicking this button.If the navigation panel is hidden, the table of contents displayed is not updated following a topic change.
Service and Support4.4 Help on WinCC Documentation
WinCC: General information and installation108 System Manual, 06/2014, A5E34372689-AA
Tab DescriptionClick this button to return to the previous page.
Click this button to go to the next page.
Navigation on the "Contents" TabThe "Contents" tab contains the table of contents of the WinCC Information System:
Tab DescriptionClick this button to display the subordinate hierarchy levels of a book.Double click this button to simultaneously open a help topic and display the subordinate hierarchy levels.Click this button to open the help topic on its own, without displaying the subordinate hierarchy levels.Double click one of these buttons to open a help topic.
Double click one of these buttons to open a an instruction for action.
Double click one of these buttons to open an example.
Shortcut menu in the table of contentsYou can open all the hierarchical levels in the table of contents at the click of a mouse via the shortcut menu with "Open all". Select "Close all" to close all the hierarchical levels again.
Navigation on a Help PageThere is an additional menu bar above the title of a page. Move the mouse pointer over a menu item to call up the related list. Use the mouse to select the topic you wish to call up.
Tab DescriptionIn Section Go to a specific topic within the page.Instructions Provides links to step-by-step instructions.Examples Provides links to application examples and sample cases.Basics Provides links to additional information, e.g. definitions or details.Properties Provides links to information on the properties of objects.Methods Provides links to information on methods that are applied to objects.Events Provides links to information on events that are applied to objects.Objects Provides links to information on related objects.Tools > Open Opens all closed dropdown texts and dropdown images.
Service and Support4.4 Help on WinCC Documentation
WinCC: General information and installationSystem Manual, 06/2014, A5E34372689-AA 109
Tab DescriptionTools > Close Closes all open dropdown texts and dropdown images.Tools > Verlauf Offers links to topics opened earlier. Maximum ten topics are saved in Verlauf.
Additional LinksFor some topics, there are links provided directly on the help page. These links are indicated by a symbol or underlined in blue. Click the underlined text or the blue arrow to call up the additional information.
Navigation Using the KeyboardThe navigation options available for the mouse can also be operated using the keyboard.
Operation Function<ALT+RIGHT> Go to next page.<ALT+LEFT> Go to previous page.<LEFT> Move the scroll bar in the active window to the left.<RIGHT> Move scroll bar in the active window to the right.<UP> Move scroll bar in the active window upwards.<DOWN> Move scroll bar in the active window downwards.<CTRL+TAB> Switch between the tabs ("Contents", "Index", "Search" and "Favorites").
Arrow Key Navigation in the Table of Contents<ENTER> Display a topic selected on a tab in the navigation panel.
Trigger the function of the button previously selected.<F6> Toggle between navigation and topic panel.<TAB> Switch between the buttons in the topic area.
See alsoWinCC Documentation (Page 103)
Tooltips and Status Bar (Page 103)
Direct Help ("What's This?") in WinCC (Page 104)
WinCC Information System (Page 106)
Search in WinCC Information System (Page 110)
4.4.6 Search in WinCC Information System
Full Text Search on the "Search" TabThe "Search" tab enables you to search for a particular topic in a highly efficient manner.
Service and Support4.4 Help on WinCC Documentation
WinCC: General information and installation110 System Manual, 06/2014, A5E34372689-AA
Expanded SearchIf the precise spelling of a term is not known or if you wish to search for all words containing the entered character string use the asterisk * as a wildcard. The asterisk stands thereby for any number of characters.
● Example: Using search term "*messages" the following words are found: "Messages", "System operator input messages", "Process controlling messages", "Process messages" etc.
Quotation MarksUse quotation marks to search for phrases.
● Example: "Configuring graphics"
Boolean OperatorsThe arrow beside the input field can be used to logically link the search term with AND, OR, NEAR and NOT.
● Example: "Configuring" AND "graphics"
Match Similar WordsAfter clicking the "Match Similar Words" check box, a search is made for terms with a similar spelling. Special characters, such as umlauts, etc. are searched for as special characters in an ungrouped form.
Search Titles OnlyAfter activating the "Search Titles Only" check box, a search is made only in the headings of the individual pages.
Search Previous ResultsIf the "Search Previous Results" check box is activated following a search, only pages found previously are searched for the new term. This of course limits the search and makes it more targeted.
Ensure that the check boxes are cleared prior to the next search where you wish to include all contents.
Sorting Search ResultsTo sort the search results alphabetically, click "Title" or "Location" button at the top of the list. In the "Location" column, you can see the help topic in which the respective page is included.
Storing Search TermsThe last search terms entered are stored in the list and can be called in again.
Service and Support4.4 Help on WinCC Documentation
WinCC: General information and installationSystem Manual, 06/2014, A5E34372689-AA 111
Displaying Search ResultsAfter clicking on a topic in the navigation panel, the corresponding page is displayed. The search term is highlighted on the page.
If the search term is only part of a word, it is possible that the term is not marked. Use the key combination <CTRL+F> to activate the search within the page.
See alsoWinCC Documentation (Page 103)
Tooltips and Status Bar (Page 103)
Direct Help ("What's This?") in WinCC (Page 104)
WinCC Information System (Page 106)
Navigation in the WinCC Information System (Page 108)
4.4.7 Documentation in the Internet
OverviewYou can search for WinCC documentation in the Internet. The search results will be displayed in "My Documentation Manager". There, you compile your own documents which you can then output in the formats PDF, RTF or XML.
Searching for WinCC Help topics in the Internet1. Click support.automation.siemens.com (http://support.automation.siemens.com/WW/view/
en/10805583/133000) to search in the WinCC documentation.
2. Select "Manuals/Operating Instructions" as the entry type in the filter settings.
3. Go to the "WinCC Information System Online Help" documentation and click on one of the desired manuals, such as "WinCC: Working with WinCC".
4. Click on the link "Displaying and configuring" in the open page. The page "My Documentation Manager" opens and the topics of the manual will be displayed.
Direct call of "My Documentation Manager"If you have already displayed or compiled documents in "My Documentation Manager", use support.automation.siemens.com (http://support.automation.siemens.com/WW/view/en/10805583/133000) to open "My Documentation Manager". Click on the link "My Documentation Manager" in the link box "mySupport" on the right. On the start page you will find a detailed description of the functions and operation of "My Documentation Manager".
If you want to use all the functions without any restrictions, you have to register for "My Documentation Manager". The registration link can be found at the top right in "My Documentation Manager". After registration, you can download the PDF version of the manual via "My Library".
Service and Support4.4 Help on WinCC Documentation
WinCC: General information and installation112 System Manual, 06/2014, A5E34372689-AA
Searching for Help topics in "My Documentation Manager"In "My Documentation Manager" you can restrict the search within a manual to a specific topic type, such as action or example.
1. Go to the "Search" tab.
2. Enter a search term, for example, WinCC alarm system
3. Select the type of Help page as the topic type, for example, "Action".
4. Click "Search". The search results are displayed below.
5. Click on one of the search results. The topic of the WinCC Information System is displayed on the right.
6. If you click on the "Last visited" tab, you will see the topic embedded in the structure of the manual.
7. You can also search for search terms using the index. Right-click on one of the chapters of the manual. The index of the document is displayed via the "Show index" menu.
Compiling Online Help documents for more processingIf you want to print parts of the Online Help or reuse them in other programs, you have to collect and generate the documents in a library. You must have registered and be logged in.
You can read how to create a generated document, as a PDF, for example, in the description of "My Documentation Manager". The generated document can then be saved in a freely selectable location.
Language support in "My Documentation Manager"The WinCC documents are available in all languages supported by WinCC. These are mainly German, English, French, Italian, Spanish, Japanese, Chinese, Korean and Taiwanese.
To set the language for a document in "My Documentation Manager", right-click on the title of the document. Select the required language.
Service and Support4.4 Help on WinCC Documentation
WinCC: General information and installationSystem Manual, 06/2014, A5E34372689-AA 113

Migration 55.1 Introduction
IntroductionThis section contains information on the migration of WinCC projects created in WinCC V6.2.3 or higher.
When you open a project of a previous version in WinCC V7.3, you are prompted to migrate it. However, you may also use WinCC Project Migrator to migrate several WinCC projects in a single step.
Prior to migration, it is recommended to make a backup copy of the original version of the project. For more information on this, refer to the "Working with WinCC" > "Working with projects" > "Copying and duplicating projects" section in the WinCC Information System.
Multi-user ProjectsWhen you are working with a multi-user project in WinCC V7.3 that was created in the previous version, migrate the individual multi-user projects from all servers in the system.
Redundant Systems in Normal OperationA project can be upgraded in a redundant system without deactivating operation. This requires that you update the server, clients with their own project and clients without their own project in a certain sequence. Detailed instructions are provided in the section "Upgrading Redundant Systems in Normal Operation".
NOTICE
Migrating redundant systems without extended interruption
In order not to affect system operation, it is essential to observe the sequence of steps described and to complete all the steps without any long interruptions.
A client may always only be connected to one server, on which the same WinCC version is installed.
Behavior during migration of ServiceMode projectsAt the start of migration, the Migrator checks whether or not the project on hand is a ServiceMode project. The following is also verified if it is a ServiceMode project:
● If a service user has been entered
● If the service user is available
WinCC: General information and installationSystem Manual, 06/2014, A5E34372689-AA 115

● If the service user is a member of the "SIMATIC HMI" group
● If the service user is able to log on
An error message is output and the migration process is aborted if one of these criteria is not met.
The central archive server WinCC/CAS is migrated to Process HistorianIn WinCC V7.2 and higher, the data of the WinCC/CAS is migrated to SIMATIC Process Historian. Observe the migration description in the Process Historian documentation.
Migration of chip cards when using the "Chip card reader" optionWith WinCC 7.3 and later, the user information on the smart card is saved with an improved hash function for passwords. After upgrading to WinCC V7.3, you must re-assign the passwords for all WinCC users in all projects, which means server projects and clients projects. This means that you have to write all chip cards in use once again with the corresponding users in the User Administrator. Afterwards, only the new user information specified as of WinCC V7.3 exists in the projects and on the chip cards.
WinCC/Audit after the migrationIf you are using WinCC/Audit, start by opening the Audit Editor after migration of the WinCC projects. Click "Apply" to activate the trigger.
NoteNo migration of a WinCC V6.2.3 project if a WinCC editor has never been opened before
If you have never opened an editor, for example, Alarm Logging or Text Library, in a WinCC V6.2.3 project, you cannot migrate the project to WinCC V7.3.
Converting project dataYou may also import selected project data and files from projects created in a previous version for use in a new WinCC project. For this purpose, for example, you need to adapt screens and script files to the current version of WinCC and convert these to the current format.
NOTICE
Conversion is irrevocable
Conversion of data cannot be undone.
Conversion starts immediately once you have selected the entry. No confirmation prompt is displayed.
Migration5.1 Introduction
WinCC: General information and installation116 System Manual, 06/2014, A5E34372689-AA
Note
It is not possible to convert an individual picture or a library object.
Conversion of pictures and libraries may take some time.
Procedure1. Select the "Tools > Convert project data" menu command in WinCC Explorer.
2. Select the project data to be converted:
– Pictures and faceplates
– Global libraries
– Project libraries
– Page layouts and line layouts
– C and VB project functions and actions
– C and VB standard functions
– Data for Basic Process Control
3. Confirm with "OK".The selected data is converted to the current version of WinCC.
See alsoImportant differences compared to previous versions (Page 118)
Conditions for Migration (Page 120)
Migration5.1 Introduction
WinCC: General information and installationSystem Manual, 06/2014, A5E34372689-AA 117
5.2 Important differences compared to previous versions
IntroductionVersion 7.3 of WinCC provides new and extended functions as compared to the predecessor version. An overview of the new features is provided in the section "What's New in WinCC V7.3?".
WinCC Configuration Studio as the configuration interface in WinCC V7.3WinCC Configuration Studio provides a simple and efficient means of configuring bulk data for WinCC projects. The WinCC Configuration Studio replaces the previous procedure for the following editors:
● Tag Management
● Tag Logging
● Alarm Logging
● Text Library
● User Administrator
● Horn
● User Archive
WinCC Configuration Studio replaces the functionality of WinCC ConfigurationTool and WinCC Archive ConfigurationTool.
Conversion to Unicode in V7.2Starting from WinCC V7.2, WinCC is Unicode-capable.
● The Asian version contains all functionalities of the European version.
● Projects created in the Asian version can be executed on a European version and vice versa. A dongle is prerequisite for running projects in Asian languages.
Migration5.2 Important differences compared to previous versions
WinCC: General information and installation118 System Manual, 06/2014, A5E34372689-AA
● An WinCC project may contain several languages. The languages do not need to have the same code page.
– The text library may contain text in languages with different code pages. A text column is generated accordingly for each language. For this purpose, set a font that contains all necessary characters.
– You may add different Runtime languages to a WinCC project, regardless of the code page of these languages. All languages listed in the text library are available in Runtime.
– Process tag names may contain both Chinese and German characters, for example. You may archive these process tags and view them in Runtime in TagLogging controls.
● Setup contains a project library for all languages.
NOTICE
The source language of a project cannot be set more than once in the migrator
You cannot rectify an incorrect setting of the source language, because a project can be migrated only once to the version. Backup the projects and project libraries before you launch migration.
The following must be installed for migration of Asian projects on a European operating system:
– Asian language support
– The respective language code page.
The source language of the project must be known and set up for migration.
Exceptions
● Scripting components.VB Scripts may contain text in a specific language.The C compiler does not support Unicode. Even though you can save C scripts in Unicode, for example, the compiler converts them into multi-byte character strings (MBCS).
● Older Active X elements
● Channels, to ensure compatibility with the Channel Development Kit (CDK) and data types within the PLC.
Migration5.2 Important differences compared to previous versions
WinCC: General information and installationSystem Manual, 06/2014, A5E34372689-AA 119
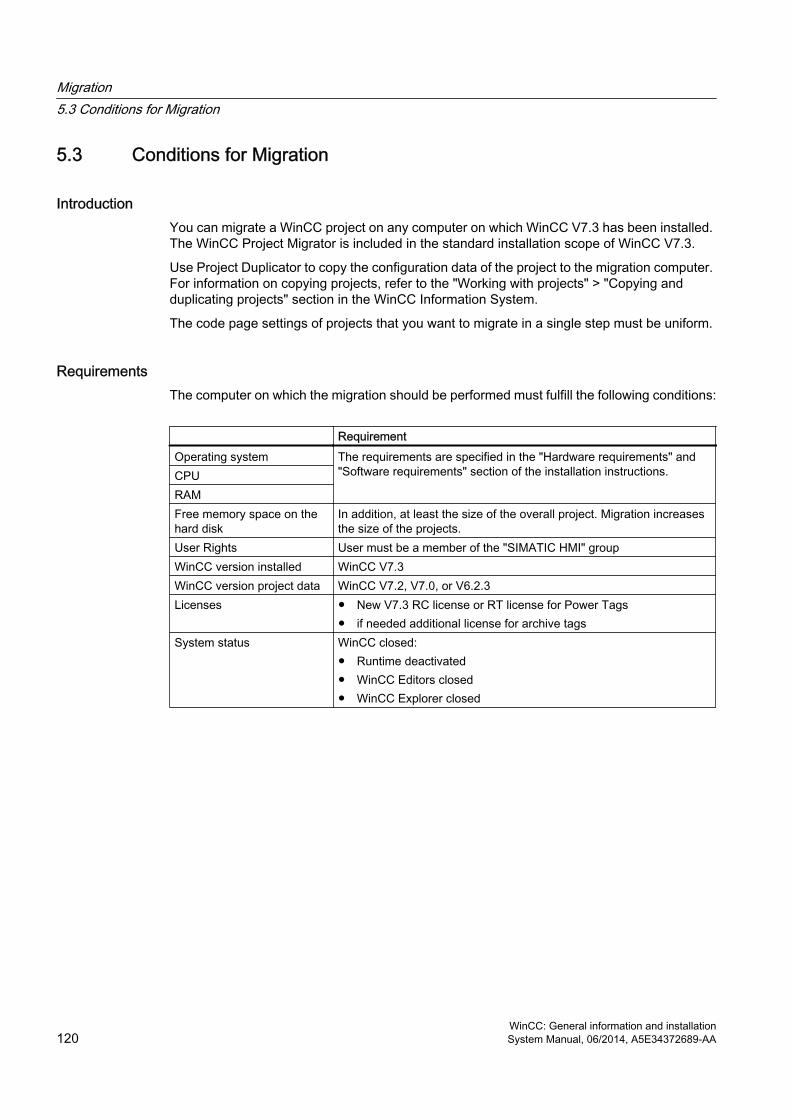
5.3 Conditions for Migration
IntroductionYou can migrate a WinCC project on any computer on which WinCC V7.3 has been installed. The WinCC Project Migrator is included in the standard installation scope of WinCC V7.3.
Use Project Duplicator to copy the configuration data of the project to the migration computer. For information on copying projects, refer to the "Working with projects" > "Copying and duplicating projects" section in the WinCC Information System.
The code page settings of projects that you want to migrate in a single step must be uniform.
RequirementsThe computer on which the migration should be performed must fulfill the following conditions:
RequirementOperating system The requirements are specified in the "Hardware requirements" and
"Software requirements" section of the installation instructions.CPURAMFree memory space on the hard disk
In addition, at least the size of the overall project. Migration increases the size of the projects.
User Rights User must be a member of the "SIMATIC HMI" groupWinCC version installed WinCC V7.3WinCC version project data WinCC V7.2, V7.0, or V6.2.3Licenses ● New V7.3 RC license or RT license for Power Tags
● if needed additional license for archive tagsSystem status WinCC closed:
● Runtime deactivated● WinCC Editors closed● WinCC Explorer closed
Migration5.3 Conditions for Migration
WinCC: General information and installation120 System Manual, 06/2014, A5E34372689-AA

5.4 How to migrate the WinCC data
IntroductionThis chapter describes the migration of WinCC projects of WinCC V6.2.3 or higher to WinCC V7.3.
You have two options of migrating the projects:
● Migration of the configuration data and runtime data when opening an old project
● Using WinCC Migrator to migrate several projects in a single step.
There is no difference between single-user projects, multi-user projects and clients with their own projects with regard to migration.
WinCC projects before V7.2 are migrated to UNICODE. Tables that do not originate from WinCC are excluded from migration.
The time it takes to migrate a project depends on the project size and computer performance. The time it takes to migrate the runtime data varies depending on the number of messages and tags. The operation may take several hours.
Note
Generate a backup copy of the project prior to migration. You can rely on this copy of the original project to retrieve your data if migration fails.
If you have used a DDE connection in WinCC prior to V7.0, you must remove this connection prior to migration. DDE is no longer supported as of WinCC V7.0.
Using WinCC Project Migrator to migrate the WinCC projects1. Open "Simatic > WinCC > Tools > Project Migrator" in the Start menu of the operating
system. Project Migrator opens with the "CCMigrator - Step 1 of 2" start window.
2. Select the project directory in which the WinCC project is located by clicking the button "...". If migrating several projects, select the corresponding paths of the directories that contain the WinCC projects.
3. Set the language of the computer on which you have created the project or projects. The language version that was set in the OS language options for non-Unicode programs or in the system locale is set by default.
4. Click "Migrate".The "CCMigrator - Step 2 of 2" window opens. Project Migrator displays the migration steps. Wait for successful completion of the migration. The migration of a project may take several hours.
5. If migration was successfully completed, the Project Migrator sends the following message: "WinCC project migrated successfully".
6. Click "Finish".
Migration5.4 How to migrate the WinCC data
WinCC: General information and installationSystem Manual, 06/2014, A5E34372689-AA 121
5.5 How to migrate S7 projects
IntroductionYou have three options for migrating S7 projects of WinCC V6.2.3 or higher to WinCC V7.3:
● Migration of the configuration data and Runtime data of an S7 project when opening the old project
● Using SIMATIC Manager to migrate an S7 multi-project
● Using WinCC Migrator to migrate several WinCC projects in a single step. This last option includes the WinCC projects, but not the S7 project. The OM database is migrated the next time you open the S7 project.
Note
Generate a backup copy of the project prior to migration. You can rely on this copy of the original project to retrieve your data if migration fails.
Migrating an S7 project1. Open the S7 project. You are prompted to start migration.
2. Click "Yes". The WinCC Migrator opens. The project path is set by default. You cannot select or enter a different path.
3. Set the language of the computer on which the project was created. The language version that was set in the OS language options for non-Unicode programs or in the system locale is set by default.
4. Click "Migrate". Wait for successful completion of the migration.
5. Acknowledge the prompt to wait for completion of the migration. Migration is completed and the S7 project opens.
Migrating an S7 multi-project1. Open the S7 multi-project. If none of the subprojects open automatically, go to step 2.
Otherwise, the migration is as described above in the section "Migrating an S7 project". Wait for completion of the migration. Proceed as follows.You may also open the project partitions successively to migrate them separately.
2. Select the "Migrate OS projects" command in the "Tools" menu of SIMATIC Manager. The WinCC Project Migrator opens. You cannot select or enter a different path.
3. Set the language of the computer on which the project was created. The language version that was set in the OS language options for non-Unicode programs or in the system locale is set by default.
4. Click "Migrate". Wait for successful completion of the migration.
5. Confirm the final prompt. Migration is complete.
Migration5.5 How to migrate S7 projects
WinCC: General information and installation122 System Manual, 06/2014, A5E34372689-AA
Using WinCC Migrator to migrate all integrated WinCC projectsYou may also use WinCC Migrator to migrate all integrated WinCC projects. The procedure corresponds with the description in "How to migrate WinCC data".
You are prompted to start migration if you now open an S7 project. Click "Yes" to open WinCC Migrator. You are informed of the updated state of the project as soon as you click "Migrate".
NoteYou must migrate all components of an S7 project
You must first migrate all components of an S7 project before you can work on this project. Operation of a partially migrated project my result in inconsistencies.
Migration5.5 How to migrate S7 projects
WinCC: General information and installationSystem Manual, 06/2014, A5E34372689-AA 123
5.6 Migrating Multi-User Projects
IntroductionClients are migrated together with the associated multi-user project.
When migrating multi-user projects, proceed in exactly the same way as in the migration of single user projects.
Make a backup copy of the project before the migration. You can rely on this copy of the original project to retrieve your data if migration fails.
Multi-user System with One ServerIn a multi-user system, all required data is transferred to the server when migrating the multi-user project.
No data is stored on clients created in multi-user projects. Therefore, no client projects are created on the WinCC clients in the new WinCC version either. The settings necessary for the WinCC clients and respective preferred server are defined in the multi-user project.
Following migration, a package must be created in the multi-user project. If an existing package was deleted for this, the newly created package must have the same name.
In the "ServerData" editor, activate the "Automatic import" setting under "Implicit Update". This provides all necessary data to clients which do not run their own project.
Multi-user System with Several ServersIf clients which run their own project were used in your original project, migrate each client project separately. Proceed in exactly the same way as for a single user project or a multi-user project. After migration, create new packages on the servers and load them onto the client. If existing packages were deleted, the newly created packages must get the respective names of the deleted packages.
It is possible that the original system uses several clients with their project with the same configuration and runtime data. In this case, migrate one client with their own project and copy to the other WinCC clients. Use Project Duplicator for the configuration data. Then load the packages of the respective servers on each client.
Note
The following restrictions apply after the migration of multi-user systems:
Access to clients: Automatic, simultaneous booting of several clients is no longer possible. Each server in the system can be activated by using the "Simatic Shell" dialog for remote access.
Deactivating servers and clients in multi-user systems: An automatic, simultaneous booting of several servers and clients is no longer possible. Each server in the system can be deactivated by using the "WinCC Projects" dialog for remote access.
Migration5.6 Migrating Multi-User Projects
WinCC: General information and installation124 System Manual, 06/2014, A5E34372689-AA

5.7 Additional Steps
IntroductionYou still have to make some project settings after migration.
Updating System Messages in Alarm LoggingOnce you have integrated the system messages in the message system and completed migration, you must update the system messages in Alarm Logging. New system messages are also applied with this step.
1. In the table area of Alarm Logging, select the system messages to be updated.If you want to update all system messages, select the "Select All" command in the shortcut menu.
2. Select the "Update" command in the shortcut menu.Selected system messages are updated, and new system messages are integrated into the project. The system messages obtain texts from the selected language for the selected user text block.
Adapting process-controlled archive tagsIf the "Compile OS" function is used, the assignment of the process controlled archive tags changes. The name of process controlled archive tags is no longer defined according to the raw data tag ID. The name of the raw data tag is used instead. You must convert these tags to adapt their assignment, for example, in Controls. For this purpose, open the "Properties" dialog of the archive tag once and then close it again without making any changes.
If you are not using the "Compile OS" function, you can continue using the process-controlled archive tags in their original structure in the new WinCC version.
Multi-user projects Loading packagesAfter migration of a multi-user project, create the packages on the server and downloaded these to the clients. For more information, refer to "Configuration > Multi-user systems > "Server configuration" or "Client configuration" in the WinCC Information System.
See alsoMigration Diagnostics (Page 138)
Migration5.7 Additional Steps
WinCC: General information and installationSystem Manual, 06/2014, A5E34372689-AA 125
5.8 Upgrading a Redundant System in Normal Operation
5.8.1 Upgrading a Redundant System in Normal Operation
IntroductionYou update a redundant system to the new WinCC version in steps. This will not interfere with plant operation.
Compare the initial situation described in the quick reference instructions with your system and prepare your system accordingly.
NoteFramework Conditions for Upgrading During Ongoing Operation
A client may always only be connected to one server, on which the same WinCC version is installed.
An upgrade in WinCC ServiceMode is not possible in logged off state.
Objective● The automation system remains permanently in Runtime.
● The process is constantly operable.
ProcessUpgrading consists of the following phases:
1. Upgrading the Standby Server
2. Upgrade WinCC clients
3. Upgrading Master Server
4. Defining Master Server
5.8.2 Quick Reference Instructions: Upgrading Redundant Systems in Normal Operation
IntroductionA redundant system in operation is upgraded in four phases. Each phase is divided into individual working steps. The necessary working steps are listed in the Section "Procedure". Detailed instructions are provided in the chapters "Phase 1" to "Phase 4".
Migration5.8 Upgrading a Redundant System in Normal Operation
WinCC: General information and installation126 System Manual, 06/2014, A5E34372689-AA
Initial Situation● Server1 is the master server.
(Server1 stands for all master servers in a redundant server pair.)
● Server2 is the standby server. (Server2 stands for all standby servers in a redundant server pair.)
● WinCC Client1 is connected to Server1. (WinCC Client1 stands for all WinCC clients originally connected to Server1, which should be reconnected with Server1 after the migration.)
● WinCC Client2 is connected to Server2 because it is configured for it as the preferred server. (WinCC Client2 stands for all WinCC clients originally connected to Server2, which should be reconnected with Server2 after the migration.)
Procedure - Quick Reference
Note
In order not to interrupt operation of the system, observe the sequence of steps described.
The working steps from Phase 1 to Phase 4 must be completed without any longer interruptions.
Note
Create a backup of the entire system before upgrading the server.
Configure a preferred server for all clients to be upgraded.
Phase 1: Upgrading the Standby Server1. WinCC Client1: Configure Server1 as preferred server
2. WinCC Client2: Configure Server1 as preferred server
3. Server2: Deactivate
4. Server2: Exit WinCC
5. Server2: Reboot the computer
6. Server2: Install new WinCC version
7. Server2: Migrate project
8. Server2: Activate
9. Server2: Other redundant server pairs: Execute Steps 1 to 8
Phase 2: Upgrade WinCC clients10. WinCC Client2: Deactivate and exit WinCC
11. WinCC Client2: Reboot the computer
12. WinCC Client2: Install new WinCC version
Migration5.8 Upgrading a Redundant System in Normal Operation
WinCC: General information and installationSystem Manual, 06/2014, A5E34372689-AA 127
13. WinCC Client2: Migrate project
14. WinCC Client2: Configure Server2 as preferred server
15. WinCC Client2: Activate
16. WinCC Client1 and other WinCC clients: Execute Steps 10 to 15
Phase 3: Upgrading Master Server17. Server1: Deactivate and exit WinCC
18. Server1: Reboot the computer
19. Server1: Install new WinCC version
20. Server1: Migrate project
21. Server1: Activate
22. WinCC Client1: Loading Packages and Configuring the Preferred Server
23. WinCC Client2: Loading Packages and Configuring the Preferred Server
24. Other redundant server pairs: Execute Steps 17 to 23
Phase 4: Defining Master Server and Completing Upgrade25. Switch master server manually
ResultWhen all the working steps from 1 to 25 have been completed, the system has the following status:
● Upgraded Server1 is the master server.
● Upgraded Server2 is the standby server.
● Upgraded WinCC Client1 is connected to its preferred server Server1.
● Upgraded WinCC Client2 is connected to its preferred server Server2.
Upgrading your redundant system to the new WinCC version is complete.
Note
Following migration of a server, the respective packages must be regenerated on this server. Following migration of a client with own project, the respective packages must be regenerated on this server.
Migration5.8 Upgrading a Redundant System in Normal Operation
WinCC: General information and installation128 System Manual, 06/2014, A5E34372689-AA
5.8.3 Phase 1: Upgrading the Standby Server
IntroductionIn the first phase, the redundant standby server Server2 is upgraded. This prevents an unnecessary redundancy switching by WinCC clients.
You system will only run on one server while you complete the phase 1 steps.
NOTICE
Procedure
In order not to interrupt operation of the system, observe the sequence of steps described.
Complete the steps in phases 1 to 4 without any longer interruption.
Note
Create a backup copy before upgrading the server.
Initial Situation Prior to Phase 1● Server1 is the configured default master server.
(Server1 is synonym for any master server of a redundant pair of servers.)
● Server2 is the standby.(Server2 is synonym for any standby server of a redundant pair of servers.)
● WinCC Client1 is connected to Server1. The package of the master server is loaded onto WinCC Client1.
● (WinCC Client1 is synonym for all WinCC clients that were originally connected to Server1 and which have to be reconnected with Server1 after migration.) WinCC-Client2 is connected to Server2 because this is its configured preferred server.The master server package is loaded on WinCC Client2.(WinCC-Client2 is synonym for all WinCC clients that were originally connected to Server2 and which have to be reconnected with Server2 after migration.)
Procedure, Phase 1For a detailed description of the procedure, please click one of the following working steps.
Note
Please note that you must work alternately on Server1 and Server2.
1. WinCC Client1: Configure Server1 as preferred serverSo that each client is connected with the associated server during the upgrade, a preferred server must be configured for all clients in the system.
Migration5.8 Upgrading a Redundant System in Normal Operation
WinCC: General information and installationSystem Manual, 06/2014, A5E34372689-AA 129
If a preferred server is not yet configured for WinCC Client1, then enter Server1 as the preferred server.
Deactivate WinCC Client1 and reactivate the client so that the changed preferred server is applied.
2. WinCC Client2: Configure Server1 as preferred serverConfigure Server1 as the preferred server for WinCC Client2.
Deactivate WinCC Client2 and reactivate the client so that the changed preferred server is applied.
WinCC Client2 connects with Server1.
3. Server2: DeactivateDeactivate WinCC Runtime on the standby Server2.
The system behaves as follows:
● WinCC Client1 remains connected to Server1.
● WinCC Client2, for which Server1 is now configured as the preferred server, remains connected to Server1.
● Server1 detects an interruption through the deactivation of Server2. If you have configured system messages, Server1 then creates a corresponding process control message.
Create a backup of Server2 and save the WinCC data before you upgrade the server.
4. Server2: Exit WinCCEnd WinCC on the existing standby server Server2.
5. Server2: Reboot the computerClose Windows and restart Server2.
6. Server2: Install new WinCC versionThe WinCC server with the new WinCC version runs only under the system conditions described in the "Installation Notes" of the WinCC Information System.
Install the new WinCC version with all necessary options or run an update. Information on installation is available in the WinCC Information System under "Installation Notes".
7. Server2: Migrate projectMigrate the WinCC data of Server2.
Migration5.8 Upgrading a Redundant System in Normal Operation
WinCC: General information and installation130 System Manual, 06/2014, A5E34372689-AA
Modify the project for the new WinCC after the migration. Observe the corresponding notes in the chapter "Additional steps".
Note
Following migration of a server, the respective packages must be deleted and regenerated on this server. The package must have the same name as the deleted package.
8. Server2: Activate1. Start WinCC on Server2.
2. Activate WinCC Runtime.
The system behaves as follows:
● There is no server switching. The activated Server2 becomes the standby server in the upgraded WinCC project.
● The WinCC Client1 remains connected to Server1.
● The WinCC Client2 remains connected to Server1.
Wait for completion of any active redundancy synchronization before you go to the next step. If you have configured system messages, Server1 then creates a corresponding process control message.
9. Other redundant server pairs: Execute steps 1 to 8If several redundant server pairs are implemented, the respective standby server, Server2, must be upgraded.
Execute steps 1 through 8 for each Server2.
Complete the upgrading of one standby server before beginning with upgrading the next standby server.
Result of Phase 1● Standby Server2 has been upgraded.
● WinCC Client2 is connected to Server1.
● WinCC Client1 is connected to Server1.
5.8.4 Phase 2: Upgrade WinCC clients
IntroductionIn phase 2, you upgrade all WinCC clients to the new WinCC version.
Migration5.8 Upgrading a Redundant System in Normal Operation
WinCC: General information and installationSystem Manual, 06/2014, A5E34372689-AA 131
In order for the system to remain operable, at least one WinCC client must remain connected to an active server of the same WinCC version during the upgrade. The same WinCC version must run on this server as on the WinCC client.
Initial situation in advance of phase 2● Server1 is the master server with the previous WinCC version.
● Upgraded Server2 is the standby server in the migrated project with the new WinCC version.
● WinCC Client1 is connected to Server1.
● WinCC Client2 is connected to Server1.
Phase 2 procedureFor a detailed description of the procedure, please click one of the following working steps.
10. WinCC Client2: Deactivate and exit WinCCDeactivate WinCC Runtime on the WinCC Client2 and exit WinCC.
11. WinCC Client2: Reboot the computerClose Windows and restart the WinCC client.
12. WinCC Client2: Install new WinCC versionA WinCC client with the new WinCC version runs only under the system conditions described in the "Installation Notes" of the WinCC Information System. Create a backup of the client and save the WinCC data before the installation.
Install the new WinCC version with all necessary options or perform an update. Information on installation is available in the WinCC Information System under "Installation Notes".
13. WinCC Client2: Migrate projectMigrate the WinCC data of the WinCC client.
Modify the project for the new WinCC version after the migration. Observe the corresponding notes in the chapter "Additional steps".
Note
Following migration of a WinCC client with own project, the packages must be reloaded to the migrated server.
14. WinCC Client2: Enter Server2 as preferred serverChange the preferred server in the migrated WinCC client and enter Server2 instead of Server1.
Migration5.8 Upgrading a Redundant System in Normal Operation
WinCC: General information and installation132 System Manual, 06/2014, A5E34372689-AA
15. WinCC Client2: Activate1. Start WinCC on the migrated WinCC client.
2. Activate WinCC Runtime.
The system behaves as follows:
● The WinCC client connects to the upgraded Server2.
● Server2 remains the standby server.
16. Other WinCC clients: Execute Steps 10 to 15For WinCC Client1, the same procedure applies as for WinCC Client2.
When a WinCC client has been upgraded, repeat steps 10 to 15 for the next WinCC client until all the WinCC clients in the system have been upgraded.
After the upgrade, also enter Server2 as the preferred server for WinCC Client1.
Complete the upgrading of one WinCC client before beginning with the upgrading of the next WinCC client.
Result of Phase 2● Upgraded WinCC Client2 is connected to the upgraded Server2 as the preferred server.
● Upgraded WinCC Client1 is connected to Server2 as preferred server.
● Server1 is the master server with the previous WinCC version.
● Upgraded Server2 is the standby server in the migrated project with the new WinCC version.
5.8.5 Phase 3: Upgrading Master Server
IntroductionIn Phase 3, the master server Server1 is upgraded.
While carrying out the working steps in Phase 3, the system runs on just one server. The system can be operated via the WinCC clients upgraded in Phase 2. Further information on redundancy synchronization is available in the WinCC Information System under the topic "Configurations > Redundant Systems".
Note
If necessary, create a backup copy before upgrading the server.
Migration5.8 Upgrading a Redundant System in Normal Operation
WinCC: General information and installationSystem Manual, 06/2014, A5E34372689-AA 133
Initial Situation Prior to Phase 3● Server1 is the master server with the previous WinCC version.
● Upgraded Server2 is the standby server in the migrated project with the new WinCC version.
● The redundancy synchronization of Server1 and Server2 is complete.
● Upgraded WinCC Client1 is connected to Server2.
● Upgraded WinCC Client2 is connected to its preferred server Server2.
Procedure, Phase 3For a detailed description of the procedure, please click one of the following working steps.
Note
Please note that you must work alternately on Server1 and Server2.
17. Server1: Deactivate and exit WinCC1. Deactivate WinCC Runtime on the master server Server1.
2. Exit WinCC on the server.
Create a backup of Server2 and save the WinCC data before you upgrade the server.
18. Server1: Reboot the computerClose Windows and restart Server1.
19. Server1: Install new WinCC versionA server with the new WinCC version runs only under the system conditions described in the "Installation Notes" of the WinCC Information System. First, save the WinCC data on the server if necessary.
Install the new WinCC version with all necessary options or perform an update. Information on installation is available in the WinCC Information System under "Installation Notes".
20. Server1: Migrate projectMigrate the WinCC data of the server. Modify the project for the new WinCC version after the migration. Observe the corresponding notes in the chapter "Additional steps".
Note
Following migration of a server, the respective packages must be regenerated on this server. The package must have the same name as the original package.
Migration5.8 Upgrading a Redundant System in Normal Operation
WinCC: General information and installation134 System Manual, 06/2014, A5E34372689-AA
21. Server1: Activate1. Activate WinCC Runtime.
The system behaves as follows:
● Server1 becomes the standby server.
● Archive synchronization is performed for the message archives, process value archives and user archives.
● If system messages have been configured, a corresponding process control message is generated.
● All the values during the downtime period are synchronized.
22. WinCC Client1: Loading Packages and Configuring the Preferred ServerLoad the Server1 package to the WinCC clients.
Configure Server1 as the preferred server for WinCC Client1.
Deactivate and activate the respective client to apply the changed configuration to the preferred server.
● The WinCC Client1 connects to the upgraded preferred server, Server1.
23. WinCC Client2: Loading Packages and Configuring the Preferred ServerLoad the Server1 package to the WinCC clients.
Configure Server2 as the preferred server for WinCC Client2.
Deactivate and activate the respective client to apply the changed configuration to the preferred server.
● The WinCC Client2 connects to the master server, Server2.
24. Other redundant server pairs: Execute Steps 17 to 23If several redundant server pairs are implemented, then upgrade the master server, Server_1.
Execute steps 17 through 23 for each Server1.
Complete the upgrading of one server before beginning with the upgrading of the next server.
Result of Phase 3● Upgraded Server1 is the standby server.
● Upgraded Server2 is the master server.
● Upgraded WinCC Client1 is connected to its preferred server Server1.
● Upgraded WinCC Client2 is connected to its preferred server Server2.
Migration5.8 Upgrading a Redundant System in Normal Operation
WinCC: General information and installationSystem Manual, 06/2014, A5E34372689-AA 135
5.8.6 Phase 4: Defining Master Server and Completing Upgrade
IntroductionAfter upgrading the system, all WinCC clients, for which no preferred server has been configured, are connected to the master server. As a result of the redundancy switching for upgrading, the original master server, Server1, was set to standby server. The original standby server, Server2, was set to master server.
In order to restore the original status, the master server must be reset manually. Follow the instructions in step 25. This step concludes the upgrading procedure of your redundant system to the new WinCC version.
Further information on preferred servers in redundant systems is available in the WinCC Information System under the topic "Configurations > Redundant Systems".
Initial Situation Prior to Phase 4● Server1 is the standby server.
● Server2 is the master server.
● WinCC Client1 is connected to its preferred server, Server1.
● WinCC Client2 is connected to its preferred server, Server2.
Procedure, Phase 4For a detailed description of the procedure, click working step 25:
25. Switch master server manuallyIn order to restore the initial situation of the system, define Server1 as the master server manually.
Set the redundancy tag "@RM_Master" on Server1 from 0 to 1. You can query and set the redundancy tag "@RM_Master" via an I/O field, for example:
1. Configure an I/O field in the multi-user project from Server1.
2. Link the I/O field with the @RM_Master tag.
3. Enter a "1" in the I/O field in Runtime. Server1 becomes the master server. As a result of the redundancy switching, Server2 becomes the standby server.
Alternatively, the redundancy tag can be set via scripts.
Result of Phase 4 ● Server1 is the master server.
● Server2 is the standby server.
● WinCC Client1 is connected to its preferred server, Server1.
● WinCC Client2 is connected to its preferred server, Server2.
Migration5.8 Upgrading a Redundant System in Normal Operation
WinCC: General information and installation136 System Manual, 06/2014, A5E34372689-AA

Upgrading your redundant system to the new WinCC version is complete.
Migration5.8 Upgrading a Redundant System in Normal Operation
WinCC: General information and installationSystem Manual, 06/2014, A5E34372689-AA 137

5.9 Migration Diagnostics
IntroductionWhen a fault occurs, clear the fault in a copy of the migrated project. Then restart the migration.
Errors During MigrationAn error during the migration of a component does not interrupt the migration. The Project Migrator writes an error message in a diagnostics file and processes the next components.
Check the list of migrated components after migration. Double-click the list entries that contain errors or warnings to view the error in a ".txt" file.
Cancelation of MigrationYou may restart an aborted migration after having eliminated all errors. Use a backup copy instead of the project containing the migration errors.
Migration after elimination of errorsYou can migrate the individual components after having eliminated the respective errors. The computer name and the name of the local computer must match.
Select "Tools > Convert project data" in WinCC Explorer. Select the components that you want to migrate.
Diagnostics fileThe Project Migrator saves the "MigratorLog.txt" diagnostics file to the directory of the migrated project. You can view this file in any text editor.
The file contains the following general information:
● Project name
● Project type
● Type of migrated data
● Start and end of migration
If an error occurs during migration, the Project Migrator writes an error message in the file.
Migration5.9 Migration Diagnostics
WinCC: General information and installation138 System Manual, 06/2014, A5E34372689-AA
5.10 Appendix
5.10.1 Documentation of Functions of Predecessor Versions
IntroductionYou will find information on functions and documentation of the predecessor versions in this chapter.
OverviewInformation on functions and documentation concerning the predecessor versions:
● The documentation on the controls before WinCC V7 are located following the description of the new controls.
● The documentation for previous user objects is still located in the WinCC Information System.
● The appendix also contains documentation on the WinCC Push Button Control.
5.10.2 WinCC Push Button Control
5.10.2.1 The "WinCC Push Button" Control
Introduction● The "WinCC Push Button" control can be used to configure a command button, which is
connected to the execution of a command. In Runtime, the Push Button can adopt the states "Pressed" and "Not pressed". Both statuses can be assigned a different image, which shows the current state of the button.
Insert Push ButtonThe Push Button is inserted from the object palette into a picture:
● As a Smart Object:The Smart Object "Control" is inserted from the "Standard" tab of the Object Palette. The Push Button is selected in the dialog "Insert a Control".
● From the "Controls" tabThe Push Button is inserted directly from the "Controls" tab of the Object Palette.
The properties of the control are changed in the configuration dialog "Properties of the WinCC Push Button Control" or in the window "Object Properties".
Migration5.10 Appendix
WinCC: General information and installationSystem Manual, 06/2014, A5E34372689-AA 139
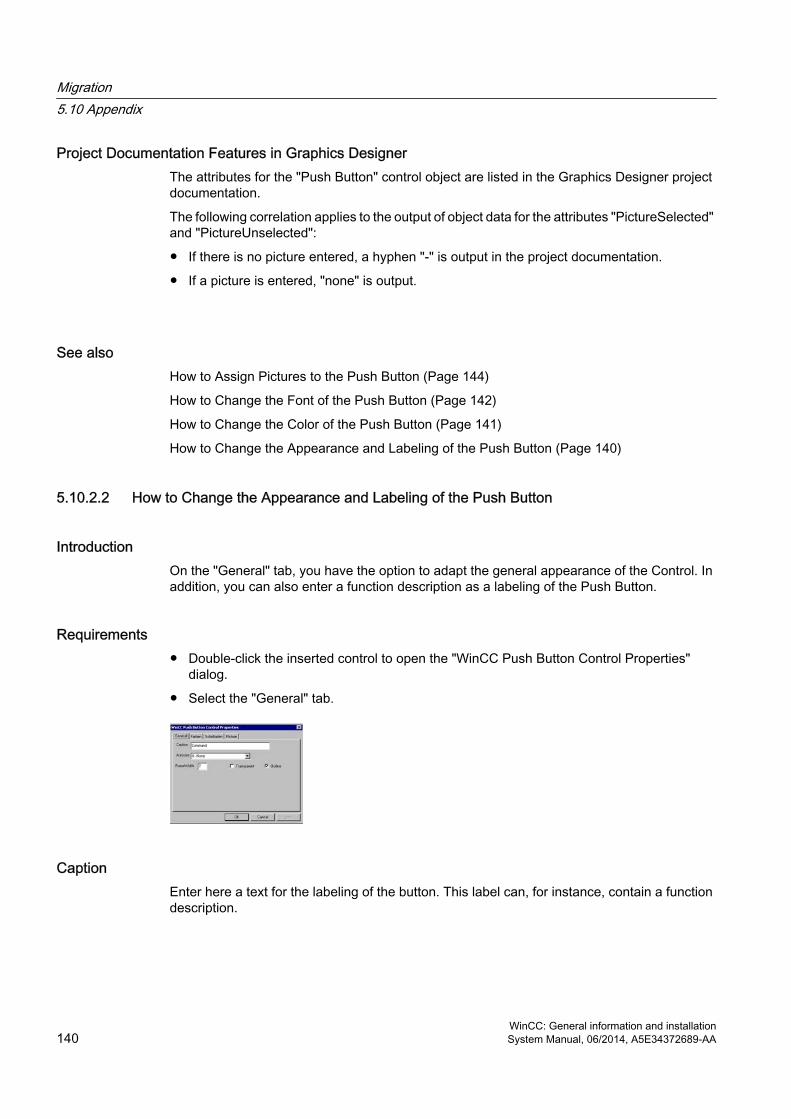
Project Documentation Features in Graphics DesignerThe attributes for the "Push Button" control object are listed in the Graphics Designer project documentation.
The following correlation applies to the output of object data for the attributes "PictureSelected" and "PictureUnselected":
● If there is no picture entered, a hyphen "-" is output in the project documentation.
● If a picture is entered, "none" is output.
See alsoHow to Assign Pictures to the Push Button (Page 144)
How to Change the Font of the Push Button (Page 142)
How to Change the Color of the Push Button (Page 141)
How to Change the Appearance and Labeling of the Push Button (Page 140)
5.10.2.2 How to Change the Appearance and Labeling of the Push Button
IntroductionOn the "General" tab, you have the option to adapt the general appearance of the Control. In addition, you can also enter a function description as a labeling of the Push Button.
Requirements● Double-click the inserted control to open the "WinCC Push Button Control Properties"
dialog.
● Select the "General" tab.
CaptionEnter here a text for the labeling of the button. This label can, for instance, contain a function description.
Migration5.10 Appendix
WinCC: General information and installation140 System Manual, 06/2014, A5E34372689-AA
AutosizeFor the geometry of the Push Button, you can configure automatic size adaptation.
Select option 0 - None, in order to disable the automatic size adaptation. With option 1 - Adjust Picture Size To Button the size of the image is adapted to the geometry of the button. Select option 2 - Adjust Button Size To Picture, in order to adapt the geometry of the Push Button to the size of an assigned picture.
Frame WidthEnter a value for the 3D Border Width of the button in pixel(s).
TransparentThe background of the button can be displayed transparent. In this case, the configured background color is not shown.
OutlineThe 3D border of the Push Button can be surrounded with an additional outer border line.
See alsoThe "WinCC Push Button" Control (Page 139)
How to Assign Pictures to the Push Button (Page 144)
How to Change the Font of the Push Button (Page 142)
How to Change the Color of the Push Button (Page 141)
5.10.2.3 How to Change the Color of the Push Button
IntroductionYou can use the "Colors" tab to adapt the color for the display of the Control.
Requirements● Double-click the inserted control to open the "WinCC Push Button Control Properties"
dialog.
● Select the "Colors" tab.
Migration5.10 Appendix
WinCC: General information and installationSystem Manual, 06/2014, A5E34372689-AA 141
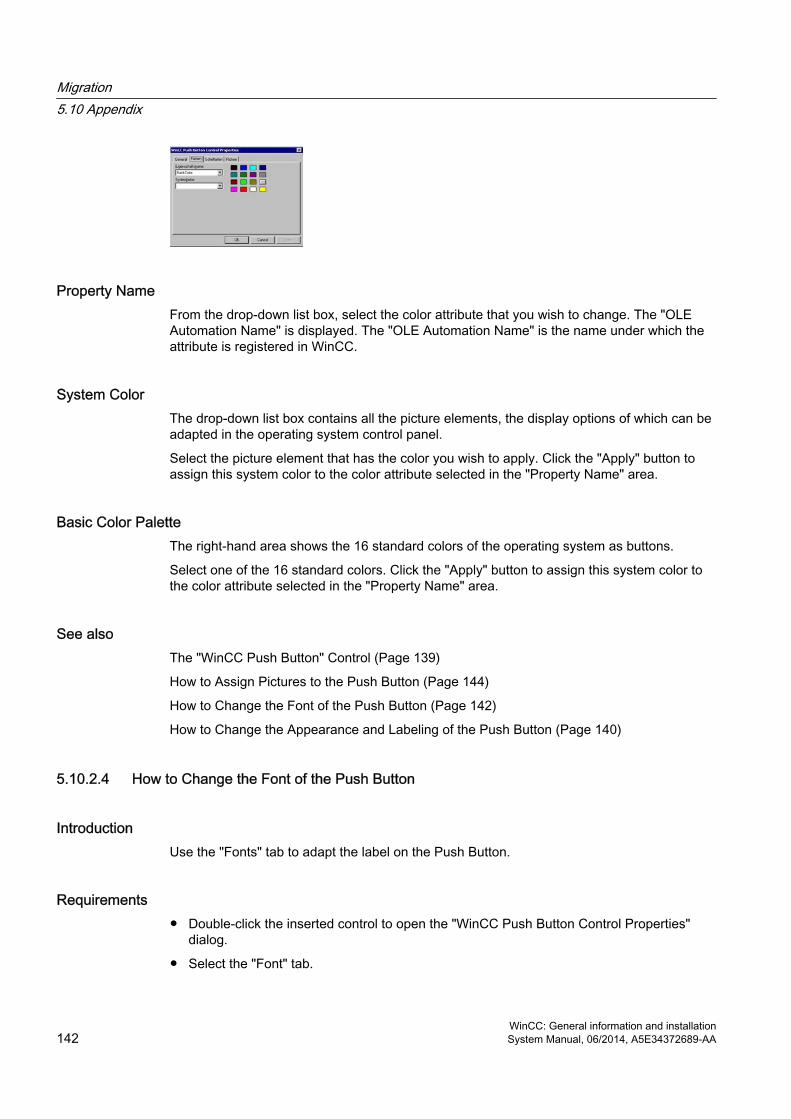
Property NameFrom the drop-down list box, select the color attribute that you wish to change. The "OLE Automation Name" is displayed. The "OLE Automation Name" is the name under which the attribute is registered in WinCC.
System ColorThe drop-down list box contains all the picture elements, the display options of which can be adapted in the operating system control panel.
Select the picture element that has the color you wish to apply. Click the "Apply" button to assign this system color to the color attribute selected in the "Property Name" area.
Basic Color PaletteThe right-hand area shows the 16 standard colors of the operating system as buttons.
Select one of the 16 standard colors. Click the "Apply" button to assign this system color to the color attribute selected in the "Property Name" area.
See alsoThe "WinCC Push Button" Control (Page 139)
How to Assign Pictures to the Push Button (Page 144)
How to Change the Font of the Push Button (Page 142)
How to Change the Appearance and Labeling of the Push Button (Page 140)
5.10.2.4 How to Change the Font of the Push Button
IntroductionUse the "Fonts" tab to adapt the label on the Push Button.
Requirements● Double-click the inserted control to open the "WinCC Push Button Control Properties"
dialog.
● Select the "Font" tab.
Migration5.10 Appendix
WinCC: General information and installation142 System Manual, 06/2014, A5E34372689-AA
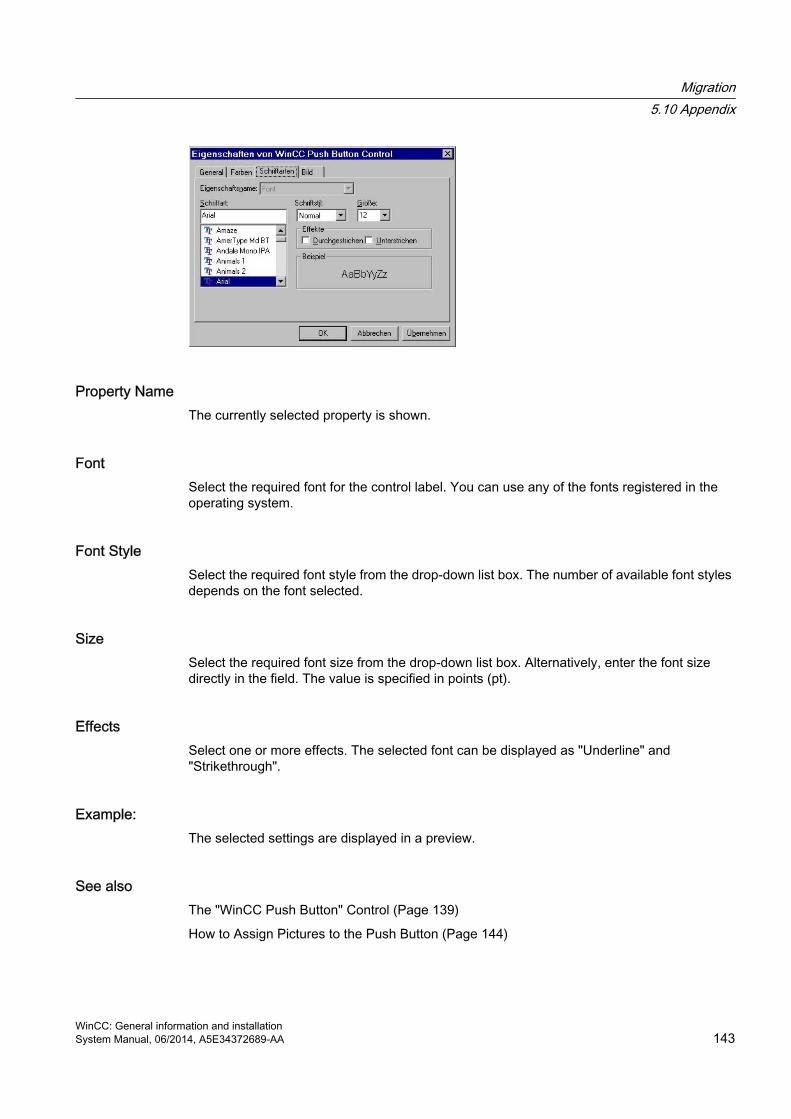
Property NameThe currently selected property is shown.
FontSelect the required font for the control label. You can use any of the fonts registered in the operating system.
Font StyleSelect the required font style from the drop-down list box. The number of available font styles depends on the font selected.
SizeSelect the required font size from the drop-down list box. Alternatively, enter the font size directly in the field. The value is specified in points (pt).
EffectsSelect one or more effects. The selected font can be displayed as "Underline" and "Strikethrough".
Example:The selected settings are displayed in a preview.
See alsoThe "WinCC Push Button" Control (Page 139)
How to Assign Pictures to the Push Button (Page 144)
Migration5.10 Appendix
WinCC: General information and installationSystem Manual, 06/2014, A5E34372689-AA 143
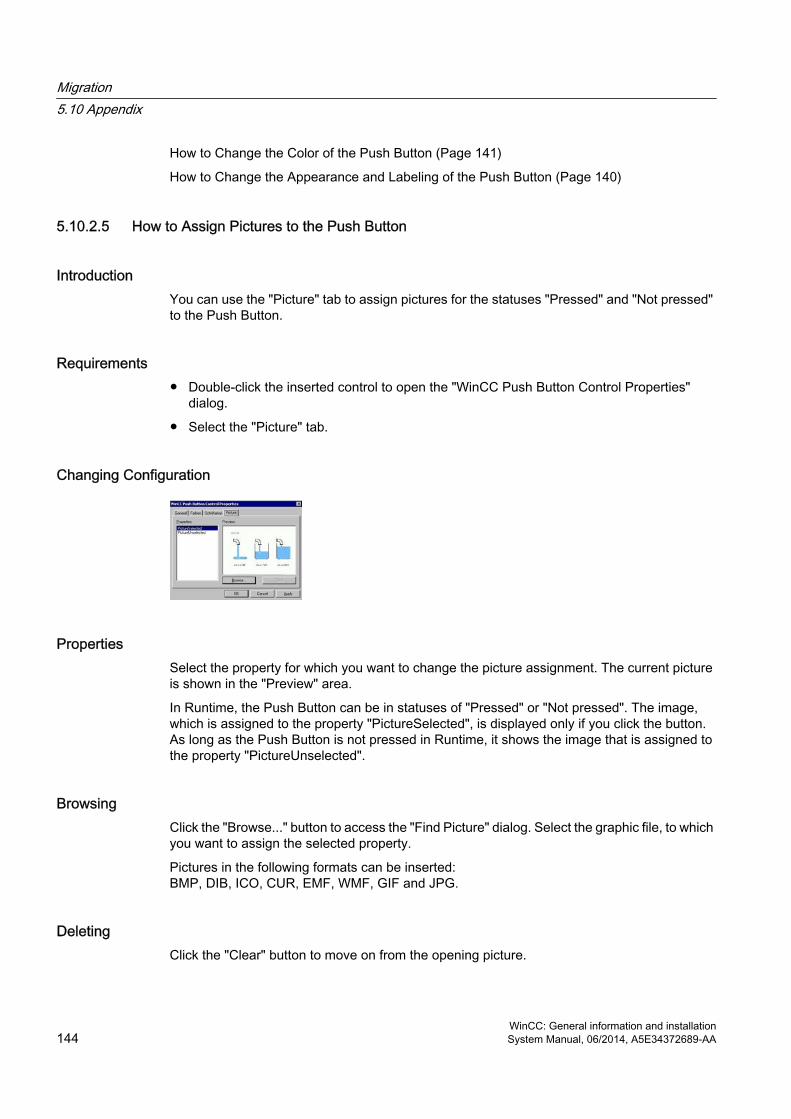
How to Change the Color of the Push Button (Page 141)
How to Change the Appearance and Labeling of the Push Button (Page 140)
5.10.2.5 How to Assign Pictures to the Push Button
IntroductionYou can use the "Picture" tab to assign pictures for the statuses "Pressed" and "Not pressed" to the Push Button.
Requirements● Double-click the inserted control to open the "WinCC Push Button Control Properties"
dialog.
● Select the "Picture" tab.
Changing Configuration
PropertiesSelect the property for which you want to change the picture assignment. The current picture is shown in the "Preview" area.
In Runtime, the Push Button can be in statuses of "Pressed" or "Not pressed". The image, which is assigned to the property "PictureSelected", is displayed only if you click the button. As long as the Push Button is not pressed in Runtime, it shows the image that is assigned to the property "PictureUnselected".
BrowsingClick the "Browse..." button to access the "Find Picture" dialog. Select the graphic file, to which you want to assign the selected property.
Pictures in the following formats can be inserted: BMP, DIB, ICO, CUR, EMF, WMF, GIF and JPG.
DeletingClick the "Clear" button to move on from the opening picture.
Migration5.10 Appendix
WinCC: General information and installation144 System Manual, 06/2014, A5E34372689-AA
See alsoThe "WinCC Push Button" Control (Page 139)
How to Change the Font of the Push Button (Page 142)
How to Change the Color of the Push Button (Page 141)
How to Change the Appearance and Labeling of the Push Button (Page 140)
Migration5.10 Appendix
WinCC: General information and installationSystem Manual, 06/2014, A5E34372689-AA 145


WinCC diagnosis 66.1 Runtime Monitoring of Actions
IntroductionWinCC script processing is a very open system. It allows Windows APIs and dedicated DLL functions to be called. The underlying programming language C is very comprehensive and offers a high degree of freedom. Incorrect implementation of these capabilities can also lead to crashing the system. Incorrect configuration can also seriously decrease the performance of the system.
The ApDiag.exe diagnostics tool should be used to support the analysis of errors and performance problems. Note that the diagnostics application itself will affect performance; collecting additional values costs time. Individual diagnostic functions can therefore be activated and deactivated to avoid degrading the runtime of the system during operation.
This is why you should ensure that the diagnostic functions are deactivated during the final commissioning stage.
This description will not explain every possible item of diagnostic information in detail, since certain parts require a well-grounded knowledge of the system architecture for this. The purpose of this description is to indicate possibilities and handling of the ApDiag diagnostics tool so that ApDiag can be utilized as intended should the need arise.
WinCC: General information and installationSystem Manual, 06/2014, A5E34372689-AA 147
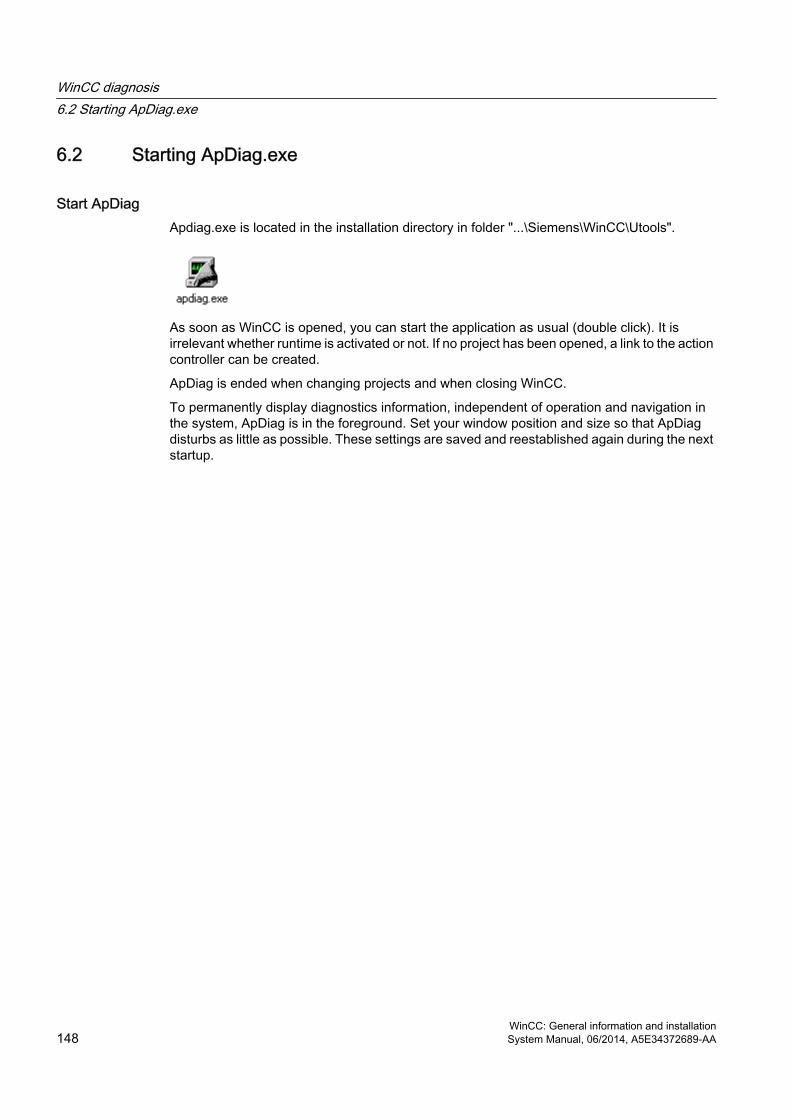
6.2 Starting ApDiag.exe
Start ApDiag Apdiag.exe is located in the installation directory in folder "...\Siemens\WinCC\Utools".
As soon as WinCC is opened, you can start the application as usual (double click). It is irrelevant whether runtime is activated or not. If no project has been opened, a link to the action controller can be created.
ApDiag is ended when changing projects and when closing WinCC.
To permanently display diagnostics information, independent of operation and navigation in the system, ApDiag is in the foreground. Set your window position and size so that ApDiag disturbs as little as possible. These settings are saved and reestablished again during the next startup.
WinCC diagnosis6.2 Starting ApDiag.exe
WinCC: General information and installation148 System Manual, 06/2014, A5E34372689-AA
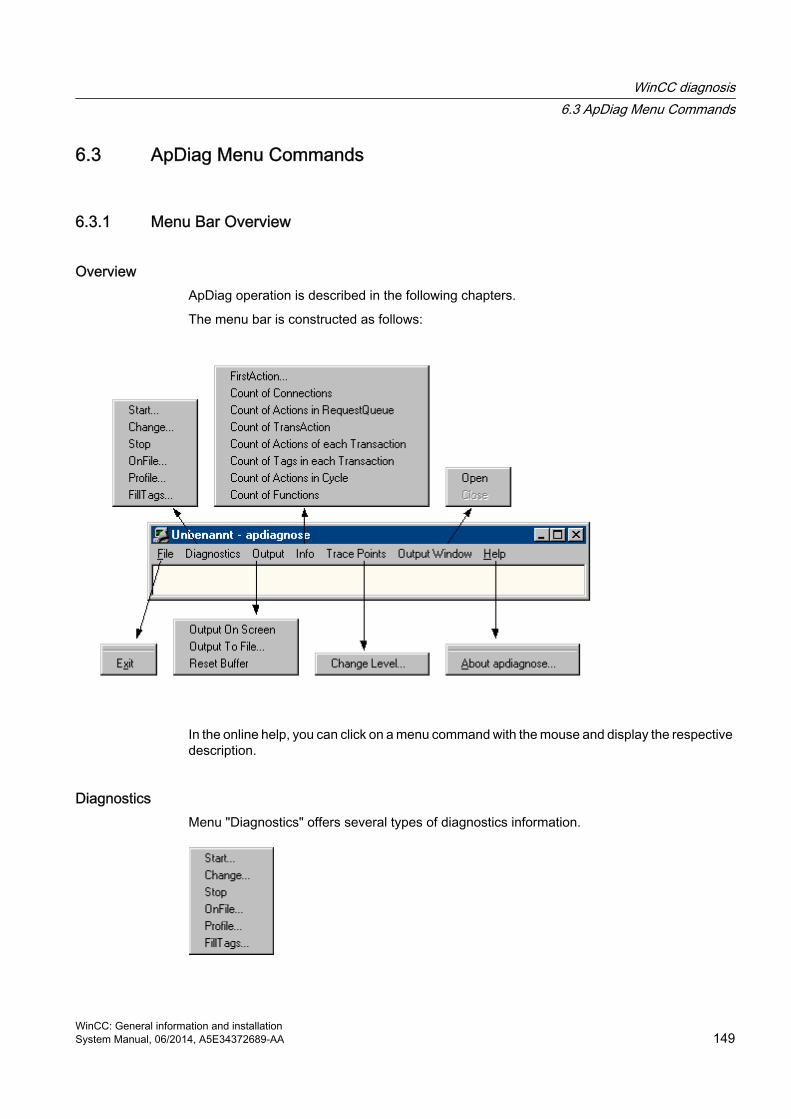
6.3 ApDiag Menu Commands
6.3.1 Menu Bar Overview
OverviewApDiag operation is described in the following chapters.
The menu bar is constructed as follows:
In the online help, you can click on a menu command with the mouse and display the respective description.
DiagnosticsMenu "Diagnostics" offers several types of diagnostics information.
WinCC diagnosis6.3 ApDiag Menu Commands
WinCC: General information and installationSystem Manual, 06/2014, A5E34372689-AA 149
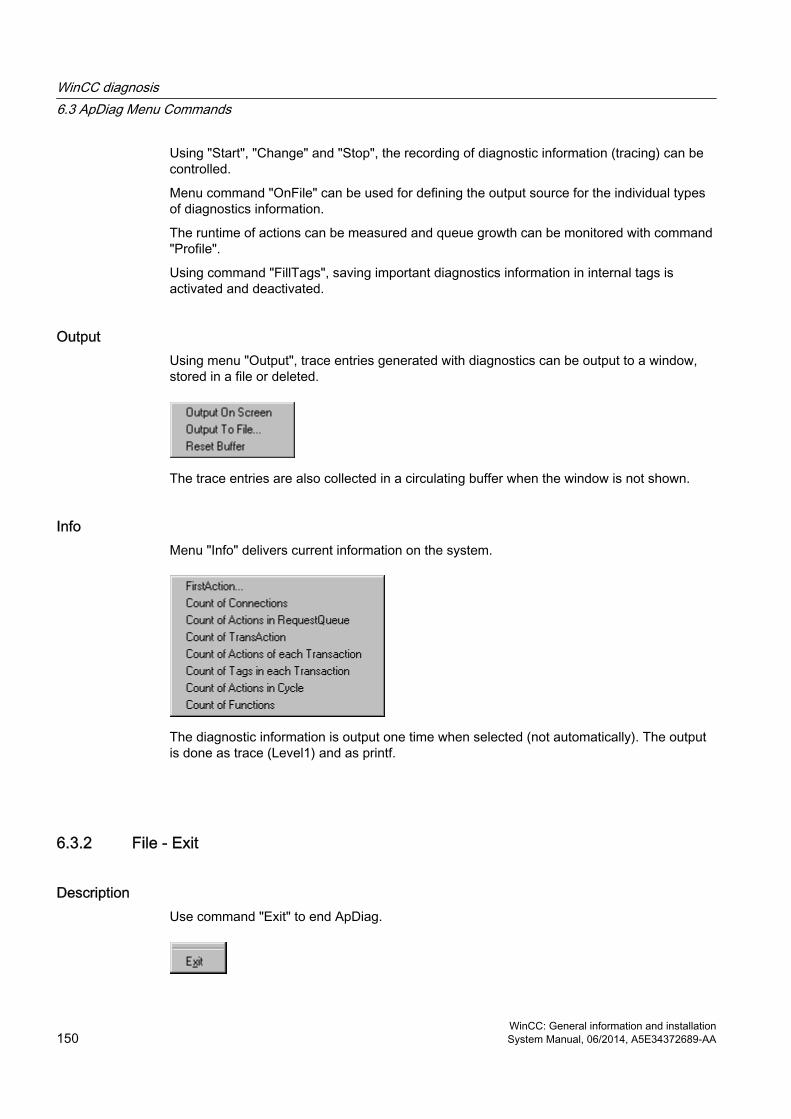
Using "Start", "Change" and "Stop", the recording of diagnostic information (tracing) can be controlled.
Menu command "OnFile" can be used for defining the output source for the individual types of diagnostics information.
The runtime of actions can be measured and queue growth can be monitored with command "Profile".
Using command "FillTags", saving important diagnostics information in internal tags is activated and deactivated.
OutputUsing menu "Output", trace entries generated with diagnostics can be output to a window, stored in a file or deleted.
The trace entries are also collected in a circulating buffer when the window is not shown.
InfoMenu "Info" delivers current information on the system.
The diagnostic information is output one time when selected (not automatically). The output is done as trace (Level1) and as printf.
6.3.2 File - Exit
DescriptionUse command "Exit" to end ApDiag.
WinCC diagnosis6.3 ApDiag Menu Commands
WinCC: General information and installation150 System Manual, 06/2014, A5E34372689-AA

6.3.3 Diagnostics
6.3.3.1 Start
Description Use menu command "Start" to open a dialog, in which a diagnostics level can be selected. Select the "OK" button to start the diagnosis and write the trace point in the defined level.
The higher the level, the more frequent and less serious the trace points are.
In level 1, only faults are output, as of level 3, printf (OnErrorExecute) are output as well. Levels 9 and 10 are mainly for testing for whether the script.exe application reacts.
In chapter "Trace points and their diagnostics level), a selection of trace points is described.
The diagnosis is different from the "printf information" in that the entries are collected with the window closed as well and mainly system messages (trace points) are shown.
Other trace entries can also be created using internal functions TraceTime() and TraceText(). The functions are described in the WinCC Help.
The trace entries are output in the diagnostics window as standard.
NoteEnd ApDiag
The diagnosis is switched off when changing projects and when ending ApDiag.
The option "Start automatically at WinCC start" offers the ability to start the diagnosis in the defined level automatically, each time a project is opened.
WinCC diagnosis6.3 ApDiag Menu Commands
WinCC: General information and installationSystem Manual, 06/2014, A5E34372689-AA 151

Since writing the trace points influences the performance, trace should really be switched off for normal operation.
NoteEnd ApDiag
This setting is also retained after ending ApDiag.exe and after restarting the computer.
6.3.3.2 Change
DescriptionWith menu command "Change", you can recognize whether a trace is switched on and change the current diagnostics level if required:
The current diagnostics level is marked. Select another level and click on "OK" to change the level.
Note
If no diagnosis is started, selecting "Change" opens no dialog.
WinCC diagnosis6.3 ApDiag Menu Commands
WinCC: General information and installation152 System Manual, 06/2014, A5E34372689-AA
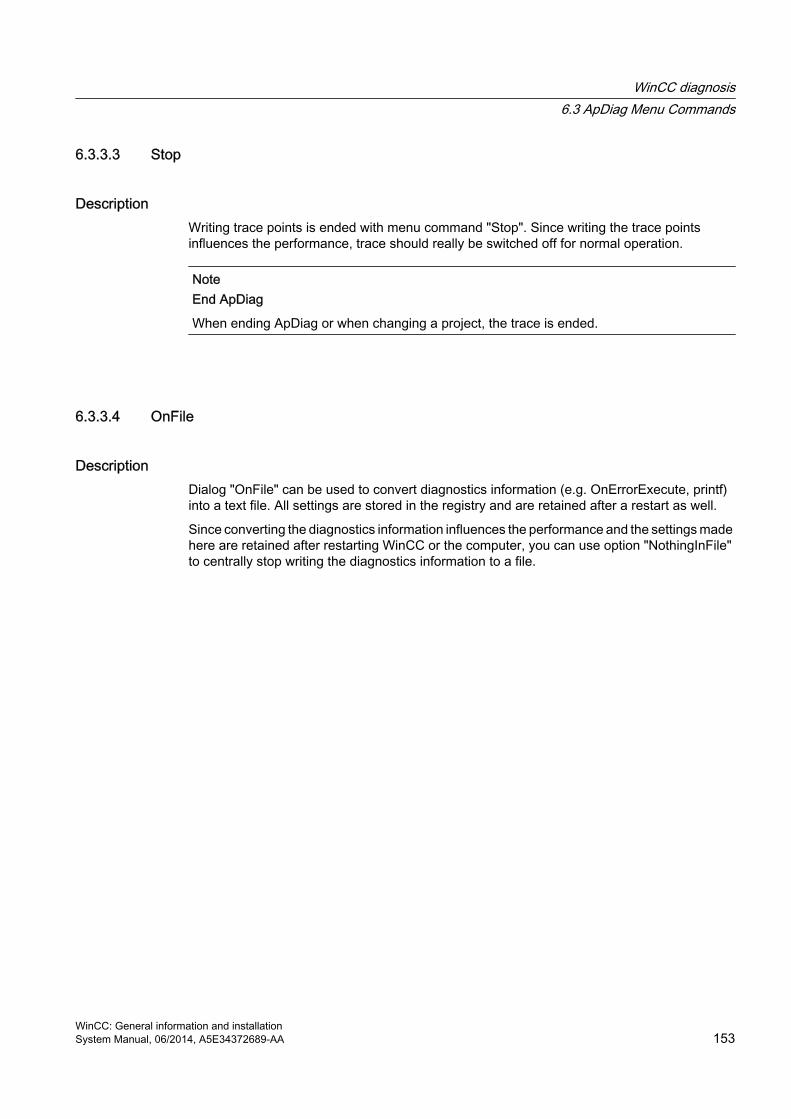
6.3.3.3 Stop
DescriptionWriting trace points is ended with menu command "Stop". Since writing the trace points influences the performance, trace should really be switched off for normal operation.
NoteEnd ApDiag
When ending ApDiag or when changing a project, the trace is ended.
6.3.3.4 OnFile
Description Dialog "OnFile" can be used to convert diagnostics information (e.g. OnErrorExecute, printf) into a text file. All settings are stored in the registry and are retained after a restart as well.
Since converting the diagnostics information influences the performance and the settings made here are retained after restarting WinCC or the computer, you can use option "NothingInFile" to centrally stop writing the diagnostics information to a file.
WinCC diagnosis6.3 ApDiag Menu Commands
WinCC: General information and installationSystem Manual, 06/2014, A5E34372689-AA 153
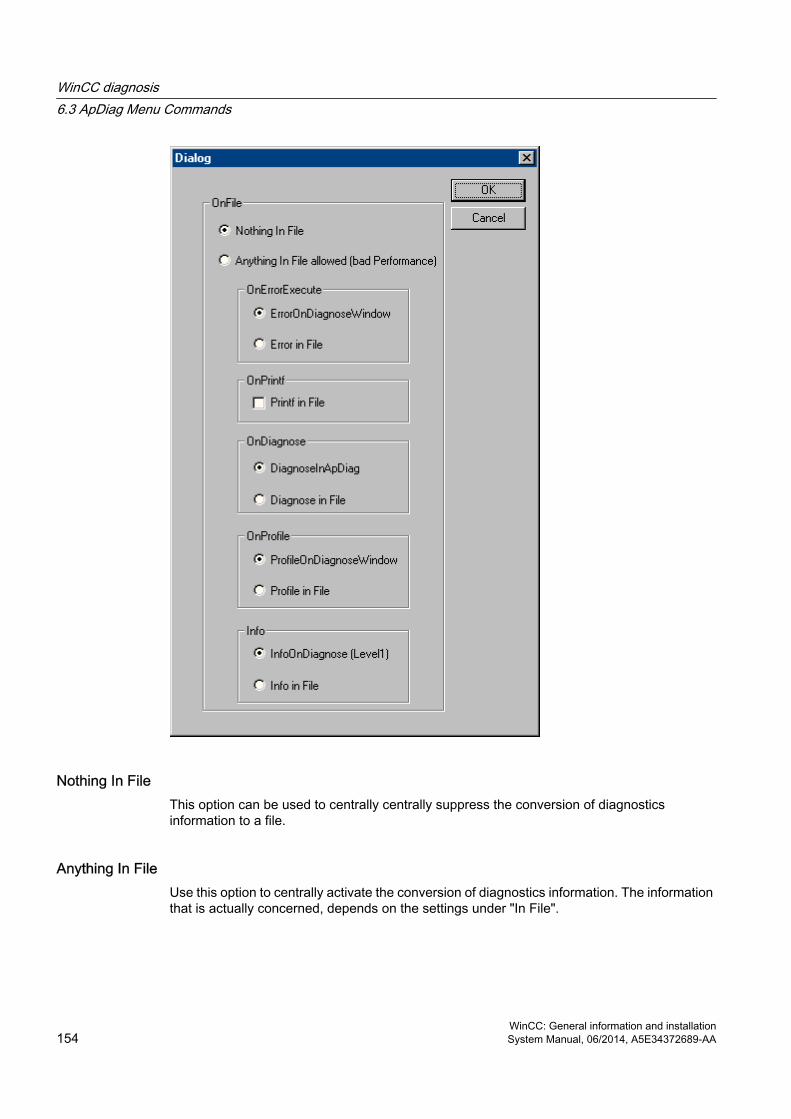
Nothing In FileThis option can be used to centrally centrally suppress the conversion of diagnostics information to a file.
Anything In FileUse this option to centrally activate the conversion of diagnostics information. The information that is actually concerned, depends on the settings under "In File".
WinCC diagnosis6.3 ApDiag Menu Commands
WinCC: General information and installation154 System Manual, 06/2014, A5E34372689-AA
OnErrorExecuteThis parameter can be used to define whether the output of an OnErrorExecute (standard function of WinCC, which is called by the system in case of an error) to a file or in the output window. An OnErrorExecute is lost when the diagnostics window is not shown, another error analysis is enabled with the output to a file, even afterward.
The following applies for the output to a file: The file is called OnErrorN.txt and is located in the installation directory:
● ..\Siemens\WinCC\Diagnose
A certain number of entries is written to a file. Then the next file is begun. It is always started with OnError0. After file OnError10, it begins with OnError0 again. After activating the project, it starts with OnError0 again the first time the function is called. The size of the files can be influenced by modifying the limit value for tag "dwErrorCount" of this WinCC standard function in the C editor for the Global Script.
OnPrintfThis parameter can be used for setting whether the outputs created by printf() are made to a file or to the output window.
The following applies for the output to a file: The file is called OnprintfX.txt and is located in the installation directory:
● ..\Siemens\WinCC\Diagnose
Particular attention is paid to the file size. 64 KB is written to a file and then the next file is begun. It is always started with Onprintf0. After file Onprintf10, it begins with Onprintf 0 again. After activation, it is also started with Onprintf 0 the first time the function is called.
OnDiagnoseWhen the diagnosis is switched on, all trace information for the respective level can be routed to a file.
The following applies for the output to a file: The file is called OnDiagnoseX.txt and is located in the installation directory:
● ..\Siemens\WinCC\Diagnose
Particular attention is paid to the file size. 64 KB is written to a file and then the next file is begun. It is always started with OnDiagnose0. After file OnDiagnose10, it begins with OnDiagnose0 again. After activation, it is also started with OnDiagnose0 the first time the function is called.
OnProfileThis parameter is used for defining whether the diagnostics information delivered with OnProfile will be output in a file or the application window.
The following applies for the output to a file: The file is called OnDiagnoseX.txt and is located in the installation directory:
WinCC diagnosis6.3 ApDiag Menu Commands
WinCC: General information and installationSystem Manual, 06/2014, A5E34372689-AA 155
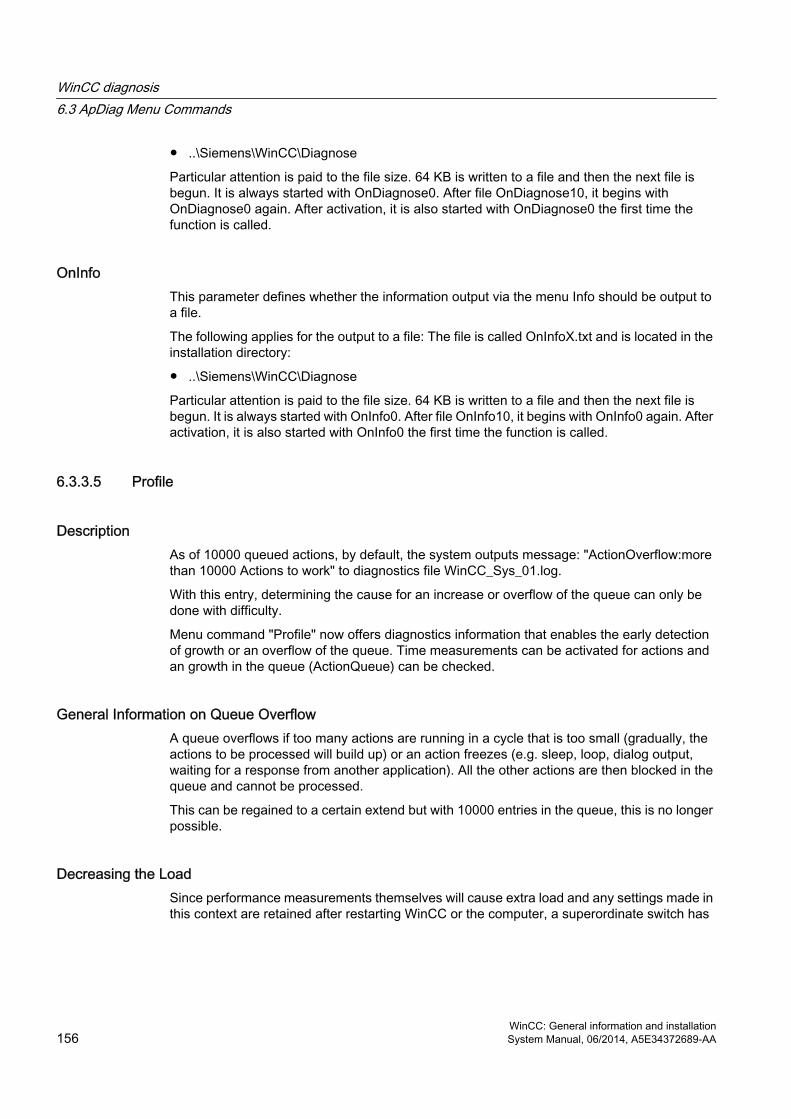
● ..\Siemens\WinCC\Diagnose
Particular attention is paid to the file size. 64 KB is written to a file and then the next file is begun. It is always started with OnDiagnose0. After file OnDiagnose10, it begins with OnDiagnose0 again. After activation, it is also started with OnDiagnose0 the first time the function is called.
OnInfoThis parameter defines whether the information output via the menu Info should be output to a file.
The following applies for the output to a file: The file is called OnInfoX.txt and is located in the installation directory:
● ..\Siemens\WinCC\Diagnose
Particular attention is paid to the file size. 64 KB is written to a file and then the next file is begun. It is always started with OnInfo0. After file OnInfo10, it begins with OnInfo0 again. After activation, it is also started with OnInfo0 the first time the function is called.
6.3.3.5 Profile
Description As of 10000 queued actions, by default, the system outputs message: "ActionOverflow:more than 10000 Actions to work" to diagnostics file WinCC_Sys_01.log.
With this entry, determining the cause for an increase or overflow of the queue can only be done with difficulty.
Menu command "Profile" now offers diagnostics information that enables the early detection of growth or an overflow of the queue. Time measurements can be activated for actions and an growth in the queue (ActionQueue) can be checked.
General Information on Queue OverflowA queue overflows if too many actions are running in a cycle that is too small (gradually, the actions to be processed will build up) or an action freezes (e.g. sleep, loop, dialog output, waiting for a response from another application). All the other actions are then blocked in the queue and cannot be processed.
This can be regained to a certain extend but with 10000 entries in the queue, this is no longer possible.
Decreasing the LoadSince performance measurements themselves will cause extra load and any settings made in this context are retained after restarting WinCC or the computer, a superordinate switch has
WinCC diagnosis6.3 ApDiag Menu Commands
WinCC: General information and installation156 System Manual, 06/2014, A5E34372689-AA
been integrated, which allows a quick overview to prevent any diagnostics measurements from remaining switched on.
Profile offThis option is superordinate and can be used to switch measurements off.
Profile onThis option is superordinate and can be used to switch measurements on. It is absolutely necessary to switch the switch and the desired information on to activate a measurement.
GeneralIf option "Call On Time for each Action" is activated, a time measurement is performed for every action that is executed and is output with standard function "On Time".
WinCC diagnosis6.3 ApDiag Menu Commands
WinCC: General information and installationSystem Manual, 06/2014, A5E34372689-AA 157

Example
CheckIf checkbox "Check wich Action need more than xx msec" is activated, the runtime for all actions that run longer than the defined time is output. This allows limiting the number of outputs and less load is created by the measurement itself (the function OnTime will not continue to cycle).
Example
Check the Request/ActionQueuesThis parameter allows recognition of slow growth in the queue, which would only lead to error message "more than 10000 Actions to Work" after several hours or days. Individual pictures can also be checked for correct action programming.
Value "ScanRate" can be used to define after which amount of new jobs that the length of the queue should be checked. If the queue has grown by more than the value defined with Gradient, a notice in the form of a printf is output.
If you enter e.g. with ScanRate "100" and Gradient "30", then after 100 new entries (actions) have been placed in the queue, a check is performed to determine whether the queue has grown by more than 30 entries (less than 70 processed from the 100 new jobs). If this is the case, the following diagnostics information is output in the form of a printf().
WinCC diagnosis6.3 ApDiag Menu Commands
WinCC: General information and installation158 System Manual, 06/2014, A5E34372689-AA
Example
6.3.3.6 FillTags
Description Using menu command "FillTags", saving important diagnostics values in tags can be switched on.
The diagnostics tags are created during the creation of a WinCC project and can be used as usual. Switching on and off is also possible with internal function FillDiagnoseInTags(). This function is described in the WinCC Help.
Note that writing the diagnostics values created more basic load. The runtime for each started action is lengthened since the diagnostics values also have to be written in the tags. This functionality should therefore be switched on for a short time only.
WinCC Diagnostics tags
@SCRIPT_COUNT_TAGS This tag contains the current number of tags requested via Script.
@SCRIPT_COUNT_REQUEST_IN_QUEUES This tag contains the current number of jobs.@SCRIPT_COUNT_ACTIONS_IN_QUEUES This tag contains the current number of actions
that exist for processing.
WinCC diagnosis6.3 ApDiag Menu Commands
WinCC: General information and installationSystem Manual, 06/2014, A5E34372689-AA 159
6.3.4 Output
6.3.4.1 Output On Screen
DescriptionUse menu command "Output On Screen" to open the diagnostics window.
The previously collected trace entries are output here. Unlike Output Window, the diagnostics window is only updated when opening and with the "Refresh" button. The contents are only deleted if Reset is actuated or the diagnostics buffer has been written full.
NoteSequence in the Diagnostics Buffer
The diagnostics buffer is a circulating buffer. The lowest entry is therefore not necessarily the oldest entry.
WinCC diagnosis6.3 ApDiag Menu Commands
WinCC: General information and installation160 System Manual, 06/2014, A5E34372689-AA
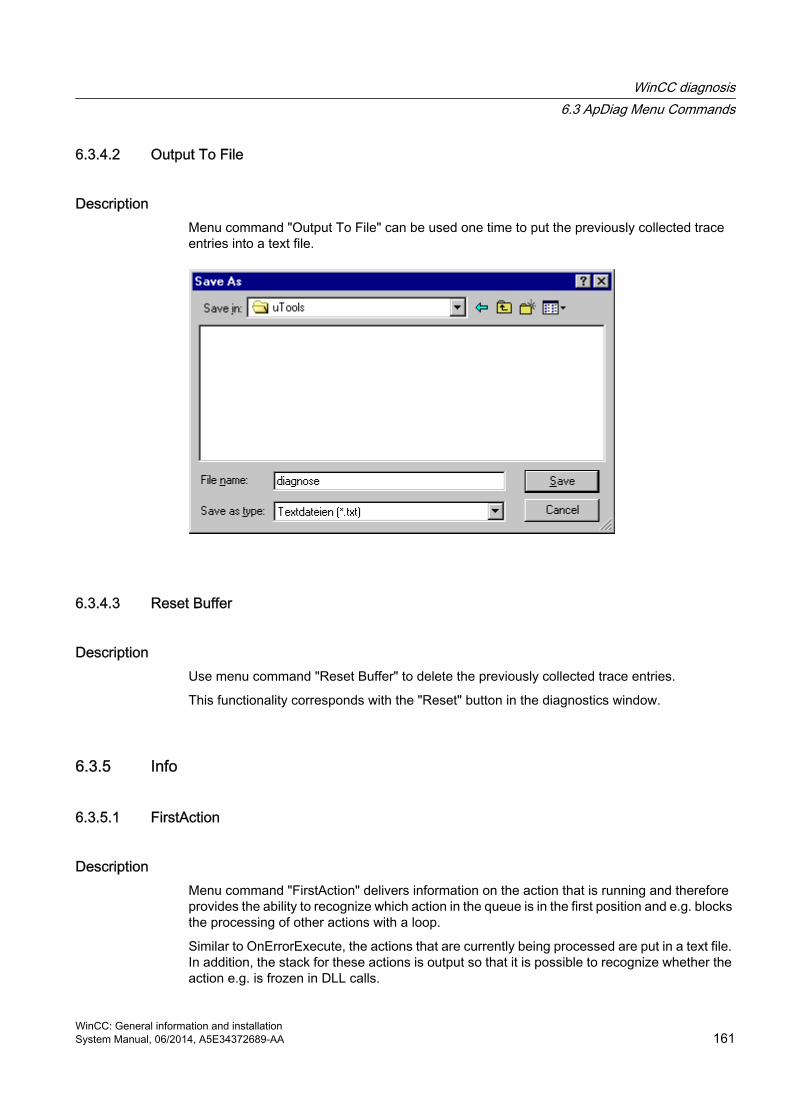
6.3.4.2 Output To File
DescriptionMenu command "Output To File" can be used one time to put the previously collected trace entries into a text file.
6.3.4.3 Reset Buffer
DescriptionUse menu command "Reset Buffer" to delete the previously collected trace entries.
This functionality corresponds with the "Reset" button in the diagnostics window.
6.3.5 Info
6.3.5.1 FirstAction
Description Menu command "FirstAction" delivers information on the action that is running and therefore provides the ability to recognize which action in the queue is in the first position and e.g. blocks the processing of other actions with a loop.
Similar to OnErrorExecute, the actions that are currently being processed are put in a text file. In addition, the stack for these actions is output so that it is possible to recognize whether the action e.g. is frozen in DLL calls.
WinCC diagnosis6.3 ApDiag Menu Commands
WinCC: General information and installationSystem Manual, 06/2014, A5E34372689-AA 161
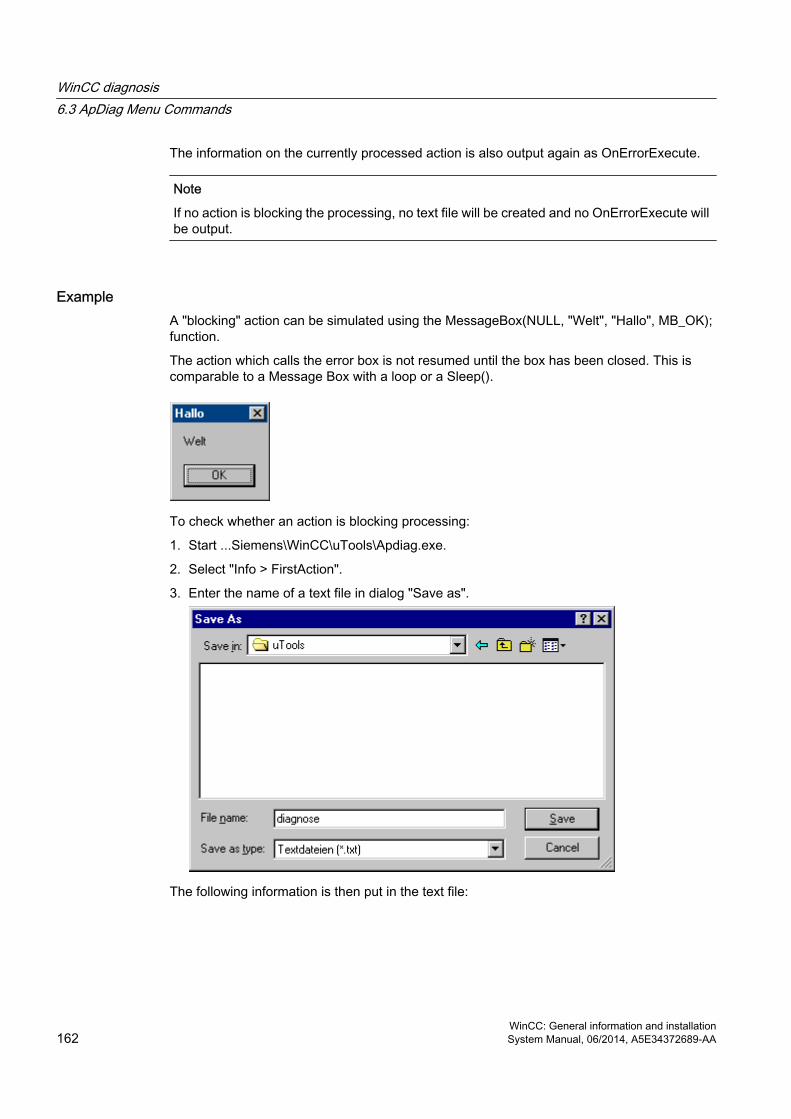
The information on the currently processed action is also output again as OnErrorExecute.
Note
If no action is blocking the processing, no text file will be created and no OnErrorExecute will be output.
ExampleA "blocking" action can be simulated using the MessageBox(NULL, "Welt", "Hallo", MB_OK); function.
The action which calls the error box is not resumed until the box has been closed. This is comparable to a Message Box with a loop or a Sleep().
To check whether an action is blocking processing:
1. Start ...Siemens\WinCC\uTools\Apdiag.exe.
2. Select "Info > FirstAction".
3. Enter the name of a text file in dialog "Save as".
The following information is then put in the text file:
WinCC diagnosis6.3 ApDiag Menu Commands
WinCC: General information and installation162 System Manual, 06/2014, A5E34372689-AA
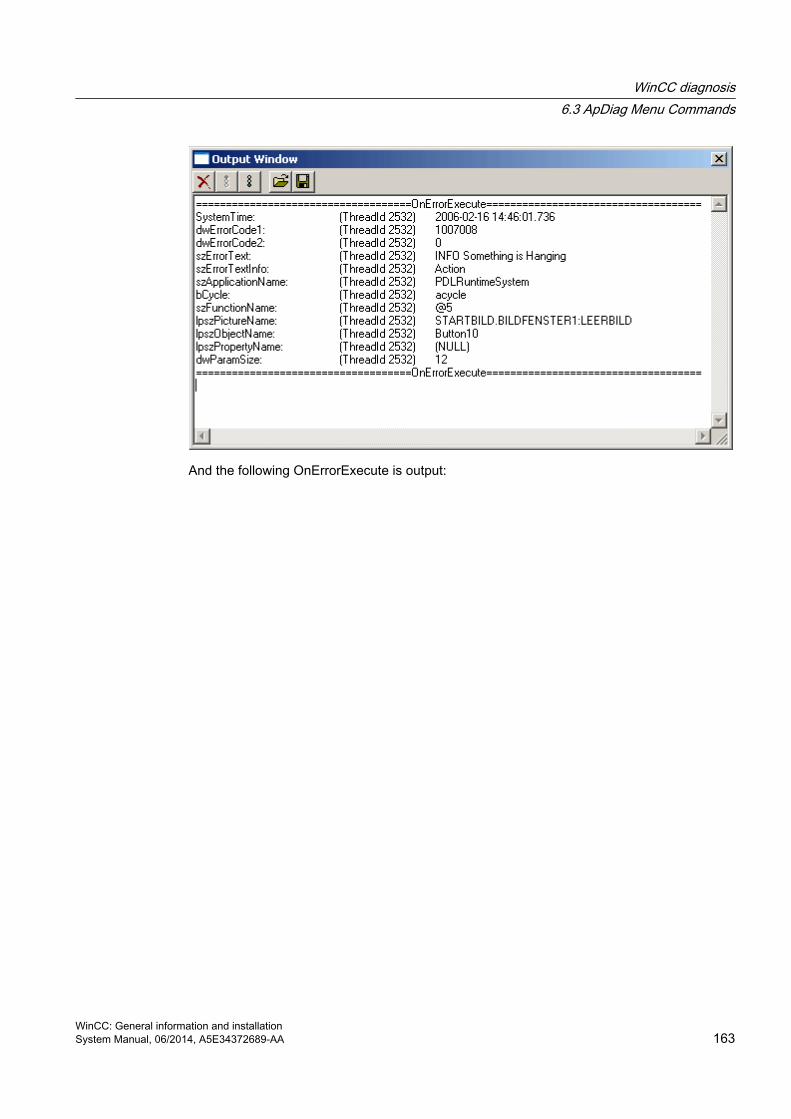
And the following OnErrorExecute is output:
WinCC diagnosis6.3 ApDiag Menu Commands
WinCC: General information and installationSystem Manual, 06/2014, A5E34372689-AA 163
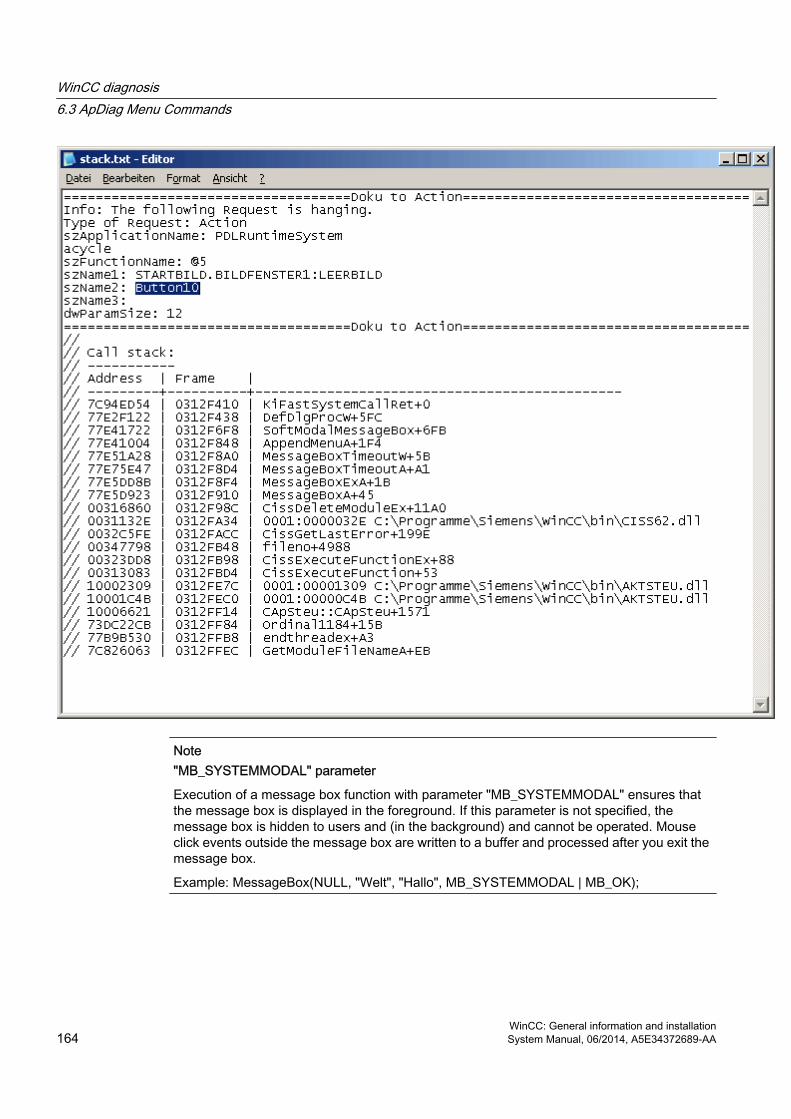
Note"MB_SYSTEMMODAL" parameter
Execution of a message box function with parameter "MB_SYSTEMMODAL" ensures that the message box is displayed in the foreground. If this parameter is not specified, the message box is hidden to users and (in the background) and cannot be operated. Mouse click events outside the message box are written to a buffer and processed after you exit the message box.
Example: MessageBox(NULL, "Welt", "Hallo", MB_SYSTEMMODAL | MB_OK);
WinCC diagnosis6.3 ApDiag Menu Commands
WinCC: General information and installation164 System Manual, 06/2014, A5E34372689-AA
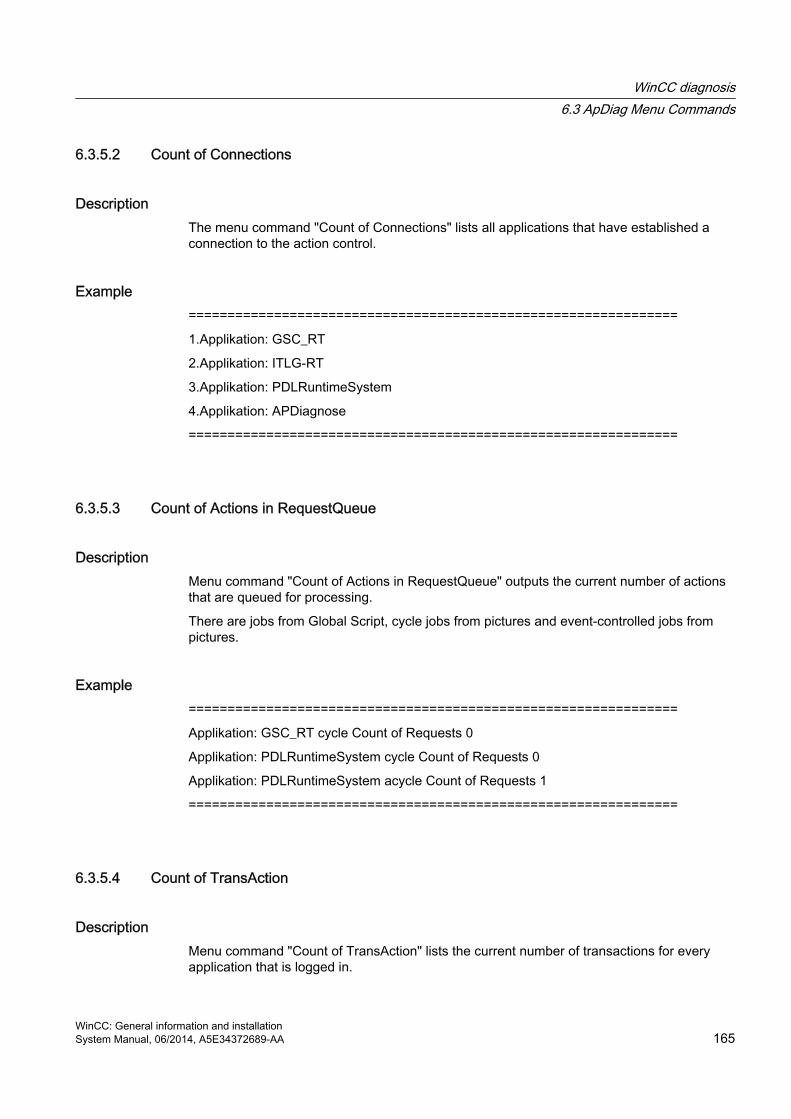
6.3.5.2 Count of Connections
DescriptionThe menu command "Count of Connections" lists all applications that have established a connection to the action control.
Example===============================================================
1.Applikation: GSC_RT
2.Applikation: ITLG-RT
3.Applikation: PDLRuntimeSystem
4.Applikation: APDiagnose
===============================================================
6.3.5.3 Count of Actions in RequestQueue
DescriptionMenu command "Count of Actions in RequestQueue" outputs the current number of actions that are queued for processing.
There are jobs from Global Script, cycle jobs from pictures and event-controlled jobs from pictures.
Example===============================================================
Applikation: GSC_RT cycle Count of Requests 0
Applikation: PDLRuntimeSystem cycle Count of Requests 0
Applikation: PDLRuntimeSystem acycle Count of Requests 1
===============================================================
6.3.5.4 Count of TransAction
DescriptionMenu command "Count of TransAction" lists the current number of transactions for every application that is logged in.
WinCC diagnosis6.3 ApDiag Menu Commands
WinCC: General information and installationSystem Manual, 06/2014, A5E34372689-AA 165

One transaction is established e.g. for every event-controlled action, for every picture window, which contains at least one cyclic action, and for global scripts.
Example===============================================================
1.Applikation: GSC_RT Count of Transactions 1
2.Applikation: ITLG-RT Count of Transactions 0
3.Applikation: PDLRuntimeSystem Count of Transactions 7
4.Applikation: APDiagnose Count of Transactions 0
===============================================================
6.3.5.5 Count of Actions of each Transaction
DescriptionMenu command "Count of Actions of each Transaction" lists the number of actions contained in the transactions.
The output is in the following form:
● Name of the Application
● Number of the Transaction
● Number of Actions
At the end of the list, the total sum of actions is output.
Example===============================================================
Info to Transaktions: Count of Action in Transaction
1.Applikation: GSC_RT Count of Actions in TransAction(0): 15
3.Applikation: PDLRuntimeSystem Count of Actions in TransAction(7): 1
3.Applikation: PDLRuntimeSystem Count of Actions in TransAction(6): 1
3.Applikation: PDLRuntimeSystem Count of Actions in TransAction(5): 1
3.Applikation: PDLRuntimeSystem Count of Actions in TransAction(3): 1
3.Applikation: PDLRuntimeSystem Count of Actions in TransAction(2): 1
3.Applikation: PDLRuntimeSystem Count of Actions in TransAction(0): 19
3.Applikation: PDLRuntimeSystem Count of Actions in TransAction(1): 1
Info to Transaktions: Count of Action in Transaction 40
===============================================================
WinCC diagnosis6.3 ApDiag Menu Commands
WinCC: General information and installation166 System Manual, 06/2014, A5E34372689-AA

6.3.5.6 Count of Tags in each Transaction
DescriptionMenu command "Count of Tags in each Transaction" lists the number of tags requested in the transactions.
The output is in the following form:
● Name of the Application
● Number of the Transaction
● Cycle time, with which the tags use for logging in
● Number of tags
At the end of the list, the total sum of tags requested in transactions is output.
The numerical value defined in Cycle corresponds with the following trigger:
0 Upon change1 250 ms2 500 ms3 1 s4 2 s5 5 s6 10 s7 1 min8 5 min9 10 min10 1 h11 - 15 User cycle 1 - 5
Example===============================================================
Info to Transaktions: Count of Tags in Transaction
1.Applikation: GSC_RT Count of Tags in TransAction(0) in Cycle 0: 1
1.Applikation: GSC_RT Count of Tags in TransAction(0) in Cycle 4: 6
3.Applikation: PDLRuntimeSystem Count of Tags in TransAction(0) in Cycle 2: 1
Info to Transaktions: Count of Tags in Transaction 8
===============================================================
WinCC diagnosis6.3 ApDiag Menu Commands
WinCC: General information and installationSystem Manual, 06/2014, A5E34372689-AA 167
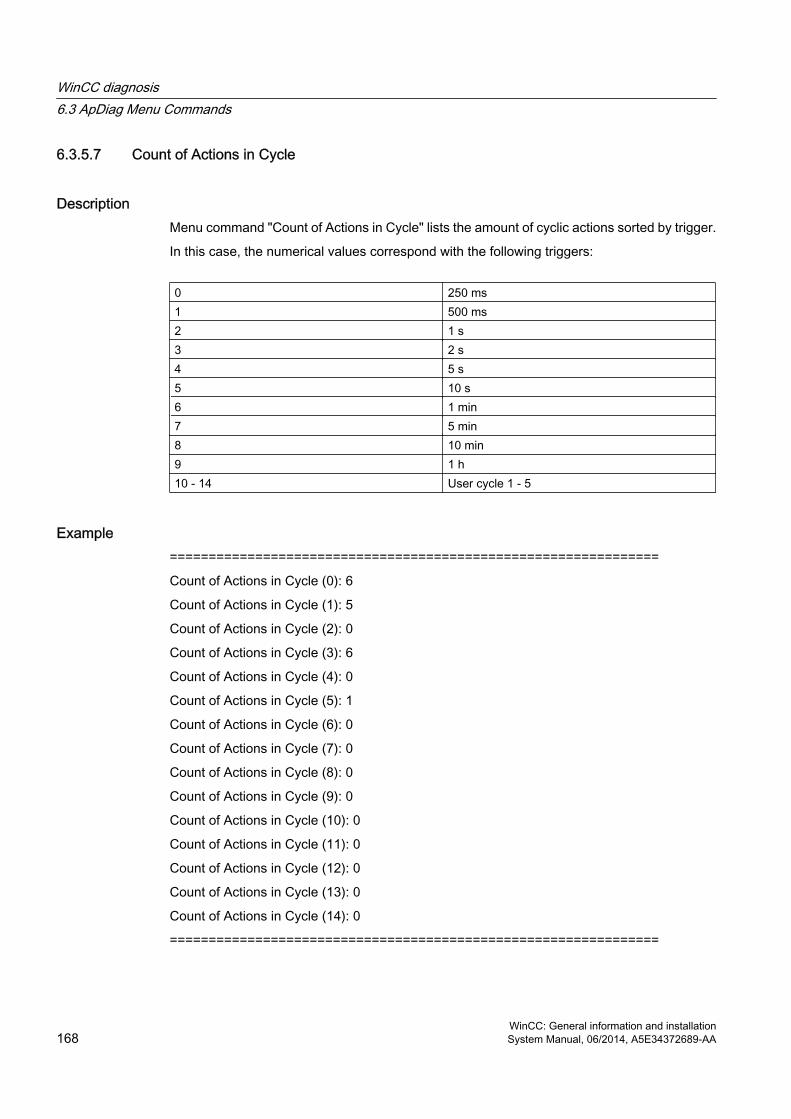
6.3.5.7 Count of Actions in Cycle
DescriptionMenu command "Count of Actions in Cycle" lists the amount of cyclic actions sorted by trigger.
In this case, the numerical values correspond with the following triggers:
0 250 ms1 500 ms2 1 s3 2 s4 5 s5 10 s6 1 min7 5 min8 10 min9 1 h10 - 14 User cycle 1 - 5
Example===============================================================
Count of Actions in Cycle (0): 6
Count of Actions in Cycle (1): 5
Count of Actions in Cycle (2): 0
Count of Actions in Cycle (3): 6
Count of Actions in Cycle (4): 0
Count of Actions in Cycle (5): 1
Count of Actions in Cycle (6): 0
Count of Actions in Cycle (7): 0
Count of Actions in Cycle (8): 0
Count of Actions in Cycle (9): 0
Count of Actions in Cycle (10): 0
Count of Actions in Cycle (11): 0
Count of Actions in Cycle (12): 0
Count of Actions in Cycle (13): 0
Count of Actions in Cycle (14): 0
===============================================================
WinCC diagnosis6.3 ApDiag Menu Commands
WinCC: General information and installation168 System Manual, 06/2014, A5E34372689-AA

6.3.5.8 Count of Functions
DescriptionMenu command "Count of Functions" provides the number of standard functions and project functions and lists the functions by name.
Example===============================================================Count of Functions 112FunctionName UTC PathName \\SERVER1\WinCC50_Project_GSLasttest\library\UTC.FctFunctionName WriteNow PathName \\SERVER1\WinCC50_Project_GSLasttest\library\WriteNow.Fct===============================================================
6.3.6 Trace Points - Change Level
Description The levels of certain trace points can be changed with this menu command.
If you expect e.g. only one certain trace point, you can set the respective level high and are no longer disrupted by a number of other trace points.
You can change the level by double clicking "Actual Level" for the desired trace point, setting the desired level in the dialog box and leaving the box with "OK".
The original level is set again with a reset.
WinCC diagnosis6.3 ApDiag Menu Commands
WinCC: General information and installationSystem Manual, 06/2014, A5E34372689-AA 169
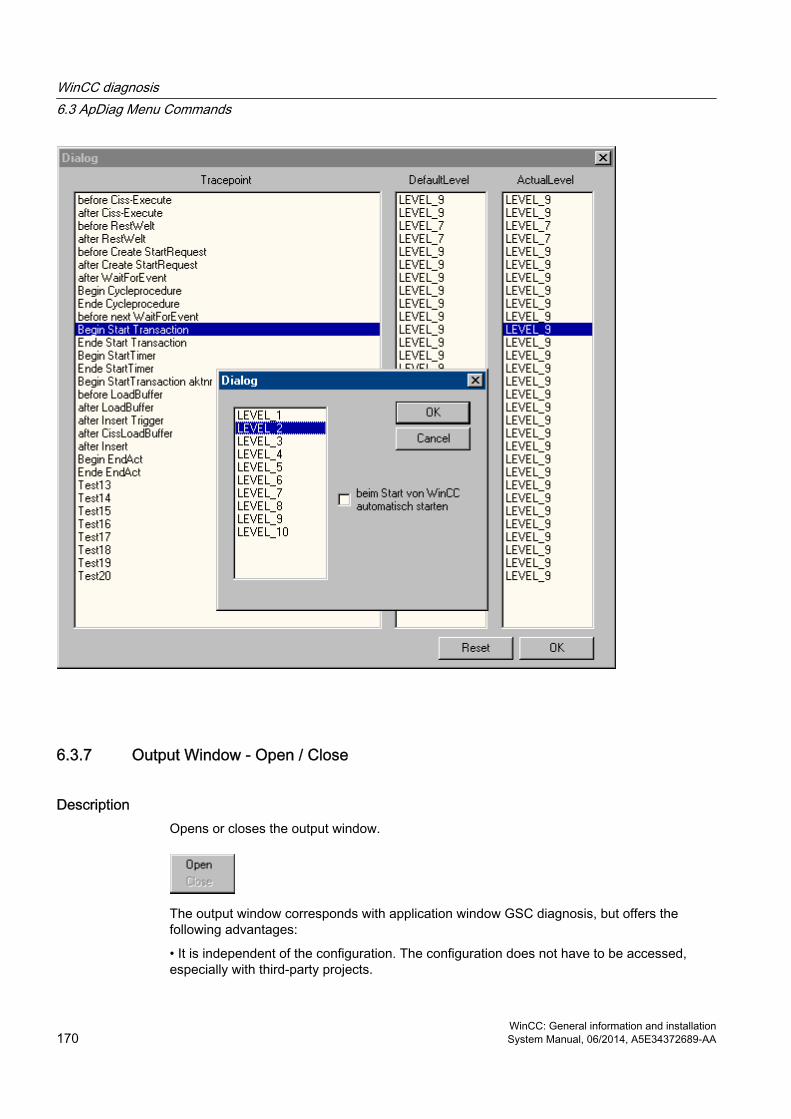
6.3.7 Output Window - Open / Close
Description Opens or closes the output window.
The output window corresponds with application window GSC diagnosis, but offers the following advantages:
• It is independent of the configuration. The configuration does not have to be accessed, especially with third-party projects.
WinCC diagnosis6.3 ApDiag Menu Commands
WinCC: General information and installation170 System Manual, 06/2014, A5E34372689-AA
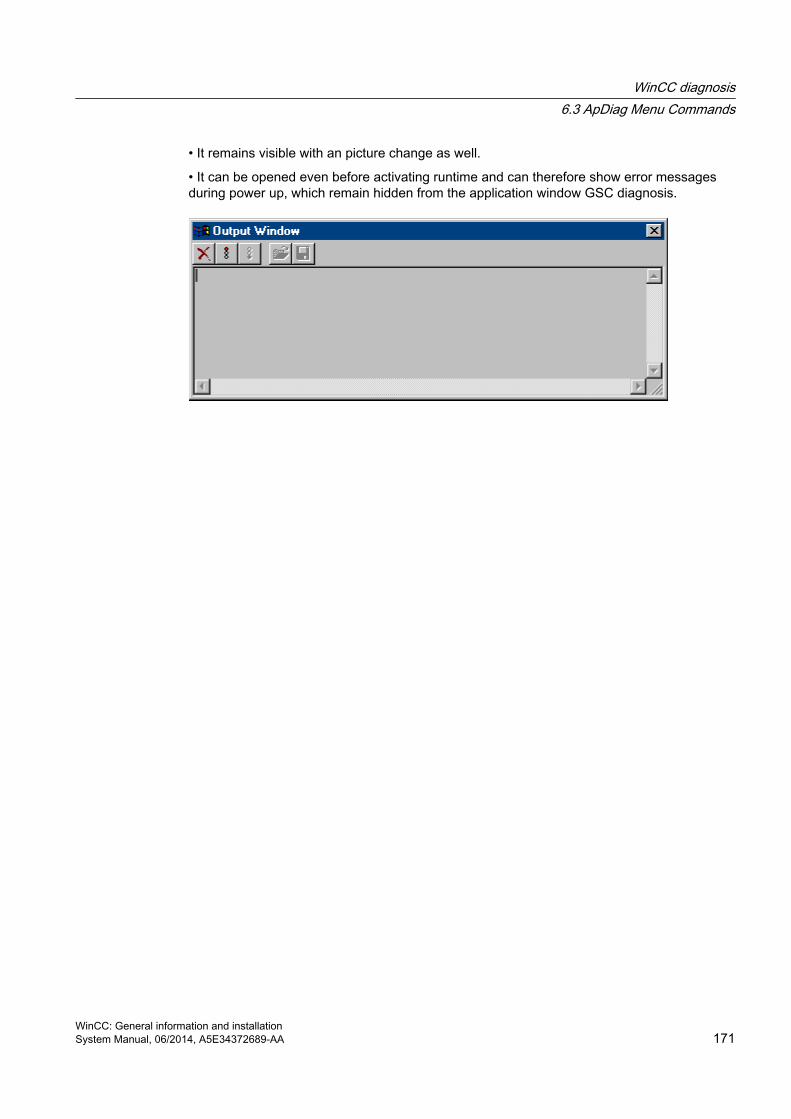
• It remains visible with an picture change as well.
• It can be opened even before activating runtime and can therefore show error messages during power up, which remain hidden from the application window GSC diagnosis.
WinCC diagnosis6.3 ApDiag Menu Commands
WinCC: General information and installationSystem Manual, 06/2014, A5E34372689-AA 171
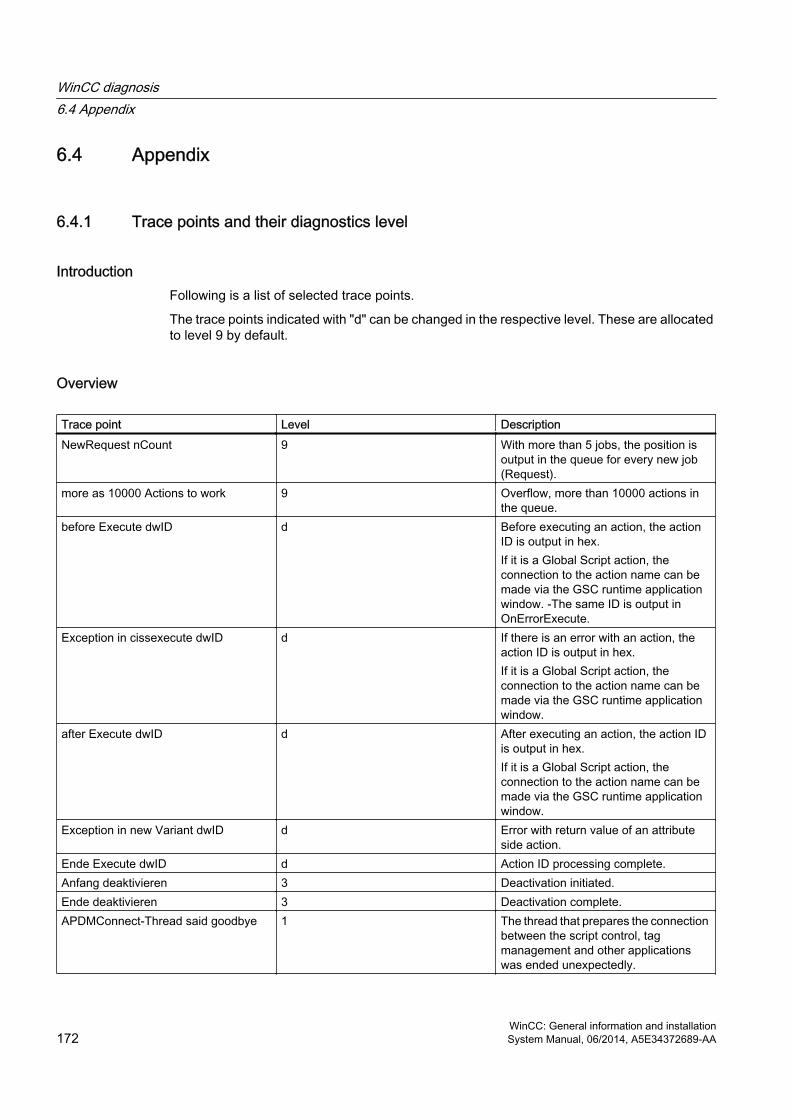
6.4 Appendix
6.4.1 Trace points and their diagnostics level
IntroductionFollowing is a list of selected trace points.
The trace points indicated with "d" can be changed in the respective level. These are allocated to level 9 by default.
Overview
Trace point Level DescriptionNewRequest nCount 9 With more than 5 jobs, the position is
output in the queue for every new job (Request).
more as 10000 Actions to work 9 Overflow, more than 10000 actions in the queue.
before Execute dwID d Before executing an action, the action ID is output in hex.If it is a Global Script action, the connection to the action name can be made via the GSC runtime application window. -The same ID is output in OnErrorExecute.
Exception in cissexecute dwID d If there is an error with an action, the action ID is output in hex.If it is a Global Script action, the connection to the action name can be made via the GSC runtime application window.
after Execute dwID d After executing an action, the action ID is output in hex.If it is a Global Script action, the connection to the action name can be made via the GSC runtime application window.
Exception in new Variant dwID d Error with return value of an attribute side action.
Ende Execute dwID d Action ID processing complete.Anfang deaktivieren 3 Deactivation initiated.Ende deaktivieren 3 Deactivation complete.APDMConnect-Thread said goodbye 1 The thread that prepares the connection
between the script control, tag management and other applications was ended unexpectedly.
WinCC diagnosis6.4 Appendix
WinCC: General information and installation172 System Manual, 06/2014, A5E34372689-AA

Trace point Level DescriptionBegin Start Transaction dwTransID: d A new transaction is logged in and the
transaction ID output.no PCode 3 A Global Script action or a function
contains no executable code (P-Code).Measures: Compile action or function.
Error in FunctionName 3 Incorrect function name.Function %s unknown. 3 Unknown functionwrong ReturnTyp 3 Return value type is invalid.Ende Start Transaction dwTransID: d Transaction logged in.Begin Start TransactionGTI dwTransID: d A transaction with cyclic actions or
Global Script actions is logged in.Begin EndAct d Transaction logging out initiated.Begin EndAct dwTransID: d Transaction numberEnde EndAct ok d Transaction logging out completed.Begin Compile 6 Compiler process initiated.projectpath: 6 Compiler: Aplib and Library directoryEnde Compile 6 Compiler process complete.printf aus Aktionen 3 Printf() outputsBegin Disconnect dwAppID: 6 An application logs out from the script
control.ChangeFct 6 Function was changed.LoadFct 6 Reloading a functionDirInfo.szProjectLibDir: 6 Project functions pathDirInfo.szGlobalLibDir: 6 Path of standard functions and internal
functionsm_szIncludepathProj: 6 Project path for a compiler include m_szIncludepath: 6 General path for a compiler include Thread said goodbye 1 A job thread has ended unexpectedly.Exception in Request 1 An error has occurred in a request.Timeout Variable ist nicht gekommen 1 Tag request was not answered within 10
seconds.
6.4.2 System messages
IntroductionThe following system messages are generated by the script controller and are entered in the Logfiles WinCC_SStart_xx.Log or WinCC_Sys_xx.Log.
WinCC diagnosis6.4 Appendix
WinCC: General information and installationSystem Manual, 06/2014, A5E34372689-AA 173
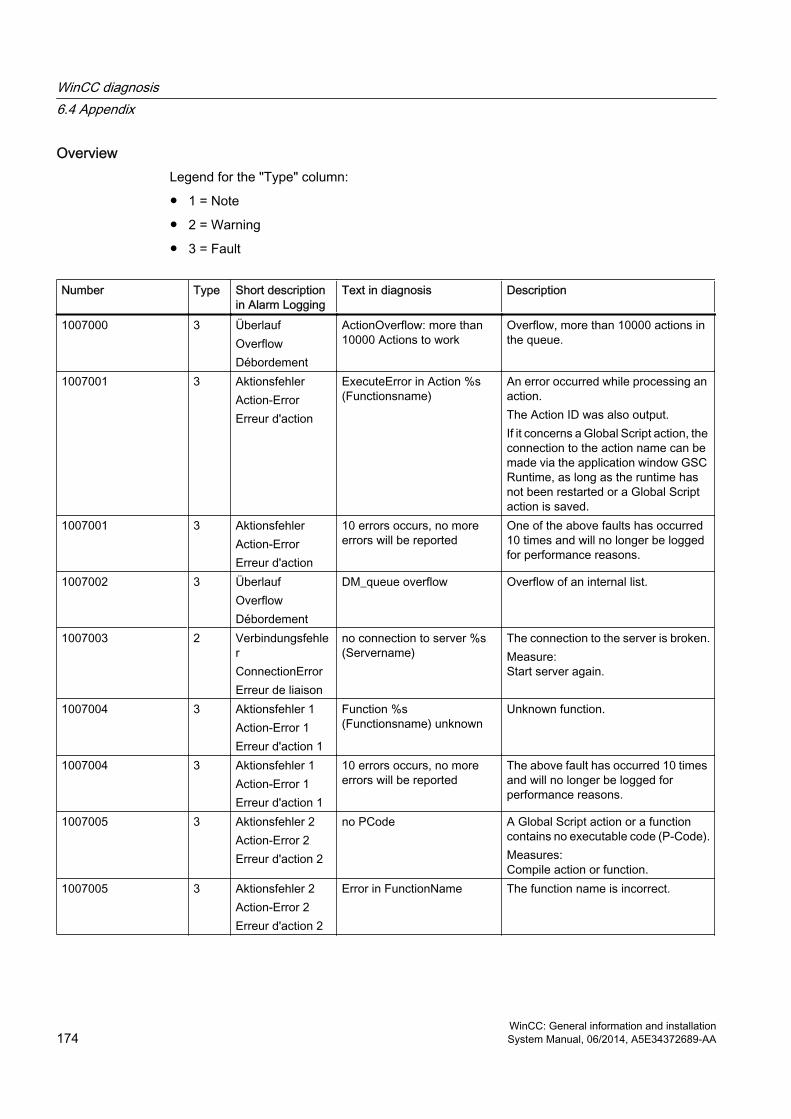
OverviewLegend for the "Type" column:
● 1 = Note
● 2 = Warning
● 3 = Fault
Number Type Short description in Alarm Logging
Text in diagnosis Description
1007000 3 ÜberlaufOverflowDébordement
ActionOverflow: more than 10000 Actions to work
Overflow, more than 10000 actions in the queue.
1007001 3 AktionsfehlerAction-ErrorErreur d'action
ExecuteError in Action %s (Functionsname)
An error occurred while processing an action.The Action ID was also output.If it concerns a Global Script action, the connection to the action name can be made via the application window GSC Runtime, as long as the runtime has not been restarted or a Global Script action is saved.
1007001 3 AktionsfehlerAction-ErrorErreur d'action
10 errors occurs, no more errors will be reported
One of the above faults has occurred 10 times and will no longer be logged for performance reasons.
1007002 3 ÜberlaufOverflowDébordement
DM_queue overflow Overflow of an internal list.
1007003 2 VerbindungsfehlerConnectionErrorErreur de liaison
no connection to server %s (Servername)
The connection to the server is broken.Measure:Start server again.
1007004 3 Aktionsfehler 1Action-Error 1Erreur d'action 1
Function %s (Functionsname) unknown
Unknown function.
1007004 3 Aktionsfehler 1Action-Error 1Erreur d'action 1
10 errors occurs, no more errors will be reported
The above fault has occurred 10 times and will no longer be logged for performance reasons.
1007005 3 Aktionsfehler 2Action-Error 2Erreur d'action 2
no PCode A Global Script action or a function contains no executable code (P-Code).Measures: Compile action or function.
1007005 3 Aktionsfehler 2Action-Error 2Erreur d'action 2
Error in FunctionName The function name is incorrect.
WinCC diagnosis6.4 Appendix
WinCC: General information and installation174 System Manual, 06/2014, A5E34372689-AA
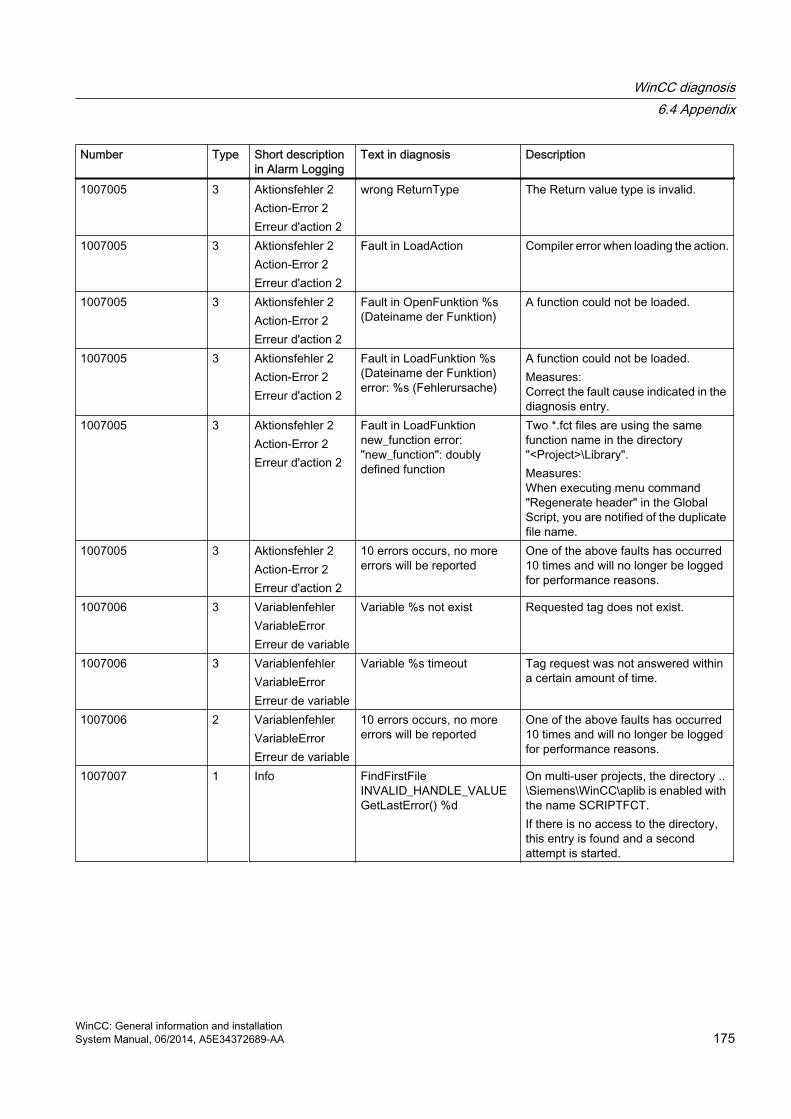
Number Type Short description in Alarm Logging
Text in diagnosis Description
1007005 3 Aktionsfehler 2Action-Error 2Erreur d'action 2
wrong ReturnType The Return value type is invalid.
1007005 3 Aktionsfehler 2Action-Error 2Erreur d'action 2
Fault in LoadAction Compiler error when loading the action.
1007005 3 Aktionsfehler 2Action-Error 2Erreur d'action 2
Fault in OpenFunktion %s (Dateiname der Funktion)
A function could not be loaded.
1007005 3 Aktionsfehler 2Action-Error 2Erreur d'action 2
Fault in LoadFunktion %s (Dateiname der Funktion) error: %s (Fehlerursache)
A function could not be loaded.Measures: Correct the fault cause indicated in the diagnosis entry.
1007005 3 Aktionsfehler 2Action-Error 2Erreur d'action 2
Fault in LoadFunktion new_function error: "new_function": doubly defined function
Two *.fct files are using the same function name in the directory "<Project>\Library". Measures: When executing menu command "Regenerate header" in the Global Script, you are notified of the duplicate file name.
1007005 3 Aktionsfehler 2Action-Error 2Erreur d'action 2
10 errors occurs, no more errors will be reported
One of the above faults has occurred 10 times and will no longer be logged for performance reasons.
1007006 3 VariablenfehlerVariableErrorErreur de variable
Variable %s not exist Requested tag does not exist.
1007006 3 VariablenfehlerVariableErrorErreur de variable
Variable %s timeout Tag request was not answered within a certain amount of time.
1007006 2 VariablenfehlerVariableErrorErreur de variable
10 errors occurs, no more errors will be reported
One of the above faults has occurred 10 times and will no longer be logged for performance reasons.
1007007 1 Info FindFirstFile INVALID_HANDLE_VALUE GetLastError() %d
On multi-user projects, the directory ..\Siemens\WinCC\aplib is enabled with the name SCRIPTFCT.If there is no access to the directory, this entry is found and a second attempt is started.
WinCC diagnosis6.4 Appendix
WinCC: General information and installationSystem Manual, 06/2014, A5E34372689-AA 175

Number Type Short description in Alarm Logging
Text in diagnosis Description
1007007 1 Info Alles vorbei INVALID_HANDLE_VALUE GetLastError() %d
The second access attempt failed. The SCRIPTFCT directory and the functions and header files contained within are not available.Possible causes:Network is faulty, no current ServicePack for NT or changed access authorization.
1007007 1 Info countall %d in szFolder %s Number of functions in one directory.1007007 1 Info before Read
StandardfunctionBefore reading the standard functions.
1007007 1 Info runtimeproject %s ok(getprojectdir) %d
Project path definition.
1007007 1 Info global %s szProjectLibDir %s The global path and the project path are output.
1007007 1 Info count StandardFunctions: %d Number of standard functions.1007007 1 Info count StandardFunctions
+ProjectFunctions: %dNumber of standard and project functions.
1007007 1 Info DM_NOTIFY_SHUTDOWN Request, to end runtime.1007007 1 Info RemoveClient A client has disabled the connection.1007007 1 Info InstallClient ok Communication Client/Server
disabled.1007007 1 Info InstallClient no ok A client was not able to establish
communication with the server.1007007 1 Info no client Client not logged in.1007007 1 Info vor share Multi-user project: Before enabling
directly ..\Siemens\WinCC\aplib.1007007 1 Info nach share Multi-user project: After enabling
directly ..\Siemens\WinCC\aplib.1007007 3 Aktionsfehler 2
Action-Error 2Erreur d'action 2
Deactivation : Action was stopped by script
An action was still running 50 s after ending runtime and was deactivated.
1007008 3 Aktionsfehler 2Action-Error 2Erreur d'action 2
EndAct Timeout An action was not able to log out within one minute and was therefore ended. Example: An action with a longer runtime was started and changed to another picture. The action will be ended after one minute.
1007009 3 Fehler im ThreadError in ThreadErreur en Thread
Thread said good-bye A job thread has ended unexpectedly.
1007009 3 Fehler im ThreadError in ThreadErreur en Thread
APDMConnect-Thread said good-bye
The thread that prepares the connection between the script control, tag management and other applications was ended unexpectedly.
WinCC diagnosis6.4 Appendix
WinCC: General information and installation176 System Manual, 06/2014, A5E34372689-AA

WinCC diagnosis6.4 Appendix
WinCC: General information and installationSystem Manual, 06/2014, A5E34372689-AA 177

Licensing 77.1 Software Has a Value
Usage AuthorizationWith the purchase of the WinCC software you obtain an unrestricted right to usage of the software. You are entitled to our warranty, our support and service.
The software is protected against unlawful use. The programs protected in such a manner can run only in an unrestricted manner when a valid license for the software package has been transferred to the hard disk of the corresponding computer.
Each installed software requires a valid license for unrestricted operation. Without a valid license, WinCC software can only be used in Demo mode.
See alsoBasic license types and license types in WinCC (Page 183)
Overview of the licensing (Page 180)
WinCC: General information and installationSystem Manual, 06/2014, A5E34372689-AA 179

7.2 Overview of the licensing
IntroductionWhen you purchase the WinCC Basic software package or a WinCC option you obtain license keys on a license data storage medium.
During the installation of WinCC the required license keys are copied to the hard disk of the computer and enable unrestricted use of the installed software.
Management of the license keysThe supplied program "Automation License Manager" is used to manage the license keys. It allows you to transfer a license key at a later time.
You can also install the Automation License Manager at a later time by means of the WinCC DVD and "Additional software" on a computer without WinCC, such as a license server.
Note
If you install the Automation License Manager as license server without WinCC, you also need to customize the firewall settings. At least "File and Printer Release" must be enabled in the firewall.
During first transmission of a license key, the Automation License Manager creates a directory "AX NF ZZ" on the hard disk. The directory has the "system" and "hidden" properties and is automatically deleted when the last license key is removed.
A copy protection prevents the copying of license keys to a license data storage medium or hard disk. Encryption technology and alteration of the physical file structure prevent the "functional" copying of a license key for a protected program.
NOTICE
You may not change the name and the properties of the directory "AX NF ZZ"
You may change neither the name nor the properties of the "AX NF ZZ" directory because the transferred license keys can be irretrievably lost.
While transferring a WinCC license to the hard disk, a cluster is marked as "defective". Do not attempt to restore this cluster.
Hence you must remove the license keys before each backup or exclude them from the backup.
Licensing7.2 Overview of the licensing
WinCC: General information and installation180 System Manual, 06/2014, A5E34372689-AA
RT and RC licensesWinCC differentiates between RT licenses (Runtime) and RC licenses (Runtime and Configuration) as well as the number of tags.
● RT licenses permit the operation of WinCC in Runtime for an unlimited period of time. The editors may only be used in demo mode for a limited period of time.
● RC licenses permit the operation of WinCC in Runtime for an unlimited period of time and during configuration.You can used RC licenses remotely. If an RC license is located on another computer, it can only be used for the configuration. If you want to use Runtime, you also need a local RT license.
● The number of external tags and archive tags permitted for configuration is indicated by the number in brackets, for example, "WinCC RC (65536)". With this license you can use up to 64*1024 external tags and up to 512 archive tags in Runtime. The system goes into demo mode if you activate a project where the number of external tags or archive tags exceeds the number of permitted tags. In this case the system behaves as if there were no licenses at all.
Note
On a WinCC client, the maximum number of external tags (256*1024) and archive tags is always permitted with an existing RT/RC license because the number of tags is only checked on a server.
Client licensing for "RT Client" and "RC Client"As of WinCC V7.0 SP3, new RT Client and RC Client licenses are available for client licensing.
You can use these licenses for both clients without a custom project as well as for clients with a custom project. Note the following:
● Microsoft SQL Express must be installed. If the SQL Standard Server is installed, the "RT Client" license causes display of a license message that requires acknowledgment.
● The database on the client can be a maximum of 2 GB in size.
● The SIMATIC Information Server requires the SQL Standard Server. This means the Information Server cannot be installed on the RT Client PC.
● The Client Upgrade package contains either only the RT Client upgrade or only the RC Client upgrade.SIMATIC NET and other options, for example WinCC/WebNavigator, are not included in this Client Upgrade package.
Archive licensesYou can cumulate archive licenses. If you transfer several single archive licenses locally on a computer, the permitted quantity for Runtime is the sum of the individual archive licenses.
Archive licenses basically belong to the "Floating" type; however, they always need to be transferred locally to the computer.
The following applies for the counting of the licenses for the archive:
Licensing7.2 Overview of the licensing
WinCC: General information and installationSystem Manual, 06/2014, A5E34372689-AA 181
● The tags for the process value archives are counted individually. The number of tags is checked in Runtime.
● The tags for the compressed archives are not included in the license count.
● A license is only required for Runtime for UserArchive.
PowerpackThe number of external tags (PowerTags) and archive tags (ArchiveTags) permitted for a WinCC software configuration can be upgraded with Powerpack:
● For the Powerpack of the PowerTags, there is the "WinCC RT (xxx) Powerpack" and "WinCC RC (xxx) Powerpack" package. If the permissible number of PowerTags is exceeded in Runtime, WinCC switches to demo mode.
● Upgrade license for ArchiveTagsA license to use 512 archive tags is included in the RT and RC licenses. If you want to use more than 512 archive tags in Runtime, you have to upgrade the system.
Note
The Powerpack is only used for the Upgrade procedure and cannot be used to operate the WinCC software.
You can only upgrade the system once with the License Key held on the license data carrier.
Avoiding errors when handling licensesYou have to remove all license keys on the hard disk before you:
● Use a hard disk optimization program that moves fixed blocks.
● Format, compress or restore the hard disk.
● Install a new operating system on the computer.
It is not possible to use compressed hard disks or disk drives.
If a backup contains copies of the license keys, you run the risk that the existing valid license keys are overwritten and therefore destroyed when you restore the backup files on the hard disk.
If you lose a license key, you can restore this license again. Additional information may be found under "How to Restore a License Key".
See alsoHow to Restore a License Key (Page 192)
Basic license types and license types in WinCC (Page 183)
Licensing7.2 Overview of the licensing
WinCC: General information and installation182 System Manual, 06/2014, A5E34372689-AA
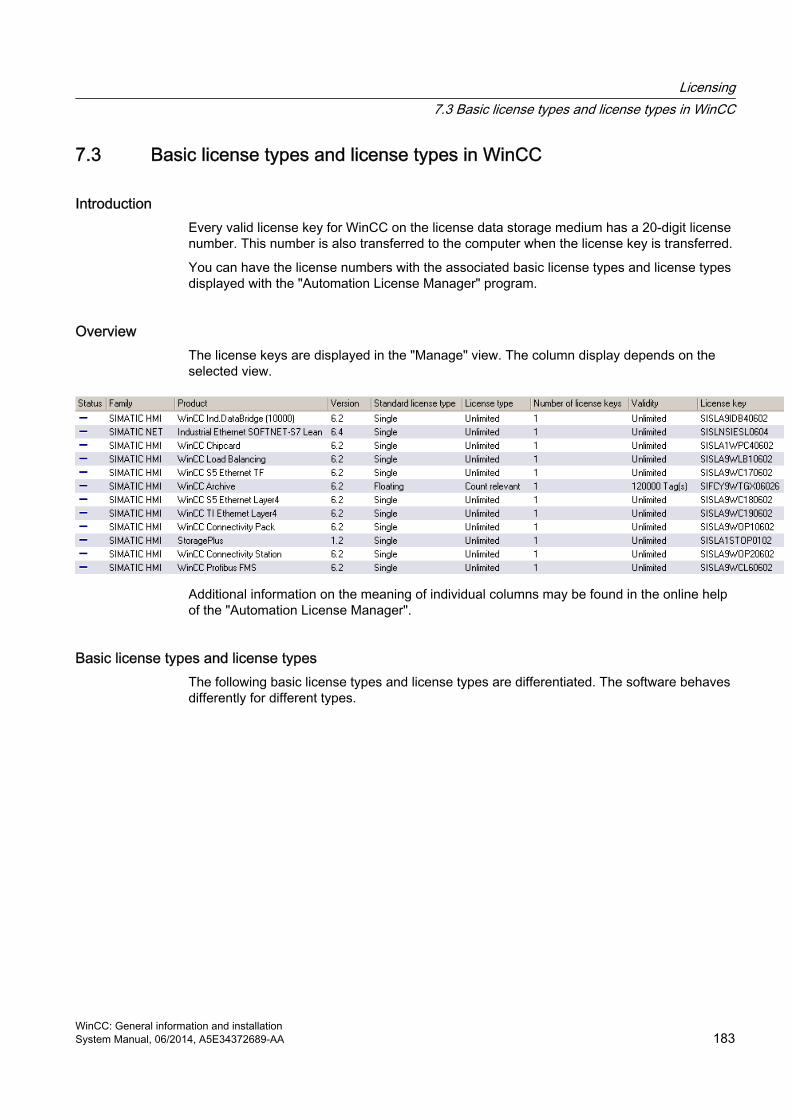
7.3 Basic license types and license types in WinCC
IntroductionEvery valid license key for WinCC on the license data storage medium has a 20-digit license number. This number is also transferred to the computer when the license key is transferred.
You can have the license numbers with the associated basic license types and license types displayed with the "Automation License Manager" program.
OverviewThe license keys are displayed in the "Manage" view. The column display depends on the selected view.
Additional information on the meaning of individual columns may be found in the online help of the "Automation License Manager".
Basic license types and license typesThe following basic license types and license types are differentiated. The software behaves differently for different types.
Licensing7.3 Basic license types and license types in WinCC
WinCC: General information and installationSystem Manual, 06/2014, A5E34372689-AA 183
Basic license types DescriptionSingle Standard license with no time restrictions; you can transfer it to any computer and only use it locally
there. The type of use is determined from the Certificate of License (CoL). Licenses of the type "Single" can be upgraded and identified with "SISL" in the license key.
Floating License with no time restrictions; you can transfer it to any computer and use it there. You can also obtain the license from a license server over the network. However, the license size cannot be selected. The first free license on the license server is assigned. You must therefore ensure that sufficient licenses of the "floating" type are available on the license server. Otherwise, the requesting computer is switched to demo mode. If a WinCC RC license is present locally and remotely, WinCC always uses the local license.Please refer to the Installation Notes of the SIMATIC Information Server for more information about particular features related to archive licenses.You must also note the following if you acquire the "floating" license via the network:● The Automation License Manager must be installed on the license server.● The license can only be used for configuration.● A WinCC RT license must be available locally on the computer for Runtime.● After disconnection, the program is restarted only after 3 hours in demo mode.Licenses of the "Floating" type can be upgraded and identified with "SIFL" in the license key.
Upgrade This license is used to convert the current version to a more recent version or to extend the number of licenses.The upgrade license contains all Runtime licenses including the following WinCC options:● WinCC/Connectivity Pack & WinCC/Connectivity Station● WinCC/DataMonitor● WinCC/Redundancy● WinCC/Server● WinCC/User Archives● WinCC/WebNavigatorExtension of the server-client configuration as of WinCC V6.0 SP4If you use at least WinCC V6.0 SP4 in your plant, you can also use Runtime licenses for WinCC V7.2 or later for additional WinCC clients. You need the Automation License Manager as of version V5.2 for this.Licenses of the "Upgrade" type are identified with "SIUP" or "SIPP" in the license key.
License Types DescriptionCount relevant With this license the use of the software is limited to the number of tags specified in the agreement.
Please refer the Installation Notes of the Information Server for more information about particular features related to the archive licenses.The Count Relevant License is labeled as "SIFC".
Rental With this license, software utilization is limited as follows: ● the number of operating hours stated in the contract● the number of days from the day of first use stated in the contract● the period until the expiry date stated in the contract● Use only on a local PC.The rental license is labeled with "SIRL".
Licensing7.3 Basic license types and license types in WinCC
WinCC: General information and installation184 System Manual, 06/2014, A5E34372689-AA

See alsoWinCC in the Demo Mode (Page 186)
How to Restore a License Key (Page 192)
Overview of the licensing (Page 180)
Licensing7.3 Basic license types and license types in WinCC
WinCC: General information and installationSystem Manual, 06/2014, A5E34372689-AA 185
7.4 WinCC in the Demo Mode
Introduction If a license is missing, WinCC runs in demo mode. This allows you to operate WinCC for testing and presentation purposes or for local configuration modifications if only one WinCC RT license is available.
OverviewIf WinCC RC licenses are missing, the WinCC Explorer and the editors are terminated after one hour in demo mode. You can use the editors and save the changes until demo mode expires.
If WinCC RT licenses are missing, a message which prompts you to acquire a valid license and has to be acknowledged is displayed when you start Runtime. This message is redisplayed every 10 minutes and must be acknowledged. If the message window is moved, the window reappears again, centered, after 30 minutes at the most. As long as you are in Runtime, WinCC Explorer is not terminated. On exiting from runtime, WinCC Explorer is also closed.
If the license keys for WinCC options in use or a channel DLL are missing, WinCC switches to demo mode, regardless of whether or not other license keys are available.
Note
When you subsequently transfer a license in the demo mode, it is effective only when you restart WinCC.
Even without a license, operational processing is fully functional without loss of data for archiving or message system.
Upgrading a WinCC demo version to the full versionYou can upgrade from a WinCC demo version to the full version. To do this, proceed as follows:
● Install the required licenses.
● Install the SQL Standard Server using the WinCC DVD.
Licensing7.4 WinCC in the Demo Mode
WinCC: General information and installation186 System Manual, 06/2014, A5E34372689-AA
7.5 How to manage licenses
Introduction You manage the WinCC licenses with the Automation License Manager.
You transfer licenses with the Automation License Manager:
● To use licenses on a computer with WinCC.
● To remove licenses from one computer so that the licenses can, for example, be used on another computer.
● To collect licenses on a drive so that the licenses of a WinCC software configuration can be transferred collectively.
For this purpose the licenses are activated or deactivated on a local drive and deactivated or activated on the license data storage medium.
Note
If several licenses are present, WinCC uses the license it finds first. In many cases, this license is not the most powerful license. This means you should ensure that only one license and not several licenses are transferred.
Requirement● Automation License Manager is installed.
● WinCC licenses or the license keys of other SIMATIC software can only be transferred using USB sticks or uncompressed hard disk drives.
● You cannot transfer licenses to RAM drives, disks or compressed hard disk drives. In the case of compressed drives you can, however, transfer the licenses to the corresponding host drive.
● The minimum amount of required space is 20 MB. You can transfer as many different licenses as you want if there is enough memory on the hard disk.
Transferring the licenses1. Connect the WinCC license data storage medium with the computer.
2. Open the Automation License Manager by using "Windows Start menu > All Programs > Siemens Automation".
3. Select the drive in the navigation window. The WinCC licenses on the license data storage medium are displayed.
4. Select a license from the table. You can select more than one license for transfer.
5. In the shortcut menu of the license select the entry "Transfer.." or drag and drop the licenses. The "Transfer License Key" dialog opens.
6. Select the destination drive and confirm your selection with "OK".
Licensing7.5 How to manage licenses
WinCC: General information and installationSystem Manual, 06/2014, A5E34372689-AA 187
7. The desired license is transferred and written to the destination drive in directory "AX NF ZZ".
8. If necessary, repeat the transfer of licenses from other license data storage media.
Removing the licenses1. Connect the WinCC license data storage medium with the computer.
2. Open the Automation License Manager by using "Windows Start menu > All Programs > Siemens Automation".
3. In the navigation window, select the drive where the license to be deleted is located. The WinCC licenses on the drive are displayed.
4. Select the required license in the table. You can also select multiple licenses for removing.
5. In the shortcut menu of this license select the entry "Transfer.." or drag and drop the licenses. The "Transfer License Key" dialog opens.
6. Select the license data storage medium as the destination drive and confirm your selection with "OK".
7. The desired license is transferred and written to the destination drive in directory "AX NF ZZ".
NOTICE
Write access to the license data storage medium
A write operation to the license data carrier is performed each time you transfer or remove a WinCC license.
For additional information on handling refer to the online help for the Automation License Manager.
Licensing7.5 How to manage licenses
WinCC: General information and installation188 System Manual, 06/2014, A5E34372689-AA
7.6 How to Upgrade Licenses
IntroductionYou upgrade the permitted number of external tags (PowerTags) and archive tags (ArchivTags) with the Automation License Manager.
Requirement● Automation License Manager is installed.
● WinCC RT/RC licenses to be upgraded or archive licenses to be upgraded exist on the computer.
● Powerpack license data carrier with upgrade license
Procedure1. Connect the Powerpack license data storage medium with the computer.
2. Open the Automation License Manager by using "Windows Start menu > All Programs > Siemens Automation".
3. In the navigation window, select the drive where the license to be upgraded is located.
4. Select this license from the table.
5. In the shortcut menu of the license, select the entry "License Key > Upgrade...". The upgrade process is started.
6. The upgrade process concludes with the transfer of the upgraded license to the local drive.
For additional information on handling refer to the online help for the Automation License Manager.
Licensing7.6 How to Upgrade Licenses
WinCC: General information and installationSystem Manual, 06/2014, A5E34372689-AA 189
7.7 Diagnostics of Licensing Problems
License Check If WinCC continues to switch to demo mode even though the licenses have been transferred, WinCC and the Automation License Manager offer a diagnostic function to check the licenses.
How to check the licenses using WinCC License Analysis 1. In the Windows start menu, select the "License Analysis" entry in the "SIMATIC > WinCC
> Tools" folder. WinCC License Analysis opens.
2. The window displays the installed licenses and the required licenses. Required licenses that are not installed or not adequately dimensioned are highlighted in red.
3. Click the "Update" button if you are installing licenses with the Automation License Manager while the license analysis is open.
How to check the licenses using the Automation License Manager 1. Open the Automation License Manager by using "Windows Start menu > All Programs >
Siemens Automation".
2. Select the "Management" view in the Automation License Manager.
3. Select the storage location of the license key in the navigation window. The available license keys are displayed.
Licensing7.7 Diagnostics of Licensing Problems
WinCC: General information and installation190 System Manual, 06/2014, A5E34372689-AA
4. Select the license key to be checked in the table.
5. Select the "Check" option from the shortcut menu. The license is checked and the result of the check is indicated in the table by means of a status icon.
The "License.Log" and "LicenseLog.xml" diagnostic files The "License.Log" and "LicenseLog.xml" diagnostic files display the licenses called by WinCC. If a license is missing, a corresponding entry is shown.
The files are located in the WinCC installation path in the "diagnose" folder that is automatically set up when WinCC is run for the first time.
Note
If the license for a WinCC option in use is missing, WinCC switches to demo mode.
See alsoWinCC in the Demo Mode (Page 186)
How to Restore a License Key (Page 192)
Licensing7.7 Diagnostics of Licensing Problems
WinCC: General information and installationSystem Manual, 06/2014, A5E34372689-AA 191
7.8 How to Restore a License Key
IntroductionA license key is defective if:
● The license on the hard disk can no longer be accessed.
● You can no longer remove the license in the Automation License Manager.
● The key disappears during the transfer to the license data storage medium.
The license key can be restored through the "Support for License Management".
To contact your local agent for "Automation & Drives", search our contact database on the Internet under:
● http://www.automation.siemens.com/partner/index.asp (http://www.automation.siemens.com/partner/index.asp)
PreparationsIf you contact "Support for License Management", please have the following information ready:
● Company data (Name, Address, Country, Telephone/Fax...)
● With regard to the license data storage medium: The item number of the product (e.g. "6AV..."), the product description in plain text, and the serial number (license number).
Procedure1. Open the Automation License Manager by using "Windows Start menu > All Programs >
Siemens Automation".
2. Select the "Management" view in the Automation License Manager. Switch to the view of the drive to which the license data carrier is linked.
3. From the table, select the license key to be restored. Select menu instruction "License Key" > "Restore". The "Restore License Key" dialog is opened.
4. Contact the "Support for License Management" and inform them of the product name, license number and the numerical inquiry code.
5. Customer Support gives you a numerical Enable Code. Enter this code in the entry field.
6. The lost license key is enabled once again on the license data storage medium (counter = 1).
7. Then transfer the license key to a local drive.
Note
For several lost license keys, this process must be repeated for the appropriate number of times.
Licensing7.8 How to Restore a License Key
WinCC: General information and installation192 System Manual, 06/2014, A5E34372689-AA
See alsoInternet: Contact person database (http://www.automation.siemens.com/partner/index.asp)
Licensing7.8 How to Restore a License Key
WinCC: General information and installationSystem Manual, 06/2014, A5E34372689-AA 193

Performance Data 88.1 Performance Data
ContentsThis chapter provides important technical data and performance limits on WinCC V7.
WinCC: General information and installationSystem Manual, 06/2014, A5E34372689-AA 195
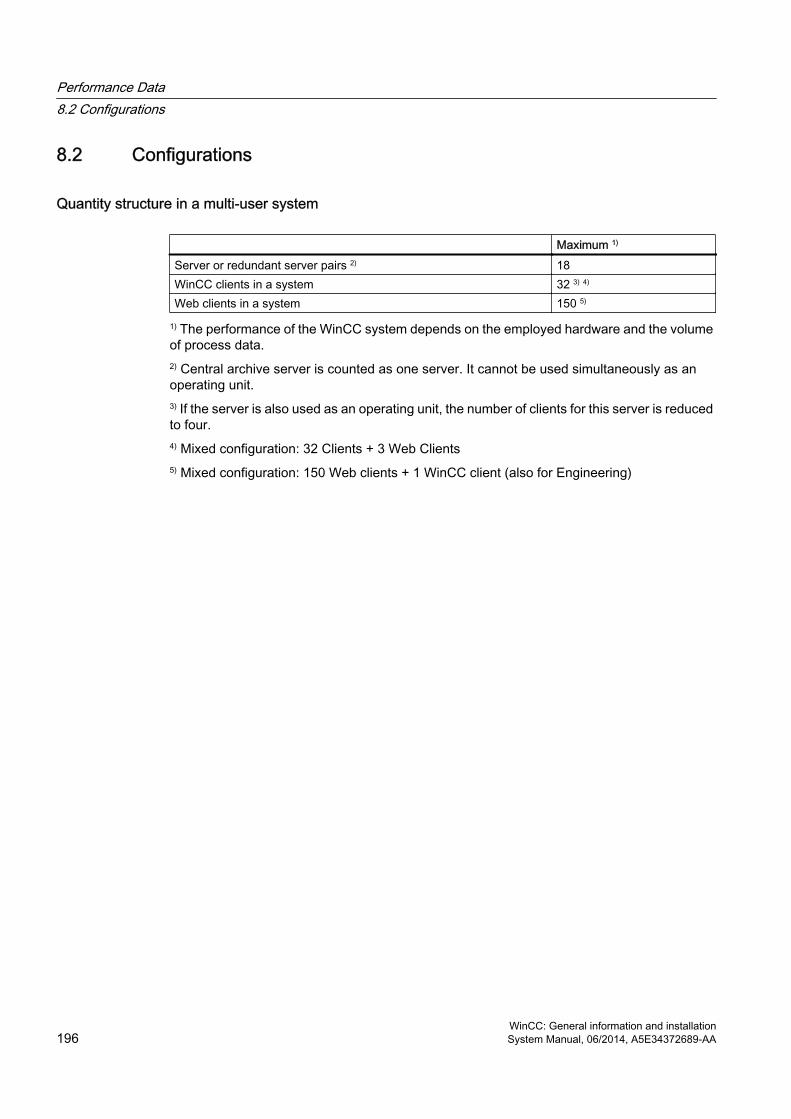
8.2 Configurations
Quantity structure in a multi-user system
Maximum 1)
Server or redundant server pairs 2) 18WinCC clients in a system 32 3) 4)
Web clients in a system 150 5)
1) The performance of the WinCC system depends on the employed hardware and the volume of process data.2) Central archive server is counted as one server. It cannot be used simultaneously as an operating unit.3) If the server is also used as an operating unit, the number of clients for this server is reduced to four.4) Mixed configuration: 32 Clients + 3 Web Clients5) Mixed configuration: 150 Web clients + 1 WinCC client (also for Engineering)
Performance Data8.2 Configurations
WinCC: General information and installation196 System Manual, 06/2014, A5E34372689-AA
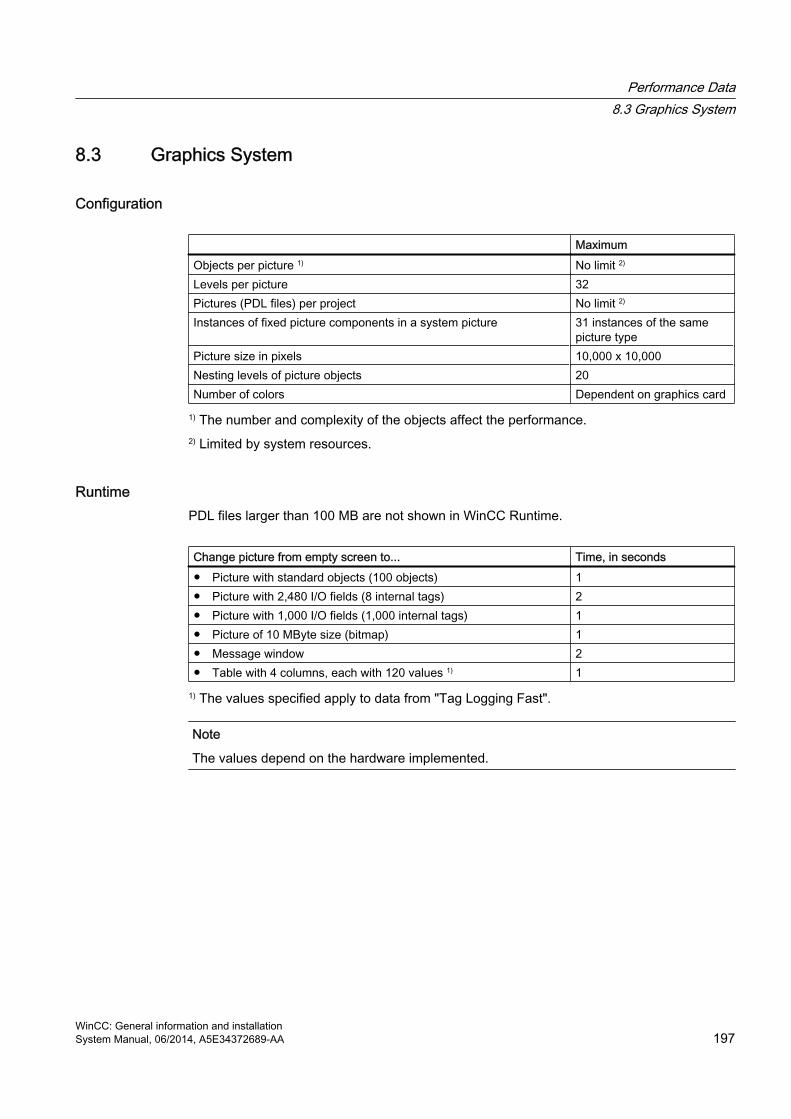
8.3 Graphics System
Configuration
MaximumObjects per picture 1) No limit 2)
Levels per picture 32Pictures (PDL files) per project No limit 2)
Instances of fixed picture components in a system picture 31 instances of the same picture type
Picture size in pixels 10,000 x 10,000Nesting levels of picture objects 20Number of colors Dependent on graphics card
1) The number and complexity of the objects affect the performance.2) Limited by system resources.
RuntimePDL files larger than 100 MB are not shown in WinCC Runtime.
Change picture from empty screen to... Time, in seconds● Picture with standard objects (100 objects) 1● Picture with 2,480 I/O fields (8 internal tags) 2● Picture with 1,000 I/O fields (1,000 internal tags) 1● Picture of 10 MByte size (bitmap) 1● Message window 2● Table with 4 columns, each with 120 values 1) 1
1) The values specified apply to data from "Tag Logging Fast".
Note
The values depend on the hardware implemented.
Performance Data8.3 Graphics System
WinCC: General information and installationSystem Manual, 06/2014, A5E34372689-AA 197
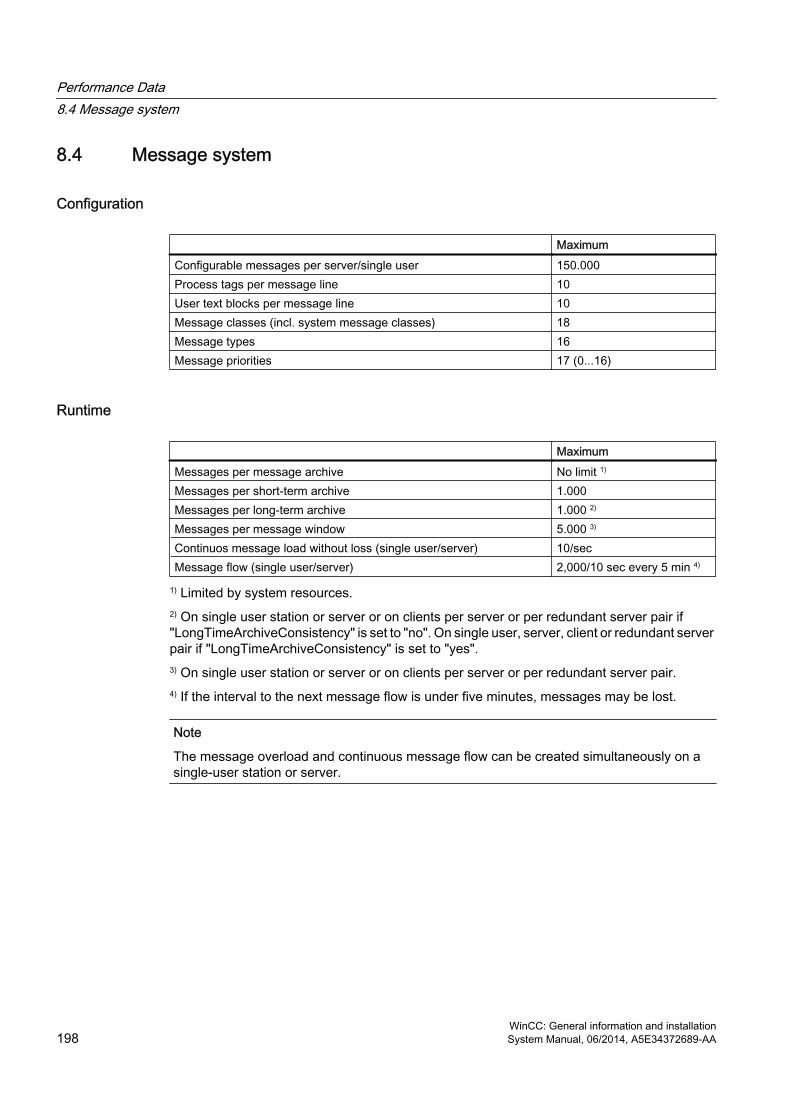
8.4 Message system
Configuration
MaximumConfigurable messages per server/single user 150.000Process tags per message line 10User text blocks per message line 10Message classes (incl. system message classes) 18Message types 16Message priorities 17 (0...16)
Runtime
MaximumMessages per message archive No limit 1)
Messages per short-term archive 1.000Messages per long-term archive 1.000 2)
Messages per message window 5.000 3)
Continuos message load without loss (single user/server) 10/secMessage flow (single user/server) 2,000/10 sec every 5 min 4)
1) Limited by system resources.2) On single user station or server or on clients per server or per redundant server pair if "LongTimeArchiveConsistency" is set to "no". On single user, server, client or redundant server pair if "LongTimeArchiveConsistency" is set to "yes".3) On single user station or server or on clients per server or per redundant server pair.4) If the interval to the next message flow is under five minutes, messages may be lost.
Note
The message overload and continuous message flow can be created simultaneously on a single-user station or server.
Performance Data8.4 Message system
WinCC: General information and installation198 System Manual, 06/2014, A5E34372689-AA
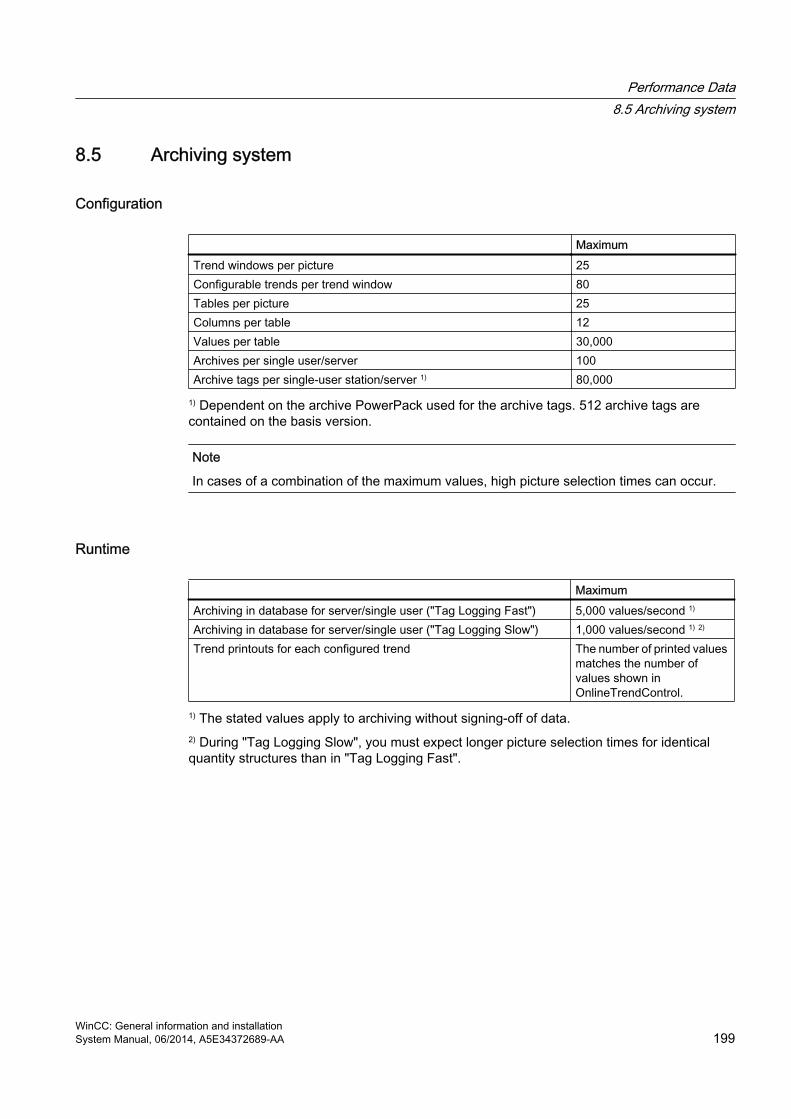
8.5 Archiving system
Configuration
MaximumTrend windows per picture 25Configurable trends per trend window 80Tables per picture 25Columns per table 12Values per table 30,000Archives per single user/server 100Archive tags per single-user station/server 1) 80,000
1) Dependent on the archive PowerPack used for the archive tags. 512 archive tags are contained on the basis version.
Note
In cases of a combination of the maximum values, high picture selection times can occur.
Runtime
MaximumArchiving in database for server/single user ("Tag Logging Fast") 5,000 values/second 1)
Archiving in database for server/single user ("Tag Logging Slow") 1,000 values/second 1) 2)
Trend printouts for each configured trend The number of printed values matches the number of values shown in OnlineTrendControl.
1) The stated values apply to archiving without signing-off of data.2) During "Tag Logging Slow", you must expect longer picture selection times for identical quantity structures than in "Tag Logging Fast".
Performance Data8.5 Archiving system
WinCC: General information and installationSystem Manual, 06/2014, A5E34372689-AA 199
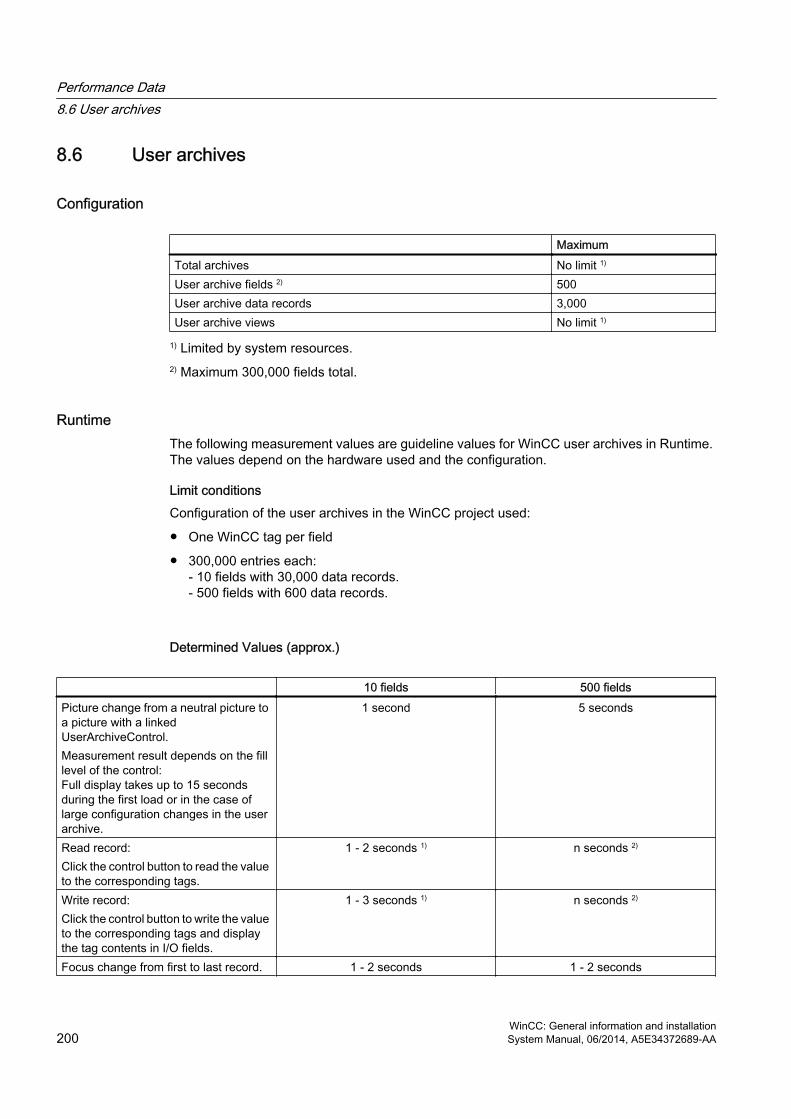
8.6 User archives
Configuration
MaximumTotal archives No limit 1)
User archive fields 2) 500User archive data records 3,000User archive views No limit 1)
1) Limited by system resources.2) Maximum 300,000 fields total.
RuntimeThe following measurement values are guideline values for WinCC user archives in Runtime. The values depend on the hardware used and the configuration.
Limit conditionsConfiguration of the user archives in the WinCC project used:
● One WinCC tag per field
● 300,000 entries each: - 10 fields with 30,000 data records. - 500 fields with 600 data records.
Determined Values (approx.)
10 fields 500 fieldsPicture change from a neutral picture to a picture with a linked UserArchiveControl.Measurement result depends on the fill level of the control: Full display takes up to 15 seconds during the first load or in the case of large configuration changes in the user archive.
1 second 5 seconds
Read record:Click the control button to read the value to the corresponding tags.
1 - 2 seconds 1) n seconds 2)
Write record: Click the control button to write the value to the corresponding tags and display the tag contents in I/O fields.
1 - 3 seconds 1) n seconds 2)
Focus change from first to last record. 1 - 2 seconds 1 - 2 seconds
Performance Data8.6 User archives
WinCC: General information and installation200 System Manual, 06/2014, A5E34372689-AA

1) 10 fields with a total of 10 tags.2) 500 fields with a total of 500 tags.
Performance Data8.6 User archives
WinCC: General information and installationSystem Manual, 06/2014, A5E34372689-AA 201

8.7 Reports
Configuring
MaximumConfigurable logs No limit 1)
Log lines per body 66Tags per log 2) 300
1) Limited by system resources.2) The number of tags per log is dependent on the performance of the process communication.
Runtime
MaximumSimultaneously running message sequence reports per server/client 1Simultaneously running message sequence reports 3
Performance Data8.7 Reports
WinCC: General information and installation202 System Manual, 06/2014, A5E34372689-AA
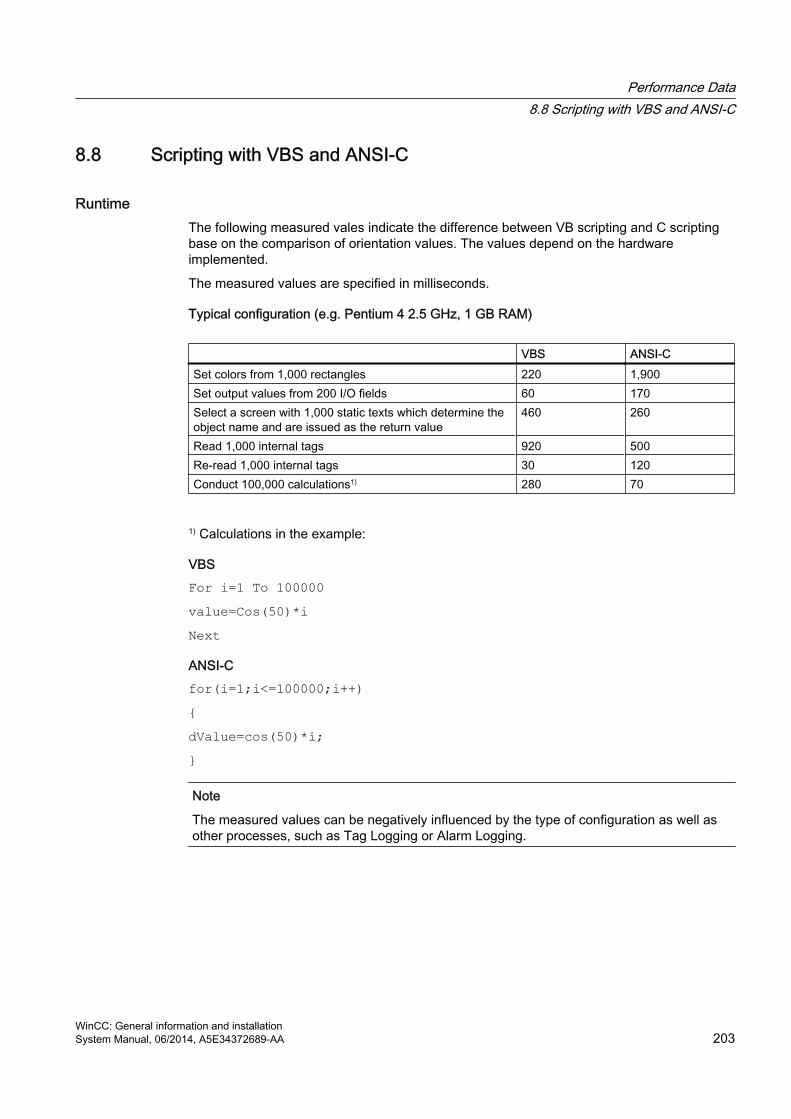
8.8 Scripting with VBS and ANSI-C
RuntimeThe following measured vales indicate the difference between VB scripting and C scripting base on the comparison of orientation values. The values depend on the hardware implemented.
The measured values are specified in milliseconds.
Typical configuration (e.g. Pentium 4 2.5 GHz, 1 GB RAM)
VBS ANSI-CSet colors from 1,000 rectangles 220 1,900Set output values from 200 I/O fields 60 170Select a screen with 1,000 static texts which determine the object name and are issued as the return value
460 260
Read 1,000 internal tags 920 500Re-read 1,000 internal tags 30 120Conduct 100,000 calculations1) 280 70
1) Calculations in the example:
VBSFor i=1 To 100000value=Cos(50)*iNext
ANSI-Cfor(i=1;i<=100000;i++){dValue=cos(50)*i;}
Note
The measured values can be negatively influenced by the type of configuration as well as other processes, such as Tag Logging or Alarm Logging.
Performance Data8.8 Scripting with VBS and ANSI-C
WinCC: General information and installationSystem Manual, 06/2014, A5E34372689-AA 203
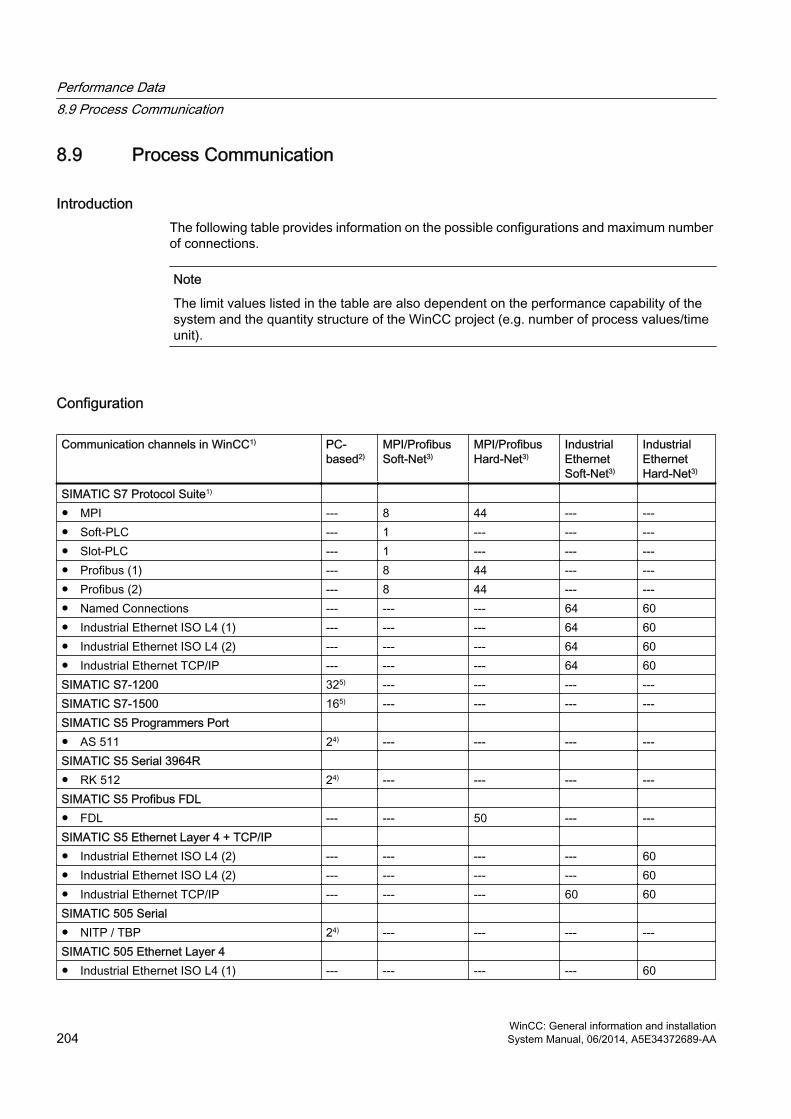
8.9 Process Communication
IntroductionThe following table provides information on the possible configurations and maximum number of connections.
Note
The limit values listed in the table are also dependent on the performance capability of the system and the quantity structure of the WinCC project (e.g. number of process values/time unit).
Configuration
Communication channels in WinCC1) PC-based2)
MPI/ProfibusSoft-Net3)
MPI/ProfibusHard-Net3)
Industrial EthernetSoft-Net3)
Industrial EthernetHard-Net3)
SIMATIC S7 Protocol Suite1) ● MPI --- 8 44 --- ---● Soft-PLC --- 1 --- --- ---● Slot-PLC --- 1 --- --- ---● Profibus (1) --- 8 44 --- ---● Profibus (2) --- 8 44 --- ---● Named Connections --- --- --- 64 60● Industrial Ethernet ISO L4 (1) --- --- --- 64 60● Industrial Ethernet ISO L4 (2) --- --- --- 64 60● Industrial Ethernet TCP/IP --- --- --- 64 60SIMATIC S7-1200 325) --- --- --- ---SIMATIC S7-1500 165) --- --- --- ---SIMATIC S5 Programmers Port ● AS 511 24) --- --- --- ---SIMATIC S5 Serial 3964R ● RK 512 24) --- --- --- ---SIMATIC S5 Profibus FDL ● FDL --- --- 50 --- ---SIMATIC S5 Ethernet Layer 4 + TCP/IP ● Industrial Ethernet ISO L4 (2) --- --- --- --- 60● Industrial Ethernet ISO L4 (2) --- --- --- --- 60● Industrial Ethernet TCP/IP --- --- --- 60 60SIMATIC 505 Serial ● NITP / TBP 24) --- --- --- ---SIMATIC 505 Ethernet Layer 4 ● Industrial Ethernet ISO L4 (1) --- --- --- --- 60
Performance Data8.9 Process Communication
WinCC: General information and installation204 System Manual, 06/2014, A5E34372689-AA
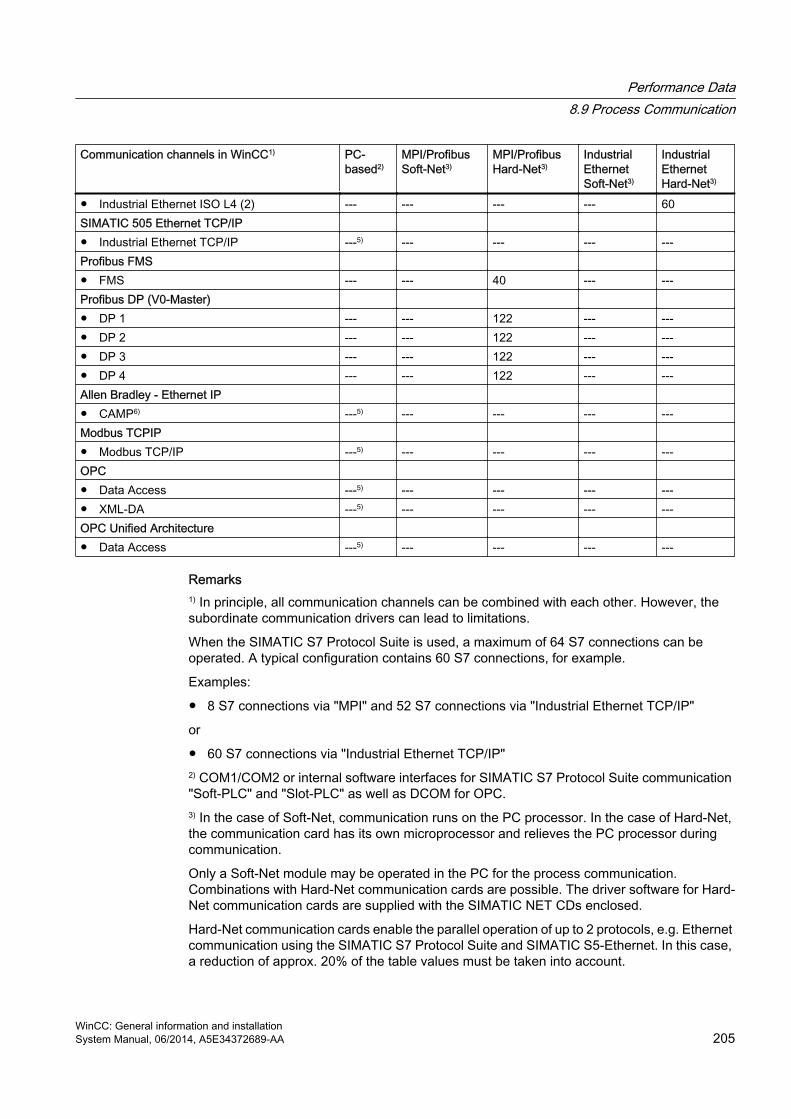
Communication channels in WinCC1) PC-based2)
MPI/ProfibusSoft-Net3)
MPI/ProfibusHard-Net3)
Industrial EthernetSoft-Net3)
Industrial EthernetHard-Net3)
● Industrial Ethernet ISO L4 (2) --- --- --- --- 60SIMATIC 505 Ethernet TCP/IP ● Industrial Ethernet TCP/IP ---5) --- --- --- ---Profibus FMS ● FMS --- --- 40 --- ---Profibus DP (V0-Master) ● DP 1 --- --- 122 --- ---● DP 2 --- --- 122 --- ---● DP 3 --- --- 122 --- ---● DP 4 --- --- 122 --- ---Allen Bradley - Ethernet IP ● CAMP6) ---5) --- --- --- ---Modbus TCPIP ● Modbus TCP/IP ---5) --- --- --- ---OPC ● Data Access ---5) --- --- --- ---● XML-DA ---5) --- --- --- ---OPC Unified Architecture ● Data Access ---5) --- --- --- ---
Remarks1) In principle, all communication channels can be combined with each other. However, the subordinate communication drivers can lead to limitations.
When the SIMATIC S7 Protocol Suite is used, a maximum of 64 S7 connections can be operated. A typical configuration contains 60 S7 connections, for example.
Examples:
● 8 S7 connections via "MPI" and 52 S7 connections via "Industrial Ethernet TCP/IP"
or
● 60 S7 connections via "Industrial Ethernet TCP/IP"2) COM1/COM2 or internal software interfaces for SIMATIC S7 Protocol Suite communication "Soft-PLC" and "Slot-PLC" as well as DCOM for OPC.3) In the case of Soft-Net, communication runs on the PC processor. In the case of Hard-Net, the communication card has its own microprocessor and relieves the PC processor during communication.
Only a Soft-Net module may be operated in the PC for the process communication. Combinations with Hard-Net communication cards are possible. The driver software for Hard-Net communication cards are supplied with the SIMATIC NET CDs enclosed.
Hard-Net communication cards enable the parallel operation of up to 2 protocols, e.g. Ethernet communication using the SIMATIC S7 Protocol Suite and SIMATIC S5-Ethernet. In this case, a reduction of approx. 20% of the table values must be taken into account.
Performance Data8.9 Process Communication
WinCC: General information and installationSystem Manual, 06/2014, A5E34372689-AA 205
Example:
● 40 connections using the "SIMATIC S7 Protocol Suite" combination and 8 connections via "SIMATIC S5 Ethernet".
4) Depending on the number of serial interfaces. Can be expanded using communication cards with several serial interfaces, e.g. Digi-Board with 8/16 ports.5) Communication is routed via the standard Ethernet port of the computer.
The maximum number of connections is restricted by the available system resources and their performance data, particularly in terms of the CPU, RAM and the Ethernet connection.6) CAMP = Common ASCII Message Protocol
Performance Data8.9 Process Communication
WinCC: General information and installation206 System Manual, 06/2014, A5E34372689-AA
Index
Error report , (See support)
AAccess right, 38, 41, 42, 63ActiveX controls, 82Adjust Button Size To Picture, 140Alarm Logging, 93
Loop in Alarm, 82ANSI-C, 203
Performance, 203ApDiag, 147, 148
Diagnostics, 149, 151, 152, 153, 156, 159Diagnostics level, 151, 169, 172Diagnostics tag, 159Info, 150, 161, 165, 166, 167, 168, 169Menu bar, 149Output, 150, 160, 161Output window, 170Profile, 156System messages, 173Text file, 153Trace points, 151, 169, 172
Appearance, 140Archive, 199
Quantity structure, 199Archive configuration, 84Archive system, 79
Performance data, 81Archive tag, 84Archiving, 199
Quantity structure, 199Area names in distributed systems, 93Automation License Manager, 180Autosize, 140
BBasic Color Palette, 141Browsing, 144
CCaption, 140
CASMigration to Process Historian, 116
Channel, 204Quantity structure, 204
Client, 124, 196Migration, 124Number of servers, 196Operating system, 32Remote access, 80
Client without its own projectOperation with several Windows users, 79
Cluster, 71Color, 141Color palette, 69
Changing, 69Communication, 204
Quantity structure, 204Communication drivers, 22, 32Communication process, 88
Diagnostics data, 88Compatibility, 62Component, 22, 47, 51
Communication drivers, 22Components supplied, 22
Connection interruption, 71Control, 139Controls
WinCC Push Button Control, 139Controls:WinCC Push Button Control, 139Converting project data, 116Customer support, (See support)
DDCF file
Create, 80DCOM configuration, 69Deleting, 144Demo Mode, 24, 26DHCP server, 71Diagnosis
ApDiag, (See ApDiag)Diagnostics, 138
Migration, 138Dialog
Frame Width dialog , 140Labeling dialog , 142Not Pressed dialog , 144Push button color dialog, 141
WinCC: General information and installationSystem Manual, 06/2014, A5E34372689-AA 207
Dialog:Frame Width dialog, 140Dialog:Labeling dialog, 142Dialog:Not Pressed dialog, 144Dialog:Push Button "Color" dialog, 141Disabling shortcut keys, 67Domain, 32Domain-global user group, 42Domains, 32Dongle, 26Driver
Unsigned, 43
EEffects, 142Energy-saving mode, 71
Network adapter, 71Event display, 54External application, 62External Applications, 59
FFAQ, (See support)File
Unsigned, 43File sharing, 38, 63Firewall, 71Folder, 38, 63
Released folders, 38, 63Font, 142Font property name , 142Font size, 142Font Style, 142Fonts"Property Name, 142Format, 144
GGeneral, 140General information, 62General Push Button , 140General"Push Button, 140Global Scripts, 203
Performance, 203Graphics System, 197
Quantity Structure, 197
HHardware Requirement, 29
IImage painting time, 94Insert, 139Insert Push Button, 139Installation, 21, 45, 47, 66
Adapting Security Policy, 43Component, 47, 51Domain, 32Multilanguage, 69Notes on installed software, 47PDF files, 22Performing, 47, 57Performing supplementary installation, 51, 52Preparing the installation, 43Removing, 54Requirements, 28, 29, 32Supplementary installation of a language, 52Upgrading an installation, 57
Installation Guide, 21Installation Notes, 21Installed software, 47Internet Explorer, 32, 68
Online Help, 68Internet Explorer V7.0, 68
Online Help, 68IP address, 71ISDN router, 71
LLabeling, 140Language
Performing supplementary installation, 52License, 24, 26, 187
Archive license, 180Basic types, 183Count relevant, 183Demo Mode, 186Diagnostics, 190Emergency license, 192Floating, 183Installation, 24, 26, 187Missing licenses, 190Powerpack, 180RC license, 180
Index
WinCC: General information and installation208 System Manual, 06/2014, A5E34372689-AA
Rental, 183Repair of license, 192RT license, 180Single, 183Test, 26Upgrade, 183Upgrading, 189WinCC License Analysis, 190
License Agreement, 24License check, 26License data carrier, 26License Type, 24Licensing, 180
Automation License Manager, 180Error avoidance, 182Powerpack, 180
Log, 202Quantity Structure, 202
MManual detachment, 71Menu bar
ApDiag, 149Message, 198
Quantity Structure, 198Message archive
Quantity Structure, 198Message Archive, 198Message filters, 92Message system, 198
Quantity Structure, 198Microsoft Message Queuing, 46
MSMQ Server, 46Microsoft SQL Server, 71Microsoft SQL Server 2008, 24, 54Migration, 92
Cancelation, 138Client project, 124Clients, 124Diagnostics, 138Diagnostics Files, 138Error Messages, 138Migrating WinCC projects as of V7.0, 121Multi-user project, 124Ongoing operation, 126Redundancy, 126Redundant system, 126Requirements, 120Runtime, 126
MS Message Queuing, 46MSMQ Server, 46
Multilanguage, 69Installation, 69
Multilingualism, 92Multi-user project, 124
Migration, 124Multi-user system, 196
Quantity structure, 196
NNetware, 69
Novell Netware client, 69Network adapter, 71
Energy-saving mode, 71Network client, 69Network connection, 71
Speed, 71Network drive, 71Network engineering, 71
Access via RAS, 71DHCP server, 71IP address, 71ISDN router, 71Network adapter, 71Network client, 69Network server, 71Notebook, 71Novell client software, 69Supported network protocols, 71TCP/IP protocol, 71WinCC in multiple domains, 71WinCC within a domain, 71
Network protocol, 71Supported network protocols, 71TCP/IP, 71
Network server, 71None, 140Not pressed, 139Notebook, 71Notes, 62
For operation, 62Novell Netware client, 69
OODK
Database, 83Online Help, 67
Internet Explorer, 68Internet Explorer V7.0, 68Runtime, 67
Index
WinCC: General information and installationSystem Manual, 06/2014, A5E34372689-AA 209
Online support, (See support)OPC, 85
Historical data access, 86XML Data Access, 86
OPC A&E, 86OPC source, 87
OPC A&E server, 86OPC_E_MAXEXCEEDED, 86Operating system, 32, 66
Access rights, 38, 63Prevent access, 37
Operation, 59Domain, 32
Outline, 140
PPDF files, 22Performance
Action configuring, 203Functions, 203Scripting, 203
Performance data, 196, 199, 200, 202, 203, 204Performance Data, 197, 198Picture, 144Picture Graphic files , 144Picture Tree Manager, 93Picture"Graphic files, 144Pictures, 197
Quantity Structure, 197PictureSelected, 144PictureUnselected, 144Preferred server, 71
Connection interruption, 71Pressed, 139Process Communication, 204
Quantity structure, 204Process coupling, 204
Quantity structure, 204Process data, 199
Quantity structure, 199Project
Include in user group, 42Migrate, 121
Properties, 144Properties of WinCC Push Button Control, 140, 141, 142, 144
Properties of WinCC Push Button Control , 141, 142, 144Properties of WinCC Push Button Control Transparent , 140
Properties of WinCC Push Button Control", 141, 142, 144Properties of WinCC Push Button Control"Transparent, 140Properties:properties of WinCC Push Button Control, 140, 141, 142, 144Property Name, 141Proxy, 71Push Button, 139, 142, 144
QQuantity structure, 196
Archiving, 199Clients, 196Communication, 204Multi-user system, 196Process Communication, 204Process coupling, 204Process data, 199Scripting, 203Server, 196Table, 199Trends, 199User archive, 200User archives, 200WinCC clients, 196
Quantity StructureGraphics System, 197Log, 202Message system, 198Pictures, 197
RRAS, 71Redundancy, 71, 126
Configuration of standard gateway, 91Migrate, 126Redundant server, 71Upgrading during operation, 126
Removal, 54Performing, 54
Requirement, 28Hardware, 29Operating system, 32Software, 32
Runtime, 71Displaying online help, 67Server failure, 71
Index
WinCC: General information and installation210 System Manual, 06/2014, A5E34372689-AA
SS5 PROFIBUS DP, 88S7 Protocol Suite, 88
Communication, 88Time change with AR_SEND, 88
Safety, 37, 38, 63Sample Text, 142Scope of delivery, 22Screen, 69
Changing the resolution, 69Changing the settings, 69
Screen savers, 62Security Controller, 47Security policy, 43Server, 196
Number of clients, 196Operating system, 32
Server prefix, 71ServiceMode
Migration, 115Share, 38, 63SIMATIC 505 TCPIP, 88SIMATIC HMI, 38, 41, 42, 63
User group, 38, 63SIMATIC Manager
User Rights, 38, 63SIMATIC Security Controller, 47Single-user project
OPC, 84Size, 142Software, 32
Requirement, 32SQL master database, 71Standard client, 52
Supplementary installation, 52Start menu, 47Storage device, 26Supplementary installation, 51, 52
Languages, 52Performing, 51, 52Standard client, 52
Support, 98, 101Support Request, 101System message
ApDiag, 173System stability, 78
TTab
Font Tab , 142Pressed tab , 144System color tab , 141Tab Adjust Picture Size to Button , 140
Tab:"Adjust Picture Size to Button" tab, 140Tab:"System Color tab, 141Tab:Font tab, 142Tab:Pressed tab, 144Table, 199
Quantity structure, 199Tag
Diagnostics tag, 159Tags with @-prefix, 92TCP/IP protocol, 71Technical support, (See support)Terminal bus
Large amounts of data, 84Time synchronization, 78Toolbar, 37Trends, 199
Quantity structure, 199
UUnicode, 118Uninterruptible power supply, 71Unsigned driver, 43Unsigned file, 43Upgrade installation, 24, 26, 57
Performing, 57UPS, 71User archive, 200
Quantity structure, 200User archives, 200
Quantity structure, 200User authorization, 94User group, 38, 63
Domain-global user group, 42Include project, 42SIMATIC HMI, 38, 41, 42, 63
User group SIMATIC HMI, 42
VVBA, 83VBS, 203
Index
WinCC: General information and installationSystem Manual, 06/2014, A5E34372689-AA 211
Performance, 203Virtualization, 31Virus scanner, 62Visual Basic Script in WinCC, 203
WWinCC, 71, 77
General information, 77Installation, 21, 28, 45Installation requirements, 29, 32Limit access, 38, 63Notebook, 71Performing installation, 47Performing supplementary installation, 51, 52Preparing the installation, 43Removing, 54upgrade, 56Upgrading an installation, 57Use in multiple domains, 71Use within a domain, 71WinCC DVD, 22
WinCC client, 196Number of servers, 196
WinCC ControlsWinCC Push Button Control, 139
WinCC controls:WinCC Push Button Control, 139WinCC DVD, 22WinCC License Analysis, 190WinCC project
Include in user group, 42Migrate, 121
WinCC ServiceMode, 94WinCC V6.x, 56WinCC V7.2, 118Windows, 32, 38, 63
Access rights, 38, 63Microsoft Message Queuing, 46Operation under Windows, 59Preparation the installation of WinCC, 43Security policy, 43Toolbar, 37User Rights, 38, 63
Windows 7, 32, 69Windows 8.1, 32Windows event display, 54Windows Server 2008, 32, 69Windows Server 2012, 32Windows Start menu, 47Windows taskbar, 67
Prevent display, 67
Index
WinCC: General information and installation212 System Manual, 06/2014, A5E34372689-AA