Embed Size (px)
Citation preview

© 2017 AprelTech, llc. All rights reserved
Silent Install Builder
GETTING STARTED GUIDE
Silent Install Builder Getting Started guide www.apreltech.com
2
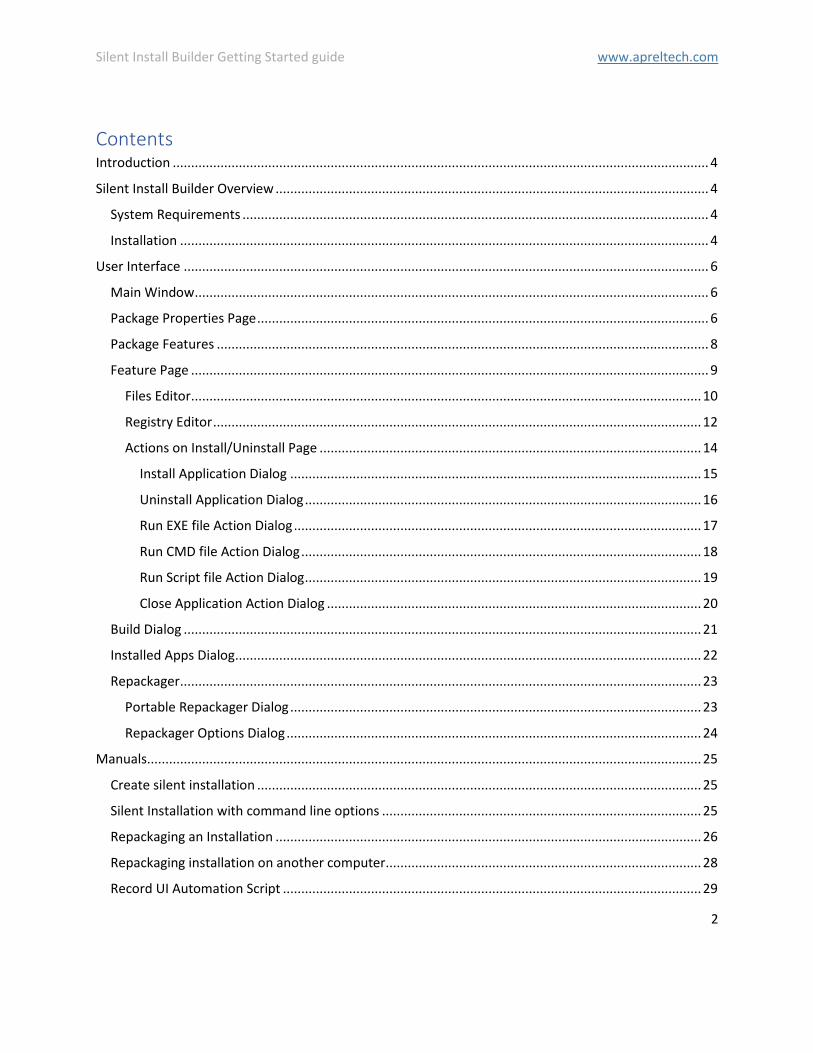
Contents Introduction .................................................................................................................................................. 4
Silent Install Builder Overview ...................................................................................................................... 4
System Requirements ............................................................................................................................... 4
Installation ................................................................................................................................................ 4
User Interface ............................................................................................................................................... 6
Main Window ............................................................................................................................................ 6
Package Properties Page ........................................................................................................................... 6
Package Features ...................................................................................................................................... 8
Feature Page ............................................................................................................................................. 9
Files Editor ........................................................................................................................................... 10
Registry Editor ..................................................................................................................................... 12
Actions on Install/Uninstall Page ........................................................................................................ 14
Install Application Dialog ................................................................................................................ 15
Uninstall Application Dialog ............................................................................................................ 16
Run EXE file Action Dialog ............................................................................................................... 17
Run CMD file Action Dialog ............................................................................................................. 18
Run Script file Action Dialog ............................................................................................................ 19
Close Application Action Dialog ...................................................................................................... 20
Build Dialog ............................................................................................................................................. 21
Installed Apps Dialog ............................................................................................................................... 22
Repackager .............................................................................................................................................. 23
Portable Repackager Dialog ................................................................................................................ 23
Repackager Options Dialog ................................................................................................................. 24
Manuals ....................................................................................................................................................... 25
Create silent installation ......................................................................................................................... 25
Silent Installation with command line options ....................................................................................... 25
Repackaging an Installation .................................................................................................................... 26
Repackaging installation on another computer ...................................................................................... 28
Record UI Automation Script .................................................................................................................. 29

Silent Install Builder Getting Started guide www.apreltech.com
3
Build the Package .................................................................................................................................... 33
Windows Installer Conditions ................................................................................................................. 34

Silent Install Builder Getting Started guide www.apreltech.com
4
Introduction This is a Getting Started guide describing how to create silent (automatic) application installation
packages with the Silent Install Builder.
Silent Install Builder Overview The Silent Install Builder allows you to automate application installation process. Create a setup package
that contains one or more application installers that will be installed automatically in the background
mode (silently). You can build either .exe (NSIS) or MSI (Windows Installer) package for an enterprise
deployment using GPO, SSCM or other third-party tools.
System Requirements Hardware:
CPU: modern x64 or x86 processor
Memory: min 1 GB RAM
Hard Disk Space: 25 MB for installation files and sufficient disk space for the repackaged installations
Operating systems:
• Windows 10
• Windows 8.1
• Windows 7
• Windows Server 2008/2012/2012 R2/2016
Runtimes:
• Microsoft .NET Framework 4.5.2 (https://www.microsoft.com/en-
us/download/details.aspx?id=42642) or above
Privileges:
Administrative privileges on the system is required for Repackaging and UI Script Recorder.
Installation The evaluation version of Silent Install Builder can be downloaded here:
https://www.apreltech.com/SilentInstallBuilder
Run the downloaded installation file (.msi) and complete all steps. An older installed version will be
updated during the installation.

Silent Install Builder Getting Started guide www.apreltech.com
5
After installation is completed you can find the Silent Install Builder shortcut on the desktop and in the
Start menu:
Silent Install Builder Getting Started guide www.apreltech.com
6
User Interface
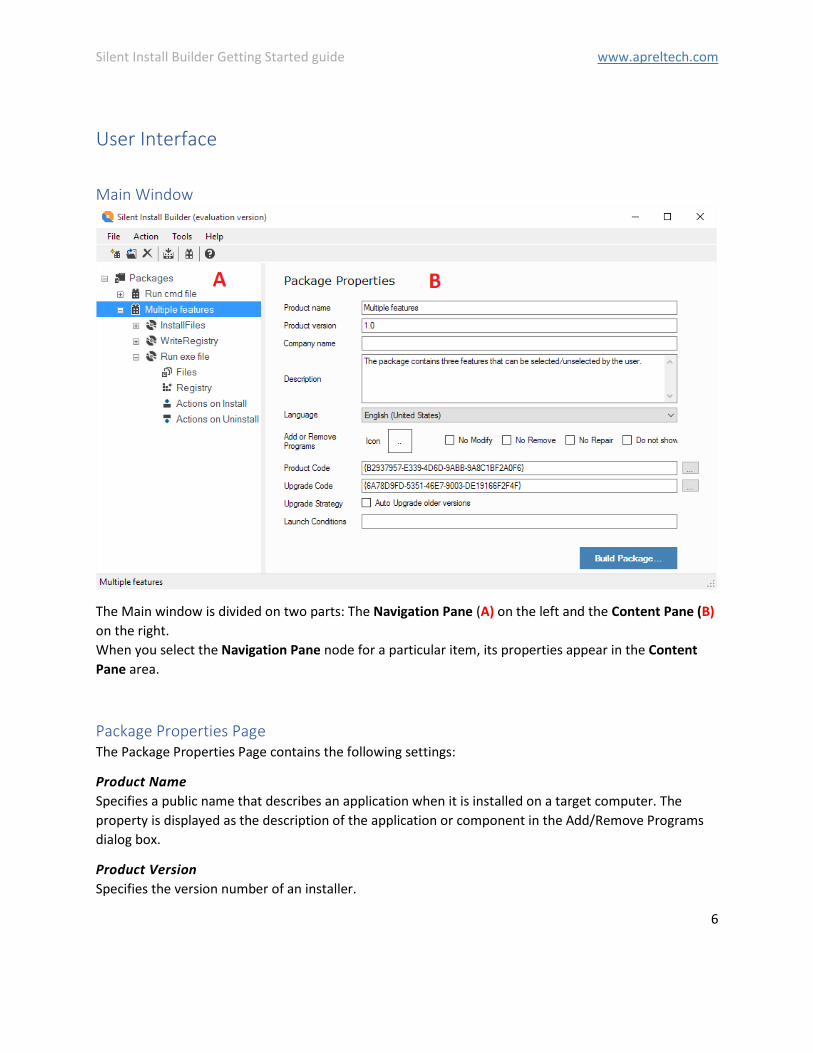
Main Window
The Main window is divided on two parts: The Navigation Pane (A) on the left and the Content Pane (B)
on the right.
When you select the Navigation Pane node for a particular item, its properties appear in the Content
Pane area.
Package Properties Page The Package Properties Page contains the following settings:
Product Name
Specifies a public name that describes an application when it is installed on a target computer. The
property is displayed as the description of the application or component in the Add/Remove Programs
dialog box.
Product Version
Specifies the version number of an installer.
Silent Install Builder Getting Started guide www.apreltech.com
7
Example: 1.0.0.0
MSI: Windows Installer uses only the first three fields of the product version. When the Version value is
changed, you should also update the Product Code property.
Company Name
Specifies the name of the manufacturer of an application or component, usually the name of the
company that developed it. The Manufacturer property is displayed in the Publisher field of the Support
Info dialog box, accessible from the Add/Remove Programs dialog box.
Description
Provides description text for the Setup Wizard and for the Add or Remove Programs in Control Panel.
Language
Set the Language for the Setup Wizard dialogs.
MSI: The Language setting also defines the Windows installer code page. It is recommended to use only
ASCII characters and then you can build a msi package with a neutral code page (en-US). Such a package
could be used by any language. If you must include extended characters, you should set the language for
the package before build.
Add or Remove Programs options
• Icon: Identifies the icon displayed in Add/Remove Programs.
• No Modify: Prevents display of a Change button
• No Remove: Prevents display of a Remove button
• No Repair: Disables the Repair button
• Do not show in list: Prevents display of the application in the Programs List
Product Code*
MSI: A unique identifier for the particular product release, represented as a string GUID, for example
"{12345678-1234-1234-1234-123456789012}". This identifier must vary for different product versions.
Upgrade Code*
MSI: A GUID representing a related set of products. A set of different versions of the Product will have
the same Upgrade Code. This enables newer versions of your application to search and upgrade
previous versions installed on the same computer.
Auto Upgrade older versions*
MSI: Ensures that all older versions of the product are automatically uninstalled and if a newer version
is detected, the "Newer version already installed" message is displayed.
Silent Install Builder Getting Started guide www.apreltech.com
8
Launch Conditions*
MSI: Specifies the Windows Installer conditions required for installation on a target computer.
* The property is valid for MSI build and ignored for EXE build.
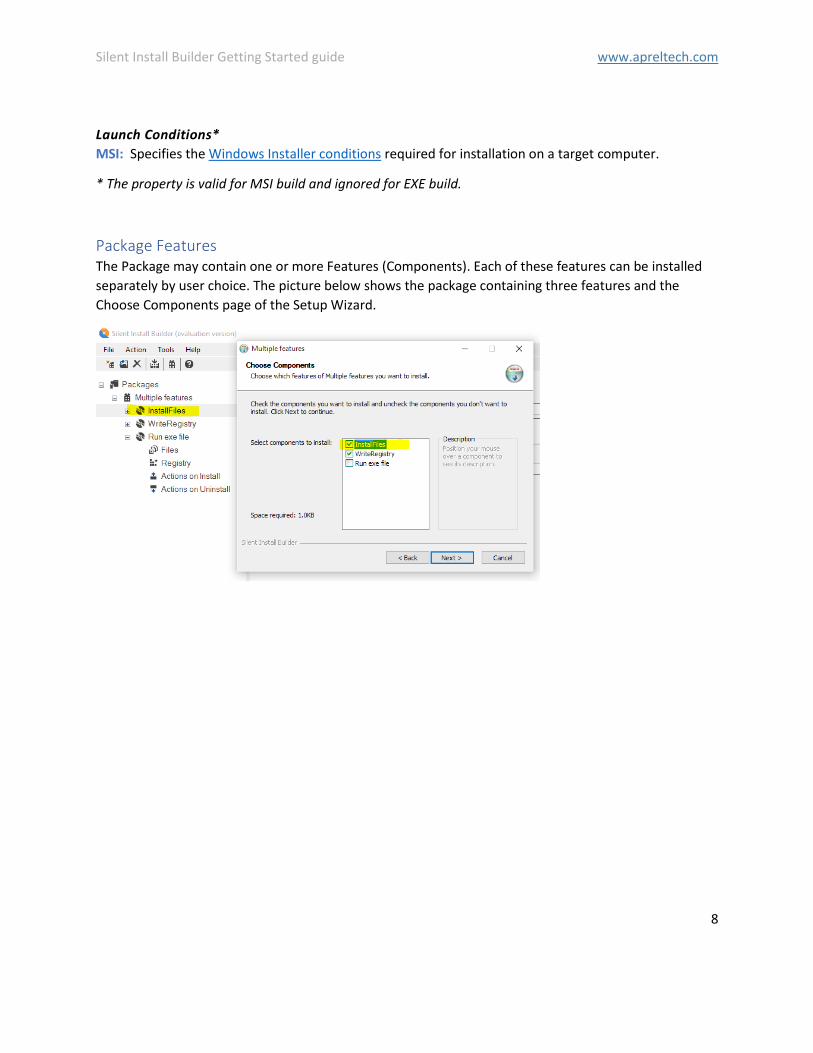
Package Features The Package may contain one or more Features (Components). Each of these features can be installed
separately by user choice. The picture below shows the package containing three features and the
Choose Components page of the Setup Wizard.
Silent Install Builder Getting Started guide www.apreltech.com
9
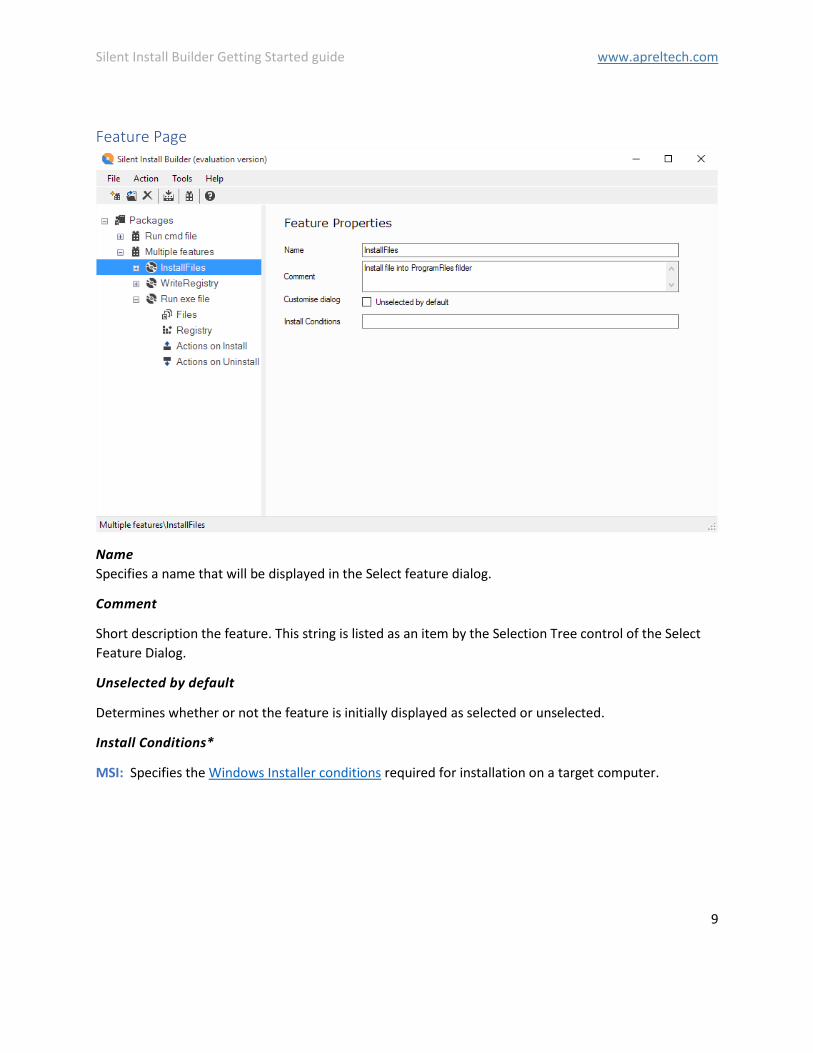
Feature Page
Name
Specifies a name that will be displayed in the Select feature dialog.
Comment
Short description the feature. This string is listed as an item by the Selection Tree control of the Select
Feature Dialog.
Unselected by default
Determines whether or not the feature is initially displayed as selected or unselected.
Install Conditions*
MSI: Specifies the Windows Installer conditions required for installation on a target computer.
Silent Install Builder Getting Started guide www.apreltech.com
10
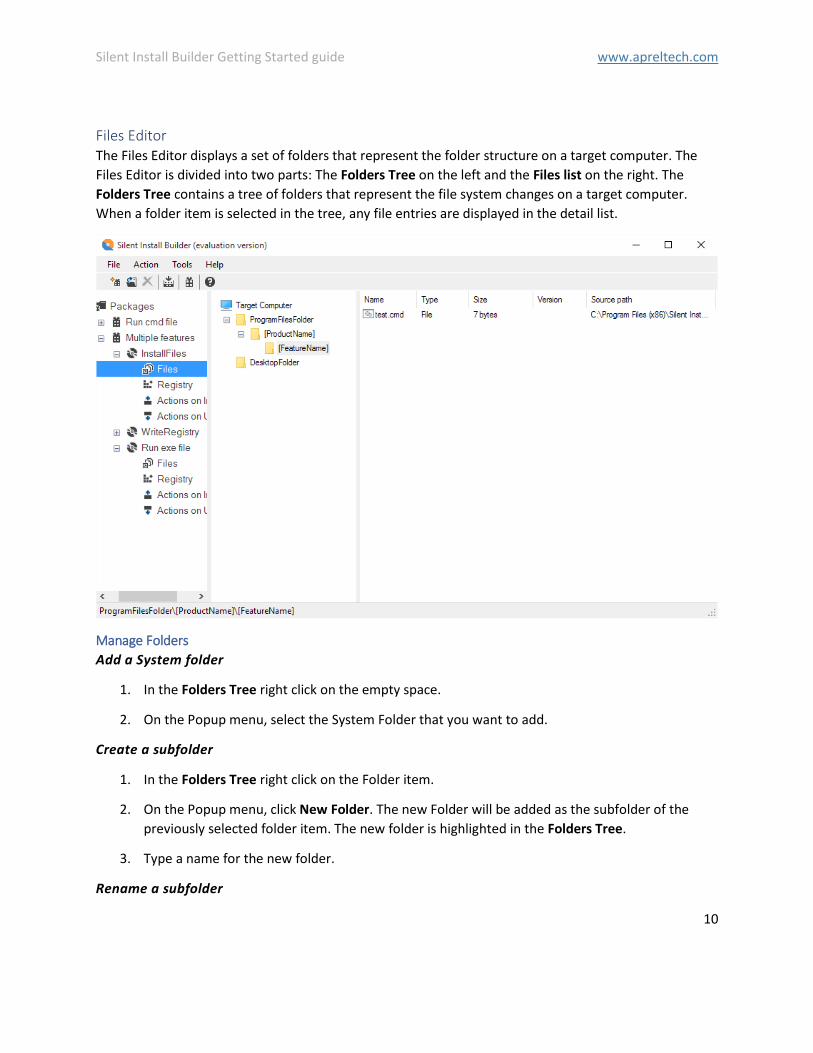
Files Editor The Files Editor displays a set of folders that represent the folder structure on a target computer. The
Files Editor is divided into two parts: The Folders Tree on the left and the Files list on the right. The
Folders Tree contains a tree of folders that represent the file system changes on a target computer.
When a folder item is selected in the tree, any file entries are displayed in the detail list.
Manage Folders
Add a System folder
1. In the Folders Tree right click on the empty space.
2. On the Popup menu, select the System Folder that you want to add.
Create a subfolder
1. In the Folders Tree right click on the Folder item.
2. On the Popup menu, click New Folder. The new Folder will be added as the subfolder of the
previously selected folder item. The new folder is highlighted in the Folders Tree.
3. Type a name for the new folder.
Rename a subfolder

Silent Install Builder Getting Started guide www.apreltech.com
11
1. Right click the folder and choose Rename from the popup menu.
2. Type a new name for the folder and press Enter
Remove a folder
1. Right click the folder and choose Delete from the popup menu.
2. The selected folder will be deleted with all subfolders and files.
Manage Files
Add files
3. Select the Folder to add files to.
4. Right click on the Files list and choose Add Files from the popup menu. Browse for file dialog
will be appeared.
5. Select the Files that you want to add and click OK.
Add Folder and containing files and subfolders
1. Select the parent folder to add files to.
2. Right click on the Files list and choose Add Folder from the popup menu. Browse for Folder
Dialog will be appeared.
3. Select the Folder that you want to add and click OK.
Remove a File
1. Right click the item and choose Delete from the popup menu.
Manage Shortcuts
Create a shortcut
1. Select the parent folder to add Shortcut to.
2. Right click the Files list and choose New Shortcut... from the popup menu. The Shortcut Dialog
will be appeared.
3. In the Shortcut dialog, select the target file for the shortcut and other properties. Click OK.
Remove a shortcut
1. Right click the shortcut and choose Delete from the popup menu.
Silent Install Builder Getting Started guide www.apreltech.com
12
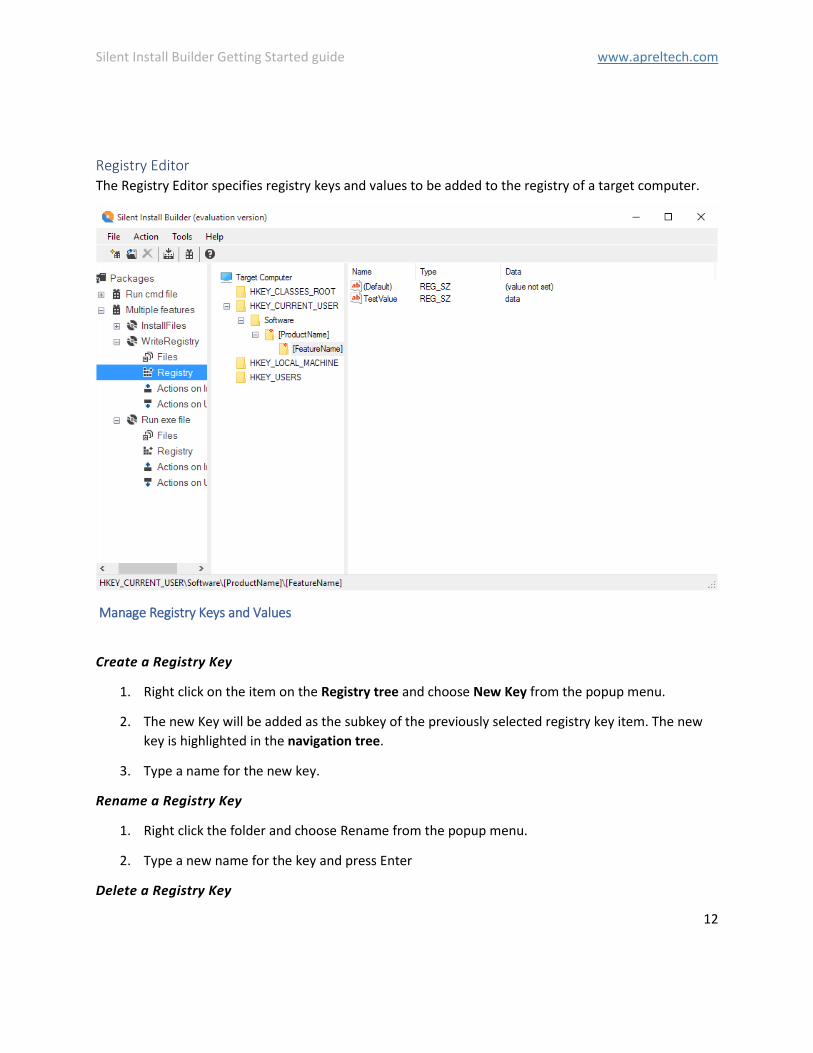
Registry Editor The Registry Editor specifies registry keys and values to be added to the registry of a target computer.
Manage Registry Keys and Values
Create a Registry Key
1. Right click on the item on the Registry tree and choose New Key from the popup menu.
2. The new Key will be added as the subkey of the previously selected registry key item. The new
key is highlighted in the navigation tree.
3. Type a name for the new key.
Rename a Registry Key
1. Right click the folder and choose Rename from the popup menu.
2. Type a new name for the key and press Enter
Delete a Registry Key
Silent Install Builder Getting Started guide www.apreltech.com
13
1. Right click the key and choose Delete from the popup menu.
2. The selected key will be deleted with all subkeys and values.
Create a Registry Value
1. Right click on the key on Registry tree and point to New from the popup menu, select new value
node.
2. The new Value will be added into previously selected registry key item. The new value is
highlighted in the details list.
Edit a Registry Value
1. Right click the selected value in the Detail list and choose Modify from the popup menu. The
Registry Value Dialog will be appeared.
2. In the Registry Value dialog, enter a name for the value and other properties. Click OK to save.
Rename a Registry Value
1. Right click the value and choose Rename from the popup menu.
2. Type a new name for the value and press Enter

Silent Install Builder Getting Started guide www.apreltech.com
14
Actions on Install/Uninstall Page
The Install/Uninstall actions Page defines the actions that will be executed during the package
installation or uninstallation. The actions will be executed sequentially from top to down of the list.
Add the Action
o Click the Add… button in the drop-down menu select the Action to add.
Delete the Action
o Select the Action in the list then click the Delete button
Change the Action execution order
o Select the Action then click the Up Arrow/Down Arrow on the right side of the list.
The following Actions is available
o Install Application
o Uninstall Application
o Run EXE file
o Run CMD file
o Run Script file
o Close Application
Silent Install Builder Getting Started guide www.apreltech.com
15
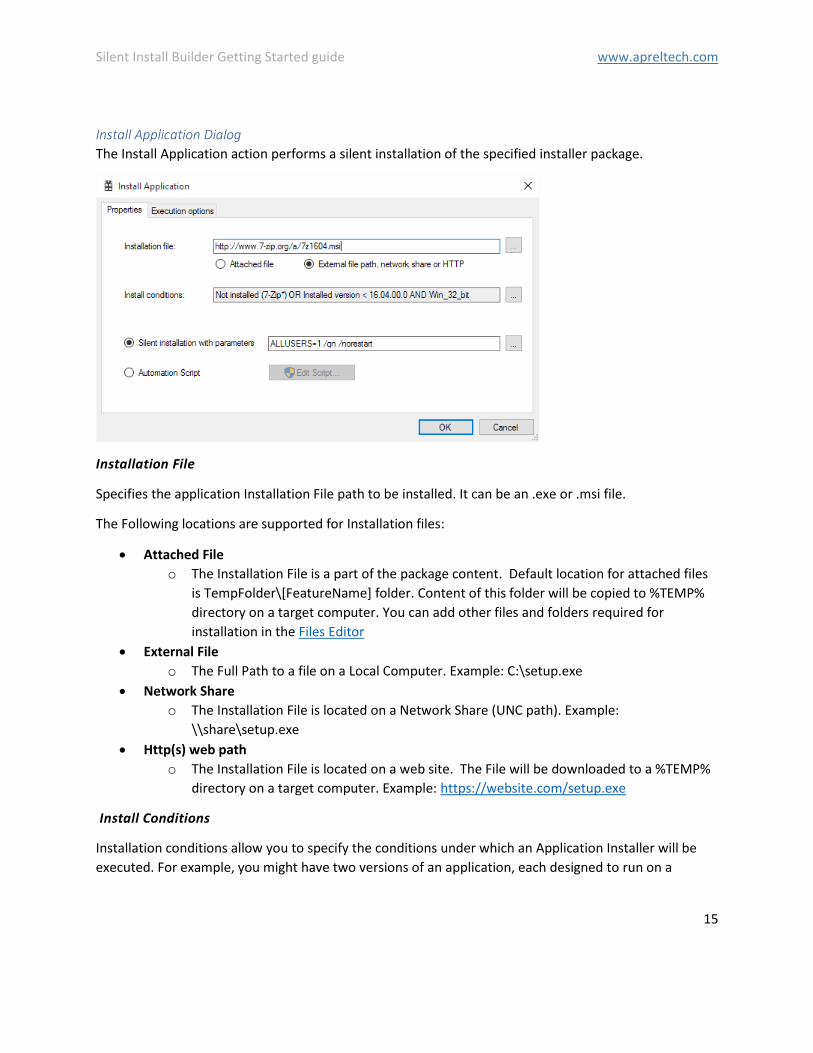
Install Application Dialog
The Install Application action performs a silent installation of the specified installer package.
Installation File
Specifies the application Installation File path to be installed. It can be an .exe or .msi file.
The Following locations are supported for Installation files:
• Attached File
o The Installation File is a part of the package content. Default location for attached files
is TempFolder\[FeatureName] folder. Content of this folder will be copied to %TEMP%
directory on a target computer. You can add other files and folders required for
installation in the Files Editor
• External File
o The Full Path to a file on a Local Computer. Example: C:\setup.exe
• Network Share
o The Installation File is located on a Network Share (UNC path). Example:
\\share\setup.exe
• Http(s) web path
o The Installation File is located on a web site. The File will be downloaded to a %TEMP%
directory on a target computer. Example: https://website.com/setup.exe
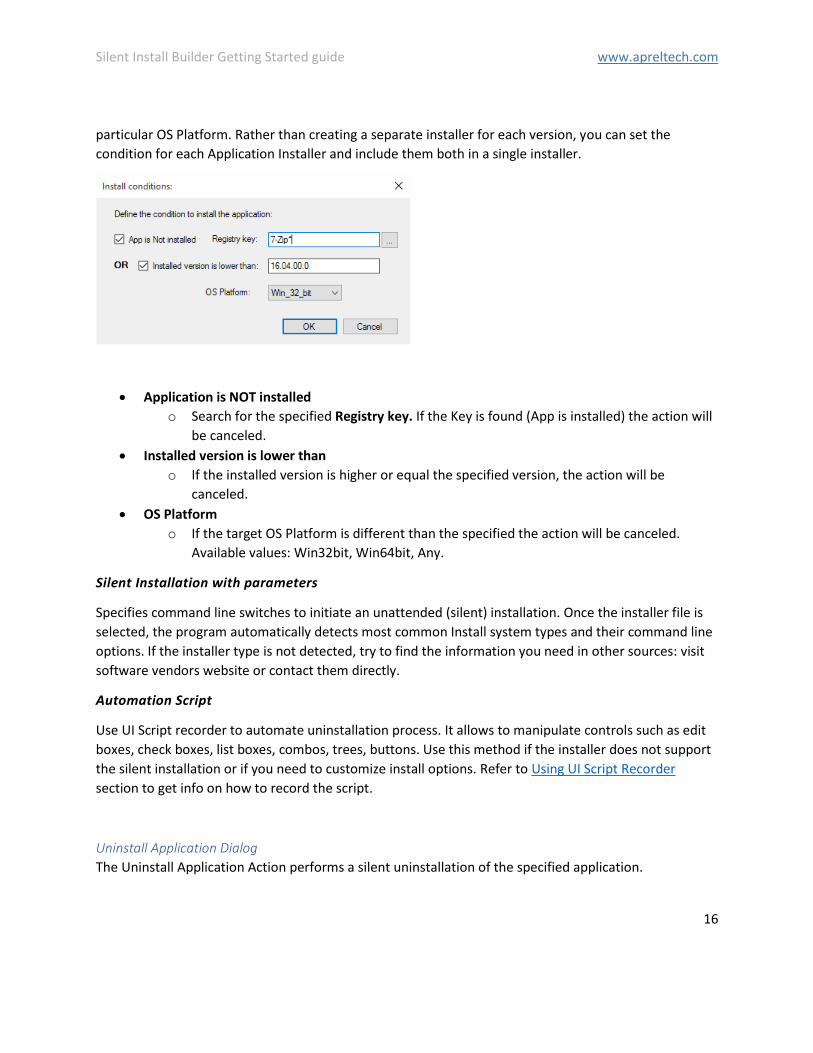
Install Conditions
Installation conditions allow you to specify the conditions under which an Application Installer will be
executed. For example, you might have two versions of an application, each designed to run on a
Silent Install Builder Getting Started guide www.apreltech.com
16
particular OS Platform. Rather than creating a separate installer for each version, you can set the
condition for each Application Installer and include them both in a single installer.
• Application is NOT installed
o Search for the specified Registry key. If the Key is found (App is installed) the action will
be canceled.
• Installed version is lower than
o If the installed version is higher or equal the specified version, the action will be
canceled.
• OS Platform
o If the target OS Platform is different than the specified the action will be canceled.
Available values: Win32bit, Win64bit, Any.
Silent Installation with parameters
Specifies command line switches to initiate an unattended (silent) installation. Once the installer file is
selected, the program automatically detects most common Install system types and their command line
options. If the installer type is not detected, try to find the information you need in other sources: visit
software vendors website or contact them directly.
Automation Script
Use UI Script recorder to automate uninstallation process. It allows to manipulate controls such as edit
boxes, check boxes, list boxes, combos, trees, buttons. Use this method if the installer does not support
the silent installation or if you need to customize install options. Refer to Using UI Script Recorder
section to get info on how to record the script.
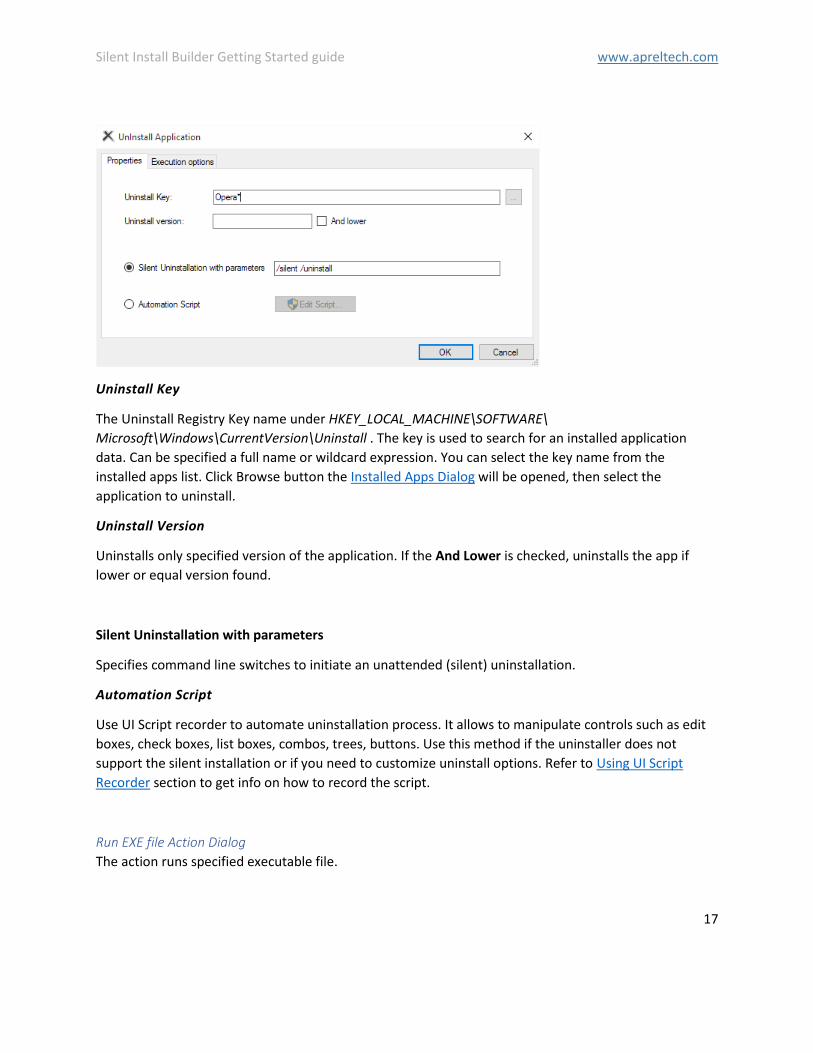
Uninstall Application Dialog
The Uninstall Application Action performs a silent uninstallation of the specified application.
Silent Install Builder Getting Started guide www.apreltech.com
17
Uninstall Key
The Uninstall Registry Key name under HKEY_LOCAL_MACHINE\SOFTWARE\
Microsoft\Windows\CurrentVersion\Uninstall . The key is used to search for an installed application
data. Can be specified a full name or wildcard expression. You can select the key name from the
installed apps list. Click Browse button the Installed Apps Dialog will be opened, then select the
application to uninstall.
Uninstall Version
Uninstalls only specified version of the application. If the And Lower is checked, uninstalls the app if
lower or equal version found.
Silent Uninstallation with parameters
Specifies command line switches to initiate an unattended (silent) uninstallation.
Automation Script
Use UI Script recorder to automate uninstallation process. It allows to manipulate controls such as edit
boxes, check boxes, list boxes, combos, trees, buttons. Use this method if the uninstaller does not
support the silent installation or if you need to customize uninstall options. Refer to Using UI Script
Recorder section to get info on how to record the script.
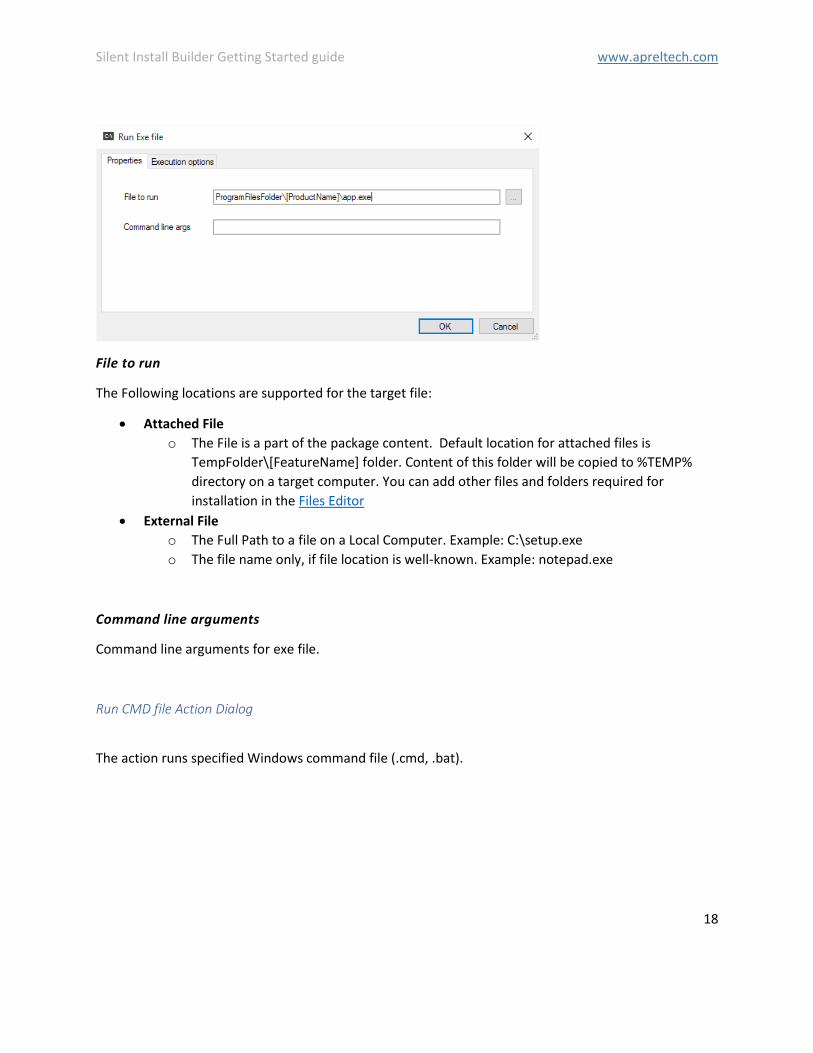
Run EXE file Action Dialog
The action runs specified executable file.
Silent Install Builder Getting Started guide www.apreltech.com
18
File to run
The Following locations are supported for the target file:
• Attached File
o The File is a part of the package content. Default location for attached files is
TempFolder\[FeatureName] folder. Content of this folder will be copied to %TEMP%
directory on a target computer. You can add other files and folders required for
installation in the Files Editor
• External File
o The Full Path to a file on a Local Computer. Example: C:\setup.exe
o The file name only, if file location is well-known. Example: notepad.exe
Command line arguments
Command line arguments for exe file.
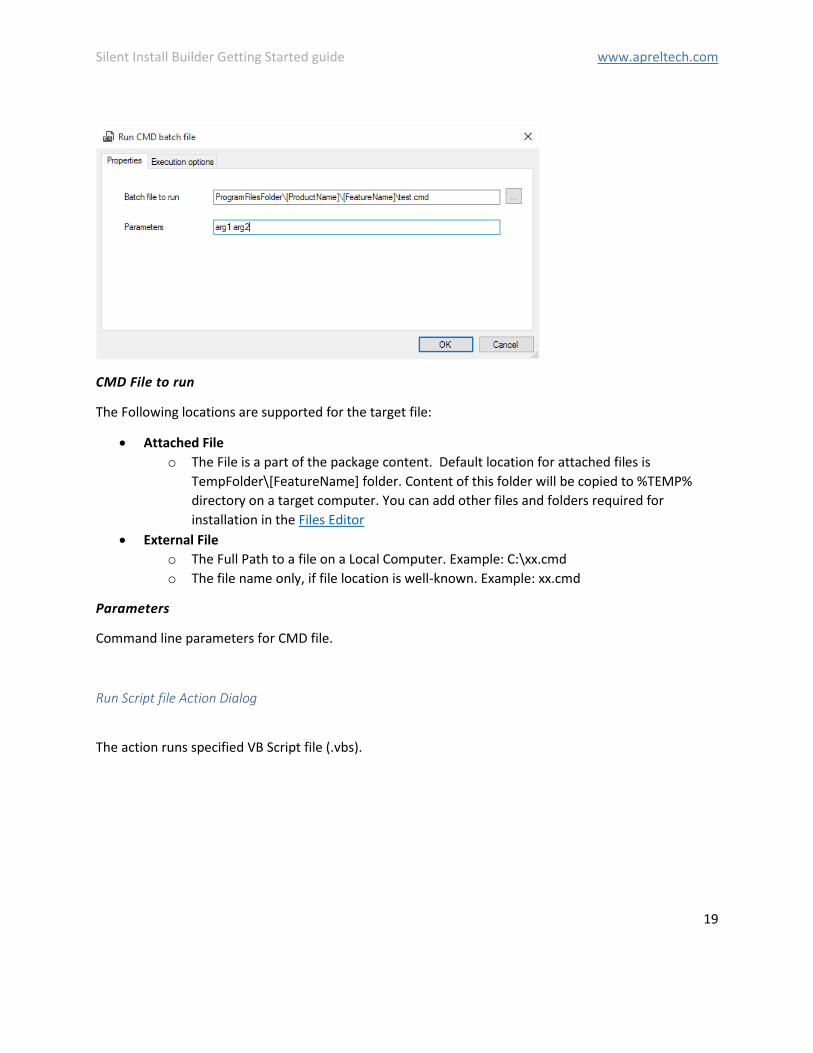
Run CMD file Action Dialog
The action runs specified Windows command file (.cmd, .bat).
Silent Install Builder Getting Started guide www.apreltech.com
19
CMD File to run
The Following locations are supported for the target file:
• Attached File
o The File is a part of the package content. Default location for attached files is
TempFolder\[FeatureName] folder. Content of this folder will be copied to %TEMP%
directory on a target computer. You can add other files and folders required for
installation in the Files Editor
• External File
o The Full Path to a file on a Local Computer. Example: C:\xx.cmd
o The file name only, if file location is well-known. Example: xx.cmd
Parameters
Command line parameters for CMD file.
Run Script file Action Dialog
The action runs specified VB Script file (.vbs).

Silent Install Builder Getting Started guide www.apreltech.com
20
Script File to run
The Following locations are supported for the target file:
• Attached File
o The File is a part of the package content. Default location for attached files is
TempFolder\[FeatureName] folder. Content of this folder will be copied to %TEMP%
directory on a target computer. You can add other files and folders required for
installation in the Files Editor
• External File
o The Full Path to a file on a Local Computer. Example: C:\xx.vbs
o The file name only, if file location is well-known. Example: xx.vbs
Parameters
Command line parameters for script file.
Close Application Action Dialog
The action tries to close the Window of specified process, and optionally terminates the process.
Silent Install Builder Getting Started guide www.apreltech.com
21
Process name
The name of the target process. Example: notepad.exe
Condition*
MSI: Specifies the Windows Installer conditions required for run the action on a target computer.
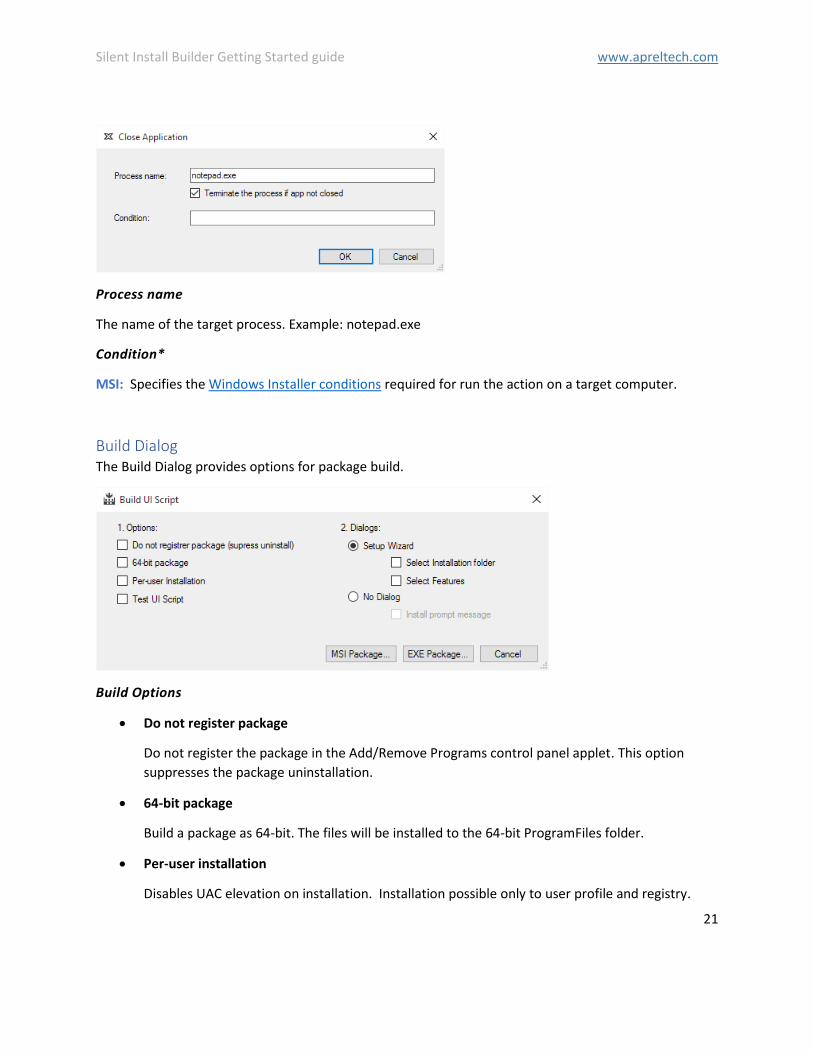
Build Dialog The Build Dialog provides options for package build.
Build Options
• Do not register package
Do not register the package in the Add/Remove Programs control panel applet. This option
suppresses the package uninstallation.
• 64-bit package
Build a package as 64-bit. The files will be installed to the 64-bit ProgramFiles folder.
• Per-user installation
Disables UAC elevation on installation. Installation possible only to user profile and registry.
Silent Install Builder Getting Started guide www.apreltech.com
22
• Test UI Script
Makes UI Script actions visible for testing.
Dialog Options
• Setup Wizard
The package displays a Full user interface (Setup Wizard) with following options:
▪ Select installation folder
Displays the page that enables user to specify the installation folder
▪ Select features
Displays the page that enables user to select package features
• No Dialog
No dialogs displayed.
o Install prompt message
User prompted to continue before install.
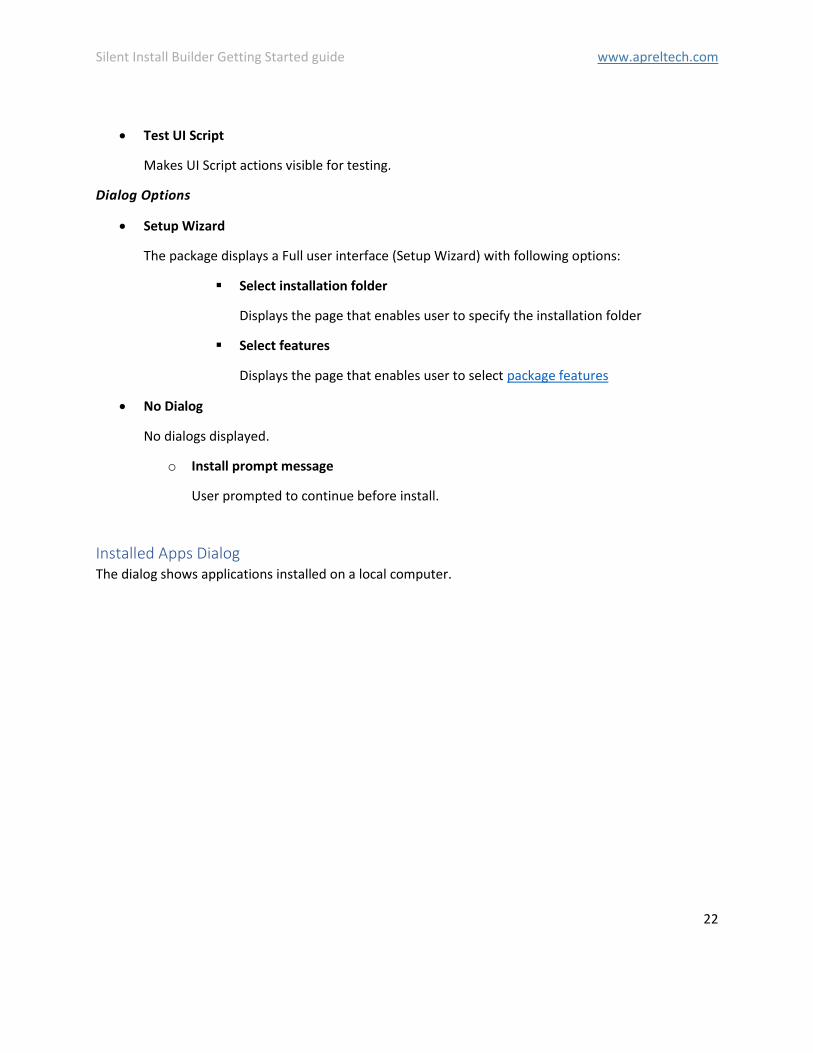
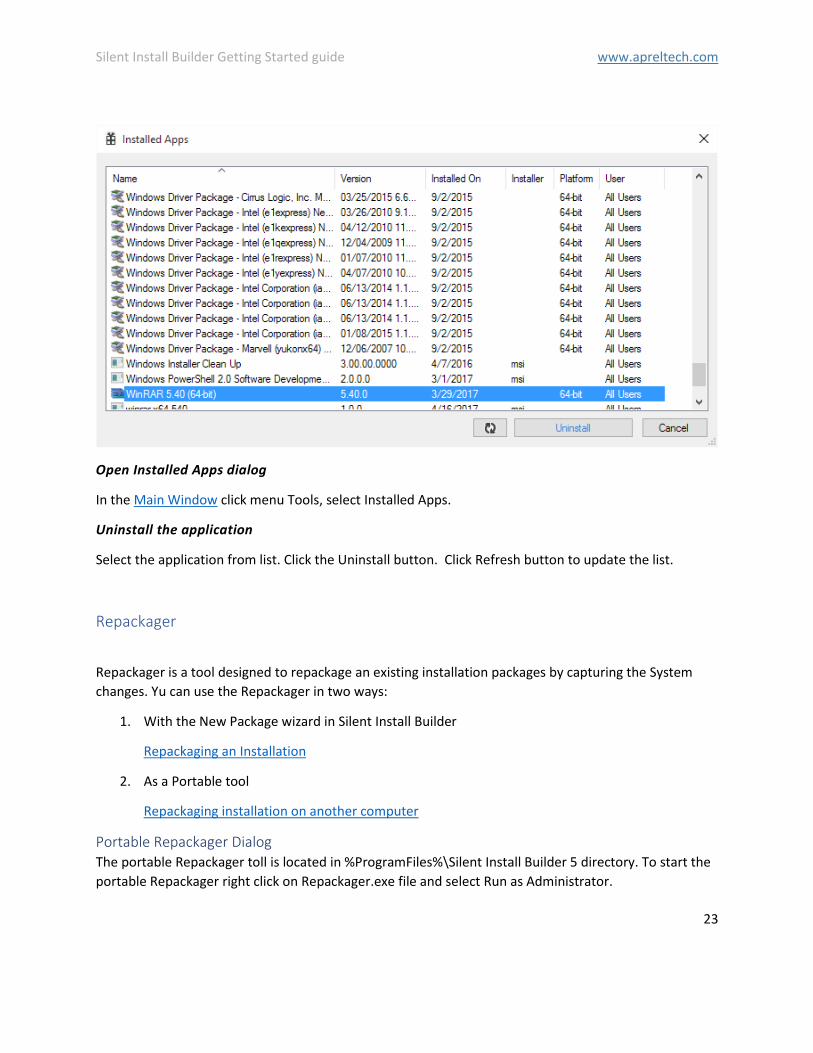
Installed Apps Dialog The dialog shows applications installed on a local computer.
Silent Install Builder Getting Started guide www.apreltech.com
23
Open Installed Apps dialog
In the Main Window click menu Tools, select Installed Apps.
Uninstall the application
Select the application from list. Click the Uninstall button. Click Refresh button to update the list.
Repackager
Repackager is a tool designed to repackage an existing installation packages by capturing the System
changes. Yu can use the Repackager in two ways:
1. With the New Package wizard in Silent Install Builder
Repackaging an Installation
2. As a Portable tool
Repackaging installation on another computer
Portable Repackager Dialog The portable Repackager toll is located in %ProgramFiles%\Silent Install Builder 5 directory. To start the
portable Repackager right click on Repackager.exe file and select Run as Administrator.

Silent Install Builder Getting Started guide www.apreltech.com
24
Application installer file
Specifies the installation file to repackage
Output directory
The directory where captured files will be stored
Repackager Options Dialog To open the Dialog: In the Main Window click menu Tools, select Repackager Options. The following
options can be specified:
• Snapshot Directory
Specifies the directory where snapshot files will be stored. Default location:
%LocalAppData%\SIB\Repackager
• File System filters
Defines the Monitoring File System Filters. Filters are used by Repackager to exclude specific
files and folders from monitoring.
• Registry filters
Defines the Monitoring Registry Filters. Filters are used by Repackager to exclude specific
registry keys from monitoring.
Monitoring Filters
The File System or Registry filter can be added in two ways:

Silent Install Builder Getting Started guide www.apreltech.com
25
1. In the Repackager Options Dialog.
a. On filters tab click the Add button. Edit Filter dialog will be opened.
b. Enter the filter value and click OK.
2. From the Files Editor and Registry Editor.
a. In the Navigation tree, right click on the Folder item.
b. On the Popup menu, click Repackager->Add to scan Filter. Edit Filter dialog will be
opened.
c. Click OK to add the Filter value to filters list.
You can use full path, wildcard or regex pattern for the Scan Filter value.
Manuals
Create silent installation The Silent Install Builder provides the following options to create silent installation:
• Repackaging an existing Installation
• Wrap an Installer file into the package
o Silent Installation with command line options
o Silent Installation with UI Automation Script
Silent Installation with command line options This is a tutorial on how to create a silent installation package with command-line parameters. This is a
recommended method if a silent installations options are known.
1. Run the New Package Wizard
2. Select Wrap an installer into the package and click Next
3. Select the installation file you wish to wrap. For well-known install systems command-line
parameters for silent installation will be detected automatically. If installer type is not
recognized, refer to the Software vendor documentation and specify command-line parameters
manually.
4. Click Next to continue, then click Finish to close the New Package wizard.

Silent Install Builder Getting Started guide www.apreltech.com
26
5. A new package will be created.
o Manage Files
o Install Application Dialog
o Build the Package
Repackaging an Installation This is a tutorial on how to create a package based on capturing an existing installation. This method
commonly used to repackage an older legacy installation to the Windows Installer package (MSI).
1. Run the New Package Wizard
2. Select Repackage an existing installation and click Next
3. Select the installation file you wish to repackage and click Next.
Silent Install Builder Getting Started guide www.apreltech.com
27
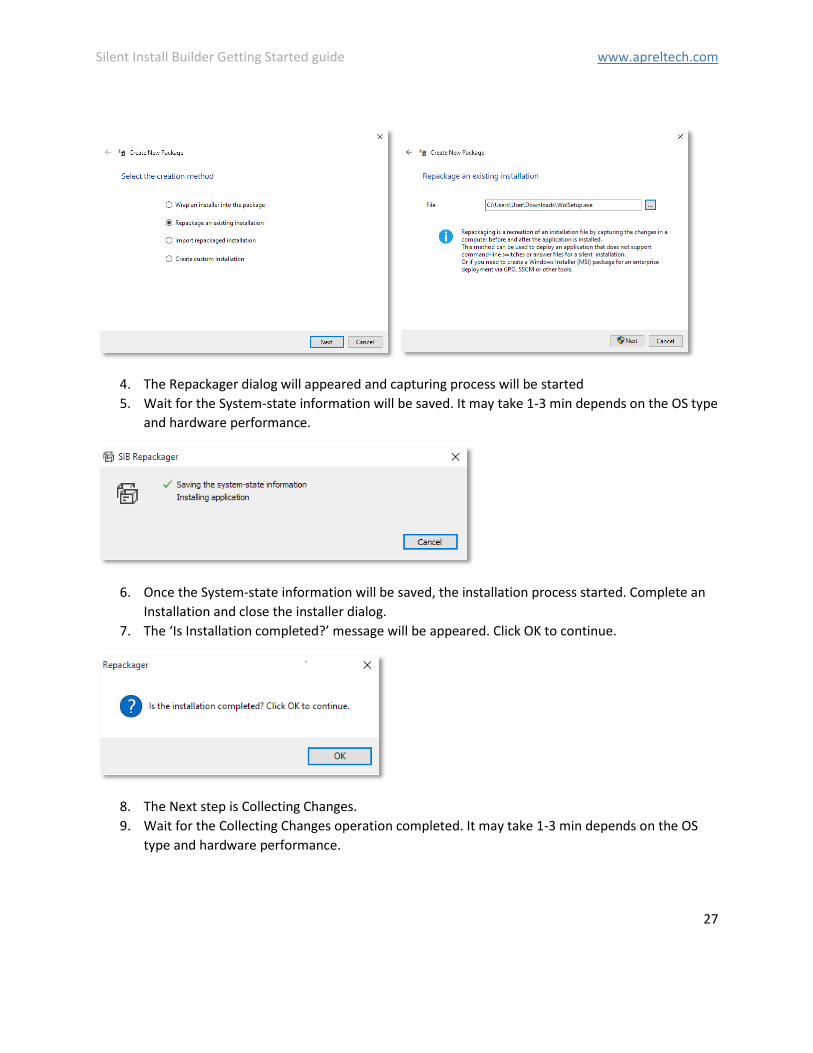
4. The Repackager dialog will appeared and capturing process will be started
5. Wait for the System-state information will be saved. It may take 1-3 min depends on the OS type
and hardware performance.
6. Once the System-state information will be saved, the installation process started. Complete an
Installation and close the installer dialog.
7. The ‘Is Installation completed?’ message will be appeared. Click OK to continue.
8. The Next step is Collecting Changes.
9. Wait for the Collecting Changes operation completed. It may take 1-3 min depends on the OS
type and hardware performance.

Silent Install Builder Getting Started guide www.apreltech.com
28
10. The Finish page of New Package Wizard will be appeared.
11. Click Finish to close the New Package Wizard.
12. The new package will be created and the Captured Installation will be imported to.
13. Examine captured files and registry entries. Remove items that were changed and captured but
are not part of installation.
o Manage Files
o Manage Registry Keys and Values
o Build the Package
Repackaging installation on another computer The best practice of repackaging is capturing changes on a ‘clean’ operating system in a Virtual machine.
You can do that with the Portable Repackager without installing Silent Install Builder.
1. Copy %ProgramFiles%\Silent Install Builder 5\Repackager.exe file to portable drive or a network
share

Silent Install Builder Getting Started guide www.apreltech.com
29
2. Run Repackager.exe as Administrator on a target computer.
3. In the Portable Repackager Dialog select the installation file you wish to repackage and output
directory.
4. Click Start
5. Wait for the System-state information will be saved. It may take 1-3 min depends on the OS type
and hardware performance.
6. The installation file will be started.
7. Compete all installation steps and close the Installer dialog.
8. Wait for the Collecting Changes operation completed. It may take 1-3 min depends on the OS
type and hardware performance.
9. Open the output directory and copy the captured files to the location accessible from the
computer running the Silent Install Builder.
10. To Import the captured files to the Silent Install Builder, run the New Package Wizard, select
Import repackaged installation and click Next.
11. Select the Snapshot directory where the captured files located. Then click Next and Finish.
12. The new package will be created and the Captured Installation will be imported to.
13. Examine captured files and registry entries. Remove items that were changed and captured but
are not part of installation.
o Manage Files
o Manage Registry Keys and Values
o Build the Package
Record UI Automation Script This is a tutorial on how to use UI Script Recorder to automate installation. This method recommended
to use to install packages that does not support silent installation via command line. Or if you want to
customize the Setup options via UI.
Silent Install Builder Getting Started guide www.apreltech.com
30
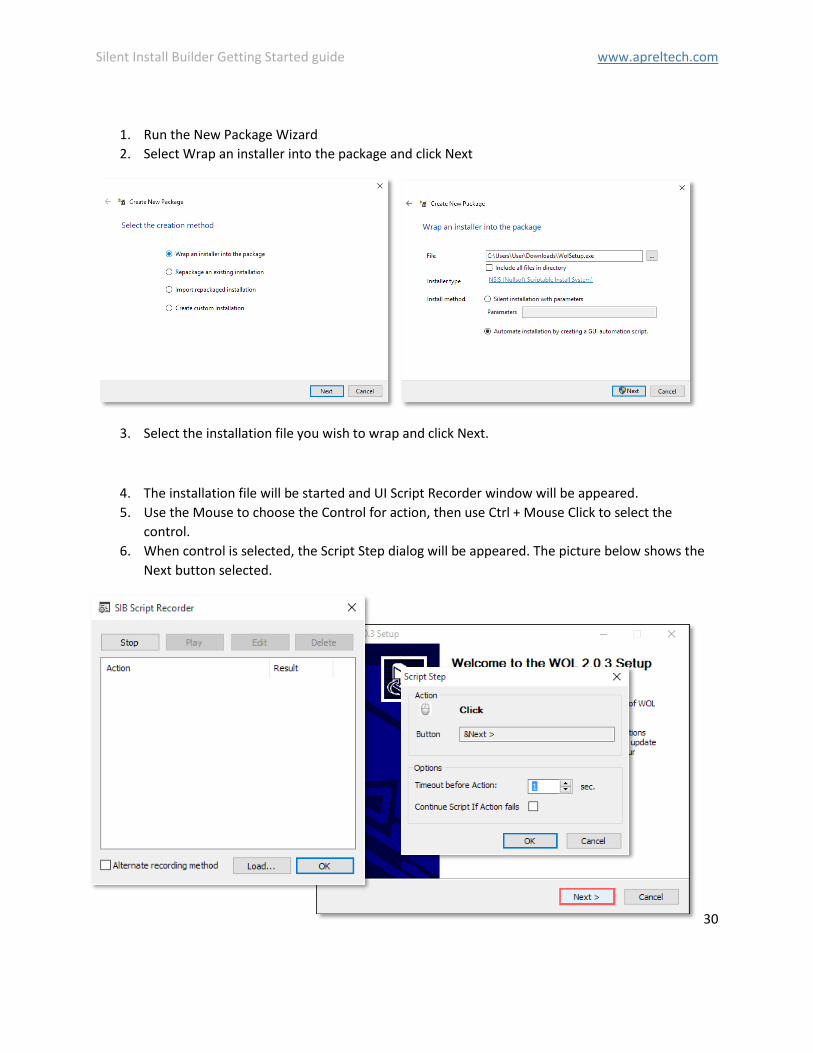
1. Run the New Package Wizard
2. Select Wrap an installer into the package and click Next
3. Select the installation file you wish to wrap and click Next.
4. The installation file will be started and UI Script Recorder window will be appeared.
5. Use the Mouse to choose the Control for action, then use Ctrl + Mouse Click to select the
control.
6. When control is selected, the Script Step dialog will be appeared. The picture below shows the
Next button selected.
Silent Install Builder Getting Started guide www.apreltech.com
31
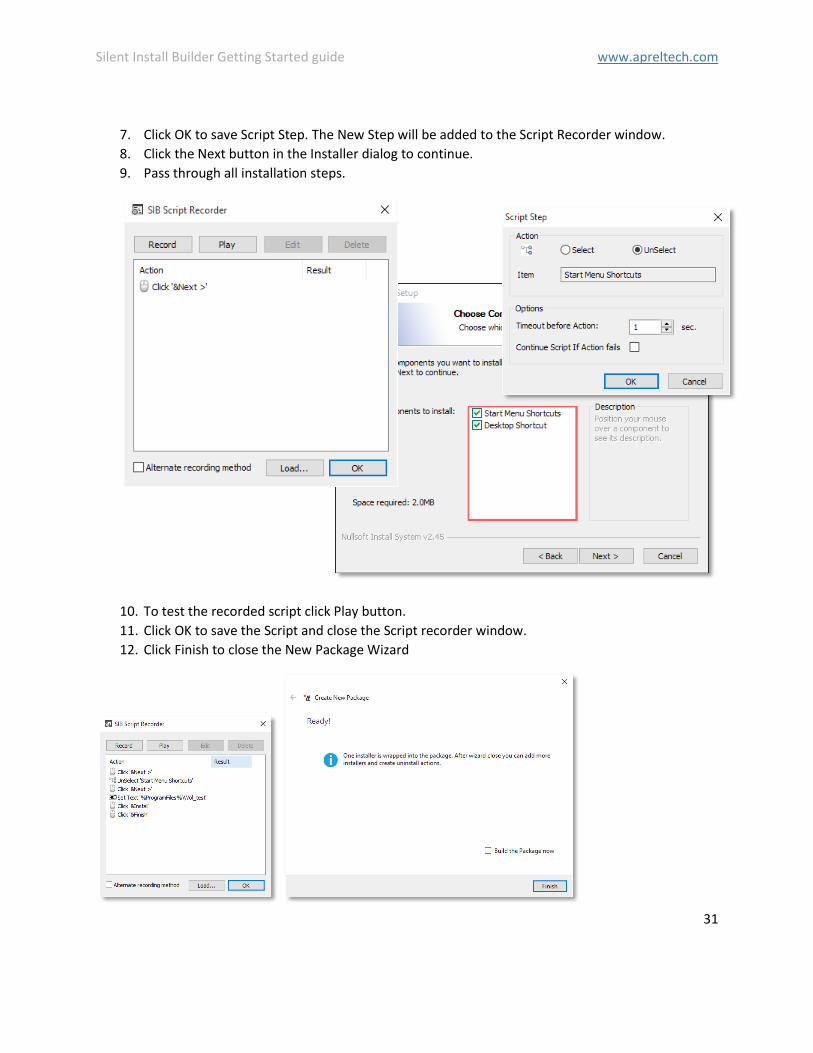
7. Click OK to save Script Step. The New Step will be added to the Script Recorder window.
8. Click the Next button in the Installer dialog to continue.
9. Pass through all installation steps.
10. To test the recorded script click Play button.
11. Click OK to save the Script and close the Script recorder window.
12. Click Finish to close the New Package Wizard
Silent Install Builder Getting Started guide www.apreltech.com
32
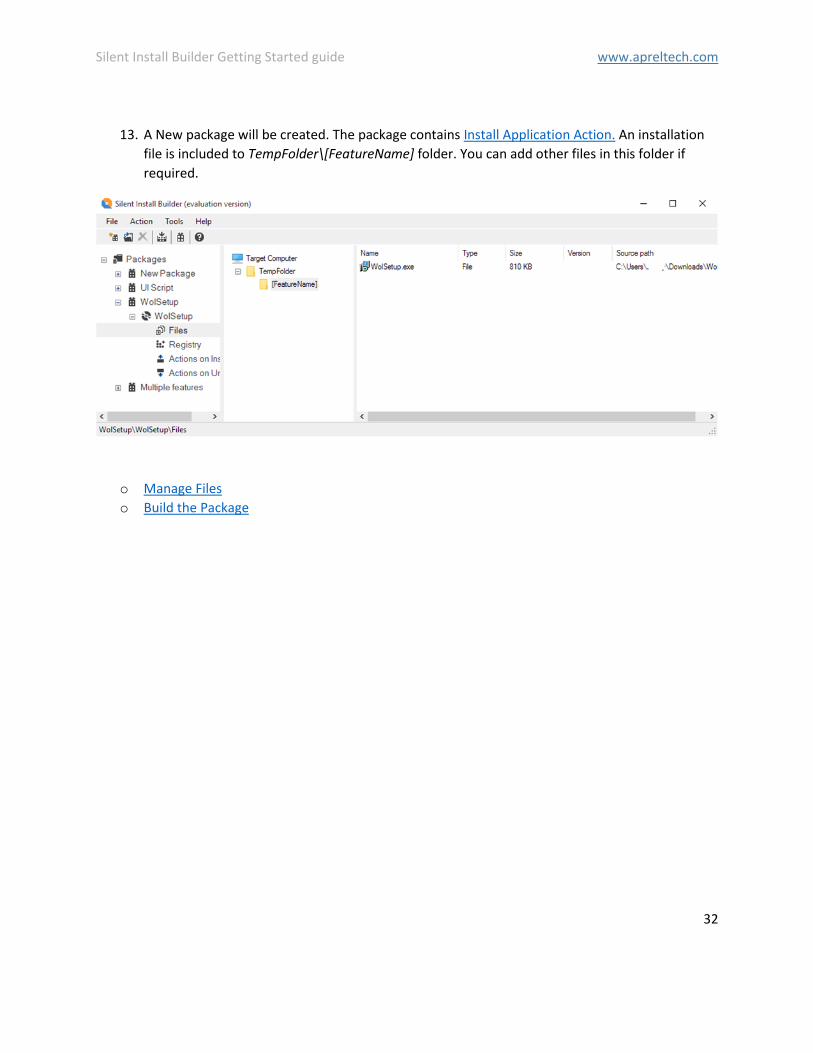
13. A New package will be created. The package contains Install Application Action. An installation
file is included to TempFolder\[FeatureName] folder. You can add other files in this folder if
required.
o Manage Files
o Build the Package
Silent Install Builder Getting Started guide www.apreltech.com
33
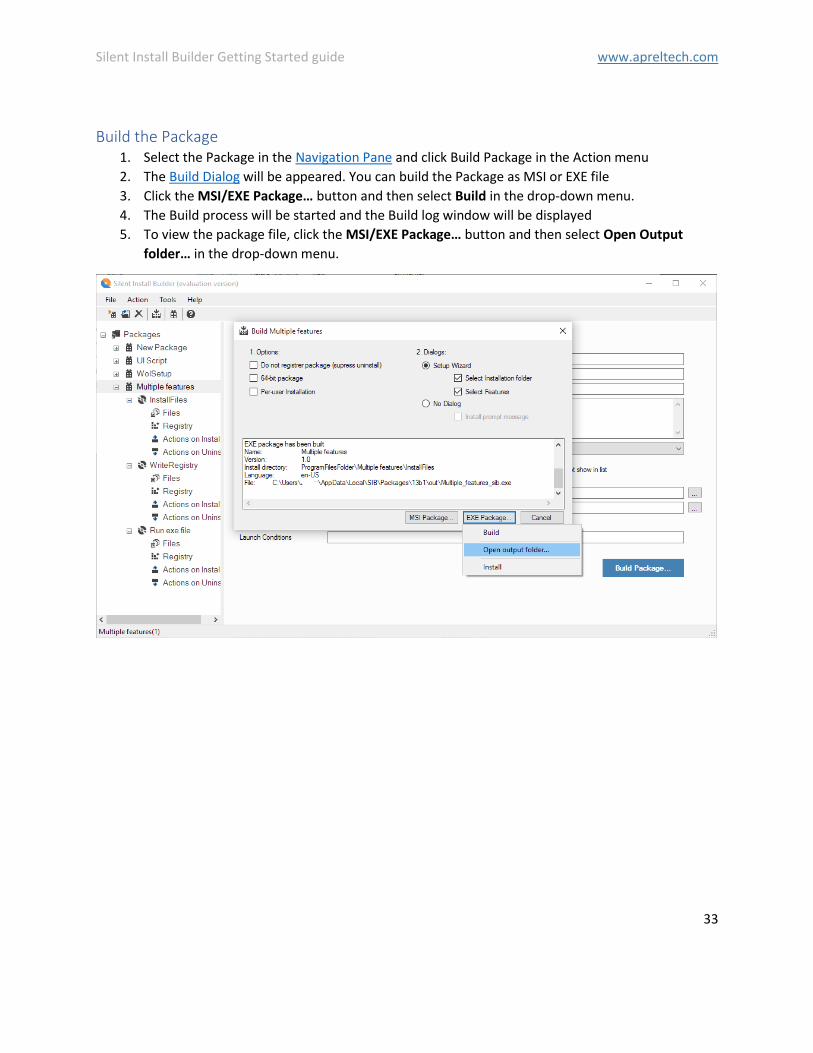
Build the Package 1. Select the Package in the Navigation Pane and click Build Package in the Action menu
2. The Build Dialog will be appeared. You can build the Package as MSI or EXE file
3. Click the MSI/EXE Package… button and then select Build in the drop-down menu.
4. The Build process will be started and the Build log window will be displayed
5. To view the package file, click the MSI/EXE Package… button and then select Open Output
folder… in the drop-down menu.

Silent Install Builder Getting Started guide www.apreltech.com
34
Windows Installer Conditions The table below contains common Windows Installer Conditions and examples of use.
64-bit OS VersionNT64 32-bit OS NOT VersionNT64 Silent Install (UI Sequence not run) UILevel <= 3 The directory that contains the installation package.
SourceDir=”somepath”
Windows 10 VersionNT = 1000 AND MsiNTProductType = 1 Windows Server 2016 VersionNT = 1000 AND MsiNTProductType = 3 Windows 8.1 VersionNT = 603 AND MsiNTProductType = 1 Windows Server 2012 R2 VersionNT = 603 AND MsiNTProductType = 3 Windows 8 and Server 2012 VersionNT = 602 Windows Server 2008 R2 VersionNT = 601 AND MsiNTProductType = 3 Windows 7 VersionNT = 601 AND MsiNTProductType = 1 Windows Server 2003 VersionNT = 502 AND MsiNTProductType = 3 Windows XP VersionNT = 501 Windows XP (64-bit) VersionNT = 502 AND MsiNTProductType = 1 The size of the installed RAM, in megabytes PhysicalMemory >= 1024 Default language identifier for the system SystemLanguageID = 1033 Environment variable value %TEMP
The full Property Reference is available in Microsoft documentation https://msdn.microsoft.com/en-
us/library/windows/desktop/aa370905(v=vs.85).aspx
Conditional Statement Syntax
Substring Operators
o >< contains
o << starts with
o >> ends with
Logical Operators
o NOT inverts state of following item
o AND TRUE if both terms are TRUE
o OR TRUE if either or both terms are TRUE
o XOR TRUE if either but not both are TRUE
o EQV TRUE if both are TRUE or both are FALSE
o IMP TRUE if left term is FALSE or right is TRUE

Silent Install Builder Getting Started guide www.apreltech.com
35
Comparison Operators
o = equals
o <> not equals
o > greater than
o >= greater than or equals < less than
o <= less than or equals
o ~= case-insensitive equals