Embed Size (px)
Citation preview
S T A
Sierra Training Academy
Simply Work Flow Training

Appointment Management
How will you benefit from this Module? 1. Learn how to search for a Customer and add Customers
2. Learn how to add a Product to a Customer account
3. Learn how to log a job against a Product
4. Learn how to process a Payment
5. Learn how to add notes to a Customer Record
6. Learn how to update, re-schedule and add notes to jobs
7. Learn how to answer FAQ questions using the core screens • ETA – Where is the engineer (usage of Maps)
• View Engineer on site information
• Learn if Customer has had a missed appointment

04
03
02
01
Step 04 Step 03 Step 01
Customer Search & Add new 1. Is Customer Live already or will we add new
customer?
2. Does the Customer require PAYG or Gas
product?
3. Does the Customer have a Gas Protection
Policy?
4. Is there a payment required or waiver?
Add a Product and Create an
Appointment 1. Add Product and process payment or waiver
2. Identify appointment type (PAYG Installation,
GAS Service, GAS Repair, )
3. If Gas Repair, specify vulnerability, no heat, no
hot water
4. Document any notes for Engineer / Agents to
see
5. Agree slot with Customer ?
6. Take Payment from customer?
Customer Experience 1. Provide summary to Customer of
agreed time slot commitment
Confirm that the Engineer will call
them when they are 30 minutes from
their home
Review Job & Case History 1. Has the Customer had a previous products?
2. Has the Customer had a recent breakdown?
3. Is there an open Query or Complaint?
Step 02
Appointment Management High Level View of Key Process Steps
6

Screen Navigation Process Steps
1. Select Customer Search function through ‘Magnifying Glass’
2. Type in Customer’s name, address OR Eircode to locate the Customer’s record
3. Once you have typed in the Customer’s name , for example: ‘test’, you will be presented with a list of all Customers and Jobs associated with the name of ‘test’. To open the Customer’s record, click on the ‘Eye’ icon beside the Customer record (in the ID column).
4. If the customer does not already exist Add Customer
Customer Searches Screen Objective: 1. Locate Customer (Search Function)
7
1
2
4
3

Screen Navigation Process Steps
EXISTING CUSTOMER VALIDATION 1. Go to Customer Details and
confirm correct address 2. Check for any recent or open
jobs that are scheduled 3. Check if any open cases
(Complaints or Queries) 4. Click on the eye symbol to
select and add a new product
Customer Searches Screen Objectives: 1. Validate Existing Customer details
2. Check status of recent jobs 3. Check for any open Complaints/Queries
8
1
From this button you will have multiple choices: 1. Create a Complaint 2. Create a Query 3. Create a Refund request
2
3
4

Add a New Customer Screen Objectives: 1. Add New Customer 9
Screen Navigation Process Steps
1. Press the Add Customer button – Move Cursor off the search screen and that screen disappears
2. Select the customer Category – Gas or PAYG. The Product Tab will now appear below customer details
3. Complete the capture of all customer details available.
4. For Gas orders Property and Fuel Type are required
1
2
3
4

Screen Navigation Process Steps
1. Press the ‘Eye’ beside the Customer Details Status- Select the Product Category at the customer level – this determines visible product selections below
2. Within the Product TAB is where you can add Products and record Payments/Waivers
3. Select the Product and Sub-Products for addition to the customer account and press Add
4. If alternate addresses are required select the Addresses TAB and add these addresses (Landlord properties)
Add a Product Screen Objectives: 1. Add New Product 10
1
2
3
3
4
4

Screen Navigation Process Steps
1. Select Address tab and enter Contact number and MPRN for the second property 2. Add the address of the alternate property to be attended and press the Add button 3. Select from the dropdown the alternate property for attendance
Add a Product Screen Objectives: 1. Add and select a second address
(landlord property)
11
1 2
3

Screen Navigation Process Steps
1. Select the Payment button from the Product line
2. Select the Payment Type or select Waiver
3. Confirm Payment or Refund recorded
4. Add amount and be paid
5. Add the reference number- Authorisation Code (For payment)
OR Contract Account Number (for Waiver/Bill/etc) Press the Register Payment button
Record a Payment Screen Objectives: 1. Record a Payment
This only records the activity, actual payments are not processed here!
12
1
4
3
2
5
6

Record a Payment Screen Objectives: 1. Confirm Payment was recorded 13
Screen Navigation
1. Confirm payment was recorded correctly

Screen Navigation
1. Use the Search function to find the customer or add a new customer
2. Listed are all the previous jobs and Products for the customer
3. Click on the ’Eye’ in the Customer Status field
4. Add a new Product as previously described and record the processed Payment or Waiver
1. Confirm payment was recorded correctly
Create and Schedule a Job Screen Objectives: 1. Create a job against a Product 14
3
2
1

Screen Navigation
1. A Product must first be added to the customer account in order to create and schedule a job (previously shown)
2. Confirm Payment status 3. In the Create Job section
select the job type you wish to create
4. Shown here is an Installation job option and the Installation is selected
1. Confirm payment was recorded correctly
Schedule a Job Screen Objectives:
1. How to Create and Schedule a Job against a Product
15

Schedule a Job Screen Objectives: 1. Choosing a suitable date & slot 16
Screen Navigation Process Steps
1. Add details to job notes 2. Is the customer Vulnerable,
Elderly, ill or Disabled? 3. Confirm address details and
area are correct for the customer
4. Scroll down the page for appointment options
Confirm that the system has picked up the correct customer location – Does the customer know their Eircode?
1
2
3

Appointment Management Screen Objectives: 1. Choosing a suitable date & slot 17
Screen Navigation Process Steps
1. From there, green slots are the available ones and if there are no green slots or only grey ones appear it means there is no availability on those days/times.
2. If there are no slots showing available move to a later date for green slots.
3. If none are suitable book an appointment , inform the customer of the provisional date and then create a Query and assign to Sierra Scheduling Team to call the customer with alternate
4. Choose the most suitable appointment that is best for the customer and their availability.
5. Once you have chosen the AM or PM slot on the relevant date / day, you will be presented with the following option to confirm.

Appointment Management Screen Objectives: 1. Assigning the job 18
Screen Navigation Process Steps
1. You will then be presented with an option to confirm that you wish to assign the job.
2. Once you have clicked ok, you will then be advised the job has been assigned successfully.
3. Agent then scrolls back up to top of the job details screen and click on the tick icon which will take you back to the customer screen.
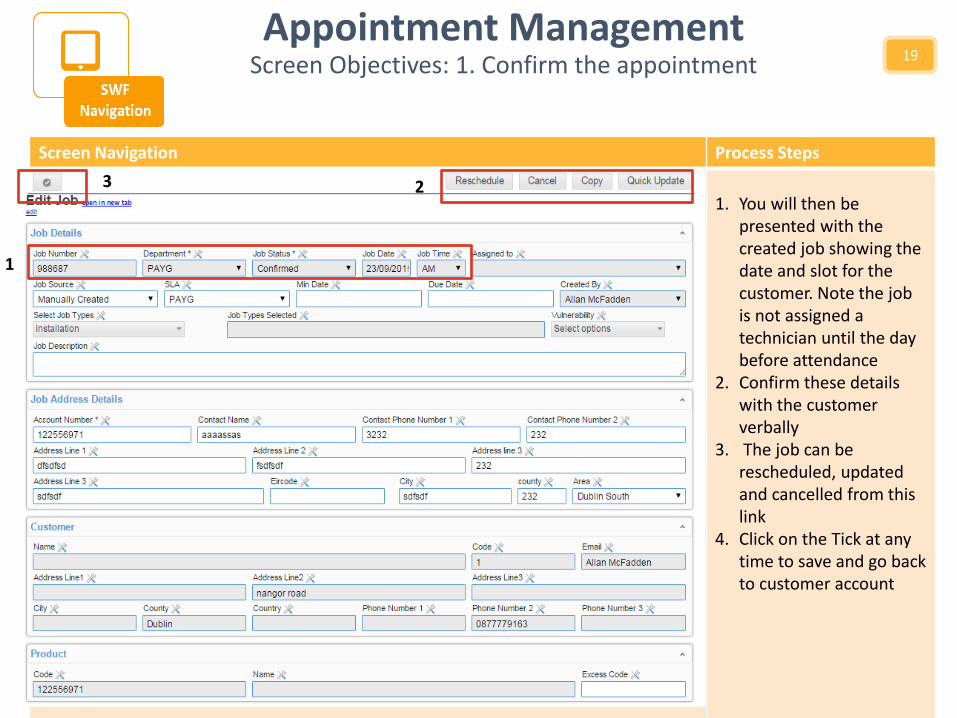
Appointment Management Screen Objectives: 1. Confirm the appointment 19
Screen Navigation Process Steps
1. You will then be presented with the created job showing the date and slot for the customer. Note the job is not assigned a technician until the day before attendance
2. Confirm these details with the customer verbally
3. The job can be rescheduled, updated and cancelled from this link
4. Click on the Tick at any time to save and go back to customer account
1
2 3

Appointment Management Screen Objectives: 1. Re-scheduling a Job 20
Screen Navigation Process Steps
1. Once a job has been scheduled, the status is changed to Confirmed and the Scheduling tab will no longer be available at the bottom of the screen.
2. To schedule a job for a different date, agent should click on the 'Reschedule‘ job tab.

Appointment Management Screen Objectives: 1. Re-scheduling a Job 21
Screen Navigation Process Steps
3. Once you have clicked on the rescheduled tab, you will be prompted a reschedule reason. Once reason has been inputted, then click submit button. 4. Once this has been added, the job status will change to Created and the Scheduling tab will become available again at the bottom of the page. 5. You can now schedule the job for an alternative date that suits the customer.

Appointment Management Screen Objectives: 1. Cancelling a Job 22
Screen Navigation Process Steps
1. Search for a customer and
then display their summary page.
2. From the Recent Jobs section, find the job that you wish to cancel. Highlight the line on which the job is on and then click on the eye to access the job details.
3. Click on the cancel job tab, and then you will be presented a reason for cancellation box. in which an agent will have to input the reason for cancellation and then hit the submit button.
4. The job status will change to cancelled.
If an engineer is En route, the job cannot be cancelled, this will need to be escalated to Sierra to action.
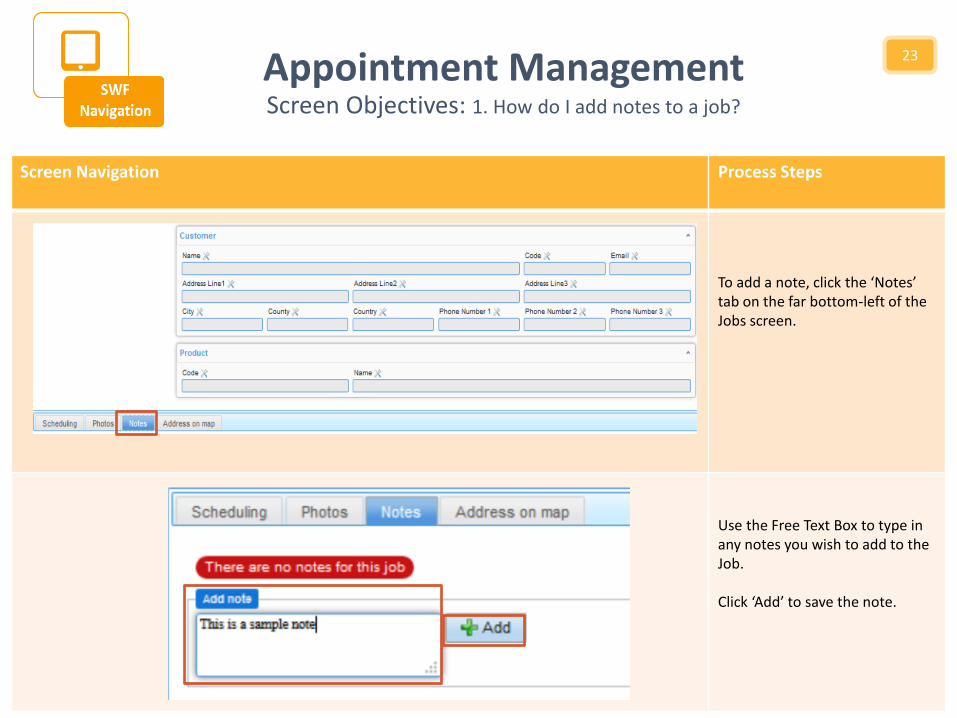
Appointment Management Screen Objectives: 1. How do I add notes to a job?
23
Screen Navigation Process Steps
To add a note, click the ‘Notes’ tab on the far bottom-left of the Jobs screen.
Use the Free Text Box to type in any notes you wish to add to the Job. Click ‘Add’ to save the note.

Appointment Management Screen Objectives: 2. How do I check an ETA – View Map
24
Screen Navigation Process Steps
The check an ETA or view a map to the address of the Job; Click on ‘Address on map’ on the far bottom-left on the Jobs Screen
This will show you a map with the location of the job highlighted using a green indicator. This is an interactive map. You can zoom in or out and scroll in various directions using the controls provided on the left.

Case Views &
Alerts / Notifications
How will you benefit from this Module? 1. Understand the Queue Structure and Assignment capability
2. Learn how to view My cases (all those assigned to me)
3. Learn how to view All cases (all those assigned to all users)
4. Learn how to view a task / activity
5. Learn how to view a reminder

Understanding Cases A case is described as a container for holding query or complaint information. A case
contains all information, including a communication history, that relates to a query or a complaint received from a Customer.
30
Label Name Description
Accountable Assignment of ownership to one of the main parties (Abtran, Sierra, EI). This is updated when ownership changes between companies and is use for search purposes.
Queue The Queue structure is mapped against main business processes that impact a Customer. These include 1. CRM Queries 2. Spare Part Queries 3. Scheduling Queries 4. Complaints. All new cases are assigned to a Queue during the ‘case creation’ stage.
Priority This case priority phase is aligned to the EI colour categorisation.
Case Number This is a unique identification number that is automatically created when a new case is created.
Reference Number This a reference field to be populated by Agents where the outsource provider (ABTRAN) has a separate solution in which to log complaints / queries. This will facilitate accurate tracking / reporting
Category This is a query or complaint reason code.
Sub Category The is a secondary level reason code and is relational to the category selected.
Description This is free text field where a detailed description of the query / complaint is expressed
Case Type The case type is the identification of the case is a (1) Query (2) Complaint. There may also be job types in this category visible for the main view.
Definition
Field Descriptions (Case container)

Understanding Cases A case is described as a container for holding query or complaint information. A case
contains all information, including a communication history, that relates to a query or a complaint received from a Customer.
31
Label Name Description
Opened By This is the name of the Simply Workflow user who created the case.
Assigned To (Owner) This is the name of the Simply Workflow user who has been assigned a case by another User (monitored by a team leader to ensure assignments are minimised)
Days Open This is the number of days that the query is open, calculated from the opening date.
Last Contact With Customer
This is a date/time stamp representing the last time the Customer was contacted. It is a field populated by the User after contacting the Customer.
Last Date/Time Case Updated
This is date/time stamp representing the last time there was a communication update in the case history.
Definition
Field Descriptions (Case container)
Field Descriptions (Case Sub Headings)
Label Name Description
Communications Tab A history of all communication on the case
Inbound / Outbound An option to select if the communications was an outbound or inbound channel
Communication Channel An option to select for the communication type (phone, email, letter, general)
Customer Experience A tracking mechanism to denote how the Customer was feeling at the time of the communication.
Goodwill / Compensation Goodwill relates to any monies offered / accepted by the Customer. Compensation relates to monies offered / accepted by the Customer for damage related complaints. Who approved is also entered in the section with a description of the discussion.

04
03
02
01
Step 04 Step 03 Step 01
Queue Selection Four Primary Queues initially configured
1. CRM
2. Spare Parts
3. Scheduling
4. Complaints
All users will select the queue or all queues to
view a list of cases.
My Cases Agents and Team Leaders will have access to their
own case list. This includes:
• A list of all cases that you have created where you
a the default owner,
• A list of all cases where ownership has been
assigned to you
Case Search & Selection All Users will use the filters to search
for a list of cases or a specific case
to work on.
All Cases Team Leaders or designated agents may select
an ALL CASES View. This view provides a list of
all cases within SWF (i.e cases in all queues,
logged by all agents with multiple status –
open/closed etc)
Step 02
32 Case View
High Level View of Key Process Steps

Delegate
USED WHEN: There is a requirement to assign
ownership of a complaint to another user
USED BY: Generally, used by the team leader.
Re-Open / Close Case
USED WHEN: There is a requirement to open an already closed
case or close a case. ALL CASES MUST BE CLOSED FROM THE
VIEW SCREEN
Used By: All USERS
..
My Reminders
A list of all activities that you have
created.
USED WHEN: To view and add
reminders
USE BY WHO: By all users
My Cases
A list of all cases that have been created
where you may or may not be the owner,
My Activities
A list of all activities that you have created.
USED WHEN: To view and add activities
USE BY WHO: By all users
All Cases
A list of all cases that you have created where
you a the default owner,
A list of all cases where ownership has been
assigned to you.
Queue Structure
Four Primary Queues initially configured
1. CRM 2. Spare Parts 3 Scheduling 4. Complaints
USED WHEN: To select which Queue you want to
view the list of cases
USED BY WHO: By all Users
Case View High Level View of Key Process Steps
33

Queue Management Screen Objectives: 1. Selecting A Queue (s)
34
Screen Navigation Process Steps
All Users have access to a suite of queues. These queues are assigned to you depending on your login credentials. 1. To access a queue, please
open the ‘queue box’, which identifies the number of queues that you have access to. (In this example = 4)
2. By ticking / un-ticking the relevant boxes, you will create a customised view that provides visibility of all cases within the ‘ticked’ queues only
3. Select the ‘Show’ button to list all the cases in the selected/ticked queues
A. Keeping all queues ‘ticked’ will allow you to have access to all queries / complaints within the system. Our experience has taught us that there is less likelihood of missing a status update on a queue if we following this rule.
B. Check your Queue Assignment each morning to ensure no changes have been made. On occasion, your team leader may assign you to a new queue.
1
2
Experience
3

Queue Management Screen Objectives: 1. Understanding the Case List
35
Screen Navigation Process Steps
All Cases: (Team Leader View) Presents a list of all cases in all queues selected. This includes both those open and closed.
My Cases: (Agent View) Presents a list of your cases that (a) you have created or (2) have been assigned to you.
1. Select the ‘Jobs’ option at the top of the menu bar
2. A drop down screen with 2 options will appear. • All Cases • My Cases Refresh ‘My Cases’
regularly to update the list (icon beside case volume)
3. Check the number of ‘Open & Work In Progress & Paused’ cases in your queue each day. This is your work basket for the day.
4. This list columns represent a detailed view of all cases. (See glossary)
5. This search / filter allows the User to filter the list quickly for easy access to cases
Best
Practice
2
3
1
4
5

Queue Management Screen Objectives: 1. Selecting A Case
2. Closing A Case 3. Re-Closing A Case
36
Screen Navigation Process Steps
1. In order to initiate any of the menu options on the top menu, it is necessary to select the case to work on. By selecting the case, it will turn yellow. It is selected by clicking on any part of the row (except the eye view – the eye view will open the case.
2. Once selected, to close the case, select ‘Close Case’. Cases can ONLY be closed from this view.
a: Enter Date and Time b: Enter closing resolution
3. To Re-open a case, select ‘Re-open’. Cases can ONLY be re-opened from this view.
a: Enter Date and Time b: Enter closing resolution
1
2 3

Queue Management Screen Objectives: 1. Selecting A Case
2. Closing A Case 3. Re-Closing A Case
37
Screen Navigation Process Steps
1. In order delegate a case to another User, select the case and select the ‘Delegate Case’ option
2. Upon selection, the User is prompted to select a user to assign to: This can be: • Another Agent – Sierra • Another Agent – CRM • A Team Leader – Sierra • A Team Leader – CRM
1
Experience
This is a smart search – returns results on first key entry

Activity Management Screen Objectives: 1. Viewing Promises, Activity & Reminder List 38
Screen Navigation Process Steps
1. Communications Hub. The hub is a repository for • Actions that you have
created with associated due dates
• Customer Promised reminders of call backs
2. LIST CORE FUNCTIONALITY AND USAGE IN THIS SECTION
1

Case Management
How will you benefit from this Module? 1. Learn how to locate a Customer
2. Learn how to create a new case / assign to queue and priority level
3. Learn how to assign ownership of a case
4. Learn how to update an existing case
5. Learn how to view the status of a case
6. Learn how to add good will or damage compensation details to a case
7. Learn how to change the life Stage of a case

Case Management Screen Objective: 1. Locate Customer (Search Function)
42
Screen Navigation Process Steps
1. Select Customer Search function through ‘Magnifying Glass’
2. Type in Customer’s name, address OR Eircode to locate the Customer’s record
3. Once you have typed in the Customer’s name , for example: ‘Butler’, you will be presented with a list of all Customers with the name of Butler.
4. To open the Customer’s record, click on the ‘Eye’ icon beside the Customer record (in the ID column).
5. This will present the Customer record with both job and case history
1
2
4
3

Case Management Screen Objectives: 1. Create a New Case 43
Screen Navigation Process Steps
The top part of the screen presents the Customers’ record, containing their contact details , a list of their contracts and associated jobs. Upon scrolling down to the bottom of the screen, you are presented with a list of 1. Recent Cases
This is a list of all queries and complaints raised
2. Recent Communication This is a history of all communications and updates on the Customer’s account. It also includes an SMS’s that were sent to the Customer (automated only)
3. Select the ‘Create Case’ option to open a new case for this Customer.
1
2
3
Before creating a new case, check to ensure that an existing case is not already open Watch
Out

Case Management Screen Objectives: 1. Create a New Case
2. First Time Fix Resolution
44
Screen Navigation Process Steps
3. Select ‘Query / Complaint’
Option to commence case creation.
4. Select the ‘Case Type’ This enables reporting to differentiate between case types A: Query B
1
2 3
Key Process
1. Select product that query relates to (PAYG/Climote)
2. Check Customer has live contract (tick)

Case Management Screen Objectives: 1. Create a New Case
2. First Time Fix Resolution
45
Screen Navigation Process Steps
• You are presented with the
option to select a category and sub category.
• You must also assign a job type to the case.
• A initial overview of the case must be entered to provide a context for the category and subcategory
• If you select ‘YES’ for ‘First Time Fix’, the case will automatically update and close.
• If you select ‘NO’, you are offered an option to assign to one of the 4 queues AND select a priority status.
Priority status are aligned to SP Colours

Case Management Screen Objectives: 1. Create a New Case
2. NO First Time Fix Resolution
46
Screen Navigation Process Steps
The main Case Container is broken into 4 primary components. 1. Case Classification 2. Customer Info 3. Case Progress 4. Resolution
Certain cells are pre-populated from the set up process, others required completion • EI reference • Source (Channel) • Contact Preference • Vulnerability • Case description • Status • Assigned to (if not
retaining ownership) • Accountable • Resolution if
available before closing. CLOSE FROM QUEUE
VIEW

Case Management Screen Objectives: 1. Life Cycle Stage
47
Screen Navigation Process Steps
Case Stage You will be presented with a drop-down menu titled “Case Stage”. Here you must select the appropriate option detailing at what part of the process the case is currently engaged in.

Case Management Screen Objectives: 1. Adding Communication
2. Adding Customer Experience
48
Screen Navigation Process Steps
1. Select direction of communication (inbound/outbound)
2. Select the channel communication received.
3. Add communication 4. Select ADD to create history (5)
Select Customer Experience tab to record customer sentiment at time of discussion (if customer comms) – see history list below
1
2
3
4
5


![Lorna Magnussen Golden Sierra Job Training …goldensierra.com/.../2015/07/Appendix-A-Sample-Letter-of-Intent.pdfSAMPLE LETTER OF INTENT [Date] Lorna Magnussen. Golden Sierra Job Training](https://img.pdfslide.us/doc/110x75/5aabaa127f8b9a59658c18d1/lorna-magnussen-golden-sierra-job-training-letter-of-intent-date-lorna-magnussen.jpg)